.NET (1323)
Children categories
How to Convert Excel (XLS or XLSX) to PDF in C# .NET: Complete Guide
2025-05-08 08:50:00 Written by Koohji
Converting Excel files to PDF is a crucial task for anyone looking to share spreadsheet data in a secure, consistent, and universally accessible format. Whether you are generating financial reports, creating invoices, or sharing analytical data, PDFs ensure that your document's layout and formatting remain intact across all devices and platforms. Unlike Excel files, which require compatible software to open, PDFs are universally viewable without any dependency.
This guide provides a comprehensive overview of how to efficiently convert Excel files to PDF in C# using a .NET Excel library – Spire.XLS for .NET. You will learn both basic and advanced conversion techniques, including how to export specific sheets or cell ranges, customize page setup, secure converted PDFs with passwords, generate PDF/A-compliant files, and more.
Table of Contents
- Why Convert Excel to PDF
- C# .NET Excel to PDF Conversion Library
- Basic Excel to PDF Conversion
- Advanced Excel to PDF Conversion Features
- FAQs
- Conclusion
Why Convert Excel to PDF
Converting Excel files to PDF offers several key advantages:
- Preserved Layout and Formatting: PDF maintains the original structure and formatting of your Excel file, ensuring consistent appearance across devices.
- Cross-Platform Accessibility: PDF is universally compatible, viewable on any device or operating system without requiring Excel or other spreadsheet software.
- Enhanced Security: PDF files can be encrypted, digitally signed, and restricted to prevent unauthorized access, copying, or editing.
C# .NET Excel to PDF Conversion Library
Spire.XLS for .NET is a comprehensive Excel library that enables seamless conversion of Excel files to PDF within .NET applications without the need for Microsoft Office. It provides developers with full control over how the content is rendered and ensures that the layout and formatting are preserved during the conversion process.
Install Spire.XLS for .NET
Before starting the conversion process, install Spire.XLS for .NET using one of the following methods:
- Option 1: Install via NuGet (Recommended)
Install-Package Spire.XLS- Option 2: Manually Add DLLs to Your Project
- Download the Spire.XLS package and extract the files.
- In Visual Studio, right-click References > Add Reference > Browse, then select the appropriate Spire.Xls.dll based on your target framework.
Basic Excel to PDF Conversion
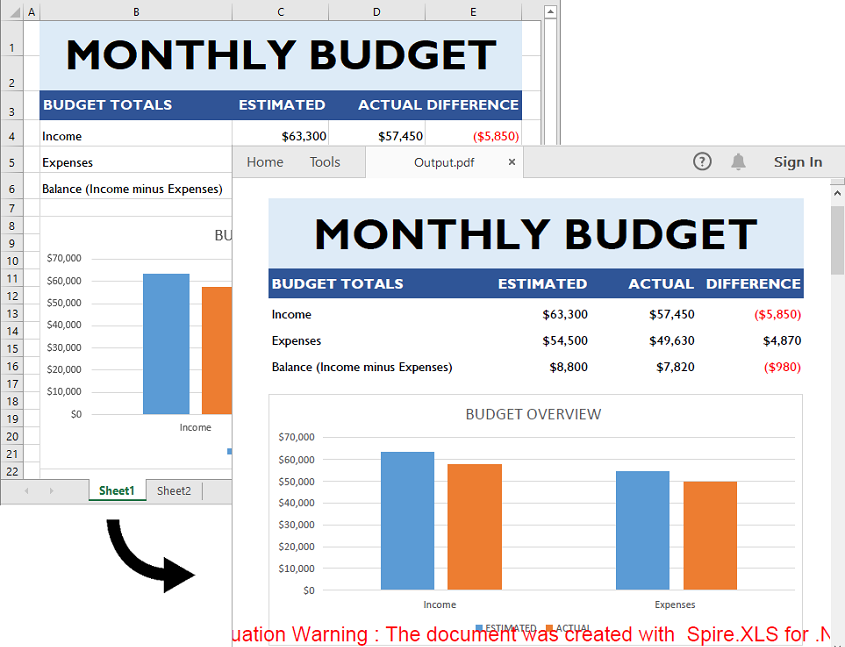
Converting an Excel file to PDF with Spire.XLS is simple and requires only a few lines of code. The following example demonstrates how to load an Excel file and save it as a PDF:
- C#
using Spire.Xls;

namespace ExcelToPdf
{
    internal class Program
    {
        static void Main(string[] args)
        {
            // Create a Workbook object
            Workbook workbook = new Workbook();
            // Load an Excel file
            workbook.LoadFromFile("C:\\Users\\Administrator\\Desktop\\Example.xlsx");

            // Save the Excel file to PDF
            workbook.SaveToFile("Output.pdf", FileFormat.PDF);
            // Dispose resources
            workbook.Dispose();
        }
    }
}
Advanced Excel to PDF Conversion Features
In addition to basic conversion, Spire.XLS for .NET provides advanced options for customized Excel-to-PDF conversions, including:
- Export specific sheet or cell range as PDF.
- Fit sheet to one page.
- Adjust page setup options (e.g., margins, orientation, paper size) for customized PDF output.
- Secure the converted PDF with password.
- Generate PDF/A-compliant files for long-term preservation.
Export Specific Sheet or Cell Range as PDF
Sometimes, you may want to export only a specific sheet or range of cells from an Excel file to PDF. Here's how to do that:
- C#
using Spire.Xls;

namespace WorksheetOrCellRangeToPdf
{
    internal class Program
    {
        static void Main(string[] args)
        {
            // Create a Workbook object
            Workbook workbook = new Workbook();
            // Load the Excel file
            workbook.LoadFromFile("C:\\Users\\Administrator\\Desktop\\Example.xlsx");

            // Get the first worksheet
            Worksheet sheet = workbook.Worksheets[0];

            // Set the print area to a specific cell range
            // Comment this line out if you need to export the entire worksheet as a PDF
            sheet.PageSetup.PrintArea = "B1:E6";

            // Save the cell range as a PDF
            sheet.SaveToPdf("CellRange.pdf");
            // Dispose resources
            workbook.Dispose();
        }
    }
}
Fit Sheet to One Page
Spire.XLS allows you to fit the content of a sheet to one page, which is particularly useful for printing or distributing concise reports.
- C#
using Spire.Xls;

namespace FitWorksheetToOnePage
{
    internal class Program
    {
        static void Main(string[] args)
        {
            // Create a Workbook object
            Workbook workbook = new Workbook();
            // Load the Excel file
            workbook.LoadFromFile("C:\\Users\\Administrator\\Desktop\\Example.xlsx");

            // Fit every worksheet in the workbook to one page
            workbook.ConverterSetting.SheetFitToPage = true;

            // Save the Excel file to PDF
            workbook.SaveToFile("FitToOnePage.pdf", FileFormat.PDF);
            // Dispose resources
            workbook.Dispose();
        }
    }
}
Adjust Page Setup for Customized PDF Output
Before converting an Excel worksheet to PDF, you can adjust page setup options such as margins, paper size, orientation, and gridline visibility. This ensures the final PDF is accurately formatted to meet your presentation requirements.
- C#
using Spire.Xls;

namespace AdjustPageSetup
{
    internal class Program
    {
        static void Main(string[] args)
        {
            // Create a Workbook object
            Workbook workbook = new Workbook();
            // Load the Excel file
            workbook.LoadFromFile("C:\\Users\\Administrator\\Desktop\\Example.xlsx");

            // Get the first worksheet
            Worksheet sheet = workbook.Worksheets[0];

            // Adjust page setup settings
            // Set page orientation
            sheet.PageSetup.Orientation = PageOrientationType.Landscape;
            // Set paper size
            sheet.PageSetup.PaperSize = PaperSizeType.PaperA4;
            // Set margins
            sheet.PageSetup.LeftMargin = 0.5;
            sheet.PageSetup.RightMargin = 0.5;
            sheet.PageSetup.TopMargin = 0.5;
            sheet.PageSetup.BottomMargin = 0.5;
            // Display Gridlines
            sheet.PageSetup.IsPrintGridlines = true;

            // Save the worksheet as a PDF
            sheet.SaveToPdf("CustomPageSetup.pdf");
            // Dispose resources
            workbook.Dispose();
        }
    }
}
Secure the Converted PDF with Password
You can secure the converted PDF by applying password protection. This ensures that unauthorized users cannot access or modify the document.
- C#
using Spire.Xls;
using Spire.Xls.Pdf.Security;

namespace SecurePdfWithPassword
{
    internal class Program
    {
        static void Main(string[] args)
        {
            // Create a Workbook object
            Workbook workbook = new Workbook();
            // Load the Excel file
            workbook.LoadFromFile("C:\\Users\\Administrator\\Desktop\\Example.xlsx");

            // Set the open and permission passwords for the converted PDF
            workbook.ConverterSetting.PdfSecurity.Encrypt("openPassword", "persmissionPassword", PdfPermissionsFlags.Print, PdfEncryptionKeySize.Key128Bit);

            // Save the Excel file to PDF
            workbook.SaveToFile("SecurePdf.pdf", FileFormat.PDF);
            // Dispose resources
            workbook.Dispose();
        }
    }
}
Generate PDF/A-compliant Files
If you need to archive your documents for long-term storage or ensure they meet certain accessibility standards, you can generate PDF/A-compliant files from Excel.
- C#
using Spire.Xls;
using Spire.Xls.Pdf;

namespace ExcelToPdfA
{
    internal class Program
    {
        static void Main(string[] args)
        {
            // Create a Workbook object
            Workbook workbook = new Workbook();
            // Load the Excel file
            workbook.LoadFromFile("C:\\Users\\Administrator\\Desktop\\Example.xlsx");

            // Set the compliance for the converted PDF
            workbook.ConverterSetting.PdfConformanceLevel = PdfConformanceLevel.Pdf_A1A;

            // Save the Excel file to PDF
            workbook.SaveToFile("PdfA_Compliant.pdf", FileFormat.PDF);
            // Dispose resources
            workbook.Dispose();
        }
    }
}
FAQs
Q1: Can I convert a password-protected Excel file to PDF?
Yes, you can load password-protected Excel files by providing the password before loading:
- C#
Workbook workbook = new Workbook();
workbook.OpenPassword = "ExcelPassword";
workbook.LoadFromFile("ProtectedExcel.xlsx");
workbook.SaveToFile("Output.pdf", FileFormat.PDF);
Q2: Is Spire.XLS compatible with .NET Core?
Yes, Spire.XLS supports .NET Framework, .NET Core, and .NET Standard.
Q3: Can I batch convert multiple Excel files to PDF?
Yes, you can batch convert multiple Excel files to PDF using a loop:
- C#
string[] files = Directory.GetFiles("ExcelFolder", "*.xlsx");
foreach (string file in files)
{
    Workbook workbook = new Workbook();
    workbook.LoadFromFile(file);
    string outputPath = Path.ChangeExtension(file, ".pdf");
    workbook.SaveToFile(outputPath, FileFormat.PDF);
}
Q4: Can I convert multiple Excel files to a single PDF?
Yes, you can combine multiple Excel files into a single workbook and then save them as a single PDF:
- C#
Workbook combinedWorkbook = new Workbook();
combinedWorkbook.Worksheets.Clear();
foreach (string file in Directory.GetFiles("ExcelFolder", "*.xlsx"))
{
    Workbook tempWorkbook = new Workbook();
    tempWorkbook.LoadFromFile(file);
    foreach (Worksheet sheet in tempWorkbook.Worksheets)
    {
        combinedWorkbook.Worksheets.AddCopy(sheet);
    }
}
combinedWorkbook.SaveToFile("Combined.pdf", FileFormat.PDF);
Q5: Why does my converted PDF look different from the Excel file?
This issue could be due to missing fonts on the system. Make sure that all fonts used in the Excel file are installed on the machine performing the conversion.
Conclusion
Spire.XLS for .NET provides a powerful and flexible solution for converting Excel files to PDF in C#. Whether you need simple conversions or advanced features—such as exporting specific sheets or cell ranges, customizing page setup, applying password protection to the converted PDF, or generating PDF/A-compliant files—Spire.XLS offers a comprehensive set of tools to meet all your requirements. By following the steps outlined in this guide, you can easily integrate Excel-to-PDF conversion capabilities into your .NET applications.
Get a Free License
To fully experience the capabilities of Spire.XLS for .NET without any evaluation limitations, you can request a free 30-day trial license.
Superscript and subscript are formatting styles that allow you to display characters or numerals above or below the regular text baseline respectively. By utilizing these formatting styles, you can emphasize certain elements, denote exponents, powers, chemical formulas, or mathematical equations, and present data in a more visually appealing and informative manner. In this article, we will demonstrate how to apply superscript and subscript styles in Excel in C# and VB.NET using Spire.XLS for .NET.
Install Spire.XLS for .NET
To begin with, you need to add the DLL files included in the Spire.XLS for .NET package as references in your .NET project. The DLL files can be either downloaded from this link or installed via NuGet.
PM> Install-Package Spire.XLS
Apply Superscript and Subscript in Excel in C# and VB.NET
To apply the superscript or subscript style to specific characters in a cell, you need to create a custom font, enable the superscript or subscript property of the font, and then assign the custom font to the specific characters within the cell. The detailed steps are as follows:
- Create a Workbook object.
- Get a specific worksheet using Workbook.Worksheets[int index] property.
- Get a specific cell using Worksheet.Range[string name] property and add rich text to the cell using CellRange.RichText.Text property.
- Create a custom font using Workbook.CreateFont() method.
- Enable the subscript property of the font by setting ExcelFont.IsSubscript property to true.
- Assign the custom font to specific characters of the rich text in the cell using CellRange.RichText.SetFont() method.
- Get a specific cell using Worksheet.Range[string name] property and add rich text to the cell using CellRange.RichText.Text property.
- Create a custom font using Workbook.CreateFont() method.
- Enable the superscript property of the font by setting ExcelFont.IsSuperscript property to true.
- Assign the custom font to specific characters of the rich text in the cell using CellRange.RichText.SetFont() method.
- Save the result file using Workbook.SaveToFile() method.
- C#
- VB.NET
using Spire.Xls;
using System.Drawing;
namespace ApplySuperscriptAndSubscript
{
internal class Program
{
static void Main(string[] args)
{
//Create a Workbook object
Workbook workbook = new Workbook();
//Get the first worksheet
Worksheet sheet = workbook.Worksheets[0];
//Add text to specific cells
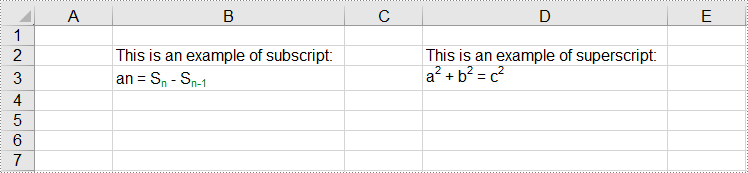
sheet.Range["B2"].Text = "This is an example of subscript:";
sheet.Range["D2"].Text = "This is an example of superscript:";
//Add rich text to a specific cell
CellRange range = sheet.Range["B3"];
range.RichText.Text = "an = Sn - Sn-1";
//Create a custom font
ExcelFont font = workbook.CreateFont();
//Enable the subscript property of the font
font.IsSubscript = true;
//Set font color
font.Color = Color.Green;
//Assign the font to specific characters of the rich text in the cell
range.RichText.SetFont(6, 6, font);
range.RichText.SetFont(11, 13, font);
//Add rich text to a specific cell
range = sheet.Range["D3"];
range.RichText.Text = "a2 + b2 = c2";
//Create a custom font
font = workbook.CreateFont();
//Enable the superscript property of the font
font.IsSuperscript = true;
//Assign the font to specific characters of the rich text in the cell
range.RichText.SetFont(1, 1, font);
range.RichText.SetFont(6, 6, font);
range.RichText.SetFont(11, 11, font);
//Auto-fit column widths
sheet.AllocatedRange.AutoFitColumns();
//Save the result file
workbook.SaveToFile("ApplySubscriptAndSuperscript.xlsx", ExcelVersion.Version2013);
workbook.Dispose();
}
}
}
Apply for a Temporary License
If you'd like to remove the evaluation message from the generated documents, or to get rid of the function limitations, please request a 30-day trial license for yourself.
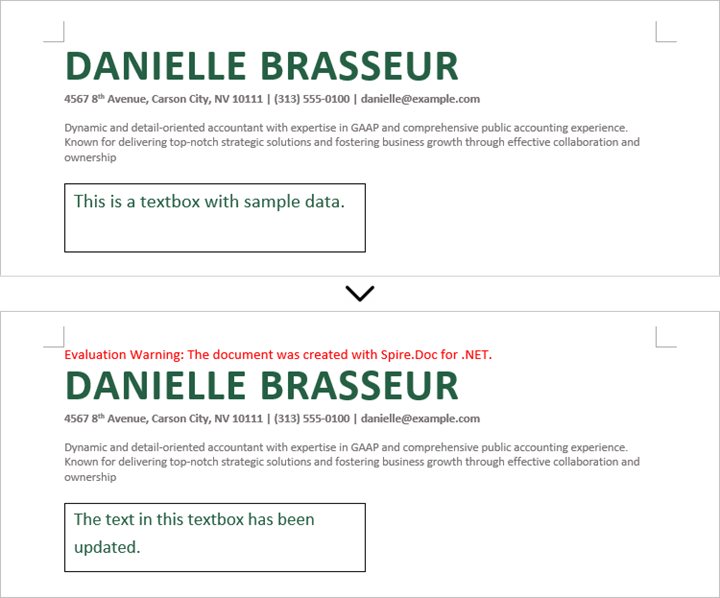
Textboxes in Microsoft Word are versatile tools that enhance document layout and design. They allow users to position text independently of the main text flow, making it easier to create visually appealing documents. In some cases, you may need to extract text from textboxes for repurposing, or update the text inside a textbox to ensure clarity and relevance.
In this article, you will learn how to extract or update text in a textbox in a Word document using C# with Spire.Doc for .NET.
Install Spire.Doc for .NET
To begin with, you need to add the DLL files included in the Spire.Doc for .NET package as references in your .NET project. The DLL files can be either downloaded from this link or installed via NuGet.
PM> Install-Package Spire.Doc
Extract Text from Textbox in a Word Document
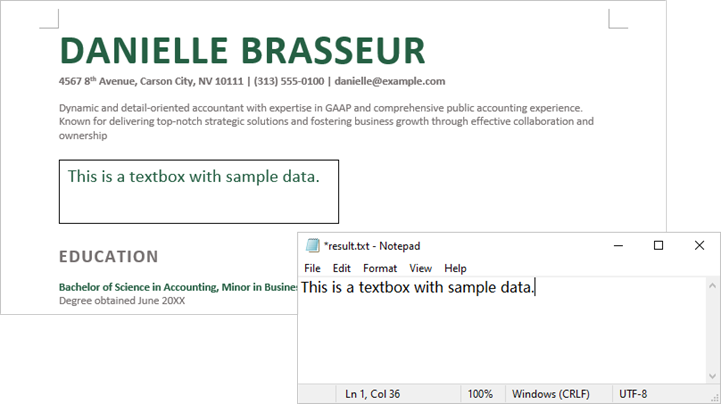
Using Spire.Doc for .NET, you can access a specific text box in a document with the Document.TextBoxes[index] property. Iterate through the text box's child objects to check if each one is a paragraph or a table. For paragraphs, retrieve the text using the Paragraph.Text property. For tables, loop through the cells to extract text from each cell.
The steps to extract text from a textbox in a Word document are as follows:
- Create a Document object.
- Load a Word file using Document.LoadFromFile() method.
- Get a specific textbox using Document.TextBoxes[index] property
- Iterate through the child objects of the textbox.
- Determine if a child object if a paragraph. If yes, get the text from the paragraph using Paragraph.Text property.
- Determine if a child object if a table. If yes, get the text from the table using ExtractTextFromTable() method.
- C#
using Spire.Doc;
using Spire.Doc.Documents;
using Spire.Doc.Fields;

namespace ExtractTextFromTextbox
{
    class Program
    {
        static void Main(string[] args)
        {
            // Create a Document object
            Document document = new Document();

            // Load a Word file
            document.LoadFromFile("C:\\Users\\Administrator\\Desktop\\Input.docx");

            // Get a specific textbox
            TextBox textBox = document.TextBoxes[0];

            // Create a StreamWriter to write extracted text to a txt file
            using (StreamWriter sw = File.CreateText("result.txt"))
            {
                // Iterate though child objects of the textbox
                foreach (DocumentObject objt in textBox.ChildObjects)
                {
                    // Determine if the child object is a paragraph
                    if (objt.DocumentObjectType == DocumentObjectType.Paragraph)
                    {
                        // Write paragraph text to the txt file
                        sw.Write((objt as Paragraph).Text);
                    }

                    // Determine if the child object is a table
                    if (objt.DocumentObjectType == DocumentObjectType.Table)
                    {
                        // Extract text from table to the txt file
                        ExtractTextFromTable(objt as Table, sw);
                    }
                }

            }

        }

        // Extract text from a table
        static void ExtractTextFromTable(Table table, StreamWriter sw)
        {
            for (int i = 0; i < table.Rows.Count; i++)
            {
                TableRow row = table.Rows[i];
                for (int j = 0; j < row.Cells.Count; j++)
                {
                    TableCell cell = row.Cells[j];
                    foreach (Paragraph paragraph in cell.Paragraphs)
                    {
                        sw.Write(paragraph.Text);
                    }
                }
            }
        }
    }
}
Update a Textbox in a Word Document
To update a text box, first clear its existing content using the TextBox.ChildObjects.Clear() method. Then, add a new paragraph and set its text.
The steps to update a textbox in a Word document are as follows:
- Create a Document object.
- Load a Word file using Document.LoadFromFile() method.
- Get a specific textbox using Document.TextBoxes[index] property
- Remove existing content of the textbox using TextBox.ChildObjects.Clear() method.
- Add a paragraph to the textbox using TextBox.Body.AddParagraph() method.
- Add text to the paragraph using Paragraph.AppendText() method.
- Save the document to a different Word file.
- C#
using Spire.Doc;
using Spire.Doc.Documents;
using Spire.Doc.Fields;

namespace UpdateTextbox
{
    class Program
    {
        static void Main(string[] args)
        {
            // Create a Document object
            Document document = new Document();

            // Load a Word file
            document.LoadFromFile("C:\\Users\\Administrator\\Desktop\\Input.docx");

            // Get a specific textbox
            TextBox textBox = document.TextBoxes[0];

            // Remove child objects of the textbox
            textBox.ChildObjects.Clear();

            // Add a new paragraph to the textbox
            Paragraph paragraph = textBox.Body.AddParagraph();

            // Set line spacing
            paragraph.Format.LineSpacing = 15f;

            // Add text to the paragraph
            TextRange textRange = paragraph.AppendText("The text in this textbox has been updated.");

            // Set font size
            textRange.CharacterFormat.FontSize = 15f;

            // Save the document to a different Word file
            document.SaveToFile("UpdateTextbox.docx", FileFormat.Docx2019);

            // Dispose resources
            document.Dispose();
        }

    }

}
Apply for a Temporary License
If you'd like to remove the evaluation message from the generated documents, or to get rid of the function limitations, please request a 30-day trial license for yourself.
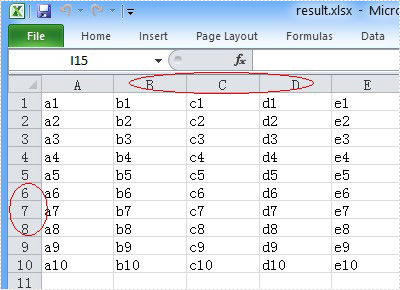
You can hide the Excel row or column by using the c# code, but a row or column also becomes hidden when you want to show the full Excel worksheet. You can unhide the Excel row and column by using the c# code. This article aims at introducing the method sheet.ShowRow and sheet.ShowColumn in the Excel .NET component Spire.Xls to show the hidden row and column.
First, let’s preview the hidden row and column.

Here comes to the steps of the process.
Step 1: Create an instance of Spire.XLS.Workbook.
Workbook workbook = new Workbook();
Step 2: Load the existing Excel file that hidden the row and column in the specified path.
workbook.LoadFromFile("hide.xlsx");
Step 3: Get the first worksheet of the Excel file.
Worksheet sheet = workbook.Worksheets[0];
Step 4: Unhide the hidden row and column.
sheet.ShowRow(7);
sheet.ShowColumn(3);
Step 5: Generate the new Excel file.
workbook.SaveToFile("result.xlsx", ExcelVersion.Version2010);
Now let's preview the effect screenshot.
Here is the full code.
using Spire.Xls;
namespace UnhideExcelRow
{
    class Program
    {
        static void Main(string[] args)
        {
            Workbook workbook = new Workbook();
            workbook.LoadFromFile("hide.xlsx");
            Worksheet sheet = workbook.Worksheets[0];
            // unhide the hidden row and column of the worksheet.
            sheet.ShowRow(7);
            sheet.ShowColumn(3);
            workbook.SaveToFile("result.xlsx", ExcelVersion.Version2010);
        }
    }
}
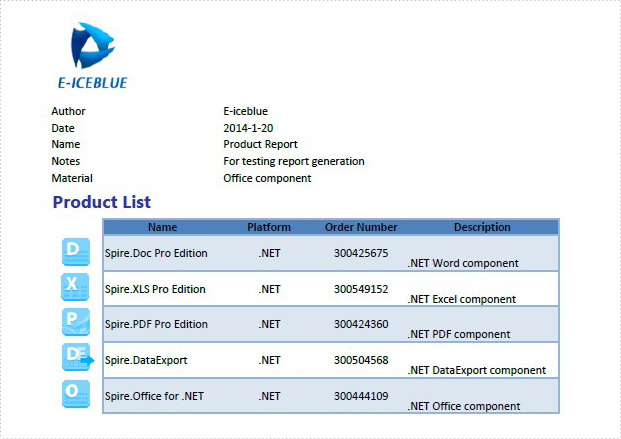
Excel header and footer gives additional information of a spreadsheet. And it can be in text and image. We have already shows you the text header and footer in excel worksheet, this guide focuses on introducing how to insert image header and footer for Excel files in C# by using Spire.XLS for .NET.
Firstly, Download Spire.XLS for .NET (or Spire.Office for .NET) and install it on your system. The Spire.XLS installation is clean, professional and wrapped up in a MSI installer.
Then, adds Spire.XLS.dll as reference in the downloaded Bin folder thought the below path: "..\Spire.XLS\Bin\NET4.0\ Spire.XLS.dll".
Now it comes to the details of how to add image header and footer in C#:
Step 1: Create a new excel document and load from the file.
Workbook workbook = new Workbook();
workbook.LoadFromFile(@"..\..\XLS1.xlsx");
Step 2: Get a first worksheet.
Worksheet sheet = workbook.Worksheets[0];
Step 3: Load the image and set header and footer style.
Image image = Image.FromFile(@"..\..\logo.png");

//Set Header format
sheet.PageSetup.LeftHeaderImage = image;
sheet.PageSetup.LeftHeader = "&G";

//Set Footer format
sheet.PageSetup.CenterFooterImage = image;
sheet.PageSetup.CenterFooter = "&G";
Step 4: Save the document to file.
workbook.SaveToFile(@"..\..\result.xlsx", ExcelVersion.Version2010);
Effected screenshot:
The full codes:
using Spire.Xls;
using System.Drawing;
namespace AddImageHeaderandFooter
{
    class Program
    {
        static void Main(string[] args)
        {
            Workbook workbook = new Workbook();
            workbook.LoadFromFile(@"..\..\XLS1.xlsx");
            Worksheet sheet = workbook.Worksheets[0];
            Image image = Image.FromFile(@"..\..\logo.png");

            sheet.PageSetup.LeftHeaderImage = image;
            sheet.PageSetup.LeftHeader = "&G";

            sheet.PageSetup.CenterFooterImage = image;
            sheet.PageSetup.CenterFooter = "&G";

            workbook.SaveToFile(@"..\..\result.xlsx", ExcelVersion.Version2010);
        }
    }
}
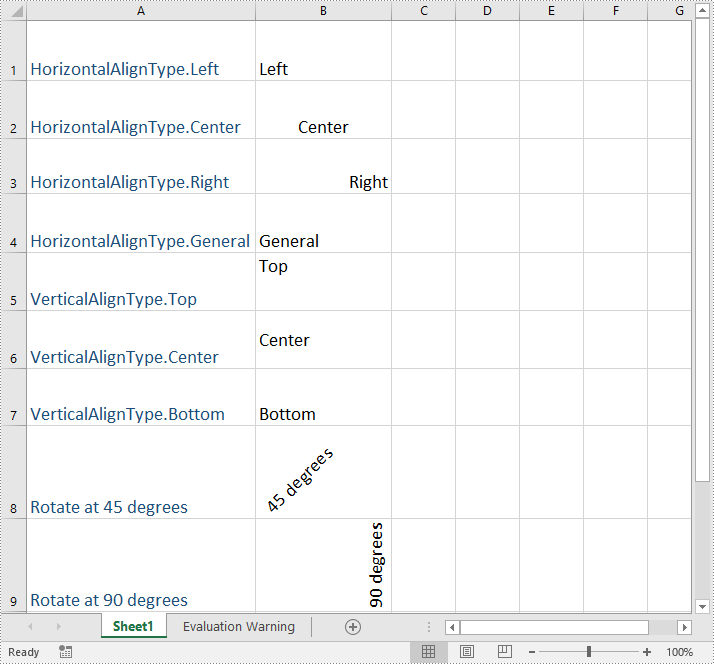
Text alignment and orientation are essential formatting features in Excel that allow you to position and orient text within cells according to your specific needs. By adjusting text alignment and orientation, you can enhance the readability and aesthetics of your spreadsheet. In this article, we will explain how to set text alignment and orientation in Excel in C# and VB.NET using Spire.XLS for .NET.
Install Spire.XLS for .NET
To begin with, you need to add the DLL files included in the Spire.XLS for.NET package as references in your .NET project. The DLL files can be either downloaded from this link or installed via NuGet.
PM> Install-Package Spire.XLS
Set Text Alignment and Orientation in Excel in C# and VB.NET
You can set the horizontal or vertical alignment of text in individual cells or a range of cells using the CellRange.Style.HorizontalAlignment or CellRange.Style.VerticalAlignment properties. In addition, you are also able to change the orientation of text by assigning a rotation value to the corresponding cell or cells using the CellRange.Style.Rotation property. The detailed steps are as follows:
- Create a Workbook object.
- Load an Excel file using Workbook.LoadFromFile() method.
- Get a specific worksheet using Workbook.Worksheets[int index] property.
- Access specific cells in the worksheet using Worksheet.Range[string name] property and then set the horizontal alignment of text in them using CellRange.Style.HorizontalAlignment property.
- Access specific cells in the worksheet using Worksheet.Range[string name] property and then set the vertical alignment of text in them using CellRange.Style.VerticalAlignment property.
- Access specific cells in the worksheet using Worksheet.Range[string name] property and then change their text orientation using CellRange.Style.Rotation property.
- Save the result file using Workbook.SaveToFile() method.
- C#
- VB.NET
using Spire.Xls;

namespace TextAlignmentAndRotation
{
    internal class Program
    {
        static void Main(string[] args)
        {
            //Create a Workbook object
            Workbook workbook = new Workbook();

            //Load an Excel file
            workbook.LoadFromFile(@"Sample.xlsx");

            //Get the first worksheet
            Worksheet sheet = workbook.Worksheets[0];

            //Set the horizontal alignment for text in a specific cell to Left
            sheet.Range["B1"].Style.HorizontalAlignment = HorizontalAlignType.Left;

            //Set the horizontal alignment for text in a specific cell to Center
            sheet.Range["B2"].Style.HorizontalAlignment = HorizontalAlignType.Center;

            //Set the horizontal alignment for text in a specific cell to Right
            sheet.Range["B3"].Style.HorizontalAlignment = HorizontalAlignType.Right;

            //Set the horizontal alignment for text in a specific cell to General
            sheet.Range["B4"].Style.HorizontalAlignment = HorizontalAlignType.General;

            //Set the vertical alignment for text in a specific cell to Top
            sheet.Range["B5"].Style.VerticalAlignment = VerticalAlignType.Top;

            //Set the vertical alignment for text in a specific cell to Center
            sheet.Range["B6"].Style.VerticalAlignment = VerticalAlignType.Center;

            //Set the vertical alignment for text in a specific cell to Bottom
            sheet.Range["B7"].Style.VerticalAlignment = VerticalAlignType.Bottom;

            //Change the text orientation in specific cells by assigning a rotation value
            sheet.Range["B8"].Style.Rotation = 45;
            sheet.Range["B9"].Style.Rotation = 90;

            //Set the row height for specific cells
            sheet.Range["B8:C9"].RowHeight = 70;

            //Save the result file
            workbook.SaveToFile("TextAlignmentAndOrientation.xlsx", ExcelVersion.Version2016);
            workbook.Dispose();
        }
    }
}
Apply for a Temporary License
If you'd like to remove the evaluation message from the generated documents, or to get rid of the function limitations, please request a 30-day trial license for yourself.
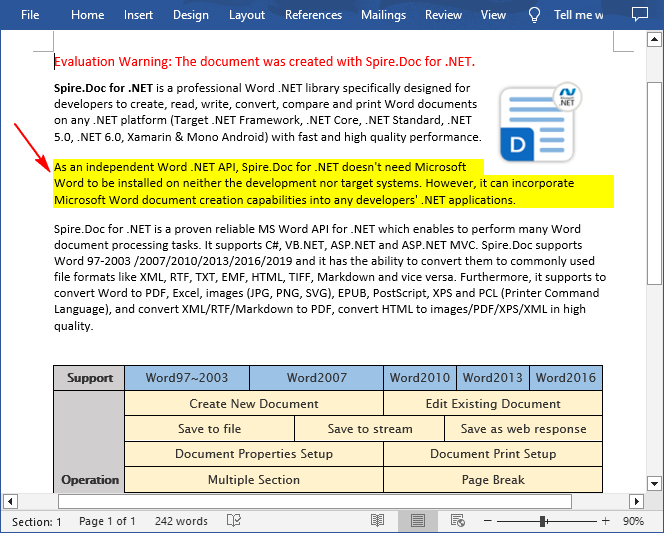
Shading is a powerful feature in MS Word that adds a background color to specified text or paragraphs in a document. This not only enhances the visual appeal of the document, but also helps to differentiate between different sections and makes the content more readable. In this article, you will learn how to apply shading to a paragraph or text in Word in C# using Spire.Doc for .NET.
Install Spire.Doc for .NET
To begin with, you need to add the DLL files included in the Spire.Doc for.NET package as references in your .NET project. The DLL files can be either downloaded from this link or installed via NuGet.
PM> Install-Package Spire.Doc
Apply Paragraph Shading in Word in C#
Spire.Doc for .NET provides developers with the Paragraph.Format.BackColor property to apply a background color to a specified paragraph in Word. The following are the detailed steps:
- Create a Document instance.
- Load a Word document using Document.LoadFromFile() method.
- Get a specified section using Document.Sections[] property.
- Get a specified paragraph using Section.Paragraphs[] property.
- Set a background color for the paragraph using Paragraph.Format.BackColor property.
- Save the result document using Document.SaveToFile() method.
- C#
using Spire.Doc;
using Spire.Doc.Documents;
using System.Drawing;

namespace WordParagrahShade
{
    class Program
    {
        static void Main(string[] args)
        {
            // Create a Document instance
            Document document = new Document();

            // Load a Word document
            document.LoadFromFile("Sample.docx");

            // Get the first section
            Section section = document.Sections[0];

            // Get the second paragraph
            Paragraph paragaph = section.Paragraphs[1];

            // Set a background color for the paragraph
            paragaph.Format.BackColor = Color.Yellow;

            // Save the result document
            document.SaveToFile("ParagraphBackground.docx", FileFormat.Docx);
        }
    }
}
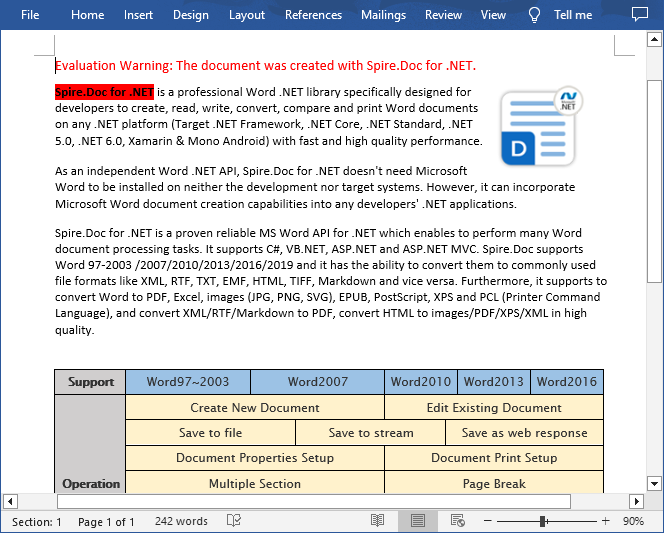
Apply Shading to Specified Text in Word in C#
If you only need to apply shading to specified text, you can first find the specific text through the Paragraph.Find() method, get its text range and then set a background color for the text range through the TextRange.CharacterFormat.TextBackgroundColor property. The following are the detailed steps:
- Create a Document instance.
- Load a Word document using Document.LoadFromFile() method.
- Get a specified section using Document.Sections[] property.
- Get a specified paragraph using Section.Paragraphs[] property.
- Find a specified text in the paragraph Paragraph.Find() method.
- Get the text range of the found text using TextSelection.GetAsOneRange() method.
- Set a background color for the text range using TextRange.CharacterFormat.TextBackgroundColor property.
- Save the document using Document.SaveToFile() method.
- C#
using Spire.Doc;
using Spire.Doc.Documents;
using Spire.Doc.Fields;
using System.Drawing;

namespace ShadeText
{
    class Program
    {
        static void Main(string[] args)
        {
            // Create a Document instance
            Document document = new Document();

            // Load a Word document
            document.LoadFromFile("Sample.docx");

            // Get the first section
            Section section = document.Sections[0];

            // Get the first paragraph
            Paragraph paragaph = section.Paragraphs[0];

            // Find a specified text in the paragraph
            TextSelection selection = paragaph.Find("Spire.Doc for .NET", true, false);

            // Get the text range of the found text
            TextRange range = selection.GetAsOneRange();

            // Set a background color for the text range
            range.CharacterFormat.TextBackgroundColor = Color.Red;

            // Save the result document
            document.SaveToFile("TextBackground.docx", FileFormat.Docx);
        }
    }
}
Apply for a Temporary License
If you'd like to remove the evaluation message from the generated documents, or to get rid of the function limitations, please request a 30-day trial license for yourself.
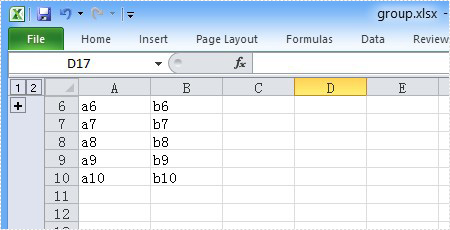
Group the Excel cells is to tie a range of cells together so that they can be collapsed or expanded. But usually, we also need to ungroup the Excel cells. Consequently, the articles aims at introducing how to ungroup Excel cells in C#, through a professional Excel .NET Component Spire.Xls.
Just as its name implies, ungroup Excel cells is to ungroup a range of cells that were previously grouped. Before ungroup Excel cells, we should complete the preparatory work:
- Download the Spire.XLS and install it on your machine.
- Add the Spire.XLS.dll files as reference.
- Open bin folder and select the three dll files under .NET 4.0.
- Right click property and select properties in its menu.
- Set the target framework as .NET 4.
- Add Spire.XLS as namespace.
Then here comes to the explanation of the code:
Step 1: Create an instance of Spire.XLS.Workbook.
Workbook workbook = new Workbook();
Step 2: Load the file base on a specified file path.
workbook.LoadFromFile(@"group.xlsx");
Step 3: Get the first worksheet.
Worksheet sheet = workbook.Worksheets[0];
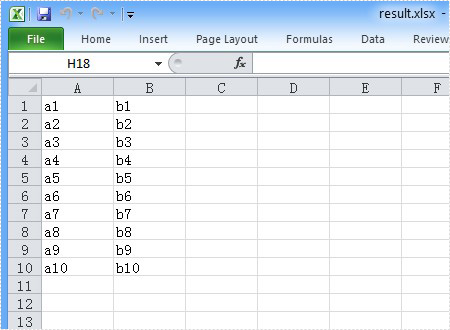
Step 4: Ungroup the first 5 row cells.
sheet.UngroupByRows(1, 5);
Step 5: Save as the generated file.
workbook.SaveToFile(@"result.xlsx", ExcelVersion.Version2010);
Full code:
using Spire.Xls;
namespace UngroupCell
{
    class Program
    {

        static void Main(string[] args)
        {

            Workbook workbook = new Workbook();
            workbook.LoadFromFile(@"group.xlsx");
            Worksheet sheet = workbook.Worksheets[0];
            sheet.UngroupByRows(1, 5);
            workbook.SaveToFile(@"..\..\result.xlsx", ExcelVersion.Version2010);

        }
    }
}
Please preview the original group effect screenshot:
And the generated ungroup effect screenshot:
Page transitions display a decorative effect such as a dissolve or wipe when you’re turning pages in a document that is exported to PDF format. Page transitions are especially useful when you create a slideshow in PDF format. And Spire.PDF, a powerful .NET component specially designed for developers enables you to apply page transitions to PDF file.
A solution is introduced here to show how to apply page transitions to PDF using Spire.PDF. Spire.PDF provides you a class called PdfSection. PdfSection has a property called PageSettings. And PageSettings has a property called Transition. You can use this property to apply page transitions.
Step 1: Create a new section.
PdfSection section = doc.Sections.Add();
section.PageSettings.Size = PdfPageSize.A4;
Step 2: Create a new PdfPageTransition instance.
section.PageSettings.Transition = new PdfPageTransition();
Step 3: Set the style of page transition.
section.PageSettings.Transition.Style = PdfTransitionStyle.Fade;
You can assign any value that is defined in PdfTransitionStyle to Style.
Step 4: Set the duration of transition effect in seconds.
section.PageSettings.Transition.Duration = 3;
Step 5: Set the page's display duration.
section.PageSettings.Transition.PageDuration = 2;
Step 6: Add more sections and apply more page transitions.
section = doc.Sections.Add();
section.PageSettings.Size = PdfPageSize.A4;
section.PageSettings.Transition = new PdfPageTransition();
section.PageSettings.Transition.Style = PdfTransitionStyle.Box;
section.PageSettings.Transition.Motion = PdfTransitionMotion.Outward;
section.PageSettings.Transition.Duration = 3;
section.PageSettings.Transition.PageDuration = 2;
You can combine the type of PdfPageTransition with the property Direction and the property Dimension of PdfPageTransition to create new and flexible page transition. For example, in this step, the Style of page transition is PdfTransitionStyle.Box and the Motion of page transition is PdfTransitionMotion.Outward.
At last, save the file.
doc.SaveToFile("result.pdf");
To see page transitions in the PDF, open the PDF file in Full Screen.


Here comes to the full code:
using Spire.Pdf;
using Spire.Pdf.Graphics;
using System.Drawing;


namespace PageTransitions
{
    class Program
    {
        static void Main(string[] args)
        {
            PdfDocument doc = new PdfDocument();

            PdfSection section = doc.Sections.Add();
            section.PageSettings.Size = PdfPageSize.A4;
            section.PageSettings.Transition = new PdfPageTransition();
            section.PageSettings.Transition.Style = PdfTransitionStyle.Fade;
            section.PageSettings.Transition.Duration = 3;
            section.PageSettings.Transition.PageDuration = 2;

            PdfNewPage page = section.Pages.Add();
            page.BackgroundColor = Color.Blue;
            page.Canvas.DrawString("This is Page One.", new PdfFont(PdfFontFamily.Helvetica, 20f), new PdfSolidBrush(Color.Black), 10, 10);

            page = section.Pages.Add();
            page.BackgroundColor = Color.Green;
            page.Canvas.DrawString("This is Page Two.", new PdfFont(PdfFontFamily.Helvetica, 20f), new PdfSolidBrush(Color.Black), 10, 10);

            section = doc.Sections.Add();
            section.PageSettings.Size = PdfPageSize.A4;
            section.PageSettings.Transition = new PdfPageTransition();
            section.PageSettings.Transition.Style = PdfTransitionStyle.Box;
            section.PageSettings.Transition.Motion = PdfTransitionMotion.Outward;
            section.PageSettings.Transition.Duration = 3;
            section.PageSettings.Transition.PageDuration = 2;

            page = section.Pages.Add();
            page.BackgroundColor = Color.Orange;
            page.Canvas.DrawString("This is Page Three.", new PdfFont(PdfFontFamily.Helvetica, 20f), new PdfSolidBrush(Color.Black), 10, 10);

            page = section.Pages.Add();
            page.BackgroundColor = Color.Brown;
            page.Canvas.DrawString("This is Page Four.", new PdfFont(PdfFontFamily.Helvetica, 20f), new PdfSolidBrush(Color.Black), 10, 10);

            section = doc.Sections.Add();
            section.PageSettings.Size = PdfPageSize.A4;
            section.PageSettings.Transition = new PdfPageTransition();
            section.PageSettings.Transition.Duration = 3;
            section.PageSettings.Transition.Style = PdfTransitionStyle.Dissolve;
            section.PageSettings.Transition.PageDuration = 2;

            page = section.Pages.Add();
            page.BackgroundColor = Color.Orange;
            page.Canvas.DrawString("This is Page Five.", new PdfFont(PdfFontFamily.Helvetica, 20f), new PdfSolidBrush(Color.Black), 10, 10);

            page = section.Pages.Add();
            page.BackgroundColor = Color.Navy;
            page.Canvas.DrawString("This is Page Six.", new PdfFont(PdfFontFamily.Helvetica, 20f), new PdfSolidBrush(Color.Black), 10, 10);

            doc.SaveToFile("result.pdf");
            doc.Close();
        }
    }
}
Watermark is a recognizable text or image that appears under document text. A watermark is useful in the examination of paper because it can be widely used for trademarks, locations and so on. This article aims at introducing how to add PDF text watermark for WPF through a simple WPF PDF API Spire.PDF for WPF. Also it can implement PDF watermark by image.
First we need to complete the preparatory work:
- Download the latest Spire.PDF and install it on your machine.
- Add the Spire.PDF.WPF.dll files as reference.
- Open bin folder and select the three dll files under .NET 4.0.
- Right click property and select properties in its menu.
- Set the target framework as .NET 4.
- Add Spire.PDF as namespace.
Here comes to the explanation of the code.
Step 1: Create an instance of Spire.PDF.Document
PdfDocument doc = new PdfDocument();
Step 2: Load the file base on a specified file path
doc.LoadFromFile(@"..\..\Sample1.pdf");
Step 3: Add the text watermark to the first page
PdfPageBase page = doc.Pages[0];
PdfTilingBrush brush = new PdfTilingBrush(new SizeF(page.Canvas.ClientSize.Width/2, page.Canvas.ClientSize.Height/3));
brush.Graphics.SetTransparency(0.3f);
brush.Graphics.Save();
brush.Graphics.TranslateTransform(brush.Size.Width / 2, brush.Size.Height / 2);
brush.Graphics.RotateTransform(-45);
brush.Graphics.DrawString("Spire.Pdf Demo",new PdfFont(PdfFontFamily.Helvetica, 24), PdfBrushes.Violet, 0, 0,new PdfStringFormat(PdfTextAlignment.Center));
brush.Graphics.Restore();
brush.Graphics.SetTransparency(1);
page.Canvas.DrawRectangle(brush, new RectangleF(new PointF(0, 0), page.Canvas.ClientSize));
Step 4: Save the PDF file
doc.SaveToFile("TextWaterMark.pdf");
Full code:
private void button1_Click(object sender, RoutedEventArgs e)
 {
  PdfDocument doc = new PdfDocument();
  doc.LoadFromFile(@"..\..\Sample1.pdf");
  PdfPageBase page = doc.Pages[0];
  PdfTilingBrush brush = new PdfTilingBrush(new SizeF(page.Canvas.ClientSize.Width/2, page.Canvas.ClientSize.Height/3));
  brush.Graphics.SetTransparency(0.3f);
  brush.Graphics.Save();
  brush.Graphics.TranslateTransform(brush.Size.Width / 2, brush.Size.Height / 2);
  brush.Graphics.RotateTransform(-45);
  brush.Graphics.DrawString("Spire.Pdf Demo",new PdfFont(PdfFontFamily.Helvetica, 24), PdfBrushes.Violet, 0, 0, new PdfStringFormat(PdfTextAlignment.Center));
  brush.Graphics.Restore();
  brush.Graphics.SetTransparency(1);
  page.Canvas.DrawRectangle(brush, new RectangleF(new PointF(0, 0), page.Canvas.ClientSize));
  doc.SaveToFile("TextWaterMark.pdf");
 }
Effect screenshot: