
Program Guide (101)
Children categories
Setting the background colors for paragraphs and text in Word documents can significantly enhance the presentation and readability of content. Customizing background color is an effective approach to emphasize key information, categorize content, and add a personalized touch, thereby making it easy to create polished and professional documents. By carefully selecting and applying background colors, documents can be transformed into visually appealing works that effectively convey information and engage the reader. This article shows how to use Spire.Doc for Python to set background colors for paragraphs and text in Word documents, unlocking new possibilities for document styling and customization.
- Set Background Colors for Paragraphs Using Python
- Set Background Colors for Selected Text Using Python
Install Spire.Doc for Python
This scenario requires Spire.Doc for Python and plum-dispatch v1.7.4. They can be easily installed in your Windows through the following pip command.
pip install Spire.Doc
If you are unsure how to install, please refer to this tutorial: How to Install Spire.Doc for Python on Windows
Set Background Color for Paragraphs Using Python
By using Spire.Doc for Python, developers can get any paragraph in any section. After getting a paragraph, developers can apply a background color to it by assigning a Color object to Paragraph.Format.BackColor property. Below are the detailed steps:
- Create an instance of Document class and load a Word document using Document.LoadFromFile() method.
- Get a section using Document.Sections.get_Item() method.
- Get a paragraph in the section using Section.Paragraphs.get_Item() method.
- Set the background color of the paragraph through Paragraph.Format.BackColor property.
- Save the document using Document.SaveToFile() method.
- Python
from spire.doc import *
from spire.doc.common import *
# Create an instance of Document class and load a Word document
doc = Document()
doc.LoadFromFile("Sample.docx")
# Get the first section
section = doc.Sections.get_Item(0)
# Get the fifth paragraph
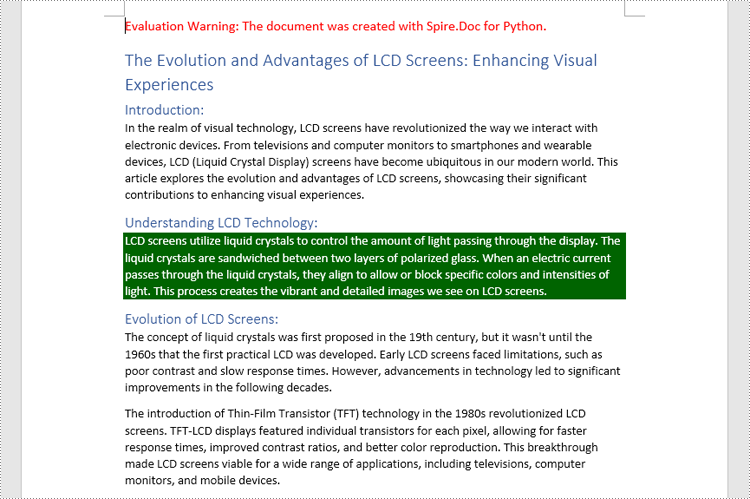
paragraph = section.Paragraphs.get_Item(4)
# Set background color for the paragraph
paragraph.Format.BackColor = Color.get_DarkGreen()
# Save the document
doc.SaveToFile("output/ParagraphBackground.docx")
doc.Close()
Set Background Colors for Selected Text Using Python
Spire.Doc for Python enables developers to find all the occurrences of specific text in a Word document with Document.FindAllString() method. After getting the finding results, developers can set the background for them through TextRange.CharacterFormat.TextBackgroundColor property. The detailed steps are as follows:
- Create an instance of Document class and load a Word document using Document.LoadFromFile() method.
- Find all the occurrences of specific text using Document.FindAllString() method.
- Loop through the occurrences, get each occurrence as a text range using TextSelection.GetAsOneRange(True) method, and set the background color of each occurrence through TextRange.CharacterFormat.TextBackgroundColor property. It is also possible to get only one occurrence from the result list and set the background color for the occurrence.
- Save the document using Document.SaveToFile() method.
- Python
from spire.doc import *
from spire.doc.common import *
# Create an instance of Document class and load a Word document
doc = Document()
doc.LoadFromFile("Sample.docx")
# Find text in the Word document
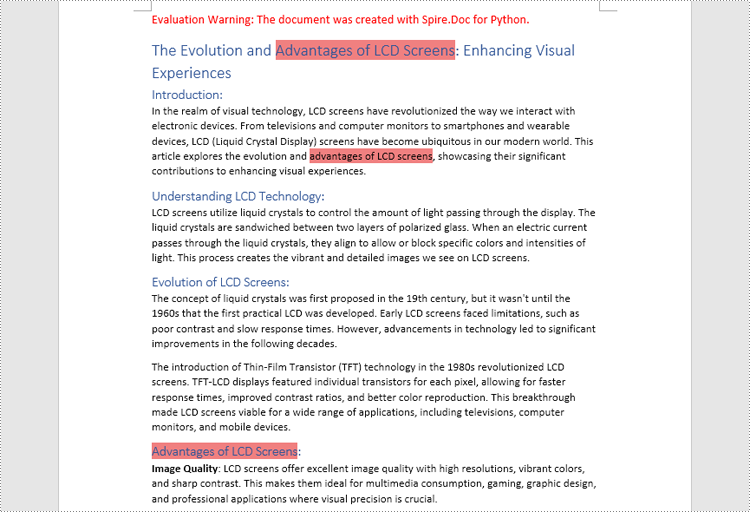
findResults = doc.FindAllString("advantages of LCD screens", False, False)
# Loop through the finding results to set background color for all occurrences
for text in findResults:
# Get an occurrence as a text range
textRange = text.GetAsOneRange(True)
# Set the background color of the text range
textRange.CharacterFormat.TextBackgroundColor = Color.get_LightCoral()
# Set the background color of a sepecified occurrence
# Get an occurrence as one text range
# textRange = findResults[1].GetAsOneRange()
# Set the background color of the text range
# textRange.CharacterFormat.BackgroundColor = Color.get_DarkCyan()
# Save the document
doc.SaveToFile("output/TextBackground.docx")
doc.Close()
Apply for a Temporary License
If you'd like to remove the evaluation message from the generated documents, or to get rid of the function limitations, please request a 30-day trial license for yourself.
The text highlighting feature in MS Word allows users to easily navigate and search for specific sections or content. By highlighting key paragraphs or keywords, users can quickly locate the desired information within the document. This feature is particularly useful when dealing with large documents, as it not only saves time but also minimizes the frustration associated with manual searching, enabling users to focus on the content that truly matters. In this article, we will demonstrate how to find and highlight text in a Word document in Python using Spire.Doc for Python.
- Find and Highlight All Instances of a Specified Text in Word in Python
- Find and Highlight the First Instance of a Specified Text in Word in Python
Install Spire.Doc for Python
This scenario requires Spire.Doc for Python and plum-dispatch v1.7.4. They can be easily installed in your Windows through the following pip command.
pip install Spire.Doc
If you are unsure how to install, please refer to this tutorial: How to Install Spire.Doc for Python on Windows
Find and Highlight All Instances of a Specified Text in Word in Python
You can use the Document.FindAllString() method provided by Spire.Doc for Python to find all instances of a specified text in a Word document. Then you can loop through these instances and highlight each of them with a bright color using TextRange.CharacterFormat.HighlightColor property. The detailed steps are as follows.
- Create an object of the Document class.
- Load a Word document using Document.LoadFromFile() method.
- Find all instances of a specific text in the document using Document.FindAllString() method.
- Loop through each found instance, and get it as a single text range using TextSelection.GetAsOneRange() method, then highlight the text range with color using TextRange.CharacterFormat.HighlightColor property.
- Save the resulting document using Document.SaveToFile() method.
- Python
from spire.doc import *
from spire.doc.common import *
# Specify the input and output file paths
inputFile = "Sample.docx"
outputFile = "HighlightAllInstances.docx"
# Create an object of the Document class
document = Document()
# Load a Word document
document.LoadFromFile(inputFile)
# Find all instances of a specific text
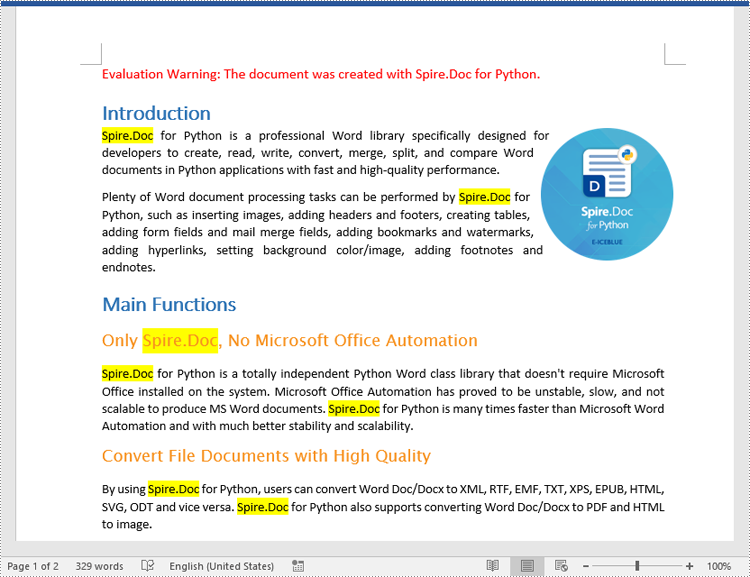
textSelections = document.FindAllString("Spire.Doc", False, True)
# Loop through all the instances
for selection in textSelections:
# Get the current instance as a single text range
textRange = selection.GetAsOneRange()
# Highlight the text range with a color
textRange.CharacterFormat.HighlightColor = Color.get_Yellow()
# Save the resulting document
document.SaveToFile(outputFile, FileFormat.Docx2016)
document.Close()
Find and Highlight the First Instance of a Specified Text in Word in Python
You can use the Document.FindString() method to find only the first instance of a specified text and then set a highlight color for it using TextRange.CharacterFormat.HighlightColor property. The detailed steps are as follows.
- Create an object of the Document class.
- Load a Word document using Document.LoadFromFile() method.
- Find the first instance of a specific text using Document.FindString() method.
- Get the instance as a single text range using TextSelection.GetAsOneRange() method, and then highlight the text range with color using TextRange.CharacterFormat.HighlightColor property.
- Save the result document using Document.SaveToFile() method.
- Python
from spire.doc import *
from spire.doc.common import *
# Specify the input and output file paths
inputFile = "Sample.docx"
outputFile = "HighlightTheFirstInstance.docx"
# Create an object of the Document class
document = Document()
# Load a Word document
document.LoadFromFile(inputFile)
# Find the first instance of a specific text
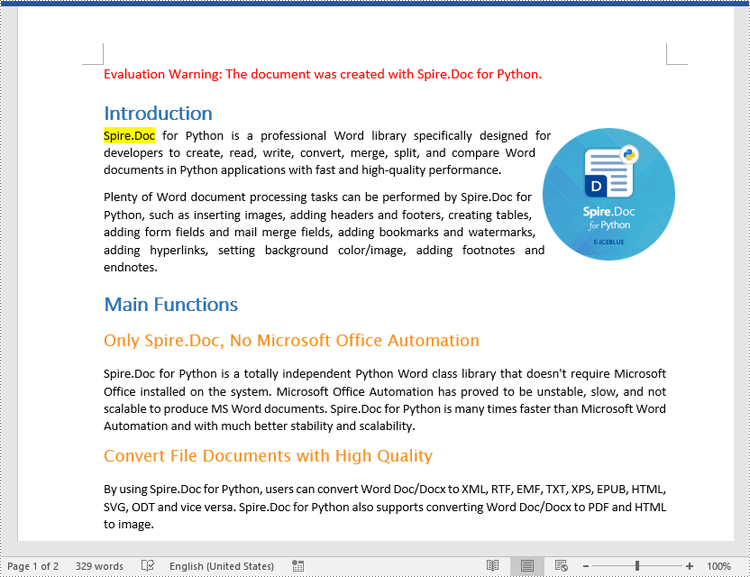
textSelection = document.FindString("Spire.Doc", False, True)
# Get the instance as a single text range
textRange = textSelection.GetAsOneRange()
# Highlight the text range with a color
textRange.CharacterFormat.HighlightColor = Color.get_Yellow()
# Save the resulting document
document.SaveToFile(outputFile, FileFormat.Docx2016)
document.Close()
Apply for a Temporary License
If you'd like to remove the evaluation message from the generated documents, or to get rid of the function limitations, please request a 30-day trial license for yourself.
Convert HTML to Word DOC or DOCX in Python | Developer Tutorial
2023-11-17 00:56:39 Written by Koohji
Converting HTML files to Word documents in Python is an essential skill for developers building documentation systems, report generators, or applications that transform web-based content into offline editable formats. While HTML excels at displaying content on the web, Word documents provide a more versatile format for offline access, collaboration, and professional presentation.
This in-depth developer guide shows you how to automate the conversion from HTML files and HTML strings into Word DOCX/DOC documents in Python using Spire.Doc for Python—a powerful, standalone library that enables high-quality Word document generation and conversion without the need for Microsoft Word.
Table of Contents
- Why Convert HTML to Word Format
- Install HTML to Word Converter in Python
- Export HTML Files to Word Documents in Python
- Insert HTML Strings into Word Documents in Python
- Supported Output Formats
- Conclusion
- FAQs
Why Convert HTML to Word Format
HTML is ideal for online content delivery, but Word documents offer significant advantages for use cases that require formatting, annotation, printing, or offline access:
- Offline Access: View and edit documents without an internet connection.
- Advanced Editing: Enable features like tracked changes, comments, and section formatting.
- Professional Presentation: Suitable for formal reports, business contracts, user manuals, and documentation.
- Cross-Platform Compatibility: Open and edit using Microsoft Word, Google Docs, LibreOffice, and other word processors.
Install HTML to Word Converter in Python
Spire.Doc for Python is a feature-rich library designed to help developers create, read, convert, and manipulate Word documents directly within Python applications. It offers high-fidelity conversion of HTML content to Word format while preserving the original structure and styles.
Key Benefits
- Fully preserves original HTML structure, CSS styles, and layout
- Accepts both HTML files and HTML strings as input sources
- Supports conversion to .doc, .docx, and other formats
- 100% standalone; no Office automation needed
Installation
You can install the library from PyPI using the following pip command:
pip install spire.doc
Export HTML Files to Word Documents in Python
If you already have an HTML file—such as a saved webpage or generated HTML report—you can save it to a Word document with just a few lines of code.
Code Example
from spire.doc import *
from spire.doc.common import *

# Specify the input and output file paths
inputFile = "Input.html"
outputFile = "HtmlToWord.docx"

# Create an object of the Document class
document = Document()
# Load an HTML file
document.LoadFromFile(inputFile, FileFormat.Html, XHTMLValidationType.none)

# Save the HTML file to a .docx file
document.SaveToFile(outputFile, FileFormat.Docx2016)
document.Close()
Explanation:
This example demonstrates how to load an existing .html file and save it to a Word .docx document:
- Document(): creates a new Word document object.
- LoadFromFile(): loads the HTML file and parses it as an HTML document.
- XHTMLValidationType.none: disables strict validation of the HTML content.
- SaveToFile(): saves the result as a .docx file using the FileFormat.Docx2016 format.
To export as .doc, replace FileFormat.Docx2016 with FileFormat.Doc.
Output:
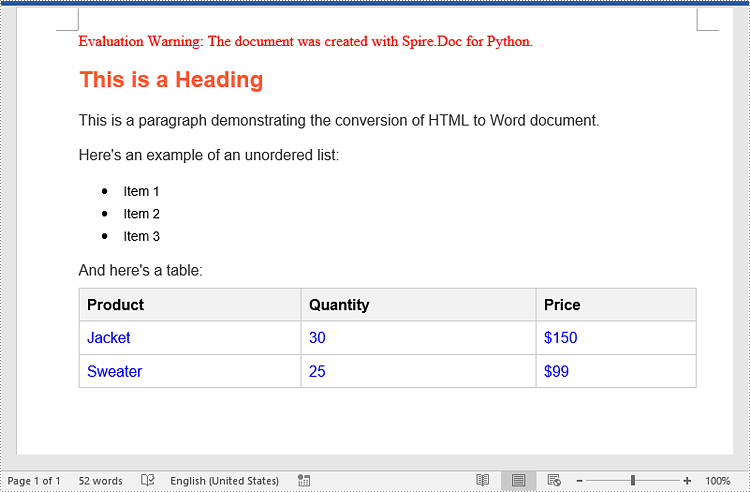
Here is the Word document generated from the HTML file:
Insert HTML Strings into Word Documents in Python
Sometimes, you may have HTML content as a string—perhaps scraped from the web or dynamically generated. Spire.Doc allows you to insert such HTML content into a Word document without saving it as a file first.
Code Example
from spire.doc import *
from spire.doc.common import *

# Specify the output file path
outputFile = "HtmlStringToWord.docx"

# Create an object of the Document class
document = Document()
# Add a section to the document
sec = document.AddSection()

# Add a paragraph to the section
paragraph = sec.AddParagraph()

# Specify the HTML string
htmlString = """
<html>
<head>
    <title>HTML to Word Example</title>
    <style>
        body {
            font-family: Arial, sans-serif;
        }
        h1 {
            color: #FF5733;
            font-size: 24px;
            margin-bottom: 20px;
        }
        p {
            color: #333333;
            font-size: 16px;
            margin-bottom: 10px;
        }
        ul {
            list-style-type: disc;
            margin-left: 20px;
            margin-bottom: 15px;
        }
        li {
            font-size: 14px;
            margin-bottom: 5px;
        }
        table {
            border-collapse: collapse;
            width: 100%;
            margin-bottom: 20px;
        }
        th, td {
            border: 1px solid #CCCCCC;
            padding: 8px;
            text-align: left;
        }
        th {
            background-color: #F2F2F2;
            font-weight: bold;
        }
        td {
            color: #0000FF;
        }
    </style>
</head>
<body>
    <h1>This is a Heading</h1>
    <p>This is a paragraph demonstrating the conversion of HTML to Word document.</p>
    <p>Here's an example of an unordered list:</p>
    <ul>
        <li>Item 1</li>
        <li>Item 2</li>
        <li>Item 3</li>
    </ul>
    <p>And here's a table:</p>
    <table>
        <tr>
            <th>Product</th>
            <th>Quantity</th>
            <th>Price</th>
        </tr>
        <tr>
            <td>Jacket</td>
            <td>30</td>
            <td>$150</td>
        </tr>
        <tr>
            <td>Sweater</td>
            <td>25</td>
            <td>$99</td>
        </tr>
    </table>
</body>
</html>
"""

# Append the HTML string to the paragraph
paragraph.AppendHTML(htmlString)

# Save the result document
document.SaveToFile(outputFile, FileFormat.Docx2016)
document.Close()
Explanation:
This code converts an HTML string directly into Word content:
- Document(): creates a new document.
- AddSection() and AddParagraph(): adds a section and paragraph to hold the content.
- AppendHTML(): parses and inserts the HTML string into the paragraph, preserving styles and structure.
- SaveToFile(): saves the document to a .docx file using the FileFormat.Docx2016 format.
This approach is ideal for use cases like email-to-Word, content pulled from CMS platforms, or HTML snippets generated dynamically at runtime.
Output:
Here is the Word document generated from the HTML string:
Supported Output Formats
With Spire.Doc for Python, you’re not limited to Word output. You can also convert HTML to various formats, including:
- Image: .png, .jpg, .bmp
- Rich Text: .rtf
- Other: .xml, .xps, .epub, etc.
Conclusion
Spire.Doc for Python provides a powerful solution for developers looking to convert HTML to Word documents with precision and efficiency. Whether you’re working with HTML files or strings, the library simplifies the process while maintaining the integrity of your content.
Give Spire.Doc a try today and see how effortlessly you can add professional document generation to your Python projects!
FAQs
Q1: Can I convert HTML to Word without installing Microsoft Word?
A1: Yes. Spire.Doc is a standalone component and does not require Word or Office on the machine.
Q2: Are CSS styles and tables preserved?
A2: Yes. The library retains CSS styles, tables, images, lists, fonts, and layout formatting.
Q3: Can I batch-convert multiple HTML files to Word?
A3: Absolutely. You can loop through folders and apply the same conversion logic to each file.
Q4: What other formats can I export HTML to?
A4: HTML can be converted to .doc, .docx, .pdf, image formats, .rtf, .xml, and more.
Q5: Is there a trial license?
A5: Yes. you can request a 30-day trial license for full functionality.
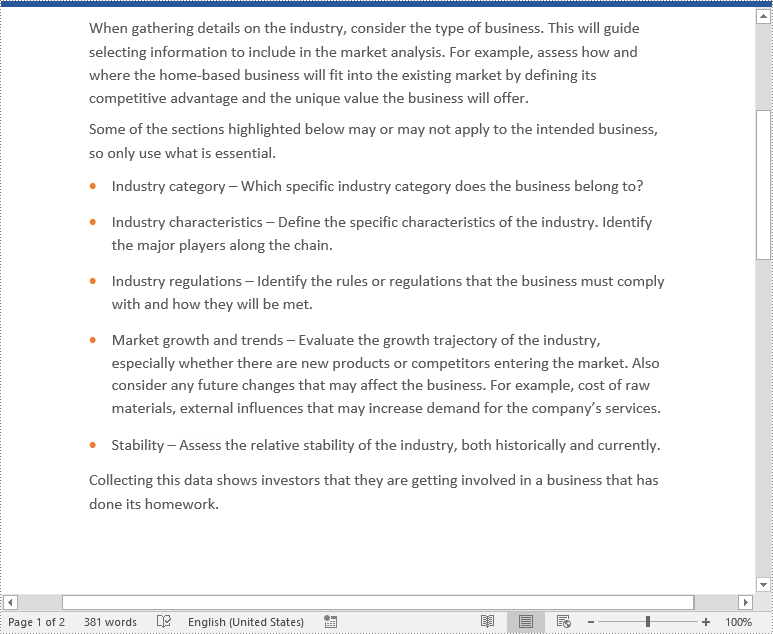
Footnotes are a valuable tool in Microsoft Word that allows you to enhance the content of your documents by providing additional information, references, or citations at the bottom of a page. For example, you can use footnotes to provide in-depth explanations of complex concepts, cite sources to support your arguments, or offer tangential information that might be interesting to your readers. Whether you're working on an academic paper, a book, or any document that requires citations or explanations, footnotes offer a convenient way to maintain a clean and organized layout while presenting supplementary details. In this article, we will explain how to insert or remove footnotes in a Word document in Python using Spire.Doc for Python.
- Insert a Footnote for a Specific Paragraph in Word in Python
- Insert a Footnote for a Specific Text in Word in Python
- Remove Footnotes in a Word Document in Python
Install Spire.Doc for Python
This scenario requires Spire.Doc for Python and plum-dispatch v1.7.4. They can be easily installed in your Windows through the following pip command.
pip install Spire.Doc
If you are unsure how to install, please refer to this tutorial: How to Install Spire.Doc for Python on Windows
Insert a Footnote for a Specific Paragraph in Word in Python
You can use the Paragraph.AppendFootnote(FootnoteType.Footnote) method provided by Spire.Doc for Python to easily add a footnote for a specific paragraph. The detailed steps are as follows.
- Create an object of the Document class.
- Load a Word document using Document.LoadFromFile() method.
- Get a specific section in the document using Document.Section[int] property and then get a specific paragraph of the section using Section.Paragraphs[int] property.
- Add a footnote at the end of the paragraph using Paragraph.AppendFootnote(FootnoteType.Footnote) method.
- Set the text content of the footnote, and then set the font and color for the footnote text and the footnote reference mark.
- Save the result document using Document.SaveToFile() method.
- Python
from spire.doc import *
from spire.doc.common import *
# Create a Document instance
document = Document()
# Load a sample Word document
document.LoadFromFile("Sample.docx")
# Get a specific section
section = document.Sections.get_Item(0)
# Get a specific paragraph
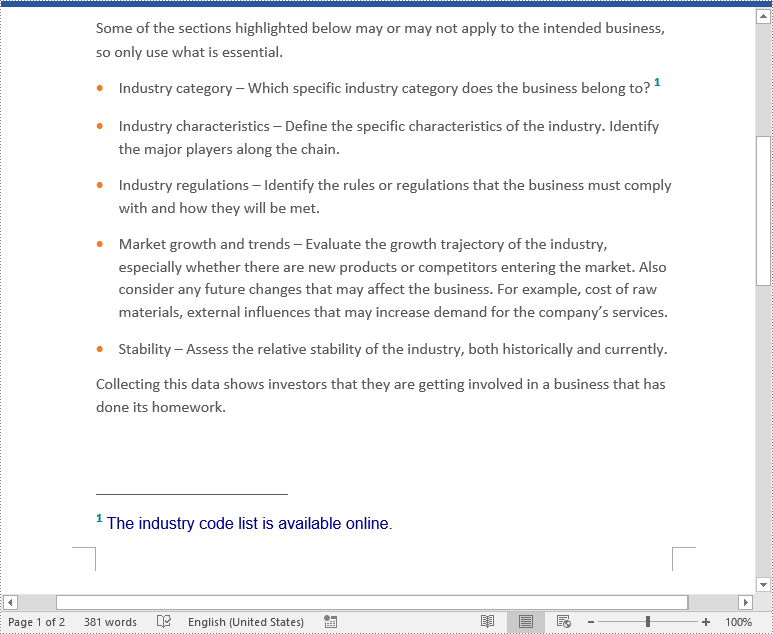
paragraph = section.Paragraphs.get_Item(3)
# Add a footnote at the end of the paragraph
footnote = paragraph.AppendFootnote(FootnoteType.Footnote)
# Set the text content of the footnote
text = footnote.TextBody.AddParagraph().AppendText("The industry code list is available online.")
# Set the text font and color
text.CharacterFormat.FontName = "Arial"
text.CharacterFormat.FontSize = 12
text.CharacterFormat.TextColor = Color.get_DarkBlue()
# Set the font and color of the footnote reference mark
footnote.MarkerCharacterFormat.FontName = "Calibri"
footnote.MarkerCharacterFormat.FontSize = 15
footnote.MarkerCharacterFormat.Bold = True
footnote.MarkerCharacterFormat.TextColor = Color.get_DarkCyan()
# Save the result document
document.SaveToFile("AddFootnoteForParagraph.docx", FileFormat.Docx2016)
document.Close()
Insert a Footnote for a Specific Text in Word in Python
To add a footnote for a specific text, you need to find the text in the document, get the location of the text in its owner paragraph, and then insert the footnote after the text. The detailed steps are as follows.
- Create an object of the Document class.
- Load a Word document using Document.LoadFromFile() method.
- Find a specific text using Document.FindString() method.
- Get the found text as a single text range using TextSelection.GetAsOneRange() method.
- Get the paragraph where the text range is located using TextRange.OwnerParagraph property.
- Get the index position of the text range in the paragraph using Paragraph.ChildObjects.IndexOf() method.
- Add a footnote to the paragraph using Paragraph.AppendFootnote(FootnoteType.Footnote) method, and then insert the footnote after the specific text using Paragraph.ChildObjects.Insert() method.
- Set the text content of the footnote, and then set the font and color for the footnote text and the footnote reference mark.
- Save the result document using Document.SaveToFile() method.
- Python
from spire.doc import *
from spire.doc.common import *
# Create a Document instance
document = Document()
# Load a sample Word document
document.LoadFromFile("Sample.docx")
# Find a specific text
selection = document.FindString("major players", False, True)
# Get the found text as a single text range
textRange = selection.GetAsOneRange()
# Get the paragraph where the text range is located
paragraph = textRange.OwnerParagraph
# Get the index position of the text range in the paragraph
index = paragraph.ChildObjects.IndexOf(textRange)
# Add a footnote to the paragraph
footnote = paragraph.AppendFootnote(FootnoteType.Footnote)
# Insert the footnote after the text range
paragraph.ChildObjects.Insert(index + 1, footnote)
# Set the text content of the footnote
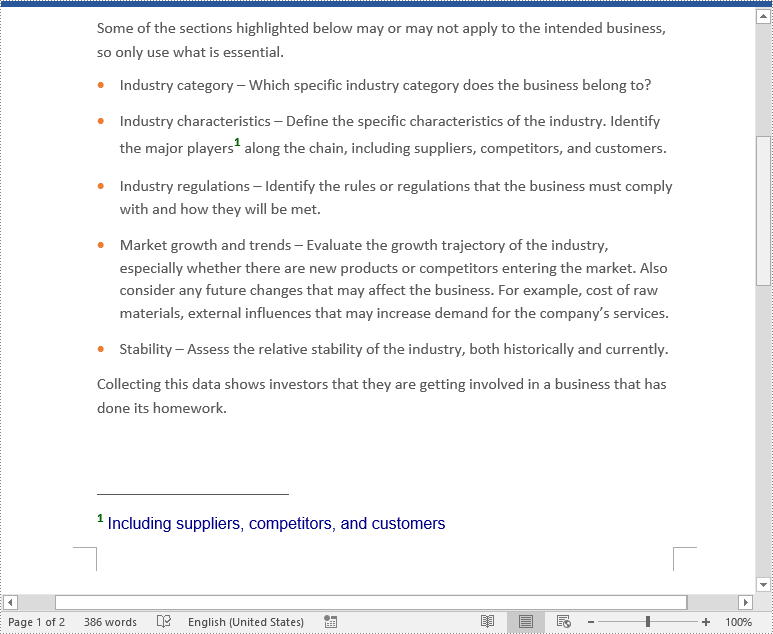
text = footnote.TextBody.AddParagraph().AppendText("Including suppliers, competitors, and customers")
# Set the text font and color
text.CharacterFormat.FontName = "Arial"
text.CharacterFormat.FontSize = 12
text.CharacterFormat.TextColor = Color.get_DarkBlue()
# Set the font and color of the footnote reference mark
footnote.MarkerCharacterFormat.FontName = "Calibri"
footnote.MarkerCharacterFormat.FontSize = 15
footnote.MarkerCharacterFormat.Bold = True
footnote.MarkerCharacterFormat.TextColor = Color.get_DarkGreen()
# Save the result document
document.SaveToFile("AddFootnoteForText.docx", FileFormat.Docx2016)
document.Close()
Remove Footnotes in a Word Document in Python
When the footnotes of a Word document are no longer needed, you can remove them to make the document neater. The detailed steps are as follows.
- Create an object of the Document class.
- Load a Word document using Document.LoadFromFile() method.
- Get a specific section using Document.Sections[int] property.
- Loop through each paragraph in the section to find the footnotes.
- Remove the footnotes using Paragraph.ChildObjects.RemoveAt() method.
- Save the result document using Document.SaveToFile() method.
- Python
from spire.doc import *
from spire.doc.common import *

# Create a Document instance
document = Document()
# Load a sample Word document
document.LoadFromFile("AddFootnoteForParagraph.docx")

# Get the first section of the document
section = document.Sections[0]

# Loop through the paragraphs in the section
for y in range(section.Paragraphs.Count):
    para = section.Paragraphs.get_Item(y)
    index = -1
    i = 0
    cnt = para.ChildObjects.Count
    while i < cnt:
        pBase = para.ChildObjects[i] if isinstance(para.ChildObjects[i], ParagraphBase) else None
        if isinstance(pBase, Footnote):
            index = i
            break
        i += 1
    if index > -1:
        # Remove the footnotes from the paragraph
        para.ChildObjects.RemoveAt(index)

# Save the result document
document.SaveToFile("RemoveFootnotes.docx", FileFormat.Docx)
document.Close()
Apply for a Temporary License
If you'd like to remove the evaluation message from the generated documents, or to get rid of the function limitations, please request a 30-day trial license for yourself.
A table is a powerful tool in a Word document that allows you to organize and present information in a structured manner. It consists of rows and columns, forming a grid-like structure. Tables are commonly used for various purposes, such as creating schedules, comparing data, or displaying data in a neat and organized format. In this article, you will learn how to programmatically create tables in a Word document in Python using Spire.Doc for Python.
- Create a Simple Table in Word in Python
- Create a Table from an HTML String in Python
- Merge and Split Cells in a Table in Python
- Fill a Table with Data in Word in Python
Install Spire.Doc for Python
This scenario requires Spire.Doc for Python and plum-dispatch v1.7.4. They can be easily installed in your Windows through the following pip command.
pip install Spire.Doc
If you are unsure how to install, please refer to this tutorial: How to Install Spire.Doc for Python on Windows
Prerequisite Knowledge
Spire.Doc for Python offers the Table class to represent a table in a Word document. You can create table objects either through the constructor or the Section.AddTable() method. After the table object is created, you can use the Table.AddRow() method to dynamically add rows to the table, or specify the number of rows and columns of the table, and then populate it with data in a single pass.
Also, Spire.Doc for Python supports creating tables from an HTML string. This method does not return an object of Table. Therefore, you cannot use the properties or methods under the Table class to deal with the table created from an HTML string. You need to set up the content and style of the table in the HTML string.
Create a Simple Table in Word in Python
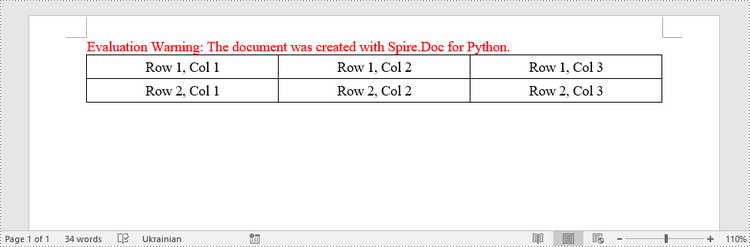
This example demonstrates how to create a simple plain table using the Table class and how to add rows one by one. Here are the main steps.
- Create a Document object.
- Add a section to it using Document.AddSection() method.
- Create a Table object.
- Add a row to it using Table.AddRow() method.
- Get a specific cell of the row through Row.Cells[index] property.
- Add text to the cell using TableCell.AddParagraph().AppendText() method.
- Add the table to the document using Section.AddTable() method.
- Save the document to a .docx file using Document.SaveToFile() method.
- Python
from spire.doc import *
from spire.doc.common import *

# Create a Document object
doc = Document()

# Add a section
section = doc.AddSection()

# Create a table
table = Table(doc, True)

# Set the width of table
table.PreferredWidth = PreferredWidth(WidthType.Percentage, int(100))

# Set the border of table
table.TableFormat.Borders.BorderType = BorderStyle.Single
table.TableFormat.Borders.Color = Color.get_Black()

# Add a row
row = table.AddRow(False, 3)
row.Height = 20.0

# Add data to the cells
cell = row.Cells[0]
cell.CellFormat.VerticalAlignment = VerticalAlignment.Middle
paragraph = cell.AddParagraph()
paragraph.Format.HorizontalAlignment = HorizontalAlignment.Center
paragraph.AppendText("Row 1, Col 1")
cell = row.Cells[1]
cell.CellFormat.VerticalAlignment = VerticalAlignment.Middle
paragraph = cell.AddParagraph()
paragraph.Format.HorizontalAlignment = HorizontalAlignment.Center
paragraph.AppendText("Row 1, Col 2")
cell = row.Cells[2]
cell.CellFormat.VerticalAlignment = VerticalAlignment.Middle
paragraph = cell.AddParagraph()
paragraph.Format.HorizontalAlignment = HorizontalAlignment.Center
paragraph.AppendText("Row 1, Col 3")

# Add the second row
row = table.AddRow(False, 3)
row.Height = 20.0
cell = row.Cells[0]
cell.CellFormat.VerticalAlignment = VerticalAlignment.Middle
paragraph = cell.AddParagraph()
paragraph.Format.HorizontalAlignment = HorizontalAlignment.Center
paragraph.AppendText("Row 2, Col 1")
cell = row.Cells[1]
cell.CellFormat.VerticalAlignment = VerticalAlignment.Middle
paragraph = cell.AddParagraph()
paragraph.Format.HorizontalAlignment = HorizontalAlignment.Center
paragraph.AppendText("Row 2, Col 2")
cell = row.Cells[2]
cell.CellFormat.VerticalAlignment = VerticalAlignment.Middle
paragraph = cell.AddParagraph()
paragraph.Format.HorizontalAlignment = HorizontalAlignment.Center
paragraph.AppendText("Row 2, Col 3")

# Add the table to the section
section.Tables.Add(table)

# Save the document
doc.SaveToFile("output/CreateTable.docx", FileFormat.Docx2013)
doc.Close()
Create a Table from an HTML String in Python
To create a table from an HTML string, use the Paragraph.AppendHTML() method. The following are the steps.
- Create a Document object.
- Add a section to it using Document.AddSection() method.
- Specify the HTML string for generating the table.
- Add a paragraph using Section.AddParagraph() method.
- Add the HTML table to the paragraph using Paragraph.AppendHTML() method.
- Save the document to a .docx file using Document.SaveToFile() method.
- Python
from spire.doc import *
from spire.doc.common import *

# Create a Document object
document = Document()

# Add a section
section = document.AddSection()

# Specify HTML string
HTML = "<table border='2px'>" + "<tr>" + "<td>Row 1, Cell 1</td>" + "<td>Row 1, Cell 2</td>" + \
    "</tr>" + "<tr>" + "<td>Row 2, Cell 2</td>" + \
    "<td>Row 2, Cell 2</td>" + "</tr>" + "</table>"

# Add a paragraph
paragraph = section.AddParagraph()

# Append HTML string to the paragraph
paragraph.AppendHTML(HTML)

# Save to Word document
document.SaveToFile("output/HtmlTable.docx", FileFormat.Docx2013)
document.Close()
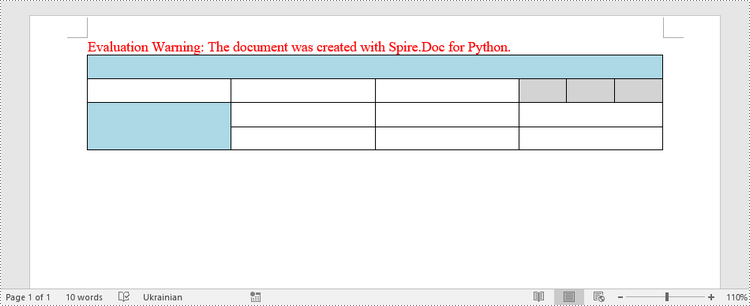
Merge and Split Cells in a Table in Python
When working with tables, the ability to merge or split cells provides a powerful way to customize and format data. This example shows you how to combine adjacent cells into a single cell and how to divide a single cell into multiple smaller cells using Spire.Doc for Python.
- Create a Document object.
- Add a section using Document.AddSection() method.
- Add a table using Section.AddTable() method.
- Set the column number and row number of the table using Table.ResetCells() method.
- Horizontally merge cells using Table.ApplyHorizontalMerge() method.
- Vertically merge cells using Table.ApplyVerticalMerge() method.
- Split a cell into multiple smaller cells using TableCell.SplitCell() method.
- Save the document to a .docx file using Document.SaveToFile() method.
- Python
from spire.doc import *
from spire.doc.common import *

# Create a Document object
document = Document()

# Add a section
section = document.AddSection()

# Create a table
table = section.AddTable(True)

# Set the row number and column number of table
table.ResetCells(4, 4)

# Set the width of table
table.PreferredWidth = PreferredWidth(WidthType.Percentage, int(100))

# Set row height
for i in range(0, table.Rows.Count):
    table.Rows[i].Height = 20.0

# Horizontally merge cells
table.ApplyHorizontalMerge(0, 0, 3)

# Vertically merge cells
table.ApplyVerticalMerge(0, 2, 3)

# Get a cell
cell = table.Rows.get_Item(1).Cells.get_Item(3)

# Split the cell into 3 smaller cells
cell.SplitCell(3, 0)

# Fill specified cells with color
table.Rows[0].Cells[0].CellFormat.BackColor = Color.get_LightBlue()
table.Rows[2].Cells[0].CellFormat.BackColor = Color.get_LightBlue()
table.Rows[1].Cells[3].CellFormat.BackColor = Color.get_LightGray()
table.Rows[1].Cells[4].CellFormat.BackColor = Color.get_LightGray()
table.Rows[1].Cells[5].CellFormat.BackColor = Color.get_LightGray()

# Save to Word document
document.SaveToFile("output/MergeAndSplit.docx", FileFormat.Docx2013)
document.Close()
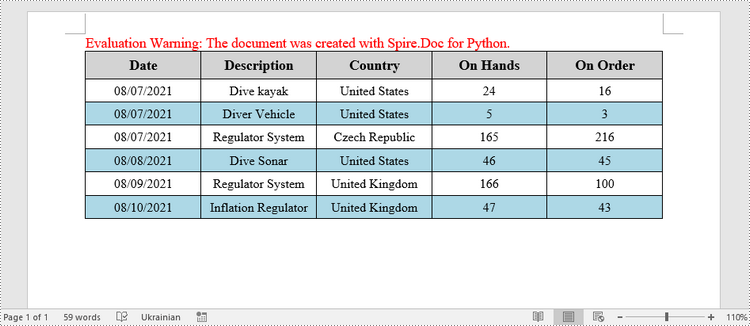
Fill a Table with Data in Word in Python
This example creates a 5x7 table, writes the data from lists into the cells, and applies different formatting to the header row and other rows. The following are the main steps.
- Create a Document object.
- Add a section using Document.AddSection() method.
- Add a table using Section.AddTable() method.
- Specify the data for filling the table in two lists.
- Reset the row number and column number of the table depending on the height and width of the data using Table.ResetCells() method.
- Write data into the corresponding cells using TableCell.AddParagraph().AppendText() method.
- Apply different colors to different rows through TableCell.CellFormat.BackColor property.
- Save the document to a .docx file using Document.SaveToFile() method.
- Python
import math
from spire.doc import *
from spire.doc.common import *

# Create a Document object
doc = Document()

# Add a section
section = doc.AddSection()

# Create a table
table = section.AddTable(True)

# Specify table data
header_data = ["Date", "Description", "Country", "On Hands", "On Order"]
row_data = [ ["08/07/2021","Dive kayak","United States","24","16"],
                ["08/07/2021","Diver Vehicle","United States","5","3"],
                ["08/07/2021","Regulator System","Czech Republic","165","216"],
                ["08/08/2021","Dive Sonar","United States","46","45"],
                ["08/09/2021","Regulator System","United Kingdom","166","100"],
                ["08/10/2021","Inflation Regulator","United Kingdom","47","43"]]

# Set the row number and column number of table
table.ResetCells(len(row_data) + 1, len(header_data))

# Set the width of table
table.PreferredWidth = PreferredWidth(WidthType.Percentage, int(100))

# Get header row
headerRow = table.Rows[0]
headerRow.IsHeader = True
headerRow.Height = 23
headerRow.RowFormat.BackColor = Color.get_LightGray()

# Fill the header row with data and set the text formatting
i = 0
while i < len(header_data):
    headerRow.Cells[i].CellFormat.VerticalAlignment = VerticalAlignment.Middle
    paragraph = headerRow.Cells[i].AddParagraph()
    paragraph.Format.HorizontalAlignment = HorizontalAlignment.Center
    txtRange = paragraph.AppendText(header_data[i])
    txtRange.CharacterFormat.Bold = True
    txtRange.CharacterFormat.FontSize = 12
    i += 1

# Fill the rest rows with data and set the text formatting
r = 0
while r < len(row_data):
    dataRow = table.Rows[r + 1]
    dataRow.Height = 20
    dataRow.HeightType = TableRowHeightType.Exactly
    c = 0
    while c < len(row_data[r]):
        dataRow.Cells[c].CellFormat.VerticalAlignment = VerticalAlignment.Middle
        paragraph = dataRow.Cells[c].AddParagraph()
        paragraph.Format.HorizontalAlignment = HorizontalAlignment.Center
        txtRange =  paragraph.AppendText(row_data[r][c])
        txtRange.CharacterFormat.FontSize = 11
        c += 1
    r += 1

# Alternate row color
for j in range(1, table.Rows.Count):
    if math.fmod(j, 2) == 0:
        row2 = table.Rows[j]
        for f in range(row2.Cells.Count):
            row2.Cells[f].CellFormat.BackColor = Color.get_LightBlue()

# Set the border of table
table.TableFormat.Borders.BorderType = BorderStyle.Single
table.TableFormat.Borders.LineWidth = 1.0
table.TableFormat.Borders.Color = Color.get_Black()

# Save the document
doc.SaveToFile("output/Table.docx", FileFormat.Docx2013)
Apply for a Temporary License
If you'd like to remove the evaluation message from the generated documents, or to get rid of the function limitations, please request a 30-day trial license for yourself.
Images play a crucial role in effectively communicating complex ideas or concepts. When there are low-quality or outdated images in a Word document, it is necessary to replace the images to enhance the overall visual appeal and professionalism of your document. In this article, you will learn how to replace images in a Word document in Python using Spire.Doc for Python.
Install Spire.Doc for Python
This scenario requires Spire.Doc for Python and plum-dispatch v1.7.4. They can be easily installed in your Windows through the following pip commands.
pip install Spire.Doc
If you are unsure how to install, please refer to this tutorial: How to Install Spire.Doc for Python on Windows
Replace Image with New Image in Word in Python
Spire.Doc for Python supports not only inserting images in Word, but also replacing existing images. The following are the detailed steps to get a specific image in Word and then replace it with a new image.
- Create a Document object.
- Load a Word document using Document.LoadFromFile() method.
- Create a list to store the images.
- Iterate through all sections in the document.
- Iterate through all paragraphs in each section.
- Iterate through all child objects in each paragraph.
- Find the images and add them to the list.
- Get a specific image from the list and replace it with another image using DocPicture.LoadImage() method.
- Save the result document using Document.SaveToFile() method.
- Python
from spire.doc import *
from spire.doc.common import *

# Create a Document object
doc = Document()

# Load a Word document
doc.LoadFromFile("Data.docx")

# Create a list to store the images
pictures = []

# Iterate through all sections in the document
for i in range(doc.Sections.Count):
    sec = doc.Sections.get_Item(i)

    # Iterate through all paragraphs in each section
    for j in range(sec.Paragraphs.Count):
        para = sec.Paragraphs.get_Item(j)

        # Iterate through all child objects in each paragraph
        for k in range(para.ChildObjects.Count):
            docObj = para.ChildObjects.get_Item(k)

            # Find the images and add them to the list
            if docObj.DocumentObjectType == DocumentObjectType.Picture:
                pictures.append(docObj)

# Replace the first picture in the list with a new image
picture = pictures[0] if isinstance(pictures[0], DocPicture) else None
picture.LoadImage("data.jpg")

# Save the result document
doc.SaveToFile("ReplaceImage.docx", FileFormat.Docx)
doc.Close()

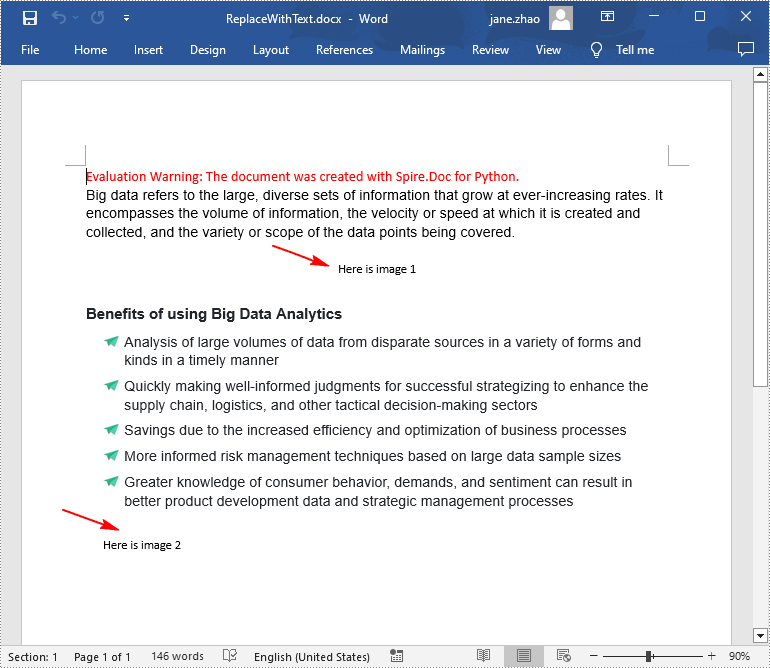
Replace Image with Text in Word in Python
Spire.Doc for Python doesn't provide a direct method to replace image with text, but you can achieve this task by inserting text at the image location and then removing the image from the document.
The following are the steps to replace all images in a Word document with text:
- Create a Document object.
- Load a Word document using Document.LoadFromFile() method.
- Iterate through all sections in the document.
- Iterate through all paragraphs in each section.
- Create a list to store the images.
- Iterate through all child objects in each paragraph.
- Find the images and add them to the list.
- Iterate through the images in the list.
- Get the index of the image in the paragraph using Paragraph.ChildObjects.Indexof() method.
- Initialize an instance of TextRange class and set text for the text range through TextRange.Text property.
- Insert the text range at the image location using Paragraph.ChildObjects.Insert() method.
- Remove the image from the paragraph using Paragraph.ChildObjects.Remove() method.
- Save the result document using Document.SaveToFile() method.
- Python
from spire.doc import *
from spire.doc.common import *

# Create a Document object
doc = Document()

# Load a Word document
doc.LoadFromFile("Data.docx")

j = 1
# Iterate through all sections in the document
for k in range(doc.Sections.Count):
    sec = doc.Sections.get_Item(k)

    # Iterate through all sections in the document
    for m in range(sec.Paragraphs.Count):
        para = sec.Paragraphs.get_Item(m)

        # Create a list to store the images
        pictures = []

        # Find the images and add them to the list
        for x in range(para.ChildObjects.Count):
            docObj = para.ChildObjects.get_Item(x)
            if docObj.DocumentObjectType == DocumentObjectType.Picture:
                pictures.append(docObj)

        # Iterate through all images in the list and replace them with text "Here is image {image index}"
        for pic in pictures:
            index = para.ChildObjects.IndexOf(pic)
            textRange = TextRange(doc)
            textRange.Text = "Here is image {0}".format(j)
            para.ChildObjects.Insert(index, textRange)
            para.ChildObjects.Remove(pic)
            j += 1

# Save the result document
doc.SaveToFile("ReplaceWithText.docx", FileFormat.Docx)
doc.Close()
Apply for a Temporary License
If you'd like to remove the evaluation message from the generated documents, or to get rid of the function limitations, please request a 30-day trial license for yourself.
When working with Word documents, sometimes you may need to adjust the content or layout of the document by deleting certain paragraphs. For example, when you have copied a very long paragraph from the Internet, you can delete redundant paragraphs as needed and keep only the useful ones. Or you can create a new document by deleting irrelevant paragraphs in an existing document. In this case, performing this process programmatically is a better option than tedious manual deletion, which can help you batch process a large number of documents in a short period of time. In this article, we will show you how to remove a specific paragraph or all paragraphs from Word documents in python using Spire.Doc for Python.
Install Spire.Doc for Python
This scenario requires Spire.Doc for Python and plum-dispatch v1.7.4. They can be easily installed in your Windows through the following pip command.
pip install Spire.Doc
If you are unsure how to install, please refer to this tutorial: How to Install Spire.Doc for Python on Windows
Delete a Specific Paragraph from Word Documents
With Spire.Doc for Python library, you are allowed to remove specific paragraphs from Word documents. You just need to get the desired section, and then call the Section.Paragraphs.RemoveAt() method to remove the paragraphs you want. The detailed steps are as follows.
- Create an object of Document class.
- Load a Word document from disk using Document.LoadFromFile() method.
- Get the first section of this file using Document.Sections[] property.
- Remove the first paragraph from this section using Section.Paragraphs.RemoveAt() method.
- Save the result file using Document.SaveToFile() method.
- Python
from spire.doc import *
from spire.doc.common import *

inputFile = "C:/Users/Administrator/Desktop/Sample.docx"
outputFile = "C:/Users/Administrator/Desktop/RemoveParagraphs.docx"

#Create an object of Document class
document = Document()

#Load a sample file from disk
document.LoadFromFile(inputFile)

#Get the first section of this file
section=document.Sections[0]

#Remove the first paragraph from this section
section.Paragraphs.RemoveAt(0)

#Save the result file
document.SaveToFile(outputFile, FileFormat.Docx2013)
document.Close()
Delete All Paragraphs from Word Documents
In addition, if you want to clear all paragraphs of the Word document at once, please loop through all sections first and call the Section.Paragraphs.Clear() method to do that. The detailed steps are as follows.
- Create an object of Document class.
- Load a Word document from disk using Document.LoadFromFile() method.
- Loop through all sections first and remove all paragraphs in each section by using Section.Paragraphs.Clear() method.
- Save the result file using Document.SaveToFile() method.
- Python
from spire.doc import *
from spire.doc.common import *

inputFile = "C:/Users/Administrator/Desktop/Sample.docx"
outputFile = "C:/Users/Administrator/Desktop/RemoveAllParagraphs.docx"

#Create an object of Document class
document = Document()

#Load a sample file from disk
document.LoadFromFile(inputFile)

#Remove paragraphs from the body of every section in the document
for i in range(document.Sections.Count):
    section = document.Sections.get_Item(i)
    section.Paragraphs.Clear()

#Save the result file
document.SaveToFile(outputFile, FileFormat.Docx2013)
document.Close()
Apply for a Temporary License
If you'd like to remove the evaluation message from the generated documents, or to get rid of the function limitations, please request a 30-day trial license for yourself.
Dealing with a large number of Word documents can be very challenging. Whether it's editing or reviewing a large number of documents, there's a lot of time wasted on opening and closing documents. What's more, sharing and receiving a large number of separate Word documents can be annoying, as it may require a lot of repeated sending and receiving operations by both the sharer and the receiver. Therefore, in order to enhance efficiency and save time, it is advisable to merge related Word documents into a single file. From this article, you will know how to use Spire.Doc for Python to easily merge Word documents through Python programs.
- Merge Word Documents by Inserting Files with Python
- Merge Word Documents by Cloning Contents with Python
Install Spire.Doc for Python
This scenario requires Spire.Doc for Python and plum-dispatch v1.7.4. They can be easily installed in your Windows through the following pip command.
pip install Spire.Doc
If you are unsure how to install, please refer to this tutorial: How to Install Spire.Doc for Python on Windows
Merge Word Documents by Inserting Files with Python
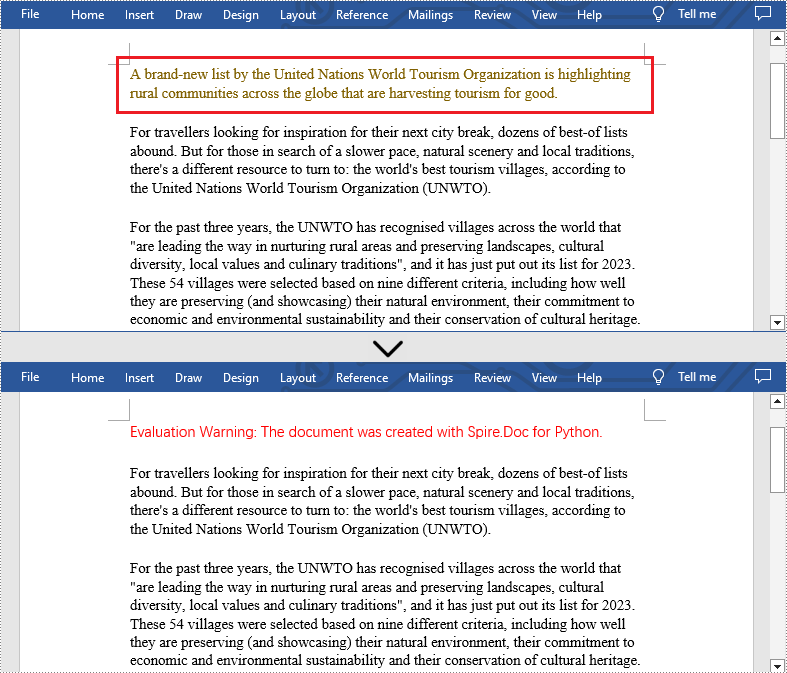
The method Document.insertTextFromFile() is used to insert other Word documents to the current one, and the inserted content will start from a new page. The detailed steps for merging Word documents by inserting are as follows:
- Create an object of Document class and load a Word document using Document.LoadFromFile() method.
- Insert the content from another document to it using Document.InsertTextFromFile() method.
- Save the document using Document.SaveToFile() method.
- Python
from spire.doc import *
from spire.doc.common import *

# Create an object of Document class and load a Word document
doc = Document()
doc.LoadFromFile("Sample1.docx")

# Insert the content from another Word document to this one
doc.InsertTextFromFile("Sample2.docx", FileFormat.Auto)

# Save the document
doc.SaveToFile("output/InsertDocuments.docx")
doc.Close()
Merge Word Documents by Cloning Contents with Python
Merging Word documents can also be achieved by cloning contents from one Word document to another. This method maintains the formatting of the original document, and content cloned from another document continues at the end of the current document without starting a new Page. The detailed steps are as follows:
- Create two objects of Document class and load two Word documents using Document.LoadFromFile() method.
- Get the last section of the destination document using Document.Sections.get_Item() method.
- Loop through the sections in the document to be cloned and then loop through the child objects of the sections.
- Get a section child object using Section.Body.ChildObjects.get_Item() method.
- Add the child object to the last section of the destination document using Section.Body.ChildObjects.Add() method.
- Save the result document using Document.SaveToFile() method.
- Python
from spire.doc import *
from spire.doc.common import *

# Create two objects of Document class and load two Word documents
doc1 = Document()
doc1.LoadFromFile("Sample1.docx")
doc2 = Document()
doc2.LoadFromFile("Sample2.docx")

# Get the last section of the first document
lastSection = doc1.Sections.get_Item(doc1.Sections.Count - 1)

# Loop through the sections in the second document
for i in range(doc2.Sections.Count):
    section = doc2.Sections.get_Item(i)
    # Loop through the child objects in the sections
    for j in range(section.Body.ChildObjects.Count):
        obj = section.Body.ChildObjects.get_Item(j)
        # Add the child objects from the second document to the last section of the first document
        lastSection.Body.ChildObjects.Add(obj.Clone())

# Save the result document
doc1.SaveToFile("output/MergeByCloning.docx")
doc1.Close()
doc2.Close()
Apply for a Temporary License
If you'd like to remove the evaluation message from the generated documents, or to get rid of the function limitations, please request a 30-day trial license for yourself.
Comments are invaluable tools for collaboration and feedback in Word documents, allowing users to provide insights, suggestions, clarification, and discussions. Whether the goal is to share ideas, respond to existing comments, or remove outdated feedback, mastering the efficient handling of Word document comments can significantly enhance document workflow. This article aims to show how to add, delete, or reply to comments in Word documents using Spire.Doc for Python in Python programs.
- Add Comments to a Paragraph in Word Documents using Python
- Add Comments to Text in Word Documents using Python
- Remove Comments from Word Documents using Python
- Reply to Comments in Word Documents using Python
Install Spire.Doc for Python
This scenario requires Spire.Doc for Python and plum-dispatch v1.7.4. They can be easily installed in your Windows through the following pip command.
pip install Spire.Doc
If you are unsure how to install, please refer to this tutorial: How to Install Spire.Doc for Python on Windows
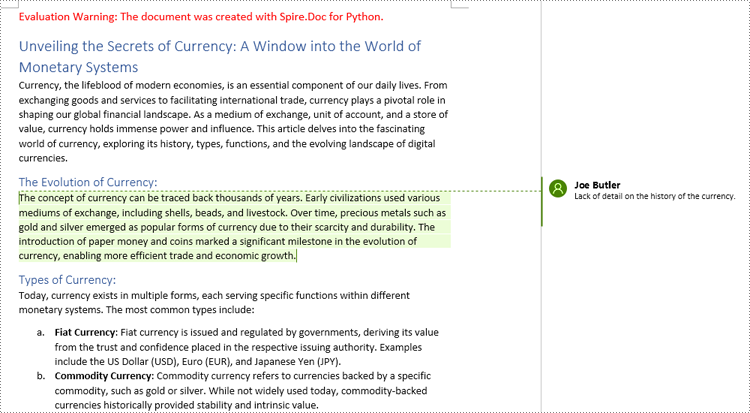
Add Comments to a Paragraph in Word Documents using Python
Spire.Doc for Python provides the Paragraph.AppendComment() method to add a comment to a specified paragraph. And the range of text corresponding to the comment needs to be controlled using the comment start marks and end marks. The detailed steps to add comments on paragraphs are as follows:
- Create an object of Document class and load a Word document using Document.LoadFromFile() method.
- Get the first section using Document.Sections.get_Item() method.
- Get the first paragraph in the section using Section.Paragraphs.get_Item() method.
- Add a comment to the paragraph using Paragraph.AppendComment() method.
- Set the author the comment through Comment.Format.Author property.
- Create a comment start mark and an end mark and set them as the start and end marks of the created comment though CommentMark.CommentId property.
- Insert the comment start mark and end mark at the beginning and end of the paragraph respectively using Paragraph.ChildObjects.Insert() method.
- Save the document using Document.SaveToFile() method.
- Python
from spire.doc import *
from spire.doc.common import *
# Create an object of Document class and load a Word document
doc = Document()
doc.LoadFromFile("Sample.docx")
# Get the first section
section = doc.Sections.get_Item(0)
# Get the forth paragraph
paragraph = section.Paragraphs.get_Item(4)
# Add a comment to the paragraph
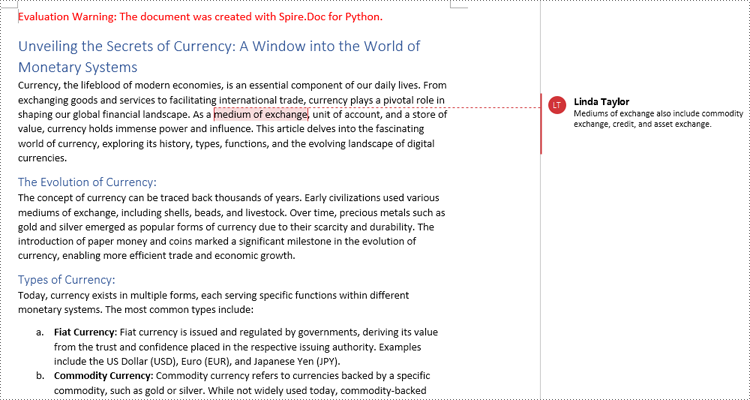
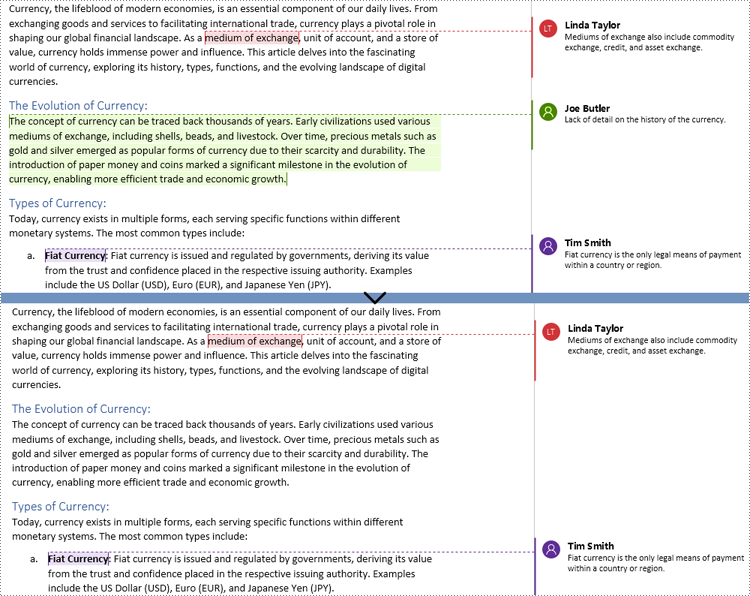
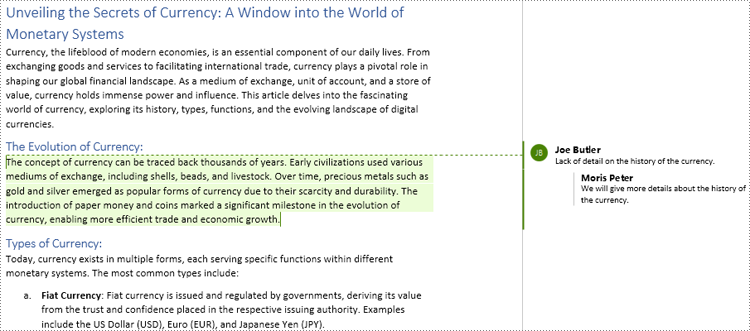
comment = paragraph.AppendComment("Lack of detail on the history of the currency.")
# Set the author of the comment
comment.Format.Author = "Joe Butler"
# Create a comment start mark and an end mark and set them as the start and end marks of the created comment
commentStart = CommentMark(doc, CommentMarkType.CommentStart)
commentEnd = CommentMark(doc, CommentMarkType.CommentEnd)
commentStart.CommentId = comment.Format.CommentId
commentEnd.CommentId = comment.Format.CommentId
# Insert the comment start mark and end mark at the beginning and end of the paragraph respectively
paragraph.ChildObjects.Insert(0, commentStart)
paragraph.ChildObjects.Add(commentEnd)
# Save the document
doc.SaveToFile("output/CommentOnParagraph.docx")
doc.Close()
Add Comments to Text in Word Documents using Python
Spire.Doc for Python also supports finding specified text and adding comments to it. The detailed steps are as follows:
- Create an object of Document class and load a Word document using Document.LoadFromFile() method.
- Find the text to comment on using Document.FindString() method.
- Create an object of Comment class, set the comment content through Comment.Body.AddParagraph().Text property, and set the author of the comment through Comment.Format.Author property.
- Get the text as one text range using TextSelection.GetAsOneRange() method and get the paragraph the text belongs to through TextRange.OwnerParagraph property.
- Insert the comment after the found text using Paragraph.ChildObjects.Insert() method.
- Create a comment start mark and an end mark and set them as the start and end marks of the created comment though CommentMark.CommentId property.
- Insert the comment start mark and end mark before and after found text respectively using Paragraph.ChildObjects.Insert() method.
- Save the document using Document.SaveToFile() method.
- Python
from spire.doc import *
from spire.doc.common import *

# Create an object of Document class and load a Word document
doc = Document()
doc.LoadFromFile("Sample.docx")

# Find the text to comment on
text = doc.FindString("medium of exchange", True, True)

# Create a comment and set the content and author of the comment
comment = Comment(doc)
comment.Body.AddParagraph().Text = "Fiat currency is the only legal means of payment within a country or region."
comment.Format.Author = "Linda Taylor"

# Get the found text as a text range and get the paragraph it belongs to
range = text.GetAsOneRange()
paragraph =  range.OwnerParagraph

# Add the comment to the paragraph
paragraph.ChildObjects.Insert(paragraph.ChildObjects.IndexOf(range) + 1, comment)

# Create a comment start mark and an end mark and set them as the start and end marks of the created comment
commentStart = CommentMark(doc, CommentMarkType.CommentStart)
commentEnd = CommentMark(doc, CommentMarkType.CommentEnd)
commentStart.CommentId = comment.Format.CommentId
commentEnd.CommentId = comment.Format.CommentId

# Insert the created comment start and end tags before and after the found text respectively
paragraph.ChildObjects.Insert(paragraph.ChildObjects.IndexOf(range), commentStart)
paragraph.ChildObjects.Insert(paragraph.ChildObjects.IndexOf(range) + 1, commentEnd)

# Save the document
doc.SaveToFile ("output/CommentOnText.docx")
doc.Close()
Remove Comments from Word Documents using Python
Spire.Doc for Python provides the Document.Comments.RemoveAt() method that can be used to remove a specified comment and the Document.Clear() method that can remove all comments. The detailed steps for removing comments are as follows:
- Create an object of Document class and load a Word document using Document.LoadFromFile() method.
- Delete a specific comment using Document.Comments.RemoveAt() method or delete all the comments using Document.Comments.Clear() method.
- Save the document using Document.SaveToFile() method.
- Python
from spire.doc import *
from spire.doc.common import *

# Create an object of Document class and load a Word document
doc = Document()
doc.LoadFromFile("Sample1.docx")

# Remove the second comment
doc.Comments.RemoveAt(1)

# Remove all comments
#doc.Comments.Clear()

# Save the document
doc.SaveToFile("output/RemoveComments.docx")
doc.Close()
Reply to Comments in Word Documents using Python
Spire.Doc for Python allows users to reply to a comment by setting a comment as a reply to another comment using Comment.ReplyToComment(Comment) method. The detailed steps are as follows:
- Create an object of Document class and load a Word document using Document.LoadFromFile() method.
- Get a comment using Document.Comments.get_Item() method.
- Create a comment and set its content and author through Comment.Body.AddParagraph().Text property and Comment.Format.Author property.
- Set the created comment as a reply to the obtained comment using Comment.ReplyToComment() method.
- Save the document using Document.SaveToFile() method.
- Python
from spire.doc import *
from spire.doc.common import *

# Create an object of Document class and load a Word document
doc = Document()
doc.LoadFromFile("output/CommentOnParagraph.docx")

# Get a comment
comment = doc.Comments.get_Item(0)

# Create a reply comment and set the content and author of it
reply = Comment(doc)
reply.Body.AddParagraph().Text = "We will give more details about the history of the currency."
reply.Format.Author = "Moris Peter"

# Set the created comment as a reply to obtained comment
comment.ReplyToComment(reply)

# Save the document
doc.SaveToFile("output/ReplyToComments.docx")
doc.Close()
Apply for a Temporary License
If you'd like to remove the evaluation message from the generated documents, or to get rid of the function limitations, please request a 30-day trial license for yourself.
Textboxes are versatile tools in Microsoft Word, allowing you to insert and position text or other elements anywhere on a page, giving you the power to create eye-catching flyers, brochures, or reports. Whether you're looking to emphasize a particular section of text, place captions near images, or simply add a decorative touch, the capacity to manipulate textboxes offers a practical and aesthetic advantage in document design. In this article, you will learn how to add or remove textboxes in a Word document in Python using Spire.Doc for Python.
Install Spire.Doc for Python
This scenario requires Spire.Doc for Python and plum-dispatch v1.7.4. They can be easily installed in your Windows through the following pip command.
pip install Spire.Doc
If you are unsure how to install, please refer to this tutorial: How to Install Spire.Doc for Python on Windows
Add a Textbox to a Word Document in Python
Spire.Doc for Python provides the Paragraph.AppendTextBox() method to insert a textbox in a specified paragraph. The content and formatting of the textbox can be set through the properties under the TextBox object. The following are the detailed steps.
- Create a Document object.
- Load a Word document using Document.LoadFromFile() method.
- Get the first section and add a paragraph to the section using Section.AddParagraph() method.
- Add a text box to the paragraph using Paragraph.AppendTextBox() method.
- Get the format of the textbox using TextBox.Format property, and then set the textbox's wrapping type, position, border color and fill color using the properties of TextBoxFormat Class.
- Add a paragraph to the textbox using TextBox.Body.AddParagraph() method.
- Add an image to the paragraph using Paragraph.AppendPicture() method.
- Add text to the textbox using Paragraph.AppendText() method
- Save the document to a different file using Document.SaveToFile() method.
- Python
from spire.doc import *
from spire.doc.common import *
# Create a Document object
document = Document()
# Load a Word document
document.LoadFromFile("C:/Users/Administrator/Desktop/input3.docx")
# Insert a textbox and set its wrapping style
textBox = document.Sections[0].Paragraphs[0].AppendTextBox(135, 300)
textBox.Format.TextWrappingStyle = TextWrappingStyle.Square
# Set the position of the textbox
textBox.Format.HorizontalOrigin = HorizontalOrigin.RightMarginArea
textBox.Format.HorizontalPosition = -145.0
textBox.Format.VerticalOrigin = VerticalOrigin.Page
textBox.Format.VerticalPosition = 120.0
# Set the border style and fill color of the textbox
textBox.Format.LineColor = Color.get_DarkBlue()
textBox.Format.FillColor = Color.get_LightGray()
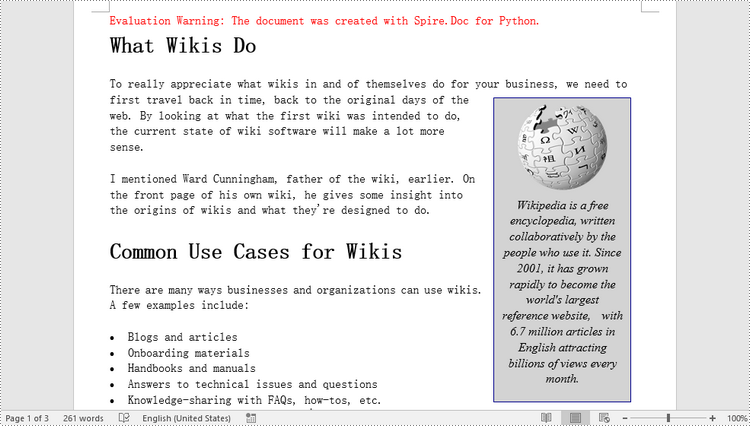
# Insert an image to textbox as a paragraph
para = textBox.Body.AddParagraph();
picture = para.AppendPicture("C:/Users/Administrator/Desktop/Wikipedia_Logo.png")
# Set alignment for the paragraph
para.Format.HorizontalAlignment = HorizontalAlignment.Center
# Set the size of the inserted image
picture.Height = 90.0
picture.Width = 90.0
# Insert text to textbox as the second paragraph
textRange = para.AppendText("Wikipedia is a free encyclopedia, written collaboratively by the people who use it. "
+ "Since 2001, it has grown rapidly to become the world's largest reference website, "
+ "with 6.7 million articles in English attracting billions of views every month.")
# Set alignment for the paragraph
para.Format.HorizontalAlignment = HorizontalAlignment.Center
# Set the font of the text
textRange.CharacterFormat.FontName = "Times New Roman"
textRange.CharacterFormat.FontSize = 12.0
textRange.CharacterFormat.Italic = True
# Save the result file
document.SaveToFile("output/AddTextBox.docx", FileFormat.Docx)
Remove a Textbox from a Word Document in Python
Spire.Doc for Python provides the Document.TextBoxes.RemoveAt(int index) method to delete a specified textbox. To delete all textboxes from a Word document, you can use the Document.TextBoxes.Clear() method. The following example shows how to remove the first textbox from a Word document.
- Create a Document object.
- Load a Word document using Document.LoadFromFile() method.
- Remove the first text box using Document.TextBoxes.RemoveAt(int index) method.
- Save the document to another file using Document.SaveToFile() method.
- Python
from spire.doc import *
from spire.doc.common import *

# Create a Document object
document = Document()

# Load a Word document
document .LoadFromFile("C:/Users/Administrator/Desktop/TextBox.docx")

# Remove the first textbox
document .TextBoxes.RemoveAt(0)

# Remove all textboxes
# document.TextBoxes.Clear()

# Save the result document
document.SaveToFile("output/RemoveTextbox.docx", FileFormat.Docx)
Apply for a Temporary License
If you'd like to remove the evaluation message from the generated documents, or to get rid of the function limitations, please request a 30-day trial license for yourself.
