Conditional formatting is an important means to visually display data in Excel. It automatically applies colors, bars, and other visual effects to cells based on their values or dates, so that high and low values and key dates in a report are clear at a glance. Spire.XLS for JavaScript applies conditional formatting to cell ranges directly in the browser based on WebAssembly, managing input and output files through a virtual file system (VFS) without the need for backend services.
This article covers three core features:
- Apply Data Bars to a Cell Range
- Conditionally Format Dates
- Create a Formula-Based Conditional Format
For installation and project configuration, refer to How to Integrate Spire.XLS for JavaScript in a React Project. The examples below assume that Spire.XLS has been installed and the WebAssembly module has been initialized.
Apply Data Bars to a Cell Range
Data bars intuitively reflect the relative size of values through the length of the horizontal bars filled in cells — the larger the value, the longer the bar. Spire.XLS for JavaScript creates a conditional format collection with the ConditionalFormats.Add method, adds a data bar condition with AddCondition, and customizes the bar color with DataBar.BarColor.
function App() {
  const sheetToSVG = async () => {
    // Get the Spire.XLS WASM module
    const xlsModule = window.wasmModule?.spirexls;

    // Check if the module is ready
    if (!xlsModule) {
      alert('Spire.Xls is not ready yet');
      return;
    }

    // Load the font file into the VFS
    await window.spire.FetchFileToVFS('ARIAL.TTF', '/Library/Fonts/', `${process.env.PUBLIC_URL}/font/`);

    // Create a workbook
    const workbook = new xlsModule.Workbook();

    // Get the first worksheet
    const sheet = workbook.Worksheets.get(0);

    // Insert data into the cell range A1:C4
    sheet.Range.get("A1").NumberValue = 582;
    sheet.Range.get("A2").NumberValue = 234;
    sheet.Range.get("A3").NumberValue = 314;
    sheet.Range.get("A4").NumberValue = 50;
    sheet.Range.get("B1").NumberValue = 150;
    sheet.Range.get("B2").NumberValue = 894;
    sheet.Range.get("B3").NumberValue = 560;
    sheet.Range.get("B4").NumberValue = 900;
    sheet.Range.get("C1").NumberValue = 134;
    sheet.Range.get("C2").NumberValue = 700;
    sheet.Range.get("C3").NumberValue = 920;
    sheet.Range.get("C4").NumberValue = 450;
    sheet.AllocatedRange.RowHeight = 15;
    sheet.AllocatedRange.ColumnWidth = 17;

    // Add a conditional format and apply it to the data range
    const xcfs = sheet.ConditionalFormats.Add();
    xcfs.AddRange(sheet.AllocatedRange);

    // Add a data bar conditional format and set the bar color
    const format = xcfs.AddCondition();
    format.FormatType = xlsModule.ConditionalFormatType.DataBar;
    format.DataBar.BarColor = xlsModule.Color.get_CadetBlue();

    const outputFileName = 'ApplyDataBarsToCellRange_out.xlsx';
    workbook.SaveToFile({ fileName: outputFileName, version: xlsModule.ExcelVersion.Version2010 });

    // Dispose of the workbook object to free resources
    workbook.Dispose();

    // Read the converted file from the VFS and trigger the download
    const fileArray = window.dotnetRuntime.Module.FS.readFile(outputFileName);
    const blob = new Blob([fileArray], { type: "application/vnd.openxmlformats-officedocument.spreadsheetml.sheet" });
    const url = URL.createObjectURL(blob);
    const a = document.createElement('a');
    a.href = url;
    a.download = outputFileName;
    a.click();
    URL.revokeObjectURL(url);
  };

  return (
    <div style={{ textAlign: 'center', height: '300px' }}>
      <h1>Apply Data Bars to Cell Range</h1>
      <button onClick={sheetToSVG}>
        Start
      </button>
    </div>
  );
}

export default App;
Apply Data Bars to a Cell Range Effect 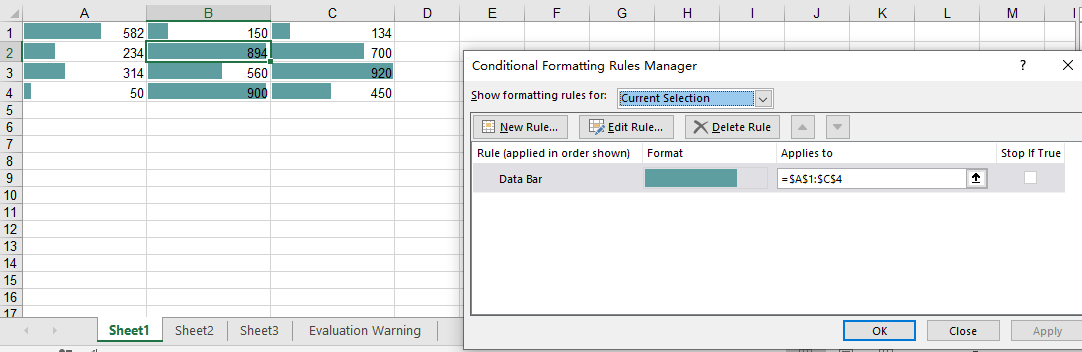
Conditionally Format Dates
In scenarios such as project management and sales reports, we often need to highlight dates within a recent period, for example records from the last 7 days. Spire.XLS for JavaScript adds a time-period-based date conditional format with the AddTimePeriodCondition method, and specifies the time range with the TimePeriodType enumeration.
function App() {
  const sheetToSVG = async () => {
    // Get the Spire.XLS WASM module
    const xlsModule = window.wasmModule?.spirexls;

    // Check if the module is ready
    if (!xlsModule) {
      alert('Spire.Xls is not ready yet');
      return;
    }

    // Load the font and Excel file into the VFS
    await window.spire.FetchFileToVFS('ARIAL.TTF', '/Library/Fonts/', `${process.env.PUBLIC_URL}/font/`);
    const inputFileName = 'ConditionallyFormatDate.xlsx';
    await window.spire.FetchFileToVFS(inputFileName, '', `${process.env.PUBLIC_URL}data/`);

    // Load the workbook
    const workbook = new xlsModule.Workbook();
    workbook.LoadFromFile({ fileName: inputFileName });

    // Get the first worksheet
    const sheet = workbook.Worksheets.get(0);

    // Add a conditional format and apply it to the data range
    const xcfs = sheet.ConditionalFormats.Add();
    xcfs.AddRange(sheet.AllocatedRange);

    // Highlight cells whose date falls within the last 7 days
    const conditionalFormat = xcfs.AddTimePeriodCondition(xlsModule.TimePeriodType.Last7Days);
    conditionalFormat.BackColor = xlsModule.Color.get_Orange();

    const outputFileName = 'ConditionallyFormatDate_out.xlsx';
    workbook.SaveToFile({ fileName: outputFileName, version: xlsModule.ExcelVersion.Version2010 });

    // Dispose of the workbook object to free resources
    workbook.Dispose();

    // Read the converted file from the VFS and trigger the download
    const fileArray = window.dotnetRuntime.Module.FS.readFile(outputFileName);
    const blob = new Blob([fileArray], { type: "application/vnd.openxmlformats-officedocument.spreadsheetml.sheet" });
    const url = URL.createObjectURL(blob);
    const a = document.createElement('a');
    a.href = url;
    a.download = outputFileName;
    a.click();
    URL.revokeObjectURL(url);
  };

  return (
    <div style={{ textAlign: 'center', height: '300px' }}>
      <h1>Conditionally Format Date</h1>
      <button onClick={sheetToSVG}>
        Start
      </button>
    </div>
  );
}

export default App;
Before Applying Date Conditional Formatting 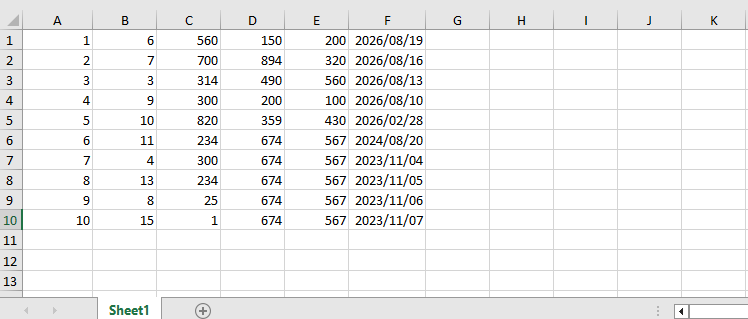 After Applying Date Conditional Formatting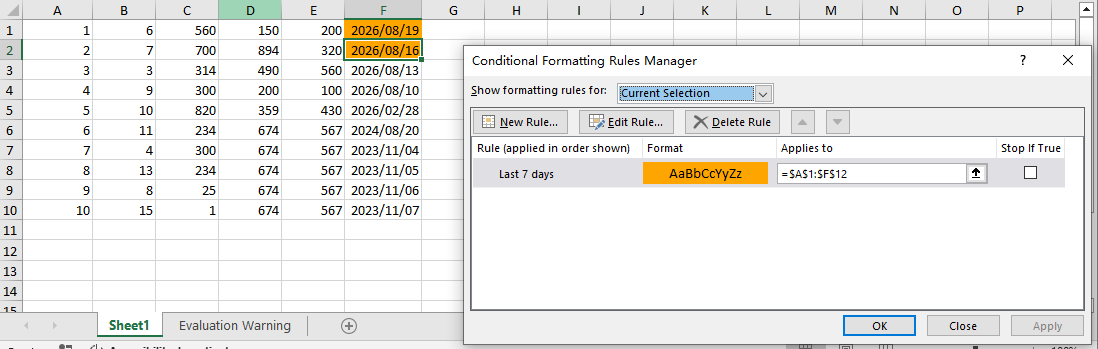
Create a Formula-Based Conditional Format
When the built-in conditional formats cannot meet your requirements, you can use a formula to define a custom judgment rule. Spire.XLS for JavaScript supports setting ConditionalFormatType to Formula and specifying the judgment formula with FirstFormula; cells that satisfy the formula will apply the configured background color.
function App() {
  const sheetToSVG = async () => {
    // Get the Spire.XLS WASM module
    const xlsModule = window.wasmModule?.spirexls;

    // Check if the module is ready
    if (!xlsModule) {
      alert('Spire.Xls is not ready yet');
      return;
    }

    // Load the font and Excel file into the VFS
    await window.spire.FetchFileToVFS('ARIAL.TTF', '/Library/Fonts/', `${process.env.PUBLIC_URL}/font/`);
    const inputFileName = 'ConditionallyFormatDate.xlsx';
    await window.spire.FetchFileToVFS(inputFileName, '', `${process.env.PUBLIC_URL}data/`);

    // Load the workbook
    const workbook = new xlsModule.Workbook();
    workbook.LoadFromFile({ fileName: inputFileName });

    // Get the first worksheet and its first column
    const sheet = workbook.Worksheets.get(0);
    const range = sheet.Columns.get(0);

    // Add a conditional format and apply it to the first column
    const xcfs = sheet.ConditionalFormats.Add();
    xcfs.AddRange(range);

    // Set the conditional format formula: apply the format when a cell in column A is less than the cell in column B of the same row
    const conditional = xcfs.AddCondition();
    conditional.FormatType = xlsModule.ConditionalFormatType.Formula;
    conditional.FirstFormula = "=($A1<$B1)";
    conditional.BackKnownColor = xlsModule.ExcelColors.Yellow;

    const outputFileName = 'CreateFormulaConditionalFormat_out.xlsx';
    workbook.SaveToFile({ fileName: outputFileName, version: xlsModule.ExcelVersion.Version2010 });

    // Dispose of the workbook object to free resources
    workbook.Dispose();

    // Read the converted file from the VFS and trigger the download
    const fileArray = window.dotnetRuntime.Module.FS.readFile(outputFileName);
    const blob = new Blob([fileArray], { type: "application/vnd.openxmlformats-officedocument.spreadsheetml.sheet" });
    const url = URL.createObjectURL(blob);
    const a = document.createElement('a');
    a.href = url;
    a.download = outputFileName;
    a.click();
    URL.revokeObjectURL(url);
  };

  return (
    <div style={{ textAlign: 'center', height: '300px' }}>
      <h1>Create Formula Conditional Format</h1>
      <button onClick={sheetToSVG}>
        Start
      </button>
    </div>
  );
}

export default App;
Apply Formula Conditional Formatting 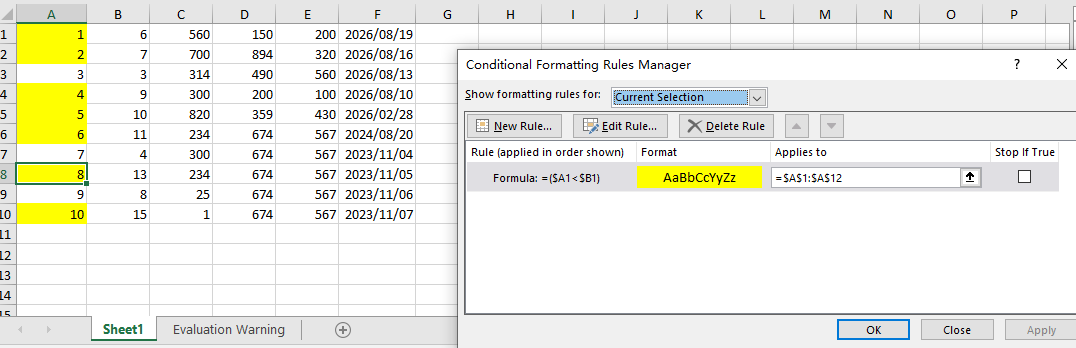
FAQ
Conditional formatting is not displayed when the file is opened in older versions of Excel
Cause: Conditional formats such as data bars, time periods, and formulas belong to the Excel 2007+ (XLSX) format capabilities. Saving with an older format may cause the conditional formatting to be lost or not displayed.
Solution: Explicitly specify the file version as Excel 2010 when saving, for example:
workbook.SaveToFile({
  fileName: 'output.xlsx',
  version: xlsModule.ExcelVersion.Version2010
});
The date conditional format has no effect
Cause: The date data in the target cells is actually stored as text or plain numbers rather than real date values, so the time-period-based judgment cannot match.
Solution: Make sure the dates in the worksheet are stored as dates, for example by writing date-type values directly when generating the data, instead of strings.
The formula conditional format references the wrong range
Cause: The relative references in the FirstFormula formula do not correspond to the cell range, so the judgment result does not match expectations.
Solution: Confirm that the row and column references in the formula are consistent with the selected range. For example, when applying =($A1<$B1) to the entire column A, the formula uses the first cell of the selected range as the reference starting point.
Get a Free License
If you want to remove the evaluation message from the result documents, or get rid of the function limitations, please contact sales to get a temporary license valid for 30 days.