
Spire.XLS for JavaScript (43)
Children categories
Hide or Unhide Excel Rows and Columns with JavaScript in React
2026-08-03 02:25:05 Written by jie zouHiding and unhiding rows and columns is a common feature in daily office work. It helps protect sensitive information, simplify data views, or temporarily conceal unnecessary data. Spire.XLS for JavaScript runs entirely in the browser via WebAssembly, using a virtual file system (VFS) to manage input and output files — no backend server required. It provides a simple API for controlling the visibility of rows and columns.
This article covers four core features:
- Hide Specific Rows and Columns in Excel
- Unhide Specific Rows and Columns in Excel
- Hide Multiple Rows and Columns at Once in Excel
- Unhide All Hidden Rows and Columns in Excel
For installation and project setup, refer to Integrating Spire.XLS for JavaScript in a React Project. The examples below assume Spire.XLS is installed and the WebAssembly module is initialized.
Hide Specific Rows and Columns in Excel
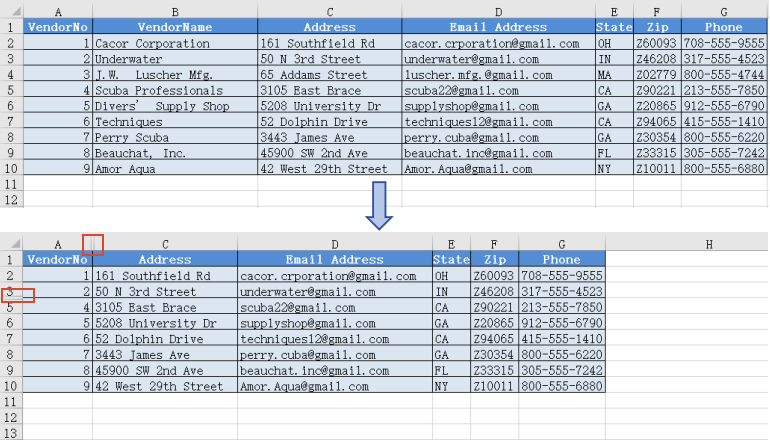
Hiding specific rows and columns can keep your worksheet cleaner and more readable without compromising data integrity. Spire.XLS for JavaScript supports hiding a specific row or column using the HideRow() and HideColumn() methods. The steps are as follows:
- Create a
Workbookobject and load an existing Excel file containing data. - Use
worksheet.HideRow()to hide a specific row. - Use
worksheet.HideColumn()to hide a specific column. - Save the workbook to an Excel file using
SaveToFile().
Below is a complete code example demonstrating how to hide specific rows and columns in Excel in React:
function App() {
  const hideSpecificRowsAndColumns = async () => {
    // Get the Spire.XLS WASM module
    const xlsModule = window.wasmModule?.spirexls;

    // Check if the module is ready
    if (!xlsModule) {
      alert('Spire.Xls is not ready yet');
      return;
    }

    // Load the sample file into the virtual file system (VFS)
    let excelFileName = 'Sample.xlsx';
    await window.spire.FetchFileToVFS(excelFileName, '', `${process.env.PUBLIC_URL}data/`);

    // Create a workbook object and load the existing file
    const workbook = new xlsModule.Workbook();
    workbook.LoadFromFile({ fileName: excelFileName });
    let sheet = workbook.Worksheets.get(0);

    // Hide a specific row (row 4)
    sheet.HideRow(4);

    // Hide a specific column (column 2, i.e., column B)
    sheet.HideColumn(2);

    // Save the workbook
    const outputFileName = 'HideSpecificRowsColumns.xlsx';
    workbook.SaveToFile(outputFileName);
    workbook.Dispose();

    // Read the file from VFS and trigger download
    const fileArray = window.dotnetRuntime.Module.FS.readFile(outputFileName);
    const blob = new Blob([fileArray], { type: 'application/vnd.openxmlformats-officedocument.spreadsheetml.sheet' });
    const url = URL.createObjectURL(blob);
    const a = document.createElement('a');
    a.href = url;
    a.download = outputFileName;
    a.click();
    URL.revokeObjectURL(url);
  };

  return (
    <div style={{ textAlign: 'center', height: '300px' }}>
      <h1>Hide Specific Rows and Columns</h1>
      <button onClick={hideSpecificRowsAndColumns}>
        Generate
      </button>
    </div>
  );
}

export default App;
Specific rows and columns hidden with Spire.XLS for JavaScript
Unhide Specific Rows and Columns in Excel
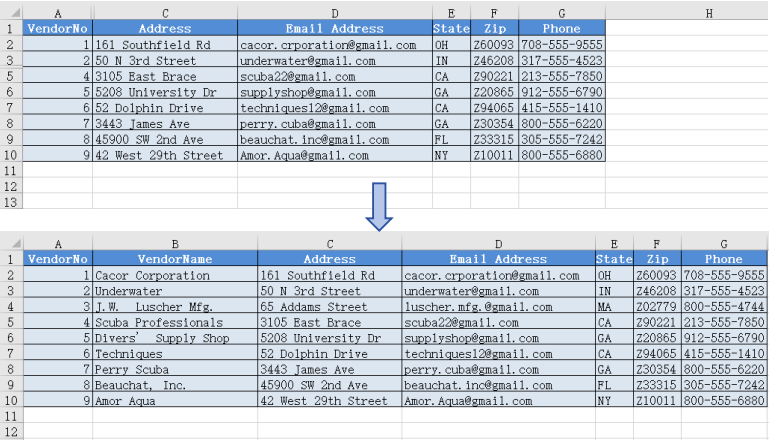
When you need to view or edit specific hidden data, you can unhide a particular row or column individually. Spire.XLS for JavaScript supports unhiding a specific row or column using the ShowRow() and ShowColumn() methods. The steps are as follows:
- Create a
Workbookobject and load an existing Excel file containing hidden rows/columns. - Use
sheet.ShowRow()to unhide a specific row. - Use
sheet.ShowColumn()to unhide a specific column. - Save the workbook to an Excel file using
SaveToFile().
Below is a complete code example demonstrating how to unhide specific rows and columns in Excel in React:
function App() {
  const unhideSpecificRowsAndColumns = async () => {
    // Get the Spire.XLS WASM module
    const xlsModule = window.wasmModule?.spirexls;

    // Check if the module is ready
    if (!xlsModule) {
      alert('Spire.Xls is not ready yet');
      return;
    }

    // Load the sample file into the virtual file system (VFS)
    let excelFileName = 'HideSpecificRowsColumns.xlsx';
    await window.spire.FetchFileToVFS(excelFileName, '', `${process.env.PUBLIC_URL}data/`);

    // Create a workbook object and load the existing file
    const workbook = new xlsModule.Workbook();
    workbook.LoadFromFile({ fileName: excelFileName });

    // Get the first worksheet
    let sheet = workbook.Worksheets.get(0);

    // Unhide a specific row (row 4)
    sheet.ShowRow(4);

    // Unhide a specific column (column 2, i.e., column B)
    sheet.ShowColumn(2);

    // Save the workbook
    const outputFileName = 'UnhideSpecificRowsColumns.xlsx';
    workbook.SaveToFile(outputFileName);
    workbook.Dispose();

    // Read the file from VFS and trigger download
    const fileArray = window.dotnetRuntime.Module.FS.readFile(outputFileName);
    const blob = new Blob([fileArray], { type: 'application/vnd.openxmlformats-officedocument.spreadsheetml.sheet' });
    const url = URL.createObjectURL(blob);
    const a = document.createElement('a');
    a.href = url;
    a.download = outputFileName;
    a.click();
    URL.revokeObjectURL(url);
  };

  return (
    <div style={{ textAlign: 'center', height: '300px' }}>
      <h1>Unhide Specific Rows and Columns</h1>
      <button onClick={unhideSpecificRowsAndColumns}>
        Generate
      </button>
    </div>
  );
}

export default App;
Specific rows and columns unhidden with Spire.XLS for JavaScript
Hide Multiple Rows and Columns at Once in Excel
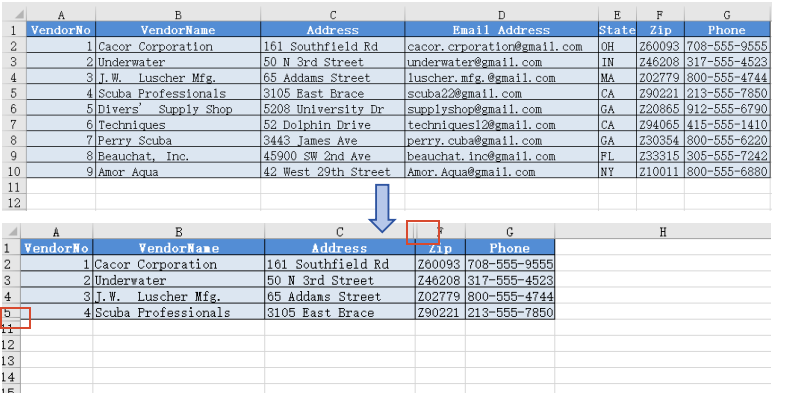
When there are multiple rows or columns that you don't need to display, hiding them one by one is inefficient. Spire.XLS for JavaScript supports hiding multiple rows and columns at once through loops, greatly improving operational efficiency. The steps are as follows:
- Create a
Workbookobject and load an existing Excel file containing data. - Use a loop to call
worksheet.HideRow()to hide multiple rows at once. - Use a loop to call
worksheet.HideColumn()to hide multiple columns at once. - Save the workbook to an Excel file using
SaveToFile().
Below is a complete code example demonstrating how to hide multiple rows and columns at once in Excel in React:
function App() {
  const hideMultipleRowsAndColumns = async () => {
    // Get the Spire.XLS WASM module
    const xlsModule = window.wasmModule?.spirexls;

    // Check if the module is ready
    if (!xlsModule) {
      alert('Spire.Xls is not ready yet');
      return;
    }

    // Load the sample file into the virtual file system (VFS)
    let excelFileName = 'Sample.xlsx';
    await window.spire.FetchFileToVFS(excelFileName, '', `${process.env.PUBLIC_URL}data/`);

    // Create a workbook object and load the existing file
    const workbook = new xlsModule.Workbook();
    workbook.LoadFromFile({ fileName: excelFileName });
    let sheet = workbook.Worksheets.get(0);

    // Hide multiple rows at once (rows 6 through 10)
    for (let i = 6; i <= 10; i++) {
      sheet.HideRow(i);
    }

    // Hide multiple columns at once (columns 4 through 5, i.e., columns D to E)
    for (let j = 4; j <= 5; j++) {
      sheet.HideColumn(j);
    }

    // Save the workbook
    const outputFileName = 'HideMultipleRowsColumns.xlsx';
    workbook.SaveToFile(outputFileName);
    workbook.Dispose();

    // Read the file from VFS and trigger download
    const fileArray = window.dotnetRuntime.Module.FS.readFile(outputFileName);
    const blob = new Blob([fileArray], { type: 'application/vnd.openxmlformats-officedocument.spreadsheetml.sheet' });
    const url = URL.createObjectURL(blob);
    const a = document.createElement('a');
    a.href = url;
    a.download = outputFileName;
    a.click();
    URL.revokeObjectURL(url);
  };

  return (
    <div style={{ textAlign: 'center', height: '300px' }}>
      <h1>Hide Multiple Rows and Columns</h1>
      <button onClick={hideMultipleRowsAndColumns}>
        Generate
      </button>
    </div>
  );
}

export default App;
Multiple rows and columns hidden at once with Spire.XLS for JavaScript
Unhide All Hidden Rows and Columns in Excel
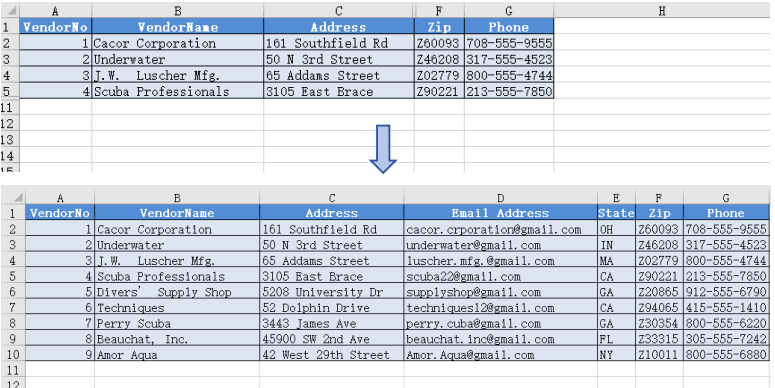
To unhide all hidden rows and columns, iterate through the rows and columns in the worksheet, use GetRowIsHide() and GetColumnIsHide() to find hidden ones, then call ShowRow() and ShowColumn() to unhide them. The steps are as follows:
- Create a
Workbookobject and load the Excel file. - Get the worksheet.
- Iterate through rows, use
GetRowIsHide()to find hidden rows, useShowRow()to unhide. - Iterate through columns, use
GetColumnIsHide()to find hidden columns, useShowColumn()to unhide. - Save the result file using
SaveToFile().
Below is a complete code example demonstrating how to unhide all hidden rows and columns in Excel in React:
function App() {
  const unhideAllRowsAndColumns = async () => {
    // Get the Spire.XLS WASM module
    const xlsModule = window.wasmModule?.spirexls;

    // Check if the module is ready
    if (!xlsModule) {
      alert('Spire.Xls is not ready yet');
      return;
    }

    // Load the sample file into the virtual file system (VFS)
    let excelFileName = 'HideMultipleRowsColumns.xlsx';
    await window.spire.FetchFileToVFS(excelFileName, '', `${process.env.PUBLIC_URL}data/`);

    // Create a workbook object and load the existing file
    const workbook = new xlsModule.Workbook();
    workbook.LoadFromFile({ fileName: excelFileName });

    // Get the first worksheet
    let sheet = workbook.Worksheets.get(0);

    for (let i = 1; i <= sheet.Rows.length; i++) {
      if (sheet.GetRowIsHide(i)) {
        // Unhide row
        sheet.ShowRow(i);
      }
    }

    for (let j = 1; j <= sheet.Columns.length; j++) {
      if (sheet.GetColumnIsHide(j)) {
        // Unhide column
        sheet.ShowColumn(j);
      }
    }

    // Save the workbook
    const outputFileName = 'UnhideAllRowsColumns.xlsx';
    workbook.SaveToFile(outputFileName);
    workbook.Dispose();

    // Read the file from VFS and trigger download
    const fileArray = window.dotnetRuntime.Module.FS.readFile(outputFileName);
    const blob = new Blob([fileArray], { type: 'application/vnd.openxmlformats-officedocument.spreadsheetml.sheet' });
    const url = URL.createObjectURL(blob);
    const a = document.createElement('a');
    a.href = url;
    a.download = outputFileName;
    a.click();
    URL.revokeObjectURL(url);
  };

  return (
    <div style={{ textAlign: 'center', height: '300px' }}>
      <h1>Unhide All Rows and Columns</h1>
      <button onClick={unhideAllRowsAndColumns}>
        Generate
      </button>
    </div>
  );
}

export default App;
All hidden rows and columns unhidden with Spire.XLS for JavaScript
FAQ
How to check whether a row or column is hidden?
Solution: Use the GetRowIsHide() and GetColumnIsHide() methods to check:
// Check if row 3 is hidden
let rowIsHidden = sheet.GetRowIsHide(3);

// Check if column 2 (column B) is hidden
let columnIsHidden = sheet.GetColumnIsHide(2);
Are row heights or column widths preserved after hiding?
Solution: When hiding rows or columns, the original row height and column width values are preserved. After unhiding with ShowRow() or ShowColumn(), the original dimensions are automatically restored without any additional configuration.
Get a Free License
Spire.XLS for JavaScript offers a 30-day full-featured free trial license with no functional limitations. Apply here to evaluate before purchasing.
Read or Delete Excel Document Properties with JavaScript in React
2026-08-03 02:20:33 Written by jie zouExcel document properties — such as title, author, category, and other metadata — are essential for file management and information retrieval. Spire.XLS for JavaScript runs entirely in the browser via WebAssembly, using a virtual file system (VFS) to manage input and output files. It provides a complete API for accessing and managing both DocumentProperties (standard/built-in properties) and CustomDocumentProperties (user-defined name-value pairs).
Spire.XLS categorizes document properties into two types: standard and custom. Standard document properties are predefined built-in metadata like title, subject, author, category, keywords, and comments. Custom document properties are user-defined name-value pairs that can contain text, numbers, dates, or boolean values.
This article covers two core features:
For installation and project setup, refer to Integrating Spire.XLS for JavaScript in a React Project. The examples below assume Spire.XLS is installed and the WebAssembly module is initialized.
Read Standard and Custom Document Properties
Reading document properties is the first step in understanding an Excel file's metadata. Through the DocumentProperties and CustomDocumentProperties collections, you can easily access all property information stored in the file. The steps are as follows:
- Create a
Workbookobject and load an existing Excel file. - Retrieve the standard document properties collection via
workbook.DocumentProperties. - Iterate through the
DocumentPropertiescollection to read each property's name and value. - Retrieve the custom document properties collection via
workbook.CustomDocumentProperties. - Iterate through the
CustomDocumentPropertiescollection to read each custom property's name and value. - Output the retrieved property information to a text file.
Below is a complete code example demonstrating how to read Excel document properties in React:
function App() {
  const readDocumentProperties = async () => {
    // Get the Spire.XLS WASM module
    const xlsModule = window.wasmModule?.spirexls;

    // Check if the module is ready
    if (!xlsModule) {
      alert('Spire.Xls is not ready yet');
      return;
    }

    // Load the sample file into VFS
    await window.spire.FetchFileToVFS('Sample.xlsx', '', `${process.env.PUBLIC_URL}data/`);

    const workbook = new xlsModule.Workbook();
    workbook.LoadFromFile({ fileName: 'Sample.xlsx' });

    // Get standard document properties
    let properties1 = workbook.DocumentProperties;
    let sb = [];
    sb.push("Excel Properties:");
    for (let i = 0; i < properties1.Count; i++) {
      let name = properties1.get(i).Name;
      let obj = properties1.get(i).Value;
      let t = properties1.get(i).PropertyType;
      let value = null;
      if (t === xlsModule.PropertyType.Double) {
        value = xlsModule.Double.Convert(obj).Value;
      } else if (t === xlsModule.PropertyType.DateTime) {
        // Convert OADate to JavaScript Date and format as date string
        let oaDate = xlsModule.DateTime.Convert(obj).Value;
        let jsDate = new Date((oaDate - 25569) * 86400 * 1000);
        value = jsDate.toLocaleDateString();
      } else if (t === xlsModule.PropertyType.Bool) {
        value = xlsModule.Boolean.Convert(obj).Value;
      } else if (
        t === xlsModule.PropertyType.Int ||
        t === xlsModule.PropertyType.Int32
      ) {
        value = xlsModule.Int32.Convert(obj).Value;
      } else {
        value = xlsModule.String.Convert(obj).Value;
      }
      sb.push(name + ": " + String(value));
    }
    sb.push("");

    // Get custom document properties
    let properties2 = workbook.CustomDocumentProperties;
    sb.push("Custom Properties:");
    for (let i = 0; i < properties2.Count; i++) {
      let name = properties2.get(i).Name;
      let t = properties2.get(i).PropertyType;
      let obj = properties2.get(i).Value;
      let value = null;
      if (t === xlsModule.PropertyType.Double) {
        value = xlsModule.Double.Convert(obj).Value;
      } else if (t === xlsModule.PropertyType.DateTime) {
        // Convert OADate to JavaScript Date and format as date string
        let oaDate = xlsModule.DateTime.Convert(obj).Value;
        let jsDate = new Date((oaDate - 25569) * 86400 * 1000);
        value = jsDate.toLocaleDateString();
      } else if (t === xlsModule.PropertyType.Bool) {
        value = xlsModule.Boolean.Convert(obj).Value;
      } else if (
        t === xlsModule.PropertyType.Int ||
        t === xlsModule.PropertyType.Int32
      ) {
        value = xlsModule.Int32.Convert(obj).Value;
      } else {
        value = xlsModule.String.Convert(obj).Value;
      }
      sb.push(name + ": " + String(value));
    }

    // Save the property information to a text file
    const outputFileName = 'DocumentProperties.txt';
    window.dotnetRuntime.Module.FS.writeFile(outputFileName, sb.join("\n"));
    workbook.Dispose();

    // Read the file from VFS and trigger download
    const fileArray = window.dotnetRuntime.Module.FS.readFile(outputFileName);
    const blob = new Blob([fileArray], { type: 'text/plain' });
    const url = URL.createObjectURL(blob);
    const a = document.createElement('a');
    a.href = url;
    a.download = outputFileName;
    a.click();
    URL.revokeObjectURL(url);
  };

  return (
    <div style={{ textAlign: 'center', height: '300px' }}>
      <h1>Read Excel Document Properties</h1>
      <button onClick={readDocumentProperties}>
        Generate
      </button>
    </div>
  );
}

export default App;
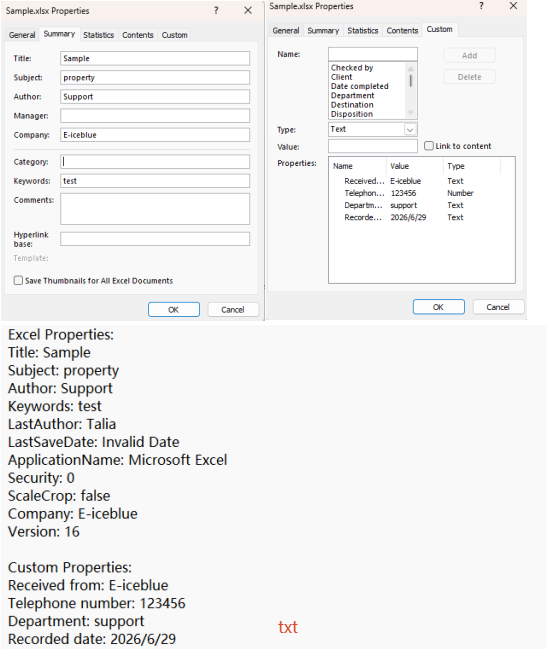
Document properties read with Spire.XLS for JavaScript
Delete Standard and Custom Document Properties
In some scenarios, you may need to clear sensitive or outdated metadata from Excel files. Spire.XLS for JavaScript allows you to delete both standard and custom document properties through straightforward API calls. The steps are as follows:
- Create a
Workbookobject and load an existing Excel file. - Retrieve the standard document properties collection via
workbook.DocumentProperties. - Clear standard properties by setting their values to empty strings.
- Retrieve the custom document properties collection via
workbook.CustomDocumentProperties. - Iterate through the collection and use the
Remove()method to delete each custom property. - Save the modified workbook to a new Excel file.
Below is a complete code example demonstrating how to delete Excel document properties in React:
function App() {
  const deleteDocumentProperties = async () => {
    // Get the Spire.XLS WASM module
    const xlsModule = window.wasmModule?.spirexls;

    // Check if the module is ready
    if (!xlsModule) {
      alert('Spire.Xls is not ready yet');
      return;
    }

    // Load the sample file into VFS
    await window.spire.FetchFileToVFS('Sample.xlsx', '', `${process.env.PUBLIC_URL}data/`);

    const workbook = new xlsModule.Workbook();
    workbook.LoadFromFile({ fileName: 'Sample.xlsx' });

    // Get the standard document properties collection and clear their values
    let standardProperties = workbook.DocumentProperties;
    standardProperties.Title = "";
    standardProperties.Subject = "";
    standardProperties.Manager = "";
    standardProperties.Category = "";
    standardProperties.Keywords = "";
    standardProperties.Comments = "";
    standardProperties.Author = "";
    standardProperties.Company = "";

    // Get the custom document properties collection, iterate and remove all properties
    let customProperties = workbook.CustomDocumentProperties;
    for (let i = customProperties.Count - 1; i >= 0; i--) {
      customProperties.Remove(customProperties.get(i).Name);
    }

    // Save the workbook
    const outputFileName = 'DeleteProperties.xlsx';
    workbook.SaveToFile(outputFileName);
    workbook.Dispose();

    // Read the file from VFS and trigger download
    const fileArray = window.dotnetRuntime.Module.FS.readFile(outputFileName);
    const blob = new Blob([fileArray], { type: 'application/vnd.openxmlformats-officedocument.spreadsheetml.sheet' });
    const url = URL.createObjectURL(blob);
    const a = document.createElement('a');
    a.href = url;
    a.download = outputFileName;
    a.click();
    URL.revokeObjectURL(url);
  };

  return (
    <div style={{ textAlign: 'center', height: '300px' }}>
      <h1>Delete Excel Document Properties</h1>
      <button onClick={deleteDocumentProperties}>
        Generate
      </button>
    </div>
  );
}

export default App;
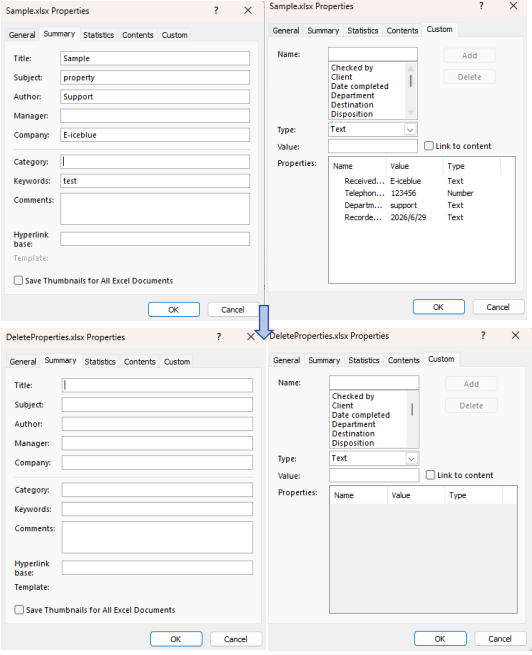
Document properties deleted with Spire.XLS for JavaScript
FAQ
Why can't standard document properties be removed using Remove() like custom properties?
Cause: Standard document properties are part of the Excel file structure, each with a fixed definition position that cannot be removed from the collection.
Solution: Clear standard properties by setting their values to empty strings instead of removing the properties themselves:
standardProperties.Title = "";
standardProperties.Author = "";
Custom properties can be directly deleted using the Remove() method.
How to handle reading non-text property types such as dates, booleans, and numbers?
Cause: Using String.Convert() directly on date or boolean properties may produce results in an unexpected format.
Solution: Check the PropertyType to determine the type and use the appropriate conversion method:
if (t === xlsModule.PropertyType.DateTime) {
  let oaDate = xlsModule.DateTime.Convert(obj).Value;
  let jsDate = new Date((oaDate - 25569) * 86400 * 1000);
  value = jsDate.toLocaleDateString();
} else if (t === xlsModule.PropertyType.Bool) {
  value = xlsModule.Boolean.Convert(obj).Value;
}
Get a Free License
Spire.XLS for JavaScript offers a 30-day full-featured free trial license with no functional limitations. Apply here to evaluate before purchasing.
Copying data within Excel files while preserving formatting is a common requirement in web-based spreadsheet applications. Spire.XLS for JavaScript runs entirely in the browser via WebAssembly, using a virtual file system (VFS) to manage input and output files — no backend server required. It provides comprehensive APIs to copy rows, columns, and cell ranges while keeping the original styles, fonts, colors, and other formatting intact.
This article covers three core features:
For installation and project setup, refer to Integrating Spire.XLS for JavaScript in a React Project. The examples below assume Spire.XLS is installed and the WebAssembly module is initialized.
Copy Rows in Excel
With Spire.XLS for JavaScript, you can copy rows within the same worksheet or across different worksheets while preserving all formatting, formulas, and styles. This is useful when you need to duplicate structured data such as headers, summary rows, or formatted templates. Through the CopyRangeOptions parameter, you can flexibly configure copy options such as copying all formats, conditional formatting, data validation, or only formula result values. The steps are as follows:
- Create a
Workbookobject and load an existing Excel file. - Get the source and destination worksheets via
workbook.Worksheets.get(). - Get the row to copy via
sheet.Rows[index]. - Use
sheet.Copy()with the source row, destination worksheet, destination row index, andCopyRangeOptions.Allto copy the row and its formatting. - Copy the column widths from the source row cells to the corresponding destination row cells.
- Save the workbook to an Excel file using
SaveToFile().
Below is a complete code example demonstrating how to copy rows in React:
function App() {
  const copyRows = async () => {
    // Get the Spire.XLS WASM module
    const xlsModule = window.wasmModule?.spirexls;

    // Check if the module is ready
    if (!xlsModule) {
      alert('Spire.Xls is not ready yet');
      return;
    }

    // Fetch the Excel file and add it to the Virtual File System (VFS)
    let excelFileName = 'Copying.xls';
    await window.spire.FetchFileToVFS(excelFileName, '', `${process.env.PUBLIC_URL}data/`);

    // Create a new workbook and load an existing file
    const workbook = new xlsModule.Workbook();
    workbook.LoadFromFile({ fileName: excelFileName });

    // Get the source and destination worksheets
    let sheet1 = workbook.Worksheets.get(0);
    let sheet2 = workbook.Worksheets.get(1);

    // Get the row to copy
    let row = sheet1.Rows[0];

    // Copy the row to the destination worksheet with all formatting
    sheet1.Copy({ sourceRange: row, destRange: sheet2.Rows[0], copyOptions: xlsModule.CopyRangeOptions.All });

    // Copy the column widths from source row to destination row
    let columns = sheet1.Columns.length;
    for (let i = 0; i < columns; i++) {
      let columnWidth = row.Columns[i].ColumnWidth;
      sheet2.Rows[0].Columns[i].ColumnWidth = columnWidth;
    }

    // Save the workbook
    const outputFileName = 'CopyRows_out.xlsx';
    workbook.SaveToFile({ fileName: outputFileName, version: xlsModule.ExcelVersion.Version2010 });
    workbook.Dispose();

    // Read the file from VFS and trigger download
    const fileArray = window.dotnetRuntime.Module.FS.readFile(outputFileName);
    const blob = new Blob([fileArray], { type: 'application/vnd.openxmlformats-officedocument.spreadsheetml.sheet' });
    const url = URL.createObjectURL(blob);
    const a = document.createElement('a');
    a.href = url;
    a.download = outputFileName;
    a.click();
    URL.revokeObjectURL(url);
  };

  return (
    <div style={{ textAlign: 'center', height: '300px' }}>
      <h1>Copy Excel Rows</h1>
      <button onClick={copyRows}>
        Generate
      </button>
    </div>
  );
}

export default App;
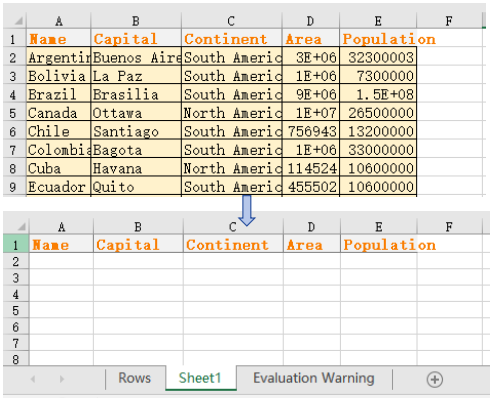
Row copy result
Copy Columns in Excel
Copying columns is equally straightforward with Spire.XLS for JavaScript. You can duplicate a column within the same worksheet or copy it to another sheet, and all cell styles, number formats, and data will be preserved. Through the CopyRangeOptions parameter, you can flexibly configure which elements to copy. This is particularly helpful for reorganizing spreadsheet layouts or replicating data structures. The steps are as follows:
- Create a
Workbookobject and load an existing Excel file. - Get the source and destination worksheets.
- Get the column to copy via
sheet.Columns[index]. - Use
sheet.Copy()with the source column, destination worksheet, destination column index, andCopyRangeOptions.Allto copy the column and its formatting. - Copy the column widths and row heights from the source column cells to the corresponding destination column cells.
- Save the workbook to an Excel file using
SaveToFile().
Below is a complete code example demonstrating how to copy columns in React:
function App() {
  const copyColumns = async () => {
    // Get the Spire.XLS WASM module
    const xlsModule = window.wasmModule?.spirexls;

    // Check if the module is ready
    if (!xlsModule) {
      alert('Spire.Xls is not ready yet');
      return;
    }

    // Fetch the Excel file and add it to the Virtual File System (VFS)
    let excelFileName = 'Copying.xls';
    await window.spire.FetchFileToVFS(excelFileName, '', `${process.env.PUBLIC_URL}data/`);

    // Create a new workbook and load an existing file
    const workbook = new xlsModule.Workbook();
    workbook.LoadFromFile({ fileName: excelFileName });

    // Get the source and destination worksheets
    let sheet1 = workbook.Worksheets.get(0);
    let sheet2 = workbook.Worksheets.get(1);

    // Get the column to copy
    let column = sheet1.Columns[0];

    // Copy the column to the destination worksheet with all formatting
    sheet1.Copy({ sourceRange: column, destRange: sheet2.Columns[0], copyOptions: xlsModule.CopyRangeOptions.All });

    // Copy the column width and row heights from source column to destination column
    sheet2.Columns[0].ColumnWidth = column.ColumnWidth;
    let rows = column.Rows.length;
    for (let i = 0; i < rows; i++) {
      let rowHeight = column.Rows[i].RowHeight;
      sheet2.Columns[0].Rows[i].RowHeight = rowHeight;
    }

    // Save the workbook
    const outputFileName = 'CopyColumns_out.xlsx';
    workbook.SaveToFile({ fileName: outputFileName, version: xlsModule.ExcelVersion.Version2010 });
    workbook.Dispose();

    // Read the file from VFS and trigger download
    const fileArray = window.dotnetRuntime.Module.FS.readFile(outputFileName);
    const blob = new Blob([fileArray], { type: 'application/vnd.openxmlformats-officedocument.spreadsheetml.sheet' });
    const url = URL.createObjectURL(blob);
    const a = document.createElement('a');
    a.href = url;
    a.download = outputFileName;
    a.click();
    URL.revokeObjectURL(url);
  };

  return (
    <div style={{ textAlign: 'center', height: '300px' }}>
      <h1>Copy Excel Columns</h1>
      <button onClick={copyColumns}>
        Generate
      </button>
    </div>
  );
}

export default App;
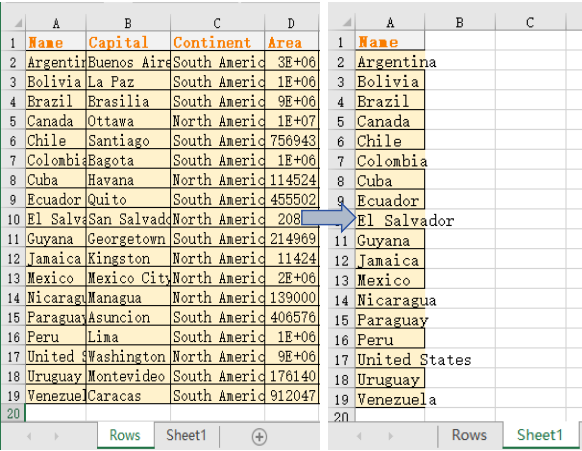
Column copy result
Copy Cells in Excel
Beyond copying entire rows and columns, Spire.XLS for JavaScript also allows you to copy specific cell ranges from one location to another while preserving all formatting. The CellRange.Copy() method provides this capability with flexible options. This gives you fine-grained control over which cells to duplicate. You can copy a range of cells within the same worksheet or to a different worksheet. The steps are as follows:
- Create a
Workbookobject and load an existing Excel file. - Get the source and destination worksheets.
- Get the source cell range and destination cell range via
sheet.Range.get(). - Use
sourceRange.Copy()with the destination range andCopyRangeOptions.Allto copy the cell range with all formatting. - Copy the column widths and row heights from the source range to the destination range.
- Save the workbook to an Excel file using
SaveToFile().
Below is a complete code example demonstrating how to copy cells in React:
function App() {
  const copyCells = async () => {
    // Get the Spire.XLS WASM module
    const xlsModule = window.wasmModule?.spirexls;

    // Check if the module is ready
    if (!xlsModule) {
      alert('Spire.Xls is not ready yet');
      return;
    }

    // Fetch the Excel file and add it to the Virtual File System (VFS)
    let excelFileName = 'Copying.xls';
    await window.spire.FetchFileToVFS(excelFileName, '', `${process.env.PUBLIC_URL}data/`);

    // Create a new workbook and load an existing file
    const workbook = new xlsModule.Workbook();
    workbook.LoadFromFile({ fileName: excelFileName });

    // Get the source and destination worksheets
    let sheet1 = workbook.Worksheets.get(0);
    let sheet2 = workbook.Worksheets.get(1);

    // Get the source cell range and destination cell range
    let range1 = sheet1.Range.get("A1:E7");
    let range2 = sheet2.Range.get("A1:E7");

    // Copy the source range to the destination range with all formatting
    range1.Copy({ destRange: range2, copyOptions: xlsModule.CopyRangeOptions.All });

    // Copy the row heights and column widths from source to destination
    for (let i = 0; i < range1.Rows.length; i++) {
      let row = range1.Rows[i];
      for (let j = 0; j < row.Columns.length; j++) {
        let column = row.Columns[j];
        range2.Rows[i].Columns[j].ColumnWidth = column.ColumnWidth;
        range2.Rows[i].RowHeight = row.RowHeight;
      }
    }

    // Save the workbook
    const outputFileName = 'CopyCells.xlsx';
    workbook.SaveToFile({ fileName: outputFileName, version: xlsModule.ExcelVersion.Version2010 });
    workbook.Dispose();

    // Read the file from VFS and trigger download
    const fileArray = window.dotnetRuntime.Module.FS.readFile(outputFileName);
    const blob = new Blob([fileArray], { type: 'application/vnd.openxmlformats-officedocument.spreadsheetml.sheet' });
    const url = URL.createObjectURL(blob);
    const a = document.createElement('a');
    a.href = url;
    a.download = outputFileName;
    a.click();
    URL.revokeObjectURL(url);
  };

  return (
    <div style={{ textAlign: 'center', height: '300px' }}>
      <h1>Copy Excel Cells</h1>
      <button onClick={copyCells}>
        Generate
      </button>
    </div>
  );
}

export default App;
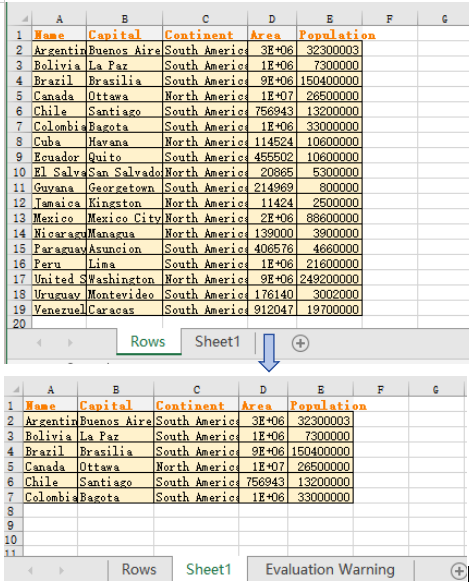
Cell copy result
FAQ
What happens if the target location already contains data
Cause: By default, the Copy() method overwrites existing data at the target location without merging or preserving the original content.
Solution: Choose an empty area as the destination range, or check whether the target range is empty before performing the copy. You can also back up the target data first, then execute the copy operation.
Can I copy only values without formulas
Cause: CopyRangeOptions.All copies formulas themselves, but sometimes you only need the calculated result values without preserving the formula logic.
Solution: Use the CopyRangeOptions.OnlyCopyFormulaValue option to copy only the calculated result values, not the formulas themselves:
sourceRange.Copy({ destRange: destRange, copyOptions: xlsModule.CopyRangeOptions.OnlyCopyFormulaValue });
Get a Free License
Spire.XLS for JavaScript offers a 30-day full-featured free trial license with no functional limitations. Apply here to evaluate before purchasing.
Configuring page setup is essential for preparing Excel documents for printing or PDF export. Spire.XLS for JavaScript runs entirely in the browser via WebAssembly, using a virtual file system (VFS) to manage input and output files — no backend server required. It provides comprehensive page setup capabilities through the PageSetup object, allowing you to control margins, orientation, paper size, print area, zoom scaling, and fit-to-page options.
The PageSetup object in Spire.XLS offers a rich set of properties for controlling how a worksheet is printed or displayed. Key properties include:
| Property | Description |
|---|---|
| TopMargin / BottomMargin / LeftMargin / RightMargin | Sets the page margins |
| Orientation | Sets the page orientation (Portrait or Landscape) |
| PaperSize | Sets the paper size (A4, Letter, etc.) |
| PrintArea | Specifies the cell range to print |
| Zoom | Sets the worksheet zoom scaling percentage |
| FitToPagesTall / FitToPagesWide | Scales the worksheet to fit a specified number of pages |
This article covers six core features:
- Adjust Excel Page Margins
- Adjust Excel Page Orientation
- Adjust Excel Paper Size
- Adjust Excel Print Area
- Adjust Excel Zoom Scale
- Fit Excel Table to 1 Page
For installation and project setup, refer to Integrating Spire.XLS for JavaScript in a React Project. The examples below assume Spire.XLS is installed and the WebAssembly module is initialized.
Adjust Excel Page Margins
Page margins define the blank space around the edges of a printed worksheet. The steps are as follows:
- Create a
Workbookobject usingnew xlsModule.Workbook(). - Get the default worksheet using the
workbook.Worksheets.get(index)method. - Access the
PageSetupobject throughsheet.PageSetup. - Set page margins using the
TopMargin,BottomMargin,LeftMargin, andRightMarginproperties. - Save the workbook to an Excel file using the
workbook.SaveToFile()method.
Below is a complete code example demonstrating how to adjust page margins in React:
function App() {
  const adjustPageMargins = async () => {
    // Get the Spire.XLS WASM module
    const xlsModule = window.wasmModule?.spirexls;

    // Check if the module is ready
    if (!xlsModule) {
      alert('Spire.Xls is not ready yet');
      return;
    }

    // Create a workbook and load the existing file
    await window.spire.FetchFileToVFS('Sample.xlsx', '', `${process.env.PUBLIC_URL}data/`);

    const workbook = new xlsModule.Workbook();
    workbook.LoadFromFile({ fileName: 'Sample.xlsx' });
    const sheet = workbook.Worksheets.get(0);

    // Get the PageSetup object
    const pageSetup = sheet.PageSetup;

    // Set the top, bottom, left, right, header, and footer margins
    pageSetup.TopMargin = 1;
    pageSetup.BottomMargin = 1;
    pageSetup.LeftMargin = 0.75;
    pageSetup.RightMargin = 0.75;

    // Save the workbook
    const outputFileName = 'AdjustMargins.xlsx';
    workbook.SaveToFile(outputFileName);
    workbook.Dispose();

    // Read the file from VFS and trigger download
    const fileArray = window.dotnetRuntime.Module.FS.readFile(outputFileName);
    const blob = new Blob([fileArray], { type: 'application/vnd.openxmlformats-officedocument.spreadsheetml.sheet' });
    const url = URL.createObjectURL(blob);
    const a = document.createElement('a');
    a.href = url;
    a.download = outputFileName;
    a.click();
    URL.revokeObjectURL(url);
  };

  return (
    <div style={{ textAlign: 'center', height: '300px' }}>
      <h1>Adjust Page Margins</h1>
      <button onClick={adjustPageMargins}>
        Generate
      </button>
    </div>
  );
}

export default App;
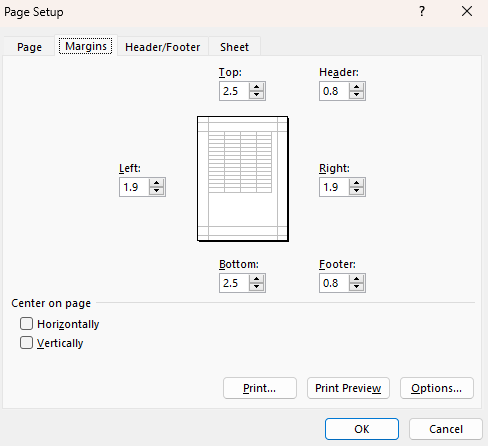
Page margins adjusted with Spire.XLS for JavaScript
Adjust Excel Page Orientation
Page orientation determines whether a worksheet is printed in portrait (vertical) or landscape (horizontal) layout. Landscape orientation is especially useful for wide tables with many columns. The steps are as follows:
- Create a
Workbookobject usingnew xlsModule.Workbook(). - Get the default worksheet using the
workbook.Worksheets.get(index)method. - Access the
PageSetupobject throughsheet.PageSetup. - Set the page orientation using the
Orientationproperty. - Save the workbook to an Excel file using the
workbook.SaveToFile()method.
Below is a complete code example demonstrating how to set the page orientation to landscape in React:
function App() {
  const setPageOrientation = async () => {
    // Get the Spire.XLS WASM module
    const xlsModule = window.wasmModule?.spirexls;

    // Check if the module is ready
    if (!xlsModule) {
      alert('Spire.Xls is not ready yet');
      return;
    }

    // Create a workbook and load the existing file
    // Load the sample file into VFS
    await window.spire.FetchFileToVFS('Sample.xlsx', '', `${process.env.PUBLIC_URL}data/`);

    const workbook = new xlsModule.Workbook();
    workbook.LoadFromFile({ fileName: 'Sample.xlsx' });
    const sheet = workbook.Worksheets.get(0);

    // Set the page orientation to Landscape
    sheet.PageSetup.Orientation = xlsModule.PageOrientationType.Landscape;

    // Save the workbook
    const outputFileName = 'SetOrientation.xlsx';
    workbook.SaveToFile(outputFileName);
    workbook.Dispose();

    // Read the file from VFS and trigger download
    const fileArray = window.dotnetRuntime.Module.FS.readFile(outputFileName);
    const blob = new Blob([fileArray], { type: 'application/vnd.openxmlformats-officedocument.spreadsheetml.sheet' });
    const url = URL.createObjectURL(blob);
    const a = document.createElement('a');
    a.href = url;
    a.download = outputFileName;
    a.click();
    URL.revokeObjectURL(url);
  };

  return (
    <div style={{ textAlign: 'center', height: '300px' }}>
      <h1>Set Page Orientation</h1>
      <button onClick={setPageOrientation}>
        Generate
      </button>
    </div>
  );
}

export default App;
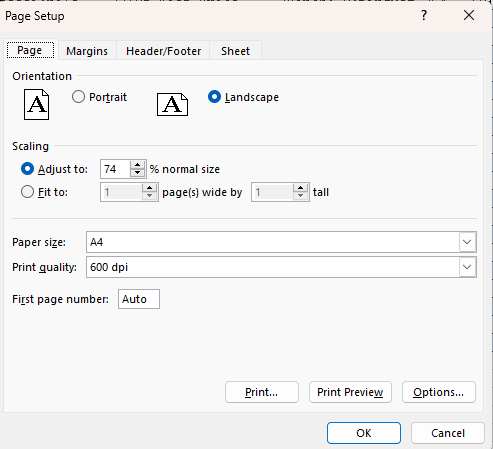
Page orientation set to landscape with Spire.XLS for JavaScript
Adjust Excel Paper Size
Different printers and regions use different standard paper sizes. Spire.XLS for JavaScript supports a wide range of paper sizes through the PaperSizeType enumeration, including A4, Letter, A3, and many more. The steps are as follows:
- Create a
Workbookobject usingnew xlsModule.Workbook(). - Get the default worksheet using the
workbook.Worksheets.get(index)method. - Access the
PageSetupobject throughsheet.PageSetup. - Set the paper size using the
PaperSizeproperty. - Save the workbook to an Excel file using the
workbook.SaveToFile()method.
Below is a complete code example demonstrating how to set the paper size to A3 in React:
function App() {
  const setPaperSize = async () => {
    // Get the Spire.XLS WASM module
    const xlsModule = window.wasmModule?.spirexls;

    // Check if the module is ready
    if (!xlsModule) {
      alert('Spire.Xls is not ready yet');
      return;
    }

    // Create a workbook and load the existing file
    // Load the sample file into VFS
    await window.spire.FetchFileToVFS('Sample.xlsx', '', `${process.env.PUBLIC_URL}data/`);

    const workbook = new xlsModule.Workbook();
    workbook.LoadFromFile({ fileName: 'Sample.xlsx' });
    const sheet = workbook.Worksheets.get(0);

    // Get the PageSetup object
    const pageSetup = sheet.PageSetup;

    // Set the paper size to A3
    pageSetup.PaperSize = xlsModule.PaperSizeType.PaperA3;

    // Save the workbook
    const outputFileName = 'SetPaperSize.xlsx';
    workbook.SaveToFile(outputFileName);
    workbook.Dispose();

    // Read the file from VFS and trigger download
    const fileArray = window.dotnetRuntime.Module.FS.readFile(outputFileName);
    const blob = new Blob([fileArray], { type: 'application/vnd.openxmlformats-officedocument.spreadsheetml.sheet' });
    const url = URL.createObjectURL(blob);
    const a = document.createElement('a');
    a.href = url;
    a.download = outputFileName;
    a.click();
    URL.revokeObjectURL(url);
  };

  return (
    <div style={{ textAlign: 'center', height: '300px' }}>
      <h1>Set Paper Size</h1>
      <button onClick={setPaperSize}>
        Generate
      </button>
    </div>
  );
}

export default App;
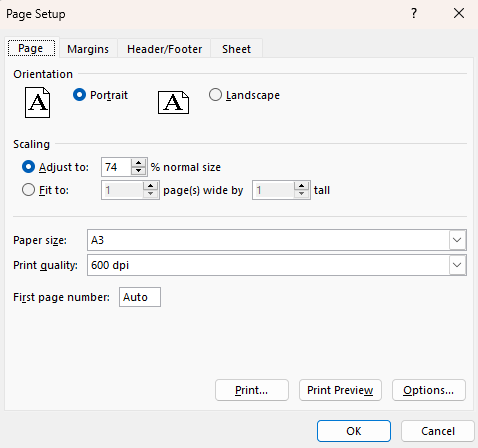
Paper size set to A3 with Spire.XLS for JavaScript
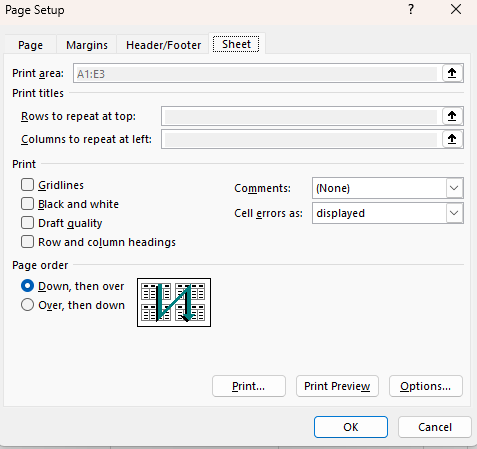
Adjust Excel Print Area
The print area defines which portion of a worksheet will be printed. The steps are as follows:
- Create a
Workbookobject usingnew xlsModule.Workbook(). - Get the default worksheet using the
workbook.Worksheets.get(index)method. - Populate sample data using the
sheet.Rangeproperty. - Access the
PageSetupobject throughsheet.PageSetup. - Set the print area using the
PrintAreaproperty. - Save the workbook to an Excel file using the
workbook.SaveToFile()method.
Below is a complete code example demonstrating how to set the print area in React:
function App() {
  const setPrintArea = async () => {
    // Get the Spire.XLS WASM module
    const xlsModule = window.wasmModule?.spirexls;

    // Check if the module is ready
    if (!xlsModule) {
      alert('Spire.Xls is not ready yet');
      return;
    }

    // Create a workbook and load the existing file
    // Load the sample file into VFS
    await window.spire.FetchFileToVFS('Sample.xlsx', '', `${process.env.PUBLIC_URL}data/`);

    const workbook = new xlsModule.Workbook();
    workbook.LoadFromFile({ fileName: 'Sample.xlsx' });
    const sheet = workbook.Worksheets.get(0);

    // Set the print area to A1:E3
    sheet.PageSetup.PrintArea = "A1:E3";

    // Save the workbook
    const outputFileName = 'SetPrintArea.xlsx';
    workbook.SaveToFile(outputFileName);
    workbook.Dispose();

    // Read the file from VFS and trigger download
    const fileArray = window.dotnetRuntime.Module.FS.readFile(outputFileName);
    const blob = new Blob([fileArray], { type: 'application/vnd.openxmlformats-officedocument.spreadsheetml.sheet' });
    const url = URL.createObjectURL(blob);
    const a = document.createElement('a');
    a.href = url;
    a.download = outputFileName;
    a.click();
    URL.revokeObjectURL(url);
  };

  return (
    <div style={{ textAlign: 'center', height: '300px' }}>
      <h1>Set Print Area</h1>
      <button onClick={setPrintArea}>
        Generate
      </button>
    </div>
  );
}

export default App;
Print area set with Spire.XLS for JavaScript
Adjust Excel Zoom Scale
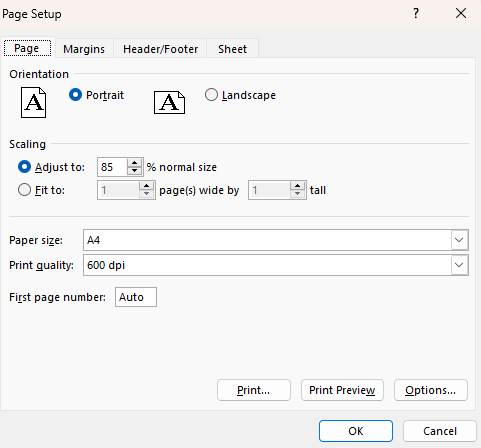
The zoom scale controls the magnification level at which a worksheet is displayed on screen. The value ranges from 10 to 400, representing a percentage of normal size. The steps are as follows:
- Create a
Workbookobject usingnew xlsModule.Workbook(). - Get the default worksheet using the
workbook.Worksheets.get(index)method. - Set the zoom scale using the
Zoomproperty. - Save the workbook to an Excel file using the
workbook.SaveToFile()method.
Below is a complete code example demonstrating how to set the zoom scale in React:
function App() {
  const setZoomScale = async () => {
    // Get the Spire.XLS WASM module
    const xlsModule = window.wasmModule?.spirexls;

    // Check if the module is ready
    if (!xlsModule) {
      alert('Spire.Xls is not ready yet');
      return;
    }

    // Create a workbook and load the existing file
    // Load the sample file into VFS
    await window.spire.FetchFileToVFS('Sample.xlsx', '', `${process.env.PUBLIC_URL}data/`);

    const workbook = new xlsModule.Workbook();
    workbook.LoadFromFile({ fileName: 'Sample.xlsx' });
    const sheet = workbook.Worksheets.get(0);

    // Set the zoom scale to 85%
    const pageSetup = sheet.PageSetup;
    pageSetup.Zoom = 85;

    // Save the workbook
    const outputFileName = 'SetZoomScale.xlsx';
    workbook.SaveToFile(outputFileName);
    workbook.Dispose();

    // Read the file from VFS and trigger download
    const fileArray = window.dotnetRuntime.Module.FS.readFile(outputFileName);
    const blob = new Blob([fileArray], { type: 'application/vnd.openxmlformats-officedocument.spreadsheetml.sheet' });
    const url = URL.createObjectURL(blob);
    const a = document.createElement('a');
    a.href = url;
    a.download = outputFileName;
    a.click();
    URL.revokeObjectURL(url);
  };

  return (
    <div style={{ textAlign: 'center', height: '300px' }}>
      <h1>Set Zoom Scale</h1>
      <button onClick={setZoomScale}>
        Generate
      </button>
    </div>
  );
}

export default App;
Zoom scale set to 85% with Spire.XLS for JavaScript
Fit Excel Table to 1 Page
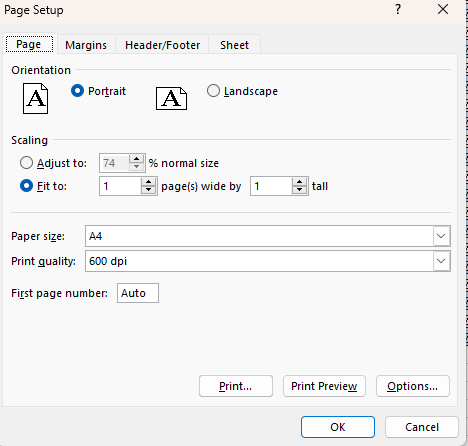
When printing a large worksheet, the content may span multiple pages, making it difficult to read. The steps are as follows:
- Create a
Workbookobject usingnew xlsModule.Workbook(). - Get the default worksheet using the
workbook.Worksheets.get(index)method. - Populate sample data using the
sheet.Rangeproperty. - Access the
PageSetupobject throughsheet.PageSetup. - Set the fit-to-page properties using the
FitToPagesTallandFitToPagesWideproperties. - Save the workbook to an Excel file using the
workbook.SaveToFile()method.
Below is a complete code example demonstrating how to fit a worksheet to one page in React:
function App() {
  const fitToPage = async () => {
    // Get the Spire.XLS WASM module
    const xlsModule = window.wasmModule?.spirexls;

    // Check if the module is ready
    if (!xlsModule) {
      alert('Spire.Xls is not ready yet');
      return;
    }

    // Create a workbook and load the existing file
    // Load the sample file into VFS
    await window.spire.FetchFileToVFS('Sample.xlsx', '', `${process.env.PUBLIC_URL}data/`);

    const workbook = new xlsModule.Workbook();
    workbook.LoadFromFile({ fileName: 'Sample.xlsx' });
    const sheet = workbook.Worksheets.get(0);

    // Fit the worksheet content to 1 page
    const pageSetup = sheet.PageSetup;
    pageSetup.FitToPagesTall = 1;
    pageSetup.FitToPagesWide = 1;

    // Save the workbook
    const outputFileName = 'FitToPage.xlsx';
    workbook.SaveToFile(outputFileName);
    workbook.Dispose();

    // Read the file from VFS and trigger download
    const fileArray = window.dotnetRuntime.Module.FS.readFile(outputFileName);
    const blob = new Blob([fileArray], { type: 'application/vnd.openxmlformats-officedocument.spreadsheetml.sheet' });
    const url = URL.createObjectURL(blob);
    const a = document.createElement('a');
    a.href = url;
    a.download = outputFileName;
    a.click();
    URL.revokeObjectURL(url);
  };

  return (
    <div style={{ textAlign: 'center', height: '300px' }}>
      <h1>Fit Worksheet to 1 Page</h1>
      <button onClick={fitToPage}>
        Generate
      </button>
    </div>
  );
}

export default App;
Worksheet scaled to fit one page with Spire.XLS for JavaScript
FAQ
How to print gridlines or row/column headings
Cause: By default, gridlines and row/column headings are not printed, which can make the data harder to read on paper.
Solution: Use the IsPrintGridlines and IsPrintHeadings properties of the PageSetup object:
pageSetup.IsPrintGridlines = true;
pageSetup.IsPrintHeadings = true;
How to get the actual page dimensions
Cause: You may need to know the actual width and height of the current paper size to adjust content layout.
Solution: Retrieve the values using the PageWidth and PageHeight properties of the PageSetup object:
var pageWidth = pageSetup.PageWidth;
var pageHeight = pageSetup.PageHeight;
Get a Free License
Spire.XLS for JavaScript offers a 30-day full-featured free trial license with no functional limitations. Apply here to evaluate before purchasing.
Adding charts to Excel files is one of the most common data visualization requirements in web applications. Spire.XLS for JavaScript runs entirely in the browser via WebAssembly, using a virtual file system (VFS) to manage input and output files — no backend server required. It supports creating a wide variety of chart types, including column charts, pie charts, doughnut charts, line charts, scatter charts, and more.
This article covers three core features:
For installation and project setup, refer to Integrating Spire.XLS for JavaScript in a React Project. The examples below assume Spire.XLS is installed and the WebAssembly module is initialized.
Create a Column Chart
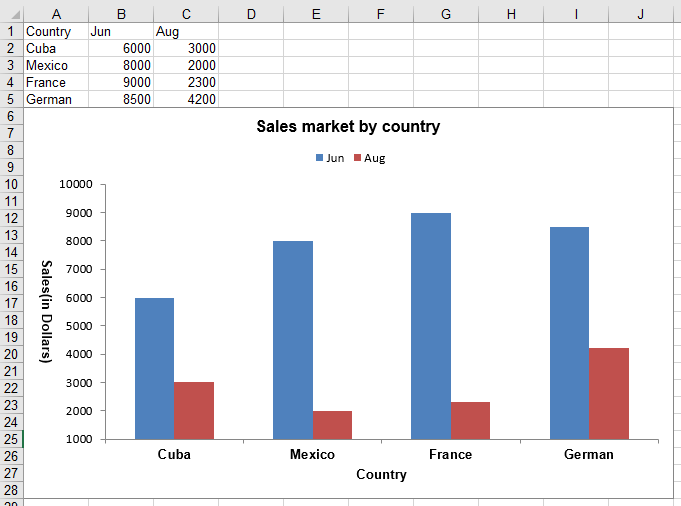
Column charts are one of the most commonly used chart types for comparing values across categories. With Spire.XLS for JavaScript, you can create a clustered column chart by first populating a worksheet with data, then adding a chart object, setting the chart type to ColumnClustered, and configuring the chart title, axes, and data labels. The steps are as follows:
- Create a
Workbookobject and get the default worksheet. - Populate the worksheet with category labels and numeric data.
- Add a chart to the worksheet using
sheet.Charts.Add(). - Set the chart's
DataRangeto the data range and specify the chart type asExcelChartType.ColumnClustered. - Configure the chart position, title, axis titles, and legend.
- Save the workbook to an Excel file using
SaveToFile().
Below is a complete code example demonstrating how to create a clustered column chart in React:
function App() {
  const createColumnChart = async () => {
    // Get the Spire.XLS WASM module
    const xlsModule = window.wasmModule?.spirexls;

    // Check if the module is ready
    if (!xlsModule) {
      alert('Spire.Xls is not ready yet');
      return;
    }

    // Create a new workbook and get the default worksheet
    const workbook = new xlsModule.Workbook();
    const sheet = workbook.Worksheets.get(0);
    sheet.Name = "ClusteredColumn";

    // Populate chart data
    sheet.Range.get("A1").Value = "Country";
    sheet.Range.get("A2").Value = "Cuba";
    sheet.Range.get("A3").Value = "Mexico";
    sheet.Range.get("A4").Value = "France";
    sheet.Range.get("A5").Value = "German";

    sheet.Range.get("B1").Value = "Jun";
    sheet.Range.get("B2").NumberValue = 6000;
    sheet.Range.get("B3").NumberValue = 8000;
    sheet.Range.get("B4").NumberValue = 9000;
    sheet.Range.get("B5").NumberValue = 8500;

    sheet.Range.get("C1").Value = "Aug";
    sheet.Range.get("C2").NumberValue = 3000;
    sheet.Range.get("C3").NumberValue = 2000;
    sheet.Range.get("C4").NumberValue = 2300;
    sheet.Range.get("C5").NumberValue = 4200;

    // Add a chart and set its data range
    const chart = sheet.Charts.Add();
    chart.DataRange = sheet.Range.get("A1:C5");
    chart.SeriesDataFromRange = false;

    // Set the chart position
    chart.LeftColumn = 1;
    chart.TopRow = 6;
    chart.RightColumn = 11;
    chart.BottomRow = 29;

    // Set the chart type to clustered column
    chart.ChartType = xlsModule.ExcelChartType.ColumnClustered;

    // Configure chart title
    chart.ChartTitle = "Sales market by country";
    chart.ChartTitleArea.IsBold = true;
    chart.ChartTitleArea.Size = 12;

    // Configure axis titles
    chart.PrimaryCategoryAxis.Title = "Country";
    chart.PrimaryCategoryAxis.Font.IsBold = true;
    chart.PrimaryCategoryAxis.TitleArea.IsBold = true;

    chart.PrimaryValueAxis.Title = "Sales(in Dollars)";
    chart.PrimaryValueAxis.HasMajorGridLines = false;
    chart.PrimaryValueAxis.MinValue = 1000;
    chart.PrimaryValueAxis.TitleArea.IsBold = true;
    chart.PrimaryValueAxis.TitleArea.TextRotationAngle = 90;

    // Configure data labels: show numeric value on each data point
    for (let i = 0; i < chart.Series.Length; i++) {
      let cs = chart.Series.get(i);
      cs.Format.Options.IsVaryColor = true;
      cs.DataPoints.DefaultDataPoint.DataLabels.HasValue = true; // Show value labels
    }

    // Set legend position
    chart.Legend.Position = xlsModule.LegendPositionType.Top;

    // Save the workbook
    const outputFileName = 'ClusteredColumn.xlsx';
    workbook.SaveToFile(outputFileName);
    workbook.Dispose();

    // Read the file from VFS and trigger download
    const fileArray = window.dotnetRuntime.Module.FS.readFile(outputFileName);
    const blob = new Blob([fileArray], { type: 'application/vnd.openxmlformats-officedocument.spreadsheetml.sheet' });
    const url = URL.createObjectURL(blob);
    const a = document.createElement('a');
    a.href = url;
    a.download = outputFileName;
    a.click();
    URL.revokeObjectURL(url);
  };

  return (
    <div style={{ textAlign: 'center', height: '300px' }}>
      <h1>Create Clustered Column Chart</h1>
      <button onClick={createColumnChart}>
        Generate
      </button>
    </div>
  );
}

export default App;
Clustered column chart created with Spire.XLS for JavaScript
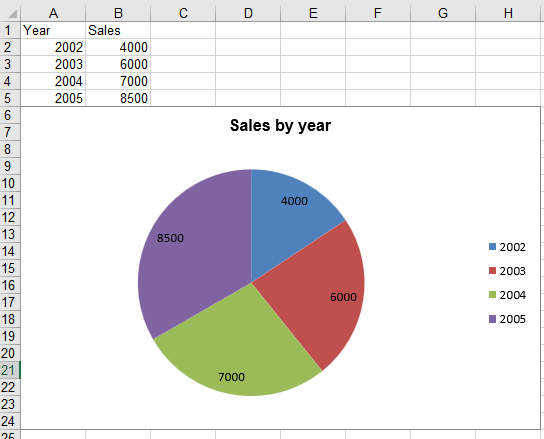
Create a Pie Chart
Pie charts are ideal for displaying the proportional distribution of data across categories. With Spire.XLS for JavaScript, you can create a pie chart by specifying the chart type as Pie when adding the chart, then binding category labels and data values. The steps are as follows:
- Create a
Workbookobject and get the default worksheet. - Populate the worksheet with category labels and numeric values.
- Add a chart with
ExcelChartType.Pieusingsheet.Charts.Add(). - Set the chart data range and bind category labels and values.
- Configure the chart position, title, and data labels.
- Save the workbook to an Excel file using
SaveToFile().
Below is a complete code example demonstrating how to create a pie chart in React:
function App() {
  const createPieChart = async () => {
    // Get the Spire.XLS WASM module
    const xlsModule = window.wasmModule?.spirexls;

    // Check if the module is ready
    if (!xlsModule) {
      alert('Spire.Xls is not ready yet');
      return;
    }

    // Create a new workbook and get the default worksheet
    const workbook = new xlsModule.Workbook();
    let sheet = workbook.Worksheets.get(0);
    sheet.Name = "Pie Chart";

    // Populate chart data
    sheet.Range.get("A1").Value = "Year";
    sheet.Range.get("A2").Value = "2002";
    sheet.Range.get("A3").Value = "2003";
    sheet.Range.get("A4").Value = "2004";
    sheet.Range.get("A5").Value = "2005";

    sheet.Range.get("B1").Value = "Sales";
    sheet.Range.get("B2").NumberValue = 4000;
    sheet.Range.get("B3").NumberValue = 6000;
    sheet.Range.get("B4").NumberValue = 7000;
    sheet.Range.get("B5").NumberValue = 8500;

    // Add a pie chart
    let chart = sheet.Charts.Add({ chartType: xlsModule.ExcelChartType.Pie });
    chart.DataRange = sheet.Range.get("B2:B5");
    chart.SeriesDataFromRange = false;

    // Set the chart position
    chart.LeftColumn = 1;
    chart.TopRow = 6;
    chart.RightColumn = 9;
    chart.BottomRow = 25;

    // Configure chart title
    chart.ChartTitle = "Sales by year";
    chart.ChartTitleArea.IsBold = true;
    chart.ChartTitleArea.Size = 12;

    // Bind category labels and values
    let cs = chart.Series.get(0);
    cs.CategoryLabels = sheet.Range.get("A2:A5");
    cs.Values = sheet.Range.get("B2:B5");
    cs.DataPoints.DefaultDataPoint.DataLabels.HasValue = true; // Show value labels

    chart.PlotArea.Fill.Visible = false;

    // Save the workbook
    const outputFileName = 'Pie.xlsx';
    workbook.SaveToFile(outputFileName);
    workbook.Dispose();

    // Read the file from VFS and trigger download
    const fileArray = window.dotnetRuntime.Module.FS.readFile(outputFileName);
    const blob = new Blob([fileArray], { type: 'application/vnd.openxmlformats-officedocument.spreadsheetml.sheet' });
    const url = URL.createObjectURL(blob);
    const a = document.createElement('a');
    a.href = url;
    a.download = outputFileName;
    a.click();
    URL.revokeObjectURL(url);
  };

  return (
    <div style={{ textAlign: 'center', height: '300px' }}>
      <h1>Create Pie Chart</h1>
      <button onClick={createPieChart}>
        Generate
      </button>
    </div>
  );
}

export default App;
Pie chart created with Spire.XLS for JavaScript
Create a Doughnut Chart
A doughnut chart is similar to a pie chart but with a hollow center, which can display multiple data series. With Spire.XLS for JavaScript, you can create a doughnut chart by setting the chart type to Doughnut and configuring percentage data labels. The steps are as follows:
- Create a
Workbookobject and get the default worksheet. - Populate the worksheet with category labels and numeric values.
- Add a chart and set its
ChartTypetoExcelChartType.Doughnut. - Configure the chart position, title, and percentage data labels.
- Save the workbook to an Excel file using
SaveToFile().
Below is a complete code example demonstrating how to create a doughnut chart in React:
function App() {
  const createDoughnutChart = async () => {
    // Get the Spire.XLS WASM module
    const xlsModule = window.wasmModule?.spirexls;

    // Check if the module is ready
    if (!xlsModule) {
      alert('Spire.Xls is not ready yet');
      return;
    }

    // Create a new workbook and get the default worksheet
    const workbook = new xlsModule.Workbook();
    let sheet = workbook.Worksheets.get(0);

    // Populate chart data
    sheet.Range.get("A1").Value = "Country";
    sheet.Range.get("A1").Style.Font.IsBold = true;
    sheet.Range.get("A2").Value = "Cuba";
    sheet.Range.get("A3").Value = "Mexico";
    sheet.Range.get("A4").Value = "France";
    sheet.Range.get("A5").Value = "German";
    sheet.Range.get("B1").Value = "Sales";
    sheet.Range.get("B1").Style.Font.IsBold = true;
    sheet.Range.get("B2").NumberValue = 6000;
    sheet.Range.get("B3").NumberValue = 8000;
    sheet.Range.get("B4").NumberValue = 9000;
    sheet.Range.get("B5").NumberValue = 8500;

    // Add a doughnut chart
    let chart = sheet.Charts.Add();
    chart.ChartType = xlsModule.ExcelChartType.Doughnut;
    chart.DataRange = sheet.Range.get("A1:B5");
    chart.SeriesDataFromRange = false;

    // Set the chart position
    chart.LeftColumn = 4;
    chart.TopRow = 2;
    chart.RightColumn = 12;
    chart.BottomRow = 22;

    // Configure chart title
    chart.ChartTitle = "Market share by country";
    chart.ChartTitleArea.IsBold = true;
    chart.ChartTitleArea.Size = 12;

    // Show percentage data labels
    for (let i = 0; i < chart.Series.Count; i++) {
      chart.Series.get(i).DataPoints.DefaultDataPoint.DataLabels.HasPercentage = true;
    }

    // Set legend position
    chart.Legend.Position = xlsModule.LegendPositionType.Top;

    // Save the workbook
    const outputFileName = 'CreateDoughnutChart.xlsx';
    workbook.SaveToFile(outputFileName);
    workbook.Dispose();

    // Read the file from VFS and trigger download
    const fileArray = window.dotnetRuntime.Module.FS.readFile(outputFileName);
    const blob = new Blob([fileArray], { type: 'application/vnd.openxmlformats-officedocument.spreadsheetml.sheet' });
    const url = URL.createObjectURL(blob);
    const a = document.createElement('a');
    a.href = url;
    a.download = outputFileName;
    a.click();
    URL.revokeObjectURL(url);
  };

  return (
    <div style={{ textAlign: 'center', height: '300px' }}>
      <h1>Create Doughnut Chart</h1>
      <button onClick={createDoughnutChart}>
        Generate
      </button>
    </div>
  );
}

export default App;
Doughnut chart created with Spire.XLS for JavaScript
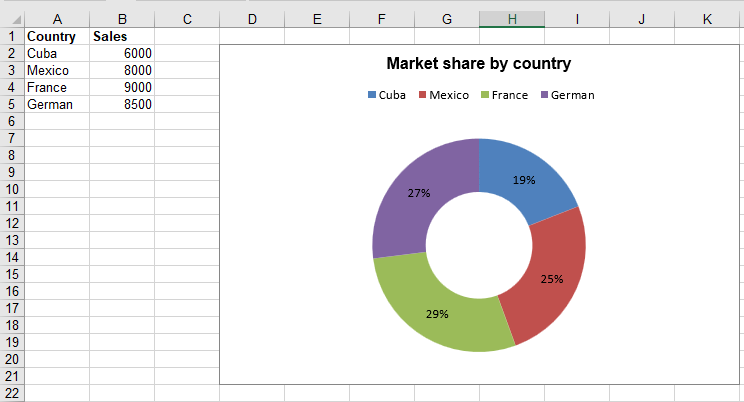
Chart Type Reference
The examples above covered column charts, pie charts, and doughnut charts. In addition, Spire.XLS supports all standard Excel chart types, which are defined in the Spire.Xls.ExcelChartType enumeration. The complete list of 81 chart types is as follows:
| Chart Type | Description |
|---|---|
| 1. ColumnClustered | Represents Clustered Column Chart |
| 2. ColumnStacked | Represents Stacked Column Chart |
| 3. Column100PercentStacked | Represents 100% Stacked Column Chart |
| 4. Column3DClustered | Represents 3D Clustered Column Chart |
| 5. Column3DStacked | Represents 3D Stacked Column Chart |
| 6. Column3D100PercentStacked | Represents 3D 100% Stacked Column Chart |
| 7. Column3D | Represents 3D Column Chart |
| 8. BarClustered | Represents Clustered Bar Chart |
| 9. BarStacked | Represents Stacked Bar Chart |
| 10. Bar100PercentStacked | Represents 100% Stacked Bar Chart |
| 11. Bar3DClustered | Represents 3D Clustered Bar Chart |
| 12. Bar3DStacked | Represents 3D Stacked Bar Chart |
| 13. Bar3D100PercentStacked | Represents 100% 3D Stacked Bar Chart |
| 14. Line | Represents Line Chart |
| 15. LineStacked | Represents Stacked Line Chart |
| 16. Line100PercentStacked | Represents 100% Stacked Line Chart |
| 17. LineMarkers | Represents Markers Line Chart |
| 18. LineMarkersStacked | Represents Stacked Markers Line Chart |
| 19. LineMarkers100PercentStacked | Represents 100% Stacked Markers Line Chart |
| 20. Line3D | Represents 3D Line Chart |
| 21. Pie | Represents Pie Chart |
| 22. Pie3D = 21 | Represents 3D Pie Chart |
| 23. PieOfPie | Represents Pie of Pie chart |
| 24. PieExploded | Represents Exploded Pie Chart |
| 25. Pie3DExploded | Represents 3D Exploded Pie Chart |
| 26. PieBar | Represents Bar Pie Chart |
| 27. ScatterMarkers | Represents Markers Scatter Chart |
| 28. ScatterSmoothedLineMarkers | Represents ScatterSmoothedLineMarkers Chart |
| 29. ScatterSmoothedLine | Represents ScatterSmoothedLine Chart |
| 30. ScatterLineMarkers | Represents ScatterLineMarkers Chart |
| 31. ScatterLine | Represents ScatterLine Chart |
| 32. Area | Represents Area Chart |
| 33. AreaStacked | Represents AreaStacked Chart |
| 34. Area100PercentStacked | Represents Area100PercentStacked Chart |
| 35. Area3D | Represents Area3D Chart |
| 36. Area3DStacked | Represents Area3DStacked Chart |
| 37. Area3D100PercentStacked | Represents Area3D100PercentStacked Chart |
| 38. Doughnut | Represents Doughnut Chart |
| 39. DoughnutExploded | Represents DoughnutExploded Chart |
| 40. Radar | Represents Radar Chart |
| 41. RadarMarkers | Represents RadarMarkers Chart |
| 42. RadarFilled | Represents RadarFilled Chart |
| 43. Surface3D | Represents Surface3D Chart |
| 44. Surface3DNoColor | Represents Surface3DNoColor Chart |
| 45. SurfaceContour | Represents SurfaceContour Chart |
| 46. SurfaceContourNoColor | Represents SurfaceContourNoColor Chart |
| 47. Bubble | Represents Bubble Chart |
| 48. Bubble3D | Represents Bubble3D Chart |
| 49. StockHighLowClose | Represents StockHighLowClose Chart |
| 50. StockOpenHighLowClose | Represents StockOpenHighLowClose Chart |
| 51. StockVolumeHighLowClose | Represents StockVolumeHighLowClose Chart |
| 52. StockVolumeOpenHighLowClose | Represents StockVolumeOpenHighLowClose Chart |
| 53. CylinderClustered | Represents CylinderClustered Chart |
| 54. CylinderStacked | Represents CylinderStacked Chart |
| 55. Cylinder100PercentStacked | Represents Cylinder100PercentStacked Chart |
| 56. CylinderBarClustered | Represents CylinderBarClustered Chart |
| 57. CylinderBarStacked | Represents CylinderBarStacked Chart |
| 58. CylinderBar100PercentStacked | Represents CylinderBar100PercentStacked Chart |
| 59. Cylinder3DClustered | Represents Cylinder3DClustered Chart |
| 60. ConeClustered | Represents ConeClustered Chart |
| 61. ConeStacked | Represents ConeStacked Chart |
| 62. Cone100PercentStacked | Represents Cone100PercentStacked Chart |
| 63. ConeBarClustered | Represents ConeBarClustered Chart |
| 64. ConeBarStacked | Represents ConeBarStacked Chart |
| 65. ConeBar100PercentStacked | Represents ConeBar100PercentStacked Chart |
| 66. Cone3DClustered | Represents Cone3DClustered Chart |
| 67. PyramidClustered | Represents PyramidClustered Chart |
| 68. PyramidStacked | Represents PyramidStacked Chart |
| 69. Pyramid100PercentStacked | Represents Pyramid100PercentStacked Chart |
| 70. PyramidBarClustered | Represents PyramidBarClustered Chart |
| 71. PyramidBarStacked | Represents PyramidBarStacked Chart |
| 72. PyramidBar100PercentStacked | Represents PyramidBar100PercentStacked Chart |
| 73. Pyramid3DClustered | Represents Pyramid3DClustered Chart |
| 74. CombinationChart | Represents Combination Chart |
| 75. Funnel | Represents Funnel Chart |
| 76. WaterFall | Represents Waterfall Chart |
| 77. BoxAndWhisker | Represents Box and Whisker Chart |
| 78. Histogram | Represents Histogram Chart |
| 79. Pareto | Represents Pareto Chart |
| 80. TreeMap | Represents Tree Map Chart |
| 81. SunBurst | Represents Sunburst Chart |
FAQ
How to show values or percentages on pie/doughnut chart labels
Solution: Choose the appropriate label property based on your needs:
// Show value labels
cs.DataPoints.DefaultDataPoint.DataLabels.HasValue = true; // Show value labels
// Or show percentage labels
cs.DataPoints.DefaultDataPoint.DataLabels.HasPercentage = true;
Legend in the generated Excel file is truncated or not fully displayed
Cause: The chart area is too small to accommodate all legend items, or the legend position setting causes overlap with the chart data area.
Solution: Increase the vertical range of the chart or adjust the legend position:
// Increase chart height
chart.BottomRow = 35;
// Or adjust legend position
chart.Legend.Position = xlsModule.LegendPositionType.Bottom;
Get a Free License
Spire.XLS for JavaScript offers a 30-day full-featured free trial license with no functional limitations. Apply here to evaluate before purchasing.
Detect and Remove Digital Signatures in Excel with JavaScript in React
2026-07-28 09:35:47 Written by jie zouDigital signatures ensure the authenticity of an Excel file's source and verify that its content has not been tampered with. Spire.XLS for JavaScript runs entirely in the browser via WebAssembly, using a virtual file system (VFS) to manage input and output files — no backend server required.
This article covers two core features:
For installation and project setup, refer to Integrating Spire.XLS for JavaScript in a React Project. The examples below assume Spire.XLS is installed and the WebAssembly module is initialized.
Detect Whether an Excel File Is Signed
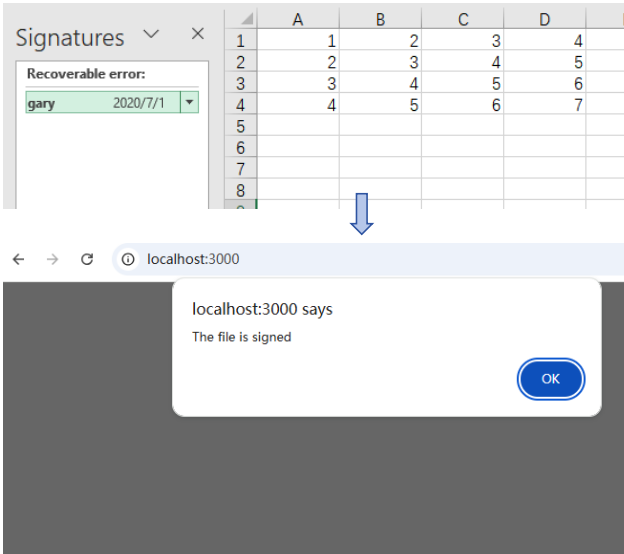
Before processing a signed Excel file, checking its signature status can prevent unintended operations. Spire.XLS provides the IsDigitallySigned property to determine whether a workbook contains digital signatures. The core process consists of three stages: first, load the font files and the target Excel file into the WASM virtual file system via FetchFileToVFS; then, instantiate a Workbook and load the file; finally, retrieve the signature status through the IsDigitallySigned property.
function App() {
  const detectDigitalSignature = async () => {
    // Get the Spire.XLS WASM module
    const xlsModule = window.wasmModule?.spirexls;

    // Check if the module is ready
    if (!xlsModule) {
      alert('Spire.Xls is not ready yet');
      return;
    }

    // Load fonts and Excel file into VFS
    await window.spire.FetchFileToVFS('arial.ttf', '/Library/Fonts/', `${process.env.PUBLIC_URL}/font/`);
    const inputFileName = 'Sample.xlsx';
    await window.spire.FetchFileToVFS(inputFileName, '', `${process.env.PUBLIC_URL}data/`);

    // Load the workbook
    const workbook = new xlsModule.Workbook();
    workbook.LoadFromFile({ fileName: inputFileName });

    // Detect if the workbook contains digital signatures
    const isSigned = workbook.IsDigitallySigned;

    // Dispose of the workbook object to release resources
    workbook.Dispose();

    // Show the detection result
    alert(isSigned ? 'The file is signed' : 'The file is not signed');
  };

  return (
    <div style={{ textAlign: 'center', height: '300px' }}>
      <h1>Detect Digital Signature</h1>
      <button onClick={detectDigitalSignature}>
        Detect
      </button>
    </div>
  );
}

export default App;
Detection result dialog showing whether the file is signed
Remove Digital Signatures from an Excel File
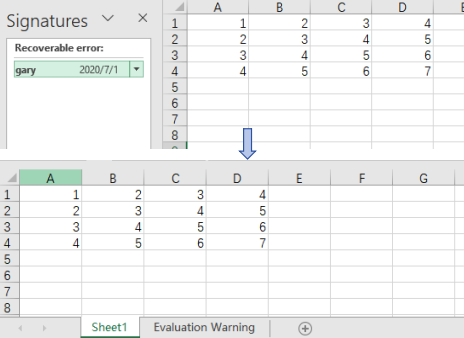
In cases where signature information needs to be updated, certificates replaced, or digital authentication canceled, the existing digital signatures must be removed from the Excel file. Using Spire.XLS, the core process consists of three stages: first, load the font files and the signed Excel file into the WASM virtual file system via FetchFileToVFS; then, instantiate a Workbook and load the file, calling RemoveAllDigitalSignatures to remove all digital signatures from the workbook at once; finally, save the workbook file with signatures removed via SaveToFile.
function App() {
  const removeDigitalSignatures = async () => {
    // Get the Spire.XLS WASM module
    const xlsModule = window.wasmModule?.spirexls;

    // Check if the module is ready
    if (!xlsModule) {
      alert('Spire.Xls is not ready yet');
      return;
    }

    // Load fonts and Excel file into VFS
    await window.spire.FetchFileToVFS('arial.ttf', '/Library/Fonts/', `${process.env.PUBLIC_URL}/font/`);
    const inputFileName = 'Sample.xlsx';
    await window.spire.FetchFileToVFS(inputFileName, '', `${process.env.PUBLIC_URL}data/`);

    // Load the signed workbook
    const workbook = new xlsModule.Workbook();
    workbook.LoadFromFile({ fileName: inputFileName });

    // Remove all digital signatures
    workbook.RemoveAllDigitalSignatures();

    // Save the workbook without signatures
    const outputFileName = 'SignatureRemoved.xlsx';
    workbook.SaveToFile({ fileName: outputFileName, version: xlsModule.ExcelVersion.Version2010 });

    // Dispose of the workbook object to release resources
    workbook.Dispose();

    // Read the file from VFS and trigger download
    const fileArray = window.dotnetRuntime.Module.FS.readFile(outputFileName);
    const blob = new Blob([fileArray], { type: 'application/vnd.openxmlformats-officedocument.spreadsheetml.sheet' });
    const url = URL.createObjectURL(blob);
    const a = document.createElement('a');
    a.href = url;
    a.download = outputFileName;
    a.click();
    URL.revokeObjectURL(url);
  };

  return (
    <div style={{ textAlign: 'center', height: '300px' }}>
      <h1>Remove Digital Signatures</h1>
      <button onClick={removeDigitalSignatures}>
        Remove Signatures
      </button>
    </div>
  );
}

export default App;
Output document after removing digital signatures
FAQ
Can I detect a signature on a specific worksheet instead of the entire workbook?
Cause: Digital signatures are applied to the entire workbook, not individual worksheets.
Solution: Digital signatures operate at the workbook level. It is not possible to detect or remove signatures on a single worksheet. Both IsDigitallySigned and RemoveAllDigitalSignatures are workbook-level methods.
How do I batch detect or remove signatures from multiple Excel files?
Cause: Real-world projects often involve processing large numbers of files, making manual processing inefficient.
Solution: Use a loop to process files in batch:
const files = ['report1.xlsx', 'report2.xlsx', 'report3.xlsx'];
for (const file of files) {
  await window.spire.FetchFileToVFS(file, '', dataPath);
  const wb = new xlsModule.Workbook();
  wb.LoadFromFile({ fileName: file });
  if (wb.IsDigitallySigned) {
    wb.RemoveAllDigitalSignatures();
  }
  wb.SaveToFile({ fileName: `unsigned_${file}`, version: xlsModule.ExcelVersion.Version2016 });
  wb.Dispose();
}
Get a Free License
Spire.XLS for JavaScript offers a 30-day full-featured free trial license with no functional limitations. Apply here to evaluate before purchasing.
Splitting Excel files into separate files by worksheet, by row, or by column is a common requirement for data distribution and management. Spire.XLS for JavaScript performs the splitting process entirely in the browser via WebAssembly, using a virtual file system (VFS) to manage input and output files — no backend server required.
This article covers three core features:
For installation and project setup, refer to Integrating Spire.XLS for JavaScript in a React Project. The examples below assume Spire.XLS is installed and the WebAssembly module is initialized.
Split by Worksheet
Splitting by worksheet exports each sheet in a multi-sheet workbook as an independent Excel file. When a workbook contains multiple worksheets, each representing different data such as separate departments or months, you can split each worksheet into its own file. Spire.XLS accomplishes this by iterating through all worksheets in the source file, creating new workbooks, and copying each sheet. The steps are as follows:
- Create a
Workbookobject and load the source Excel document withLoadFromFile(). - Iterate through all worksheets in the source document.
- Create a new
Workbookobject. - Copy the source worksheet to the default worksheet of the new workbook using the
CopyFrommethod. - Get the worksheet name via
sheet.Nameas the output file name. - Save the new workbook as an Excel file with
SaveToFile().
Below is a complete code example demonstrating how to split worksheets into separate Excel files:
function App() {
  const splitByWorksheet = async () => {
    // Get the Spire.XLS WASM module
    const xlsModule = window.wasmModule?.spirexls;

    // Check if the module is ready
    if (!xlsModule) {
      alert('Spire.Xls is not ready yet');
      return;
    }

    // Load fonts and the Excel file into VFS
    await window.spire.FetchFileToVFS('arial.ttf', '/Library/Fonts/', `${process.env.PUBLIC_URL}/font/`);
    const inputFileName = 'Sample.xlsx';
    await window.spire.FetchFileToVFS(inputFileName, '', `${process.env.PUBLIC_URL}data/`);

    // Load the workbook
    const workbook = new xlsModule.Workbook();
    workbook.LoadFromFile({ fileName: inputFileName });

    // Iterate through each worksheet and export it as a separate file
    for (let i = 0; i < workbook.Worksheets.Count; i++) {
      let sheet = workbook.Worksheets.get(i);

      // Create a new workbook and copy the current worksheet
      let newWorkbook = new xlsModule.Workbook();
      let newSheet = newWorkbook.Worksheets.get(0);
      newSheet.CopyFrom(sheet);

      // Use the worksheet name as the output file name
      const outputFileName = `${sheet.Name}.xlsx`;
      newWorkbook.SaveToFile({ fileName: outputFileName, version: xlsModule.ExcelVersion.Version2010 });
      newWorkbook.Dispose();

      // Read the split file from VFS and trigger a browser download
      const fileArray = window.dotnetRuntime.Module.FS.readFile(outputFileName);
      const blob = new Blob([fileArray], { type: 'application/vnd.openxmlformats-officedocument.spreadsheetml.sheet' });
      const url = URL.createObjectURL(blob);
      const a = document.createElement('a');
      a.href = url;
      a.download = outputFileName;
      a.click();
      URL.revokeObjectURL(url);
    }

    // Release resources
    workbook.Dispose();
  };

  return (
    <div style={{ textAlign: 'center', height: '300px' }}>
      <h1>Split Excel By Worksheet</h1>
      <button onClick={splitByWorksheet}>
        Generate
      </button>
    </div>
  );
}

export default App;
After splitting by worksheet, each resulting file contains a single worksheet from the original workbook
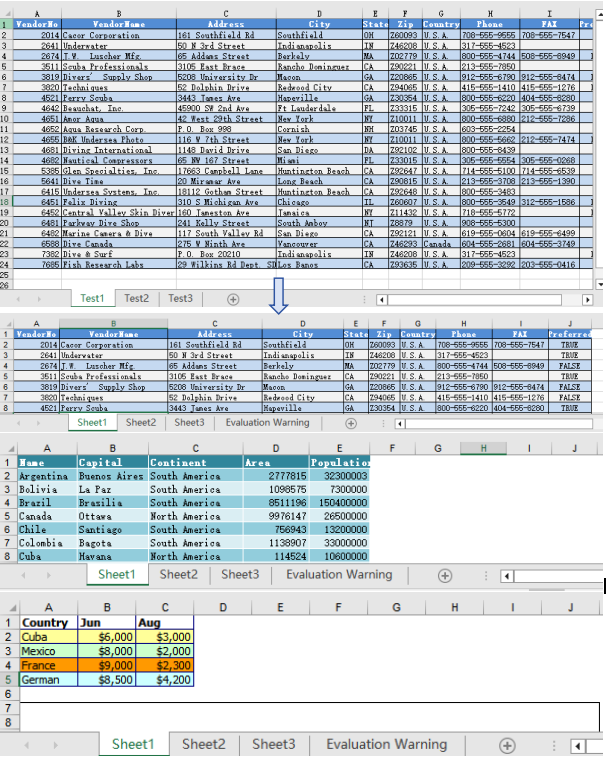
Split by Row
Splitting by row is suitable for breaking up large tables into multiple smaller files by a fixed number of rows, making pagination and distribution easier. When a worksheet contains a large amount of data rows that need to be split into multiple files, Spire.XLS accomplishes this by copying source rows one by one into a new workbook. The steps are as follows:
- Create a
Workbookobject, load the source Excel document withLoadFromFile(), and retrieve the first worksheet. - Create a new
Workbookobject. - Use a loop to call the
Copymethod row by row, copying specified rows from the source worksheet to the new worksheet. - Copy the column widths from the source worksheet to the new worksheet.
- Save the new workbook as an Excel file with
SaveToFile(). - Repeat the steps above to create more split files, copying the header row separately when needed.
Below is a complete code example demonstrating how to split a worksheet into multiple Excel files by row:
function App() {
  const splitByRow = async () => {
    // Get the Spire.XLS WASM module
    const xlsModule = window.wasmModule?.spirexls;

    // Check if the module is ready
    if (!xlsModule) {
      alert('Spire.Xls is not ready yet');
      return;
    }

    // Load fonts and the Excel file into VFS
    await window.spire.FetchFileToVFS('arial.ttf', '/Library/Fonts/', `${process.env.PUBLIC_URL}/font/`);
    const inputFileName = 'Sample.xlsx';
    await window.spire.FetchFileToVFS(inputFileName, '', `${process.env.PUBLIC_URL}data/`);

    // Load the workbook and get the first worksheet
    const workbook = new xlsModule.Workbook();
    workbook.LoadFromFile({ fileName: inputFileName });
    const sheet = workbook.Worksheets.get(0);

    // Create a new workbook (comes with one default worksheet)
    let newWorkbook1 = new xlsModule.Workbook();
    let newSheet1 = newWorkbook1.Worksheets.get(0);

    // Copy rows 1-5 to the target file
    let destRow = 1;
    for (let i = 0; i < 5; i++) {
      sheet.Copy({
        sourceRange: sheet.Rows[i],
        worksheet: newSheet1,
        destRow: destRow,
        destColumn: 1,
        copyStyle: true
      });
      destRow++;
    }

    // Copy column widths
    for (let c = 0; c < sheet.Columns.length; c++) {
      newSheet1.SetColumnWidth(c + 1, sheet.GetColumnWidth(c + 1));
    }

    // Save the first split file
    const outputFileName1 = "Rows1-5.xlsx";
    newWorkbook1.SaveToFile({ fileName: outputFileName1, version: xlsModule.ExcelVersion.Version2010 });
    newWorkbook1.Dispose();

    // Read file data from VFS
    const fileData1 = window.dotnetRuntime.Module.FS.readFile(outputFileName1);

    // Create a second new workbook
    let newWorkbook2 = new xlsModule.Workbook();
    let newSheet2 = newWorkbook2.Worksheets.get(0);

    destRow = 1;

    // Copy the header row
    sheet.Copy({
      sourceRange: sheet.Rows[0],
      worksheet: newSheet2,
      destRow: destRow,
      destColumn: 1,
      copyStyle: true
    });
    destRow++;

    // Copy rows 6-10 to the second target file
    for (let i = 5; i < 10; i++) {
      sheet.Copy({
        sourceRange: sheet.Rows[i],
        worksheet: newSheet2,
        destRow: destRow,
        destColumn: 1,
        copyStyle: true
      });
      destRow++;
    }

    // Copy column widths
    for (let c = 0; c < sheet.Columns.length; c++) {
      newSheet2.SetColumnWidth(c + 1, sheet.GetColumnWidth(c + 1));
    }

    // Save the second split file
    const outputFileName2 = "Rows6-10.xlsx";
    newWorkbook2.SaveToFile({ fileName: outputFileName2, version: xlsModule.ExcelVersion.Version2010 });
    newWorkbook2.Dispose();

    // Read file data from VFS
    const fileData2 = window.dotnetRuntime.Module.FS.readFile(outputFileName2);

    // Package the split files into a ZIP for download
    const zip = new JSZip();
    zip.file(outputFileName1, fileData1);
    zip.file(outputFileName2, fileData2);
    const zipBlob = await zip.generateAsync({ type: 'blob' });
    const zipUrl = URL.createObjectURL(zipBlob);
    const a = document.createElement('a');
    a.href = zipUrl;
    a.download = "SplitByRows.zip";
    a.click();
    URL.revokeObjectURL(zipUrl);

    // Release resources
    workbook.Dispose();
  };

  return (
    <div style={{ textAlign: 'center', height: '300px' }}>
      <h1>Split Excel By Row</h1>
      <button onClick={splitByRow}>
        Generate
      </button>
    </div>
  );
}

export default App;
After splitting by row, each file contains the header row and the specified number of data rows
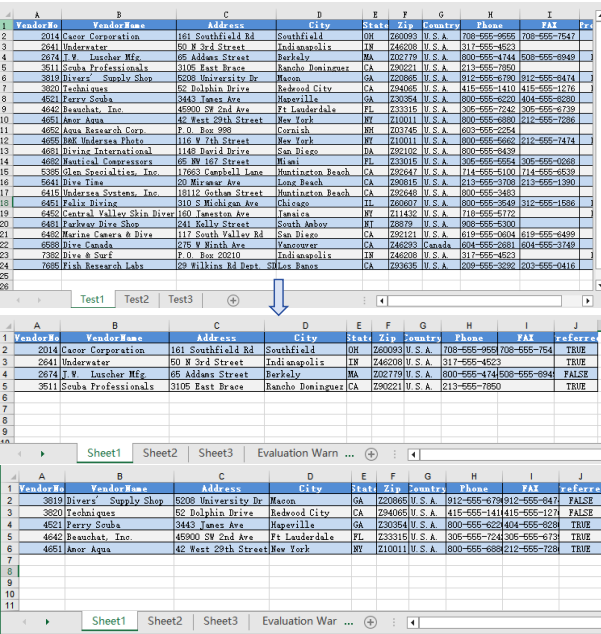
Split by Column
Splitting by column is suitable for breaking up wide tables into multiple files by column groups, making the data structure clearer. When a worksheet contains many columns and you need to split different column groups into separate files, Spire.XLS accomplishes this by copying source columns one by one into a new workbook. The steps are as follows:
- Create a
Workbookobject, load the source Excel document withLoadFromFile(), and retrieve the first worksheet. - Create a new
Workbookobject. - Use a loop to call the
Copymethod column by column, copying specified columns from the source worksheet to the new worksheet. - Copy the column widths from the source worksheet to the new worksheet.
- Save the new workbook as an Excel file with
SaveToFile(). - Repeat the steps above to create more split files.
Below is a complete code example demonstrating how to split a worksheet into multiple Excel files by column:
function App() {
  const splitByColumn = async () => {
    // Get the Spire.XLS WASM module
    const xlsModule = window.wasmModule?.spirexls;

    // Check if the module is ready
    if (!xlsModule) {
      alert('Spire.Xls is not ready yet');
      return;
    }

    // Load fonts and the Excel file into VFS
    await window.spire.FetchFileToVFS('arial.ttf', '/Library/Fonts/', `${process.env.PUBLIC_URL}/font/`);
    const inputFileName = 'Sample.xlsx';
    await window.spire.FetchFileToVFS(inputFileName, '', `${process.env.PUBLIC_URL}data/`);

    // Load the workbook and get the first worksheet
    const workbook = new xlsModule.Workbook();
    workbook.LoadFromFile({ fileName: inputFileName });
    const sheet = workbook.Worksheets.get(0);

    // Create a new workbook and copy columns 1-2 (columns A-B) to the new file
    let newWorkbook1 = new xlsModule.Workbook();
    let newSheet1 = newWorkbook1.Worksheets.get(0);

    for (let i = 1; i <= 2; i++) {
      sheet.Copy({
        sourceRange: sheet.Columns[i - 1],
        worksheet: newSheet1,
        destRow: 1,
        destColumn: i,
        copyStyle: true
      });
    }

    // Copy column widths
    for (let i = 1; i <= 2; i++) {
      newSheet1.SetColumnWidth(i, sheet.GetColumnWidth(i));
    }

    // Save the first split file
    const outputFileName1 = "ColumnsAB.xlsx";
    newWorkbook1.SaveToFile({ fileName: outputFileName1, version: xlsModule.ExcelVersion.Version2010 });
    newWorkbook1.Dispose();

    // Read file data from VFS
    const fileData1 = window.dotnetRuntime.Module.FS.readFile(outputFileName1);

    // Create a second new workbook and copy columns 3-4 (columns C-D) to the new file
    let newWorkbook2 = new xlsModule.Workbook();
    let newSheet2 = newWorkbook2.Worksheets.get(0);

    for (let i = 3; i <= 4; i++) {
      sheet.Copy({
        sourceRange: sheet.Columns[i - 1],
        worksheet: newSheet2,
        destRow: 1,
        destColumn: i - 2,
        copyStyle: true
      });
    }

    // Copy column widths
    for (let i = 3; i <= 4; i++) {
      newSheet2.SetColumnWidth(i - 2, sheet.GetColumnWidth(i));
    }

    // Save the second split file
    const outputFileName2 = "ColumnsCD.xlsx";
    newWorkbook2.SaveToFile({ fileName: outputFileName2, version: xlsModule.ExcelVersion.Version2010 });
    newWorkbook2.Dispose();

    // Read file data from VFS
    const fileData2 = window.dotnetRuntime.Module.FS.readFile(outputFileName2);

    // Package the split files into a ZIP for download
    const zip = new JSZip();
    zip.file(outputFileName1, fileData1);
    zip.file(outputFileName2, fileData2);
    const zipBlob = await zip.generateAsync({ type: 'blob' });
    const zipUrl = URL.createObjectURL(zipBlob);
    const a = document.createElement('a');
    a.href = zipUrl;
    a.download = "SplitByColumns.zip";
    a.click();
    URL.revokeObjectURL(zipUrl);

    // Release resources
    workbook.Dispose();
  };

  return (
    <div style={{ textAlign: 'center', height: '300px' }}>
      <h1>Split Excel By Column</h1>
      <button onClick={splitByColumn}>
        Generate
      </button>
    </div>
  );
}

export default App;
After splitting by column, each file contains a portion of the columns from the original worksheet
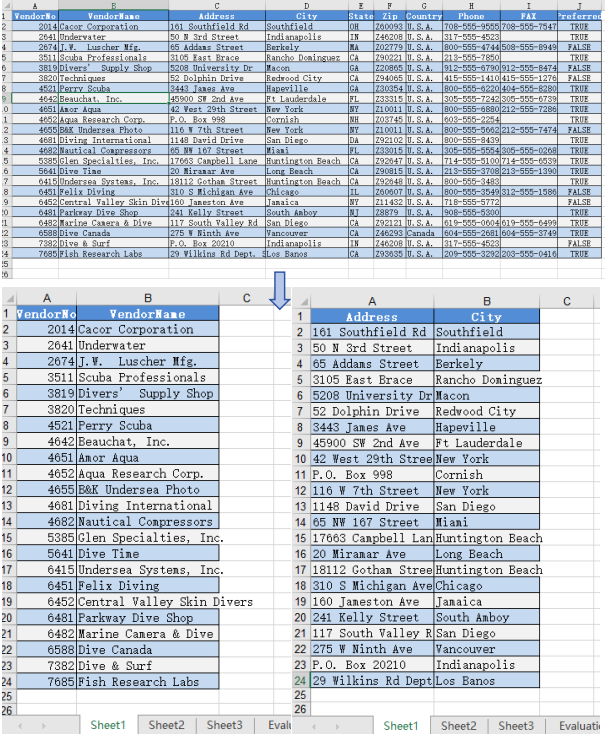
FAQ
Worksheet name shows as default (Sheet1) instead of the original name
Cause: The CopyFrom method only copies worksheet content — it does not retain the original worksheet name. The new workbook's default worksheet keeps its default name.
Solution: Manually set the worksheet name after copying using newSheet.Name = sheet.Name:
let newSheet = newWorkbook.Worksheets.get(0);
newSheet.CopyFrom(sheet);
newSheet.Name = sheet.Name;
VFS file loading fails or path is incorrect
Cause: The file path or VFS file name is incorrect, or the required font files have not been loaded into VFS, causing the workbook to fail to load.
Solution: Verify that the FetchFileToVFS parameters use the correct paths. The font file path should be /Library/Fonts/, and ensure the font file name matches exactly (e.g., arial.ttf):
await window.spire.FetchFileToVFS('arial.ttf', '/Library/Fonts/', fontSourcePath);
Get a Free License
Spire.XLS for JavaScript offers a 30-day full-featured free trial license with no functional limitations. Apply here to evaluate before purchasing.
Copying worksheets is one of the most common and efficient operations in everyday Excel document processing — whether you are quickly creating similar reports from a template or consolidating data across multiple documents. Spire.XLS for JavaScript handles this entirely in the browser via WebAssembly, using a virtual file system (VFS) to manage input and output files — no backend server required.
This article covers three core features:
- Copy a worksheet within the same workbook
- Copy a worksheet across workbooks
- Copy a selected cell range
For installation and project setup, refer to Integrating Spire.XLS for JavaScript in a React Project. The examples below assume Spire.XLS is installed and the WebAssembly module is initialized.
Copy a Worksheet Within the Same Workbook
Duplicating a worksheet within the same workbook is a frequent development task — for example, quickly creating next month's report copy from a monthly template. Spire.XLS for JavaScript provides the CopyFrom method to duplicate a worksheet. The copied sheet retains all content from the source worksheet, including data, styles, fonts, colors, borders, column widths, and row heights.
function App() {
  const sheetToSVG = async () => {
    // Get the Spire.XLS WASM module
    const xlsModule = window.wasmModule?.spirexls;

    // Check if the module is ready
    if (!xlsModule) {
      alert('Spire.Xls is not ready yet');
      return;
    }

    // Load fonts and the Excel file into VFS
    await window.spire.FetchFileToVFS('ARIAL.TTF', '/Library/Fonts/', `${process.env.PUBLIC_URL}/font/`);
    const inputFileName = 'Sample.xlsx';
    await window.spire.FetchFileToVFS(inputFileName, '', `${process.env.PUBLIC_URL}data/`);

    // Load the workbook
    const workbook = new xlsModule.Workbook();
    workbook.LoadFromFile({ fileName: inputFileName });

    // Get the first worksheet
    let sheet = workbook.Worksheets.get(0);

    // Add a new worksheet
    let sheet1 = workbook.Worksheets.Add("MySheet");

    // Copy the first worksheet into the newly added sheet
    sheet1.CopyFrom(sheet);

    const outputFileName = "CopySheetWithinWorkbook_output.xlsx";
    workbook.SaveToFile({ fileName: outputFileName });

    // Release the workbook object to free resources
    workbook.Dispose();

    // Read the converted file from VFS and trigger download
    const fileArray = window.dotnetRuntime.Module.FS.readFile(outputFileName);
    const blob = new Blob([fileArray], { type: "application/vnd.openxmlformats-officedocument.spreadsheetml.sheet" });
    const url = URL.createObjectURL(blob);
    const a = document.createElement('a');
    a.href = url;
    a.download = outputFileName;
    a.click();
    URL.revokeObjectURL(url);
  };

  return (
    <div style={{ textAlign: 'center', height: '300px' }}>
      <h1>Copy Worksheet Within Workbook</h1>
      <button onClick={sheetToSVG}>
        Start
      </button>
    </div>
  );
}

export default App;
When using CopyFrom, data, styles, fonts, colors, borders, and column widths from the source worksheet are fully preserved in the new sheet.
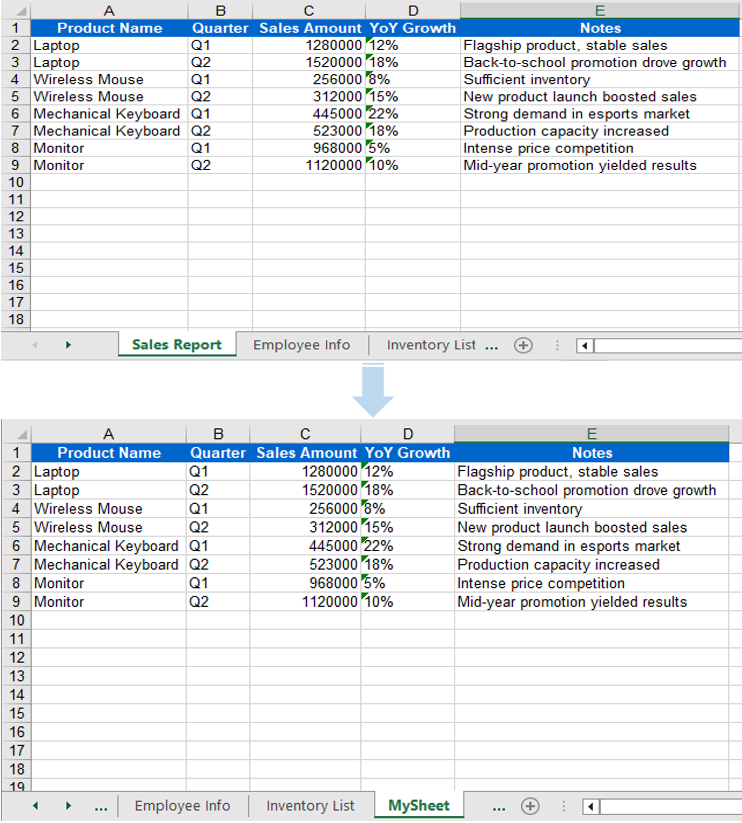
Copy a Worksheet Across Workbooks
In real-world scenarios, data from multiple Excel files often needs to be consolidated into a single workbook — for example, extracting specific sheets from departmental reports and merging them into a master sheet. The AddCopy method lets you copy a worksheet from the source workbook into the target workbook with all its content intact.
function App() {
  const sheetToSVG = async () => {
    // Get the Spire.XLS WASM module
    const xlsModule = window.wasmModule?.spirexls;

    // Check if the module is ready
    if (!xlsModule) {
      alert('Spire.Xls is not ready yet');
      return;
    }

    // Load fonts and the Excel files into VFS
    await window.spire.FetchFileToVFS('arial.ttf', '/Library/Fonts/', `${process.env.PUBLIC_URL}/font/`);
    const sourceFileName = 'ReadImages.xlsx';
    const targetFileName = 'Sample.xlsx';
    await window.spire.FetchFileToVFS(sourceFileName, '', `${process.env.PUBLIC_URL}data/`);
    await window.spire.FetchFileToVFS(targetFileName, '', `${process.env.PUBLIC_URL}data/`);

    // Load the source workbook
    const sourceWorkbook = new xlsModule.Workbook();
    sourceWorkbook.LoadFromFile({ fileName: sourceFileName });

    // Get the first worksheet of the source workbook
    const srcWorksheet = sourceWorkbook.Worksheets.get(0);

    // Load the target workbook
    const targetWorkbook = new xlsModule.Workbook();
    targetWorkbook.LoadFromFile({ fileName: targetFileName });

    // Add a new worksheet in the target workbook and copy the source sheet into it
    targetWorkbook.Worksheets.AddCopy({ sheet: srcWorksheet });

    // Save the target workbook
    const outputFileName = "CopyAcrossWorkbooks_output.xlsx";
    targetWorkbook.SaveToFile({ fileName: outputFileName });

    // Release resources
    sourceWorkbook.Dispose();
    targetWorkbook.Dispose();

    // Read the converted file from VFS and trigger download
    const fileArray = window.dotnetRuntime.Module.FS.readFile(outputFileName);
    const blob = new Blob([fileArray], { type: "application/vnd.openxmlformats-officedocument.spreadsheetml.sheet"});
    const url = URL.createObjectURL(blob);
    const a = document.createElement('a');
    a.href = url;
    a.download = outputFileName;
    a.click();
    URL.revokeObjectURL(url);
  };

  return (
    <div style={{ textAlign: 'center', height: '300px' }}>
      <h1>Copy Worksheet Across Workbooks</h1>
      <button onClick={sheetToSVG}>
        Start
      </button>
    </div>
  );
}

export default App;
When copying across workbooks, all data and styles from the source worksheet are preserved — AddCopy copies the complete worksheet content into the target workbook.
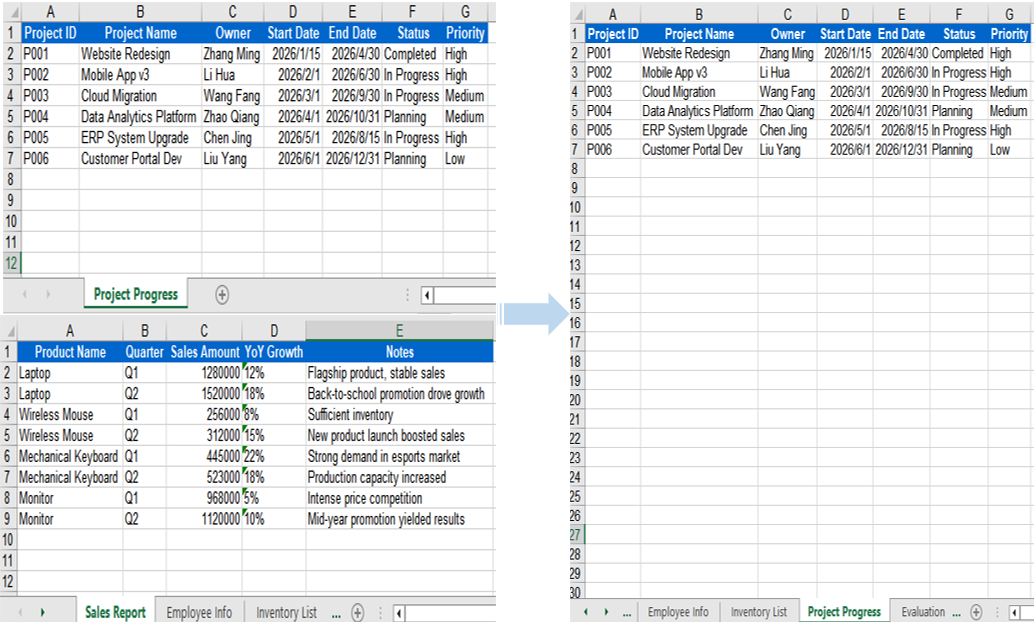
Copy a Selected Cell Range
Sometimes you do not need to copy an entire worksheet — you only need to copy a specific cell range (such as a particular data table or summary result) to a target location. Spire.XLS for JavaScript provides the Copy method, which copies data, styles, and formatting from the source range to the starting position of the target range.
function App() {
  const sheetToSVG = async () => {
    // Get the Spire.XLS WASM module
    const xlsModule = window.wasmModule?.spirexls;

    // Check if the module is ready
    if (!xlsModule) {
      alert('Spire.Xls is not ready yet');
      return;
    }

    // Load the source Excel file into VFS
    await window.spire.FetchFileToVFS('ARIAL.TTF', '/Library/Fonts/', `${process.env.PUBLIC_URL}/font/`);
    const inputFileName = 'Sample.xlsx';
    await window.spire.FetchFileToVFS(inputFileName, '', `${process.env.PUBLIC_URL}data/`);

    // Load the workbook
    const workbook = new xlsModule.Workbook();
    workbook.LoadFromFile({ fileName: inputFileName });

    // Get the first row of the first worksheet as the source range
    const sheet = workbook.Worksheets.get(0);
    const sourceRange = sheet.Range.get("A1:E1");

    // Add a new worksheet
    let sheet1 = workbook.Worksheets.Add("AddSheet");

    // Copy the source range to the starting position of the target worksheet
    sheet.Copy(sourceRange, sheet1, sheet.FirstRow, sheet.FirstColumn, true);

    // Save the workbook
    const outputFileName = "CopyRange_output22.xlsx";
    workbook.SaveToFile({ fileName: outputFileName });

    // Release resources
    workbook.Dispose();

    // Read the converted file from VFS and trigger download
    const fileArray = window.dotnetRuntime.Module.FS.readFile(outputFileName);
    const blob = new Blob([fileArray], { type: "application/vnd.openxmlformats-officedocument.spreadsheetml.sheet" });
    const url = URL.createObjectURL(blob);
    const a = document.createElement('a');
    a.href = url;
    a.download = outputFileName;
    a.click();
    URL.revokeObjectURL(url);
  };

  return (
    <div style={{ textAlign: 'center', height: '300px' }}>
      <h1>Copy Range</h1>
      <button onClick={sheetToSVG}>
        Start
      </button>
    </div>
  );
}

export default App;
The Copy method transfers data, styles, and formatting from the source range to the target range — ideal for lightweight scenarios where only partial data extraction is needed.
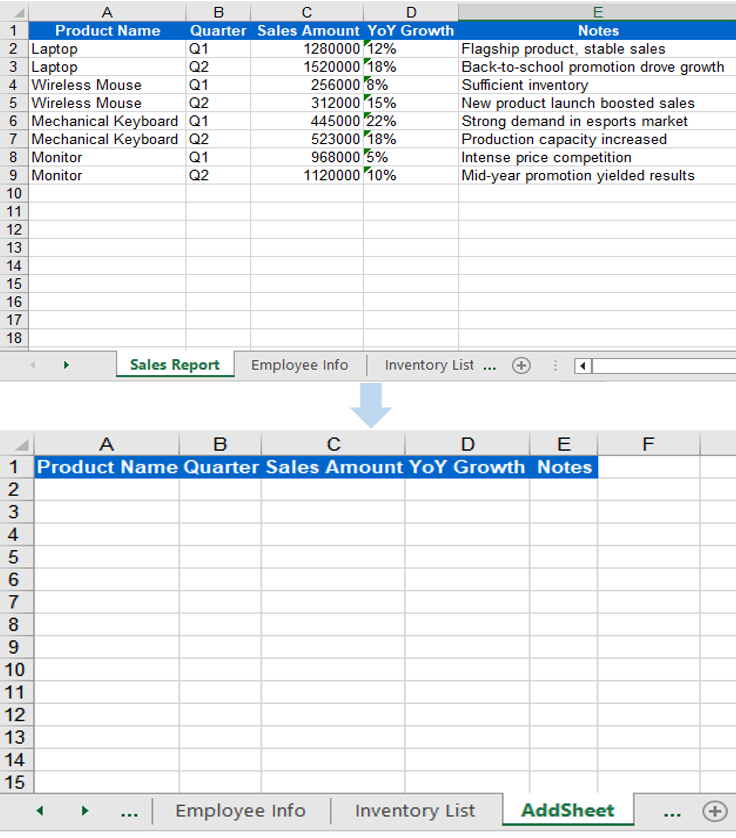
FAQ
Column width differs after copying
Cause: Font mismatch between the source and target workbooks.
Solution: Ensure all required font files are loaded into the VFS environment of the target workbook before copying across workbooks:
await window.spire.FetchFileToVFS(
  'arial.ttf', '/Library/Fonts/', '/'
);
Range content is pasted at the wrong position
Cause: Incorrect destRow and destColumn parameters in the Copy method, causing data to be pasted at an unexpected location.
Solution: Confirm that the destination row and column indices start from 1 (not 0), and verify the row and column range of the target worksheet before copying.
Get a Free License
Spire.XLS for JavaScript offers a 30-day full-featured free trial license with no functional limitations. Apply here to evaluate before purchasing.
Add, Remove, and Move Excel Worksheets with JavaScript in React
2026-06-15 03:56:24 Written by Lisa LiManaging worksheets — adding, removing, and reordering them — is one of the most fundamental and frequently used operations in Excel document processing. Spire.XLS for JavaScript handles these operations entirely in the browser via WebAssembly, using a virtual file system (VFS) to manage input and output files — no backend server required.
This article covers three core features:
For installation and project setup, refer to Integrating Spire.XLS for JavaScript in a React Project. The examples below assume Spire.XLS is installed and the WebAssembly module is initialized.
Add Worksheet
Adding new worksheets to a workbook is a common requirement in daily development. Spire.XLS for JavaScript provides the Add method to create a new worksheet and give it a name. After adding, you can write data to the new sheet's cells and save the workbook.
function App() {
  const startProcessing = async () => {
    // Get the Spire.XLS WASM module
    const xlsModule = window.wasmModule?.spirexls;
    if (!xlsModule) {
      alert('Spire.Xls is not ready yet');
      return;
    }

    // Load fonts and the Excel file into VFS
    await window.spire.FetchFileToVFS('ARIAL.TTF', '/Library/Fonts/', `${process.env.PUBLIC_URL}/font/`);
    const inputFileName = 'AddWorksheet.xlsx';
    await window.spire.FetchFileToVFS(inputFileName, '', `${process.env.PUBLIC_URL}/data/`);

    // Create a workbook instance and load the file
    const workbook = new xlsModule.Workbook();
    workbook.LoadFromFile({ fileName: inputFileName });

    // Add a new worksheet named "NewSheet"
    const sheet = workbook.Worksheets.Add("NewSheet");
    sheet.Range.get("C5").Text = "This is an inserted sheet.";

    // Auto-fit columns
    sheet.AllocatedRange.AutoFitColumns();

    // Save the workbook
    const outputFileName = "AddWorksheet_output.xlsx";
    workbook.SaveToFile({ fileName: outputFileName });

    // Release resources
    workbook.Dispose();

    // Read the output file from VFS, wrap it as a Blob, and trigger download
    const modifiedFileArray = window.dotnetRuntime.Module.FS.readFile(outputFileName);
    const blob = new Blob([modifiedFileArray], { type: "application/vnd.openxmlformats-officedocument.spreadsheetml.sheet" });
    const url = URL.createObjectURL(blob);
    const a = document.createElement('a');
    a.href = url;
    a.download = outputFileName;
    a.click();
    URL.revokeObjectURL(url);
  };

  return (
    <div style={{ textAlign: 'center', height: '300px' }}>
      <h1>Add Worksheet</h1>
      <button onClick={startProcessing}>
        Start
      </button>
    </div>
  );
}

export default App;
Adding a new worksheet after the existing ones via the Add method.
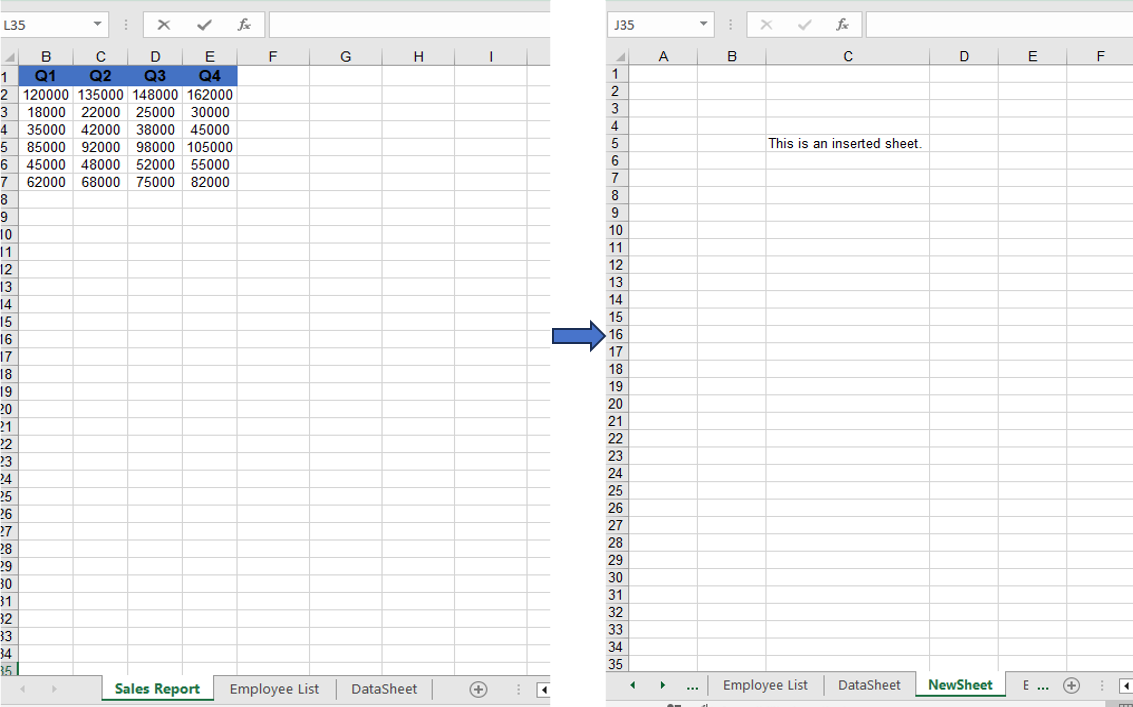
Remove Worksheet
When you need to clean up unwanted worksheets from a workbook, you can remove them directly by name. Spire.XLS for JavaScript's Remove method precisely locates and removes the target worksheet.
function App() {
  const startProcessing = async () => {
    // Get the Spire.XLS WASM module
    const xlsModule = window.wasmModule?.spirexls;
    if (!xlsModule) {
      alert('Spire.Xls is not ready yet');
      return;
    }

    // Load fonts and the Excel file into VFS
    await window.spire.FetchFileToVFS('ARIAL.TTF', '/Library/Fonts/', `${process.env.PUBLIC_URL}/font/`);
    const inputFileName = 'RemoveWorksheet.xlsx';
    await window.spire.FetchFileToVFS(inputFileName, '', `${process.env.PUBLIC_URL}/data/`);

    // Create a workbook instance and load the file
    const workbook = new xlsModule.Workbook();
    workbook.LoadFromFile({ fileName: inputFileName });

    // Remove a worksheet by name
    const sheet = workbook.Worksheets.get("Sheet2");
    workbook.Worksheets.Remove(sheet);
    // Remove by index
    //workbook.Worksheets.RemoveAt(1);

    // Save the workbook
    const outputFileName = "RemoveWorksheet_output.xlsx";
    workbook.SaveToFile({ fileName: outputFileName });

    // Release resources
    workbook.Dispose();

    // Read the output file from VFS, wrap it as a Blob, and trigger download
    const modifiedFileArray = window.dotnetRuntime.Module.FS.readFile(outputFileName);
    const blob = new Blob([modifiedFileArray], { type: "application/vnd.openxmlformats-officedocument.spreadsheetml.sheet" });
    const url = URL.createObjectURL(blob);
    const a = document.createElement('a');
    a.href = url;
    a.download = outputFileName;
    a.click();
    URL.revokeObjectURL(url);
  };

  return (
    <div style={{ textAlign: 'center', height: '300px' }}>
      <h1>Remove Worksheet</h1>
      <button onClick={startProcessing}>
        Start
      </button>
    </div>
  );
}

export default App;
Using Remove to delete a worksheet by name.
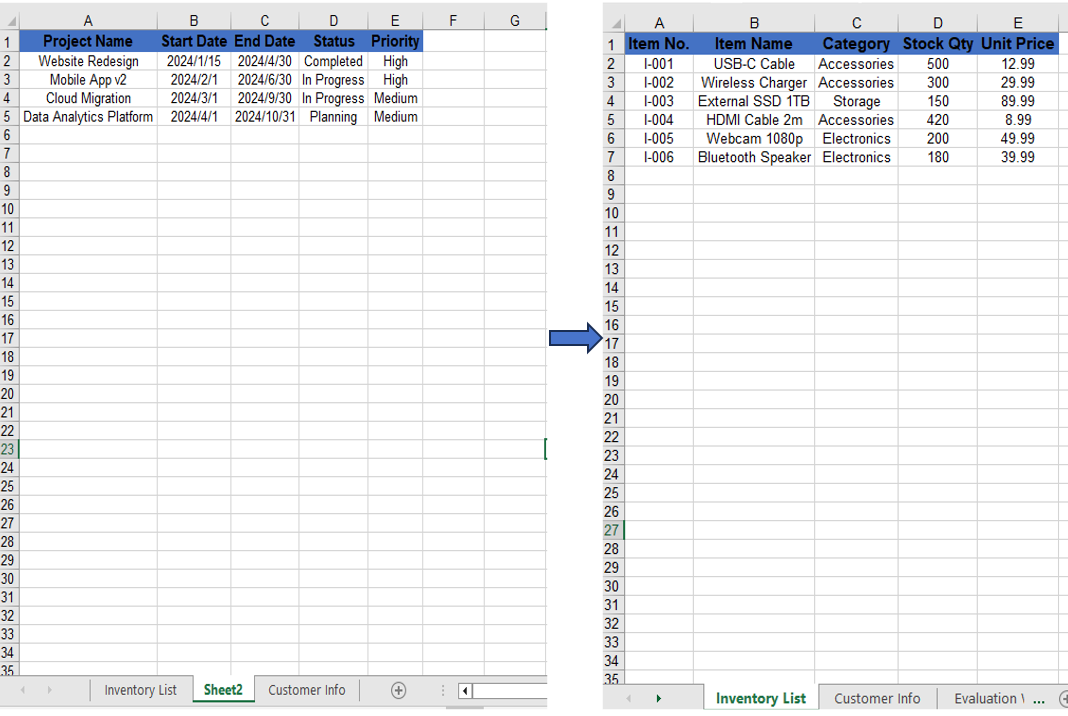
Move and Reorder Worksheets
Reordering worksheets is a common task when organizing an Excel document. With Spire.XLS for JavaScript's MoveWorksheet method, you can move a worksheet to a target index position, effectively reordering the sheets within the workbook.
function App() {
  const startProcessing = async () => {
    // Get the Spire.XLS WASM module
    const xlsModule = window.wasmModule?.spirexls;
    if (!xlsModule) {
      alert('Spire.Xls is not ready yet');
      return;
    }

    // Load fonts and the Excel file into VFS
    await window.spire.FetchFileToVFS('ARIAL.TTF', '/Library/Fonts/', `${process.env.PUBLIC_URL}/font/`);
    const inputFileName = 'Sample.xlsx';
    await window.spire.FetchFileToVFS(inputFileName, '', `${process.env.PUBLIC_URL}/data/`);

    // Create a workbook instance and load the file
    const workbook = new xlsModule.Workbook();
    workbook.LoadFromFile({ fileName: inputFileName });

    // Get the first worksheet and move it to index 1
    const sheet = workbook.Worksheets.get(0);
    sheet.MoveWorksheet(1);

    // Save the workbook
    const outputFileName = "MoveWorksheet_output.xlsx";
    workbook.SaveToFile({ fileName: outputFileName });

    // Release resources
    workbook.Dispose();

    // Read the output file from VFS, wrap it as a Blob, and trigger download
    const modifiedFileArray = window.dotnetRuntime.Module.FS.readFile(outputFileName);
    const blob = new Blob([modifiedFileArray], { type: "application/vnd.openxmlformats-officedocument.spreadsheetml.sheet" });
    const url = URL.createObjectURL(blob);
    const a = document.createElement('a');
    a.href = url;
    a.download = outputFileName;
    a.click();
    URL.revokeObjectURL(url);
  };

  return (
    <div style={{ textAlign: 'center', height: '300px' }}>
      <h1>Move Worksheet</h1>
      <button onClick={startProcessing}>
        Start
      </button>
    </div>
  );
}

export default App;
Moving the first worksheet to the second sheet position via the MoveWorksheet method.
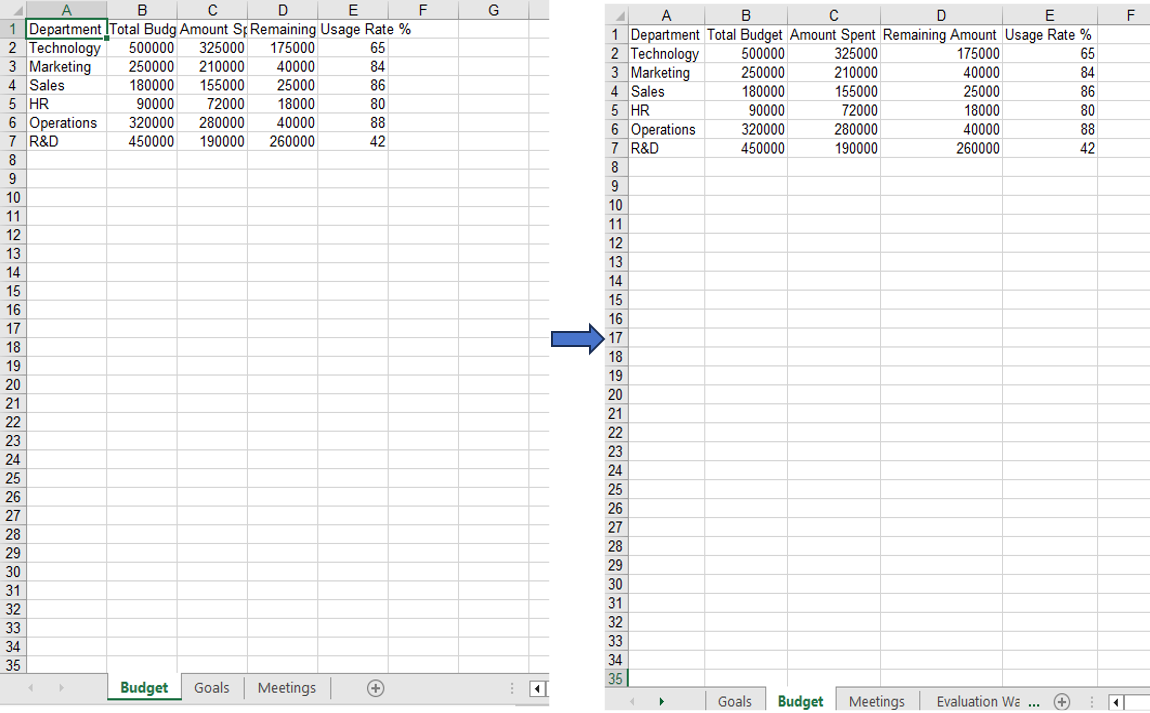
FAQ
Index out of range when operating on worksheets
Cause: The index parameter is outside the range of the current worksheet collection in the workbook.
Solution: Verify the total number of worksheets before performing the operation, ensuring the index is within 0 to worksheets.Count-1. Use workbook.Worksheets.Count to get the current total:
const count = workbook.Worksheets.Count;
Worksheet not found when removing by name
Cause: The specified worksheet name does not exactly match the actual name in the workbook.
Solution: Iterate through the worksheet names to confirm before removal:
for (let i = 0; i < workbook.Worksheets.Count; i++) {
  let name = workbook.Worksheets.get(i).Name;
  console.log(name);
}
Get a Free License
Spire.XLS for JavaScript offers a 30-day full-featured free trial license with no functional limitations. Apply here to evaluate before purchasing.
Exporting Excel worksheets and charts to SVG vector graphics lets you display data clearly at any resolution on the web, while keeping text selectable and searchable. Spire.XLS for JavaScript runs entirely in the browser via WebAssembly, using a virtual file system (VFS) to manage input and output files — no backend server required.
This article covers two core features:
For installation and project setup, refer to Integrating Spire.XLS for JavaScript in a React Project. The examples below assume Spire.XLS is installed and the WebAssembly module is initialized.
Worksheet to SVG
Converting a worksheet to SVG involves three steps: first, load the font files and the target Excel file into the WASM virtual file system via FetchFileToVFS; then instantiate a Workbook, load the file, retrieve the target worksheet, and call ToSVGStream to render it into a Stream object; finally, read the generated SVG file from VFS, wrap it as a Blob, and trigger a browser download.
function App() {
  const sheetToSVG = async () => {
    // Get the Spire.XLS WASM module
    const xlsModule = window.wasmModule?.spirexls;

    // Check if the module is ready
    if (!xlsModule) {
      alert('Spire.Xls is not ready yet');
      return;
    }

    // Load fonts and the Excel file into VFS
    await window.spire.FetchFileToVFS('arial.ttf', '/Library/Fonts/', `${process.env.PUBLIC_URL}/font/`);
    const inputFileName = 'ImageHeaderFooter.xlsx';
    await window.spire.FetchFileToVFS(inputFileName, '', `${process.env.PUBLIC_URL}data/`);

    // Load the workbook and get the first worksheet
    const workbook = new xlsModule.Workbook();
    workbook.LoadFromFile({ fileName: inputFileName });
    const sheet = workbook.Worksheets.get(0);

    // Convert the worksheet to an SVG stream
    const outputFileName = "Worksheet.svg";
    let fs = new xlsModule.Stream(outputFileName);
    sheet.ToSVGStream(fs, 0, 0, 0, 0);
    fs.Flush();
    fs.Dispose();

    // Read the converted file from VFS and trigger download
    const fileArray = window.dotnetRuntime.Module.FS.readFile(outputFileName);
    const blob = new Blob([fileArray], { type: "image/svg+xml;charset=utf-8"});
    const url = URL.createObjectURL(blob);
    const a = document.createElement('a');
    a.href = url;
    a.download = outputFileName;
    a.click();
    URL.revokeObjectURL(url);

    // Release resources
    workbook.Dispose();
  };

  return (
    <div style={{ textAlign: 'center', height: '300px' }}>
      <h1>Convert Excel To SVG</h1>
      <button onClick={sheetToSVG}>
        Generate
      </button>
    </div>
  );
}

export default App;
SVG output generated from a worksheet via ToSVGStream
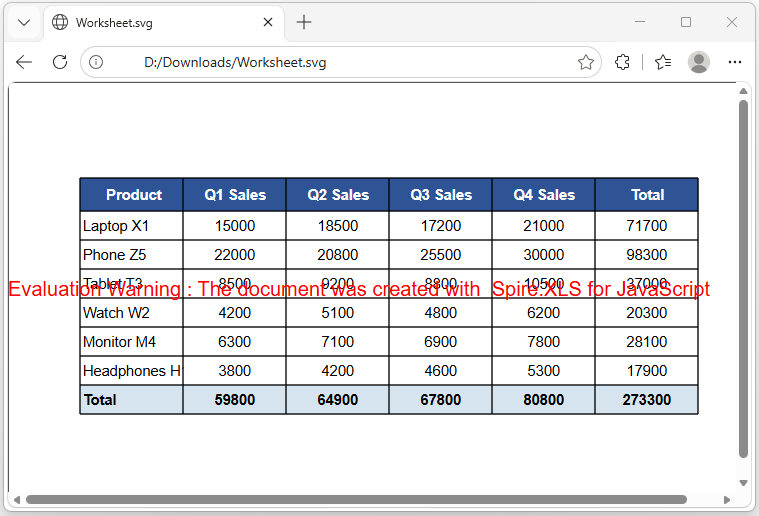
ChartSheet to SVG
A ChartSheet is a special type of worksheet that contains an embedded chart instead of cell data. The conversion process is similar to worksheet-to-SVG, with two key differences: retrieve the chartsheet by name using GetChartSheetByName("Chart1") instead of by index; and call ToSVGStream(fs) without specifying cell range parameters, since the rendering area is determined by the chart itself.
function App() {
  const chartsheetToSVG = async () => {
    // Get the Spire.XLS WASM module
    const xlsModule = window.wasmModule?.spirexls;

    // Check if the module is ready
    if (!xlsModule) {
      alert('Spire.Xls is not ready yet');
      return;
    }

    // Load fonts and the Excel file into VFS
    await window.spire.FetchFileToVFS('arial.ttf', '/Library/Fonts/', `${process.env.PUBLIC_URL}/font/`);
    const inputFileName = 'ChartSheet.xlsx';
    await window.spire.FetchFileToVFS(inputFileName, '', `${process.env.PUBLIC_URL}data/`);

    // Load the workbook
    const workbook = new xlsModule.Workbook();
    workbook.LoadFromFile({ fileName: inputFileName });

    // Get the chartsheet by name
    let cs = workbook.GetChartSheetByName("Chart1");

    // Define the output file name
    const outputFileName = 'ChartSheetToSVG-out.svg';

    // Create a stream and convert the chartsheet to SVG
    const fs = new xlsModule.Stream(outputFileName);
    cs.ToSVGStream(fs);
    fs.Flush();

    // Read the converted file from VFS and trigger download
    const fileArray = window.dotnetRuntime.Module.FS.readFile(outputFileName);
    const blob = new Blob([fileArray], { type: "image/svg+xml;charset=utf-8" });
    const url = URL.createObjectURL(blob);
    const a = document.createElement('a');
    a.href = url;
    a.download = outputFileName;
    a.click();
    URL.revokeObjectURL(url);

    // Release resources
    workbook.Dispose();
  };

  return (
    <div style={{ textAlign: 'center', height: '300px' }}>
      <h1>Convert Chartsheet To SVG</h1>
      <button onClick={chartsheetToSVG}>
        Generate
      </button>
    </div>
  );
}

export default App;
SVG output generated from a chartsheet via ToSVGStream
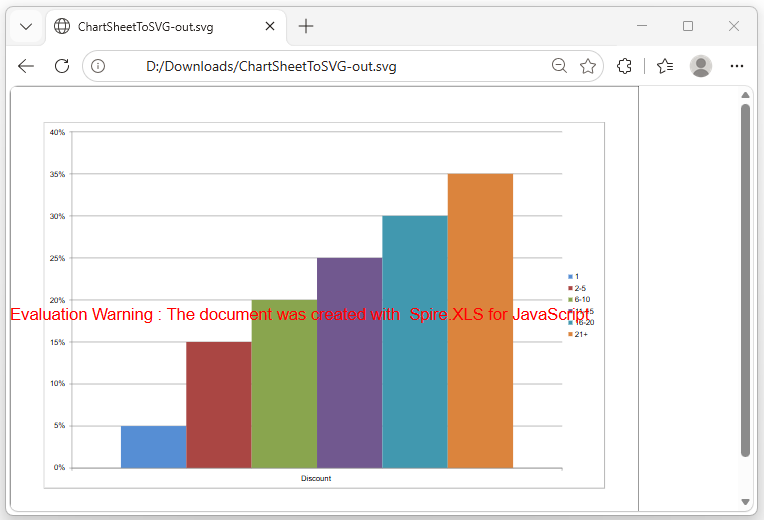
SVG vs PNG Comparison
| Feature | SVG | PNG |
|---|---|---|
| Scaling Quality | Sharp at any zoom | Blurry when enlarged |
| Text | Selectable and searchable | Rasterized (flat image) |
| File Size | Small (a few KB) | Large at high resolutions |
| CSS Styling | Supports inline styles | Not supported |
| Post-processing | Editable in Illustrator, Inkscape | Requires pixel-level editing |
| Browser Embedding | <img> or <embed> |
<img> tag |
Recommendation: Use SVG for web reports or scenarios where selectable text matters; use PNG when compatibility with image editors or legacy systems is required.
FAQ
Missing or garbled SVG text
Cause: The required font files are not present in the WASM virtual file system. ToSVGStream reads fonts from VFS when rendering text — if fonts are not preloaded, text areas will appear blank or garbled.
Solution: Load the font files into VFS via FetchFileToVFS before conversion:
await window.spire.FetchFileToVFS(
  'ARIAL.TTF', '/Library/Fonts/', '/'
);
SVG file cannot be opened or appears corrupted
Cause: The MIME type is incorrect when creating the Blob, so the browser cannot properly identify the file format.
Solution: Use the correct SVG MIME type:
const blob = new Blob([data], {
  type: "image/svg+xml;charset=utf-8"
});
Get a Free License
Spire.XLS for JavaScript offers a 30-day full-featured free trial license with no functional limitations. Apply here to evaluate before purchasing.
