
Spire.XLS for JavaScript (43)
Children categories
Insert or Delete Images in Excel with JavaScript in React
2025-03-03 01:05:21 Written by AdministratorImages in Excel can add a visual element to your data, making it more engaging and easier to understand. From adding company logos to embedding charts or diagrams, images can convey complex information more effectively than text alone. There are also times that you need to remove the images that are no longer relevant or cluttering your worksheet. This article will demonstrate how to insert or delete images in an Excel worksheet in React using Spire.XLS for JavaScript.
Install Spire.XLS for JavaScript
To get started with inserting or deleting picture in Excel in a React application, you can either download Spire.XLS for JavaScript from our website or install it via npm with the following command:
npm i spire.office
The downloaded product package has been integrated Spire.Doc for JavaScript,Spire.XLS for JavaScript,Spire.PDF for JavaScript,Spire.Presentation for JavaScript. To use the functionality of Spire.XLS for JavaScript, you need to copy the corresponding files (spire.xls.js, Spire.Xls.Wasm.zip, spire.common.js, Spire.Common.Wasm.zip, and _framework) to the project's "public" folder. At the same time, in order to ensure text rendering, the related font files can be added with custom paths. In the following example, the font addition path is: public\static\font.
For more details, refer to the documentation: How to Integrate Spire.XLS for JavaScript in a React Project
Insert Images in Excel in JavaScript
Spire.XLS for JavaScript provides the Worksheet.Pictures.Add() method to add a picture to a specified cell in an Excel worksheet. The following are the main steps.
- Create a Workbook object using the new wasmModule.Workbook() method.
- Get a specific worksheet using the Workbook.Worksheets.get() method.
- Insert a picture into a specific cell using the Worksheet.Pictures.Add() method and return an object of ExcelPicture.
- Set the width and height of the picture, as well as the distance between the picture and the cell border through the properties under the ExcelPicture object.
- Save the result file using the Workbook.SaveToFile() method.
- JavaScript
import React, { useState, useEffect } from 'react';
function App() {
  const [wasmModule, setWasmModule] = useState(null);
  // Load Spire.XLS
  useEffect(() => {
    (async () => {
      try {
        const publicUrl = process.env.PUBLIC_URL || '';
        const spireModule = await import(/* webpackIgnore: true */ `${publicUrl}/spire.xls.js`);
        const rawModule = spireModule.default || spireModule;
        window.wasmModule = typeof rawModule === 'function'
          ? await rawModule({ locateFile: p => p.endsWith('.wasm') ? `${publicUrl}/${p}` : p })
          : rawModule;
        setWasmModule(window.wasmModule);
      } catch (error) {
        console.error('Failed to load spire.xls.js WASM module:', error);
      }
    })();
  }, []);

  // Function to insert an image in Excel
  const InsertExcelImage = async () => {
    const wasmModule = window.wasmModule.spirexls;

    if (wasmModule) {
      // Load font into Virtual File System (VFS)
      await window.spire.FetchFileToVFS('Arial.ttf', '/Library/Fonts/', `${process.env.PUBLIC_URL}/static/font/`);


      // Load the image files into the virtual file system (VFS)
      let inputFileName = 'logo.png';
      await window.spire.FetchFileToVFS(inputFileName, '', `${process.env.PUBLIC_URL}/static/data/`);


      // Create a new workbook
      let workbook = new wasmModule.Workbook();

      // Get the first worksheet.
      let sheet = workbook.Worksheets.get(0);

      // Add a picture to the specific cell
      let picture = sheet.Pictures.Add({ topRow: 2, leftColumn: 3, fileName: inputFileName });

      // Set the picture width and height
      picture.Width = 150
      picture.Height = 150

      // Adjust the column width and row height to accommodate the picture
      sheet.SetRowHeight(2, 135);
      sheet.SetColumnWidth(3, 25);

      // Set the distance between cell border and picture
      picture.LeftColumnOffset = 90
      picture.TopRowOffset = 20

      // Save the modified workbook to the specified file
      const outputFileName = 'InsertExcelImage.xlsx';
      workbook.SaveToFile({ fileName: outputFileName, version: wasmModule.ExcelVersion.Version2016 });

      // Read the saved file and convert to Blob object
      const modifiedFileArray = window.dotnetRuntime.Module.FS.readFile(outputFileName);
      const modifiedFile = new Blob([modifiedFileArray], { type: 'application/vnd.openxmlformats-officedocument.spreadsheetml.sheet' });

      // Create a URL for the Blob and initiate download
      const url = URL.createObjectURL(modifiedFile);
      const a = document.createElement('a');
      a.href = url;
      a.download = outputFileName;
      document.body.appendChild(a);
      a.click();
      document.body.removeChild(a);
      URL.revokeObjectURL(url);

      // Clean up resources used by the workbook
      workbook.Dispose();
    }
  };

  return (
    <div style={{ textAlign: 'center', height: '300px' }}>
      <h1>Insert an Image to a Specified Cell in Excel Using JavaScript in React</h1>
      <button onClick={InsertExcelImage} disabled={!wasmModule}>
        Process
      </button>
    </div>
  );
}

export default App;
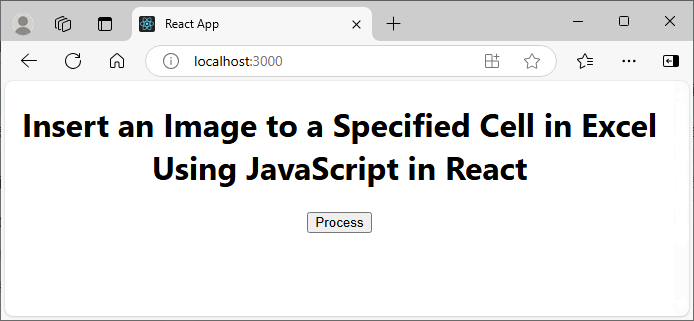
Run the code to launch the React app at localhost:3000. Once it's running, click the "Process" button to insert image in Excel:
Below is the result file:

Delete Images in Excel in JavaScript
To delete all pictures in an Excel worksheet, you need to iterate through each picture and then remove them through the Worksheet.Pictures.get().Remove() method. The following are the main steps.
- Create a Workbook object using the new wasmModule.Workbook() method.
- Load an Excel file using the Workbook.LoadFromFile() method.
- Get a specific worksheet using the Workbook.Worksheets.get() method.
- Iterate through all pictures in the worksheet and then remove them using the Worksheet.Pictures.get().Remove() method.
- Save the result file using the Workbook.SaveToFile() method.
- JavaScript
import React, { useState, useEffect } from 'react';
function App() {
  const [wasmModule, setWasmModule] = useState(null);
  // Load Spire.XLS
  useEffect(() => {
    (async () => {
      try {
        const publicUrl = process.env.PUBLIC_URL || '';
        const spireModule = await import(/* webpackIgnore: true */ `${publicUrl}/spire.xls.js`);
        const rawModule = spireModule.default || spireModule;
        window.wasmModule = typeof rawModule === 'function'
          ? await rawModule({ locateFile: p => p.endsWith('.wasm') ? `${publicUrl}/${p}` : p })
          : rawModule;
        setWasmModule(window.wasmModule);
      } catch (error) {
        console.error('Failed to load spire.xls.js WASM module:', error);
      }
    })();
  }, []);

  // Function to delete images from Excel
  const DeleteExcelImage = async () => {
    const wasmModule = window.wasmModule.spirexls;

    if (wasmModule) {
      // Load font into Virtual File System (VFS)
      await window.spire.FetchFileToVFS('Arial.ttf', '/Library/Fonts/', `${process.env.PUBLIC_URL}/static/font/`);


      // Load the excel files into the virtual file system (VFS)
      let inputFileName = 'InsertExcelImage.xlsx';
      await window.spire.FetchFileToVFS(inputFileName, '', `${process.env.PUBLIC_URL}/static/data/`);


      // Create a new workbook
      let workbook = new wasmModule.Workbook();

      // Load the Excel document
      workbook.LoadFromFile({ fileName: inputFileName });

      // Get the first worksheet
      let sheet = workbook.Worksheets.get(0);

      // Delete all images from the worksheet
      for (let i = sheet.Pictures.Count - 1; i >= 0; i--) {
        sheet.Pictures.get(i).Remove();
      }

      // Save the result file
      const outputFileName = 'DeleteImages.xlsx';
      workbook.SaveToFile({ fileName: outputFileName, version: wasmModule.ExcelVersion.Version2016 });

      // Read the saved file and convert to Blob object
      const modifiedFileArray = window.dotnetRuntime.Module.FS.readFile(outputFileName);
      const modifiedFile = new Blob([modifiedFileArray], { type: 'application/vnd.openxmlformats-officedocument.spreadsheetml.sheet' });

      // Create a URL for the Blob and initiate download
      const url = URL.createObjectURL(modifiedFile);
      const a = document.createElement('a');
      a.href = url;
      a.download = outputFileName;
      document.body.appendChild(a);
      a.click();
      document.body.removeChild(a);
      URL.revokeObjectURL(url);

      // Clean up resources used by the workbook
      workbook.Dispose();
    }
  };

  return (
    <div style={{ textAlign: 'center', height: '300px' }}>
      <h1>Delete Images from Excel Using JavaScript in React</h1>
      <button onClick={DeleteExcelImage} disabled={!wasmModule}>
        Process
      </button>
    </div>
  );
}

export default App;
Get a Free License
To fully experience the capabilities of Spire.XLS for JavaScript without any evaluation limitations, you can request a free 30-day trial license.
Save Excel Charts and Shapes as Images with JavaScript in React
2025-02-28 00:57:01 Written by AdministratorExport Excel charts and shapes as standalone images is a critical feature for enhancing data visualization workflows. Converting charts and shapes into image formats enables seamless integration of dynamic data into reports, dashboards, or presentations, ensuring compatibility across platforms where Excel files might not be natively supported. By programmatically generating images from Excel charts and shapes within web applications using Spire.XLS for JavaScript API, developers can automate export workflows, ensure consistent visualization, and deliver dynamically updated visuals to end-users without extra manual processing steps.
In this article, we will explore how to use Spire.XLS for Java Script to save charts and shapes in Excel workbooks as images using JavaScript in React applications.
Install Spire.XLS for JavaScript
To get started with saving Excel charts and shapes as images in a React application, you can either download Spire.XLS for JavaScript from our website or install it via npm with the following command:
npm i spire.office
The downloaded product package has been integrated Spire.Doc for JavaScript,Spire.XLS for JavaScript,Spire.PDF for JavaScript,Spire.Presentation for JavaScript. To use the functionality of Spire.XLS for JavaScript, you need to copy the corresponding files (spire.xls.js, Spire.Xls.Wasm.zip, spire.common.js, Spire.Common.Wasm.zip, and _framework) to the project's "public" folder. At the same time, in order to ensure text rendering, the related font files can be added with custom paths. In the following example, the font addition path is: public\static\font.
For more details, refer to the documentation: How to Integrate Spire.XLS for JavaScript in a React Project
Save Excel Charts to Images with JavaScript
By processing Excel files using the Spire.XLS WebAssembly module, we can utilize the Workbook.SaveChartAsImage() method to save a specific chart from an Excel worksheet as an image and store it in the virtual file system (VFS). The saved image can then be downloaded or used for further processing.
The detailed steps are as follows:
- Load the Spire.Xls.js file to initialize the WebAssembly module.
- Fetch the Excel file and font files into the VFS using the window.spire.FetchFileToVFS() method.
- Create a Workbook instance using the new wasmModule.Workbook() method.
- Load the Excel file into the Workbook instance using the Workbook.LoadFromFile() method.
- Retrieve a specific worksheet or iterate through all worksheets using the Workbook.Worksheets.get() method.
- Iterate though the charts and save them as images using the Workbook.SaveChartAsImage() method, specifying the worksheet and chart index as parameters.
- Save the images to the VFS using the image.Save() method.
- Download the images or use them as needed.
- JavaScript
import React, { useState, useEffect } from 'react';
import JSZip from 'jszip';

function App() {
  const [wasmModule, setWasmModule] = useState(null);
  // Load Spire.XLS
  useEffect(() => {
    (async () => {
      try {
        const publicUrl = process.env.PUBLIC_URL || '';
        const spireModule = await import(/* webpackIgnore: true */ `${publicUrl}/spire.xls.js`);
        const rawModule = spireModule.default || spireModule;
        window.wasmModule = typeof rawModule === 'function'
          ? await rawModule({ locateFile: p => p.endsWith('.wasm') ? `${publicUrl}/${p}` : p })
          : rawModule;
        setWasmModule(window.wasmModule);
      } catch (error) {
        console.error('Failed to load spire.xls.js WASM module:', error);
      }
    })();
  }, []);

  // Function to convert charts to images
  const SaveExcelChartAsImage = async () => {
    const wasmModule = window.wasmModule.spirexls;

    if (wasmModule) {
      // Load font into virtual file system (VFS)
      await window.spire.FetchFileToVFS('Arial.ttf', '/Library/Fonts/', `${process.env.PUBLIC_URL}/static/font/`);

      // Load Excel file into virtual file system (VFS)
      const inputFileName = 'in.xlsx';
      await window.spire.FetchFileToVFS(inputFileName, '', `${process.env.PUBLIC_URL}/static/data/`);

      // Create an images folder in the VFS
      const imageFolderName = `Images`;
      window.dotnetRuntime.Module.FS.mkdirTree(imageFolderName);

      // Create a new workbook
      const workbook = new wasmModule.Workbook();

      // Load the Excel file from VFS
      workbook.LoadFromFile(inputFileName);

      // Iterate through each worksheet in the workbook
      for (let i = 0; i < workbook.Worksheets.Count; i++) {
        // Get the current worksheet
        const sheet = workbook.Worksheets.get(i);
        // Iterate through each chart in the worksheet
        for (let j = 0; j < sheet.Charts.Count; j++) {
          // Save the current chart to an image
          let image = workbook.SaveChartAsImage({ worksheet: sheet, chartIndex: j })
          // Save the image to the VFS
          let filePath = `${imageFolderName}/${sheet.Name}_chart-${j}.png`;
          image.Save(filePath);
        }
      }

      // Recursive function to add a directory and its contents to a ZIP
      const addFilesToZip = (folderPath, zipFolder) => {
        const items = window.dotnetRuntime.Module.FS.readdir(folderPath);
        items.filter(item => item !== "." && item !== "..").forEach((item) => {
          const itemPath = `${folderPath}/${item}`;

          try {
            // Try to read file data
            const fileData = window.dotnetRuntime.Module.FS.readFile(itemPath);
            zipFolder.file(item, fileData);
          } catch (error) {
            if (error.code === 'EISDIR') {
              // If it is a directory, create a new folder in the ZIP and recurse into it
              const zipSubFolder = zipFolder.folder(item);
              addFilesToZip(itemPath, zipSubFolder);
            } else {
              // Handle other errors
              console.error(`Error processing ${itemPath}:`, error);
            }
          }
        });
      };

      // Package the image folder into a ZIP file
      const zip = new JSZip();
      addFilesToZip(imageFolderName, zip);

      // Generate a Blob from the resulting ZIP file and trigger download
      zip.generateAsync({ type: "blob" })
        .then(function (content) {
          const link = document.createElement('a');
          link.href = URL.createObjectURL(content);
          link.download = 'chartToimg.zip';
          document.body.appendChild(link);
          link.click();
          document.body.removeChild(link);
          URL.revokeObjectURL(link.href);
        }).catch(function (err) {
          console.error("Error generating ZIP file:", err);
        });
    }
  };

  return (
    <div style={{ textAlign: 'center', height: '300px' }}>
      <h1>Save Excel Charts as Images Using JavaScript in React</h1>
      <button onClick={SaveExcelChartAsImage} disabled={!wasmModule}>
        Export Charts
      </button>
    </div>
  );
}

export default App;

Save Excel Shapes to Images with JavaScript
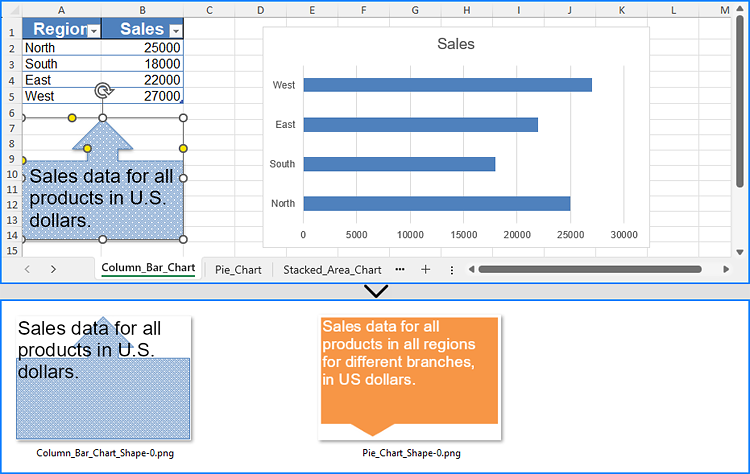
We can retrieve shapes from an Excel worksheet using the Worksheet.PrstGeomShapes.get() method and save them as images using the shape.SaveToImage() method. The images can then be stored in the virtual file system (VFS) and downloaded or used for further processing.
Below are the detailed steps:
- Load the Spire.Xls.js file to initialize the WebAssembly module.
- Fetch the Excel file and font files into the VFS using the window.spire.FetchFileToVFS() method.
- Create a Workbook instance using the new wasmModule.Workbook() method.
- Load the Excel file into the Workbook instance using the Workbook.LoadFromFile() method.
- Retrieve a specific worksheet or iterate through all worksheets using the Workbook.Worksheets.get() method.
- Get a shape from the worksheet or iterate through all shapes using the Worksheet.PrstGeomShapes.get() method.
- Save the shapes as images using the shape.SaveToImage() method.
- Save the images to the VFS using the image.Save() method.
- Download the images or use them as needed.
- JavaScript
import React, { useState, useEffect } from 'react';
import JSZip from 'jszip';

function App() {
  const [wasmModule, setWasmModule] = useState(null);
  // Load Spire.XLS
  useEffect(() => {
    (async () => {
      try {
        const publicUrl = process.env.PUBLIC_URL || '';
        const spireModule = await import(/* webpackIgnore: true */ `${publicUrl}/spire.xls.js`);
        const rawModule = spireModule.default || spireModule;
        window.wasmModule = typeof rawModule === 'function'
          ? await rawModule({ locateFile: p => p.endsWith('.wasm') ? `${publicUrl}/${p}` : p })
          : rawModule;
        setWasmModule(window.wasmModule);
      } catch (error) {
        console.error('Failed to load spire.xls.js WASM module:', error);
      }
    })();
  }, []);

  // Function to convert shapes to images
  const SaveExcelShapeAsImage = async () => {
    const wasmModule = window.wasmModule.spirexls;

    if (wasmModule) {
      // Load font into virtual file system (VFS)
      await window.spire.FetchFileToVFS('Arial.ttf', '/Library/Fonts/', `${process.env.PUBLIC_URL}/static/font/`);

      // Load Excel file into virtual file system (VFS)
      const inputFileName = 'Shape.xlsx';
      await window.spire.FetchFileToVFS(inputFileName, '', `${process.env.PUBLIC_URL}/static/data/`);

      // Create an images folder in the VFS
      const imageFolderName = `Images`;
      window.dotnetRuntime.Module.FS.mkdirTree(imageFolderName);

      // Create a new workbook
      const workbook = new wasmModule.Workbook();

      // Load the Excel file from VFS
      workbook.LoadFromFile(inputFileName);

      // Iterate through each worksheet in the workbook
      for (let i = 0; i < workbook.Worksheets.Count; i++) {
        // Get the current worksheet
        const sheet = workbook.Worksheets.get(i);
        // Iterate through each shape in the worksheet
        for (let j = 0; j < sheet.PrstGeomShapes.Count; j++) {
          // Get the current shape
          const shape = sheet.PrstGeomShapes.get(j);
          // Save the shape to an image
          const image = shape.SaveToImage();
          // Save the image to the VFS
          let filePath = `${imageFolderName}/${sheet.Name}_shape-${j}.png`;
          image.Save(filePath);
        }
      }

      // Recursive function to add a directory and its contents to a ZIP
      const addFilesToZip = (folderPath, zipFolder) => {
        const items = window.dotnetRuntime.Module.FS.readdir(folderPath);
        items.filter(item => item !== "." && item !== "..").forEach((item) => {
          const itemPath = `${folderPath}/${item}`;

          try {
            // Try to read file data
            const fileData = window.dotnetRuntime.Module.FS.readFile(itemPath);
            zipFolder.file(item, fileData);
          } catch (error) {
            if (error.code === 'EISDIR') {
              // If it is a directory, create a new folder in the ZIP and recurse into it
              const zipSubFolder = zipFolder.folder(item);
              addFilesToZip(itemPath, zipSubFolder);
            } else {
              // Handle other errors
              console.error(`Error processing ${itemPath}:`, error);
            }
          }
        });
      };

      // Package the image folder into a ZIP file
      const zip = new JSZip();
      addFilesToZip(imageFolderName, zip);

      // Generate a Blob from the resulting ZIP file and trigger download
      zip.generateAsync({ type: "blob" })
        .then(function (content) {
          const link = document.createElement('a');
          link.href = URL.createObjectURL(content);
          link.download = 'shapeToimg.zip';
          document.body.appendChild(link);
          link.click();
          document.body.removeChild(link);
          URL.revokeObjectURL(link.href);
        }).catch(function (err) {
          console.error("Error generating ZIP file:", err);
        });
    }
  };

  return (
    <div style={{ textAlign: 'center', height: '300px' }}>
      <h1>Save Excel Shapes as Images Using JavaScript in React</h1>
      <button onClick={SaveExcelShapeAsImage} disabled={!wasmModule}>
        Export Shapes
      </button>
    </div>
  );
}

export default App;
Get a Free License
To fully experience the capabilities of Spire.XLS for JavaScript without any evaluation limitations, you can request a free 30-day trial license.
Convert Text to Numbers or Numbers to Text in Excel with JavaScript in React
2025-02-17 03:12:47 Written by AdministratorProper data formatting is essential for accurate calculations, sorting, and analysis. In Excel, numbers are sometimes mistakenly stored as text, which prevents them from being used in mathematical calculations. On the other hand, certain values like ZIP codes, phone numbers, and product IDs should be stored as text to preserve leading zeros and ensure consistency. Knowing how to convert between text and numeric formats is essential for maintaining data integrity, preventing errors, and improving usability. In this article, you will learn how to convert text to numbers and numbers to text in Excel in React using Spire.XLS for JavaScript.
Install Spire.XLS for JavaScript
To get started with converting text to numbers and numbers to text in Excel in a React application, you can either download Spire.XLS for JavaScript from our website or install it via npm with the following command:
npm i spire.office
The downloaded product package has been integrated Spire.Doc for JavaScript,Spire.XLS for JavaScript,Spire.PDF for JavaScript,Spire.Presentation for JavaScript. To use the functionality of Spire.XLS for JavaScript, you need to copy the corresponding files (spire.xls.js, Spire.Xls.Wasm.zip, spire.common.js, Spire.Common.Wasm.zip, and _framework) to the project's "public" folder. At the same time, in order to ensure text rendering, the related font files can be added with custom paths. In the following example, the font addition path is: public\static\font.
For more details, refer to the documentation: How to Integrate Spire.XLS for JavaScript in a React Project
Convert Text to Numbers in Excel
With Spire.XLS for JavaScript, developers can format the text in individual cells or a range of cells as numbers using the CellRange.ConvertToNumber() method. The detailed steps are as follows.
- Create a Workbook object using the new wasmModule.Workbook() method.
- Load the Excel file using the Workbook.LoadFromFile() method.
- Get a specific worksheet using the Workbook.Worksheets.get(index) method.
- Get the desired cell or range of cells using the Worksheet.Range.get() method.
- Format the text in the cell or range of cells as numbers using the CellRange.ConvertToNumber() method.
- Save the resulting workbook using the Workbook.SaveToFile() method.
- JavaScript
import React, { useState, useEffect } from 'react';
function App() {
  const [wasmModule, setWasmModule] = useState(null);
  // Load Spire.XLS
  useEffect(() => {
    (async () => {
      try {
        const publicUrl = process.env.PUBLIC_URL || '';
        const spireModule = await import(/* webpackIgnore: true */ `${publicUrl}/spire.xls.js`);
        const rawModule = spireModule.default || spireModule;
        window.wasmModule = typeof rawModule === 'function'
          ? await rawModule({ locateFile: p => p.endsWith('.wasm') ? `${publicUrl}/${p}` : p })
          : rawModule;
        setWasmModule(window.wasmModule);
      } catch (error) {
        console.error('Failed to load spire.xls.js WASM module:', error);
      }
    })();
  }, []);

  // Function to convert text to numbers in an Excel worksheet
  const ConvertTextToNumbers = async () => {
    const wasmModule = window.wasmModule.spirexls;

    if (wasmModule) {
      // Load font into Virtual File System (VFS)
      await window.spire.FetchFileToVFS('Arial.ttf', '/Library/Fonts/', `${process.env.PUBLIC_URL}/static/font/`);

      // Load input file into Virtual File System (VFS)
      const inputFileName = 'sample.xlsx';
      await window.spire.FetchFileToVFS(inputFileName, '', `${process.env.PUBLIC_URL}/static/data/`);

      // Create a new workbook
      const workbook = new wasmModule.Workbook();

      // Load the Excel file from the virtual file system
      workbook.LoadFromFile(inputFileName);

      // Get the first worksheet
      let sheet = workbook.Worksheets.get(0);

      // Get the desired cell range
      let range = sheet.Range.get("D2:D6");

      // Convert the text in the cell range as numbers
      range.ConvertToNumber();

      // Define the output file name
      const outputFileName = "TextToNumbers_output.xlsx";

      // Save the workbook to the specified path
      workbook.SaveToFile({ fileName: outputFileName, version: wasmModule.ExcelVersion.Version2010 });

      // Read the saved file and convert to Blob object
      const modifiedFileArray = window.dotnetRuntime.Module.FS.readFile(outputFileName);
      const modifiedFile = new Blob([modifiedFileArray], { type: 'application/vnd.openxmlformats-officedocument.spreadsheetml.sheet' });

      // Create a URL for the Blob and initiate download
      const url = URL.createObjectURL(modifiedFile);
      const a = document.createElement('a');
      a.href = url;
      a.download = outputFileName;
      document.body.appendChild(a);
      a.click();
      document.body.removeChild(a);
      URL.revokeObjectURL(url);

      // Clean up resources used by the workbook
      workbook.Dispose();
    }
  };

  return (
    <div style={{ textAlign: 'center', height: '300px' }}>
      <h1>Convert Text to Numbers in Excel Using JavaScript in React</h1>
      <button onClick={ConvertTextToNumbers} disabled={!wasmModule}>
        Convert
      </button>
    </div>
  );
}

export default App;
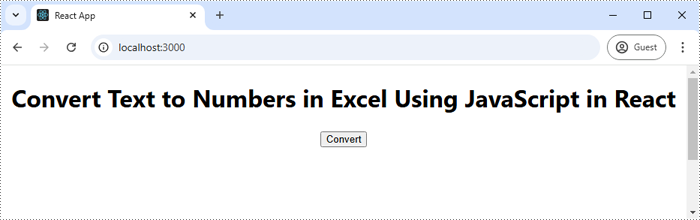
Run the code to launch the React app at localhost:3000. Once it's running, click on the "Convert" button to format text stored in specific cells of an Excel worksheet as numbers:
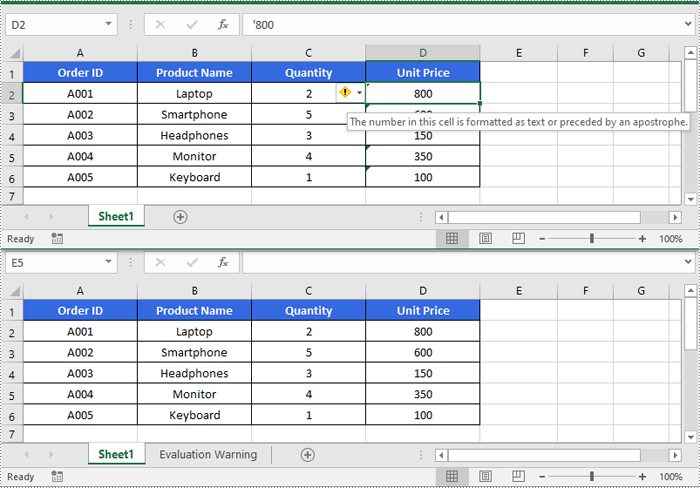
The screenshot below shows the input Excel worksheet and the output Excel worksheet:
Convert Numbers to Text in Excel
To convert numbers stored in specific cells or a range of cells as text, developers can use the CellRange.NumberFormat property. The detailed steps are as follows.
- Create a Workbook object using the new wasmModule.Workbook() method.
- Load the Excel file using the Workbook.LoadFromFile() method.
- Get a specific worksheet using the Workbook.Worksheets.get(index) method.
- Get the desired cell or range of cells using the Worksheet.Range.get() method.
- Format the numbers in the cell or range of cells as text by setting the CellRange.NumberFormat property to "@".
- Save the resulting workbook using the Workbook.SaveToFile() method.
- JavaScript
import React, { useState, useEffect } from 'react';
function App() {
  const [wasmModule, setWasmModule] = useState(null);
  // Load Spire.XLS
  useEffect(() => {
    (async () => {
      try {
        const publicUrl = process.env.PUBLIC_URL || '';
        const spireModule = await import(/* webpackIgnore: true */ `${publicUrl}/spire.xls.js`);
        const rawModule = spireModule.default || spireModule;
        window.wasmModule = typeof rawModule === 'function'
          ? await rawModule({ locateFile: p => p.endsWith('.wasm') ? `${publicUrl}/${p}` : p })
          : rawModule;
        setWasmModule(window.wasmModule);
      } catch (error) {
        console.error('Failed to load spire.xls.js WASM module:', error);
      }
    })();
  }, []);

  // Function to convert numbers to text in an Excel worksheet
  const ConvertNumbersToText = async () => {
    const wasmModule = window.wasmModule.spirexls;

    if (wasmModule) {
      // Load font into Virtual File System (VFS)
      await window.spire.FetchFileToVFS('Arial.ttf', '/Library/Fonts/', `${process.env.PUBLIC_URL}/static/font/`);

      // Load input file into Virtual File System (VFS)
      const inputFileName = 'sample.xlsx';
      await window.spire.FetchFileToVFS(inputFileName, '', `${process.env.PUBLIC_URL}/static/data/`);

      // Create a new workbook
      const workbook = new wasmModule.Workbook();

      // Load the Excel file from the virtual file system
      workbook.LoadFromFile(inputFileName);

      // Get the first worksheet
      let sheet = workbook.Worksheets.get(0);

      // Get the desired cell range
      let range = sheet.Range.get("F2:F9");

      // Convert the numbers in the cell range as text
      range.NumberFormat = "@"

      // Define the output file name
      const outputFileName = "NumbersToText_output.xlsx";

      // Save the workbook to the specified path
      workbook.SaveToFile({ fileName: outputFileName, version: wasmModule.ExcelVersion.Version2010 });

      // Read the saved file and convert to Blob object
      const modifiedFileArray = window.dotnetRuntime.Module.FS.readFile(outputFileName);
      const modifiedFile = new Blob([modifiedFileArray], { type: 'application/vnd.openxmlformats-officedocument.spreadsheetml.sheet' });

      // Create a URL for the Blob and initiate download
      const url = URL.createObjectURL(modifiedFile);
      const a = document.createElement('a');
      a.href = url;
      a.download = outputFileName;
      document.body.appendChild(a);
      a.click();
      document.body.removeChild(a);
      URL.revokeObjectURL(url);

      // Clean up resources used by the workbook
      workbook.Dispose();
    }
  };

  return (
    <div style={{ textAlign: 'center', height: '300px' }}>
      <h1>Convert Numbers To Text in Excel Using JavaScript in React</h1>
      <button onClick={ConvertNumbersToText} disabled={!wasmModule}>
        Convert
      </button>
    </div>
  );
}

export default App;

Get a Free License
To fully experience the capabilities of Spire.XLS for JavaScript without any evaluation limitations, you can request a free 30-day trial license.
Set Row Height and Column Width in Excel with JavaScript in React
2025-02-17 01:01:16 Written by AdministratorWhen working with Excel files, setting the proper row height and column width is crucial for data presentation and readability. For example, if there are long text entries in a column, increasing the column width ensures that the entire text is clearly visible without truncation. Similarly, for rows that contain large fonts or multiple lines of text, adjusting the row height is necessary. In this article, you will learn how to set row height and column width in Excel in React using Spire.XLS for JavaScript.
Install Spire.XLS for JavaScript
To get started with setting row height or column width in a React application, you can either download Spire.XLS for JavaScript from our website or install it via npm with the following command:
npm i spire.office
The downloaded product package has been integrated Spire.Doc for JavaScript,Spire.XLS for JavaScript,Spire.PDF for JavaScript,Spire.Presentation for JavaScript. To use the functionality of Spire.XLS for JavaScript, you need to copy the corresponding files (spire.xls.js, Spire.Xls.Wasm.zip, spire.common.js, Spire.Common.Wasm.zip, and _framework) to the project's "public" folder. At the same time, in order to ensure text rendering, the related font files can be added with custom paths. In the following example, the font addition path is: public\static\font.
For more details, refer to the documentation: How to Integrate Spire.XLS for JavaScript in a React Project
Set Row Height in Excel with JavaScript
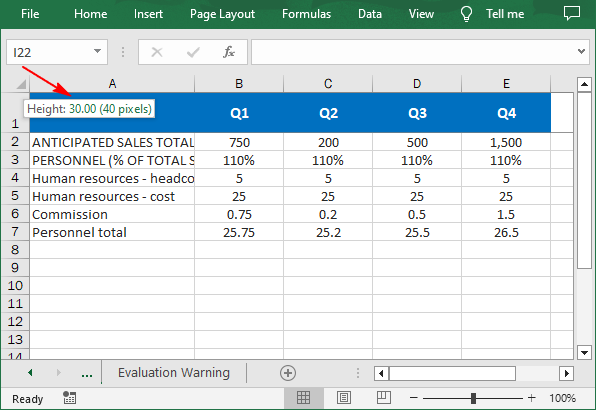
Spire.XLS for JavaScript provides the Worksheet.SetRowHeight() method to set the height of a specified row in an Excel worksheet. The following are the main steps.
- Create a Workbook object using the new wasmModule.Workbook() method.
- Load an Excel file using the Workbook.LoadFromFile() method.
- Get a specific worksheet using the Workbook.Worksheets.get() method.
- Set the height of a specified row using the Worksheet. SetRowHeight() method.
- Save the result file using the Workbook.SaveToFile() method.
- JavaScript
import React, { useState, useEffect } from 'react';
function App() {
  const [wasmModule, setWasmModule] = useState(null);
  // Load Spire.XLS
  useEffect(() => {
    (async () => {
      try {
        const publicUrl = process.env.PUBLIC_URL || '';
        const spireModule = await import(/* webpackIgnore: true */ `${publicUrl}/spire.xls.js`);
        const rawModule = spireModule.default || spireModule;
        window.wasmModule = typeof rawModule === 'function'
          ? await rawModule({ locateFile: p => p.endsWith('.wasm') ? `${publicUrl}/${p}` : p })
          : rawModule;
        setWasmModule(window.wasmModule);
      } catch (error) {
        console.error('Failed to load spire.xls.js WASM module:', error);
      }
    })();
  }, []);

  // Function to delete a specified row and column
  const SetRowHeight  = async () => {
    const wasmModule = window.wasmModule.spirexls;

    if (wasmModule) {
      // Load font into Virtual File System (VFS)
      await window.spire.FetchFileToVFS('Arial.ttf', '/Library/Fonts/', `${process.env.PUBLIC_URL}/static/font/`);


      // Load the Excel files into the virtual file system (VFS)
      let inputFileName = 'merged.xlsx';
      await window.spire.FetchFileToVFS(inputFileName, '', `${process.env.PUBLIC_URL}/static/data/`);


      // Create a new workbook
      let workbook = new wasmModule.Workbook();


      // Load an Excel document
      workbook.LoadFromFile({ fileName: inputFileName });

      // Get the first worksheet
      let sheet = workbook.Worksheets.get(0);

      // Set the height of the first row to 30
      sheet.SetRowHeight(1, 30)

      //Save result file
      const outputFileName = 'SetRowHeight.xlsx';
      workbook.SaveToFile({fileName: outputFileName, version:wasmModule.ExcelVersion.Version2016});

      // Read the saved file and convert to Blob object
      const modifiedFileArray = window.dotnetRuntime.Module.FS.readFile(outputFileName);
      const modifiedFile = new Blob([modifiedFileArray], { type: 'application/vnd.openxmlformats-officedocument.spreadsheetml.sheet' });

      // Create a URL for the Blob and initiate download
      const url = URL.createObjectURL(modifiedFile);
      const a = document.createElement('a');
      a.href = url;
      a.download = outputFileName;
      document.body.appendChild(a);
      a.click();
      document.body.removeChild(a);
      URL.revokeObjectURL(url);

      // Clean up resources used by the workbook
      workbook.Dispose();
    }
  };

  return (
    <div style={{ textAlign: 'center', height: '300px' }}>
      <h1>Set Row Height in Excel Using JavaScript in React</h1>
      <button onClick={SetRowHeight} disabled={!wasmModule}>
        Process
      </button>
    </div>
  );
}

export default App;
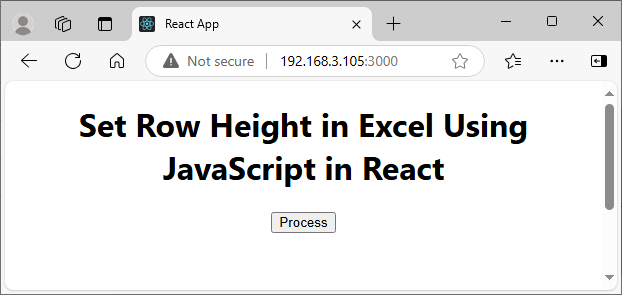
Run the code to launch the React app at localhost:3000. Once it's running, click the "Process" button to set the row height in Excel:
Below is the result file:
Set Column Width in Excel with JavaScript
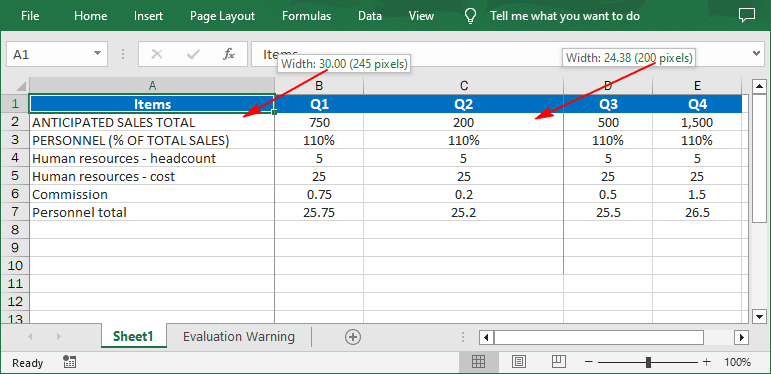
Worksheet.SetColumnWidth() method can be used to set the width of a specified column. The default unit of measure is points, and if you want to set column width in pixels, you can use the Worksheet.SetColumnWidthInPixels() method. The following are the main steps.
- Create a Workbook object using the new wasmModule.Workbook() method.
- Load an Excel file using the Workbook.LoadFromFile() method.
- Get a specific worksheet using the Workbook.Worksheets.get() method.
- Set the width of a specified column in points using the Worksheet.SetColumnWidth() method.
- Set the width of a specified column in pixels using the Worksheet.SetColumnWidthInPixels() method.
- Save the result file using the Workbook.SaveToFile() method.
- JavaScript
import React, { useState, useEffect } from 'react';
function App() {
  const [wasmModule, setWasmModule] = useState(null);
  // Load Spire.XLS
  useEffect(() => {
    (async () => {
      try {
        const publicUrl = process.env.PUBLIC_URL || '';
        const spireModule = await import(/* webpackIgnore: true */ `${publicUrl}/spire.xls.js`);
        const rawModule = spireModule.default || spireModule;
        window.wasmModule = typeof rawModule === 'function'
          ? await rawModule({ locateFile: p => p.endsWith('.wasm') ? `${publicUrl}/${p}` : p })
          : rawModule;
        setWasmModule(window.wasmModule);
      } catch (error) {
        console.error('Failed to load spire.xls.js WASM module:', error);
      }
    })();
  }, []);

  //  Function to delete a specified row and column
  const SetColumnWidth = async () => {
    const wasmModule = window.wasmModule.spirexls;

    if (wasmModule) {
      // Load font into Virtual File System (VFS)
      await window.spire.FetchFileToVFS('Arial.ttf', '/Library/Fonts/', `${process.env.PUBLIC_URL}/static/font/`);


      // Load the Excel files into the virtual file system (VFS)
      let inputFileName = 'merged.xlsx';
      await window.spire.FetchFileToVFS(inputFileName, '', `${process.env.PUBLIC_URL}/static/data/`);


      // Create a new workbook
      let workbook = new wasmModule.Workbook();


      // Load an Excel document
      workbook.LoadFromFile({ fileName: inputFileName });

      // Get the first worksheet
      let sheet = workbook.Worksheets.get(0);

      // Set the width of the first colum to 30 points
      sheet.SetColumnWidth(1, 30);

      // Set the width of the third column to 200 pixels
      sheet.SetColumnWidthInPixels(3, 200);

      //Save result file
      const outputFileName = 'SetColumnWidth.xlsx';
      workbook.SaveToFile({ fileName: outputFileName, version: wasmModule.ExcelVersion.Version2016 });

      // Read the saved file and convert to Blob object
      const modifiedFileArray = window.dotnetRuntime.Module.FS.readFile(outputFileName);
      const modifiedFile = new Blob([modifiedFileArray], { type: 'application/vnd.openxmlformats-officedocument.spreadsheetml.sheet' });

      // Create a URL for the Blob and initiate download
      const url = URL.createObjectURL(modifiedFile);
      const a = document.createElement('a');
      a.href = url;
      a.download = outputFileName;
      document.body.appendChild(a);
      a.click();
      document.body.removeChild(a);
      URL.revokeObjectURL(url);

      // Clean up resources used by the workbook
      workbook.Dispose();
    }
  };

  return (
    <div style={{ textAlign: 'center', height: '300px' }}>
      <h1>Set Column Width in Excel Using JavaScript in React</h1>
      <button onClick={SetColumnWidth} disabled={!wasmModule}>
        Process
      </button>
    </div>
  );
}

export default App;
Get a Free License
To fully experience the capabilities of Spire.XLS for JavaScript without any evaluation limitations, you can request a free 30-day trial license.
Merge or Unmerge Cells in Excel with JavaScript in React
2025-02-13 08:57:13 Written by AdministratorMerging and unmerging cells in Excel is a useful feature that enhances the organization and presentation of data in worksheets. By combining multiple cells into a single cell or separating a merged cell back into its original state, you can better format your data for readability and aesthetic appeal. In this article, we will demonstrate how to merge and unmerge cells in Excel in React using Spire.XLS for JavaScript.
Install Spire.XLS for JavaScript
To get started with merging and unmerging cells in Excel in a React application, you can either download Spire.XLS for JavaScript from our website or install it via npm with the following command:
npm i spire.office
The downloaded product package has been integrated Spire.Doc for JavaScript,Spire.XLS for JavaScript,Spire.PDF for JavaScript,Spire.Presentation for JavaScript. To use the functionality of Spire.XLS for JavaScript, you need to copy the corresponding files (spire.xls.js, Spire.Xls.Wasm.zip, spire.common.js, Spire.Common.Wasm.zip, and _framework) to the project's "public" folder. At the same time, in order to ensure text rendering, the related font files can be added with custom paths. In the following example, the font addition path is: public\static\font.
For more details, refer to the documentation: How to Integrate Spire.XLS for JavaScript in a React Project
Merge Specific Cells in Excel
Merging cells allows users to create a header that spans multiple columns or rows, making the data more visually structured and easier to read. With Spire.XLS for JavaScript, developers are able to merge specific adjacent cells into a single cell by using the CellRange.Merge() method. The detailed steps are as follows.
- Create a Workbook object using the new wasmModule.Workbook() method.
- Load the Excel file using the Workbook.LoadFromFile() method.
- Get a specific worksheet using the Workbook.Worksheets.get(index) method.
- Get the range of cells that need to be merged using the Worksheet.Range.get() method.
- Merge the cells into one using the CellRange.Merge() method.
- Save the resulting workbook using the Workbook.SaveToFile() method.
- JavaScript
import React, { useState, useEffect } from 'react';
function App() {
  const [wasmModule, setWasmModule] = useState(null);
  // Load Spire.XLS
  useEffect(() => {
    (async () => {
      try {
        const publicUrl = process.env.PUBLIC_URL || '';
        const spireModule = await import(/* webpackIgnore: true */ `${publicUrl}/spire.xls.js`);
        const rawModule = spireModule.default || spireModule;
        window.wasmModule = typeof rawModule === 'function'
          ? await rawModule({ locateFile: p => p.endsWith('.wasm') ? `${publicUrl}/${p}` : p })
          : rawModule;
        setWasmModule(window.wasmModule);
      } catch (error) {
        console.error('Failed to load spire.xls.js WASM module:', error);
      }
    })();
  }, []);

  // Function to merge cells in an Excel worksheet
  const MergeCells = async () => {
    const wasmModule = window.wasmModule.spirexls;

    if (wasmModule) {
      // Load font into Virtual File System (VFS)
      await window.spire.FetchFileToVFS('Arial.ttf', '/Library/Fonts/', `${process.env.PUBLIC_URL}/static/font/`);


      // Load the Excel files into the virtual file system (VFS)
      let inputFileName = 'sample.xlsx';
      await window.spire.FetchFileToVFS(inputFileName, '', `${process.env.PUBLIC_URL}/static/data/`);


      // Create a new workbook
      let workbook = new wasmModule.Workbook();


      // Load an Excel document
      workbook.LoadFromFile({ fileName: inputFileName });

      // Get the first worksheet
      let sheet = workbook.Worksheets.get(0);

      // Merge the particular cells in the worksheet
      sheet.Range.get("A1:D1").Merge();

      // Define the output file name
      const outputFileName = "MergeCells_output.xlsx";

      // Save the workbook to the specified path
      workbook.SaveToFile({ fileName: outputFileName, version: wasmModule.ExcelVersion.Version2013 });

      // Read the saved file and convert to Blob object
      const modifiedFileArray = window.dotnetRuntime.Module.FS.readFile(outputFileName);
      const modifiedFile = new Blob([modifiedFileArray], { type: 'application/vnd.openxmlformats-officedocument.spreadsheetml.sheet' });

      // Create a URL for the Blob and initiate download
      const url = URL.createObjectURL(modifiedFile);
      const a = document.createElement('a');
      a.href = url;
      a.download = outputFileName;
      document.body.appendChild(a);
      a.click();
      document.body.removeChild(a);
      URL.revokeObjectURL(url);

      // Clean up resources used by the workbook
      workbook.Dispose();
    }
  };

  return (
    <div style={{ textAlign: 'center', height: '300px' }}>
      <h1>Merge Cells in an Excel Worksheet into One Using JavaScript in React</h1>
      <button onClick={MergeCells} disabled={!wasmModule}>
        Merge
      </button>
    </div>
  );
}

export default App;
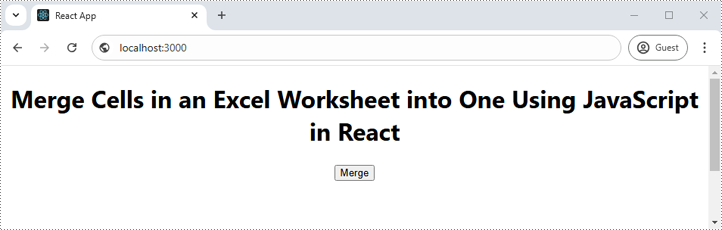
Run the code to launch the React app at localhost:3000. Once it's running, click on the "Merge" button to merge specific cells in an Excel worksheet into one:
The output Excel worksheet appears as follows:

Unmerge Specific Cells in Excel
Unmerging cells allows users to restore previously merged cells to their original individual state, enabling better data manipulation and formatting flexibility. With Spire.XLS for JavaScript, developers can unmerge specific merged cells using the CellRange.UnMerge() method. The detailed steps are as follows.
- Create a Workbook object using the new wasmModule.Workbook() method.
- Load the Excel file using the Workbook.LoadFromFile() method.
- Get a specific worksheet using the Workbook.Worksheets.get(index) method.
- Get the cell that needs to be unmerged using the Worksheet.Range.get() method.
- Unmerge the cell using the CellRange.UnMerge() method.
- Save the resulting workbook using the Workbook.SaveToFile() method.
- JavaScript
import React, { useState, useEffect } from 'react';
function App() {
  const [wasmModule, setWasmModule] = useState(null);
  // Load Spire.XLS
  useEffect(() => {
    (async () => {
      try {
        const publicUrl = process.env.PUBLIC_URL || '';
        const spireModule = await import(/* webpackIgnore: true */ `${publicUrl}/spire.xls.js`);
        const rawModule = spireModule.default || spireModule;
        window.wasmModule = typeof rawModule === 'function'
          ? await rawModule({ locateFile: p => p.endsWith('.wasm') ? `${publicUrl}/${p}` : p })
          : rawModule;
        setWasmModule(window.wasmModule);
      } catch (error) {
        console.error('Failed to load spire.xls.js WASM module:', error);
      }
    })();
  }, []);

  // Function to unmerge cells in an Excel worksheet
  const UnmergeCells = async () => {
    const wasmModule = window.wasmModule.spirexls;

    if (wasmModule) {
      // Load font into Virtual File System (VFS)
      await window.spire.FetchFileToVFS('Arial.ttf', '/Library/Fonts/', `${process.env.PUBLIC_URL}/static/font/`);


      // Load the Excel files into the virtual file system (VFS)
      let inputFileName = 'merged.xlsx';
      await window.spire.FetchFileToVFS(inputFileName, '', `${process.env.PUBLIC_URL}/static/data/`);


      // Create a new workbook
      let workbook = new wasmModule.Workbook();


      // Load an Excel document
      workbook.LoadFromFile({ fileName: inputFileName });

      // Get the first worksheet
      let sheet = workbook.Worksheets.get(0);

      // Unmerge the particular cell in the worksheet
      sheet.Range.get("A1").UnMerge();

      // Define the output file name
      const outputFileName = "UnmergeCells.xlsx";

      // Save the workbook to the specified path
      workbook.SaveToFile({ fileName: outputFileName, version: wasmModule.ExcelVersion.Version2010 });

      // Read the saved file and convert to Blob object
      const modifiedFileArray = window.dotnetRuntime.Module.FS.readFile(outputFileName);
      const modifiedFile = new Blob([modifiedFileArray], { type: 'application/vnd.openxmlformats-officedocument.spreadsheetml.sheet' });

      // Create a URL for the Blob and initiate download
      const url = URL.createObjectURL(modifiedFile);
      const a = document.createElement('a');
      a.href = url;
      a.download = outputFileName;
      document.body.appendChild(a);
      a.click();
      document.body.removeChild(a);
      URL.revokeObjectURL(url);

      // Clean up resources used by the workbook
      workbook.Dispose();
    }
  };

  return (
    <div style={{ textAlign: 'center', height: '300px' }}>
      <h1>Unmerge Cells in an Excel Worksheet Using JavaScript in React</h1>
      <button onClick={UnmergeCells} disabled={!wasmModule}>
        Unmerge
      </button>
    </div>
  );
}

export default App;
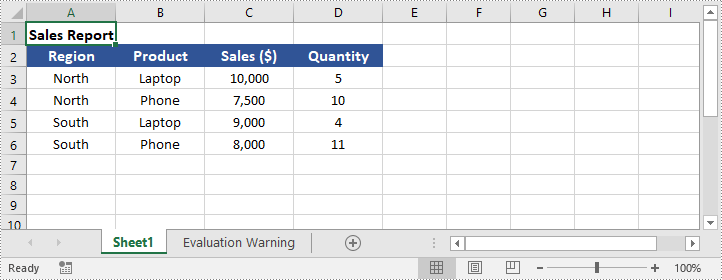
Unmerge All Merged Cells in Excel
When dealing with spreadsheets containing multiple merged cells, unmerging them all at once can help restore the original cell structure. With Spire.XLS for JavaScript, developers can easily find all merged cells in a worksheet using the Worksheet.MergedCells property and unmerge them with the CellRange.UnMerge() method. The detailed steps are as follows.
- Create a Workbook object using the new wasmModule.Workbook() method.
- Load the Excel file using the Workbook.LoadFromFile() method.
- Get a specific worksheet using the Workbook.Worksheets.get(index) method.
- Get all merged cell ranges in the worksheet using the Worksheet.MergedCells property.
- Loop through the merged cell ranges and unmerge them using the CellRange.UnMerge() method.
- Save the resulting workbook using the Workbook.SaveToFile() method.
- JavaScript
import React, { useState, useEffect } from 'react';
function App() {
  const [wasmModule, setWasmModule] = useState(null);
  // Load Spire.XLS
  useEffect(() => {
    (async () => {
      try {
        const publicUrl = process.env.PUBLIC_URL || '';
        const spireModule = await import(/* webpackIgnore: true */ `${publicUrl}/spire.xls.js`);
        const rawModule = spireModule.default || spireModule;
        window.wasmModule = typeof rawModule === 'function'
          ? await rawModule({ locateFile: p => p.endsWith('.wasm') ? `${publicUrl}/${p}` : p })
          : rawModule;
        setWasmModule(window.wasmModule);
      } catch (error) {
        console.error('Failed to load spire.xls.js WASM module:', error);
      }
    })();
  }, []);

  // Function to unmerge cells in an Excel worksheet
  const UnmergeCells = async () => {
    const wasmModule = window.wasmModule.spirexls;

    if (wasmModule) {
      // Load font into Virtual File System (VFS)
      await window.spire.FetchFileToVFS('Arial.ttf', '/Library/Fonts/', `${process.env.PUBLIC_URL}/static/font/`);


      // Load the Excel files into the virtual file system (VFS)
      let inputFileName = 'merged.xlsx';
      await window.spire.FetchFileToVFS(inputFileName, '', `${process.env.PUBLIC_URL}/static/data/`);


      // Create a new workbook
      let workbook = new wasmModule.Workbook();


      // Load an Excel document
      workbook.LoadFromFile({ fileName: inputFileName });

      // Get the first worksheet
      let sheet = workbook.Worksheets.get(0);

      // Get all merged cell ranges in the worksheet and put them into a CellRange array
      let range = sheet.MergedCells;

      // Loop through the array and unmerge all merged cell ranges
      for (let cell of range) {
        cell.UnMerge();
      }

      // Define the output file name
      const outputFileName = "UnmergeAllMergedCells.xlsx";

      // Save the workbook to the specified path
      workbook.SaveToFile({ fileName: outputFileName, version: wasmModule.ExcelVersion.Version2010 });

      // Read the saved file and convert to Blob object
      const modifiedFileArray = window.dotnetRuntime.Module.FS.readFile(outputFileName);
      const modifiedFile = new Blob([modifiedFileArray], { type: 'application/vnd.openxmlformats-officedocument.spreadsheetml.sheet' });

      // Create a URL for the Blob and initiate download
      const url = URL.createObjectURL(modifiedFile);
      const a = document.createElement('a');
      a.href = url;
      a.download = outputFileName;
      document.body.appendChild(a);
      a.click();
      document.body.removeChild(a);
      URL.revokeObjectURL(url);

      // Clean up resources used by the workbook
      workbook.Dispose();
    }
  };

  return (
    <div style={{ textAlign: 'center', height: '300px' }}>
      <h1>Unmerge Cells in an Excel Worksheet Using JavaScript in React</h1>
      <button onClick={UnmergeCells} disabled={!wasmModule}>
        Unmerge
      </button>
    </div>
  );
}

export default App;
Get a Free License
To fully experience the capabilities of Spire.XLS for JavaScript without any evaluation limitations, you can request a free 30-day trial license.
Convert Excel to OpenXML and OpenXML to Excel with JavaScript in React
2025-02-10 01:05:26 Written by AdministratorOpenXML is a widely used format for creating and manipulating Microsoft Office documents, including Excel files. It provides a structured, XML-based representation of spreadsheet data, making it ideal for interoperability and automation. Converting an Excel file to OpenXML allows users to extract and process data programmatically, while converting OpenXML back to Excel ensures compatibility with Microsoft Excel and other spreadsheet applications. This article will guide you through the process of converting Excel to OpenXML and OpenXML back to Excel in React using Spire.XLS for JavaScript.
Install Spire.XLS for JavaScript
To get started with converting Excel to OpenXML and OpenXML to Excel in a React application, you can either download Spire.XLS for JavaScript from the official website or install it via npm with the following command:
npm i spire.office
The downloaded product package has been integrated Spire.Doc for JavaScript,Spire.XLS for JavaScript,Spire.PDF for JavaScript,Spire.Presentation for JavaScript. To use the functionality of Spire.XLS for JavaScript, you need to copy the corresponding files (spire.xls.js, Spire.Xls.Wasm.zip, spire.common.js, Spire.Common.Wasm.zip, and _framework) to the project's "public" folder. At the same time, in order to ensure text rendering, the related font files can be added with custom paths. In the following example, the font addition path is: public\static\font.
For more details, refer to the documentation: How to Integrate Spire.XLS for JavaScript in a React Project.
Convert Excel to OpenXML with JavaScript
Converting an Excel workbook to OpenXML format can be easily achieved using the Workbook.SaveAsXml() method provided by Spire.XLS for JavaScript. Below are the key steps:
- Load the font file to ensure correct text rendering.
- Create a Workbook object using the new wasmModule.Workbook() method.
- Load the Excel file using the Workbook.LoadFromFile() method.
- Save the Excel file as an OpenXML file using the Workbook.SaveAsXml() method.
Code example:
- JavaScript
import React, { useState, useEffect } from 'react';
function App() {
  const [wasmModule, setWasmModule] = useState(null);
  // Load Spire.XLS
  useEffect(() => {
    (async () => {
      try {
        const publicUrl = process.env.PUBLIC_URL || '';
        const spireModule = await import(/* webpackIgnore: true */ `${publicUrl}/spire.xls.js`);
        const rawModule = spireModule.default || spireModule;
        window.wasmModule = typeof rawModule === 'function'
          ? await rawModule({ locateFile: p => p.endsWith('.wasm') ? `${publicUrl}/${p}` : p })
          : rawModule;
        setWasmModule(window.wasmModule);
      } catch (error) {
        console.error('Failed to load spire.xls.js WASM module:', error);
      }
    })();
  }, []);

  // Function to convert Excel to OpenXML
  const ExcelToOpenXML  = async () => {
    const wasmModule = window.wasmModule.spirexls;

    if (wasmModule) {
      // Load font into Virtual File System (VFS)
      await window.spire.FetchFileToVFS('Arial.ttf', '/Library/Fonts/', `${process.env.PUBLIC_URL}/static/font/`);

      // Load input file into Virtual File System (VFS)
      const inputFileName = 'sample.xlsx';
      await window.spire.FetchFileToVFS(inputFileName, '', `${process.env.PUBLIC_URL}/static/data/`);

      // Create a new workbook
      const workbook = new wasmModule.Workbook();

      // Load an existing HTML file
      workbook.LoadFromHtml({ fileName: inputFileName });

      // Specify the output OpenXML file path
      const outputFileName = 'ExcelXML.xml';

      // Save the workbook as an OpenXML file
      workbook.SaveAsXml({ fileName: outputFileName });

      // Read the saved file and convert to Blob object
      const modifiedFileArray = window.dotnetRuntime.Module.FS.readFile(outputFileName);
      const modifiedFile = new Blob([modifiedFileArray], { type: 'application/xml' });

      // Create a URL for the Blob and initiate download
      const url = URL.createObjectURL(modifiedFile);
      const a = document.createElement('a');
      a.href = url;
      a.download = outputFileName;
      document.body.appendChild(a);
      a.click();
      document.body.removeChild(a);
      URL.revokeObjectURL(url);

      // Clean up resources used by the workbook
      workbook.Dispose();
    }
  };

  return (
    <div style={{ textAlign: 'center', height: '300px' }}>
      <h1>Convert an Excel File to OpenXML Using JavaScript in React</h1>
      <button onClick={ExcelToOpenXML} disabled={!wasmModule}>
        Convert
      </button>
    </div>
  );
}

export default App;
Run the code to launch the React app at localhost:3000. Once it's running, click on the "Convert" button to save the Excel file as an OpenXML file:
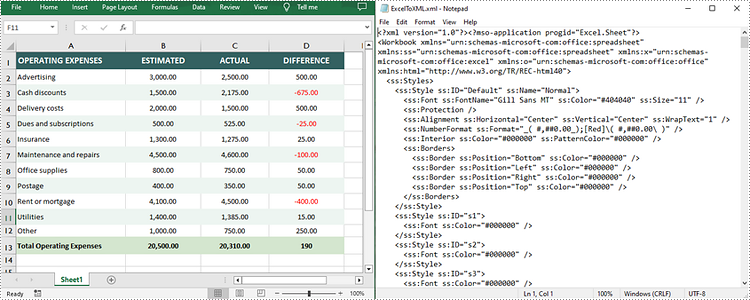
The below screenshot shows the input Excel file and the converted OpenXML file:
Convert OpenXML to Excel with JavaScript
To convert an OpenXML file back to Excel, you can use the Workbook.LoadFromXml() method to load the OpenXML file and the Workbook.SaveToFile() method to save it in Excel format. Below are the key steps:
- Load the font file to ensure correct text rendering.
- Create a Workbook object using the new wasmModule.Workbook() method.
- Read an OpenXML file into a stream using the wasmModule.Stream.CreateByFile() method.
- Load the OpenXML file from the stream using the Workbook.LoadFromXml() method.
- Save the OpenXML file as an Excel file using the Workbook.SaveToFile() method.
Code example:
- JavaScript
import React, { useState, useEffect } from 'react';
function App() {
  const [wasmModule, setWasmModule] = useState(null);
  // Load Spire.XLS
  useEffect(() => {
    (async () => {
      try {
        const publicUrl = process.env.PUBLIC_URL || '';
        const spireModule = await import(/* webpackIgnore: true */ `${publicUrl}/spire.xls.js`);
        const rawModule = spireModule.default || spireModule;
        window.wasmModule = typeof rawModule === 'function'
          ? await rawModule({ locateFile: p => p.endsWith('.wasm') ? `${publicUrl}/${p}` : p })
          : rawModule;
        setWasmModule(window.wasmModule);
      } catch (error) {
        console.error('Failed to load spire.xls.js WASM module:', error);
      }
    })();
  }, []);

  // Function to convert OpenXML to Excel
  const OpenXMLToExcel = async () => {
    const wasmModule = window.wasmModule.spirexls;

    if (wasmModule) {
      // Load font into Virtual File System (VFS)
      await window.spire.FetchFileToVFS('Arial.ttf', '/Library/Fonts/', `${process.env.PUBLIC_URL}/static/font/`);

      // Load input file into Virtual File System (VFS)
      const inputFileName = 'in.xml';
      await window.spire.FetchFileToVFS(inputFileName, '', `${process.env.PUBLIC_URL}/static/data/`);

      // Create a new workbook
      const workbook = new wasmModule.Workbook();

      // Read an OpenXML file into a stream
      let fileStream = new wasmModule.Stream(inputFileName);
      // Load the OpenXML file from the stream
      workbook.LoadFromXml({ stream: fileStream });

      // Specify the output Excel file path
      const outputFileName = 'XMLToExcel.xlsx';

      // Save the OpenXML file as an Excel file
      workbook.SaveToFile({ fileName: outputFileName, version: wasmModule.ExcelVersion.Version2013 });

      // Read the saved file and convert to Blob object
      const modifiedFileArray = window.dotnetRuntime.Module.FS.readFile(outputFileName);
      const modifiedFile = new Blob([modifiedFileArray], { type: 'application/vnd.openxmlformats-officedocument.spreadsheetml.sheet' });

      // Create a URL for the Blob and initiate download
      const url = URL.createObjectURL(modifiedFile);
      const a = document.createElement('a');
      a.href = url;
      a.download = outputFileName;
      document.body.appendChild(a);
      a.click();
      document.body.removeChild(a);
      URL.revokeObjectURL(url);

      // Clean up resources used by the workbook
      workbook.Dispose();
    }
  };

  return (
    <div style={{ textAlign: 'center', height: '300px' }}>
      <h1>Convert an OpenXML File to Excel Using JavaScript in React</h1>
      <button onClick={OpenXMLToExcel} disabled={!wasmModule}>
        Convert
      </button>
    </div>
  );
}

export default App;
Get a Free License
To fully experience the capabilities of Spire.XLS for JavaScript without any evaluation limitations, you can request a free 30-day trial license.
Protect or Unprotect Excel Workbooks with JavaScript in React
2025-01-27 07:05:58 Written by AdministratorAs businesses increasingly rely on web-based platforms for data manipulation and sharing, the ability to programmatically protect or unprotect Excel files becomes crucial. These security settings not only ensure sensitive information is shielded from unauthorized access but also facilitate seamless collaboration among team members by allowing controlled access to specific data sets. By leveraging JavaScript in React, developers can implement these features natively, providing a robust solution to manage data confidentiality and integrity directly within their applications. In this article, we will explore how to use Spire.XLS for JavaScript to protect and unprotect Excel workbooks using JavaScript in React applications.
- Password-Protect an Excel Workbook using JavaScript
- Protect an Excel Worksheet with Specific Permissions
- Set Editable Ranges when Protect an Excel Worksheet
- Unprotect an Excel Worksheet with JavaScript
- Reset or Remove the Password of an Encrypted Excel Workbook
Install Spire.XLS for JavaScript
To get started with protecting and unprotecting Excel files in a React application, you can either download Spire.XLS for JavaScript from our website or install it via npm with the following command:
npm i spire.office
The downloaded product package has been integrated Spire.Doc for JavaScript,Spire.XLS for JavaScript,Spire.PDF for JavaScript,Spire.Presentation for JavaScript. To use the functionality of Spire.XLS for JavaScript, you need to copy the corresponding files (spire.xls.js, Spire.Xls.Wasm.zip, spire.common.js, Spire.Common.Wasm.zip, and _framework) to the project's "public" folder. At the same time, in order to ensure text rendering, the related font files can be added with custom paths. In the following example, the font addition path is: public\static\font.
For more details, refer to the documentation: How to Integrate Spire.XLS for JavaScript in a React Project
Password-Protect an Excel Workbook using JavaScript
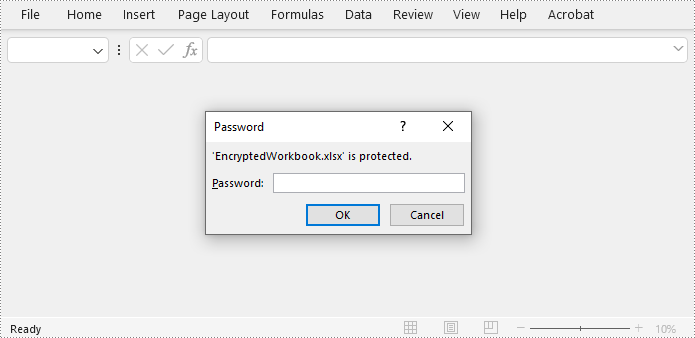
Spire.XLS for JavaScript offers the Workbook.Protect(filename: string) method to encrypt an Excel file with a password. This functionality allows developers to secure the entire Excel workbook. Below are the steps to implement this:
- Load the Spire.Xls.Base.js file to initialize the WebAssembly module.
- Load the Excel file to the virtual file system using the window.spire.FetchFileToVFS() method
- Create an instance of the Workbook class using the new wasmModule.Workbook() method.
- Load the Excel file to the Workbook instance using the Workbook.LoadFromFile() method.
- Protect the workbook with a password using the Workbook.Protect() method.
- Save the workbook to a file using Workbook.SaveToFile() method.
- Create a download link for the result file.
- JavaScript
import React, { useState, useEffect } from 'react';
function App() {
  const [wasmModule, setWasmModule] = useState(null);
  // Load Spire.XLS
  useEffect(() => {
    (async () => {
      try {
        const publicUrl = process.env.PUBLIC_URL || '';
        const spireModule = await import(/* webpackIgnore: true */ `${publicUrl}/spire.xls.js`);
        const rawModule = spireModule.default || spireModule;
        window.wasmModule = typeof rawModule === 'function'
          ? await rawModule({ locateFile: p => p.endsWith('.wasm') ? `${publicUrl}/${p}` : p })
          : rawModule;
        setWasmModule(window.wasmModule);
      } catch (error) {
        console.error('Failed to load spire.xls.js WASM module:', error);
      }
    })();
  }, []);

  //  Function to protect an Excel workbook with a password
  const EncryptExcel  = async () => {
    const wasmModule = window.wasmModule.spirexls;

    if (wasmModule) {
      // Load font into Virtual File System (VFS)
      await window.spire.FetchFileToVFS('Arial.ttf', '/Library/Fonts/', `${process.env.PUBLIC_URL}/static/font/`);


      // Load the Excel files into the virtual file system (VFS)
      let inputFileName = 'sample.xlsx';
      await window.spire.FetchFileToVFS(inputFileName, '', `${process.env.PUBLIC_URL}/static/data/`);


      // Create a new workbook
      let workbook = new wasmModule.Workbook();

      // Load an Excel document
      workbook.LoadFromFile({ fileName: inputFileName });

      // Encrypt the workbook with a password
      workbook.Protect('password')

      //Save result file
      const outputFileName = 'EncryptedWorkbook.xlsx';
      workbook.SaveToFile({ fileName: outputFileName, version: wasmModule.ExcelVersion.Version2016 });

      // Read the saved file and convert to Blob object
      const modifiedFileArray = window.dotnetRuntime.Module.FS.readFile(outputFileName);
      const modifiedFile = new Blob([modifiedFileArray], { type: 'application/vnd.openxmlformats-officedocument.spreadsheetml.sheet' });

      // Create a URL for the Blob and initiate download
      const url = URL.createObjectURL(modifiedFile);
      const a = document.createElement('a');
      a.href = url;
      a.download = outputFileName;
      document.body.appendChild(a);
      a.click();
      document.body.removeChild(a);
      URL.revokeObjectURL(url);

      // Clean up resources used by the workbook
      workbook.Dispose();
    }
  };

  return (
      <div style={{ textAlign: 'center', height: '300px' }}>
        <h1>Protect Excel Workbook Using JavaScript in React</h1>
        <button onClick={EncryptExcel} disabled={!wasmModule}>
          Encrypt and Download
        </button>
      </div>
  );
}

export default App;
Protect an Excel Worksheet with Specific Permissions
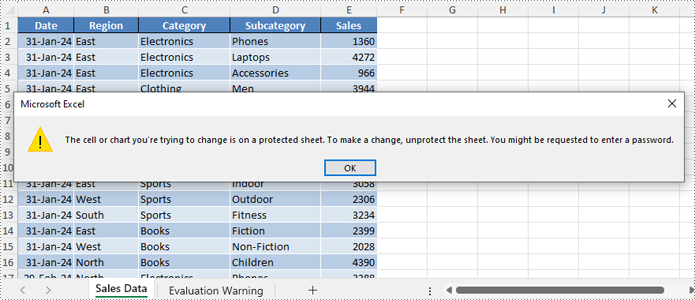
Spire.XLS for JavaScript enables developers to secure worksheets with specific permissions using the Worksheet.Protect() method, such as restricting edits while allowing formatting or filtering, or simply restricting all changes. The permissions are specified by the SheetProtectionType Enum class.
| Protection Type | Allow users to |
| Content | Modify or insert content. |
| DeletingColumns | Delete columns. |
| DeletingRows | Delete rows. |
| Filtering | Set filters. |
| FormattingCells | Format cells. |
| FormattingColumns | Format columns. |
| FormattingRows | Format rows. |
| InsertingColumns | Insert columns. |
| InsertingRows | Insert rows. |
| InsertingHyperlinks | Insert hyperlinks. |
| LockedCells | Select locked cells. |
| UnlockedCells | Select unlocked cells. |
| Objects | Modify drawing objects. |
| Scenarios | Modify saved scenarios. |
| Sorting | Sort data. |
| UsingPivotTables | Use the pivot table and pivot chart. |
| All | Do any operations listed above on the protected worksheet. |
| None | Do nothing on the protected worksheet. |
Follow these steps to protect a worksheet with specific permissions:
- Load the Spire.Xls.Base.js file to initialize the WebAssembly module.
- Load the Excel file into the virtual file system using the window.spire.FetchFileToVFS() method.
- Create a Workbook instance with the new wasmModule.Workbook() method.
- Load the Excel file into the Workbook using the Workbook.LoadFromFile() method.
- Retrieve the desired worksheet using the Workbook.Worksheets.get(index) method.
- Protect the worksheet and allow only filtering with the Worksheet.Protect(password, SheetProtectionType.None) method.
- Save the workbook using the Workbook.SaveToFile() method.
- Create a download link for the protected file.
- JavaScript
import React, { useState, useEffect } from 'react';
function App() {
  const [wasmModule, setWasmModule] = useState(null);
  // Load Spire.XLS
  useEffect(() => {
    (async () => {
      try {
        const publicUrl = process.env.PUBLIC_URL || '';
        const spireModule = await import(/* webpackIgnore: true */ `${publicUrl}/spire.xls.js`);
        const rawModule = spireModule.default || spireModule;
        window.wasmModule = typeof rawModule === 'function'
          ? await rawModule({ locateFile: p => p.endsWith('.wasm') ? `${publicUrl}/${p}` : p })
          : rawModule;
        setWasmModule(window.wasmModule);
      } catch (error) {
        console.error('Failed to load spire.xls.js WASM module:', error);
      }
    })();
  }, []);

  //  Function to protect an Excel worksheet with a password
  const EncryptExcelWorksheet = async () => {
    const wasmModule = window.wasmModule.spirexls;

    if (wasmModule) {
      // Load font into Virtual File System (VFS)
      await window.spire.FetchFileToVFS('Arial.ttf', '/Library/Fonts/', `${process.env.PUBLIC_URL}/static/font/`);


      // Load the Excel files into the virtual file system (VFS)
      let inputFileName = 'sample.xlsx';
      await window.spire.FetchFileToVFS(inputFileName, '', `${process.env.PUBLIC_URL}/static/data/`);


      // Create a new workbook
      let workbook = new wasmModule.Workbook();

      // Load an Excel document
      workbook.LoadFromFile({ fileName: inputFileName });

      // Get a worksheet
      const sheet = workbook.Worksheets.get(0);

      // Protect the worksheet with a specific permission
      sheet.Protect({ password: '123456', options: wasmModule.SheetProtectionType.None });

      //Save result file
      const outputFileName = 'ProtectedWorksheet.xlsx';
      workbook.SaveToFile({ fileName: outputFileName, version: wasmModule.ExcelVersion.Version2016 });

      // Read the saved file and convert to Blob object
      const modifiedFileArray = window.dotnetRuntime.Module.FS.readFile(outputFileName);
      const modifiedFile = new Blob([modifiedFileArray], { type: 'application/vnd.openxmlformats-officedocument.spreadsheetml.sheet' });

      // Create a URL for the Blob and initiate download
      const url = URL.createObjectURL(modifiedFile);
      const a = document.createElement('a');
      a.href = url;
      a.download = outputFileName;
      document.body.appendChild(a);
      a.click();
      document.body.removeChild(a);
      URL.revokeObjectURL(url);

      // Clean up resources used by the workbook
      workbook.Dispose();
    }
  };

  return (
    <div style={{ textAlign: 'center', height: '300px' }}>
      <h1>Protect Excel Worksheet Using JavaScript in React</h1>
      <button onClick={EncryptExcelWorksheet} disabled={!wasmModule}>
        Encrypt and Download
      </button>
    </div>
  );
}

export default App;
Set Editable Ranges when Protect an Excel Worksheet
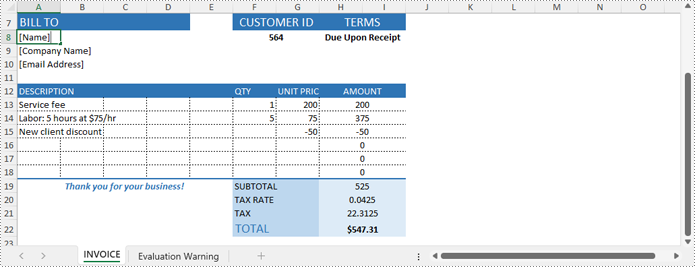
If certain cell ranges need to remain editable while protecting other areas, developers can use the Worksheet.AddAllowEditRange(name: string, range: CellRange) method to define editable ranges, and then protect the worksheet with specific permissions using the Worksheet.Protect({password: string, options: wasmModule.SheetProtectionType.All}) method.
The steps are as follows:
- Load the Spire.Xls.Base.js file to initialize the WebAssembly module.
- Load the Excel file into the virtual file system using the window.spire.FetchFileToVFS() method.
- Create a Workbook instance with the new wasmModule.Workbook() method.
- Load the Excel file into the Workbook using the Workbook.LoadFromFile() method.
- Obtain the desired worksheet using the Workbook.Worksheets.get(index) method.
- Get the cell ranges to allow editing using the Worksheet.Range.get() method.
- Add the cell ranges to editable ranges using the Worksheet.AddAllowEditRange() method.
- Protect the worksheet with the Worksheet.Protect({password: string, options: wasmModule.SheetProtectionType.All}) method.
- Save the workbook using the Workbook.SaveToFile() method.
- Create a download link for the protected file.
- JavaScript
import React, { useState, useEffect } from 'react';
function App() {
  const [wasmModule, setWasmModule] = useState(null);
  // Load Spire.XLS
  useEffect(() => {
    (async () => {
      try {
        const publicUrl = process.env.PUBLIC_URL || '';
        const spireModule = await import(/* webpackIgnore: true */ `${publicUrl}/spire.xls.js`);
        const rawModule = spireModule.default || spireModule;
        window.wasmModule = typeof rawModule === 'function'
          ? await rawModule({ locateFile: p => p.endsWith('.wasm') ? `${publicUrl}/${p}` : p })
          : rawModule;
        setWasmModule(window.wasmModule);
      } catch (error) {
        console.error('Failed to load spire.xls.js WASM module:', error);
      }
    })();
  }, []);

  //  Function to protect an Excel worksheet and add editable ranges
  const EncryptExcelWorksheetWithEditableRange = async () => {
    const wasmModule = window.wasmModule.spirexls;

    if (wasmModule) {
      // Load font into Virtual File System (VFS)
      await window.spire.FetchFileToVFS('Arial.ttf', '/Library/Fonts/', `${process.env.PUBLIC_URL}/static/font/`);


      // Load the Excel files into the virtual file system (VFS)
      let inputFileName = 'sample.xlsx';
      await window.spire.FetchFileToVFS(inputFileName, '', `${process.env.PUBLIC_URL}/static/data/`);


      // Create a new workbook
      let workbook = new wasmModule.Workbook();

      // Load an Excel document
      workbook.LoadFromFile({ fileName: inputFileName });

      // Get a worksheet
      const sheet = workbook.Worksheets.get(0);

      // Add editable ranges
      const range1 = sheet.Range.get('A8:A10');
      sheet.AddAllowEditRange({ title: "Editable Range 1", range: range1 });
      const range2 = sheet.Range.get('A13:G18');
      sheet.AddAllowEditRange({ title: "Editable Range 2", range: range2 });

      // Protect the worksheet
      sheet.Protect({ password: '123456', options: wasmModule.SheetProtectionType.All });

      //Save result file
      const outputFileName = 'EditableRanges.xlsx';
      workbook.SaveToFile({ fileName: outputFileName, version: wasmModule.ExcelVersion.Version2016 });

      // Read the saved file and convert to Blob object
      const modifiedFileArray = window.dotnetRuntime.Module.FS.readFile(outputFileName);
      const modifiedFile = new Blob([modifiedFileArray], { type: 'application/vnd.openxmlformats-officedocument.spreadsheetml.sheet' });

      // Create a URL for the Blob and initiate download
      const url = URL.createObjectURL(modifiedFile);
      const a = document.createElement('a');
      a.href = url;
      a.download = outputFileName;
      document.body.appendChild(a);
      a.click();
      document.body.removeChild(a);
      URL.revokeObjectURL(url);

      // Clean up resources used by the workbook
      workbook.Dispose();
    }
  };

  return (
    <div style={{ textAlign: 'center', height: '300px' }}>
      <h1>Protect Excel Worksheet with Editable Ranges Using JavaScript in React</h1>
      <button onClick={EncryptExcelWorksheetWithEditableRange} disabled={!wasmModule}>
        Encrypt and Download
      </button>
    </div>
  );
}

export default App;
Unprotect an Excel Worksheet with JavaScript
Developers can easily remove the password and unprotect an Excel worksheet by invoking the Worksheet.Unprotect(password: string) method, granting access and edit permissions to all users. The detailed steps are as follows:
- Load the Spire.Xls.Base.js file to initialize the WebAssembly module.
- Load the Excel file into the virtual file system using the window.spire.FetchFileToVFS() method.
- Create a Workbook instance with the new wasmModule.Workbook() method.
- Load the Excel file into the Workbook using the Workbook.LoadFromFile() method.
- Get the worksheet to unprotect using the Workbook.Worksheets.get() method.
- Remove the password protection using the Worksheet.Unprotect() method.
- Save the workbook using the Workbook.SaveToFile() method.
- Create a download link for the protected file.
- JavaScript
import React, { useState, useEffect } from 'react';
function App() {
  const [wasmModule, setWasmModule] = useState(null);
  // Load Spire.XLS
  useEffect(() => {
    (async () => {
      try {
        const publicUrl = process.env.PUBLIC_URL || '';
        const spireModule = await import(/* webpackIgnore: true */ `${publicUrl}/spire.xls.js`);
        const rawModule = spireModule.default || spireModule;
        window.wasmModule = typeof rawModule === 'function'
          ? await rawModule({ locateFile: p => p.endsWith('.wasm') ? `${publicUrl}/${p}` : p })
          : rawModule;
        setWasmModule(window.wasmModule);
      } catch (error) {
        console.error('Failed to load spire.xls.js WASM module:', error);
      }
    })();
  }, []);

  //  Function to unprotect an Excel worksheet
  const UnprotectExcelWorksheet = async () => {
    const wasmModule = window.wasmModule.spirexls;

    if (wasmModule) {
      // Load font into Virtual File System (VFS)
      await window.spire.FetchFileToVFS('Arial.ttf', '/Library/Fonts/', `${process.env.PUBLIC_URL}/static/font/`);


      // Load the Excel files into the virtual file system (VFS)
      let inputFileName = 'sample.xlsx';
      await window.spire.FetchFileToVFS(inputFileName, '', `${process.env.PUBLIC_URL}/static/data/`);


      // Create a new workbook
      let workbook = new wasmModule.Workbook();

      // Load an Excel document
      workbook.LoadFromFile({ fileName: inputFileName });

      // Get a worksheet
      const sheet = workbook.Worksheets.get(0);

      // Remove the password protection
      sheet.Unprotect('password');

      //Save result file
      const outputFileName = 'out.xlsx';
      workbook.SaveToFile({ fileName: outputFileName, version: wasmModule.ExcelVersion.Version2016 });

      // Read the saved file and convert to Blob object
      const modifiedFileArray = window.dotnetRuntime.Module.FS.readFile(outputFileName);
      const modifiedFile = new Blob([modifiedFileArray], { type: 'application/vnd.openxmlformats-officedocument.spreadsheetml.sheet' });

      // Create a URL for the Blob and initiate download
      const url = URL.createObjectURL(modifiedFile);
      const a = document.createElement('a');
      a.href = url;
      a.download = outputFileName;
      document.body.appendChild(a);
      a.click();
      document.body.removeChild(a);
      URL.revokeObjectURL(url);

      // Clean up resources used by the workbook
      workbook.Dispose();
    }
  };

  return (
    <div style={{ textAlign: 'center', height: '300px' }}>
      <h1>Unprotect Excel Worksheet Using JavaScript in React</h1>
      <button onClick={UnprotectExcelWorksheet} disabled={!wasmModule}>
        Unprotect and Download
      </button>
    </div>
  );
}

export default App;
Reset or Remove the Password of an Encrypted Excel Workbook
Spire.XLS for JavaScript provides the Workbook.OpenPassword property to specify the password for encrypted Excel workbooks, allowing developers to load and process them. After loading the encrypted workbook, developers can use the Workbook.Unprotect(password: string) method to remove the password or the Workbook.Protect(newPassword: string) method to set a new one. The steps are as follows:
- Load the Spire.Xls.Base.js file to initialize the WebAssembly module.
- Load the Excel file into the virtual file system using the window.spire.FetchFileToVFS() method.
- Create a Workbook instance with the new wasmModule.Workbook() method.
- Specify the password through the Workbook.OpenPassword property.
- Load the encrypted Excel file into the Workbook using the Workbook.LoadFromFile() method.
- Unprotect the workbook using the Workbook.Unprotect(password: string) method or set a new password using the Workbook.Protect(newPassword: string) method.
- Save the workbook using the Workbook.SaveToFile() method.
- Create a download link for the protected file.
- JavaScript
import React, { useState, useEffect } from 'react';
function App() {
  const [wasmModule, setWasmModule] = useState(null);
  // Load Spire.XLS
  useEffect(() => {
    (async () => {
      try {
        const publicUrl = process.env.PUBLIC_URL || '';
        const spireModule = await import(/* webpackIgnore: true */ `${publicUrl}/spire.xls.js`);
        const rawModule = spireModule.default || spireModule;
        window.wasmModule = typeof rawModule === 'function'
          ? await rawModule({ locateFile: p => p.endsWith('.wasm') ? `${publicUrl}/${p}` : p })
          : rawModule;
        setWasmModule(window.wasmModule);
      } catch (error) {
        console.error('Failed to load spire.xls.js WASM module:', error);
      }
    })();
  }, []);

  //  Function to unprotect an Excel workbook
  const RemoveResetExcelPassword = async () => {
    const wasmModule = window.wasmModule.spirexls;

    if (wasmModule) {
      // Load font into Virtual File System (VFS)
      await window.spire.FetchFileToVFS('Arial.ttf', '/Library/Fonts/', `${process.env.PUBLIC_URL}/static/font/`);


      // Load the Excel files into the virtual file system (VFS)
      let inputFileName = 'sample.xlsx';
      await window.spire.FetchFileToVFS(inputFileName, '', `${process.env.PUBLIC_URL}/static/data/`);


      // Create a new workbook
      let workbook = new wasmModule.Workbook();

      // Specify the password of the workbook
      workbook.OpenPassword = 'password';

      // Load an Excel document
      workbook.LoadFromFile({ fileName: inputFileName });

      // Get a worksheet
      const sheet = workbook.Worksheets.get(0);

      // Decrypt the workbook
      workbook.UnProtect('password')

      // Reset the password
      // workbook.Protect("NewPassword")

      //Save result file
      const outputFileName = 'DecryptedWorkbook.xlsx';
      workbook.SaveToFile({ fileName: outputFileName, version: wasmModule.ExcelVersion.Version2016 });

      // Read the saved file and convert to Blob object
      const modifiedFileArray = window.dotnetRuntime.Module.FS.readFile(outputFileName);
      const modifiedFile = new Blob([modifiedFileArray], { type: 'application/vnd.openxmlformats-officedocument.spreadsheetml.sheet' });

      // Create a URL for the Blob and initiate download
      const url = URL.createObjectURL(modifiedFile);
      const a = document.createElement('a');
      a.href = url;
      a.download = outputFileName;
      document.body.appendChild(a);
      a.click();
      document.body.removeChild(a);
      URL.revokeObjectURL(url);

      // Clean up resources used by the workbook
      workbook.Dispose();
    }
  };

  return (
    <div style={{ textAlign: 'center', height: '300px' }}>
      <h1>Remove the Password of Excel Workbook Using JavaScript in React</h1>
      <button onClick={RemoveResetExcelPassword} disabled={!wasmModule}>
        Decrypt and Download
      </button>
    </div>
  );
}

export default App;
Get a Free License
To fully experience the capabilities of Spire.XLS for JavaScript without any evaluation limitations, you can request a free 30-day trial license.
Delete Rows and Columns from Excel with JavaScript in React
2025-01-10 02:46:07 Written by AdministratorWhen working with Excel, you might occasionally find your worksheets cluttered with unnecessary rows and columns. These might be leftover data from previous versions, temporary calculations, or placeholders that no longer serve a purpose. Removing these unnecessary or unwanted rows and columns can keep your data organized and your sheets neat. In this article, you will learn how to delete rows and columns from an Excel Worksheet in React using Spire.XLS for JavaScript.
- Delete a Specific Row and Column from Excel
- Delete Multiple Rows and Columns from Excel
- Delete Blank Rows and Columns from Excel
Install Spire.XLS for JavaScript
To get started with deleting Excel rows and columns in a React application, you can either download Spire.XLS for JavaScript from our website or install it via npm with the following command:
npm i spire.office
The downloaded product package has been integrated Spire.Doc for JavaScript,Spire.XLS for JavaScript,Spire.PDF for JavaScript,Spire.Presentation for JavaScript. To use the functionality of Spire.XLS for JavaScript, you need to copy the corresponding files (spire.xls.js, Spire.Xls.Wasm.zip, spire.common.js, Spire.Common.Wasm.zip, and _framework) to the project's "public" folder. At the same time, in order to ensure text rendering, the related font files can be added with custom paths. In the following example, the font addition path is: public\static\font.
For more details, refer to the documentation: How to Integrate Spire.XLS for JavaScript in a React Project
Delete a Specific Row and Column from Excel
Spire.XLS for JavaScript provides the Worksheet.DeleteRow() and Worksheet.DeleteColumn() methods to delete a specific row and column by index. The following are the main steps.
- Create a Workbook object using the new wasmModule.Workbook() method.
- Load an Excel file using the Workbook.LoadFromFile() method.
- Get a specific worksheet using the Workbook.Worksheets.get() method.
- Delete a specified row by its index (1-based) using the Worksheet.DeleteRow() method.
- Delete a specified column by its index (1-based) using the Worksheet.DeleteColumn() method.
- Save the result file using the Workbook.SaveToFile() method.
- JavaScript
import React, { useState, useEffect } from 'react';
function App() {
  const [wasmModule, setWasmModule] = useState(null);
  // Load Spire.XLS
  useEffect(() => {
    (async () => {
      try {
        const publicUrl = process.env.PUBLIC_URL || '';
        const spireModule = await import(/* webpackIgnore: true */ `${publicUrl}/spire.xls.js`);
        const rawModule = spireModule.default || spireModule;
        window.wasmModule = typeof rawModule === 'function'
          ? await rawModule({ locateFile: p => p.endsWith('.wasm') ? `${publicUrl}/${p}` : p })
          : rawModule;
        setWasmModule(window.wasmModule);
      } catch (error) {
        console.error('Failed to load spire.xls.js WASM module:', error);
      }
    })();
  }, []);

  // Function to delete a specified row and column
  const DeleteRowColumn = async () => {
    const wasmModule = window.wasmModule.spirexls;

    if (wasmModule) {
      // Load font into Virtual File System (VFS)
      await window.spire.FetchFileToVFS('Arial.ttf', '/Library/Fonts/', `${process.env.PUBLIC_URL}/static/font/`);


      // Load the Excel files into the virtual file system (VFS)
      let inputFileName = 'sample.xlsx';
      await window.spire.FetchFileToVFS(inputFileName, '', `${process.env.PUBLIC_URL}/static/data/`);


      // Create a new workbook
      let workbook = new wasmModule.Workbook();


      // Load an Excel document
      workbook.LoadFromFile({ fileName: inputFileName });

      // Get the first worksheet
      let sheet = workbook.Worksheets.get(0);

      //Delete the 18th row
      sheet.DeleteRow({ index: 18 });

      //Delete the 5th
      sheet.DeleteColumn({ index: 5 });

      //Save result file
      const outputFileName = 'DeleteRowAndColumn.xlsx';
      workbook.SaveToFile({ fileName: outputFileName, version: wasmModule.ExcelVersion.Version2016 });

      // Read the saved file and convert to Blob object
      const modifiedFileArray = window.dotnetRuntime.Module.FS.readFile(outputFileName);
      const modifiedFile = new Blob([modifiedFileArray], { type: 'application/vnd.openxmlformats-officedocument.spreadsheetml.sheet' });

      // Create a URL for the Blob and initiate download
      const url = URL.createObjectURL(modifiedFile);
      const a = document.createElement('a');
      a.href = url;
      a.download = outputFileName;
      document.body.appendChild(a);
      a.click();
      document.body.removeChild(a);
      URL.revokeObjectURL(url);

      // Clean up resources used by the workbook
      workbook.Dispose();
    }
  };

  return (
    <div style={{ textAlign: 'center', height: '300px' }}>
      <h1>Delete a Specified Row and Column Using JavaScript in React
      <button onClick={DeleteRowColumn} disabled={!wasmModule}>
        Delete
      </button>
    </div>
  );
}

export default App;
Run the code to launch the React app at localhost:3000. Once it's running, click the "Delete" button to delete the specific row and column:
Below is the input Excel file and the result file:

Delete Multiple Rows and Columns from Excel
Spire.XLS for JavaScript also allows you to delete multiple adjacent rows and columns from an Excel worksheet at once through the Worksheet.DeleteRow(index, count) and Worksheet.DeleteColumn(index, count) methods. The following are the main steps.
- Create a Workbook object using the new wasmModule.Workbook() method.
- Load an Excel file using the Workbook.LoadFromFile() method.
- Get a specific worksheet using the Workbook.Worksheets.get() method.
- Delete multiple rows from the worksheet using the Worksheet.DeleteRow(index, count) method.
- Delete multiple columns from the worksheet using the Worksheet.DeleteColumn(index, count) method.
- Save the result file using the Workbook.SaveToFile() method.
- JavaScript
import React, { useState, useEffect } from 'react';
function App() {
  const [wasmModule, setWasmModule] = useState(null);
  // Load Spire.XLS
  useEffect(() => {
    (async () => {
      try {
        const publicUrl = process.env.PUBLIC_URL || '';
        const spireModule = await import(/* webpackIgnore: true */ `${publicUrl}/spire.xls.js`);
        const rawModule = spireModule.default || spireModule;
        window.wasmModule = typeof rawModule === 'function'
          ? await rawModule({ locateFile: p => p.endsWith('.wasm') ? `${publicUrl}/${p}` : p })
          : rawModule;
        setWasmModule(window.wasmModule);
      } catch (error) {
        console.error('Failed to load spire.xls.js WASM module:', error);
      }
    })();
  }, []);

  // Function to delete multiple rows and columns
  const DeleteMultiRowsColumns = async () => {
    const wasmModule = window.wasmModule.spirexls;

    if (wasmModule) {
      // Load font into Virtual File System (VFS)
      await window.spire.FetchFileToVFS('Arial.ttf', '/Library/Fonts/', `${process.env.PUBLIC_URL}/static/font/`);


      // Load the Excel files into the virtual file system (VFS)
      let inputFileName = 'sample.xlsx';
      await window.spire.FetchFileToVFS(inputFileName, '', `${process.env.PUBLIC_URL}/static/data/`);


      // Create a new workbook
      let workbook = new wasmModule.Workbook();

      // Load an Excel document
      workbook.LoadFromFile({ fileName: inputFileName });

      // Get the first worksheet
      let sheet = workbook.Worksheets.get(0);

      //Delete 5 rows from the 8th row
      sheet.DeleteRow({ index: 8, count: 5 });

      //Delete 2 columns from the 4th column
      sheet.DeleteColumn({ index: 4, count: 2 });

      //Save result file
      const outputFileName = 'DeleteMultiRowsAndColumns.xlsx';
      workbook.SaveToFile({ fileName: outputFileName, version: wasmModule.ExcelVersion.Version2016 });

      // Read the saved file and convert to Blob object
      const modifiedFileArray = window.dotnetRuntime.Module.FS.readFile(outputFileName);
      const modifiedFile = new Blob([modifiedFileArray], { type: 'application/vnd.openxmlformats-officedocument.spreadsheetml.sheet' });

      // Create a URL for the Blob and initiate download
      const url = URL.createObjectURL(modifiedFile);
      const a = document.createElement('a');
      a.href = url;
      a.download = outputFileName;
      document.body.appendChild(a);
      a.click();
      document.body.removeChild(a);
      URL.revokeObjectURL(url);

      // Clean up resources used by the workbook
      workbook.Dispose();
    }
  };

  return (
    <div style={{ textAlign: 'center', height: '300px' }}>
      <h1>Delete Multiple Rows and Columns Using JavaScript in React
      <button onClick={DeleteMultiRowsColumns} disabled={!wasmModule}>
        Delete
      </button>
    </div>
  );
}

export default App;
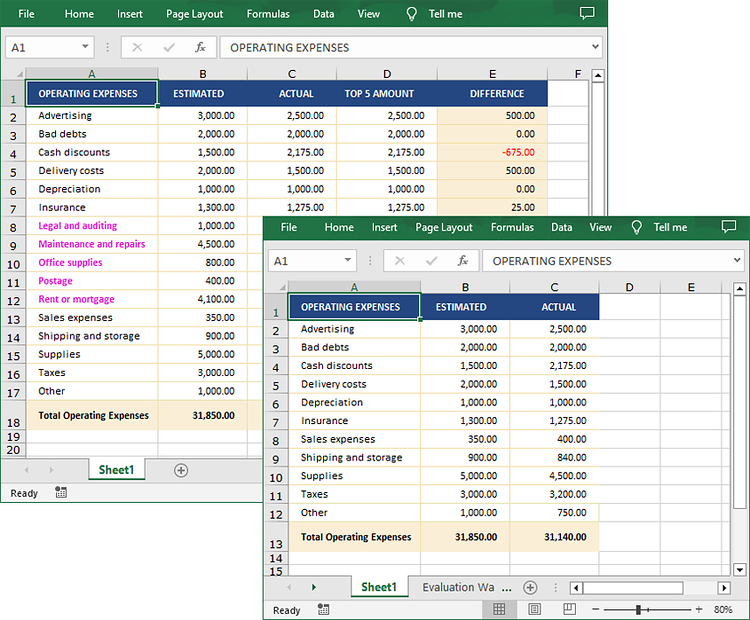
Delete Blank Rows and Columns from Excel
To remove the blank rows and column, you need to iterate over each row and column to detect whether they are blank or not. If yes, then remove them from the worksheet. The following are the main steps.
- Create a Workbook object using the new wasmModule.Workbook() method.
- Load an Excel file using the Workbook.LoadFromFile() method.
- Get a specific worksheet using the Workbook.Worksheets.get() method.
- Iterate through the used rows in the worksheet.
- Find the blank rows using the Worksheet.Rows.get().IsBlank property, and then delete them using the Worksheet.DeleteRow() method.
- Iterate through the used columns in the worksheet.
- Find the blank columns using the Worksheet.Columns.get().IsBlank property, and then delete them using the Worksheet.DeleteColumn() method.
- Save the result file using the Workbook.SaveToFile() method.
- JavaScript
import React, { useState, useEffect } from 'react';
function App() {
  const [wasmModule, setWasmModule] = useState(null);
  // Load Spire.XLS
  useEffect(() => {
    (async () => {
      try {
        const publicUrl = process.env.PUBLIC_URL || '';
        const spireModule = await import(/* webpackIgnore: true */ `${publicUrl}/spire.xls.js`);
        const rawModule = spireModule.default || spireModule;
        window.wasmModule = typeof rawModule === 'function'
          ? await rawModule({ locateFile: p => p.endsWith('.wasm') ? `${publicUrl}/${p}` : p })
          : rawModule;
        setWasmModule(window.wasmModule);
      } catch (error) {
        console.error('Failed to load spire.xls.js WASM module:', error);
      }
    })();
  }, []);

  // Function to delete blank rows and columns
  const DeleteBlankRowsColumns = async () => {
    const wasmModule = window.wasmModule.spirexls;

    if (wasmModule) {
      // Load font into Virtual File System (VFS)
      await window.spire.FetchFileToVFS('Arial.ttf', '/Library/Fonts/', `${process.env.PUBLIC_URL}/static/font/`);


      // Load the Excel files into the virtual file system (VFS)
      let inputFileName = 'sample.xlsx';
      await window.spire.FetchFileToVFS(inputFileName, '', `${process.env.PUBLIC_URL}/static/data/`);


      // Create a new workbook
      let workbook = new wasmModule.Workbook();


      // Load an Excel document
      workbook.LoadFromFile({ fileName: inputFileName });

      // Get the first worksheet
      let sheet = workbook.Worksheets.get(0);

      //Delete blank rows from the worksheet.
      for (let i = sheet.Rows.Count - 1; i >= 0; i--) {
        if (sheet.Rows.get(i).IsBlank) {
          sheet.DeleteRow(i + 1);
        }
      }

      //Delete blank columns from the worksheet.
      for (let j = sheet.Columns.Count - 1; j >= 0; j--) {
        if (sheet.Columns.get(j).IsBlank) {
          sheet.DeleteColumn(j + 1);
        }
      }

      //Save result file
      const outputFileName = 'DeleteBlankRowsAndColumns.xlsx';
      workbook.SaveToFile({ fileName: outputFileName, version: wasmModule.ExcelVersion.Version2016 });

      // Read the saved file and convert to Blob object
      const modifiedFileArray = window.dotnetRuntime.Module.FS.readFile(outputFileName);
      const modifiedFile = new Blob([modifiedFileArray], { type: 'application/vnd.openxmlformats-officedocument.spreadsheetml.sheet' });

      // Create a URL for the Blob and initiate download
      const url = URL.createObjectURL(modifiedFile);
      const a = document.createElement('a');
      a.href = url;
      a.download = outputFileName;
      document.body.appendChild(a);
      a.click();
      document.body.removeChild(a);
      URL.revokeObjectURL(url);

      // Clean up resources used by the workbook
      workbook.Dispose();
    }
  };

  return (
    <div style={{ textAlign: 'center', height: '300px' }}>
      <h1>Delete Blank Rows and Columns Using JavaScript in React
      <button onClick={DeleteBlankRowsColumns} disabled={!wasmModule}>
        Delete
      </button>
    </div>
  );
}

export default App;
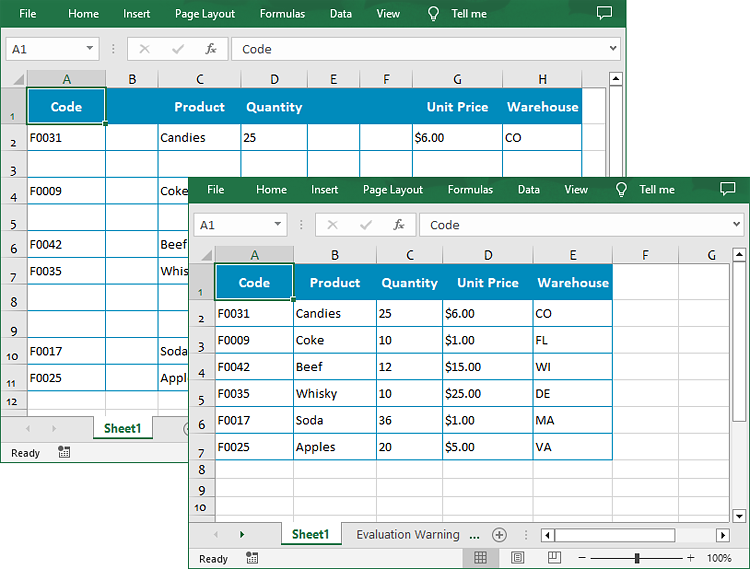
Get a Free License
To fully experience the capabilities of Spire.XLS for JavaScript without any evaluation limitations, you can request a free 30-day trial license.
Convert Excel to HTML and Vice Versa with JavaScript in React
2025-01-03 01:05:42 Written by AdministratorConverting between Excel and HTML formats is a common task for developers working on data visualization, reporting, or web-based applications. Excel files are often used to store, organize, and analyze structured data, while HTML is widely used to display information on the web. Converting between these two formats allows seamless integration between back-end data processing and front-end data presentation. In this article, we will demonstrate how to convert Excel files to HTML format and HTML files to Excel format in React using Spire.XLS for JavaScript.
Install Spire.XLS for JavaScript
To get started with converting Excel to PDF in a React application, you can either download Spire.XLS for JavaScript from our website or install it via npm with the following command:
npm i spire.office
The downloaded product package has been integrated Spire.Doc for JavaScript,Spire.XLS for JavaScript,Spire.PDF for JavaScript,Spire.Presentation for JavaScript. To use the functionality of Spire.XLS for JavaScript, you need to copy the corresponding files (spire.xls.js, Spire.Xls.Wasm.zip, spire.common.js, Spire.Common.Wasm.zip, and _framework) to the project's "public" folder. At the same time, in order to ensure text rendering, the related font files can be added with custom paths. In the following example, the font addition path is: public\static\font.
For more details, refer to the documentation: How to Integrate Spire.XLS for JavaScript in a React Project
Convert Excel to HTML in React
Spire.XLS for JavaScript provides the Worksheet.SaveToHtml() function, which enables you to save a specific worksheet in an Excel file as an HTML file. The key steps for converting an Excel worksheet to HTML using Spire.XLS for JavaScript are as follows.
- Create a Workbook object using the new wasmModule.Workbook() function.
- Load the Excel file using the Workbook.LoadFromFile() function.
- Get a specific worksheet using the Workbook.Worksheets.get(index) function.
- Create an HTMLOptions object using the new wasmModule.HTMLOptions() function.
- Set the HTMLOptions.ImageEmbedded property as "true" to embed images in the converted HTML file.
- Save the worksheet as an HTML file using the Worksheet.SaveToHtml() function.
- JavaScript
import React, { useState, useEffect } from 'react';
function App() {
  const [wasmModule, setWasmModule] = useState(null);
  // Load Spire.XLS
  useEffect(() => {
    (async () => {
      try {
        const publicUrl = process.env.PUBLIC_URL || '';
        const spireModule = await import(/* webpackIgnore: true */ `${publicUrl}/spire.xls.js`);
        const rawModule = spireModule.default || spireModule;
        window.wasmModule = typeof rawModule === 'function'
          ? await rawModule({ locateFile: p => p.endsWith('.wasm') ? `${publicUrl}/${p}` : p })
          : rawModule;
        setWasmModule(window.wasmModule);
      } catch (error) {
        console.error('Failed to load spire.xls.js WASM module:', error);
      }
    })();
  }, []);

  // Function to convert an Excel worksheet to HTML
  const ExcelToHTML  = async () => {
    const wasmModule = window.wasmModule.spirexls;

    if (wasmModule) {
      // Load font into Virtual File System (VFS)
      await window.spire.FetchFileToVFS('Arial.ttf', '/Library/Fonts/', `${process.env.PUBLIC_URL}/static/font/`);

      // Load input file into Virtual File System (VFS)
      const inputFileName = 'sample.xlsx';
      await window.spire.FetchFileToVFS(inputFileName, '', `${process.env.PUBLIC_URL}/static/data/`);

      // Create a new workbook
      const workbook = new wasmModule.Workbook();

      // Load an existing Excel document
      workbook.LoadFromFile({fileName: inputFileName});

      // Get the first worksheet
      let sheet = workbook.Worksheets.get(0);

      // Create an HTMLOptions object
      let options = new wasmModule.HTMLOptions();
      // Embed images in the converted HTML file
      options.ImageEmbedded = true;

      // Specify the output HTML file path
      const outputFileName = 'ToHtml.html';
      // Save the worksheet to HTML with the images embedded
      sheet.SaveToHtml({fileName:outputFileName, saveOption:options});

      // Read the saved file and convert to Blob object
      const modifiedFileArray = window.dotnetRuntime.Module.FS.readFile(outputFileName);
      const modifiedFile = new Blob([modifiedFileArray], { type:  'text/html'  });

      // Create a URL for the Blob and initiate download
      const url = URL.createObjectURL(modifiedFile);
      const a = document.createElement('a');
      a.href = url;
      a.download = outputFileName;
      document.body.appendChild(a);
      a.click();
      document.body.removeChild(a);
      URL.revokeObjectURL(url);

      // Clean up resources used by the workbook
      workbook.Dispose();
    }
  };

  return (
    <div style={{ textAlign: 'center', height: '300px' }}>
      <h1>Convert an Excel Worksheet to HTML Using JavaScript in React</h1>
      <button onClick={ExcelToHTML} disabled={!wasmModule}>
        Convert
      </button>
    </div>
  );
}

export default App;
Run the code to launch the React app at localhost:3000. Once it's running, click on the "Convert" button to convert the specified Excel worksheet to HTML format:
The below screenshot shows the input Excel worksheet and the converted HTML file:
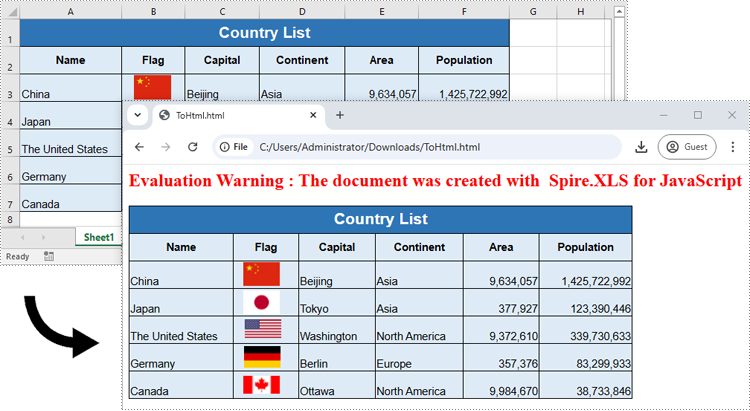
Convert HTML to Excel in React
Spire.XLS for JavaScript offers the Workbook.LoadFromHtml() function for loading an HTML file. Once the HTML file is loaded, you can save it as an Excel file using the Workbook.SaveToFile() function. The key steps are as follows.
- Create a Workbook object using the new wasmModule.Workbook() function.
- Load the HTML file using the Workbook.LoadFromHtml() function.
- Save the HTML file to an Excel file using the Workbook.SaveToFile() function.
- JavaScript
import React, { useState, useEffect } from 'react';
function App() {
  const [wasmModule, setWasmModule] = useState(null);
  // Load Spire.XLS
  useEffect(() => {
    (async () => {
      try {
        const publicUrl = process.env.PUBLIC_URL || '';
        const spireModule = await import(/* webpackIgnore: true */ `${publicUrl}/spire.xls.js`);
        const rawModule = spireModule.default || spireModule;
        window.wasmModule = typeof rawModule === 'function'
          ? await rawModule({ locateFile: p => p.endsWith('.wasm') ? `${publicUrl}/${p}` : p })
          : rawModule;
        setWasmModule(window.wasmModule);
      } catch (error) {
        console.error('Failed to load spire.xls.js WASM module:', error);
      }
    })();
  }, []);

  // Function to convert an HTML to Excel
  const HTMLToExcel = async () => {
    const wasmModule = window.wasmModule.spirexls;

    if (wasmModule) {
      // Load font into Virtual File System (VFS)
      await window.spire.FetchFileToVFS('Arial.ttf', '/Library/Fonts/', `${process.env.PUBLIC_URL}/static/font/`);

      // Load input file into Virtual File System (VFS)
      const inputFileName = 'in.html';
      await window.spire.FetchFileToVFS(inputFileName, '', `${process.env.PUBLIC_URL}/static/data/`);

      // Create a new workbook
      const workbook = new wasmModule.Workbook();

      // Load an existing HTML file
      workbook.LoadFromHtml({ fileName: inputFileName });

      // Specify the output Excel file path
      const outputFileName = 'ToExcel.xlsx';
      // Save the HTML file to Excel format
      workbook.SaveToFile({ fileName: outputFileName, version: wasmModule.ExcelVersion.Version2013 });

      // Read the saved file and convert to Blob object
      const modifiedFileArray = window.dotnetRuntime.Module.FS.readFile(outputFileName);
      const modifiedFile = new Blob([modifiedFileArray], { type:'application/vnd.openxmlformats-officedocument.spreadsheetml.sheet' });

      // Create a URL for the Blob and initiate download
      const url = URL.createObjectURL(modifiedFile);
      const a = document.createElement('a');
      a.href = url;
      a.download = outputFileName;
      document.body.appendChild(a);
      a.click();
      document.body.removeChild(a);
      URL.revokeObjectURL(url);

      // Clean up resources used by the workbook
      workbook.Dispose();
    }
  };

  return (
    <div style={{ textAlign: 'center', height: '300px' }}>
      <h1>Convert an HTML File to Excel Using JavaScript in React</h1>
      <button onClick={HTMLToExcel} disabled={!wasmModule}>
        Convert
      </button>
    </div>
  );
}

export default App;

Get a Free License
To fully experience the capabilities of Spire.XLS for JavaScript without any evaluation limitations, you can request a free 30-day trial license.
Convert Excel to CSV or CSV to Excel with JavaScript in React
2024-12-31 01:51:41 Written by AdministratorConverting files between Excel and CSV formats is a highly common and essential task in data processing. Excel is ideal for data organization, analysis, and visualization, while CSV (Comma-Separated Values) files are lightweight and compatible with various applications, making them ideal for data exchange. Whether you're preparing data for analysis, sharing information between systems, or ensuring seamless compatibility with other software, the ability to efficiently switch between these two formats greatly enhances the convenience and flexibility of data processing tasks. In this article, we will demonstrate how to convert Excel to CSV and CSV to Excel in React using Spire.XLS for JavaScript.
Install Spire.XLS for JavaScript
To get started with converting between Excel and CSV files in a React application, you can either download Spire.XLS for JavaScript from our website or install it via npm with the following command:
npm i spire.office
The downloaded product package has been integrated Spire.Doc for JavaScript,Spire.XLS for JavaScript,Spire.PDF for JavaScript,Spire.Presentation for JavaScript. To use the functionality of Spire.XLS for JavaScript, you need to copy the corresponding files (spire.xls.js, Spire.Xls.Wasm.zip, spire.common.js, Spire.Common.Wasm.zip, and _framework) to the project's "public" folder. At the same time, in order to ensure text rendering, the related font files can be added with custom paths. In the following example, the font addition path is: public\static\font.
For more details, refer to the documentation: How to Integrate Spire.XLS for JavaScript in a React Project
Convert Excel to CSV with JavaScript in React
Spire.XLS for JavaScript provides the Worksheet.SaveToFile() function, which enables developers to save a specific worksheet in a workbook as a standalone CSV file. The key steps for converting an Excel worksheet to CSV using Spire.XLS for JavaScript are as follows.
- Create a Workbook object using the new wasmModule.Workbook() function.
- Load the Excel file using the Workbook.LoadFromFile() function.
- Get a specific worksheet using the Workbook.Worksheets.get(index) function.
- Save the worksheet in CSV format using the Worksheet.SaveToFile() function.
- JavaScript
import React, { useState, useEffect } from 'react';
function App() {
  const [wasmModule, setWasmModule] = useState(null);
  // Load Spire.XLS
  useEffect(() => {
    (async () => {
      try {
        const publicUrl = process.env.PUBLIC_URL || '';
        const spireModule = await import(/* webpackIgnore: true */ `${publicUrl}/spire.xls.js`);
        const rawModule = spireModule.default || spireModule;
        window.wasmModule = typeof rawModule === 'function'
          ? await rawModule({ locateFile: p => p.endsWith('.wasm') ? `${publicUrl}/${p}` : p })
          : rawModule;
        setWasmModule(window.wasmModule);
      } catch (error) {
        console.error('Failed to load spire.xls.js WASM module:', error);
      }
    })();
  }, []);

  // Function to convert an Excel worksheet to CSV
  const ExcelToCSV = async () => {
    const wasmModule = window.wasmModule.spirexls;

    if (wasmModule) {
      // Load font into Virtual File System (VFS)
      await window.spire.FetchFileToVFS('Arial.ttf', '/Library/Fonts/', `${process.env.PUBLIC_URL}/static/font/`);

      // Load input file into Virtual File System (VFS)
      const inputFileName = 'sample.xlsxx';
      await window.spire.FetchFileToVFS(inputFileName, '', `${process.env.PUBLIC_URL}/static/data/`);

      // Create a new workbook
      const workbook = new wasmModule.Workbook();

      // Load existing Excel document
      workbook.LoadFromFile({ fileName: inputFileName });

      // Get the first worksheet
      let sheet = workbook.Worksheets.get(0);

      // Specify the output CSV file path
      const outputFileName = 'ExcelToCSV.csv';
      //Save the worksheet to CSV
      sheet.SaveToFile({ fileName: outputFileName, separator: ",", encoding: wasmModule.Encoding.get_UTF8() });

      // Read the saved file and convert to Blob object
      const modifiedFileArray = window.dotnetRuntime.Module.FS.readFile(outputFileName);
      const modifiedFile = new Blob([modifiedFileArray], { type: 'text/csv' });

      // Create a URL for the Blob and initiate download
      const url = URL.createObjectURL(modifiedFile);
      const a = document.createElement('a');
      a.href = url;
      a.download = outputFileName;
      document.body.appendChild(a);
      a.click();
      document.body.removeChild(a);
      URL.revokeObjectURL(url);

      // Clean up resources used by the workbook
      workbook.Dispose();
    }
  };

  return (
    <div style={{ textAlign: 'center', height: '300px' }}>
      <h1>Convert an Excel Worksheet to CSV Using JavaScript in React</h1>
      <button onClick={ExcelToCSV} disabled={!wasmModule}>
        Convert
      </button>
    </div>
  );
}

export default App;
Run the code to launch the React app at localhost:3000. Once it's running, click on the "Convert" button to convert the specified Excel worksheet to CSV:
The below screenshot shows the input Excel worksheet and the converted CSV:
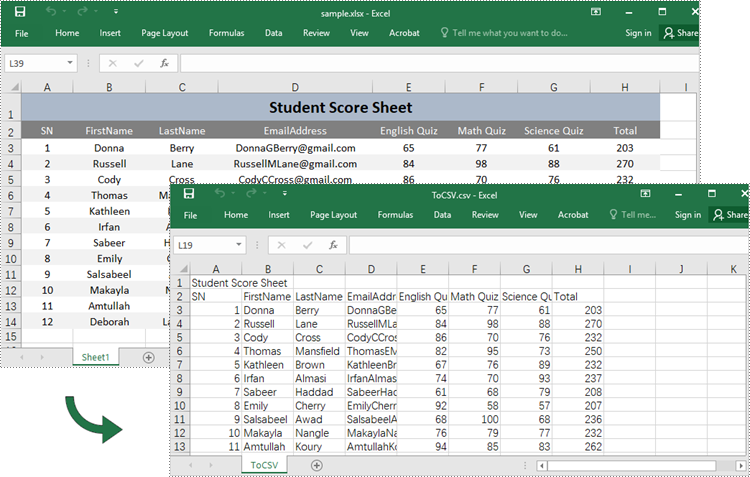
Convert CSV to Excel with JavaScript in React
The Workbook.LoadFromFile() function in Spire.XLS for JavaScript can also be used for loading CSV files. Once a CSV file is loaded, it can be saved as an Excel file using the Workbook.SaveToFile() function. The key steps for converting a CSV file to Excel using Spire.XLS for JavaScript are as follows.
- Create a Workbook object using the new wasmModule.Workbook() function.
- Load the CSV file using the Workbook.LoadFromFile() function.
- Get a specific worksheet using the Workbook.Worksheets.get(index) function.
- Ignore possible errors while saving the numbers in a specific cell range of the worksheet as text using the CellRange.IgnoreErrorOptions property.
- Autofit columns using the CellRange.AutoFitColumns() function.
- Save the CSV file in Excel format using the Workbook.SaveToFile() function.
- JavaScript
import React, { useState, useEffect } from 'react';
function App() {
  const [wasmModule, setWasmModule] = useState(null);
  // Load Spire.XLS
  useEffect(() => {
    (async () => {
      try {
        const publicUrl = process.env.PUBLIC_URL || '';
        const spireModule = await import(/* webpackIgnore: true */ `${publicUrl}/spire.xls.js`);
        const rawModule = spireModule.default || spireModule;
        window.wasmModule = typeof rawModule === 'function'
          ? await rawModule({ locateFile: p => p.endsWith('.wasm') ? `${publicUrl}/${p}` : p })
          : rawModule;
        setWasmModule(window.wasmModule);
      } catch (error) {
        console.error('Failed to load spire.xls.js WASM module:', error);
      }
    })();
  }, []);

  // Function to convert a CSV file to Excel
  const CSVToExcel = async () => {
    const wasmModule = window.wasmModule.spirexls;

    if (wasmModule) {
      // Load font into Virtual File System (VFS)
      await window.spire.FetchFileToVFS('Arial.ttf', '/Library/Fonts/', `${process.env.PUBLIC_URL}/static/font/`);

      // Load input file into Virtual File System (VFS)
      const inputFileName = 'sample.csv';
      await window.spire.FetchFileToVFS(inputFileName, '', `${process.env.PUBLIC_URL}/static/data/`);

      // Create a new workbook
      const workbook = new wasmModule.Workbook();

      // Load existing document
     workbook.LoadFromFile({ fileName: inputFileName, separator: ",", row: 1, column: 1 });

      // Get the first worksheet
      let sheet = workbook.Worksheets.get(0);

      // Ignore possible errors when saving numbers as text during the conversion
      sheet.Range.get("A1:C4").IgnoreErrorOptions = wasmModule.IgnoreErrorType.NumberAsText;
      // Auto-fit columns in the used range of the worksheet
      sheet.AllocatedRange.AutoFitColumns();

      // Specify the output Excel file path
      const outputFileName = 'CSVToExcel.xlsx';
      // Save the modified workbook to the specified path
      workbook.SaveToFile({ fileName: outputFileName, version: wasmModule.ExcelVersion.Version2010 });

      // Read the saved file and convert to Blob object
      const modifiedFileArray = window.dotnetRuntime.Module.FS.readFile(outputFileName);
      const modifiedFile = new Blob([modifiedFileArray], { type: 'application/vnd.openxmlformats-officedocument.spreadsheetml.sheet' });

      // Create a URL for the Blob and initiate download
      const url = URL.createObjectURL(modifiedFile);
      const a = document.createElement('a');
      a.href = url;
      a.download = outputFileName;
      document.body.appendChild(a);
      a.click();
      document.body.removeChild(a);
      URL.revokeObjectURL(url);

      // Clean up resources used by the workbook
      workbook.Dispose();
    }
  };

  return (
    <div style={{ textAlign: 'center', height: '300px' }}>
      <h1>Convert a CSV File to Excel Using JavaScript in React</h1>
      <button onClick={CSVToExcel} disabled={!wasmModule}>
        Convert
      </button>
    </div>
  );
}

export default App;
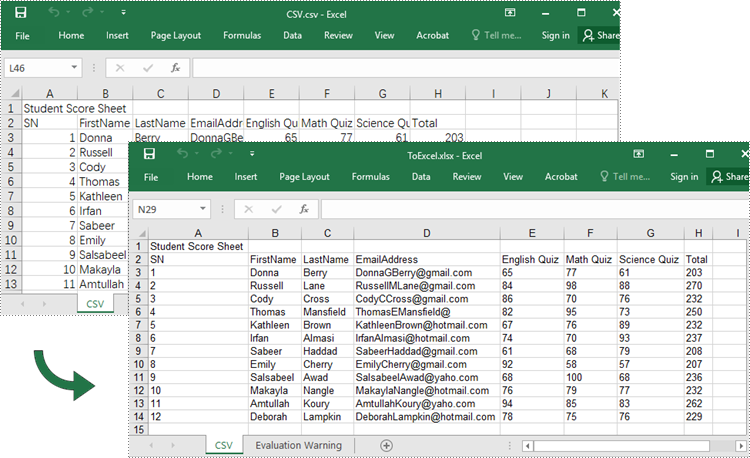
Get a Free License
To fully experience the capabilities of Spire.XLS for JavaScript without any evaluation limitations, you can request a free 30-day trial license.
