
Knowledgebase (2417)
Children categories
How to Split PDF Files in C# .NET (Complete Guide with Code Examples)
2022-06-28 07:52:00 Written by Koohji
Splitting PDF files programmatically is a crucial step for automating document management in many C# and .NET applications. Whether you need to extract specific pages, divide PDFs by defined ranges, or organize large reports, using code to segment PDFs saves time and improves accuracy.
This comprehensive guide shows how to programmatically split or divide PDF files in C# using the Spire.PDF for .NET library, with practical methods and clear code examples to help developers easily integrate PDF splitting into their applications.
Table of Contents
- Why Split a PDF Programmatically in C#?
- What You Need to Get Started
- Installing Spire.PDF for .NET Library
- How to Split PDF Files in C# (Methods and Code Examples)
- Split PDF in VB.NET
- Conclusion
- Frequently Asked Questions (FAQs)
Why Split a PDF Programmatically in C#?
Splitting PDFs through code offers significant advantages over manual processing. It enables:
- Automated report generation
- Faster document preparation in enterprise workflows
- Easy content extraction for archiving or redistribution
- Dynamic document handling based on user or system input
It also reduces the risk of human error and ensures consistency across repetitive tasks.
What You Need to Get Started
Before diving into the code, make sure you have:
- .NET Framework or .NET Core installed
- Visual Studio or another C# IDE
- Spire.PDF for .NET library installed
- Basic familiarity with C# programming
Installing Spire.PDF for .NET Library
Spire.PDF for .NET is a professional .NET library that enables developers to create, read, edit, and manipulate PDF files without Adobe Acrobat. It supports advanced PDF operations like splitting, merging, extracting text, adding annotations, and more.
You can install Spire.PDF for .NET NuGet Package via NuGet Package Manager:
Install-Package Spire.PDF
Or through the NuGet UI in Visual Studio:
- Right-click your project > Manage NuGet Packages
- Search for Spire.PDF
- Click Install
How to Split PDF Files in C# (Methods and Code Examples)
Breaking PDF by Every Page
When you want to break a PDF into multiple single-page files, the Split method is the easiest way. By specifying the output file name pattern, you can automatically save each page of the PDF as a separate file. This method simplifies batch processing or distributing pages individually.
using Spire.Pdf;

namespace SplitPDF
{
    internal class Program
    {
        static void Main(string[] args)
        {
            PdfDocument pdf = new PdfDocument();
            pdf.LoadFromFile("Sample.pdf");

            // Split each page into separate PDF files.
            // The first parameter is the output file pattern.
            // {0} will be replaced by the page number starting from 1.
            pdf.Split("Output/Page_{0}.pdf", 1);

            pdf.Close();
        }
    }
}

Dividing PDF by Page Ranges
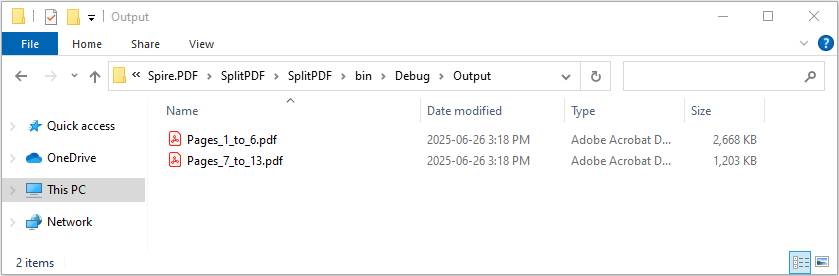
To divide a PDF into multiple sections based on specific page ranges, the InsertPageRange method is ideal. This example shows how to define page ranges using zero-based start and end page indices, and then extract those ranges into separate PDF files efficiently.
using Spire.Pdf;

namespace SplitPDF
{
    internal class Program
    {
        static void Main(string[] args)
        {
            // Load the PDF
            PdfDocument document = new PdfDocument();
            document.LoadFromFile("Sample.pdf");

            // Define two ranges — pages 1–6 and 7–13 (0-based index)
            int[][] ranges = new int[][]
            {
                new int[] { 0, 5 },
                new int[] { 6, 12 }
            };

            // Split the PDF into smaller files by the predefined page ranges
            for (int i = 0; i < ranges.Length; i++)
            {
                int startPage = ranges[i][0];
                int endPage = ranges[i][1];

                PdfDocument rangePdf = new PdfDocument();
                rangePdf.InsertPageRange(document, startPage, endPage);
                rangePdf.SaveToFile($"Output/Pages_{startPage + 1}_to_{endPage + 1}.pdf");
                rangePdf.Close();
            }

            document.Close();
        }
    }
}
Splitting PDF by Text or Keywords
To perform content-based PDF splitting, use the Find method of the PdfTextFinder class to locate pages containing specific keywords. Once identified, you can extract these pages and insert them into new PDF files using the InsertPage method. This approach enables precise page extraction based on document content instead of fixed page numbers.
using Spire.Pdf;
using Spire.Pdf.Texts;
using System.Collections.Generic;

namespace SplitPDF
{
    internal class Program
    {
        static void Main(string[] args)
        {
            // Load the PDF document
            PdfDocument document = new PdfDocument();
            document.LoadFromFile("Sample.pdf");

            // Create a new PDF to hold extracted pages
            PdfDocument resultDoc = new PdfDocument();

            string keyword = "Market";

            // Loop through all pages to find the keyword
            for (int i = 0; i < document.Pages.Count; i++)
            {
                PdfPageBase page = document.Pages[i];
                PdfTextFinder finder = new PdfTextFinder(page);

                // Set search options
                finder.Options.Parameter = TextFindParameter.WholeWord;
                finder.Options.Parameter = TextFindParameter.IgnoreCase;

                // Find keyword on the page
                List<PdfTextFragment> fragments = finder.Find(keyword);

                // If keyword found, append the page to result PDF
                if (fragments.Count > 0)
                {
                    resultDoc.InsertPage(document, page);
                }
            }

            // Save the result PDF
            resultDoc.SaveToFile("Pages_With_Keyword.pdf");

            // Dispose resources
            document.Dispose();
            resultDoc.Dispose();
        }
    }
}

Extracting Specific Pages from PDF
Sometimes you only need to extract one or a few individual pages from a PDF instead of splitting the whole document. This example demonstrates how to use the InsertPage method of the PdfDocument class to extract a specific page and save it as a new PDF. This method is useful for quickly pulling out important pages for review or distribution.
using Spire.Pdf;

namespace SplitPDF
{
    internal class Program
    {
        static void Main(string[] args)
        {
            // Load the PDF file
            PdfDocument pdf = new PdfDocument();
            pdf.LoadFromFile("Sample.pdf");

            // Create a new PDF to hold the extracted page
            PdfDocument newPdf = new PdfDocument();

            // Insert the third page (index 2, zero-based) from the PDF into the new PDF
            newPdf.InsertPage(pdf, pdf.Pages[2]);

            // Save the new PDF
            newPdf.SaveToFile("ExtractPage.pdf");

            newPdf.Close();
            pdf.Close();
        }
    }
}

Split PDF in VB.NET
If you're working with VB.NET instead of C#, you don't need to worry about translating the code manually. You can easily convert the C# code examples in this article to VB.NET using our C# to VB.NET code converter. This tool ensures accurate syntax conversion, saving time and helping you stay focused on development.
Conclusion
Splitting PDF files programmatically in C# using Spire.PDF offers a reliable and flexible solution for automating document processing. Whether you're working with invoices, reports, or dynamic content, Spire.PDF supports various splitting methods—by page, page range, or keyword—allowing you to tailor the logic to fit any business or technical requirement.
Frequently Asked Questions (FAQs)
Q1: Is Spire.PDF free to use?
A1: Spire.PDF offers a free version suitable for small-scale or non-commercial use. For full functionality and advanced features, the commercial version is recommended.
Q2: Can I split encrypted PDFs?
A2: Yes, as long as you provide the correct password when loading the PDF files.
Q3: Does Spire.PDF support .NET Core?
A3: Yes, Spire.PDF is compatible with both .NET Framework and .NET Core.
Q4: Can I split and merge PDFs in the same project?
A4: Absolutely. Spire.PDF provides comprehensive support for both splitting and merging operations.
Get a Free License
To fully experience the capabilities of Spire.PDF for .NET without any evaluation limitations, you can request a free 30-day trial license.
What is Excel Interior?
Excel provides essentially no support in worksheet functions for Working with cell colors. However, colors are often used in spreadsheets to indicate some sorts of value or category. Thus comes the need for functions that can work with colors on the worksheet. So it appears in the version in Excel 2007 as a new function. It contains all kinds of colors. Below I will show you how to insert interior in Excel with MS Excel and how to do this with Spire.XLS.
How to insert interior in Excel with MS Excel?
To insert interior in Excel with Microsoft Excel, you can follow the sections below:
- Open the worksheet in Excel
- Highlight the zones that you want to insert interior
- Rightclick and choose Setting Cell Format
- Choose Fill->Fill Effect in the dialog box of Setting Cell Format
- In the box, you can change the Color and the Shade Format to your desired effect
How to Insert Interior with Spire.XLS?
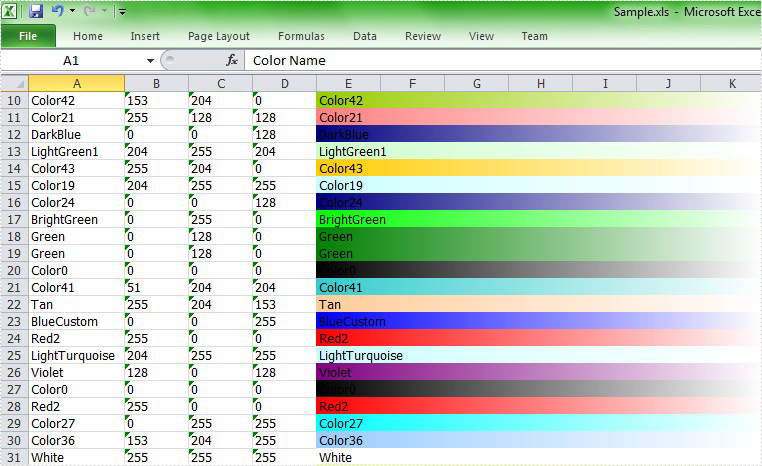
It's convenient to realize C#/.NET Excel Integration via Spire.XLS. In interior method, to realize interior you may set the color gradient by assigning sheet.Range[string.Format("E{0}:K{0}", i)].Style.Interior.FillPattern property with ExcelPatternType.Gradient. You can set the BackKnownColor and ForeKnownColor of the sheet. What's more, you can set the gradient style, in the demo, we set the gradient style vertical. In order to reflect the effect, we merge the worksheet range from E to K. In this demo, we use Enum method to enumerate many kinds of colors and define a random object to fill the cell with a gradient color randomly.
First, let's preview the effect screenshot:
Here comes to the full code in C# and VB.NET.
using Spire.Xls;
using System.Drawing;
using System;

namespace Interior
{
    class Program
    {
        static void Main(string[] args)
        {
            //Create a workbook
            Workbook workbook = new Workbook();

            //Initialize the worksheet
            Worksheet sheet = workbook.Worksheets[0];

            //Specify the version
            workbook.Version = ExcelVersion.Version2007;

            //Define the number of the colors
            int maxColor = Enum.GetValues(typeof(ExcelColors)).Length;

            //Create a random object
            Random random = new Random((int)System.DateTime.Now.Ticks);

            for (int i = 2; i < 40; i++)
            {
                //Random backKnownColor
                ExcelColors backKnownColor = (ExcelColors)(random.Next(1, maxColor / 2));
                sheet.Range["A1"].Text = "Color Name";
                sheet.Range["B1"].Text = "Red";
                sheet.Range["C1"].Text = "Green";
                sheet.Range["D1"].Text = "Blue";

                //Merge the sheet"E1-K1"
                sheet.Range["E1:K1"].Merge();
                sheet.Range["E1:K1"].Text = "Gradient";
                sheet.Range["A1:K1"].Style.Font.IsBold = true;
                sheet.Range["A1:K1"].Style.Font.Size = 11;

                //Set the text of color in sheetA-sheetD
                string colorName = backKnownColor.ToString();
                sheet.Range[string.Format("A{0}", i)].Text = colorName;
                sheet.Range[string.Format("B{0}", i)].Text = workbook.GetPaletteColor(backKnownColor).R.ToString();
                sheet.Range[string.Format("C{0}", i)].Text = workbook.GetPaletteColor(backKnownColor).G.ToString();
                sheet.Range[string.Format("D{0}", i)].Text = workbook.GetPaletteColor(backKnownColor).B.ToString();

                //Merge the sheets
                sheet.Range[string.Format("E{0}:K{0}", i)].Merge();

                //Set the text of sheetE-sheetK
                sheet.Range[string.Format("E{0}:K{0}", i)].Text = colorName;

                //Set the interior of the color
                sheet.Range[string.Format("E{0}:K{0}", i)].Style.Interior.FillPattern = ExcelPatternType.Gradient;
                sheet.Range[string.Format("E{0}:K{0}", i)].Style.Interior.Gradient.BackKnownColor = backKnownColor;
                sheet.Range[string.Format("E{0}:K{0}", i)].Style.Interior.Gradient.ForeKnownColor = ExcelColors.White;
                sheet.Range[string.Format("E{0}:K{0}", i)].Style.Interior.Gradient.GradientStyle = GradientStyleType.Vertical;
                sheet.Range[string.Format("E{0}:K{0}", i)].Style.Interior.Gradient.GradientVariant = GradientVariantsType.ShadingVariants1;
            }

            //AutoFit Column
            sheet.AutoFitColumn(1);

            //Save the file
            workbook.SaveToFile("Sample.xls",ExcelVersion.Version97to2003);

            //Launch the file
            System.Diagnostics.Process.Start("Sample.xls");
        }
    }
}
Imports Spire.Xls
Imports System.Drawing
Imports System

Module Module1

    Sub Main()
        'Create a workbook
        Dim workbook As New Workbook()

        'Initialize the worksheet
        Dim sheet As Worksheet = workbook.Worksheets(0)

        'Specify the version
        workbook.Version = ExcelVersion.Version2007

        'Define the number of the colors
        Dim maxColor As Integer = [Enum].GetValues(GetType(ExcelColors)).Length

        'Create a random object
        Dim random As New Random()

        For i As Integer = 2 To 39
            'Random backKnownColor
            Dim backKnownColor As ExcelColors = DirectCast(random.[Next](1, maxColor \ 2), ExcelColors)
            sheet.Range("A1").Text = "Color Name"
            sheet.Range("B1").Text = "Red"
            sheet.Range("C1").Text = "Green"
            sheet.Range("D1").Text = "Blue"

            'Merge the sheet"E1-K1"
            sheet.Range("E1:K1").Merge()
            sheet.Range("E1:K1").Text = "Gradient"
            sheet.Range("A1:K1").Style.Font.IsBold = True
            sheet.Range("A1:K1").Style.Font.Size = 11

            'Set the text of color in sheetA-sheetD
            Dim colorName As String = backKnownColor.ToString()
            sheet.Range(String.Format("A{0}", i)).Text = colorName
            sheet.Range(String.Format("B{0}", i)).Text = workbook.GetPaletteColor(backKnownColor).R.ToString()
            sheet.Range(String.Format("C{0}", i)).Text = workbook.GetPaletteColor(backKnownColor).G.ToString()
            sheet.Range(String.Format("D{0}", i)).Text = workbook.GetPaletteColor(backKnownColor).B.ToString()

            'Merge the sheets
            sheet.Range(String.Format("E{0}:K{0}", i)).Merge()

            'Set the text of sheetE-sheetK
            sheet.Range(String.Format("E{0}:K{0}", i)).Text = colorName

            'Set the interior of the color
            sheet.Range(String.Format("E{0}:K{0}", i)).Style.Interior.FillPattern = ExcelPatternType.Gradient
            sheet.Range(String.Format("E{0}:K{0}", i)).Style.Interior.Gradient.BackKnownColor = backKnownColor
            sheet.Range(String.Format("E{0}:K{0}", i)).Style.Interior.Gradient.ForeKnownColor = ExcelColors.White
            sheet.Range(String.Format("E{0}:K{0}", i)).Style.Interior.Gradient.GradientStyle = GradientStyleType.Vertical
            sheet.Range(String.Format("E{0}:K{0}", i)).Style.Interior.Gradient.GradientVariant = GradientVariantsType.ShadingVariants1
        Next

        'AutoFit Column
        sheet.AutoFitColumn(1)

        'Save doc file.
        workbook.SaveToFile("Sample.xls",ExcelVersion.Version97to2003)

        'Launching the MS Word file.
        System.Diagnostics.Process.Start("Sample.xls")
    End Sub
End Module
After running the demo, you will find color interior in your 2007 worksheet.
In today's digital age, managing and manipulating Excel files programmatically has become an essential skill for developers. Whether you're building a reporting tool, automating data processing, or enhancing your applications with dynamic data handling, having a robust library at your disposal can make all the difference. Enter Spire.XLS for .NET - a versatile and powerful library that allows you to create, read, write, and edit Excel files seamlessly using C#.
In this article, you will learn how to edit Excel documents effortlessly using C# and Spire.XLS for .NET.
- Read and Write Excel Files in C#
- Apply Styles and Formats to Excel Cells in C#
- Find and Replace Text in Excel in C#
- Add Formulas and Charts to Excel in C#
Install Spire.XLS for .NET
To begin with, you need to add the DLL files included in the Spire.XLS for .NET package as references in your .NET project. The DLL files can be either downloaded from this link or installed via NuGet.
PM> Install-Package Spire.XLS
Read and Write Excel Files in C#
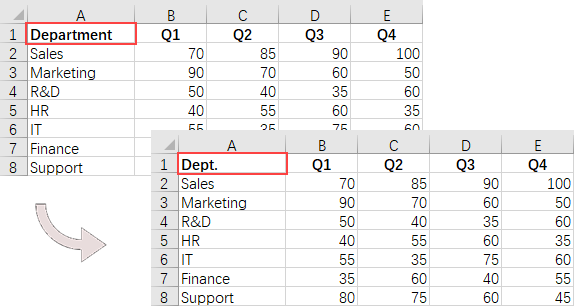
One of the most common tasks when working with Excel files in C# is reading and writing data. Spire.XLS for .NET provides the CellRange.Value property, enabling developers to easily retrieve or assign values to individual cells.
The step to read and write an Excel file using C# are as follows:
- Create a Workbook object.
- Load an Excel file from a given file path.
- Get a specific worksheet using the Workbook.Worksheets[] property.
- Get a specific cell using the Worksheet.Range[] property
- Get or set the cell value using the CellRange.Value property.
- Save the workbook to a different Excel file.
- C#
using Spire.Xls;

namespace ReadAndWriteExcel
{
    class Program
    {
        static void Main(string[] args)
        {
            // Create a Workbook object
            Workbook workbook = new Workbook();

            // Load an Excel file
            workbook.LoadFromFile("C:\\Users\\Administrator\\Desktop\\Sample.xlsx");

            // Get a specific worksheet
            Worksheet worksheet = workbook.Worksheets[0];

            // Get a specific cell
            CellRange cell = worksheet.Range["A1"];

            // Read the cell value
            String text = cell.Value;

            // Determine if the cell value is "Department"
            if (text == "Department")
            {
                // Update the cell value
                cell.Value = "Dept.";
            }

            // Save the workbook to a different
            workbook.SaveToFile("ModifyExcel.xlsx", ExcelVersion.Version2016);

            // Dispose resources
            workbook.Dispose();
        }
    }
}
Apply Styles and Formats to Excel Cells in C#
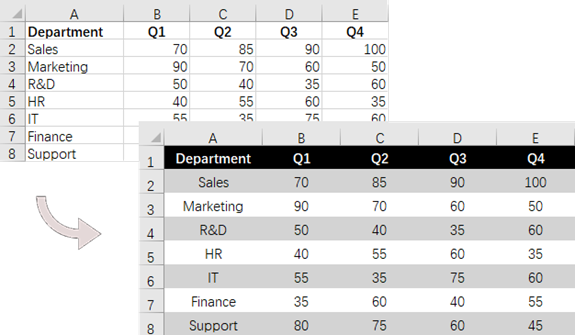
Styling and formatting Excel documents is an important aspect of creating professional-looking reports. Spire.XLS for .NET offers a variety of APIs within the CellRange class for managing cell styles, fonts, colors, and alignments, as well as adjusting row heights and column widths.
The steps to apply styles and formats to Excel cells are as follows:
- Create a Workbook object.
- Load an Excel file from a given file path.
- Get a specific worksheet using the Workbook.Worksheets[] property.
- Get all located range using the Worksheet.AllocatedRange property.
- Get a specific row using the CellRange.Rows[] property, and set the cell color, text color, text alignment, and row height using the properties under the CellRange object.
- Get a specific column using the CellRange.Columns[] property, and set the column width using the ColumnWidth property under the CellRange object.
- Save the workbook to a different Excel file.
- C#
using Spire.Xls;
using System.Drawing;

namespace FormatCells
{
    class Program
    {
        static void Main(string[] args)
        {
            // Create a Workbook object
            Workbook workbook = new Workbook();

            // Load an Excel file
            workbook.LoadFromFile("C:\\Users\\Administrator\\Desktop\\Sample.xlsx");

            // Get a specific worksheet
            Worksheet worksheet = workbook.Worksheets[0];

            // Get all located range from the worksheet
            CellRange allocatedRange = worksheet.AllocatedRange;

            // Iterate through the rows
            for (int rowNum = 0; rowNum < allocatedRange.RowCount; rowNum++)
            {
                if(rowNum == 0)
                {
                    // Apply cell color to the header row
                    allocatedRange.Rows[rowNum].Style.Color = Color.Black;

                    // Change the font color of the header row
                    allocatedRange.Rows[rowNum].Style.Font.Color = Color.White;
                }

                // Apply alternate colors to other rows
                else if (rowNum % 2 == 1)
                {
                    allocatedRange.Rows[rowNum].Style.Color = Color.LightGray;
                }
                else if (rowNum % 2 == 0)
                {
                    allocatedRange.Rows[rowNum].Style.Color = Color.White;
                }

                // Align text to center
                allocatedRange.Rows[rowNum].HorizontalAlignment = HorizontalAlignType.Center;
                allocatedRange.Rows[rowNum].VerticalAlignment = VerticalAlignType.Center;

                // Set the row height
                allocatedRange.Rows[rowNum].RowHeight = 20;
            }

            // Iterate through the columns
            for (int columnNum = 0; columnNum < allocatedRange.ColumnCount; columnNum++)
            {
                // Set the column width
                if (columnNum > 0)
                {
                    allocatedRange.Columns[columnNum].ColumnWidth = 10;
                }
            }

            // Save the workbook to a different
            workbook.SaveToFile("FormatExcel.xlsx", ExcelVersion.Version2016);

            // Dispose resources
            workbook.Dispose();
        }
    }
}
Find and Replace Text in Excel in C#
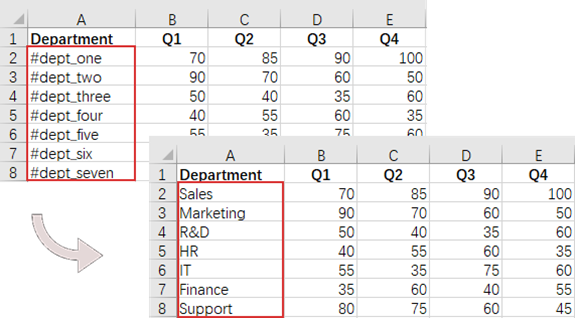
The find and replace feature in Excel enhances data accuracy and consistency while significantly improving efficiency. With Spire.XLS for .NET, you can easily locate a cell containing a specific string using the Worksheet.FindString() method and then update the cell value with the CellRange.Value property.
The steps to find and replace text in Excel using C# are as follows:
- Create a Workbook object.
- Load an Excel file from a given file path.
- Get a specific worksheet using the Workbook.Worksheets[] property.
- Find the cell that contains a specified string using the Worksheet.FindString() method.
- Update the cell value using the CellRange.Value property.
- Save the workbook to a different Excel file.
- C#
using Spire.Xls;

namespace FindAndReplaceText
{
    class Program
    {
        static void Main(string[] args)
        {
            // Create a Workbook object
            Workbook workbook = new Workbook();

            // Load an Excel file
            workbook.LoadFromFile("C:\\Users\\Administrator\\Desktop\\Sample.xlsx");

            // Get a specific worksheet
            Worksheet worksheet = workbook.Worksheets[0];

            // Define an array of department names for replacement
            String[] departments = new String[] { "Sales", "Marketing", "R&D", "HR", "IT", "Finance", "Support" };

            // Define an array of placeholders that will be replaced in the Excel sheet
            String[] placeholders = new String[] { "#dept_one", "#dept_two", "#dept_three", "#dept_four", "#dept_five", "#dept_six", "#dept_seven" };

            // Iterate through the placeholder strings
            for (int i = 0; i < placeholders.Length; i++)
            {
                // Find the cell containing the current placeholder string
                CellRange cell = worksheet.FindString(placeholders[i], false, false);

                // Replace the text in the found cell with the corresponding department name
                cell.Text = departments[i];
            }

            // Save the workbook to a different
            workbook.SaveToFile("ReplaceText.xlsx", ExcelVersion.Version2016);

            // Dispose resources
            workbook.Dispose();
        }
    }
}
Add Formulas and Charts to Excel in C#
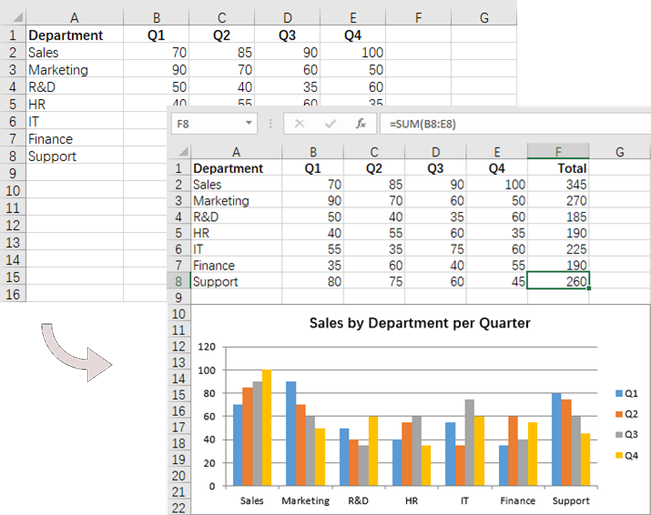
In addition to basic file operations, Spire.XLS for .NET provides a variety of advanced techniques for working with Excel files. These techniques can be used to automate complex tasks, perform calculations, and generate dynamic reports.
The following are the steps to add formulas and create a chart in Excel using C#:
- Create a Workbook object.
- Load an Excel file from a given file path.
- Get a specific worksheet using the Workbook.Worksheets[] property.
- Get a specific cell using the Worksheet.Range[] property.
- Add a formula to the cell using the CellRange.Formula property.
- Add a column chart to the worksheet using the Worksheet.Charts.Add() method.
- Set the chart data range, position, title and other attributes using the methods and properties under the Chart object.
- Save the workbook to a different Excel file.
- C#
using Spire.Xls;

namespace AddFormulaAndChart
{
    class Program
    {
        static void Main(string[] args)
        {
            // Create a Workbook object
            Workbook workbook = new Workbook();

            // Load an Excel file
            workbook.LoadFromFile("C:\\Users\\Administrator\\Desktop\\Sample.xlsx");

            // Get a specific worksheet
            Worksheet worksheet = workbook.Worksheets[0];

            // Get all located range
            CellRange allocatedRange = worksheet.AllocatedRange;

            // Iterate through the rows
            for (int rowNum = 0; rowNum < allocatedRange.RowCount; rowNum++)
            {
                if (rowNum == 0)
                {
                    // Write text in the cell F1
                    worksheet.Range[rowNum + 1, 6].Text = "Total";

                    // Apply style to the cell
                    worksheet.Range[rowNum + 1, 6].Style.Font.IsBold = true;
                    worksheet.Range[rowNum + 1, 6].Style.HorizontalAlignment = HorizontalAlignType.Right;
                }

                else
                {
                    // Add formulas to the cells from F2 to F8
                    worksheet.Range[rowNum + 1, 6].Formula = $"=SUM(B{rowNum + 1}:E{rowNum + 1})";
                }

            }

            // Add a clustered column chart
            Chart chart = worksheet.Charts.Add(ExcelChartType.ColumnClustered);

            // Set data range for the chart
            chart.DataRange = worksheet.Range["A1:E8"];
            chart.SeriesDataFromRange = false;

            // Set position of the chart
            chart.LeftColumn = 1;
            chart.TopRow = 10;
            chart.RightColumn = 8;
            chart.BottomRow = 23;

            // Set and format chart title
            chart.ChartTitle = "Sales by Department per Quarter";
            chart.ChartTitleArea.Size = 13;
            chart.ChartTitleArea.IsBold = true;

            // Save the workbook to a different
            workbook.SaveToFile("AddFormulaAndChart.xlsx", ExcelVersion.Version2016);

            // Dispose resources
            workbook.Dispose();
        }
    }
}
Apply for a Temporary License
If you'd like to remove the evaluation message from the generated documents, or to get rid of the function limitations, please request a 30-day trial license for yourself.
