Create and Remove Multi-level Groups in Excel with JavaScript in React
When managing data with many rows and columns, such as project plans or financial reports, you often need to group some rows (Group / Outline) so that they can be collapsed into a layered structure, letting you view only the summary rows or the content of a certain phase. When the structure is no longer needed, you can remove the groups at any time to restore the flat layout of the rows. Spire.XLS for JavaScript completes this directly in the browser based on WebAssembly, and manages input/output files through a virtual file system (VFS), with no backend service required.
This article covers two core features:
For installation and project configuration, refer to Integrating Spire.XLS for JavaScript in a React Project. The examples below assume Spire.XLS is installed and the WebAssembly module is initialized.
Create Multi-level (Nested) Groups
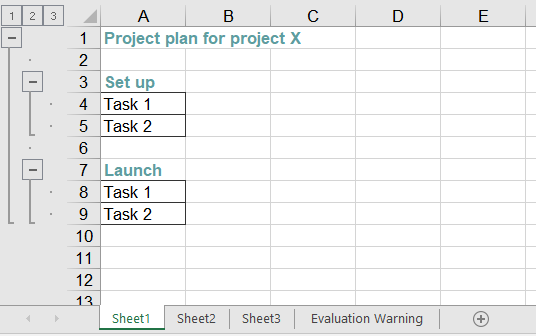
A multi-level group consists of an "outer group" plus "inner groups". For example, in a project plan, the whole execution phase (several rows) can be one level of group, while the detail rows of each sub-phase are the second level of group. When creating it, you should call GroupByRows() on the larger outer range first, and then on the smaller inner ranges, so that Excel generates the collapse buttons of different levels. The main steps are as follows:
- Create a
Workbookobject and get the first worksheet. - Add a named style and set its font (used for titles and similar cells).
- Set
Worksheet.PageSetup.IsSummaryRowBelow = falseso that the summary rows are shown above the detail rows. - Write the sample data into the cells.
- Call
GroupByRows()on the outer row range (rows 2-9) first, then callGroupByRows()on the nested inner row ranges (rows 4-5 and rows 8-9). - Save the workbook with the
Workbook.SaveToFile()method.
Here is a complete code example showing how to create two-level (nested) row groups for a worksheet in React:
function App() {
  const createNestedGroup = async () => {
    // Get the Spire.XLS WASM module
    const xlsModule = window.wasmModule?.spirexls;

    // Check whether the module is ready
    if (!xlsModule) {
      alert('Spire.Xls is not ready yet');
      return;
    }

    // Load the font into the VFS for text measurement
    await window.spire.FetchFileToVFS('ARIAL.TTF', '/Library/Fonts/', `${process.env.PUBLIC_URL}/font/`);

    // Create a new workbook and get the first worksheet
    const workbook = new xlsModule.Workbook();
    const sheet = workbook.Worksheets.get(0);

    // Add a named style for the title rows
    const style = workbook.Styles.Add("style");
    style.Font.Color = xlsModule.Color.get_CadetBlue();
    style.Font.IsBold = true;

    // Make the summary rows appear above the detail rows
    sheet.PageSetup.IsSummaryRowBelow = false;

    // Write the sample data
    sheet.Range.get("A1").Value = "Project plan for project X";
    sheet.Range.get("A1").CellStyleName = style.Name;

    sheet.Range.get("A3").Value = "Set up";
    sheet.Range.get("A3").CellStyleName = style.Name;
    sheet.Range.get("A4").Value = "Task 1";
    sheet.Range.get("A5").Value = "Task 2";
    sheet.Range.get("A4:A5").BorderAround(xlsModule.LineStyleType.Thin);
    sheet.Range.get("A4:A5").BorderInside(xlsModule.LineStyleType.Thin);

    sheet.Range.get("A7").Value = "Launch";
    sheet.Range.get("A7").CellStyleName = style.Name;
    sheet.Range.get("A8").Value = "Task 1";
    sheet.Range.get("A9").Value = "Task 2";
    sheet.Range.get("A8:A9").BorderAround(xlsModule.LineStyleType.Thin);
    sheet.Range.get("A8:A9").BorderInside(xlsModule.LineStyleType.Thin);

    // Group the outer rows first, then the nested inner rows, to form multi-level groups
    sheet.GroupByRows(2, 9, false);
    sheet.GroupByRows(4, 5, false);
    sheet.GroupByRows(8, 9, false);

    // Save the document
    const outputFileName = 'MultiLevelGroup.xlsx';
    workbook.SaveToFile({ fileName: outputFileName, version: xlsModule.ExcelVersion.Version2010 });

    // Release resources
    workbook.Dispose();

    // Read the converted file from the VFS and trigger a download
    const fileArray = window.dotnetRuntime.Module.FS.readFile(outputFileName);
    const blob = new Blob([fileArray], { type: 'application/vnd.openxmlformats-officedocument.spreadsheetml.sheet' });
    const url = URL.createObjectURL(blob);
    const a = document.createElement('a');
    a.href = url;
    a.download = outputFileName;
    a.click();
    URL.revokeObjectURL(url);
  };

  return (
    <div style={{ textAlign: 'center', height: '300px' }}>
      <h1>Create Nested Group</h1>
      <button onClick={createNestedGroup}>
        Start
      </button>
    </div>
  );
}

export default App;
Effect of creating multi-level groups
Remove (Delete) Multi-level Groups
When a workbook already contains multi-level groups and you need to remove a particular outer "large group" or inner "small group", you can load the file and call the Worksheet.UngroupByRows() method on the corresponding range. Grouping only affects the collapsed display of rows; removing a group never deletes any cell content. After the outer large group is removed, the inner small groups that were nested inside it remain as independent single-level groups and can be removed one by one. The main steps are as follows:
- Create a
Workbookobject and load the workbook that already contains multi-level groups with theWorkbook.LoadFromFile()method. - Get the worksheet with the
Workbook.Worksheets.get()method. - Call
UngroupByRows()on the outer row range (rows 2-9) to remove the large group. - Call
UngroupByRows()on the inner row range (rows 4-5) to remove the small group. - Save the workbook with the
Workbook.SaveToFile()method.
Here is a complete code example showing how to load an already-grouped Excel file in React and remove a large group and a small group:
function App() {
  const ungroupRows = async () => {
    // Get the Spire.XLS WASM module
    const xlsModule = window.wasmModule?.spirexls;

    // Check whether the module is ready
    if (!xlsModule) {
      alert('Spire.Xls is not ready yet');
      return;
    }

    // Load the font into the VFS for text measurement
    await window.spire.FetchFileToVFS('ARIAL.TTF', '/Library/Fonts/', `${process.env.PUBLIC_URL}/font/`);

    // Load the Excel file that already contains multi-level groups
    const inputFileName = 'MultiLevelGroup.xlsx';
    await window.spire.FetchFileToVFS(inputFileName, '', `${process.env.PUBLIC_URL}data/`);

    // Create a Workbook object and load the workbook
    const workbook = new xlsModule.Workbook();
    workbook.LoadFromFile({ fileName: inputFileName });

    // Get the first worksheet
    const sheet = workbook.Worksheets.get(0);

    // Remove the outer large group (rows 2-9)
    sheet.UngroupByRows(2, 9);

    // Remove the inner small group (rows 4-5)
    sheet.UngroupByRows(4, 5);

    // Save the document
    const outputFileName = 'UngroupRows_output.xlsx';
    workbook.SaveToFile({ fileName: outputFileName, version: xlsModule.ExcelVersion.Version2010 });

    // Release resources
    workbook.Dispose();

    // Read the converted file from the VFS and trigger a download
    const fileArray = window.dotnetRuntime.Module.FS.readFile(outputFileName);
    const blob = new Blob([fileArray], { type: 'application/vnd.openxmlformats-officedocument.spreadsheetml.sheet' });
    const url = URL.createObjectURL(blob);
    const a = document.createElement('a');
    a.href = url;
    a.download = outputFileName;
    a.click();
    URL.revokeObjectURL(url);
  };

  return (
    <div style={{ textAlign: 'center', height: '300px' }}>
      <h1>Ungroup Rows</h1>
      <button onClick={ungroupRows}>
        Start
      </button>
    </div>
  );
}

export default App;
Effect of removing multi-level groups

FAQ
Why does calling GroupByRows several times not produce multi-level groups
Cause: A multi-level group requires the range of the inner group to be completely contained within the range of the outer group. If two grouped ranges do not contain each other, Excel treats them as two groups of the same level instead of nested multi-level groups.
Solution: Call GroupByRows() on the larger outer range first, and then on the smaller inner range, for example call GroupByRows(2, 9, false) first and then GroupByRows(4, 5, false).
How can I make a group collapsed by default (or keep it expanded)?
Cause: The third Boolean parameter of GroupByRows(startRow, endRow, isCollapsed) decides whether the detail rows of a group are collapsed by default after the group is created. true collapses them by default, while false keeps them expanded (the examples in this article use false). When the saved file is opened, it is shown in that state.
Solution: Set the third parameter to true to collapse the group by default, for example sheet.GroupByRows(4, 5, true). To collapse or expand a group at runtime, call CollapseGroup() / ExpandGroup() on the grouped range.
Obtain a Free License
Spire.XLS for JavaScript offers a 30-day full-featured free trial license with no functional limitations. Apply here to evaluate before purchasing.
How to Compress PDF Documents with JavaScript in React
PDF keeps its layout fixed and identical across devices, which makes it the format of choice for distributing contracts, reports, and photo albums. But PDFs that contain many high-resolution images or embedded fonts are often very large: they eat up storage space and slow down emailing, web uploads, and downloads. If the document can be “slimmed down” directly in the browser while keeping it readable, distribution and loading get noticeably better — without uploading the file to a server and waiting for processing.
Spire.PDF for JavaScript runs on WebAssembly and completes the loading, compression, and saving of PDFs entirely in the browser, managing input and output files through a virtual file system (VFS) with no backend required. It ships a dedicated PdfCompressor, whose Options control the compression strategy along three dimensions: first ImageCompressionOptions resizes and re-compresses the images in the document, second TextCompressionOptions compresses font data or even removes embedded fonts, and third CompressContents re-compresses the page content streams. The three can be freely combined in a single pass to balance visual quality against file size.
This article first introduces the three compression dimensions of PdfCompressor, and then gives a complete runnable example that combines them:
- Compressing Images in a PDF
- Compressing Fonts and Unembedding Fonts in a PDF
- Compressing PDF Content Streams
- Combining All Three Approaches to Compress a PDF
For installation and project configuration, refer to Integrating Spire.PDF for JavaScript in a React Project. The examples below assume Spire.PDF is installed and the WebAssembly module has been initialized.
Compressing Images in a PDF
High-resolution bitmaps on a page are usually the main source of a PDF's size. Options.ImageCompressionOptions controls image scaling and re-encoding with three properties:
| Property | What it does | Effect and trade-off |
|---|---|---|
ResizeImages |
Scales images down proportionally and re-encodes them | Noticeably reduces the size; suited to very large, high-resolution images |
CompressImage |
Performs lossy compression on images | Smaller file at the cost of a little image quality |
ImageQuality |
Controls the quality tier used for re-encoding | High gives better quality but a larger file; Low gives a smaller file but images may look softer |
For an image-heavy document, a typical approach is to enable ResizeImages and CompressImage first, then pick the ImageQuality tier that matches your tolerance for quality loss:
// Compress images in the document: resize, re-compress, and lower the quality
compressor.Options.ImageCompressionOptions.ResizeImages = true;
compressor.Options.ImageCompressionOptions.CompressImage = true;
compressor.Options.ImageCompressionOptions.ImageQuality = pdfModule.ImageQuality.Low;
Compressing Fonts and Unembedding Fonts in a PDF
A PDF embeds the fonts used in its text as subsets inside the file, and several fonts with multiple weights can add up to a fair amount of size. Options.TextCompressionOptions offers two ways to handle fonts:
| Property | What it does | Effect and trade-off |
|---|---|---|
CompressFonts |
Compresses the embedded font data and keeps the fonts | Same rendering, smaller file, no display risk |
UnembedFonts |
Removes the fonts and lets the reader render with system fonts | Even smaller file; glyphs may be substituted if the target system lacks the fonts |
UnembedFonts shrinks the file further but carries a display risk, so whether to enable it depends on where the document will be viewed:
// Compress font data; UnembedFonts goes further and removes the embedded fonts
compressor.Options.TextCompressionOptions.CompressFonts = true;
compressor.Options.TextCompressionOptions.UnembedFonts = true;
Compressing PDF Content Streams
The text and vector drawing commands on a PDF page are stored as “content streams”. They are usually compressed when generated, but after repeated edits or processing by different tools they can still hold redundancy. Options.CompressContents re-compresses the document's content streams, which can also free up some space in text-heavy, layout-complex documents:
// Re-compress the document content streams
compressor.Options.CompressContents = true;
Combining All Three Approaches to Compress a PDF
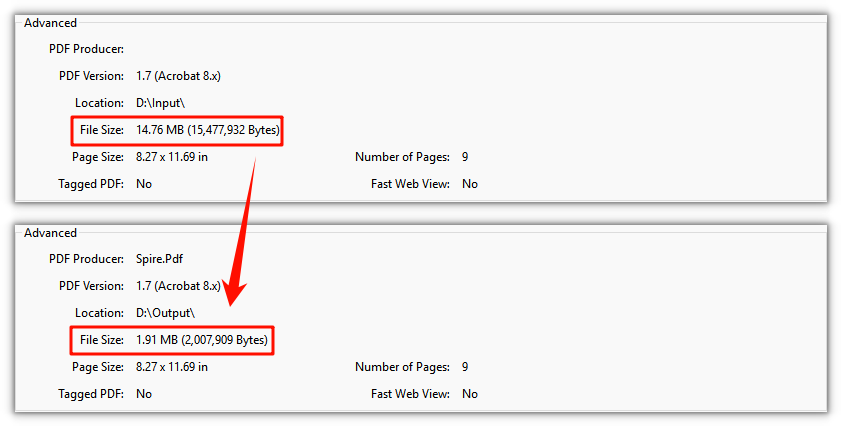
Combining the three approaches above gives a complete compression flow that balances effect and speed: after loading the PDF, enable image, font, and content compression in one pass, then call CompressToFile to write the result to a new file. The example below enables ResizeImages, CompressImage (with the High quality tier), CompressFonts, UnembedFonts, and CompressContents all at once on a PDF that contains both high-resolution images and text, and produces a new document that is clearly smaller:
function App() {
  const compressPdfDocument = async () => {
    // Get the Spire.PDF WASM module
    const pdfModule = window.wasmModule?.spirepdf;

    // Check that the module is ready
    if (!pdfModule) {
      alert('Spire.PDF is not ready yet');
      return;
    }

    // Load the PDF to be compressed into the VFS
    const inputFileName = 'ImageDocument.pdf';
    await window.spire.FetchFileToVFS(inputFileName, "", `${process.env.PUBLIC_URL}/data/`);

    // Create a PdfCompressor and point it at the PDF to compress
    let compressor = new pdfModule.PdfCompressor({ filePath: inputFileName });

    // 1. Image compression: resize and re-compress images, with a higher quality tier
    compressor.Options.ImageCompressionOptions.ResizeImages = true;
    compressor.Options.ImageCompressionOptions.CompressImage = true;
    compressor.Options.ImageCompressionOptions.ImageQuality = pdfModule.ImageQuality.High;

    // 2. Font compression: compress font data and remove embedded fonts
    compressor.Options.TextCompressionOptions.CompressFonts = true;
    compressor.Options.TextCompressionOptions.UnembedFonts = true;

    // 3. Content compression: re-compress the document content streams
    compressor.Options.CompressContents = true;

    // Define the output file name and compress to it
    const outputFileName = 'CompressedDocument.pdf';
    compressor.CompressToFile(outputFileName);

    // Read the generated file from the VFS and trigger the download
    const fileArray = window.dotnetRuntime.Module.FS.readFile(outputFileName);
    const blob = new Blob([fileArray], { type: 'application/pdf' });
    const url = URL.createObjectURL(blob);
    const a = document.createElement('a');
    a.href = url;
    a.download = outputFileName;
    a.click();
    URL.revokeObjectURL(url);
  };

  return (
    <div style={{ textAlign: 'center', height: '300px' }}>
      <h1>Compress PDF Document</h1>
      <button onClick={compressPdfDocument}>
        Generate
      </button>
    </div>
  );
}

export default App;
PDF document compressed by combining all three approaches
FAQ
Why is the file still large after compression when the PDF has few images
Reason: The size does not always come from images. When the pages are text-heavy, the size is more likely to come from the embedded fonts and the page content streams, so enabling image compression alone helps little.
Solution: Cover the other dimensions as well — compress font data with TextCompressionOptions (using UnembedFonts to remove embedded fonts when appropriate) and re-compress the content streams with CompressContents, so that text-heavy documents also shrink noticeably.
Will unembedding fonts cause the text to display incorrectly
Reason: UnembedFonts removes the font programs from the PDF, so the reader renders the text with fonts installed on the system; if the target environment lacks those fonts, glyph substitution or spacing changes may occur.
Solution: For documents distributed to users whose font environments are unknown, keep the fonts embedded and only use CompressFonts to compress the font data; enable UnembedFonts only when you are sure the target system has the corresponding fonts:
// Keep fonts embedded but compress the font data to avoid display risks after unembedding
compressor.Options.TextCompressionOptions.UnembedFonts = false;
compressor.Options.TextCompressionOptions.CompressFonts = true;
How should I trade off the image quality tier against the compression methods
Reason: ImageQuality only affects the quality and size of the re-encoded images; depending on the document, the part that contributes the most to its size differs, so a single dimension rarely reaches an ideal compression ratio.
Solution: For image-heavy documents, enable ResizeImages and CompressImage first and choose between the High/Low tiers; for text-heavy documents, focus on font compression and content compression. If fonts must stay embedded, just turn off UnembedFonts — the other compression options are unaffected:
// For image-heavy documents, choose the lower quality tier for a smaller file
compressor.Options.ImageCompressionOptions.ImageQuality = pdfModule.ImageQuality.Low;
Get a Free License
If you want to remove the evaluation message from the result documents or get rid of feature limitations, please contact sales to obtain a free 30-day temporary license.
Add or Remove Attachments in PDF with JavaScript in React
PDF is a fixed-layout format that is easy to distribute, yet a single PDF usually carries only the body of a document. In practice you often want to hand over supporting material together with the main document, such as a contract bundled with its signed images, or a report bundled with the source data behind it, so that everything stays together for archiving and circulation. PDF attachments (embedded files) provide a standard way to do this: a PDF can carry files of any type in its embedded-file tree, and a recipient who opens one PDF finds both the main document and the supporting files in the viewer’s “Attachments” panel, with no need to request them separately.
Spire.PDF for JavaScript is built on WebAssembly, so it loads, draws, and saves PDFs directly in the browser and manages input and output files through a virtual file system (VFS), with no backend service required. Working with attachments comes down to two operations: adding—wrap a file into an attachment with PdfAttachment and add it to the document’s attachment collection through doc.Attachments.Add; and removing—delete a specified attachment from the doc.Attachments collection with Attachments.RemoveAt(index). Both revolve around the PdfDocument.Attachments collection.
This article covers two key operations:
For installation and project setup, refer to How to Integrate Spire.PDF for JavaScript in a React Project. The examples below assume Spire.PDF is installed and the WebAssembly module has been initialized.
Add an Attachment to a PDF Document
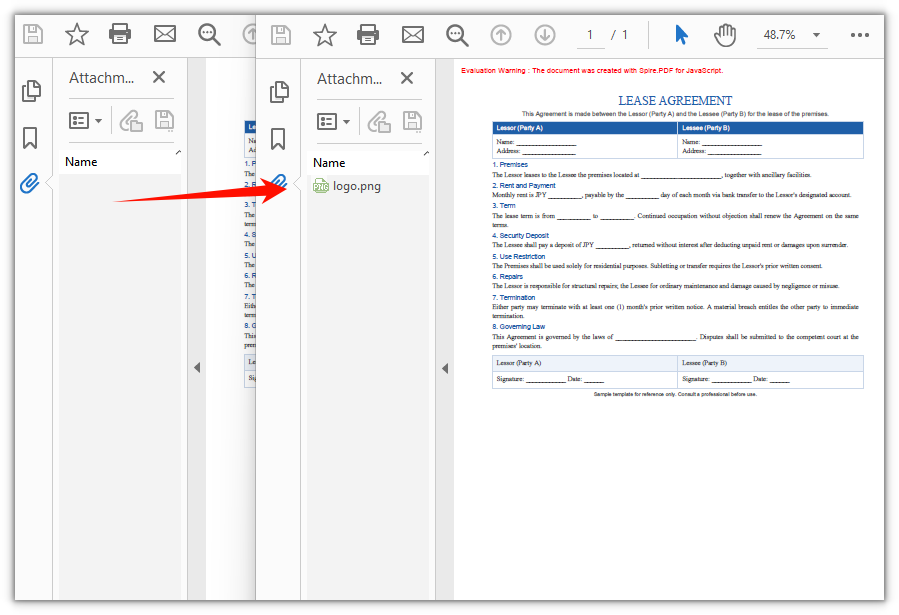
To add an attachment, first load the container PDF and the file to embed into the virtual file system, then wrap the file with PdfAttachment (name, data, description, and MIME type) and add it to doc.Attachments. The attachment is not drawn on the page; it is stored in the PDF’s embedded-file tree, where you can view and save it from the viewer’s “Attachments” panel. This example embeds a logo.png into a lease agreement.
function App() {
  const addAttachment = async () => {
    // Get the Spire.PDF WASM module
    const pdfModule = window.wasmModule?.spirepdf;

    // Check whether the module is ready
    if (!pdfModule) {
      alert('Spire.PDF is not ready yet');
      return;
    }

    // Load the container PDF file into the VFS
    const inputFileName = 'Lease_Agreement_EN.pdf';
    await window.spire.FetchFileToVFS(inputFileName, "", `${process.env.PUBLIC_URL}/data/`);

    // Load the image file to embed as an attachment into the VFS
    const attachFileName = 'logo.png';
    await window.spire.FetchFileToVFS(attachFileName, "", `${process.env.PUBLIC_URL}/data/`);

    // Create a PdfDocument object and load the PDF document
    let doc = new pdfModule.PdfDocument();
    doc.LoadFromFile(inputFileName);

    // Create the attachment and set its file name, description, and MIME type
    let attachment = new pdfModule.PdfAttachment({ fileName: attachFileName });
    attachment.Data = window.dotnetRuntime.Module.FS.readFile(attachFileName);
    attachment.Description = 'Company logo attached to the agreement';
    attachment.MimeType = 'image/png';

    // Add the attachment to the document's attachment collection
    doc.Attachments.Add({ attachment: attachment });

    // Define the output file name and save the document
    const outputFileName = 'Agreement_With_Attachment.pdf';
    doc.SaveToFile(outputFileName);
    doc.Close();

    // Read the generated file from the VFS and trigger a download
    const fileArray = window.dotnetRuntime.Module.FS.readFile(outputFileName);
    const blob = new Blob([fileArray], { type: 'application/pdf' });
    const url = URL.createObjectURL(blob);
    const a = document.createElement('a');
    a.href = url;
    a.download = outputFileName;
    a.click();
    URL.revokeObjectURL(url);
  };

  return (
    <div style={{ textAlign: 'center', height: '300px' }}>
      <h1>Add Attachment To PDF</h1>
      <button onClick={addAttachment}>
        Generate
      </button>
    </div>
  );
}

export default App;
Agreement with the logo.png attachment embedded
Remove an Attachment from a PDF Document
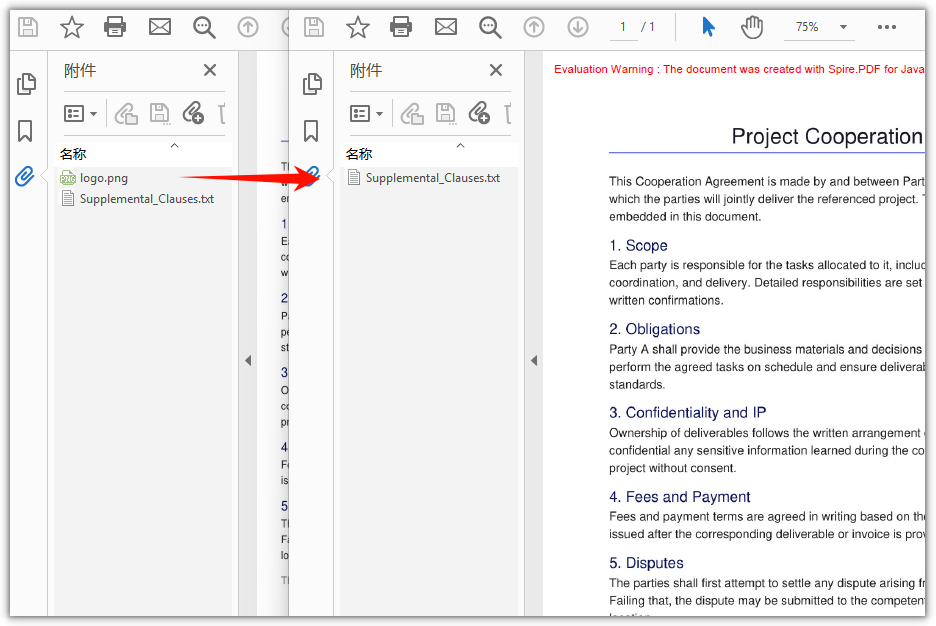
To remove a specified attachment, call Attachments.RemoveAt(index) on the attachment collection; the index is zero-based (check Count first to confirm how many attachments there are). This example loads a sample document that already contains attachments and deletes its first one. To remove every attachment from the document at once, call attachments.Clear() instead.
function App() {
  const deleteAttachments = async () => {
    // Get the Spire.PDF WASM module
    const pdfModule = window.wasmModule?.spirepdf;

    // Check whether the module is ready
    if (!pdfModule) {
      alert('Spire.PDF is not ready yet');
      return;
    }

    // Load the PDF file that contains attachments into the VFS
    const inputFileName = 'SampleWithAttachments.pdf';
    await window.spire.FetchFileToVFS(inputFileName, "", `${process.env.PUBLIC_URL}/data/`);

    // Create a PdfDocument object and load the PDF document
    let doc = new pdfModule.PdfDocument();
    doc.LoadFromFile(inputFileName);

    // Get the document's attachment collection
    let attachments = doc.Attachments;

    // Remove the attachment at the given index (zero-based; here the first one)
    attachments.RemoveAt(0);

    // Define the output file name and save the document
    const outputFileName = 'Attachment_Removed.pdf';
    doc.SaveToFile(outputFileName);
    doc.Close();

    // Read the generated file from the VFS and trigger a download
    const fileArray = window.dotnetRuntime.Module.FS.readFile(outputFileName);
    const blob = new Blob([fileArray], { type: 'application/pdf' });
    const url = URL.createObjectURL(blob);
    const a = document.createElement('a');
    a.href = url;
    a.download = outputFileName;
    a.click();
    URL.revokeObjectURL(url);
  };

  return (
    <div style={{ textAlign: 'center', height: '300px' }}>
      <h1>Delete Attachments From PDF</h1>
      <button onClick={deleteAttachments}>
        Generate
      </button>
    </div>
  );
}

export default App;
PDF document after the first attachment is removed
Frequently Asked Questions
How do I check whether a PDF contains attachments and how many there are
Reason: Before removing or reading attachments, you usually want to know whether the document has any attachments and how many, to avoid invalid operations on an empty collection.
Solution: All attachments of a document live in the doc.Attachments collection; its Count property returns the number of attachments, and a value of 0 means there are none. To read a single attachment, access it by index with get_Item(index):
// Get the document's attachment collection and the number of attachments
let attachments = doc.Attachments;
let count = attachments.Count;
Which properties should I set when adding an attachment
Reason: If you only assign the file bytes without a name and description, the item is displayed incompletely in the viewer’s “Attachments” panel and the recipient cannot tell what the file is.
Solution: The commonly used properties of PdfAttachment are fileName (the file name the recipient sees), Description (a one-line description), and MimeType (the content type); assign the file bytes to Data. After setting them, Add the attachment to the collection so the panel shows it with its name and description:
// Create the attachment and set its file name, data, description, and MIME type
let attachment = new pdfModule.PdfAttachment({ fileName: 'logo.png' });
attachment.Data = window.dotnetRuntime.Module.FS.readFile('logo.png');
attachment.Description = 'Company logo attached to the agreement';
attachment.MimeType = 'image/png';
doc.Attachments.Add({ attachment: attachment });
Can I embed file types other than images as attachments
Reason: Examples often demonstrate attachments with images, which can make it look as if PDF attachments only accept images.
Solution: A PDF attachment is essentially an embedded file that carries arbitrary bytes, with no restriction on the type. As long as you load the file into the virtual file system, read its bytes into Data with FS.readFile, and set MimeType to the matching content type, files such as Word, Excel, PDF, or archives can all be embedded as attachments. Embedding a PDF appendix, for example:
// Load the PDF appendix to embed and add it as an attachment
const attachName = 'Product_Appendix.pdf';
await window.spire.FetchFileToVFS(attachName, "", `${process.env.PUBLIC_URL}/data/`);
let attachment = new pdfModule.PdfAttachment({ fileName: attachName });
attachment.Data = window.dotnetRuntime.Module.FS.readFile(attachName);
attachment.MimeType = 'application/pdf';
doc.Attachments.Add({ attachment: attachment });
Get a Free License
If you wish to delete the evaluation message from the resulting documents, or to get rid of function limitations, please contact sales to obtain a valid 30-day temporary license.
Add, Read, Modify, and Delete Excel Hyperlinks with JavaScript in React
Hyperlinks are a common element in Excel for quickly jumping to web pages, email addresses, or other resources, and they often appear in tables such as product websites, contact information, and reference materials. Spire.XLS for JavaScript uses WebAssembly to add, read, modify, and delete hyperlinks directly in the browser and manages input/output files through a virtual file system (VFS) without any backend support.
This article demonstrates the following common features:
For installation and project configuration, please refer to Integrating Spire.XLS for JavaScript in a React Project. The examples below assume that Spire.XLS is installed and the WebAssembly module has been initialized.
Add a Hyperlink to Text
For cells that contain text such as company names, website names, or email addresses, you can add hyperlinks to the text so that users can click to jump to a web page or send an email.
function App() {
  const addHyperlinkToText = async () => {
    // Get the Spire.XLS WASM module
    const xlsModule = window.wasmModule?.spirexls;

    // Check whether the module is ready
    if (!xlsModule) {
      alert('Spire.Xls is not ready yet');
      return;
    }

    // Load the font and the Excel file into the VFS
    await window.spire.FetchFileToVFS('ARIAL.TTF', '/Library/Fonts/', `${process.env.PUBLIC_URL}/font/`);
    const inputFileName = 'HyperlinksSample.xlsx';
    await window.spire.FetchFileToVFS(inputFileName, '', `${process.env.PUBLIC_URL}data/`);

    // Load the workbook
    const workbook = new xlsModule.Workbook();
    workbook.LoadFromFile({ fileName: inputFileName });

    // Get the first worksheet
    const sheet = workbook.Worksheets.get(0);

    // Add a web hyperlink to the text in cell D10
    const urlLink = sheet.HyperLinks.Add({ range: sheet.Range.get('D10') });
    urlLink.TextToDisplay = sheet.Range.get('D10').Text;
    urlLink.Type = xlsModule.HyperLinkType.Url;
    urlLink.Address = 'https://www.e-iceblue.com/';

    // Add an email hyperlink to the text in cell E10
    const mailLink = sheet.HyperLinks.Add({ range: sheet.Range.get('E10') });
    mailLink.TextToDisplay = sheet.Range.get('E10').Text;
    mailLink.Type = xlsModule.HyperLinkType.Url;
    mailLink.Address = 'mailto:support@e-iceblue.com';

    // Save the workbook
    const outputFileName = 'AddHyperlinkToText_output.xlsx';
    workbook.SaveToFile({ fileName: outputFileName, version: xlsModule.ExcelVersion.Version2010 });

    // Dispose of the workbook
    workbook.Dispose();

    // Read the generated file from the VFS and trigger the download
    const fileArray = window.dotnetRuntime.Module.FS.readFile(outputFileName);
    const blob = new Blob([fileArray], { type: 'application/vnd.openxmlformats-officedocument.spreadsheetml.sheet' });
    const url = URL.createObjectURL(blob);
    const a = document.createElement('a');
    a.href = url;
    a.download = outputFileName;
    a.click();
    URL.revokeObjectURL(url);
  };

  return (
    <div style={{ textAlign: 'center', height: '300px' }}>
      <h1>Add Hyperlink To Text</h1>
      <button onClick={addHyperlinkToText}>Start</button>
    </div>
  );
}

export default App;
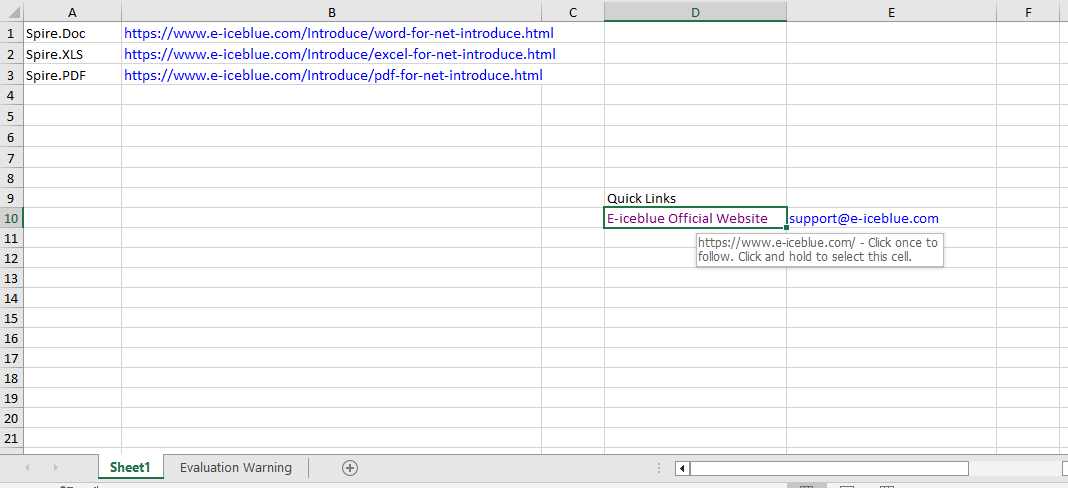
After running, the text in cell D10 becomes a clickable web link, and the email address in cell E10 becomes an email link that can be used to send an email.
Read Hyperlinks
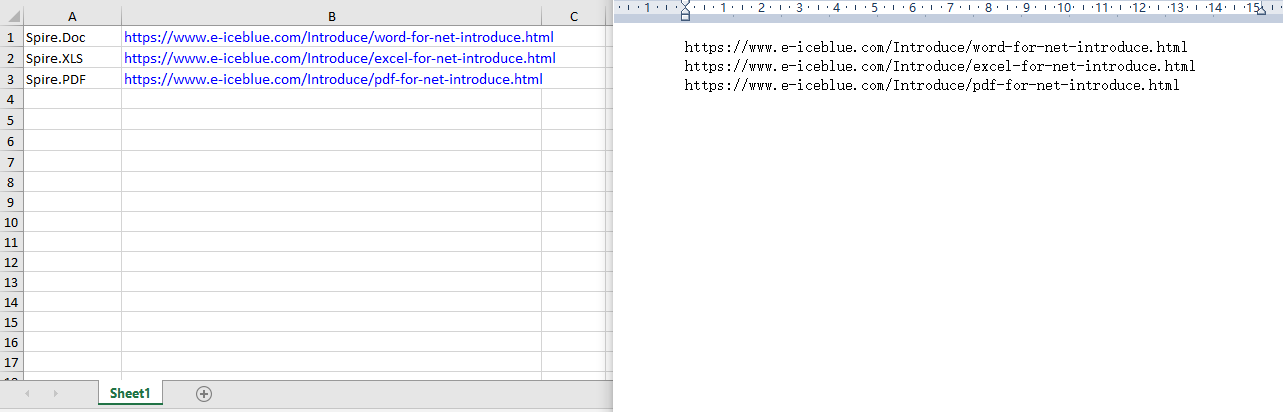
Through the Worksheet.HyperLinks collection, you can get all the hyperlinks in a worksheet and access the target address of each hyperlink by index.
function App() {
  const readHyperlinks = async () => {
    // Get the Spire.XLS WASM module
    const xlsModule = window.wasmModule?.spirexls;

    // Check whether the module is ready
    if (!xlsModule) {
      alert('Spire.Xls is not ready yet');
      return;
    }

    // Load the Excel file into the VFS
    const inputFileName = 'HyperlinksSample.xlsx';
    await window.spire.FetchFileToVFS(inputFileName, '', `${process.env.PUBLIC_URL}data/`);

    // Load the workbook
    const workbook = new xlsModule.Workbook();
    workbook.LoadFromFile({ fileName: inputFileName });

    // Get the first worksheet
    const sheet = workbook.Worksheets.get(0);

    // Read the target addresses of all hyperlinks
    const hyperlinkCount = sheet.HyperLinks.Count;
    let allAddresses = '';

    for (let i = 0; i < hyperlinkCount; i++) {
        const address = sheet.HyperLinks.get(i).Address;
        allAddresses += address + '\n';
    }

    // Save the hyperlink addresses as a txt file
    const outputFileName = 'ReadHyperlinks_output.txt';
    window.dotnetRuntime.Module.FS.writeFile(outputFileName, allAddresses);
    workbook.Dispose();

    // Read the generated file from the VFS and trigger the download
    const fileArray = window.dotnetRuntime.Module.FS.readFile(outputFileName);
    const blob = new Blob([fileArray], { type: 'text/plain' });
    const url = URL.createObjectURL(blob);
    const a = document.createElement('a');
    a.href = url;
    a.download = outputFileName;
    a.click();
    URL.revokeObjectURL(url);
  };

  return (
    <div style={{ textAlign: 'center', height: '300px' }}>
      <h1>Read Hyperlinks</h1>
      <button onClick={readHyperlinks}>Start</button>
    </div>
  );
}

export default App;
Use the HyperLinks.Count property to get the total number of hyperlinks in the worksheet.
Modify a Hyperlink
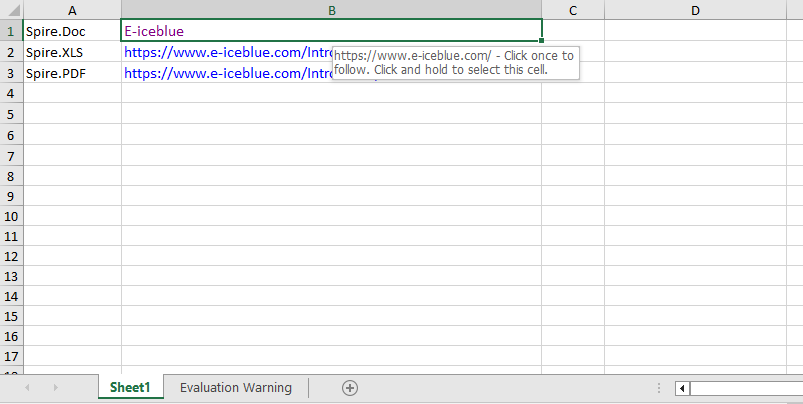
After getting a hyperlink by index with HyperLinks.get(0), you can reset its display text and target address to modify the hyperlink.
function App() {
  const modifyHyperlink = async () => {
    // Get the Spire.XLS WASM module
    const xlsModule = window.wasmModule?.spirexls;

    // Check whether the module is ready
    if (!xlsModule) {
      alert('Spire.Xls is not ready yet');
      return;
    }

    // Load the font and the Excel file into the VFS
    await window.spire.FetchFileToVFS('ARIAL.TTF', '/Library/Fonts/', `${process.env.PUBLIC_URL}/font/`);
    const inputFileName = 'HyperlinksSample.xlsx';
    await window.spire.FetchFileToVFS(inputFileName, '', `${process.env.PUBLIC_URL}data/`);

    // Load the workbook
    const workbook = new xlsModule.Workbook();
    workbook.LoadFromFile({ fileName: inputFileName });

    // Get the first worksheet
    const sheet = workbook.Worksheets.get(0);

    // Get all hyperlinks in the worksheet
    const links = sheet.HyperLinks;

    // Modify the display text and target address of the first hyperlink
    links.get(0).TextToDisplay = 'E-iceblue';
    links.get(0).Address = 'https://www.e-iceblue.com/';

    // Save the workbook
    const outputFileName = 'ModifyHyperlink_output.xlsx';
    workbook.SaveToFile({ fileName: outputFileName, version: xlsModule.ExcelVersion.Version2010 });

    // Dispose of the workbook
    workbook.Dispose();

    // Read the generated file from the VFS and trigger the download
    const fileArray = window.dotnetRuntime.Module.FS.readFile(outputFileName);
    const blob = new Blob([fileArray], { type: 'application/vnd.openxmlformats-officedocument.spreadsheetml.sheet' });
    const url = URL.createObjectURL(blob);
    const a = document.createElement('a');
    a.href = url;
    a.download = outputFileName;
    a.click();
    URL.revokeObjectURL(url);
  };

  return (
    <div style={{ textAlign: 'center', height: '300px' }}>
      <h1>Modify Hyperlink</h1>
      <button onClick={modifyHyperlink}>Start</button>
    </div>
  );
}

export default App;
After modification, both the display text and the target address of the first hyperlink are updated.
Remove Hyperlinks
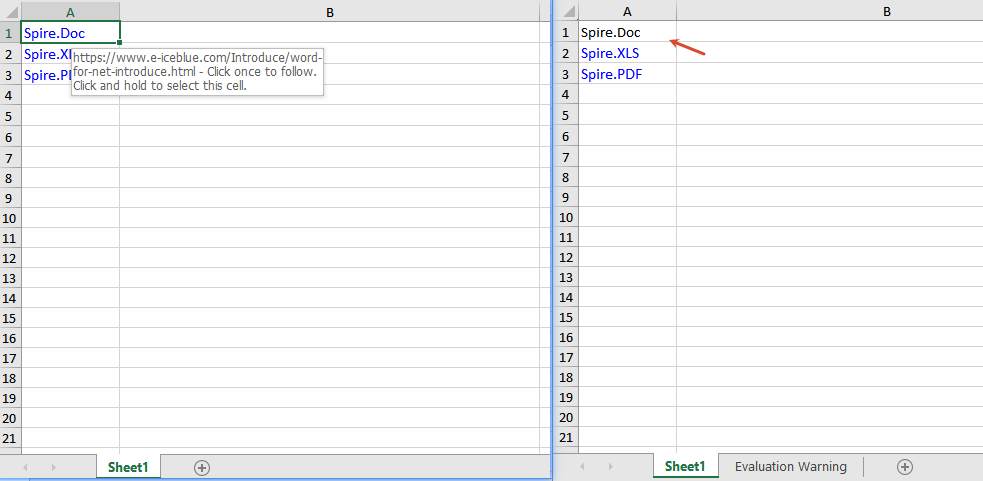
Use the HyperLinks.RemoveAt(index) method to only remove the hyperlink and keep the text, or use the Range.ClearAll() method to clear all content in the cell, including the hyperlink.
function App() {
  const removeHyperlinks = async () => {
    // Get the Spire.XLS WASM module
    const xlsModule = window.wasmModule?.spirexls;

    // Check whether the module is ready
    if (!xlsModule) {
      alert('Spire.Xls is not ready yet');
      return;
    }

    // Load the font and the Excel file into the VFS
    await window.spire.FetchFileToVFS('ARIAL.TTF', '/Library/Fonts/', `${process.env.PUBLIC_URL}/font/`);
    const inputFileName = 'HyperlinksSample.xlsx';
    await window.spire.FetchFileToVFS(inputFileName, '', `${process.env.PUBLIC_URL}data/`);

    // Load the workbook
    const workbook = new xlsModule.Workbook();
    workbook.LoadFromFile({ fileName: inputFileName });

    // Get the first worksheet
    const sheet = workbook.Worksheets.get(0);

    // Get all hyperlinks in the worksheet
    const links = sheet.HyperLinks;

    // Clear all content in the linked cells
    // sheet.Range.get('A1').ClearAll();
    // sheet.Range.get('A2').ClearAll();
    // sheet.Range.get('A3').ClearAll();

    // Only remove the hyperlink and keep the original text
    sheet.HyperLinks.RemoveAt(0);

    // Save the workbook
    const outputFileName = 'RemoveHyperlinks_output.xlsx';
    workbook.SaveToFile({ fileName: outputFileName, version: xlsModule.ExcelVersion.Version2010 });

    // Dispose of the workbook
    workbook.Dispose();

    // Read the generated file from the VFS and trigger the download
    const fileArray = window.dotnetRuntime.Module.FS.readFile(outputFileName);
    const blob = new Blob([fileArray], { type: 'application/vnd.openxmlformats-officedocument.spreadsheetml.sheet' });
    const url = URL.createObjectURL(blob);
    const a = document.createElement('a');
    a.href = url;
    a.download = outputFileName;
    a.click();
    URL.revokeObjectURL(url);
  };

  return (
    <div style={{ textAlign: 'center', height: '300px' }}>
      <h1>Remove Hyperlinks</h1>
      <button onClick={removeHyperlinks}>Start</button>
    </div>
  );
}

export default App;
Frequently Asked Questions
The target address is not updated after modifying the hyperlink
Reason: The wrong hyperlink index was modified, or there is no hyperlink on the target cell.
Solution: Make sure a hyperlink already exists in the worksheet, access it at the correct index such as sheet.HyperLinks.get(0), and then set its Address property.
Get a Free License
If you want to remove the evaluation message from the result documents or get rid of feature limitations, please contact sales to obtain a temporary license valid for 30 days.
How to Generate Government Documents with an AI Agent in C#
In the day-to-day work of government agencies and public institutions, drafting and formatting official documents—notices, directives, reports, and memoranda—is a frequent and highly standardized task. Before an official document is issued, it must be authoritative in tone, precise in wording, and rigorous in logic, and it must also follow a consistent, professional layout: the typeface and size of the title and body text, the hierarchy and formatting of section headings, margins, line spacing, and page numbers should all look uniform across the documents an agency produces. The traditional approach relies on clerical staff to draft documents manually, proofread them repeatedly, and typeset them item by item; a single notice can take more than half a day from draft to a clean, consistent layout, and the formatting details produced by different people often vary.
Comparison with Traditional SDK API Processing
| Traditional Spire.Office for .NET API | Spire.Agent.Office | |
|---|---|---|
| Driving approach | Write code to assemble the official document according to a template: load document → iterate paragraphs → map fields → apply the layout; every step requires code control | Describe the issuing elements in natural language, and AI automatically composes the document and typesets it according to the requested layout |
| Code volume | Requires a large amount of code to maintain official document templates, field mappings, and format rule libraries | Only configuration code + one natural language instruction |
| Style and wording | Can only replace placeholders, unable to handle formal government tone, official titles, and standard administrative expressions | AI generates an authoritative and formal official-document style based on semantics, automatically handling heading hierarchies and transitions |
| Layout rules | Font typefaces and sizes, margins, line spacing, and other formats must be hard-coded into the program, and any change requires a new release | A single phrase such as "format it in the standard official document layout" in the instruction applies the desired layout |
| Maintainability | Different document types and different agencies' requirements need to be developed and maintained with separate templates | Document types, elements, and layout requirements can be adjusted at any time in natural language |
This article explains how to use the Word AI capability of Spire.Agent.Office to achieve intelligent drafting and format standardization of official documents. Together, the two form a complete pipeline from drafting to finalization: first use AI to automatically generate a stylistically standardized, structurally complete first draft based on the issuing points, and then normalize the format of the draft or of existing official documents with one click, so documents from different sources all follow the same standard official document layout.
For product installation and SpireToken configuration, refer to Integrating Spire.Agent.Office in a .NET Project. The examples below assume Spire.Agent.Office is installed and SpireToken is configured.
Intelligent Generation of Official Document Drafts
Intelligent generation of official document drafts is the starting point of the drafting stage, suitable for quickly producing a first draft from scratch. The core idea is: describe in natural language the issuing agency, document type, main recipients, subject matter, and the key points of the body to the AI; the AI automatically composes the document in a formal official-document style with a clear structure, while simultaneously applying the requested standard official document layout, producing a draft that can go directly into the review process in one pass.
using Spire.Agent.Office.AI;
using Spire.Agent.Office.Extensions;
using Spire.Doc;

// Save path
string savePath = "E:\\Output\\output-AirQualityNotice.docx";
// SpireToken Key
string key = "**********************";
// Natural language instruction
string instruction =
    "Please draft a formal public notice in standard official document style. " +
    "1. Issuing authority: [City] Department of Environmental Protection. " +
    "2. Subject: 2026 Fall-Winter Air Quality Initiative. " +
    "3. Recipients: all residents and businesses in the city. " +
    "4. Body: General Requirements; Key Tasks (residential wood smoke and open burning restrictions, vehicle idling reduction, industrial emission compliance); Implementation Requirements. " +
    "Format the notice in a standard official document layout: 12 pt Times New Roman body text, 1-inch margins, double-spaced, justified; bold section headings (I./ II./ III.) and bold-italic subheadings (A./ B./ C.); include the issuing authority, the date, and a distribution list. Save as DOCX.";

// Call the Word document processing function
AIResult result = ExecuteDemoWord(instruction, savePath, key, null);

// Execute Word document AI processing
static AIResult ExecuteDemoWord(string instruction, string savePath, string key, string[] attachmentPaths)
{
    // Create an AIOptions configuration object
    AIOptions options = new AIOptions();
    // Set the SpireToken Key
    options.SpireToken = key;

    // Use the Document object to process the Word document
    using (Document doc = new Document())
    {
        // Create the AI document processor
        AIDocumentProcessor processor = doc.AI(options);

        // Execute the AI instruction
        return processor.ExecuteInstruction(doc, instruction, savePath, attachmentPaths);
    }
}
AI-generated official document draft 
The generated draft is formal in tone and clear in hierarchy; the font typefaces and sizes of the title, body text, and headings at all levels, as well as the margins and line spacing, all follow the requested standard official document layout. Clerical staff only need to verify the facts and figures and add the signer's name and the date before sending it for review, compressing the writing time from hours to a few minutes. For high-frequency document types of the same agency (notices, directives, reports, and memoranda), frequently used elements can also be fixed into a unified instruction to achieve one-click drafting of routine official documents.
Standardization of the Official Document Format
For existing official documents, drafts submitted by field offices, or AI-generated drafts, one-click format standardization can unify their layout to the standard official document format you specify. The core idea is: load an existing official document and let the AI standardize the title, body text, hierarchical headings, margins, line spacing, and page numbers item by item according to the layout rules you describe, while also correcting typos and grammatical errors, so that official documents from different sources present a consistent, professional layout.
using Spire.Agent.Office.AI;
using Spire.Agent.Office.Extensions;
using Spire.Doc;

// Path of the official document to be standardized
string inputPath = "E:\\Input\\Field_Office_Submission.docx";
// Save path
string savePath = "E:\\Output\\Field_Office_Submission-Standardized.docx";
// SpireToken Key
string key = "**********************";
// Natural language instruction
string instruction =
    "Please standardize the layout of the current document to the official document format described below. " +
    "1. Title: 16 pt Times New Roman Bold, centered. " +
    "2. Body: 12 pt Times New Roman, justified, double-spaced. " +
    "3. Section headings (I./ II./ III.): 12 pt Times New Roman Bold; subheadings (A./ B./ C.): 12 pt Times New Roman Bold Italic. " +
    "4. Page margins: 1 inch on all sides. " +
    "5. Page numbers: centered at the bottom of the page, 12 pt. " +
    "6. Correct typos and grammatical errors without altering the original meaning. " +
    "Save and output in DOCX format.";

// Call the Word document processing function
AIResult result = ExecuteDemoWord(instruction, inputPath, savePath, key, null);

// Execute Word document AI processing
static AIResult ExecuteDemoWord(string instruction, string inputPath, string savePath, string key, string[] attachmentPaths)
{
    // Create an AIOptions configuration object
    AIOptions options = new AIOptions();
    // Set the SpireToken Key
    options.SpireToken = key;

    // Use the Document object to process the Word document
    using (Document doc = new Document())
    {
        // Load the official document to be standardized
        if (!string.IsNullOrEmpty(inputPath) && File.Exists(inputPath))
        {
            doc.LoadFromFile(inputPath);
        }
        // Create the AI document processor
        AIDocumentProcessor processor = doc.AI(options);

        // Execute the AI instruction
        return processor.ExecuteInstruction(doc, instruction, savePath, attachmentPaths);
    }
}
Official document after format standardization 
After format standardization, the title, body text, hierarchical headings, margins, line spacing, and page numbers of the official document all conform to the specified official document layout, and the same instruction can be applied to multiple documents in batch. For drafts submitted by field offices, the appearance of official documents across an entire agency can be quickly unified; you can also ask the AI to correct obvious grammatical errors during standardization, reducing the burden of manual review.
FAQ
The generated official document style is nonstandard or too colloquial
Reason: AI's grasp of the official document style depends on the description of the document type, the issuing agency and recipients, and the intended tone in the instruction; when the description is too general, the wording may become colloquial.
Solution: Clearly specify the document type, issuing agency, and main recipients in the instruction, and add requirements such as "use a formal official-document style and tone, with precise and concise wording". If necessary, attach a sample document your agency has already issued as a reference attachment.
The layout is inconsistent with your agency's requirements after format standardization
Reason: Different agencies may have special layout requirements for their own official documents (such as the style of the letterhead, dedicated fonts, and the arrangement of the signature and date), which a general instruction does not fully cover.
Solution: Supplement the instruction with your own agency's detailed layout rules (margins, font typefaces and sizes, letterhead, and the position of the signature and date, etc.), or pass the agency's layout template as an attachment so that AI applies it according to the template.
The generated official document content contains fabricated information
Reason: The writing points are described too briefly, and AI supplements content such as dates and figures on its own to complete the structure.
Solution: Write key elements such as the basis for issuance, time frames, and any figures into the instruction, and explicitly require that "elements not provided should be marked as blank or placeholders and must not be fabricated".
Layouts are not uniform after processing multiple official documents
Reason: The details described differ between instructions, or documents from different sources differ greatly in their base styles, so the formats may diverge after individual processing.
Solution: Use exactly the same layout description for documents in the same batch, fix the rule that "all documents must be typeset strictly according to the same layout rules", and repeatedly emphasize the key formatting items (such as fixed line spacing and a first-line indent of 2 characters) in the instruction.
Get the SpireToken Key
- Contact sales@e-iceblue.com or visit https://www.e-iceblue.com/TemLicense.html to obtain a trial/commercial API key
Configure it in your code:
AIOptions options = new AIOptions();
options.SpireToken = key;
Add Image Watermarks to PDF with JavaScript in React
PDF has a fixed layout and is easy to distribute, but once its content has been generated, it is difficult to modify within the body text. For documents such as contracts, reports, and notices, you often need to indicate the confidentiality level, copyright ownership, or usage states such as "Draft" and "Sample" without affecting the reading of the body content. Besides the text watermarks mentioned above, image watermarks made from a company logo, seal, or warning image are also quite common: they float over the content as semi-transparent images, conveying the brand and status information clearly without harming the readability of the original.
Spire.PDF for JavaScript loads, draws, and saves PDFs directly in the browser via WebAssembly, managing input and output files through a virtual file system (VFS) without requiring a backend server. Image watermarking usually takes two forms: one places a single image watermark at a specified position on the page (such as the center of the page), which can be achieved directly by loading the image with PdfImage.FromFile and combining the transparency settings of the page canvas with the DrawImage method; the other repeats the image across the whole page, which can be done with the PdfTilingBrush tiling brush.
This article covers two core features:
For installation and project setup, refer to Integrating Spire.PDF for JavaScript in a React Project. The examples below assume Spire.PDF is installed and the WebAssembly module is initialized.
Add a Single Image Watermark to PDF
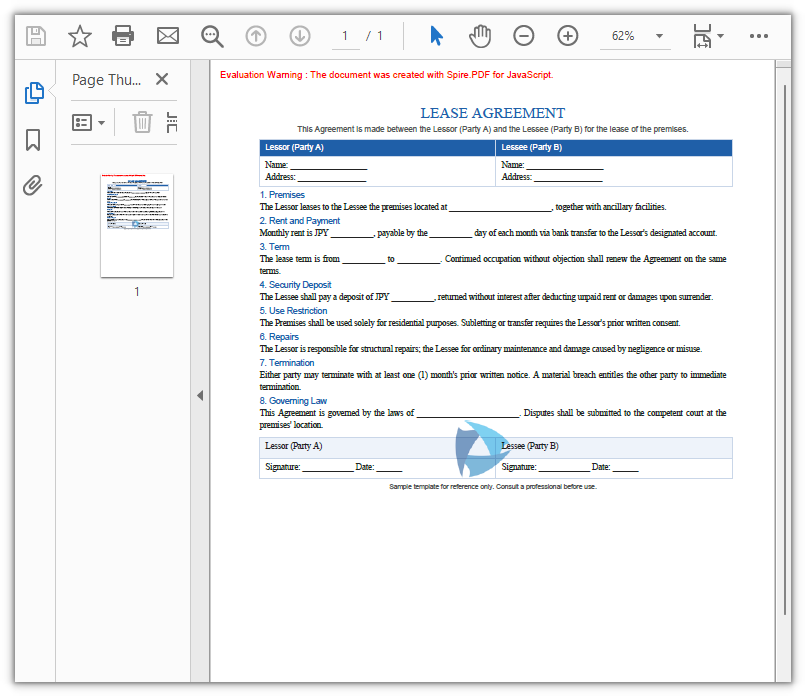
A single image watermark places a semi-transparent image at a specified position on the page (in this example, the center of each page), suitable for placing a company logo or warning sign in a prominent position of the document. The approach is as follows: load the image from a file with PdfImage.FromFile; then, on the canvas of each page, save the state with Save, set the transparency and blend mode with SetTransparency, draw the image at the centered position with DrawImage, and finally restore the canvas state with Restore.
function App() {
  const addSingleImageWatermark = async () => {
    // Get the Spire.PDF WASM module
    const pdfModule = window.wasmModule?.spirepdf;

    // Check whether the WASM module is ready
    if (!pdfModule) {
      alert('Spire.PDF is not ready yet');
      return;
    }

    // Load the PDF file to be watermarked into VFS
    const inputFileName = 'Lease_Agreement_EN.pdf';
    await window.spire.FetchFileToVFS(inputFileName, "", `${process.env.PUBLIC_URL}/data/`);

    // Load the watermark image into VFS
    const inputImageName = 'logo.png';
    await window.spire.FetchFileToVFS(inputImageName, "", `${process.env.PUBLIC_URL}/data/`);

    // Create a PdfDocument object and load the PDF document
    let doc = new pdfModule.PdfDocument();
    doc.LoadFromFile(inputFileName);

    // Load the watermark image from a file
    let image = pdfModule.PdfImage.FromFile(inputImageName);

    // Loop through all the pages in the document
    for (let i = 0; i < doc.Pages.Count; i++) {
      // Get the specified page
      let page = doc.Pages.get_Item(i);

      // Save the canvas state, and set the semi-transparency (alpha 0.5) with the Multiply blend mode
      page.Canvas.Save();
      page.Canvas.SetTransparency({ alphaPen: 0.5, alphaBrush: 0.5, blendMode: pdfModule.PdfBlendMode.Multiply });

      // Compute the centered drawing position: subtract the image size from the page size and halve the result
      let position = new pdfModule.PointF(
        (page.Canvas.Size.Width - image.Width) / 2,
        (page.Canvas.Size.Height - image.Height) / 2
      );

      // Draw the watermark image at the center of the page
      page.Canvas.DrawImage({ image: image, point: position });

      // Restore the previous state of the canvas
      page.Canvas.Restore();
    }

    // Define the output file name and save the document
    const outputFileName = 'SingleImageWatermark.pdf';
    doc.SaveToFile(outputFileName);
    doc.Close();

    // Read the generated file from VFS and trigger the download
    const fileArray = window.dotnetRuntime.Module.FS.readFile(outputFileName);
    const blob = new Blob([fileArray], { type: 'application/pdf' });
    const url = URL.createObjectURL(blob);
    const a = document.createElement('a');
    a.href = url;
    a.download = outputFileName;
    a.click();
    URL.revokeObjectURL(url);
  };

  return (
    <div style={{ textAlign: 'center', height: '300px' }}>
      <h1>Add Single Image Watermark To PDF</h1>
      <button onClick={addSingleImageWatermark}>
        Generate
      </button>
    </div>
  );
}

export default App;
PDF document after adding the single image watermark
Add a Tiled Image Watermark to PDF
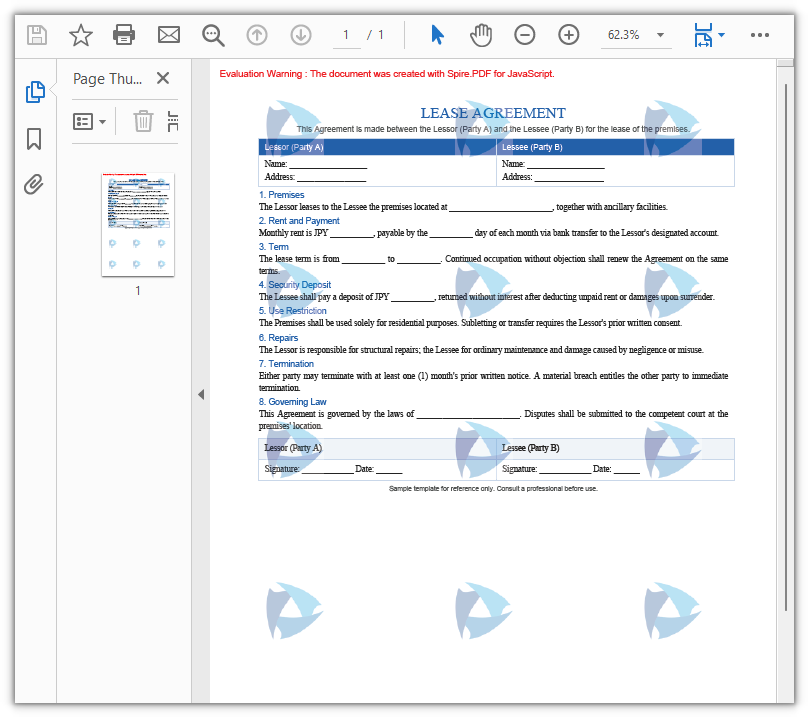
When you need the watermark to fill the whole page and form a faint background texture, use a tiled image watermark. The approach is as follows: load the image with PdfImage.FromFile; divide the page into tiling cells according to the page size with PdfTilingBrush; inside the graphics context of the brush, lower the transparency with SetTransparency and draw the image within the cell with DrawImage; finally fill the whole page with the brush using DrawRectangle so that the image repeats row by row and column by column, covering the entire page.
function App() {
  const addTiledImageWatermark = async () => {
    // Get the Spire.PDF WASM module
    const pdfModule = window.wasmModule?.spirepdf;

    // Check whether the WASM module is ready
    if (!pdfModule) {
      alert('Spire.PDF is not ready yet');
      return;
    }

    // Load the PDF file to be watermarked into VFS
    const inputFileName = 'Lease_Agreement_EN.pdf';
    await window.spire.FetchFileToVFS(inputFileName, "", `${process.env.PUBLIC_URL}/data/`);

    // Load the watermark image into VFS
    const inputImageName = 'logo.png';
    await window.spire.FetchFileToVFS(inputImageName, "", `${process.env.PUBLIC_URL}/data/`);

    // Create a PdfDocument object and load the PDF document
    let doc = new pdfModule.PdfDocument();
    doc.LoadFromFile(inputFileName);

    // Load the watermark image from a file
    let image = pdfModule.PdfImage.FromFile(inputImageName);

    // Loop through all the pages in the document
    for (let i = 0; i < doc.Pages.Count; i++) {
      // Get the specified page
      let page = doc.Pages.get_Item(i);

      // Create a tiling brush: use one third of the page width and one fifth of the page height as the tiling cell
      let size = new pdfModule.SizeF({
        width: page.Canvas.Size.Width / 3,
        height: page.Canvas.Size.Height / 5
      });
      let brush = new pdfModule.PdfTilingBrush({ size: size });

      // Set the watermark transparency to 30%
      brush.Graphics.SetTransparency({ alpha: 0.3 });

      // Draw the watermark image at the center of the tiling cell
      let point = new pdfModule.PointF(
        (brush.Size.Width - image.Width) / 2,
        (brush.Size.Height - image.Height) / 2
      );
      brush.Graphics.DrawImage({ image: image, point: point });

      // Fill a whole-page rectangle with the tiling brush so that the image watermark tiles across the entire page
      let rect = new pdfModule.RectangleF({
        location: new pdfModule.PointF(0, 0),
        size: page.Canvas.Size
      });
      page.Canvas.DrawRectangle({ brush: brush, rectangle: rect });
    }

    // Define the output file name and save the document
    const outputFileName = 'TiledImageWatermark.pdf';
    doc.SaveToFile(outputFileName);
    doc.Close();

    // Read the generated file from VFS and trigger the download
    const fileArray = window.dotnetRuntime.Module.FS.readFile(outputFileName);
    const blob = new Blob([fileArray], { type: 'application/pdf' });
    const url = URL.createObjectURL(blob);
    const a = document.createElement('a');
    a.href = url;
    a.download = outputFileName;
    a.click();
    URL.revokeObjectURL(url);
  };

  return (
    <div style={{ textAlign: 'center', height: '300px' }}>
      <h1>Add Tiled Image Watermark To PDF</h1>
      <button onClick={addTiledImageWatermark}>
        Generate
      </button>
    </div>
  );
}

export default App;
PDF document after adding the tiled image watermark
FAQ
How to control the transparency of an image watermark
Reason: An image watermark is layered over the body content as an image; if its transparency is not lowered, it will obscure the content underneath.
Solution: Before drawing, save the canvas state with Save, and then set the transparency with SetTransparency, whose value is specified by alphaPen and alphaBrush ranging from 0 (fully transparent) to 1 (opaque). To make the watermark blend naturally with the background, you can also specify a blend mode through blendMode, such as PdfBlendMode.Multiply. After drawing, restore the canvas state with Restore to avoid affecting subsequent drawing:
// Save the canvas state, set the semi-transparency and the Multiply blend mode, then draw the watermark image
page.Canvas.Save();
page.Canvas.SetTransparency({ alphaPen: 0.5, alphaBrush: 0.5, blendMode: pdfModule.PdfBlendMode.Multiply });
page.Canvas.DrawImage({ image: image, point: position });
page.Canvas.Restore();
How to specify the position of an image watermark
Reason: If no position is passed, DrawImage draws the image at the default coordinates, making it impossible to precisely control where the watermark lands.
Solution: DrawImage supports passing a PointF position or x, y coordinates. To center the image, subtract the image size from the page size and halve the result to get the centering coordinates:
// Compute the centered position: subtract the image size from the page size and halve the result
let point = new pdfModule.PointF(
  (page.Canvas.Size.Width - image.Width) / 2,
  (page.Canvas.Size.Height - image.Height) / 2
);

// Draw the watermark image at the specified position
page.Canvas.DrawImage({ image: image, point: point });
How to adjust the density of a tiled image watermark
Reason: The density of a tiled image watermark is determined by the size (tiling cell size) of the PdfTilingBrush tiling brush.
Solution: The smaller the tiling cell, the denser the repeated images; the larger the cell, the sparser they are. Set size to a certain ratio of the page width and height to tile the images row by row and column by column — for example, using one third of the page width and one fifth of the page height as one cell yields a moderately spaced watermark texture. To make it sparser, increase the divisor (such as Width / 4); to make it denser, decrease the divisor:
// Create a tiling brush: use one third of the page width and one fifth of the page height as the tiling cell
let size = new pdfModule.SizeF({
  width: page.Canvas.Size.Width / 3,
  height: page.Canvas.Size.Height / 5
});
let brush = new pdfModule.PdfTilingBrush({ size: size });
Get a Free License
If you want to remove the evaluation messages in the resulting documents or get rid of functional limitations, contact sales to obtain a 30-day temporary license.
Add Text Watermarks to PDF with JavaScript in React
PDF has a fixed layout and is easy to distribute, but once its content has been generated, it is difficult to modify within the body text. For documents such as contracts, reports, and notices, you often need to indicate the confidentiality level, copyright ownership, or usage states such as "Draft" and "Sample" without affecting the reading of the body content. A text watermark is a common solution to this problem: it floats over the content as semi-transparent text, conveying the information clearly without harming the readability of the original.
Spire.PDF for JavaScript loads, draws, and saves PDFs directly in the browser via WebAssembly, managing input and output files through a virtual file system (VFS) without requiring a backend server. Text watermarking usually takes two forms: one places a single line of watermark text diagonally across the center of each page, which can be achieved directly through the transparency settings and coordinate-system transformations of the page canvas; the other tiles text repeatedly across the whole page, which can be done with the PdfTilingBrush tiling brush.
This article covers two core features:
For installation and project setup, refer to Integrating Spire.PDF for JavaScript in a React Project. The examples below assume Spire.PDF is installed and the WebAssembly module is initialized.
Add a Single-Line Text Watermark to PDF
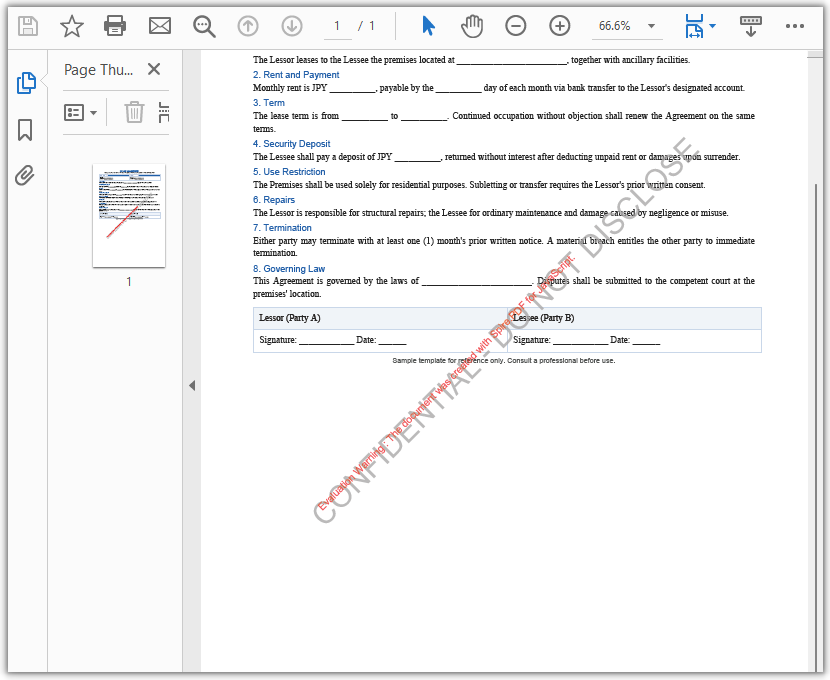
A single-line text watermark places a line of diagonal text at the center of each page, suitable for marking confidentiality levels or copyright ownership. The approach is as follows: use a PdfTrueTypeFont based on a font that supports the characters you need, together with MeasureString, to measure the text size and compute the centering offset; then, page by page, set the transparency and rotate the coordinate system through SetTransparency, TranslateTransform, and RotateTransform; and finally draw the watermark text with DrawString.
function App() {
  const addSingleLineTextWatermark = async () => {
    // Get the Spire.PDF WASM module
    const pdfModule = window.wasmModule?.spirepdf;

    // Check whether the WASM module is ready
    if (!pdfModule) {
      alert('Spire.PDF is not ready yet');
      return;
    }

    // Load a TrueType font into VFS
    await window.spire.FetchFileToVFS('ARIAL UNICODE MS.TTF', '/Library/Fonts/', `${process.env.PUBLIC_URL}/font/`);

    // Load the PDF file to be watermarked into VFS
    const inputFileName = 'Lease_Agreement_EN.pdf';
    await window.spire.FetchFileToVFS(inputFileName, "", `${process.env.PUBLIC_URL}/data/`);

    // Create a PdfDocument object and load the PDF document
    let doc = new pdfModule.PdfDocument();
    doc.LoadFromFile(inputFileName);

    // Create a TrueType font: bold, 30 point
    let trueTypeFont = new pdfModule.PdfTrueTypeFont({
      fontFamily: 'Arial Unicode MS',
      size: 30,
      style: pdfModule.PdfFontStyle.Bold,
      unicode: true
    });


    // Create the watermark brush and specify the watermark text
    let brush = pdfModule.PdfBrushes.get_DarkGray();
    const text = 'CONFIDENTIAL - DO NOT DISCLOSE';

    // Measure the size of the watermark text
    let textSize = trueTypeFont.MeasureString({ text: text });

    // Compute two offsets to determine the coordinate translation, so that the watermark is centered diagonally
    let offset1 = (textSize.Width * Math.sqrt(2)) / 4;
    let offset2 = (textSize.Height * Math.sqrt(2)) / 4;
    let format = new pdfModule.PdfStringFormat({ alignment: pdfModule.PdfTextAlignment.Left });

    // Loop through all the pages in the document
    for (let i = 0; i < doc.Pages.Count; i++) {
      // Get the specified page
      let page = doc.Pages.get_Item(i);

      // Set the page transparency
      page.Canvas.SetTransparency(0.8);

      // Translate the coordinate system to the center of the page and compensate for the offset caused by the text size
      page.Canvas.TranslateTransform(
        page.Canvas.ClientSize.Width / 2 - offset1 - offset2,
        page.Canvas.ClientSize.Height / 2 + offset1 - offset2
      );

      // Rotate the coordinate system counterclockwise by 45 degrees
      page.Canvas.RotateTransform({ angle: -45 });

      // Draw the watermark text on the page
      page.Canvas.DrawString({ s: text, font: trueTypeFont, brush: brush, x: 0, y: 0, format: format });
    }

    // Define the output file name and save the document
    const outputFileName = 'SingleLineTextWatermark.pdf';
    doc.SaveToFile(outputFileName);
    doc.Close();

    // Read the generated file from VFS and trigger the download
    const fileArray = window.dotnetRuntime.Module.FS.readFile(outputFileName);
    const blob = new Blob([fileArray], { type: 'application/pdf' });
    const url = URL.createObjectURL(blob);
    const a = document.createElement('a');
    a.href = url;
    a.download = outputFileName;
    a.click();
    URL.revokeObjectURL(url);
  };

  return (
    <div style={{ textAlign: 'center', height: '300px' }}>
      <h1>Add Single-line Text Watermark To PDF</h1>
      <button onClick={addSingleLineTextWatermark}>
        Generate
      </button>
    </div>
  );
}

export default App;
PDF document after adding the single-line text watermark
Add a Multiline Text Watermark to PDF
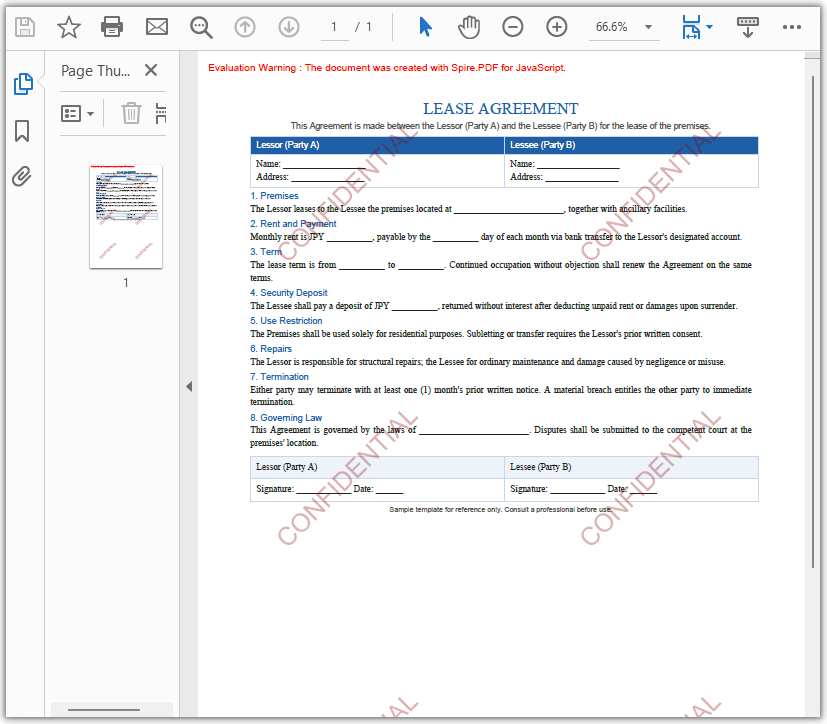
When you need the watermark to fill the entire page, use a multiline text watermark. The approach is as follows: use PdfTilingBrush to divide the page into tiling cells according to the page size; inside a cell, adjust the transparency and angle with SetTransparency and RotateTransform and draw the text with DrawString; finally fill the whole page with the brush using DrawRectangle.
function App() {
  const addMultilineTextWatermark = async () => {
    // Get the Spire.PDF WASM module
    const pdfModule = window.wasmModule?.spirepdf;

    // Check whether the WASM module is ready
    if (!pdfModule) {
      alert('Spire.PDF is not ready yet');
      return;
    }

    // Load the PDF file to be watermarked into VFS
    const inputFileName = 'Lease_Agreement_EN.pdf';
    await window.spire.FetchFileToVFS(inputFileName, "", `${process.env.PUBLIC_URL}/data/`);

    // Create a PdfDocument object and load the PDF document
    let doc = new pdfModule.PdfDocument();
    doc.LoadFromFile(inputFileName);

    // Get the first page of the document
    let page = doc.Pages.get_Item(0);

    // Create a tiling brush: use half the page width and one third of the page height as the tiling cell
    let size = new pdfModule.SizeF({
      width: page.Canvas.ClientSize.Width / 2,
      height: page.Canvas.ClientSize.Height / 3
    });
    let brush = new pdfModule.PdfTilingBrush({ size: size });

    // Set the watermark transparency to 30%
    brush.Graphics.SetTransparency(0.3);

    // Save the current state of the brush, then translate and rotate the coordinate system so that the watermark is arranged diagonally
    brush.Graphics.Save();
    brush.Graphics.TranslateTransform(brush.Size.Width / 2, brush.Size.Height / 2);
    brush.Graphics.RotateTransform({ angle: -45 });

    // Draw the tiled watermark
    let format = new pdfModule.PdfStringFormat({ alignment: pdfModule.PdfTextAlignment.Center });

    // Create font: bold, 25 point
    let font = new pdfModule.PdfFont({ fontFamily: pdfModule.PdfFontFamily.Helvetica, size: 25 });

    // Draw the watermark text
    brush.Graphics.DrawString({
      s: "CONFIDENTIAL",
      font: font,
      brush: pdfModule.PdfBrushes.get_DarkRed(),
      x: 0,
      y: -18,
      format: format
    });

    // Restore the previous state of the brush and set it back to opaque
    brush.Graphics.Restore();
    brush.Graphics.SetTransparency({ alpha: 1 });

    // Fill a whole-page rectangle with the tiling brush so that the watermark text tiles across the entire page
    let rect = new pdfModule.RectangleF({
      location: new pdfModule.PointF(0, 0),
      size: page.Canvas.ClientSize
    });
    page.Canvas.DrawRectangle({ brush: brush, rectangle: rect });

    // Define the output file name and save the document
    const outputFileName = 'MultilineTextWatermark.pdf';
    doc.SaveToFile(outputFileName);
    doc.Close();

    // Read the generated file from VFS and trigger the download
    const fileArray = window.dotnetRuntime.Module.FS.readFile(outputFileName);
    const blob = new Blob([fileArray], { type: 'application/pdf' });
    const url = URL.createObjectURL(blob);
    const a = document.createElement('a');
    a.href = url;
    a.download = outputFileName;
    a.click();
    URL.revokeObjectURL(url);
  };

  return (
    <div style={{ textAlign: 'center', height: '300px' }}>
      <h1>Add Multiline Text Watermark To PDF</h1>
      <button onClick={addMultilineTextWatermark}>
        Generate
      </button>
    </div>
  );
}

export default App;
PDF document after adding the multiline text watermark
FAQ
How to set the font, size, and color of the watermark text
Reason: DrawString requires you to explicitly specify the font and brush used to draw the text.
Solution: The font, size, and color of the watermark text are determined by the font and brush passed to DrawString. For Latin text, create a PdfFont based on a built-in PdfFontFamily such as Helvetica, and set the color through the brush:
// Create a built-in font: Helvetica, 24 point
let font = new pdfModule.PdfFont({
  fontFamily: pdfModule.PdfFontFamily.Helvetica,
  size: 24
});

// Set the watermark color through the brush
let brush = pdfModule.PdfBrushes.get_DarkRed();

// Draw the watermark text on the page canvas
page.Canvas.DrawString({ s: 'CONFIDENTIAL', font: font, brush: brush, x: 0, y: 0, format: format });
If you need a font that is not built in — for example, to display non-Latin scripts such as Chinese or Japanese, or to apply a specific typeface — load the corresponding TrueType font into VFS and use PdfTrueTypeFont instead, as shown in the single-line text watermark example.
How to add a watermark to every page of a PDF
Reason: In the single-line text watermark example, a page loop applies the watermark to every page, while the multiline text watermark example only targets the first page through doc.Pages.get_Item(0).
Solution: To make the multiline watermark cover the entire document as well, move the creation of the tiling brush and the page fill into the page loop:
for (let i = 0; i < doc.Pages.Count; i++) {
  let page = doc.Pages.get_Item(i);

  // Create a tiling brush and set the transparency, rotation, and text
  let size = new pdfModule.SizeF({
    width: page.Canvas.ClientSize.Width / 2,
    height: page.Canvas.ClientSize.Height / 3
  });
  let brush = new pdfModule.PdfTilingBrush({ size: size });
  // …… set transparency, rotate, and draw the watermark text ……

  // Fill the current page with the tiling brush
  page.Canvas.DrawRectangle({
    brush: brush,
    rectangle: new pdfModule.RectangleF({ location: new pdfModule.PointF(0, 0), size: page.Canvas.ClientSize })
  });
}
How to control the transparency and rotation angle of the watermark
Reason: Too high or too low transparency affects the appearance of the watermark, and the rotation angle determines the direction of the watermark text.
Solution: Use SetTransparency to set the transparency, whose value ranges from 0 (fully transparent) to 1 (opaque); use RotateTransform to control the coordinate-system rotation angle, where a negative value means counterclockwise rotation. The single-line example sets the transparency to 0.8 and rotates by -45 degrees, and the multiline tiling example makes the same settings within the graphics context of the tiling brush:
// Single-line watermark: set the page transparency and rotate the page canvas
page.Canvas.SetTransparency(0.8);
page.Canvas.RotateTransform({ angle: -45 });

// Multiline tiled watermark: set the transparency and rotation within the graphics context of the tiling brush
brush.Graphics.SetTransparency(0.3);
brush.Graphics.RotateTransform({ angle: -45 });
Get a Free License
If you want to remove the evaluation messages in the resulting documents or get rid of functional limitations, contact sales to obtain a 30-day temporary license.
Convert PDF to Excel with JavaScript in React
PDF has a fixed layout and is easy to distribute, but the tabular data within it is hard to edit and analyze directly; Excel (XLSX) is the common format in the spreadsheet domain, supporting formulas, sorting, filtering, and further processing. Real-world business often requires converting reports, invoices, and data tables in PDF to Excel for continued editing, summarization, or entry into systems. Because the underlying models of PDF and Excel differ significantly, the layout strategy during conversion has a notable impact on result quality.
Spire.PDF for JavaScript completes PDF-to-Excel conversion entirely in the browser via WebAssembly, managing input and output files through a virtual file system (VFS) with no backend server required. In addition to simple regular conversion, it also provides two types of conversion options, XlsxLineLayoutOptions and XlsxTextLayoutOptions, to help you control the row layout and text layout of the converted result.
This article covers three core features:
- Convert PDF to Excel Using the Regular Method
- Convert PDF to Excel Using XlsxLineLayoutOptions
- Convert PDF to Excel Using XlsxTextLayoutOptions
For installation and project setup, refer to Integrating Spire.PDF for JavaScript in a React Project. The examples below assume Spire.PDF is installed and the WebAssembly module is initialized.
Convert PDF to Excel Using the Regular Method
The regular conversion is the most direct way to convert PDF to Excel: after creating a PdfDocument object and loading the PDF, simply save it as an Excel document by specifying FileFormat.XLSX in the SaveToFile method, without setting any conversion options. Spire.PDF parses the text, table, and graphic content of the PDF using the default strategy, which suits most conversion needs for regular documents; when the default result cannot meet specific layout requirements, consider using XlsxLineLayoutOptions or XlsxTextLayoutOptions for fine-grained control.
function App() {
  const convertToExcel = async () => {
    // Get the Spire.PDF WASM module
    const pdfModule = window.wasmModule?.spirepdf;

    // Check if the WASM module is ready
    if (!pdfModule) {
      alert('Spire.PDF is not ready yet');
      return;
    }

    // Load the PDF file and fonts into VFS
    await window.spire.FetchFileToVFS('ARIAL.TTF', '/Library/Fonts/', `${process.env.PUBLIC_URL}/font/`);
    const inputFileName = 'FinancialStatement2025.pdf';
    await window.spire.FetchFileToVFS(inputFileName, "", `${process.env.PUBLIC_URL}/data/`);

    // Create PdfDocument object and load the PDF document
    let doc = new pdfModule.PdfDocument();
    doc.LoadFromFile(inputFileName);

    // Define the output file name in Excel format
    const outputFileName = 'OutputExcel.xlsx';

    // Save as Excel format
    doc.SaveToFile({ fileName: outputFileName, fileFormat: pdfModule.FileFormat.XLSX });
    doc.Close();

    // Read the converted file from VFS and trigger download
    const fileArray = window.dotnetRuntime.Module.FS.readFile(outputFileName);
    const blob = new Blob([fileArray], { type: 'application/vnd.openxmlformats-officedocument.spreadsheetml.sheet' });
    const url = URL.createObjectURL(blob);
    const a = document.createElement('a');
    a.href = url;
    a.download = outputFileName;
    a.click();
    URL.revokeObjectURL(url);
  };

  return (
    <div style={{ textAlign: 'center', height: '300px' }}>
      <h1>Convert PDF To Excel</h1>
      <button onClick={convertToExcel}>
        Generate
      </button>
    </div>
  );
}

export default App;
Excel document generated using the regular conversion method
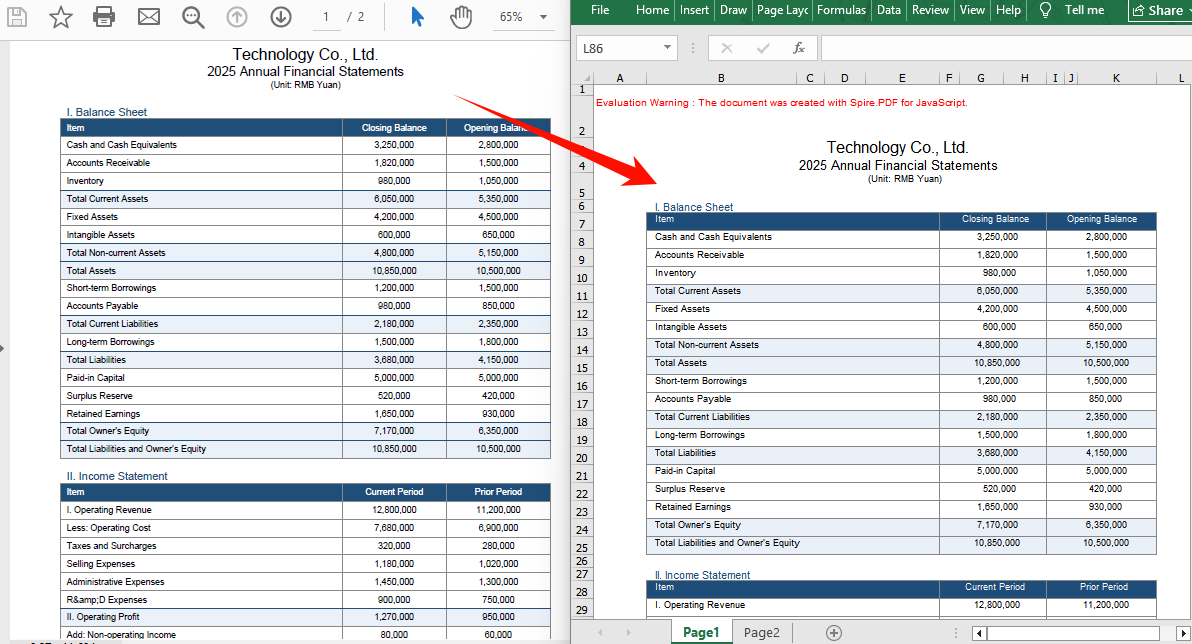
Convert PDF to Excel Using XlsxLineLayoutOptions
Line elements such as table borders, separator lines, and graphics need to be controlled through row layout options for their preservation during conversion to Excel. XlsxLineLayoutOptions provides several row layout parameters: whether to convert to multiple worksheets, whether to keep rotated text, whether to split cells containing multiple lines of text, whether to wrap text, and whether to keep overlapping text. Pass this option to the ConvertOptions SetPdfToXlsxOptions method, then save with SaveToFile specifying FileFormat.XLSX to complete the conversion.
function App() {
  const convertToExcel = async () => {
    // Get the Spire.PDF WASM module
    const pdfModule = window.wasmModule?.spirepdf;

    // Check if the WASM module is ready
    if (!pdfModule) {
      alert('Spire.PDF is not ready yet');
      return;
    }

    // Load the PDF file and fonts into VFS
    await window.spire.FetchFileToVFS('ARIAL.TTF', '/Library/Fonts/', `${process.env.PUBLIC_URL}/font/`);
    const inputFileName = 'FinancialStatement.pdf';
    await window.spire.FetchFileToVFS(inputFileName, "", `${process.env.PUBLIC_URL}/data/`);

    // Create PdfDocument object and load the PDF document
    let doc = new pdfModule.PdfDocument();
    doc.LoadFromFile(inputFileName);

    // Create row layout conversion options
    // Parameters: whether to convert to multiple worksheets, whether to keep rotated text, whether to split cells, whether to wrap text, whether to keep overlapping text
    let lineLayoutOptions = new pdfModule.XlsxLineLayoutOptions(true, true, false, true, true);
    doc.ConvertOptions.SetPdfToXlsxOptions(lineLayoutOptions);

    // Define the output file name in Excel format
    const outputFileName = 'LineLayoutOptions.xlsx';

    // Save as Excel format
    doc.SaveToFile({ fileName: outputFileName, fileFormat: pdfModule.FileFormat.XLSX });
    doc.Close();

    // Read the converted file from VFS and trigger download
    const fileArray = window.dotnetRuntime.Module.FS.readFile(outputFileName);
    const blob = new Blob([fileArray], { type: 'application/vnd.openxmlformats-officedocument.spreadsheetml.sheet' });
    const url = URL.createObjectURL(blob);
    const a = document.createElement('a');
    a.href = url;
    a.download = outputFileName;
    a.click();
    URL.revokeObjectURL(url);
  };

  return (
    <div style={{ textAlign: 'center', height: '300px' }}>
      <h1>Convert PDF To Excel using XlsxLineLayoutOptions</h1>
      <button onClick={convertToExcel}>
        Generate
      </button>
    </div>
  );
}

export default App;
Excel document generated using the XlsxLineLayoutOptions conversion option
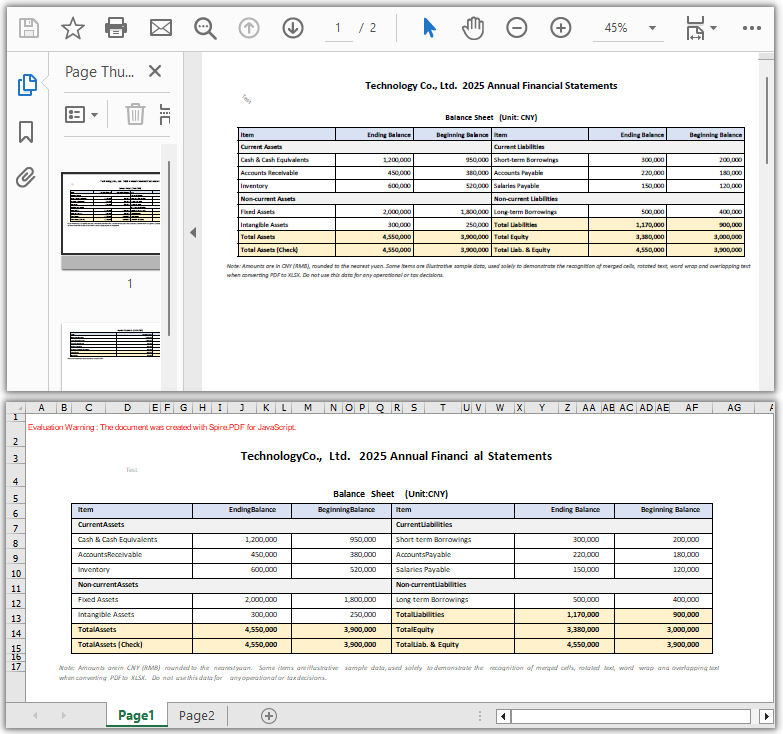
Convert PDF to Excel Using XlsxTextLayoutOptions
When the PDF content consists mainly of text and numeric values, you can switch to XlsxTextLayoutOptions to control text layout conversion parameters, such as whether to convert to multiple worksheets and whether to keep rotated text. Unlike the row layout option, this option focuses more on the arrangement of text content and is suitable for documents with few table lines and mainly text. The usage is the same: pass the option to the ConvertOptions SetPdfToXlsxOptions method, then save as XLSX.
function App() {
  const convertToExcel = async () => {
    // Get the Spire.PDF WASM module
    const pdfModule = window.wasmModule?.spirepdf;

    // Check if the WASM module is ready
    if (!pdfModule) {
      alert('Spire.PDF is not ready yet');
      return;
    }

    // Load the PDF file and fonts into VFS
    await window.spire.FetchFileToVFS('ARIAL.TTF', '/Library/Fonts/', `${process.env.PUBLIC_URL}/font/`);
    const inputFileName = 'Report.pdf';
    await window.spire.FetchFileToVFS(inputFileName, "", `${process.env.PUBLIC_URL}/data/`);

    // Create PdfDocument object and load the PDF document
    let doc = new pdfModule.PdfDocument();
    doc.LoadFromFile(inputFileName);

    // Create text layout conversion options
    // Parameters: whether to convert to multiple worksheets, whether to keep rotated text
    let textLayoutOptions = new pdfModule.XlsxTextLayoutOptions(false, true);
    doc.ConvertOptions.SetPdfToXlsxOptions(textLayoutOptions);

    // Define the output file name in Excel format
    const outputFileName = 'TextLayoutOptions.xlsx';

    // Save as Excel format
    doc.SaveToFile({ fileName: outputFileName, fileFormat: pdfModule.FileFormat.XLSX });
    doc.Close();

    // Read the converted file from VFS and trigger download
    const fileArray = window.dotnetRuntime.Module.FS.readFile(outputFileName);
    const blob = new Blob([fileArray], { type: 'application/vnd.openxmlformats-officedocument.spreadsheetml.sheet' });
    const url = URL.createObjectURL(blob);
    const a = document.createElement('a');
    a.href = url;
    a.download = outputFileName;
    a.click();
    URL.revokeObjectURL(url);
  };

  return (
    <div style={{ textAlign: 'center', height: '300px' }}>
      <h1>Convert PDF To Excel using XlsxTextLayoutOptions</h1>
      <button onClick={convertToExcel}>
        Generate
      </button>
    </div>
  );
}

export default App;
Excel document generated using the XlsxTextLayoutOptions conversion option
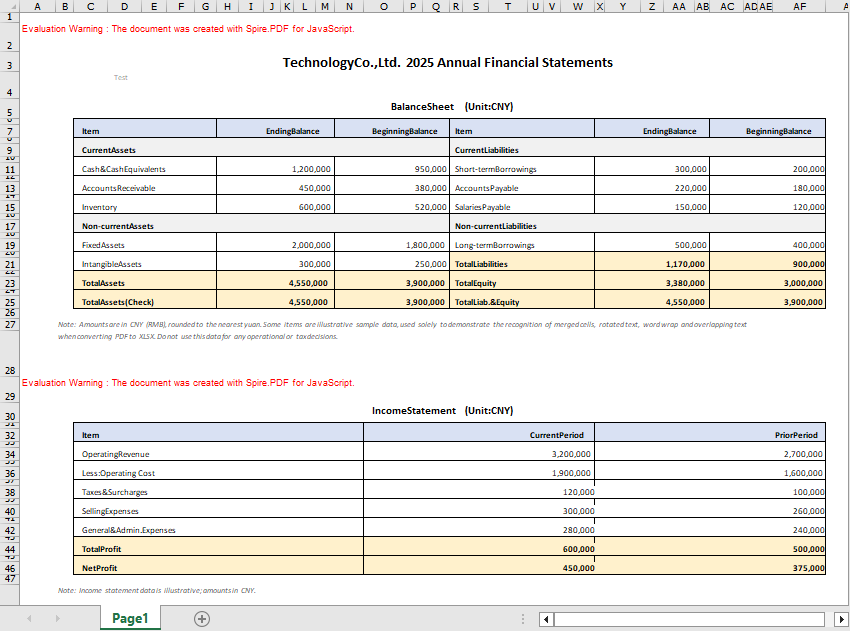
FAQ
What is the difference between regular conversion and conversion using the options?
Reason: When no conversion option is set, Spire.PDF converts the PDF content to Excel using the default layout strategy.
Solution: Regular conversion (without calling SetPdfToXlsxOptions) involves the fewest steps and suits documents with a simple content structure where the default layout is sufficient; when you need to control details such as multi-worksheet splitting, rotated text, cell splitting, and text wrapping, choose XlsxLineLayoutOptions (oriented toward graphics and lines) or XlsxTextLayoutOptions (oriented toward text) based on the document content.
What is the difference between XlsxLineLayoutOptions and XlsxTextLayoutOptions?
Reason: The two types of options control how different content is preserved during PDF-to-Excel conversion.
Solution: XlsxLineLayoutOptions targets graphic elements such as table borders and lines, controlling behaviors like multi-worksheet splitting, rotated text, cell splitting, text wrapping, and overlapping text; XlsxTextLayoutOptions targets text content, controlling whether to merge into a single worksheet and whether to keep rotated text. Choose the appropriate option based on whether the PDF content is graphics-oriented or text-oriented.
Can encrypted PDF files be converted to Excel?
Reason: Password-protected encrypted PDF files cannot be converted directly; the document needs to be decrypted first.
Solution: Pass the password as the second parameter of LoadFromFile when loading the PDF to decrypt it, then convert and save as Excel:
// Load the password-protected PDF document
let doc = new pdfModule.PdfDocument();
doc.LoadFromFile(inputFileName, "password");

// Save as Excel format
doc.SaveToFile({ fileName: outputFileName, fileFormat: pdfModule.FileFormat.XLSX });
doc.Close();
Get a Free License
If you want to remove the evaluation messages in the resulting documents or get rid of functional limitations, contact sales to obtain a 30-day temporary license.
Intelligent Textbook Analysis and Automated Word Lesson Plan Generation with Spire.Agent.Office
In teaching work, lesson preparation is the most time-consuming and skill-demanding task for every teacher. When you receive a textbook, you need to read through each chapter and section, distill core knowledge points, organize the knowledge logic, and then design teaching objectives, determine teaching key and difficult points, arrange the complete teaching process of introduction — new teaching — consolidation — summary, and finally compile it into a standardized lesson plan. A complete lesson plan often takes several hours, and different teachers vary greatly in analysis depth and lesson plan structure, making it difficult to ensure consistent quality.
Comparison with Traditional SDK API Processing
| Traditional Spire.Office for .NET API | Spire.Agent.Office | |
|---|---|---|
| Driving approach | Write code to parse the textbook paragraph by paragraph: load document → iterate paragraphs → extract keywords → manually assemble the lesson plan; every step requires code control | Describe the parsing and generation goals in natural language, and AI automatically understands the textbook and generates the lesson plan |
| Code volume | Requires a large amount of code to maintain the knowledge point library, paragraph classification rules, and lesson plan template logic | Only configuration code + 1 natural language instruction |
| Lesson plan structure | Teaching objectives, key/difficult points, and teaching process must each be hard-coded with a set of generation logic | AI automatically generates a structurally complete lesson plan according to subject standards |
| Textbook understanding | Can only match mechanically by keywords, unable to understand the relationships and hierarchy between knowledge points | AI understands the textbook based on semantics, extracting chapter themes, test points, and teaching suggestions |
| Maintainability | Different subjects and textbook versions require separate development and maintenance | The analysis scope and lesson plan style can be adjusted at any time in natural language |
This article explains how to use the Word AI capability of Spire.Agent.Office to analyze textbooks and automatically generate lesson plans. Together, they form a complete lesson preparation pipeline: first use AI to parse the textbook PDF, organize unit key points and key/difficult points, then generate a standardized, content-complete lesson plan based on the analysis results.
For product installation and SpireToken configuration, refer to Integrating Spire.Agent.Office in a .NET Project. The examples below assume Spire.Agent.Office is installed and SpireToken is configured.
Intelligent Textbook Analysis
Intelligent textbook analysis is the starting point of the entire lesson preparation workflow, suitable for quickly establishing an overall understanding of the textbook before reading the whole book. The core idea is: pass the electronic textbook PDF as an attachment, let AI parse the textbook content, organize the core knowledge, key and difficult points, learning suggestions, and the connections between chapters according to the chapters, and generate a Word unit textbook analysis document. Teachers can use it to complete unit teaching planning, and subsequent lesson plan generation is also based on it.
using Spire.Agent.Office.AI;
using Spire.Agent.Office.Extensions;
using Spire.Doc;

// Textbook PDF (multiple chapters can be passed in)
string[] attachments = new string[] {
    "E:\\Input\\Textbook-Rational_Numbers.pdf",
    "E:\\Input\\Textbook-Addition_and_Subtraction_of_Algebraic_Expressions.pdf",
    "E:\\Input\\Textbook-Linear_Equations_in_One_Variable.pdf"
};
// Save path
string savePath = "E:\\Output\\Textbook_Analysis.docx";
// SpireToken Key
string key = "**********************";
// Natural language instruction
string instruction =
    "Please analyze the textbook content in the attached PDFs, and from the perspective of a lesson-preparing teacher, help me organize a textbook analysis suitable for daily lesson preparation.\n" +
    "For each chapter, explain the chapter's core knowledge content, teaching key and difficult points, and recommended class hours.\n" +
    "Try to preserve the key concepts and typical example points of each section, and supplement the common difficulties and error-prone points students encounter when learning this chapter.\n" +
    "Also describe the connections between chapters. Please strictly analyze based on the actual content of the textbook in the PDFs and do not fabricate anything.\n" +
    "Generate a Word document with a clear structure so that I can arrange the unit teaching plan accordingly, and subsequent lesson plans will also be based on this analysis.";

// Call the Word document processing function
AIResult result = ExecuteDemoWord(instruction, savePath, key, attachments);

// Execute Word document AI processing
static AIResult ExecuteDemoWord(string instruction, string savePath, string key, string[] attachments)
{
    // Create an AIOptions configuration object
    AIOptions options = new AIOptions();
    // Set the SpireToken Key
    options.SpireToken = key;

    // Use the Document object to process the Word document
    using (Document doc = new Document())
    {
        // Create the AI document processor
        AIDocumentProcessor processor = doc.AI(options);

        // Execute the AI instruction
        return processor.ExecuteInstruction(doc, instruction, savePath, attachments);
    }
}
AI-generated Word textbook analysis document 
The analysis document unfolds by chapter, clearly explaining each chapter's core knowledge, key and difficult points, and recommended class hours, and also supplements students' common learning difficulties, error-prone points, and the connections between chapters. Teachers only need to provide the electronic PDF of the textbook to complete the whole-book analysis, quickly identify key chapters, and reasonably allocate class hours; this unit textbook analysis can also be directly used as background material for the subsequent lesson plan generation.
Automated Word Lesson Plan Generation
Fine-grained lesson preparation for a single class can be further advanced on the basis of the textbook analysis in the first section. The core idea is: directly use the unit textbook analysis generated in the first section as input, and let AI generate a structurally complete, ready-to-use lesson plan based on the analysis of the relevant section, including student analysis, teaching objectives, teaching key and difficult points, teaching preparation, teaching process, blackboard design, and tiered after-class assignments.
using Spire.Agent.Office.AI;
using Spire.Agent.Office.Extensions;
using Spire.Doc;

// The unit textbook analysis generated in the first section (already includes the analysis of the relevant section content)
string inputPath = "E:\\Input\\Textbook_Analysis.docx";
// Save path
string savePath = "E:\\Output\\Linear_Equations_in_One_Variable-Lesson_Plan.docx";
// SpireToken Key
string key = "**********************";
// Natural language instruction
string instruction =
    "Based on the content of the \"Linear Equations in One Variable\" section in the unit textbook analysis document, " +
    "help me write a complete lesson plan Word document. It is recommended to include: " +
    "student analysis, teaching objectives (knowledge and skills, process and methods, emotional attitude and values), teaching key and difficult points, teaching preparation, " +
    "teaching process (introduction, new teaching, consolidation practice, class summary), blackboard design, and tiered after-class assignments. " +
    "The teaching objectives and key/difficult points must closely match the textbook content, and the teaching process must be specific about how the teacher guides and how students learn in each segment. " +
    "The after-class assignments should be tiered into basic and advanced questions. Please format according to a standardized lesson plan layout, unify the heading levels and fonts, and finally save and output in DOCX format";

// Call the Word document processing function
AIResult result = ExecuteDemoWord(instruction, inputPath, savePath, key, null);

// Execute Word document AI processing
static AIResult ExecuteDemoWord(string instruction, string inputPath, string savePath, string key, string[] attachmentPaths)
{
    // Create an AIOptions configuration object
    AIOptions options = new AIOptions();
    // Set the SpireToken Key
    options.SpireToken = key;

    // Use the Document object to process the Word document
    using (Document doc = new Document())
    {
        // Load the unit textbook analysis document as the context for lesson plan generation
        if (!string.IsNullOrEmpty(inputPath) && File.Exists(inputPath))
        {
            doc.LoadFromFile(inputPath);
        }
        // Create the AI document processor
        AIDocumentProcessor processor = doc.AI(options);

        // Execute the AI instruction
        return processor.ExecuteInstruction(doc, instruction, savePath, attachmentPaths);
    }
}
AI-generated Word lesson plan document 
The generated lesson plan has a complete structure and content that closely matches the textbook, covering student analysis and tiered after-class assignments as well. Based directly on the unit textbook analysis, teachers can get a first draft of the lesson, then adjust and polish it, saving the time of writing from scratch. For multiple classes in the same unit, the same unit textbook analysis can be reused to generate lesson plans section by section and then proofread them uniformly, turning lesson preparation from "writing word by word" into "localized modification".
FAQ
Teaching objectives not matching the textbook content
Reason: AI's generation of teaching objectives depends on its understanding of the textbook theme. If the textbook content is too extensive or the instruction is too general, the objectives may diverge from the actual teaching content.
Solution: Limit the analysis scope in the instruction (such as specifying the chapter name), explicitly require the objectives to be developed from three dimensions, and bind the requirement "must be written based on the actual textbook content".
Lesson plan structure not standardized, missing sections
Reason: The section structure that the lesson plan should contain is not specified in the instruction, and the structure AI generates by default may not match the school template.
Solution: List the sections the lesson plan must include in order in the instruction (such as introduction, new teaching, consolidation, summary), and AI will output strictly according to this structure.
Analysis report missing test points or knowledge points
Reason: The textbook has too many chapters, or the same knowledge point is scattered across multiple chapters, making the analysis report incomplete.
Solution: Pass the complete textbook or the PDFs of relevant chapters as attachments, and specify the knowledge types to focus on in the instruction (such as "focus on frequently tested question types and examples").
Inconsistent formatting in the generated lesson plan
Reason: The layout requirements of the lesson plan are not specified in the instruction, and the heading levels, fonts, and paragraph styles output by AI may be inconsistent.
Solution: Add descriptions such as "format according to a standardized lesson plan layout and unify heading levels and fonts" to the instruction.
Get the SpireToken Key
- Contact sales@e-iceblue.com or visit https://www.e-iceblue.com/TemLicense.html to obtain a trial/commercial API key
Configure it in your code:
AIOptions options = new AIOptions();
options.SpireToken = key;
Legal Contract Clause Review and Annotation with Spire.Agent.Office
In corporate legal and compliance management scenarios, contract review is one of the most time-consuming and error-prone tasks. Every contract involves a large number of rights and obligations clauses — liquidated damages, payment terms, disclaimer clauses, breach liability, dispute resolution, and more. Any clause that is unfavorable to your side or ambiguously worded may lead to legal disputes or financial losses in the future. Traditional approaches rely on legal professionals reading and annotating each clause manually; a single contract of dozens of pages often takes hours, and review standards vary from person to person.
Comparison with Traditional SDK API Processing
| Traditional Spire.Office for .NET API | Spire.Agent.Office | |
|---|---|---|
| Driving approach | Write code to parse clauses one by one: load document → iterate paragraphs → regex match keywords → judge risk → highlight and annotate; every step requires code control | Describe the review goal in natural language, and AI automatically identifies and annotates risk clauses |
| Code volume | Requires a large amount of code to maintain the clause risk rule library, keyword matching, and annotation logic | Only configuration code + 1 natural language instruction |
| Risk rules | Risk judgment relies on hard-coded keywords; new risk types require code changes | AI understands clauses semantically and can identify new risks not covered by the rules |
| Review stance | Review logic for each contract type must be developed separately | A single phrase like "review from our side" in the instruction switches the review stance |
| Maintainability | The risk rule library requires continuous manual maintenance | Review scope and rules can be adjusted at any time in natural language |
This article explains how to use the Word AI capability of Spire.Agent.Office to review contract clauses and annotate risks. You can choose to highlight risk clauses on the original contract and add comments, or batch review and output a structured risk review report, meeting contract review needs of different scales and scenarios.
For product installation and SpireToken configuration, refer to Integrating Spire.Agent.Office in a .NET Project. The examples below assume Spire.Agent.Office is installed and SpireToken is configured.
Risk Clause Highlighting and Annotation
Risk clause highlighting and annotation suits in-depth review of important contracts. The core idea is: let AI review contract clauses one by one, identify clauses that are unfavorable to your side or carry legal risks, highlight them in yellow in place and add comments, so legal professionals can view the risk points directly on the contract.
using Spire.Agent.Office.AI;
using Spire.Agent.Office.Extensions;
using Spire.Doc;

// Path of the contract file to be reviewed
string inputPath = "E:\\Input\\Software_Contract.docx";
// Save path
string savePath = "E:\\Output\\Review.docx";
// Output directory
string OutDir = "E:\\Output";
// SpireToken Key
string key = "xxxxx";
// Natural language instruction
string instruction =
    "Review all clauses in the current contract document and identify clauses that are unfavorable to the purchaser or carry legal risks, including but not limited to: " +
    "excessively high liquidated damages, stringent payment terms, overly broad disclaimer clauses, missing breach liability provisions, unfavorable court jurisdiction agreements, unclear intellectual property ownership, etc. " +
    "For each risk clause, perform the following operations: 1. Highlight the risk clause text in yellow; 2. Add a comment in place, noting the risk point, risk level (high/medium/low), and modification suggestions. " +
    "After processing, keep the same layout, styles, and fonts as the original document, and finally save and output in DOCX format";

// Call the Word document processing function
AIResult result = ExecuteDemoWord(instruction, inputPath, savePath, key, OutDir, null);

// Execute Word document AI processing
static AIResult ExecuteDemoWord(string instruction, string inputPath, string savePath, string key, string output, string[] attachmentPaths)
{
    // Create an AIOptions configuration object
    AIOptions options = new AIOptions();
    // Set the working directory to the output directory
    options.WorkDir = output;
    // Set the SpireToken Key
    options.SpireToken = key;

    // Use the Document object to process the Word document
    using (Document doc = new Document())
    {
        // Load the contract document from file
        if (!string.IsNullOrEmpty(inputPath) && File.Exists(inputPath))
        {
            doc.LoadFromFile(inputPath);
        }
        // Create the AI document processor
        AIDocumentProcessor processor = doc.AI(options);

        // Execute the AI instruction
        return processor.ExecuteInstruction(doc, instruction, savePath, attachmentPaths);
    }
}
Contract after AI highlighting and annotation 
In the reviewed contract, risk clauses are highlighted in yellow, and the comments clearly state the risk points and modification suggestions. Legal professionals can quickly locate the highlighted positions without reading the original text line by line, and can directly discuss modification plans with the business side based on the comments.
Batch Review and Review Report
For quick screening of large batches of contracts (such as contract renewal or supplier qualification review), batch review with a structured review report is more suitable. The core idea is: let AI review multiple contracts one by one, consolidate the risk clauses of each contract into a risk list, and output it as an MD report for statistics, tracking, and tiered processing.
using Spire.Agent.Office.AI;
using Spire.Agent.Office.Extensions;
using Spire.Doc;

// Paths of multiple contract files to be reviewed
string[] attachments = new string[] {
    "E:\\Input\\Purchase_Contract_EN.docx",   // Purchase contract
    "E:\\Input\\Sales_Contract_EN.docx",   // Sales contract
    "E:\\Input\\Labor_Contract_EN.docx"    // Labor contract
};
// Save path (null here; the output folder path set below will be used)
string savePath = "E:\\Output\\Structural_Review_Output.md";
// Output directory
string OutDir = "E:\\Output";
// SpireToken Key
string key = "xxxxx";
// Natural language instruction
string instruction =
    "Review the contract documents in the attachments one by one, extract risk clauses, and output a Markdown review report: " +
    "The report contains a table with fixed columns: Contract Name | Clause Number | Clause Original Text | Risk Level (High/Medium/Low) | Risk Type | Risk Description | Modification Suggestion. " +
    "Sort by risk level from high to low; the clause original text must be quoted from the contract, truncated with … after 20 characters, and must not be fabricated.";

// Call the Word document processing function
AIResult result = ExecuteDemoWord(instruction, savePath, key, OutDir, attachments);

// Execute Word document AI processing
static AIResult ExecuteDemoWord(string instruction, string savePath, string key, string output, string[] attachments)
{
    // Create an AIOptions configuration object
    AIOptions options = new AIOptions();
    // Set the working directory to the output directory
    options.WorkDir = output;
    // Set the SpireToken Key
    options.SpireToken = key;

    // Use the Document object to process the Word document
    using (Document doc = new Document())
    {
        // Create the AI document processor
        AIDocumentProcessor processor = doc.AI(options);

        // Execute the AI instruction
        return processor.ExecuteInstruction(doc, instruction, savePath, attachments);
    }
}
Contract risk review report output by AI 
Each row in the review report corresponds to a risk clause and contains the clause original text, risk level, risk type, and modification suggestion. Legal professionals can sort by risk level to prioritize high-risk clauses, or export the report for risk ledger tracking in a contract management system.
FAQ
Risk clauses identified inaccurately
Reason: AI's judgment of "unfavorable clauses" depends on the review stance. From your side's perspective versus the counterparty's perspective, the risk judgment for the same clause may be completely opposite.
Solution: Specify the review stance clearly in the instruction, such as "review from the purchaser's perspective", and add a list of risk types to focus on. AI will strictly follow this stance and scope.
Document style changes after highlighting
Reason: The AI model automatically modified or added content during processing.
Solution: Add a description such as "keep the same layout, styles, and fonts as the original document" to the instruction.
Review report does not accurately correspond to contract clauses
Reason: Clause numbers are inconsistent, or the same clause is scattered across multiple places in the contract, causing the clause original text in the report to not match the contract.
Solution: In the instruction, require AI to quote the clause original text and note the source of the clause number, for easy manual verification and location.
Get the SpireToken Key
- Contact sales@e-iceblue.com or visit https://www.e-iceblue.com/TemLicense.html to obtain a trial/commercial API key
Configure it in your code:
AIOptions options = new AIOptions();
options.SpireToken = key;