Comment ajouter des tampons à un PDF — Utilisation d'Adobe Acrobat et de Python
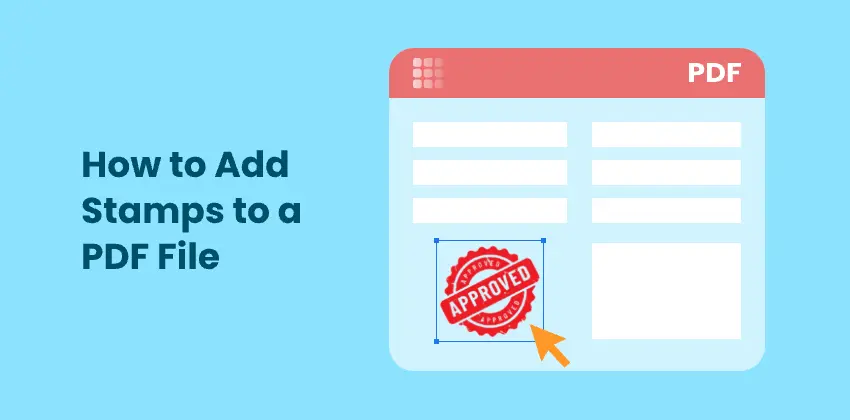
L'ajout de tampons à un PDF est une tâche courante dans les flux de travail de révision, d'approbation et de distribution de documents. Les tampons sont souvent utilisés pour marquer des fichiers comme Approuvé, Brouillon ou Confidentiel, ou pour appliquer des éléments visuels tels que des logos d'entreprise et des sceaux officiels.
En pratique, les tampons PDF sont généralement ajoutés soit manuellement via un logiciel de bureau, soit par programmation dans le cadre d'un flux de travail automatisé. Bien que de nombreux outils puissent placer du texte ou des images sur un PDF, seuls quelques-uns créent des tampons qui restent déplaçables et modifiables lorsque le document est rouvert dans des éditeurs PDF tels qu'Adobe Acrobat.
Cet article présente deux approches fiables et largement utilisées pour ajouter des tampons aux fichiers PDF :
- Adobe Acrobat, qui est bien adapté à l'édition manuelle et visuelle
- Python (Spire.PDF), qui est idéal pour l'automatisation et le traitement par lots
Chaque méthode montre comment ajouter des tampons texte et des tampons image, vous aidant à choisir la meilleure approche pour votre flux de travail.
Qu'est-ce qu'un tampon PDF ?
Un tampon PDF est implémenté en tant qu'annotation de tampon en caoutchouc, définie dans la spécification PDF. Comparés au texte ou aux images ordinaires, les tampons :
- Peuvent être déplacés librement dans Adobe Acrobat.
- Apparaissent dans le panneau Commentaires / Tampons.
- Peuvent être réutilisés d'un document à l'autre.
- Sont clairement identifiés comme des annotations, et non comme du contenu de page.
Cette distinction est essentielle lorsque les documents sont révisés, modifiés ou audités ultérieurement.
Méthode 1 : Ajouter des tampons texte et image avec Adobe Acrobat
Adobe Acrobat offre une prise en charge intégrée de l'estampillage PDF et est l'un des outils les plus couramment utilisés pour la révision et l'approbation manuelles et visuelles de documents. Il vous permet d'ajouter des tampons à base de texte et d'images et d'ajuster leur apparence directement sur la page.
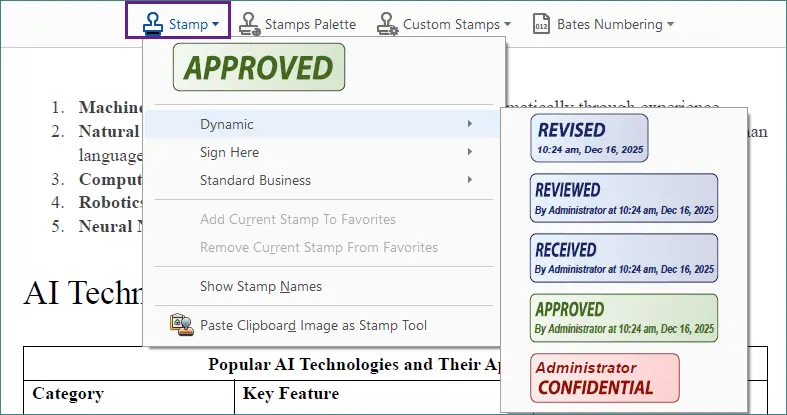
Ajouter un tampon texte dans Adobe Acrobat
Adobe Acrobat inclut plusieurs tampons texte prédéfinis, tels que Approuvé, Brouillon et Confidentiel, et vous permet également de créer et de personnaliser vos propres tampons.
Étapes :
-
Ouvrez le PDF dans Adobe Acrobat.
-
Allez dans Outils → Tampon.

-
Sélectionnez un tampon texte intégré.
-
Cliquez n'importe où sur la page pour placer le tampon.
-
Redimensionnez ou repositionnez le tampon si nécessaire.
-
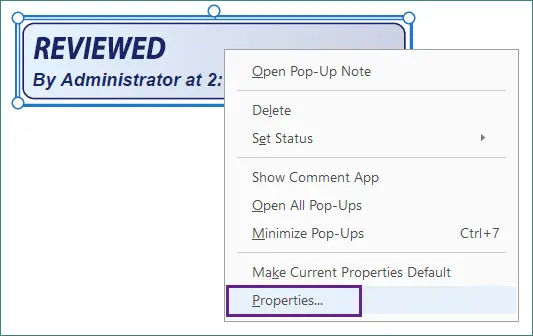
Faites un clic droit sur le tampon et choisissez Propriétés pour personnaliser davantage son apparence (comme la couleur et l'opacité) et les détails du tampon comme l'auteur ou le sujet.
-
Enregistrez le document.
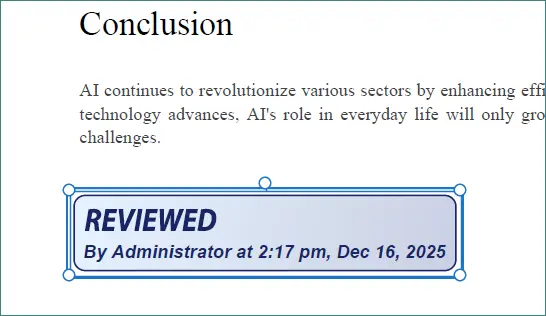
Une fois ajouté, le tampon reste déplaçable et modifiable, ce qui facilite l'ajustement de son emplacement ou la mise à jour de ses propriétés ultérieurement.
Ajouter un tampon image dans Adobe Acrobat
Les tampons image sont généralement utilisés pour les logos d'entreprise, les sceaux officiels ou les signatures numérisées. Acrobat vous permet de convertir des fichiers image en tampons personnalisés réutilisables.
Étapes :
-
Préparez un fichier image au format PNG ou JPG.
-
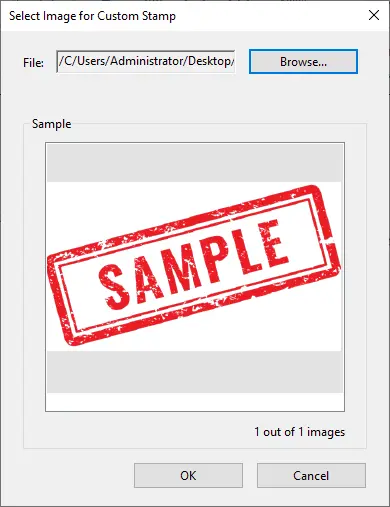
Dans Acrobat, accédez à Outils → Tampon → Tampons personnalisés → Créer.
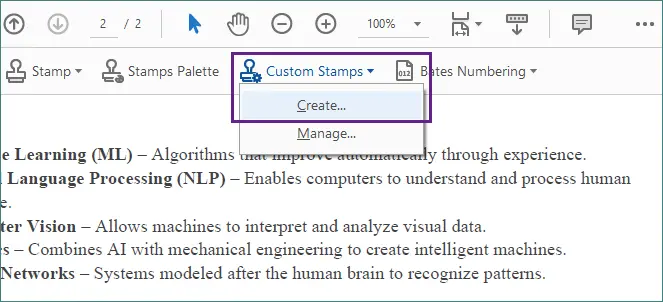
-
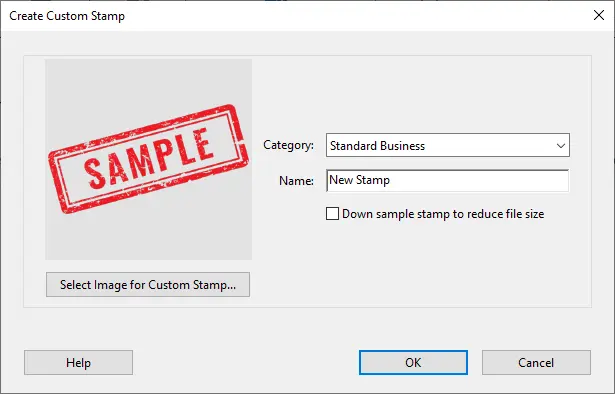
Importez l'image et enregistrez-la en tant que tampon personnalisé.
-
Attribuez le tampon à une catégorie sélectionnée pour une réutilisation plus facile.
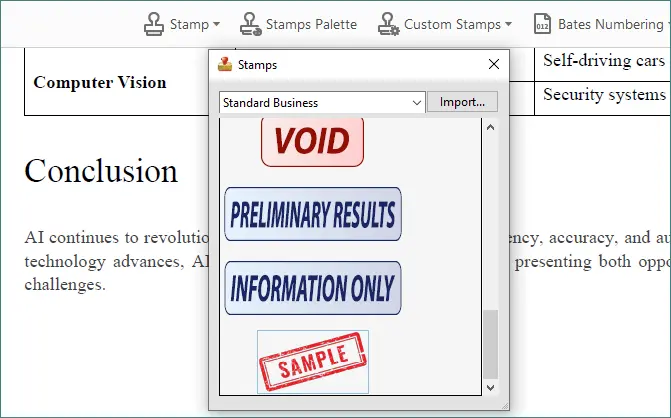
-
Ouvrez l'outil Tampon ou la palette Tampons, sélectionnez le tampon nouvellement créé et cliquez pour le placer sur la page.
-
Ajustez visuellement la taille et la position du tampon.
-
Enregistrez le document.
Les tampons image créés de cette manière se comportent de la même manière que les tampons texte : ils peuvent être déplacés, réutilisés d'un document à l'autre et gérés directement dans Acrobat.
Avantages et limites d'Adobe Acrobat
Avantages
- Prise en charge complète des tampons texte et image.
- Contrôle visuel précis sur le placement et l'apparence.
- Bien adapté aux modifications ponctuelles et aux petits ensembles de documents.
Limites
- Flux de travail entièrement manuel.
- Non conçu pour le traitement par lots ou l'automatisation.
Méthode 2 : Ajouter des tampons texte et image avec Python (Spire.PDF)
Pour les développeurs et les flux de travail automatisés, l'ajout de tampons par programmation est souvent la solution la plus efficace et la plus évolutive. Au lieu de placer manuellement des tampons sur chaque document, vous pouvez définir l'apparence du tampon une seule fois et l'appliquer de manière cohérente sur un ou plusieurs fichiers PDF.
Spire.PDF for Python fournit des API pour créer et appliquer directement des annotations de tampon, vous donnant un contrôle précis sur la mise en page, le style et le positionnement. Cette approche est particulièrement utile pour :
- Le traitement par lots d'un grand nombre de fichiers PDF.
- Les flux de travail d'approbation ou de révision automatisés.
- La génération de documents backend ou côté serveur.
Ajouter un tampon texte à un PDF avec Python
L'exemple suivant montre comment créer un tampon texte personnalisé avec un arrière-plan stylisé et l'appliquer à une page spécifique. Le contenu, les polices, les couleurs et l'emplacement du tampon peuvent tous être ajustés par programmation.
from spire.pdf import *
from spire.pdf.common import *

# Load the PDF document
doc = PdfDocument()
doc.LoadFromFile(r"C:\Users\Administrator\Desktop\input.pdf")

# Get the target page (zero-based index)
page = doc.Pages.get_Item(1)

# Create a template for the stamp
w, h, r = 220.0, 50.0, 10.0
template = PdfTemplate(w, h, True)
bounds = template.GetBounds()

# Fonts and brush
title_font = PdfTrueTypeFont("Elephant", 16.0, 0, True)
info_font = PdfTrueTypeFont("Times New Roman", 10.0, 0, True)
brush = PdfSolidBrush(PdfRGBColor(Color.get_Blue()))
linearGradientBrush = PdfLinearGradientBrush(
    bounds,
    PdfRGBColor(Color.get_White()),
    PdfRGBColor(Color.get_LightBlue()),
    PdfLinearGradientMode.Horizontal)

# Draw the stamp background
path = PdfPath()
path.AddArc(bounds.X, bounds.Y, r, r, 180.0, 90.0)
path.AddArc(bounds.X + w - r, bounds.Y, r, r, 270.0, 90.0)
path.AddArc(bounds.X + w - r, bounds.Y + h - r, r, r, 0.0, 90.0)
path.AddArc(bounds.X, bounds.Y + h - r, r, r, 90.0, 90.0)
path.AddLine(bounds.X, bounds.Y + h - r, bounds.X, bounds.Y + r / 2)
template.Graphics.DrawPath(PdfPen(brush), path)
template.Graphics.DrawPath(linearGradientBrush, path)

# Draw text
template.Graphics.DrawString("APPROVED", title_font, brush, PointF(5.0, 5.0))
template.Graphics.DrawString(
f"By Manager at {DateTime.get_Now().ToString('HH:mm, MMM dd, yyyy')}",
    info_font, brush, PointF(5.0, 28.0)
)

# Create and apply the stamp
rect = RectangleF(50.0, 500.0, w, h)
stamp = PdfRubberStampAnnotation(rect)
appearance = PdfAppearance(stamp)
appearance.Normal = template
stamp.Appearance = appearance
page.AnnotationsWidget.Add(stamp)

# Save the result
doc.SaveToFile("output/TextStamp.pdf", FileFormat.PDF)
doc.Dispose()
Lorsque le fichier de sortie est ouvert dans Adobe Acrobat, le tampon peut être déplacé, redimensionné et géré comme un tampon ajouté manuellement.

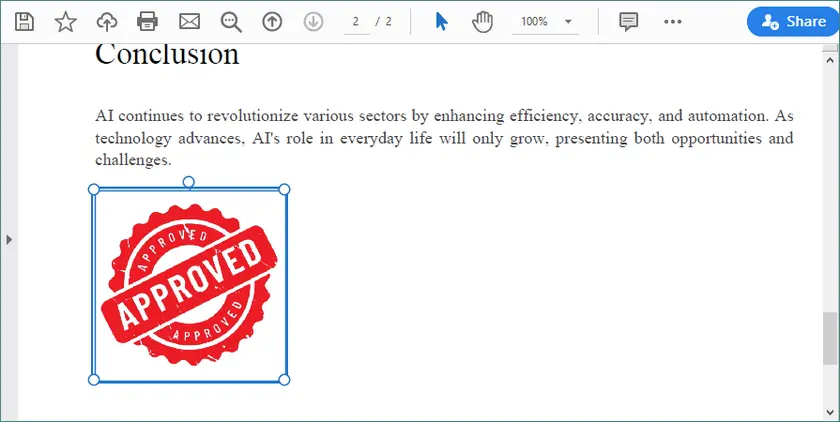
Ajouter un tampon image à un PDF avec Python
Les tampons image sont couramment utilisés pour les logos, les sceaux ou les marques d'approbation visuelles. Le processus est similaire à l'estampillage de texte, mais le modèle est construit à partir d'une image au lieu de graphiques dessinés.
from spire.pdf import *
from spire.pdf.common import *

# Load the PDF document
doc = PdfDocument()
doc.LoadFromFile(r"C:\Users\Administrator\Desktop\input.pdf")

# Get the target page
page = doc.Pages.get_Item(1)

# Load the image
image = PdfImage.FromFile(r"C:\Users\Administrator\Desktop\approved-stamp.png")
w, h = float(image.Width), float(image.Height)

# Create a template and draw the image
template = PdfTemplate(w, h, True)
template.Graphics.DrawImage(image, 0.0, 0.0, w, h)

# Define the stamp position
rect = RectangleF(50.0, 500.0, w, h)

# Create and apply the image stamp
stamp = PdfRubberStampAnnotation(rect)
appearance = PdfAppearance(stamp)
appearance.Normal = template
stamp.Appearance = appearance
page.AnnotationsWidget.Add(stamp)

# Save and close
doc.SaveToFile("output/ImageStamp.pdf", FileFormat.PDF)
doc.Dispose()
Le tampon image peut être repositionné ou redimensionné dans Adobe Acrobat et se comporte de manière cohérente avec les tampons créés via l'interface d'Acrobat.
Quand choisir Python plutôt qu'Adobe Acrobat
Une approche basée sur Python est la meilleure option lorsque :
- Le même tampon doit être appliqué à plusieurs fichiers PDF.
- Le contenu du tampon doit être généré dynamiquement (par exemple, des dates, des noms d'utilisateur ou des valeurs de statut).
- Le traitement PDF fait partie d'un flux de travail automatisé ou backend.
Adobe Acrobat est idéal pour les modifications visuelles ponctuelles, tandis que Python excelle lorsque l'estampillage doit être mis à l'échelle.
Pour explorer des scénarios de traitement PDF plus avancés, vous pouvez également vous référer à d'autres ressources de programmation Spire.PDF, telles que des tutoriels sur l'ajout d'en-têtes et de pieds de page, le filigrane des pages PDF, ou l'annotation et la signature de documents par programmation. Ces sujets peuvent vous aider à étendre davantage vos flux de travail PDF.
Comparaison des fonctionnalités
| Fonctionnalité | Adobe Acrobat | Python (Spire.PDF) |
|---|---|---|
| Tampons texte | Oui | Oui |
| Tampons image | Oui | Oui |
| Annotation de tampon en caoutchouc | Oui | Oui |
| Déplaçable dans Acrobat | Oui | Oui |
| Traitement par lots | Non | Oui |
| Automatisation | Non | Oui |
Réflexions finales
L'ajout de tampons à un PDF peut être géré de différentes manières en fonction de la fréquence à laquelle vous travaillez avec des documents et du niveau de contrôle dont vous avez besoin.
- Adobe Acrobat est un choix solide pour les tâches manuelles où la précision visuelle est importante. Il fonctionne bien pour l'estampillage occasionnel, les révisions et les approbations qui nécessitent une interaction directe avec le document.
- Python avec Spire.PDF est mieux adapté aux flux de travail automatisés. Il vous permet d'appliquer des tampons texte et image par programmation, ce qui le rend idéal pour le traitement par lots ou l'intégration de l'estampillage dans des systèmes existants.
Les deux approches prennent en charge les besoins courants en matière d'estampillage, y compris les étiquettes de statut et les marques basées sur des images telles que les logos ou les sceaux. En choisissant la méthode qui correspond à votre flux de travail, vous pouvez maintenir l'estampillage PDF efficace, cohérent et facile à gérer.
FAQ
Q1. Quelle est la différence entre l'ajout de texte ou d'images et l'ajout d'une annotation de tampon ?
Le texte ou les images sont généralement ajoutés en tant que contenu de page fixe. Les annotations de tampon sont des éléments interactifs qui peuvent être déplacés, redimensionnés et gérés dans des éditeurs PDF comme Adobe Acrobat.
Q2. Pourquoi les tampons de certains outils PDF ne sont-ils pas modifiables dans Adobe Acrobat ?
De nombreux outils aplatissent le contenu sur la page au lieu de créer des annotations. Le contenu aplati devient statique et ne peut pas être repositionné ou réutilisé comme un tampon.
Q3. Les tampons ajoutés avec Python peuvent-ils être modifiés ultérieurement dans Adobe Acrobat ?
Oui. Lorsqu'une annotation de tampon est créée par programmation, elle se comporte de la même manière qu'une annotation ajoutée dans Acrobat et reste entièrement modifiable.
Q4. Quand dois-je utiliser l'estampillage par programmation au lieu d'un éditeur PDF ?
Utilisez l'estampillage par programmation pour l'automatisation, le traitement par lots ou le contenu dynamique. Les éditeurs PDF sont meilleurs pour les modifications manuelles rapides.
Vous pourriez aussi être intéressé par
Cómo agregar sellos a un PDF — Usando Adobe Acrobat y Python
Agregar sellos a un PDF es una tarea común en los flujos de trabajo de revisión, aprobación y distribución de documentos. Los sellos se utilizan a menudo para marcar archivos como Aprobado, Borrador o Confidencial, o para aplicar elementos visuales como logotipos de empresas y sellos oficiales.
En la práctica, los sellos de PDF generalmente se agregan manualmente a través de un software de escritorio o programáticamente como parte de un flujo de trabajo automatizado. Si bien muchas herramientas pueden colocar texto o imágenes en un PDF, solo unas pocas crean sellos que permanecen móviles y editables cuando el documento se vuelve a abrir en editores de PDF como Adobe Acrobat.
Este artículo presenta dos enfoques fiables y ampliamente utilizados para agregar sellos a archivos PDF:
- Adobe Acrobat, que es ideal para la edición manual y visual
- Python (Spire.PDF), que es ideal para la automatización y el procesamiento por lotes
Cada método demuestra cómo agregar sellos de texto y sellos de imagen, ayudándole a elegir el mejor enfoque para su flujo de trabajo.
¿Qué es un sello de PDF?
Un sello de PDF se implementa como una Anotación de Sello de Goma, definida en la especificación de PDF. En comparación con el texto o las imágenes ordinarias, los sellos:
- Se pueden mover libremente en Adobe Acrobat.
- Aparecen en el panel Comentarios / Sellos.
- Se pueden reutilizar en todos los documentos.
- Se identifican claramente como anotaciones, no como contenido de la página.
Esta distinción es fundamental cuando los documentos se revisan, corrigen o auditan más tarde.
Método 1: Agregar sellos de texto e imagen con Adobe Acrobat
Adobe Acrobat ofrece soporte integrado para el sellado de PDF y es una de las herramientas más utilizadas para la revisión y aprobación manual y visual de documentos. Le permite agregar sellos de texto e imagen y ajustar su apariencia directamente en la página.
Agregar un sello de texto en Adobe Acrobat
Adobe Acrobat incluye varios sellos de texto predefinidos, como Aprobado, Borrador y Confidencial, y también le permite crear y personalizar sus propios sellos.
Pasos:
-
Abra el PDF en Adobe Acrobat.
-
Vaya a Herramientas → Sello .
-
Seleccione un sello de texto incorporado.
-
Haga clic en cualquier lugar de la página para colocar el sello.
-
Cambie el tamaño o la posición del sello según sea necesario.
-
Haga clic con el botón derecho en el sello y elija Propiedades para personalizar aún más su apariencia (como el color y la opacidad) y los detalles del sello, como el autor o el asunto.
-
Guarde el documento.
Una vez agregado, el sello permanece móvil y editable, lo que facilita ajustar la ubicación o actualizar sus propiedades más tarde.
Agregar un sello de imagen en Adobe Acrobat
Los sellos de imagen se utilizan normally para logotipos de empresas, sellos oficiales o firmas escaneadas. Acrobat le permite convertir archivos de imagen en sellos personalizados reutilizables.
Pasos:
-
Prepare un archivo de imagen en formato PNG o JPG.
-
En Acrobat, vaya a Herramientas → Sello → Sellos personalizados → Crear .
-
Importe la imagen y guárdela como un sello personalizado.
-
Asigne el sello a una categoría seleccionada para facilitar su reutilización.
-
Abra la herramienta Sello o la paleta Sellos, seleccione el sello recién creado y haga clic para colocarlo en la página.
-
Ajuste el tamaño y la posición del sello visualmente.
-
Guarde el documento.
Los sellos de imagen creados de esta manera se comportan igual que los sellos de texto: se pueden mover, reutilizar en todos los documentos y administrar directamente en Acrobat.
Ventajas y limitaciones de Adobe Acrobat
Ventajas
- Soporte completo para sellos de texto e imagen.
- Control visual preciso sobre la ubicación y la apariencia.
- Ideal para ediciones únicas y conjuntos de documentos pequeños.
Limitaciones
- Flujo de trabajo totalmente manual.
- No está diseñado para el procesamiento por lotes o la automatización.
Método 2: Agregar sellos de texto e imagen con Python (Spire.PDF)
Para los desarrolladores y los flujos de trabajo automatizados, agregar sellos mediante programación suele ser la solución más eficiente y escalable. En lugar de colocar sellos manualmente en cada documento, puede definir la apariencia del sello una vez y aplicarlo de manera consistente en uno o varios archivos PDF.
Spire.PDF for Python proporciona API para crear y aplicar anotaciones de sello directamente, lo que le brinda un control preciso sobre el diseño, el estilo y la posición. Este enfoque es particularmente útil para:
- Procesamiento por lotes de grandes cantidades de archivos PDF.
- Flujos de trabajo de aprobación o revisión automatizados.
- Generación de documentos de backend o del lado del servidor.
Agregar un sello de texto a un PDF con Python
El siguiente ejemplo demuestra cómo crear un sello de texto personalizado con un fondo con estilo y aplicarlo a una página específica. El contenido, las fuentes, los colores y la ubicación del sello se pueden ajustar mediante programación.
from spire.pdf import *
from spire.pdf.common import *

# Load the PDF document
doc = PdfDocument()
doc.LoadFromFile(r"C:\Users\Administrator\Desktop\input.pdf")

# Get the target page (zero-based index)
page = doc.Pages.get_Item(1)

# Create a template for the stamp
w, h, r = 220.0, 50.0, 10.0
template = PdfTemplate(w, h, True)
bounds = template.GetBounds()

# Fonts and brush
title_font = PdfTrueTypeFont("Elephant", 16.0, 0, True)
info_font = PdfTrueTypeFont("Times New Roman", 10.0, 0, True)
brush = PdfSolidBrush(PdfRGBColor(Color.get_Blue()))
linearGradientBrush = PdfLinearGradientBrush(
    bounds,
    PdfRGBColor(Color.get_White()),
    PdfRGBColor(Color.get_LightBlue()),
    PdfLinearGradientMode.Horizontal)

# Draw the stamp background
path = PdfPath()
path.AddArc(bounds.X, bounds.Y, r, r, 180.0, 90.0)
path.AddArc(bounds.X + w - r, bounds.Y, r, r, 270.0, 90.0)
path.AddArc(bounds.X + w - r, bounds.Y + h - r, r, r, 0.0, 90.0)
path.AddArc(bounds.X, bounds.Y + h - r, r, r, 90.0, 90.0)
path.AddLine(bounds.X, bounds.Y + h - r, bounds.X, bounds.Y + r / 2)
template.Graphics.DrawPath(PdfPen(brush), path)
template.Graphics.DrawPath(linearGradientBrush, path)

# Draw text
template.Graphics.DrawString("APPROVED", title_font, brush, PointF(5.0, 5.0))
template.Graphics.DrawString(
f"By Manager at {DateTime.get_Now().ToString('HH:mm, MMM dd, yyyy')}",
    info_font, brush, PointF(5.0, 28.0)
)

# Create and apply the stamp
rect = RectangleF(50.0, 500.0, w, h)
stamp = PdfRubberStampAnnotation(rect)
appearance = PdfAppearance(stamp)
appearance.Normal = template
stamp.Appearance = appearance
page.AnnotationsWidget.Add(stamp)

# Save the result
doc.SaveToFile("output/TextStamp.pdf", FileFormat.PDF)
doc.Dispose()
Cuando el archivo de salida se abre en Adobe Acrobat, el sello se puede mover, cambiar de tamaño y administrar como un sello agregado manualmente.
Agregar un sello de imagen a un PDF con Python
Los sellos de imagen se utilizan comúnmente para logotipos, sellos o marcas de aprobación visual. El proceso es similar al sellado de texto, pero la plantilla se crea a partir de una imagen en lugar de gráficos dibujados.
from spire.pdf import *
from spire.pdf.common import *

# Load the PDF document
doc = PdfDocument()
doc.LoadFromFile(r"C:\Users\Administrator\Desktop\input.pdf")

# Get the target page
page = doc.Pages.get_Item(1)

# Load the image
image = PdfImage.FromFile(r"C:\Users\Administrator\Desktop\approved-stamp.png")
w, h = float(image.Width), float(image.Height)

# Create a template and draw the image
template = PdfTemplate(w, h, True)
template.Graphics.DrawImage(image, 0.0, 0.0, w, h)

# Define the stamp position
rect = RectangleF(50.0, 500.0, w, h)

# Create and apply the image stamp
stamp = PdfRubberStampAnnotation(rect)
appearance = PdfAppearance(stamp)
appearance.Normal = template
stamp.Appearance = appearance
page.AnnotationsWidget.Add(stamp)

# Save and close
doc.SaveToFile("output/ImageStamp.pdf", FileFormat.PDF)
doc.Dispose()
El sello de imagen se puede reposicionar o cambiar de tamaño en Adobe Acrobat y se comporta de manera consistente con los sellos creados a través de la interfaz de Acrobat.
Cuándo elegir Python en lugar de Adobe Acrobat
Un enfoque basado en Python es la mejor opción cuando:
- El mismo sello debe aplicarse a varios archivos PDF.
- El contenido del sello debe generarse dinámicamente (por ejemplo, fechas, nombres de usuario o valores de estado).
- El procesamiento de PDF es parte de un flujo de trabajo automatizado o de backend.
Adobe Acrobat es ideal para ediciones visuales únicas, mientras que Python sobresale cuando el sellado necesita escalar.
Para explorar escenarios de procesamiento de PDF más avanzados, también puede consultar otros recursos de programación de Spire.PDF, como tutoriales sobre cómo agregar encabezados y pies de página, marcas de agua en páginas PDF o anotar y firmar documentos mediante programación. Estos temas pueden ayudarlo a ampliar aún más sus flujos de trabajo de PDF.
Comparación de características
| Característica | Adobe Acrobat | Python (Spire.PDF) |
|---|---|---|
| Sellos de texto | Sí | Sí |
| Sellos de imagen | Sí | Sí |
| Anotación de sello de goma | Sí | Sí |
| Móvil en Acrobat | Sí | Sí |
| Procesamiento por lotes | No | Sí |
| Automatización | No | Sí |
Conclusiones
Agregar sellos a un PDF se puede manejar de diferentes maneras dependiendo de la frecuencia con la que trabaje con documentos y de cuánto control necesite.
- Adobe Acrobat es una opción sólida para tareas manuales donde la precisión visual es importante. Funciona bien para sellados, revisiones y aprobaciones ocasionales que requieren una interacción directa con el documento.
- Python con Spire.PDF es más adecuado para flujos de trabajo automatizados. Le permite aplicar sellos de texto e imagen mediante programación, lo que lo hace ideal para el procesamiento por lotes o la integración del sellado en los sistemas existentes.
Ambos enfoques admiten las necesidades comunes de sellado, incluidas las etiquetas de estado y las marcas basadas en imágenes, como logotipos o sellos. Al elegir el método que se adapte a su flujo de trabajo, puede mantener el sellado de PDF eficiente, consistente y fácil de administrar.
Preguntas frecuentes
P1. ¿Cuál es la diferencia entre agregar texto o imágenes y agregar una anotación de sello?
El texto o las imágenes generalmente se agregan como contenido de página fijo. Las anotaciones de sello son elementos interactivos que se pueden mover, cambiar de tamaño y administrar en editores de PDF como Adobe Acrobat.
P2. ¿Por qué los sellos de algunas herramientas de PDF no se pueden editar en Adobe Acrobat?
Muchas herramientas aplanan el contenido en la página en lugar de crear anotaciones. El contenido aplanado se vuelve estático y no se puede reposicionar ni reutilizar como un sello.
P3. ¿Se pueden editar posteriormente en Adobe Acrobat los sellos agregados con Python?
Sí. Cuando se crea una anotación de sello mediante programación, se comporta igual que una agregada en Acrobat y permanece totalmente editable.
P4. ¿Cuándo debo usar el sellado programático en lugar de un editor de PDF?
Utilice el sellado programático para la automatización, el procesamiento por lotes o el contenido dinámico. Los editores de PDF son mejores para ediciones manuales rápidas.
También le puede interesar
So fügen Sie Stempel zu einer PDF-Datei hinzu – mit Adobe Acrobat und Python
Das Hinzufügen von Stempeln zu einer PDF-Datei ist eine häufige Aufgabe in Arbeitsabläufen zur Überprüfung, Genehmigung und Verteilung von Dokumenten. Stempel werden oft verwendet, um Dateien als „Genehmigt“, „Entwurf“ oder „Vertraulich“ zu kennzeichnen oder um visuelle Elemente wie Firmenlogos und offizielle Siegel anzubringen.
In der Praxis werden PDF-Stempel in der Regel entweder manuell über eine Desktop-Software oder programmgesteuert als Teil eines automatisierten Arbeitsablaufs hinzugefügt. Während viele Werkzeuge Text oder Bilder in einer PDF-Datei platzieren können, erstellen nur wenige Stempel, die beweglich und bearbeitbar bleiben, wenn das Dokument in PDF-Editoren wie Adobe Acrobat erneut geöffnet wird.
Dieser Artikel stellt zwei zuverlässige und weit verbreitete Ansätze zum Hinzufügen von Stempeln zu PDF-Dateien vor:
- Adobe Acrobat, das sich gut für die manuelle und visuelle Bearbeitung eignet
- Python (Spire.PDF), das ideal für die Automatisierung und Stapelverarbeitung ist
Jede Methode zeigt, wie sowohl Text- als auch Bildstempel hinzugefügt werden, und hilft Ihnen, den besten Ansatz für Ihren Arbeitsablauf zu wählen.
Was ist ein PDF-Stempel?
Ein PDF-Stempel wird als Gummistempel-Anmerkung implementiert, die in der PDF-Spezifikation definiert ist. Im Vergleich zu gewöhnlichem Text oder Bildern gilt für Stempel:
- Können in Adobe Acrobat frei bewegt werden.
- Erscheinen im Kommentar- / Stempel-Bedienfeld.
- Können dokumentübergreifend wiederverwendet werden.
- Sind eindeutig als Anmerkungen und nicht als Seiteninhalt gekennzeichnet.
Diese Unterscheidung ist entscheidend, wenn Dokumente später überprüft, überarbeitet oder geprüft werden.
Methode 1: Text- und Bildstempel mit Adobe Acrobat hinzufügen
Adobe Acrobat bietet integrierte Unterstützung für das Stempeln von PDFs und ist eines der am häufigsten verwendeten Werkzeuge für die manuelle, visuelle Überprüfung und Genehmigung von Dokumenten. Es ermöglicht Ihnen, sowohl textbasierte als auch bildbasierte Stempel hinzuzufügen und deren Erscheinungsbild direkt auf der Seite anzupassen.
Einen Textstempel in Adobe Acrobat hinzufügen
Adobe Acrobat enthält mehrere vordefinierte Textstempel – wie „Genehmigt“, „Entwurf“ und „Vertraulich“ – und ermöglicht es Ihnen auch, Ihre eigenen Stempel zu erstellen und anzupassen.
Schritte:
-
Öffnen Sie die PDF-Datei in Adobe Acrobat.
-
Gehen Sie zu Werkzeuge → Stempel .
-
Wählen Sie einen integrierten Textstempel aus.
-
Klicken Sie an eine beliebige Stelle auf der Seite, um den Stempel zu platzieren.
-
Passen Sie die Größe oder Position des Stempels nach Bedarf an.
-
Klicken Sie mit der rechten Maustaste auf den Stempel und wählen Sie Eigenschaften, um sein Erscheinungsbild (wie Farbe und Deckkraft) und Stempeldetails wie den Autor oder den Betreff weiter anzupassen.
-
Speichern Sie das Dokument.
Einmal hinzugefügt, bleibt der Stempel beweglich und bearbeitbar, sodass die Platzierung leicht angepasst oder seine Eigenschaften später aktualisiert werden können.
Einen Bildstempel in Adobe Acrobat hinzufügen
Bildstempel werden normalerweise für Firmenlogos, offizielle Siegel oder gescannte Unterschriften verwendet. Mit Acrobat können Sie Bilddateien in wiederverwendbare benutzerdefinierte Stempel umwandeln.
Schritte:
-
Bereiten Sie eine Bilddatei im PNG- oder JPG-Format vor.
-
Navigieren Sie in Acrobat zu Werkzeuge → Stempel → Benutzerdefinierte Stempel → Erstellen .
-
Importieren Sie das Bild und speichern Sie es als benutzerdefinierten Stempel.
-
Weisen Sie den Stempel einer ausgewählten Kategorie zur einfacheren Wiederverwendung zu.
-
Öffnen Sie das Stempelwerkzeug oder die Stempelpalette, wählen Sie den neu erstellten Stempel aus und klicken Sie, um ihn auf der Seite zu platzieren.
-
Passen Sie die Größe und Position des Stempels visuell an.
-
Speichern Sie das Dokument.
Auf diese Weise erstellte Bildstempel verhalten sich genauso wie Textstempel – sie können verschoben, dokumentübergreifend wiederverwendet und direkt in Acrobat verwaltet werden.
Vorteile und Einschränkungen von Adobe Acrobat
Vorteile
- Umfassende Unterstützung für Text- und Bildstempel.
- Präzise visuelle Kontrolle über Platzierung und Erscheinungsbild.
- Gut geeignet für einmalige Bearbeitungen und kleine Dokumentensätze.
Einschränkungen
- Vollständig manueller Arbeitsablauf.
- Nicht für die Stapelverarbeitung oder Automatisierung ausgelegt.
Methode 2: Text- und Bildstempel mit Python (Spire.PDF) hinzufügen
Für Entwickler und automatisierte Arbeitsabläufe ist das programmgesteuerte Hinzufügen von Stempeln oft die effizienteste und skalierbarste Lösung. Anstatt Stempel manuell auf jedem Dokument zu platzieren, können Sie das Erscheinungsbild des Stempels einmal definieren und es konsistent auf eine oder viele PDF-Dateien anwenden.
Spire.PDF for Python bietet APIs zum direkten Erstellen und Anwenden von Stempelanmerkungen, die Ihnen eine präzise Kontrolle über Layout, Stil und Positionierung geben. Dieser Ansatz ist besonders nützlich für:
- Stapelverarbeitung großer Mengen von PDF-Dateien.
- Automatisierte Genehmigungs- oder Überprüfungs-Workflows.
- Backend- oder serverseitige Dokumenterstellung.
Einen Textstempel mit Python zu einer PDF hinzufügen
Das folgende Beispiel zeigt, wie man einen benutzerdefinierten Textstempel mit einem gestalteten Hintergrund erstellt und auf eine bestimmte Seite anwendet. Der Stempelinhalt, die Schriftarten, Farben und die Platzierung können alle programmgesteuert angepasst werden.
from spire.pdf import *
from spire.pdf.common import *

# Load the PDF document
doc = PdfDocument()
doc.LoadFromFile(r"C:\Users\Administrator\Desktop\input.pdf")

# Get the target page (zero-based index)
page = doc.Pages.get_Item(1)

# Create a template for the stamp
w, h, r = 220.0, 50.0, 10.0
template = PdfTemplate(w, h, True)
bounds = template.GetBounds()

# Fonts and brush
title_font = PdfTrueTypeFont("Elephant", 16.0, 0, True)
info_font = PdfTrueTypeFont("Times New Roman", 10.0, 0, True)
brush = PdfSolidBrush(PdfRGBColor(Color.get_Blue()))
linearGradientBrush = PdfLinearGradientBrush(
    bounds,
    PdfRGBColor(Color.get_White()),
    PdfRGBColor(Color.get_LightBlue()),
    PdfLinearGradientMode.Horizontal)

# Draw the stamp background
path = PdfPath()
path.AddArc(bounds.X, bounds.Y, r, r, 180.0, 90.0)
path.AddArc(bounds.X + w - r, bounds.Y, r, r, 270.0, 90.0)
path.AddArc(bounds.X + w - r, bounds.Y + h - r, r, r, 0.0, 90.0)
path.AddArc(bounds.X, bounds.Y + h - r, r, r, 90.0, 90.0)
path.AddLine(bounds.X, bounds.Y + h - r, bounds.X, bounds.Y + r / 2)
template.Graphics.DrawPath(PdfPen(brush), path)
template.Graphics.DrawPath(linearGradientBrush, path)

# Draw text
template.Graphics.DrawString("APPROVED", title_font, brush, PointF(5.0, 5.0))
template.Graphics.DrawString(
f"By Manager at {DateTime.get_Now().ToString('HH:mm, MMM dd, yyyy')}",
    info_font, brush, PointF(5.0, 28.0)
)

# Create and apply the stamp
rect = RectangleF(50.0, 500.0, w, h)
stamp = PdfRubberStampAnnotation(rect)
appearance = PdfAppearance(stamp)
appearance.Normal = template
stamp.Appearance = appearance
page.AnnotationsWidget.Add(stamp)

# Save the result
doc.SaveToFile("output/TextStamp.pdf", FileFormat.PDF)
doc.Dispose()
Wenn die Ausgabedatei in Adobe Acrobat geöffnet wird, kann der Stempel wie ein manuell hinzugefügter Stempel verschoben, in der Größe geändert und verwaltet werden.
Einen Bildstempel mit Python zu einer PDF hinzufügen
Bildstempel werden häufig für Logos, Siegel oder visuelle Genehmigungszeichen verwendet. Der Prozess ähnelt dem Textstempeln, aber die Vorlage wird aus einem Bild anstelle von gezeichneten Grafiken erstellt.
from spire.pdf import *
from spire.pdf.common import *

# Load the PDF document
doc = PdfDocument()
doc.LoadFromFile(r"C:\Users\Administrator\Desktop\input.pdf")

# Get the target page
page = doc.Pages.get_Item(1)

# Load the image
image = PdfImage.FromFile(r"C:\Users\Administrator\Desktop\approved-stamp.png")
w, h = float(image.Width), float(image.Height)

# Create a template and draw the image
template = PdfTemplate(w, h, True)
template.Graphics.DrawImage(image, 0.0, 0.0, w, h)

# Define the stamp position
rect = RectangleF(50.0, 500.0, w, h)

# Create and apply the image stamp
stamp = PdfRubberStampAnnotation(rect)
appearance = PdfAppearance(stamp)
appearance.Normal = template
stamp.Appearance = appearance
page.AnnotationsWidget.Add(stamp)

# Save and close
doc.SaveToFile("output/ImageStamp.pdf", FileFormat.PDF)
doc.Dispose()
Der Bildstempel kann in Adobe Acrobat neu positioniert oder in der Größe geändert werden und verhält sich konsistent mit Stempeln, die über die Acrobat-Oberfläche erstellt wurden.
Wann man Python gegenüber Adobe Acrobat bevorzugen sollte
Ein Python-basierter Ansatz ist die bessere Option, wenn:
- Derselbe Stempel auf mehrere PDF-Dateien angewendet werden muss.
- Stempelinhalt dynamisch generiert werden muss (zum Beispiel Daten, Benutzernamen oder Statuswerte).
- Die PDF-Verarbeitung Teil eines automatisierten oder Backend-Workflows ist.
Adobe Acrobat ist ideal für visuelle, einmalige Bearbeitungen, während Python hervorragend ist, wenn das Stempeln skalierbar sein muss.
Um fortgeschrittenere PDF-Verarbeitungsszenarien zu erkunden, können Sie auch auf andere Spire.PDF-Programmierressourcen zurückgreifen, wie z. B. Tutorials zum Hinzufügen von Kopf- und Fußzeilen, zum Setzen von Wasserzeichen auf PDF-Seiten oder zum programmgesteuerten Kommentieren und Signieren von Dokumenten. Diese Themen können Ihnen helfen, Ihre PDF-Workflows weiter auszubauen.
Funktionsvergleich
| Funktion | Adobe Acrobat | Python (Spire.PDF) |
|---|---|---|
| Textstempel | Ja | Ja |
| Bildstempel | Ja | Ja |
| Gummistempel-Anmerkung | Ja | Ja |
| Beweglich in Acrobat | Ja | Ja |
| Stapelverarbeitung | Nein | Ja |
| Automatisierung | Nein | Ja |
Abschließende Gedanken
Das Hinzufügen von Stempeln zu einer PDF-Datei kann auf unterschiedliche Weise gehandhabt werden, je nachdem, wie oft Sie mit Dokumenten arbeiten und wie viel Kontrolle Sie benötigen.
- Adobe Acrobat ist eine solide Wahl für manuelle Aufgaben, bei denen visuelle Genauigkeit wichtig ist. Es eignet sich gut für gelegentliches Stempeln, Überprüfungen und Genehmigungen, die eine direkte Interaktion mit dem Dokument erfordern.
- Python mit Spire.PDF ist besser für automatisierte Arbeitsabläufe geeignet. Es ermöglicht Ihnen, Text- und Bildstempel programmgesteuert anzuwenden, was es ideal für die Stapelverarbeitung oder die Integration des Stempelns in bestehende Systeme macht.
Beide Ansätze unterstützen gängige Stempelanforderungen, einschließlich Statusetiketten und bildbasierter Markierungen wie Logos oder Siegel. Indem Sie die Methode wählen, die zu Ihrem Arbeitsablauf passt, können Sie das PDF-Stempeln effizient, konsistent und einfach zu verwalten halten.
Häufig gestellte Fragen
F1. Was ist der Unterschied zwischen dem Hinzufügen von Text oder Bildern und dem Hinzufügen einer Stempelanmerkung?
Text oder Bilder werden normalerweise als fester Seiteninhalt hinzugefügt. Stempelanmerkungen sind interaktive Elemente, die in PDF-Editoren wie Adobe Acrobat verschoben, in der Größe geändert und verwaltet werden können.
F2. Warum sind Stempel von einigen PDF-Werkzeugen in Adobe Acrobat nicht bearbeitbar?
Viele Werkzeuge reduzieren den Inhalt auf die Seite, anstatt Anmerkungen zu erstellen. Reduzierter Inhalt wird statisch und kann nicht als Stempel neu positioniert oder wiederverwendet werden.
F3. Können mit Python hinzugefügte Stempel später in Adobe Acrobat bearbeitet werden?
Ja. Wenn eine Stempelanmerkung programmgesteuert erstellt wird, verhält sie sich genauso wie eine in Acrobat hinzugefügte und bleibt vollständig bearbeitbar.
F4. Wann sollte ich programmgesteuertes Stempeln anstelle eines PDF-Editors verwenden?
Verwenden Sie programmgesteuertes Stempeln für Automatisierung, Stapelverarbeitung oder dynamische Inhalte. PDF-Editoren sind besser für schnelle, manuelle Bearbeitungen.
Das könnte Sie auch interessieren
Как добавить штампы в PDF — использование Adobe Acrobat и Python
Добавление штампов в PDF — обычная задача в процессах рецензирования, утверждения и распространения документов. Штампы часто используются для пометки файлов как «Утверждено», «Черновик» или «Конфиденциально», а также для применения визуальных элементов, таких как логотипы компаний и официальные печати.
На практике штампы в PDF обычно добавляются либо вручную с помощью настольного программного обеспечения, либо программно в рамках автоматизированного рабочего процесса. Хотя многие инструменты могут размещать текст или изображения в PDF, лишь немногие создают штампы, которые остаются подвижными и редактируемыми при повторном открытии документа в редакторах PDF, таких как Adobe Acrobat.
В этой статье представлены два надежных и широко используемых подхода для добавления штампов в PDF-файлы:
- Adobe Acrobat, который хорошо подходит для ручного и визуального редактирования
- Python (Spire.PDF), который идеально подходит для автоматизации и пакетной обработки
Каждый метод демонстрирует, как добавлять как текстовые, так и графические штампы, помогая вам выбрать лучший подход для вашего рабочего процесса.
Что такое PDF-штамп?
PDF-штамп реализуется как аннотация резинового штампа, определенная в спецификации PDF. По сравнению с обычным текстом или изображениями, штампы:
- Можно свободно перемещать в Adobe Acrobat.
- Отображаются на панели «Комментарии / Штампы».
- Могут быть повторно использованы в разных документах.
- Четко идентифицируются как аннотации, а не как содержимое страницы.
Это различие имеет решающее значение при последующем рецензировании, пересмотре или аудите документов.
Способ 1: Добавление текстовых и графических штампов с помощью Adobe Acrobat
Adobe Acrobat предлагает встроенную поддержку для проставления штампов в PDF и является одним из наиболее часто используемых инструментов для ручного, визуального рецензирования и утверждения документов. Он позволяет добавлять как текстовые, так и графические штампы и настраивать их внешний вид прямо на странице.
Добавление текстового штампа в Adobe Acrobat
Adobe Acrobat включает несколько предопределенных текстовых штампов, таких как «Утверждено», «Черновик» и «Конфиденциально», а также позволяет создавать и настраивать собственные штампы.
Шаги:
-
Откройте PDF в Adobe Acrobat.
-
Перейдите в Инструменты → Штамп .
-
Выберите встроенный текстовый штамп.
-
Щелкните в любом месте страницы, чтобы разместить штамп.
-
При необходимости измените размер или положение штампа.
-
Щелкните штамп правой кнопкой мыши и выберите Свойства, чтобы дополнительно настроить его внешний вид (например, цвет и непрозрачность) и детали штампа, такие как автор или тема.
-
Сохраните документ.
После добавления штамп остается подвижным и редактируемым, что позволяет легко изменять его расположение или обновлять свойства позже.
Добавление графического штампа в Adobe Acrobat
Графические штампы обычно используются для логотипов компаний, официальных печатей или отсканированных подписей. Acrobat позволяет преобразовывать файлы изображений в многоразовые пользовательские штампы.
Шаги:
-
Подготовьте файл изображения в формате PNG или JPG.
-
В Acrobat перейдите в Инструменты → Штамп → Пользовательские штампы → Создать .
-
Импортируйте изображение и сохраните его как пользовательский штамп.
-
Назначьте штамп выбранной категории для более удобного повторного использования.
-
Откройте инструмент «Штамп» или палитру штампов, выберите только что созданный штамп и щелкните, чтобы разместить его на странице.
-
Визуально настройте размер и положение штампа.
-
Сохраните документ.
Графические штампы, созданные таким образом, ведут себя так же, как и текстовые — их можно перемещать, повторно использовать в разных документах и управлять ими непосредственно в Acrobat.
Преимущества и ограничения Adobe Acrobat
Преимущества
- Полная поддержка текстовых и графических штампов.
- Точный визуальный контроль над размещением и внешним видом.
- Хорошо подходит для разовых правок и небольших наборов документов.
Ограничения
- Полностью ручной рабочий процесс.
- Не предназначен для пакетной обработки или автоматизации.
Способ 2: Добавление текстовых и графических штампов с помощью Python (Spire.PDF)
Для разработчиков и автоматизированных рабочих процессов программное добавление штампов часто является наиболее эффективным и масштабируемым решением. Вместо того чтобы вручную размещать штампы на каждом документе, вы можете один раз определить внешний вид штампа и последовательно применять его к одному или многим PDF-файлам.
Spire.PDF for Python предоставляет API для прямого создания и применения аннотаций штампов, давая вам точный контроль над макетом, стилем и позиционированием. Этот подход особенно полезен для:
- Пакетной обработки большого количества PDF-файлов.
- Автоматизированных процессов утверждения или рецензирования.
- Генерации документов на стороне бэкенда или сервера.
Добавление текстового штампа в PDF с помощью Python
Следующий пример демонстрирует, как создать пользовательский текстовый штамп со стилизованным фоном и применить его к определенной странице. Содержимое штампа, шрифты, цвета и расположение можно настраивать программно.
from spire.pdf import *
from spire.pdf.common import *

# Load the PDF document
doc = PdfDocument()
doc.LoadFromFile(r"C:\Users\Administrator\Desktop\input.pdf")

# Get the target page (zero-based index)
page = doc.Pages.get_Item(1)

# Create a template for the stamp
w, h, r = 220.0, 50.0, 10.0
template = PdfTemplate(w, h, True)
bounds = template.GetBounds()

# Fonts and brush
title_font = PdfTrueTypeFont("Elephant", 16.0, 0, True)
info_font = PdfTrueTypeFont("Times New Roman", 10.0, 0, True)
brush = PdfSolidBrush(PdfRGBColor(Color.get_Blue()))
linearGradientBrush = PdfLinearGradientBrush(
    bounds,
    PdfRGBColor(Color.get_White()),
    PdfRGBColor(Color.get_LightBlue()),
    PdfLinearGradientMode.Horizontal)

# Draw the stamp background
path = PdfPath()
path.AddArc(bounds.X, bounds.Y, r, r, 180.0, 90.0)
path.AddArc(bounds.X + w - r, bounds.Y, r, r, 270.0, 90.0)
path.AddArc(bounds.X + w - r, bounds.Y + h - r, r, r, 0.0, 90.0)
path.AddArc(bounds.X, bounds.Y + h - r, r, r, 90.0, 90.0)
path.AddLine(bounds.X, bounds.Y + h - r, bounds.X, bounds.Y + r / 2)
template.Graphics.DrawPath(PdfPen(brush), path)
template.Graphics.DrawPath(linearGradientBrush, path)

# Draw text
template.Graphics.DrawString("APPROVED", title_font, brush, PointF(5.0, 5.0))
template.Graphics.DrawString(
f"By Manager at {DateTime.get_Now().ToString('HH:mm, MMM dd, yyyy')}",
    info_font, brush, PointF(5.0, 28.0)
)

# Create and apply the stamp
rect = RectangleF(50.0, 500.0, w, h)
stamp = PdfRubberStampAnnotation(rect)
appearance = PdfAppearance(stamp)
appearance.Normal = template
stamp.Appearance = appearance
page.AnnotationsWidget.Add(stamp)

# Save the result
doc.SaveToFile("output/TextStamp.pdf", FileFormat.PDF)
doc.Dispose()
Когда выходной файл открывается в Adobe Acrobat, штамп можно перемещать, изменять его размер и управлять им так же, как и штампом, добавленным вручную.
Добавление графического штампа в PDF с помощью Python
Графические штампы обычно используются для логотипов, печатей или визуальных знаков утверждения. Процесс аналогичен проставлению текстовых штампов, но шаблон создается из изображения, а не из нарисованной графики.
from spire.pdf import *
from spire.pdf.common import *

# Load the PDF document
doc = PdfDocument()
doc.LoadFromFile(r"C:\Users\Administrator\Desktop\input.pdf")

# Get the target page
page = doc.Pages.get_Item(1)

# Load the image
image = PdfImage.FromFile(r"C:\Users\Administrator\Desktop\approved-stamp.png")
w, h = float(image.Width), float(image.Height)

# Create a template and draw the image
template = PdfTemplate(w, h, True)
template.Graphics.DrawImage(image, 0.0, 0.0, w, h)

# Define the stamp position
rect = RectangleF(50.0, 500.0, w, h)

# Create and apply the image stamp
stamp = PdfRubberStampAnnotation(rect)
appearance = PdfAppearance(stamp)
appearance.Normal = template
stamp.Appearance = appearance
page.AnnotationsWidget.Add(stamp)

# Save and close
doc.SaveToFile("output/ImageStamp.pdf", FileFormat.PDF)
doc.Dispose()
Графический штамп можно перемещать или изменять его размер в Adobe Acrobat, и он ведет себя так же, как штампы, созданные через интерфейс Acrobat.
Когда выбирать Python вместо Adobe Acrobat
Подход на основе Python является лучшим вариантом, когда:
- Один и тот же штамп должен быть применен к нескольким PDF-файлам.
- Содержимое штампа необходимо генерировать динамически (например, даты, имена пользователей или значения статуса).
- Обработка PDF является частью автоматизированного или бэкенд-процесса.
Adobe Acrobat идеально подходит для визуальных, разовых правок, в то время как Python превосходит, когда требуется масштабирование проставления штампов.
Чтобы изучить более сложные сценарии обработки PDF, вы также можете обратиться к другим ресурсам по программированию Spire.PDF, таким как руководства по добавлению верхних и нижних колонтитулов, нанесению водяных знаков на страницы PDF или программному аннотированию и подписанию документов. Эти темы помогут вам еще больше расширить ваши рабочие процессы с PDF.
Сравнение функций
| Функция | Adobe Acrobat | Python (Spire.PDF) |
|---|---|---|
| Текстовые штампы | Да | Да |
| Графические штампы | Да | Да |
| Аннотация резинового штампа | Да | Да |
| Перемещаемый в Acrobat | Да | Да |
| Пакетная обработка | Нет | Да |
| Автоматизация | Нет | Да |
Заключение
Добавление штампов в PDF можно выполнять по-разному в зависимости от того, как часто вы работаете с документами и какой уровень контроля вам нужен.
- Adobe Acrobat — это надежный выбор для ручных задач, где важна визуальная точность. Он хорошо подходит для периодического проставления штампов, рецензирования и утверждения, требующих прямого взаимодействия с документом.
- Python со Spire.PDF лучше подходит для автоматизированных рабочих процессов. Он позволяет программно применять текстовые и графические штампы, что делает его идеальным для пакетной обработки или интеграции проставления штампов в существующие системы.
Оба подхода поддерживают общие потребности в проставлении штампов, включая метки статуса и графические знаки, такие как логотипы или печати. Выбирая метод, который соответствует вашему рабочему процессу, вы можете сделать проставление штампов в PDF эффективным, последовательным и простым в управлении.
Часто задаваемые вопросы
В1. В чем разница между добавлением текста или изображений и добавлением аннотации штампа?
Текст или изображения обычно добавляются как фиксированное содержимое страницы. Аннотации штампов — это интерактивные элементы, которые можно перемещать, изменять их размер и управлять ими в редакторах PDF, таких как Adobe Acrobat.
В2. Почему штампы из некоторых PDF-инструментов не редактируются в Adobe Acrobat?
Многие инструменты «сплющивают» содержимое на странице вместо создания аннотаций. «Сплющенное» содержимое становится статичным и не может быть перемещено или повторно использовано как штамп.
В3. Можно ли редактировать штампы, добавленные с помощью Python, в Adobe Acrobat позже?
Да. Когда аннотация штампа создается программно, она ведет себя так же, как и добавленная в Acrobat, и остается полностью редактируемой.
В4. Когда следует использовать программное проставление штампов вместо PDF-редактора?
Используйте программное проставление штампов для автоматизации, пакетной обработки или динамического содержимого. PDF-редакторы лучше подходят для быстрых ручных правок.
Вам также может быть интересно
Quick PDF Parsing in Java: Text, Tables, Images & Metadata
PDF parsing in Java is commonly required when applications need to extract usable information from PDF files, rather than simply render them for display. Typical use cases include document indexing, automated report processing, invoice analysis, and data ingestion pipelines.
Unlike structured formats such as JSON or XML, PDFs are designed for visual fidelity. Text, tables, images, and other elements are stored as positioned drawing instructions instead of logical data structures. As a result, effective PDF parsing in Java depends on understanding how content is represented internally and how Java-based libraries expose that content through their APIs.
This article focuses on practical PDF parsing operations in real Java applications using Spire.PDF for Java, with each section covering a specific extraction task—text, tables, images, or metadata—rather than presenting PDF parsing as a single linear workflow.
Table of Contents
- Understanding PDF Parsing from an Implementation Perspective
- A Practical PDF Parsing Workflow in Java
- Loading and Validating PDF Documents in Java
- Parsing Text from PDF Pages Using Java
- Parsing Tables from PDF Pages Using Java
- Parsing Images from PDF Pages Using Java
- Parsing PDF Metadata Using Java
- Implementation Considerations for PDF Parsing in Java
- Frequently Asked Questions
Understanding PDF Parsing from an Implementation Perspective
From an implementation perspective, PDF parsing in Java is not a single operation, but a set of extraction tasks applied to the same document, depending on the type of data the application needs to obtain.
In real systems, PDF parsing is typically used to retrieve:
- Plain text content for indexing, search, or analysis
- Structured data such as tables for further processing or storage
- Embedded resources such as images for archiving or downstream processing
- Document metadata for classification, auditing, or version tracking
The complexity of PDF parsing comes from the way PDF files store content. Unlike structured document formats, PDFs do not preserve logical elements such as paragraphs, rows, or tables. Instead, most content is represented as:
- Page-level content streams
- Text fragments positioned using coordinates
- Graphical elements (images, lines, spacing, borders) that visually imply structure
As a result, Java-based PDF parsing focuses on reconstructing meaning from layout information, rather than reading predefined data structures. This is why practical Java implementations rely on a dedicated PDF parsing library that exposes low-level page content while also providing higher-level utilities—such as text extraction and table detection—to reduce the amount of custom logic required.
A Practical PDF Parsing Workflow in Java
In production environments, PDF parsing is best designed as a set of independent parsing operations that can be applied selectively, rather than as a strict step-by-step pipeline. This design improves fault isolation and allows applications to apply only the parsing logic they actually need.
At this stage, we will use Spire.PDF for Java, a Java PDF library that provides APIs for text extraction, table detection, image exporting, metadata access, and more. It is suitable for backend services, batch processing jobs, and document automation systems.
Installing Spire.PDF for Java
You can download the library from the Spire.PDF for Java download page and manually include it in your project dependencies. If you are using Maven, you can also install it by adding the following dependency to your project:
<repositories>
    <repository>
        <id>com.e-iceblue</id>
        <name>e-iceblue</name>
        <url>https://repo.e-iceblue.com/nexus/content/groups/public/</url>
    </repository>
</repositories>
<dependencies>
    <dependency>
        <groupId>e-iceblue</groupId>
        <artifactId>spire.doc</artifactId>
        <version>14.6.0</version>
    </dependency>
</dependencies>
After installation, you can load and analyze PDF documents using Java code without relying on external tools.
Loading and Validating PDF Documents in Java
Before performing any parsing operation, the PDF document should be loaded and validated. This step is best treated as a standalone operation that confirms the document can be safely processed by downstream parsing logic.
import com.spire.pdf.PdfDocument;
public class loadPDF {
public static void main(String[] args) {
// Create a PdfDocument instance
PdfDocument pdf = new PdfDocument();
// Load the PDF document
pdf.loadFromFile("sample.pdf");
// Get the total number of pages
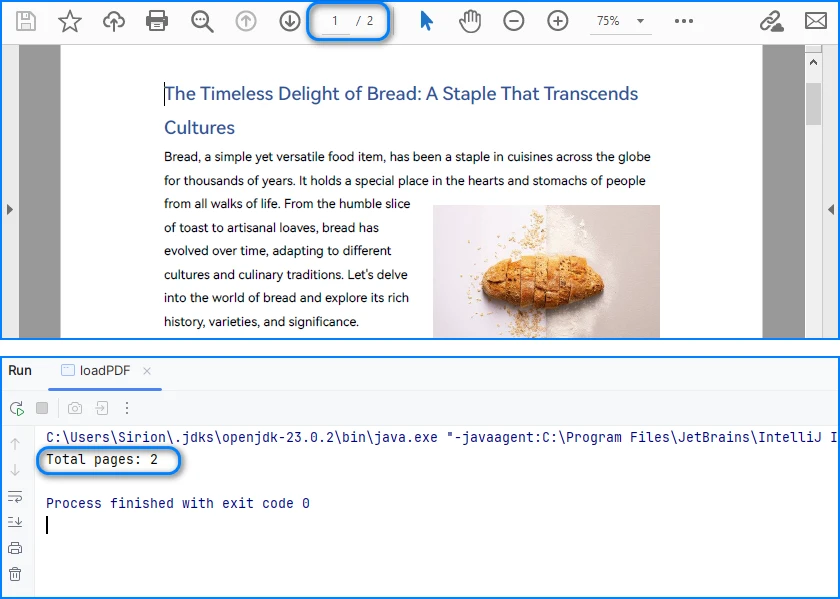
int pageCount = pdf.getPages().getCount();
System.out.println("Total pages: " + pageCount);
}
}
Console Output Preview
From an implementation perspective, successful loading and page access already verify several critical conditions:
- The file conforms to a supported PDF format
- The document structure can be parsed without fatal errors
- The page tree is present and accessible
In production systems, this validation step is often used as a gatekeeper. Documents that fail to load or expose a valid page collection can be rejected early.
Real world applications often need developers to parse PDFs in other formats, like bytes or streams. You can refer to How to Load PDF Documents from Bytes Using Java for details.
Separating document validation from extraction logic helps prevent cascading failures, especially in batch or automated parsing workflows.
Parsing Text from PDF Pages Using Java
Text parsing is one of the most common PDF processing tasks in Java and typically involves extracting and reconstructing readable text from PDF pages. When working with Spire.PDF for Java, text extraction should be implemented using the PdfTextExtractor class together with configurable extraction options, rather than relying on a single high-level API call.
Treating text parsing as an independent operation allows developers to extract and process textual content flexibly whenever it is required, such as indexing, analysis, or content migration.
How Text Parsing and Extraction Work in Java
In a typical Java implementation, text parsing is performed through a small set of clearly defined operations, each of which is reflected directly in the code:
- Load the PDF document into a PdfDocument instance
- Configure text parsing behavior using PdfTextExtractOptions
- Create a PdfTextExtractor for each page
- Parse and collect page-level text results
This page-based design maps cleanly to the underlying PDF structure and provides better control when processing multi-page documents.
Java Example: Extracting Text from PDF
The following example demonstrates how to extract text from a PDF file using PdfTextExtractor and PdfTextExtractOptions in Spire.PDF for Java.
import com.spire.pdf.PdfDocument;
import com.spire.pdf.texts.PdfTextExtractOptions;
import com.spire.pdf.texts.PdfTextExtractor;
public class extractPdfText {
public static void main(String[] args) {
// Create and load the PDF document
PdfDocument pdf = new PdfDocument();
pdf.loadFromFile("sample.pdf");
// Use StringBuilder to efficiently accumulate extracted text
StringBuilder extractedText = new StringBuilder();
// Configure text extraction options
PdfTextExtractOptions options = new PdfTextExtractOptions();
// Enable simple extraction mode for more readable text output
options.setSimpleExtraction(true);
// Iterate through each page in the PDF
for (int i = 0; i < pdf.getPages().getCount(); i++) {
// Create a PdfTextExtractor for the current page
PdfTextExtractor extractor =
new PdfTextExtractor(pdf.getPages().get(i));
// Extract text content from the current page using the options
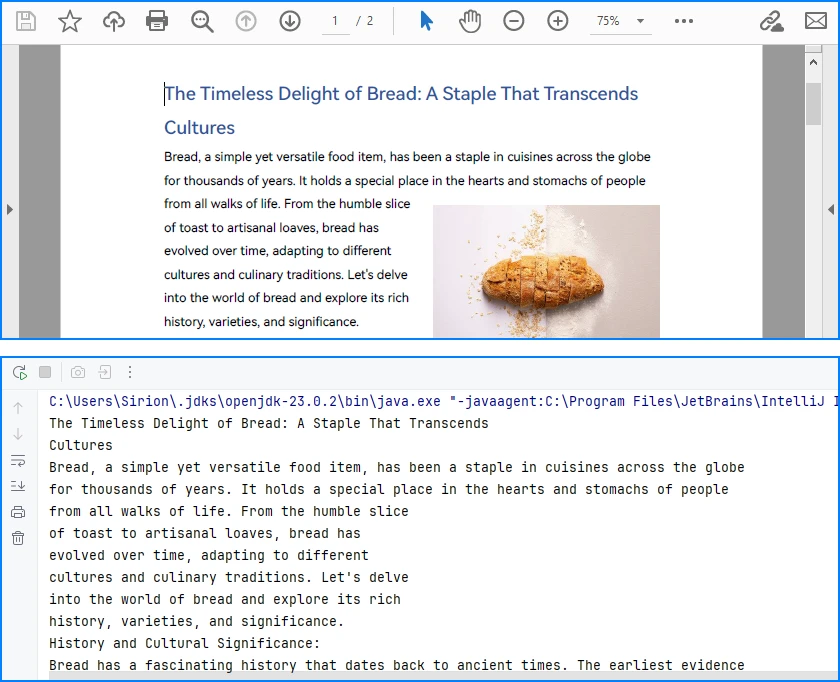
String pageText = extractor.extract(options);
// Append the extracted page text to the result buffer
extractedText.append(pageText).append("\n");
}
// At this point, extractedText contains the full textual content
// and can be stored, indexed, or further processed
System.out.println(extractedText.toString());
}
}
Console Output Preview
Explanation of Key Points in PDF Text Parsing
-
PdfTextExtractor: Operates at the page level and provides finer control over how text is reconstructed.
-
PdfTextExtractOptions: Allows you to control extraction behavior. Enabling
setSimpleExtraction(true)helps produce cleaner, more readable text by simplifying layout reconstruction. -
Page-by-page processing: Improves scalability and makes it easier to handle large PDF files or isolate problematic pages.
Technical Considerations
- Text is reconstructed from positioned glyphs rather than stored as paragraphs
- Extraction behavior can be tuned using PdfTextExtractOptions
- Page-level extraction improves fault tolerance and flexibility
- Extracted text often requires additional normalization for downstream systems
This method works well for reports, contracts, and other text-centric documents with relatively consistent layouts and is the recommended approach for parsing text from PDF pages in Java using Spire.PDF for Java. You can check out How to Extract Text from PDF Pages Using Java for more text extraction examples.
Parsing Tables from PDF Pages Using Java
Table parsing is an advanced PDF parsing operation that focuses on identifying tabular structures within PDF pages and reconstructing them into structured rows and columns. Compared to plain text parsing, table parsing preserves semantic relationships between data cells and is commonly used in scenarios such as invoices, financial statements, and operational reports.
When performing PDF parsing in Java, table parsing allows applications to transform visually aligned content into structured data that can be programmatically processed, stored, or exported.
How Table Parsing Works in Java Practice
When parsing tables, the implementation shifts from plain text extraction to structure inference based on visual alignment and layout consistency.
- Load the PDF document into a PdfDocument instance
- Create a PdfTableExtractor bound to the document
- Parse table structures from a specific page
- Reconstruct rows and columns from the parsed table model
- Validate and normalize parsed cell data for downstream use
Unlike plain text parsing, table parsing infers structure from visual alignment and layout consistency, allowing row-and-column access to data that is otherwise represented as positioned text.
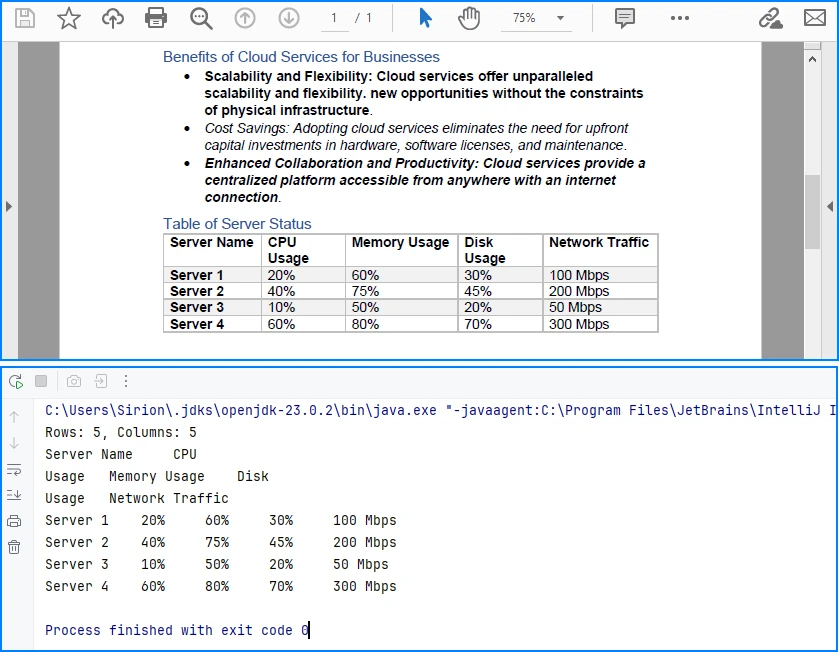
Java Example: Parsing Tables from a PDF Page
The following example demonstrates how to parse tables from a PDF page using PdfTableExtractor in Spire.PDF for Java. The extracted tables are converted into structured row-and-column data that can be further processed or exported.
import com.spire.pdf.PdfDocument;
import com.spire.pdf.utilities.PdfTable;
import com.spire.pdf.utilities.PdfTableExtractor;

public class extractPdfTable {
    public static void main(String[] args) {

        // Load the PDF document
        PdfDocument pdf = new PdfDocument();
        pdf.loadFromFile("sample1.pdf");

        // Create a table extractor bound to the document
        PdfTableExtractor extractor = new PdfTableExtractor(pdf);

        // Parse tables from the first page (page index starts at 0)
        PdfTable[] tables = extractor.extractTable(0);

        if (tables != null) {
            for (PdfTable table : tables) {

                // Retrieve parsed table structure
                int rowCount = table.getRowCount();
                int columnCount = table.getColumnCount();

                System.out.println("Rows: " + rowCount +
                        ", Columns: " + columnCount);

                // Reconstruct table cell data row by row
                StringBuilder tableData = new StringBuilder();
                for (int i = 0; i < rowCount; i++) {
                    for (int j = 0; j < columnCount; j++) {

                        // Retrieve text from each parsed table cell
                        tableData.append(table.getText(i, j));

                        if (j < columnCount - 1) {
                            tableData.append("\t");
                        }
                    }
                    if (i < rowCount - 1) {
                        tableData.append("\n");
                    }
                }

                // Parsed table data is now available for export or storage
                System.out.println(tableData.toString());
            }
        }
    }
}
Console Output Preview
Explanation of Key Implementation Details
-
PdfTableExtractor: Analyzes page-level content and detects tabular regions based on visual alignment and layout features.
-
Structure reconstruction: Rows and columns are inferred from the relative positioning of text elements, allowing cell-level access through row and column indices.
-
Page-scoped parsing: Tables are parsed on a per-page basis, which improves accuracy and makes it easier to handle layout variations across pages.
Practical Considerations When Parsing PDF Tables
- Table boundaries are inferred from visual layout, not from an explicit schema
- Header rows may require additional detection or handling logic
- Parsed cell content often needs normalization before storage or export
- Complex or inconsistent layouts may affect parsing accuracy
Despite these limitations, table parsing remains one of the most valuable PDF parsing capabilities in Java, especially for automating data extraction from structured business documents.
After parsing table structures from PDF pages, the extracted data is often exported to structured formats such as CSV for further use, as shown in Convert PDF Tables to CSV in Java.
Parsing Images from PDF Pages Using Java
Image parsing is a specialized PDF parsing capability that focuses on extracting embedded image resources from PDF pages. Unlike text or table parsing, which operates on content streams or layout inference, image parsing works by analyzing page-level resources and identifying image objects embedded within each page.
In Java-based PDF processing systems, parsing images is commonly used for archiving visual content, auditing document composition, or passing image data to downstream processing pipelines.
How Image Parsing Works in Java
At the implementation level, image parsing operates on page-level resources rather than text content streams.
- Load the PDF document into a PdfDocument instance
- Initialize a PdfImageHelper utility
- Iterate through pages and retrieve image resource information
- Parse each embedded image and export it as a standard image format
Because images are stored as independent page resources, this parsing operation does not depend on text flow, layout reconstruction, or table detection logic.
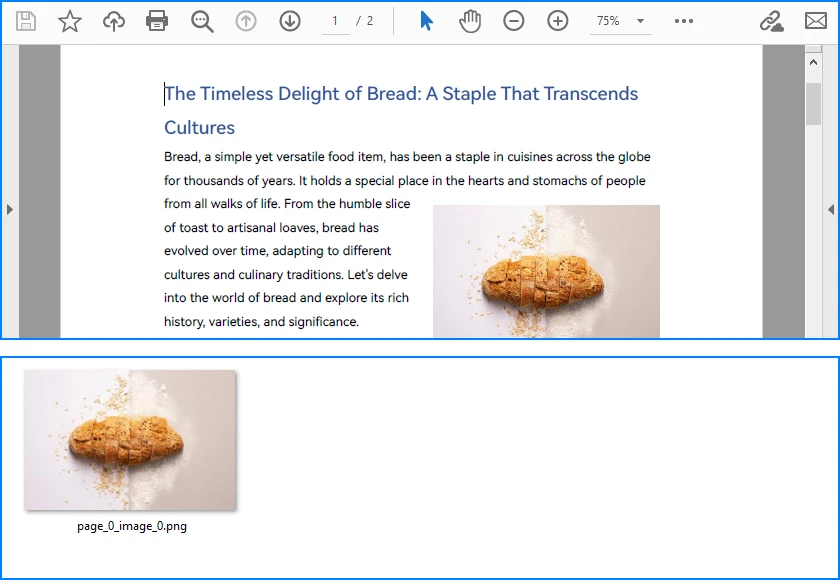
Java Example: Parsing Images from PDF Pages
The following example demonstrates how to parse images embedded in PDF pages using PdfImageHelper and PdfImageInfo in Spire.PDF for Java. Each detected image is extracted and saved as a PNG file.
import com.spire.pdf.PdfDocument;
import com.spire.pdf.utilities.PdfImageHelper;
import com.spire.pdf.utilities.PdfImageInfo;

import javax.imageio.ImageIO;
import java.awt.image.BufferedImage;
import java.io.File;
import java.io.IOException;

public class ExtractPdfImages {
    public static void main(String[] args) throws IOException {

        // Load the PDF document
        PdfDocument pdf = new PdfDocument();
        pdf.loadFromFile("sample.pdf");

        // Create a PdfImageHelper instance
        PdfImageHelper imageHelper = new PdfImageHelper();

        // Iterate through each page in the document
        for (int i = 0; i < pdf.getPages().getCount(); i++) {

            // Retrieve information of all images in the current page
            PdfImageInfo[] imageInfos = imageHelper.getImagesInfo(pdf.getPages().get(i));

            if (imageInfos != null) {
                for (int j = 0; j < imageInfos.length; j++) {

                    // Retrieve image data as BufferedImage
                    BufferedImage image = imageInfos[j].getImage();

                    // Save the parsed image to a file
                    File output = new File(
                            "output/images/page_" + i + "_image_" + j + ".png"
                    );
                    ImageIO.write(image, "PNG", output);
                }
            }
        }
    }
}
Extracted Images Preview
Explanation of Key Details in PDF Image Parsing
-
PdfImageHelper & PdfImageInfo: These classes analyze page-level resources and provide access to embedded images as BufferedImage objects.
-
Page-scoped parsing: Images are parsed on a per-page basis, ensuring accurate extraction even for multi-page PDFs with repeated or reused images.
-
Independent of layout: Parsing does not rely on text flow or table alignment, making it suitable for any visual resources embedded in the document.
Practical Considerations When Parsing PDF Images
- Parsed images may include decorative or background elements
- Image resolution, color space, and format may vary by document
- Large PDFs can contain many images, so memory and storage should be managed
- Image parsing complements text, table, and metadata parsing, completing the PDF parsing workflow in Java
Besides extracting and saving individual images, PDF pages can also be converted directly to images; see Convert PDF Pages to Images in Java for more details.
Parsing PDF Metadata Using Java
Metadata parsing is a foundational PDF parsing capability that focuses on reading document-level information stored separately from visual content. Unlike text or table parsing, metadata parsing does not depend on page layout and can be applied reliably to almost any PDF file.
In Java-based PDF processing systems, parsing metadata is often used as an initial analysis step to support document classification, routing, and indexing decisions.
How Metadata Parsing works with Java
Unlike page-level parsing tasks, metadata parsing is implemented as a document-level operation that accesses information stored outside the rendering content.
- Load the PDF document into a PdfDocument instance
- Access the document information dictionary
- Parse available metadata fields
- Use parsed metadata to support classification, routing, or indexing logic
Since metadata is stored independently of page layout and rendering instructions, this parsing operation is lightweight, fast, and highly consistent across PDF files.
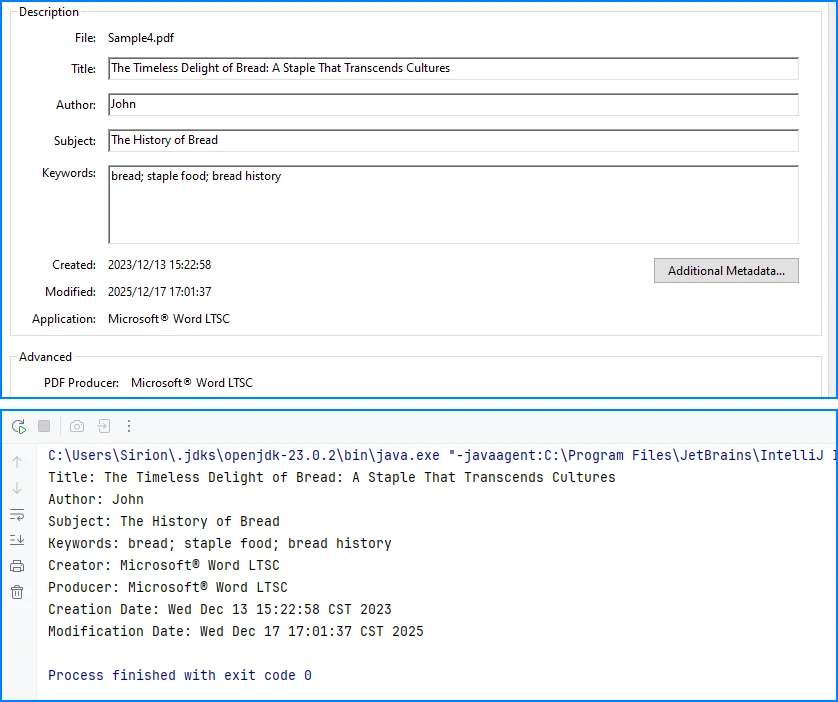
Java Example: Parsing PDF Document Metadata
The following example demonstrates how to parse common metadata fields from a PDF document using Spire.PDF for Java. These fields can be used for indexing, classification, or workflow routing.
import com.spire.pdf.PdfDocument;

public class ParsePdfMetadata {
    public static void main(String[] args) {

        // Load the PDF document
        PdfDocument pdf = new PdfDocument();
        pdf.loadFromFile("sample.pdf");

        // Parse document-level metadata
        String title = pdf.getDocumentInformation().getTitle();
        String author = pdf.getDocumentInformation().getAuthor();
        String subject = pdf.getDocumentInformation().getSubject();
        String keywords = pdf.getDocumentInformation().getKeywords();
        String creator = pdf.getDocumentInformation().getCreator();
        String producer = pdf.getDocumentInformation().getProducer();

        String creationDate = pdf.getDocumentInformation()
                .getCreationDate().toString();
        String modificationDate = pdf.getDocumentInformation()
                .getModificationDate().toString();

        // Parsed metadata can be stored, indexed, or used for routing logic
        System.out.println(
                "Title: " + title +
                "\nAuthor: " + author +
                "\nSubject: " + subject +
                "\nKeywords: " + keywords +
                "\nCreator: " + creator +
                "\nProducer: " + producer +
                "\nCreation Date: " + creationDate +
                "\nModification Date: " + modificationDate
        );
    }
}
Console Output Preview
Explanation of Key Details in PDF Metadata Parsing
-
Document information dictionary: Metadata is parsed from a dedicated structure within the PDF file and is independent of page-level rendering content.
-
Field availability: Not all PDF files contain complete metadata. Parsed values may be empty or null and should be validated before use.
-
Low parsing overhead: Metadata parsing is fast and does not require page iteration, making it suitable as a preliminary parsing step.
For accessing custom PDF properties, see the PdfDocumentInformation API reference.
Common Use Cases for Metadata Parsing
- Document classification and tagging
- Search indexing and filtering
- Workflow routing and access control
- Version tracking and audit logging
Because metadata is parsed independently from visual layout and content streams, it is generally more stable and predictable than text or table parsing in complex PDF documents.
Implementation Considerations for PDF Parsing in Java
While individual parsing operations can be implemented independently, real-world Java applications often combine multiple PDF parsing capabilities within the same processing pipeline.
Combining Multiple Parsing Operations
Common implementation patterns include:
- Parsing text for indexing while parsing tables for structured storage
- Using parsed metadata to route documents to different processing workflows
- Executing parsing operations asynchronously or in scheduled batch jobs
Treating text, table, image, and metadata parsing as independent but composable operations makes PDF processing systems easier to extend, test, and maintain.
Practical Limitations and Constraints
Even with a capable Java PDF parser, certain limitations remain unavoidable:
- Scanned PDF files require OCR before any parsing can occur
- Highly complex or inconsistent layouts can reduce parsing accuracy
- Custom fonts or encodings may affect text reconstruction
Understanding these constraints helps align parsing strategies with realistic technical expectations and reduces error handling complexity in production systems.
Conclusion
PDF parsing in Java is most effective when treated as a collection of independent, purpose-driven extraction operations rather than a single linear workflow. By focusing on text extraction, table parsing, and metadata access as separate concerns, Java applications can reliably transform PDF documents into usable data.
With the help of a dedicated Java PDF parser such as Spire.PDF for Java, developers can build maintainable, production-ready PDF processing solutions that scale with real-world requirements.
To unlock the full potential of PDF parsing in Java using Spire.PDF for Java, you can request a free trial license.
Frequently Asked Questions for PDF Parsing in Java
Q1: How can I parse text from PDF pages in Java?
A1: You can use Spire.PDF for Java with the PdfTextExtractor class and PdfTextExtractOptions to extract page-level text efficiently. This approach allows flexible text parsing for indexing, analysis, or migration.
Q2: How do I extract tables from PDF files in Java?
A2: Use PdfTableExtractor to detect tabular regions and reconstruct rows and columns. Extracted tables can be further processed, exported, or stored as structured data.
Q3: Can I parse images from PDF pages in Java?
A3: Yes. With PdfImageHelper and PdfImageInfo, you can extract embedded images from each page and save them as files. You can also convert entire PDF pages directly to images if needed.
Q4: How do I read PDF metadata in Java?
A4: Access the PdfDocumentInformation object from your PDF document to retrieve standard fields like title, author, creation date, and keywords. This is fast and independent of page content.
Q5: Are there limitations to PDF parsing in Java?
A5: Complex layouts, scanned PDFs, and custom fonts can reduce parsing accuracy. Scanned documents require OCR before text or table extraction.
Como Achatar um PDF: 5 Métodos (Adobe, Online e Python)
Quando você deseja impedir que seus PDFs sejam editados, achatar o documento costuma ser a solução mais simples e eficaz. No entanto, muitos usuários não estão familiarizados com o que um PDF achatado realmente significa ou como criar um.
Neste artigo, explicaremos o que significa achatar um PDF e mostraremos como achatar um documento PDF usando várias abordagens práticas. Isso inclui o uso do Adobe Acrobat, Google Chrome, ferramentas online e bibliotecas de programação, ajudando você a proteger seus PDFs facilmente tanto no Windows quanto no Mac.
- O Que Significa Achatar um PDF
- Como Achatar um PDF no Adobe Acrobat
- Como Achatar um PDF Sem o Acrobat
- Achatar um PDF Programaticamente Usando o Free Spire.PDF
- Como Achatar um Documento PDF no Mac
- Perguntas Frequentes Sobre Como Achatar um PDF
O Que Significa Achatar um PDF (e Por Que Você Pode Precisar Disso)
Antes de mergulhar em ferramentas específicas, vale a pena esclarecer o que "achatar" realmente significa no contexto de arquivos PDF e por que isso é importante nos fluxos de trabalho diários.
Achatar um PDF significa converter elementos interativos — como texto, anotações ou imagens — em conteúdo de página estático. O documento mantém a mesma aparência visual, mas os usuários não podem mais digitar em novos parágrafos, marcar caixas de seleção ou modificar anotações. Em outras palavras, achatar transforma um PDF de trabalho ou rascunho em uma versão final e não editável.
Isso é especialmente útil quando você precisa enviar o relatório final, compartilhar contratos, emitir faturas ou arquivar documentos. O achatamento ajuda a evitar edições não intencionais e garante que o PDF seja exibido de forma consistente em todos os dispositivos e visualizadores. Também é importante notar que achatar é diferente de proteger PDFs com uma senha, pois a proteção por senha controla principalmente quem pode abrir ou editar o arquivo, mas não remove permanentemente a capacidade de modificar o conteúdo do PDF.
Como Achatar um PDF no Adobe Acrobat
O Adobe Acrobat é frequentemente a primeira ferramenta em que as pessoas pensam ao lidar com tarefas avançadas de PDF. Como ele suporta totalmente o padrão PDF, oferece maneiras confiáveis de achatar documentos que contêm formulários, comentários ou outros elementos interativos.
O Adobe Acrobat permite que você achate um arquivo PDF recriando o documento por meio do recurso de impressão. A abordagem produz um arquivo PDF estático que tem a mesma aparência do original, mas não pode ser editado.
- Abra o arquivo PDF no Adobe Acrobat.
- Use a ferramenta Produção de Impressão para achatar campos de formulário e anotações, ou vá para Arquivo → Imprimir e selecione “Adobe PDF” como a impressora para recriar o documento como um PDF achatado.
- Salve o arquivo resultante como um novo PDF achatado.
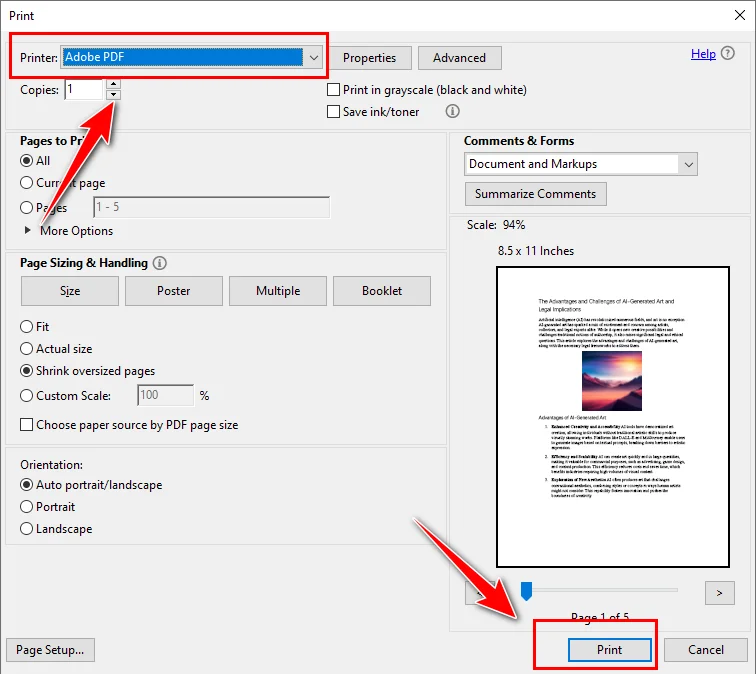
O Adobe Acrobat é uma escolha forte se você trabalha frequentemente com PDFs e prefere uma interface visual baseada em desktop. No entanto, requer uma licença paga e não foi projetado para processamento automatizado ou em grande escala.
Como Achatar um PDF Sem o Acrobat
Nem todo mundo tem acesso ao Adobe Acrobat, e muitos usuários procuram maneiras de achatar um PDF sem instalar software pago. Nesses casos, métodos alternativos ainda podem fazer o trabalho, embora possam envolver alguns compromissos.
Como Achatar um PDF Usando o Google Chrome
O Google Chrome oferece uma maneira simples e confiável de achatar um documento PDF sem instalar software adicional. Ao abrir um PDF no Chrome e imprimi-lo em um novo arquivo PDF, ele será transformado em um documento estático.
Aqui estão as etapas detalhadas para achatar um PDF com o Chrome:
- Abra o arquivo PDF no Google Chrome.
- Pressione Ctrl + P (ou Cmd + P no Mac) para abrir a caixa de diálogo de impressão.
- Selecione Salvar como PDF como a impressora de destino.
- Clique em Salvar para gerar um arquivo PDF achatado.
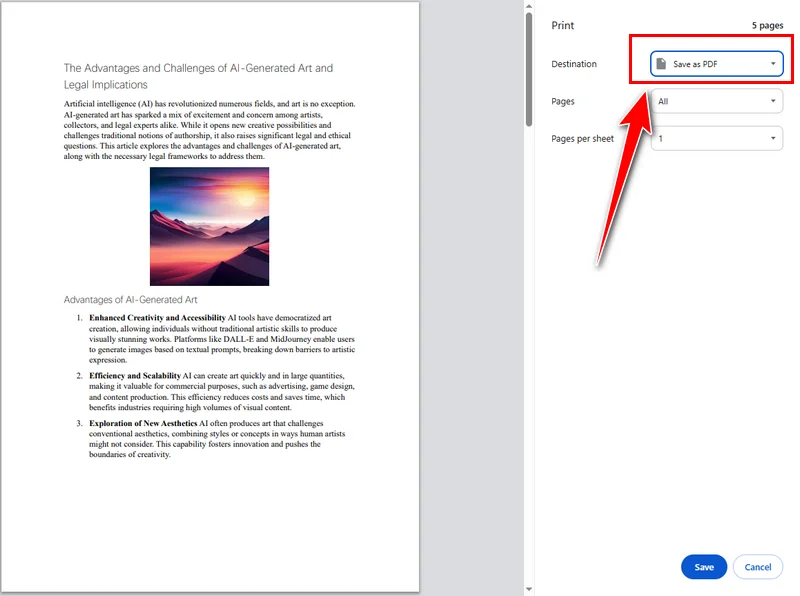
Este método é gratuito e funciona tanto no Windows quanto no Mac. No entanto, oferece controle limitado sobre o processamento de PDF, e o Google Chrome depende de um ambiente baseado em navegador, o que o torna menos adequado para fluxos de trabalho offline ou controlados.
Como Achatar um PDF com Ferramentas Online Gratuitas
As ferramentas de PDF online são populares porque são executadas diretamente no navegador e não requerem instalação. Serviços como Smallpdf e Sejda PDF permitem que os usuários achatem um arquivo PDF rapidamente, tornando-os uma escolha comum para tarefas ocasionais e de curto prazo.
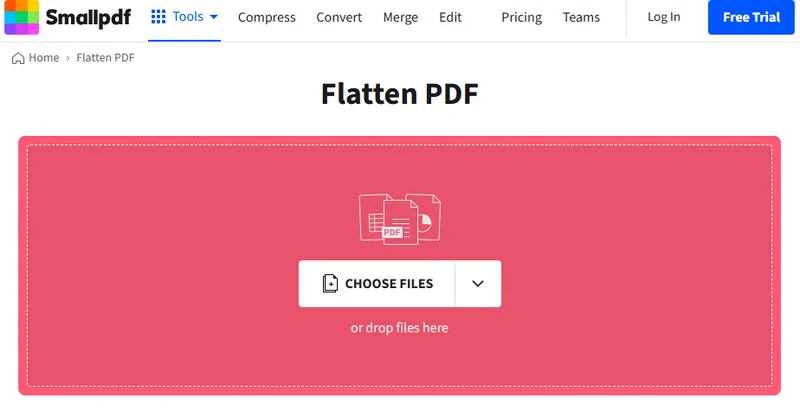
Essas ferramentas geralmente seguem um fluxo de trabalho simples, baseado em navegador. Usando o Smallpdf como exemplo, o processo normalmente funciona da seguinte maneira:
- Navegue até o site da ferramenta online.
- Carregue o arquivo PDF que você deseja achatar, após o qual a ferramenta o processa automaticamente.
- Baixe o arquivo PDF achatado e salve-o em seu dispositivo local.
Essas ferramentas são úteis se você precisar achatar um PDF gratuitamente e o documento não contiver informações confidenciais. Dito isso, elas geralmente vêm com limitações, como tamanho de arquivo e restrições de uso. Para documentos profissionais ou confidenciais, esses fatores devem ser levados em consideração.
Como Achatar um PDF Programaticamente Usando o Free Spire.PDF
Para desenvolvedores que trabalham com sistemas automatizados, o achatamento de PDF costuma fazer parte de um fluxo de trabalho maior, em vez de uma tarefa única. Nesses casos, o Free Spire.PDF for Python permite que você achate um documento PDF achatando seus campos de formulário interativos por meio de código, garantindo que a saída final não seja editável, preservando a aparência original.
A ideia geral é simples: carregar o PDF, habilitar o achatamento do formulário e salvar o resultado. Uma vez que os campos do formulário são achatados, todos os dados inseridos pelo usuário são renderizados diretamente na página e o documento se torna um PDF estático.
from spire.pdf.common import *
from spire.pdf import *

# Specify the input and output PDF file paths
input_file = "Form.pdf"
output_file = "FlattenAll.pdf"

# Create an object of the PdfDocument class
doc = PdfDocument()
# Load a PDF file
doc.LoadFromFile(input_file)

# Flatten all forms in the PDF file
doc.Form.IsFlatten = True

# Save the result file
doc.SaveToFile(output_file)
doc.Close()
Essa abordagem é particularmente útil quando o achatamento precisa ser integrado a sistemas automatizados, ao processar arquivos em lotes ou ao lidar com grandes documentos PDF.
Como Achatar um Documento PDF no Mac
No macOS, além do Chrome e das ferramentas online, você também pode achatar um PDF usando o Preview. Como um aplicativo integrado, o Preview permite que você achate PDFs diretamente no Mac sem instalar nenhum software de terceiros, tornando-o uma opção conveniente e direta para tarefas rápidas, seguras e offline.
Veja como funciona:
- Abra o arquivo PDF no Preview.
- Escolha Imprimir e salve a saída como um novo arquivo PDF.
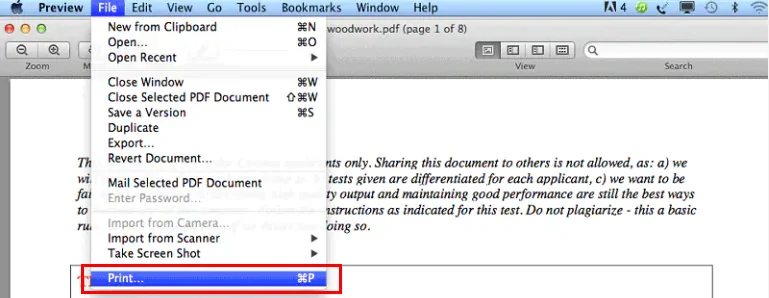
Este método funciona bem para projetos pequenos. No entanto, se você precisar de operações de PDF mais avançadas além do achatamento, como tornar um PDF somente leitura, editar campos de formulário ou manusear documentos programaticamente, o Adobe Acrobat ou o Free Spire.PDF seriam uma escolha melhor.
Perguntas Frequentes Sobre Como Achatar um PDF
P1: Como eu achato um arquivo PDF?
Você pode achatar um arquivo PDF usando o Adobe Acrobat, Google Chrome, ferramentas de PDF online ou programaticamente com bibliotecas como o Free Spire.PDF.
P2: Qual é o atalho para achatar um PDF?
Em geral, no Adobe Acrobat, você pode usar Ctrl + P para achatar um PDF imprimindo-o, enquanto outras ferramentas podem depender de diferentes combinações de atalhos.
P3: Comprimir um PDF é o mesmo que achatá-lo?
Não. Comprimir um PDF reduz o tamanho do arquivo, enquanto achatar remove elementos interativos e torna o documento não editável.
Conclusão
Não existe um método único que seja o melhor para todas as situações. O Adobe Acrobat é adequado para fluxos de trabalho manuais baseados em desktop. O Google Chrome e as ferramentas online funcionam para tarefas rápidas e ocasionais. Para o processamento automatizado de documentos, o Free Spire.PDF oferece a maior flexibilidade e controle.
Ao entender como cada método funciona, você pode achatar um documento PDF de forma eficiente com base em suas próprias necessidades.
Leia Também
PDF 평면화 방법: 5가지 방법 (Adobe, 온라인 및 Python)
PDF 편집을 방지하고 싶을 때 문서를 병합하는 것이 가장 간단하고 효과적인 해결책인 경우가 많습니다. 하지만 많은 사용자들이 병합된 PDF가 실제로 무엇을 의미하는지, 어떻게 만드는지에 대해 잘 모릅니다.
이 기사에서는 PDF 병합이 무엇을 의미하는지 설명하고 Adobe Acrobat, Google Chrome, 온라인 도구 및 프로그래밍 라이브러리를 사용하는 등 여러 가지 실용적인 접근 방식을 사용하여 PDF 문서를 병합하는 방법을 보여드리겠습니다. 이를 통해 Windows와 Mac 모두에서 PDF를 쉽게 보호할 수 있습니다.
- PDF 병합이란 무엇을 의미하나요
- Adobe Acrobat에서 PDF를 병합하는 방법
- Acrobat 없이 PDF를 병합하는 방법
- Free Spire.PDF를 사용하여 프로그래밍 방식으로 PDF 병합
- Mac에서 PDF 문서를 병합하는 방법
- PDF 병합에 대한 자주 묻는 질문
PDF 병합이란 무엇을 의미하며 왜 필요한가요
특정 도구에 대해 알아보기 전에 PDF 파일의 맥락에서 "병합"이 실제로 무엇을 의미하는지, 그리고 일상적인 워크플로우에서 왜 중요한지 명확히 할 가치가 있습니다.
PDF를 병합한다는 것은 텍스트, 주석 또는 이미지와 같은 대화형 요소를 정적 페이지 콘텐츠로 변환하는 것을 의미합니다. 문서는 동일한 시각적 모양을 유지하지만 사용자는 더 이상 새 단락에 입력하거나 확인란을 선택하거나 주석을 수정할 수 없습니다. 즉, 병합은 작업 중이거나 초안인 PDF를 최종적이고 편집 불가능한 버전으로 바꿉니다.
이는 최종 보고서를 제출하거나, 계약서를 공유하거나, 송장을 발행하거나, 문서를 보관해야 할 때 특히 유용합니다. 병합은 의도하지 않은 편집을 방지하고 PDF가 여러 장치와 뷰어에서 일관되게 표시되도록 합니다. 또한 병합은 암호로 PDF를 보호하는 것과는 다르다는 점에 유의해야 합니다. 암호 보호는 주로 파일을 열거나 편집할 수 있는 사람을 제어하지만 PDF 콘텐츠를 수정하는 기능을 영구적으로 제거하지는 않습니다.
Adobe Acrobat에서 PDF를 병합하는 방법
Adobe Acrobat은 고급 PDF 작업을 처리할 때 사람들이 가장 먼저 떠올리는 도구인 경우가 많습니다. PDF 표준을 완벽하게 지원하므로 양식, 주석 또는 기타 대화형 요소가 포함된 문서를 안정적으로 병합할 수 있는 방법을 제공합니다.
Adobe Acrobat을 사용하면 인쇄 기능을 통해 문서를 다시 만들어 PDF 파일을 병합할 수 있습니다. 이 접근 방식은 원본과 동일하게 보이지만 편집할 수 없는 정적 PDF 파일을 생성합니다.
- Adobe Acrobat에서 PDF 파일을 엽니다.
- 인쇄물 제작 도구를 사용하여 양식 필드와 주석을 병합하거나, 파일 → 인쇄로 이동하여 프린터로 “Adobe PDF”를 선택하여 문서를 병합된 PDF로 다시 만듭니다.
- 결과 파일을 새 병합된 PDF로 저장합니다.
PDF로 자주 작업하고 데스크톱 기반의 시각적 인터페이스를 선호한다면 Adobe Acrobat은 강력한 선택입니다. 그러나 유료 라이선스가 필요하며 자동화되거나 대규모 처리용으로 설계되지 않았습니다.
Acrobat 없이 PDF를 병합하는 방법
모든 사람이 Adobe Acrobat에 액세스할 수 있는 것은 아니며, 많은 사용자가 유료 소프트웨어를 설치하지 않고 PDF를 병합하는 방법을 찾습니다. 이러한 경우 대체 방법으로도 작업을 완료할 수 있지만 몇 가지 절충안이 포함될 수 있습니다.
Google Chrome을 사용하여 PDF를 병합하는 방법
Google Chrome은 추가 소프트웨어를 설치하지 않고도 PDF 문서를 병합할 수 있는 간단하고 안정적인 방법을 제공합니다. Chrome에서 PDF를 열고 새 PDF 파일로 인쇄하면 정적 문서로 변경됩니다.
다음은 Chrome으로 PDF를 병합하는 자세한 단계입니다.
- Google Chrome에서 PDF 파일을 엽니다.
- Ctrl + P(Mac에서는 Cmd + P)를 눌러 인쇄 대화 상자를 엽니다.
- 대상 프린터로 PDF로 저장을 선택합니다.
- 저장을 클릭하여 병합된 PDF 파일을 생성합니다.
이 방법은 무료이며 Windows와 Mac 모두에서 작동합니다. 그러나 PDF 처리에 대한 제어가 제한적이며 Google Chrome은 브라우저 기반 환경에 의존하므로 오프라인 또는 제어된 워크플로우에는 적합하지 않습니다.
온라인 도구를 사용하여 무료로 PDF를 병합하는 방법
온라인 PDF 도구는 브라우저에서 직접 실행되고 설치가 필요 없기 때문에 인기가 있습니다. Smallpdf 및 Sejda PDF와 같은 서비스를 사용하면 사용자가 PDF 파일을 신속하게 병합할 수 있으므로 가끔씩 단기적인 작업을 위한 일반적인 선택이 됩니다.
이러한 도구는 일반적으로 간단한 브라우저 기반 워크플로우를 따릅니다. Smallpdf를 예로 들면 프로세스는 일반적으로 다음과 같이 작동합니다.
- 온라인 도구의 웹사이트로 이동합니다.
- 병합하려는 PDF 파일을 업로드하면 도구가 자동으로 처리합니다.
- 병합된 PDF 파일을 다운로드하여 로컬 장치에 저장합니다.
이러한 도구는 PDF를 무료로 병합해야 하고 문서에 민감한 정보가 포함되어 있지 않은 경우에 유용합니다. 즉, 파일 크기 및 사용 제한과 같은 제한이 있는 경우가 많습니다. 전문적이거나 기밀인 문서의 경우 이러한 요소를 고려해야 합니다.
Free Spire.PDF를 사용하여 프로그래밍 방식으로 PDF 병합하는 방법
자동화된 시스템으로 작업하는 개발자의 경우 PDF 병합은 일회성 작업이 아니라 더 큰 워크플로우의 일부인 경우가 많습니다. 이러한 경우 Free Spire.PDF for Python을 사용하면 코드를 통해 대화형 양식 필드를 병합하여 PDF 문서를 병합할 수 있으므로 원본 모양을 유지하면서 최종 출력을 편집할 수 없도록 할 수 있습니다.
일반적인 아이디어는 간단합니다. PDF를 로드하고, 양식 병합을 활성화하고, 결과를 저장합니다. 양식 필드가 병합되면 모든 사용자 입력 데이터가 페이지에 직접 렌더링되고 문서는 정적 PDF가 됩니다.
from spire.pdf.common import *
from spire.pdf import *

# Specify the input and output PDF file paths
input_file = "Form.pdf"
output_file = "FlattenAll.pdf"

# Create an object of the PdfDocument class
doc = PdfDocument()
# Load a PDF file
doc.LoadFromFile(input_file)

# Flatten all forms in the PDF file
doc.Form.IsFlatten = True

# Save the result file
doc.SaveToFile(output_file)
doc.Close()
이 접근 방식은 병합을 자동화된 시스템에 통합해야 하거나, 파일을 일괄 처리하거나, 대용량 PDF 문서를 처리할 때 특히 유용합니다.
Mac에서 PDF 문서를 병합하는 방법
macOS에서는 Chrome 및 온라인 도구 외에도 미리보기를 사용하여 PDF를 병합할 수도 있습니다. 내장 응용 프로그램인 미리보기를 사용하면 타사 소프트웨어를 설치하지 않고도 Mac에서 직접 PDF를 병합할 수 있으므로 빠르고 안전하며 오프라인 작업을 위한 편리하고 간단한 옵션입니다.
작동 방식은 다음과 같습니다.
- 미리보기에서 PDF 파일을 엽니다.
- 인쇄를 선택하고 출력을 새 PDF 파일로 저장합니다.
이 방법은 소규모 프로젝트에 적합합니다. 그러나 PDF를 읽기 전용으로 만들거나, 양식 필드를 편집하거나, 프로그래밍 방식으로 문서를 처리하는 등 병합 이상의 고급 PDF 작업이 필요한 경우 Adobe Acrobat 또는 Free Spire.PDF가 더 나은 선택이 될 것입니다.
PDF 병합에 대한 자주 묻는 질문
Q1: PDF 파일을 어떻게 병합하나요?
Adobe Acrobat, Google Chrome, 온라인 PDF 도구를 사용하거나 Free Spire.PDF와 같은 라이브러리를 사용하여 프로그래밍 방식으로 PDF 파일을 병합할 수 있습니다.
Q2: PDF 병합 단축키는 무엇인가요?
일반적으로 Adobe Acrobat에서는 Ctrl + P를 사용하여 인쇄하여 PDF를 병합할 수 있으며 다른 도구는 다른 바로 가기 조합에 의존할 수 있습니다.
Q3: PDF를 압축하는 것이 병합하는 것과 같나요?
아니요. PDF를 압축하면 파일 크기가 줄어들고, 병합하면 대화형 요소가 제거되고 문서를 편집할 수 없게 됩니다.
결론
모든 상황에 맞는 단일 최상의 방법은 없습니다. Adobe Acrobat은 수동, 데스크톱 기반 워크플로우에 적합합니다. Google Chrome 및 온라인 도구는 빠르고 가끔씩 수행하는 작업에 적합합니다. 자동화된 문서 처리의 경우 Free Spire.PDF가 가장 뛰어난 유연성과 제어 기능을 제공합니다.
각 방법의 작동 방식을 이해하면 자신의 필요에 따라 PDF 문서를 효율적으로 병합할 수 있습니다.
함께 읽기
Come appiattire un PDF: 5 metodi (Adobe, online e Python)
Quando si desidera impedire la modifica dei PDF, l'appiattimento del documento è spesso la soluzione più semplice ed efficace. Tuttavia, molti utenti non hanno familiarità con il significato di un PDF appiattito o con come crearne uno.
In questo articolo, spiegheremo cosa significa appiattire un PDF e ti mostreremo come appiattire un documento PDF utilizzando diversi approcci pratici. Questi includono l'uso di Adobe Acrobat, Google Chrome, strumenti online e librerie di programmazione, aiutandoti a proteggere facilmente i tuoi PDF sia su Windows che su Mac.
- Cosa significa appiattire un PDF
- Come appiattire un PDF in Adobe Acrobat
- Come appiattire un PDF senza Acrobat
- Appiattire un PDF programmaticamente utilizzando Free Spire.PDF
- Come appiattire un documento PDF su Mac
- Domande frequenti sull'appiattimento di un PDF
Cosa significa appiattire un PDF (e perché potresti averne bisogno)
Prima di immergersi in strumenti specifici, vale la pena chiarire cosa significa effettivamente "appiattire" nel contesto dei file PDF e perché è importante nei flussi di lavoro quotidiani.
Appiattire un PDF significa convertire elementi interattivi, come testo, annotazioni o immagini, in contenuto di pagina statico. Il documento mantiene lo stesso aspetto visivo, ma gli utenti non possono più digitare nuovi paragrafi, attivare caselle di controllo o modificare annotazioni. In altre parole, l'appiattimento trasforma un PDF di lavoro o una bozza in una versione finale e non modificabile.
Questo è particolarmente utile quando è necessario inviare il rapporto finale, condividere contratti, emettere fatture o archiviare documenti. L'appiattimento aiuta a prevenire modifiche involontarie e garantisce che il PDF venga visualizzato in modo coerente su tutti i dispositivi e visualizzatori. È anche importante notare che l'appiattimento è diverso dalla protezione dei PDF con una password, poiché la protezione con password controlla principalmente chi può aprire o modificare il file, ma non rimuove permanentemente la possibilità di modificare il contenuto del PDF.
Come appiattire un PDF in Adobe Acrobat
Adobe Acrobat è spesso il primo strumento a cui le persone pensano quando si occupano di attività PDF avanzate. Poiché supporta pienamente lo standard PDF, offre modi affidabili per appiattire documenti che contengono moduli, commenti o altri elementi interattivi.
Adobe Acrobat consente di appiattire un file PDF ricreando il documento tramite la funzione di stampa. L'approccio produce un file PDF statico che ha lo stesso aspetto dell'originale ma non può essere modificato.
- Apri il file PDF in Adobe Acrobat.
- Utilizza lo strumento Produzione di stampe per appiattire i campi modulo e le annotazioni, oppure vai su File → Stampa e seleziona "Adobe PDF" come stampante per ricreare il documento come PDF appiattito.
- Salva il file risultante come un nuovo PDF appiattito.
Adobe Acrobat è una scelta valida se lavori spesso con i PDF e preferisci un'interfaccia visiva basata su desktop. Tuttavia, richiede una licenza a pagamento e non è progettato per l'elaborazione automatizzata o su larga scala.
Come appiattire un PDF senza Acrobat
Non tutti hanno accesso ad Adobe Acrobat e molti utenti cercano modi per appiattire un PDF senza installare software a pagamento. In questi casi, metodi alternativi possono comunque portare a termine il lavoro, anche se possono comportare alcuni compromessi.
Come appiattire un PDF utilizzando Google Chrome
Google Chrome offre un modo semplice e affidabile per appiattire un documento PDF senza installare software aggiuntivo. Aprendo un PDF in Chrome e stampandolo su un nuovo file PDF, verrà trasformato in un documento statico.
Ecco i passaggi dettagliati per appiattire un PDF con Chrome:
- Apri il file PDF in Google Chrome.
- Premi Ctrl + P (o Cmd + P su Mac) per aprire la finestra di dialogo di stampa.
- Seleziona Salva come PDF come stampante di destinazione.
- Fai clic su Salva per generare un file PDF appiattito.
Questo metodo è gratuito e funziona sia su Windows che su Mac. Tuttavia, offre un controllo limitato sull'elaborazione dei PDF e Google Chrome si basa su un ambiente basato su browser, il che lo rende meno adatto per flussi di lavoro offline o controllati.
Come appiattire un PDF con strumenti online gratuiti
Gli strumenti PDF online sono popolari perché vengono eseguiti direttamente nel browser e non richiedono installazione. Servizi come Smallpdf e Sejda PDF consentono agli utenti di appiattire rapidamente un file PDF, rendendoli una scelta comune per attività occasionali e a breve termine.
Questi strumenti seguono generalmente un semplice flusso di lavoro basato su browser. Utilizzando Smallpdf come esempio, il processo funziona in genere come segue:
- Vai al sito web dello strumento online.
- Carica il file PDF che desideri appiattire, dopodiché lo strumento lo elabora automaticamente.
- Scarica il file PDF appiattito e salvalo sul tuo dispositivo locale.
Questi strumenti sono utili se è necessario appiattire un PDF gratuitamente e il documento non contiene informazioni sensibili. Detto questo, spesso presentano limitazioni come le dimensioni del file e le restrizioni di utilizzo. Per i documenti professionali o riservati, questi fattori dovrebbero essere presi in considerazione.
Come appiattire un PDF programmaticamente utilizzando Free Spire.PDF
Per gli sviluppatori che lavorano con sistemi automatizzati, l'appiattimento dei PDF è spesso parte di un flusso di lavoro più ampio piuttosto che un'attività una tantum. In tali casi, Free Spire.PDF for Python consente di appiattire un documento PDF appiattendo i suoi campi modulo interattivi tramite codice, garantendo che l'output finale non sia modificabile preservando l'aspetto originale.
L'idea generale è semplice: carica il PDF, abilita l'appiattimento del modulo e salva il risultato. Una volta appiattiti i campi del modulo, tutti i dati inseriti dall'utente vengono resi direttamente sulla pagina e il documento diventa un PDF statico.
from spire.pdf.common import *
from spire.pdf import *

# Specify the input and output PDF file paths
input_file = "Form.pdf"
output_file = "FlattenAll.pdf"

# Create an object of the PdfDocument class
doc = PdfDocument()
# Load a PDF file
doc.LoadFromFile(input_file)

# Flatten all forms in the PDF file
doc.Form.IsFlatten = True

# Save the result file
doc.SaveToFile(output_file)
doc.Close()
Questo approccio è particolarmente utile quando l'appiattimento deve essere integrato in sistemi automatizzati, durante l'elaborazione di file in batch o durante la gestione di documenti PDF di grandi dimensioni.
Come appiattire un documento PDF su Mac
Su macOS, oltre a Chrome e agli strumenti online, puoi anche appiattire un PDF utilizzando Anteprima. Essendo un'applicazione integrata, Anteprima ti consente di appiattire i PDF direttamente su Mac senza installare alcun software di terze parti, rendendola un'opzione comoda e semplice per attività rapide, sicure e offline.
Ecco come funziona:
- Apri il file PDF in Anteprima.
- Scegli Stampa e salva l'output come un nuovo file PDF.
Questo metodo funziona bene per piccoli progetti. Tuttavia, se hai bisogno di operazioni PDF più avanzate oltre all'appiattimento, come rendere un PDF di sola lettura, modificare i campi del modulo o gestire i documenti a livello di codice, Adobe Acrobat o Free Spire.PDF sarebbero una scelta migliore.
Domande frequenti sull'appiattimento di un PDF
D1: Come si appiattisce un file PDF?
È possibile appiattire un file PDF utilizzando Adobe Acrobat, Google Chrome, strumenti PDF online o a livello di codice con librerie come Free Spire.PDF.
D2: Qual è la scorciatoia per appiattire un PDF?
In generale, in Adobe Acrobat, è spesso possibile utilizzare Ctrl + P per appiattire un PDF stampandolo, mentre altri strumenti possono basarsi su diverse combinazioni di scorciatoie.
D3: Comprimere un PDF è la stessa cosa che appiattirlo?
No. La compressione di un PDF ne riduce le dimensioni, mentre l'appiattimento rimuove gli elementi interattivi e rende il documento non modificabile.
Conclusione
Non esiste un unico metodo migliore per ogni situazione. Adobe Acrobat è adatto per flussi di lavoro manuali basati su desktop. Google Chrome e gli strumenti online funzionano per attività rapide e occasionali. Per l'elaborazione automatizzata dei documenti, Free Spire.PDF offre la massima flessibilità e controllo.
Comprendendo come funziona ogni metodo, puoi appiattire un documento PDF in modo efficiente in base alle tue esigenze.
Leggi anche
Comment aplatir un PDF : 5 méthodes (Adobe, en ligne et Python)
Table des matières
Lorsque vous souhaitez empêcher la modification de vos PDF, l'aplatissement du document est souvent la solution la plus simple et la plus efficace. Cependant, de nombreux utilisateurs ne savent pas ce que signifie réellement un PDF aplati ni comment en créer un.
Dans cet article, nous expliquerons ce que signifie aplatir un PDF et vous montrerons comment aplatir un document PDF en utilisant plusieurs approches pratiques. Celles-ci incluent l'utilisation d'Adobe Acrobat, de Google Chrome, d'outils en ligne et de bibliothèques de programmation, vous aidant à sécuriser facilement vos PDF sur Windows et Mac.
- Que signifie aplatir un PDF
- Comment aplatir un PDF dans Adobe Acrobat
- Comment aplatir un PDF sans Acrobat
- Aplatir un PDF par programmation avec Free Spire.PDF
- Comment aplatir un document PDF sur Mac
- FAQ sur l'aplatissement d'un PDF
Que signifie aplatir un PDF (et pourquoi vous pourriez en avoir besoin)
Avant de nous plonger dans des outils spécifiques, il convient de clarifier ce que signifie réellement « aplatir » dans le contexte des fichiers PDF et pourquoi c'est important dans les flux de travail quotidiens.
Aplatir un PDF signifie convertir des éléments interactifs — tels que du texte, des annotations ou des images — en contenu de page statique. Le document conserve la même apparence visuelle, mais les utilisateurs ne peuvent plus taper de nouveaux paragraphes, cocher des cases ou modifier des annotations. En d'autres termes, l'aplatissement transforme un PDF de travail ou de brouillon en une version finale non modifiable.
Ceci est particulièrement utile lorsque vous devez soumettre le rapport final, partager des contrats, émettre des factures ou archiver des documents. L'aplatissement aide à prévenir les modifications involontaires et garantit que le PDF s'affiche de manière cohérente sur tous les appareils et visionneuses. Il est également important de noter que l'aplatissement est différent de la protection des PDF par un mot de passe, car la protection par mot de passe contrôle principalement qui peut ouvrir ou modifier le fichier, mais elle ne supprime pas de manière permanente la possibilité de modifier le contenu du PDF.
Comment aplatir un PDF dans Adobe Acrobat
Adobe Acrobat est souvent le premier outil auquel les gens pensent lorsqu'ils sont confrontés à des tâches PDF avancées. Parce qu'il prend entièrement en charge la norme PDF, il offre des moyens fiables d'aplatir les documents contenant des formulaires, des commentaires ou d'autres éléments interactifs.
Adobe Acrobat vous permet d'aplatir un fichier PDF en recréant le document via la fonction d'impression. L'approche produit un fichier PDF statique qui a la même apparence que l'original mais ne peut pas être modifié.
- Ouvrez le fichier PDF dans Adobe Acrobat.
- Utilisez l'outil Production d'imprimés pour aplatir les champs de formulaire et les annotations, ou allez dans Fichier → Imprimer et sélectionnez « Adobe PDF » comme imprimante pour recréer le document en tant que PDF aplati.
- Enregistrez le fichier résultant en tant que nouveau PDF aplati.
Adobe Acrobat est un excellent choix si vous travaillez fréquemment avec des PDF et préférez une interface visuelle de bureau. Cependant, il nécessite une licence payante et n'est pas conçu pour un traitement automatisé ou à grande échelle.
Comment aplatir un PDF sans Acrobat
Tout le monde n'a pas accès à Adobe Acrobat, et de nombreux utilisateurs cherchent des moyens d'aplatir un PDF sans installer de logiciel payant. Dans ces cas, des méthodes alternatives peuvent toujours faire l'affaire, bien qu'elles puissent impliquer certains compromis.
Comment aplatir un PDF avec Google Chrome
Google Chrome offre un moyen simple et fiable d'aplatir un document PDF sans installer de logiciel supplémentaire. En ouvrant un PDF dans Chrome et en l'imprimant dans un nouveau fichier PDF, il sera transformé en un document statique.
Voici les étapes détaillées pour aplatir un PDF avec Chrome :
- Ouvrez le fichier PDF dans Google Chrome.
- Appuyez sur Ctrl + P (ou Cmd + P sur Mac) pour ouvrir la boîte de dialogue d'impression.
- Sélectionnez Enregistrer au format PDF comme imprimante de destination.
- Cliquez sur Enregistrer pour générer un fichier PDF aplati.
Cette méthode est gratuite et fonctionne sur Windows et Mac. Cependant, elle offre un contrôle limité sur le traitement des PDF, et Google Chrome repose sur un environnement basé sur un navigateur, ce qui le rend moins adapté aux flux de travail hors ligne ou contrôlés.
Comment aplatir un PDF avec des outils en ligne gratuits
Les outils PDF en ligne sont populaires car ils s'exécutent directement dans le navigateur et ne nécessitent aucune installation. Des services comme Smallpdf et Sejda PDF permettent aux utilisateurs d'aplatir rapidement un fichier PDF, ce qui en fait un choix courant pour les tâches occasionnelles et à court terme.
Ces outils suivent généralement un flux de travail simple basé sur un navigateur. En utilisant Smallpdf comme exemple, le processus fonctionne généralement comme suit :
- Accédez au site Web de l'outil en ligne.
- Téléchargez le fichier PDF que vous souhaitez aplatir, après quoi l'outil le traite automatiquement.
- Téléchargez le fichier PDF aplati et enregistrez-le sur votre appareil local.
Ces outils sont utiles si vous devez aplatir un PDF gratuitement et que le document ne contient pas d'informations sensibles. Cela dit, ils s'accompagnent souvent de limitations telles que la taille des fichiers et les restrictions d'utilisation. Pour les documents professionnels ou confidentiels, ces facteurs doivent être pris en considération.
Comment aplatir un PDF par programmation avec Free Spire.PDF
Pour les développeurs travaillant avec des systèmes automatisés, l'aplatissement de PDF fait souvent partie d'un flux de travail plus large plutôt que d'une tâche ponctuelle. Dans de tels cas, Free Spire.PDF for Python vous permet d'aplatir un document PDF en aplatissant ses champs de formulaire interactifs par le code, garantissant que le résultat final n'est pas modifiable tout en préservant l'apparence originale.
L'idée générale est simple : chargez le PDF, activez l'aplatissement du formulaire et enregistrez le résultat. Une fois les champs de formulaire aplatis, toutes les données saisies par l'utilisateur sont rendues directement sur la page et le document devient un PDF statique.
from spire.pdf.common import *
from spire.pdf import *

# Spécifiez les chemins des fichiers PDF d'entrée et de sortie
input_file = "Form.pdf"
output_file = "FlattenAll.pdf"

# Créez un objet de la classe PdfDocument
doc = PdfDocument()
# Chargez un fichier PDF
doc.LoadFromFile(input_file)

# Aplatir tous les formulaires dans le fichier PDF
doc.Form.IsFlatten = True

# Enregistrez le fichier de résultat
doc.SaveToFile(output_file)
doc.Close()
Cette approche est particulièrement utile lorsque l'aplatissement doit être intégré dans des systèmes automatisés, lors du traitement de fichiers par lots ou lors de la manipulation de documents PDF volumineux.
Comment aplatir un document PDF sur Mac
Sur macOS, en plus de Chrome et des outils en ligne, vous pouvez également aplatir un PDF en utilisant Aperçu. En tant qu'application intégrée, Aperçu vous permet d'aplatir des PDF directement sur Mac sans installer de logiciel tiers, ce qui en fait une option pratique et simple pour les tâches rapides, sûres et hors ligne.
Voici comment cela fonctionne :
- Ouvrez le fichier PDF dans Aperçu.
- Choisissez Imprimer et enregistrez la sortie en tant que nouveau fichier PDF.
Cette méthode fonctionne bien pour les petits projets. Cependant, si vous avez besoin d'opérations PDF plus avancées au-delà de l'aplatissement, telles que rendre un PDF en lecture seule, modifier des champs de formulaire ou manipuler des documents par programmation, Adobe Acrobat ou Free Spire.PDF serait un meilleur choix.
FAQ sur l'aplatissement d'un PDF
Q1 : Comment puis-je aplatir un fichier PDF ?
Vous pouvez aplatir un fichier PDF en utilisant Adobe Acrobat, Google Chrome, des outils PDF en ligne ou par programmation avec des bibliothèques telles que Free Spire.PDF.
Q2 : Quel est le raccourci pour aplatir un PDF ?
En général, dans Adobe Acrobat, vous pouvez souvent utiliser Ctrl + P pour aplatir un PDF en l'imprimant, tandis que d'autres outils peuvent s'appuyer sur différentes combinaisons de raccourcis.
Q3 : La compression d'un PDF est-elle la même chose que son aplatissement ?
Non. La compression d'un PDF réduit la taille de son fichier, tandis que l'aplatissement supprime les éléments interactifs et rend le document non modifiable.
Conclusion
Il n'y a pas de méthode unique idéale pour chaque situation. Adobe Acrobat est bien adapté aux flux de travail manuels de bureau. Google Chrome et les outils en ligne fonctionnent pour les tâches rapides et occasionnelles. Pour le traitement automatisé de documents, Free Spire.PDF offre le plus de flexibilité et de contrôle.
En comprenant comment chaque méthode fonctionne, vous pouvez aplatir un document PDF efficacement en fonction de vos propres besoins.
À lire également
Cómo acoplar un PDF: 5 métodos (Adobe, en línea y Python)
Tabla de Contenidos
Cuando quieres evitar que tus PDF sean editados, acoplar el documento suele ser la solución más simple y efectiva. Sin embargo, muchos usuarios no están familiarizados con lo que realmente significa un PDF acoplado o cómo crear uno.
En este artículo, explicaremos qué significa acoplar un PDF y te mostraremos cómo acoplar un documento PDF utilizando varios enfoques prácticos. Estos incluyen el uso de Adobe Acrobat, Google Chrome, herramientas en línea y bibliotecas de programación, ayudándote a proteger tus PDF fácilmente tanto en Windows como en Mac.
- Qué Significa Acoplar un PDF
- Cómo Acoplar un PDF en Adobe Acrobat
- Cómo Acoplar un PDF Sin Acrobat
- Acoplar un PDF Programáticamente Usando Free Spire.PDF
- Cómo Acoplar un Documento PDF en Mac
- Preguntas Frecuentes Sobre Acoplar un PDF
Qué Significa Acoplar un PDF (y Por Qué Podrías Necesitarlo)
Antes de sumergirnos en herramientas específicas, vale la pena aclarar qué significa realmente "acoplar" en el contexto de los archivos PDF y por qué es importante en los flujos de trabajo diarios.
Acoplar un PDF significa convertir elementos interactivos, como texto, anotaciones o imágenes, en contenido de página estático. El documento mantiene la misma apariencia visual, pero los usuarios ya no pueden escribir en nuevos párrafos, marcar casillas de verificación o modificar anotaciones. En otras palabras, acoplar convierte un PDF de trabajo o borrador en una versión final no editable.
Esto es especialmente útil cuando necesitas entregar el informe final, compartir contratos, emitir facturas o archivar documentos. El acoplamiento ayuda a prevenir ediciones no deseadas y asegura que el PDF se muestre de manera consistente en todos los dispositivos y visores. También es importante tener en cuenta que acoplar es diferente de proteger los PDF con una contraseña, ya que la protección con contraseña controla principalmente quién puede abrir o editar el archivo, pero no elimina permanentemente la capacidad de modificar el contenido del PDF.
Cómo Acoplar un PDF en Adobe Acrobat
Adobe Acrobat suele ser la primera herramienta en la que la gente piensa al enfrentarse a tareas avanzadas con PDF. Debido a que es totalmente compatible con el estándar PDF, ofrece formas fiables de acoplar documentos que contienen formularios, comentarios u otros elementos interactivos.
Adobe Acrobat te permite acoplar un archivo PDF recreando el documento a través de la función de impresión. Este enfoque produce un archivo PDF estático que tiene la misma apariencia que el original pero no se puede editar.
- Abre el archivo PDF en Adobe Acrobat.
- Usa la herramienta de Producción de Impresión para acoplar campos de formulario y anotaciones, o ve a Archivo → Imprimir y selecciona “Adobe PDF” como la impresora para recrear el documento como un PDF acoplado.
- Guarda el archivo resultante como un nuevo PDF acoplado.
Adobe Acrobat es una excelente opción si trabajas frecuentemente con PDF y prefieres una interfaz visual de escritorio. Sin embargo, requiere una licencia de pago y no está diseñado para el procesamiento automatizado o a gran escala.
Cómo Acoplar un PDF Sin Acrobat
No todo el mundo tiene acceso a Adobe Acrobat, y muchos usuarios buscan formas de acoplar un PDF sin instalar software de pago. En esos casos, los métodos alternativos pueden hacer el trabajo, aunque pueden implicar algunas concesiones.
Cómo Acoplar un PDF Usando Google Chrome
Google Chrome proporciona una forma sencilla y fiable de acoplar un documento PDF sin necesidad de instalar software adicional. Al abrir un PDF en Chrome e imprimirlo en un nuevo archivo PDF, se convertirá en un documento estático.
Aquí están los pasos detallados para acoplar un PDF con Chrome:
- Abre el archivo PDF en Google Chrome.
- Presiona Ctrl + P (o Cmd + P en Mac) para abrir el diálogo de impresión.
- Selecciona Guardar como PDF como la impresora de destino.
- Haz clic en Guardar para generar un archivo PDF acoplado.
Este método es gratuito y funciona tanto en Windows como en Mac. Sin embargo, ofrece un control limitado sobre el procesamiento de PDF, y Google Chrome depende de un entorno basado en el navegador, lo que lo hace menos adecuado para flujos de trabajo sin conexión o controlados.
Cómo Acoplar un PDF con Herramientas en Línea Gratuitas
Las herramientas de PDF en línea son populares porque se ejecutan directamente en el navegador y no requieren instalación. Servicios como Smallpdf y Sejda PDF permiten a los usuarios acoplar un archivo PDF rápidamente, lo que los convierte en una opción común para tareas ocasionales y a corto plazo.
Estas herramientas generalmente siguen un flujo de trabajo simple basado en el navegador. Usando Smallpdf como ejemplo, el proceso generalmente funciona de la siguiente manera:
- Navega al sitio web de la herramienta en línea.
- Sube el archivo PDF que deseas acoplar, después de lo cual la herramienta lo procesa automáticamente.
- Descarga el archivo PDF acoplado y guárdalo en tu dispositivo local.
Estas herramientas son útiles si necesitas acoplar un PDF de forma gratuita y el documento no contiene información sensible. Dicho esto, a menudo vienen con limitaciones como el tamaño del archivo y restricciones de uso. Para documentos profesionales o confidenciales, estos factores deben tenerse en cuenta.
Cómo Acoplar un PDF Programáticamente Usando Free Spire.PDF
Para los desarrolladores que trabajan con sistemas automatizados, el acoplamiento de PDF suele ser parte de un flujo de trabajo más grande en lugar de una tarea única. En tales casos, Free Spire.PDF for Python te permite acoplar un documento PDF acoplando sus campos de formulario interactivos a través de código, asegurando que el resultado final no sea editable mientras se preserva la apariencia original.
La idea general es sencilla: cargar el PDF, habilitar el acoplamiento de formularios y guardar el resultado. Una vez que los campos del formulario están acoplados, todos los datos introducidos por el usuario se representan directamente en la página y el documento se convierte en un PDF estático.
from spire.pdf.common import *
from spire.pdf import *

# Specify the input and output PDF file paths
input_file = "Form.pdf"
output_file = "FlattenAll.pdf"

# Create an object of the PdfDocument class
doc = PdfDocument()
# Load a PDF file
doc.LoadFromFile(input_file)

# Flatten all forms in the PDF file
doc.Form.IsFlatten = True

# Save the result file
doc.SaveToFile(output_file)
doc.Close()
Este enfoque es particularmente útil cuando el acoplamiento necesita integrarse en sistemas automatizados, al procesar archivos por lotes o al manejar grandes documentos PDF.
Cómo Acoplar un Documento PDF en Mac
En macOS, además de Chrome y las herramientas en línea, también puedes acoplar un PDF usando Vista Previa. Como aplicación integrada, Vista Previa te permite acoplar PDF directamente en Mac sin instalar ningún software de terceros, lo que la convierte en una opción conveniente y sencilla para tareas rápidas, seguras y sin conexión.
Así es como funciona:
- Abre el archivo PDF en Vista Previa.
- Elige Imprimir y guarda el resultado como un nuevo archivo PDF.
Este método funciona bien para proyectos pequeños. Sin embargo, si necesitas operaciones de PDF más avanzadas más allá del acoplamiento, como hacer que un PDF sea de solo lectura, editar campos de formulario o manejar documentos programáticamente, Adobe Acrobat o Free Spire.PDF serían una mejor opción.
Preguntas Frecuentes Sobre Acoplar un PDF
P1: ¿Cómo acoplo un archivo PDF?
Puedes acoplar un archivo PDF usando Adobe Acrobat, Google Chrome, herramientas de PDF en línea o programáticamente con bibliotecas como Free Spire.PDF.
P2: ¿Cuál es el atajo para acoplar un PDF?
En general, en Adobe Acrobat, a menudo puedes usar Ctrl + P para acoplar un PDF imprimiéndolo, mientras que otras herramientas pueden depender de diferentes combinaciones de atajos.
P3: ¿Es lo mismo comprimir un PDF que acoplarlo?
No. Comprimir un PDF reduce el tamaño de su archivo, mientras que acoplar elimina los elementos interactivos y hace que el documento no sea editable.
Conclusión
No existe un único método mejor para cada situación. Adobe Acrobat es adecuado para flujos de trabajo manuales y de escritorio. Google Chrome y las herramientas en línea funcionan para tareas rápidas y ocasionales. Para el procesamiento automatizado de documentos, Free Spire.PDF ofrece la mayor flexibilidad y control.
Al comprender cómo funciona cada método, puedes acoplar un documento PDF de manera eficiente según tus propias necesidades.