.NET (1327)
Children categories
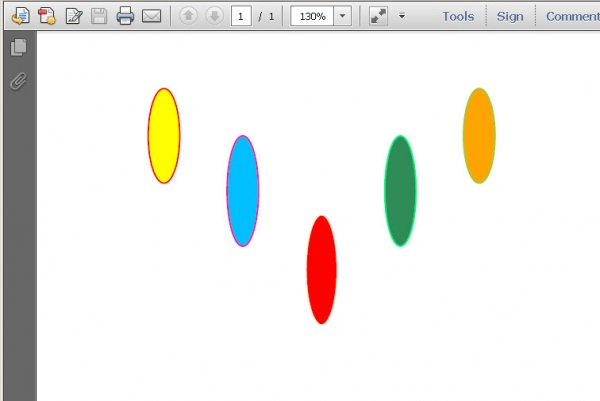

Circles can be defined as the curves traced out by points that move so that its distance from a given point is constant. They are also look as special ellipses in which the two foci are coincident and the eccentricity is “0”. Whatever they are, they are indispensable in PDF document. This section will introduce a solution to draw circles and set their size and position in PDF file via a .NET PDF component Spire.PDF for .NET in C#, VB.NET.
When we draw circles in PDF, we only need to call one method in Spire.PDF: Spire.Pdf.PdfPageBase.Canvas.DrawPie(PdfPen pen, float x, float y, float width, float height, float startAngle, float sweepAngle); Here there are seven parameters in this method. The first one is the class Spire.Pdf.Graphics.PdfPen which can define the color and the outline of the circle. If we change this parameter to be another class Spire.Pdf.Graphics.PdfBrush, we can easily fill the circle with a certain color. The second and third parameters determine the exact distance between the PDF margin and the circle. "float x" decides the distance of left margin with circle, while "float y" means the distance between the top margin with the circle. By setting the fourth and fifth parameters, we can decide the circle width and height. The last two parameters are the start angle and sweep angle when drawing circles. Now please view the circles in PDF as below picture:
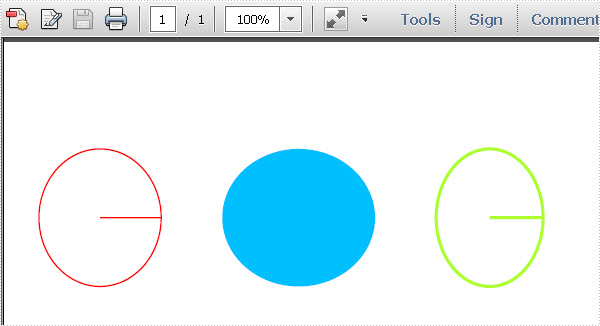
Here we can quickly download Spire.PDF for .NET . After adding Spire.Pdf dll in the download Bin folder, we can draw circles in PDF file via Spire.PDF by below code.
using System.Drawing;
using Spire.Pdf;
using Spire.Pdf.Graphics;

namespace pdf_circles
{
    class Program
    {
        static void Main(string[] args)
        {
            //Create a pdf document.
            PdfDocument doc = new PdfDocument();
            // Create one page
            PdfPageBase page = doc.Pages.Add();
            //save graphics state
            PdfGraphicsState state = page.Canvas.Save();
            PdfPen pen = new PdfPen(Color.Red, 1f);
            PdfPen pen1 = new PdfPen(Color.GreenYellow, 2f);
            PdfBrush brush = new PdfSolidBrush(Color.DeepSkyBlue);
            page.Canvas.DrawPie(pen, 30, 30, 80, 90, 360, 360);
            page.Canvas.DrawPie(brush, 150, 30, 100, 90, 360, 360);
            page.Canvas.DrawPie(pen1,290, 30, 70, 90, 360, 360);
            //restor graphics
            page.Canvas.Restore(state);
            doc.SaveToFile("Circles.pdf");
            System.Diagnostics.Process.Start("Circles.pdf");
        }
    }
}
Imports System.Drawing
Imports Spire.Pdf
Imports Spire.Pdf.Graphics

Namespace pdf_circles
	Class Program
		Private Shared Sub Main(args As String())
			'Create a pdf document.
			Dim doc As New PdfDocument()
			' Create one page
			Dim page As PdfPageBase = doc.Pages.Add()
			'save graphics state
			Dim state As PdfGraphicsState = page.Canvas.Save()
			Dim pen As New PdfPen(Color.Red, 1F)
			Dim pen1 As New PdfPen(Color.GreenYellow, 2F)
			Dim brush As PdfBrush = New PdfSolidBrush(Color.DeepSkyBlue)
			page.Canvas.DrawPie(pen, 30, 30, 80, 90, 360, _
				360)
			page.Canvas.DrawPie(brush, 150, 30, 100, 90, 360, _
				360)
			page.Canvas.DrawPie(pen1, 290, 30, 70, 90, 360, _
				360)
			'restor graphics
			page.Canvas.Restore(state)
			doc.SaveToFile("Circles.pdf")
			System.Diagnostics.Process.Start("Circles.pdf")
		End Sub
	End Class
End Namespace
Spire.PDF for .NET is a PDF component that enables users to draw different kinds of shapes in PDF document in C#, VB.NET.
In Euclidean plane geometry, a rectangle is any quadrilateral with four right angles. The term "oblong" is occasionally used to refer to a non-square rectangle. A rectangle with vertices ABCD would be denoted as ABCD. It’s simple for people to draw rectangles in paper. While how about drawing rectangles in PDF document? This section will show you the exact answer. This section will introduce a solution to draw rectangles and set the size and position of rectangles in PDF via a .NET PDF component Spire.PDF for .NET with C#, VB.NET.
In Spire.PDF, there are two classes: Spire.Pdf.Graphics.PdfPen and Spire.Pdf.Granphics.PdfBrush. By using the first class, we can set the color and decide the outline of the PDF rectangle. While the second class can quickly help us fill the rectangles with a color we want. Now let us see this method: Spire.Pdf.PdfPageBase.Canvas.DrawRectangle(PdfPen pen, RectangleF rectangle); There are two parameters passed. One is the PdfPen which I referred above. The other represents the location and size of a rectangle. By calling this method, we can draw rectangles and set their size and position very quickly. Now let us view the rectangles as below picture:
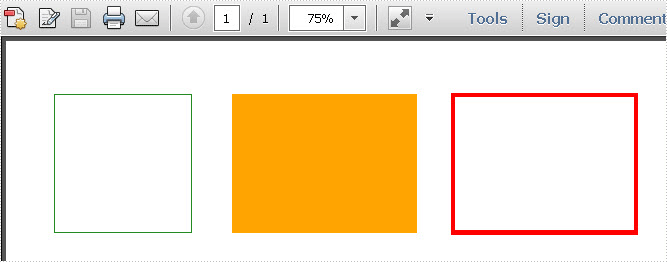
Here we can download Spire.PDF for .NET and install it on system. After adding Spire.Pdf dll, we can draw rectangle in our PDF document as below code:
using System.Drawing;
using Spire.Pdf;
using Spire.Pdf.Graphics;

namespace PDF_rectangles
{
    class Program
    {
        static void Main(string[] args)
        {
            //create a PDF
            PdfDocument pdfDoc = new PdfDocument();
            PdfPageBase page = pdfDoc.Pages.Add();
            //save graphics state
            PdfGraphicsState state = page.Canvas.Save();
            //draw rectangles
            PdfPen pen = new PdfPen(Color.ForestGreen, 0.1f);
            PdfPen pen1 = new PdfPen(Color.Red, 3f);
            PdfBrush brush = new PdfSolidBrush(Color.Orange);
            page.Canvas.DrawRectangle(pen, new Rectangle(new Point(2, 7), new Size(120, 120)));
            page.Canvas.DrawRectangle(pen1, new Rectangle(new Point(350, 7), new Size(160, 120)));
            page.Canvas.DrawRectangle(brush, new RectangleF(new Point(158, 7), new SizeF(160, 120)));
            //restor graphics
            page.Canvas.Restore(state);
            pdfDoc.SaveToFile("Rectangles.pdf");
            System.Diagnostics.Process.Start("Rectangles.pdf");
        }
    }
}
Imports System.Drawing
Imports Spire.Pdf
Imports Spire.Pdf.Graphics

Namespace PDF_rectangles
	Class Program
		Private Shared Sub Main(args As String())
			'create a PDF
			Dim pdfDoc As New PdfDocument()
			Dim page As PdfPageBase = pdfDoc.Pages.Add()
			'save graphics state
			Dim state As PdfGraphicsState = page.Canvas.Save()
			'draw rectangles
			Dim pen As New PdfPen(Color.ForestGreen, 0.1F)
			Dim pen1 As New PdfPen(Color.Red, 3F)
			Dim brush As PdfBrush = New PdfSolidBrush(Color.Orange)
			page.Canvas.DrawRectangle(pen, New Rectangle(New Point(2, 7), New Size(120, 120)))
			page.Canvas.DrawRectangle(pen1, New Rectangle(New Point(350, 7), New Size(160, 120)))
			page.Canvas.DrawRectangle(brush, New RectangleF(New Point(158, 7), New SizeF(160, 120)))
			'restor graphics
			page.Canvas.Restore(state)
			pdfDoc.SaveToFile("Rectangles.pdf")
			System.Diagnostics.Process.Start("Rectangles.pdf")
		End Sub
	End Class
End Namespace
Spire.PDF for .NET is a .NET PDF component that can draw different kinds of shapes in PDF document such as Circles, Arcs. Ellipse and Five-pointed Star.
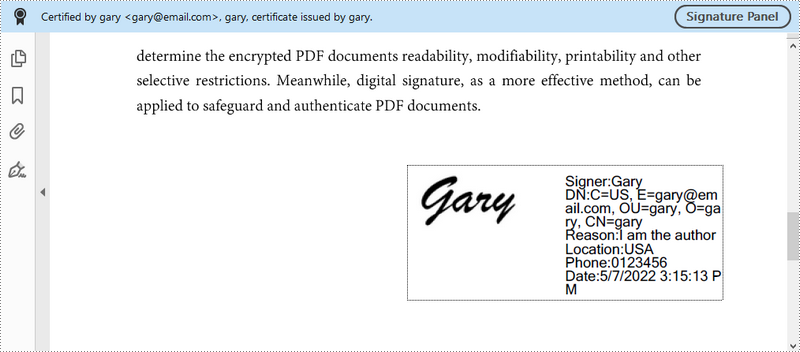
As PDF documents become increasingly popular in business, ensuring their authenticity has become a key concern. Signing PDFs with a certificate-based signature can protect the content and also let others know who signed or approved the document. In this article, you will learn how to digitally sign PDF with an invisible or a visible signature, and how to remove digital signatures from PDF by using Spire.PDF for .NET.
- Add an Invisible Digital Signature to PDF
- Add a Visible Digital Signature to PDF
- Remove Digital Signatures from PDF
Install Spire.PDF for .NET
To begin with, you need to add the DLL files included in the Spire.PDF for.NET package as references in your .NET project. The DLLs files can be either downloaded from this link or installed via NuGet.
PM> Install-Package Spire.PDF
Add an Invisible Digital Signature to PDF
The following are the steps to add an invisible digital signature to PDF using Spire.PDF for .NET.
- Create a PdfDocument object.
- Load a sample PDF file using PdfDocument.LoadFromFile() method.
- Load a pfx certificate file while initializing the PdfCertificate object.
- Create a PdfSignature object based on the certificate.
- Set the document permissions through the PdfSignature object.
- Save the document to another PDF file using PdfDocument.SaveToFile() method.
- C#
- VB.NET
using Spire.Pdf;
using Spire.Pdf.Security;

namespace AddInvisibleSignature
{
    class Program
    {
        static void Main(string[] args)
        {
            //Create a PdfDocument object
            PdfDocument doc = new PdfDocument();

            //Load a sample PDF file
            doc.LoadFromFile("C:\\Users\\Administrator\\Desktop\\sample.pdf");

            //Load the certificate
            PdfCertificate cert = new PdfCertificate("C:\\Users\\Administrator\\Desktop\\MyCertificate.pfx", "e-iceblue");

            //Create a PdfSignature object
            PdfSignature signature = new PdfSignature(doc, doc.Pages[doc.Pages.Count - 1], cert, "MySignature");

            //Set the document permission to forbid changes but allow form fill
             signature.DocumentPermissions = PdfCertificationFlags.ForbidChanges Or PdfCertificationFlags.AllowFormFill

            //Save to another PDF file
            doc.SaveToFile("InvisibleSignature.pdf");
            doc.Close();
        }
    }
}
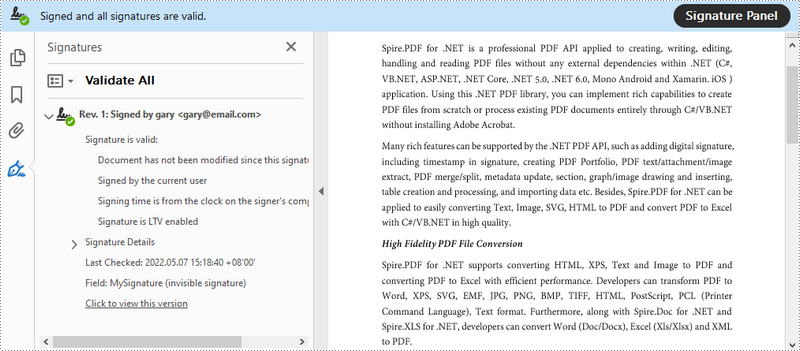
Add a Visible Digital Signature to PDF
The following are the steps to add a visible digital signature to PDF using Spire.PDF for .NET.
- Create a PdfDocument object.
- Load a sample PDF file using PdfDocument.LoadFromFile() method.
- Load a pfx certificate file while initializing the PdfCertificate object.
- Create a PdfSignature object and specify its position and size on the document.
- Set the signature details including date, name, location, reason, handwritten signature image, and document permissions.
- Save the document to another PDF file using PdfDocument.SaveToFile() method.
- C#
- VB.NET
using System;
using System.Drawing;
using Spire.Pdf;
using Spire.Pdf.Security;
using Spire.Pdf.Graphics;

namespace AddVisibleSignature
{
    class Program
    {
        static void Main(string[] args)
        {
            //Create a PdfDocument object
            PdfDocument doc = new PdfDocument();

            //Load a sample PDF file
            doc.LoadFromFile("C:\\Users\\Administrator\\Desktop\\sample.pdf");

            //Load the certificate
            PdfCertificate cert = new PdfCertificate("C:\\Users\\Administrator\\Desktop\\MyCertificate.pfx", "e-iceblue");

            //Create a PdfSignature object and specify its position and size
            PdfSignature signature = new PdfSignature(doc, doc.Pages[doc.Pages.Count - 1], cert, "MySignature");
            RectangleF rectangleF = new RectangleF(doc.Pages[0].ActualSize.Width - 260 - 54, 200, 260, 110);
            signature.Bounds = rectangleF;
            signature.Certificated = true;

            //Set the graphics mode to ImageAndSignDetail
            signature.GraphicsMode = GraphicMode.SignImageAndSignDetail;

            //Set the signature content
            signature.NameLabel = "Signer:";
            signature.Name = "Gary";
            signature.ContactInfoLabel = "Phone:";
            signature.ContactInfo = "0123456";
            signature.DateLabel = "Date:";
            signature.Date = DateTime.Now;
            signature.LocationInfoLabel = "Location:";
            signature.LocationInfo = "USA";
            signature.ReasonLabel = "Reason:";
            signature.Reason = "I am the author";
            signature.DistinguishedNameLabel = "DN:";
            signature.DistinguishedName = signature.Certificate.IssuerName.Name;

            //Set the signature image source
            signature.SignImageSource = PdfImage.FromFile("C:\\Users\\Administrator\\Desktop\\handwrittingSignature.png");

            //Set the signature font
            signature.SignDetailsFont = new PdfTrueTypeFont(new Font("Arial Unicode MS", 12f, FontStyle.Regular));

            //Set the document permission to forbid changes but allow form fill
            signature.DocumentPermissions = PdfCertificationFlags.ForbidChanges | PdfCertificationFlags.AllowFormFill;

            //Save to file
            doc.SaveToFile("VisiableSignature.pdf");
            doc.Close();
        }
    }
}
Remove Digital Signatures from PDF
The following are the steps to remove digital signatures from PDF using Spire.PDF for .NET.
- Create a PdfDocument object.
- Get form widgets from the document through PdfDocument.Form property.
- Loop through the widgets and determine if a specific widget is a PdfSignatureFieldWidget.
- Remove the signature widget using PdfFieldCollection.RemoveAt() method.
- Save the document to another PDF file using PdfDocument.SaveToFile() method.
- C#
- VB.NET
using Spire.Pdf;
using Spire.Pdf.Widget;

namespace RemoveSignature
{
    class Program
    {
        static void Main(string[] args)
        {
            //Create a PdfDocument object
            PdfDocument doc = new PdfDocument("C:\\Users\\Administrator\\Desktop\\VisiableSignature.pdf");

            //Get form widgets from the document
            PdfFormWidget widgets = doc.Form as PdfFormWidget;

            //Loop through the widgets
            for (int i = 0; i < widgets.FieldsWidget.List.Count; i++)
            {
                //Get the specific widget
                PdfFieldWidget widget = widgets.FieldsWidget.List[i] as PdfFieldWidget;

                //Determine if the widget is a PdfSignatureFieldWidget
                if (widget is PdfSignatureFieldWidget)
                {
                    //Remove the widget
                    widgets.FieldsWidget.RemoveAt(i);
                }
            }

            //Save the document to another PDF file
            doc.SaveToFile("RemoveSignatures.pdf");
        }
    }
}
Apply for a Temporary License
If you'd like to remove the evaluation message from the generated documents, or to get rid of the function limitations, please request a 30-day trial license for yourself.
Encrypting PDF is a way people commonly used to protect PDF. Whether for a company or for individual, using PDF encryption to place some certain restrictions is indispensable. In order to make the PDF document available to read but unable to modify by unauthorized users, two passwords are required for an encrypted PDF document: owner password and user password. This section will particularly introduce a simple solution to quickly encrypt PDF with C#, VB.NET via Spire.PDF for .NET.
Spire.PDF for .NET as a .NET PDF component, can encrypt your PDF by owner and user password. Owner password is provided to fully access to PDF file such as reset password and restrictions. While user password allows users to open the document as well as subject to the restrictions placed by owner.
In the encryption solution, an object of the PDFSecurity class which is included in the namespace Spire.PDFDocument.Security is used to set the owner and user password. Please feel free to download Spire.PDF for .NET and load your PDF file and then protect it.
Protect PDF by setting password and specify document restrictions.
Step 1: Set PDF key size by the enum."Spire.Pdf.Security.PdfEncryptionKeySize".Three kinds of key size are available here: Key128Bit, Key256Bit and Key40Bit, you can use any one among the three.
doc.Security.KeySize = PdfEncryptionKeySize.Key256Bit;
doc.Security.KeySize = PdfEncryptionKeySize.Key256Bit
Step 2: Encrypt PDF file by setting owner and user password. The password size you set should not be over the key size.
doc.Security.OwnerPassword = "e-iceblue";
doc.Security.UserPassword = "pdfcomponent";
doc.Security.OwnerPassword = "e-iceblue"
doc.Security.UserPassword = "pdfcomponent"
Step 3: Specify access restrictions of user password. There are nine permissions are available in the solution. You can see them as below picture.
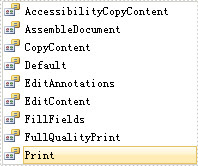
doc.Security.Permissions = PdfPermissionsFlags.Print | PdfPermissionsFlags.CopyContent;
doc.Security.Permissions = PdfPermissionsFlags.Print Or PdfPermissionsFlags. CopyContent
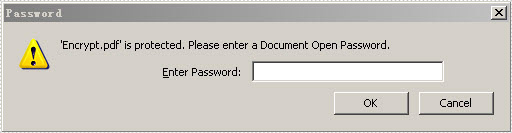
After running your project, you will be requested a password when you open this encrypted PDF file. Please look at the effective screenshot below:
Marker Designer: Generate Excel Reports from Templates in .NET
2011-07-01 02:51:40 Written by Jane Zhao
Generating dynamic Excel reports is a core requirement for most enterprise .NET applications. Yet, traditional automation approaches often create more problems than they solve. When code is tightly coupled to specific layouts, even a minor design change—moving a logo or adding a column—can trigger costly rewrites and endless debugging cycles.
The Marker Designer feature in Spire.XLS for .NET reimagines this workflow. It establishes a clean separation between presentation and logic: designers build visually polished templates in native Excel, while developers write simple, decoupled C# code that focuses solely on data retrieval. The engine acts as an intelligent bridge—parsing placeholders, injecting data, expanding rows, and adjusting formulas automatically, all while preserving every detail of the original formatting.
In this article, we will explore how to use the Marker Designer feature to import data into Excel. We’ll cover its core concepts, syntax, supported data sources, and practical code examples—from simple variable replacement to complex data‑driven reports with automatic formula recalculation.
- Understanding Marker Designer Architecture
- Install Spire.XLS for .NET
- Example 1: Basic Text Variable Replacement
- Example 2: Populate Templates from a DataTable
- Example 3: Import Arrays to Excel Rows and Columns
- Example 4: Dynamic Auto-Adjusting Formulas
- Practical: Auto Populate Excel Template from an External Data File
- Frequently Asked Questions
Understanding Marker Designer Architecture
Core Components
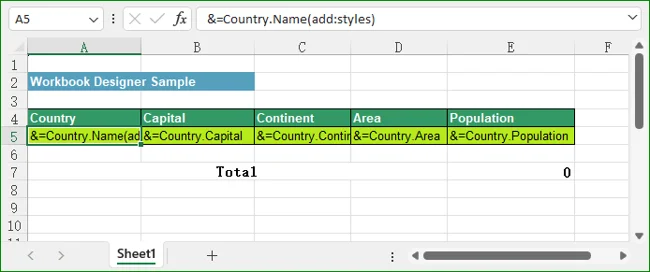
Marker: A special text string placed in an Excel cell that tells Spire.XLS where to insert data and which data field to use. Every marker starts with the prefix &=, followed by a data source identifier and a field name.
- Example:
&=Party.FullName - This marker tells the engine to replace the cell content with the “FullName” field from the “Party” data source.
Designer Spreadsheet: A standard Excel file (.xls or .xlsx) that serves as a reusable template. It typically contains:
- Visual formatting (colors, fonts, borders)
- Predefined Excel formulas
- Marker designers in cells where data should be inserted
Marker Syntax Reference
All markers begin with the prefix &= and are placed directly in cells of your Excel template. The standard syntax formats:
- &=DataSource.FieldName: References a field from a structured data source such as a DataTable column.
- &=[Data Source].[Field Name]: Used when data source or field names contain spaces.
- &=VariableName: References a single-value parameter or variable.
Supported Data Sources
Marker Designer supports a wide range of .NET data types. Data sources are registered in code via dedicated methods on the MarkerDesigner object:
| Data Source Type | Method |
|---|---|
| DataTable | AddDataTable(string paraName, DataTable dataTable) |
| DataTable with row limit | AddDataTable(string paraName, DataTable dataTable, int rowCount) |
| DataView | AddDataView(string paraName, DataView dataView) |
| DataColumn | AddDataColumn(string paraName, DataColumn paramValue) |
| Array | AddArray(string paraName, Object[] paramValues) |
| Parameter (single value) | AddParameter(string paraName, Object paramValue) |
Advanced Marker Parameters
Parameters are appended in parentheses after the field name and provide granular control over the rendering behavior.
add:styles: Inherits all cell formatting (font, fill color, borders, number format) from the marker cell and applies it to all expanded data rows.
- Example:
&=Country.Name(add:styles) - Pro Tip: Apply add:styles only to the first marker cell in a template row. The engine automatically propagates formatting to all other expanded cells.
Horizontal: Fills data horizontally (across columns) instead of the default vertical (down rows) direction.
- Example:
&=Products.Name(horizontal) - Use Case: This is particularly useful for creating cross-tabular reports, comparative charts, or filling out header columns for specific date ranges.
Install Spire.XLS for .NET
Option 1: Install via NuGet (Recommended)
Package Manager Console:
Install-Package Spire.XLS
Or search for “Spire.XLS” within NuGet Package Manager UI in Visual Studio.
Option 2: Manual DLL Reference
- Download the Spire.XLS package and extract the files.
- In Visual Studio, right-click References > Add Reference > Browse, then select the appropriate Spire.Xls.dll based on your target framework.
Example 1: Basic Text Variable Replacement
This example demonstrates how to bind a single text value to a marker, ideal for report titles, dates, or summary labels.
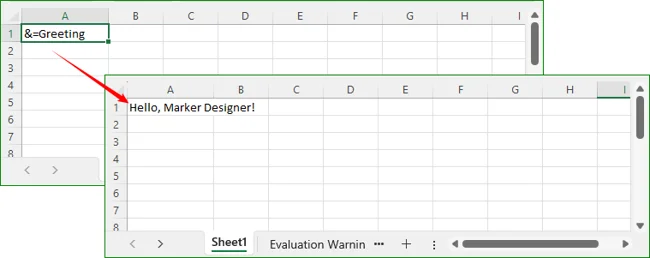
Template Preparation: In cell A1 of Template1.xlsx, place the marker: &=Greeting.
C# Code:
using Spire.Xls;

class Program
{
    static void Main()
    {
        // Load template workbook
        Workbook workbook = new Workbook();
        workbook.LoadFromFile("Template1.xlsx");

        // Add a simple parameter
        workbook.MarkerDesigner.AddParameter("Greeting", "Hello, Marker Designer!");

        // Apply all markers
        workbook.MarkerDesigner.Apply();

        // Save the result
        workbook.SaveToFile("Output.xlsx", ExcelVersion.Version2016);
        workbook.Dispose();
    }
}
Result: Cell A1 will display: Hello, Marker Designer!
Example 2: Populate Templates from a DataTable
This is the most widely used scenario for generating tabular business reports. Data from a DataTable is populated vertically into a formatted template.
C# code to import DataTable:
using System.Data;
using Spire.Xls;

class Program
{
    static void Main()
    {
        // Create sample DataTable
        DataTable dt = new DataTable("Country");
        dt.Columns.Add("Name", typeof(string));
        dt.Columns.Add("Capital", typeof(string));
        dt.Columns.Add("Continent", typeof(string));

        dt.Rows.Add("Argentina", "Buenos Aires", "South America");
        dt.Rows.Add("Brazil", "Brasilia", "South America");
        dt.Rows.Add("Canada", "Ottawa", "North America");
        dt.Rows.Add("Japan", "Tokyo", "Asia");
        dt.Rows.Add("Germany", "Berlin", "Europe");

        // Load template
        Workbook workbook = new Workbook();
        workbook.LoadFromFile("CountryTemplate.xlsx");
        Worksheet sheet = workbook.Worksheets[0];

        // Register DataTable with Marker Designer
        // The name "Country" must match the prefix in &=Country.Name
        workbook.MarkerDesigner.AddDataTable("Country", dt);

        // Apply markers – data expands downward automatically
        workbook.MarkerDesigner.Apply();

        // Optional: Auto-fit columns
        //sheet.AllocatedRange.AutoFitColumns();
        //sheet.AllocatedRange.AutoFitRows();

        // Save output
        workbook.SaveToFile("CountryReport.xlsx", ExcelVersion.Version2016);
        workbook.Dispose();
    }
}
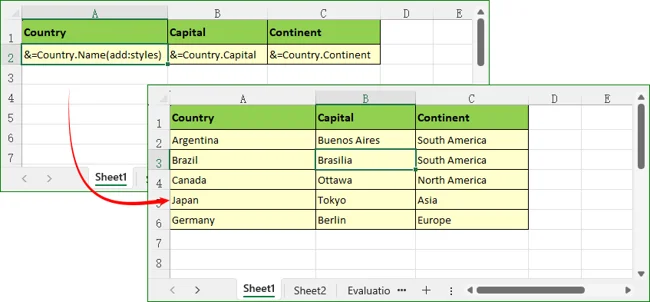
Result: The template row (row 2) expands to 5 rows of data, with header formatting preserved and styles inherited.
In real-world projects, source data is typically stored in a separate Excel file rather than being constructed inline in code. You can combine Spire.XLS's data export capability with Marker Designer to read raw data from one workbook and populate it into a pre-formatted template workbook.
Example 3: Import Arrays to Excel Rows and Columns
This example demonstrates how to bind a simple one‑dimensional array to fill a column or row with sequential values.
using Spire.Xls;

class Program
{
    static void Main()
    {
        // Load template workbook
        Workbook workbook = new Workbook();
        workbook.LoadFromFile("ArrayTemplate.xlsx");

        // Add array data source
        string[] products = { "Apple", "Banana", "Cherry", "Durian" };
        workbook.MarkerDesigner.AddArray("ProductList", products);

        // Apply markers
        workbook.MarkerDesigner.Apply();

        workbook.SaveToFile("ArrayOutput.xlsx", ExcelVersion.Version2016);
        workbook.Dispose();
    }
}
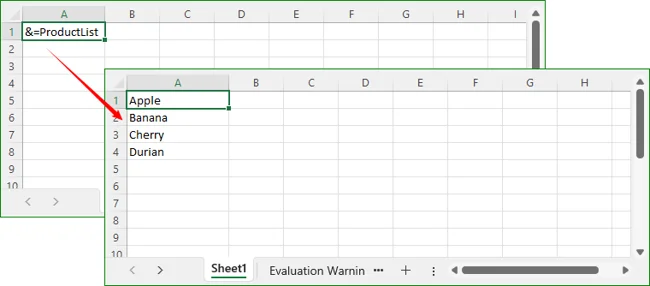
Result: The array values fill vertically from A1 to A4.
Horizontal Fill
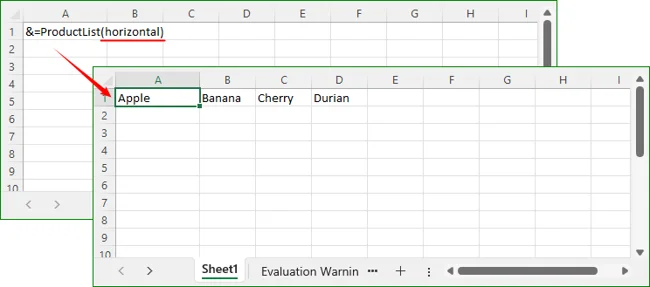
To fill horizontally, you could modify the marker to &=ProductList(horizontal), and the array would span A1 to D1.
Example 4: Dynamic Auto-Adjusting Formulas
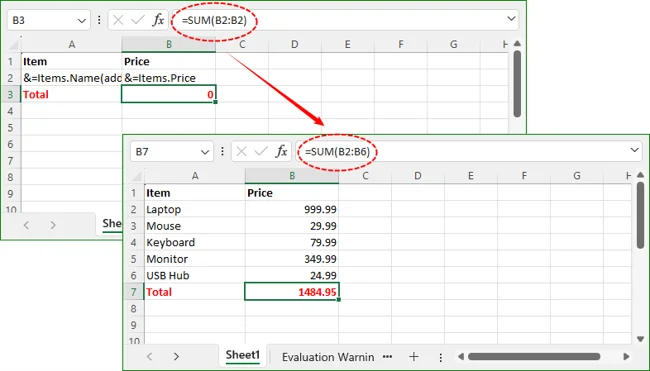
When data expands vertically, formulas referencing marker rows automatically adjust their range. Place summary formulas in the row immediately after the marker row, and they will shift down correctly.
using System.Data;
using Spire.Xls;
class Program
{
    static void Main()
    {
        // Prepare sample data
        DataTable items = new DataTable("Items");
        items.Columns.Add("Name", typeof(string));
        items.Columns.Add("Price", typeof(decimal));
        items.Rows.Add("Laptop", 999.99);
        items.Rows.Add("Mouse", 29.99);
        items.Rows.Add("Keyboard", 79.99);
        items.Rows.Add("Monitor", 349.99);
        items.Rows.Add("USB Hub", 24.99);

        // Create workbook and build template inline
        Workbook workbook = new Workbook();
        workbook.LoadFromFile("FormulaTemplate.xlsx");

        // Bind data source
        workbook.MarkerDesigner.AddDataTable("Items", items);

        // Apply markers – formula range expands automatically
        workbook.MarkerDesigner.Apply();

        // Recalculate all formulas to get actual values
        workbook.CalculateAllValue();

        // Save result
        workbook.SaveToFile("FormulaReport.xlsx", ExcelVersion.Version2016);
        workbook.Dispose();
    }
}
Result: Original template formula “=SUM(B2:B2)” auto‑updates to “=SUM(B2:B6)” after row expansion to cover all generated data rows.
Practical: Auto Populate Excel Template from an External Data File
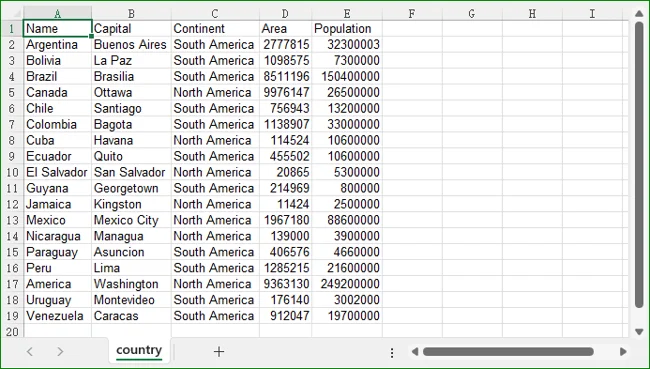
Very often, your application receives raw data files (e.g., an export from a legacy system, a CSV converted to Excel, or a weekly operational report) that contain only numbers and text but lack any visual styling. Separately, your design team maintains a beautifully formatted “Template.xlsx” file containing headers, logos, color schemes, and the markers.
This example bridges the gap by reading the raw data from a source file, converting it into a DataTable, and injecting it into the styled template—all programmatically.
The template file containing formatted headers with markers:
The data source file containing unformatted data:
C# Code:
using Spire.Xls;
using System.Data;

class Program
{
    static void Main(string[] args)
    {
        // 1. Create a new workbook instance and load the DESIGN template.
        Workbook workbook = new Workbook();
        workbook.LoadFromFile("C:\\Users\\Administrator\\Desktop\\MarkerDesigner.xls");

        // 2. Fetch the raw data from a SEPARATE source file.
        DataTable dt = ExportTable();

        // 3. (Optional) Retrieve row count for logging or validation purposes.
        int rowCount = dt.Rows.Count;

        // 4. Get the first worksheet (where your markers are located).
        Worksheet sheet = workbook.Worksheets[0];

        // 5. Bind the extracted DataTable to the MarkerDesigner engine.
        // The name "Country" must match the marker in the template (e.g., &=Country.Name).
        workbook.MarkerDesigner.AddDataTable("Country", dt);
        workbook.MarkerDesigner.Apply();

        // 6. AutoFit rows and columns to ensure all content is fully visible.
        sheet.AllocatedRange.AutoFitRows();
        sheet.AllocatedRange.AutoFitColumns();

        // 7. Recalculate all formulas in the workbook.
        workbook.CalculateAllValue();

        // 8. Save the modified workbook.
        workbook.SaveToFile("Output_MarkerDesigner.xlsx", ExcelVersion.Version2016);

        // 9. Dispose of the workbook object to release memory and file locks.
        workbook.Dispose();
    }

    // Helper method to load data from a specific data-source Excel file.
    static DataTable ExportTable()
    {
        // Instantiate a new workbook to act purely as a data reader.
        Workbook workbook = new Workbook();

        // Load the raw data file (this could be an export from a CRM, ERP, etc.).
        workbook.LoadFromFile("C:\\Users\\Administrator\\Desktop\\MarkerDesigner-DataSample.xls");

        // Initialize the first worksheet where the data resides.
        Worksheet sheet = workbook.Worksheets[0];

        // Export the entire range of the worksheet into a DataTable.
        return sheet.ExportDataTable();
    }
}
Result: The output file contains formatted headers and styles from the template, with rows dynamically populated from the data file.
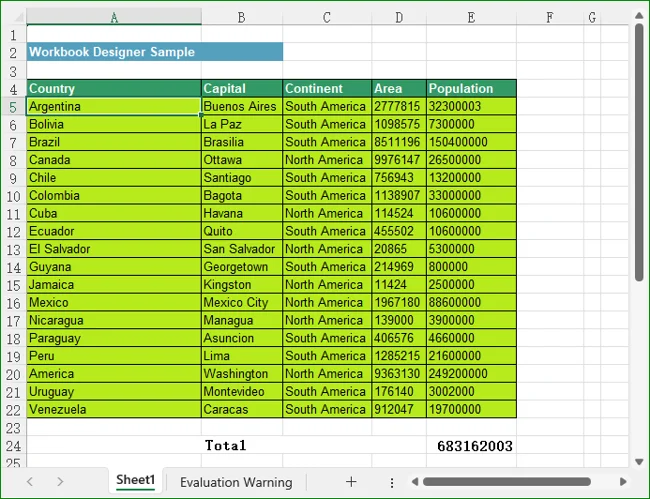
Conclusion
Marker Designer streamlines Excel report generation by decoupling visual design from data logic, reducing development effort and improving maintainability. With support for multiple data sources, configurable single‑value marker parameters, and automatic formula adaptation, it provides a flexible solution for building dynamic Excel documents in .NET applications.
Whether you are generating simple parameterized reports, complex tabular datasets, or summary reports with calculated fields, Marker Designer in Spire.XLS for .NET delivers a declarative, low‑code approach to Excel automation that saves hundreds of hours of development effort.
Frequently Asked Questions
Can I use multiple data sources in a single template?
A: Yes. You can register multiple data sources (DataTables, arrays, parameters) in the same workbook. Each marker references its corresponding data source by name, and all markers are processed in a single Apply() call.
Does the add:styles parameter work on multiple columns?
A: You only need to apply add:styles to the very first marker cell in a template row. The engine captures the style from that cell and propagates it horizontally across all the newly created cells in that row. If you apply it to a middle column, the style propagation may not extend correctly to preceding columns.
How do I control the number of rows populated from a DataTable?
A: Use the AddDataTable overload with the rowCount parameter to limit the maximum number of rows populated from the data source. This is useful for preview scenarios or paginated reports.
Can I use MarkerDesigner with existing Excel files that already contain data?
A: Yes. You can load any Excel file, register data sources, and apply markers. The engine will update only the cells containing markers, leaving other content untouched.
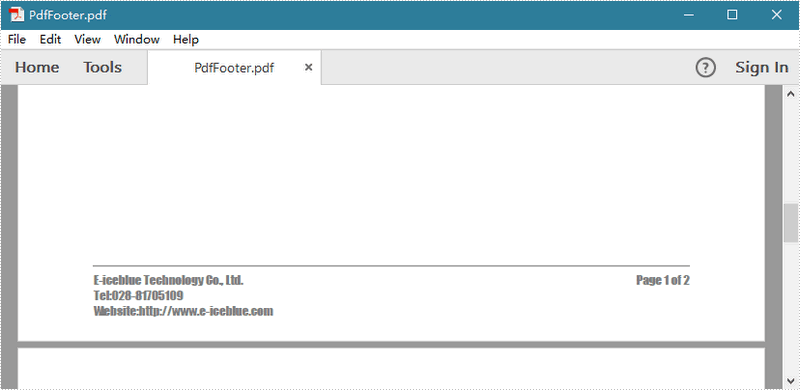
A PDF header or footer presents consistent information (For example: a date, page numbering, the title of the overall document, or author’s name) in the page margins throughout a PDF. In this article, you will learn to add text and automatic page numbering to footer space when creating a PDF document from scratch.
Spire.PDF has a class named PdfPageTemplateElement, which represents a page template element that can be used as header, footer, watermark or stamp. The template can contain text, image as well as dynamic fields like PdfPageCountField, PdfPageNumberField, etc.
Step 1: Define a custom function CreateFooterTemplate() to create a page template element that servers as footer, and return a PdfPageDocumentElement object.
static PdfPageTemplateElement CreateFooterTemplate(PdfDocument doc, PdfMargins margins)
{
    //get page size
    SizeF pageSize = doc.PageSettings.Size;

    //create a PdfPageTemplateElement object which works as footer space
    PdfPageTemplateElement footerSpace = new PdfPageTemplateElement(pageSize.Width, margins.Bottom);
    footerSpace.Foreground = false;

    //declare two float variables
    float x = margins.Left;
    float y = 0;

    //draw line in footer space
    PdfPen pen = new PdfPen(PdfBrushes.Gray, 1);
    footerSpace.Graphics.DrawLine(pen, x, y, pageSize.Width - x, y);

    //draw text in footer space
    y = y + 5;
    PdfTrueTypeFont font = new PdfTrueTypeFont(new Font("Impact", 10f), true);
    PdfStringFormat format = new PdfStringFormat(PdfTextAlignment.Left);
    String footerText = "E-iceblue Technology Co., Ltd.\nTel:028-81705109\nWebsite:http://www.e-iceblue.com";
    footerSpace.Graphics.DrawString(footerText, font, PdfBrushes.Gray, x, y, format);

    //draw dynamic field in footer space
    PdfPageNumberField number = new PdfPageNumberField();
    PdfPageCountField count = new PdfPageCountField();
    PdfCompositeField compositeField = new PdfCompositeField(font, PdfBrushes.Gray, "Page {0} of {1}", number, count);
    compositeField.StringFormat = new PdfStringFormat(PdfTextAlignment.Right, PdfVerticalAlignment.Top);
    SizeF size = font.MeasureString(compositeField.Text);
    compositeField.Bounds = new RectangleF(pageSize.Width - x , y, size.Width, size.Height);
    compositeField.Draw(footerSpace.Graphics);

    //return footerSpace
    return footerSpace;
}
Step 2: Create a PDF document, call the method CreateFooterTemplate() to create a footer template and apply it to the document.
static void Main(string[] args)
{
    //create a PDF document
    PdfDocument doc = new PdfDocument();
    doc.PageSettings.Size = PdfPageSize.A4;

    //reset the default margins to 0
    doc.PageSettings.Margins = new PdfMargins(0);

    //create a PdfMargins object, the parameters indicate the page margins you want to set
    PdfMargins margins = new PdfMargins(60, 60, 60, 60);

    //create a footer template with content and apply it to bottom page template
    doc.Template.Bottom = CreateFooterTemplate(doc, margins);

    //apply blank templates to other parts of page template
    doc.Template.Top = new PdfPageTemplateElement(doc.PageSettings.Size.Width, margins.Top);
    doc.Template.Left = new PdfPageTemplateElement(margins.Left, doc.PageSettings.Size.Height);
    doc.Template.Right = new PdfPageTemplateElement(margins.Right, doc.PageSettings.Size.Height);

    //add two pages in the document
    doc.Pages.Add();
    doc.Pages.Add();

    //save the file
    doc.SaveToFile("PdfFooter.pdf");
}
Output:
Full Code:
using Spire.Pdf;
using Spire.Pdf.AutomaticFields;
using Spire.Pdf.Graphics;
using System;
using System.Drawing;


namespace AddPDFFooter
{
    class Program
    {
        static void Main(string[] args)
        {
            //create a PDF document
            PdfDocument doc = new PdfDocument();
            doc.PageSettings.Size = PdfPageSize.A4;

            //reset the default margins to 0
            doc.PageSettings.Margins = new PdfMargins(0);

            //create a PdfMargins object, the parameters indicate the page margins you want to set
            PdfMargins margins = new PdfMargins(60, 60, 60, 60);

            //create a footer template with content and apply it to page template
            doc.Template.Bottom = CreateFooterTemplate(doc, margins);

            //apply blank templates to other parts of page template
            doc.Template.Top = new PdfPageTemplateElement(doc.PageSettings.Size.Width, margins.Top);
            doc.Template.Left = new PdfPageTemplateElement(margins.Left, doc.PageSettings.Size.Height);
            doc.Template.Right = new PdfPageTemplateElement(margins.Right, doc.PageSettings.Size.Height);

            //add two pages in the document
            doc.Pages.Add();
            doc.Pages.Add();

            //save the file
            doc.SaveToFile("PdfFooter.pdf");
        }
        static PdfPageTemplateElement CreateFooterTemplate(PdfDocument doc, PdfMargins margins)
        {
            //get page size
            SizeF pageSize = doc.PageSettings.Size;

            //create a PdfPageTemplateElement object which works as footer space
            PdfPageTemplateElement footerSpace = new PdfPageTemplateElement(pageSize.Width, margins.Bottom);
            footerSpace.Foreground = false;

            //declare two float variables
            float x = margins.Left;
            float y = 0;

            //draw line in footer space
            PdfPen pen = new PdfPen(PdfBrushes.Gray, 1);
            footerSpace.Graphics.DrawLine(pen, x, y, pageSize.Width - x, y);

            //draw text in footer space
            y = y + 5;
            PdfTrueTypeFont font = new PdfTrueTypeFont(new Font("Impact", 10f), true);
            PdfStringFormat format = new PdfStringFormat(PdfTextAlignment.Left);
            String footerText = "E-iceblue Technology Co., Ltd.\nTel:028-81705109\nWebsite:http://www.e-iceblue.com";
            footerSpace.Graphics.DrawString(footerText, font, PdfBrushes.Gray, x, y, format);

            //draw dynamic field in footer space
            PdfPageNumberField number = new PdfPageNumberField();
            PdfPageCountField count = new PdfPageCountField();
            PdfCompositeField compositeField = new PdfCompositeField(font, PdfBrushes.Gray, "Page {0} of {1}", number, count);
            compositeField.StringFormat = new PdfStringFormat(PdfTextAlignment.Right, PdfVerticalAlignment.Top);
            SizeF size = font.MeasureString(compositeField.Text);
            compositeField.Bounds = new RectangleF(pageSize.Width - x, y, size.Width, size.Height);
            compositeField.Draw(footerSpace.Graphics);

            //return footerSpace
            return footerSpace;
        }
    }
}
Imports Spire.Pdf
Imports Spire.Pdf.AutomaticFields
Imports Spire.Pdf.Graphics
Imports System.Drawing


Namespace AddPDFFooter
	Class Program
		Private Shared Sub Main(args As String())
			'create a PDF document
			Dim doc As New PdfDocument()
			doc.PageSettings.Size = PdfPageSize.A4

			'reset the default margins to 0
			doc.PageSettings.Margins = New PdfMargins(0)

			'create a PdfMargins object, the parameters indicate the page margins you want to set
			Dim margins As New PdfMargins(60, 60, 60, 60)

			'create a footer template with content and apply it to page template
			doc.Template.Bottom = CreateFooterTemplate(doc, margins)

			'apply blank templates to other parts of page template
			doc.Template.Top = New PdfPageTemplateElement(doc.PageSettings.Size.Width, margins.Top)
			doc.Template.Left = New PdfPageTemplateElement(margins.Left, doc.PageSettings.Size.Height)
			doc.Template.Right = New PdfPageTemplateElement(margins.Right, doc.PageSettings.Size.Height)

			'add two pages in the document
			doc.Pages.Add()
			doc.Pages.Add()

			'save the file
			doc.SaveToFile("PdfFooter.pdf")
		End Sub
		Private Shared Function CreateFooterTemplate(doc As PdfDocument, margins As PdfMargins) As PdfPageTemplateElement
			'get page size
			Dim pageSize As SizeF = doc.PageSettings.Size

			'create a PdfPageTemplateElement object which works as footer space
			Dim footerSpace As New PdfPageTemplateElement(pageSize.Width, margins.Bottom)
			footerSpace.Foreground = False

			'declare two float variables
			Dim x As Single = margins.Left
			Dim y As Single = 0

			'draw line in footer space
			Dim pen As New PdfPen(PdfBrushes.Gray, 1)
			footerSpace.Graphics.DrawLine(pen, x, y, pageSize.Width - x, y)

			'draw text in footer space
			y = y + 5
			Dim font As New PdfTrueTypeFont(New Font("Impact", 10F), True)
			Dim format As New PdfStringFormat(PdfTextAlignment.Left)
			Dim footerText As [String] = "E-iceblue Technology Co., Ltd." & vbLf & "Tel:028-81705109" & vbLf & "Website:http://www.e-iceblue.com"
			footerSpace.Graphics.DrawString(footerText, font, PdfBrushes.Gray, x, y, format)

			'draw dynamic field in footer space
			Dim number As New PdfPageNumberField()
			Dim count As New PdfPageCountField()
			Dim compositeField As New PdfCompositeField(font, PdfBrushes.Gray, "Page {0} of {1}", number, count)
			compositeField.StringFormat = New PdfStringFormat(PdfTextAlignment.Right, PdfVerticalAlignment.Top)
			Dim size As SizeF = font.MeasureString(compositeField.Text)
			compositeField.Bounds = New RectangleF(pageSize.Width - x, y, size.Width, size.Height)
			compositeField.Draw(footerSpace.Graphics)

			'return footerSpace
			Return footerSpace
		End Function
	End Class
End Namespace

Spire.PDF for .NET is a professional PDF API applied to creating, writing, editing, handling and reading PDF files without any external dependencies within .NET (C#, VB.NET, ASP.NET, .NET Core, .NET 5.0, .NET 6.0, .NET 7.0, MonoAndroid and Xamarin.iOS) application. Using this .NET PDF library, you can implement rich capabilities to create PDF files from scratch or process existing PDF documents entirely through C#/VB.NET without installing Adobe Acrobat.
Many rich features can be supported by the .NET PDF API, such as adding digital signature, including timestamp in signature, adding dynamic/image stamp, adding text/image watermark, creating PDF Portfolio, extracting text/attachment/images, PDF merging/spliting, metadata updating, section, graph/image drawing and inserting, table creation and processing, cropping pages, copying pages, and importing data etc.