Create CSV File in Java: From Scratch, Arrays & Excel
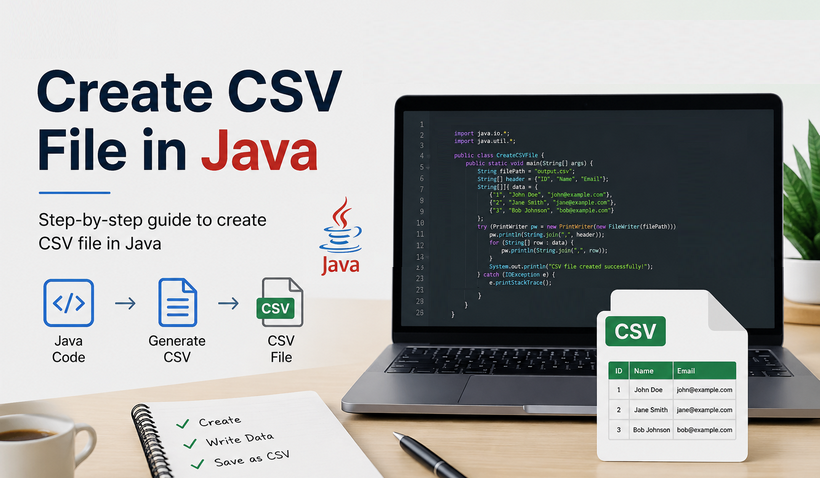
CSV remains a ubiquitous, lightweight data format in Java development, powering report exports, data migration, and cross-platform data interchange. But despite its apparent simplicity, building production-grade CSV files requires handling special characters, encodings, and strict formatting rules – all of which add unnecessary development and testing overhead.
Spire.XLS for Java streamlines this workflow with a clean, robust API that automatically handles all low-level formatting and encoding details. This guide shows you how to use Java to create CSV files – covering basic CSV generation, structured batch exports, Excel-to-CSV conversion, special character support, and advanced delimiter configuration.
- Why Choose Spire.XLS for Java to Create CSV Files
- Creating CSV Files from Scratch with Java
- Create Structured CSV from Arrays in Java
- Create CSV from Excel in Java
- Advanced CSV Generation Techniques
- Frequently Asked Questions
Why Choose Spire.XLS for Java to Create CSV Files
Compared to native Java IO, Apache POI, or any other CSV Java library, Spire.XLS for Java offers distinct advantages:
- Simplified API: Create and write CSV files in just a few lines of code, with no manual stream operations or low-level formatting work.
- Automatic Format Handling: Automatically escapes special characters (commas, double quotes, line breaks) that break standard CSV syntax.
- Full Encoding Support: Natively supports UTF-8, UTF-16, GB2312, and other encodings to avoid Chinese and special text garbling.
- Dual Format Compatibility: Supports both Excel (XLS/XLSX) and CSV formats, enabling bidirectional conversion between spreadsheets and delimited text.
- No Dependencies Bloat: Lightweight library with no third-party dependency conflicts, suitable for Java web, desktop, and microservice projects.
Prerequisites: Install Spire.XLS for Java
To start using Java to write CSV files, you first need to integrate the library into your project. We provide Maven and manual JAR installation methods.
1. Maven Dependency Configuration (Recommended)
Add the following repository and dependency to your project’s pom.xml file:
<repositories>
    <repository>
        <id>com.e-iceblue</id>
        <name>e-iceblue</name>
        <url>https://repo.e-iceblue.com/nexus/content/groups/public/</url>
    </repository>
</repositories>
<dependency>
    <groupId>e-iceblue</groupId>
    <artifactId>spire.xls</artifactId>
    <version>16.4.1</version>
</dependency>
2. Manual JAR Installation
For non-Maven projects, download the Spire.XLS for Java JAR file from the official website and add it to your project’s build path.
Create CSV Files from Scratch with Java
This example demonstrates how to create a blank CSV file from scratch, write custom row and column data, and save the file with standard comma delimiters and UTF-8 encoding. This is the most common basic scenario to generate CSV in Java.
import com.spire.xls.*;
import java.nio.charset.Charset;

public class CreateBasicCSV {
    public static void main(String[] args) {
        // Create Workbook instance
        Workbook workbook = new Workbook();

        // Get the first worksheet (index 0)
        Worksheet sheet = workbook.getWorksheets().get(0);

        // Write header row
        sheet.getCellRange("A1").setValue("ID");
        sheet.getCellRange("B1").setValue("Product Name");
        sheet.getCellRange("C1").setValue("Price");
        sheet.getCellRange("D1").setValue("Quantity");
        sheet.getCellRange("E1").setValue("Category");

        // Write data rows
        sheet.getCellRange("A2").setNumberValue(1001);
        sheet.getCellRange("B2").setValue("Wireless Mouse");
        sheet.getCellRange("C2").setNumberValue(29.99);
        sheet.getCellRange("D2").setNumberValue(150);
        sheet.getCellRange("E2").setValue("Electronics");

        sheet.getCellRange("A3").setNumberValue(1002);
        sheet.getCellRange("B3").setValue("Mechanical Keyboard");
        sheet.getCellRange("C3").setNumberValue(89.99);
        sheet.getCellRange("D3").setNumberValue(75);
        sheet.getCellRange("E3").setValue("Electronics");

        sheet.getCellRange("A4").setNumberValue(1003);
        sheet.getCellRange("B4").setValue("Desk Chair");
        sheet.getCellRange("C4").setNumberValue(199.99);
        sheet.getCellRange("D4").setNumberValue(30);
        sheet.getCellRange("E4").setValue("Furniture");

        // Save worksheet as CSV file (comma delimiter + UTF-8 encoding)
        sheet.saveToFile("products.csv", ",", Charset.forName("UTF-8"));

        // Release resources
        workbook.dispose();
    }
}
Key API Methods Explained
- setValue(): Writes text or string values into a cell.
- setNumberValue(): Writes numeric values (integers and decimals) into a cell.
- saveToFile(filename, separator, charset): Exports the worksheet to CSV with specified delimiter and encoding.
Open the generated CSV in Excel:

Bonus Tip: Beyond generating CSV files from scratch, Spire.XLS also allows you to read a CSV file in Java, enabling full bidirectional data processing within a single library.
Create Structured CSV from Arrays in Java
For practical development, you usually need to batch write business data (e.g., user lists, order records) to CSV files. This example shows how to create a standardized CSV file with fixed headers and batch structured data from 1D & 2D arrays.
import com.spire.xls.*;
import java.nio.charset.Charset;

public class CreateStructuredCSV {
    public static void main(String[] args) {
        Workbook workbook = new Workbook();
        Worksheet sheet = workbook.getWorksheets().get(0);

        // Define CSV header row
        String[] headers = {"Order ID", "Customer Name", "Order Amount", "Order Date", "Order Status"};
        for (int i = 0; i < headers.length; i++) {
            sheet.getCellRange(1, i + 1).setValue(headers[i]);
        }

        // Batch write order data
        String[][] orderData = {
                {"ORD001", "Tom Brown", "299.99", "2026-06-01", "Completed"},
                {"ORD002", "Lucy Green", "599.50", "2026-06-05", "Pending"},
                {"ORD003", "Mike Wilson", "129.00", "2026-06-08", "Shipped"}
        };

        // Traverse and write batch data
        int rowNum = 2;
        for (String[] rowData : orderData) {
            for (int col = 0; col < rowData.length; col++) {
                sheet.getCellRange(rowNum, col + 1).setValue(rowData[col]);
            }
            rowNum++;
        }

        // Save structured CSV file
        sheet.saveToFile("Record.csv", ",", Charset.forName("UTF-8"));
        workbook.dispose();
    }
}
Unlike the previous example where we populated each cell individually, this approach loops through arrays or collections. And the same pattern can be easily adapted to List<List<String>> or other dynamic data sources.
Output:

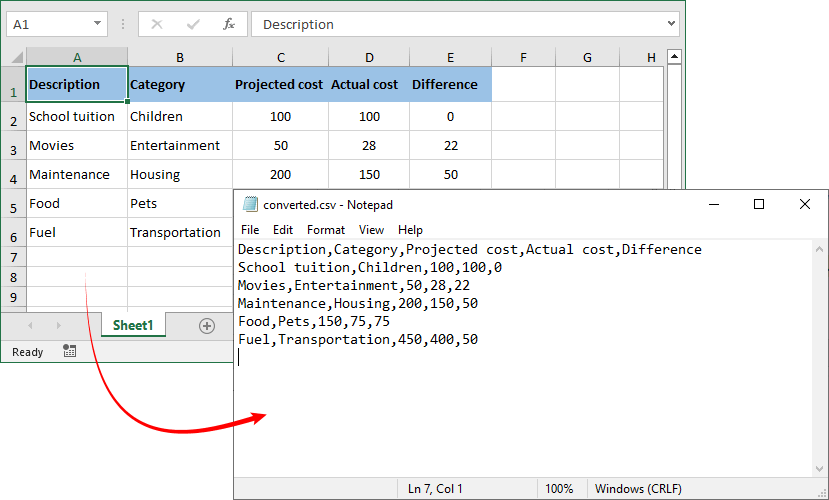
Create CSV from Excel in Java
When you need to convert Excel to CSV in Java, Spire.XLS makes this process incredibly simple with only a few lines of code.
import com.spire.xls.*;
import java.nio.charset.Charset;

public class ExcelToCSV {
    public static void main(String[] args) {
        // Load Excel file
        Workbook workbook = new Workbook();
        workbook.loadFromFile("sample.xlsx");

        // Get the first worksheet
        Worksheet sheet = workbook.getWorksheets().get(0);

        // Save worksheet as CSV
        sheet.saveToFile("converted.csv", ",", Charset.forName("UTF-8"));

        workbook.dispose();
    }
}
The core logic is straightforward: load the Excel file → target the specific worksheet → call the conversion API to save as CSV.
Excel to CSV Result:
The reverse operation – turning a CSV file into an Excel workbook – is equally valuable when you need to apply styles, formulas, or multiple worksheets to raw exported data.
Advanced CSV Generation Techniques
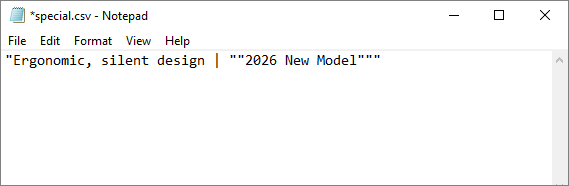
1. Handle Special Characters
When your data contains commas or double quotes, proper escaping is critical. Spire.XLS automatically wraps affected fields in double quotes per RFC 4180 standards, ensuring compatibility with Excel, WPS, and all standard text editors.
Example:
sheet.getCellRange("A1").setValue("Ergonomic, silent design | \"2026 New Model\"");
2. Custom Delimiters and Encoding
Spire.XLS for Java supports custom delimiters beyond the standard comma, accommodating regional and format-specific requirements.
// Using semicolon as delimiter and UTF-16 as encoding
sheet.saveToFile("european_data.csv", ";", Charset.forName("UTF-16"));

// Using tab as delimiter for TSV files
sheet.saveToFile("tab_separated.txt", "\t", Charset.forName("UTF-8"));
Frequently Asked Questions
Q1. Does Spire.XLS for Java require Microsoft Excel?
No. The library works completely independently without any Office dependencies.
Q2. Can I append data to the end of an existing CSV file?
Spire.XLS loads full CSV content into a worksheet for editing. To append data, load the existing file, locate the last used row, write new records starting from the next row index, then save the file back.
Q3. Can multiple worksheets be exported to a single CSV file?
No. CSV is a plain-text, single-sheet format by definition. Each saveToFile() call exports exactly one worksheet to one CSV file. To export multiple sheets, call the save method separately for each worksheet to output individual CSV files.
Q4. What about licensing?
Spire.XLS for Java offers both commercial and free versions. While the free version carries certain usage limitations, it fully supports fundamental CSV operations and lightweight spreadsheet processing tasks.
Conclusion
Generating CSV files is a routine yet critical task in Java development. The quality and reliability of your CSV output directly impact downstream processes such as reporting, system migration, and data analysis. To ensure error‑free CSV generation, you need a library that handles formatting, encoding, and special characters automatically.
Spire.XLS for Java provides exactly that. By following the step‑by‑step code examples in this article, you can quickly integrate robust CSV generation into your Java projects, improving development efficiency while eliminating common formatting flaws and encoding errors.
For more advanced features (e.g., converting CSV to PDF), explore the Spire.XLS for Java Documentation.
How to Check PDF Page Size: 4 Free Easy Methods
Table of Contents
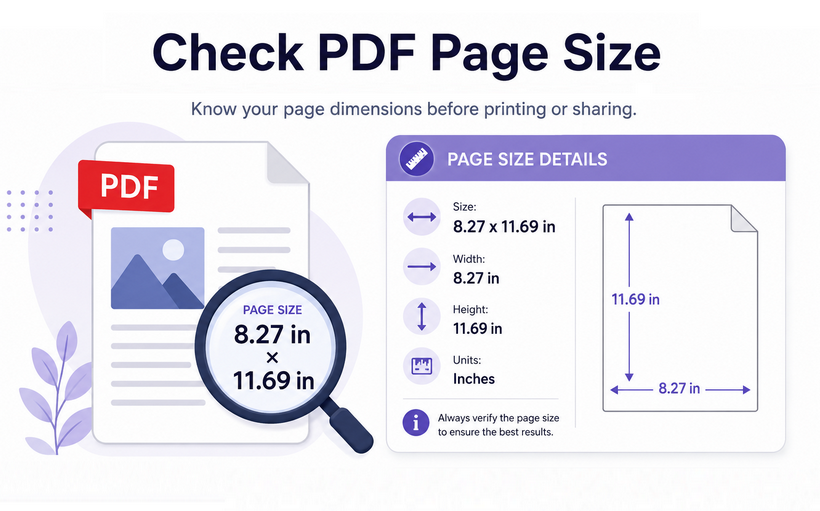
Checking page size of PDF is an essential daily operation for office staff, graphic designers, and printing professionals alike. Incorrect page dimensions can lead to clipped content, skewed layouts, and even automatic rejection of official document submissions.
From quick one-off checks on individual PDFs to large-scale bulk inspection of hundreds of documents, different usage scenarios call for tailored solutions. This article will guide you through how to check PDF page size using 4 fast and free tools. No paid software is required, and by the end, you will never have to guess a PDF’s dimensions again.
- Why Knowing Your PDF Page Size Matters
- The Easiest Method - Using Adobe Acrobat Reader
- Web Browser Method - Checking via Chrome/Edge
- No Software? Using Online PDF Page Size Checker
- Automate with Code - Check Page Size of PDF via C#
- Standard PDF Page Size Reference Table
- FAQs
Why Knowing Your PDF Page Size Matters
Checking the exact dimensions of a PDF page is crucial for several reasons:
- Professional Printing: Printers require exact specifications. An incorrect page size can lead to cut-off text, misaligned margins, and rejected print jobs.
- Form Submissions: Many official forms and applications require a specific paper size (e.g., Letter or A4). Using the wrong size could result in automatic rejection.
- Design and Layout: Designers need to ensure elements fit perfectly within the page boundaries.
- File Consistency: A PDF document can contain pages of mixed sizes. Checking them ensures a uniform and professional final product.
⚠️ Note: Don’t confuse page size with file size. They are unrelated.
- Page size = physical width & height (e.g., 8.5”×11”, 210×297 mm).
- File size = storage space on disk (e.g., 2.5 MB).
The Easiest Method - Using Adobe Acrobat Reader
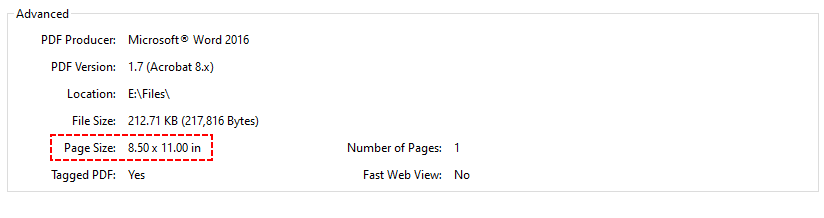
Adobe Acrobat Reader is a popular free PDF viewer. It delivers precise page size measurements and works with all PDF files, including those with custom or non‑standard dimensions.
Here's the quickest way to find page size of PDF:
- Open your target PDF file with Adobe Acrobat Reader.
- Go to File > Properties (or simply use the keyboard shortcut Ctrl+D on Windows).
- In the Document Properties dialog box, click on the Description tab.
- Scroll down to find the Page Size field. It will display exact dimensions (e.g., 8.5 x 11 in / 210 x 297 mm).
After checking your PDF page dimensions, the next logical steps are resizing and cropping. Resizing changes the entire PDF page size—e.g., converting A4 to Letter by scaling content up or down. Cropping PDF pages removes unwanted edges (white margins, crop marks) without scaling the content.
Web Browser Method - Checking via Chrome/Edge
If you don’t have a PDF viewer installed, modern browsers like Google Chrome and Microsoft Edge can display PDF page sizes without any additional software.
How to know PDF paper size in a browser:
- Open your PDF file in Chrome (or Edge) browser.
- Click the three vertical dots (menu icon) in the top‑right corner.
- From the dropdown, select “Document Properties”.
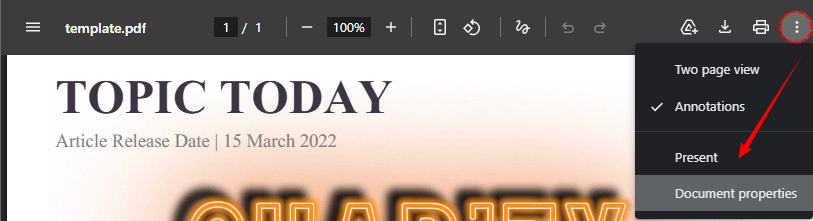
- Check Page size plus portrait/landscape orientation in the pop-up panel.
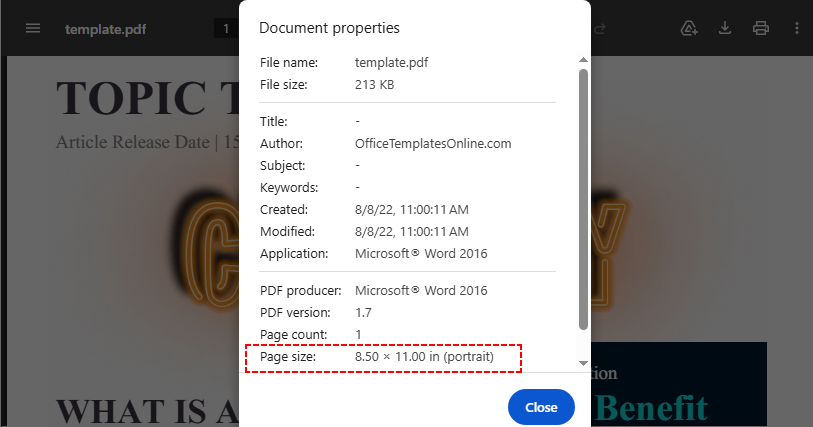
❌ Limitation: For multi-page documents with mixed page sizes, most browsers cannot display exact dimensions—they only show "varies." In this scenario, use the methods below.
No Software? Using Online PDF Page Size Checker
For users who prefer to avoid desktop software entirely, or need a quick cross‑platform solution, online PDF tools are an excellent alternative. These web‑based analyzers typically scan the entire document and identify mixed PDF page sizes in seconds.
Steps to check PDF page size online:
- Open a trusted free online PDF page size checker (e.g., SwiftPDFLab’s Page Dimensions Analyzer)
- Upload your PDF file via drag-and-drop or file browser upload.
- The platform will analyze all pages and output detailed specs:
- Number of pages
- Page dimensions (in inches, mm, or points – you can switch units)
- Orientation (portrait/landscape)
- Standard size classification (e.g., “A4”, “Letter”, “Legal”)
- An indicator if the document has mixed page sizes
- Optional: Export the page information as a CSV file for documentation purposes.
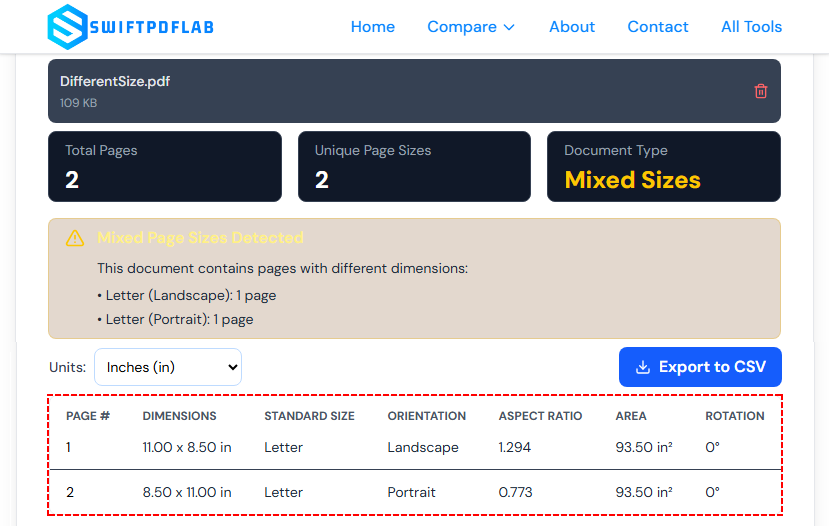
Privacy Reminder: Never upload confidential or sensitive PDF documents to public online tools to prevent data leakage.
Automate with Code - Check Page Size of PDF via C#
If you work with large numbers of PDFs or you need to integrate page size detection into an automated workflow, using a .NET library like Free Spire.PDF is the most efficient approach.
Why use this method?
- You can scan all pages instantly.
- Get dimensions in points, inches, cm, or pixels.
- Works on servers (no GUI required).
- Free library with no watermarks for basic operations (10-page limit).
C# Code to Get PDF Page Size
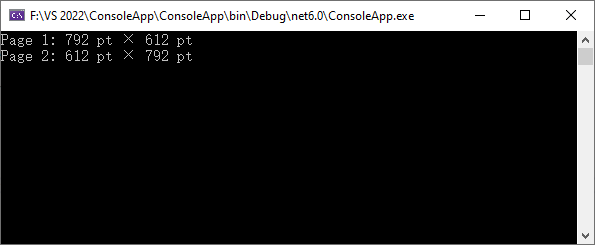
Every PDF internally stores page dimensions in points (1 point = 1/72 inch). The following code loads a PDF and prints the width and height of each page in points.
using System;
using Spire.Pdf;

namespace GetPDFPageSize_Points
{
    class Program
    {
        static void Main(string[] args)
        {
            PdfDocument pdf = new PdfDocument();
            pdf.LoadFromFile("SamplePDF.pdf");
            // Traverse every PDF page
            for (int i = 0; i < pdf.Pages.Count; i++)
            {
                PdfPageBase page = pdf.Pages[i];
                float widthPt = page.Size.Width;
                float heightPt = page.Size.Height;
                Console.WriteLine($"Page {i+1}: {widthPt} pt × {heightPt} pt");
            }
            Console.ReadKey();
        }
    }
}
Output:
Converting Points to Other Units
Points are technical but not always user‑friendly. To present dimensions in inches, centimeters, or pixels, use PdfUnitConvertor to switch measurement units
PdfUnitConvertor unitCvtr = new PdfUnitConvertor();
// Convert to inches
float inchW = unitCvtr.ConvertUnits(widthPt, PdfGraphicsUnit.Point, PdfGraphicsUnit.Inch);
float inchH = unitCvtr.ConvertUnits(heightPt, PdfGraphicsUnit.Point, PdfGraphicsUnit.Inch);

// Convert to centimeters
float cmW = unitCvtr.ConvertUnits(widthPt, PdfGraphicsUnit.Point, PdfGraphicsUnit.Centimeter);
float cmH = unitCvtr.ConvertUnits(heightPt, PdfGraphicsUnit.Point, PdfGraphicsUnit.Centimeter);

// Convert to pixels
float pxW = unitCvtr.ConvertUnits(widthPt, PdfGraphicsUnit.Point, PdfGraphicsUnit.Pixel);
float pxH = unitCvtr.ConvertUnits(heightPt, PdfGraphicsUnit.Point, PdfGraphicsUnit.Pixel);
Beyond just page dimensions, you may also need to detect page orientation and rotation angle —information that is especially useful when processing scanned documents or automatically straightening PDF pages.
Standard PDF Page Size Reference Table
After checking your PDF page size, use this table to identify standard formats or verify compliance with submission requirements.
| Paper Size | Width × Height (mm) | Width × Height (inches) | Width × Height (points) | Common Use |
|---|---|---|---|---|
| A4 | 210 × 297 mm | 8.27 × 11.69 in | 595 × 842 pt | Letters, reports, forms (most countries) |
| US Letter | 216 × 279 mm | 8.5 × 11 in | 612 × 792 pt | Business letters, resumes (US, Canada) |
| A3 | 297 × 420 mm | 11.69 × 16.54 in | 842 × 1191 pt | Diagrams, posters, small newspapers |
| A5 | 148 × 210 mm | 5.83 × 8.27 in | 420 × 595 pt | Notebooks, flyers, booklets |
| Legal | 216 × 356 mm | 8.5 × 14 in | 612 × 1008 pt | Legal contracts (US) |
| Tabloid / Ledger | 279 × 432 mm | 11 × 17 in | 792 × 1224 pt | Brochures, newsletters |
How to interpret custom sizes?
If the dimensions do not match any standard row, your PDF uses a custom page size. This is common for:
- Screenshots saved as PDF (size matches screen resolution)
- CAD drawings or architectural plans
- Scanned images with margins trimmed
Wrap‑Up
Knowing how to check PDF page size is a fundamental skill for anyone who works with digital documents. The above four solutions cover all user scenarios: use Adobe Reader for single local file verification, browsers for quick casual checks, online tools for cross-device temporary use, and C# coding for enterprise-level bulk automated inspection.
Always verify page dimensions before printing or document submission to avoid formatting errors, and refer to standard paper specs and conversion formulas to match required submission rules effortlessly.
FAQs
Q: Can a single PDF have pages of different sizes?
Yes, absolutely. A PDF document can contain a mix of different page sizes and orientations. For example, you could have a portrait A4 text page followed by a landscape A3 diagram. It's always a good idea to check page sizes for the entire document to avoid inconsistencies.
Q: How do I check if a PDF has mixed page sizes?
- Manual method (small documents): In Adobe Acrobat Reader, scroll through each page to check its dimension. This is tedious for long PDFs.
- Online tool method: Upload to a free page size checker; it will list sizes for all pages instantly.
- C# script method: Use the code above to scan every page and flag any that differ from the first page.
Q: How do I convert between inches, mm, and points?
You can use simple conversion formulas:
- Points → Inches: Divide points by 72. (e.g., 612 pt / 72 = 8.5 in).
- Inches → Points: Multiply inches by 72. (e.g., 8.5 in * 72 = 612 pt).
- Inches → mm: Multiply inches by 25.4. (e.g., 8.5 in * 25.4 = 215.9 mm).
- mm → Inches: Divide mm by 25.4. (e.g., 210 mm / 25.4 = 8.2677 in).
For quick reference: 1 inch = 72 points = 25.4 millimeters.
Q: Is there a way to check page sizes of multiple PDFs at once (bulk)?
Yes, write a C# script to loop through a folder, load each PDF, and extract page sizes. Here’s a minimal example:
string[] files = Directory.GetFiles(@"C:\PDFs\", "*.pdf");
foreach (string file in files)
{
    using (PdfDocument pdf = new PdfDocument())
    {
        pdf.LoadFromFile(file);
        Console.WriteLine($"{Path.GetFileName(file)}: {pdf.Pages[0].Size.Width} x {pdf.Pages[0].Size.Height} pts");
    }
}
See Also
Convert PDF Versions: A Guide to Upgrade & Downgrade PDFs
Table of Contents
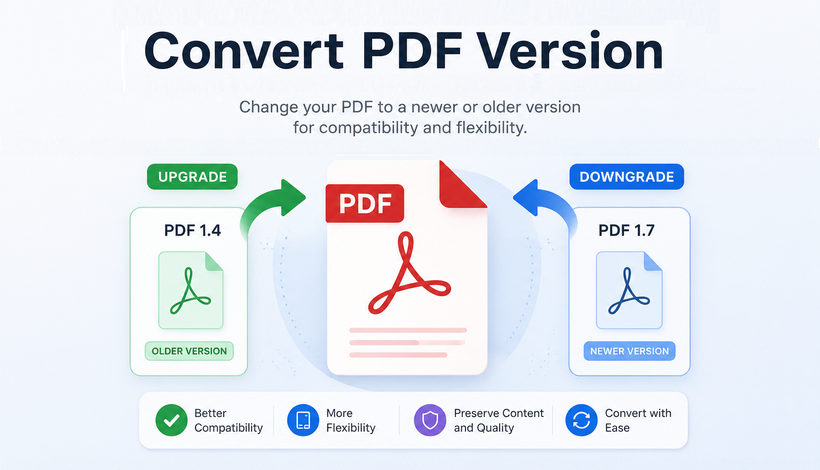
PDF version incompatibility is one of the most common headaches for anyone working with digital files. Old software cannot load new PDFs properly, while legacy-format files often fail to meet the requirements of modern platforms and official filing systems. Whether you need to upgrade for better security and functionality, or downgrade for broader compatibility, learning to convert PDF versions is an essential skill.
In this guide, we will explore what PDF versions are, why they matter, and, most importantly, provide step-by-step tutorials for multiple conversion methods to fix compatibility issues once and for all.
- Overview of PDF Versions: A Quick History
- Why Would I Need to Convert a PDF Version?
- How to Check PDF Version First
- Method 1: Free Online PDF Version Converters
- Method 2: Offline Free Desktop Tools
- Method 3: Programmatically Convert PDF Version via C#
- Frequently Asked Questions (FAQs)
Overview of PDF Versions: A Quick History
The PDF format has evolved significantly over more than 30 years. Each new version introduced more advanced features, while also bringing compatibility challenges. Below are the major version milestones:
| PDF Version | Introduced With | Key Features |
|---|---|---|
| PDF 1.0–1.2 | Acrobat 1.0 (1993) | Basic text, images, and hyperlinks |
| PDF 1.3 | Acrobat 4.0 (2000) | Digital signatures and JavaScript support |
| PDF 1.4 | Acrobat 5.0 (2001) | Transparency effects, enhanced security, and metadata |
| PDF 1.5 | Acrobat 6.0 (2003) | Layers (optional content) and improved compression |
| PDF 1.6 | Acrobat 7.0 (2005) | 3D content and AES encryption |
| PDF 1.7 | Acrobat 8.0 (2006) | Later became the ISO standard for PDF (ISO 32000-1:2008) |
| PDF 2.0 | ISO 32000-2 (2017) | Enhanced accessibility, improved digital signatures, and better encryption |
Why Would I Need to Convert a PDF Version?
A mismatch between the PDF version and your viewing software can lead to several problems:
- Broken Visuals: Graphics may appear incorrectly if transparency effects are not supported.
- Interactive Failures: Forms, 3D content, and embedded multimedia simply won't work.
- Font Errors: Text might be replaced with the wrong font or show up as empty boxes.
- Complete Failure: The file may display an error message, crash your software, or refuse to open.
Here are the most common reasons you might need to perform a conversion:
- Upgrading to a Newer Version: To take advantage of the latest security, accessibility, and interactive features found in PDF 2.0.
- Downgrading to an Older Version for Compatibility: The most common reason. For example, some government systems and legal e-filing portals only accept files saved in the older PDF 1.4 format.
- Converting to a Specialized Subset: Beyond the main versions, there are ISO-standardized subsets designed for specific needs. Convert to PDF/A for long-term archiving, PDF/X for professional printing, and PDF/E for engineering and CAD documents.
How to Check PDF Version First
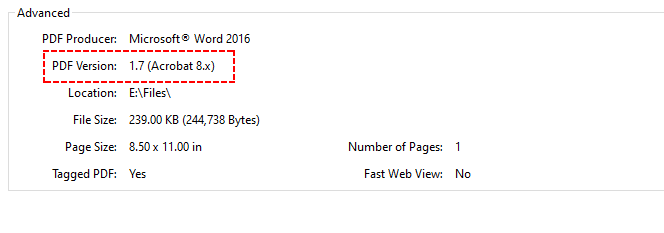
Before you convert PDF version, confirm your existing file version to avoid unnecessary conversions. Here’s a quick verification using Adobe:
- Open your PDF file in Adobe Acrobat or Adobe Reader.
- Click File > Properties.
- Locate the PDF Version field under the “Description” tab.
Example:
Method 1: Free Online PDF Version Converters
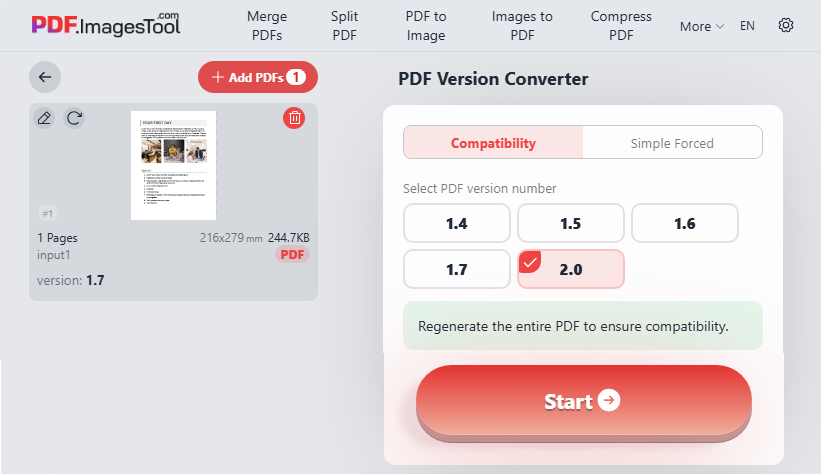
Online PDF converters are perfect for quick, one-off conversions for small to medium-sized files. They support all version conversions (1.4, 1.5, 1.7, 2.0) and require no installation.
Steps to change PDF version online:
- Open a trusted free PDF version converter tool (e.g., PDF.ImagesTool.com).
- Upload your target PDF file.
- Select your desired output PDF version.
- Click “Start”, then download your updated PDF file.
In this example, we convert PDF to a newer version online (1.7 → 2.0):
Often, a user has a large PDF with mixed content—some pages need to be downgraded while others must remain at a higher version. Extracting PDF pages is a complementary operation in such cases.
Method 2: Offline Free Desktop Tools
Desktop tools are ideal for private, confidential files or users who prefer not to upload files to the cloud. Two mainstream free/paid options are recommended below.
Option A: Using Adobe Acrobat Pro
Acrobat Pro offers the most reliable offline PDF version conversion with zero data leaks and full quality retention. Here are the steps to downgrade PDF version:
- Open your PDF in Adobe Acrobat Pro.
- Navigate to File > Save As Other > Optimized PDF....
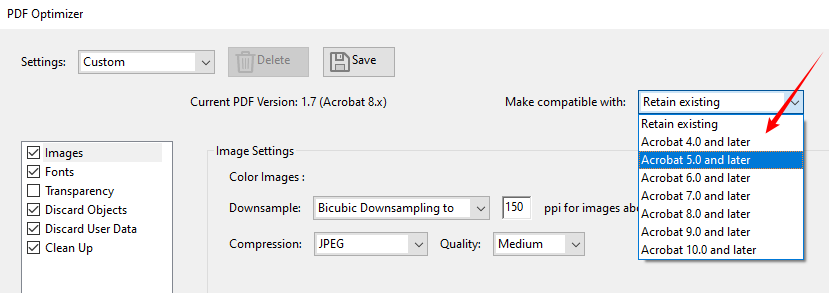
- In the "PDF Optimizer" dialog, find the Make compatible with drop-down menu.
- Select the desired version. For example, choose "Acrobat 5.0” for PDF 1.4.
- Click OK and save the optimized file with the new version.
Example: Convert PDF 1.7 to PDF 1.4
Pro Tip: Downgrading a PDF can increase file size due to flattened transparency and layers. Follow this guide to compress the resulting PDF without losing quality.
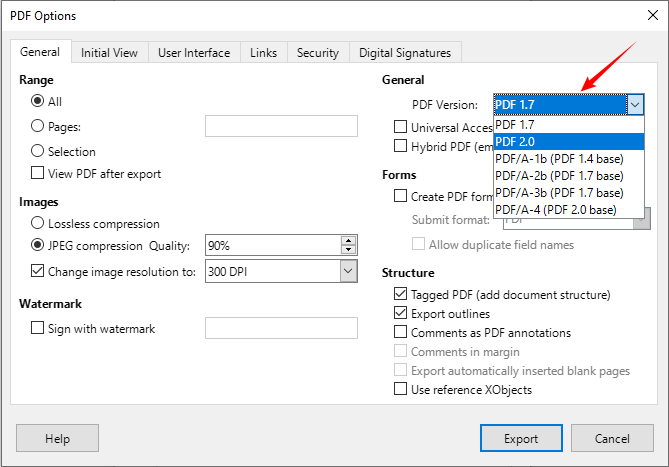
Option B: Using LibreOffice (Free Alternative)
If you do not have Adobe Acrobat Pro, free open-source desktop tools like LibreOffice allow you to convert PDF versions for free. Ideal for regular users who need offline conversion with no extra cost.
- Open your PDF file in LibreOffice Draw.
- Go to File > Export As > Export as PDF.
- Navigate to the General tab and select your target PDF version.
- Adjust other settings as needed, then click Export to save the file.
Method 3: Programmatically Convert PDF Version via C#
For .NET developers building automated document processing systems, enterprise bulk PDF conversion, or backend automation scripts, use the Free Spire.PDF library to realize automatic PDF version conversion via code.
Sample C# Code to Change PDF Version
using Spire.Pdf;

namespace ConvertPDFVersion
{
    class Program
    {
        static void Main(string[] args)
        {
            // Create a PdfDocument object
            PdfDocument pdf = new PdfDocument();

            // Load a sample PDF file
            pdf.LoadFromFile("F:\\sample.pdf");

            // Change the PDF to version 1.7
            pdf.FileInfo.Version = PdfVersion.Version1_7;

            // Save the result file
            pdf.SaveToFile("F:\\ConvertVersion.pdf");
        }
    }
}
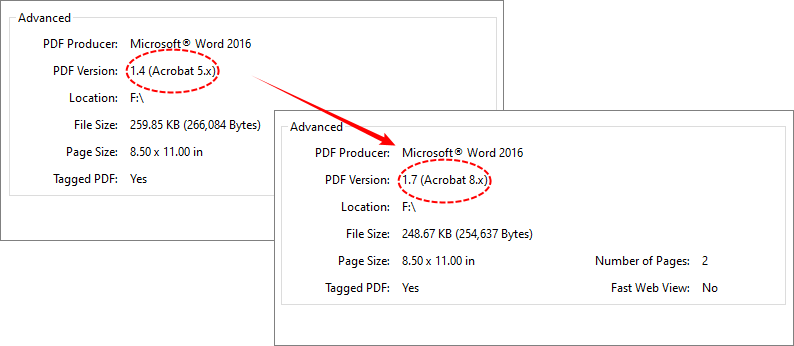
Free Spire.PDF provides a PdfDocument class with a FileInfo.Version property. Setting this property changes the internal version header and triggers the library to remove or adjust features that are incompatible with the target version.
Output: Convert PDF version 1.4 to 1.7
You can modify the PdfVersion enumeration value to switch to other versions (supports PDF 1.0 to 1.7).
Frequently Asked Questions (FAQs)
Q1: Which PDF version offers the best compatibility?
A: PDF 1.7 is the best all-around version for universal compatibility. For strict legacy systems or government portals, PDF 1.4 is the safest choice.
Q2: Can I convert PDF version without losing quality?
A: Yes. Use offline tools like Adobe Acrobat Pro, LibreOffice, or Free Spire.PDF for lossless conversion. Online tools may cause minor image compression. Downgrading PDFs will remove advanced new features but will not ruin file quality.
Q3: Is it safe to downgrade a PDF version?
A: Yes, downgrading is safe for standard documents. Note that advanced features exclusive to newer versions (like 3D graphics or modern encryption) will be removed during downgrading.
Q4: Does converting PDF version work for scanned/image-based PDFs?
A: Yes. Version conversion takes effect on both editable native PDFs and scanned image-only PDFs. Since scanned PDFs contain no advanced features like layers, 3D content or dynamic forms, downgrading or upgrading will not damage content or visual display.
Final Thoughts
Knowing how to convert PDF versions is a valuable skill that saves time and prevents document headaches. Whether you need to downgrade or upgrade PDF version, the methods outlined above provide reliable solutions for every scenario—from one-off online conversions to automated enterprise workflows.
Summary of method selection:
- Quick & simple → Online converter (non-sensitive small files).
- Secure & professional → Adobe Acrobat Pro (offline, full control).
- Free & offline → LibreOffice Draw (open source, good for basic documents).
- Automation & batch → Free Spire.PDF with C# (for developers).
Always check your current PDF version first, then choose the conversion method that best fits your requirements. By mastering PDF version conversion, you turn a potential point of failure into a seamless part of your document workflow.
See Also
Change Font in PDF: Adobe, Online & C# Automation
PDF has long been the universal standard for sharing fixed-format professional documents worldwide. However, its static design often brings a common pain point: you cannot easily change font sizes, styles, or colors in a PDF without the right tools.
Whether you need to fix inconsistent text formatting, update brand fonts, adjust font sizes for readability, or refine typography for printing and presentations, mastering how to change fonts in PDF is an essential skill for students, professionals, and business owners alike.
In this guide, we break down step-by-step methods to change PDF font using:
- Professional software (Adobe Acrobat Pro)
- Desktop workaround (Microsoft Word)
- Free online PDF editors
- Programmatic automation (C#/.NET)
We also elaborate on PDF font limitations, industry best practices, and FAQs to solve all your PDF font editing issues once and for all.
Understanding PDF Font Challenges
Before modifying PDF fonts, it’s critical to understand why PDFs are hard to edit:
| Challenge | Explanation |
|---|---|
| Embedded vs. non-embedded fonts | Some PDFs embed only subsets of fonts, limiting editing options. |
| Scanned PDFs (image-based) | These have no editable text layer, and OCR is required to convert images to editable text. |
| Missing system fonts | If a font isn’t installed on your device, text may appear garbled or be substituted automatically. |
| Fixed Text Boxes | PDF text is divided into independent text blocks. Changing font size on PDF may cause line breaks, text overflow, or layout shift. |
| Permission restrictions | Some PDFs are locked by the creator; you may need to remove permissions before editing. |
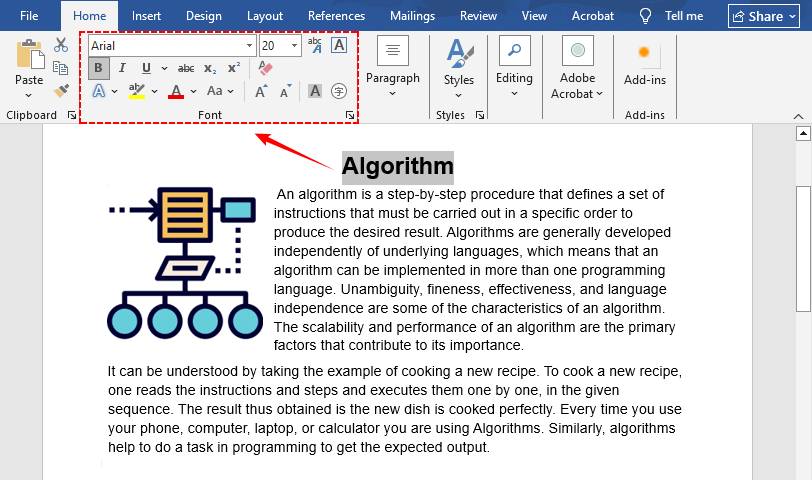
Method 1: Edit PDF Font with Adobe Acrobat Pro
Adobe Acrobat Pro is the most reliable tool for editing native PDF fonts. It delivers lossless font customization, full typography control, and built-in OCR for scanned documents, compatible with both Windows and Mac.
Steps to change font on Adobe Acrobat:
(1) Open your PDF in Adobe Acrobat Pro.
(2) Enter Edit Mode: Click the “Edit” button on the top global bar to activate PDF editing panel.
(3) Select your text: Select the specific text block you want to reformat with your mouse cursor.
(4) Change the font: In the “FORMAT TEXT” section on the left panel:
- Choose a new font from the dropdown list
- Adjust font size (preset values or custom input)
- Change PDF font color via the color picker
- Toggle bold, italic, underline text styles
- Set text alignment: left, center, right, justify
- Customize line spacing and character spacing
(5) Click outside the text box to apply your changes and save the PDF.

Pro Tip for Scanned PDFs
If your PDF comes from a scanned document, Acrobat automatically runs OCR (Optical Character Recognition) to create an editable text layer. This is crucial for changing fonts in scanned PDF documents.
Method 2: Change PDF Font with Microsoft Word
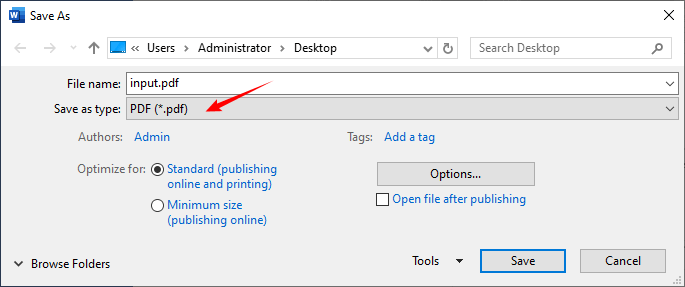
If you don’t have premium PDF software, use Microsoft Word as a workaround to change font in a PDF document on Windows and Mac. It converts PDFs to editable Word documents, supports full font editing, and re-exports to PDF.
(1) Launch Microsoft Word and click “File” > “Open” to select your PDF file.
(2) A pop-up will appear confirming PDF conversion. Click “OK” to convert the PDF to an editable Word document.
(3) Select text and use the Word top font toolbar to change font family, size, color, and bold/italic style.
(4) Fix any layout shifts (note that complex elements may be lost or misaligned. Word works best with simple text-based PDFs).
(5) Go to “File” > “Save As” and choose “PDF” as the export format to save your updated file.
After refining PDF fonts and formatting, you can compress the finalized PDF file size while preserving font and layout integrity.
Method 3: Free Online PDF Editors
For one‑off, simple font changes, free online PDF editors let you edit font on PDF directly in your browser. We recommend Soda PDF and Sejda, two trusted tools offering free PDF font-editing features.
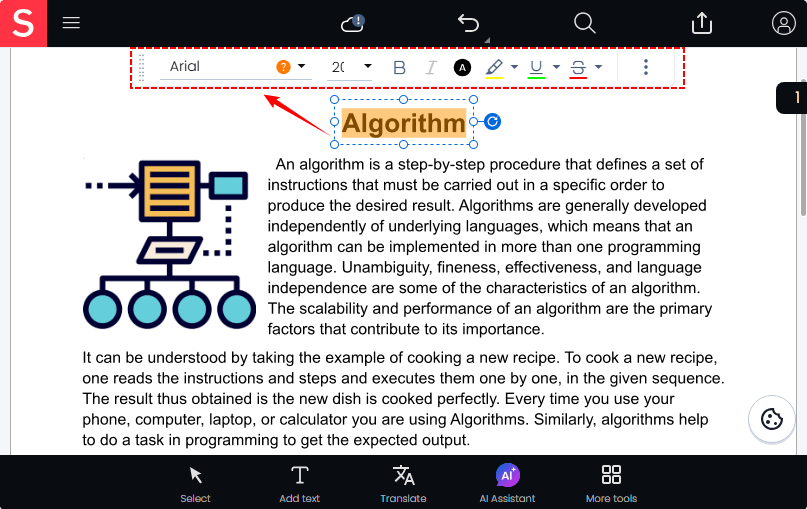
Change Font in PDF Online Using Soda PDF
Soda PDF offers a web-based editing tool that makes it easy to edit PDF font online. Without any installation, you can receive a PDF file with the desired font.
(1) Open Soda PDF’s Edit PDF tool and upload your PDF.
(2) Select existing text to modify font family, adjust font size, set bold/italic styles, or change font color in PDF.
(3) After editing, save and download your final PDF file.
Method 4: Programmatically Change PDF Font with C#
For developers, IT teams, or users needing to perform batch processing, Free Spire.PDF for .NET is a free library that lets you change all fonts in a PDF with just a few lines of C# code.
Key Benefits
- Free for commercial & non-commercial use
- Batch change ALL fonts in a PDF in seconds
- No manual editing; ideal for automated workflows
- Preserves PDF layout and formatting
Step-by-Step C# Code Example
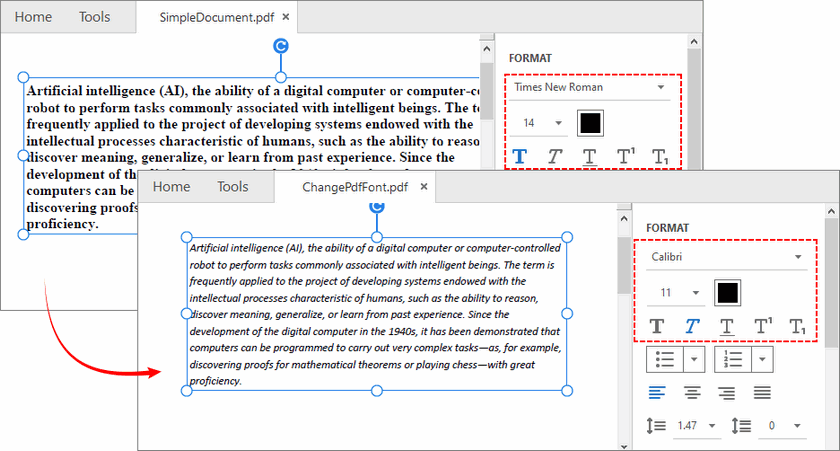
The following code loads a PDF, retrieves every font used in the document, and replaces them all with a new font (Calibri, Italic, 11pt).
using Spire.Pdf;
using Spire.Pdf.Graphics;
using Spire.Pdf.Graphics.Fonts;

namespace Replace_font_in_PDF
{
    class Program
    {
        static void Main(string[] args)
        {
            // 1. Load the PDF document
            PdfDocument pdf = new PdfDocument();
            pdf.LoadFromFile(@"C:\SimpleDocument.pdf");

            // 2. Get all fonts used in the PDF
            PdfUsedFont[] fonts = pdf.UsedFonts;

            // 3. Create a new TrueType font
            PdfTrueTypeFont newfont = new PdfTrueTypeFont("Calibri", 11f, PdfFontStyle.Italic, true);

            // 4. Replace every existing font with the new font
            foreach (PdfUsedFont font in fonts)
            {
                font.Replace(newfont);
            }

            // 5. Save the modified PDF
            pdf.SaveToFile("ChangePdfFont.pdf");
        }
    }
}
The code uses two core members:
- pdf.UsedFonts: Retrieves an array of every font used in the PDF (including subsets).
- font.Replace(newfont): Replaces the original font with the new font.
Example Output:
⚠️ Note: Free Spire.PDF currently only supports replacing standard Type‑1 fonts and non‑embedded TrueType fonts.
Preserving Font Size & Style
In real-world scenarios, replacing PDF fonts with a fixed size or style often causes layout issues such as text overlap, content truncation, and broken line wrapping. To avoid document distortion, you can retain the original font size and style while only swapping the font family.
//Replace each font while preserving its original size and style
PdfUsedFont[] fonts = pdf.UsedFonts;
foreach (PdfUsedFont font in fonts)
{
   float originalSize = font.Size;               // Keep original font size
   PdfFontStyle originalStyle = font.Style;      // Keep original style (bold, italic, etc.)

   // Create a new TrueType font with the same size and style
PdfTrueTypeFont newfont = new PdfTrueTypeFont("Calibri", originalSize, originalStyle, true);

   // Replace the old font with the new one
   font.Replace(newfont);
}
Customizing the PDF Font
You can modify the font constructor to suit your needs:
// using different font families
PdfFont newfont = new PdfFont(PdfFontFamily.Helvetica, 12f, PdfFontStyle.Bold);
PdfFont newfont = new PdfFont(PdfFontFamily.Courier, 10f, PdfFontStyle.Regular);

// Using a specific system font by name (TrueType)
PdfTrueTypeFont newfont = new PdfTrueTypeFont("Arial", 11f, PdfFontStyle.Regular, true);
Building on batch font replacement, you can also search and replace text strings in PDF using C# with Free Spire.PDF.
Best Practices for Changing PDF Fonts
- Use web-safe fonts: Use Arial, Calibri, Helvetica, or Times New Roman to ensure consistent display across all devices and operating systems.
- Avoid over-editing scanned PDFs: For heavy typography changes, recreate the document in Word/Google Docs and export to PDF for cleaner results.
- Embed custom fonts: If using brand-specific fonts, enable font embedding during saving to prevent missing font errors on other devices.
- Use desktop/programmatic tools for professional documents: For business, legal, or batch PDFs, prioritize Adobe Acrobat, Word, or C# (Free Spire.PDF) over free online tools for better quality control.
Wrap‑Up
Learning how to change font in PDF eliminates the limitations of static PDF formatting, letting you polish documents for professional use, business branding, or automated workflows. For professional results, Adobe Acrobat Pro remains the gold standard. If you already have Microsoft Word, it offers a clever free workaround for Word users. For quick, browser‑based edits, free online editors work well.
And for developers and power users, Free Spire.PDF for .NET opens up a world of automation. With just a few lines of C# code, you can replace every font in a PDF with consistency and precision. Always confirm if your PDF is editable or scanned first to choose the fastest, most effective editing method.
FAQs About Changing Fonts in PDFs
Q: Can I change font in a PDF for free?
A: Yes. You can use Microsoft Word, free online tools, or the C# Free Spire.PDF method to change PDF fonts at no cost. Premium tools are only required for advanced/unlimited edits.
Q: Why can’t I edit text in my PDF?
A: Your file is most likely a scanned/image-based PDF. These files have no editable text layer—you need OCR software to convert the image to editable text before modifying fonts.
Q: Does changing font in a PDF affect the document's layout?
A: Yes, potentially. Different fonts have different character widths, which can shift line breaks and page layouts. Each text box is independent, so text does not automatically reflow to the next page.
Q: Can I use custom fonts for PDF editing?
A: Yes. Install the custom font on your Windows/Mac device first; then you can select it in Acrobat, Word, online editors, or reference it via file path in Free Spire.PDF C# code. Remember to embed the font when saving to avoid display errors on other devices.
Q: Will changing a font increase the PDF file size?
A: Possibly. If you replace a non‑embedded font with an embedded one, the font data is added to the PDF, increasing file size. To avoid larger PDF files, use standard web-safe fonts and enable embedding only when required.
See Also
Convert CSV to XML in C# - Full Guide with Code
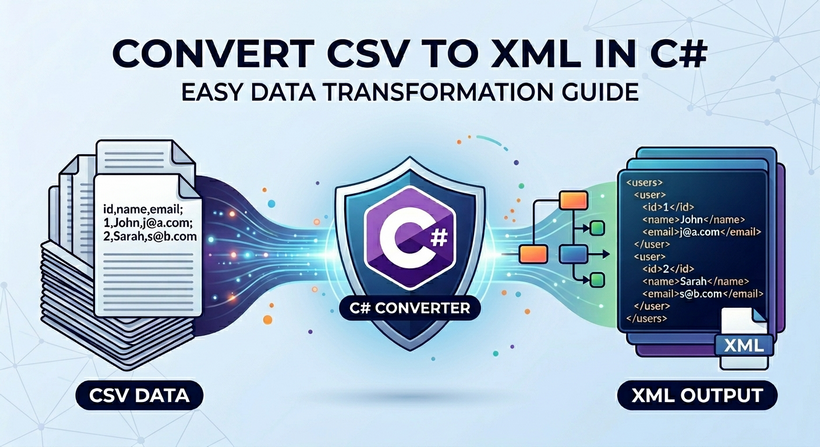
CSV (Comma-Separated Values) and XML (eXtensible Markup Language) are two mainstream data exchange formats in modern software development. CSV excels at lightweight storage and transmission of tabular data, while XML is widely used for cross-system data interaction due to its hierarchical structure and strict validation rules. Converting CSV to XML is a common demand in scenarios such as configuration file generation, database record export, and third-party API integration.
Manual CSV parsing and XML generation are error-prone, inefficient, and difficult to maintain for large datasets. For C# developers, Spire.XLS for .NET provides a lightweight, high-performance solution for CSV-to-XML conversion.
This article will guide you through two core methods to convert CSV to XML in C# using Spire.XLS, covering basic conversion and customized XML output with complete code examples.
- Understanding the Two XML Output Types
- Method 1: Convert CSV to Excel XML in C#
- Method 2: Convert CSV to Custom XML in C#
- Handling Real World CSV Scenarios
- FAQs About CSV to XML Conversion
Prerequisites
Install Spire.XLS via NuGet
The quickest way to add Spire.XLS to your project is through the NuGet Package Manager. In Visual Studio, run the following command in the Package Manager Console:
Install-Package Spire.XLS
Alternatively, search for “Spire.XLS” in the NuGet UI and install the latest version.
Prepare a Sample CSV Data (For Testing)
Create a Products.csv file in your project’s output folder with this sample tabular data (includes headers and rows):
ID,ProductName,Category,Price,StockQuantity,ReleaseDate
1,Laptop,Electronics,999.99,50,2023-01-15
2,Wireless Mouse,Electronics,25.50,200,2023-02-20
3,Cotton T-Shirt,Apparel,19.99,150,2022-11-05
4,Coffee Mug,Home Goods,12.99,300,2022-09-10
5,Desk Chair,Furniture,150.00,75,2023-03-01
Understanding the Two XML Output Types
When converting CSV file to XML using Spire.XLS for .NET, you can produce two distinct types of XML output:
1. Excel XML (SpreadsheetML)
A standardized XML format based on Microsoft's Open XML specification. It retains the original table layout, cell formatting and overall structure of the CSV file. This is an ideal choice if you need to open, edit or process the generated XML with Excel and other spreadsheet-compatible tools.
2. Custom XML Structure
A user-defined XML schema enables free mapping of CSV columns to custom element tags, nested hierarchies, and adjustable presentation rules. This is ideal for integrating with third-party APIs, legacy systems, and business platforms that require specific fixed XML node structures.
Both approaches are covered in detail with C# code examples in the following sections. For developers working in Python, refer to our separate guide: Convert CSV to XML in Python
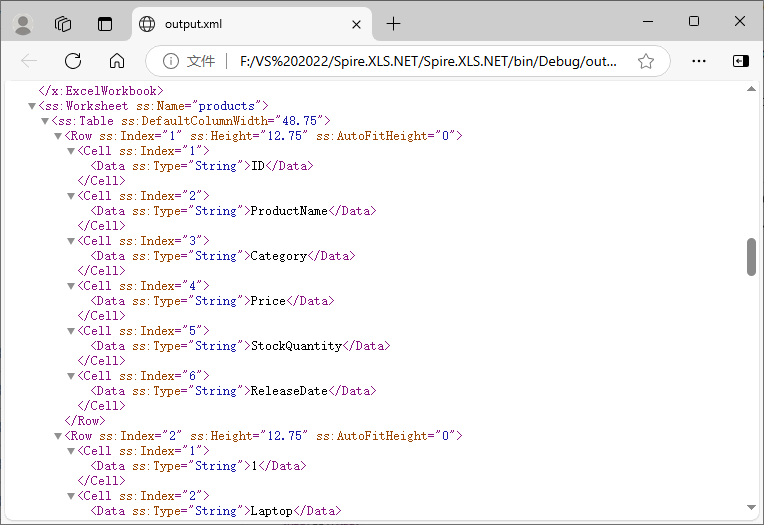
Method 1: Convert CSV to Excel XML in C#
This is the simplest approach that requires only a few lines of code. The CSV is loaded into a Workbook, then saved directly as Excel XML (SpreadsheetML) format. Suitable for cases where the target system accepts Excel's native XML format.
CSV to XML C# Code Example:
using Spire.Xls;

namespace CsvToExcelXmlConverter
{
    class Program
    {
        static void Main(string[] args)
        {
            // Create a Workbook instance
            Workbook workbook = new Workbook();

            // Load CSV into the first worksheet
            workbook.LoadFromFile("Products.csv", ",", 1, 1);

            // Save as Excel SpreadsheetML format
            workbook.SaveAsXml("output.xml");

            // Clean up resources
            workbook.Dispose();
        }
    }
}
Core Methods:
- LoadFromFile() – Spire.XLS automatically parses the CSV content into the first worksheet of the workbook.
- SaveAsXml() – Export the loaded CSV data as an Excel XML file.
The core data parts looks like:
Beyond converting CSV files, Spire.XLS for .NET also enables seamless conversion of Excel (XLS / XLSX) to XML using the same robust Workbook.SaveAsXml() method.
Method 2: Convert CSV to Custom XML in C#
When the target system expects a specific XML schema, you’ll need to build a custom XML document. Spire.XLS, together with the built-in .NET XmlWriter class, makes this straightforward: simply iterate over worksheet rows and columns, then generate well-structured XML efficiently.
Custom XML Code Example:
using Spire.Xls;
using System.Xml;

namespace CSVtoXMLConverter
{
    class program
    {
        static void Main(string[] args)
        {

            // Initialize workbook and load CSV
            Workbook workbook = new Workbook();
            workbook.LoadFromFile("Products.csv", ",", 1, 1);
            Worksheet worksheet = workbook.Worksheets[0];

            // Create custom XML settings (indentation for readability)
            XmlWriterSettings settings = new XmlWriterSettings
            {
                Indent = true,
                IndentChars = "\t",
                OmitXmlDeclaration = false,
                Encoding = System.Text.Encoding.UTF8
            };

            // Save CSV to XML with CUSTOM ROOT NODE and FORMATTING
            XmlWriter writer = XmlWriter.Create("Custom_Output.xml", settings);

            writer.WriteStartDocument();
            // Custom root element: <ProductInventory>
            writer.WriteStartElement("ProductInventory");


            // Loop through CSV rows (skip header row: start at 2)
            for (int row = 2; row <= worksheet.LastRow; row++)
            {
                // Custom data node: <Product>
                writer.WriteStartElement("Product");

                // Loop through CSV columns and write custom elements
                for (int col = 1; col <= worksheet.LastColumn; col++)
                {
                    string header = worksheet.Range[1, col].Text;
                    string value = worksheet.Range[row, col].Text;
                    writer.WriteElementString(header, value);
                }

                writer.WriteEndElement(); // Close <Product>
            }

            writer.WriteEndElement(); // Close <ProductInventory>
            writer.WriteEndDocument();

            writer.Close();
            workbook.Dispose();
        }

    }
}
How the code works:
- Load the CSV file into a Workbook.
- Access the worksheet – Retrieve the first worksheet containing the imported data.
- Create an XmlWriter – Configure it with indentation, encoding, and other formatting preferences.
- Write the XML document – Start the document, write the custom root element, then loop through rows (skipping the header row) and columns, writing an element per column using the header text as the tag name.
- Close resources – Close the XmlWriter and dispose of the Workbook.
Output:
The generated XML uses <ProductInventory> as the root node and <Product> as the data node, with child nodes named after CSV headers, fully matching custom business requirements.
Bonus Tip: For scenarios requiring formal document delivery, you can also use Spire.XLS for .NET to convert XML files to PDF in C# effortlessly.
Handling Real‑World CSV Scenarios
Real-world CSV files often have non-standard delimiters, empty values, redundant rows/columns, or missing headers. The following solutions solve these common problems:
Different Delimiters
CSV files may use tabs (\t), semicolons (;), or pipes (|). Spire.XLS supports specifying custom delimiters when loading CSV files:
// Tab-separated
workbook.LoadFromFile("data.tsv", "\t", 1, 1);

// Semicolon-separated (common in European locales)
workbook.LoadFromFile("data.csv", ";", 1, 1);

// Pipe-separated
workbook.LoadFromFile("data.psv", "|", 1, 1);
Skipping Rows and Columns
If the CSV contains metadata rows or empty columns, adjust your loop bounds:
// start from row 3
for (int row = 3; row <= worksheet.LastRow; row++)
//start from column 3
for (int col = 3; col <= worksheet.LastColumn; col++)
Handling Missing Values and Empty Cells
Empty cells in CSV files appear as empty strings. You can handle them by writing a default value or omitting the elements:
// Option 1: Fill empty values with "N/A"
string value = worksheet.Range[row, col].Text;
if (string.IsNullOrEmpty(value))
    value = "N/A";
writer.WriteElementString(header, value);

// Option 2: Omit empty nodes
string value = worksheet.Range[row, col].Text;
if (!string.IsNullOrEmpty(value))
    writer.WriteElementString(header, value);
Missing Header Row
If your CSV has no header row, you can pass an array of custom names, or generate generic column names such as:
for (int col = 1; col <= worksheet.LastColumn; col++)
{
    string header = $"Column{col}";
    string value = worksheet.Range[row, col].Text;
    writer.WriteElementString(header, value);
}
Conclusion
Converting CSV to XML in C# with Spire.XLS for .NET eliminates manual parsing and reduces code complexity. Whether you need a simple one-line conversion to Excel XML or a fully customized XML structure, the code examples in this guide let you seamlessly integrate CSV-to-XML conversion into your C# applications.
For more Excel or CSV-related tasks in .NET development, visit the online documentation.
FAQs About CSV to XML Conversion
Q1: Can I convert only a specific range of cells (e.g., A1:C10)?
Yes. Instead of looping to worksheet.LastRow and LastColumn, set custom bounds (e.g., loop rows 2 to 11 for A1:C10) or directly access a range via worksheet.Range.
Q2: Does Spire.XLS require Microsoft Excel to be installed?
No, it is an independent .NET component and does not rely on Microsoft Excel, Office interop, or any third-party Office software.
Q3: Can I batch convert multiple CSV files to XML at once?
Yes. You can loop through all CSV files in a folder, load each one with Spire.XLS, and export them to corresponding XML files in batches with the same logic in the tutorial.
Q4: Can I add custom attributes and namespaces to generated XML elements?
Absolutely. Use XmlWriter.WriteAttributeString() to add custom attributes to nodes, and WriteStartElement with namespace parameters to define XML namespaces for enterprise-standard XML schemas.
Convert XML to CSV: Online Tools, Excel & Python
Table of Contents
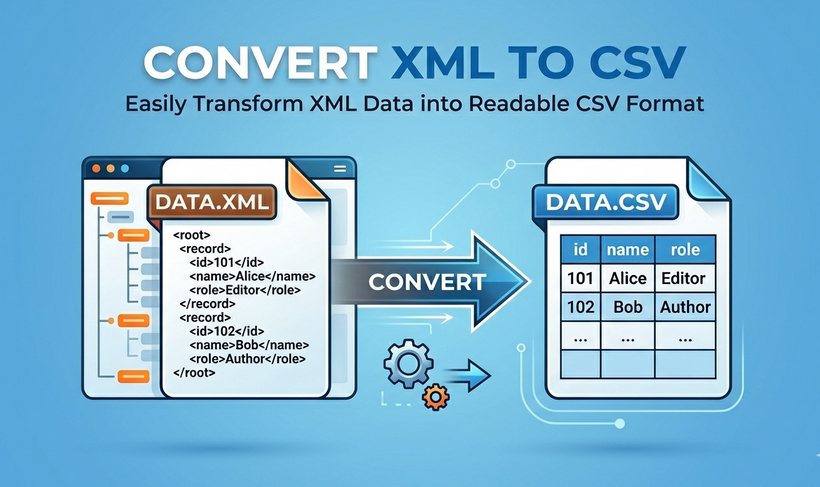
In the world of data, transforming XML to CSV is a frequent necessity for analysts, developers, and business professionals. Whether you're migrating data, building a report, or feeding structured information into a legacy system, knowing how to flatten hierarchical XML into a clean, tabular CSV is an essential skill.
This guide breaks down four practical, scalable methods to convert XML to CSV - from no‑code online tools and Excel’s built‑in features to Python scripting and command‑line automation. Whatever your file size, technical skill, or workflow demand, you’ll get step‑by‑step instructions, ready‑to‑use code examples, and solutions to common pitfalls to keep your data accurate, secure, and ready to use.
- Key Differences: XML vs. CSV
- Method 1: Using Free Online XML to CSV Converters
- Method 2: Converting XML to CSV in Excel
- Method 3: Automating the Conversion with Python
- Method 4: Using Command-Line Tools
- Common XML to CSV Conversion Pitfalls & Fixes
Key Differences: XML vs. CSV
XML and CSV serve distinct data needs, and understanding their differences helps you choose the right conversion approach. Here's a quick comparison table:
| Feature | XML | CSV |
|---|---|---|
| Data Structure | Hierarchical / tree-like. Perfect for nested data. | Tabular / flat. A simple two-dimensional table. |
| File Size | Large. The descriptive tags add significant overhead. | Small. Very compact, with minimal data redundancy. |
| Readability | Readable, but cluttered with tags. | Extremely easy for humans and machines to read in a table format. |
| Use Case | Ideal for data exchange between complex systems, web services, and configuration files. | Ideal for data analysis, business reporting, and importing/exporting to databases and spreadsheets. |
In short: you change XML to CSV to flatten hierarchical data into a simple table for analysis.
Method 1: Using Free Online XML to CSV Converters
If you have a small XML file (under 10MB) and no coding experience, online converters are the fastest, simplest option. They require no installation, and most are free to use.
Steps to convert XML to CSV online:
- Search for “XML to CSV online converters” and select a trusted free tool (e.g., CSVTools.com’s XML to CSV tool)
- Upload your XML file or paste your XML code into the input box.
- The tool automatically detects XML elements and maps them to CSV columns.
- Preview the CSV output on the right.
- Copy the result or click “Save” to download the file to your computer.

✅ When to use this method:
- You have a one‑time conversion need, and the XML file is small.
- The XML structure is relatively simple (two or three levels deep) and contains no sensitive information.
- You want to quickly test what the flattened data looks like before committing to a more robust method.
Data professionals working with modern web APIs or NoSQL databases often deal with JSON rather than XML. Here’s a guide to convert JSON to CSV — a valuable complementary skill for data transformation.
Method 2: Converting XML to CSV in Excel
If you already use Microsoft Excel, you can convert XML to CSV format directly without any extra tools. This method is great for small to medium XML files and works well if you need to edit the data before saving as CSV.
Basic Excel Method (Simple XML)
- Open Microsoft Excel.
- Go to File > Open and locate your XML file.
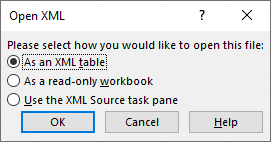
- Excel will prompt you to open the file. In the dialog box, select "As an XML table".
- If Excel warns that the XML schema cannot be inferred, it will create one automatically. Click OK.
- Excel renders the hierarchical XML into a table. Review the columns. For simple, flat XML, this is your final table.
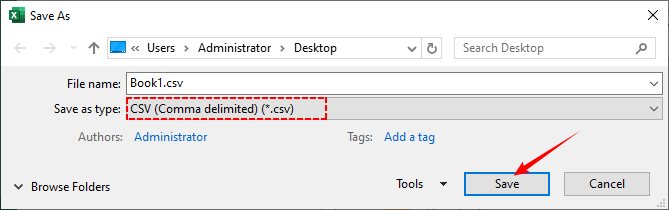
- To save as CSV, go to File > Save As.
- In the "Save as type" dropdown, select CSV (Comma delimited) (*.csv) , choose a location, and click Save.
Advanced Power Query Method (Nested XML)
To convert nested XML to CSV, follow these steps:
- Go to Data > Get Data > From File > From XML.
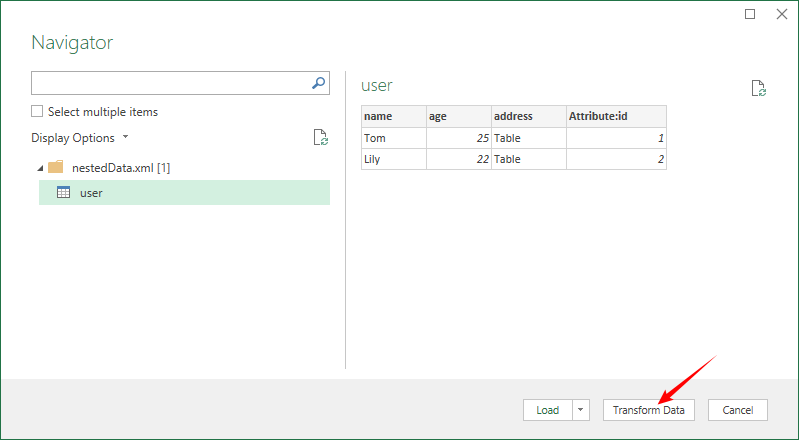
- Select your XML file. The Power Query Navigator window opens, showing a tree view of the XML structure.
- Select the repeating parent element and you’ll see a preview table. Click Transform Data.
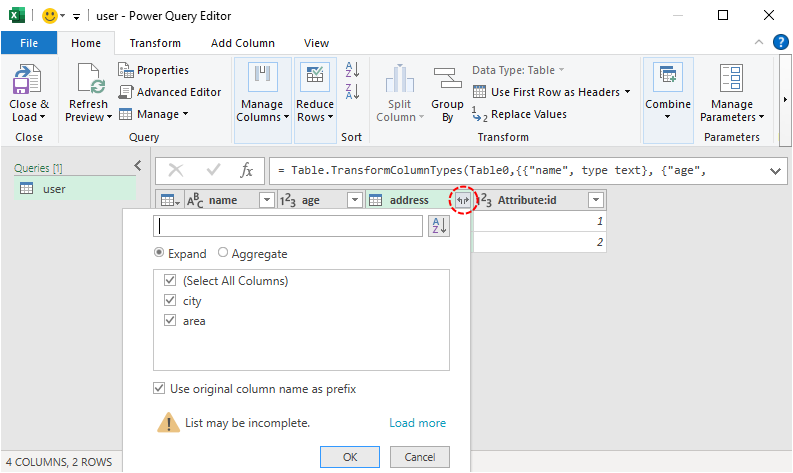
- In the Power Query Editor, for columns labeled Table/Record (nested data), click the expand icon (double arrow) and select fields to flatten (e.g.,
address.city,address.area). - Clean data (replace null/missing values) → click Close & Load.
- Save the final table as CSV (follow basic conversion steps 6–7).
Bonus tip: While CSV works well for simple data sharing and lightweight analysis, converting XML directly to Excel XLSX empowers you to build professional reports enriched with formulas, pivot tables, and dynamic charts.
Method 3: Automating the Conversion with Python
For developers and data professionals, Python is the gold standard for XML-to-CSV conversion. It offers an unrivaled balance of power and control, allowing you to handle complex nesting, custom logic, and automate the process for many files.
You'll use two libraries:
- xml.etree.ElementTree (included with Python) for parsing and extracting the XML data.
- Free Spire.XLS for Python (a third-party library) for writing the data to a CSV file.
Basic Example: Convert XML to CSV in Python
Let’s convert a simple XML file (e.g., products.xml) to CSV. Here’s the sample XML:
<products>
  <product>
    <id>1</id>
    <name>Wireless Headphones</name>
    <price>99.99</price>
    <category>Electronics</category>
  </product>
  <product>
    <id>2</id>
    <name>Stainless Steel Water Bottle</name>
    <price>24.99</price>
    <category>Home Goods</category>
  </product>
</products>
Here’s the Python code to convert XML file to CSV:
from spire.xls import *
from spire.xls.common import *
import xml.etree.ElementTree as ET

# 1. Create a Workbook object
workbook = Workbook()

# 2. Remove the default worksheet and add a new one
workbook.Worksheets.Clear()
worksheet = workbook.Worksheets.Add("Products")

# 3. Load and parse the XML file
xml_tree = ET.parse("C:\\Users\\Administrator\\Desktop\\products.xml")
root = xml_tree.getroot()

# 4. Get the first <product> to define column headers
first_product = root.find("product")
headers = [elem.tag for elem in first_product]

# 5. Write headers to the first row (row index 1, column index starting at 1)
for col_idx, header in enumerate(headers, start=1):
    worksheet.SetValue(1, col_idx, header)

# 6. Write data rows
row_idx = 2
for product in root.findall("product"):
    for col_idx, header in enumerate(headers, start=1):
        # Get element text, default to empty string if missing
        elem = product.find(header)
        value = elem.text if elem is not None else ""
        worksheet.SetValue(row_idx, col_idx, value)
    row_idx += 1

# 7. Save the worksheet as a CSV file (comma delimiter, UTF-8 encoding)
worksheet.SaveToFile("XmlToCsv.csv", ",", Encoding.get_UTF8())

# 8. Clean up
workbook.Dispose()
What the code does?
- Create a blank workbook and prepare a worksheet for storing XML data.
ET.parse()loads the XML file.worksheet.SetValue()writes data to a specific cell. Rows and columns are 1‑indexed.- Loop through each
<product>, then loop through each header, extract the text, and write to the corresponding cell. worksheet.SaveToFile()exports the worksheet as a CSV file.workbook.Dispose()releases resources.
The above parsing workflow applies only to flat XML structures with single-level elements and no hierarchical nesting. If your XML contains nested structures, you must flatten the data first. For further details, refer to our guide on handling nested XML during CSV conversion.
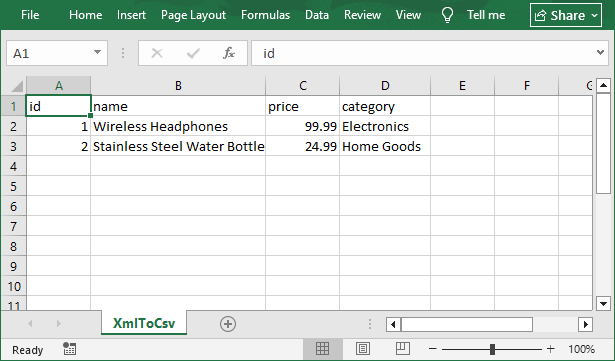
Open the result CSV file in Excel:
When to Choose Free Spire.XLS Over Python’s Built‑in Library
Python’s built‑in csv module is lightweight and perfect for simple, CSV‑only tasks. Consider Free Spire.XLS when:
- You need both CSV and Excel output from the same conversion – no separate conversion step required.
- Your end users expect an Excel file (.xlsx) for manual editing, reporting, or formatting.
- You prefer the Excel object model (Workbook → Worksheet → Cell) – intuitive if you’re familiar with spreadsheets.
- You already use Free Spire.XLS for other reporting or document generation tasks in the same project.
Bottom line: For pure CSV, stick with the built‑in csv module. For mixed‑format output (CSV + Excel + PDF) or Excel‑centric workflows, Free Spire.XLS saves time and code.
Method 4: Using Command-Line Tools
For users comfortable with a terminal, XMLStarlet is a powerful tool for exporting XML to CSV directly from the command line, making it ideal for integration into shell scripts.
How to Use: Download from xmlstar.sourceforge.net (Windows), and then convert XML to CSV with this command (replace products.xml with your file):
xmlstarlet sel -T -t -m //product -v "id" -o "," -v "name" -o "," -v "price" -o "," -v "category" -n products.xml > products.csv
Command Breakdown:
sel -T: Select data and output as text-t -m "//product": Match all <product> elements-v: Extract element value-o ",": Add comma delimiter-n: New line for each row
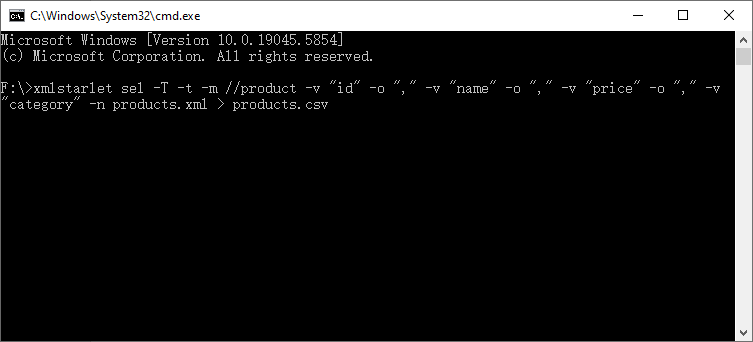
Note: This works well for flat, predictable structures. For nested data, you’ll need more complex XPath expressions.
Common XML to CSV Conversion Pitfalls & Fixes
Here are the most common issues and how to resolve them:
1. Nested XML Elements Not Converting Properly
Problem: CSV is a flat format, so nested XML elements like <address><city>New York</city></address> don’t map naturally.
Solution: Flatten nested elements before conversion. Use Power Query’s expand feature, Python’s dot notation (e.g., address.city), or XPath in XMLStarlet.
2. Missing Data in CSV Output
Problem: Some XML elements are missing from the CSV, especially if the XML has optional elements (e.g., some products don’t have a <category> tag).
Solution: Handle missing values explicitly. In Python: product.findtext('category', ''). In Excel/Power Query, use “Replace Values”. In online tools, look for a “handle missing values” option.
3. Special Characters Causing Errors
Problem: Special characters (e.g., commas, quotes, accents) in XML data can break the CSV format (e.g., a product name like “Wireless Headphones, Black” will split into two columns).
Solution:
- Always use UTF‑8 encoding.
- Ensure fields containing commas or quotes are quoted.
- In Excel, when saving as CSV, choose “Quote all text fields” or use Power Query’s “Quote style” option.
4. Converting large XML to CSV causing memory errors
Problem: Loading a 1 GB XML file into memory with ET.parse() may crash your script or application.
Solution:
- Use streaming parsers (e.g.,
ET.iterparse()in Python). - Use command‑line tools like xmlstarlet (streams by default).
- Consider splitting the XML into smaller chunks if possible.
Final Thoughts
Converting XML to CSV bridges the gap between complex, structured data exchange and simple, actionable data analysis. Whether you use a quick online tool, a visual desktop application like Excel, or a powerful, programmable solution with Python, the right method depends on your data volume, technical comfort, and need for control.
For most business users, Excel + Power Query provides a perfect balance. For developers, Python with ElementTree and Free Spire.XLS is an indispensable tool. Now that you've learned the core concepts and methods, you're ready to choose the best approach and start converting your XML data into clean, powerful CSV files.
See Also
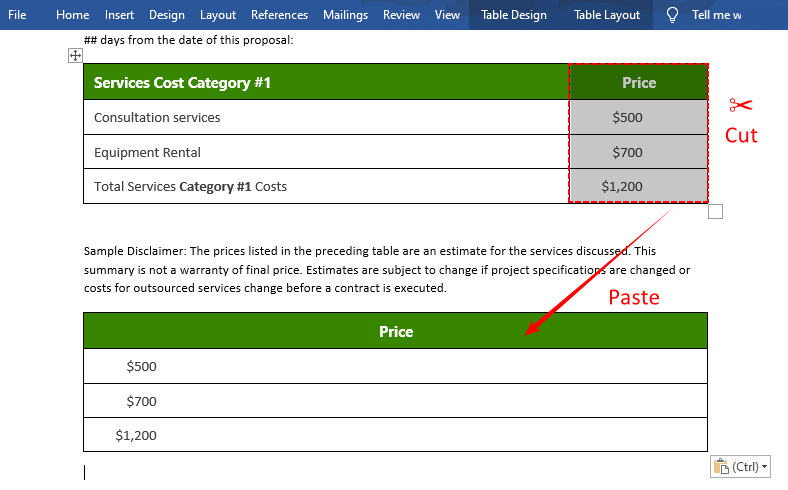
How to Split a Table in Word? (Shortcuts + VBA + C#)
Tables are great for organizing data, but what happens when your table grows too long, or you need to insert a paragraph between rows? You don’t need to rebuild it from scratch. Instead, you can split a table in Word into two separate tables.
Learning to split Word table efficiently is a small but high-impact skill that refines your document structure, speeds up editing, and keeps all your data, styles, borders, and cell formatting fully preserved. Whether you’re a student, office worker, or developer, this guide will help you split tables confidently and correctly.
In this post, we’ll cover:
- What Does It Mean to Split a Table?
- 3 Manual Methods to Split a Table in Word
- VBA Automated Word Table Splitting
- C# Automation with Free Spire.Doc for .NET
- Frequently Asked Questions (FAQ)
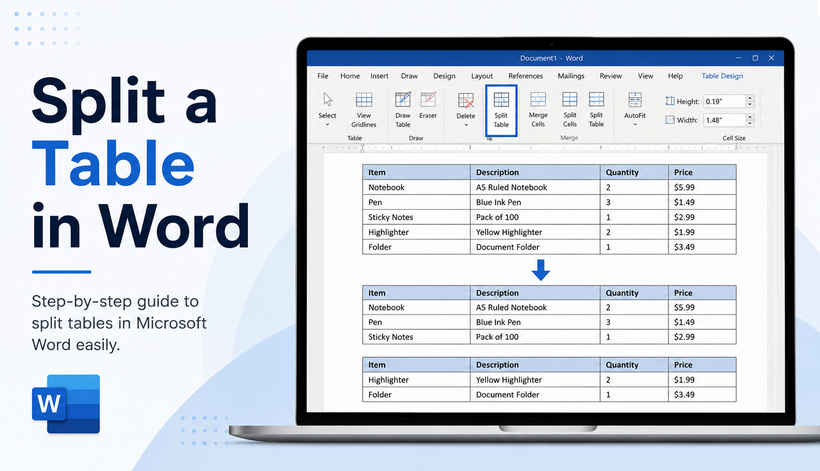
What Does It Mean to Split a Table?
When you split a table in Word, you break one table into two independent tables at a chosen row. The row you select becomes the first row of the new second table.
⚠️ Note: Splitting a table is not the same as splitting cells. Splitting cells divides one cell into multiple columns/rows. Splitting a table divides the entire table structure.
Example:
Original 5-row table → Split at Row 3
- Table 1 (Upper): Rows 1–2
- Table 2 (Lower): Rows 3–5
3 Manual Methods to Split a Table in Word
Below are the most reliable manual methods to divide a table in Word, ranging from the easiest ribbon tool to full manual control.
1. Ribbon Tool (Easiest for Beginners)
The “Split Table” ribbon tool in MS Word provides a simple visual workflow with zero error risk, making it the ideal choice for new and casual Word users.
- Open your Word document and navigate to the table you want to split.
- Click anywhere inside the table to activate Table Tools (Design + Layout tabs).
- Place your cursor in the row that will start the second table.
- Go to the Table Layout tab.
- In the Merge group, click the “Split Table” button.
Result: Word instantly divides your single table into two separate tables, with the split occurring just above the row you selected.
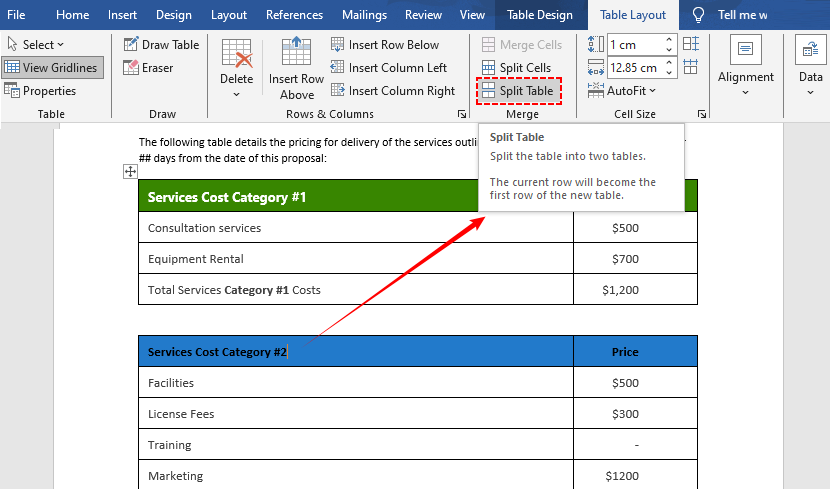
Tip: If you select multiple rows, the split will still happen above the first selected row.
After splitting a Word table into well‑organized chunks, you might need to analyze the data in Excel—learn how to export Word table to Excel for analysis.
2. Keyboard Shortcut (Fastest Option)
For users who prefer keyboard shortcuts (or want to save time), use the keyboard shortcut below to split a Word table in 1 second without touching the mouse.
- Windows: Ctrl + Shift + Enter
- Mac: Cmd + Shift + Enter

How to use it reliably:
- Place your cursor in any cell of the row that will be the first row of the second table.
- Press the shortcut.
- The table will split immediately at the cursor position.
Why it’s faster:
Your hands never leave the keyboard. Works in all desktop versions of Word (2016, 2019, 2021, 365, Mac).
⚠️ Note: In some international keyboard layouts, you may need to use "Ctrl + Shift + Return".
3. Cut & Paste (Full Control + Vertical Splits)
The above two methods split a table horizontally by default, but the cut-paste method can quickly split a table vertically into left/right side-by-side tables
- Select the rows or columns you want to move to a new table.
- Right-click → Cut (Ctrl+X/Cmd+X).
- Place your cursor where you want the new table.
- Right-click →Paste (Ctrl + V/Cmd+V) the cut rows or columns into the document. Word will automatically create a new table.
✅ Vertical splits use case: You have a wide table with 8 columns, but you want two tables of 4 columns each, side by side.
VBA Automated Word Table Splitting
Word does not have a built‑in “split all tables” feature. You must split each table individually. However, you can use a macro (VBA) to automate this.
VBA Macro to split every table in a document after row 3:
Option Explicit

Sub SplitAllTablesAfterRow3()
    Dim doc As Document
    Dim tbl As Table
    Dim successCount As Integer
    Dim skipCount As Integer

    ' Set the active Word document
    Set doc = ActiveDocument
    successCount = 0
    skipCount = 0

    ' Check if there are any tables in the document
    If doc.Tables.Count = 0 Then
        MsgBox "No tables found in the document!", vbExclamation
        Exit Sub
    End If

    ' Loop through every table in the document
    For Each tbl In doc.Tables
        ' Only split tables with at least 4 rows (to split after row 3)
        If tbl.Rows.Count >= 4 Then
            ' Select the 4th row (this will be the first row of the new split table)
            tbl.Rows(4).Select
            ' Use Word's native SplitTable command (the correct method for splitting tables)
            Selection.SplitTable
            successCount = successCount + 1
        Else
            ' Skip tables that are too short to split after row 3
            skipCount = skipCount + 1
        End If
    Next tbl

    ' Show a summary of the operation
    MsgBox "Batch split completed!" & vbCrLf & _
           "Successfully split tables: " & successCount & vbCrLf & _
           "Skipped (insufficient rows): " & skipCount, vbInformation

End Sub
To use: Press "Alt+F11" to open VBA editor → Insert → Module → paste code → Run.

VBA Important Notes
- Save the document as .docm (macro-enabled Word document) to retain the macro.
- Enable macro security: Go to “File” → “Options” → “Trust Center” → “Trust Center Settings” → “Macro Settings” → Select “Enable all macros” (for trusted documents only).
C# Automation with Free Spire.Doc for .NET
For batch splitting tables in Word documents (reports, invoices, data forms), manual methods are inefficient. Instead, use Free Spire.Doc for .NET—a free library to split Word tables programmatically with C#.
Prerequisites
Install the Free Spire.Doc NuGet package:
Install-Package FreeSpire.Doc
Note: The free version has a limit of 25 tables per document. For larger documents, consider the commercial edition.
Basic C# Example: Split a Table at a Specific Row
This code loads a Word document, splits a table at a specified row index, creates a new table, and saves the modified document.
using Spire.Doc;

namespace SplitWordTable
{
    class Program
    {
        static void Main(string[] args)
        {
            //Create a Document instance
            Document doc = new Document();

            //Load a Word document
            doc.LoadFromFile("CombineTables.docx");

            //Get the first section
            Section section = doc.Sections[0];

            //Get the first table in the section
            Table table = section.Tables[0] as Table;

            //Specify to split the table from the fifth row
            int splitIndex = 4;

            //Create a new table
            Table newTable = new Table(section.Document);

            //Adds rows (from the 5th to the last row) to the new table
            for (int i = splitIndex; i < table.Rows.Count; i++)
            {
                newTable.Rows.Add(table.Rows[i].Clone());
            }

            //Delete rows from the original table
            for (int i = table.Rows.Count - 1; i >= splitIndex; i--)
            {
                table.Rows.RemoveAt(i);
            }

            //Add the new table to the section
            section.Tables.Add(newTable);

            //Save the result document
            doc.SaveToFile("SplitTable.docx", FileFormat.Docx);
        }
    }
}
Code Explanation:
- Document Initialization: Creates a blank document object to work with.
- Load File: Loads your existing Word file with the table to split.
- Section/Table Access: Targets the first section and first table (adjust indexes for multi-table docs).
- Split Index: Zero-based value → “splitIndex = 4” means to split after the 4th row.
- Clone Rows: Copies rows to the new table (preserves formatting/data).
- Clean Up Original Table: Removes the split rows from the source table.
- Save Document: Exports the modified Word file with two split tables.
Why Use Free Spire.Doc Instead of Word Interop?
| Feature | Free Spire.Doc | Microsoft.Office.Interop.Word |
|---|---|---|
| Requires Word installed | ❌ No | ✅ Yes |
| Works on headless servers | ✅ Yes | ❌ No |
| Formatting preservation | ✅ Excellent | ✅ Good |
| Free for small documents | ✅ Yes (25 tables) | ❌ No (requires Office license) |
Bonus Tip: Alongside splitting tables programmatically, you can extend your automation skills to generate new Word tables from scratch using C# and Free Spire.Doc.
Final Thoughts
Learning how to split a table in Word is a simple yet powerful skill for clean, professional documents. For one-off tasks, use the ribbon button, the Ctrl + Shift + Enter shortcut, or the cut‑and‑paste method. For bulk automation, the VBA macro or the C# method saves hours of manual work.
Whether you’re a casual Word user or a developer, this guide has everything you need to separate tables in Word perfectly every time.
Frequently Asked Questions (FAQ)
Q1: Can I split table vertically in Word?
A: Yes, use the cut/paste method. Select columns → Cut → Paste next to the original. You can adjust column widths if needed.
Q2: Does splitting a table delete any data?
A: No. All content remains exactly as it was. Splitting only changes the table structure.
Q3: How do I merge split tables back together?
A: Delete the blank paragraph between the two tables → Word auto-merges them into one. Free Spire.Doc for .NET also supports merging Word tables via C# code.
Q4: How do I split a table into more than two tables?
A: Repeat the splitting process on any of the resulting tables. For example, split Table 1, then split one of the new tables.
See Also
How to Change PDF Permissions? 4 Secure Methods
Table of Contents
- What PDF Permissions Can You Change?
- Method 1: Edit PDF Permissions with Adobe Acrobat Pro
- Method 2: Change PDF Permissions Using LibreOffice Draw
- Method 3: Online PDF Permission Changers
- Method 4: Change Permissions Programmatically in C#
- Final Checklist Before You Change Permissions
- Frequently Asked Questions (FAQs)
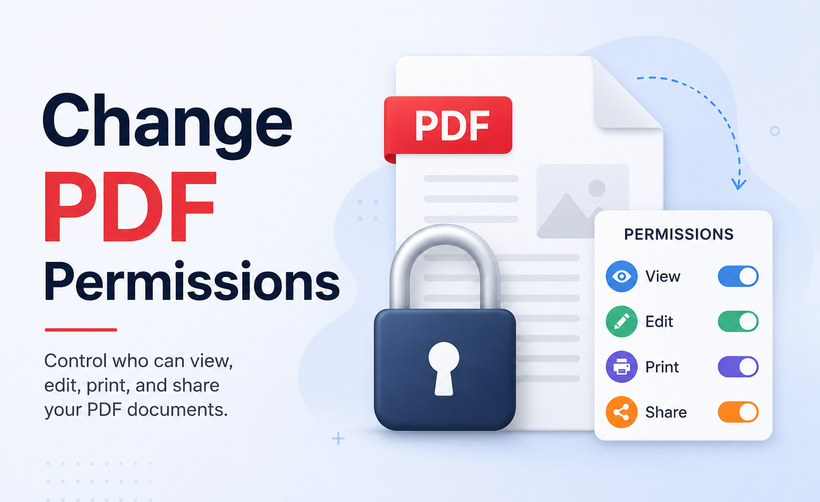
Are you wondering how to change PDF permissions to restrict editing, disable copying, lock printing, or unlock restricted PDF files? PDFs are universally used for professional documents, contracts, resumes, and official files because of their fixed formatting and secure sharing features. However, default PDF permission settings often fail to match your unique sharing and security needs.
In this guide, we will cover easy, actionable methods to edit PDF permissions using professional software, free desktop tools, reliable online platforms, and even programmatic approaches for developers.
- What PDF Permissions Can You Change?
- Method 1: Edit PDF Permissions with Adobe Acrobat Pro
- Method 2: Change PDF Permissions Using LibreOffice Draw
- Method 3: Online PDF Permission Changers
- Method 4: Change Permissions Programmatically in C#
- Final Checklist Before You Change Permissions
- Frequently Asked Questions (FAQs)
What PDF Permissions Can You Change?
PDF permissions (also called “restriction settings” or “security flags”) control core user actions. You can toggle these settings as needed:
| Permission | What it controls |
|---|---|
| Printing | Whether users can print – Low resolution or High resolution |
| Content copying | Ability to copy text or images to the clipboard |
| Document assembly | Inserting, deleting, or rotating pages |
| Commenting | Adding notes, highlights, or sticky comments |
| Form filling | Working with fillable form fields |
| Content extraction | Accessibility tools and screen readers |
| Modification | Editing text, images, or objects |
When you change permissions, you are updating these flags – for example, switching from “printing not allowed” to “high-resolution printing allowed”, or enabling commenting that was previously disabled.
Critical Note: There is no security "backdoor". You cannot legally change permissions without the owner password or the author’s consent.
Method 1: Edit PDF Permissions with Adobe Acrobat Pro
Adobe Acrobat is the official tool for modifying PDF security settings, offering full control over all PDF permission options. It is ideal for professional users who need precise security customization.
Steps to change PDF file permissions:
- Open the target PDF file in Adobe Acrobat Pro.
- Go to File > Properties (shortcut: Ctrl+D).
- Navigate to the Security tab – this is where all permission settings are displayed.
- Click Change Settings to modify existing permission configurations. If the file is locked, enter the permission password to unlock editable settings.
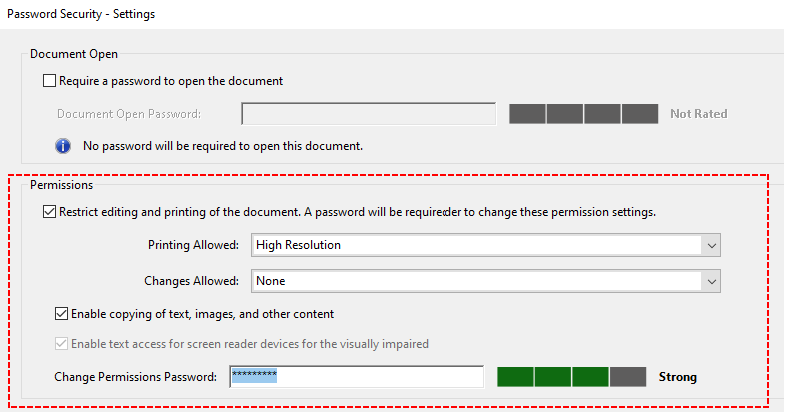
- In the “Password Security – Settings” window, customize permissions by checking or unchecking actions such as:
- Set printing allowed (None/Low/High Resolution)
- Define allowed changes (Commenting/Form Filling/None)
- Toggle content copying and accessibility access
- Set a new permission password, confirm the settings, and save the modified PDF file to apply all changes.
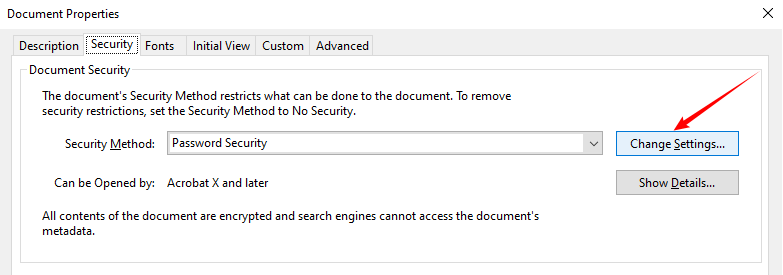
Note: Adobe Acrobat requires a paid subscription.
✅ Practical Examples:
- Use “Changes Allowed: None” for final, read-only contracts.
- Use “Changes Allowed: Commenting” for team reviews.
Beyond adjusting specific PDF permission settings, the same tools also let you remove PDF permissions entirely to lift all restrictions at once.
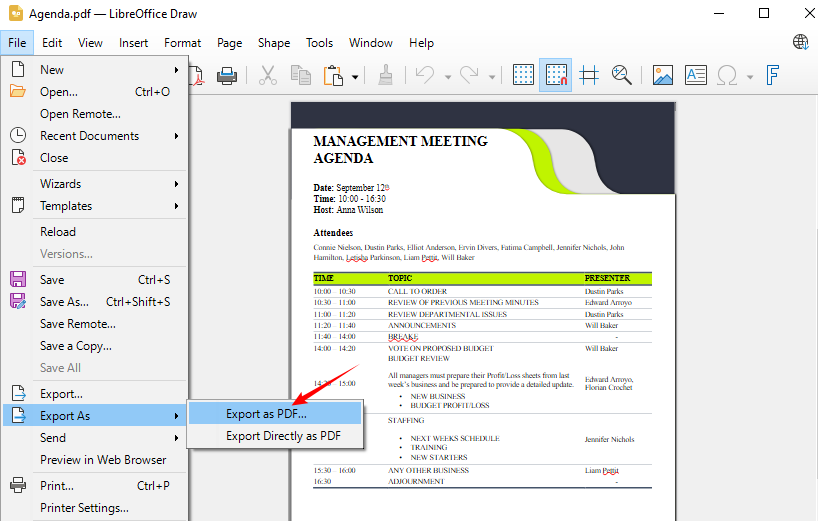
Method 2: Change PDF Permissions Using LibreOffice Draw
Don’t have Adobe? No problem. You can use LibreOffice Draw to modify PDF permissions. This tool can open and edit PDFs, then re‑export them with new permission settings. It works offline, respects your privacy, and costs nothing.
Steps to use LibreOffice Draw:
- Download and install from libreoffice.org. Choose the version for your operating system (Windows, Mac, Linux).
- Launch LibreOffice Draw and open your PDF in it.
- Go to File > Export As > Export as PDF.
- Navigate to the Security tab in the PDF Options dialog.
- Set a new owner password (required to change permissions).
- Adjust the permission checkboxes as you desire. For example:
- Enable high resolution printing
- Enable form filling (build interactive form fields in PDF first)
- Enable content copying
- Enable text/access for screen readers
- Click Export and save the new PDF.
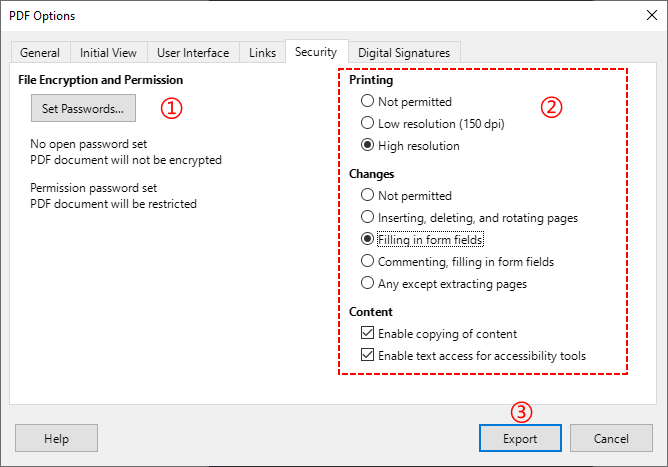
⚠️ Warning: This method rewrites the PDF. Some complex formatting (fonts, layers) may shift. Test with a copy first.
Method 3: Online PDF Permission Changers
If you rarely adjust PDF permissions and refuse to install desktop software, secure online PDF tools provide a quick, temporary solution. Tools like SwiftPDFLab and pdfup.org support browser-based PDF permission editing.
General workflow to change PDF permissions online:
- Open a trusted online PDF permission editor on your browser (e.g., SwiftPDFLab Change Permissions tool).
- Upload your PDF file to the online platform.
- Customize printing, editing, and copying restrictions according to your requirements.
- Set a new owner password and click Change Permissions to apply new settings.
- The modified PDF file will download automatically.
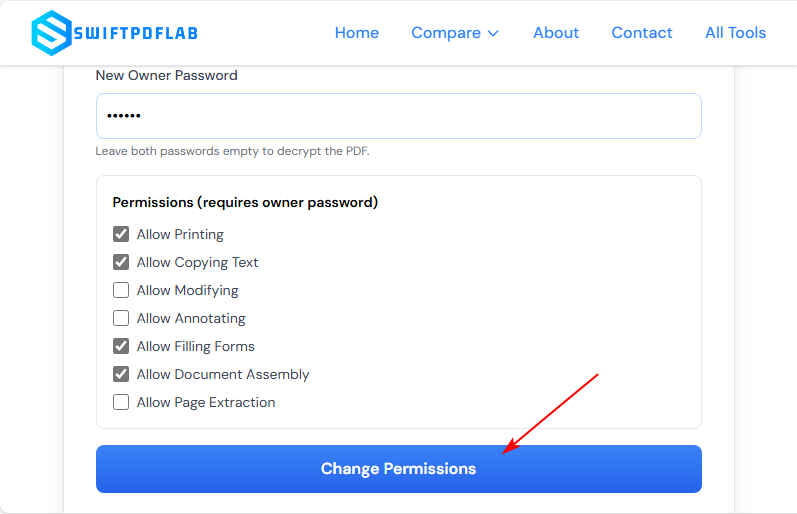
Security best practice: Use a tool that auto-deletes uploads. Never upload highly confidential, private, or business-sensitive PDFs. Online tools are only recommended for non-sensitive public documents.
Method 4: Change Permissions Programmatically in C#
For developers, IT teams, or users needing batch PDF automation, you can programmatically change PDF permissions with C# using Free Spire.PDF for .NET—a free, offline .NET library that handles both permission passwords and open passwords, giving you full lifecycle control over PDF security.
C# Code Example (Enable Copying and Printing)
The following C# code loads a PDF, creates a new security policy, sets various permissions, and saves the PDF with the new permissions.
using Spire.Pdf;

namespace ChangeSecurityPermission
{
    class Program
    {
        static void Main(string[] args)
        {
            // 1. Create a PdfDocument object
            PdfDocument pdf = new PdfDocument();

            // 2. Load the restricted PDF file with owner password (if any)
            pdf.LoadFromFile("Agenda.pdf", "12345");

            // 3. Specify open password (leave empty if not needed)
            string openPsd = string.Empty;

            // 4. Specify a new owner password
            string permissionPsd = "abc123";

            // 5. Create a security policy using new open & owner passwords
            PdfSecurityPolicy securityPolicy = new PdfPasswordSecurityPolicy(openPsd, permissionPsd);

            // 6. Set encryption algorithm (AES 128-bit is modern and secure)
            securityPolicy.EncryptionAlgorithm = PdfEncryptionAlgorithm.AES_128;

            // 7. Define the new permissions you want to allow
            securityPolicy.DocumentPrivilege.AllowContentCopying = true; // Allow content copying
            securityPolicy.DocumentPrivilege.AllowPrint = true; // Allow printing

            // 8. Apply the new security policy to the document
            pdf.Encrypt(securityPolicy);

            // 9. Save the updated PDF to a new file
            pdf.SaveToFile("ChangePermissions.pdf");
            pdf.Close();
        }
    }
}
The PdfDocumentPrivilege object, retrieved via PdfSecurityPolicy.DocumentPrivilege, is a granular permission control class that defines exactly what users can and cannot do with the PDF (the "restriction rules"). This is where you toggle permissions such as printing, copying, editing, and form filling.
Result:
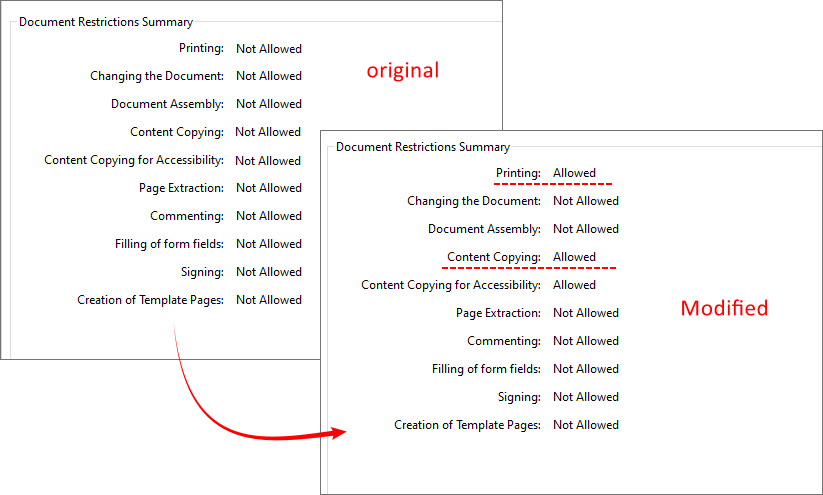
When to use this method:
- You’re comfortable with C# and .NET.
- You need to process many PDFs automatically (e.g., daily reports).
- You want to integrate permission changes into your own software.
Final Checklist Before You Change Permissions
Before starting, verify these points:
- Do you have the owner password? (Not the user/open password)
- Do you have legal rights to modify this document?
- Which permissions do you actually need? (e.g., just printing, or full copying too)
- Are you using a trusted tool (local software > online platforms)?
Once you confirm these, follow the method above that matches your budget and skill level.
Summary
Learning how to change PDF permissions empowers you to fully control your PDF files, balancing document security and flexibility. For professional users, Adobe Acrobat is the most reliable choice. LibreOffice Draw serves as a free offline alternative but may alter formatting. Online tools are for quick, non-sensitive edits, and C# with Free Spire.PDF is the best choice for secure, automated batch processing.
Always prioritize offline methods (desktop software/code) for confidential business and personal files to avoid data leakage risks. By mastering these methods, you can easily lock, restrict, or unlock PDF files to meet all your document sharing and security needs.
Frequently Asked Questions (FAQs)
Q1. Will changing PDF permissions affect existing PDF content?
No. Changing permissions only modifies the security envelope around the PDF. The content bytes remain identical. However, Method 2 (LibreOffice Draw) is an exception – because it re‑renders the PDF, formatting may change. Always use a copy with Method 2.
Q2. Can I change permissions on a digitally signed PDF?
No. Digital signatures lock the PDF to prevent tampering. You must remove the signature (requires the signer’s action) before modifying permissions.
Q3. What is the most secure way to change PDF permissions?
The most secure way is offline with Adobe Acrobat Pro or Free Spire.PDF because:
- The file never leaves your computer.
- Strong encryption (AES‑128) can be applied.
- No third‑party server can intercept the data.
Q4. Is the Free Spire.PDF method safe for production?
For internal tools and small-scale automation, yes. But note the 10‑page limit in the free version. For unlimited pages, consider the commercial version.
See Also
RTF to TXT: A Guide to Convert Rich Text to Plain Text
Table of Contents
- Understanding RTF vs. TXT Formats
- What You Lose When Converting
- Method 1: Using Built-in Windows Tools (WordPad)
- Method 2: Converting with Microsoft Word or LibreOffice
- Method 3: Free Online RTF to TXT Converters
- Method 4: Python Programming for Automated Workflows
- Common RTF to TXT Conversion Problems & Fixes
- Frequently Asked Questions (FAQ)
If you’ve ever worked with text files, you’ve likely encountered both RTF (Rich Text Format) and TXT (Plain Text) files. While RTF is great for preserving formatting like bold, italics, font styles, tables, and basic images across word processors, TXT stands out for its universal compatibility, minimal file size, and simplicity. Converting RTF to TXT is essential for data processing, document archiving, code integration, cross-device sharing, and storage optimization.
In this guide, we’ll cover everything you need to know about RTF to TXT conversion—from the key differences between the two formats to step-by-step methods for every user.
- Understanding RTF vs. TXT Formats
- What You Lose When Converting
- Method 1: Using Built-in Windows Tools (WordPad)
- Method 2: Converting with Microsoft Word or LibreOffice
- Method 3: Free Online RTF to TXT Converters
- Method 4: Python Programming for Automated Workflows
- Common RTF to TXT Conversion Problems & Fixes
- Frequently Asked Questions (FAQ)
Understanding RTF vs. TXT Formats
RTF and TXT serve distinct purposes, and understanding their differences helps you choose the right format for your task.
| Feature | RTF (Rich Text Format) | TXT (Plain Text) |
|---|---|---|
| Format Support | Rich formatting (fonts, colors, tables, images) | No formatting, pure text only |
| File extension | .rtf | .txt |
| Compatibility | Works with most word processors (Microsoft Word, LibreOffice, WordPad) | Universally compatible – can be opened by any text editor on any device |
| File size | Larger due to embedded formatting codes | Very small |
| Use cases | Document exchange with basic formatting, resumes, and reports | Configuration files, logs, source code, data exchange, note‑taking |
What You Lose When Converting
Learn exactly what gets removed when converting RTF to TXT:
- All formatting - bold, italics, fonts, colors, alignment
- Tables - they become plain text with spaces or tabs, or lose structure entirely
- Images - completely removed; some converters insert placeholders like [Image]
- Hyperlinks - the link text remains, but the URL disappears
- Headers and footers - they become part of the main text or vanish
Important: This loss is not a bug – it is inherent to the TXT format. If you need to preserve structure or images, consider converting RTF to PDF, HTML, or CSV instead.
Method 1: Using Built-in Windows Tools (WordPad)
For Windows users, WordPad is the quickest and most accessible method, requiring no additional software installation.
Using WordPad:
- Right-click on your RTF file, select "Open With," and choose WordPad.
- Once the file is open, review the content for accuracy.
- Go to “File > Save As” and select "Plain text document" from the list of options.
- Choose your destination, name the file, and click “Save”.

Pro tip: WordPad may strip some advanced RTF features (like nested tables) even before saving. For complex RTFs, use Microsoft Word or LibreOffice instead.
Method 2: Converting with Microsoft Word or LibreOffice
If you have a full‑featured word processor, you gain precise control over encoding, layout preservation, and handling of complex elements.
Using MS Word or LibreOffice to convert RTF to text:
- Open your RTF file in Microsoft Word or LibreOffice Writer.
- Go to “File > Save As” (or “Export As”).
- Select “Plain Text (.txt)” from the dropdown menu.
- Choose your save location and click “Save.”
- If prompted, select an encoding (UTF-8 is recommended for universal compatibility) and click “OK.”
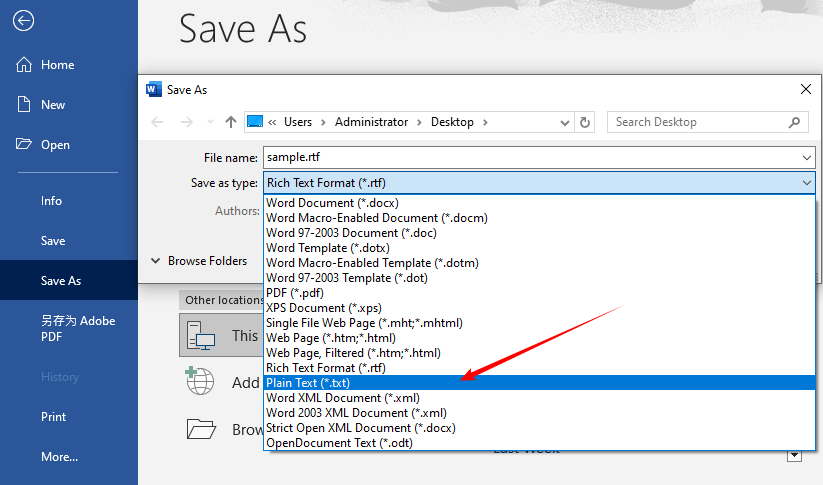
Best for: Complex RTF files, offline conversion, encoding customization
Beyond converting RTF to plain text, word processors also provide a reliable RTF to Word (DOC/DOCX) conversion feature that fully preserves rich formatting, tables, and images for further editing.
Method 3: Free Online RTF to TXT Converters
Online converters are ideal when you don’t have access to your computer, need a quick conversion, or want to avoid installing software. However, never upload sensitive or confidential documents to an online service unless it explicitly guarantees file deletion and uses encryption.
Here’s how to convert RTF to TXT online:
- Choose a reputable online converter (e.g., Convertio RTF to TXT Converter).
- Upload your RTF file(s) by dragging and dropping or selecting from your computer.
- Ensure the output format is “TXT” and click “Convert”.
- Wait for the process to finish.
- Download your converted TXT file(s).
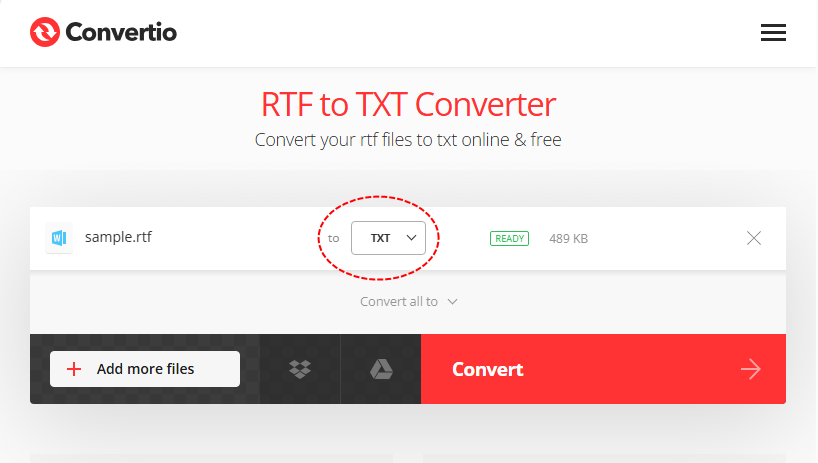
Limitations of Online Converters
- Internet connection required.
- Most free tiers have file size limits. Larger files require a paid plan.
- Files are temporarily stored on third‑party servers.
- Free tiers often restrict batch size to 2‑5 files.
Method 4: Python Programming for Automated Workflows
If you need to batch convert RTF to TXT, or integrate the conversion into your code (e.g., for a web app or data pipeline), Python is the most popular choice.
Python with Free Spire.Doc (Easiest for Beginners)
Free Spire.Doc for Python is a free and lightweight library that supports converting RTF to plain text with high accuracy. It handles complex RTF content and is ideal for both simple and advanced conversion workflows. Below is the pip command to install it:
pip install Spire.Doc.Free
Basic RTF to TXT Python conversion code:
from spire.doc import *
from spire.doc.common import *

# Initialize a Document object
doc = Document()

# Load the RTF file
doc.LoadFromFile("sample.rtf")

# Convert RTF to TXT and save the result
# FileFormat.Txt specifies the output format as plain text
doc.SaveToFile("output.txt", FileFormat.Txt)

# Close the document to free up resources
doc.Close()

print("RTF to TXT conversion completed successfully!")
RTF to plain text conversion result:
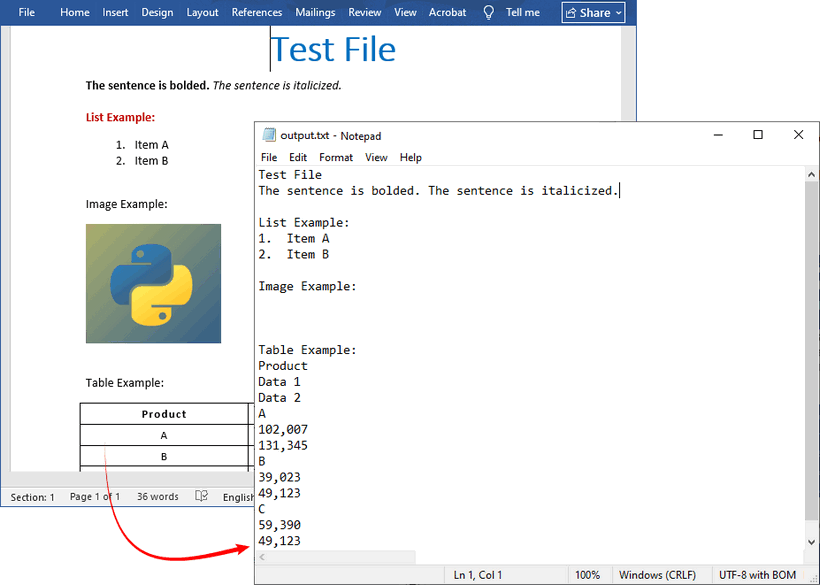
Batch conversion example (loop through a folder):
This script converts every RTF file in a given folder to TXT, preserving the original filenames.
import os
from spire.doc import *
from spire.doc.common import *

folder = "C:/rtf_files/"
for file in os.listdir(folder):
    if file.endswith(".rtf"):
        doc = Document()
        doc.LoadFromFile(os.path.join(folder, file))
        txt_name = file.replace(".rtf", ".txt")
        doc.SaveToFile(os.path.join(folder, txt_name), FileFormat.Txt)
        doc.Close()
By calling the SaveToFile() method with the FileFormat.Txt parameter, Free Spire.Doc exports the loaded RTF document to plain text format. To convert RTF to HTML, you only need to update the parameter to FileFormat.Html.
Common RTF to TXT Conversion Problems & Fixes
Even with the right tools, you might run into problems. Here are the most common issues and their solutions:
1. Formatting Loss (Bold, Italics, Tables)
- Why? TXT doesn’t support any formatting – this is normal.
- Solution: If you need table structure, convert RTF to CSV first, then open the CSV as plain text. Or use a script to replace table cells with tabs.
2. Garbled Text/Encoding Errors
- Why? Encoding mismatch. The RTF may use an unsupported encoding.
- Solution: Use UTF-8 encoding when saving TXT files (most tools let you select this).
3. Line Breaks Disappear or Multiply
- Why? Different operating systems use different line ending characters (Windows: CR+LF, Linux/macOS: LF). Some converters strip them.
- Solution: When saving from a word processor, look for options like "Insert line breaks" or "Preserve wrapping". For Python solution, Free Spire.Doc preserves line breaks well.
4. Empty TXT File After Conversion
- Why? Corrupted RTF file, tool failed to read content.
- Solution: Open RTF in WordPad/Word to confirm it’s not corrupted; re-save RTF first, then convert.
Conclusion
Converting RTF to TXT is straightforward, but the right approach depends on your needs. For occasional users, online converters offer a quick, no‑setup solution. If you’re working with sensitive documents or prefer offline processing, desktop applications like Microsoft Word and LibreOffice provide secure, local control. For large‑scale or automated workflows, programming libraries such as Free Spire.Doc deliver customizable, scriptable conversion.
By converting RTF to TXT, you gain the simplicity and universal compatibility of plain text, making your content more accessible, storage‑efficient, and compatible with any tool. Whether you’re archiving legacy documents, processing data, or writing a script, this guide equips you to convert rich text to plain text seamlessly.
Frequently Asked Questions (FAQ)
Q: Is RTF to TXT conversion free?
A: Yes. All built-in tools (WordPad), LibreOffice, free online converters, and Free Spire.Doc for Python are completely free with no hidden costs.
Q: Can I convert TXT back to RTF?
A: Yes, but all formatting is lost. You’ll need to re-add bold, italics, etc., in a word processor before saving as RTF.
Q: Does converting RTF to TXT reduce file size?
A: Yes. TXT removes all formatting markup, and the file size is usually 1/5 to 1/10 of the original RTF, saving massive storage space for archiving.
Q: Can I convert RTF to TXT on a Mac?
A: Yes. macOS includes TextEdit, which can open RTF files. In TextEdit, go to Format → Make Plain Text, then save as .txt.
See Also
How to Generate a CSV File: 4 Simple Methods
Table of Contents
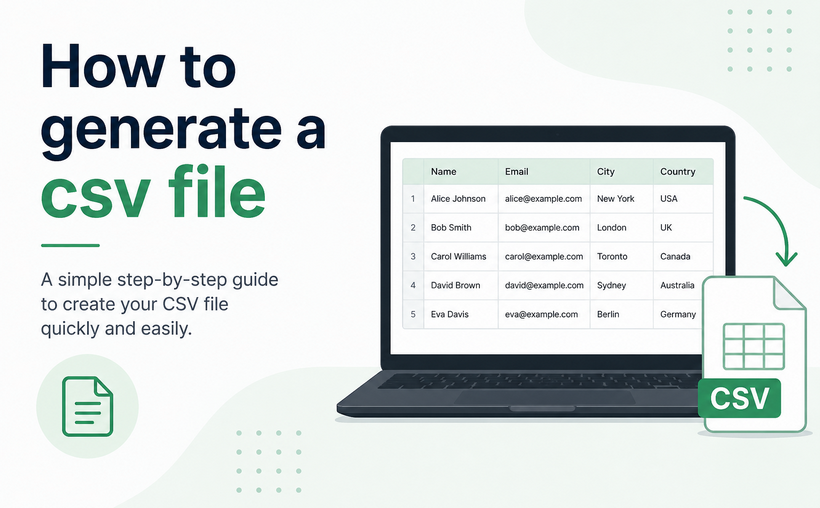
CSV (Comma-Separated Values) files are the universal standard for data exchange—lightweight, human-readable, and compatible with Microsoft Excel, Google Sheets, and programming languages like Python. Whether you’re organizing customer data, exporting reports, migrating information, or building ML datasets, knowing how to generate a CSV file is a foundational skill.
This guide walks you through 4 simple, actionable methods to create a CSV file, from quick no‑code methods to automated scripts. You'll also get tips for handling special characters and converting data from JSON, PDF, and Excel to CSV.
- Method 1: Manually Create with a Text Editor
- Method 2: Generate CSV with Microsoft Excel
- Method 3: Create CSV with Google Sheets (Free)
- Method 4: Create a CSV File in Python
- Bonus: Generate CSV File from Different Data Sources
Why Should You Use CSV Files?
A CSV file stores tabular data in plain text. Each line represents a data record, and each record contains fields separated by commas.
Core advantages of CSVs:
- Universal compatibility – Works with most spreadsheet tools, CRMs, databases, and programming languages.
- Lightweight – No proprietary formatting, small file size.
- Ideal for data exchange – Fast to import/export between different systems.
- Free & open standard – Free to create and use without paid tools.
Common use cases:
- Uploading product lists to an e‑commerce platform
- Import leads/contacts into CRMs
- Data backup or migration
- Feeding data into Python (pandas), R, or SQL databases
Method 1: Manually Create with a Text Editor
For small, simple datasets (e.g., a short list of names and emails), you can make a CSV file manually using a text editor like Notepad (Windows).
Note: This method is error‑prone for large data – use only for quick, tiny lists.
Steps for manually CSV file creation:
- Open your text editor.
- Type each row on a new line. Separate values with commas. For example:
- Click “File” → “Save As.”
- Name the file with a .csv extension (e.g., simple_data.csv) and change “Save as type” to “All Files” → Save.
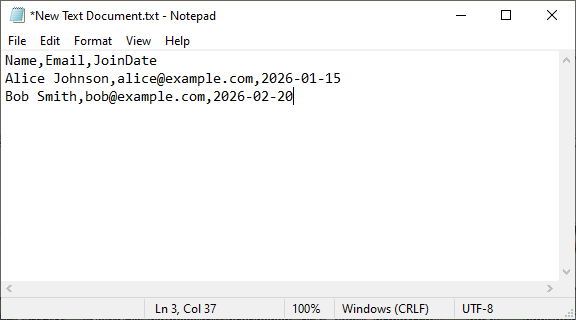
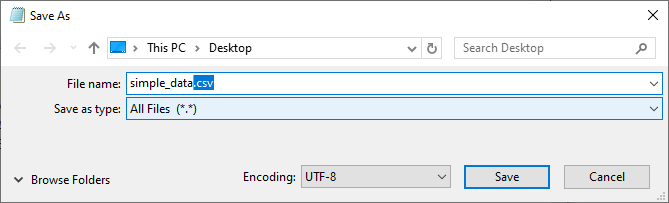
Handling tricky data
If a field contains a comma or line break, enclose it in double quotes. Example:
"Smith, John",john@example.com,"Hello\nworld!"
You can also open an existing text file and follow steps 3-4 to save it as a CSV file. For more conversion methods, refer to: 3 Best Ways to Convert TXT to CSV (Fast & Error-Free)
Method 2: Generate CSV with Microsoft Excel
Excel is the most common tool for creating CSV files, especially if you already work with spreadsheets. Follow these step-by-step instructions to avoid formatting errors and ensure your CSV is usable.
Step 1: Prepare Your Data in Excel
Open Excel and organize your data into rows and columns. Each column should have a clear header (e.g., “ID”, “Name,” “Email,” “Date”), and each row should represent a single entry.
Important tips for CSV compatibility:
- Remove merged cells, filters, or conditional formatting (CSV files can’t retain these).
- Convert formulas to values.
- Format columns with leading zeros as “Text” to preserve zeros.
Example Data:
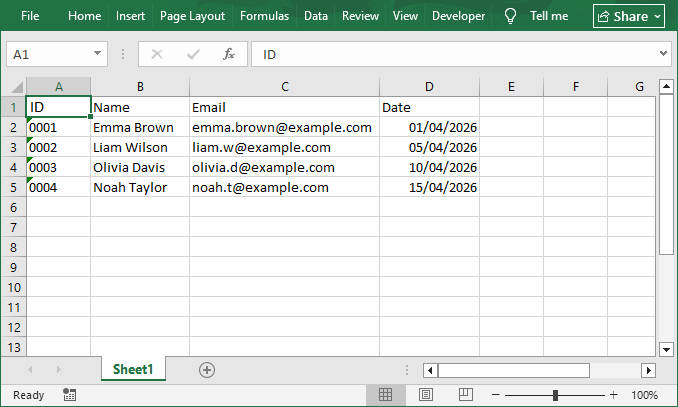
Step 2: Save the File as CSV
Click “File” → “Save As” → choose a location. In the “Save as type” dropdown, select:
- CSV UTF‑8 (Comma delimited) (*.csv): best for non‑English characters
- CSV (Comma delimited) (*.csv): standard but may break special characters
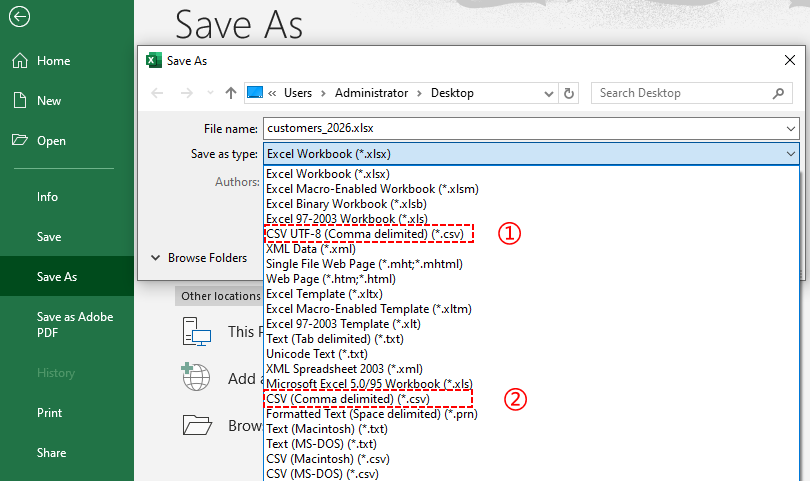
Step 3: Name Your File and Save
Give your file a descriptive name and click “Save”. Excel will display a warning that some features (like formatting) will be lost - just click “Yes”.
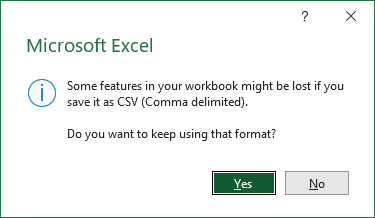
Pro Tip: For European systems that use semicolons as delimiters, change your Windows regional settings first, then save as CSV.
Method 3: Create CSV with Google Sheets (Free)
If you don’t have Excel or prefer cloud-based tools (no software installation required), Google Sheets is a free alternative. It works in any browser and makes collaboration easy.
Here’s how to create a CSV file in Google Sheets:
-
Open Google Sheets: Go to sheets.google.com, log in with your Google account, and create a new blank spreadsheet.
-
Enter Your Data: Just like Excel, enter your structured data into the cells.
-
Download as CSV: Click on the “File” menu, hover over “Download,” and select “Comma-separated values (.csv)” from the dropdown menu.(Note that Google Sheets only exports the current active sheet. Make sure you’re on the correct tab before downloading.)
-
Save the File: Your browser will automatically download the CSV file to your computer’s “Downloads” folder. You can then move it to your desired location.
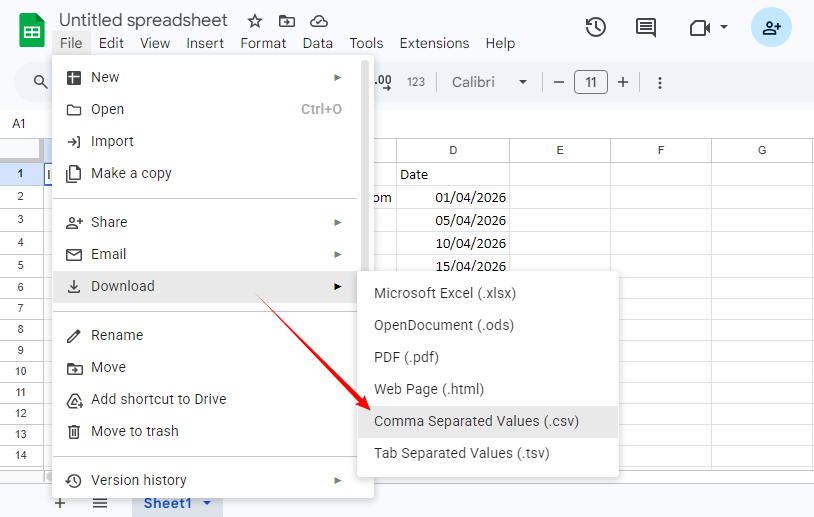
Advantage: Google Sheets automatically handles UTF‑8 encoding, so emojis and international characters are preserved.
Method 4: Create a CSV File in Python
When working with large datasets or needing to automate CSV generation (e.g., batch processing), Python is a powerful tool. We’ll use the Free Spire.XLS for Python library for full control over encoding and delimiters.
Step 1: Install the Free Python Library
Before starting, open your command prompt or terminal and run:
pip install Spire.XLS.Free
Step 2: Write Python Code to Generate CSV
Create a new Python file and add the following code. This example creates a CSV file from scratch with static data:
from spire.xls import *
from spire.xls.common import *

# 1. Create a new workbook
workbook = Workbook()

# 2. Get the first worksheet
worksheet = workbook.Worksheets[0]

# 3. Populate data into cells
# Header row
worksheet.Range["A1"].Text = "Product"
worksheet.Range["B1"].Text = "Price"
worksheet.Range["C1"].Text = "Quantity"

worksheet.Range["A2"].Text = "Wireless Headphones"
worksheet.Range["B2"].NumberValue = 79.99
worksheet.Range["C2"].NumberValue = 250

worksheet.Range["A3"].Text = "Bluetooth Speaker"
worksheet.Range["B3"].NumberValue = 49.99
worksheet.Range["C3"].NumberValue = 180

# 4. Save the worksheet to CSV
worksheet.SaveToFile("BasicReport.csv", ",", Encoding.get_UTF8())
workbook.Dispose()
Open the generated CSV in Excel:
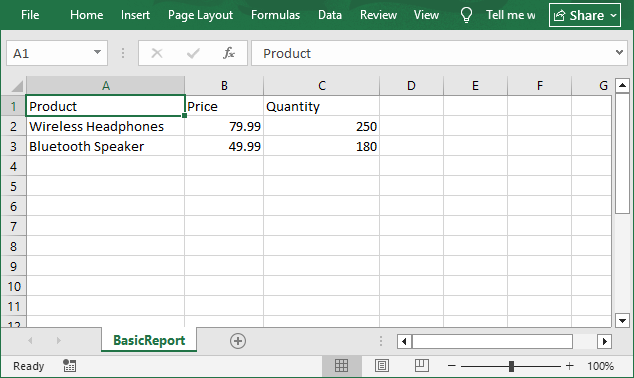
Advanced Examples with Free Spire.XLS
Specifying a custom delimiter and encoding
# Save with semicolon delimiters (for European systems)
worksheet.SaveToFile("output.csv", ";", Encoding.get_UTF8())

# Save with tab delimiters
worksheet.SaveToFile("output.csv", "\t", Encoding.get_UTF8())

# Save with Unicode encoding
worksheet.SaveToFile("output.csv", ",", Encoding.get_Unicode())
Exporting an existing Excel file to CSV:
from spire.xls import *

workbook = Workbook()
workbook.LoadFromFile("input.xlsx")
worksheet = workbook.Worksheets[0]
worksheet.SaveToFile("output.csv", ",", Encoding.get_UTF8())
workbook.Dispose()
For C# developers: Learn How to Create a CSV File in C# (From Scratch, List, or Excel)
Bonus: Generate CSV File from Different Data Sources
CSV files can be created from virtually any data source. Below are the most common scenarios.
From Excel to CSV
- Method A: Open Excel file in Excel → Save As → CSV (as in Method 2).
- Method B: Use Free Spire.XLS for Python as shown in Method 4 – load the Excel file and call SaveToFile.
From JSON to CSV
JSON is the standard format for web APIs. Converting it to CSV allows you to analyze the data in spreadsheets or databases.
- Full tutorial: Convert JSON to CSV – includes Python examples, using MS Excel and online converters.
From PDF Tables to CSV
PDFs are great for printing but terrible for structured data. To extract tables into CSV, use one of these approaches:
- Adobe Acrobat Pro: Open PDF → Export → Spreadsheet → Save as CSV.
- Online converters: Upload PDF and then download as CSV.
- Python library (Spire.PDF): Automatically extract tables from all PDF pages and export to CSV.
For a full guide, see: Convert PDF Tables to CSV: Manual, Online & Automated
Conclusion
No matter your skill level or the tools you have on hand, generating a CSV file is straightforward. You don’t need to be a developer or own expensive software. A few clicks in Excel or Google Sheets, a few lines of Python, or even a plain text editor can get the job done.
To help you pick the right approach at a glance, here’s a quick recap:
| Method | Best for | Difficulty |
|---|---|---|
| Text editor | Tiny, simple data | ★ Beginner |
| Excel | Existing spreadsheets, occasional use | ★ Beginner |
| Google Sheets | Free, cloud‑based, no install | ★ Beginner |
| Python with Free Spire.XLS | Large data, automation, cross‑platform | ★★ Intermediate |
The best method is the one that fits your immediate needs: data size, skill level, or automation. Whichever you choose, the result is the same: a clean, universal CSV file that works seamlessly across any platform.
FAQs About Generating CSV Files
Q: What’s the difference between CSV and Excel files?
A: CSV files are plain text with comma-separated values (no formatting/formulas), while Excel files are binary and can store formatting, charts, and formulas. CSV files are smaller and more compatible, while Excel is better for complex data analysis.
Q: Can I have multiple sheets in a CSV file?
A: No. CSV is a single-sheet format. You need separate CSV files for each sheet, or convert to Excel (XLSX).
Q: Can I use a custom delimiter (semicolon, tab) instead of commas?
A: Yes. In Excel/Google Sheets, select the delimited format when saving. In Python, set the delimiter in the SaveToFile method.
Q: Can I create CSV file online for free?
A: Yes, use the online CSV generator tools like ConvertCSV and TableConvert. However, avoid uploading sensitive data.