
Smart Marker (1)
Marker Designer: Generate Excel Reports from Templates in .NET
2011-07-01 02:51:40 Written by Jane Zhao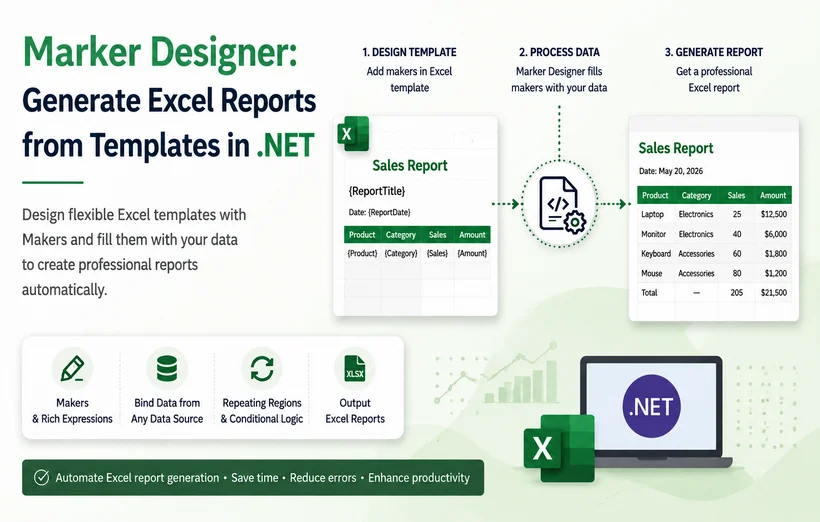
Generating dynamic Excel reports is a core requirement for most enterprise .NET applications. Yet, traditional automation approaches often create more problems than they solve. When code is tightly coupled to specific layouts, even a minor design change—moving a logo or adding a column—can trigger costly rewrites and endless debugging cycles.
The Marker Designer feature in Spire.XLS for .NET reimagines this workflow. It establishes a clean separation between presentation and logic: designers build visually polished templates in native Excel, while developers write simple, decoupled C# code that focuses solely on data retrieval. The engine acts as an intelligent bridge—parsing placeholders, injecting data, expanding rows, and adjusting formulas automatically, all while preserving every detail of the original formatting.
In this article, we will explore how to use the Marker Designer feature to import data into Excel. We’ll cover its core concepts, syntax, supported data sources, and practical code examples—from simple variable replacement to complex data‑driven reports with automatic formula recalculation.
- Understanding Marker Designer Architecture
- Install Spire.XLS for .NET
- Example 1: Basic Text Variable Replacement
- Example 2: Populate Templates from a DataTable
- Example 3: Import Arrays to Excel Rows and Columns
- Example 4: Dynamic Auto-Adjusting Formulas
- Practical: Auto Populate Excel Template from an External Data File
- Frequently Asked Questions
Understanding Marker Designer Architecture
Core Components
Marker: A special text string placed in an Excel cell that tells Spire.XLS where to insert data and which data field to use. Every marker starts with the prefix &=, followed by a data source identifier and a field name.
- Example:
&=Party.FullName - This marker tells the engine to replace the cell content with the “FullName” field from the “Party” data source.
Designer Spreadsheet: A standard Excel file (.xls or .xlsx) that serves as a reusable template. It typically contains:
- Visual formatting (colors, fonts, borders)
- Predefined Excel formulas
- Marker designers in cells where data should be inserted
Marker Syntax Reference
All markers begin with the prefix &= and are placed directly in cells of your Excel template. The standard syntax formats:
- &=DataSource.FieldName: References a field from a structured data source such as a DataTable column.
- &=[Data Source].[Field Name]: Used when data source or field names contain spaces.
- &=VariableName: References a single-value parameter or variable.
Supported Data Sources
Marker Designer supports a wide range of .NET data types. Data sources are registered in code via dedicated methods on the MarkerDesigner object:
| Data Source Type | Method |
|---|---|
| DataTable | AddDataTable(string paraName, DataTable dataTable) |
| DataTable with row limit | AddDataTable(string paraName, DataTable dataTable, int rowCount) |
| DataView | AddDataView(string paraName, DataView dataView) |
| DataColumn | AddDataColumn(string paraName, DataColumn paramValue) |
| Array | AddArray(string paraName, Object[] paramValues) |
| Parameter (single value) | AddParameter(string paraName, Object paramValue) |
Advanced Marker Parameters
Parameters are appended in parentheses after the field name and provide granular control over the rendering behavior.
add:styles: Inherits all cell formatting (font, fill color, borders, number format) from the marker cell and applies it to all expanded data rows.
- Example:
&=Country.Name(add:styles) - Pro Tip: Apply add:styles only to the first marker cell in a template row. The engine automatically propagates formatting to all other expanded cells.
Horizontal: Fills data horizontally (across columns) instead of the default vertical (down rows) direction.
- Example:
&=Products.Name(horizontal) - Use Case: This is particularly useful for creating cross-tabular reports, comparative charts, or filling out header columns for specific date ranges.
Install Spire.XLS for .NET
Option 1: Install via NuGet (Recommended)
Package Manager Console:
Install-Package Spire.XLS
Or search for “Spire.XLS” within NuGet Package Manager UI in Visual Studio.
Option 2: Manual DLL Reference
- Download the Spire.XLS package and extract the files.
- In Visual Studio, right-click References > Add Reference > Browse, then select the appropriate Spire.Xls.dll based on your target framework.
Example 1: Basic Text Variable Replacement
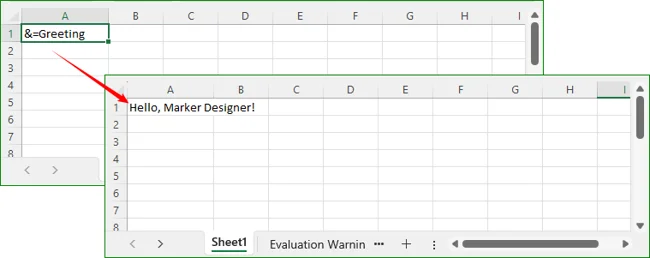
This example demonstrates how to bind a single text value to a marker, ideal for report titles, dates, or summary labels.
Template Preparation: In cell A1 of Template1.xlsx, place the marker: &=Greeting.
C# Code:
using Spire.Xls;

class Program
{
    static void Main()
    {
        // Load template workbook
        Workbook workbook = new Workbook();
        workbook.LoadFromFile("Template1.xlsx");

        // Add a simple parameter
        workbook.MarkerDesigner.AddParameter("Greeting", "Hello, Marker Designer!");

        // Apply all markers
        workbook.MarkerDesigner.Apply();

        // Save the result
        workbook.SaveToFile("Output.xlsx", ExcelVersion.Version2016);
        workbook.Dispose();
    }
}
Result: Cell A1 will display: Hello, Marker Designer!
Example 2: Populate Templates from a DataTable
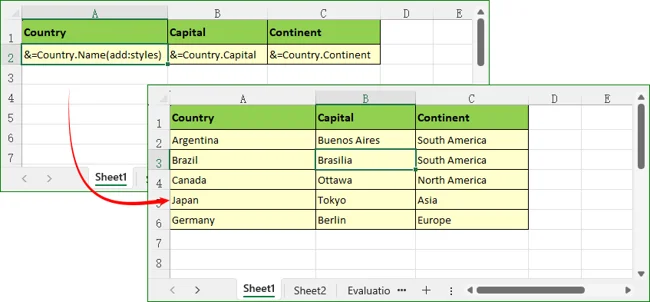
This is the most widely used scenario for generating tabular business reports. Data from a DataTable is populated vertically into a formatted template.
C# code to import DataTable:
using System.Data;
using Spire.Xls;

class Program
{
    static void Main()
    {
        // Create sample DataTable
        DataTable dt = new DataTable("Country");
        dt.Columns.Add("Name", typeof(string));
        dt.Columns.Add("Capital", typeof(string));
        dt.Columns.Add("Continent", typeof(string));

        dt.Rows.Add("Argentina", "Buenos Aires", "South America");
        dt.Rows.Add("Brazil", "Brasilia", "South America");
        dt.Rows.Add("Canada", "Ottawa", "North America");
        dt.Rows.Add("Japan", "Tokyo", "Asia");
        dt.Rows.Add("Germany", "Berlin", "Europe");

        // Load template
        Workbook workbook = new Workbook();
        workbook.LoadFromFile("CountryTemplate.xlsx");
        Worksheet sheet = workbook.Worksheets[0];

        // Register DataTable with Marker Designer
        // The name "Country" must match the prefix in &=Country.Name
        workbook.MarkerDesigner.AddDataTable("Country", dt);

        // Apply markers – data expands downward automatically
        workbook.MarkerDesigner.Apply();

        // Optional: Auto-fit columns
        //sheet.AllocatedRange.AutoFitColumns();
        //sheet.AllocatedRange.AutoFitRows();

        // Save output
        workbook.SaveToFile("CountryReport.xlsx", ExcelVersion.Version2016);
        workbook.Dispose();
    }
}
Result: The template row (row 2) expands to 5 rows of data, with header formatting preserved and styles inherited.
In real-world projects, source data is typically stored in a separate Excel file rather than being constructed inline in code. You can combine Spire.XLS's data export capability with Marker Designer to read raw data from one workbook and populate it into a pre-formatted template workbook.
Example 3: Import Arrays to Excel Rows and Columns
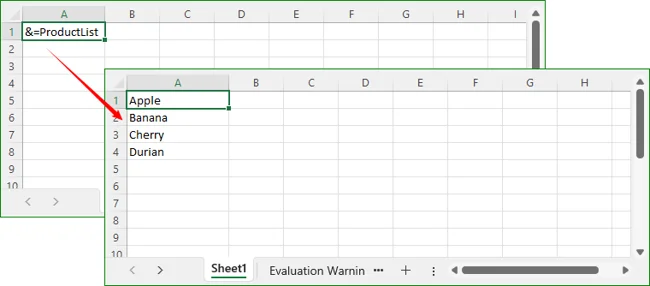
This example demonstrates how to bind a simple one‑dimensional array to fill a column or row with sequential values.
using Spire.Xls;

class Program
{
    static void Main()
    {
        // Load template workbook
        Workbook workbook = new Workbook();
        workbook.LoadFromFile("ArrayTemplate.xlsx");

        // Add array data source
        string[] products = { "Apple", "Banana", "Cherry", "Durian" };
        workbook.MarkerDesigner.AddArray("ProductList", products);

        // Apply markers
        workbook.MarkerDesigner.Apply();

        workbook.SaveToFile("ArrayOutput.xlsx", ExcelVersion.Version2016);
        workbook.Dispose();
    }
}
Result: The array values fill vertically from A1 to A4.
Horizontal Fill
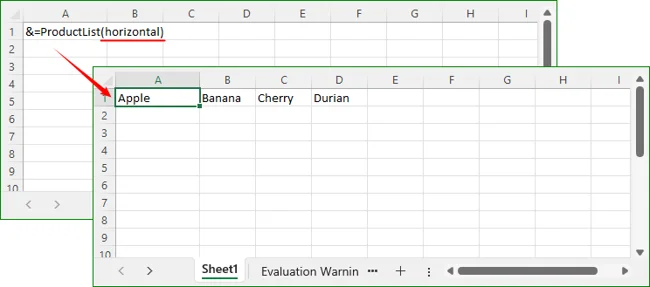
To fill horizontally, you could modify the marker to &=ProductList(horizontal), and the array would span A1 to D1.
Example 4: Dynamic Auto-Adjusting Formulas
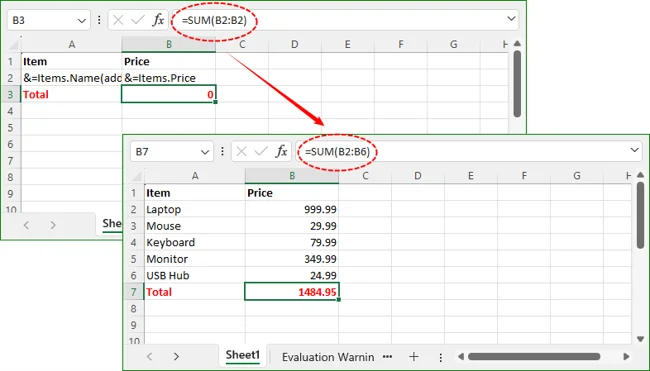
When data expands vertically, formulas referencing marker rows automatically adjust their range. Place summary formulas in the row immediately after the marker row, and they will shift down correctly.
using System.Data;
using Spire.Xls;
class Program
{
    static void Main()
    {
        // Prepare sample data
        DataTable items = new DataTable("Items");
        items.Columns.Add("Name", typeof(string));
        items.Columns.Add("Price", typeof(decimal));
        items.Rows.Add("Laptop", 999.99);
        items.Rows.Add("Mouse", 29.99);
        items.Rows.Add("Keyboard", 79.99);
        items.Rows.Add("Monitor", 349.99);
        items.Rows.Add("USB Hub", 24.99);

        // Create workbook and build template inline
        Workbook workbook = new Workbook();
        workbook.LoadFromFile("FormulaTemplate.xlsx");

        // Bind data source
        workbook.MarkerDesigner.AddDataTable("Items", items);

        // Apply markers – formula range expands automatically
        workbook.MarkerDesigner.Apply();

        // Recalculate all formulas to get actual values
        workbook.CalculateAllValue();

        // Save result
        workbook.SaveToFile("FormulaReport.xlsx", ExcelVersion.Version2016);
        workbook.Dispose();
    }
}
Result: Original template formula “=SUM(B2:B2)” auto‑updates to “=SUM(B2:B6)” after row expansion to cover all generated data rows.
Practical: Auto Populate Excel Template from an External Data File
Very often, your application receives raw data files (e.g., an export from a legacy system, a CSV converted to Excel, or a weekly operational report) that contain only numbers and text but lack any visual styling. Separately, your design team maintains a beautifully formatted “Template.xlsx” file containing headers, logos, color schemes, and the markers.
This example bridges the gap by reading the raw data from a source file, converting it into a DataTable, and injecting it into the styled template—all programmatically.
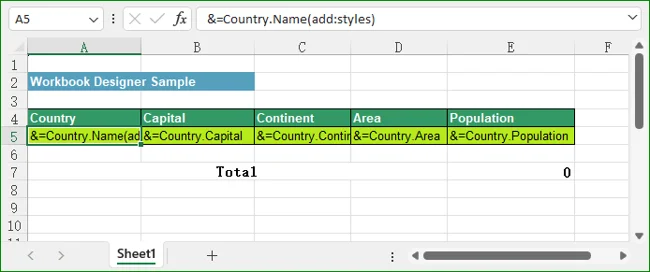
The template file containing formatted headers with markers:
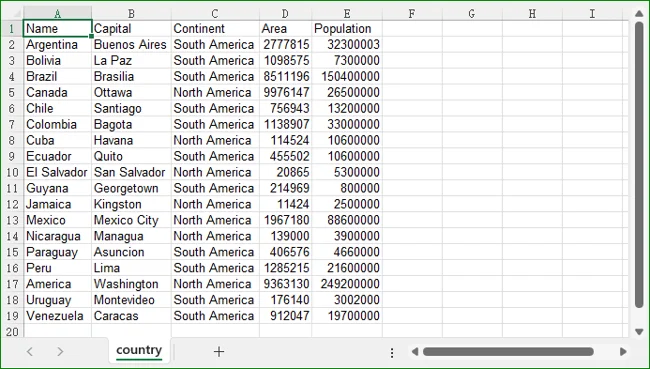
The data source file containing unformatted data:
C# Code:
using Spire.Xls;
using System.Data;

class Program
{
    static void Main(string[] args)
    {
        // 1. Create a new workbook instance and load the DESIGN template.
        Workbook workbook = new Workbook();
        workbook.LoadFromFile("C:\\Users\\Administrator\\Desktop\\MarkerDesigner.xls");

        // 2. Fetch the raw data from a SEPARATE source file.
        DataTable dt = ExportTable();

        // 3. (Optional) Retrieve row count for logging or validation purposes.
        int rowCount = dt.Rows.Count;

        // 4. Get the first worksheet (where your markers are located).
        Worksheet sheet = workbook.Worksheets[0];

        // 5. Bind the extracted DataTable to the MarkerDesigner engine.
        // The name "Country" must match the marker in the template (e.g., &=Country.Name).
        workbook.MarkerDesigner.AddDataTable("Country", dt);
        workbook.MarkerDesigner.Apply();

        // 6. AutoFit rows and columns to ensure all content is fully visible.
        sheet.AllocatedRange.AutoFitRows();
        sheet.AllocatedRange.AutoFitColumns();

        // 7. Recalculate all formulas in the workbook.
        workbook.CalculateAllValue();

        // 8. Save the modified workbook.
        workbook.SaveToFile("Output_MarkerDesigner.xlsx", ExcelVersion.Version2016);

        // 9. Dispose of the workbook object to release memory and file locks.
        workbook.Dispose();
    }

    // Helper method to load data from a specific data-source Excel file.
    static DataTable ExportTable()
    {
        // Instantiate a new workbook to act purely as a data reader.
        Workbook workbook = new Workbook();

        // Load the raw data file (this could be an export from a CRM, ERP, etc.).
        workbook.LoadFromFile("C:\\Users\\Administrator\\Desktop\\MarkerDesigner-DataSample.xls");

        // Initialize the first worksheet where the data resides.
        Worksheet sheet = workbook.Worksheets[0];

        // Export the entire range of the worksheet into a DataTable.
        return sheet.ExportDataTable();
    }
}
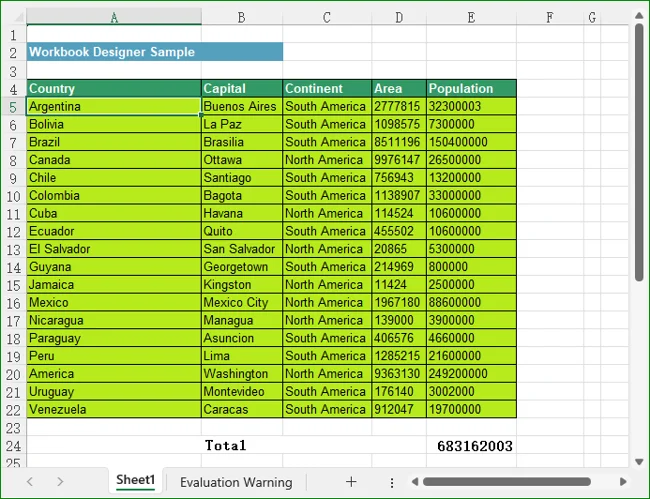
Result: The output file contains formatted headers and styles from the template, with rows dynamically populated from the data file.
Conclusion
Marker Designer streamlines Excel report generation by decoupling visual design from data logic, reducing development effort and improving maintainability. With support for multiple data sources, configurable single‑value marker parameters, and automatic formula adaptation, it provides a flexible solution for building dynamic Excel documents in .NET applications.
Whether you are generating simple parameterized reports, complex tabular datasets, or summary reports with calculated fields, Marker Designer in Spire.XLS for .NET delivers a declarative, low‑code approach to Excel automation that saves hundreds of hours of development effort.
Frequently Asked Questions
Can I use multiple data sources in a single template?
A: Yes. You can register multiple data sources (DataTables, arrays, parameters) in the same workbook. Each marker references its corresponding data source by name, and all markers are processed in a single Apply() call.
Does the add:styles parameter work on multiple columns?
A: You only need to apply add:styles to the very first marker cell in a template row. The engine captures the style from that cell and propagates it horizontally across all the newly created cells in that row. If you apply it to a middle column, the style propagation may not extend correctly to preceding columns.
How do I control the number of rows populated from a DataTable?
A: Use the AddDataTable overload with the rowCount parameter to limit the maximum number of rows populated from the data source. This is useful for preview scenarios or paginated reports.
Can I use MarkerDesigner with existing Excel files that already contain data?
A: Yes. You can load any Excel file, register data sources, and apply markers. The engine will update only the cells containing markers, leaving other content untouched.
