
Knowledgebase (2344)
Children categories
Exporting a DataTable to Excel in C# is a common task in .NET development, such as generating reports, exporting logs, or preparing data for sharing across systems. By using a standalone component, developers can quickly export data and apply formatting to create professional, ready-to-use Excel files from DataTables without relying on complex setup or external dependencies.
To streamline this process, Spire.XLS for .NET offers a lightweight and fully independent library. In this article, you'll learn how to export a DataTable to Excel (.xlsx or .xls) in C#, apply formatting to improve readability, and address common export scenarios effectively.
Quick Navigation
- Install and Configure Spire.XLS
- Step-by-Step: Export DataTable to Excel
- Format and Style the Exported Excel File
- Common Issues and Solutions
- Conclusion
- Frequently Asked Questions
Install and Configure Spire.XLS
Before you start, make sure your project includes Spire.XLS for .NET.
Install Spire.XLS via NuGet
Run this command in the NuGet Package Manager Console:
Install-Package Spire.XLS
Spire.XLS works with .NET Framework, .NET Core, .NET 6/7+, and ASP.NET projects — no Microsoft Office installation required.
Step-by-Step: Export DataTable to Excel in C#
The following steps demonstrate how to export a DataTable to an Excel file using Spire.XLS, including data preparation, file generation, optional streaming, and output formatting.
1. Create a Sample DataTable
First, create a DataTable and add some sample rows:
DataTable dt = new DataTable("Employees");

// Insert columns
dt.Columns.Add("ID", typeof(int));
dt.Columns.Add("Name", typeof(string));
dt.Columns.Add("Department", typeof(string));
dt.Columns.Add("Join Date", typeof(DateTime));
dt.Columns.Add("Salary", typeof(double));
dt.Columns.Add("Full-Time", typeof(bool));
dt.Columns.Add("Bonus Rate", typeof(decimal));

// Insert rows
dt.Rows.Add(1001, "Alice", "HR", new DateTime(2021, 5, 10), 55000.5, true, 0.05m);
dt.Rows.Add(1002, "Bob", "IT", new DateTime(2020, 11, 23), 72000.0, false, 0.03m);
dt.Rows.Add(1003, "Carol", "Finance", new DateTime(2019, 8, 15), 63000.75, true, 0.07m);
dt.Rows.Add(1004, "David", "Marketing", new DateTime(2022, 3, 8), 48800.0, true, 0.06m);
Tip: This is just sample data — you can bind any DataTable your app generates.
2. Import DataTable and Save to Excel File
Next, initialize the Excel workbook, import the DataTable into a worksheet, and save the file:
// Create a new workbook
Workbook workbook = new Workbook();
// Clear the default worksheets and add a new one
workbook.Worksheets.Clear();
Worksheet sheet = workbook.Worksheets.Add(dt.TableName);

// Import the DataTable starting at cell A1
sheet.InsertDataTable(dt, true, 1, 1);

// Save as XLSX (recommended)
workbook.SaveToFile("EmployeeData.xlsx", FileFormat.Version2016);

// Or save as XLS (older format)
workbook.SaveToFile("EmployeeData.xls", FileFormat.Version97to2003);
Explanation:
- Workbook is the container for your Excel file.
- InsertDataTable(dataTable, includeColumnHeaders, startRow, startColumn) maps the entire table to the Excel grid.
- SaveToFile() writes the file to disk in your chosen format.
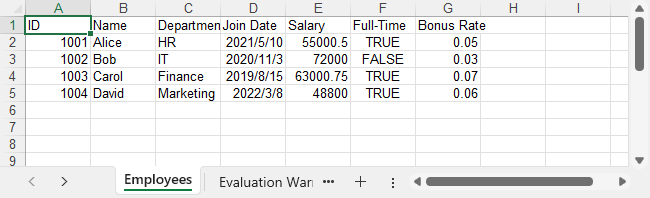
Output Preview
Example of the exported Excel file:
3. Export Excel File as Stream in ASP.NET
When building a web app, you might want to export the file directly as a stream instead of saving to disk:
MemoryStream stream = new MemoryStream();
workbook.SaveToStream(stream, FileFormat.Version2013);
stream.Position = 0;
Return this MemoryStream in your ASP.NET controller to trigger a file download in the browser.
For additional tips on managing Excel files in C#, check out How to Create and Manipulate Excel Files in C#.
Format and Style the Exported Excel File
Formatting is optional but recommended for creating professional Excel files. Below is how you can format the exported content using Spire.XLS.
// Style the header row
CellRange header = sheet.Rows[0];
header.Style.Font.IsBold = true;
header.Style.Font.FontName = "Arial";
header.Style.Font.Size = 13;
header.Style.Color = Color.LightGray;
header.Style.Borders[BordersLineType.EdgeBottom].LineStyle = LineStyleType.Thick;

// Style the data rows
for (int i =  1; i < sheet.Rows.Length; i++)
{
    CellRange dataRow = sheet.Rows[i];
    dataRow.Style.Font.FontName = "Times New Roman";
    dataRow.Style.Font.Size = 11;
    dataRow.BorderInside();
}

// Format date column to display as date
CellRange dateColumn = sheet.Range[2, 4, sheet.Rows.Length + 1, 4];
dateColumn.Style.NumberFormat = "yyyy-mm-dd";

// Auto-fit columns
sheet.AllocatedRange.AutoFitColumns();
Key Properties and Methods:
- Style: Applies font, color, border, number formatting, etc. to cells.
- AutoFitColumns(): Automatically adjusts column width to fit content.
- NumberFormat: Sets how dates or numbers are displayed in Excel, e.g., "yyyy-mm-dd".
- BorderInside(): Adds internal borders to improve table readability.
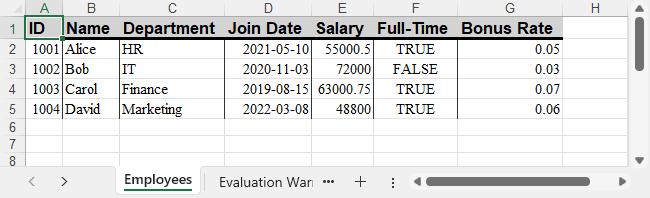
Formatted Output Preview
Excel file with formatted header and date column:
For more advanced number formatting options, see how to set number format in Excel using C#.
Common Issues and Solutions
- File won’t open or shows corruption error
Ensure streams are closed properly and file extensions match the format.
- Special characters or non-English text look garbled
Confirm strings are UTF-8 encoded and use appropriate fonts.
- Columns too narrow
Use AutoFitColumns() to adjust widths automatically or use CellRange.ColumnWidth to set a fixed column width.
Conclusion
Exporting a DataTable to Excel in C# is straightforward with Spire.XLS. This approach lets you create .xlsx or .xls files easily without relying on Office, while giving you full control over the output layout for both desktop and web applications.
If needed, you can also request a free temporary license to unlock the full feature set for evaluation.
Frequently Asked Questions
Q1: How to convert DataTable to Excel in C#?
You can use sheet.InsertDataTable() from Spire.XLS to load a DataTable into a worksheet, then save it as an Excel file using workbook.SaveToFile().
Q2: Is there a free library to export a DataTable to Excel in C#?
Yes — Free Spire.XLS for .NET is a standalone library that lets you create and export Excel files directly in C# without needing to install Microsoft Office.
Q3: Can I export DataTable to Excel in ASP.NET?
Yes, the same logic can be applied in ASP.NET by generating the workbook in a controller and streaming it back as a downloadable file.
Q4: What's the difference between .xlsx and .xls export?
.xlsx is the newer Office Open XML format, compatible with Excel 2007 and later. .xls supports legacy Excel 97–2003 but is limited to 65,536 rows.

Optical Character Recognition (OCR) has become an indispensable technology in modern software development, enabling computers to convert different types of documents, such as images or scanned documents, into editable and searchable text. In the Java ecosystem, integrating OCR capabilities enables powerful document processing, data extraction, and accessibility features. This guide explores how to implement OCR in Java using the Spire.OCR for Java library, leveraging its advanced features to extract text from images with or without positional coordinates.
Table of Contents:
- Why Perform OCR in Java?
- Environment Setup & Configuration
- Extract Text from an Image in Java
- Extract Text with Coordinates from an Image in Java
- Advanced OCR Techniques
- FAQs (Supported Languages and Image Formats)
- Conclusion & Free License
Why Perform OCR in Java?
OCR technology transforms images into machine-readable text. Java developers leverage OCR for:
- Automating invoice/receipt processing
- Digitizing printed records and forms
- Enabling text search in scanned documents
- Extracting structured data with spatial coordinates
Spire.OCR for Java stands out with its:
- Advanced OCR algorithms ensure accurate text recognition.
- Support for multiple image formats and languages.
- Batch processing of multiple images, improving efficiency.
- Ease of integration with Java applications
Environment Setup & Configuration
Step 1: Add Spire.OCR to Your Project
Add the following to your pom.xml:
<repositories>
    <repository>
        <id>com.e-iceblue</id>
        <name>e-iceblue</name>
        <url>https://repo.e-iceblue.com/nexus/content/groups/public/</url>
    </repository>
</repositories>
<dependency>
    <groupId>e-iceblue</groupId>
    <artifactId>spire.ocr</artifactId>
    <version>2.1.1</version>
</dependency>
Alternatively, you can download the Spire.OCR for Java library, and then add it to your Java project.
Step 2: Download the OCR Model Files
Spire.OCR for Java relies on pre-trained models to extract image text. Download the OCR model files for your OS:
After downloading, unzip the files to a directory (e.g., F:\win-x64)
Extract Text from an Image in Java
The following is a basic text extraction example, i.e., reading text from an image and saving it to .txt files.
Use Cases:
- Archiving printed materials (e.g., books, newspapers) as digital text.
- Converting images (e.g., screenshots, memes, signs) into shareable/editable text.
Java code to get text from an image:
import com.spire.ocr.*;
import java.io.BufferedWriter;
import java.io.FileWriter;
import java.io.IOException;

public class ocrJava {
    public static void main(String[] args) throws Exception {
            // Create an instance of the OcrScanner class
            OcrScanner scanner = new OcrScanner();

            // Create an instance of the ConfigureOptions class
            ConfigureOptions configureOptions = new ConfigureOptions();

            // Set the path to the OCR model
            configureOptions.setModelPath("F:\\win-x64");

            // Set the language for text recognition
            configureOptions.setLanguage("English");

            // Apply the configuration options to the scanner
            scanner.ConfigureDependencies(configureOptions);

            // Extract text from an image
            scanner.scan("sample.png");
            String text = scanner.getText().toString();

            // Save the extracted text to a text file
            try (BufferedWriter writer = new BufferedWriter(new FileWriter("output.txt"))) {
                writer.write(text);
            } catch (IOException e) {
            e.printStackTrace();
        }
    }
}
Key Steps:
-
Initialize Scanner: OcrScanner handles OCR operations
-
Configure Settings:
- setModelPath(): Location of OCR model files
- setLanguage(): Supports multiple languages (Chinese, Spanish, etc.)
-
Process Image: scan() performs OCR on the image file
-
Export Text: getText() retrieves results as a string
Output:

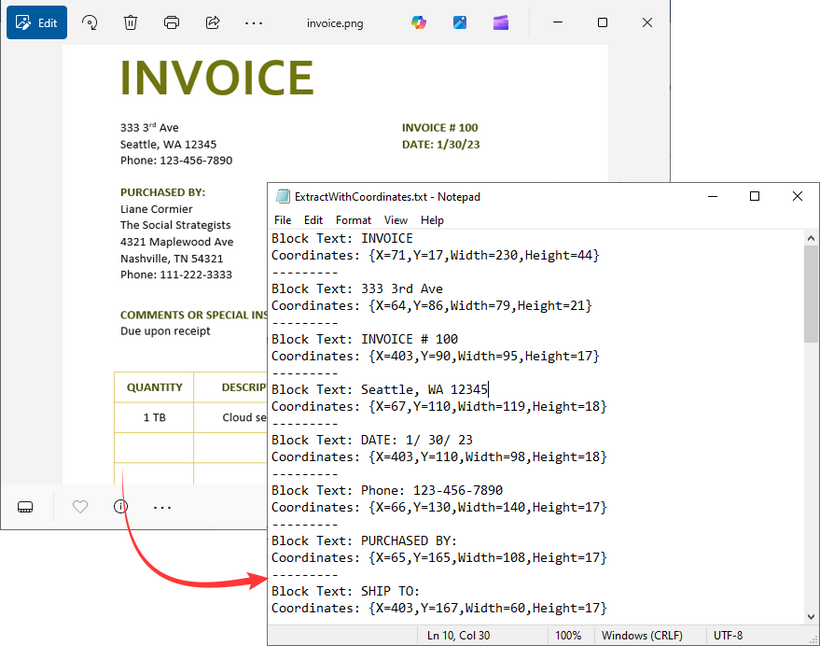
Extract Text with Coordinates from an Image in Java
In some applications, knowing the position of text within the image is crucial, for example, when processing structured documents like invoices or forms. The Spire.OCR library supports this through its block-based text extraction feature.
Use Cases:
- Automated invoice processing (locate amounts, dates)
- Form data extraction (identify fields by position)
Java code to extract text with coordinates:
import com.spire.ocr.*;
import java.io.IOException;
import java.nio.file.Files;
import java.nio.file.Paths;
import java.util.ArrayList;
import java.util.List;

public class ExtractWithCoordinates {
    public static void main(String[] args) throws Exception {
            // Create an instance of the OcrScanner class
            OcrScanner scanner = new OcrScanner();

            // Create an instance of the ConfigureOptions class
            ConfigureOptions configureOptions = new ConfigureOptions();

            // Set the path to the OCR model
            configureOptions.setModelPath("F:\\win-x64");

            // Set the language for text recognition
            configureOptions.setLanguage("English");

            // Apply the configuration options to the scanner
            scanner.ConfigureDependencies(configureOptions);

            // Extract text from an image
            scanner.scan("invoice.png");
            IOCRText text = scanner.getText();

            // Create a list to store information
            List<String> results = new ArrayList<>();

            // Iterate through each detected text block
            for (IOCRTextBlock block : text.getBlocks()) {
                // Add the extracted text and coordinates to the list
                results.add("Block Text: " + block.getText());
                results.add("Coordinates: " + block.getBox());
                results.add("---------");
            }

            // Save to a text file
            try {
                Files.write(Paths.get("ExtractWithCoordinates.txt"), results);
            } catch (IOException e) {
                e.printStackTrace();
            }
        }
    }
Key Features:
-
Text & Coordinate Extraction:
-
Iterates over text blocks detected in the image.
-
getText(): Returns an IOCRText object containing recognized text.
-
getBox(): Returns bounding box coordinates [x, y, width, height]
-
-
Efficient File Writing:
-
Uses Java NIO for efficient file operations.
-
Outputs human-readable results for easy parsing.
-
Output:
Advanced OCR Techniques
1. Enable Auto-Rotation of Images
For accurate processing of skewed or rotated images, enable the SetAutoRotate() method to rotate the image to the correct upright position automatically:
ConfigureOptions configureOptions = new ConfigureOptions();
configureOptions.SetAutoRotate(true);
2. Preserve the Original Layout
If you need to preserve the original visual layout in the image (e.g., table, multi-column layout), initialize the VisualTextAligner class to enhance the formatting of the extracted text.
// Align the recognized text (for better formatting)
VisualTextAligner visualTextAligner = new VisualTextAligner(scanner.getText());
String scannedText = visualTextAligner.toString();
FAQs (Supported Languages and Image Formats)
Q1: What image formats does Spire.OCR for Java support?
A: Spire.OCR for Java supports all common formats:
- PNG
- JPEG/JPG
- BMP
- TIFF
- GIF
Q2: What languages does Spire.OCR for Java support?
A: Multiple languages are supported:
- English (default)
- Chinese (Simplified and Traditional)
- Japanese
- Korean
- German
- French
Q3: How to improve OCR accuracy?
A: To boost accuracy:
- Use high-quality images (300+ DPI, well-lit, low noise).
- Preprocess images (adjust contrast, remove artifacts) before scanning.
- Specify the correct language(s) for the text in the image.
Q4: Can Spire.OCR for Java extract text from scanned PDFs?
A: This task requires the Spire.PDF for Java integration to convert PDFs to images or extract images from scanned PDFs first, and then use the above Java examples to get text from the images.
Conclusion & Free License
This guide provides a comprehensive roadmap for mastering Spire.OCR for Java, equipping developers with the knowledge to seamlessly integrate powerful OCR capabilities into their Java applications. From step-by-step installation to implementing basic and advanced text extraction, every critical aspect of recognizing text from images has been covered. Whether you're new to OCR or experienced, you now have the tools to convert images to text simply and effectively.
Request a 30-day free trial license here to enjoy unlimited OCR processing in Java.
Read Email in C# via IMAP and POP3 (Outlook Example Included)
2025-07-30 08:56:03 Written by zaki zou
Reading emails using C# is a common task in enterprise applications where automatic email processing is needed. For example, customer support systems retrieve tickets from email inboxes, financial platforms extract PDF invoices from attachments, and workflow tools react to notification emails. These applications require access to message content, metadata (sender, subject, timestamp), and attachments.
In this article, we’ll walk through how to read emails in C# using IMAP and POP3, and access Gmail or Outlook mailboxes securely with OAuth 2.0. We'll use Spire.Email for .NET, a library that simplifies email client implementation by providing a unified API for IMAP, POP3, and SMTP. It supports both OAuth and password-based authentication, and allows parsing full MIME messages including headers, bodies, and attachments.
This article covers:
- Environment Setup
- Authenticate Email Access via OAuth
- Read Emails Using IMAP in C#
- Read Emails via POP3 in C#
- Extract Attachments and Plain Text
- Summary
- Frequently Asked Questions
Environment Setup
To follow this tutorial, you’ll need the following:
- A .NET development environment (e.g., Visual Studio)
- Spire.Email for .NET (Install via NuGet: Install-Package Spire.Email)
- Access to a Gmail or Outlook account with OAuth 2.0 enabled
Spire.Email for .NET supports standard email protocols—IMAP, POP3, and SMTP—and provides built-in functionality for MIME parsing, attachments, HTML rendering, and encoding handling.
You can also try Free Spire.Email for .NET if your project is small or for evaluation.
Authenticate Email Access via OAuth
Modern email providers such as Gmail and Outlook require OAuth 2.0 for secure and token-based access to IMAP and POP3 services. Gmail still supports app passwords for POP3 in some cases, but OAuth is the preferred and more secure method.
Here’s how to use MSAL.NET to acquire an access token for Outlook:
var app = PublicClientApplicationBuilder
    .Create("your-client-id")
    .WithDefaultRedirectUri()
    .Build();

string[] scopes = new[] { "https://outlook.office365.com/IMAP.AccessAsUser.All" };

AuthenticationResult result = await app
    .AcquireTokenInteractive(scopes)
    .ExecuteAsync();

string accessToken = result.AccessToken;
For Gmail, you can use Google.Apis.Auth or any OAuth 2.0 compliant method to retrieve a token with the https://mail.google.com/ scope. This token can then be passed to Spire.Email for authentication.
Read Emails Using IMAP in C# from Outlook and Gmail
To read emails from Outlook or Gmail in C#, IMAP is a widely used protocol that allows access to mailbox folders, message flags, and full message content. With Spire.Email for .NET, you can use the ImapClient class to connect securely to IMAP servers using OAuth tokens.
The following C# example demonstrates how to read emails from Outlook's IMAP server:
using Spire.Email;
using Spire.Email.IMap;
using System.Text;

class Program
{
    static void Main()
    {
        ImapClient client = new ImapClient();

        // Connect to IMAP server (Outlook)
        client.Host = "outlook.office365.com";
        client.Port = 993;
        client.ConnectionProtocols = ConnectionProtocols.Ssl;

        // Use OAuth 2.0
        client.UseOAuth = true;
        client.Username = "your-email@outlook.com";
        client.AccessToken = "your-access-token";

        client.Connect();
        client.Login();

        // Retrieve message count in the Inbox
        int messageCount = client.GetMessageCount("Inbox");
        StringBuilder messageDetails = new StringBuilder();

        for (int i = 0; i <= messageCount; i++)
        {
            MailMessage message = client.GetFullMessage(i);
            messageDetails.AppendLine("Message: " + i);
            messageDetails.AppendLine("Subject: " + message.Subject);
            messageDetails.AppendLine("From: " + message.From.Address);
            messageDetails.AppendLine("Date: " + message.Date);
            messageDetails.AppendLine("Body (HTML): " + message.BodyHtml);
        }

        File.WriteAllText("MessageInfo.txt", messageDetails.ToString());
        client.Disconnect();
    }
}
Technical Details
- ImapClient: Represents an IMAP client connection. It handles server communication and supports OAuth-based authentication via the UseOAuth property.
- Host and Port: Set the server address and port number. For Outlook, you can use "outlook.office365.com" and port 993 with SSL.
- AccessToken: Replace "your-access-token" with a valid token obtained via Microsoft or Google OAuth 2.0 flow.
- GetMessageCount("Inbox"): Retrieves the number of emails in the specified folder.
- GetFullMessage(i): Retrieves the full content of the message at the specified index as a MailMessage object.
- MailMessage: Represents an email message. Properties like Subject, From, Date, and BodyHtml allow structured access to message details.
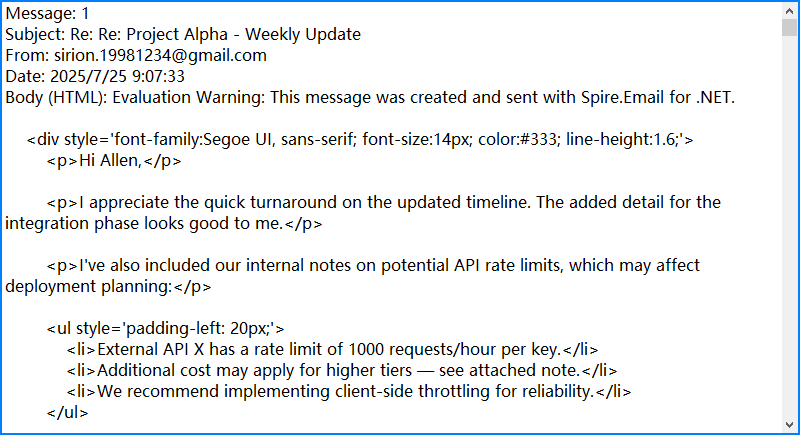
The following screenshot shows the extracted email subject, sender, and HTML body saved from Outlook using IMAP:
By combining Spire.Email’s IMAP interface with OAuth security and flexible MIME parsing, you can reliably automate email reading in C# with full access to both content and context.
If you need examples of how to send emails, please refer to How to Send Emails Using C#.
Read Emails via POP3 in C#
If folder management and server-side search are not required, POP3 offers a simpler alternative to IMAP. The following example demonstrates how to read emails using POP3 with Spire.Email.
using Spire.Email;
using Spire.Email.Pop3;

Pop3Client popClient = new Pop3Client();
popClient.Host = "pop.gmail.com";
popClient.Port = 995;
popClient.EnableSsl = true;
popClient.Username = "your-address@gmail.com";
popClient.Password = "your-password";

// Or use OAuth
// popClient.UseOAuth = true;
// popClient.AccessToken = "your-access-token";

popClient.Connect();
popClient.Login();

for (int i = 1; i < popClient.GetMessageCount(); i++)
{
    MailMessage msg = popClient.GetMessage(i);
    Console.WriteLine("Message - " + i);
    Console.WriteLine("Subject: " + msg.Subject);
    Console.WriteLine("From: " + msg.From.Address);
}

popClient.Disconnect();
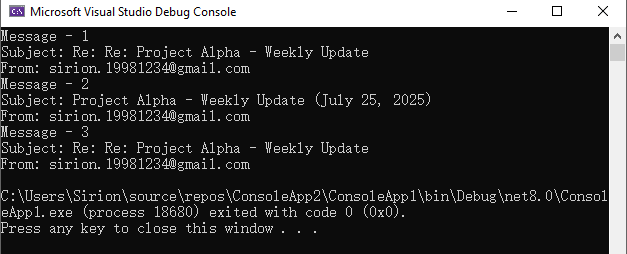
This screenshot displays the console output after fetching messages via POP3 from Gmail:
Unlike IMAP, POP3 downloads messages but does not maintain folder structure or message states on the server. Choose POP3 for simple retrieval scenarios.
Advanced Email Parsing in C#: Extract Attachments and Plain Text
In many cases, it's necessary to extract the plain-text content of an email for further processing, or to retrieve attachments for downstream use such as storage, analysis, or forwarding. The following C# example demonstrates how to access and save both the plain-text body and attachments using the MailMessage object.
MailMessage message = client.GetFullMessage(index);

// Retrieve plain text content
string plainText = message.BodyText;

// Extract attachments
foreach (Attachment attachment in message.Attachments)
{
    string path = Path.Combine("Attachments", attachment.ContentType.Name);
    Directory.CreateDirectory("Attachments");
    using (var fileStream = new FileStream(path, FileMode.Create, FileAccess.Write))
    {
        attachment.Data.Position = 0;
        attachment.Data.CopyTo(fileStream);
    }
}
Notes:
- Most emails contain both HTML and plain text bodies; use the format appropriate for your application.
- To skip embedded images (like inline logos), check that attachment.ContentDisposition.DispositionType != "Inline".
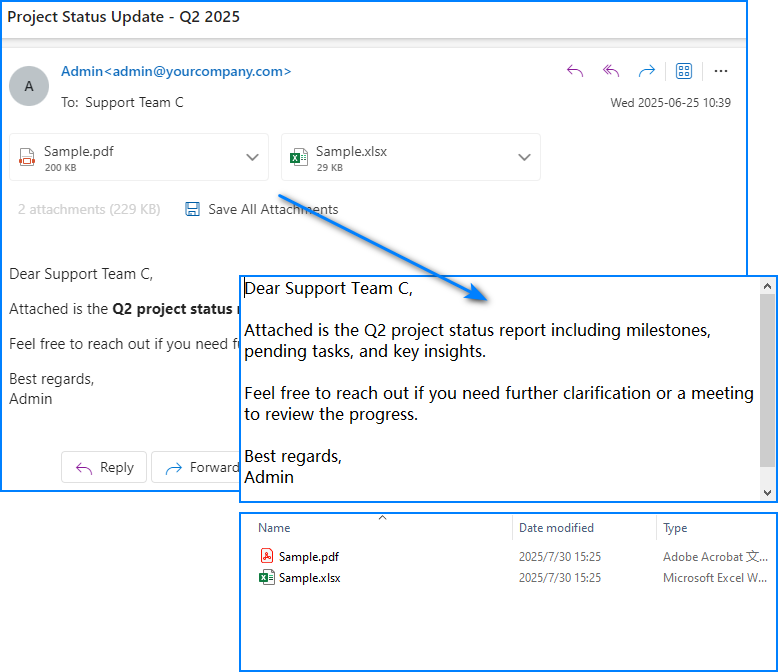
Below is a sample output showing saved attachments and extracted plain text from the retrieved email:
For more detailed operations such as managing email folders—creating, deleting, or moving messages—please refer to our guide on Email Folder Management in C#.
Summary
With Spire.Email for .NET, you can programmatically access Gmail or Outlook inboxes in C# using either IMAP or POP3. The library supports OAuth 2.0 authentication, parses both HTML and plain-text email bodies, and enables attachment extraction for downstream processing. Whether you're building an internal automation tool, an alerting system, or an email parser, Spire.Email provides the essential components for email integration in .NET applications.
If you'd like to explore all features without limitations, you can apply for a free temporary license.
Frequently Asked Questions
Can I use Spire.Email for sending emails too?
Yes. Spire.Email for .NET includes support for SMTP as well, allowing you to send HTML-formatted emails, add attachments, and configure encoding and headers.
Does Spire.Email work with other email providers?
Yes. As long as the provider supports standard IMAP, POP3, or SMTP protocols, and offers compatible authentication (OAuth or basic), it will work with Spire.Email.
How do I get the access token programmatically?
For Outlook, you can use Microsoft’s MSAL.NET; for Gmail, use Google.Apis.Auth or any other OAuth library that retrieves a valid token with mail access scopes. These tokens can then be passed to the email client for secure login.
