
Knowledgebase (2408)
Children categories
How to Convert Excel to Markdown in Python (Files, Sheets & Ranges)
2026-06-08 07:16:12 Written by alice yang
Excel files are commonly used to store structured data, while Markdown is widely used in technical documentation, static websites, and Git-based publishing workflows. When you need to reuse spreadsheet data in Markdown documents, manually copying and reformatting Excel tables can be time-consuming and error-prone. A more reliable approach is to automate the conversion with Python.
This tutorial demonstrates how to convert Excel to Markdown in Python using Spire.XLS for Python. You will learn how to convert entire workbooks, export specific sheets or cell ranges, as well as batch processing with simple code examples.
In This Article
- Why Convert Excel to Markdown?
- Install Python Excel to Markdown Library
- Basic Excel to Markdown Conversion in Python
- Advanced Excel to Markdown Conversion Scenarios
- Best Practices for Converting Excel to Markdown
- Conclusion
- FAQs
Why Convert Excel to Markdown?
Converting Excel tables to Markdown can be useful in several scenarios:
- Create documentation: Add Excel tables to README files and wikis.
- Use with Git: Markdown is text-based and easier to track than Excel files.
- Publish online: Use Excel data in blogs or docs sites.
- Share data easily: Markdown tables are lightweight and widely compatible across platforms.
Install Python Excel to Markdown Library
To convert Excel files to Markdown in Python, install Spire.XLS for Python from PyPI:
pip install spire.xls
Markdown conversion is supported in Spire.XLS for Python 16.4.0 and later versions. If you are using an earlier version, upgrade the package first:
pip install --upgrade spire.xls
Basic Excel to Markdown Conversion in Python
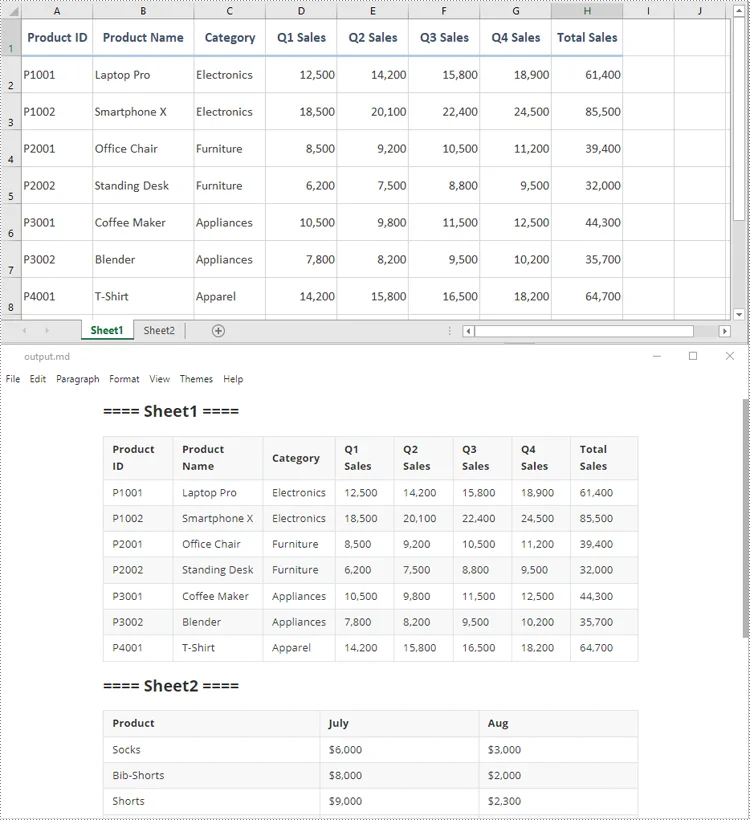
The simplest way to convert an Excel file to Markdown is to load the workbook and save it as a .md file.
The process only requires three main steps:
- Create a Workbook object.
- Load the Excel file using the Workbook.LoadFromFile() method.
- Save the workbook as a Markdown file using the Workbook.SaveToMarkdown() method.
from spire.xls import Workbook

# Create a Workbook object
workbook = Workbook()

# Load an Excel file
workbook.LoadFromFile("report.xlsx")

# Save the workbook as a Markdown file
workbook.SaveToMarkdown("output.md")

# Release resources
workbook.Dispose()
Output:
Advanced Excel to Markdown Conversion Scenarios
In many real-world projects, you may not always need to convert the entire workbook. You may want to customize how images and hyperlinks are exported, convert only one worksheet, export a selected range, or process a folder of Excel files automatically.
The following sections show how to implement these conversions in Python.
1. Customize Image and Hyperlink Export Options
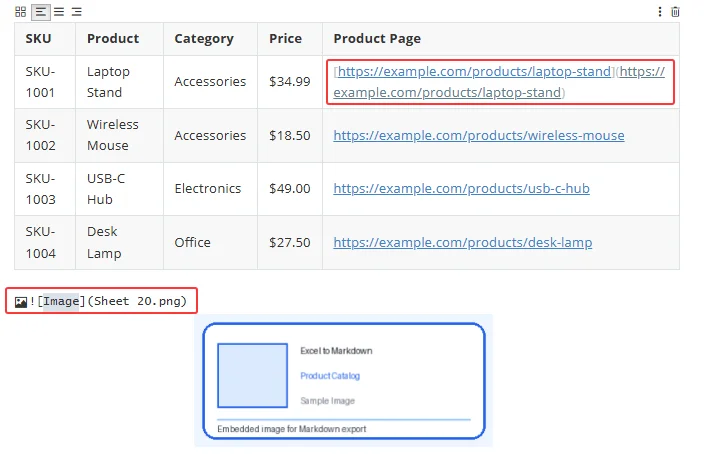
When exporting Excel to Markdown, images and hyperlinks are written as Markdown syntax. You can use the properties of the MarkdownOptions class to control how image paths and hyperlinks are saved in the output file.
| Property | When Set to True | When Set to False |
|---|---|---|
| SavePicInRelativePath | Images are saved with relative paths, such as  . |
Images are saved with absolute paths, such as  . |
| SaveHyperlinkAsRef | Hyperlinks are saved as reference-style links, such as [Link Text][ref1] . |
Hyperlinks are saved as inline links, such as [Link Text](https://example.com) . |
Using relative image paths is usually better for documentation projects because the Markdown file and image folder can be moved together. Inline links are often easier to read and maintain in smaller Markdown files.
The following example shows how to convert an Excel workbook to Markdown with custom image and hyperlink options:
from spire.xls import Workbook, MarkdownOptions

# Create a Workbook object
workbook = Workbook()

# Load an Excel file
workbook.LoadFromFile("sample.xlsx")

# Create a MarkdownOptions object
markdown_options = MarkdownOptions()

# Save images with relative paths
markdown_options.SavePicInRelativePath = True

# Save hyperlinks as inline links
markdown_options.SaveHyperlinkAsRef = False

# Save the workbook as a Markdown file
workbook.SaveToMarkdown("custom_options.md", markdown_options)

# Release resources
workbook.Dispose()
Output:
2. Convert a Specific Sheet to Markdown
If an Excel workbook contains multiple worksheets, but you only need to export one sheet, you can copy the target worksheet to a new workbook with the AddCopy method, and then save that new workbook as a .md file.
This approach helps avoid exporting unnecessary sheets into the same Markdown document.
from spire.xls import Workbook


def convert_specific_sheet(excel_file, sheet_name, output_md):
    """
    Convert a specific worksheet in an Excel file to Markdown.
    """
    workbook = Workbook()
    new_workbook = None

    try:
        # Load the Excel file
        workbook.LoadFromFile(excel_file)

        # Find the target worksheet by name
        worksheet = None
        for ws in workbook.Worksheets:
            if ws.Name == sheet_name:
                worksheet = ws
                break

        if worksheet is None:
            print(f"Worksheet '{sheet_name}' was not found.")
            return

        # Create a new workbook that contains only the target worksheet
        new_workbook = Workbook()
        new_workbook.Worksheets.Clear()
        new_workbook.Worksheets.AddCopy(worksheet)

        # Save the new workbook as Markdown
        new_workbook.SaveToMarkdown(output_md)

        print(f"Worksheet '{sheet_name}' converted successfully to {output_md}.")

    finally:
        # Release resources
        if new_workbook is not None:
            new_workbook.Dispose()

        workbook.Dispose()


# Usage
convert_specific_sheet("report.xlsx", "Sheet 1", "sheet1.md")
3. Export a Selected Cell Range to Markdown
Sometimes, you may only need to export part of a worksheet, such as a summary table, a data range, or a report section. In this case, you can copy the required cell range to a new workbook and save it as a Markdown file.
The following example converts a selected range from a specific worksheet to a Markdown file:
from spire.xls import Workbook, CopyRangeOptions


def convert_cell_range_to_markdown(excel_file, sheet_name, cell_range, output_md):
    """Convert a specific cell range from an Excel worksheet to Markdown.

    Example cell range: "A1:C5"
    """
    workbook = Workbook()
    new_workbook = Workbook()

    try:
        # Load the original Excel file
        workbook.LoadFromFile(excel_file)

        # Get the target worksheet by name
        worksheet = workbook.Worksheets[sheet_name]
        if worksheet is None:
            print(f"Worksheet '{sheet_name}' was not found.")
            return

        # Get the specific source cell range (e.g., "A1:C5")
        src_range = worksheet.Range[cell_range]

        # Initialize the new workbook with a single blank sheet
        new_workbook.CreateEmptySheets(1)
        new_sheet = new_workbook.Worksheets[0]

        # Define the destination range starting at cell A1 in the new sheet.
        # We use the row and column count of the source range to match the size perfectly.
        dest_range = new_sheet.Range[
            1, 1, src_range.Rows.Count, src_range.Columns.Count
        ]

        # Copy ONLY the selected range (all data, formulas, and formatting)
        src_range.Copy(dest_range, CopyRangeOptions.All)

        # Save the new isolated workbook as Markdown
        new_workbook.SaveToMarkdown(output_md)

        print(
            f"Cell range '{cell_range}' from worksheet '{sheet_name}' "
            f"converted successfully to {output_md}."
        )

    except Exception as e:
        print(f"An error occurred: {e}")

    finally:
        # Release resources
        new_workbook.Dispose()
        workbook.Dispose()


# Usage
convert_cell_range_to_markdown(
    "report.xlsx", "Sheet 1", "A1:C5", "cell_range.md"
)
This method is useful when you want to reuse only the key part of a worksheet in documentation, instead of exporting the entire sheet.
4. Batch Convert Multiple Excel Files to Markdown
For large-scale conversion tasks, you can loop through a folder and convert all .xlsx and .xls files to Markdown automatically.
This is especially useful when you need to generate documentation from multiple reports, export datasets regularly, or integrate Excel-to-Markdown conversion into a publishing workflow.
from pathlib import Path
from spire.xls import Workbook


def batch_convert_excel_to_markdown(input_folder, output_folder):
    """
    Convert all Excel files in a folder to Markdown files.
    Supported formats: .xlsx and .xls
    """
    input_dir = Path(input_folder)
    output_dir = Path(output_folder)

    # Create the output folder if it does not exist
    output_dir.mkdir(parents=True, exist_ok=True)

    # Supported Excel file extensions
    excel_extensions = {".xlsx", ".xls"}

    converted_count = 0

    for input_file in input_dir.iterdir():
        # Skip folders, temporary Excel files, and unsupported files
        if not input_file.is_file():
            continue

        if input_file.name.startswith("~$"):
            continue

        if input_file.suffix.lower() not in excel_extensions:
            continue

        output_file = output_dir / f"{input_file.stem}.md"

        workbook = Workbook()

        try:
            # Load the Excel file
            workbook.LoadFromFile(str(input_file))

            # Save as Markdown
            workbook.SaveToMarkdown(str(output_file))

            converted_count += 1
            print(f"Converted: {input_file.name} -> {output_file.name}")

        except Exception as e:
            print(f"Failed to convert {input_file.name}: {e}")

        finally:
            workbook.Dispose()

    print(f"\nBatch conversion complete. {converted_count} file(s) converted.")


# Usage
batch_convert_excel_to_markdown("./excel_files", "./markdown_output")
Best Practices for Converting Excel to Markdown
To get cleaner Markdown output, keep the following tips in mind:
- Use simple table structures whenever possible.
- Unmerge merged cells if the output is intended for Markdown tables.
- Remove unused rows and columns before conversion.
- Use relative image paths for portable documentation projects.
- Review the generated Markdown file before publishing it to GitHub, a wiki, or a static website.
Conclusion
Converting Excel to Markdown in Python with Spire.XLS for Python makes it easy to generate Markdown files from workbook data with minimal code. It is a practical solution for developers who need to add Excel data export to documentation, reporting, or publishing workflows.
FAQs
Q1: What Excel formats can be converted to Markdown?
A1: Common Excel formats such as .xlsx and .xls can be loaded and saved as Markdown files.
Q2: Are images preserved when converting Excel to Markdown?
A2: Yes. By default, images can be embedded in the Markdown output as Base64 strings. You can also configure the export options to save images with relative or absolute file paths.
Q3: Do I need Microsoft Office to convert Excel to Markdown in Python?
A3: No. Spire.XLS for Python works independently and does not require Microsoft Excel or Microsoft Office to be installed.
Get a Free License
To fully experience the capabilities of Spire.XLS for .NET without any evaluation limitations, you can request a free 30-day trial license.
See Also
Formatting plays an important role in making Excel spreadsheets easier to read, analyze, and present. Whether you are generating reports, invoices, financial statements, or dashboards, raw data often needs proper styling before it can be shared with end users.
In C#, Excel formatting tasks may include changing fonts, applying colors, aligning content, formatting numbers and dates, adding borders, creating tables, and configuring page layouts. Performing these tasks manually can be time-consuming, especially when dealing with large volumes of spreadsheets.
Spire.XLS for .NET provides a comprehensive set of APIs for creating, editing, formatting, and converting Excel documents without requiring Microsoft Excel to be installed. In this article, you will learn how to apply various types of formatting to Excel files in C# using Spire.XLS for .NET.
Table of Contents:
- Prepare Your C# Project for Excel Formatting
- Part 1. Format Cell Appearance
- Part 2. Format Cell Values
- Part 3. Format Ranges and Layout
- Part 4. Apply Advanced Formatting
- Part 5. Format Excel Tables and Worksheets
- Part 6. Create a Professional Report Example
- Conclusion
- FAQs
Prepare Your C# Project for Excel Formatting
Spire.XLS for .NET is a powerful Excel library that enables developers to work with XLS, XLSX, XLSM, CSV, and other spreadsheet formats programmatically. Besides formatting operations, it also supports formula calculation, chart creation, pivot tables, worksheet management, printing, and file conversion.
To install Spire.XLS for .NET, run the following NuGet command:
Install-Package Spire.XLS
Before applying formatting, load an existing Excel workbook (or create a new one) and access the worksheet you want to modify. Once all formatting operations are complete, save the result to a new Excel file using the SaveToFile() method.
using Spire.Xls;
using System.Drawing;

// Create a workbook object
Workbook workbook = new Workbook();

// Load an existing Excel file
workbook.LoadFromFile("input.xlsx");

// Get a specific worksheet
Worksheet sheet = workbook.Worksheets[0];

// Apply formatting
...

// Save the result
workbook.SaveToFile("output.xlsx", ExcelVersion.Version2016);
Note: The following examples assume that the workbook has already been loaded and the worksheet object has been obtained.
Part 1. Format Cell Appearance
Cell appearance settings control how data looks inside a worksheet. Proper formatting can significantly improve readability and help users quickly identify important information.
Format Cell Fonts
Font formatting allows you to customize the visual style of cell content. Common options include font family, font size, bold, italic, underline, and font color. These settings are frequently used for report titles, section headers, and highlighted values.
CellStyle style = workbook.Styles.Add("FontStyle");

style.Font.FontName = "Calibri";
style.Font.Size = 14;
style.Font.IsBold = true;
style.Font.IsItalic = true;
style.Font.Underline = FontUnderlineType.Single;
style.Font.Color = Color.Blue;

sheet.Range["A1"].Text = "Formatted Text";
sheet.Range["A1"].Style = style;
Set Cell Background Colors
Background colors help distinguish different sections of a worksheet and draw attention to key cells. For example, you may use a colored header row or highlight summary data with a contrasting fill color.
sheet.Range["A2"].Text = "Background Color";
sheet.Range["A2"].Style.Color = Color.LightSkyBlue;
Align Cell Content
Excel provides horizontal alignment, vertical alignment, indentation, and text rotation options. Proper alignment improves the overall layout of a worksheet and makes tabular data easier to scan.
sheet.Range["B2"].Text = "Centered Text";
CellStyle style = sheet.Range["B2"].Style;

style.HorizontalAlignment = HorizontalAlignType.Center;
style.VerticalAlignment = VerticalAlignType.Center;
style.Rotation = 45;

sheet.SetRowHeight(2, 40);
sheet.SetColumnWidth(2, 20);
Add Cell Borders
Borders are useful for separating rows and columns and defining table structures. Depending on the scenario, you can apply borders to individual cells or entire ranges and customize their styles and colors.
CellRange range = sheet.Range["A4:D6"];
range.Text = "Border";

range.Style.Borders[BordersLineType.EdgeTop].LineStyle = LineStyleType.Thin;
range.Style.Borders[BordersLineType.EdgeBottom].LineStyle = LineStyleType.Thin;
range.Style.Borders[BordersLineType.EdgeLeft].LineStyle = LineStyleType.Thin;
range.Style.Borders[BordersLineType.EdgeRight].LineStyle = LineStyleType.Thin;
range.Style.Borders[BordersLineType.EdgeTop].Color = Color.Black;
Wrap Text
When cell content exceeds the available column width, wrapping text allows multiple lines to be displayed within the same cell, preventing important information from being truncated.
sheet.Range["A8"].Text = "This is a very long sentence that will automatically wrap within the cell.";

sheet.Range["A8"].Style.WrapText = true;

sheet.SetColumnWidth(1, 20);
sheet.SetRowHeight(8, 60);
Part 2. Format Cell Values
Value formatting changes how data is displayed without modifying the underlying values. This is particularly important for business and financial spreadsheets.
Format Numbers
Numeric formats can control decimal places, thousands separators, scientific notation, and other display rules. Choosing the right format improves accuracy and readability.
sheet.Range["A10"].NumberValue = 1234567.891;
sheet.Range["A10"].NumberFormat = "#,##0.00";
Format Currency
Currency formatting automatically displays monetary symbols and decimal precision according to your requirements. This is commonly used in invoices, budgets, and financial reports.
sheet.Range["A11"].NumberValue = 5999.95;
sheet.Range["A11"].NumberFormat = "$#,##0.00";
Format Dates
Date formatting allows the same date value to be displayed in different styles, such as short dates, long dates, or custom patterns. Consistent date formats make reports easier to interpret.
sheet.Range["A12"].DateTimeValue = DateTime.Now;
sheet.Range["A12"].NumberFormat = "yyyy-MM-dd";
Part 3. Format Ranges and Layout
Instead of formatting cells one by one, you can apply styles to larger worksheet areas to improve efficiency and maintain consistency.
Format Ranges
A range may contain multiple rows and columns. Applying formatting to a range ensures that all cells share the same appearance and reduces repetitive code.
CellRange range = sheet.Range["A14:D18"];

range.Style.Color = Color.LightYellow;
range.Style.Font.IsBold = true;
range.Style.HorizontalAlignment = HorizontalAlignType.Center;
Merge Cells
Merged cells are often used for report titles and section headers. After merging, the content can be centered and styled to create a more professional appearance.
sheet.Range["A20:D20"].Merge();

sheet.Range["A20"].Text = "Monthly Sales Report";
sheet.Range["A20"].Style.Font.Size = 18;
sheet.Range["A20"].Style.Font.IsBold = true;
sheet.Range["A20"].Style.HorizontalAlignment = HorizontalAlignType.Center;
Format Rows and Columns
Formatting entire rows or columns is useful when all cells in a specific area should follow the same style, such as a header row or a currency column.
sheet.Rows[21].Style.Font.IsBold = true;
sheet.Rows[21].Style.Color = Color.LightGray;

sheet.Columns[1].Style.NumberFormat = "$#,##0.00";
AutoFit Rows and Columns
AutoFit automatically adjusts row heights and column widths based on cell content. This helps prevent clipped text and improves the presentation of generated spreadsheets.
sheet.AllocatedRange.AutoFitColumns();
sheet.AllocatedRange.AutoFitRows();
Part 4. Apply Advanced Formatting
Conditional formatting enables Excel to apply styles automatically based on cell values. Instead of manually highlighting data, rules can be configured to identify trends, exceptions, or important values.
For example, you can highlight numbers above a threshold, display data bars, apply color scales, or use icon sets to visualize performance indicators. These features make large datasets easier to analyze and understand.
sheet.Range["A25"].NumberValue = 1200;
sheet.Range["A26"].NumberValue = 800;
sheet.Range["A27"].NumberValue = 1500;

XlsConditionalFormats formats = sheet.ConditionalFormats.Add();
formats.AddRange(sheet.Range["A25:A27"]);
IConditionalFormat format = formats.AddCondition();
format.FormatType = ConditionalFormatType.CellValue;
format.FirstFormula = "1000";
format.Operator = ComparisonOperatorType.Greater;
format.BackColor = Color.LightGreen;
Part 5. Format Excel Tables and Worksheets
Formatting can also be applied at the worksheet level to improve the overall structure and appearance of a workbook.
Format Excel Tables
Excel tables provide built-in styling options such as header formatting, alternating row colors, and predefined themes. Converting a data range into a table can instantly enhance readability and organization.
sheet.Range["A30"].Text = "Product";
sheet.Range["B30"].Text = "Sales";
sheet.Range["A31"].Text = "Laptop";
sheet.Range["B31"].NumberValue = 5000;
sheet.Range["A32"].Text = "Monitor";
sheet.Range["B32"].NumberValue = 2000;

IListObject table = sheet.ListObjects.Create("SalesTable", sheet.Range["A30:B32"]);
table.BuiltInTableStyle = TableBuiltInStyles.TableStyleMedium2;
Configure Page Layout
Page layout settings determine how worksheets appear when printed or exported. Common options include page orientation, margins, print areas, scaling, and repeating header rows.
Proper page setup ensures that reports look professional both on screen and on paper.
sheet.PageSetup.Orientation = PageOrientationType.Landscape;
sheet.PageSetup.LeftMargin = 0.5;
sheet.PageSetup.RightMargin = 0.5;
sheet.PageSetup.TopMargin = 0.75;
sheet.PageSetup.BottomMargin = 0.75;
sheet.PageSetup.FitToPagesWide = 1;
sheet.PageSetup.FitToPagesTall = 1;
Part 6. Create a Professional Report Example
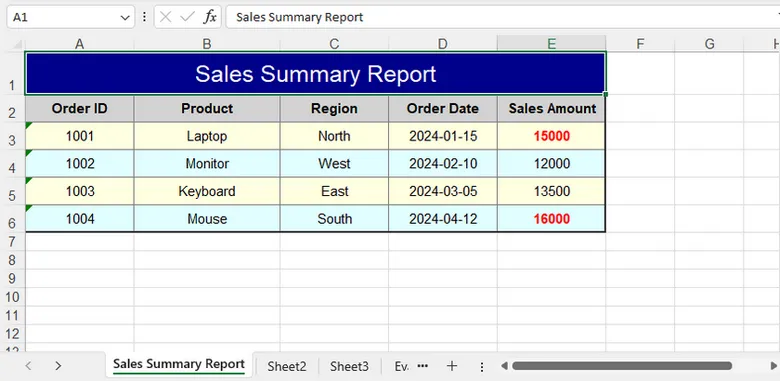
In real-world scenarios, multiple formatting techniques are often used together. A typical report may include a merged title, custom fonts, colored headers, borders, number formats, conditional formatting, and optimized page settings.
By combining these features, you can generate polished Excel documents that are ready for distribution without requiring manual editing.
using Spire.Xls;
using Spire.Xls.Core.Spreadsheet.Collections;
using Spire.Xls.Core;
using System.Drawing;

class Program
{
    static void Main()
    {
        // Create a new workbook
        Workbook workbook = new Workbook();
        Worksheet sheet = workbook.Worksheets[0];

        sheet.Name = "Sales Summary Report";

        // Title Row
        CellRange title = sheet.Range["A1:E1"];
        title.Merge();
        title.Text = "Sales Summary Report";

        title.Style.Font.FontName = "Arial";
        title.Style.Font.Size = 16;
        title.Style.Font.Color = Color.White;
        title.Style.Color = Color.DarkBlue;

        title.Style.HorizontalAlignment = HorizontalAlignType.Center;
        title.Style.VerticalAlignment = VerticalAlignType.Center;

        sheet.Rows[0].RowHeight = 30;

        // Headers
        string[] headers = { "Order ID", "Product", "Region", "Order Date", "Sales Amount" };

        for (int i = 0; i < headers.Length; i++)
        {
            CellRange cell = sheet.Range[2, i + 1];

            cell.Text = headers[i];
            cell.Style.Font.IsBold = true;
            cell.Style.Color = Color.LightGray;

            cell.Style.Borders[BordersLineType.EdgeBottom].LineStyle = LineStyleType.Medium;
            cell.Style.Borders[BordersLineType.EdgeBottom].Color = Color.DarkBlue;
        }

        // Data
        object[][] data =
        {
            new object[] { 1001, "Laptop", "North", "2024-01-15", 15000 },
            new object[] { 1002, "Monitor", "West", "2024-02-10", 12000 },
            new object[] { 1003, "Keyboard", "East", "2024-03-05", 13500 },
            new object[] { 1004, "Mouse", "South", "2024-04-12", 16000 }
        };

        for (int r = 0; r < data.Length; r++)
        {
            for (int c = 0; c < data[r].Length; c++)
            {
                CellRange cell = sheet.Range[r + 3, c + 1];
                var value = data[r][c];

                if (c == 3) // Order Date
                {
                    cell.DateTimeValue = DateTime.Parse(value.ToString());
                    cell.NumberFormat = "yyyy-MM-dd";
                }
                else if (c == 4) // Sales Amount
                {
                    cell.NumberValue = Convert.ToDouble(value);
                    cell.NumberFormat = "$#,##0.00";
                }
                else
                {
                    cell.Text = value.ToString();
                }

                // Alternate row colors
                cell.Style.Color = (r % 2 == 0)
                    ? Color.LightYellow
                    : Color.LightCyan;
            }
        }

        // Borders
        CellRange range = sheet.Range["A2:E6"];

        range.BorderAround(LineStyleType.Medium, Color.Black);
        range.BorderInside(LineStyleType.Thin, Color.Gray);

        // Auto Fit Columns
        for (int i = 1; i <= 5; i++)
        {
            sheet.AutoFitColumn(i);
        }

        // Conditional Formatting
        XlsConditionalFormats formats = sheet.ConditionalFormats.Add();
        formats.AddRange(sheet.Range["E3:E6"]);

        IConditionalFormat condition = formats.AddCondition();
        condition.FormatType = ConditionalFormatType.CellValue;
        condition.Operator = ComparisonOperatorType.Greater;
        condition.FirstFormula = "14000";

        condition.FontColor = Color.Red;
        condition.IsBold = true;

        // Align + Layout Formatting
        CellRange all = sheet.AllocatedRange;

        for (int r = 1; r < all.RowCount; r++)
        {
            all.Rows[r].HorizontalAlignment = HorizontalAlignType.Center;
           // all.Rows[r].VerticalAlignment = VerticalAlignType.Center;
            all.Rows[r].RowHeight = 20;
        }

        for (int c = 0; c < all.ColumnCount; c++)
        {
            all.Columns[c].ColumnWidth = (c == 1) ? 19 : 14;
        }

        // Save
        workbook.SaveToFile("SalesSummaryReport.xlsx", ExcelVersion.Version2016);
        workbook.Dispose();
    }
}
Output:
Conclusion
Formatting is an essential step in creating professional Excel documents. With Spire.XLS for .NET, you can efficiently customize cell appearance, control number and date formats, manage worksheet layouts, apply conditional formatting, and build visually appealing reports entirely in C#.
By using the techniques covered in this guide, you can automate Excel formatting tasks and generate polished spreadsheets suitable for business, reporting, and data analysis scenarios.
FAQs
Can I format Excel files without Microsoft Excel installed?
Yes. Spire.XLS for .NET works independently of Microsoft Excel and can create, edit, and format spreadsheets directly through code.
Does formatting change the actual cell values?
No. Most formatting operations only affect how data is displayed. The underlying values remain unchanged unless explicitly modified.
Can I apply the same style to multiple cells at once?
Yes. Styles can be applied to ranges, rows, columns, or entire worksheets, making it easy to maintain consistent formatting.
Does Spire.XLS support conditional formatting?
Yes. The library supports common conditional formatting features, including highlighting rules, data bars, color scales, and icon sets.
Which Excel formats are supported?
Spire.XLS supports XLS, XLSX, XLSM, CSV, and several other spreadsheet formats for both reading and writing.
How to Convert HTML to Markdown in C# (File, String & Stream)
2026-05-29 09:55:41 Written by alice yang
HTML is widely used for web pages, online articles, and rich text content, while Markdown (.md) is often preferred for documentation, technical writing, and text-based publishing. If you need to reuse HTML content in a Markdown-based workflow, converting it manually can be time-consuming and error-prone.
In this tutorial, we’ll show you how to convert HTML to Markdown in C# step-by-step using Spire.Doc for .NET. You’ll learn how to convert HTML files, HTML strings, streams, and multiple HTML files in batch.
Table of Contents
- When Do You Need to Convert HTML to Markdown?
- Install C# HTML to Markdown Library
- Convert an HTML File to Markdown in C#
- Convert HTML Strings to Markdown in C#
- Convert HTML Stream to Markdown in C#
- Batch Convert Multiple HTML Files
- What HTML Elements Can Be Converted to Markdown?
- Troubleshooting Common HTML to Markdown Issues
When Do You Need to Convert HTML to Markdown?
Converting HTML to Markdown is useful when you want to reuse web-based or rich-text content in a cleaner, text-friendly format. Common scenarios include:
- Moving HTML articles or CMS content into Markdown-based documentation systems.
- Preparing content for GitHub, static site generators, or developer portals.
- Converting rich text editor output into editable Markdown files.
- Simplifying HTML pages for version control, review, or long-term maintenance.
- Exporting help center articles, product descriptions, or blog content as .md files.
Install C# HTML to Markdown Library
To convert HTML to Markdown programmatically, you need to add Spire.Doc for .NET to your project. This standalone document processing library allows you to parse HTML and export it to clean Markdown without requiring Microsoft Word or Microsoft Office interop assemblies on your server.
Method 1: Install via NuGet Package Manager
Run this command in your NuGet Package Manager Console:
Install-Package Spire.Doc
Method 2: Download and Reference DLLs Manually
If your development environment is offline or you prefer not to use NuGet, you can manually download and reference the library:
- Download & Unzip: Get the Spire.Doc for .NET package from the official download page and extract it.
- Add Reference: In the Solution Explorer of Visual Studio, right-click Dependencies (or References) > Add Project Reference (or Add Reference) > Browse and select the
Spire.Doc.dllthat matches your target .NET Framework or .NET Core version.
Note: Markdown support is available in Spire.Doc for .NET version 12.3.12 or later.
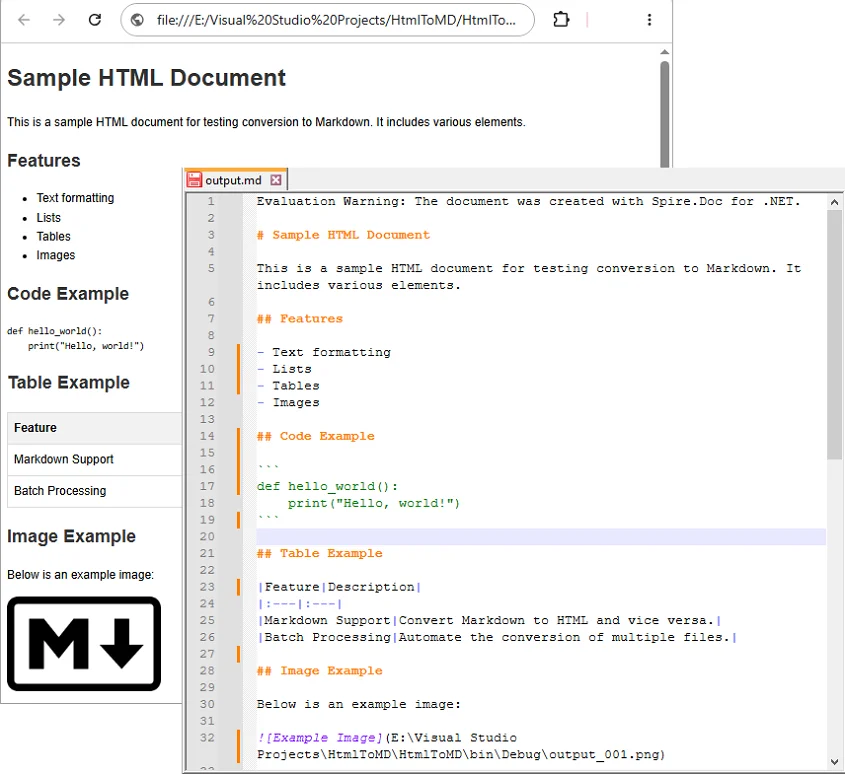
Convert an HTML File to Markdown in C#
If your HTML content is stored as a local .html or .htm file, you can convert it directly using the Document object. This approach is ideal for processing static web pages, documentation exports, or offline help articles.
C# Code Example
using Spire.Doc;
using Spire.Doc.Documents;

namespace ConvertHtmlFileToMarkdown
{
    class Program
    {
        static void Main(string[] args)
        {
            // Initialize a Document instance within a using statement
            using (Document document = new Document())
            {
                // Load the local HTML file
                document.LoadFromFile("input.html", FileFormat.Html, XHTMLValidationType.None);

                // Export the HTML file to a Markdown file
                document.SaveToFile("output.md", FileFormat.Markdown);
            }
        }
    }
}
How the Code Works:
using (Document document = new Document()): Ensures theDocumentobject is properly disposed of after conversion.LoadFromFile("input.html", FileFormat.Html, XHTMLValidationType.None): Reads the source HTML file without strict XHTML validation, allowing the library to parse the HTML even if it doesn’t fully comply with XHTML rules.SaveToFile("output.md", FileFormat.Markdown): Maps the supported HTML elements such as headings, bold text, lists, images, and links into Markdown syntax, and generate the .md file.
Output:
Convert HTML Strings to Markdown in C#
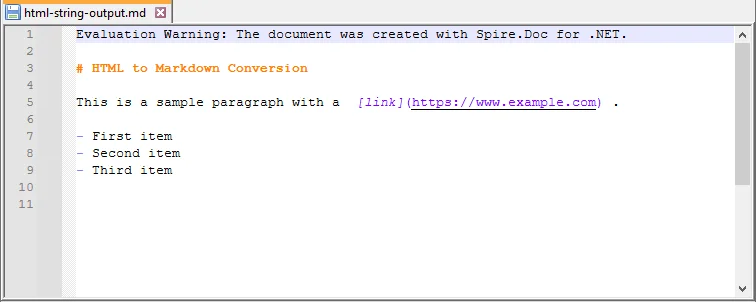
When dealing with dynamic web data—such as content fetched from a database, API responses, or CMS rich-text inputs—you can convert raw HTML strings directly to Markdown without saving them as physical files first.
C# Code Example
using Spire.Doc;
using Spire.Doc.Documents;

namespace ConvertHtmlStringToMarkdown
{
    class Program
    {
        static void Main(string[] args)
        {
            // Initialize a Document instance
            using (Document document = new Document())
            {
                // Add a section and paragraph to host the dynamic html content
                Section section = document.AddSection();
                Paragraph paragraph = section.AddParagraph();

                // Define the source HTML string
                string htmlString = @"
                    <h1>HTML to Markdown Conversion</h1>
                    <p>This is a sample paragraph with a <a href='https://www.example.com'>link</a>.</p>
                    <ul>
                        <li>First item</li>
                        <li>Second item</li>
                        <li>Third item</li>
                    </ul>";

                // Parse and append the HTML string directly into the text paragraph
                paragraph.AppendHTML(htmlString);

                // Save the fully compiled document model as Markdown
                document.SaveToFile("html-string-output.md", FileFormat.Markdown);
            }
        }
    }
}
Key Methods Explanation:
document.AddSection()§ion.AddParagraph(): An emptyDocumentobject does not contain structural layouts. You must explicitly create a parent section and a text paragraph to serve as the container before injecting raw HTML string content.paragraph.AppendHTML(htmlString): Parses the HTML string and inserts supported HTML elements into the document structure.
Output:
Convert HTML Stream to Markdown in C#
In cloud-ready or backend enterprise applications, HTML content is often processed in memory as a stream rather than being read from a fixed physical path. Using LoadFromStream() and SaveToStream(), you can convert in-memory HTML content directly to a Markdown stream.
This approach is useful for web services, ASP.NET applications, background processing tasks, or conversion APIs where files are uploaded, converted, and returned without permanent disk storage.
C# Code Example
using System.IO;
using System.Text;
using Spire.Doc;
using Spire.Doc.Documents;

namespace ConvertHtmlStreamToMarkdown
{
    class Program
    {
        static void Main(string[] args)
        {
            // Define a sample HTML string to simulate an in-memory input source
            string htmlContent = "<h1>HTML Stream to Markdown Stream</h1><p>This process happens entirely in memory.</p>";
            byte[] htmlBytes = Encoding.UTF8.GetBytes(htmlContent);

            // Create an input stream from the HTML bytes
            using (MemoryStream inputStream = new MemoryStream(htmlBytes))
            {
                // Create an empty memory stream to receive the converted Markdown data
                using (MemoryStream outputStream = new MemoryStream())
                {
                    // Initialize the Document instance
                    using (Document document = new Document())
                    {
                        // Load the HTML content directly from the input stream
                        document.LoadFromStream(inputStream, FileFormat.Html, XHTMLValidationType.None);

                        // Save the converted content directly into the output stream as Markdown
                        document.SaveToStream(outputStream, FileFormat.Markdown);
                    }

                    // Crucial: Reset the output stream position to the beginning before reading it
                    outputStream.Position = 0;

                    // Optional: Convert the output stream back to a string to verify the result (you can also save it as a .md file)
                    using (StreamReader reader = new StreamReader(outputStream, Encoding.UTF8))
                    {
                        string markdownResult = reader.ReadToEnd();
                        System.Console.WriteLine(markdownResult);
                    }
                }
            }
        }
    }
}
Batch Convert Multiple HTML Files
For large-scale publishing workflows, you can automate the conversion of multiple HTML files to Markdown using a loop.
C# Code Example
The following example converts all .html files in a source folder to .md files in an output folder.
using Spire.Doc;
using Spire.Doc.Documents;
using System;
using System.IO;

namespace BatchConvertHtmlToMarkdown
{
    internal class Program
    {
        static void Main(string[] args)
        {
            string inputFolder = @"C:\HtmlFiles";
            string outputFolder = @"C:\MarkdownFiles";

            // Create output folder if it does not exist
            Directory.CreateDirectory(outputFolder);

            // Get all HTML files
            string[] htmlFiles = Directory.GetFiles(inputFolder, "*.html");

            foreach (string htmlFile in htmlFiles)
            {
                try
                {
                    string fileName = Path.GetFileNameWithoutExtension(htmlFile);
                    string outputPath = Path.Combine(outputFolder, fileName + ".md");

                    using (Document document = new Document())
                    {
                        document.LoadFromFile(htmlFile, FileFormat.Html, XHTMLValidationType.None);
                        document.SaveToFile(outputPath, FileFormat.Markdown);
                    }

                    Console.WriteLine($"Converted: {Path.GetFileName(htmlFile)}");
                }
                catch (Exception ex)
                {
                    Console.WriteLine($"Failed to convert {Path.GetFileName(htmlFile)}");
                    Console.WriteLine($"Error: {ex.Message}");
                }
            }

            Console.WriteLine("HTML to Markdown batch conversion completed.");
        }
    }
}
What HTML Elements Can Be Converted to Markdown?
HTML has many elements, but Markdown supports only a smaller set of document structures. During conversion, content-focused elements are usually easier to preserve than layout-focused or style-heavy elements. For instance, standard Markdown tables only support basic rows and columns. If your source contains complex tables, you might want to convert HTML to Excel in C# instead.
The following table summarizes common HTML elements and how they may appear in Markdown.
| HTML Element | Markdown Syntax |
|---|---|
<h1> to <h6> |
# to ###### (Headings) |
<p> |
Plain paragraph |
<strong>, <b> |
**bold** |
<em>, <i> |
*italic* |
<ul>, <ol>, <li> |
Bulleted or numbered lists |
<a> |
[Link Text](URL) |
<img> |
 |
<table> |
Markdown table |
<code> |
Inline code |
<pre> |
Code block |
<br> |
Line break |
<div>, <section> |
Usually simplified |
| CSS styles | Limited or removed |
| JavaScript | Not supported |
Tip: Actual output may vary depending on the source HTML structure and the Markdown features supported by the target editor or platform.
Troubleshooting Common HTML to Markdown Issues
- Images not showing: Verify that all image paths are still valid after conversion; relative paths may need adjustment.
- Tables look different: Markdown supports only basic tables. For complex tables with merged cells, nested layouts, or custom styling, simplify the HTML table before conversion or manually adjust the generated Markdown table afterward.
- Special characters appear incorrectly: This is usually an encoding issue. Make sure the source HTML file uses UTF-8 encoding and open the generated Markdown file in an editor that supports UTF-8.
- Extra blank lines: Remove unnecessary empty tags, nested
divelements, or redundantbrtags from the source HTML before conversion. You can also clean the generated Markdown file afterward by opening it in a text editor like Notepad++ and then performing a find & replace.
Conclusion
With Spire.Doc for .NET, converting HTML to Markdown in C# can be implemented in just a few lines of code. This guide covered the core approaches needed for various development scenarios:
- Converting local HTML files and streams to Markdown.
- Inserting and converting dynamic HTML strings.
- Batch converting multiple HTML files simultaneously.
If your workflow also requires the reverse process, see this tutorial on how to convert Markdown to HTML in C#.
Frequently Asked Questions
Q1: Will images be preserved during HTML to Markdown conversion?
A1: Yes. Standard HTML <img> tags can be converted into Markdown image syntax (). Just ensure your source HTML links use valid URLs or correct file paths so the images can load.
Q2: Can I convert an HTML string or stream to Markdown without saving files?
A2: Yes. You can load an HTML string using AppendHTML() or a stream via LoadFromStream(), then export it entirely in memory using SaveToStream() without hitting the local disk.
Q3: Can I convert multiple HTML files to Markdown at once in C#?
A3: Yes. You can use a foreach loop in C# to scan a folder for *.html files, process each file through the converter, and output them to a destination folder in bulk.
Q4: Is Microsoft Word required for HTML to Markdown conversion?
A4: No. Spire.Doc for .NET is a standalone library, so Microsoft Word does not need to be installed.
