Wie man EPUB in PDF umwandelt (Schnelle & einfache Anleitung)
EPUB, kurz für Electronic Publication, ist eines der beliebtesten E-Book-Formate und wird von vielen E-Readern unterstützt, was ein komfortables Leseerlebnis bietet. Es ist jedoch nicht mit jedem Gerät oder jeder Plattform kompatibel. Beim Vergleich von EPUB vs. PDF erweist sich PDF oft als vielseitiger: Es funktioniert zuverlässig auf Computern, Tablets und Geräten, die EPUB nicht unterstützen, und behält ein konsistentes Layout für Druck, Weitergabe und Dateiübertragung bei. In dieser Anleitung führen wir Sie durch mehrere einfache Möglichkeiten, EPUB in PDF zu konvertieren, und helfen Ihnen bei der Auswahl der Methode, die für Ihre Bedürfnisse am besten geeignet ist.
- Wie man EPUB online in PDF umwandelt
- Eine EPUB-Datei auf Windows oder Mac in PDF umwandeln
- Wie man EPUB-Dateien mit einfachem Code stapelweise in PDF umwandelt
- Das Fazit
Wie man EPUB online in PDF umwandelt
Wenn es darum geht, wie man EPUB in PDF umwandelt, ist die erste Lösung, die einem oft in den Sinn kommt, die Verwendung von Online-Tools. Diese Tools funktionieren auf jedem Gerät mit einer Internetverbindung, sei es ein Smartphone, Tablet oder Computer. Sie sind in der Regel sehr einfach zu bedienen, und die Konvertierungsgeschwindigkeit hängt von Ihrem Netzwerk ab, sodass Sie normalerweise nicht lange warten müssen. Die meisten EPUB-zu-PDF-Konverter erfordern nicht einmal eine Anmeldung, was sie zu einer schnellen und bequemen Option macht. Hier zeigen wir, wie man eine EPUB-Datei mit PDFgear in PDF umwandelt.
Schritte, um EPUB online mit PDFgear in PDF zu ändern:
- Gehen Sie zur PDFgear-Konvertierungsseite.
- Klicken Sie auf Epub-Datei auswählen, um Ihre Datei hochzuladen, und die Konvertierung startet automatisch.
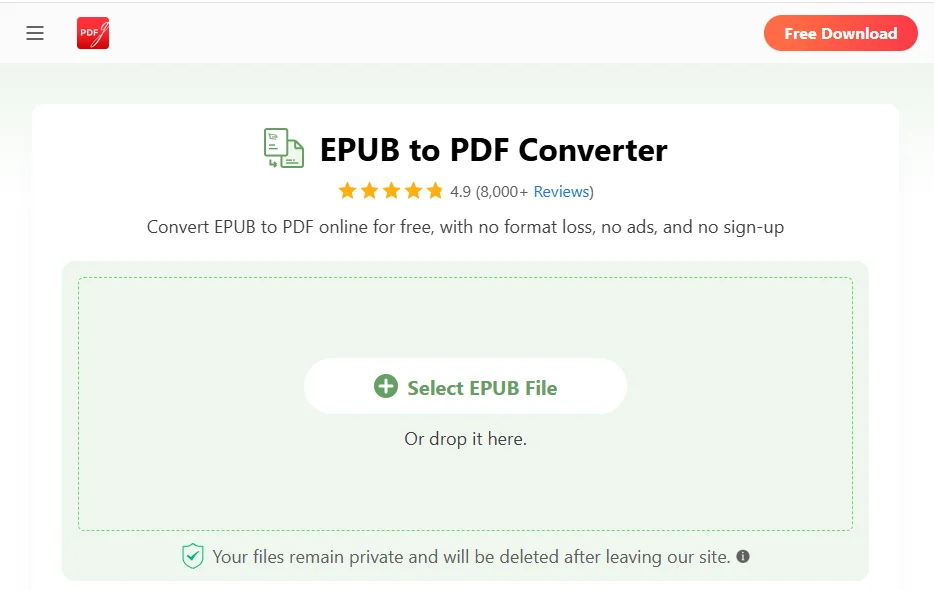
- Sobald die Konvertierung abgeschlossen ist, klicken Sie auf Datei herunterladen, um die konvertierte PDF-Datei auf Ihrem Gerät zu speichern.
Obwohl Online-EPUB-zu-PDF-Konverter praktisch sind, haben sie auch einige Nachteile – wie die Notwendigkeit einer Internetverbindung und potenzielle Risiken für den Datenschutz oder Datenlecks. Aus diesen Gründen ist es am besten, sie nur für kleinere Dateien oder Dokumente zu verwenden, die keine sensiblen Informationen enthalten.
Eine EPUB-Datei auf Windows oder Mac in PDF umwandeln
Wenn Sie Ihre Dateien lieber in einer sichereren und stabileren Umgebung konvertieren, ist die Verwendung eines dedizierten Desktop-Tools eine gute Option. Eine der beliebtesten Optionen ist Calibre, ein Open-Source- und leistungsstarkes E-Book-Verwaltungstool. Es unterstützt die Konvertierung zwischen mehreren Formaten – einschließlich EPUB, MOBI und PDF. Calibre funktioniert sowohl unter Windows als auch unter macOS und ist somit ideal für die Konvertierung großer Dateien oder die Durchführung von Offline-Konvertierungen ohne Internetverbindung.
Nach der Installation des Tools können Sie EPUB in PDF konvertieren, indem Sie die folgenden Schritte ausführen:
- Klicken Sie auf Bücher hinzufügen, um die EPUB-Dateien zu importieren, die Sie konvertieren möchten.
- Wählen Sie die importierten EPUB-Dateien aus Ihrer Calibre-Bibliothek aus.
- Klicken Sie auf Bücher konvertieren und wählen Sie PDF als Ausgabeformat.
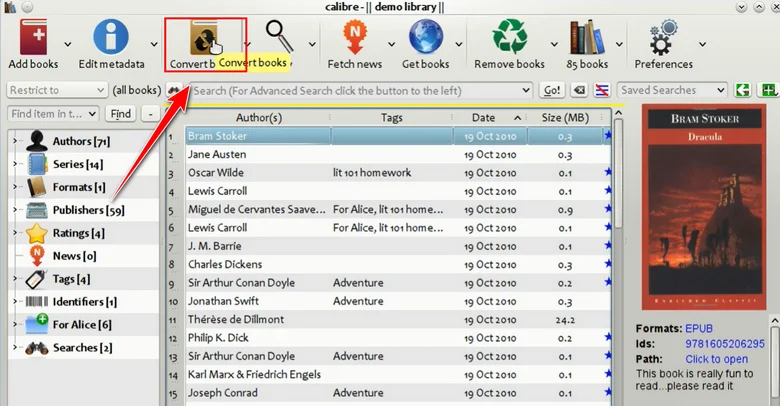
- Bearbeiten Sie bei Bedarf die Metadaten, wie z. B. Titel, Autor oder Cover.
- Klicken Sie auf OK, um die Konvertierung zu starten, und kehren Sie zu Ihrer Calibre-Bibliothek zurück, um die generierte PDF-Datei herunterzuladen.
Wie man EPUB-Dateien mit einfachem Code stapelweise in PDF umwandelt
Neben den beiden oben genannten gängigen Methoden können Sie EPUB auch mit nur wenigen Codezeilen in PDF umwandeln. Die Verwendung von Code reduziert nicht nur die Anzahl der auszuführenden Schritte, sondern unterstützt auch die Stapelkonvertierung und eliminiert jegliches Risiko von Datenlecks, da alles lokal auf Ihrem Gerät ausgeführt wird.
In diesem Kapitel verwenden wir Free Spire.Doc for Python, um Ihnen zu zeigen, wie Sie von EPUB in PDF in Python konvertieren. Als professionelle Bibliothek zur Dokumentenverarbeitung unterstützt sie viele Formatkonvertierungen – einschließlich der Umwandlung von EPUB in Word oder der Konvertierung von Word-Dokumenten in PDF.

Wenn Sie nach einer effizienteren, kontrollierbareren und automatisierungsfreundlicheren Möglichkeit zur Handhabung von Dokumentenkonvertierungen suchen, ist Free Spire.Doc definitiv eine Überlegung wert.
Schritte zum Konvertieren einer EPUB-Datei in PDF mit Free Spire.Doc
- Installieren Sie Free Spire.Doc
Verwenden Sie den folgenden pip-Befehl, um Free Spire.Doc in Ihrer Python-Umgebung (z. B. VS Code) zu installieren, oder laden Sie das Installationsprogramm für eine benutzerdefinierte Einrichtung herunter:
pip install spire.doc
- Importieren Sie die erforderlichen Module
Importieren Sie die notwendigen Klassen für die Dokumentenverarbeitung:
from spire.doc import Document, FileFormat
- Erstellen Sie ein Document-Objekt
Erstellen Sie ein Document-Objekt, um die EPUB-Datei zu laden und zu verarbeiten:
document = Document()
- Laden Sie die EPUB-Datei
Verwenden Sie die Methode LoadFromFile(), um Ihre EPUB-Datei zu laden. Stellen Sie sicher, dass der Dateipfad korrekt ist:
document.LoadFromFile("E:/DownloadsNew/wasteland.epub")
- Als PDF speichern
Speichern Sie die geladene EPUB-Datei als PDF:
document.SaveToFile("E:/DownloadsNew/output.pdf", FileFormat.PDF)
Vollständiges Codebeispiel:
from spire.doc import Document, FileFormat

# Erstellen Sie ein Document-Objekt
document = Document()

# Laden Sie eine EPUB-Datei
document.LoadFromFile("E:/DownloadsNew/wasteland.epub")

# Speichern Sie das EPUB-Dokument als PDF
document.SaveToFile("E:/DownloadsNew/output.pdf", FileFormat.PDF)
Hier ist die Vorschau der ausgegebenen PDF-Datei: 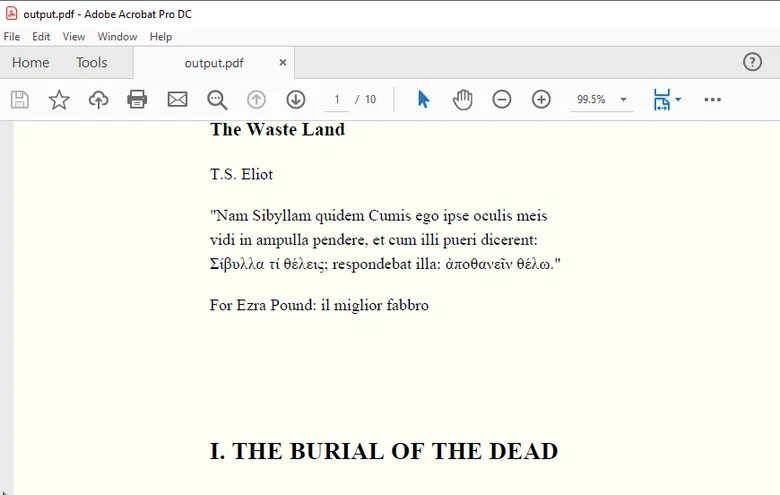
Tipp: Wenn Sie auch die konvertierten PDF-Dateien verarbeiten müssen – wie z. B. das Zusammenführen mehrerer PDFs oder das Aufteilen einer PDF – können Sie Free Spire.PDF verwenden, eine Bibliothek, die speziell für die Verarbeitung von PDF-Dokumenten entwickelt wurde.
Stapelkonvertierung mehrerer Epub-Dateien in PDFs
Die Logik für die Stapelkonvertierung ist dieselbe wie bei der Konvertierung einer einzelnen Datei, aber es ist am besten, alle Dateien im selben Ordner abzulegen, um das Iterieren zu erleichtern. Hier ist der Beispielcode:
from spire.doc import Document, FileFormat

# Geben Sie den Dateipfad an
folder_path = "E:/DownloadsNew/"

# Holen Sie sich EPUB-Dateien zum Konvertieren
epub_files = ["wasteland.epub", "sample.epub", "script.epub"]

for epub_name in epub_files:
    epub_path = folder_path + epub_name
    pdf_name = epub_name.replace(".epub", ".pdf")
    pdf_path = folder_path + pdf_name

    # Erstellen Sie ein Document-Objekt
    document = Document()

    # Laden Sie jedes EPUB-Dokument
    document.LoadFromFile(epub_path)

    # Konvertieren Sie die EPUB-Datei als PDF
    document.SaveToFile(pdf_path, FileFormat.PDF)
Das Fazit
Ob Sie Online-Tools, Desktop-Software oder Code zum Konvertieren von EPUB-Dateien in PDFs verwenden, jede Methode hat ihre Vorteile. Wenn Sie PDFs konvertieren und gleichzeitig die Flexibilität haben möchten, Dokumenteninhalte zu bearbeiten oder Konvertierungen zwischen verschiedenen Formaten durchzuführen, bietet Free Spire.Doc eine zuverlässige lokale Lösung, die die Arbeit mit EPUB, Word, PDF und anderen Dokumenttypen erleichtert.
Lesen Sie auch
Как конвертировать EPUB в PDF (Быстрое и простое руководство)
EPUB, сокращение от Electronic Publication, является одним из самых популярных форматов электронных книг и поддерживается многими электронными читалками, предлагая комфортный опыт чтения. Однако он не совместим со всеми устройствами или платформами. При сравнении EPUB и PDF, PDF часто оказывается более универсальным: он надежно работает на компьютерах, планшетах и устройствах, которые не поддерживают EPUB, и сохраняет постоянный макет для печати, обмена и передачи файлов. В этом руководстве мы рассмотрим несколько простых способов конвертировать EPUB в PDF, помогая вам выбрать метод, который лучше всего подходит для ваших нужд.
- Как конвертировать EPUB в PDF онлайн
- Конвертировать файл EPUB в PDF на Windows или Mac
- Как пакетно конвертировать EPUB в PDF с помощью простого кода
- Заключение
Как конвертировать EPUB в PDF онлайн
Когда речь заходит о том, как конвертировать EPUB в PDF, первое решение, которое часто приходит на ум, — это использование онлайн-инструментов. Эти инструменты работают на любом устройстве с подключением к Интернету, будь то смартфон, планшет или компьютер. Они обычно очень просты в использовании, а скорость конвертации зависит от вашей сети, поэтому вам, как правило, не придется долго ждать. Большинство конвертеров EPUB в PDF даже не требуют регистрации, что делает их быстрым и удобным вариантом. Здесь мы продемонстрируем, как конвертировать файл EPUB в PDF с помощью PDFgear.
Шаги по преобразованию EPUB в PDF онлайн с помощью PDFgear:
- Перейдите на страницу конвертации PDFgear.
- Нажмите Выбрать файл Epub, чтобы загрузить ваш файл, и конвертация начнется автоматически.
- После завершения конвертации нажмите Скачать файл, чтобы сохранить преобразованный PDF на вашем устройстве.
Хотя онлайн-конвертеры EPUB в PDF удобны, у них также есть несколько недостатков, таких как необходимость подключения к Интернету и потенциальные риски для конфиденциальности или утечки данных. По этим причинам лучше использовать их только для небольших файлов или документов, которые не содержат конфиденциальной информации.
Конвертировать файл EPUB в PDF на Windows или Mac
Если вы предпочитаете конвертировать файлы в более безопасной и стабильной среде, использование специального настольного инструмента — отличный вариант. Одним из самых популярных вариантов является Calibre, мощный инструмент для управления электронными книгами с открытым исходным кодом. Он поддерживает конвертацию между несколькими форматами, включая EPUB, MOBI и PDF. Calibre работает как на Windows, так и на macOS, что делает его идеальным для конвертации больших файлов или выполнения офлайн-конвертаций без зависимости от подключения к Интернету.
После установки инструмента вы можете конвертировать EPUB в PDF, выполнив следующие шаги:
- Нажмите Добавить книги, чтобы импортировать файлы EPUB, которые вы хотите конвертировать.
- Выберите импортированные файлы EPUB из вашей библиотеки Calibre.
- Нажмите Конвертировать книги и выберите PDF в качестве выходного формата.
- При необходимости отредактируйте метаданные, такие как название, автор или обложка.
- Нажмите OK, чтобы начать конвертацию, и вернитесь в свою библиотеку Calibre, чтобы загрузить сгенерированный PDF.
Как пакетно конвертировать EPUB в PDF с помощью простого кода
Помимо двух распространенных методов, упомянутых выше, вы также можете преобразовать EPUB в PDF всего несколькими строками кода. Использование кода не только сокращает количество шагов, которые вам нужно выполнить, но также поддерживает пакетную конвертацию и устраняет любой риск утечки данных, поскольку все выполняется локально на вашем устройстве.
В этой главе мы будем использовать Free Spire.Doc for Python, чтобы показать вам, как конвертировать из EPUB в PDF на Python. Как профессиональная библиотека для обработки документов, она поддерживает множество преобразований форматов, включая превращение EPUB в Word или конвертацию документов Word в PDF.
Если вы ищете более эффективный, контролируемый и удобный для автоматизации способ обработки преобразований документов, Free Spire.Doc определенно стоит рассмотреть.
Шаги по конвертации файла EPUB в PDF с помощью Free Spire.Doc
- Установите Free Spire.Doc
Используйте следующую команду pip для установки Free Spire.Doc в вашей среде Python (например, VS Code) или загрузите установщик для пользовательской настройки:
pip install spire.doc
- Импортируйте необходимые модули
Импортируйте необходимые классы для обработки документов:
from spire.doc import Document, FileFormat
- Создайте объект Document
Создайте объект Document для загрузки и обработки файла EPUB:
document = Document()
- Загрузите файл EPUB
Используйте метод LoadFromFile() для загрузки вашего файла EPUB. Убедитесь, что путь к файлу указан правильно:
document.LoadFromFile("E:/DownloadsNew/wasteland.epub")
- Сохранить как PDF
Сохраните загруженный файл EPUB как PDF:
document.SaveToFile("E:/DownloadsNew/output.pdf", FileFormat.PDF)
Полный пример кода:
from spire.doc import Document, FileFormat

# Создайте объект Document
document = Document()

# Загрузите файл EPUB
document.LoadFromFile("E:/DownloadsNew/wasteland.epub")

# Сохраните документ EPUB как PDF
document.SaveToFile("E:/DownloadsNew/output.pdf", FileFormat.PDF)
Вот предварительный просмотр выходного PDF-файла:
Совет: Если вам также нужно обрабатывать преобразованные PDF-файлы, например, объединять несколько PDF-файлов или разделять PDF, вы можете использовать Free Spire.PDF, библиотеку, специально разработанную для работы с PDF-документами.
Пакетное преобразование нескольких файлов Epub в PDF
Логика пакетного преобразования такая же, как и при преобразовании одного файла, но лучше всего поместить все файлы в одну папку, чтобы их было легче перебирать. Вот пример кода:
from spire.doc import Document, FileFormat

# Укажите путь к папке
folder_path = "E:/DownloadsNew/"

# Получите файлы EPUB для конвертации
epub_files = ["wasteland.epub", "sample.epub", "script.epub"]

for epub_name in epub_files:
    epub_path = folder_path + epub_name
    pdf_name = epub_name.replace(".epub", ".pdf")
    pdf_path = folder_path + pdf_name

    # Создайте объект Document
    document = Document()

    # Загрузите каждый документ EPUB
    document.LoadFromFile(epub_path)

    # Преобразуйте файл EPUB в PDF
    document.SaveToFile(pdf_path, FileFormat.PDF)
Итог
Независимо от того, используете ли вы онлайн-инструменты, настольное программное обеспечение или код для преобразования файлов EPUB в PDF, у каждого метода есть свои преимущества. Если вы хотите конвертировать PDF-файлы, а также иметь гибкость для обработки содержимого документов или выполнения преобразований между различными форматами, Free Spire.Doc предоставляет надежное локальное решение, облегчающее работу с EPUB, Word, PDF и другими типами документов.
Также читайте
Come copiare un foglio di lavoro in Excel (Manuale, VBA e Python)
Indice
Copiare un foglio di lavoro in Excel è un'operazione comune, sia che si tratti di duplicare dati, creare backup o impostare modelli. Excel offre diversi metodi per copiare i fogli di lavoro in modo rapido e semplice. In questo articolo, tratteremo vari metodi, dalle azioni manuali con il tasto destro del mouse o il trascinamento della selezione a opzioni più avanzate che utilizzano VBA e Python. Che tu sia un principiante o un utente avanzato che cerca di automatizzare il processo, troverai il metodo giusto per le tue esigenze.
Cosa imparerai
- Perché copiare un foglio di lavoro in Excel
- Come copiare un foglio di lavoro in Excel
- Come copiare più fogli di lavoro in Excel contemporaneamente
- Come copiare automaticamente i fogli di lavoro in Excel
- Suggerimenti professionali per la copia di un foglio di lavoro in Excel
Perché copiare un foglio di lavoro in Excel?
Copiare un foglio di lavoro in Excel è essenziale per molte ragioni, come ad esempio:
- Backup: proteggi il tuo lavoro duplicando i fogli importanti.
- Modelli: crea modelli riutilizzabili senza alterare i dati originali.
- Analisi dei dati: duplica un foglio di lavoro per manipolare i dati mantenendo intatto l'originale.
- Collaborazione: condividi una copia del tuo foglio senza influire sulla versione principale.
Ora che hai compreso i vantaggi della duplicazione di un foglio, esploriamo come farlo.
Come copiare un foglio di lavoro in Excel?
Esistono diversi metodi per copiare un foglio di lavoro in Excel, ognuno dei quali si adatta a esigenze e preferenze diverse. Di seguito sono riportate alcune delle tecniche più comunemente utilizzate.
Copiare un foglio di lavoro facendo clic con il pulsante destro del mouse
Fare clic con il pulsante destro del mouse sulla scheda del foglio di lavoro è uno dei modi più comuni e intuitivi per duplicare un foglio di lavoro in Excel. Questo metodo è semplice e ideale per copie occasionali o una tantum. Ecco come puoi farlo:
-
Fai clic con il pulsante destro del mouse sulla scheda del foglio di lavoro che desideri duplicare.
-
Dal menu di scelta rapida, seleziona Sposta o copia. Si aprirà la finestra di dialogo Sposta o copia.
-
Nell'elenco Prima del foglio, seleziona dove vuoi che appaia il foglio copiato (ad esempio prima del Foglio2 o spostalo alla fine).
-
Seleziona la casella Crea una copia per assicurarti di copiare il foglio e non di spostarlo.
-
Fai clic su OK per completare il processo.
Il tuo foglio di lavoro verrà ora copiato nella posizione selezionata e apparirà con lo stesso nome seguito da "(2)" (ad esempio, Foglio1 (2)). Se necessario, puoi rinominare il foglio di lavoro copiato facendo clic con il pulsante destro del mouse sulla scheda e selezionando Rinomina.
Potrebbe interessarti anche: Come dividere i fogli di Excel in più file (3 modi).
Duplicare un foglio di lavoro trascinandolo
Un altro modo semplice e veloce per duplicare un foglio di lavoro è trascinarlo e rilasciarlo. Questo metodo è perfetto quando si desidera che il nuovo foglio venga posizionato vicino a quello originale. Segui questi passaggi:
-
Tieni premuto il tasto Ctrl sulla tastiera.
-
Fai clic e trascina la scheda del foglio di lavoro nella posizione desiderata all'interno dell'area delle schede.
-
Rilascia il pulsante del mouse e quindi il tasto Ctrl.
Copiare una scheda del foglio utilizzando la barra multifunzione
Se preferisci utilizzare l'interfaccia della barra multifunzione, copiare un foglio di lavoro tramite i controlli della barra multifunzione è semplice. Ecco come:
- Seleziona la scheda del foglio di lavoro che desideri copiare.
- Vai alla scheda Home sulla barra multifunzione.
- Fai clic su Formato nel gruppo Celle.
- Dal menu a discesa, seleziona Sposta o copia foglio.
- Nella finestra di dialogo Sposta o copia, seleziona la casella Crea una copia e scegli dove vuoi posizionare il foglio di lavoro copiato.
- Fai clic su OK per completare il processo.
Copiare un foglio di Excel in un'altra cartella di lavoro
La copia di un foglio di lavoro in una cartella di lavoro diversa è un'operazione comune quando è necessario consolidare i dati da più file. Ecco come farlo senza problemi:
- Apri sia la cartella di lavoro di origine che quella di destinazione.
- Fai clic con il pulsante destro del mouse sulla scheda del foglio di lavoro che desideri copiare.
- Seleziona Sposta o copia dal menu di scelta rapida.
- Nel menu a discesa Alla cartella, seleziona la cartella di lavoro di destinazione.
- Nell'elenco Prima del foglio, scegli dove posizionare il foglio copiato.
- Seleziona la casella Crea una copia e fai clic su OK per completare il processo.
Il tuo foglio di lavoro è ora duplicato nella cartella di lavoro di destinazione, conservando tutti i dati e la formattazione originali.
Suggerimento: puoi ottenere lo stesso risultato tenendo premuto il tasto Ctrl e trascinando la scheda del foglio dalla cartella di lavoro di origine alla cartella di lavoro di destinazione.
Come copiare più fogli di lavoro in Excel contemporaneamente
Quando lavori con più fogli di lavoro, puoi copiarli tutti in una volta per risparmiare tempo. Ecco come:
-
Tieni premuto il tasto Ctrl per i fogli non adiacenti o il tasto Shift per i fogli adiacenti.
-
Seleziona le schede dei fogli che desideri copiare.
-
Fai clic con il pulsante destro del mouse su una delle schede del foglio selezionate e scegli Sposta o copia.
-
Nella finestra di dialogo Sposta o copia, scegli la cartella di lavoro di destinazione e la posizione di destinazione in cui posizionare la copia.
-
Seleziona la casella Crea una copia e fai clic su OK. Excel creerà copie di tutti i fogli di lavoro selezionati contemporaneamente.
Come copiare automaticamente i fogli di lavoro in Excel
Per gli utenti avanzati o per coloro che copiano frequentemente fogli di lavoro, l'automazione del processo con VBA (Visual Basic for Applications) o Python può far risparmiare molto tempo e garantire la coerenza.
Copiare un foglio di lavoro con VBA
VBA è perfetto per automatizzare attività ripetitive all'interno di Excel, in particolare le attività che richiedono l'interazione dell'utente tramite pulsanti o menu.
Ecco come utilizzare una semplice macro VBA per copiare un foglio:
-
Premi Alt + F11 per aprire l'editor VBA.
-
Nell'editor, vai su Inserisci > Modulo.
-
Incolla il seguente codice VBA nella finestra del modulo. Questo codice copia il Foglio1 e posiziona la copia dopo il Foglio3.
Sub CopyWorksheet() ' Modifica "Foglio1" con il nome del tuo foglio Worksheets("Foglio1").Copy After:=Worksheets("Foglio3") End Sub -
Premi F5 per eseguire la macro. La copia verrà creata istantaneamente.
Per maggiori dettagli sul metodo Worksheet.Copy utilizzato in questo script VBA, consulta la documentazione ufficiale di Microsoft: Metodo Worksheet.Copy (Excel).
Copiare un foglio di lavoro con Python
In alternativa, puoi utilizzare Python con librerie come Spire.XLS for Python per creare una copia di un foglio. Questo metodo è ideale per automatizzare attività Excel su larga scala, elaborazione lato server o integrazione di operazioni Excel con sistemi esterni.
Ecco come utilizzare Python per copiare un foglio di lavoro:
-
Installa Spire.XLS for Python da PyPI utilizzando il seguente comando:
pip install spire-xls -
Utilizza lo script Python seguente per copiare un foglio all'interno di una cartella di lavoro.
from spire.xls import *

# Inizializza un'istanza della classe Workbook
workbook = Workbook()

# Carica una cartella di lavoro di Excel
workbook.LoadFromFile("Input.xlsx")

# Ottieni il primo foglio di lavoro
sourceSheet = workbook.Worksheets[0]

# Crea un nuovo foglio con un nome specifico
sheetName = sourceSheet.Name + "_Copy"
destSheet = workbook.Worksheets.Add(sheetName)

# Copia il primo foglio di lavoro nel foglio appena aggiunto
destSheet.CopyFrom(sourceSheet)

# Salva la cartella di lavoro risultante con il foglio copiato
workbook.SaveToFile("CopySheet.xlsx", ExcelVersion.Version2013)

# Elimina la cartella di lavoro per rilasciare le risorse
workbook.Dispose()
Per tecniche aggiuntive come la copia del foglio tra cartelle di lavoro, consulta la guida ufficiale di Spire.XLS: Python: Copia fogli di lavoro in Excel.
Suggerimenti professionali per la copia di un foglio di lavoro in Excel
Per mantenere l'integrità dei dati ed evitare errori durante la copia di un foglio di lavoro, segui questi suggerimenti professionali:
- Gestione delle tabelle di Excel: quando si copia un foglio di lavoro contenente una tabella di Excel, Excel rinominerà automaticamente la tabella (ad esempio, Tabella1 diventa Tabella2). Se si dispone di formule che fanno riferimento a Tabella1, aggiornarle manualmente o utilizzare riferimenti strutturati per una maggiore flessibilità.
- Gestione delle origini dati dei grafici: i grafici nel foglio copiato faranno generalmente riferimento ai dati del foglio copiato. Se i grafici si basano su dati esterni, controllare e aggiornare l'origine dati dopo la copia.
- Gestione dei dati nascosti: verranno copiate anche le righe, le colonne o i dati filtrati nascosti. Se si desidera copiare solo i dati visibili, utilizzare la funzione Vai a speciale (in Trova e seleziona nella scheda Home) per selezionare le celle visibili prima di copiare.
- Correzione dei collegamenti interrotti: dopo aver copiato un foglio di lavoro in una nuova cartella di lavoro, verificare la presenza di collegamenti interrotti utilizzando la funzione "Modifica collegamenti" (nella scheda Dati). Aggiornare eventuali riferimenti esterni secondo necessità.
Conclusione: scegli il metodo giusto per la massima efficienza
La copia di fogli di lavoro in Excel può essere rapida e semplice quando si utilizza il metodo giusto. Selezionando l'approccio più efficiente, puoi risparmiare tempo e aumentare la tua produttività. Ecco una guida rapida per aiutarti a scegliere l'opzione migliore per le tue esigenze:
- Copie rapide una tantum: per copie occasionali, il metodo del clic con il pulsante destro del mouse o Ctrl + trascina offre una soluzione rapida e semplice.
- Automazione di attività ripetitive: se si copiano spesso fogli di lavoro, VBA può automatizzare il processo, garantendo coerenza e risparmiando tempo.
- Automazione avanzata: per progetti su larga scala o integrazioni di dati complesse, Python offre solide funzionalità di automazione che vanno oltre le funzionalità integrate di Excel.
Scegli il metodo che meglio si adatta al tuo flusso di lavoro e inizia a ottimizzare le tue attività di Excel oggi stesso!
Domande frequenti
D1: Posso copiare un foglio di lavoro di Excel in un'altra cartella di lavoro?
R1: Sì. Utilizza la finestra di dialogo Sposta o copia: fai clic con il pulsante destro del mouse sulla scheda del foglio, seleziona la cartella di lavoro di destinazione dal menu a discesa Alla cartella, seleziona Crea una copia e fai clic su OK.
D2: Come si copiano più fogli di lavoro in Excel?
R2: Seleziona più fogli tenendo premuto Ctrl (per fogli non adiacenti) o Shift (per fogli adiacenti). Quindi, fai clic con il pulsante destro del mouse su una scheda selezionata e scegli Sposta o copia. Assicurati che la casella Crea una copia sia selezionata.
D3: Come si copia solo la formattazione di un foglio di lavoro senza copiarne i dati?
R3: Seleziona tutte le celle nel foglio originale (Ctrl+A) e copia (Ctrl+C). In un nuovo foglio di lavoro, fai clic con il pulsante destro del mouse su una cella qualsiasi, scegli Incolla speciale -> Formati per applicare solo la formattazione.
D4: Esiste un modo per automatizzare la copia di più fogli in Excel?
R4: Sì. Per l'automazione, utilizza VBA per le attività all'interno di Excel o Python con librerie come Spire.XLS per l'elaborazione esterna su larga scala.
Vedi anche
Como copiar uma planilha no Excel (Manual, VBA e Python)
Copiar uma planilha no Excel é uma tarefa comum, seja para duplicar dados, criar backups ou configurar modelos. O Excel oferece vários métodos para copiar planilhas de forma rápida e fácil. Neste artigo, abordaremos vários métodos, desde ações manuais de clicar com o botão direito ou arrastar e soltar até opções mais avançadas usando VBA e Python. Seja você um iniciante ou um usuário avançado procurando automatizar o processo, encontrará o método certo para suas necessidades.
O que você vai aprender
- Por que você deve copiar uma planilha no Excel
- Como copiar uma planilha no Excel
- Como copiar várias planilhas no Excel de uma só vez
- Como copiar planilhas automaticamente no Excel
- Dicas profissionais para copiar uma planilha no Excel
Por que você deve copiar uma planilha no Excel?
Copiar uma planilha no Excel é essencial por muitas razões, como:
- Backup: proteja seu trabalho duplicando planilhas importantes.
- Modelos: crie modelos reutilizáveis sem alterar os dados originais.
- Análise de dados: duplique uma planilha para manipular dados, mantendo o original intacto.
- Colaboração: compartilhe uma cópia de sua planilha sem afetar a versão principal.
Agora que você entende os benefícios de duplicar uma planilha, vamos explorar como fazer isso.
Como copiar uma planilha no Excel?
Existem vários métodos para copiar uma planilha no Excel, cada um atendendo a diferentes necessidades e preferências. Abaixo estão algumas das técnicas mais comumente usadas.
Copiar uma planilha clicando com o botão direito
Clicar com o botão direito na guia da planilha é uma das maneiras mais comuns e intuitivas de duplicar uma planilha no Excel. Este método é simples e ideal para cópias únicas ou ocasionais. Veja como você pode fazer isso:
-
Clique com o botão direito na guia da planilha que deseja duplicar.
-
No menu de contexto, selecione Mover ou Copiar. Isso abrirá a caixa de diálogo Mover ou Copiar.
-
Na lista Antes da planilha, selecione onde deseja que a planilha copiada apareça (como antes da Planilha2 ou mova-a para o final).
-
Marque a caixa Criar uma cópia para garantir que você está copiando a planilha, e não movendo-a.
-
Clique em OK para concluir o processo.
Sua planilha agora será copiada para o local selecionado e aparecerá com o mesmo nome seguido por "(2)" (por exemplo, Planilha1 (2)). Se necessário, você pode renomear a planilha copiada clicando com o botão direito na guia e selecionando Renomear.
Você também pode se interessar por: Como dividir planilhas do Excel em vários arquivos (3 maneiras).
Duplicar uma planilha arrastando
Outra maneira simples e rápida de duplicar uma planilha é arrastando e soltando-a. Este método é perfeito quando você deseja que a nova planilha seja colocada perto da original. Siga estes passos:
-
Mantenha pressionada a tecla Ctrl no seu teclado.
-
Clique e arraste a guia da planilha para o local desejado na área de guias.
-
Solte o botão do mouse e, em seguida, a tecla Ctrl.
Copiar uma guia de planilha usando a faixa de opções
Se você prefere usar a interface da Faixa de Opções, copiar uma planilha através dos controles da Faixa de Opções é simples. Veja como:
- Selecione a guia da planilha que você deseja copiar.
- Navegue até a guia Página Inicial na Faixa de Opções.
- Clique em Formatar no grupo Células.
- No menu suspenso, selecione Mover ou Copiar Planilha.
- Na caixa de diálogo Mover ou Copiar, marque a caixa Criar uma cópia e escolha onde deseja que a planilha copiada seja colocada.
- Clique em OK para concluir o processo.
Copiar uma planilha do Excel para outra pasta de trabalho
Copiar uma planilha para uma pasta de trabalho diferente é uma tarefa comum quando você precisa consolidar dados de vários arquivos. Veja como fazer isso sem problemas:
- Abra as pastas de trabalho de origem e de destino.
- Clique com o botão direito na guia da planilha que deseja copiar.
- Selecione Mover ou Copiar no menu de contexto.
- No menu suspenso Para a pasta de trabalho, selecione a pasta de trabalho de destino.
- Na lista Antes da planilha, escolha onde deseja colocar a planilha copiada.
- Marque a caixa Criar uma cópia e clique em OK para concluir o processo.
Sua planilha agora está duplicada na pasta de trabalho de destino, mantendo todos os dados e formatação originais.
Dica: Você também pode conseguir o mesmo segurando a tecla Ctrl e arrastando a guia da planilha da pasta de trabalho de origem para a pasta de trabalho de destino.
Como copiar várias planilhas no Excel de uma só vez
Ao trabalhar com várias planilhas, você pode copiá-las de uma só vez para economizar tempo. Veja como:
-
Mantenha pressionada a tecla Ctrl para planilhas não adjacentes, ou a tecla Shift para planilhas adjacentes.
-
Selecione as guias das planilhas que você deseja copiar.
-
Clique com o botão direito em uma das guias de planilha selecionadas e escolha Mover ou Copiar.
-
Na caixa de diálogo Mover ou Copiar, escolha a pasta de trabalho de destino e o local de destino para colocar a cópia.
-
Marque a caixa Criar uma cópia e clique em OK. O Excel criará cópias de todas as planilhas selecionadas de uma só vez.
Como copiar planilhas automaticamente no Excel
Para usuários avançados ou aqueles que copiam planilhas com frequência, automatizar o processo com VBA (Visual Basic for Applications) ou Python pode economizar tempo significativamente e garantir a consistência.
Copiar uma planilha com VBA
O VBA é perfeito para automatizar tarefas repetitivas no Excel, especialmente tarefas que exigem interação do usuário por meio de botões ou menus.
Veja como usar uma macro VBA simples para copiar uma planilha:
-
Pressione Alt + F11 para abrir o editor do VBA.
-
No editor, vá para Inserir > Módulo.
-
Cole o seguinte código VBA na janela do módulo. Este código copia a Planilha1 e coloca a cópia após a Planilha3.
Sub CopyWorksheet() ' Modifique "Sheet1" para o nome da sua planilha Worksheets("Sheet1").Copy After:=Worksheets("Sheet3") End Sub -
Pressione F5 para executar a macro. A cópia será criada instantaneamente.
Para mais detalhes sobre o método Worksheet.Copy usado neste script VBA, consulte a documentação oficial da Microsoft: Método Worksheet.Copy (Excel).
Copiar uma planilha com Python
Alternativamente, você pode usar Python com bibliotecas como Spire.XLS for Python para criar uma cópia de uma planilha. Este método é o melhor para automatizar tarefas do Excel em grande escala, processamento no lado do servidor ou integrar operações do Excel com sistemas externos.
Veja como usar Python para copiar uma planilha:
-
Instale o Spire.XLS for Python do PyPI usando o seguinte comando:
pip install spire-xls -
Use o script Python abaixo para copiar uma planilha dentro de uma pasta de trabalho.
from spire.xls import *

# Inicialize uma instância da classe Workbook
workbook = Workbook()

# Carregue uma pasta de trabalho do Excel
workbook.LoadFromFile("Input.xlsx")

# Obtenha a primeira planilha
sourceSheet = workbook.Worksheets[0]

# Crie uma nova planilha com um nome específico
sheetName = sourceSheet.Name + "_Copy"
destSheet = workbook.Worksheets.Add(sheetName)

# Copie a primeira planilha para a planilha recém-adicionada
destSheet.CopyFrom(sourceSheet)

# Salve a pasta de trabalho resultante com a planilha copiada
workbook.SaveToFile("CopySheet.xlsx", ExcelVersion.Version2013)

# Descarte a pasta de trabalho para liberar recursos
workbook.Dispose()
Para técnicas adicionais, como copiar a planilha entre pastas de trabalho, verifique o guia oficial do Spire.XLS: Python: Copiar planilhas no Excel.
Dicas profissionais para copiar uma planilha no Excel
Para manter a integridade dos dados e evitar erros ao copiar uma planilha, siga estas dicas profissionais:
- Manuseio de tabelas do Excel: ao copiar uma planilha que contém uma tabela do Excel, o Excel renomeará automaticamente a tabela (por exemplo, Tabela1 se torna Tabela2). Se você tiver fórmulas que fazem referência à Tabela1, atualize-as manualmente ou use referências estruturadas para maior flexibilidade.
- Gerenciamento de fontes de dados de gráficos: os gráficos na planilha copiada geralmente farão referência a dados da planilha copiada. Se seus gráficos dependem de dados externos, verifique e atualize a fonte de dados após a cópia.
- Lidando com dados ocultos: linhas, colunas ou dados filtrados ocultos também serão copiados. Se você deseja copiar apenas os dados visíveis, use o recurso Ir para Especial (em Localizar e Selecionar na guia Página Inicial) para selecionar as células visíveis antes de copiar.
- Corrigindo links quebrados: depois de copiar uma planilha para uma nova pasta de trabalho, verifique se há links quebrados usando o recurso "Editar Links" (na guia Dados). Atualize quaisquer referências externas conforme necessário.
Conclusão: escolha o método certo para máxima eficiência
Copiar planilhas no Excel pode ser rápido e direto quando você usa o método certo. Ao selecionar a abordagem mais eficiente, você pode economizar tempo e aumentar sua produtividade. Aqui está um guia rápido para ajudá-lo a escolher a melhor opção para suas necessidades:
- Cópias rápidas e únicas: para cópias ocasionais, o método de clicar com o botão direito ou Ctrl + Arrastar oferece uma solução rápida e simples.
- Automatizando tarefas repetitivas: se você costuma copiar planilhas, o VBA pode automatizar o processo, garantindo consistência e economizando tempo.
- Automação avançada: para projetos de maior escala ou integrações de dados complexas, o Python oferece recursos robustos de automação que vão além dos recursos integrados do Excel.
Escolha o método que melhor se adapta ao seu fluxo de trabalho e comece a otimizar suas tarefas no Excel hoje mesmo!
Perguntas frequentes
P1: Posso copiar uma planilha do Excel para outra pasta de trabalho?
R1: Sim. Use a caixa de diálogo Mover ou Copiar: clique com o botão direito na guia da planilha, selecione a pasta de trabalho de destino no menu suspenso Para a pasta de trabalho, marque Criar uma cópia e clique em OK.
P2: Como copio várias planilhas no Excel?
R2: Selecione várias planilhas segurando Ctrl (para planilhas não adjacentes) ou Shift (para planilhas adjacentes). Em seguida, clique com o botão direito em qualquer guia selecionada e escolha Mover ou Copiar. Certifique-se de que a caixa Criar uma cópia esteja marcada.
P3: Como copio apenas a formatação de uma planilha sem copiar seus dados?
R3: Selecione todas as células na planilha original (Ctrl+A) e copie (Ctrl+C). Em uma nova planilha, clique com o botão direito em qualquer célula, escolha Colar Especial -> Formatos para aplicar apenas a formatação.
P4: Existe uma maneira de automatizar a cópia de várias planilhas no Excel?
R4: Sim. Para automação, use VBA para tarefas no Excel ou Python com bibliotecas como Spire.XLS para processamento externo em grande escala.
Veja também
Excel에서 워크시트를 복사하는 방법 (수동, VBA 및 Python)
Excel에서 워크시트 복사는 데이터를 복제하거나, 백업을 만들거나, 템플릿을 설정할 때 흔히 하는 작업입니다. Excel은 워크시트를 빠르고 쉽게 복사할 수 있는 여러 가지 방법을 제공합니다. 이 기사에서는 마우스 오른쪽 버튼 클릭이나 드래그 앤 드롭과 같은 수동 작업부터 VBA 및 Python을 사용하는 고급 옵션까지 다양한 방법을 다룹니다. 초보자이든 프로세스를 자동화하려는 고급 사용자이든 필요에 맞는 올바른 방법을 찾을 수 있습니다.
학습할 내용
- Excel에서 워크시트를 복사해야 하는 이유
- Excel에서 워크시트를 복사하는 방법
- Excel에서 여러 워크시트를 한 번에 복사하는 방법
- Excel에서 워크시트를 자동으로 복사하는 방법
- Excel에서 워크시트 복사를 위한 전문가 팁
Excel에서 워크시트를 복사해야 하는 이유는 무엇입니까?
Excel에서 워크시트를 복사하는 것은 다음과 같은 여러 가지 이유로 필수적입니다.
- 백업: 중요한 시트를 복제하여 작업을 보호합니다.
- 템플릿: 원본 데이터를 변경하지 않고 재사용 가능한 템플릿을 만듭니다.
- 데이터 분석: 원본을 그대로 유지하면서 데이터를 조작하기 위해 워크시트를 복제합니다.
- 공동 작업: 마스터 버전에 영향을 주지 않고 시트 사본을 공유합니다.
이제 시트 복제의 이점을 이해했으므로 수행 방법을 살펴보겠습니다.
Excel에서 워크시트를 복사하는 방법은 무엇입니까?
Excel에서 워크시트를 복사하는 방법에는 여러 가지가 있으며, 각각 다른 요구와 선호도에 맞춰져 있습니다. 다음은 가장 일반적으로 사용되는 몇 가지 기술입니다.
마우스 오른쪽 버튼 클릭으로 워크시트 복사
워크시트 탭을 마우스 오른쪽 버튼으로 클릭하는 것은 Excel에서 워크시트를 복제하는 가장 일반적이고 직관적인 방법 중 하나입니다. 이 방법은 간단하며 일회성 또는 가끔 복사하는 데 이상적입니다. 방법은 다음과 같습니다.
-
복제하려는 워크시트의 탭을 마우스 오른쪽 버튼으로 클릭합니다.
-
상황에 맞는 메뉴에서 이동/복사를 선택합니다. 그러면 이동/복사 대화 상자가 열립니다.
-
다음 시트 앞에 목록에서 복사한 시트가 나타날 위치를 선택합니다(예: Sheet2 앞 또는 맨 끝으로 이동).
-
시트를 이동하는 것이 아니라 복사하는 것인지 확인하려면 복사본 만들기 확인란을 선택합니다.
-
확인을 클릭하여 프로세스를 완료합니다.
이제 워크시트가 선택한 위치에 복사되고 동일한 이름 뒤에 "(2)"가 붙어 나타납니다(예: Sheet1 (2)). 필요한 경우 탭을 마우스 오른쪽 버튼으로 클릭하고 이름 바꾸기를 선택하여 복사된 워크시트의 이름을 바꿀 수 있습니다.
관심이 있을 수도 있습니다: Excel 시트를 여러 파일로 분할하는 방법 (3가지 방법).
드래그하여 워크시트 복제
워크시트를 복제하는 또 다른 간단하고 빠른 방법은 드래그 앤 드롭하는 것입니다. 이 방법은 새 시트를 원본 시트 가까이에 배치하려는 경우에 적합합니다. 다음 단계를 따르십시오.
-
키보드의 Ctrl 키를 누르고 있습니다.
-
워크시트 탭을 탭 영역 내의 원하는 위치로 클릭하여 드래그합니다.
-
마우스 버튼을 놓은 다음 Ctrl 키를 놓습니다.
리본을 사용하여 시트 탭 복사
리본 인터페이스를 사용하는 것을 선호하는 경우 리본 컨트롤을 통해 워크시트를 복사하는 것은 간단합니다. 방법은 다음과 같습니다.
- 복사하려는 워크시트 탭을 선택합니다.
- 리본의 홈 탭으로 이동합니다.
- 셀 그룹에서 서식을 클릭합니다.
- 드롭다운 메뉴에서 시트 이동/복사를 선택합니다.
- 이동/복사 대화 상자에서 복사본 만들기 확인란을 선택하고 복사한 워크시트를 배치할 위치를 선택합니다.
- 확인을 클릭하여 프로세스를 완료합니다.
Excel 시트를 다른 통합 문서로 복사
워크시트를 다른 통합 문서로 복사하는 것은 여러 파일의 데이터를 통합해야 할 때 일반적인 작업입니다. 원활하게 수행하는 방법은 다음과 같습니다.
- 소스 통합 문서와 대상 통합 문서를 모두 엽니다.
- 복사하려는 워크시트의 탭을 마우스 오른쪽 버튼으로 클릭합니다.
- 상황에 맞는 메뉴에서 이동/복사를 선택합니다.
- 대상 통합 문서 드롭다운 메뉴에서 대상 통합 문서를 선택합니다.
- 다음 시트 앞에 목록에서 복사한 시트를 배치할 위치를 선택합니다.
- 복사본 만들기 확인란을 선택하고 확인을 클릭하여 프로세스를 완료합니다.
이제 워크시트가 대상 통합 문서에 복제되어 모든 원본 데이터와 서식이 유지됩니다.
팁: Ctrl 키를 누른 상태에서 시트 탭을 소스 통합 문서에서 대상 통합 문서로 드래그하여 동일한 작업을 수행할 수도 있습니다.
Excel에서 여러 워크시트를 한 번에 복사하는 방법
여러 워크시트로 작업할 때 한 번에 복사하여 시간을 절약할 수 있습니다. 방법은 다음과 같습니다.
-
인접하지 않은 시트의 경우 Ctrl 키를, 인접한 시트의 경우 Shift 키를 누르고 있습니다.
-
복사하려는 시트의 탭을 선택합니다.
-
선택한 시트 탭 중 하나를 마우스 오른쪽 버튼으로 클릭하고 이동/복사를 선택합니다.
-
이동/복사 대화 상자에서 대상 통합 문서와 복사본을 배치할 대상 위치를 선택합니다.
-
복사본 만들기 확인란을 선택하고 확인을 클릭합니다. Excel은 선택한 모든 워크시트의 복사본을 한 번에 만듭니다.
Excel에서 워크시트를 자동으로 복사하는 방법
고급 사용자나 워크시트를 자주 복사하는 사용자의 경우 VBA (Visual Basic for Applications) 또는 Python으로 프로세스를 자동화하면 시간을 크게 절약하고 일관성을 보장할 수 있습니다.
VBA로 워크시트 복사
VBA는 Excel 내에서 반복적인 작업을 자동화하는 데 적합하며, 특히 버튼이나 메뉴를 통한 사용자 상호 작용이 필요한 작업에 유용합니다.
다음은 간단한 VBA 매크로를 사용하여 시트를 복사하는 방법입니다.
-
Alt + F11을 눌러 VBA 편집기를 엽니다.
-
편집기에서 삽입 > 모듈로 이동합니다.
-
다음 VBA 코드를 모듈 창에 붙여넣습니다. 이 코드는 Sheet1을 복사하고 복사본을 Sheet3 뒤에 배치합니다.
Sub CopyWorksheet() ' "Sheet1"을 시트 이름으로 수정 Worksheets("Sheet1").Copy After:=Worksheets("Sheet3") End Sub -
F5 키를 눌러 매크로를 실행합니다. 복사본이 즉시 생성됩니다.
이 VBA 스크립트에서 사용되는 Worksheet.Copy 메서드에 대한 자세한 내용은 공식 Microsoft 설명서를 참조하십시오: Worksheet.Copy 메서드 (Excel).
Python으로 워크시트 복사
또는 Spire.XLS for Python과 같은 라이브러리와 함께 Python을 사용하여 시트 복사본을 만들 수 있습니다. 이 방법은 대규모 Excel 작업, 서버 측 처리 또는 Excel 작업을 외부 시스템과 통합하는 자동화에 가장 적합합니다.
다음은 Python을 사용하여 워크시트를 복사하는 방법입니다.
-
다음 명령을 사용하여 PyPI에서 Spire.XLS for Python을 설치합니다.
pip install spire-xls -
아래 Python 스크립트를 사용하여 통합 문서 내에서 시트를 복사합니다.
from spire.xls import *

# Workbook 클래스의 인스턴스 초기화
workbook = Workbook()

# Excel 통합 문서 로드
workbook.LoadFromFile("Input.xlsx")

# 첫 번째 워크시트 가져오기
sourceSheet = workbook.Worksheets[0]

# 특정 이름으로 새 시트 만들기
sheetName = sourceSheet.Name + "_Copy"
destSheet = workbook.Worksheets.Add(sheetName)

# 첫 번째 워크시트를 새로 추가된 시트로 복사
destSheet.CopyFrom(sourceSheet)

# 복사된 시트와 함께 결과 통합 문서 저장
workbook.SaveToFile("CopySheet.xlsx", ExcelVersion.Version2013)

# 리소스를 해제하기 위해 통합 문서 삭제
workbook.Dispose()
통합 문서 간 시트 복사와 같은 추가 기술은 Spire.XLS의 공식 가이드를 확인하십시오: Python: Excel에서 워크시트 복사.
Excel에서 워크시트 복사를 위한 전문가 팁
워크시트를 복사할 때 데이터 무결성을 유지하고 오류를 방지하려면 다음 전문가 팁을 따르십시오.
- Excel 표 처리: Excel 표가 포함된 워크시트를 복사하면 Excel에서 자동으로 표 이름을 바꿉니다(예: Table1이 Table2가 됨). Table1을 참조하는 수식이 있는 경우 수동으로 업데이트하거나 유연성을 위해 구조적 참조를 사용하십시오.
- 차트 데이터 원본 관리: 복사된 시트의 차트는 일반적으로 복사된 시트의 데이터를 참조합니다. 차트가 외부 데이터에 의존하는 경우 복사 후 데이터 원본을 확인하고 업데이트하십시오.
- 숨겨진 데이터 처리: 숨겨진 행, 열 또는 필터링된 데이터도 복사됩니다. 보이는 데이터만 복사하려면 복사하기 전에 홈 탭의 찾기 및 선택 아래에 있는 이동 옵션 기능을 사용하여 보이는 셀을 선택하십시오.
- 끊어진 링크 수정: 워크시트를 새 통합 문서로 복사한 후 데이터 탭 아래의 "연결 편집" 기능을 사용하여 끊어진 링크를 확인합니다. 필요에 따라 외부 참조를 업데이트하십시오.
결론: 최대 효율성을 위해 올바른 방법 선택
올바른 방법을 사용하면 Excel에서 워크시트를 빠르고 간단하게 복사할 수 있습니다. 가장 효율적인 접근 방식을 선택하면 시간을 절약하고 생산성을 높일 수 있습니다. 필요에 가장 적합한 옵션을 선택하는 데 도움이 되는 빠른 안내서는 다음과 같습니다.
- 빠른 일회성 복사: 가끔 복사하는 경우 마우스 오른쪽 버튼 클릭 방법이나 Ctrl + 드래그가 빠르고 간단한 해결책을 제공합니다.
- 반복 작업 자동화: 워크시트를 자주 복사하는 경우 VBA를 사용하여 프로세스를 자동화하여 일관성을 보장하고 시간을 절약할 수 있습니다.
- 고급 자동화: 대규모 프로젝트나 복잡한 데이터 통합의 경우 Python은 Excel의 기본 기능을 뛰어넘는 강력한 자동화 기능을 제공합니다.
워크플로에 가장 적합한 방법을 선택하고 지금 바로 Excel 작업을 최적화하십시오!
자주 묻는 질문
Q1: Excel 워크시트를 다른 통합 문서로 복사할 수 있습니까?
A1: 예. 이동/복사 대화 상자를 사용합니다. 시트 탭을 마우스 오른쪽 버튼으로 클릭하고 대상 통합 문서 드롭다운에서 대상 통합 문서를 선택한 다음 복사본 만들기를 선택하고 확인을 클릭합니다.
Q2: Excel에서 여러 워크시트를 복사하려면 어떻게 합니까?
A2: Ctrl(인접하지 않은 시트의 경우) 또는 Shift(인접한 시트의 경우)를 누른 상태에서 여러 시트를 선택합니다. 그런 다음 선택한 탭을 마우스 오른쪽 버튼으로 클릭하고 이동/복사를 선택합니다. 복사본 만들기 확인란이 선택되어 있는지 확인합니다.
Q3: 데이터를 복사하지 않고 워크시트의 서식만 복사하려면 어떻게 합니까?
A3: 원본 시트의 모든 셀을 선택(Ctrl+A)하고 복사(Ctrl+C)합니다. 새 워크시트에서 아무 셀이나 마우스 오른쪽 버튼으로 클릭하고 붙여넣기 옵션 -> 서식을 선택하여 서식만 적용합니다.
Q4: Excel에서 여러 시트 복사를 자동화하는 방법이 있습니까?
A4: 예. 자동화를 위해 Excel 내 작업에는 VBA를 사용하거나 외부 대규모 처리에는 Spire.XLS와 같은 라이브러리와 함께 Python을 사용합니다.
참고 항목
Comment copier une feuille de calcul dans Excel (Manuel, VBA et Python)
Table des matières
Copier une feuille de calcul dans Excel est une tâche courante, que vous dupliquiez des données, créiez des sauvegardes ou configuriez des modèles. Excel propose plusieurs méthodes pour copier rapidement et facilement des feuilles de calcul. Dans cet article, nous aborderons différentes méthodes, des actions manuelles par clic droit ou glisser-déposer aux options plus avancées utilisant VBA et Python. Que vous soyez un débutant ou un utilisateur avancé cherchant à automatiser le processus, vous trouverez la méthode adaptée à vos besoins.
Ce que vous apprendrez
- Pourquoi copier une feuille de calcul dans Excel
- Comment copier une feuille de calcul dans Excel
- Comment copier plusieurs feuilles de calcul dans Excel à la fois
- Comment copier automatiquement des feuilles de calcul dans Excel
- Conseils de pro pour copier une feuille de calcul dans Excel
Pourquoi devriez-vous copier une feuille de calcul dans Excel ?
La copie d'une feuille de calcul dans Excel est essentielle pour de nombreuses raisons, telles que :
- Sauvegarde : Protégez votre travail en dupliquant les feuilles importantes.
- Modèles : Créez des modèles réutilisables sans modifier les données d'origine.
- Analyse de données : Dupliquez une feuille de calcul pour manipuler les données tout en conservant l'original intact.
- Collaboration : Partagez une copie de votre feuille sans affecter la version principale.
Maintenant que vous comprenez les avantages de la duplication d'une feuille, explorons comment le faire.
Comment copier une feuille de calcul dans Excel ?
Il existe plusieurs méthodes pour copier une feuille de calcul dans Excel, chacune répondant à des besoins et des préférences différents. Vous trouverez ci-dessous certaines des techniques les plus couramment utilisées.
Copier une feuille de calcul par clic droit
Le clic droit sur l'onglet de la feuille de calcul est l'un des moyens les plus courants et intuitifs de dupliquer une feuille de calcul dans Excel. Cette méthode est simple et idéale pour les copies uniques ou occasionnelles. Voici comment vous pouvez le faire :
-
Faites un clic droit sur l'onglet de la feuille de calcul que vous souhaitez dupliquer.
-
Dans le menu contextuel, sélectionnez Déplacer ou copier. Cela ouvrira la boîte de dialogue Déplacer ou copier.
-
Dans la liste Avant la feuille, sélectionnez l'endroit où vous souhaitez que la feuille copiée apparaisse (par exemple, avant la Feuille2 ou déplacez-la à la fin).
-
Cochez la case Créer une copie pour vous assurer que vous copiez la feuille et non que vous la déplacez.
-
Cliquez sur OK pour terminer le processus.
Votre feuille de calcul sera maintenant copiée à l'emplacement sélectionné et apparaîtra avec le même nom suivi de « (2) » (par exemple, Feuille1 (2)). Si nécessaire, vous pouvez renommer la feuille de calcul copiée en faisant un clic droit sur l'onglet et en sélectionnant Renommer.
Vous pourriez également être intéressé par : Comment diviser des feuilles Excel en plusieurs fichiers (3 façons).
Dupliquer une feuille de calcul en la faisant glisser
Une autre façon simple et rapide de dupliquer une feuille de calcul consiste à la faire glisser et à la déposer. Cette méthode est parfaite lorsque vous souhaitez que la nouvelle feuille soit placée à proximité de l'originale. Suivez ces étapes :
-
Maintenez la touche Ctrl de votre clavier enfoncée.
-
Cliquez et faites glisser l'onglet de la feuille de calcul vers l'emplacement souhaité dans la zone des onglets.
-
Relâchez le bouton de la souris, puis la touche Ctrl.
Copier un onglet de feuille à l'aide du ruban
Si vous préférez utiliser l'interface du ruban, la copie d'une feuille de calcul via les commandes du ruban est simple. Voici comment :
- Sélectionnez l'onglet de la feuille de calcul que vous souhaitez copier.
- Accédez à l'onglet Accueil du ruban.
- Cliquez sur Format dans le groupe Cellules.
- Dans le menu déroulant, sélectionnez Déplacer ou copier une feuille.
- Dans la boîte de dialogue Déplacer ou copier, cochez la case Créer une copie et choisissez où vous souhaitez placer la feuille de calcul copiée.
- Cliquez sur OK pour terminer le processus.
Copier une feuille Excel dans un autre classeur
La copie d'une feuille de calcul dans un autre classeur est une tâche courante lorsque vous devez consolider des données provenant de plusieurs fichiers. Voici comment le faire de manière transparente :
- Ouvrez les classeurs source et de destination.
- Faites un clic droit sur l'onglet de la feuille de calcul que vous souhaitez copier.
- Sélectionnez Déplacer ou copier dans le menu contextuel.
- Dans le menu déroulant Dans le classeur, sélectionnez le classeur de destination.
- Dans la liste Avant la feuille, choisissez où vous souhaitez placer la feuille copiée.
- Cochez la case Créer une copie et cliquez sur OK pour terminer le processus.
Votre feuille de calcul est maintenant dupliquée dans le classeur de destination, en conservant toutes les données et la mise en forme d'origine.
Conseil : Vous pouvez également obtenir le même résultat en maintenant la touche Ctrl enfoncée et en faisant glisser l'onglet de la feuille du classeur source vers le classeur de destination.
Comment copier plusieurs feuilles de calcul dans Excel à la fois
Lorsque vous travaillez avec plusieurs feuilles de calcul, vous pouvez les copier en une seule fois pour gagner du temps. Voici comment :
-
Maintenez la touche Ctrl enfoncée pour les feuilles non adjacentes, ou la touche Maj pour les feuilles adjacentes.
-
Sélectionnez les onglets des feuilles que vous souhaitez copier.
-
Faites un clic droit sur l'un des onglets de feuille sélectionnés et choisissez Déplacer ou copier.
-
Dans la boîte de dialogue Déplacer ou copier, choisissez le classeur de destination et l'emplacement cible pour placer la copie.
-
Cochez la case Créer une copie et cliquez sur OK. Excel créera des copies de toutes les feuilles de calcul sélectionnées à la fois.
Comment copier automatiquement des feuilles de calcul dans Excel
Pour les utilisateurs avancés ou ceux qui copient fréquemment des feuilles de calcul, l'automatisation du processus avec VBA (Visual Basic for Applications) ou Python peut considérablement faire gagner du temps et garantir la cohérence.
Copier une feuille de calcul avec VBA
VBA est parfait pour automatiser les tâches répétitives dans Excel, en particulier les tâches qui nécessitent une interaction de l'utilisateur via des boutons ou des menus.
Voici comment utiliser une simple macro VBA pour copier une feuille :
-
Appuyez sur Alt + F11 pour ouvrir l'éditeur VBA.
-
Dans l'éditeur, allez dans Insertion > Module.
-
Collez le code VBA suivant dans la fenêtre du module. Ce code copie la Feuille1 et place la copie après la Feuille3.
Sub CopyWorksheet() ' Modifiez "Feuille1" par le nom de votre feuille Worksheets("Sheet1").Copy After:=Worksheets("Sheet3") End Sub -
Appuyez sur F5 pour exécuter la macro. La copie sera créée instantanément.
Pour plus de détails sur la méthode Worksheet.Copy utilisée dans ce script VBA, consultez la documentation officielle de Microsoft : Méthode Worksheet.Copy (Excel).
Copier une feuille de calcul avec Python
Alternativement, vous pouvez utiliser Python avec des bibliothèques comme Spire.XLS pour Python pour créer une copie d'une feuille. Cette méthode est idéale pour automatiser des tâches Excel à grande échelle, le traitement côté serveur ou l'intégration des opérations Excel avec des systèmes externes.
Voici comment utiliser Python pour copier une feuille de calcul :
-
Installez Spire.XLS pour Python depuis PyPI en utilisant la commande suivante :
pip install spire-xls -
Utilisez le script Python ci-dessous pour copier une feuille dans un classeur.
from spire.xls import *

# Initialize an instance of the Workbook class
workbook = Workbook()

# Load an Excel workbook
workbook.LoadFromFile("Input.xlsx")

# Get the first worksheet
sourceSheet = workbook.Worksheets[0]

# Create a new sheet with a specific name
sheetName = sourceSheet.Name + "_Copy"
destSheet = workbook.Worksheets.Add(sheetName)

# Copy the first worksheet to the newly added sheet
destSheet.CopyFrom(sourceSheet)

# Save the result workbook with the copied sheet
workbook.SaveToFile("CopySheet.xlsx", ExcelVersion.Version2013)

# Dispose of the workbook to release resources
workbook.Dispose()
Pour des techniques supplémentaires comme la copie de la feuille entre les classeurs, consultez le guide officiel de Spire.XLS : Python : Copier des feuilles de calcul dans Excel.
Conseils de pro pour copier une feuille de calcul dans Excel
Pour maintenir l'intégrité des données et éviter les erreurs lors de la copie d'une feuille de calcul, suivez ces conseils de pro :
- Gestion des tableaux Excel : lors de la copie d'une feuille de calcul contenant un tableau Excel, Excel renommera automatiquement le tableau (par exemple, Tableau1 devient Tableau2). Si vous avez des formules faisant référence à Tableau1, mettez-les à jour manuellement ou utilisez des références structurées pour plus de flexibilité.
- Gestion des sources de données de graphique : les graphiques de la feuille copiée feront généralement référence aux données de la feuille copiée. Si vos graphiques reposent sur des données externes, vérifiez et mettez à jour la source de données après la copie.
- Gestion des données masquées : les lignes, colonnes ou données filtrées masquées seront également copiées. Si vous souhaitez uniquement copier les données visibles, utilisez la fonction Atteindre (Spécial) (sous Rechercher et sélectionner dans l'onglet Accueil) pour sélectionner les cellules visibles avant de copier.
- Correction des liens rompus : après avoir copié une feuille de calcul dans un nouveau classeur, recherchez les liens rompus à l'aide de la fonction « Modifier les liens » (sous l'onglet Données). Mettez à jour les références externes si nécessaire.
Conclusion : Choisissez la bonne méthode pour une efficacité maximale
La copie de feuilles de calcul dans Excel peut être rapide et simple lorsque vous utilisez la bonne méthode. En sélectionnant l'approche la plus efficace, vous pouvez gagner du temps et augmenter votre productivité. Voici un guide rapide pour vous aider à choisir la meilleure option pour vos besoins :
- Copies uniques rapides : pour les copies occasionnelles, la méthode du clic droit ou Ctrl + Glisser offre une solution simple et rapide.
- Automatisation des tâches répétitives : si vous copiez souvent des feuilles de calcul, VBA peut automatiser le processus, garantissant la cohérence et un gain de temps.
- Automatisation avancée : pour les projets à plus grande échelle ou les intégrations de données complexes, Python offre des capacités d'automatisation robustes qui vont au-delà des fonctionnalités intégrées d'Excel.
Choisissez la méthode qui correspond le mieux à votre flux de travail et commencez à optimiser vos tâches Excel dès aujourd'hui !
FAQ
Q1 : Puis-je copier une feuille de calcul Excel dans un autre classeur ?
R1 : Oui. Utilisez la boîte de dialogue Déplacer ou copier : faites un clic droit sur l'onglet de la feuille, sélectionnez le classeur cible dans le menu déroulant Dans le classeur, cochez Créer une copie et cliquez sur OK.
Q2 : Comment copier plusieurs feuilles de calcul dans Excel ?
R2 : Sélectionnez plusieurs feuilles en maintenant la touche Ctrl (pour les feuilles non adjacentes) ou Maj (pour les feuilles adjacentes). Ensuite, faites un clic droit sur n'importe quel onglet sélectionné et choisissez Déplacer ou copier. Assurez-vous que la case Créer une copie est cochée.
Q3 : Comment copier uniquement la mise en forme d'une feuille de calcul sans copier ses données ?
R3 : Sélectionnez toutes les cellules de la feuille d'origine (Ctrl+A) et copiez (Ctrl+C). Dans une nouvelle feuille de calcul, faites un clic droit sur n'importe quelle cellule, choisissez Collage spécial -> Formats pour appliquer uniquement la mise en forme.
Q4 : Existe-t-il un moyen d'automatiser la copie de plusieurs feuilles dans Excel ?
R4 : Oui. Pour l'automatisation, utilisez VBA pour les tâches dans Excel, ou Python avec des bibliothèques comme Spire.XLS pour le traitement externe à grande échelle.
Voir aussi
Cómo copiar una hoja de cálculo en Excel (Manual, VBA y Python)
Tabla de Contenidos
Copiar una hoja de cálculo en Excel es una tarea común, ya sea que estés duplicando datos, creando copias de seguridad o configurando plantillas. Excel ofrece varios métodos para copiar hojas de cálculo de forma rápida y sencilla. En este artículo, cubriremos varios métodos, desde acciones manuales con el botón derecho o de arrastrar y soltar hasta opciones más avanzadas usando VBA y Python. Ya seas un principiante o un usuario avanzado que busca automatizar el proceso, encontrarás el método adecuado para tus necesidades.
Lo Que Aprenderás
- Por Qué Deberías Copiar una Hoja de Cálculo en Excel
- Cómo Copiar una Hoja de Cálculo en Excel
- Cómo Copiar Múltiples Hojas de Cálculo en Excel a la Vez
- Cómo Copiar Hojas de Cálculo en Excel Automáticamente
- Consejos Profesionales para Copiar una Hoja de Cálculo en Excel
¿Por Qué Deberías Copiar una Hoja de Cálculo en Excel?
Copiar una hoja de cálculo en Excel es esencial por muchas razones, como:
- Copia de seguridad: Protege tu trabajo duplicando hojas importantes.
- Plantillas: Crea plantillas reutilizables sin alterar los datos originales.
- Análisis de datos: Duplica una hoja de cálculo para manipular datos manteniendo intacta la original.
- Colaboración: Comparte una copia de tu hoja sin afectar la versión maestra.
Ahora que entiendes los beneficios de duplicar una hoja, exploremos cómo hacerlo.
¿Cómo Copiar una Hoja de Cálculo en Excel?
Existen varios métodos para copiar una hoja de cálculo en Excel, cada uno adaptado a diferentes necesidades y preferencias. A continuación se presentan algunas de las técnicas más utilizadas.
Copiar una Hoja de Cálculo Haciendo Clic con el Botón Derecho
Hacer clic con el botón derecho en la pestaña de la hoja de cálculo es una de las formas más comunes e intuitivas de duplicar una hoja de cálculo en Excel. Este método es simple e ideal para copias únicas u ocasionales. Así es como puedes hacerlo:
-
Haz clic con el botón derecho en la pestaña de la hoja de cálculo que deseas duplicar.
-
En el menú contextual, selecciona Mover o Copiar. Esto abrirá el cuadro de diálogo Mover o Copiar.
-
En la lista Antes de la hoja, selecciona dónde quieres que aparezca la hoja copiada (como antes de la Hoja2 o moverla al final).
-
Marca la casilla Crear una copia para asegurarte de que estás copiando la hoja, no moviéndola.
-
Haz clic en Aceptar para completar el proceso.
Tu hoja de cálculo ahora se copiará en la ubicación seleccionada y aparecerá con el mismo nombre seguido de "(2)" (por ejemplo, Hoja1 (2)). Si es necesario, puedes cambiar el nombre de la hoja de cálculo copiada haciendo clic con el botón derecho en la pestaña y seleccionando Cambiar nombre.
También te puede interesar: Cómo Dividir Hojas de Excel en Varios Archivos (3 Formas).
Duplicar una Hoja de Cálculo Arrastrando
Otra forma simple y rápida de duplicar una hoja de cálculo es arrastrándola y soltándola. Este método es perfecto cuando quieres que la nueva hoja se coloque cerca de la original. Sigue estos pasos:
-
Mantén presionada la tecla Ctrl en tu teclado.
-
Haz clic y arrastra la pestaña de la hoja de cálculo a la ubicación deseada dentro del área de pestañas.
-
Suelta el botón del mouse y luego la tecla Ctrl.
Copiar una Pestaña de Hoja Usando la Cinta de Opciones
Si prefieres usar la interfaz de la Cinta de Opciones, copiar una hoja de cálculo a través de los controles de la Cinta de Opciones es sencillo. Aquí te explicamos cómo:
- Selecciona la pestaña de la hoja de cálculo que deseas copiar.
- Navega a la pestaña Inicio en la Cinta de Opciones.
- Haz clic en Formato en el grupo Celdas.
- En el menú desplegable, selecciona Mover o Copiar hoja.
- En el cuadro de diálogo Mover o Copiar, marca la casilla Crear una copia y elige dónde quieres que se coloque la hoja de cálculo copiada.
- Haz clic en Aceptar para completar el proceso.
Copiar una Hoja de Excel a Otro Libro de Trabajo
Copiar una hoja de cálculo a un libro de trabajo diferente es una tarea común cuando necesitas consolidar datos de múltiples archivos. Aquí te explicamos cómo hacerlo sin problemas:
- Abre tanto el libro de trabajo de origen como el de destino.
- Haz clic con el botón derecho en la pestaña de la hoja de cálculo que deseas copiar.
- Selecciona Mover o Copiar en el menú contextual.
- En el menú desplegable Al libro, selecciona el libro de trabajo de destino.
- En la lista Antes de la hoja, elige dónde quieres colocar la hoja copiada.
- Marca la casilla Crear una copia y haz clic en Aceptar para completar el proceso.
Tu hoja de cálculo ahora está duplicada en el libro de trabajo de destino, conservando todos los datos y el formato originales.
Consejo: También puedes lograr lo mismo manteniendo presionada la tecla Ctrl y arrastrando la pestaña de la hoja desde el libro de trabajo de origen al libro de trabajo de destino.
Cómo Copiar Múltiples Hojas de Cálculo en Excel a la Vez
Cuando trabajas con múltiples hojas de cálculo, puedes copiarlas todas a la vez para ahorrar tiempo. Aquí te explicamos cómo:
-
Mantén presionada la tecla Ctrl para hojas no adyacentes, o la tecla Shift para hojas adyacentes.
-
Selecciona las pestañas de las hojas que deseas copiar.
-
Haz clic con el botón derecho en una de las pestañas de hoja seleccionadas y elige Mover o Copiar.
-
En el cuadro de diálogo Mover o Copiar, elige el libro de trabajo de destino y la ubicación de destino para colocar la copia.
-
Marca la casilla Crear una copia y haz clic en Aceptar. Excel creará copias de todas las hojas de cálculo seleccionadas a la vez.
Cómo Copiar Hojas de Cálculo en Excel Automáticamente
Para usuarios avanzados o aquellos que copian hojas de cálculo con frecuencia, automatizar el proceso con VBA (Visual Basic for Applications) o Python puede ahorrar significativamente tiempo y garantizar la coherencia.
Copiar una Hoja de Cálculo con VBA
VBA es perfecto para automatizar tareas repetitivas dentro de Excel, especialmente tareas que requieren la interacción del usuario a través de botones o menús.
Aquí te explicamos cómo usar una macro simple de VBA para copiar una hoja:
-
Presiona Alt + F11 para abrir el editor de VBA.
-
En el editor, ve a Insertar > Módulo.
-
Pega el siguiente código VBA en la ventana del módulo. Este código copia la Hoja1 y coloca la copia después de la Hoja3.
Sub CopyWorksheet() ' Modifica "Sheet1" al nombre de tu hoja Worksheets("Sheet1").Copy After:=Worksheets("Sheet3") End Sub -
Presiona F5 para ejecutar la macro. La copia se creará instantáneamente.
Para obtener más detalles sobre el método Worksheet.Copy utilizado en este script de VBA, consulta la documentación oficial de Microsoft: Método Worksheet.Copy (Excel).
Copiar una Hoja de Cálculo con Python
Alternativamente, puedes usar Python con bibliotecas como Spire.XLS for Python para crear una copia de una hoja. Este método es ideal para automatizar tareas de Excel a gran escala, procesamiento del lado del servidor o integrar operaciones de Excel con sistemas externos.
Aquí te explicamos cómo usar Python para copiar una hoja de cálculo:
-
Instala Spire.XLS for Python desde PyPI usando el siguiente comando:
pip install spire-xls -
Usa el siguiente script de Python para copiar una hoja dentro de un libro de trabajo.
from spire.xls import *

# Inicializa una instancia de la clase Workbook
workbook = Workbook()

# Carga un libro de trabajo de Excel
workbook.LoadFromFile("Input.xlsx")

# Obtiene la primera hoja de cálculo
sourceSheet = workbook.Worksheets[0]

# Crea una nueva hoja con un nombre específico
sheetName = sourceSheet.Name + "_Copy"
destSheet = workbook.Worksheets.Add(sheetName)

# Copia la primera hoja de cálculo a la hoja recién agregada
destSheet.CopyFrom(sourceSheet)

# Guarda el libro de trabajo resultante con la hoja copiada
workbook.SaveToFile("CopySheet.xlsx", ExcelVersion.Version2013)

# Descarta el libro de trabajo para liberar recursos
workbook.Dispose()
Para técnicas adicionales como copiar la hoja entre libros de trabajo, consulta la guía oficial de Spire.XLS: Python: Copiar Hojas de Cálculo en Excel.
Consejos Profesionales para Copiar una Hoja de Cálculo en Excel
Para mantener la integridad de los datos y evitar errores al copiar una hoja de cálculo, sigue estos consejos profesionales:
- Manejo de Tablas de Excel: Al copiar una hoja de cálculo que contiene una Tabla de Excel, Excel renombrará automáticamente la tabla (por ejemplo, Tabla1 se convierte en Tabla2). Si tienes fórmulas que hacen referencia a Tabla1, actualízalas manualmente o usa referencias estructuradas para mayor flexibilidad.
- Gestión de Fuentes de Datos de Gráficos: Los gráficos en la hoja copiada generalmente harán referencia a datos de la hoja copiada. Si tus gráficos dependen de datos externos, verifica y actualiza la fuente de datos después de copiar.
- Manejo de Datos Ocultos: Las filas, columnas o datos filtrados ocultos también se copiarán. Si solo deseas copiar los datos visibles, usa la función Ir a Especial (en Buscar y seleccionar en la pestaña Inicio) para seleccionar las celdas visibles antes de copiar.
- Reparación de Vínculos Rotos: Después de copiar una hoja de cálculo a un nuevo libro de trabajo, verifica si hay vínculos rotos usando la función "Editar vínculos" (en la pestaña Datos). Actualiza las referencias externas según sea necesario.
Conclusión: Elige el Método Correcto para una Máxima Eficiencia
Copiar hojas de cálculo en Excel puede ser rápido y sencillo cuando usas el método correcto. Al seleccionar el enfoque más eficiente, puedes ahorrar tiempo y aumentar tu productividad. Aquí tienes una guía rápida para ayudarte a elegir la mejor opción para tus necesidades:
- Copias Rápidas y Únicas: Para copias ocasionales, el método de clic derecho o Ctrl + Arrastrar ofrece una solución rápida y sencilla.
- Automatización de Tareas Repetitivas: Si copias hojas de cálculo con frecuencia, VBA puede automatizar el proceso, garantizando la coherencia y ahorrando tiempo.
- Automatización Avanzada: Para proyectos a mayor escala o integraciones de datos complejas, Python proporciona capacidades de automatización robustas que van más allá de las funciones integradas de Excel.
¡Elige el método que mejor se adapte a tu flujo de trabajo y comienza a optimizar tus tareas de Excel hoy mismo!
Preguntas Frecuentes
P1: ¿Puedo copiar una hoja de cálculo de Excel a otro libro de trabajo?
R1: Sí. Usa el diálogo Mover o Copiar: haz clic con el botón derecho en la pestaña de la hoja, selecciona el libro de trabajo de destino en el menú desplegable Al libro, marca Crear una copia y haz clic en Aceptar.
P2: ¿Cómo copio múltiples hojas de cálculo en Excel?
R2: Selecciona múltiples hojas manteniendo presionada la tecla Ctrl (para hojas no adyacentes) o Shift (para hojas adyacentes). Luego, haz clic con el botón derecho en cualquier pestaña seleccionada y elige Mover o Copiar. Asegúrate de que la casilla Crear una copia esté marcada.
P3: ¿Cómo copio solo el formato de una hoja de cálculo sin copiar sus datos?
R3: Selecciona todas las celdas de la hoja original (Ctrl+A) y copia (Ctrl+C). En una nueva hoja de cálculo, haz clic con el botón derecho en cualquier celda, elige Pegado Especial -> Formatos para aplicar solo el formato.
P4: ¿Hay alguna forma de automatizar la copia de múltiples hojas en Excel?
R4: Sí. Para la automatización, usa VBA para tareas dentro de Excel, o Python con bibliotecas como Spire.XLS para procesamiento externo a gran escala.
Ver También
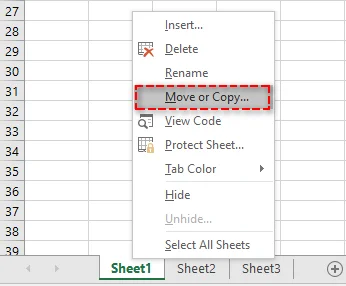
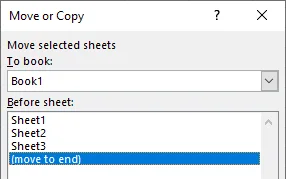
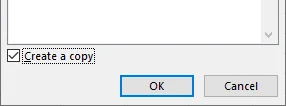
Wie man ein Arbeitsblatt in Excel kopiert (Manuell, VBA & Python)
Inhaltsverzeichnis
Das Kopieren eines Arbeitsblatts in Excel ist eine häufige Aufgabe, egal ob Sie Daten duplizieren, Sicherungen erstellen oder Vorlagen einrichten. Excel bietet mehrere Methoden zum schnellen und einfachen Kopieren von Arbeitsblättern. In diesem Artikel werden wir verschiedene Methoden behandeln – von manuellen Rechtsklick- oder Drag-and-Drop-Aktionen bis hin zu fortgeschritteneren Optionen mit VBA und Python. Egal, ob Sie Anfänger oder fortgeschrittener Benutzer sind, der den Prozess automatisieren möchte, Sie werden die richtige Methode für Ihre Bedürfnisse finden.
Was Sie lernen werden
- Warum sollten Sie ein Arbeitsblatt in Excel kopieren
- So kopieren Sie ein Arbeitsblatt in Excel
- So kopieren Sie mehrere Arbeitsblätter in Excel auf einmal
- So kopieren Sie Arbeitsblätter in Excel automatisch
- Profi-Tipps zum Kopieren eines Arbeitsblatts in Excel
Warum sollten Sie ein Arbeitsblatt in Excel kopieren?
Das Kopieren eines Arbeitsblatts in Excel ist aus vielen Gründen unerlässlich, wie zum Beispiel:
- Sicherung: Schützen Sie Ihre Arbeit, indem Sie wichtige Blätter duplizieren.
- Vorlagen: Erstellen Sie wiederverwendbare Vorlagen, ohne die Originaldaten zu verändern.
- Datenanalyse: Duplizieren Sie ein Arbeitsblatt, um Daten zu bearbeiten, während das Original erhalten bleibt.
- Zusammenarbeit: Teilen Sie eine Kopie Ihres Blattes, ohne die Master-Version zu beeinträchtigen.
Nachdem Sie nun die Vorteile des Duplizierens eines Blattes verstanden haben, wollen wir uns ansehen, wie man es macht.
Wie kopiert man ein Arbeitsblatt in Excel?
Es gibt verschiedene Methoden, ein Arbeitsblatt in Excel zu kopieren, die jeweils auf unterschiedliche Bedürfnisse und Vorlieben zugeschnitten sind. Im Folgenden finden Sie einige der am häufigsten verwendeten Techniken.
Ein Arbeitsblatt per Rechtsklick kopieren
Das Klicken mit der rechten Maustaste auf den Arbeitsblatt-Tab ist eine der häufigsten und intuitivsten Möglichkeiten, ein Arbeitsblatt in Excel zu duplizieren. Diese Methode ist einfach und ideal für einmalige oder gelegentliche Kopien. So geht's:
-
Klicken Sie mit der rechten Maustaste auf den Tab des Arbeitsblatts, das Sie duplizieren möchten.
-
Wählen Sie im Kontextmenü Verschieben oder Kopieren. Dadurch wird das Dialogfeld Verschieben oder Kopieren geöffnet.
-
Wählen Sie in der Liste Vor Blatt aus, wo das kopierte Blatt erscheinen soll (z. B. vor Tabelle2 oder an das Ende verschieben).
-
Aktivieren Sie das Kontrollkästchen Kopie erstellen, um sicherzustellen, dass Sie das Blatt kopieren und nicht verschieben.
-
Klicken Sie auf OK, um den Vorgang abzuschließen.
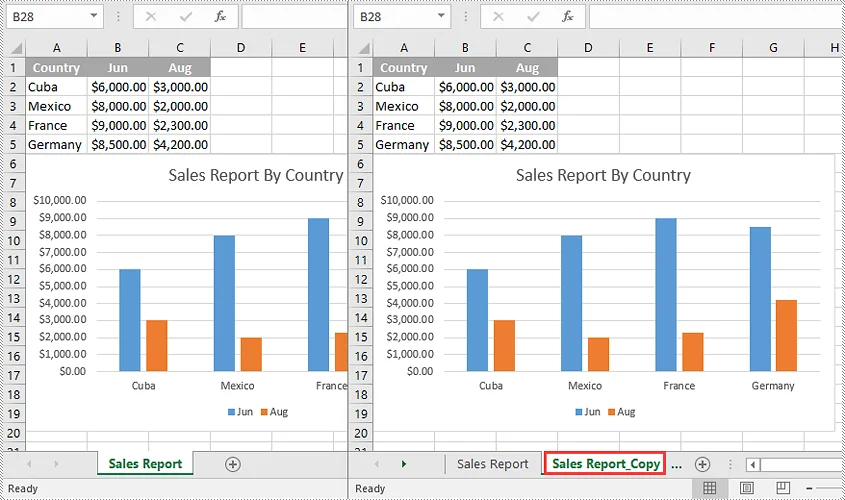
Ihr Arbeitsblatt wird nun an den ausgewählten Speicherort kopiert und erscheint mit demselben Namen, gefolgt von „(2)“ (z. B. Tabelle1 (2)). Bei Bedarf können Sie das kopierte Arbeitsblatt umbenennen, indem Sie mit der rechten Maustaste auf den Tab klicken und Umbenennen auswählen.
Das könnte Sie auch interessieren: So teilen Sie Excel-Blätter in mehrere Dateien auf (3 Wege).
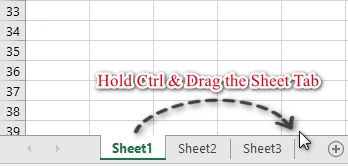
Ein Arbeitsblatt durch Ziehen duplizieren
Eine weitere einfache und schnelle Möglichkeit, ein Arbeitsblatt zu duplizieren, ist das Ziehen und Ablegen. Diese Methode ist perfekt, wenn Sie das neue Blatt in der Nähe des Originals platzieren möchten. Befolgen Sie diese Schritte:
-
Halten Sie die Strg-Taste auf Ihrer Tastatur gedrückt.
-
Klicken und ziehen Sie den Tab des Arbeitsblatts an die gewünschte Stelle im Tab-Bereich.
-
Lassen Sie die Maustaste und dann die Strg-Taste los.
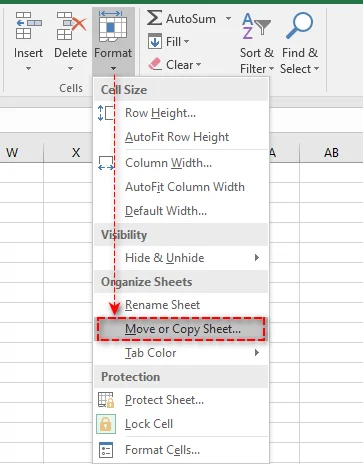
Ein Arbeitsblatt-Tab über das Menüband kopieren
Wenn Sie die Menüband-Oberfläche bevorzugen, ist das Kopieren eines Arbeitsblatts über die Menüband-Steuerelemente unkompliziert. So geht's:
- Wählen Sie den Arbeitsblatt-Tab aus, den Sie kopieren möchten.
- Navigieren Sie zum Start-Tab im Menüband.
- Klicken Sie in der Gruppe Zellen auf Format.
- Wählen Sie aus dem Dropdown-Menü Blatt verschieben oder kopieren.
- Aktivieren Sie im Dialogfeld Verschieben oder Kopieren das Kontrollkästchen Kopie erstellen und wählen Sie aus, wo das kopierte Arbeitsblatt platziert werden soll.
- Klicken Sie auf OK, um den Vorgang abzuschließen.
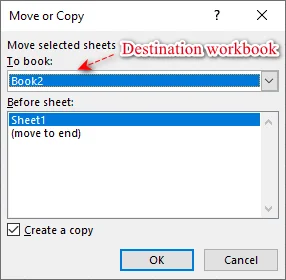
Ein Excel-Blatt in eine andere Arbeitsmappe kopieren
Das Kopieren eines Arbeitsblatts in eine andere Arbeitsmappe ist eine häufige Aufgabe, wenn Sie Daten aus mehreren Dateien konsolidieren müssen. So geht's nahtlos:
- Öffnen Sie sowohl die Quell- als auch die Zielarbeitsmappe.
- Klicken Sie mit der rechten Maustaste auf den Tab des Arbeitsblatts, das Sie kopieren möchten.
- Wählen Sie im Kontextmenü Verschieben oder Kopieren.
- Wählen Sie im Dropdown-Menü Zur Mappe die Zielarbeitsmappe aus.
- Wählen Sie in der Liste Vor Blatt aus, wo Sie das kopierte Blatt platzieren möchten.
- Aktivieren Sie das Kontrollkästchen Kopie erstellen und klicken Sie auf OK, um den Vorgang abzuschließen.
Ihr Arbeitsblatt wird nun in der Zielarbeitsmappe dupliziert, wobei alle ursprünglichen Daten und Formatierungen erhalten bleiben.
Tipp: Dasselbe können Sie auch erreichen, indem Sie die Strg-Taste gedrückt halten und den Blatt-Tab von der Quellarbeitsmappe in die Zielarbeitsmappe ziehen.
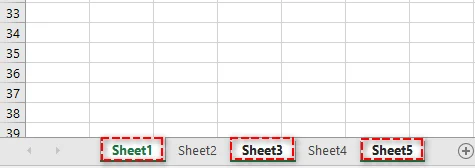
So kopieren Sie mehrere Arbeitsblätter in Excel auf einmal
Wenn Sie mit mehreren Arbeitsblättern arbeiten, können Sie diese auf einmal kopieren, um Zeit zu sparen. So geht's:
-
Halten Sie die Strg-Taste für nicht benachbarte Blätter oder die Umschalttaste für benachbarte Blätter gedrückt.
-
Wählen Sie die Tabs der Blätter aus, die Sie kopieren möchten.
-
Klicken Sie mit der rechten Maustaste auf einen der ausgewählten Blatt-Tabs und wählen Sie Verschieben oder Kopieren.
-
Wählen Sie im Dialogfeld Verschieben oder Kopieren die Zielarbeitsmappe und den Zielort für die Kopie aus.
-
Aktivieren Sie das Kontrollkästchen Kopie erstellen und klicken Sie auf OK. Excel erstellt dann auf einmal Kopien aller ausgewählten Arbeitsblätter.
So kopieren Sie Arbeitsblätter in Excel automatisch
Für fortgeschrittene Benutzer oder diejenigen, die häufig Arbeitsblätter kopieren, kann die Automatisierung des Prozesses mit VBA (Visual Basic for Applications) oder Python erheblich Zeit sparen und die Konsistenz gewährleisten.
Ein Arbeitsblatt mit VBA kopieren
VBA ist perfekt für die Automatisierung sich wiederholender Aufgaben in Excel, insbesondere für Aufgaben, die eine Benutzerinteraktion über Schaltflächen oder Menüs erfordern.
So verwenden Sie ein einfaches VBA-Makro, um ein Blatt zu kopieren:
-
Drücken Sie Alt + F11, um den VBA-Editor zu öffnen.
-
Gehen Sie im Editor zu Einfügen > Modul.
-
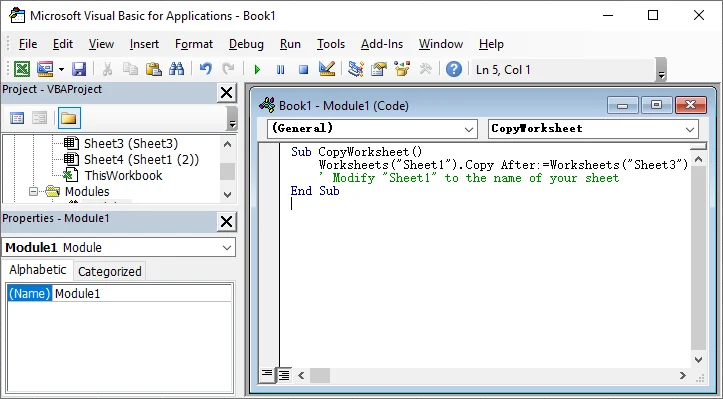
Fügen Sie den folgenden VBA-Code in das Modulfenster ein. Dieser Code kopiert Tabelle1 und platziert die Kopie nach Tabelle3.
Sub CopyWorksheet() ' Ändern Sie "Tabelle1" in den Namen Ihres Blattes Worksheets("Tabelle1").Copy After:=Worksheets("Tabelle3") End Sub -
Drücken Sie F5, um das Makro auszuführen. Die Kopie wird sofort erstellt.
Weitere Details zur in diesem VBA-Skript verwendeten Worksheet.Copy-Methode finden Sie in der offiziellen Microsoft-Dokumentation: Worksheet.Copy-Methode (Excel).
Ein Arbeitsblatt mit Python kopieren
Alternativ können Sie Python mit Bibliotheken wie Spire.XLS for Python verwenden, um eine Kopie eines Blattes zu erstellen. Diese Methode eignet sich am besten für die Automatisierung umfangreicher Excel-Aufgaben, die serverseitige Verarbeitung oder die Integration von Excel-Operationen in externe Systeme.
So verwenden Sie Python, um ein Arbeitsblatt zu kopieren:
-
Installieren Sie Spire.XLS for Python von PyPI mit dem folgenden Befehl:
pip install spire-xls -
Verwenden Sie das folgende Python-Skript, um ein Blatt innerhalb einer Arbeitsmappe zu kopieren.
from spire.xls import *

# Initialisieren Sie eine Instanz der Workbook-Klasse
workbook = Workbook()

# Laden Sie eine Excel-Arbeitsmappe
workbook.LoadFromFile("Input.xlsx")

# Holen Sie sich das erste Arbeitsblatt
sourceSheet = workbook.Worksheets[0]

# Erstellen Sie ein neues Blatt mit einem bestimmten Namen
sheetName = sourceSheet.Name + "_Copy"
destSheet = workbook.Worksheets.Add(sheetName)

# Kopieren Sie das erste Arbeitsblatt in das neu hinzugefügte Blatt
destSheet.CopyFrom(sourceSheet)

# Speichern Sie die Ergebnisarbeitsmappe mit dem kopierten Blatt
workbook.SaveToFile("CopySheet.xlsx", ExcelVersion.Version2013)

# Entsorgen Sie die Arbeitsmappe, um Ressourcen freizugeben
workbook.Dispose()
Für zusätzliche Techniken wie das Kopieren des Blattes zwischen Arbeitsmappen, lesen Sie die offizielle Anleitung von Spire.XLS: Python: Arbeitsblätter in Excel kopieren.
Profi-Tipps zum Kopieren eines Arbeitsblatts in Excel
Um die Datenintegrität zu wahren und Fehler beim Kopieren eines Arbeitsblatts zu vermeiden, befolgen Sie diese Profi-Tipps:
- Umgang mit Excel-Tabellen: Beim Kopieren eines Arbeitsblatts, das eine Excel-Tabelle enthält, benennt Excel die Tabelle automatisch um (z. B. wird aus Tabelle1 Tabelle2). Wenn Sie Formeln haben, die auf Tabelle1 verweisen, aktualisieren Sie diese manuell oder verwenden Sie strukturierte Verweise für mehr Flexibilität.
- Verwalten von Diagrammdatenquellen: Diagramme im kopierten Blatt verweisen im Allgemeinen auf Daten aus dem kopierten Blatt. Wenn Ihre Diagramme auf externen Daten basieren, überprüfen und aktualisieren Sie die Datenquelle nach dem Kopieren.
- Umgang mit ausgeblendeten Daten: Ausgeblendete Zeilen, Spalten oder gefilterte Daten werden ebenfalls kopiert. Wenn Sie nur sichtbare Daten kopieren möchten, verwenden Sie die Funktion Gehe zu Spezial (unter Suchen & Auswählen auf der Registerkarte Start), um sichtbare Zellen vor dem Kopieren auszuwählen.
- Beheben fehlerhafter Verknüpfungen: Überprüfen Sie nach dem Kopieren eines Arbeitsblatts in eine neue Arbeitsmappe mit der Funktion „Verknüpfungen bearbeiten“ (auf der Registerkarte Daten) auf fehlerhafte Verknüpfungen. Aktualisieren Sie bei Bedarf alle externen Verweise.
Fazit: Wählen Sie die richtige Methode für maximale Effizienz
Das Kopieren von Arbeitsblättern in Excel kann schnell und unkompliziert sein, wenn Sie die richtige Methode anwenden. Durch die Wahl des effizientesten Ansatzes können Sie Zeit sparen und Ihre Produktivität steigern. Hier ist eine kurze Anleitung, die Ihnen hilft, die beste Option für Ihre Bedürfnisse zu wählen:
- Schnelle einmalige Kopien: Für gelegentliche Kopien bietet die Rechtsklick-Methode oder Strg + Ziehen eine schnelle und einfache Lösung.
- Automatisierung sich wiederholender Aufgaben: Wenn Sie häufig Arbeitsblätter kopieren, kann VBA den Prozess automatisieren, was für Konsistenz sorgt und Zeit spart.
- Erweiterte Automatisierung: Für größere Projekte oder komplexe Datenintegrationen bietet Python robuste Automatisierungsfunktionen, die über die integrierten Funktionen von Excel hinausgehen.
Wählen Sie die Methode, die am besten zu Ihrem Arbeitsablauf passt, und beginnen Sie noch heute mit der Optimierung Ihrer Excel-Aufgaben!
FAQs
F1: Kann ich ein Excel-Arbeitsblatt in eine andere Arbeitsmappe kopieren?
A1: Ja. Verwenden Sie das Dialogfeld Verschieben oder Kopieren: Klicken Sie mit der rechten Maustaste auf den Blatt-Tab, wählen Sie die Zielarbeitsmappe aus dem Dropdown-Menü Zur Mappe aus, aktivieren Sie Kopie erstellen und klicken Sie auf OK.
F2: Wie kopiere ich mehrere Arbeitsblätter in Excel?
A2: Wählen Sie mehrere Blätter aus, indem Sie Strg (für nicht benachbarte Blätter) oder Umschalt (für benachbarte Blätter) gedrückt halten. Klicken Sie dann mit der rechten Maustaste auf einen ausgewählten Tab und wählen Sie Verschieben oder Kopieren. Stellen Sie sicher, dass das Kontrollkästchen Kopie erstellen aktiviert ist.
F3: Wie kopiere ich nur die Formatierung eines Arbeitsblatts, ohne die Daten zu kopieren?
A3: Wählen Sie alle Zellen im Originalblatt aus (Strg+A) und kopieren Sie sie (Strg+C). Klicken Sie in einem neuen Arbeitsblatt mit der rechten Maustaste auf eine beliebige Zelle und wählen Sie Inhalte einfügen -> Formate, um nur die Formatierung anzuwenden.
F4: Gibt es eine Möglichkeit, das Kopieren mehrerer Blätter in Excel zu automatisieren?
A4: Ja. Zur Automatisierung verwenden Sie VBA für Aufgaben innerhalb von Excel oder Python mit Bibliotheken wie Spire.XLS für die externe, umfangreiche Verarbeitung.
Siehe auch
Как скопировать лист в Excel (Вручную, VBA и Python)
Копирование листа в Excel — это обычная задача, независимо от того, дублируете ли вы данные, создаете резервные копии или настраиваете шаблоны. Excel предоставляет несколько методов для быстрого и простого копирования листов. В этой статье мы рассмотрим различные методы — от ручных действий с помощью щелчка правой кнопкой мыши или перетаскивания до более продвинутых вариантов с использованием VBA и Python. Независимо от того, являетесь ли вы новичком или опытным пользователем, желающим автоматизировать процесс, вы найдете подходящий метод для своих нужд.
Что вы узнаете
- Зачем копировать лист в Excel
- Как скопировать лист в Excel
- Как скопировать несколько листов в Excel одновременно
- Как автоматически копировать листы в Excel
- Профессиональные советы по копированию листа в Excel
Зачем копировать лист в Excel?
Копирование листа в Excel необходимо по многим причинам, таким как:
- Резервное копирование: Защитите свою работу, дублируя важные листы.
- Шаблоны: Создавайте многоразовые шаблоны, не изменяя исходные данные.
- Анализ данных: Дублируйте лист для обработки данных, сохраняя оригинал нетронутым.
- Сотрудничество: Делитесь копией своего листа, не затрагивая основную версию.
Теперь, когда вы понимаете преимущества дублирования листа, давайте рассмотрим, как это сделать.
Как скопировать лист в Excel?
Существует несколько методов копирования листа в Excel, каждый из которых отвечает различным потребностям и предпочтениям. Ниже приведены некоторые из наиболее часто используемых техник.
Копирование листа щелчком правой кнопкой мыши
Щелчок правой кнопкой мыши по вкладке листа — один из самых распространенных и интуитивно понятных способов дублирования листа в Excel. Этот метод прост и идеален для одноразовых или редких копий. Вот как это можно сделать:
-
Щелкните правой кнопкой мыши вкладку листа, который хотите дублировать.
-
В контекстном меню выберите Переместить или скопировать. Это откроет диалоговое окно Переместить или скопировать.
-
В списке Перед листом выберите, где должен появиться скопированный лист (например, перед Листом2 или переместить его в конец).
-
Установите флажок Создать копию, чтобы убедиться, что вы копируете лист, а не перемещаете его.
-
Нажмите OK, чтобы завершить процесс.
Ваш лист будет скопирован в выбранное место и появится с тем же именем, за которым следует "(2)" (например, Лист1 (2)). При необходимости вы можете переименовать скопированный лист, щелкнув правой кнопкой мыши по вкладке и выбрав Переименовать.
Вам также может быть интересно: Как разделить листы Excel на несколько файлов (3 способа).
Дублирование листа перетаскиванием
Еще один простой и быстрый способ дублировать лист — перетащить его. Этот метод идеален, когда вы хотите, чтобы новый лист располагался близко к исходному. Выполните следующие шаги:
-
Удерживайте клавишу Ctrl на клавиатуре.
-
Нажмите и перетащите вкладку листа в нужное место в области вкладок.
-
Отпустите кнопку мыши, а затем клавишу Ctrl.
Копирование вкладки листа с помощью ленты
Если вы предпочитаете использовать интерфейс ленты, копирование листа с помощью элементов управления ленты очень просто. Вот как:
- Выберите вкладку листа, который хотите скопировать.
- Перейдите на вкладку Главная на ленте.
- Нажмите на Формат в группе Ячейки.
- В раскрывающемся меню выберите Переместить или скопировать лист.
- В диалоговом окне Переместить или скопировать установите флажок Создать копию и выберите, куда вы хотите поместить скопированный лист.
- Нажмите OK, чтобы завершить процесс.
Копирование листа Excel в другую книгу
Копирование листа в другую книгу — обычная задача, когда необходимо объединить данные из нескольких файлов. Вот как это сделать без проблем:
- Откройте как исходную, так и целевую книги.
- Щелкните правой кнопкой мыши вкладку листа, который хотите скопировать.
- Выберите Переместить или скопировать из контекстного меню.
- В раскрывающемся меню В книгу выберите целевую книгу.
- В списке Перед листом выберите, куда вы хотите поместить скопированный лист.
- Установите флажок Создать копию и нажмите OK, чтобы завершить процесс.
Ваш лист теперь дублирован в целевой книге, сохранив все исходные данные и форматирование.
Совет: Вы также можете добиться того же, удерживая клавишу Ctrl и перетаскивая вкладку листа из исходной книги в целевую.
Как скопировать несколько листов в Excel одновременно
При работе с несколькими листами вы можете скопировать их все сразу, чтобы сэкономить время. Вот как:
-
Удерживайте клавишу Ctrl для несмежных листов или клавишу Shift для смежных листов.
-
Выберите вкладки листов, которые хотите скопировать.
-
Щелкните правой кнопкой мыши по одной из выбранных вкладок листов и выберите Переместить или скопировать.
-
В диалоговом окне Переместить или скопировать выберите целевую книгу и место для размещения копии.
-
Установите флажок Создать копию и нажмите OK. Excel создаст копии всех выбранных листов одновременно.
Как автоматически копировать листы в Excel
Для опытных пользователей или тех, кто часто копирует листы, автоматизация процесса с помощью VBA (Visual Basic for Applications) или Python может значительно сэкономить время и обеспечить согласованность.
Копирование листа с помощью VBA
VBA идеально подходит для автоматизации повторяющихся задач в Excel, особенно задач, требующих взаимодействия с пользователем через кнопки или меню.
Вот как использовать простой макрос VBA для копирования листа:
-
Нажмите Alt + F11, чтобы открыть редактор VBA.
-
В редакторе перейдите в Insert > Module.
-
Вставьте следующий код VBA в окно модуля. Этот код копирует Лист1 и помещает копию после Листа3.
Sub CopyWorksheet() ' Измените "Sheet1" на имя вашего листа Worksheets("Sheet1").Copy After:=Worksheets("Sheet3") End Sub -
Нажмите F5, чтобы запустить макрос. Копия будет создана мгновенно.
Для получения дополнительной информации о методе Worksheet.Copy, используемом в этом скрипте VBA, см. официальную документацию Microsoft: Метод Worksheet.Copy (Excel).
Копирование листа с помощью Python
В качестве альтернативы вы можете использовать Python с библиотеками, такими как Spire.XLS for Python, для создания копии листа. Этот метод лучше всего подходит для автоматизации крупномасштабных задач Excel, обработки на стороне сервера или интеграции операций Excel с внешними системами.
Вот как использовать Python для копирования листа:
-
Установите Spire.XLS for Python из PyPI с помощью следующей команды:
pip install spire-xls -
Используйте приведенный ниже скрипт Python для копирования листа в книге.
from spire.xls import *

# Инициализировать экземпляр класса Workbook
workbook = Workbook()

# Загрузить книгу Excel
workbook.LoadFromFile("Input.xlsx")

# Получить первый лист
sourceSheet = workbook.Worksheets[0]

# Создать новый лист с определенным именем
sheetName = sourceSheet.Name + "_Copy"
destSheet = workbook.Worksheets.Add(sheetName)

# Скопировать первый лист на только что добавленный лист
destSheet.CopyFrom(sourceSheet)

# Сохранить результирующую книгу со скопированным листом
workbook.SaveToFile("CopySheet.xlsx", ExcelVersion.Version2013)

# Освободить ресурсы книги
workbook.Dispose()
Для получения дополнительных техник, таких как копирование листа между книгами, ознакомьтесь с официальным руководством Spire.XLS: Python: Копирование листов в Excel.
Профессиональные советы по копированию листа в Excel
Чтобы сохранить целостность данных и избежать ошибок при копировании листа, следуйте этим профессиональным советам:
- Работа с таблицами Excel: При копировании листа, содержащего таблицу Excel, Excel автоматически переименует таблицу (например, Table1 станет Table2). Если у вас есть формулы, ссылающиеся на Table1, обновите их вручную или используйте структурированные ссылки для гибкости.
- Управление источниками данных диаграмм: Диаграммы на скопированном листе обычно ссылаются на данные со скопированного листа. Если ваши диаграммы зависят от внешних данных, проверьте и обновите источник данных после копирования.
- Работа со скрытыми данными: Скрытые строки, столбцы или отфильтрованные данные также будут скопированы. Если вы хотите скопировать только видимые данные, используйте функцию Перейти к выделению (в разделе Найти и выделить на вкладке Главная), чтобы выбрать видимые ячейки перед копированием.
- Исправление неработающих ссылок: После копирования листа в новую книгу проверьте наличие неработающих ссылок с помощью функции «Изменить связи» (на вкладке Данные). При необходимости обновите все внешние ссылки.
Заключение: выберите правильный метод для максимальной эффективности
Копирование листов в Excel может быть быстрым и простым, если вы используете правильный метод. Выбрав наиболее эффективный подход, вы можете сэкономить время и повысить свою производительность. Вот краткое руководство, которое поможет вам выбрать лучший вариант для ваших нужд:
- Быстрые одноразовые копии: Для редких копий метод щелчка правой кнопкой мыши или Ctrl + перетаскивание предлагает быстрое и простое решение.
- Автоматизация повторяющихся задач: Если вы часто копируете листы, VBA может автоматизировать процесс, обеспечивая согласованность и экономя время.
- Продвинутая автоматизация: Для крупномасштабных проектов или сложных интеграций данных Python предоставляет надежные возможности автоматизации, которые выходят за рамки встроенных функций Excel.
Выберите метод, который лучше всего подходит для вашего рабочего процесса, и начните оптимизировать свои задачи в Excel уже сегодня!
Часто задаваемые вопросы
В1: Могу ли я скопировать лист Excel в другую книгу?
О1: Да. Используйте диалоговое окно Переместить или скопировать: щелкните правой кнопкой мыши вкладку листа, выберите целевую книгу из раскрывающегося списка В книгу, установите флажок Создать копию и нажмите OK.
В2: Как скопировать несколько листов в Excel?
О2: Выберите несколько листов, удерживая Ctrl (для несмежных листов) или Shift (для смежных листов). Затем щелкните правой кнопкой мыши любую выбранную вкладку и выберите Переместить или скопировать. Убедитесь, что флажок Создать копию установлен.
В3: Как скопировать только форматирование листа, не копируя его данные?
О3: Выделите все ячейки на исходном листе (Ctrl+A) и скопируйте (Ctrl+C). На новом листе щелкните правой кнопкой мыши любую ячейку, выберите Специальная вставка -> Форматы, чтобы применить только форматирование.
В4: Есть ли способ автоматизировать копирование нескольких листов в Excel?
О4: Да. Для автоматизации используйте VBA для задач в Excel или Python с библиотеками, такими как Spire.XLS, для внешней, крупномасштабной обработки.
Смотрите также
5 semplici metodi per bloccare righe e colonne in Excel
Indice
- Metodo 1. Usa preimpostazioni di blocco rapido (riga superiore / prima colonna)
- Metodo 2. Blocca righe e colonne qualsiasi usando Blocca riquadri
- Metodo 3. Usa la scorciatoia da tastiera (Alt + W + F + …)
- Metodo 4. Usa l'automazione VBA
- Metodo 5. Usa l'automazione Python (Spire.XLS)
- Tabella di confronto: scegli il modo giusto
- Riepilogo
- Domande frequenti sul blocco dei riquadri in Excel
Lavorare con grandi set di dati in Excel significa spesso scorrere centinaia o addirittura migliaia di righe. Quando ciò accade, è facile perdere di vista le intestazioni o le etichette di riferimento chiave, il che rallenta l'analisi e aumenta la possibilità di errori. Mantenere visibili righe e colonne importanti può migliorare notevolmente l'efficienza e la precisione.
Fortunatamente, Excel fornisce diversi strumenti integrati che consentono di bloccare parti specifiche del foglio di lavoro. Che tu abbia bisogno di mantenere una riga di intestazione al suo posto, bloccare una colonna di identificazione chiave o creare una combinazione di sezioni bloccate, Excel ha opzioni flessibili per ogni scenario.
In questa guida, esamineremo cinque semplici metodi per bloccare righe e colonne in Excel—dai semplici predefiniti con un clic alle soluzioni completamente automatizzate che utilizzano VBA e Python (Spire.XLS). Alla fine, saprai esattamente quale metodo si adatta al tuo flusso di lavoro e come applicarlo con sicurezza.
Panoramica dei metodi:
- Metodo 1. Usa preimpostazioni di blocco rapido (riga superiore / prima colonna)
- Metodo 2. Blocca righe e colonne qualsiasi usando Blocca riquadri
- Metodo 3. Usa la scorciatoia da tastiera (Alt + W + F + …)
- Metodo 4. Usa l'automazione VBA
- Metodo 5. Usa l'automazione Python (Spire.XLS)
Metodo 1. Usa preimpostazioni di blocco rapido (riga superiore / prima colonna)
Excel fornisce due preimpostazioni istantanee che consentono di bloccare le aree più comunemente utilizzate—la riga superiore e la prima colonna. Queste opzioni sono ideali quando il set di dati utilizza una singola riga o colonna di intestazione.
Come utilizzare le preimpostazioni di blocco rapido
-
Vai alla scheda Visualizza sulla barra multifunzione.
-
Fai clic su Blocca riquadri.
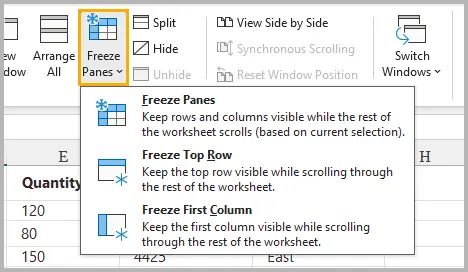
-
Scegli una delle seguenti opzioni:
- Blocca riga superiore – mantiene visibile la riga 1 durante lo scorrimento verso il basso.
- Blocca prima colonna – mantiene visibile la colonna A durante lo scorrimento orizzontale.
Una volta selezionato, Excel aggiunge una linea sottile (orizzontale o verticale) che indica che la riga o la colonna è bloccata.
Quando utilizzare queste preimpostazioni
- Il tuo set di dati ha una singola riga di intestazione che deve rimanere visibile.
- I tuoi identificatori chiave (ad es. ID, Nome, SKU) si trovano nella prima colonna.
- Vuoi il modo più veloce possibile per bloccare il contenuto senza selezionare alcuna cella.
Queste opzioni coprono gli scenari di blocco più comuni e sono ideali per una rapida navigazione nel foglio di lavoro.
Metodo 2. Blocca righe e colonne qualsiasi usando Blocca riquadri
Sebbene le preimpostazioni rapide siano comode, a volte è necessario bloccare più righe, più colonne, o entrambe contemporaneamente. È qui che entra in gioco la funzione completa Blocca riquadri.
Come funziona
Excel blocca:
- Tutto ciò che si trova sopra la cella selezionata
- Tutto ciò che si trova a sinistra della cella selezionata
Ciò consente di bloccare intestazioni complesse o strutture di righe/colonne combinate.
Esempio: blocca le righe 1–2 e la colonna A
-
Seleziona la cella B3 (perché si trova sotto la riga 2 e a destra della colonna A).
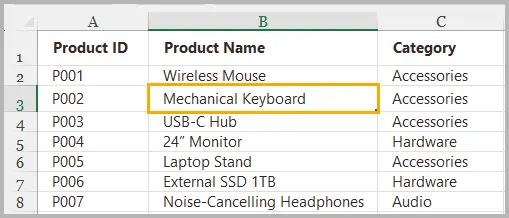
-
Vai a Visualizza → Blocca riquadri.
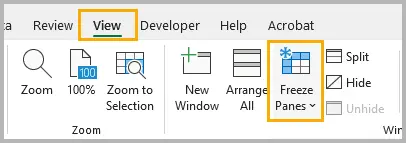
-
Scegli Blocca riquadri.
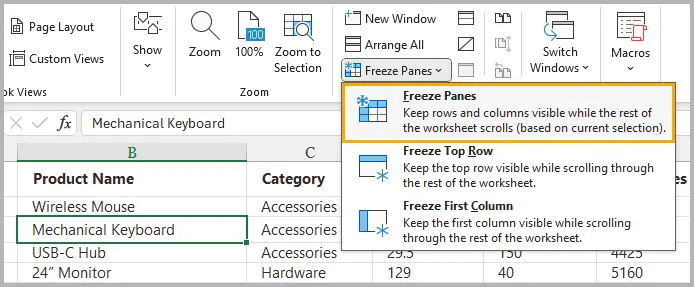
Ora le righe 1–2 e la colonna A sono bloccate mentre il resto del foglio rimane scorrevole.
Altri esempi
- Blocca solo le righe 1–3: seleziona A4 → Blocca riquadri.
- Blocca solo le colonne A–B: seleziona C1 → Blocca riquadri.
- Blocca le prime 2 righe e le prime 3 colonne: seleziona D3 → Blocca riquadri.
Quando questo metodo è il migliore
- Il tuo set di dati contiene intestazioni a più livelli.
- Hai bisogno di flessibilità.
- Hai bisogno che sia le righe che le colonne siano bloccate contemporaneamente.
Questo è l'approccio manuale più potente e quello utilizzato più spesso nei report professionali.
Metodo 3. Usa la scorciatoia da tastiera (Alt + W + F + …)
Se preferisci tenere le mani sulla tastiera, l'utilizzo della sequenza di scorciatoie integrata di Excel può essere un'alternativa più rapida. Queste scorciatoie imitano i passaggi attivati nella barra multifunzione, consentendo un accesso rapido.
Sequenze di scorciatoie
- Alt → W → F → F = Blocca riquadri
- Alt → W → F → T = Blocca riga superiore
- Alt → W → F → C = Blocca prima colonna
Queste sono scorciatoie sequenziali (non premute contemporaneamente). Funzionano su tutte le versioni moderne di Excel per Windows.
Perché le scorciatoie sono importanti
- Flusso di lavoro più rapido per gli utenti esperti di Excel
- Utile durante la pulizia e l'analisi dei dati
- Risparmia tempo quando si attiva/disattiva ripetutamente il blocco
Se stai sviluppando competenze in Excel per un lavoro professionale con i fogli di calcolo, vale la pena memorizzare queste scorciatoie.
Metodo 4. Usa l'automazione VBA
Se prepari regolarmente modelli, report o esportazioni di dati, l'automazione del blocco dei riquadri con VBA può farti risparmiare molto tempo. Una singola macro può bloccare intervalli specifici su più fogli o cartelle di lavoro.
Come applicare il codice VBA per bloccare i riquadri
-
Premi Alt + F11 per aprire l'editor VBA.
-
Nel pannello di sinistra, fai clic con il pulsante destro del mouse su VBAProject (LaTuaCartellaDiLavoro) e scegli Inserisci → Modulo.
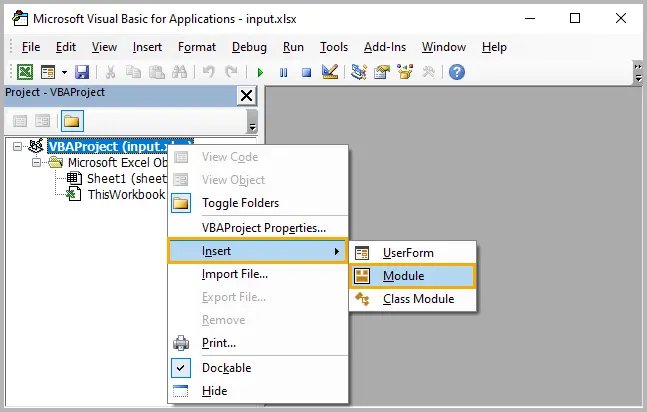
-
Copia e incolla lo snippet di codice VBA nel modulo.
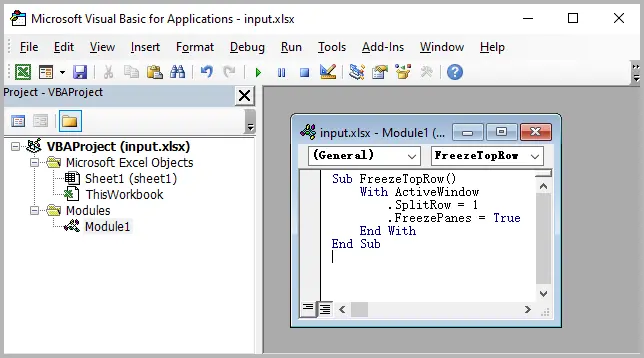
-
Chiudi l'editor VBA.
-
Premi Alt + F8, seleziona la macro (ad es.
BloccaRigaSuperiore), e fai clic su Esegui.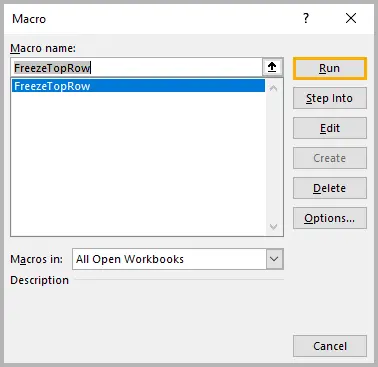
-
Torna al foglio di lavoro e conferma che le impostazioni di blocco dei riquadri sono state applicate.
Esempio 1: blocca la riga superiore
Sub FreezeTopRow()
    With ActiveWindow
        .SplitRow = 1
        .FreezePanes = True
    End With
End Sub
Esempio 2: blocca le righe 1–2 e la colonna A
Sub FreezeCustom()
    With ActiveWindow
        .SplitRow = 2
        .SplitColumn = 1
        .FreezePanes = True
    End With
End Sub
Esempio 3: sblocca riquadri
Sub UnfreezePanes()
    ActiveWindow.FreezePanes = False
End Sub
Quando l'automazione VBA è utile
- Generi report per più reparti.
- Lavori con strutture di cartelle di lavoro standardizzate.
- Hai bisogno che il blocco dei riquadri venga applicato automaticamente all'apertura di un file.
- Crei strumenti o modelli basati su Excel condivisi tra i team.
VBA rende la formattazione ripetibile, affidabile e coerente.
Metodo 5. Usa l'automazione Python (Spire.XLS)
Per gli sviluppatori che creano sistemi di reporting automatizzati—specialmente in ambienti aziendali—il blocco dei riquadri con Python fornisce una soluzione scalabile e basata su codice. La libreria Spire.XLS per Python consente di manipolare i file di Excel senza che Excel sia installato.
Installa Spire.XLS
pip install spire.xls
Esempio: blocca le righe 1–2 e la colonna A
from spire.xls import *

workbook = Workbook()
workbook.LoadFromFile("input.xlsx")

sheet = workbook.Worksheets[0]
sheet.FreezePanes(3, 2)  # Blocca sopra la riga 3 e a sinistra della colonna 2

workbook.SaveToFile("output.xlsx", ExcelVersion.Version2016)
Blocca solo la riga superiore
sheet.FreezePanes(2, 1)
Sblocca
sheet.UnfreezePanes()
Leggi di più: Bloccare o sbloccare i riquadri in Excel usando Python
Quando l'automazione Python è ideale
- Generi centinaia di report Excel automaticamente.
- Il tuo flusso di lavoro è integrato con applicazioni web o sistemi backend.
- Devi applicare impostazioni di blocco coerenti a livello di codice.
- Vuoi l'automazione di Excel senza fare affidamento su COM o Windows.
Spire.XLS offre ampie funzionalità di Excel, tra cui formattazione avanzata delle celle, personalizzazione di caratteri e stili, automazione delle formule, convalida dei dati, e generazione di report, rendendolo uno strumento potente per l'automazione di Excel a livello aziendale e l'ottimizzazione del flusso di lavoro.
Tabella di confronto: scegli il modo giusto
| Metodo | Livello di abilità | Ideale per | Supporta blocco righe | Supporta blocco colonne | Automazione | Velocità |
|---|---|---|---|---|---|---|
| Preimpostazioni blocco rapido | Principiante | Blocco intestazione semplice | ✔ Riga superiore | ✔ Prima colonna | ✘ | ★★★★★ |
| Blocca riquadri (personalizzato) | Principiante–Intermedio | Blocco flessibile (righe e colonne) | ✔ | ✔ | ✘ | ★★★★☆ |
| Scorciatoia da tastiera | Intermedio | Lavoro manuale veloce | ✔ | ✔ | ✘ | ★★★★★ |
| Automazione VBA | Intermedio–Avanzato | Blocchi ripetuti nei modelli | ✔ | ✔ | ✔ | ★★★★☆ |
| Python (Spire.XLS) | Sviluppatore | Automazione su larga scala e reporting di backend | ✔ | ✔ | ✔ | ★★★★★ |
Riepilogo
Il blocco di righe e colonne è essenziale per la navigazione in fogli di lavoro Excel di grandi dimensioni ed Excel fornisce diversi strumenti facili e flessibili per farlo. Le preimpostazioni di blocco rapido sono perfette per le attività comuni, mentre Blocca riquadri ti dà il pieno controllo su quali parti del tuo foglio di lavoro rimangono visibili. Le scorciatoie da tastiera sono ideali per flussi di lavoro manuali veloci e, per gli utenti più avanzati, l'automazione VBA e Python fornisce modi per applicare i blocchi su molti fogli o file generati automaticamente.
Che tu sia un analista, uno sviluppatore, un contabile o un professionista dei dati, la scelta del metodo giusto ti aiuterà a lavorare in modo più efficiente e a mantenere i tuoi dati più facili da interpretare.
Domande frequenti sul blocco dei riquadri in Excel
D1. Perché "Blocca riquadri" è disattivato in Excel?
Questo di solito accade quando:
- Stai attualmente modificando una cella.
- Il foglio di lavoro è protetto.
- Sei in visualizzazione Layout di pagina (passa alla visualizzazione Normale).
D2. Posso bloccare i riquadri in Excel Online?
Sì, Excel Online supporta il blocco della riga superiore e della prima colonna, nonché il blocco personalizzato dei riquadri.
D3. Posso bloccare più di una riga o colonna?
Sì. Utilizza la funzione Blocca riquadri completa e seleziona il riferimento di cella corretto sotto/accanto alle righe e alle colonne che desideri bloccare.
D4. Le impostazioni di blocco dei riquadri vengono salvate con il file?
Sì. Una volta salvata la cartella di lavoro, le impostazioni di blocco rimangono attive alla successiva apertura.
D5. Posso bloccare i riquadri su più fogli contemporaneamente?
Non manualmente. È necessario ripetere l'azione di blocco su ogni foglio o automatizzarla con VBA o Python.