Convertir tablas PDF a CSV: Manual, en línea y automatizado
Tabla de Contenidos
Convertir tablas de archivos PDF a formato CSV es un requisito común en los flujos de trabajo de informes, análisis e integración de datos. Los archivos CSV son ligeros, ampliamente compatibles y adecuados para la automatización, lo que los hace mucho más útiles que los PDF estáticos una vez que los datos tabulares necesitan ser reutilizados.
En la práctica, sin embargo, convertir una tabla de PDF a CSV rara vez es sencillo. Los archivos PDF están diseñados para preservar la apariencia visual en lugar de la estructura lógica. Una tabla que parece perfectamente alineada en la pantalla puede no existir como filas y columnas internamente, razón por la cual los métodos de conversión ingenuos a menudo fallan.
Este artículo se centra en prácticos métodos de conversión de tablas de PDF a CSV. En lugar de cubrir todas las opciones teóricas, explica los enfoques más utilizados, cómo se comportan en la práctica y cuándo cada método es apropiado.
Tabla de Contenidos
- Formas Prácticas Comunes de Convertir Tablas de PDF a CSV
- Método 1: Exportar PDF a Hoja de Cálculo Usando Acrobat
- Método 2: Conversión en Línea de Tablas de PDF a CSV
- Método 3: Extracción Programática de Tablas de PDF con Python
- Manejo de Escenarios de Tablas de PDF del Mundo Real
- Puntos Clave: Convertir Tablas de PDF a CSV
- Preguntas Frecuentes
Formas Prácticas Comunes de Convertir Tablas de PDF a CSV
En la mayoría de los flujos de trabajo reales, la conversión de una tabla de PDF a CSV se clasifica en una de las siguientes categorías:
- Exportar tablas a través de herramientas de PDF a hoja de cálculo (como Acrobat)
- Usando conversores en línea de tablas de PDF a CSV
- Extrayendo tablas programáticamente usando código Python
Las técnicas simples de copiar y pegar se excluyen intencionadamente, ya que generalmente aplanan las tablas en texto plano y requieren una reconstrucción manual extensa.
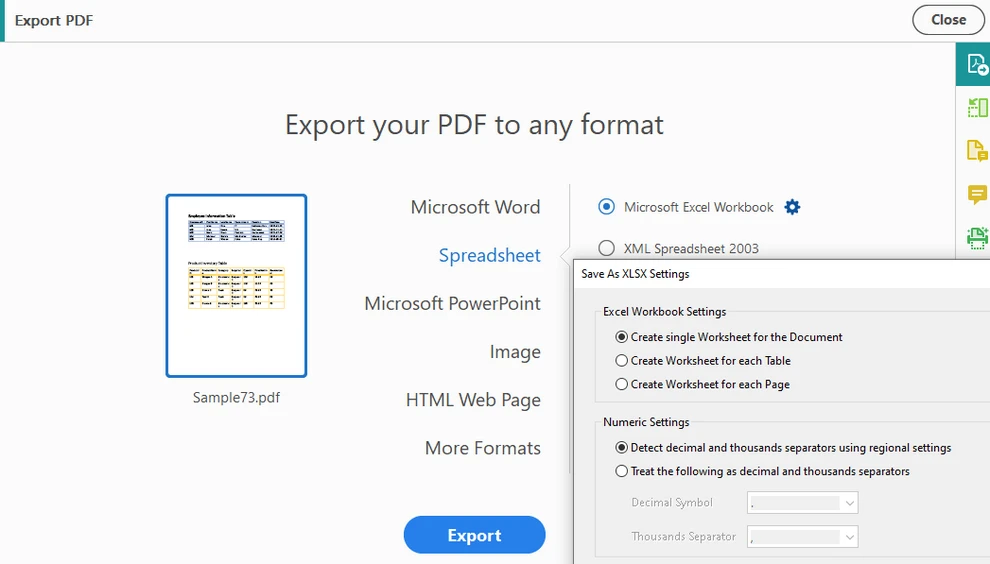
Método 1: Exportar PDF a Hoja de Cálculo Usando Acrobat
Exportar un PDF a un formato de hoja de cálculo y luego guardarlo como CSV es una opción común para los usuarios que prefieren herramientas de escritorio e inspección visual.
Cuándo Funciona Bien Este Método
- El PDF está basado en texto y bien estructurado
- Las tablas tienen límites claros de filas y columnas
- La revisión y corrección manual son aceptables
Flujo de Trabajo Típico Basado en Acrobat
-
Abra el archivo PDF en Acrobat
-
Elija Exportar PDF y seleccione Hoja de cálculo como formato de salida
-
Exporte el documento a formato Excel
-
Revise y ajuste la estructura de la tabla si es necesario
-
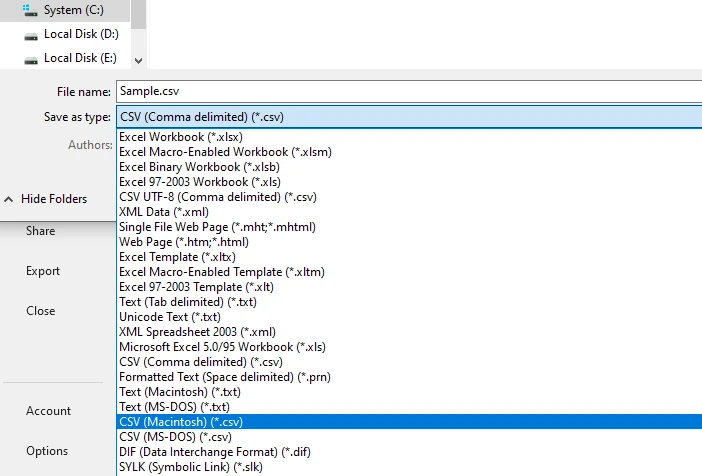
Guarde o exporte la hoja de cálculo como un archivo CSV
Este flujo de trabajo a menudo produce mejores resultados estructurales que la copia directa, especialmente para tablas de una sola página o con formato consistente.
Limitaciones Prácticas
- Las tablas complejas o de varias páginas pueden dividirse en varias hojas
- Las celdas combinadas pueden provocar columnas desalineadas en la salida CSV
- A menudo se requiere una limpieza manual antes de la exportación
- No es adecuado para el procesamiento por lotes o automatizado
Este enfoque es efectivo para conversiones ocasionales donde la validación visual es importante, pero no escala bien.
Para los usuarios que buscan una alternativa gratuita a Acrobat para convertir tablas de PDF a Excel antes de guardarlas como CSV, consulte Cómo Convertir PDF a Excel Gratis.
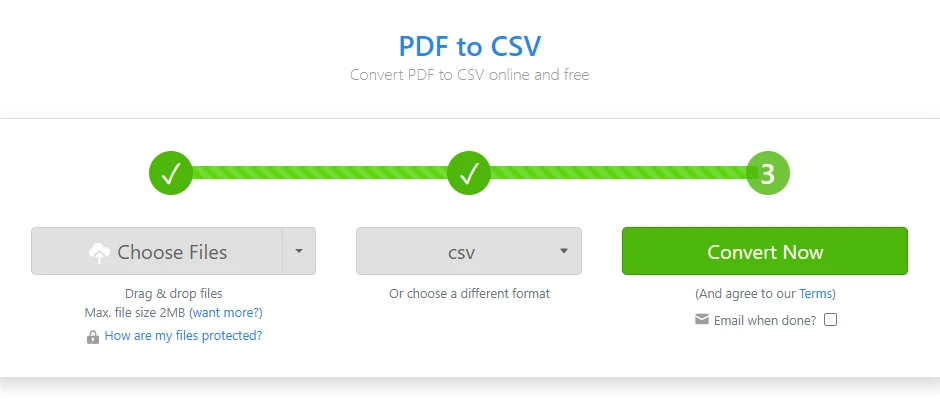
Método 2: Conversión en Línea de Tablas de PDF a CSV
Los conversores en línea son muy utilizados porque no requieren instalación y proporcionan resultados rápidos.
Cuándo es Adecuada la Conversión en Línea
- El PDF contiene texto seleccionable (no escaneado)
- Los diseños de las tablas son relativamente simples
- Solo se necesita convertir un número pequeño de archivos
Flujo de Trabajo Típico de Conversión de Tablas de PDF a CSV en Línea
La mayoría de las herramientas en línea siguen un proceso similar (Zamzar ejemplo):
-
Abra un conversor de PDF a CSV en línea
-
Suba el archivo PDF que contiene la tabla
-
Configure el rango de páginas o las opciones de detección de tablas, si están disponibles
-
Inicie el proceso de conversión
-
Descargue el archivo CSV generado
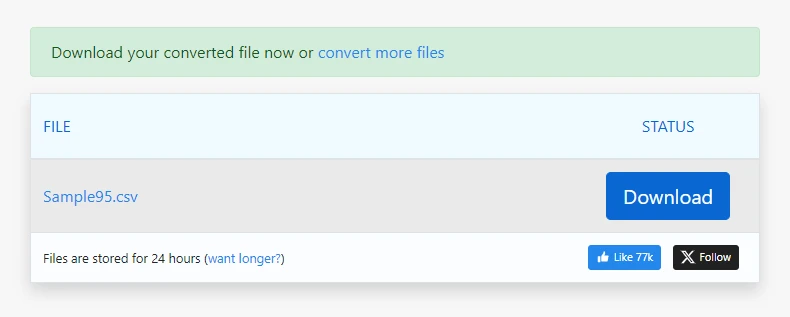
Para PDF sencillos, este proceso puede generar una salida CSV utilizable en segundos.
Consideraciones Comunes con los Conversores en Línea
- Las columnas pueden desplazarse cuando el espaciado es inconsistente
- Los conversores a menudo exportan todo el PDF como CSV, no solo las tablas
- Los saltos de línea dentro de las celdas pueden crear filas adicionales
- La calidad de la salida varía según el diseño del documento
- Pueden aplicarse límites de tamaño de archivo y preocupaciones de privacidad
Las herramientas en línea se deben tratar como una opción de conveniencia en lugar de una solución predecible o reutilizable.
Método 3: Extracción Programática de Tablas de PDF con Python
Cuando se requiere precisión, consistencia o automatización, la extracción programática suele ser la forma más confiable de convertir tablas de PDF a CSV.
Por Qué a Menudo se Prefiere la Extracción Programática
- Las tablas se pueden procesar página por página
- Las tablas de varias páginas se pueden manejar de manera consistente
- La misma lógica de extracción se puede reutilizar en trabajos por lotes
- La salida es reproducible y más fácil de validar
Este enfoque es común en las canalizaciones de datos, los sistemas de informes y los servicios de backend que procesan PDF a escala. Con Spire.PDF for Python, los desarrolladores pueden extraer tablas con precisión de documentos PDF, manejar diseños complejos y de varias páginas, y automatizar la conversión a CSV con una mínima intervención manual.
Flujo de Trabajo Programático Típico para Convertir Tablas de PDF a CSV
La mayoría de las soluciones programáticas siguen un proceso similar de alto nivel:
- Cargar el documento PDF
- Iterar a través de cada página
- Detectar estructuras de tabla en cada página
- Extraer filas y columnas como datos estructurados
- Normalizar el texto extraído cuando sea necesario
- Escribir los datos estructurados en archivos CSV
Python es ampliamente utilizado para esta tarea porque combina legibilidad con potentes capacidades de procesamiento de datos.
Ejemplo: Convertir Tablas de PDF a CSV Usando Python
Antes de ejecutar el siguiente ejemplo, asegúrese de que la biblioteca de procesamiento de PDF requerida esté instalada.
Puede instalar Spire.PDF para Python usando pip:
pip install spire.pdf
Una vez instalado, puede continuar con el ejemplo de extracción de tablas.
El siguiente ejemplo demuestra cómo convertir tablas de PDF a CSV usando Spire.PDF for Python.
import os
import csv
from spire.pdf import PdfDocument, PdfTableExtractor

# Load the PDF document
pdf = PdfDocument()
pdf.LoadFromFile("Sample.pdf")

# Create a table extractor
extractor = PdfTableExtractor(pdf)

# Normalize text to handle PDF ligatures and PUA characters
def normalize_text(text: str) -> str:
    if not text:
        return text
    if not any('\uE000' <= ch <= '\uF8FF' for ch in text):
        return text

    ligatures = {
        '\uE000': 'ff',
        '\uE001': 'fi',
        '\uE002': 'fl',
        '\uE003': 'ffl',
        '\uE004': 'ffi',
        '\uE005': 'ft',
        '\uE006': 'st',
    }
    for lig, repl in ligatures.items():
        text = text.replace(lig, repl)
    return text

# Extract tables page by page
for page_index in range(pdf.Pages.Count):
    tables = extractor.ExtractTable(page_index)
    if tables:
        for table_index, table in enumerate(tables):
            rows = []
            for r in range(table.GetRowCount()):
                row = []
                for c in range(table.GetColumnCount()):
                    cell = normalize_text(table.GetText(r, c)).replace("\n", " ")
                    row.append(cell)
                rows.append(row)

            os.makedirs("output/Tables", exist_ok=True)
            with open(
                f"output/Tables/Page{page_index + 1}-Table{table_index + 1}.csv",
                "w",
                newline="",
                encoding="utf-8",
            ) as f:
                writer = csv.writer(f)
                writer.writerows(rows)

pdf.Close()
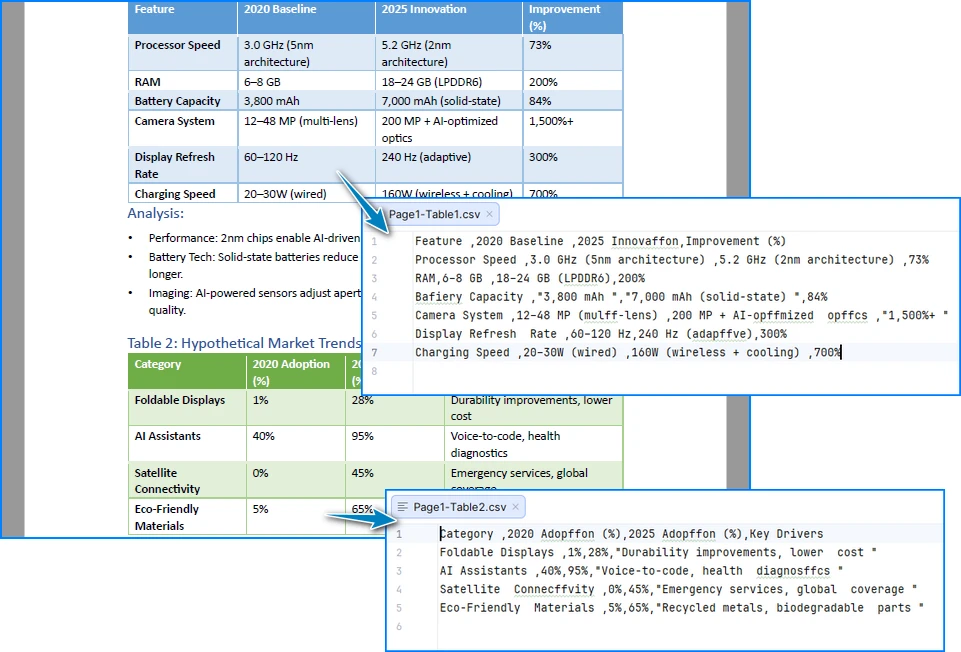
A continuación se muestra una vista previa de los resultados de la conversión de tablas de PDF a CSV:
Cómo Funciona Esta Implementación
Esta implementación se centra en preservar la estructura de la tabla en lugar de inferir el diseño a partir de las posiciones del texto:
- Extracción a nivel de celda asegura que las filas y columnas se conserven como unidades lógicas en lugar de ser reconstruidas a partir del espaciado
- Procesamiento página por página evita que las tablas se fusionen incorrectamente a través de los límites de las páginas
- Normalización explícita del texto maneja problemas comunes de PDF como ligaduras y caracteres Unicode de uso privado, que pueden corromper silenciosamente la salida CSV
- Escritura directa a CSV evita formatos intermedios que pueden introducir artefactos de formato adicionales
Como resultado, los archivos CSV generados son más estables y adecuados para el procesamiento automatizado. Para una guía paso a paso sobre cómo extraer tablas de documentos PDF, consulte Guía Detallada: Extracción de Tablas de PDF.
Manejo de Escenarios de Tablas de PDF del Mundo Real
En los flujos de trabajo del mundo real, las tablas de PDF a menudo se comportan de manera diferente a como se ven en la pantalla. Los problemas típicos incluyen:
- Tablas que abarcan varias páginas con encabezados repetidos o faltantes
- Ligeros desplazamientos de la posición de las columnas entre páginas
- Filas con celdas vacías, ajustadas o irregulares
- Grandes lotes de PDF con diseños similares pero no idénticos
Estos factores suelen ser donde las herramientas de exportación genéricas y los conversores en línea comienzan a producir una salida CSV inconsistente.
Desde una perspectiva práctica, la extracción programática es más adecuada para estos casos porque permite:
- Procesamiento página por página sin fusionar accidentalmente tablas no relacionadas
- Manejo controlado de tablas de varias páginas
- Alineación de columna estable incluso cuando los diseños no son perfectamente uniformes
Un detalle adicional de usabilidad que vale la pena señalar es la codificación CSV:
- Cuando los datos extraídos incluyen caracteres no ASCII, los archivos CSV abiertos directamente en Excel pueden mostrar texto ilegible
- Guardar la salida CSV como UTF-8 con BOM (UTF-8-SIG) ayuda a garantizar la visualización correcta de los caracteres sin pasos de importación manual
Estas consideraciones se vuelven especialmente relevantes cuando se trabaja con PDF del mundo real en lugar de ejemplos idealizados.
Puntos Clave: Convertir Tablas de PDF a CSV
En la práctica, la conversión de una tabla de PDF a CSV generalmente se reduce a tres opciones:
- Exportación de Acrobat funciona bien para conversiones ocasionales y verificadas visualmente, como facturas o informes de una sola página
- Conversores en línea son convenientes para tareas simples y únicas con tablas sencillas
- Extracción programática ofrece los resultados más confiables para flujos de trabajo complejos, de varias páginas o repetidos, especialmente en canalizaciones automatizadas
Elegir el método correcto depende menos de la herramienta en sí y más de cómo se utilizarán los datos extraídos.
Preguntas Frecuentes
¿Se pueden convertir las tablas de PDF escaneadas a CSV directamente?
No. Los PDF escaneados requieren OCR antes de que sea posible la extracción de tablas. Para una guía paso a paso sobre cómo extraer texto de PDF escaneados usando Python, consulte Extracción de Texto de PDF Escaneados con Python.
¿Es CSV mejor que Excel para las tablas de PDF extraídas? CSV es más simple y más adecuado para la automatización, mientras que Excel a menudo se prefiere para la revisión manual.
¿Es Python adecuado para la conversión por lotes de tablas de PDF? Sí. Python es ampliamente utilizado para la extracción de tablas de PDF a gran escala y automatizada debido a su flexibilidad y legibilidad.
Ver También
PDF-Tabellen in CSV umwandeln: Manuell, Online & Automatisch
Inhaltsverzeichnis
Die Konvertierung von Tabellen aus PDF-Dateien in das CSV-Format ist eine häufige Anforderung in Berichts-, Analyse- und Datenintegrations-Workflows. CSV-Dateien sind leichtgewichtig, werden weithin unterstützt und eignen sich gut für die Automatisierung, was sie weitaus nützlicher macht als statische PDFs, sobald tabellarische Daten wiederverwendet werden müssen.
In der Praxis ist die Konvertierung einer PDF-Tabelle in CSV jedoch selten einfach. PDF-Dateien sind darauf ausgelegt, das visuelle Erscheinungsbild zu erhalten und nicht die logische Struktur. Eine Tabelle, die auf dem Bildschirm perfekt ausgerichtet aussieht, existiert intern möglicherweise nicht als Zeilen und Spalten, weshalb naive Konvertierungsmethoden oft scheitern.
Dieser Artikel konzentriert sich auf praktische Methoden zur Konvertierung von PDF-Tabellen in CSV. Anstatt jede theoretische Option zu behandeln, werden die am häufigsten verwendeten Ansätze erläutert, wie sie sich in der Praxis verhalten und wann jede Methode geeignet ist.
Inhaltsverzeichnis
- Gängige praktische Wege zur Konvertierung von PDF-Tabellen in CSV
- Methode 1: PDF mit Acrobat in eine Tabelle exportieren
- Methode 2: Online-Konvertierung von PDF-Tabellen in CSV
- Methode 3: Programmatische Extraktion von PDF-Tabellen mit Python
- Umgang mit realen PDF-Tabellenszenarien
- Wichtige Erkenntnisse: Konvertierung von PDF-Tabellen in CSV
- FAQ
Gängige praktische Wege zur Konvertierung von PDF-Tabellen in CSV
In den meisten realen Arbeitsabläufen fällt die Konvertierung einer PDF-Tabelle in CSV in eine der folgenden Kategorien:
- Exportieren von Tabellen über PDF-zu-Tabellenkalkulations-Tools (wie Acrobat)
- Verwendung von Online-Konvertern für PDF-Tabellen in CSV
- Extrahieren von Tabellen programmatisch mit Python-Code
Einfache Kopier- und Einfügetechniken werden absichtlich ausgeschlossen, da sie Tabellen normalerweise in reinen Text umwandeln und eine umfangreiche manuelle Rekonstruktion erfordern.
Methode 1: PDF mit Acrobat in eine Tabelle exportieren
Das Exportieren einer PDF-Datei in ein Tabellenkalkulationsformat und das anschließende Speichern als CSV ist eine gängige Wahl für Benutzer, die Desktop-Tools und eine visuelle Überprüfung bevorzugen.
Wann diese Methode gut funktioniert
- Die PDF ist textbasiert und gut strukturiert
- Tabellen haben klare Zeilen- und Spaltengrenzen
- Manuelle Überprüfung und Korrektur sind akzeptabel
Typischer Acrobat-basierter Arbeitsablauf
-
Öffnen Sie die PDF-Datei in Acrobat
-
Wählen Sie PDF exportieren und wählen Sie Tabelle als Ausgabeformat
-
Exportieren Sie das Dokument in das Excel-Format
-
Überprüfen und passen Sie die Tabellenstruktur bei Bedarf an
-
Speichern oder exportieren Sie die Tabelle als CSV-Datei
Dieser Arbeitsablauf liefert oft bessere strukturelle Ergebnisse als direktes Kopieren, insbesondere bei einseitigen oder einheitlich formatierten Tabellen.
Praktische Einschränkungen
- Komplexe oder mehrseitige Tabellen können auf mehrere Blätter aufgeteilt werden
- Verbundene Zellen können zu falsch ausgerichteten Spalten in der CSV-Ausgabe führen
- Eine manuelle Bereinigung ist oft vor dem Export erforderlich
- Nicht für die Stapel- oder automatisierte Verarbeitung geeignet
Dieser Ansatz ist effektiv für gelegentliche Konvertierungen, bei denen eine visuelle Validierung wichtig ist, aber er skaliert nicht gut.
Für Benutzer, die eine kostenlose Alternative zu Acrobat suchen, um PDF-Tabellen vor dem Speichern als CSV in Excel zu konvertieren, siehe Wie man PDF kostenlos in Excel konvertiert.
Methode 2: Online-Konvertierung von PDF-Tabellen in CSV
Online-Konverter sind weit verbreitet, da sie keine Installation erfordern und schnelle Ergebnisse liefern.
Wann die Online-Konvertierung eine gute Wahl ist
- Die PDF enthält auswählbaren (nicht gescannten) Text
- Tabellenlayouts sind relativ einfach
- Nur eine kleine Anzahl von Dateien muss konvertiert werden
Typischer Online-Workflow für die Konvertierung von PDF-Tabellen in CSV
Die meisten Online-Tools folgen einem ähnlichen Prozess (Beispiel Zamzar):
-
Öffnen Sie einen Online-Konverter für PDF in CSV
-
Laden Sie die PDF-Datei mit der Tabelle hoch
-
Konfigurieren Sie den Seitenbereich oder die Optionen zur Tabellenerkennung, falls verfügbar
-
Starten Sie den Konvertierungsprozess
-
Laden Sie die generierte CSV-Datei herunter
Bei einfachen PDFs kann dieser Prozess in Sekunden eine brauchbare CSV-Ausgabe erzeugen.
Häufige Überlegungen bei Online-Konvertern
- Spalten können sich bei inkonsistentem Abstand verschieben
- Konverter exportieren oft die gesamte PDF als CSV, nicht nur die Tabellen
- Zeilenumbrüche innerhalb von Zellen können zusätzliche Zeilen erzeugen
- Die Ausgabequalität variiert je nach Dokumentenlayout
- Dateigrößenbeschränkungen und Datenschutzbedenken können gelten
Online-Tools sollten eher als eine bequeme Option denn als eine vorhersagbare oder wiederverwendbare Lösung betrachtet werden.
Methode 3: Programmatische Extraktion von PDF-Tabellen mit Python
Wenn Genauigkeit, Konsistenz oder Automatisierung erforderlich sind, ist die programmatische Extraktion oft der zuverlässigste Weg, um PDF-Tabellen in CSV zu konvertieren.
Warum die programmatische Extraktion oft bevorzugt wird
- Tabellen können Seite für Seite verarbeitet werden
- Mehrseitige Tabellen können konsistent behandelt werden
- Dieselbe Extraktionslogik kann in Stapelverarbeitungsaufträgen wiederverwendet werden
- Die Ausgabe ist reproduzierbar und leichter zu validieren
Dieser Ansatz ist in Datenpipelines, Berichtssystemen und Backend-Diensten, die PDFs in großem Umfang verarbeiten, üblich. Mit Spire.PDF für Python können Entwickler Tabellen aus PDF-Dokumenten präzise extrahieren, mehrseitige und komplexe Layouts handhaben und die Konvertierung in CSV mit minimalem manuellem Eingriff automatisieren.
Typischer programmatischer Workflow für PDF-Tabelle zu CSV
Die meisten programmatischen Lösungen folgen einem ähnlichen übergeordneten Prozess:
- Laden Sie das PDF-Dokument
- Iterieren Sie durch jede Seite
- Erkennen Sie Tabellenstrukturen auf jeder Seite
- Extrahieren Sie Zeilen und Spalten als strukturierte Daten
- Normalisieren Sie extrahierten Text bei Bedarf
- Schreiben Sie die strukturierten Daten in CSV-Dateien
Python wird für diese Aufgabe häufig verwendet, da es Lesbarkeit mit starken Datenverarbeitungsfähigkeiten kombiniert.
Beispiel: PDF-Tabellen mit Python in CSV konvertieren
Stellen Sie vor dem Ausführen des folgenden Beispiels sicher, dass die erforderliche PDF-Verarbeitungsbibliothek installiert ist.
Sie können Spire.PDF für Python mit pip installieren:
pip install spire.pdf
Nach der Installation können Sie mit dem Beispiel zur Tabellenextraktion fortfahren.
Das folgende Beispiel zeigt, wie Sie PDF-Tabellen mit Spire.PDF für Python in CSV konvertieren.
import os
import csv
from spire.pdf import PdfDocument, PdfTableExtractor

# Load the PDF document
pdf = PdfDocument()
pdf.LoadFromFile("Sample.pdf")

# Create a table extractor
extractor = PdfTableExtractor(pdf)

# Normalize text to handle PDF ligatures and PUA characters
def normalize_text(text: str) -> str:
    if not text:
        return text
    if not any('\uE000' <= ch <= '\uF8FF' for ch in text):
        return text

    ligatures = {
        '\uE000': 'ff',
        '\uE001': 'fi',
        '\uE002': 'fl',
        '\uE003': 'ffl',
        '\uE004': 'ffi',
        '\uE005': 'ft',
        '\uE006': 'st',
    }
    for lig, repl in ligatures.items():
        text = text.replace(lig, repl)
    return text

# Extract tables page by page
for page_index in range(pdf.Pages.Count):
    tables = extractor.ExtractTable(page_index)
    if tables:
        for table_index, table in enumerate(tables):
            rows = []
            for r in range(table.GetRowCount()):
                row = []
                for c in range(table.GetColumnCount()):
                    cell = normalize_text(table.GetText(r, c)).replace("\n", " ")
                    row.append(cell)
                rows.append(row)

            os.makedirs("output/Tables", exist_ok=True)
            with open(
                f"output/Tables/Page{page_index + 1}-Table{table_index + 1}.csv",
                "w",
                newline="",
                encoding="utf-8",
            ) as f:
                writer = csv.writer(f)
                writer.writerows(rows)

pdf.Close()
Unten sehen Sie eine Vorschau der Konvertierungsergebnisse von PDF-Tabelle zu CSV:
Wie diese Implementierung funktioniert
Diese Implementierung konzentriert sich auf die Beibehaltung der Tabellenstruktur anstatt das Layout aus Textpositionen abzuleiten:
- Extraktion auf Zellenebene stellt sicher, dass Zeilen und Spalten als logische Einheiten erhalten bleiben, anstatt aus Abständen rekonstruiert zu werden
- Seitenweise Verarbeitung verhindert, dass Tabellen über Seitengrenzen hinweg falsch zusammengeführt werden
- Explizite Textnormalisierung behandelt häufige PDF-Probleme wie Ligaturen und privat genutzte Unicode-Zeichen, die die CSV-Ausgabe unbemerkt beschädigen können
- Direktes Schreiben von CSV vermeidet Zwischenformate, die zusätzliche Formatierungsartefakte einführen können
Dadurch sind die generierten CSV-Dateien stabiler und für die automatisierte Verarbeitung besser geeignet. Eine schrittweise Anleitung zum Extrahieren von Tabellen aus PDF-Dokumenten finden Sie unter Detaillierte Anleitung: Tabellen aus PDF extrahieren.
Umgang mit realen PDF-Tabellenszenarien
In realen Arbeitsabläufen verhalten sich PDF-Tabellen oft anders, als sie auf dem Bildschirm aussehen. Typische Probleme sind:
- Tabellen, die sich über mehrere Seiten erstrecken, mit wiederholten oder fehlenden Kopfzeilen
- Leichte Verschiebungen der Spaltenposition zwischen den Seiten
- Zeilen mit leeren, umgebrochenen oder unregelmäßigen Zellen
- Große Stapel von PDFs mit ähnlichen, aber nicht identischen Layouts
Diese Faktoren sind normalerweise der Punkt, an dem generische Export-Tools und Online-Konverter anfangen, inkonsistente CSV-Ausgaben zu produzieren.
Aus praktischer Sicht ist die programmatische Extraktion für diese Fälle besser geeignet, da sie Folgendes ermöglicht:
- Seitenweise Verarbeitung ohne versehentliches Zusammenführen nicht zusammengehöriger Tabellen
- Kontrollierte Handhabung von mehrseitigen Tabellen
- Stabile Spaltenausrichtung auch bei nicht perfekt einheitlichen Layouts
Ein zusätzliches erwähnenswertes Usability-Detail ist die CSV-Kodierung:
- Wenn extrahierte Daten Nicht-ASCII-Zeichen enthalten, können CSV-Dateien, die direkt in Excel geöffnet werden, verstümmelten Text anzeigen
- Das Speichern der CSV-Ausgabe als UTF-8 mit BOM (UTF-8-SIG) hilft, die korrekte Zeichenanzeige ohne manuelle Importschritte sicherzustellen
Diese Überlegungen werden besonders relevant, wenn man mit realen PDFs anstelle von idealisierten Beispielen arbeitet.
Wichtige Erkenntnisse: Konvertierung von PDF-Tabellen in CSV
In der Praxis läuft die Konvertierung einer PDF-Tabelle in CSV normalerweise auf drei Optionen hinaus:
- Der Acrobat-Export eignet sich gut für gelegentliche, visuell überprüfte Konvertierungen, wie z. B. einseitige Rechnungen oder Berichte
- Online-Konverter sind praktisch für einfache, einmalige Aufgaben mit unkomplizierten Tabellen
- Die programmatische Extraktion bietet die zuverlässigsten Ergebnisse für komplexe, mehrseitige oder wiederholte Arbeitsabläufe, insbesondere in automatisierten Pipelines
Die Wahl der richtigen Methode hängt weniger vom Werkzeug selbst ab, sondern mehr davon, wie die extrahierten Daten verwendet werden.
FAQ
Können gescannte PDF-Tabellen direkt in CSV konvertiert werden?
Nein. Gescannte PDFs erfordern OCR, bevor eine Tabellenextraktion möglich ist. Eine schrittweise Anleitung zum Extrahieren von Text aus gescannten PDFs mit Python finden Sie unter Text aus gescannten PDFs mit Python extrahieren.
Ist CSV besser als Excel für extrahierte PDF-Tabellen? CSV ist einfacher und besser für die Automatisierung geeignet, während Excel oft für die manuelle Überprüfung bevorzugt wird.
Ist Python für die Stapelkonvertierung von PDF-Tabellen geeignet? Ja. Python wird aufgrund seiner Flexibilität und Lesbarkeit häufig für die groß angelegte und automatisierte Extraktion von PDF-Tabellen verwendet.
Siehe auch
Конвертировать таблицы PDF в CSV: вручную, онлайн и автоматически
Преобразование таблиц из файлов PDF в формат CSV является частым требованием в рабочих процессах отчетности, аналитики и интеграции данных. Файлы CSV легковесны, широко поддерживаются и хорошо подходят для автоматизации, что делает их гораздо более полезными, чем статические PDF-файлы, когда табличные данные необходимо использовать повторно.
Однако на практике преобразование таблицы PDF в CSV редко бывает простым. Файлы PDF предназначены для сохранения внешнего вида, а не логической структуры. Таблица, которая выглядит идеально выровненной на экране, может не существовать внутри как строки и столбцы, поэтому наивные методы преобразования часто терпят неудачу.
Эта статья посвящена практическим методам преобразования таблиц PDF в CSV. Вместо того чтобы рассматривать все теоретические варианты, в ней объясняются наиболее часто используемые подходы, их поведение на практике и случаи, когда каждый метод является подходящим.
Содержание
- Распространенные практические способы преобразования таблиц PDF в CSV
- Метод 1: Экспорт PDF в электронную таблицу с помощью Acrobat
- Метод 2: Онлайн-преобразование таблиц PDF в CSV
- Метод 3: Программное извлечение таблиц PDF с помощью Python
- Обработка реальных сценариев с таблицами PDF
- Основные выводы: преобразование таблиц PDF в CSV
- Часто задаваемые вопросы
Распространенные практические способы преобразования таблиц PDF в CSV
В большинстве реальных рабочих процессов преобразование таблицы PDF в CSV подпадает под одну из следующих категорий:
- Экспорт таблиц с помощью инструментов для преобразования PDF в электронные таблицы (например, Acrobat)
- Использование онлайн-конвертеров таблиц PDF в CSV
- Извлечение таблиц программно с использованием кода Python
Простые методы копирования и вставки намеренно исключены, так как они обычно преобразуют таблицы в обычный текст и требуют значительной ручной реконструкции.
Метод 1: Экспорт PDF в электронную таблицу с помощью Acrobat
Экспорт PDF в формат электронной таблицы с последующим сохранением в виде CSV — это распространенный выбор для пользователей, предпочитающих настольные инструменты и визуальный контроль.
Когда этот метод хорошо работает
- PDF является текстовым и хорошо структурированным
- Таблицы имеют четкие границы строк и столбцов
- Допустимы ручная проверка и исправление
Типичный рабочий процесс на основе Acrobat
-
Откройте файл PDF в Acrobat
-
Выберите Экспорт PDF и укажите Электронная таблица в качестве формата вывода
-
Экспортируйте документ в формат Excel
-
При необходимости просмотрите и скорректируйте структуру таблицы
-
Сохраните или экспортируйте электронную таблицу как файл CSV
Этот рабочий процесс часто дает лучшие структурные результаты, чем прямое копирование, особенно для одностраничных или единообразно отформатированных таблиц.
Практические ограничения
- Сложные или многостраничные таблицы могут быть разделены на несколько листов
- Объединенные ячейки могут привести к смещению столбцов в выходном файле CSV
- Часто требуется ручная очистка перед экспортом
- Не подходит для пакетной или автоматизированной обработки
Этот подход эффективен для разовых преобразований, где важна визуальная проверка, но он плохо масштабируется.
Для пользователей, ищущих бесплатную альтернативу Acrobat для преобразования таблиц PDF в Excel перед сохранением в CSV, см. Как бесплатно преобразовать PDF в Excel.
Метод 2: Онлайн-преобразование таблиц PDF в CSV
Онлайн-конвертеры широко используются, поскольку не требуют установки и обеспечивают быстрые результаты.
Когда онлайн-преобразование является хорошим выбором
- PDF содержит выделяемый (несканированный) текст
- Макеты таблиц относительно просты
- Требуется преобразовать лишь небольшое количество файлов
Типичный рабочий процесс онлайн-преобразования таблиц PDF в CSV
Большинство онлайн-инструментов следуют схожему процессу (пример Zamzar):
-
Откройте онлайн-конвертер PDF в CSV
-
Загрузите файл PDF, содержащий таблицу
-
Настройте диапазон страниц или параметры обнаружения таблиц, если они доступны
-
Начните процесс преобразования
-
Загрузите сгенерированный файл CSV
Для простых PDF-файлов этот процесс может сгенерировать пригодный для использования CSV-файл за считанные секунды.
Общие соображения при работе с онлайн-конвертерами
- Столбцы могут смещаться при несогласованных интервалах
- Конвертеры часто экспортируют весь PDF-файл в CSV, а не только таблицы
- Разрывы строк внутри ячеек могут создавать дополнительные строки
- Качество вывода зависит от макета документа
- Могут применяться ограничения на размер файла и соображения конфиденциальности
Онлайн-инструменты лучше рассматривать как удобный вариант, а не как предсказуемое или многоразовое решение.
Метод 3: Программное извлечение таблиц PDF с помощью Python
Когда требуется точность, последовательность или автоматизация, программное извлечение часто является самым надежным способом преобразования таблиц PDF в CSV.
Почему программное извлечение часто предпочтительнее
- Таблицы можно обрабатывать постранично
- Многостраничные таблицы можно обрабатывать последовательно
- Одну и ту же логику извлечения можно повторно использовать в пакетных заданиях
- Вывод является воспроизводимым и его легче проверить
Этот подход распространен в конвейерах данных, системах отчетности и серверных службах, которые обрабатывают PDF-файлы в больших масштабах. С помощью Spire.PDF for Python разработчики могут точно извлекать таблицы из документов PDF, обрабатывать многостраничные и сложные макеты, а также автоматизировать преобразование в CSV с минимальным ручным вмешательством.
Типичный программный рабочий процесс для преобразования таблиц PDF в CSV
Большинство программных решений следуют схожему высокоуровневому процессу:
- Загрузить документ PDF
- Перебрать каждую страницу
- Обнаружить структуры таблиц на каждой странице
- Извлечь строки и столбцы как структурированные данные
- При необходимости нормализовать извлеченный текст
- Записать структурированные данные в файлы CSV
Python широко используется для этой задачи, поскольку он сочетает в себе удобочитаемость с мощными возможностями обработки данных.
Пример: преобразование таблиц PDF в CSV с помощью Python
Перед запуском приведенного ниже примера убедитесь, что установлена необходимая библиотека для обработки PDF.
Вы можете установить Spire.PDF for Python с помощью pip:
pip install spire.pdf
После установки вы можете перейти к примеру извлечения таблицы.
Следующий пример демонстрирует, как преобразовать таблицы PDF в CSV с помощью Spire.PDF for Python.
import os
import csv
from spire.pdf import PdfDocument, PdfTableExtractor

# Load the PDF document
pdf = PdfDocument()
pdf.LoadFromFile("Sample.pdf")

# Create a table extractor
extractor = PdfTableExtractor(pdf)

# Normalize text to handle PDF ligatures and PUA characters
def normalize_text(text: str) -> str:
    if not text:
        return text
    if not any('\uE000' <= ch <= '\uF8FF' for ch in text):
        return text

    ligatures = {
        '\uE000': 'ff',
        '\uE001': 'fi',
        '\uE002': 'fl',
        '\uE003': 'ffl',
        '\uE004': 'ffi',
        '\uE005': 'ft',
        '\uE006': 'st',
    }
    for lig, repl in ligatures.items():
        text = text.replace(lig, repl)
    return text

# Extract tables page by page
for page_index in range(pdf.Pages.Count):
    tables = extractor.ExtractTable(page_index)
    if tables:
        for table_index, table in enumerate(tables):
            rows = []
            for r in range(table.GetRowCount()):
                row = []
                for c in range(table.GetColumnCount()):
                    cell = normalize_text(table.GetText(r, c)).replace("\n", " ")
                    row.append(cell)
                rows.append(row)

            os.makedirs("output/Tables", exist_ok=True)
            with open(
                f"output/Tables/Page{page_index + 1}-Table{table_index + 1}.csv",
                "w",
                newline="",
                encoding="utf-8",
            ) as f:
                writer = csv.writer(f)
                writer.writerows(rows)

pdf.Close()
Ниже приведен предварительный просмотр результатов преобразования таблицы PDF в CSV:
Как работает эта реализация
Эта реализация фокусируется на сохранении структуры таблицы, а не на выводе макета из позиций текста:
- Извлечение на уровне ячеек гарантирует, что строки и столбцы сохраняются как логические единицы, а не реконструируются из интервалов
- Постраничная обработка предотвращает неправильное слияние таблиц через границы страниц
- Явная нормализация текста решает распространенные проблемы PDF, такие как лигатуры и символы частного использования Unicode, которые могут незаметно повредить вывод CSV
- Прямая запись в CSV позволяет избежать промежуточных форматов, которые могут вносить дополнительные артефакты форматирования
В результате сгенерированные файлы CSV более стабильны и подходят для автоматизированной обработки. Пошаговое руководство по извлечению таблиц из документов PDF см. в разделе Подробное руководство: извлечение таблиц из PDF.
Обработка реальных сценариев с таблицами PDF
В реальных рабочих процессах таблицы PDF часто ведут себя иначе, чем выглядят на экране. Типичные проблемы включают:
- Таблицы, охватывающие несколько страниц с повторяющимися или отсутствующими заголовками
- Незначительные смещения позиций столбцов между страницами
- Строки с пустыми, перенесенными или неправильными ячейками
- Большие партии PDF-файлов с похожими, но не идентичными макетами
Именно из-за этих факторов универсальные инструменты экспорта и онлайн-конвертеры начинают производить несогласованный вывод CSV.
С практической точки зрения, программное извлечение лучше подходит для этих случаев, поскольку оно позволяет:
- Постраничная обработка без случайного слияния несвязанных таблиц
- Контролируемая обработка многостраничных таблиц
- Стабильное выравнивание столбцов даже при неидеально однородных макетах
Еще одна деталь юзабилити, на которую стоит обратить внимание, — это кодировка CSV:
- Когда извлеченные данные содержат символы, отличные от ASCII, файлы CSV, открытые непосредственно в Excel, могут отображать искаженный текст
- Сохранение вывода CSV в кодировке UTF-8 с BOM (UTF-8-SIG) помогает обеспечить правильное отображение символов без ручных шагов импорта
Эти соображения становятся особенно актуальными при работе с реальными PDF-файлами, а не с идеализированными примерами.
Основные выводы: преобразование таблиц PDF в CSV
На практике преобразование таблицы PDF в CSV обычно сводится к трем вариантам:
- Экспорт из Acrobat хорошо подходит для разовых, визуально проверяемых преобразований, таких как одностраничные счета или отчеты
- Онлайн-конвертеры удобны для простых, разовых задач с простыми таблицами
- Программное извлечение предлагает самые надежные результаты для сложных, многостраничных или повторяющихся рабочих процессов, особенно в автоматизированных конвейерах
Выбор правильного метода зависит не столько от самого инструмента, сколько от того, как будут использоваться извлеченные данные.
Часто задаваемые вопросы
Можно ли напрямую преобразовать отсканированные таблицы PDF в CSV?
Нет. Отсканированные PDF-файлы требуют распознавания текста (OCR) перед извлечением таблиц. Пошаговое руководство по извлечению текста из отсканированных PDF-файлов с помощью Python см. в статье Извлечение текста из отсканированных PDF-файлов с помощью Python.
Лучше ли CSV, чем Excel, для извлеченных таблиц PDF? CSV проще и лучше подходит для автоматизации, в то время как Excel часто предпочитают для ручной проверки.
Подходит ли Python для пакетного преобразования таблиц PDF? Да. Python широко используется для крупномасштабного и автоматизированного извлечения таблиц PDF благодаря своей гибкости и удобочитаемости.
Смотрите также
Converter Word para ODT: 4 métodos fáceis e confiáveis
Índice
- O que é ODT
- Por que converter Word para ODT
- Método 1: Converter Word para ODT usando o Microsoft Word
- Método 2: Converter Word para ODT com o LibreOffice Writer
- Método 3: Converter Word para ODT usando ferramentas online
- Método 4: Converter em lote Word para ODT com Python
- Dicas práticas para evitar problemas de formatação e compatibilidade do Word para ODT
Ao trabalhar com suítes de escritório de código aberto como LibreOffice ou OpenOffice, muitas vezes você pode precisar converter documentos do Word para o formato ODT (OpenDocument Text). Embora os arquivos do Word (DOC/DOCX) sejam amplamente utilizados, eles nem sempre oferecem a melhor compatibilidade entre plataformas — especialmente em ambientes Linux, sistemas governamentais ou organizações que dependem de padrões abertos.
Este guia apresenta quatro métodos fáceis e confiáveis para converter Word para ODT, incluindo ferramentas de desktop, conversores online e soluções automatizadas em lote. Se você precisa de uma conversão rápida e única ou de um fluxo de trabalho escalável para vários arquivos, encontrará a abordagem mais eficiente aqui.
- O que é ODT
- Por que converter Word para ODT
- Método 1: Converter Word para ODT usando o Microsoft Word
- Método 2: Converter Word para ODT com o LibreOffice Writer
- Método 3: Converter Word para ODT usando ferramentas online
- Método 4: Converter em lote Word para ODT com Python
- Dicas práticas para evitar problemas de formatação e compatibilidade do Word para ODT
O que é ODT?
ODT (OpenDocument Text) é o formato de arquivo de processamento de texto padrão do LibreOffice e do Apache OpenOffice. Faz parte do padrão OpenDocument Format (ODF), mantido pela OASIS e reconhecido como um padrão ISO.
Vantagens do ODT sobre o DOCX:
- Especificação aberta e neutra em relação ao fornecedor
- Suporte nativo em ambientes Linux e de código aberto
- Melhor compatibilidade para arquivamento a longo prazo
Por que converter Word para ODT?
A conversão de documentos do Word para ODT oferece vários benefícios práticos:
- Fluxo de trabalho de código aberto: Necessário para usuários do LibreOffice ou OpenOffice
- Compatibilidade entre plataformas: Funciona bem em Linux e macOS
- Independência de fornecedor: Evite depender exclusivamente do Microsoft Word
- Arquivamento e conformidade: Preferido em certos fluxos de trabalho governamentais ou institucionais
Nota importante:
A Microsoft afirma que, ao salvar documentos do Word como ODT, a maioria dos recursos principais é suportada, mas alguns como Controle de Alterações, proteção de documentos, temas, marcas d'água e macros VBA podem não ser totalmente transferidos. Sempre revise seus documentos convertidos.
Fonte: Suporte da Microsoft - Diferenças entre o formato OpenDocument Text (.odt) e o formato Word (.docx)
Método 1: Converter Word para ODT usando o Microsoft Word
Para usuários que ocasionalmente precisam converter documentos do Word para ODT, o Microsoft Word oferece uma solução simples e confiável. Este método é ideal para arquivos únicos ou pequenos lotes de arquivos.
Passos para salvar um documento do Word como ODT no Microsoft Word:
-
Abra seu documento do Word (.doc ou .docx) no Microsoft Word.
-
Clique em Arquivo > Salvar como.
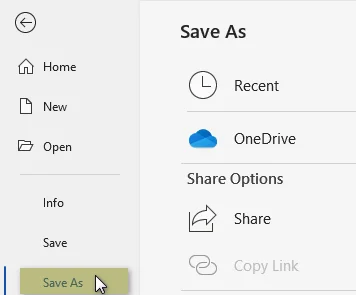
-
Escolha a pasta de destino para o seu arquivo ODT.
-
Na lista suspensa Salvar como tipo, selecione Documento de Texto ODF (*.odt).
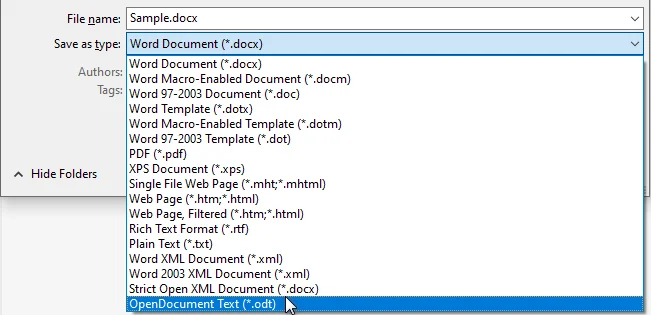
-
Clique em Salvar e confirme quaisquer avisos de compatibilidade.
Prós:
- Simples e rápido para conversões ocasionais
- Mantém a maior parte da formatação e do layout
- Nenhum software adicional necessário
Contras:
- Não é ideal para um grande número de arquivos
- O processo manual pode ser demorado
Você também pode gostar: Converter ODT para Word: 4 maneiras simples (Desktop, Online e Python)
Método 2: Converter Word para ODT com o LibreOffice Writer
O LibreOffice Writer é uma solução de código aberto para converter documentos do Word para ODT. Ele oferece excelente compatibilidade e flexibilidade, tornando-o ideal tanto para conversões únicas quanto para pequenos lotes, especialmente para usuários que preferem software livre.
Passos para converter DOCX para ODT com o LibreOffice Writer:
-
Abra o LibreOffice Writer.
-
Vá para Arquivo > Abrir e selecione seu documento do Word.
-
Revise o documento para garantir que o layout e a formatação apareçam corretamente.
-
Clique em Arquivo > Salvar como.
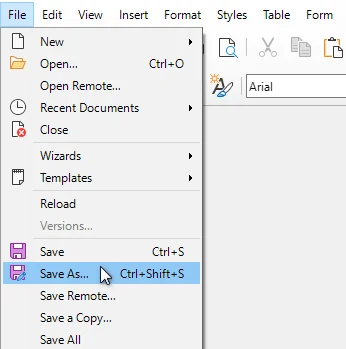
-
Escolha Documento de Texto ODF (.odt) como o tipo de arquivo.
-
Clique em Salvar para concluir a conversão.
Prós:
- Gratuito e de código aberto
- Preservação confiável de formatação e estilo
- Compatível com DOC e DOCX
Contras:
- Leve curva de aprendizado para novos usuários não familiarizados com a interface do LibreOffice
Método 3: Converter Word para ODT usando ferramentas online
Os conversores online fornecem a maneira mais rápida de converter documentos do Word para ODT sem instalar nenhum software. Este método é ideal para conversões rápidas e únicas e para usuários que precisam de acesso a partir de vários dispositivos.
Conversores online gratuitos populares como Zamzar e CloudConvert permitem que você converta DOC ou DOCX para ODT online diretamente no seu navegador em apenas alguns passos simples.
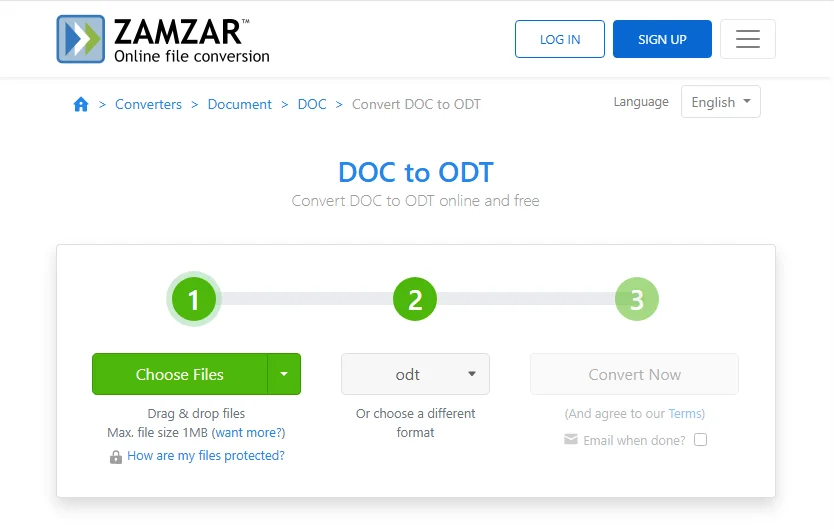
Passos para converter Word para ODT online (usando o Zamzar como exemplo):
- Abra o conversor online de Word para ODT do Zamzar.
- Clique em Escolher arquivos para carregar o documento do Word que você deseja converter.
- Clique em Converter agora e aguarde a conclusão do processo de conversão.
- Baixe o arquivo ODT convertido.
Prós:
- Nenhuma instalação de software necessária
- Funciona em todos os dispositivos e plataformas
- Rápido e conveniente para documentos únicos
Contras:
- O tamanho do arquivo e o número de documentos podem ser limitados
- Conexão com a Internet necessária
- Preocupações com a privacidade de documentos confidenciais
Método 4: Converter em lote Word para ODT com Python
Para desenvolvedores e empresas, automatizar a conversão de Word para ODT com Python é uma solução escalável, consistente e altamente eficiente para processar centenas ou milhares de arquivos do Word. Isso é particularmente útil ao padronizar arquivos, migrar sistemas ou integrar a conversão de documentos em fluxos de trabalho automatizados.
Este exemplo usa a biblioteca Spire.Doc for Python. Ele suporta a conversão de arquivos do Word para ODT e outros formatos, como PDF e HTML, tornando-o ideal para processamento em lote e integração em fluxos de trabalho automatizados.
Passos para converter arquivos do Word em lote para ODT com Python:
-
Instale a biblioteca necessária do PyPI:
pip install spire.doc
-
Prepare o script Python.
from spire.doc import * import os # Input folder containing Word files input_folder = "C:/WordFiles" # Output folder for ODT files output_folder = "C:/ODTFiles" # Ensure the output folder exists os.makedirs(output_folder, exist_ok=True) # Loop through all Word files in the input folder for filename in os.listdir(input_folder): if filename.endswith(".docx") or filename.endswith(".doc"): # Load the Word document doc = Document(os.path.join(input_folder, filename)) # Set the output ODT file path output_path = os.path.join(output_folder, filename.rsplit(".", 1)[0] + ".odt") # Save as ODT doc.saveToFile(output_path, FileFormat.Odt) print(f"Converted {filename} to {output_path}") -
Execute o script.
O script processará todos os arquivos do Word na pasta de entrada e salvará os arquivos ODT convertidos na pasta de saída.
Prós:
- Escalável: pode processar um grande número de arquivos automaticamente
- Flexível: suporta vários formatos de saída, incluindo ODT, PDF e HTML
- Integrável: pode ser incorporado em pipelines de automação Python
- Consistente: fornece resultados de conversão repetíveis e confiáveis
Contras:
- Requer conhecimento básico de Python para configurar e executar
- Precisa instalar uma biblioteca de terceiros
Dicas práticas para evitar problemas de formatação e compatibilidade do Word para ODT
Para garantir uma conversão suave de Word para ODT e manter a integridade do documento, siga estas dicas principais:
- Evite elementos não suportados: recursos como macros, Controle de Alterações, marcas d'água e certos elementos de cabeçalho/rodapé podem não ser totalmente transferidos para ODT.
- Simplifique a formatação: use fontes padrão e evite tabelas excessivamente complexas ou objetos aninhados para reduzir problemas de compatibilidade.
- Teste um arquivo de amostra primeiro: converta um documento para identificar problemas de layout ou formatação antes da conversão em lote.
- Faça backup e revise: sempre mantenha o arquivo original do Word e verifique o ODT convertido para garantir que tabelas, imagens e estilos apareçam corretamente.
Considerações finais: escolha o melhor método para converter Word para ODT
Com várias maneiras de converter Word para ODT, é importante escolher o método que corresponda ao seu fluxo de trabalho, volume de arquivos e plataforma. Aqui está uma comparação rápida dos quatro principais métodos de conversão de Word para ODT:
| Método | Prós | Contras |
|---|---|---|
| Microsoft Word | Simples, sem ferramentas extras | Manual, não amigável para lotes |
| LibreOffice | Gratuito, boa compatibilidade | Manual, pequenos lotes |
| Ferramentas online | Rápido, entre dispositivos | Internet necessária, preocupações com a privacidade |
| Python | Escalável, flexível | Requer conhecimento de Python |
Escolhendo o método certo:
- Arquivos únicos: o Microsoft Word é o mais fácil e rápido.
- Fluxos de trabalho de código aberto: o LibreOffice garante a máxima compatibilidade.
- Tarefas rápidas e únicas: os conversores online oferecem conveniência.
- Pipelines empresariais ou de desenvolvedor: a conversão em lote com Python é eficiente, escalável e confiável.
perguntas frequentes
Q1: A conversão de Word para ODT perderá a formatação?
A1: A maioria das formatações padrão, como fontes, títulos e tabelas, é preservada. Recursos avançados como macros ou Controle de Alterações podem não ser totalmente transferidos. Sempre verifique o ODT convertido no LibreOffice ou no Microsoft Word.
Q2: Posso converter em lote vários arquivos do Word para ODT?
A2: Sim. Você pode converter em lote Word para ODT usando scripts do LibreOffice ou bibliotecas Python como Spire.Doc para uma conversão rápida e automatizada.
Q3: ODT é melhor que DOCX?
A3: ODT é um padrão aberto, multiplataforma e ideal para arquivamento a longo prazo. O DOCX é proprietário, mas amplamente suportado. O ODT é preferido para fluxos de trabalho de código aberto e independência de fornecedor.
Q4: Os conversores online de Word para ODT são seguros?
A4: Para documentos confidenciais, evite conversores online públicos. Use ferramentas offline como Microsoft Word, LibreOffice ou scripts Python para uma conversão segura de Word para ODT.
Q5: Qual método é mais rápido para arquivos únicos do Word?
A5: O Microsoft Word ou os conversores online são os mais rápidos para conversões individuais de Word para ODT, mantendo o layout com o mínimo de esforço.
Q6: Os arquivos ODT podem ser abertos no Mac ou no Google Docs?
A6: Sim. Os arquivos ODT funcionam no macOS via LibreOffice/OpenOffice e podem ser abertos no Google Docs, embora algumas formatações complexas possam variar.
Veja também
Word를 ODT로 변환: 4가지 쉽고 안정적인 방법
LibreOffice 또는 OpenOffice와 같은 오픈 소스 오피스 제품군으로 작업할 때 Word 문서를 ODT(OpenDocument Text) 형식으로 변환해야 하는 경우가 많습니다. Word(DOC/DOCX) 파일이 널리 사용되지만, 특히 Linux 환경, 정부 시스템 또는 개방형 표준에 의존하는 조직에서는 항상 최상의 플랫폼 간 호환성을 제공하지는 않습니다.
이 가이드에서는 데스크톱 도구, 온라인 변환기 및 자동화된 일괄 솔루션을 포함하여 Word를 ODT로 변환하는 네 가지 쉽고 신뢰할 수 있는 방법을 안내합니다. 빠른 일회성 변환이 필요하든 여러 파일에 대한 확장 가능한 워크플로가 필요하든 여기에서 가장 효율적인 접근 방식을 찾을 수 있습니다.
- ODT란 무엇인가
- Word를 ODT로 변환해야 하는 이유
- 방법 1: Microsoft Word를 사용하여 Word를 ODT로 변환
- 방법 2: LibreOffice Writer로 Word를 ODT로 변환
- 방법 3: 온라인 도구를 사용하여 Word를 ODT로 변환
- 방법 4: Python으로 Word를 ODT로 일괄 변환
- Word를 ODT로 변환 시 서식 및 호환성 문제를 피하기 위한 실용적인 팁
ODT란 무엇인가?
ODT(OpenDocument Text)는 LibreOffice 및 Apache OpenOffice의 기본 워드 프로세싱 파일 형식입니다. OASIS에서 유지 관리하고 ISO 표준으로 인정받는 ODF(OpenDocument Format) 표준의 일부입니다.
DOCX에 대한 ODT의 장점:
- 개방형, 공급업체 중립적 사양
- Linux 및 오픈 소스 환경에서의 기본 지원
- 더 나은 장기 보관 호환성
Word를 ODT로 변환해야 하는 이유?
Word 문서를 ODT로 변환하면 몇 가지 실용적인 이점이 있습니다.
- 오픈 소스 워크플로: LibreOffice 또는 OpenOffice 사용자에게 필요
- 플랫폼 간 호환성: Linux 및 macOS에서 잘 작동
- 공급업체 독립성: Microsoft Word에만 의존하지 않음
- 보관 및 규정 준수: 특정 정부 또는 기관 워크플로에서 선호됨
중요 참고:
Microsoft는 Word 문서를 ODT로 저장할 때 대부분의 핵심 기능이 지원되지만 변경 내용 추적, 문서 보호, 테마, 워터마크 및 VBA 매크로와 같은 일부 기능은 완전히 전송되지 않을 수 있다고 밝혔습니다. 변환된 문서를 항상 검토하십시오.
출처: Microsoft 지원 - OpenDocument 텍스트(.odt) 형식과 Word(.docx) 형식의 차이점
방법 1: Microsoft Word를 사용하여 Word를 ODT로 변환
가끔 Word 문서를 ODT로 변환해야 하는 사용자를 위해 Microsoft Word는 간단하고 신뢰할 수 있는 솔루션을 제공합니다. 이 방법은 단일 또는 소량의 파일에 이상적입니다.
Microsoft Word에서 Word 문서를 ODT로 저장하는 단계:
-
Microsoft Word에서 Word 문서(.doc 또는 .docx)를 엽니다.
-
파일 > 다른 이름으로 저장을 클릭합니다.
-
ODT 파일의 대상 폴더를 선택합니다.
-
파일 형식 드롭다운에서 ODF 텍스트 문서(*.odt)를 선택합니다.
-
저장을 클릭하고 호환성 프롬프트를 확인합니다.
장점:
- 가끔 변환할 때 간단하고 빠름
- 대부분의 서식 및 레이아웃 유지
- 추가 소프트웨어 필요 없음
단점:
- 많은 수의 파일에는 이상적이지 않음
- 수동 프로세스는 시간이 많이 걸릴 수 있음
관심 있을 만한 글: ODT를 Word로 변환: 4가지 간단한 방법(데스크톱, 온라인 및 Python)
방법 2: LibreOffice Writer로 Word를 ODT로 변환
LibreOffice Writer는 Word 문서를 ODT로 변환하기 위한 오픈 소스 솔루션입니다. 뛰어난 호환성과 유연성을 제공하여 단일 변환 및 소규모 배치 모두에 이상적이며, 특히 무료 소프트웨어를 선호하는 사용자에게 적합합니다.
LibreOffice Writer로 DOCX를 ODT로 변환하는 단계:
-
LibreOffice Writer를 엽니다.
-
파일 > 열기로 이동하여 Word 문서를 선택합니다.
-
문서를 검토하여 레이아웃과 서식이 올바르게 표시되는지 확인합니다.
-
파일 > 다른 이름으로 저장을 클릭합니다.
-
파일 형식으로 ODF 텍스트 문서(.odt)를 선택합니다.
-
저장을 클릭하여 변환을 완료합니다.
장점:
- 무료 및 오픈 소스
- 신뢰할 수 있는 서식 및 스타일 보존
- DOC 및 DOCX와 모두 호환
단점:
- LibreOffice 인터페이스에 익숙하지 않은 신규 사용자를 위한 약간의 학습 곡선
방법 3: 온라인 도구를 사용하여 Word를 ODT로 변환
온라인 변환기는 소프트웨어를 설치하지 않고도 Word 문서를 ODT로 변환하는 가장 빠른 방법을 제공합니다. 이 방법은 빠른 일회성 변환 및 여러 장치에서 액세스해야 하는 사용자에게 이상적입니다.
Zamzar 및 CloudConvert와 같은 인기 있는 무료 온라인 변환기를 사용하면 몇 가지 간단한 단계만으로 브라우저에서 직접 DOC 또는 DOCX를 ODT로 온라인 변환할 수 있습니다.
온라인에서 Word를 ODT로 변환하는 단계(Zamzar 예시):
- Zamzar 온라인 Word to ODT 변환기를 엽니다.
- 파일 선택을 클릭하여 변환하려는 Word 문서를 업로드합니다.
- 지금 변환을 클릭하고 변환 프로세스가 완료될 때까지 기다립니다.
- 변환된 ODT 파일을 다운로드합니다.
장점:
- 소프트웨어 설치 필요 없음
- 장치 및 플랫폼 전반에서 작동
- 단일 문서에 대해 빠르고 편리함
단점:
- 파일 크기 및 문서 수가 제한될 수 있음
- 인터넷 연결 필요
- 민감한 문서에 대한 개인 정보 보호 문제
방법 4: Python으로 Word를 ODT로 일괄 변환
개발자 및 기업의 경우 Python을 사용하여 Word에서 ODT로의 변환을 자동화하는 것은 수백 또는 수천 개의 Word 파일을 처리하기 위한 확장 가능하고 일관되며 매우 효율적인 솔루션입니다. 이는 아카이브를 표준화하거나 시스템을 마이그레이션하거나 문서 변환을 자동화된 워크플로에 통합할 때 특히 유용합니다.
이 예에서는 Spire.Doc for Python 라이브러리를 사용합니다. Word 파일을 ODT 및 PDF, HTML과 같은 다른 형식으로 변환하는 것을 지원하므로 일괄 처리 및 자동화된 워크플로에 통합하는 데 이상적입니다.
Python으로 Word 파일을 ODT로 일괄 변환하는 단계:
-
PyPI에서 필수 라이브러리 설치:
pip install spire.doc -
Python 스크립트를 준비합니다.
from spire.doc import * import os # Word 파일이 포함된 입력 폴더 input_folder = "C:/WordFiles" # ODT 파일용 출력 폴더 output_folder = "C:/ODTFiles" # 출력 폴더가 있는지 확인 os.makedirs(output_folder, exist_ok=True) # 입력 폴더의 모든 Word 파일을 반복 for filename in os.listdir(input_folder): if filename.endswith(".docx") or filename.endswith(".doc"): # Word 문서 로드 doc = Document(os.path.join(input_folder, filename)) # 출력 ODT 파일 경로 설정 output_path = os.path.join(output_folder, filename.rsplit(".", 1)[0] + ".odt") # ODT로 저장 doc.saveToFile(output_path, FileFormat.Odt) print(f"{filename}을(를) {output_path}(으)로 변환했습니다") -
스크립트를 실행합니다.
스크립트는 입력 폴더의 모든 Word 파일을 처리하고 변환된 ODT 파일을 출력 폴더에 저장합니다.
장점:
- 확장 가능: 많은 수의 파일을 자동으로 처리할 수 있음
- 유연함: ODT, PDF 및 HTML을 포함한 여러 출력 형식 지원
- 통합 가능: Python 자동화 파이프라인에 통합 가능
- 일관성: 반복 가능하고 신뢰할 수 있는 변환 결과 제공
단점:
- 설정 및 실행을 위해 기본 Python 지식 필요
- 타사 라이브러리 설치 필요
Word를 ODT로 변환 시 서식 및 호환성 문제를 피하기 위한 실용적인 팁
원활한 Word to ODT 변환을 보장하고 문서 무결성을 유지하려면 다음 주요 팁을 따르십시오.
- 지원되지 않는 요소 피하기: 매크로, 변경 내용 추적, 워터마크 및 특정 머리글/바닥글 요소와 같은 기능은 ODT로 완전히 전송되지 않을 수 있습니다.
- 서식 단순화: 표준 글꼴을 사용하고 지나치게 복잡한 표나 중첩된 개체를 피하여 호환성 문제를 줄입니다.
- 샘플 파일 먼저 테스트: 일괄 변환 전에 하나의 문서를 변환하여 레이아웃 또는 서식 문제를 식별합니다.
- 백업 및 검토: 항상 원본 Word 파일을 보관하고 변환된 ODT를 확인하여 표, 이미지 및 스타일이 올바르게 표시되는지 확인합니다.
마지막 생각: Word를 ODT로 변환하는 최상의 방법 선택
Word를 ODT로 변환하는 여러 가지 방법이 있으므로 워크플로, 파일 볼륨 및 플랫폼에 맞는 방법을 선택하는 것이 중요합니다. 다음은 네 가지 주요 Word to ODT 변환 방법을 간략하게 비교한 것입니다.
| 방법 | 장점 | 단점 |
|---|---|---|
| Microsoft Word | 간단하고 추가 도구 없음 | 수동, 일괄 처리 미지원 |
| LibreOffice | 무료, 우수한 호환성 | 수동, 소규모 배치 |
| 온라인 도구 | 빠르고, 여러 장치 지원 | 인터넷 필요, 개인 정보 보호 문제 |
| Python | 확장 가능, 유연함 | Python 지식 필요 |
올바른 방법 선택:
- 단일 파일: Microsoft Word가 가장 쉽고 빠릅니다.
- 오픈 소스 워크플로: LibreOffice는 최대의 호환성을 보장합니다.
- 빠른 일회성 작업: 온라인 변환기는 편리함을 제공합니다.
- 기업 또는 개발자 파이프라인: Python 일괄 변환은 효율적이고 확장 가능하며 신뢰할 수 있습니다.
자주 묻는 질문
Q1: Word를 ODT로 변환하면 서식이 손실됩니까?
A1: 글꼴, 제목, 표와 같은 대부분의 표준 서식은 유지됩니다. 매크로나 변경 내용 추적과 같은 고급 기능은 완전히 전송되지 않을 수 있습니다. LibreOffice 또는 Microsoft Word에서 변환된 ODT를 항상 확인하십시오.
Q2: 여러 Word 파일을 ODT로 일괄 변환할 수 있습니까?
A2: 예. LibreOffice 스크립팅 또는 Spire.Doc과 같은 Python 라이브러리를 사용하여 빠르고 자동화된 변환을 위해 Word를 ODT로 일괄 변환할 수 있습니다.
Q3: ODT가 DOCX보다 낫습니까?
A3: ODT는 개방형 표준이며 플랫폼 간 호환이 가능하며 장기 보관에 이상적입니다. DOCX는 독점적이지만 널리 지원됩니다. ODT는 오픈 소스 워크플로 및 공급업체 독립성을 위해 선호됩니다.
Q4: 온라인 Word to ODT 변환기는 안전합니까?
A4: 기밀 문서의 경우 공용 온라인 변환기를 사용하지 마십시오. 안전한 Word to ODT 변환을 위해 Microsoft Word, LibreOffice 또는 Python 스크립트와 같은 오프라인 도구를 사용하십시오.
Q5: 단일 Word 파일에 가장 빠른 방법은 무엇입니까?
A5: Microsoft Word 또는 온라인 변환기는 개별 Word to ODT 변환에 가장 빠르며 최소한의 노력으로 레이아웃을 유지합니다.
Q6: Mac 또는 Google Docs에서 ODT 파일을 열 수 있습니까?
A6: 예. ODT 파일은 LibreOffice/OpenOffice를 통해 macOS에서 작동하며 Google Docs에서 열 수 있지만 일부 복잡한 서식은 다를 수 있습니다.
참고 항목
Convertire Word in ODT: 4 metodi semplici e affidabili
Indice
- Cos'è ODT
- Perché convertire Word in ODT
- Metodo 1: Convertire Word in ODT usando Microsoft Word
- Metodo 2: Convertire Word in ODT con LibreOffice Writer
- Metodo 3: Convertire Word in ODT usando strumenti online
- Metodo 4: Conversione batch di Word in ODT con Python
- Consigli pratici per evitare problemi di formattazione e compatibilità da Word a ODT
Quando si lavora con suite per ufficio open source come LibreOffice o OpenOffice, potrebbe essere spesso necessario convertire documenti Word nel formato ODT (OpenDocument Text). Sebbene i file di Word (DOC/DOCX) siano ampiamente utilizzati, non sempre offrono la migliore compatibilità multipiattaforma, specialmente in ambienti Linux, sistemi governativi o organizzazioni che si basano su standard aperti.
Questa guida illustra quattro metodi facili e affidabili per convertire Word in ODT, inclusi strumenti desktop, convertitori online e soluzioni batch automatizzate. Che tu abbia bisogno di una rapida conversione una tantum o di un flusso di lavoro scalabile per più file, qui troverai l'approccio più efficiente.
- Cos'è ODT
- Perché convertire Word in ODT
- Metodo 1: Convertire Word in ODT usando Microsoft Word
- Metodo 2: Convertire Word in ODT con LibreOffice Writer
- Metodo 3: Convertire Word in ODT usando strumenti online
- Metodo 4: Conversione batch di Word in ODT con Python
- Consigli pratici per evitare problemi di formattazione e compatibilità da Word a ODT
Cos'è ODT?
ODT (OpenDocument Text) è il formato di file di elaborazione testi predefinito di LibreOffice e Apache OpenOffice. Fa parte dello standard OpenDocument Format (ODF), mantenuto da OASIS e riconosciuto come standard ISO.
Vantaggi di ODT rispetto a DOCX:
- Specifica aperta e neutrale rispetto al fornitore
- Supporto nativo in ambienti Linux e open source
- Migliore compatibilità per l'archiviazione a lungo termine
Perché convertire Word in ODT?
La conversione di documenti Word in ODT offre diversi vantaggi pratici:
- Flusso di lavoro open source: Richiesto per gli utenti di LibreOffice o OpenOffice
- Compatibilità multipiattaforma: Funziona bene su Linux e macOS
- Indipendenza dal fornitore: Evita di fare affidamento esclusivamente su Microsoft Word
- Archiviazione e conformità: Preferito in alcuni flussi di lavoro governativi o istituzionali
Nota importante:
Microsoft afferma che quando si salvano documenti Word come ODT, la maggior parte delle funzionalità principali è supportata, ma alcune come la revisione delle modifiche, la protezione del documento, i temi, le filigrane e le macro VBA potrebbero non essere trasferite completamente. Rivedi sempre i tuoi documenti convertiti.
Fonte: Supporto Microsoft - Differenze tra il formato OpenDocument Text (.odt) e il formato Word (.docx)
Metodo 1: Convertire Word in ODT usando Microsoft Word
Per gli utenti che occasionalmente devono convertire documenti Word in ODT, Microsoft Word offre una soluzione semplice e affidabile. Questo metodo è ideale per file singoli o piccoli lotti di file.
Passaggi per salvare un documento Word come ODT in Microsoft Word:
-
Apri il tuo documento Word (.doc o .docx) in Microsoft Word.
-
Fai clic su File > Salva con nome.
-
Scegli la cartella di destinazione per il tuo file ODT.
-
Nel menu a discesa Salva come, seleziona Documento di testo ODF (*.odt).
-
Fai clic su Salva e conferma eventuali avvisi di compatibilità.
Vantaggi:
- Semplice e veloce per conversioni occasionali
- Mantiene la maggior parte della formattazione e del layout
- Nessun software aggiuntivo necessario
Svantaggi:
- Non ideale per un gran numero di file
- Il processo manuale può richiedere molto tempo
Potrebbe piacerti anche: Convertire ODT in Word: 4 modi semplici (Desktop, Online e Python)
Metodo 2: Convertire Word in ODT con LibreOffice Writer
LibreOffice Writer è una soluzione open source per la conversione di documenti Word in ODT. Offre un'eccellente compatibilità e flessibilità, rendendolo ideale sia per conversioni singole che per piccoli lotti, specialmente per gli utenti che preferiscono software gratuito.
Passaggi per convertire DOCX in ODT con LibreOffice Writer:
-
Apri LibreOffice Writer.
-
Vai su File > Apri e seleziona il tuo documento Word.
-
Rivedi il documento per assicurarti che il layout e la formattazione appaiano correttamente.
-
Fai clic su File > Salva con nome.
-
Scegli Documento di testo ODF (.odt) come tipo di file.
-
Fai clic su Salva per completare la conversione.
Vantaggi:
- Gratuito e open source
- Formattazione affidabile e conservazione dello stile
- Compatibile sia con DOC che con DOCX
Svantaggi:
- Leggera curva di apprendimento per i nuovi utenti non familiari con l'interfaccia di LibreOffice
Metodo 3: Convertire Word in ODT usando strumenti online
I convertitori online offrono il modo più veloce per convertire documenti Word in ODT senza installare alcun software. Questo metodo è ideale per conversioni rapide e una tantum e per gli utenti che necessitano di accesso da più dispositivi.
Popolari convertitori online gratuiti come Zamzar e CloudConvert ti consentono di convertire DOC o DOCX in ODT online direttamente nel tuo browser in pochi semplici passaggi.
Passaggi per convertire Word in ODT online (usando Zamzar come esempio):
- Apri il convertitore online da Word a ODT di Zamzar.
- Fai clic su Scegli file per caricare il documento Word che desideri convertire.
- Fai clic su Converti ora e attendi il completamento del processo di conversione.
- Scarica il file ODT convertito.
Vantaggi:
- Nessuna installazione di software richiesta
- Funziona su tutti i dispositivi e le piattaforme
- Veloce e comodo per documenti singoli
Svantaggi:
- Le dimensioni dei file e il numero di documenti potrebbero essere limitati
- Connessione Internet richiesta
- Preoccupazioni sulla privacy per documenti sensibili
Metodo 4: Conversione batch di Word in ODT con Python
Per sviluppatori e aziende, l'automazione della conversione da Word a ODT con Python è una soluzione scalabile, coerente e altamente efficiente per l'elaborazione di centinaia o migliaia di file Word. Ciò è particolarmente utile per standardizzare archivi, migrare sistemi o integrare la conversione di documenti in flussi di lavoro automatizzati.
Questo esempio utilizza la libreria Spire.Doc for Python. Supporta la conversione di file Word in ODT e altri formati come PDF e HTML, rendendolo ideale per l'elaborazione batch e l'integrazione in flussi di lavoro automatizzati.
Passaggi per la conversione batch di file Word in ODT con Python:
-
Installa la libreria richiesta da PyPI:
pip install spire.doc -
Prepara lo script Python.
from spire.doc import * import os # Cartella di input contenente i file di Word input_folder = "C:/WordFiles" # Cartella di output per i file ODT output_folder = "C:/ODTFiles" # Assicurati che la cartella di output esista os.makedirs(output_folder, exist_ok=True) # Scorri tutti i file di Word nella cartella di input for filename in os.listdir(input_folder): if filename.endswith(".docx") or filename.endswith(".doc"): # Carica il documento Word doc = Document(os.path.join(input_folder, filename)) # Imposta il percorso del file ODT di output output_path = os.path.join(output_folder, filename.rsplit(".", 1)[0] + ".odt") # Salva come ODT doc.saveToFile(output_path, FileFormat.Odt) print(f"Converted {filename} to {output_path}") -
Esegui lo script.
Lo script elaborerà tutti i file di Word nella cartella di input e salverà i file ODT convertiti nella cartella di output.
Vantaggi:
- Scalabile: può elaborare automaticamente un gran numero di file
- Flessibile: supporta più formati di output tra cui ODT, PDF e HTML
- Integrabile: può essere incorporato nelle pipeline di automazione Python
- Coerente: fornisce risultati di conversione ripetibili e affidabili
Svantaggi:
- Richiede una conoscenza di base di Python per la configurazione e l'esecuzione
- È necessario installare una libreria di terze parti
Consigli pratici per evitare problemi di formattazione e compatibilità da Word a ODT
Per garantire una conversione fluida da Word a ODT e mantenere l'integrità del documento, segui questi suggerimenti chiave:
- Evita elementi non supportati: funzionalità come macro, revisioni, filigrane e alcuni elementi di intestazione/piè di pagina potrebbero non essere trasferiti completamente in ODT.
- Semplifica la formattazione: utilizza caratteri standard ed evita tabelle eccessivamente complesse o oggetti nidificati per ridurre i problemi di compatibilità.
- Testa prima un file di esempio: converti un documento per identificare problemi di layout o formattazione prima della conversione batch.
- Backup e revisione: conserva sempre il file Word originale e controlla l'ODT convertito per assicurarti che tabelle, immagini e stili appaiano correttamente.
Considerazioni finali: scegli il metodo migliore per convertire Word in ODT
Con più modi per convertire Word in ODT, è importante scegliere il metodo che corrisponde al tuo flusso di lavoro, al volume di file e alla piattaforma. Ecco un rapido confronto dei quattro principali metodi di conversione da Word a ODT:
| Metodo | Vantaggi | Svantaggi |
|---|---|---|
| Microsoft Word | Semplice, nessuno strumento aggiuntivo | Manuale, non adatto ai batch |
| LibreOffice | Gratuito, buona compatibilità | Manuale, piccoli lotti |
| Strumenti online | Veloce, multi-dispositivo | Internet richiesto, problemi di privacy |
| Python | Scalabile, flessibile | Richiede conoscenza di Python |
Scegliere il metodo giusto:
- File singoli: Microsoft Word è il più semplice e veloce.
- Flussi di lavoro open source: LibreOffice garantisce la massima compatibilità.
- Attività rapide una tantum: i convertitori online offrono praticità.
- Pipeline aziendali o per sviluppatori: la conversione batch Python è efficiente, scalabile e affidabile.
Domande frequenti
D1: La conversione da Word a ODT perderà la formattazione?
R1: La maggior parte della formattazione standard come caratteri, intestazioni e tabelle viene preservata. Funzionalità avanzate come macro o revisioni potrebbero non essere trasferite completamente. Controlla sempre l'ODT convertito in LibreOffice o Microsoft Word.
D2: Posso convertire in batch più file Word in ODT?
R2: Sì. Puoi convertire in batch Word in ODT utilizzando lo scripting di LibreOffice o librerie Python come Spire.Doc per una conversione rapida e automatizzata.
D3: ODT è meglio di DOCX?
R3: ODT è uno standard aperto, multipiattaforma e ideale per l'archiviazione a lungo termine. DOCX è proprietario ma ampiamente supportato. ODT è preferito per i flussi di lavoro open source e l'indipendenza dal fornitore.
D4: I convertitori online da Word a ODT sono sicuri?
R4: Per i documenti riservati, evita i convertitori online pubblici. Utilizza strumenti offline come Microsoft Word, LibreOffice o script Python per una conversione sicura da Word a ODT.
D5: Qual è il metodo più veloce per i singoli file di Word?
R5: Microsoft Word o i convertitori online sono i più veloci per le conversioni individuali da Word a ODT, mantenendo il layout con il minimo sforzo.
D6: I file ODT possono essere aperti su Mac o Google Docs?
R6: Sì. I file ODT funzionano su macOS tramite LibreOffice/OpenOffice e possono essere aperti in Google Docs, sebbene alcune formattazioni complesse possano variare.
Vedi anche
Convertir Word en ODT : 4 méthodes simples et fiables
Table des matières
- Qu'est-ce que l'ODT
- Pourquoi convertir Word en ODT
- Méthode 1 : Convertir Word en ODT avec Microsoft Word
- Méthode 2 : Convertir Word en ODT avec LibreOffice Writer
- Méthode 3 : Convertir Word en ODT avec des outils en ligne
- Méthode 4 : Conversion par lots de Word en ODT avec Python
- Conseils pratiques pour éviter les problèmes de formatage et de compatibilité de Word à ODT
Lorsque vous travaillez avec des suites bureautiques open source comme LibreOffice ou OpenOffice, vous devrez peut-être souvent convertir des documents Word au format ODT (OpenDocument Text). Bien que les fichiers Word (DOC/DOCX) soient largement utilisés, ils n'offrent pas toujours la meilleure compatibilité multiplateforme, en particulier dans les environnements Linux, les systèmes gouvernementaux ou les organisations qui s'appuient sur des normes ouvertes.
Ce guide vous présente quatre méthodes simples et fiables pour convertir Word en ODT, y compris des outils de bureau, des convertisseurs en ligne et des solutions de traitement par lots automatisées. Que vous ayez besoin d'une conversion ponctuelle rapide ou d'un flux de travail évolutif pour plusieurs fichiers, vous trouverez ici l'approche la plus efficace.
- Qu'est-ce que l'ODT
- Pourquoi convertir Word en ODT
- Méthode 1 : Convertir Word en ODT avec Microsoft Word
- Méthode 2 : Convertir Word en ODT avec LibreOffice Writer
- Méthode 3 : Convertir Word en ODT avec des outils en ligne
- Méthode 4 : Conversion par lots de Word en ODT avec Python
- Conseils pratiques pour éviter les problèmes de formatage et de compatibilité de Word à ODT
Qu'est-ce que l'ODT ?
ODT (OpenDocument Text) est le format de fichier de traitement de texte par défaut de LibreOffice et Apache OpenOffice. Il fait partie de la norme OpenDocument Format (ODF), maintenue par OASIS et reconnue comme une norme ISO.
Avantages de l'ODT par rapport au DOCX :
- Spécification ouverte et neutre vis-à-vis des fournisseurs
- Prise en charge native dans les environnements Linux et open source
- Meilleure compatibilité pour l'archivage à long terme
Pourquoi convertir Word en ODT ?
La conversion de documents Word en ODT offre plusieurs avantages pratiques :
- Flux de travail open source : requis pour les utilisateurs de LibreOffice ou OpenOffice
- Compatibilité multiplateforme : fonctionne bien sur Linux et macOS
- Indépendance vis-à-vis des fournisseurs : évitez de dépendre uniquement de Microsoft Word
- Archivage et conformité : privilégié dans certains flux de travail gouvernementaux ou institutionnels
Note importante :
Microsoft déclare que lors de l'enregistrement de documents Word au format ODT, la plupart des fonctionnalités de base sont prises en charge, mais certaines comme le suivi des modifications, la protection des documents, les thèmes, les filigranes et les macros VBA peuvent ne pas être entièrement transférées. Vérifiez toujours vos documents convertis.
Source : Support Microsoft - Différences entre le format OpenDocument Text (.odt) et le format Word (.docx)
Méthode 1 : Convertir Word en ODT avec Microsoft Word
Pour les utilisateurs qui ont occasionnellement besoin de convertir des documents Word en ODT, Microsoft Word offre une solution simple et fiable. Cette méthode est idéale pour les fichiers uniques ou les petits lots de fichiers.
Étapes pour enregistrer un document Word au format ODT dans Microsoft Word :
-
Ouvrez votre document Word (.doc ou .docx) dans Microsoft Word.
-
Cliquez sur Fichier > Enregistrer sous.
-
Choisissez le dossier de destination pour votre fichier ODT.
-
Dans la liste déroulante Type de fichier, sélectionnez Document texte ODF (*.odt).
-
Cliquez sur Enregistrer et confirmez les éventuelles invites de compatibilité.
Avantages :
- Simple et rapide pour les conversions occasionnelles
- Conserve la plupart du formatage et de la mise en page
- Aucun logiciel supplémentaire requis
Inconvénients :
- Pas idéal pour un grand nombre de fichiers
- Le processus manuel peut prendre du temps
Vous pourriez aussi aimer : Convertir ODT en Word : 4 méthodes simples (bureau, en ligne et Python)
Méthode 2 : Convertir Word en ODT avec LibreOffice Writer
LibreOffice Writer est une solution open source pour convertir des documents Word en ODT. Il offre une excellente compatibilité et flexibilité, ce qui le rend idéal pour les conversions uniques et les petits lots, en particulier pour les utilisateurs préférant les logiciels libres.
Étapes pour convertir DOCX en ODT avec LibreOffice Writer :
-
Ouvrez LibreOffice Writer.
-
Allez dans Fichier > Ouvrir et sélectionnez votre document Word.
-
Vérifiez le document pour vous assurer que la mise en page et le formatage s'affichent correctement.
-
Cliquez sur Fichier > Enregistrer sous.
-
Choisissez Document texte ODF (.odt) comme type de fichier.
-
Cliquez sur Enregistrer pour terminer la conversion.
Avantages :
- Gratuit et open source
- Conservation fiable du formatage et du style
- Compatible avec DOC et DOCX
Inconvénients :
- Légère courbe d'apprentissage pour les nouveaux utilisateurs peu familiers avec l'interface de LibreOffice
Méthode 3 : Convertir Word en ODT avec des outils en ligne
Les convertisseurs en ligne offrent le moyen le plus rapide de convertir des documents Word en ODT sans installer de logiciel. Cette méthode est idéale pour les conversions rapides et ponctuelles et pour les utilisateurs qui ont besoin d'un accès depuis plusieurs appareils.
Des convertisseurs en ligne gratuits populaires comme Zamzar et CloudConvert vous permettent de convertir DOC ou DOCX en ODT en ligne directement dans votre navigateur en quelques étapes simples.
Étapes pour convertir Word en ODT en ligne (en utilisant Zamzar comme exemple) :
- Ouvrez le convertisseur Word en ODT en ligne de Zamzar.
- Cliquez sur Choisir les fichiers pour télécharger le document Word que vous souhaitez convertir.
- Cliquez sur Convertir maintenant et attendez la fin du processus de conversion.
- Téléchargez le fichier ODT converti.
Avantages :
- Aucune installation de logiciel requise
- Fonctionne sur tous les appareils et plates-formes
- Rapide et pratique pour les documents uniques
Inconvénients :
- La taille et le nombre de documents peuvent être limités
- Connexion Internet requise
- Problèmes de confidentialité pour les documents sensibles
Méthode 4 : Conversion par lots de Word en ODT avec Python
Pour les développeurs et les entreprises, l'automatisation de la conversion de Word en ODT avec Python est une solution évolutive, cohérente et très efficace pour traiter des centaines ou des milliers de fichiers Word. Ceci est particulièrement utile lors de la normalisation des archives, de la migration des systèmes ou de l'intégration de la conversion de documents dans des flux de travail automatisés.
Cet exemple utilise la bibliothèque Spire.Doc for Python. Il prend en charge la conversion de fichiers Word en ODT et d'autres formats tels que PDF et HTML, ce qui le rend idéal pour le traitement par lots et l'intégration dans des flux de travail automatisés.
Étapes pour convertir par lots des fichiers Word en ODT avec Python :
-
Installez la bibliothèque requise depuis PyPI :
pip install spire.doc -
Préparez le script Python.
from spire.doc import * import os # Dossier d'entrée contenant les fichiers Word input_folder = "C:/WordFiles" # Dossier de sortie pour les fichiers ODT output_folder = "C:/ODTFiles" # S'assurer que le dossier de sortie existe os.makedirs(output_folder, exist_ok=True) # Parcourir tous les fichiers Word dans le dossier d'entrée for filename in os.listdir(input_folder): if filename.endswith(".docx") or filename.endswith(".doc"): # Charger le document Word doc = Document(os.path.join(input_folder, filename)) # Définir le chemin du fichier ODT de sortie output_path = os.path.join(output_folder, filename.rsplit(".", 1)[0] + ".odt") # Enregistrer en ODT doc.saveToFile(output_path, FileFormat.Odt) print(f"Converti {filename} en {output_path}") -
Exécutez le script.
Le script traitera tous les fichiers Word dans le dossier d'entrée et enregistrera les fichiers ODT convertis dans le dossier de sortie.
Avantages :
- Évolutif : peut traiter automatiquement un grand nombre de fichiers
- Flexible : prend en charge plusieurs formats de sortie, notamment ODT, PDF et HTML
- Intégrable : peut être incorporé dans des pipelines d'automatisation Python
- Cohérent : fournit des résultats de conversion reproductibles et fiables
Inconvénients :
- Nécessite des connaissances de base en Python pour la configuration et l'exécution
- Nécessite l'installation d'une bibliothèque tierce
Conseils pratiques pour éviter les problèmes de formatage et de compatibilité de Word à ODT
Pour garantir une conversion fluide de Word en ODT et maintenir l'intégrité du document, suivez ces conseils clés :
- Évitez les éléments non pris en charge : des fonctionnalités telles que les macros, le suivi des modifications, les filigranes et certains éléments d'en-tête/pied de page peuvent ne pas être entièrement transférées vers ODT.
- Simplifiez le formatage : utilisez des polices standard et évitez les tableaux trop complexes ou les objets imbriqués pour réduire les problèmes de compatibilité.
- Testez d'abord un fichier d'exemple : convertissez un document pour identifier les problèmes de mise en page ou de formatage avant la conversion par lots.
- Sauvegardez et révisez : conservez toujours le fichier Word d'origine et vérifiez l'ODT converti pour vous assurer que les tableaux, les images et les styles s'affichent correctement.
Réflexions finales : choisissez la meilleure méthode pour convertir Word en ODT
Avec plusieurs façons de convertir Word en ODT, il est important de choisir la méthode qui correspond à votre flux de travail, au volume de fichiers et à la plate-forme. Voici une comparaison rapide des quatre principales méthodes de conversion de Word en ODT :
| Méthode | Avantages | Inconvénients |
|---|---|---|
| Microsoft Word | Simple, pas d'outils supplémentaires | Manuel, pas adapté aux lots |
| LibreOffice | Gratuit, bonne compatibilité | Manuel, petits lots |
| Outils en ligne | Rapide, multi-appareils | Connexion Internet requise, problèmes de confidentialité |
| Python | Évolutif, flexible | Nécessite des connaissances en Python |
Choisir la bonne méthode :
- Fichiers uniques : Microsoft Word est le plus simple et le plus rapide.
- Flux de travail open source : LibreOffice garantit une compatibilité maximale.
- Tâches ponctuelles rapides : les convertisseurs en ligne sont pratiques.
- Pipelines d'entreprise ou de développeur : la conversion par lots Python est efficace, évolutive et fiable.
Questions fréquemment posées
Q1 : La conversion de Word en ODT entraînera-t-elle une perte de formatage ?
R1 : La plupart des mises en forme standard comme les polices, les titres et les tableaux sont conservées. Les fonctionnalités avancées telles que les macros ou le suivi des modifications peuvent ne pas être entièrement transférées. Vérifiez toujours l'ODT converti dans LibreOffice ou Microsoft Word.
Q2 : Puis-je convertir par lots plusieurs fichiers Word en ODT ?
R2 : Oui. Vous pouvez convertir par lots Word en ODT à l'aide de scripts LibreOffice ou de bibliothèques Python comme Spire.Doc pour une conversion rapide et automatisée.
Q3 : L'ODT est-il meilleur que le DOCX ?
R3 : ODT est une norme ouverte, multiplateforme et idéale pour l'archivage à long terme. DOCX est propriétaire mais largement pris en charge. ODT est préféré pour les flux de travail open source et l'indépendance vis-à-vis des fournisseurs.
Q4 : Les convertisseurs Word en ODT en ligne sont-ils sûrs ?
R4 : Pour les documents confidentiels, évitez les convertisseurs en ligne publics. Utilisez des outils hors ligne comme Microsoft Word, LibreOffice ou des scripts Python pour une conversion sécurisée de Word en ODT.
Q5 : Quelle est la méthode la plus rapide pour les fichiers Word uniques ?
R5 : Microsoft Word ou les convertisseurs en ligne sont les plus rapides pour les conversions individuelles de Word en ODT, en conservant la mise en page avec un minimum d'effort.
Q6 : Les fichiers ODT peuvent-ils s'ouvrir sur Mac ou Google Docs ?
R6 : Oui. Les fichiers ODT fonctionnent sur macOS via LibreOffice/OpenOffice et peuvent être ouverts dans Google Docs, bien que certaines mises en forme complexes puissent varier.
Voir aussi
Convertir Word a ODT: 4 métodos fáciles y fiables
Tabla de Contenidos
- Qué es ODT
- Por qué convertir Word a ODT
- Método 1: Convertir Word a ODT usando Microsoft Word
- Método 2: Convertir Word a ODT con LibreOffice Writer
- Método 3: Convertir Word a ODT usando herramientas en línea
- Método 4: Convertir por lotes Word a ODT con Python
- Consejos prácticos para evitar problemas de formato y compatibilidad de Word a ODT
Cuando se trabaja con suites de ofimática de código abierto como LibreOffice u OpenOffice, a menudo es necesario convertir documentos de Word al formato ODT (OpenDocument Text). Aunque los archivos de Word (DOC/DOCX) son ampliamente utilizados, no siempre ofrecen la mejor compatibilidad multiplataforma, especialmente en entornos Linux, sistemas gubernamentales u organizaciones que dependen de estándares abiertos.
Esta guía le mostrará cuatro métodos fáciles y fiables para convertir Word a ODT, incluyendo herramientas de escritorio, convertidores en línea y soluciones automatizadas por lotes. Ya sea que necesite una conversión rápida de una sola vez o un flujo de trabajo escalable para múltiples archivos, aquí encontrará el enfoque más eficiente.
- Qué es ODT
- Por qué convertir Word a ODT
- Método 1: Convertir Word a ODT usando Microsoft Word
- Método 2: Convertir Word a ODT con LibreOffice Writer
- Método 3: Convertir Word a ODT usando herramientas en línea
- Método 4: Convertir por lotes Word a ODT con Python
- Consejos prácticos para evitar problemas de formato y compatibilidad de Word a ODT
¿Qué es ODT?
ODT (OpenDocument Text) es el formato de archivo de procesamiento de textos predeterminado de LibreOffice y Apache OpenOffice. Forma parte del estándar OpenDocument Format (ODF), mantenido por OASIS y reconocido como un estándar ISO.
Ventajas de ODT sobre DOCX:
- Especificación abierta y neutral para el proveedor
- Soporte nativo en entornos Linux y de código abierto
- Mejor compatibilidad para el archivo a largo plazo
¿Por qué convertir Word a ODT?
Convertir documentos de Word a ODT ofrece varios beneficios prácticos:
- Flujo de trabajo de código abierto: Requerido para usuarios de LibreOffice u OpenOffice
- Compatibilidad multiplataforma: Funciona bien en Linux y macOS
- Independencia del proveedor: Evite depender únicamente de Microsoft Word
- Archivo y cumplimiento: Preferido en ciertos flujos de trabajo gubernamentales o institucionales
Nota importante:
Microsoft afirma que al guardar documentos de Word como ODT, la mayoría de las características principales son compatibles, pero algunas como el Control de cambios, la protección de documentos, los temas, las marcas de agua y las macros de VBA pueden no transferirse por completo. Revise siempre sus documentos convertidos.
Método 1: Convertir Word a ODT usando Microsoft Word
Para los usuarios que ocasionalmente necesitan convertir documentos de Word a ODT, Microsoft Word ofrece una solución simple y fiable. Este método es ideal para archivos individuales o pequeños lotes de archivos.
Pasos para guardar un documento de Word como ODT en Microsoft Word:
-
Abra su documento de Word (.doc o .docx) en Microsoft Word.
-
Haga clic en Archivo > Guardar como.
-
Elija la carpeta de destino para su archivo ODT.
-
En el menú desplegable Guardar como tipo, seleccione Documento de texto ODF (*.odt).
-
Haga clic en Guardar y confirme cualquier aviso de compatibilidad.
Pros:
- Simple y rápido para conversiones ocasionales
- Mantiene la mayor parte del formato y el diseño
- No se necesita software adicional
Contras:
- No es ideal para grandes cantidades de archivos
- El proceso manual puede llevar mucho tiempo
También te puede interesar: Convertir ODT a Word: 4 formas sencillas (escritorio, en línea y Python)
Método 2: Convertir Word a ODT con LibreOffice Writer
LibreOffice Writer es una solución de código abierto para convertir documentos de Word a ODT. Ofrece una excelente compatibilidad y flexibilidad, lo que lo hace ideal tanto para conversiones individuales como para pequeños lotes, especialmente para usuarios que prefieren software gratuito.
Pasos para convertir DOCX a ODT con LibreOffice Writer:
-
Abra LibreOffice Writer.
-
Vaya a Archivo > Abrir y seleccione su documento de Word.
-
Revise el documento para asegurarse de que el diseño y el formato aparezcan correctamente.
-
Haga clic en Archivo > Guardar como.
-
Elija Documento de texto ODF (.odt) como tipo de archivo.
-
Haga clic en Guardar para completar la conversión.
Pros:
- Gratuito y de código abierto
- Preservación fiable del formato y el estilo
- Compatible con DOC y DOCX
Contras:
- Ligera curva de aprendizaje para nuevos usuarios no familiarizados con la interfaz de LibreOffice
Método 3: Convertir Word a ODT usando herramientas en línea
Los convertidores en línea proporcionan la forma más rápida de convertir documentos de Word a ODT sin instalar ningún software. Este método es ideal para conversiones rápidas y únicas y para usuarios que necesitan acceso desde múltiples dispositivos.
Convertidores en línea gratuitos populares como Zamzar y CloudConvert le permiten convertir DOC o DOCX a ODT en línea directamente en su navegador en solo unos pocos pasos simples.
Pasos para convertir Word a ODT en línea (usando Zamzar como ejemplo):
- Abra el convertidor de Word a ODT en línea de Zamzar.
- Haga clic en Elegir archivos para cargar el documento de Word que desea convertir.
- Haga clic en Convertir ahora y espere a que se complete el proceso de conversión.
- Descargue el archivo ODT convertido.
Pros:
- No se requiere instalación de software
- Funciona en todos los dispositivos y plataformas
- Rápido y conveniente para documentos individuales
Contras:
- El tamaño del archivo y el número de documentos pueden ser limitados
- Se requiere conexión a Internet
- Preocupaciones de privacidad para documentos sensibles
Método 4: Convertir por lotes Word a ODT con Python
Para desarrolladores y empresas, automatizar la conversión de Word a ODT con Python es una solución escalable, consistente y altamente eficiente para procesar cientos o miles de archivos de Word. Esto es particularmente útil al estandarizar archivos, migrar sistemas o integrar la conversión de documentos en flujos de trabajo automatizados.
Este ejemplo utiliza la biblioteca Spire.Doc for Python. Admite la conversión de archivos de Word a ODT y otros formatos como PDF y HTML, lo que lo hace ideal para el procesamiento por lotes y la integración en flujos de trabajo automatizados.
Pasos para convertir por lotes archivos de Word a ODT con Python:
-
Instale la biblioteca requerida desde PyPI:
pip install spire.doc -
Prepare el script de Python.
from spire.doc import * import os # Input folder containing Word files input_folder = "C:/WordFiles" # Output folder for ODT files output_folder = "C:/ODTFiles" # Ensure the output folder exists os.makedirs(output_folder, exist_ok=True) # Loop through all Word files in the input folder for filename in os.listdir(input_folder): if filename.endswith(".docx") or filename.endswith(".doc"): # Load the Word document doc = Document(os.path.join(input_folder, filename)) # Set the output ODT file path output_path = os.path.join(output_folder, filename.rsplit(".", 1)[0] + ".odt") # Save as ODT doc.saveToFile(output_path, FileFormat.Odt) print(f"Converted {filename} to {output_path}") -
Ejecute el script.
El script procesará todos los archivos de Word en la carpeta de entrada y guardará los archivos ODT convertidos en la carpeta de salida.
Pros:
- Escalable: puede procesar grandes cantidades de archivos automáticamente
- Flexible: admite múltiples formatos de salida, incluidos ODT, PDF y HTML
- Integrable: se puede incorporar en canalizaciones de automatización de Python
- Consistente: proporciona resultados de conversión repetibles y fiables
Contras:
- Requiere conocimientos básicos de Python para configurar y ejecutar
- Necesita instalar una biblioteca de terceros
Consejos prácticos para evitar problemas de formato y compatibilidad de Word a ODT
Para garantizar una conversión fluida de Word a ODT y mantener la integridad del documento, siga estos consejos clave:
- Evite elementos no compatibles: características como macros, control de cambios, marcas de agua y ciertos elementos de encabezado/pie de página pueden no transferirse por completo a ODT.
- Simplifique el formato: use fuentes estándar y evite tablas demasiado complejas u objetos anidados para reducir los problemas de compatibilidad.
- Pruebe primero un archivo de muestra: convierta un documento para identificar problemas de diseño o formato antes de la conversión por lotes.
- Haga una copia de seguridad y revise: conserve siempre el archivo de Word original y verifique el ODT convertido para asegurarse de que las tablas, las imágenes y los estilos aparezcan correctamente.
Reflexiones finales: elija el mejor método para convertir Word a ODT
Con múltiples formas de convertir Word a ODT, es importante elegir el método que se adapte a su flujo de trabajo, volumen de archivos y plataforma. Aquí hay una comparación rápida de los cuatro métodos principales de conversión de Word a ODT:
| Método | Pros | Contras |
|---|---|---|
| Microsoft Word | Simple, sin herramientas adicionales | Manual, no apto para lotes |
| LibreOffice | Gratis, buena compatibilidad | Manual, lotes pequeños |
| Herramientas en línea | Rápido, multidispositivo | Requiere Internet, problemas de privacidad |
| Python | Escalable, flexible | Requiere conocimientos de Python |
Elegir el método correcto:
- Archivos individuales: Microsoft Word es el más fácil y rápido.
- Flujos de trabajo de código abierto: LibreOffice garantiza la máxima compatibilidad.
- Tareas rápidas y únicas: los convertidores en línea brindan comodidad.
- Canalizaciones empresariales o de desarrollador: la conversión por lotes de Python es eficiente, escalable y fiable.
Preguntas frecuentes
P1: ¿La conversión de Word a ODT perderá el formato?
R1: La mayoría de los formatos estándar como fuentes, encabezados y tablas se conservan. Las funciones avanzadas como macros o control de cambios pueden no transferirse por completo. Compruebe siempre el ODT convertido en LibreOffice o Microsoft Word.
P2: ¿Puedo convertir por lotes varios archivos de Word a ODT?
R2: Sí. Puede convertir por lotes Word a ODT utilizando secuencias de comandos de LibreOffice o bibliotecas de Python como Spire.Doc para una conversión rápida y automatizada.
P3: ¿Es ODT mejor que DOCX?
R3: ODT es un estándar abierto, multiplataforma e ideal para el archivo a largo plazo. DOCX es propietario pero ampliamente compatible. Se prefiere ODT para flujos de trabajo de código abierto e independencia del proveedor.
P4: ¿Son seguros los convertidores de Word a ODT en línea?
R4: Para documentos confidenciales, evite los convertidores públicos en línea. Utilice herramientas sin conexión como Microsoft Word, LibreOffice o scripts de Python para una conversión segura de Word a ODT.
P5: ¿Qué método es más rápido para archivos de Word individuales?
R5: Microsoft Word o los convertidores en línea son los más rápidos para las conversiones individuales de Word a ODT, manteniendo el diseño con un esfuerzo mínimo.
P6: ¿Se pueden abrir archivos ODT en Mac o Google Docs?
R6: Sí. Los archivos ODT funcionan en macOS a través de LibreOffice/OpenOffice y se pueden abrir en Google Docs, aunque algunos formatos complejos pueden variar.
Ver también
Word in ODT umwandeln: 4 einfache & zuverlässige Methoden
Inhaltsverzeichnis
- Was ist ODT
- Warum Word in ODT konvertieren
- Methode 1: Word in ODT mit Microsoft Word konvertieren
- Methode 2: Word in ODT mit LibreOffice Writer konvertieren
- Methode 3: Word in ODT mit Online-Tools konvertieren
- Methode 4: Stapelkonvertierung von Word in ODT mit Python
- Praktische Tipps zur Vermeidung von Formatierungs- und Kompatibilitätsproblemen bei der Konvertierung von Word in ODT
Bei der Arbeit mit Open-Source-Office-Suiten wie LibreOffice oder OpenOffice müssen Sie häufig Word-Dokumente in das ODT-Format (OpenDocument Text) konvertieren. Obwohl Word-Dateien (DOC/DOCX) weit verbreitet sind, bieten sie nicht immer die beste plattformübergreifende Kompatibilität – insbesondere in Linux-Umgebungen, Regierungssystemen oder Organisationen, die auf offene Standards setzen.
Diese Anleitung führt Sie durch vier einfache und zuverlässige Methoden zur Konvertierung von Word in ODT, einschließlich Desktop-Tools, Online-Konvertern und automatisierten Stapellösungen. Egal, ob Sie eine schnelle einmalige Konvertierung oder einen skalierbaren Workflow für mehrere Dateien benötigen, hier finden Sie den effizientesten Ansatz.
- Was ist ODT
- Warum Word in ODT konvertieren
- Methode 1: Word in ODT mit Microsoft Word konvertieren
- Methode 2: Word in ODT mit LibreOffice Writer konvertieren
- Methode 3: Word in ODT mit Online-Tools konvertieren
- Methode 4: Stapelkonvertierung von Word in ODT mit Python
- Praktische Tipps zur Vermeidung von Formatierungs- und Kompatibilitätsproblemen bei der Konvertierung von Word in ODT
Was ist ODT?
ODT (OpenDocument Text) ist das Standard-Dateiformat für die Textverarbeitung von LibreOffice und Apache OpenOffice. Es ist Teil des OpenDocument Format (ODF)-Standards, der von OASIS gepflegt und als ISO-Standard anerkannt ist.
Vorteile von ODT gegenüber DOCX:
- Offene, herstellerneutrale Spezifikation
- Native Unterstützung in Linux- und Open-Source-Umgebungen
- Bessere Langzeitarchivierungskompatibilität
Warum Word in ODT konvertieren?
Die Konvertierung von Word-Dokumenten in ODT bietet mehrere praktische Vorteile:
- Open-Source-Workflow: Erforderlich für Benutzer von LibreOffice oder OpenOffice
- Plattformübergreifende Kompatibilität: Funktioniert gut unter Linux und macOS
- Herstellerunabhängigkeit: Vermeiden Sie die alleinige Abhängigkeit von Microsoft Word
- Archivierung und Compliance: In bestimmten Regierungs- oder institutionellen Arbeitsabläufen bevorzugt
Wichtiger Hinweis:
Microsoft gibt an, dass beim Speichern von Word-Dokumenten als ODT die meisten Kernfunktionen unterstützt werden, aber einige wie Nachverfolgen von Änderungen, Dokumentschutz, Designs, Wasserzeichen und VBA-Makros möglicherweise nicht vollständig übertragen werden. Überprüfen Sie immer Ihre konvertierten Dokumente.
Methode 1: Word in ODT mit Microsoft Word konvertieren
Für Benutzer, die gelegentlich Word-Dokumente in ODT konvertieren müssen, bietet Microsoft Word eine einfache und zuverlässige Lösung. Diese Methode ist ideal für einzelne oder kleine Dateimengen.
Schritte zum Speichern eines Word-Dokuments als ODT in Microsoft Word:
-
Öffnen Sie Ihr Word-Dokument (.doc oder .docx) in Microsoft Word.
-
Klicken Sie auf Datei > Speichern unter.
-
Wählen Sie den Zielordner für Ihre ODT-Datei.
-
Wählen Sie im Dropdown-Menü Dateityp die Option ODF-Textdokument (*.odt) aus.
-
Klicken Sie auf Speichern und bestätigen Sie alle Kompatibilitätsaufforderungen.
Vorteile:
- Einfach und schnell für gelegentliche Konvertierungen
- Behält die meisten Formatierungen und das Layout bei
- Keine zusätzliche Software erforderlich
Nachteile:
- Nicht ideal für eine große Anzahl von Dateien
- Manueller Prozess kann zeitaufwändig sein
Das könnte Ihnen auch gefallen: ODT in Word konvertieren: 4 einfache Wege (Desktop, Online & Python)
Methode 2: Word in ODT mit LibreOffice Writer konvertieren
LibreOffice Writer ist eine Open-Source-Lösung zum Konvertieren von Word-Dokumenten in ODT. Es bietet eine hervorragende Kompatibilität und Flexibilität und ist daher ideal für einzelne Konvertierungen und kleine Stapel, insbesondere für Benutzer, die freie Software bevorzugen.
Schritte zum Konvertieren von DOCX in ODT mit LibreOffice Writer:
-
Öffnen Sie LibreOffice Writer.
-
Gehen Sie zu Datei > Öffnen und wählen Sie Ihr Word-Dokument aus.
-
Überprüfen Sie das Dokument, um sicherzustellen, dass Layout und Formatierung korrekt angezeigt werden.
-
Klicken Sie auf Datei > Speichern unter.
-
Wählen Sie ODF-Textdokument (.odt) als Dateityp.
-
Klicken Sie auf Speichern, um die Konvertierung abzuschließen.
Vorteile:
- Kostenlos und Open-Source
- Zuverlässige Beibehaltung von Formatierung und Stil
- Kompatibel mit DOC und DOCX
Nachteile:
- Leichte Lernkurve für neue Benutzer, die mit der LibreOffice-Oberfläche nicht vertraut sind
Methode 3: Word in ODT mit Online-Tools konvertieren
Online-Konverter bieten die schnellste Möglichkeit, Word-Dokumente in ODT zu konvertieren, ohne Software installieren zu müssen. Diese Methode ist ideal für schnelle, einmalige Konvertierungen und für Benutzer, die von mehreren Geräten aus Zugriff benötigen.
Beliebte kostenlose Online-Konverter wie Zamzar und CloudConvert ermöglichen es Ihnen, DOC oder DOCX direkt in Ihrem Browser in nur wenigen einfachen Schritten online in ODT zu konvertieren.
Schritte zum Online-Konvertieren von Word in ODT (am Beispiel von Zamzar):
- Öffnen Sie den Online-Konverter von Zamzar für Word zu ODT.
- Klicken Sie auf Dateien auswählen, um das Word-Dokument hochzuladen, das Sie konvertieren möchten.
- Klicken Sie auf Jetzt konvertieren und warten Sie, bis der Konvertierungsprozess abgeschlossen ist.
- Laden Sie die konvertierte ODT-Datei herunter.
Vorteile:
- Keine Softwareinstallation erforderlich
- Funktioniert auf allen Geräten und Plattformen
- Schnell und praktisch für einzelne Dokumente
Nachteile:
- Dateigröße und Anzahl der Dokumente können begrenzt sein
- Internetverbindung erforderlich
- Datenschutzbedenken bei sensiblen Dokumenten
Methode 4: Stapelkonvertierung von Word in ODT mit Python
Für Entwickler und Unternehmen ist die Automatisierung der Konvertierung von Word in ODT mit Python eine skalierbare, konsistente und hocheffiziente Lösung für die Verarbeitung von Hunderten oder Tausenden von Word-Dateien. Dies ist besonders nützlich bei der Standardisierung von Archiven, der Migration von Systemen oder der Integration der Dokumentenkonvertierung in automatisierte Arbeitsabläufe.
Dieses Beispiel verwendet die Bibliothek Spire.Doc for Python. Sie unterstützt die Konvertierung von Word-Dateien in ODT und andere Formate wie PDF und HTML und ist somit ideal für die Stapelverarbeitung und die Integration in automatisierte Arbeitsabläufe.
Schritte zur Stapelkonvertierung von Word-Dateien in ODT mit Python:
-
Installieren Sie die erforderliche Bibliothek von PyPI:
pip install spire.doc -
Bereiten Sie das Python-Skript vor.
from spire.doc import * import os # Input folder containing Word files input_folder = "C:/WordFiles" # Output folder for ODT files output_folder = "C:/ODTFiles" # Ensure the output folder exists os.makedirs(output_folder, exist_ok=True) # Loop through all Word files in the input folder for filename in os.listdir(input_folder): if filename.endswith(".docx") or filename.endswith(".doc"): # Load the Word document doc = Document(os.path.join(input_folder, filename)) # Set the output ODT file path output_path = os.path.join(output_folder, filename.rsplit(".", 1)[0] + ".odt") # Save as ODT doc.saveToFile(output_path, FileFormat.Odt) print(f"Converted {filename} to {output_path}") -
Führen Sie das Skript aus.
Das Skript verarbeitet alle Word-Dateien im Eingabeordner und speichert die konvertierten ODT-Dateien im Ausgabeordner.
Vorteile:
- Skalierbar: Kann große Mengen von Dateien automatisch verarbeiten
- Flexibel: Unterstützt mehrere Ausgabeformate, einschließlich ODT, PDF und HTML
- Integrierbar: Kann in Python-Automatisierungspipelines integriert werden
- Konsistent: Liefert wiederholbare, zuverlässige Konvertierungsergebnisse
Nachteile:
- Erfordert grundlegende Python-Kenntnisse zum Einrichten und Ausführen
- Muss eine Drittanbieter-Bibliothek installieren
Praktische Tipps zur Vermeidung von Formatierungs- und Kompatibilitätsproblemen bei der Konvertierung von Word in ODT
Um eine reibungslose Konvertierung von Word in ODT zu gewährleisten und die Dokumentenintegrität zu erhalten, befolgen Sie diese wichtigen Tipps:
- Vermeiden Sie nicht unterstützte Elemente: Funktionen wie Makros, Nachverfolgen von Änderungen, Wasserzeichen und bestimmte Kopf-/Fußzeilenelemente werden möglicherweise nicht vollständig in ODT übertragen.
- Vereinfachen Sie die Formatierung: Verwenden Sie Standardschriftarten und vermeiden Sie übermäßig komplexe Tabellen oder verschachtelte Objekte, um Kompatibilitätsprobleme zu reduzieren.
- Testen Sie zuerst eine Beispieldatei: Konvertieren Sie ein Dokument, um Layout- oder Formatierungsprobleme vor der Stapelkonvertierung zu identifizieren.
- Sichern und überprüfen: Bewahren Sie immer die ursprüngliche Word-Datei auf und überprüfen Sie die konvertierte ODT-Datei, um sicherzustellen, dass Tabellen, Bilder und Stile korrekt angezeigt werden.
Abschließende Gedanken: Wählen Sie die beste Methode zur Konvertierung von Word in ODT
Da es mehrere Möglichkeiten gibt, Word in ODT zu konvertieren, ist es wichtig, die Methode zu wählen, die zu Ihrem Arbeitsablauf, Ihrem Dateivolumen und Ihrer Plattform passt. Hier ist ein kurzer Vergleich der vier Hauptmethoden zur Konvertierung von Word in ODT:
| Methode | Vorteile | Nachteile |
|---|---|---|
| Microsoft Word | Einfach, keine zusätzlichen Werkzeuge | Manuell, nicht für Stapelverarbeitung geeignet |
| LibreOffice | Kostenlos, gute Kompatibilität | Manuell, kleine Stapel |
| Online-Tools | Schnell, geräteübergreifend | Internet erforderlich, Datenschutzbedenken |
| Python | Skalierbar, flexibel | Erfordert Python-Kenntnisse |
Die richtige Methode wählen:
- Einzelne Dateien: Microsoft Word ist am einfachsten und schnellsten.
- Open-Source-Workflows: LibreOffice gewährleistet maximale Kompatibilität.
- Schnelle einmalige Aufgaben: Online-Konverter bieten Komfort.
- Unternehmens- oder Entwickler-Pipelines: Die Stapelkonvertierung mit Python ist effizient, skalierbar und zuverlässig.
Häufig gestellte Fragen
F1: Geht beim Konvertieren von Word in ODT die Formatierung verloren?
A1: Die meisten Standardformatierungen wie Schriftarten, Überschriften und Tabellen bleiben erhalten. Erweiterte Funktionen wie Makros oder Nachverfolgen von Änderungen werden möglicherweise nicht vollständig übertragen. Überprüfen Sie immer die konvertierte ODT-Datei in LibreOffice oder Microsoft Word.
F2: Kann ich mehrere Word-Dateien stapelweise in ODT konvertieren?
A2: Ja. Sie können Word-Dateien stapelweise in ODT konvertieren, indem Sie LibreOffice-Skripting oder Python-Bibliotheken wie Spire.Doc für eine schnelle, automatisierte Konvertierung verwenden.
F3: Ist ODT besser als DOCX?
A3: ODT ist ein offener Standard, plattformübergreifend und ideal für die Langzeitarchivierung. DOCX ist proprietär, wird aber weithin unterstützt. ODT wird für Open-Source-Workflows und Herstellerunabhängigkeit bevorzugt.
F4: Sind Online-Konverter von Word zu ODT sicher?
A4: Vermeiden Sie bei vertraulichen Dokumenten öffentliche Online-Konverter. Verwenden Sie Offline-Tools wie Microsoft Word, LibreOffice oder Python-Skripte für eine sichere Konvertierung von Word in ODT.
F5: Welche Methode ist für einzelne Word-Dateien am schnellsten?
A5: Microsoft Word oder Online-Konverter sind die schnellsten für einzelne Konvertierungen von Word in ODT und erhalten das Layout mit minimalem Aufwand.
F6: Können ODT-Dateien auf dem Mac oder in Google Docs geöffnet werden?
A6: Ja. ODT-Dateien funktionieren unter macOS über LibreOffice/OpenOffice und können in Google Docs geöffnet werden, obwohl einige komplexe Formatierungen variieren können.
Siehe auch
Конвертировать Word в ODT: 4 простых и надежных способа
Содержание
- Что такое ODT
- Зачем конвертировать Word в ODT
- Метод 1: Конвертация Word в ODT с помощью Microsoft Word
- Метод 2: Конвертация Word в ODT с помощью LibreOffice Writer
- Метод 3: Конвертация Word в ODT с помощью онлайн-инструментов
- Метод 4: Пакетная конвертация Word в ODT с помощью Python
- Практические советы, как избежать проблем с форматированием и совместимостью при конвертации Word в ODT
При работе с офисными пакетами с открытым исходным кодом, такими как LibreOffice или OpenOffice, часто возникает необходимость конвертировать документы Word в формат ODT (OpenDocument Text). Хотя файлы Word (DOC/DOCX) широко используются, они не всегда обеспечивают наилучшую кроссплатформенную совместимость, особенно в средах Linux, государственных системах или организациях, которые полагаются на открытые стандарты.
Это руководство проведет вас через четыре простых и надежных метода конвертации Word в ODT, включая настольные инструменты, онлайн-конвертеры и автоматизированные пакетные решения. Независимо от того, нужна ли вам быстрая одноразовая конвертация или масштабируемый рабочий процесс для нескольких файлов, вы найдете здесь наиболее эффективный подход.
- Что такое ODT
- Зачем конвертировать Word в ODT
- Метод 1: Конвертация Word в ODT с помощью Microsoft Word
- Метод 2: Конвертация Word в ODT с помощью LibreOffice Writer
- Метод 3: Конвертация Word в ODT с помощью онлайн-инструментов
- Метод 4: Пакетная конвертация Word в ODT с помощью Python
- Практические советы, как избежать проблем с форматированием и совместимостью при конвертации Word в ODT
Что такое ODT?
ODT (OpenDocument Text) — это формат файлов для обработки текстов по умолчанию в LibreOffice и Apache OpenOffice. Он является частью стандарта OpenDocument Format (ODF), поддерживаемого OASIS и признанного стандартом ISO.
Преимущества ODT перед DOCX:
- Открытая, независимая от поставщика спецификация
- Встроенная поддержка в Linux и средах с открытым исходным кодом
- Лучшая совместимость для долгосрочного архивирования
Зачем конвертировать Word в ODT?
Конвертация документов Word в ODT дает несколько практических преимуществ:
- Рабочий процесс с открытым исходным кодом: Требуется для пользователей LibreOffice или OpenOffice
- Кроссплатформенная совместимость: Хорошо работает на Linux и macOS
- Независимость от поставщика: Избегайте зависимости исключительно от Microsoft Word
- Архивирование и соответствие требованиям: Предпочтительно в определенных государственных или институциональных рабочих процессах
Важное примечание:
Microsoft заявляет, что при сохранении документов Word в формате ODT поддерживается большинство основных функций, но некоторые из них, такие как отслеживание изменений, защита документа, темы, водяные знаки и макросы VBA, могут передаваться не полностью. Всегда проверяйте сконвертированные документы.
Источник: Поддержка Microsoft - Различия между форматом OpenDocument Text (.odt) и форматом Word (.docx)
Метод 1: Конвертация Word в ODT с помощью Microsoft Word
Для пользователей, которым время от времени необходимо конвертировать документы Word в ODT, Microsoft Word предоставляет простое и надежное решение. Этот метод идеально подходит для отдельных файлов или небольших партий.
Шаги по сохранению документа Word в формате ODT в Microsoft Word:
-
Откройте ваш документ Word (.doc или .docx) в Microsoft Word.
-
Нажмите Файл > Сохранить как.
-
Выберите папку назначения для вашего файла ODT.
-
В выпадающем списке Тип файла выберите Текстовый документ ODF (*.odt).
-
Нажмите Сохранить и подтвердите любые запросы о совместимости.
Плюсы:
- Просто и быстро для редких конвертаций
- Сохраняет большую часть форматирования и макета
- Не требуется дополнительное программное обеспечение
Минусы:
- Не идеально для большого количества файлов
- Ручной процесс может занимать много времени
Вам также может понравиться: Конвертация ODT в Word: 4 простых способа (настольные, онлайн и Python)
Метод 2: Конвертация Word в ODT с помощью LibreOffice Writer
LibreOffice Writer — это решение с открытым исходным кодом для конвертации документов Word в ODT. Он предлагает отличную совместимость и гибкость, что делает его идеальным как для одиночных конвертаций, так и для небольших партий, особенно для пользователей, предпочитающих бесплатное программное обеспечение.
Шаги по конвертации DOCX в ODT с помощью LibreOffice Writer:
-
Откройте LibreOffice Writer.
-
Перейдите в Файл > Открыть и выберите ваш документ Word.
-
Просмотрите документ, чтобы убедиться, что макет и форматирование отображаются правильно.
-
Нажмите Файл > Сохранить как.
-
Выберите Текстовый документ ODF (.odt) в качестве типа файла.
-
Нажмите Сохранить, чтобы завершить конвертацию.
Плюсы:
- Бесплатный и с открытым исходным кодом
- Надежное сохранение форматирования и стилей
- Совместим как с DOC, так и с DOCX
Минусы:
- Небольшая кривая обучения для новых пользователей, не знакомых с интерфейсом LibreOffice
Метод 3: Конвертация Word в ODT с помощью онлайн-инструментов
Онлайн-конвертеры предоставляют самый быстрый способ конвертировать документы Word в ODT без установки какого-либо программного обеспечения. Этот метод идеально подходит для быстрых, одноразовых конвертаций и для пользователей, которым нужен доступ с нескольких устройств.
Популярные бесплатные онлайн-конвертеры, такие как Zamzar и CloudConvert, позволяют конвертировать DOC или DOCX в ODT онлайн прямо в вашем браузере всего за несколько простых шагов.
Шаги по конвертации Word в ODT онлайн (на примере Zamzar):
- Откройте онлайн-конвертер Word в ODT от Zamzar.
- Нажмите Выбрать файлы, чтобы загрузить документ Word, который вы хотите конвертировать.
- Нажмите Конвертировать сейчас и дождитесь завершения процесса конвертации.
- Загрузите сконвертированный файл ODT.
Плюсы:
- Не требуется установка программного обеспечения
- Работает на разных устройствах и платформах
- Быстро и удобно для отдельных документов
Минусы:
- Размер файла и количество документов могут быть ограничены
- Требуется подключение к Интернету
- Проблемы с конфиденциальностью для чувствительных документов
Метод 4: Пакетная конвертация Word в ODT с помощью Python
Для разработчиков и предприятий автоматизация конвертации Word в ODT с помощью Python является масштабируемым, последовательным и высокоэффективным решением для обработки сотен или тысяч файлов Word. Это особенно полезно при стандартизации архивов, миграции систем или интеграции конвертации документов в автоматизированные рабочие процессы.
В этом примере используется библиотека Spire.Doc for Python. Она поддерживает конвертацию файлов Word в ODT и другие форматы, такие как PDF и HTML, что делает ее идеальной для пакетной обработки и интеграции в автоматизированные рабочие процессы.
Шаги по пакетной конвертации файлов Word в ODT с помощью Python:
-
Установите необходимую библиотеку из PyPI:
pip install spire.doc -
Подготовьте скрипт Python.
from spire.doc import * import os # Входная папка, содержащая файлы Word input_folder = "C:/WordFiles" # Выходная папка для файлов ODT output_folder = "C:/ODTFiles" # Убедитесь, что выходная папка существует os.makedirs(output_folder, exist_ok=True) # Перебрать все файлы Word во входной папке for filename in os.listdir(input_folder): if filename.endswith(".docx") or filename.endswith(".doc"): # Загрузить документ Word doc = Document(os.path.join(input_folder, filename)) # Установить путь к выходному файлу ODT output_path = os.path.join(output_folder, filename.rsplit(".", 1)[0] + ".odt") # Сохранить как ODT doc.saveToFile(output_path, FileFormat.Odt) print(f"Converted {filename} to {output_path}") -
Запустите скрипт.
Скрипт обработает все файлы Word во входной папке и сохранит сконвертированные файлы ODT в выходной папке.
Плюсы:
- Масштабируемость: Может автоматически обрабатывать большое количество файлов
- Гибкость: Поддерживает несколько выходных форматов, включая ODT, PDF и HTML
- Интегрируемость: Может быть встроен в конвейеры автоматизации Python
- Последовательность: Обеспечивает повторяемые, надежные результаты конвертации
Минусы:
- Требуются базовые знания Python для настройки и запуска
- Необходимо установить стороннюю библиотеку
Практические советы, как избежать проблем с форматированием и совместимостью при конвертации Word в ODT
Чтобы обеспечить плавную конвертацию Word в ODT и сохранить целостность документа, следуйте этим ключевым советам:
- Избегайте неподдерживаемых элементов: Такие функции, как макросы, отслеживание изменений, водяные знаки и некоторые элементы колонтитулов, могут не полностью переноситься в ODT.
- Упрощайте форматирование: Используйте стандартные шрифты и избегайте слишком сложных таблиц или вложенных объектов, чтобы уменьшить проблемы с совместимостью.
- Сначала протестируйте образец файла: Сконвертируйте один документ, чтобы выявить проблемы с макетом или форматированием перед пакетной конвертацией.
- Резервное копирование и проверка: Всегда сохраняйте исходный файл Word и проверяйте сконвертированный ODT, чтобы убедиться, что таблицы, изображения и стили отображаются правильно.
Заключительные мысли: выберите лучший метод для конвертации Word в ODT
Имея несколько способов конвертации Word в ODT, важно выбрать метод, который соответствует вашему рабочему процессу, объему файлов и платформе. Вот краткое сравнение четырех основных методов конвертации Word в ODT:
| Метод | Плюсы | Минусы |
|---|---|---|
| Microsoft Word | Просто, без дополнительных инструментов | Ручной, не подходит для пакетной обработки |
| LibreOffice | Бесплатно, хорошая совместимость | Ручной, для небольших партий |
| Онлайн-инструменты | Быстро, на разных устройствах | Требуется интернет, проблемы с конфиденциальностью |
| Python | Масштабируемый, гибкий | Требуются знания Python |
Выбор правильного метода:
- Одиночные файлы: Microsoft Word — самый простой и быстрый способ.
- Рабочие процессы с открытым исходным кодом: LibreOffice обеспечивает максимальную совместимость.
- Быстрые одноразовые задачи: Онлайн-конвертеры обеспечивают удобство.
- Корпоративные или разработческие конвейеры: Пакетная конвертация с помощью Python эффективна, масштабируема и надежна.
Часто задаваемые вопросы
В1: Потеряется ли форматирование при конвертации Word в ODT?
О1: Большинство стандартных форматов, таких как шрифты, заголовки и таблицы, сохраняются. Расширенные функции, такие как макросы или отслеживание изменений, могут передаваться не полностью. Всегда проверяйте сконвертированный ODT в LibreOffice или Microsoft Word.
В2: Могу ли я пакетно конвертировать несколько файлов Word в ODT?
О2: Да. Вы можете пакетно конвертировать Word в ODT, используя скрипты LibreOffice или библиотеки Python, такие как Spire.Doc, для быстрой автоматизированной конвертации.
В3: ODT лучше, чем DOCX?
О3: ODT — это открытый стандарт, кроссплатформенный и идеальный для долгосрочного архивирования. DOCX является проприетарным, но широко поддерживается. ODT предпочтителен для рабочих процессов с открытым исходным кодом и независимости от поставщика.
В4: Безопасны ли онлайн-конвертеры Word в ODT?
О4: Для конфиденциальных документов избегайте общедоступных онлайн-конвертеров. Используйте офлайн-инструменты, такие как Microsoft Word, LibreOffice или скрипты Python, для безопасной конвертации Word в ODT.
В5: Какой метод самый быстрый для отдельных файлов Word?
О5: Microsoft Word или онлайн-конвертеры — самые быстрые для индивидуальных конвертаций Word в ODT, сохраняя макет с минимальными усилиями.
В6: Могут ли файлы ODT открываться на Mac или в Google Docs?
О6: Да. Файлы ODT работают на macOS через LibreOffice/OpenOffice и могут быть открыты в Google Docs, хотя некоторое сложное форматирование может отличаться.