
Data (2)
Add, Get, and Remove Excel Data Validation with JavaScript in React
2026-08-27 08:46:45 Written by Lisa LiData validation is an effective way to control the input content of Excel cells. It can intercept incorrect input at the data entry stage, ensuring that data is standardized and accurate. Spire.XLS for JavaScript uses WebAssembly to add, read, and remove data validation directly in the browser, managing input and output files through a virtual file system (VFS) — no backend server required.
This article covers three core features:
For installation and project configuration, refer to Integrating Spire.XLS for JavaScript in a React Project. The examples below assume Spire.XLS is installed and the WebAssembly module is initialized.
Add Data Validation
In daily forms and reports, we often need to restrict the input of cells, for example only allowing numbers or dates within a certain range, or limiting the text length. Spire.XLS for JavaScript sets validation rules through the DataValidation property of a cell, supporting multiple validation types such as Decimal, Whole Number, Date, Time, Text Length, and List.
function App() {
  const sheetToSVG = async () => {
    // Get the Spire.XLS WASM module
    const xlsModule = window.wasmModule?.spirexls;

    // Check if the module is ready
    if (!xlsModule) {
      alert('Spire.Xls is not ready yet');
      return;
    }

    // Load the font into VFS
    await window.spire.FetchFileToVFS('ARIAL.TTF', '/Library/Fonts/', `${process.env.PUBLIC_URL}/font/`);

    // Create a new workbook
    const workbook = new xlsModule.Workbook();

    // Get the first worksheet
    const sheet = workbook.Worksheets.get(0);

    // Add a decimal validation: cell B12 can only accept numbers between 3 and 6
    sheet.Range.get("B11").Text = "Input Number(3-6):";
    let rangeNumber = sheet.Range.get("B12");
    rangeNumber.DataValidation.CompareOperator = xlsModule.ValidationComparisonOperator.Between;
    rangeNumber.DataValidation.Formula1 = "3";
    rangeNumber.DataValidation.Formula2 = "6";
    rangeNumber.DataValidation.AllowType = xlsModule.CellDataType.Decimal;
    rangeNumber.DataValidation.ErrorMessage = "Please input correct number!";
    rangeNumber.DataValidation.ShowError = true;
    rangeNumber.Style.KnownColor = xlsModule.ExcelColors.Gray25Percent;

    // Add a date validation: cell B15 can only accept dates within the year 2024
    sheet.Range.get("B14").Text = "Input Date: 1/1/2024";
    let rangeDate = sheet.Range.get("B15");
    rangeDate.DataValidation.AllowType = xlsModule.CellDataType.Date;
    rangeDate.DataValidation.CompareOperator = xlsModule.ValidationComparisonOperator.Between;
    rangeDate.DataValidation.Formula1 = "1/1/2024";
    rangeDate.DataValidation.Formula2 = "12/31/2024";
    rangeDate.DataValidation.ErrorMessage = "Please input correct date!";
    rangeDate.DataValidation.ShowError = true;
    // Supports setting AlertStyleType.Warning; AlertStyleType.Info; AlertStyleType.Stop
    rangeDate.DataValidation.AlertStyle = xlsModule.AlertStyleType.Warning;
    rangeDate.Style.KnownColor = xlsModule.ExcelColors.Gray25Percent;

    // Add a text length validation: the text length in cell B18 cannot exceed 5 characters
    sheet.Range.get("B17").Text = "Input Text:";
    let rangeTextLength = sheet.Range.get("B18");
    rangeTextLength.DataValidation.AllowType = xlsModule.CellDataType.TextLength;
    rangeTextLength.DataValidation.CompareOperator = xlsModule.ValidationComparisonOperator.LessOrEqual;
    rangeTextLength.DataValidation.Formula1 = "5";
    rangeTextLength.DataValidation.ErrorMessage = "Enter a Valid String!";
    rangeTextLength.DataValidation.ShowError = true;
    rangeTextLength.DataValidation.AlertStyle = xlsModule.AlertStyleType.Stop;
    rangeTextLength.Style.KnownColor = xlsModule.ExcelColors.Gray25Percent;

    // Auto-fit the width of column 2
    sheet.AutoFitColumn(2);

    const outputFileName = "DataValidation_out.xlsx";
    workbook.SaveToFile({ fileName: outputFileName, version: xlsModule.ExcelVersion.Version2010 });

    // Release the workbook object to free resources
    workbook.Dispose();

    // Read the converted file from VFS and trigger the download
    const fileArray = window.dotnetRuntime.Module.FS.readFile(outputFileName);
    const blob = new Blob([fileArray], { type: "application/vnd.openxmlformats-officedocument.spreadsheetml.sheet" });
    const url = URL.createObjectURL(blob);
    const a = document.createElement('a');
    a.href = url;
    a.download = outputFileName;
    a.click();
    URL.revokeObjectURL(url);
  };

  return (
    <div style={{ textAlign: 'center', height: '300px' }}>
      <h1>Add Data Validation</h1>
      <button onClick={sheetToSVG}>
        Start
      </button>
    </div>
  );
}

export default App;
Add data validation 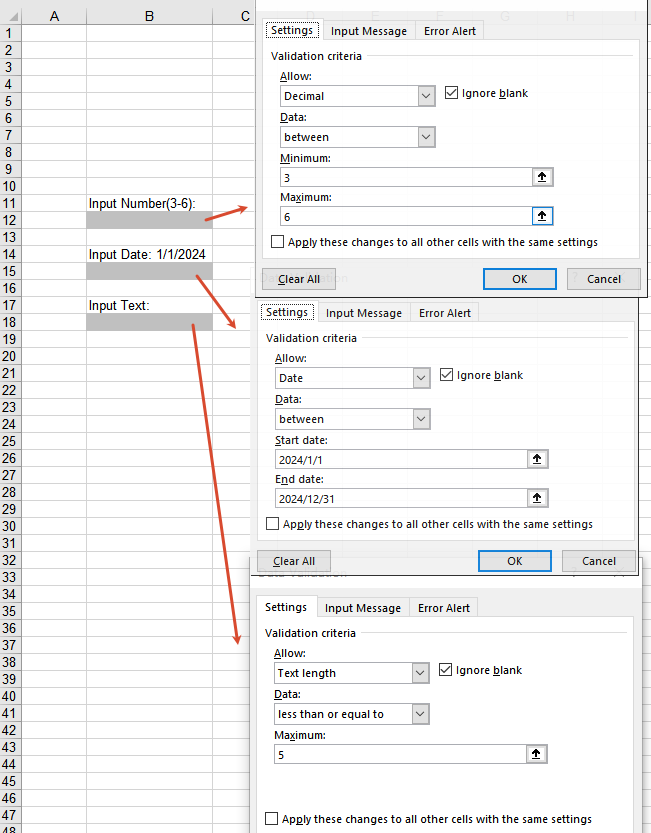
Get Data Validation Settings
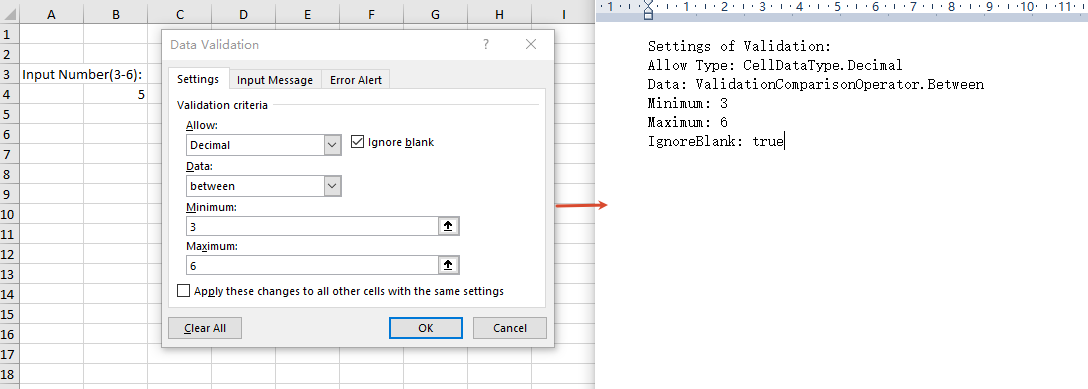
When processing an Excel document that already has data validation, you may sometimes need to read the validation rules to understand the input constraints of a cell. Through the DataValidation property of a cell, you can obtain the validation object and then read settings such as AllowType (validation type), CompareOperator (comparison operator), Formula1 (minimum/lower limit), Formula2 (maximum/upper limit), and IgnoreBlank (whether blank values are ignored).
function App() {
  const sheetToSVG = async () => {
    // Get the Spire.XLS WASM module
    const xlsModule = window.wasmModule?.spirexls;

    // Check if the module is ready
    if (!xlsModule) {
      alert('Spire.Xls is not ready yet');
      return;
    }

    // Load the font and Excel file into VFS
    await window.spire.FetchFileToVFS('ARIAL.TTF', '/Library/Fonts/', `${process.env.PUBLIC_URL}/font/`);
    const inputFileName = 'GetSettingsOfDataValidation.xlsx';
    await window.spire.FetchFileToVFS(inputFileName, '', `${process.env.PUBLIC_URL}/static/data/`);

    // Load the workbook
    const workbook = new xlsModule.Workbook();
    workbook.LoadFromFile({ fileName: inputFileName });

    // Get the first worksheet
    const worksheet = workbook.Worksheets.get(0);

    // Cell B4 has a decimal validation set
    const cell = worksheet.Range.get("B4");

    // Get the data validation object of this cell
    const validation = cell.DataValidation;

    // Get the validation settings
    let allowType = validation.AllowType.toString();
    let data = validation.CompareOperator.toString();
    let minimum = validation.Formula1.toString();
    let maximum = validation.Formula2.toString();
    let ignoreBlank = validation.IgnoreBlank.toString();

    // Concatenate the result into a string
    let result = `Settings of Validation: \r\nAllow Type: ${allowType}\r\nData: ${data}\r\nMinimum: ${minimum}\r\nMaximum: ${maximum}\r\nIgnoreBlank: ${ignoreBlank}`;

    const outputFileName = 'GetSettingsOfDataValidation-out.txt';

    // Write the result to a txt file
    window.dotnetRuntime.Module.FS.writeFile(outputFileName, result);

    // Release the workbook object to free resources
    workbook.Dispose();

    // Read the converted file from VFS and trigger the download
    const fileArray = window.dotnetRuntime.Module.FS.readFile(outputFileName);
    const blob = new Blob([fileArray], { type: 'text/plain' });
    const url = URL.createObjectURL(blob);
    const a = document.createElement('a');
    a.href = url;
    a.download = outputFileName;
    a.click();
    URL.revokeObjectURL(url);
  };

  return (
    <div style={{ textAlign: 'center', height: '300px' }}>
      <h1>Get Data Validation Settings</h1>
      <button onClick={sheetToSVG}>
        Start
      </button>
    </div>
  );
}

export default App;
Remove Data Validation
When the validation rules are no longer needed, you can remove data validation in bulk by cell range through the Remove method of the worksheet's DVTable. When removing, you need to pass in an array composed of rectangles, which are used to locate the ranges in the worksheet where the validations should be removed.
function App() {
  const sheetToSVG = async () => {
    // Get the Spire.XLS WASM module
    const xlsModule = window.wasmModule?.spirexls;

    // Check if the module is ready
    if (!xlsModule) {
      alert('Spire.Xls is not ready yet');
      return;
    }

    // Load the font and Excel file into VFS
    await window.spire.FetchFileToVFS('ARIAL.TTF', '/Library/Fonts/', `${process.env.PUBLIC_URL}/font/`);
    const inputFileName = 'RemoveDataValidation.xlsx';
    await window.spire.FetchFileToVFS(inputFileName, '', `${process.env.PUBLIC_URL}/static/data/`);

    // Load the workbook
    const workbook = new xlsModule.Workbook();
    workbook.LoadFromFile({ fileName: inputFileName });

    // Create an array of rectangles, which is used to locate the ranges in the worksheet
    let rectangles = [];

    // Add a rectangle to the array. This rectangle specifies the cells from A1 to B3.
    rectangles.push(xlsModule.Rectangle.FromLTRB(0, 0, 1, 2));

    // Remove the validations in the ranges represented by the rectangles
    workbook.Worksheets.get(0).DVTable.Remove(rectangles);

    const outputFileName = 'RemoveDataValidation-out.xlsx';
    workbook.SaveToFile({ fileName: outputFileName, version: xlsModule.ExcelVersion.Version2010 });

    // Release the workbook object to free resources
    workbook.Dispose();

    // Read the converted file from VFS and trigger the download
    const fileArray = window.dotnetRuntime.Module.FS.readFile(outputFileName);
    const blob = new Blob([fileArray], { type: "application/vnd.openxmlformats-officedocument.spreadsheetml.sheet" });
    const url = URL.createObjectURL(blob);
    const a = document.createElement('a');
    a.href = url;
    a.download = outputFileName;
    a.click();
    URL.revokeObjectURL(url);
  };

  return (
    <div style={{ textAlign: 'center', height: '300px' }}>
      <h1>Remove Data Validation</h1>
      <button onClick={sheetToSVG}>
        Start
      </button>
    </div>
  );
}

export default App;
Remove data validation 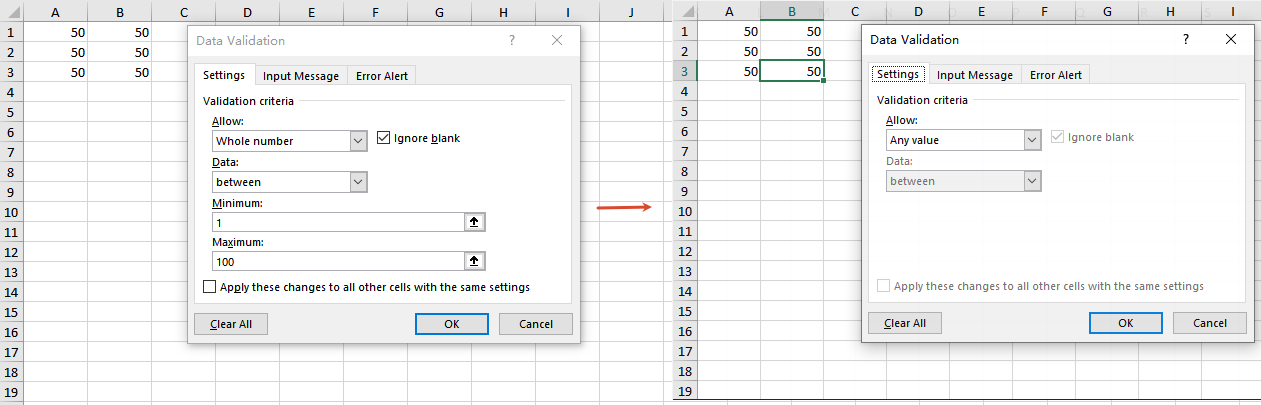
Frequently Asked Questions
The added data validation does not take effect
Cause: Other validation rules already exist on the target cell, or the validation type or comparison operator does not match the requirement.
Solution: Make sure the validation rule is applied to the correct cell range, and check whether the values of properties such as AllowType, CompareOperator, Formula1, and Formula2 meet the expectation.
The result is empty when getting data validation settings
Cause: No data validation is set on the target cell, or the cell range being read does not match the location of the validation.
Solution: Make sure the cell has data validation set, and check whether the cell address referenced by the Range.get method is correct.
Data validation still exists after removal
Cause: The rectangle range passed to the DVTable.Remove method does not cover the actual validation area.
Solution: Adjust the coordinates in the Rectangle.FromLTRB method according to the cell range covered by the validations, ensuring that the rectangle range includes all the cells whose validations need to be removed.
Get a Free License
If you want to remove the evaluation messages in the output documents, or get rid of the feature limitations, please contact our sales team to obtain a free 30-day temporary license.
During daily Excel data processing, filtering is one of the most common ways to quickly locate and view target data. The AutoFilter feature allows users to quickly filter out data rows that match the conditions by clicking the drop-down arrow on the column header, avoiding the need to search manually through large amounts of data. Spire.XLS for JavaScript, powered by WebAssembly, completes this operation directly in the browser, managing input and output files through a Virtual File System (VFS) with no backend service required.
This article covers three key features:
For installation and project configuration, please refer to How to Integrate Spire.XLS for JavaScript in a React Project. The examples below assume that Spire.XLS is already installed and the WebAssembly module has been initialized.
Add AutoFilters
In Excel, the AutoFilter is an important feature for quickly processing large amounts of data. Through the drop-down arrow on the right side of the column header, you can set filter conditions for each column. Spire.XLS for JavaScript provides the AutoFilters.Range property — you can add AutoFilters to a worksheet simply by setting the worksheet's auto-filter range to the cell range of the header row.
function App() {
  const addAutoFilter = async () => {
    // Get the Spire.XLS WASM module
    const xlsModule = window.wasmModule?.spirexls;

    // Check if the module is ready
    if (!xlsModule) {
      alert('Spire.Xls is not ready yet');
      return;
    }

    // Load the font and Excel file into VFS
    await window.spire.FetchFileToVFS('ARIAL.TTF', '/Library/Fonts/', `${process.env.PUBLIC_URL}/font/`);
    const inputFileName = 'FilterData.xlsx';
    await window.spire.FetchFileToVFS(inputFileName, '', `${process.env.PUBLIC_URL}data/`);

    // Load the workbook
    const workbook = new xlsModule.Workbook();
    workbook.LoadFromFile({ fileName: inputFileName });

    // Get the first worksheet
    const sheet = workbook.Worksheets.get(0);

    // Set the auto filter range: columns A to C of the header row
    sheet.AutoFilters.Range = sheet.Range.get("A1:C1");

    // Save the result file, specifying Excel version 2016
    const outputFileName = "AddAutoFilter_output.xlsx";
    workbook.SaveToFile({ fileName: outputFileName, version: xlsModule.ExcelVersion.Version2016 });

    // Dispose of the workbook object to release resources
    workbook.Dispose();

    // Read the converted file from VFS and trigger the download
    const fileArray = window.dotnetRuntime.Module.FS.readFile(outputFileName);
    const blob = new Blob([fileArray], { type: "application/vnd.openxmlformats-officedocument.spreadsheetml.sheet" });
    const url = URL.createObjectURL(blob);
    const a = document.createElement('a');
    a.href = url;
    a.download = outputFileName;
    a.click();
    URL.revokeObjectURL(url);
  };

  return (
    <div style={{ textAlign: 'center', height: '300px' }}>
      <h1>Add AutoFilter</h1>
      <button onClick={addAutoFilter}>
        Start
      </button>
    </div>
  );
}

export default App;
Add AutoFilters 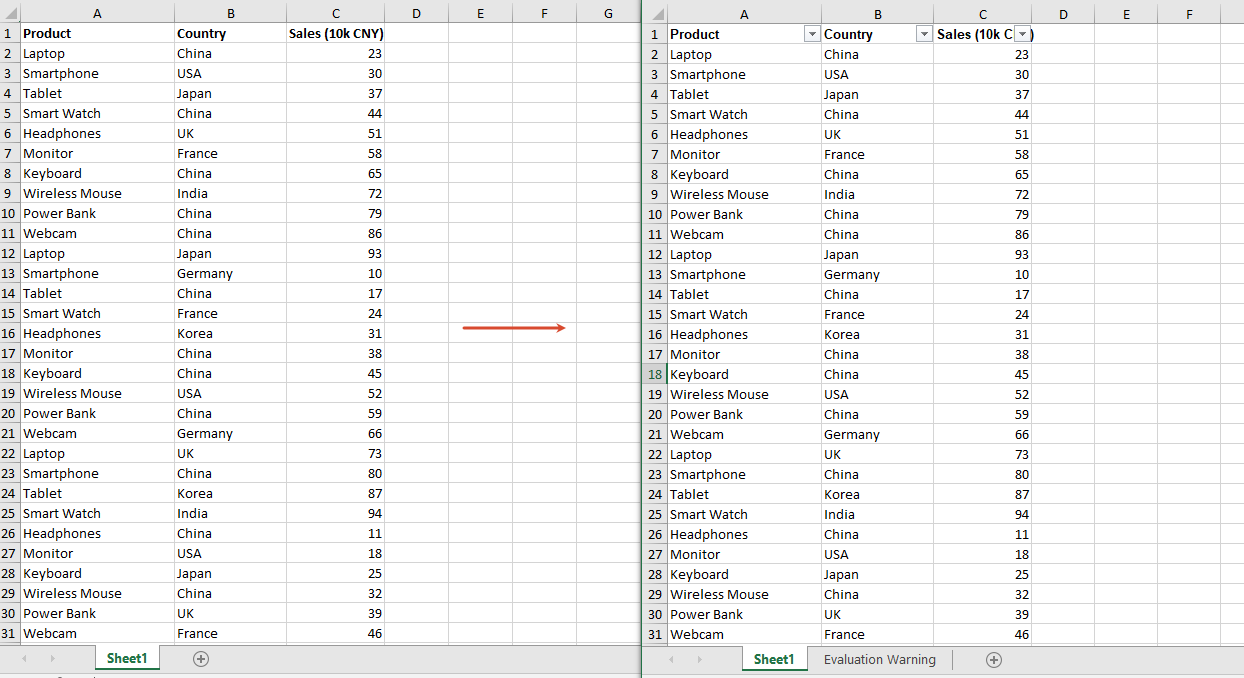
Apply Filter Conditions to Filter Data
After adding AutoFilters, you can also set a custom filter condition for a specified column through the CustomFilter method in code, and then call the Filter method to apply the filter, so that data rows matching the condition are automatically filtered out. For example, the following code sets the filter condition of the second column (Country) to equal "China"; after applying the filter, only data rows whose country is "China" are kept, and the remaining rows are hidden.
function App() {
  const applyFilter = async () => {
    // Get the Spire.XLS WASM module
    const xlsModule = window.wasmModule?.spirexls;

    // Check if the module is ready
    if (!xlsModule) {
      alert('Spire.Xls is not ready yet');
      return;
    }

    // Load the font and Excel file into VFS
    await window.spire.FetchFileToVFS('ARIAL.TTF', '/Library/Fonts/', `${process.env.PUBLIC_URL}/font/`);
    const inputFileName = 'FilterData.xlsx';
    await window.spire.FetchFileToVFS(inputFileName, '', `${process.env.PUBLIC_URL}data/`);

    // Load the workbook
    const workbook = new xlsModule.Workbook();
    workbook.LoadFromFile({ fileName: inputFileName });

    // Get the first worksheet
    const sheet = workbook.Worksheets.get(0);

    // Set the auto filter range: the header and data rows of the second column (Country)
    sheet.AutoFilters.Range = sheet.Range.get("B1:B51");

    // Get the first column of the auto filters
    const filterColumn = sheet.AutoFilters.get(0);

    // Set the custom filter condition: filter rows whose country is "China"
    const strCrt = "China";
    sheet.AutoFilters.CustomFilter({
      column: filterColumn,
      operatorType: xlsModule.FilterOperatorType.Equal,
      criteria: new xlsModule.String(strCrt)
    });

    // Apply the filter
    sheet.AutoFilters.Filter();

    // Save the result file, specifying Excel version 2016
    const outputFileName = "ApplyFilter_output.xlsx";
    workbook.SaveToFile({ fileName: outputFileName, version: xlsModule.ExcelVersion.Version2016 });

    // Dispose of the workbook object to release resources
    workbook.Dispose();

    // Read the converted file from VFS and trigger the download
    const fileArray = window.dotnetRuntime.Module.FS.readFile(outputFileName);
    const blob = new Blob([fileArray], { type: "application/vnd.openxmlformats-officedocument.spreadsheetml.sheet" });
    const url = URL.createObjectURL(blob);
    const a = document.createElement('a');
    a.href = url;
    a.download = outputFileName;
    a.click();
    URL.revokeObjectURL(url);
  };

  return (
    <div style={{ textAlign: 'center', height: '300px' }}>
      <h1>Apply Filter Condition</h1>
      <button onClick={applyFilter}>
        Start
      </button>
    </div>
  );
}

export default App;
Apply Filter Conditions to Filter Data 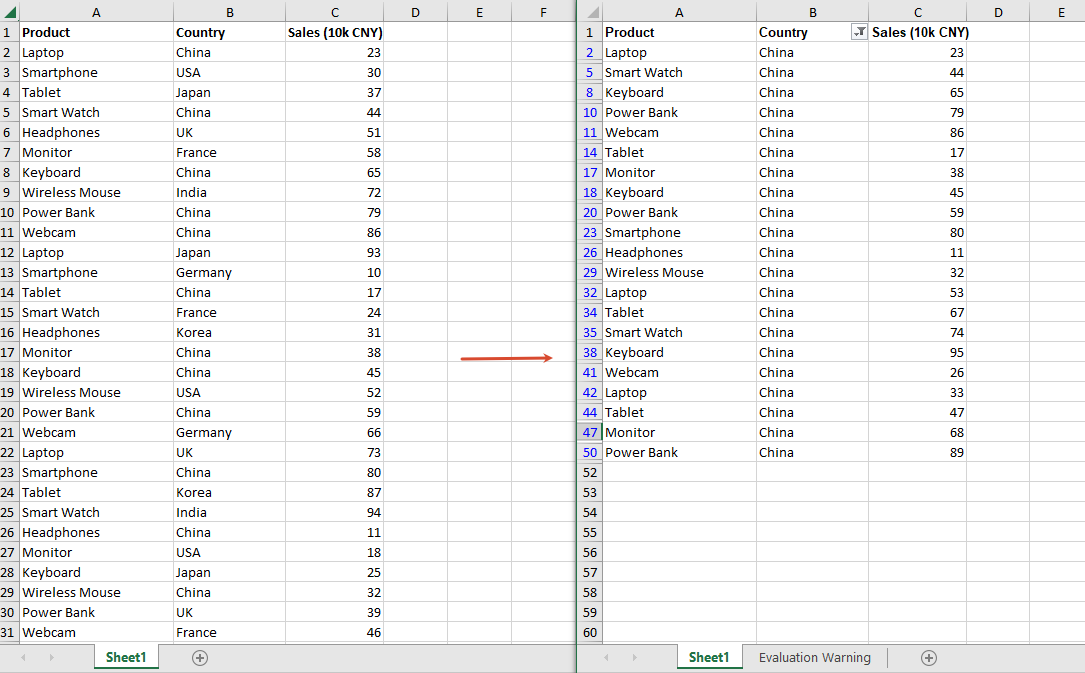
Remove AutoFilters
When you no longer need to filter data, you can remove all AutoFilters from the worksheet through the AutoFilters.Clear method, so that the data is fully displayed again.
function App() {
  const removeAutoFilter = async () => {
    // Get the Spire.XLS WASM module
    const xlsModule = window.wasmModule?.spirexls;

    // Check if the module is ready
    if (!xlsModule) {
      alert('Spire.Xls is not ready yet');
      return;
    }

    // Load the font and Excel file into VFS
    await window.spire.FetchFileToVFS('ARIAL.TTF', '/Library/Fonts/', `${process.env.PUBLIC_URL}/font/`);
    const inputFileName = 'FilteredData.xlsx';
    await window.spire.FetchFileToVFS(inputFileName, '', `${process.env.PUBLIC_URL}data/`);

    // Load the workbook
    const workbook = new xlsModule.Workbook();
    workbook.LoadFromFile({ fileName: inputFileName });

    // Get the first worksheet
    const sheet = workbook.Worksheets.get(0);

    // Remove all AutoFilters from the worksheet
    sheet.AutoFilters.Clear();

    // Save the result file, specifying Excel version 2016
    const outputFileName = "RemoveAutoFilter_output.xlsx";
    workbook.SaveToFile({ fileName: outputFileName, version: xlsModule.ExcelVersion.Version2016 });

    // Dispose of the workbook object to release resources
    workbook.Dispose();

    // Read the converted file from VFS and trigger the download
    const fileArray = window.dotnetRuntime.Module.FS.readFile(outputFileName);
    const blob = new Blob([fileArray], { type: "application/vnd.openxmlformats-officedocument.spreadsheetml.sheet" });
    const url = URL.createObjectURL(blob);
    const a = document.createElement('a');
    a.href = url;
    a.download = outputFileName;
    a.click();
    URL.revokeObjectURL(url);
  };

  return (
    <div style={{ textAlign: 'center', height: '300px' }}>
      <h1>Remove AutoFilter</h1>
      <button onClick={removeAutoFilter}>
        Start
      </button>
    </div>
  );
}

export default App;
Remove AutoFilters 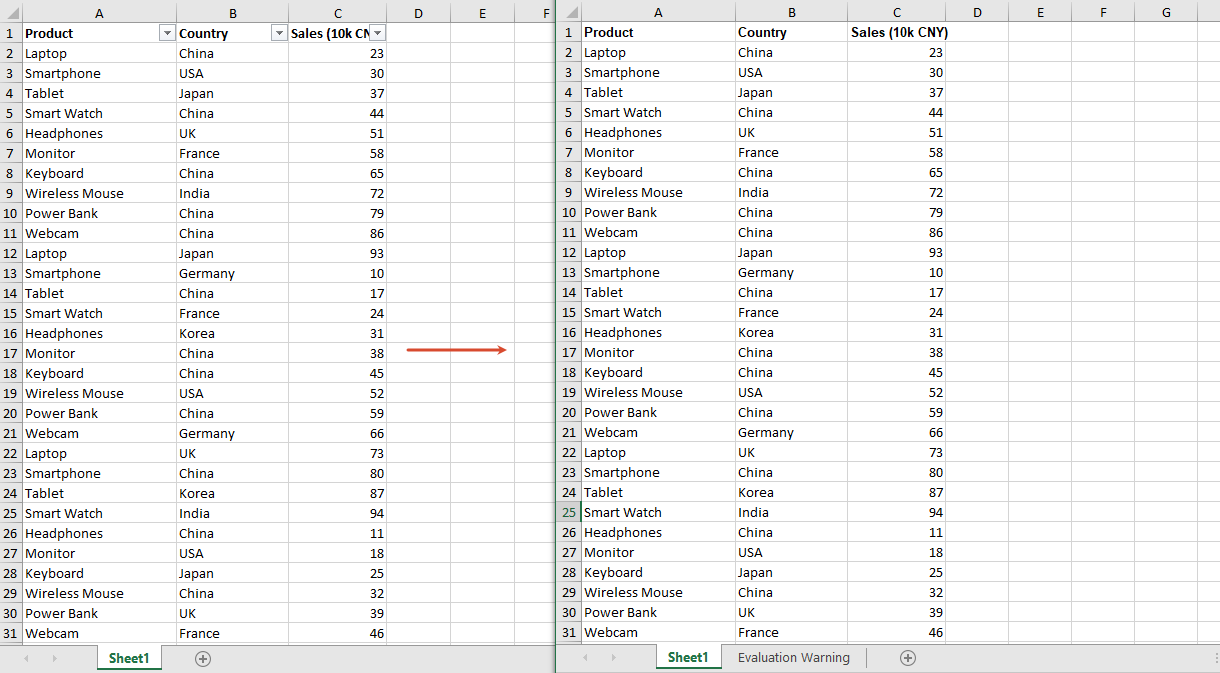
Frequently Asked Questions
Data rows are not hidden after filtering
Reason: The Filter() method was not called to apply the filter after the filter condition was set, or the range set by AutoFilters.Range does not cover the data rows you want to filter.
Solution: Call sheet.AutoFilters.Filter() after setting the filter condition, and make sure AutoFilters.Range covers the header row and all data rows, for example "B1:B51" in the example above.
Filtering by Chinese content fails
Reason: The filter condition is an exact match. If the filter value does not exactly match the cell content (for example, it contains leading or trailing spaces), it will not match.
Solution: Make sure the filter value exactly matches the cell content.
Get a Free License
If you wish to remove the evaluation message from the result documents, or get rid of the feature limitations, please contact sales to get a 30-day temporary license.
