During daily Excel data processing, filtering is one of the most common ways to quickly locate and view target data. The AutoFilter feature allows users to quickly filter out data rows that match the conditions by clicking the drop-down arrow on the column header, avoiding the need to search manually through large amounts of data. Spire.XLS for JavaScript, powered by WebAssembly, completes this operation directly in the browser, managing input and output files through a Virtual File System (VFS) with no backend service required.
This article covers three key features:
For installation and project configuration, please refer to How to Integrate Spire.XLS for JavaScript in a React Project. The examples below assume that Spire.XLS is already installed and the WebAssembly module has been initialized.
Add AutoFilters
In Excel, the AutoFilter is an important feature for quickly processing large amounts of data. Through the drop-down arrow on the right side of the column header, you can set filter conditions for each column. Spire.XLS for JavaScript provides the AutoFilters.Range property — you can add AutoFilters to a worksheet simply by setting the worksheet's auto-filter range to the cell range of the header row.
function App() {
  const addAutoFilter = async () => {
    // Get the Spire.XLS WASM module
    const xlsModule = window.wasmModule?.spirexls;

    // Check if the module is ready
    if (!xlsModule) {
      alert('Spire.Xls is not ready yet');
      return;
    }

    // Load the font and Excel file into VFS
    await window.spire.FetchFileToVFS('ARIAL.TTF', '/Library/Fonts/', `${process.env.PUBLIC_URL}/font/`);
    const inputFileName = 'FilterData.xlsx';
    await window.spire.FetchFileToVFS(inputFileName, '', `${process.env.PUBLIC_URL}data/`);

    // Load the workbook
    const workbook = new xlsModule.Workbook();
    workbook.LoadFromFile({ fileName: inputFileName });

    // Get the first worksheet
    const sheet = workbook.Worksheets.get(0);

    // Set the auto filter range: columns A to C of the header row
    sheet.AutoFilters.Range = sheet.Range.get("A1:C1");

    // Save the result file, specifying Excel version 2016
    const outputFileName = "AddAutoFilter_output.xlsx";
    workbook.SaveToFile({ fileName: outputFileName, version: xlsModule.ExcelVersion.Version2016 });

    // Dispose of the workbook object to release resources
    workbook.Dispose();

    // Read the converted file from VFS and trigger the download
    const fileArray = window.dotnetRuntime.Module.FS.readFile(outputFileName);
    const blob = new Blob([fileArray], { type: "application/vnd.openxmlformats-officedocument.spreadsheetml.sheet" });
    const url = URL.createObjectURL(blob);
    const a = document.createElement('a');
    a.href = url;
    a.download = outputFileName;
    a.click();
    URL.revokeObjectURL(url);
  };

  return (
    <div style={{ textAlign: 'center', height: '300px' }}>
      <h1>Add AutoFilter</h1>
      <button onClick={addAutoFilter}>
        Start
      </button>
    </div>
  );
}

export default App;
Add AutoFilters 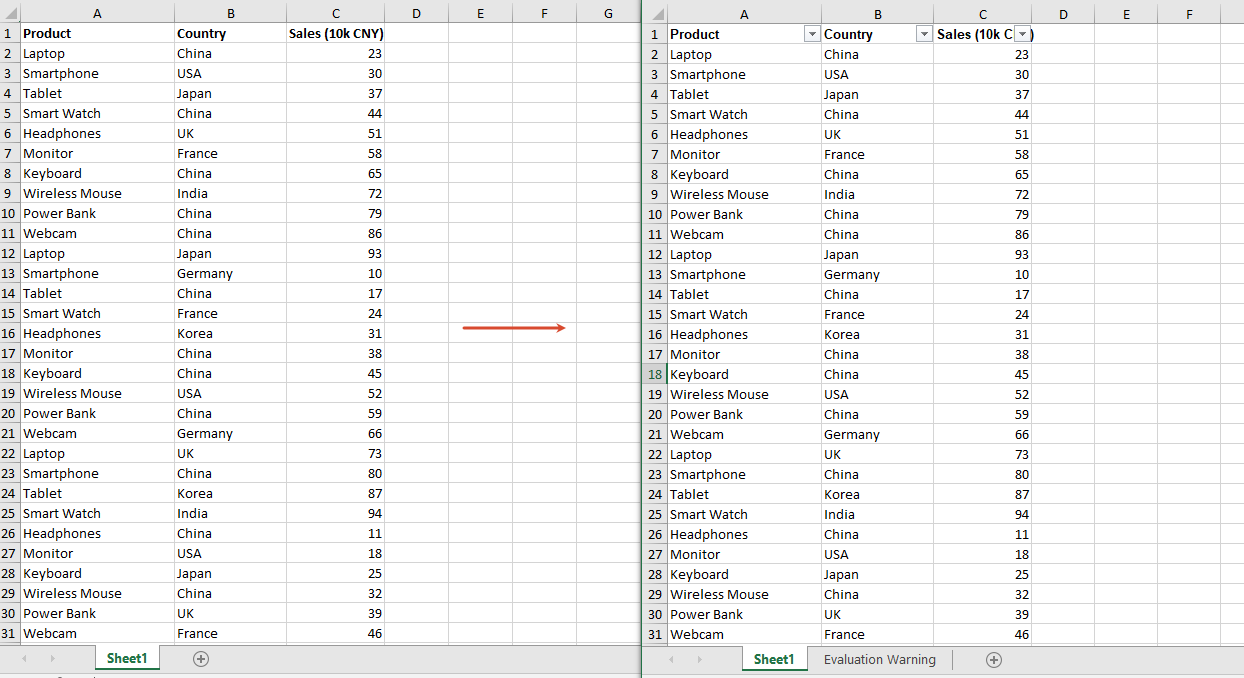
Apply Filter Conditions to Filter Data
After adding AutoFilters, you can also set a custom filter condition for a specified column through the CustomFilter method in code, and then call the Filter method to apply the filter, so that data rows matching the condition are automatically filtered out. For example, the following code sets the filter condition of the second column (Country) to equal "China"; after applying the filter, only data rows whose country is "China" are kept, and the remaining rows are hidden.
function App() {
  const applyFilter = async () => {
    // Get the Spire.XLS WASM module
    const xlsModule = window.wasmModule?.spirexls;

    // Check if the module is ready
    if (!xlsModule) {
      alert('Spire.Xls is not ready yet');
      return;
    }

    // Load the font and Excel file into VFS
    await window.spire.FetchFileToVFS('ARIAL.TTF', '/Library/Fonts/', `${process.env.PUBLIC_URL}/font/`);
    const inputFileName = 'FilterData.xlsx';
    await window.spire.FetchFileToVFS(inputFileName, '', `${process.env.PUBLIC_URL}data/`);

    // Load the workbook
    const workbook = new xlsModule.Workbook();
    workbook.LoadFromFile({ fileName: inputFileName });

    // Get the first worksheet
    const sheet = workbook.Worksheets.get(0);

    // Set the auto filter range: the header and data rows of the second column (Country)
    sheet.AutoFilters.Range = sheet.Range.get("B1:B51");

    // Get the first column of the auto filters
    const filterColumn = sheet.AutoFilters.get(0);

    // Set the custom filter condition: filter rows whose country is "China"
    const strCrt = "China";
    sheet.AutoFilters.CustomFilter({
      column: filterColumn,
      operatorType: xlsModule.FilterOperatorType.Equal,
      criteria: new xlsModule.String(strCrt)
    });

    // Apply the filter
    sheet.AutoFilters.Filter();

    // Save the result file, specifying Excel version 2016
    const outputFileName = "ApplyFilter_output.xlsx";
    workbook.SaveToFile({ fileName: outputFileName, version: xlsModule.ExcelVersion.Version2016 });

    // Dispose of the workbook object to release resources
    workbook.Dispose();

    // Read the converted file from VFS and trigger the download
    const fileArray = window.dotnetRuntime.Module.FS.readFile(outputFileName);
    const blob = new Blob([fileArray], { type: "application/vnd.openxmlformats-officedocument.spreadsheetml.sheet" });
    const url = URL.createObjectURL(blob);
    const a = document.createElement('a');
    a.href = url;
    a.download = outputFileName;
    a.click();
    URL.revokeObjectURL(url);
  };

  return (
    <div style={{ textAlign: 'center', height: '300px' }}>
      <h1>Apply Filter Condition</h1>
      <button onClick={applyFilter}>
        Start
      </button>
    </div>
  );
}

export default App;
Apply Filter Conditions to Filter Data 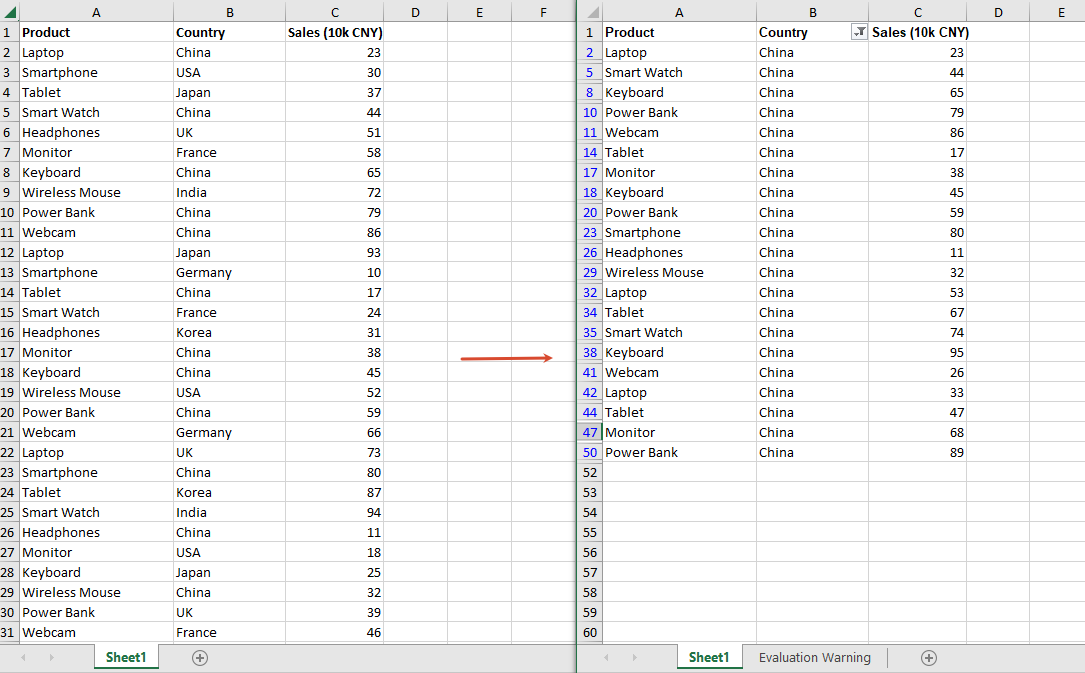
Remove AutoFilters
When you no longer need to filter data, you can remove all AutoFilters from the worksheet through the AutoFilters.Clear method, so that the data is fully displayed again.
function App() {
  const removeAutoFilter = async () => {
    // Get the Spire.XLS WASM module
    const xlsModule = window.wasmModule?.spirexls;

    // Check if the module is ready
    if (!xlsModule) {
      alert('Spire.Xls is not ready yet');
      return;
    }

    // Load the font and Excel file into VFS
    await window.spire.FetchFileToVFS('ARIAL.TTF', '/Library/Fonts/', `${process.env.PUBLIC_URL}/font/`);
    const inputFileName = 'FilteredData.xlsx';
    await window.spire.FetchFileToVFS(inputFileName, '', `${process.env.PUBLIC_URL}data/`);

    // Load the workbook
    const workbook = new xlsModule.Workbook();
    workbook.LoadFromFile({ fileName: inputFileName });

    // Get the first worksheet
    const sheet = workbook.Worksheets.get(0);

    // Remove all AutoFilters from the worksheet
    sheet.AutoFilters.Clear();

    // Save the result file, specifying Excel version 2016
    const outputFileName = "RemoveAutoFilter_output.xlsx";
    workbook.SaveToFile({ fileName: outputFileName, version: xlsModule.ExcelVersion.Version2016 });

    // Dispose of the workbook object to release resources
    workbook.Dispose();

    // Read the converted file from VFS and trigger the download
    const fileArray = window.dotnetRuntime.Module.FS.readFile(outputFileName);
    const blob = new Blob([fileArray], { type: "application/vnd.openxmlformats-officedocument.spreadsheetml.sheet" });
    const url = URL.createObjectURL(blob);
    const a = document.createElement('a');
    a.href = url;
    a.download = outputFileName;
    a.click();
    URL.revokeObjectURL(url);
  };

  return (
    <div style={{ textAlign: 'center', height: '300px' }}>
      <h1>Remove AutoFilter</h1>
      <button onClick={removeAutoFilter}>
        Start
      </button>
    </div>
  );
}

export default App;
Remove AutoFilters 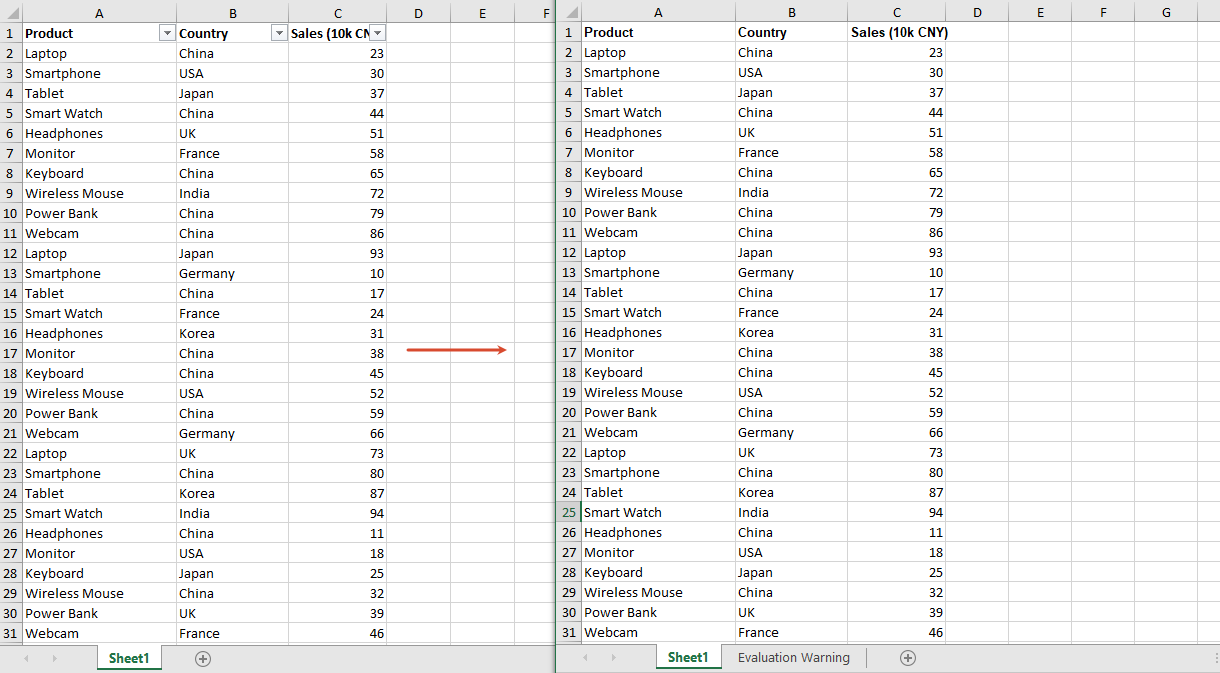
Frequently Asked Questions
Data rows are not hidden after filtering
Reason: The Filter() method was not called to apply the filter after the filter condition was set, or the range set by AutoFilters.Range does not cover the data rows you want to filter.
Solution: Call sheet.AutoFilters.Filter() after setting the filter condition, and make sure AutoFilters.Range covers the header row and all data rows, for example "B1:B51" in the example above.
Filtering by Chinese content fails
Reason: The filter condition is an exact match. If the filter value does not exactly match the cell content (for example, it contains leading or trailing spaces), it will not match.
Solution: Make sure the filter value exactly matches the cell content.
Get a Free License
If you wish to remove the evaluation message from the result documents, or get rid of the feature limitations, please contact sales to get a 30-day temporary license.