
Knowledgebase (2345)
Children categories
The table of contents is a field in a Word document that displays the headings of all levels and their corresponding page numbers in the document. Moreover, the table of contents can be updated after changes are made to the content of the document, and new headings and page numbers can be generated according to the new document content. Therefore, the table of contents can be a great convenience both when editing documents and reading them, while also making them more professional. This article is going to show how to insert the table of contents into Word documents through Java programs using Spire.Doc for Java.
- Create a Table of Contents with the Default Format
- Create a Table of Contents with Customized Format
Install Spire.Doc for Java
First, you're required to add the Spire.Doc.jar file as a dependency in your Java program. The JAR file can be downloaded from this link. If you use Maven, you can easily import the JAR file in your application by adding the following code to your project's pom.xml file.
<repositories>
    <repository>
        <id>com.e-iceblue</id>
        <name>e-iceblue</name>
        <url>https://repo.e-iceblue.com/nexus/content/groups/public/</url>
    </repository>
</repositories>
<dependencies>
    <dependency>
        <groupId>e-iceblue</groupId>
        <artifactId>spire.doc</artifactId>
        <version>14.6.0</version>
    </dependency>
</dependencies>
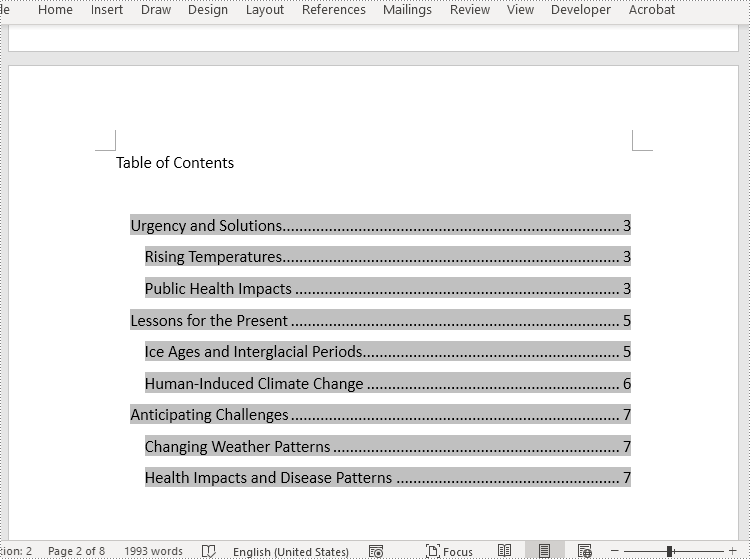
Create a Table of Contents with the Default Format
Before creating a table of contents, it is necessary to set the level for each heading, so that the table of contents can be generated according to each heading and its level. The level of a heading can be set by using the Paragraph.getListFormat().setListLevelNumber(int) method.
Spire.Doc for Java provides the Paragraph.appendTOC() method to insert a table of contents into a paragraph. The detailed steps for inserting a table of contents with the default style in a Word document are as follows:
- Create an object of Document class.
- Load a Word document using Document.loadFromFile() method.
- Add a section to the document using Document.addSection() method and insert it into the document after the cover section using Document.getSections().insert() method.
- Add a paragraph to the section using Section.addParagraph() method.
- Create a table of contents in the paragraph using Paragraph.appendTOC() method.
- Update the table of contents to display the headings in the document and their page numbers using Document.updateTableOfContents() method.
- Save the document using Document.saveToFile() method.
- Java
import com.spire.doc.Document;
import com.spire.doc.Section;
import com.spire.doc.documents.Paragraph;
import com.spire.doc.fields.TableOfContent;

public class insertTableOfContents {
    public static void main(String[] args) {
        //Create an object of Document class
        Document doc = new Document();

        //Load a Word document
        doc.loadFromFile("Sample.docx");

        //Add a section and insert it into the document after the cover section
        Section section = doc.addSection();
        doc.getSections().insert(1, section);

        //Add a paragraph to the section
        Paragraph paragraph = section.addParagraph();
        paragraph.appendText("Table of Contents\r\n");
        paragraph.getStyle().getCharacterFormat().setFontSize(14f);

        //Create a table of contents in the paragraph
        paragraph.appendTOC(2, 3);

        //Update the table of contents
        doc.updateTableOfContents();

        //Save the document
        doc.saveToFile("CreateTableOfContents.docx");
    }
}
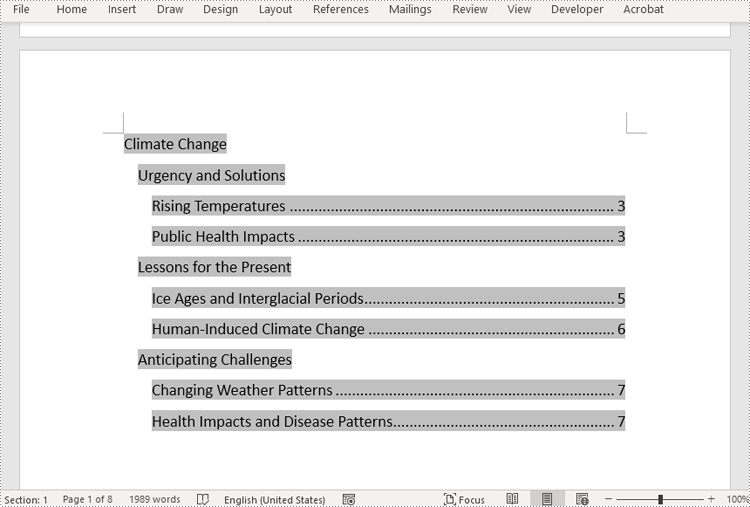
Create a Table of Contents with Customized Format
In Spire.Doc for Java, the TableOfContent class represents a table of contents of a Word document. The parts displayed in the table of contents can be customized by the switches while initializing an instance of the TableOfContent class. For example, the switches, "{\\o \"1-3\" \\n 1-2}", mean displaying the first to third level headings while omitting the page numbers of the first and second level headings.
The detailed steps for customizing a table of contents in a Word document are as follows:
- Create an object of Document class.
- Load a Word document using Document.loadFromFile() method.
- Insert a section after the cover section using Document.getSections().insert() method and add a paragraph to the section using Section.addParagraph() method.
- Create an instance of TableOfContent class to create a table of contents that displays the first to third level headings and omits page numbers of the first and second level headings.
- Insert the table of contents to the paragraph using Paragraph.getItems().add() method.
- Insert a field separator mark and a field end mark to the paragraph using Paragraph.appendFieldMark() method to end the table of contents field.
- Set the instance as the table of contents of the document using Document.setTOC() method.
- Update the table of contents to display the current contents for the document using Document.updateTableOfContents() method.
- Save the document using Document.saveToFile() method.
- Java
import com.spire.doc.Document;
import com.spire.doc.Section;
import com.spire.doc.documents.FieldMarkType;
import com.spire.doc.documents.Paragraph;
import com.spire.doc.fields.TableOfContent;

public class insertTableOfContentsWithCustomizedStyle {
    public static void main(String[] args) {
        //Create an object of Document class
        Document doc = new Document();

        //Load a Word document
        doc.loadFromFile("Sample.docx");

        //Insert a section after the first section and add a paragraph in the section
        Section section = doc.addSection();
        doc.getSections().insert(1, section);
        Paragraph paragraph = section.addParagraph();
        paragraph.getStyle().getCharacterFormat().setFontSize(14f);

        //Initialize an instance of TableOfContent class
        TableOfContent toc = new TableOfContent(doc, "{\\o \"1-3\" \\n 1-2}");

        //Insert the table of contents to the document
        paragraph.getItems().add(toc);

        //Insert field marks to end the field
        paragraph.appendFieldMark(FieldMarkType.Field_Separator);
        paragraph.appendFieldMark(FieldMarkType.Field_End);

        //Set the created table of contents as the table of contents of the document
        doc.setTOC(toc);

        //Update the table of contents
        doc.updateTableOfContents();

        //Save the document
        doc.saveToFile("TableOfContentsWithCustomizedStyle.docx");
        doc.dispose();
    }
}
Apply for a Temporary License
If you'd like to remove the evaluation message from the generated documents, or to get rid of the function limitations, please request a 30-day trial license for yourself.
Printing PowerPoint presentations allows you to convert your digital slides into tangible documents that can be shared, distributed, or used for reference. Whether you need handouts for a meeting, materials for a presentation, or physical copies for archival purposes, printing PowerPoint presentations is a versatile way to turn content into physical objects.
In this article, you will learn how to print PowerPoint documents in Java using Spire.Presentation for Java.
- Print PowerPoint with Default Printer in Java
- Print PowerPoint with a Specified Printer in Java
- Print Multiple Slides on One Page in Java
- Print PowerPoint in Grayscale in Java
- Print PowerPoint on Both Sides of the Paper in Java
- Set Print Range when Printing PowerPoint in Java
- Set Copies when Printing PowerPoint in Java
Install Spire.Presentation for Java
First of all, you're required to add the Spire.Presentation.jar file as a dependency in your Java program. The JAR file can be downloaded from this link. If you use Maven, you can easily import the JAR file in your application by adding the following code to your project's pom.xml file.
<repositories>
    <repository>
        <id>com.e-iceblue</id>
        <name>e-iceblue</name>
        <url>https://repo.e-iceblue.com/nexus/content/groups/public/</url>
    </repository>
</repositories>
<dependencies>
    <dependency>
        <groupId>e-iceblue</groupId>
        <artifactId>spire.presentation</artifactId>
        <version>11.5.1</version>
    </dependency>
</dependencies>
Print PowerPoint with the Default Printer in Java
Printing a PowerPoint presentation is a straightforward process that can be done using the default printer with default printer settings on your computer.
To print a PowerPoint file with the default printer, follow these steps.
- Create a Presentation object.
- Load a PowerPoint file from a given file path.
- Create a PresentationPrintDocument object based on the document.
- Print the document with the default printer using print() method of the PresentationPrintDocument object.
- Java
import com.spire.presentation.Presentation;
import com.spire.presentation.PresentationPrintDocument;

public class PrintWithDefaultPrinter {

    public static void main(String[] args) throws Exception {

        // Create a Presentation object
        Presentation presentation = new Presentation();

        // Load a PowerPoint file
        presentation.loadFromFile("C:\\Users\\Administrator\\Desktop\\Input.pptx");

        // Create a PresentationPrintDocument object
        PresentationPrintDocument printDocument = new PresentationPrintDocument(presentation);

        // Print the document
        printDocument.print();

        // Dispose resources
        presentation.dispose();
        printDocument.dispose();
    }
}
Print PowerPoint with a Specified Printer in Java
If you want to print your PowerPoint presentation using a specific printer rather than the default one, you can easily do so by following these steps.
- Create a Presentation object.
- Load a PowerPoint file from a given file path.
- Create a PrinterSettings object.
- Specify the printer name using PrinterSettings.print() method.
- Print the document using Presentation.print() method.
- Java
import com.spire.presentation.Presentation;
import com.spire.presentation.printing.PrinterSettings;

public class PrintWithSpecifiedPrinter {

    public static void main(String[] args) throws Exception {

        // Create a Presentation object
        Presentation presentation = new Presentation();

        // Load a PowerPoint file
        presentation.loadFromFile("C:\\Users\\Administrator\\Desktop\\Input.pptx");

        // Create a PrinterSettings object
        PrinterSettings printerSettings = new PrinterSettings();

        // Specify printer name
        printerSettings.setPrinterName("HP ColorLaserJet MFP M278-M281 PCL-6 (V4)");

        // Print the document
        presentation.print(printerSettings);

        // Dispose resources
        presentation.dispose();
    }
}
Print Multiple Slides on One Page in Java
Printing multiple slides on one page is a convenient way to optimize paper usage and create compact handouts or reference materials from your PowerPoint presentation.
The following are the steps to print multiple slides on one page using Java.
- Create a Presentation object.
- Load a PowerPoint file from a given file path.
- Set the slide count per page for printing using Presentation.setSlideCountPerPageForPrint() method.
- Print the document using Presentation.print() method.
- Java
import com.spire.presentation.PageSlideCount;
import com.spire.presentation.Presentation;
import com.spire.presentation.printing.Duplex;
import com.spire.presentation.printing.PrinterSettings;

public class PrintMultipleSlidesOnOnePage {

    public static void main(String[] args) throws Exception {

        // Create a Presentation object
        Presentation presentation = new Presentation();

        // Load a PowerPoint file
        presentation.loadFromFile("C:\\Users\\Administrator\\Desktop\\Input.pptx");

        // Set slide count per page for print
        presentation.setSlideCountPerPageForPrint(PageSlideCount.Two);

        // Create a PrinterSettings object
        PrinterSettings printerSettings = new PrinterSettings();

        // Print the document
        presentation.print(printerSettings);

        // Dispose resources
        presentation.dispose();
    }
}
Print PowerPoint in Grayscale in Java
By printing in grayscale, you can remove the color elements from your slides and obtain a monochromatic version of your presentation.
The following are the steps to print PowerPoint in grayscale using Java.
- Create a Presentation object.
- Load a PowerPoint file from a given file path.
- Enable grayscale printing using Presentation.setGrayLevelForPrint() method
- Print the document using Presentation.print() method.
- Java
import com.spire.presentation.Presentation;
import com.spire.presentation.printing.PrinterSettings;

public class PrintInGrayScale {

    public static void main(String[] args) throws Exception {

        // Create a Presentation object
        Presentation presentation = new Presentation();

        // Load a PowerPoint file
        presentation.loadFromFile("C:\\Users\\Administrator\\Desktop\\Input.pptx");

        // Enable grayscale printing mode
        presentation.setGrayLevelForPrint(true);

        // Create a PrinterSettings object
        PrinterSettings printerSettings = new PrinterSettings();

        // Print the document
        presentation.print(printerSettings);

        // Dispose resources
        presentation.dispose();
    }
}
Print PowerPoint on Both Sides of the Paper in Java
Printing PowerPoint slides on both sides of the paper can be a practical and eco-friendly option, as it reduces paper consumption and helps create more compact handouts or documents.
The steps to print a PowerPoint file on both sides of the pager are as follow.
- Create a Presentation object.
- Load a PowerPoint file from a given file path.
- Create a PrinterSettings object.
- Enable duplex printing mode using PrinterSettings.setDuplex() method.
- Print the document using Presentation.print() method.
- Java
import com.spire.presentation.Presentation;
import com.spire.presentation.printing.Duplex;
import com.spire.presentation.printing.PrinterSettings;

public class PrintInDuplexMode {

    public static void main(String[] args) throws Exception {

        // Create a Presentation object
        Presentation presentation = new Presentation();

        // Load a PowerPoint file
        presentation.loadFromFile("C:\\Users\\Administrator\\Desktop\\Input.pptx");

        // Create a PrinterSettings object
        PrinterSettings printerSettings = new PrinterSettings();

        // Enable duplex printing mode
        printerSettings.setDuplex(Duplex.Default);

        // Print the document
        presentation.print(printerSettings);

        // Dispose resources
        presentation.dispose();
    }
}
Set Print Range when Printing PowerPoint in Java
By setting the print range in PowerPoint, you have control over which slides are printed, allowing you to customize your printouts according to your specific needs.
To specify a range of slides to be printed, follow the steps below.
- Create a Presentation object.
- Load a PowerPoint file from a given file path.
- Create a PrinterSettings object.
- Specify a range of slides to be printed using PrinterSettings.setFromPage() and PrinterSettings.setToPage() methods.
- Print the document using Presentation.print() method.
- Java
import com.spire.presentation.Presentation;
import com.spire.presentation.printing.PrintRange;
import com.spire.presentation.printing.PrinterSettings;

public class SetPrintRange {

    public static void main(String[] args) throws Exception {

        // Create a Presentation object
        Presentation presentation = new Presentation();

        // Load a PowerPoint file
        presentation.loadFromFile("C:\\Users\\Administrator\\Desktop\\Input.pptx");

        // Create a PrinterSettings object
        PrinterSettings printerSettings = new PrinterSettings();

        // Specify a range of slides to be printed
        printerSettings.setPrintRange(PrintRange.SomePages);
        printerSettings.setFromPage(1);
        printerSettings.setToPage(4);

        // Print the document
        presentation.print(printerSettings);

        // Dispose resources
        presentation.dispose();
    }
}
Set Copies when Printing PowerPoint in Java
By setting the number of copies, you can easily specify how many duplicates of your slides you want to print.
To specify the number of copies to be printed, follow these steps.
- Create a Presentation object.
- Load a PowerPoint file from a given file path.
- Create a PrinterSettings object.
- Specify the number of copies to be printed using PrinterSettings.setCopies() method.
- Print the document using Presentation.print() method.
- Java
import com.spire.presentation.Presentation;
import com.spire.presentation.printing.PrinterSettings;

public class SetCopies {

    public static void main(String[] args) throws Exception {

        // Create a Presentation object
        Presentation presentation = new Presentation();

        // Load a PowerPoint file
        presentation.loadFromFile("C:\\Users\\Administrator\\Desktop\\Test.pptx");

        // Create a PrinterSettings object
        PrinterSettings printerSettings = new PrinterSettings();

        // Specify the number of copies to be printed
        printerSettings.setCopies((short)2);

        // Print the document
        presentation.print(printerSettings);

        // Dispose resources
        presentation.dispose();
    }
}
Apply for a Temporary License
If you'd like to remove the evaluation message from the generated documents, or to get rid of the function limitations, please request a 30-day trial license for yourself.
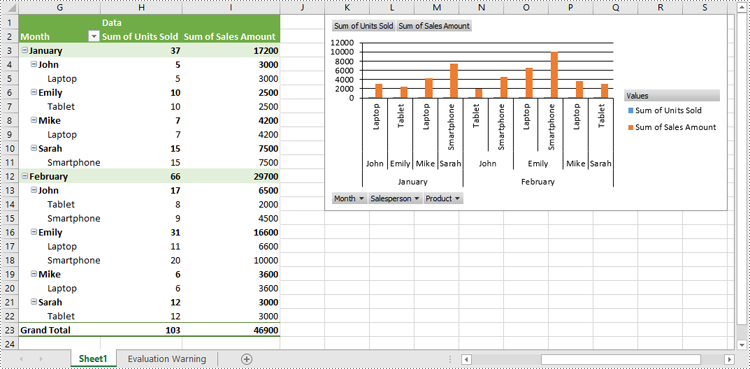
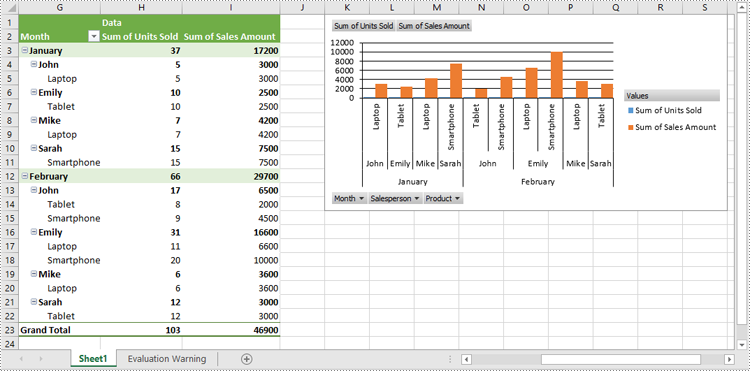
A Pivot Chart is a graphical representation of a Pivot Table. While a Pivot Table summarizes data and allows users to manipulate it for analysis, a Pivot Chart provides a visual representation of that summarized data. Pivot Charts can be easily updated as the data in the Pivot Table changes, making them an essential tool for reporting and analysis. In this article, we will demonstrate how to create pivot charts in Excel in C# using Spire.XLS for .NET.
- Create Pivot Charts in Excel in C#
- Show or Hide Field Buttons in Pivot Charts in Excel in C#
- Format Pivot Chart Series in Excel in C#
Install Spire.XLS for .NET
To begin with, you need to add the DLL files included in the Spire.XLS for .NET package as references in your .NET project. The DLL files can be either downloaded from this link or installed via NuGet.
PM> Install-Package Spire.XLS
Create Pivot Charts in Excel in C#
With Spire.XLS for .NET, creating a pivot chart from an existing pivot table in Excel is straightforward using the Worksheet.Charts.Add(ExcelChartType pivotChartType, IPivotTable pivotTable) method. The detailed steps are as follows.
- Create an object of the Workbook class.
- Load an Excel file using Workbook.LoadFromFile() method.
- Get a specific worksheet in the Excel file using Workbook.Worksheets[index] property.
- Get a specific pivot table in the worksheet using Worksheet.PivotTables[index] property.
- Add a pivot chart based on the pivot table to the worksheet using Worksheet.Charts.Add(ExcelChartType pivotChartType, IPivotTable pivotTable) method.
- Set the position and title of the pivot chart.
- Save the resulting file using Workbook.SaveToFile() method.
- C#
using Spire.Xls;
using Spire.Xls.Core;

namespace CreatePivotChart
{
    internal class Program
    {
        static void Main(string[] args)
        {
            // Create a Workbook object
            Workbook workbook = new Workbook();

            // Load an Excel file
            workbook.LoadFromFile("PivotTable.xlsx");

            // Get the first worksheet
            Worksheet sheet = workbook.Worksheets[0];

            // Get the first pivot table in the worksheet
            IPivotTable pivotTable = sheet.PivotTables[0];

            // Create a clustered column chart based on the pivot table
            Chart pivotChart = sheet.Charts.Add(ExcelChartType.ColumnClustered, pivotTable);

            // Set chart position
            pivotChart.TopRow = 1;
            pivotChart.LeftColumn = 11;
            pivotChart.RightColumn = 20;
            pivotChart.BottomRow = 15;

            // Set chart title to null
            pivotChart.ChartTitle = "";

            // Save the resulting file
            workbook.SaveToFile("CreatePivotChart.xlsx", ExcelVersion.Version2013);
            workbook.Dispose();
        }
    }
}
Show or Hide Field Buttons in Pivot Charts in Excel in C#
Using Spire.XLS for .NET, you can easily show or hide different types of field buttons to customize the appearance of your charts. The field buttons you can control include:
- Entire Field Buttons
- Report Filter Field Buttons
- Legend Field Buttons
- Axis Field Buttons
- Value Field Buttons
The detailed steps are as follows:
- Create an object of the Workbook class.
- Load an Excel file using Workbook.LoadFromFile() method.
- Get a specific worksheet in the Excel file using Workbook.Worksheets[index] property.
- Get a specific pivot table in the worksheet using Worksheet.PivotTables[index] property.
- Add a pivot chart based on the pivot table to the worksheet using Worksheet.Charts.Add(ExcelChartType pivotChartType, IPivotTable pivotTable) method.
- Set the position and title of the pivot chart.
- Hide specific field buttons in the pivot chart, such as the axis field buttons and the value field buttons, using Chart.DisplayAxisFieldButtons and Chart.DisplayValueFieldButtons properties.
- Save the resulting file using Workbook.SaveToFile() method.
- C#
using Spire.Xls;
using Spire.Xls.Core;

namespace ShowOrHideFieldButtons
{
    internal class Program
    {
        static void Main(string[] args)
        {
            // Create a Workbook object
            Workbook workbook = new Workbook();

            // Load an Excel file
            workbook.LoadFromFile("CreatePivotChart.xlsx");

            // Get the first worksheet
            Worksheet sheet = workbook.Worksheets[0];

            // Get the first pivot table in the worksheet
            IPivotTable pivotTable = sheet.PivotTables[0];

            // Create a clustered column chart based on the pivot table
            Chart pivotChart = sheet.Charts.Add(ExcelChartType.ColumnClustered, pivotTable);

            // Set chart position
            pivotChart.TopRow = 1;
            pivotChart.LeftColumn = 11;
            pivotChart.RightColumn = 20;
            pivotChart.BottomRow = 15;

            // Set chart title to null
            pivotChart.ChartTitle = "";

            // Hide specific field buttons
            pivotChart.DisplayAxisFieldButtons = false;
            pivotChart.DisplayValueFieldButtons = false;
            // pivotChart.DisplayLegendFieldButtons = false;
            // pivotChart.ShowReportFilterFieldButtons = false;
            // pivotChart.DisplayEntireFieldButtons = false;

            // Save the resulting file
            workbook.SaveToFile("HideFieldButtons.xlsx", ExcelVersion.Version2013);
            workbook.Dispose();
        }
    }
}
Format Pivot Chart Series in Excel in C#
When creating a pivot chart in Excel from a pivot table using Spire.XLS for .NET, it's important to note that the chart series do not get generated automatically. Instead, you must manually add the series and format them according to your preferences. The detailed steps are as follows:
- Create an object of the Workbook class.
- Load an Excel file using Workbook.LoadFromFile() method.
- Get a specific worksheet in the Excel file using Workbook.Worksheets[index] property.
- Get a specific pivot table in the worksheet using Worksheet.PivotTables[index] property.
- Add a pivot chart based on the pivot table to the worksheet using Worksheet.Charts.Add(ExcelChartType pivotChartType, IPivotTable pivotTable) method.
- Set the position and title of the pivot chart.
- Add series to the chart using Chart.Series.Add() method and then apply the desired formatting to the series.
- Save the resulting file using Workbook.SaveToFile() method.
- C#
using Spire.Xls;
using Spire.Xls.Charts;
using Spire.Xls.Core;

namespace FormatChartSeries
{
    internal class Program
    {
        static void Main(string[] args)
        {
            // Create a Workbook object
            Workbook workbook = new Workbook();

            // Load an Excel file
            workbook.LoadFromFile("CreatePivotChart.xlsx");

            // Get the first worksheet
            Worksheet sheet = workbook.Worksheets[0];

            // Get the first pivot table in the worksheet
            IPivotTable pivotTable = sheet.PivotTables[0];

            // Create a clustered column chart based on the pivot table
            Chart pivotChart = sheet.Charts.Add(ExcelChartType.ColumnClustered, pivotTable);

            // Set chart position
            pivotChart.TopRow = 1;
            pivotChart.LeftColumn = 11;
            pivotChart.RightColumn = 20;
            pivotChart.BottomRow = 15;

            // Set chart title to null
            pivotChart.ChartTitle = "";

            // Add chart series
            ChartSerie series = pivotChart.Series.Add(ExcelChartType.ColumnClustered);

            // Set bar width
            series.GetCommonSerieFormat().GapWidth = 10;

            // Set overlap (uncomment the line below to enable)
            // series.GetCommonSerieFormat().Overlap = 100;

            // Save the resulting file
            workbook.SaveToFile("FormatChartSeries.xlsx", ExcelVersion.Version2013);
            workbook.Dispose();
        }
    }
}
Apply for a Temporary License
If you'd like to remove the evaluation message from the generated documents, or to get rid of the function limitations, please request a 30-day trial license for yourself.
