
Knowledgebase (2417)
Children categories
Adding document properties to an Excel file is a simple and convenient way to provide additional context and information about the file. Document properties can be either standard or custom. Standard document properties, such as author, title, and subject, offer basic information about the file and make it easier to locate and identify. Custom document properties allow users to add specific details about the file, such as project name, client name, or department owner, providing relevant information and context to the data presented in the file. In this article, we will demonstrate how to add standard document properties and custom document properties to an Excel file in Java using Spire.XLS for Java library.
- Add Standard Document Properties to an Excel File in Java
- Add Custom Document Properties to an Excel File in Java
Install Spire.XLS for Java
First of all, you're required to add the Spire.Xls.jar file as a dependency in your Java program. The JAR file can be downloaded from this link. If you use Maven, you can easily import the JAR file in your application by adding the following code to your project's pom.xml file.
<repositories>
    <repository>
        <id>com.e-iceblue</id>
        <name>e-iceblue</name>
        <url>https://repo.e-iceblue.com/nexus/content/groups/public/</url>
    </repository>
</repositories>
<dependencies>
    <dependency>
        <groupId>e-iceblue</groupId>
        <artifactId>spire.xls</artifactId>
        <version>16.8.4</version>
    </dependency>
</dependencies>
Add Standard Document Properties to an Excel File in Java
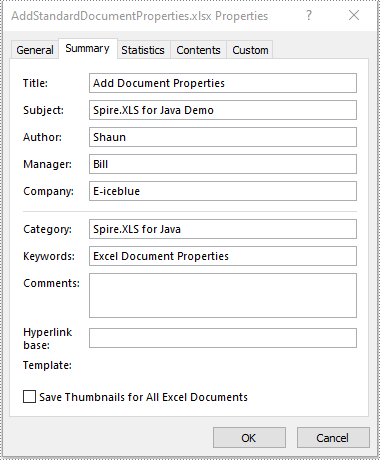
Standard document properties are pre-defined by Microsoft Excel and include fields such as Title, Subject, Author, Keywords, and Comments. The following steps demonstrate how to add standard document properties to an Excel file in Java using Spire.XLS for Java:
- Initialize an instance of the Workbook class.
- Load an Excel file using the Workbook.loadFromFile(String fileName) method.
- Add standard document properties, such as title, subject and author to the file using the Workbook.getDocumentProperties().setTitle(String value), Workbook.getDocumentProperties().setSubject(String value), Workbook.getDocumentProperties().setAuthor(String value) methods.
- Save the result file using the Workbook.saveToFile(String fileName, ExcelVersion version) method.
- Java
import com.spire.xls.ExcelVersion;
import com.spire.xls.Workbook;

public class AddStandardDocumentProperties {
    public static void main(String[] args) {
        //Initialize an instance of the Workbook class
        Workbook workbook = new Workbook();
        //Load an Excel file
        workbook.loadFromFile("Input.xlsx");

        //Add standard document properties to the file
        workbook.getDocumentProperties().setTitle("Add Document Properties");
        workbook.getDocumentProperties().setSubject("Spire.XLS for Java Demo");
        workbook.getDocumentProperties().setAuthor("Shaun");
        workbook.getDocumentProperties().setManager("Bill");
        workbook.getDocumentProperties().setCompany("E-iceblue");
        workbook.getDocumentProperties().setCategory("Spire.XLS for Java");
        workbook.getDocumentProperties().setKeywords("Excel Document Properties");

        //Save the result file
        workbook.saveToFile("AddStandardDocumentProperties.xlsx", ExcelVersion.Version2016);
        workbook.dispose();
    }
}
Add Custom Document Properties to an Excel File in Java
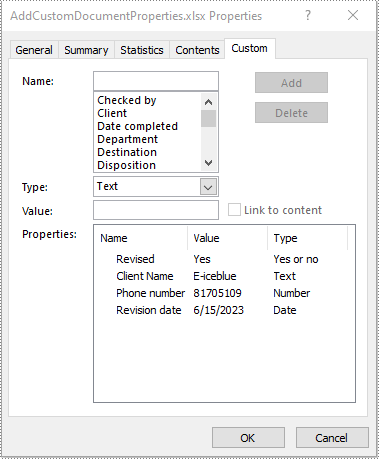
Custom document properties are user-defined and can be tailored to suit specific needs or requirements. The data type of the custom document properties can be Yes or No, Text, Number, and Date. The following steps demonstrate how to add custom document properties to an Excel file in Java using Spire.XLS for Java:
- Initialize an instance of the Workbook class.
- Load an Excel file using the Workbook.loadFromFile(String fileName) method.
- Add a custom document property of "Yes or No" type to the file using the Workbook.getCustomDocumentProperties().add(String var1, boolean var2) method.
- Add a custom document property of "Text" type to the file using the Workbook.getCustomDocumentProperties().add(String var1, String var2) method.
- Add a custom document property of "Number" type to the file using the Workbook.getCustomDocumentProperties().add(String var1, int var2) method.
- Add a custom document property of "Date" type to the file using the Workbook.getCustomDocumentProperties().add(String var1, Date var2) method.
- Save the result file using the Workbook.saveToFile(String fileName, ExcelVersion version) method.
- Java
import com.spire.xls.ExcelVersion;
import com.spire.xls.Workbook;

import java.util.Date;

public class AddCustomDocumentProperties {
    public static void main(String[] args) {
        //Initialize an instance of the Workbook class
        Workbook workbook = new Workbook();
        //Load an Excel file
        workbook.loadFromFile("Input.xlsx");

        //Add a “yes or no” custom document property
        workbook.getCustomDocumentProperties().add("Revised", true);
        //Add a “text” custom document property
        workbook.getCustomDocumentProperties().add("Client Name", "E-iceblue");
        //Add a “number” custom document property
        workbook.getCustomDocumentProperties().add("Phone number", 81705109);
        //Add a “date” custom document property
        workbook.getCustomDocumentProperties().add("Revision date", new Date());

        //Save the result file
        workbook.saveToFile("AddCustomDocumentProperties.xlsx", ExcelVersion.Version2013);
        workbook.dispose();
    }
}
Apply for a Temporary License
If you'd like to remove the evaluation message from the generated documents, or to get rid of the function limitations, please request a 30-day trial license for yourself.
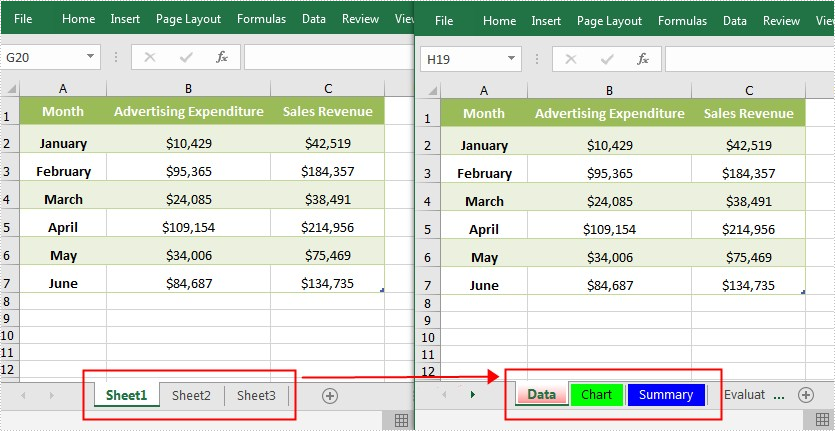
Usually, an Excel document may contain several worksheets with similar names such as Sheet1, Sheet2, Sheet3. In order to make the document more organized and at the same time facilitate your search, it is advisable to rename these worksheets and set different tab colors. In this article, you will learn how to achieve this task programmatically using Spire.XLS for Java.
Install Spire.XLS for Java
First of all, you're required to add the Spire.Xls.jar file as a dependency in your Java program. The JAR file can be downloaded from this link. If you use Maven, you can easily import the JAR file in your application by adding the following code to your project's pom.xml file.
<repositories>
    <repository>
        <id>com.e-iceblue</id>
        <name>e-iceblue</name>
        <url>https://repo.e-iceblue.com/nexus/content/groups/public/</url>
    </repository>
</repositories>
<dependencies>
    <dependency>
        <groupId>e-iceblue</groupId>
        <artifactId>spire.xls</artifactId>
        <version>16.8.4</version>
    </dependency>
</dependencies>
Rename Excel Worksheets and Set Tab Colors
The detailed steps are as follows:
- Create a Workbook object.
- Load a sample Excel document using Workbook.loadFromFile() method.
- Get a specified worksheet using Workbook.getWorksheets().get() method.
- Rename the specified worksheet using Worksheet.setName() method.
- Set tab color for the specified worksheet using Worksheet.setTabColor() method.
- Save the document to another file using Workbook.saveToFile() method.
- Java
import com.spire.xls.*;
import java.awt.*;

public class RenameSheetandSetTabColor {
    public static void main(String[] args) {
        //Create a Workbook object
        Workbook workbook = new Workbook();

        // Load a sample Excel document
        workbook.loadFromFile("input.xlsx");

        //Get the first worksheet
        Worksheet worksheet = workbook.getWorksheets().get(0);
        //Rename the first worksheet and set its tab color
        worksheet.setName("Data");
        worksheet.setTabColor(Color.red);

        //Get the second worksheet
        worksheet = workbook.getWorksheets().get(1);
        //Rename the second worksheet and set its tab color
        worksheet.setName("Chart");
        worksheet.setTabColor(Color.green);

        //Get the third worksheet
        worksheet = workbook.getWorksheets().get(2);
        //Rename the third worksheet and set its tab color
        worksheet.setName("Summary");
        worksheet.setTabColor(Color.blue);

        //Save the document to file
        workbook.saveToFile("RenameSheet.xlsx", ExcelVersion.Version2010);
    }
}
Apply for a Temporary License
If you'd like to remove the evaluation message from the generated documents, or to get rid of the function limitations, please request a 30-day trial license for yourself.
The data validation in Excel helps control what kind of data can or should be entered into a worksheet. In other words, any input entered into a particular cell must meet the criteria set for that cell. For example, you can create a validation rule that restricts a cell to accept only whole numbers. In this article, you will learn how to apply or remove data validation in Excel by using Spire.XLS for Java.
Install Spire.XLS for Java
First of all, you’re required to add the Spire.Xls.jar file as a dependency in your Java program. The JAR file can be downloaded from this link. If you use Maven, you can easily import the JAR file in your application by adding the following code to your project’s pom.xml file.
<repositories>
    <repository>
        <id>com.e-iceblue</id>
        <name>e-iceblue</name>
        <url>https://repo.e-iceblue.com/nexus/content/groups/public/</url>
    </repository>
</repositories>
<dependencies>
    <dependency>
        <groupId>e-iceblue</groupId>
        <artifactId>spire.xls</artifactId>
        <version>16.8.4</version>
    </dependency>
</dependencies>
Apply Data Validation to Excel Cells
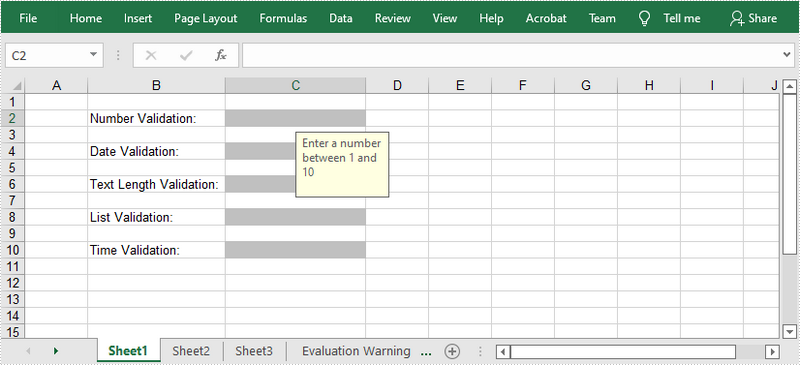
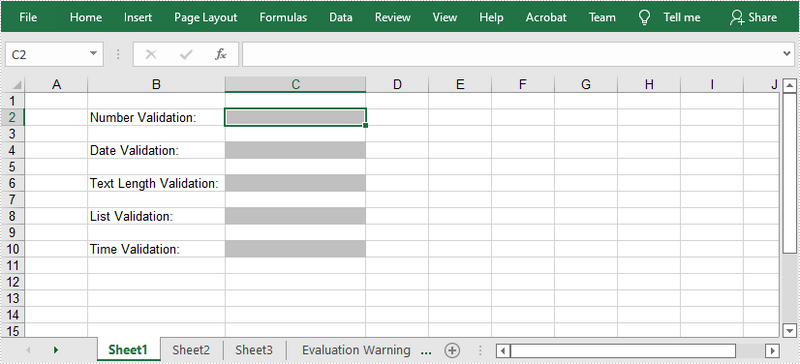
The following are the main steps to add various types of data validation to cells.
- Create a Workbook object, and get the first worksheet using Workbook.getWorksheets().get() method.
- Get a specific cell range using Worksheet.getCellRange() method to add data validation.
- Set the data type allowed in the cell using CellRange.getDataValidation().setAllowType() method. You can choose the data type as Integer, Time, Date, TextLength, Decimal, etc.
- Set the comparison operator using CellRange.getDataValiation().setCompareOperator() method. The comparison operators include Between, NotBetween, Less, Greater, Equal, etc.
- Set one or two formulas for the data validation using CellRange.getDataValidation().setFormula1() and CellRange.getDataValidation().setFormula2() methods.
- Set the input prompt using CellRange.getDataValidation().setInputMessage() method.
- Save the workbook to an Excel file using Workbook.saveToFile() method.
- Java
import com.spire.xls.*;

public class DataValidation {

    public static void main(String[] args) {

        //Create a Workbook object
        Workbook workbook = new Workbook();

        //Get the first worksheet
        Worksheet sheet = workbook.getWorksheets().get(0);

        //Insert text in cells
        sheet.getCellRange("B2").setText("Number Validation:");
        sheet.getCellRange("B4").setText("Date Validation:");
        sheet.getCellRange("B6").setText("Text Length Validation:");
        sheet.getCellRange("B8").setText("List Validation:");
        sheet.getCellRange("B10").setText("Time Validation:");

        //Add a number validation to C2
        CellRange rangeNumber = sheet.getCellRange("C2");
        rangeNumber.getDataValidation().setAllowType(CellDataType.Integer);
        rangeNumber.getDataValidation().setCompareOperator(ValidationComparisonOperator.Between);
        rangeNumber.getDataValidation().setFormula1("1");
        rangeNumber.getDataValidation().setFormula2("10");
        rangeNumber.getDataValidation().setInputMessage("Enter a number between 1 and 10");
        rangeNumber.getCellStyle().setKnownColor(ExcelColors.Gray25Percent);

        //Add a date validation to C4
        CellRange rangeDate = sheet.getCellRange("C4");
        rangeDate.getDataValidation().setAllowType(CellDataType.Date);
        rangeDate.getDataValidation().setCompareOperator(ValidationComparisonOperator.Between);
        rangeDate.getDataValidation().setFormula1("1/1/2010");
        rangeDate.getDataValidation().setFormula2("12/31/2020");
        rangeDate.getDataValidation().setInputMessage("Enter a date between 1/1/2010 and 12/31/2020");
        rangeDate.getCellStyle().setKnownColor(ExcelColors.Gray25Percent);

        //Add a text length validation to C6
        CellRange rangeTextLength = sheet.getCellRange("C6");
        rangeTextLength.getDataValidation().setAllowType(CellDataType.TextLength);
        rangeTextLength.getDataValidation().setCompareOperator(ValidationComparisonOperator.LessOrEqual);
        rangeTextLength.getDataValidation().setFormula1("5");
        rangeTextLength.getDataValidation().setInputMessage("Enter text lesser than 5 characters");
        rangeTextLength.getCellStyle().setKnownColor(ExcelColors.Gray25Percent);

        //Apply a list validation to C8
        CellRange rangeList = sheet.getCellRange("C8");
        rangeList.getDataValidation().setValues(new String[]{ "United States", "Canada", "United Kingdom", "Germany" });
        rangeList.getDataValidation().isSuppressDropDownArrow(false);
        rangeList.getDataValidation().setInputMessage("Choose an item from the list");
        rangeList.getCellStyle().setKnownColor(ExcelColors.Gray25Percent);

        //Apply a time validation to C10
        CellRange rangeTime= sheet.getCellRange("C10");
        rangeTime.getDataValidation().setAllowType(CellDataType.Time);
        rangeTime.getDataValidation().setCompareOperator(ValidationComparisonOperator.Between);
        rangeTime.getDataValidation().setFormula1("9:00");
        rangeTime.getDataValidation().setFormula2("12:00");
        rangeTime.getDataValidation().setInputMessage("Enter a time between 9:00 and 12:00");
        rangeTime.getCellStyle().setKnownColor(ExcelColors.Gray25Percent);

        //Auto fit width of column 2
        sheet.autoFitColumn(2);

        //Set the width of column 3
        sheet.setColumnWidth(3, 20);

        //Save to file
        workbook.saveToFile("output/ApplyDataValidation.xlsx", ExcelVersion.Version2016);
    }
}
Remove Data Validation from Selected Cell Ranges
The following are the steps to remove data validation from selected cell ranges.
- Create a Workbook object.
- Load a sample Excel file using Workbook.loadFromFile() method.
- Get the first worksheet using Workbook.getWorksheets().get() method.
- Create an array of rectangles, which is used to locate the cell ranges where the validation will be removed.
- Remove the data validation from the selected cell ranges using Worksheet.getDVTable().remove() method.
- Save the workbook to another Excel file using Workbook.saveToFile() method.
- Java
import com.spire.xls.Workbook;
import com.spire.xls.Worksheet;

import java.awt.*;

public class RemoveDataValidation {

    public static void main(String[] args) {

        //Create a Workbook object
        Workbook workbook = new Workbook();

        //Load a sample Excel file
        workbook.loadFromFile("C:\\Users\\Administrator\\Desktop\\ApplyDataValidation.xlsx");

        //Get the first worksheet
        Worksheet worksheet = workbook.getWorksheets().get(0);

        //Create an array of rectangles, which is used to locate the ranges in worksheet
        Rectangle[] rectangles = new Rectangle[]{

                //One Rectangle(columnIndex, rowIndex) specifies a specific cell,the column or row index starts at 0
                //To specify a cell range, use Rectangle(startColumnIndex, startRowIndex, endColumnIndex, endRowIndex)
                new Rectangle(2,1),
                new Rectangle(2,3),
                new Rectangle(2,5),
                new Rectangle(2,7),
                new Rectangle(2,9)
        };

        //Remove the data validation from the selected cells
        worksheet.getDVTable().remove(rectangles);

        //Save the workbook to an Excel file
        workbook.saveToFile("output/RemoveDataValidation.xlsx");
    }
}
Apply for a Temporary License
If you'd like to remove the evaluation message from the generated documents, or to get rid of the function limitations, please request a 30-day trial license for yourself.
