Python: Apply Conditional Formatting in Excel
Conditional formatting is a powerful feature in Microsoft Excel that allows users to apply formatting rules to cells based on specific conditions or criteria. It provides a quick and efficient way to visually highlight and analyze data, making it easier to identify trends, patterns, and outliers. With conditional formatting, users can customize the appearance of cells, such as font color, cell background, and borders, to draw attention to specific data points or results. In this article, you will learn how to programmatically apply conditional formatting in Excel in Python using Spire.XLS for Python.
- Alternate Row Colors in Excel Using Conditional Formatting in Python
- Highlight Top or Bottom Ranked Values in Excel in Python
- Highlight Values Below or Above Average in Excel in Python
- Highlight Values Between Two Numbers in Excel in Python
Install Spire.XLS for Python
This scenario requires Spire.XLS for Python and plum-dispatch v1.7.4. They can be easily installed in your Windows through the following pip command.
pip install Spire.XLS
If you are unsure how to install, please refer to this tutorial: How to Install Spire.XLS for Python on Windows
Alternate Row Colors in Excel Using Conditional Formatting in Python
Apply alternating row colors enhances the readability and visual appeal of a spreadsheet. By using different background colors for adjacent rows, it makes it easier to distinguish and follow individual rows of data. The following are the steps to alternate row colors in Excel using conditional formatting with Spire.XLS for Python.
- Create a Workbook object.
- Load an Excel file using Workbook.LoadFromFile() method.
- Get a specific worksheet from the workbook through Workbook.Worsheets[index] property.
- Add a conditional format to the worksheet using Worksheet.ConditionalFormats.Add() method and return an object of XlsConditionalFormats class.
- Specify the cell range where the conditional formatting will be applied using XlsConditionalFormats.AddRange() method.
- Add a condition using XlsConditionalFormats.AddCondition() method to change the color of even rows.
- Add another condition to change the color of odd rows.
- Save the workbook to an Excel file using Workbook.SaveToFile() method.
- Python
from spire.xls import *
from spire.xls.common import *

# Create a Workbook object
workbook = Workbook()

# Load a file from disk
workbook.LoadFromFile("C:/Users/Administrator/Desktop/input.xlsx")

# Get the first worksheet
sheet = workbook.Worksheets[0]

# Add a conditional format to the worksheet
conditionalFormat = sheet.ConditionalFormats.Add()

# Specify the range where the conditional format will be applied
conditionalFormat.AddRange(sheet.Range[2, 1, sheet.LastRow, sheet.LastColumn])

# Specify the first condition and format the cells that match the condition
condition1 = conditionalFormat.AddCondition()
condition1.FirstFormula = "=MOD(ROW(),2)=0"
condition1.FormatType = ConditionalFormatType.Formula
condition1.BackColor = Color.get_White()

# Specify the second condition and format the cells that match the condition
condition2 = conditionalFormat.AddCondition()
condition2.FirstFormula = "=MOD(ROW(),2)=1"
condition2.FormatType = ConditionalFormatType.Formula
condition2.BackColor = Color.get_LightGray()

# Save to file
workbook.SaveToFile("output/AlternateRowColors.xlsx", ExcelVersion.Version2016)
workbook.Dispose()

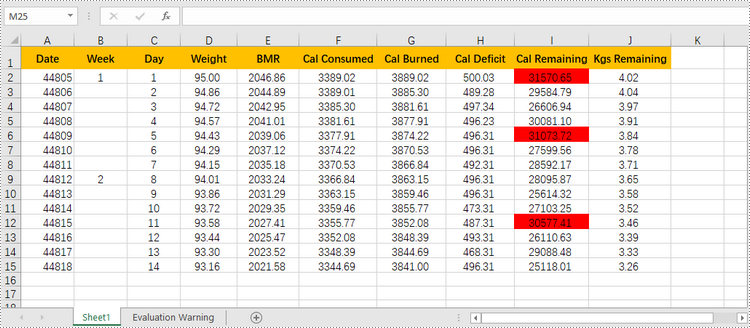
Highlight Top or Bottom Ranked Values in Excel
Highlighting top-ranked or bottom-ranked values in Excel can quickly identify the highest or the lowest values within a range or dataset, making it easier to analyze and interpret the data. The following are the steps to highlight top or bottom ranked values in Excel using conditional formatting with Spire.XLS for Python.
- Create a Workbook object.
- Load an Excel file using Workbook.LoadFromFile() method.
- Get a specific worksheet from the workbook through Workbook.Worsheets[index] property.
- Add a conditional format to the worksheet using Worksheet.ConditionalFormats.Add() method and return an object of XlsConditionalFormats class.
- Specify the cell range where the conditional formatting will be applied using XlsConditionalFormats.AddRange() method.
- Add a condition using XlsConditionalFormats.AddCondition() method to change the color of the cells that have top ranked or bottom ranked values.
- Save the workbook to an Excel file using Workbook.SaveToFile() method.
- Python
from spire.xls import *
from spire.xls.common import *

# Create a Workbook object
workbook = Workbook()

# Load a file from disk
workbook.LoadFromFile("C:/Users/Administrator/Desktop/input.xlsx")

# Get the first worksheet
sheet = workbook.Worksheets[0]

# Add a conditional format to the worksheet
conditionalFormat = sheet.ConditionalFormats.Add()

# Specify the range where the conditional format will be applied
conditionalFormat.AddRange(sheet.Range["I2:I15"])

# Add a condition to highlight the top 3 ranked values
condition1 = conditionalFormat.AddTopBottomCondition(TopBottomType.Top, 3)
condition1.BackColor = Color.get_Red()

# Add a condition to highlight the bottom 3 ranked values
# condition2 = conditionalFormat.AddTopBottomCondition(TopBottomType.Bottom, 3)
# condition2.BackColor = Color.get_Green()

# Save the workbook to an Excel file
workbook.SaveToFile("output/TopOrBottomValues.xlsx", ExcelVersion.Version2016)
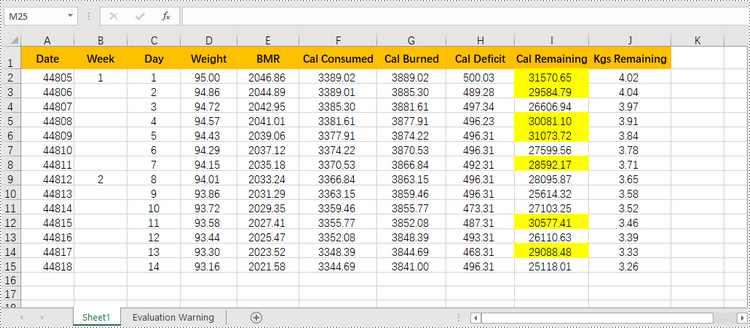
Highlight Values Below or Above Average in Excel
To quickly identify data points that are significantly higher or lower than the average, you can use conditional formatting as well. Here are the detailed steps.
- Create a Workbook object.
- Load an Excel file using Workbook.LoadFromFile() method.
- Get a specific worksheet from the workbook through Workbook.Worsheets[index] property.
- Add a conditional format to the worksheet using Worksheet.ConditionalFormats.Add() method and return an object of XlsConditionalFormats class.
- Specify the cell range where the conditional formatting will be applied using XlsConditionalFormats.AddRange() method.
- Add a condition using XlsConditionalFormats.AddCondition() method to change the color of the cells with values above or below the average.
- Save the workbook to an Excel file using Workbook.SaveToFile() method.
- Python
from spire.xls import *
from spire.xls.common import *

# Create a Workbook object
workbook = Workbook()

# Load a file from disk
workbook.LoadFromFile("C:/Users/Administrator/Desktop/input.xlsx")

# Get the first worksheet
sheet = workbook.Worksheets[0]

# Add a conditional format to the worksheet
conditionalFormat = sheet.ConditionalFormats.Add()

# Specify the range where the conditional format will be applied
conditionalFormat.AddRange(sheet.Range["I2:I15"])

# Add a condition to highlight the values above average
condition1 = conditionalFormat.AddAverageCondition(AverageType.Above)
condition1.BackColor = Color.get_Yellow()

# Add a condition to highlight the values below average
# condition2 = conditionalFormat.AddAverageCondition(AverageType.Below)
# condition2.BackColor = Color.get_DarkGray()

# Save the workbook to an Excel file
workbook.SaveToFile("output/AboveOrBelowAverage.xlsx", ExcelVersion.Version2016)
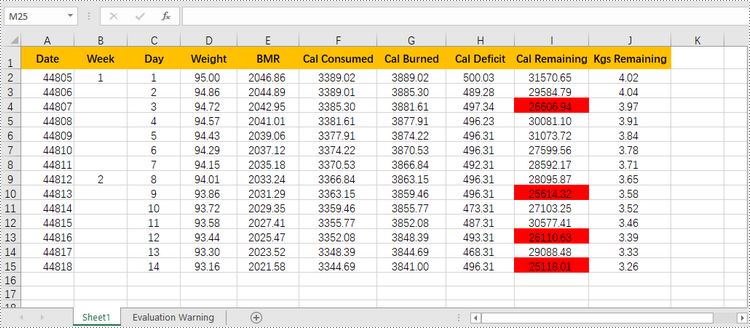
Highlight Values Between Two Numbers in Excel
Highlighting values between a specific range helps you quickly identify and focus on the relevant data points that fall within the range. The following are the steps to highlight values between two numbers using conditional formatting with Spire.XLS for Python.
- Create a Workbook object.
- Load an Excel file using Workbook.LoadFromFile() method.
- Get a specific worksheet from the workbook through Workbook.Worsheets[index] property.
- Add a conditional format to the worksheet using Worksheet.ConditionalFormats.Add() method and return an object of XlsConditionalFormats class.
- Specify the cell range where the conditional formatting will be applied using XlsConditionalFormats.AddRange() method.
- Add a condition using XlsConditionalFormats.AddCondition() method to change the color of the cells with values between two specific numbers.
- Save the workbook to an Excel file using Workbook.SaveToFile() method.
- Python
from spire.xls import *
from spire.xls.common import *

# Create a Workbook object
workbook = Workbook()

# Load a file from disk
workbook.LoadFromFile("C:/Users/Administrator/Desktop/input.xlsx")

# Get the first worksheet
sheet = workbook.Worksheets[0]

# Add a conditional format to the worksheet
conditionalFormat = sheet.ConditionalFormats.Add()

# Specify the range where the conditional format will be applied
conditionalFormat.AddRange(sheet.Range["I2:I15"])

# Create a condition and format the cells that meet the condition
condition = conditionalFormat.AddCondition()
condition.FormatType = ConditionalFormatType.CellValue
condition.Operator = ComparisonOperatorType.Between
condition.FirstFormula = "25000"
condition.SecondFormula = "27000"
condition.BackColor = Color.get_Red()

# Save the workbook to an Excel file
workbook.SaveToFile("output/ValuesBetweenTwoNumbers.xlsx", ExcelVersion.Version2016)
Apply for a Temporary License
If you'd like to remove the evaluation message from the generated documents, or to get rid of the function limitations, please request a 30-day trial license for yourself.
Python: Insert or Remove Footnotes in Word
Footnotes are a valuable tool in Microsoft Word that allows you to enhance the content of your documents by providing additional information, references, or citations at the bottom of a page. For example, you can use footnotes to provide in-depth explanations of complex concepts, cite sources to support your arguments, or offer tangential information that might be interesting to your readers. Whether you're working on an academic paper, a book, or any document that requires citations or explanations, footnotes offer a convenient way to maintain a clean and organized layout while presenting supplementary details. In this article, we will explain how to insert or remove footnotes in a Word document in Python using Spire.Doc for Python.
- Insert a Footnote for a Specific Paragraph in Word in Python
- Insert a Footnote for a Specific Text in Word in Python
- Remove Footnotes in a Word Document in Python
Install Spire.Doc for Python
This scenario requires Spire.Doc for Python and plum-dispatch v1.7.4. They can be easily installed in your Windows through the following pip command.
pip install Spire.Doc
If you are unsure how to install, please refer to this tutorial: How to Install Spire.Doc for Python on Windows
Insert a Footnote for a Specific Paragraph in Word in Python
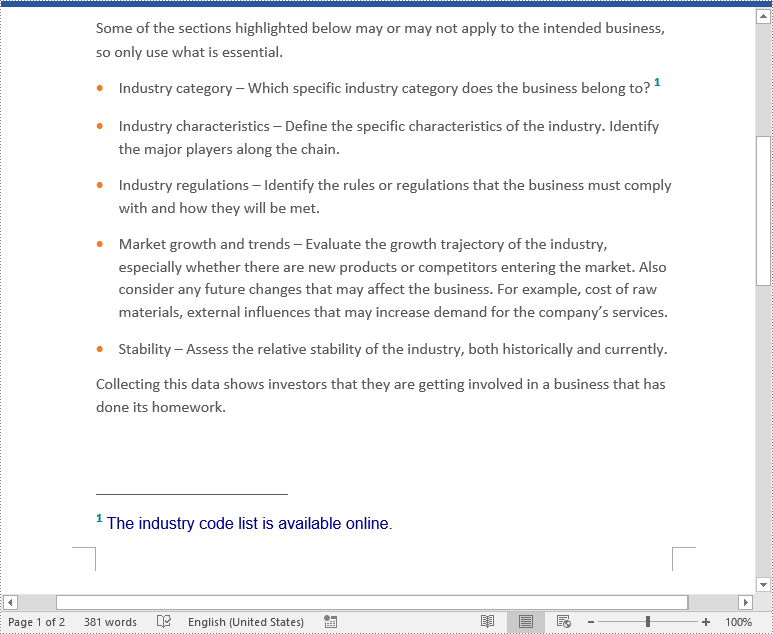
You can use the Paragraph.AppendFootnote(FootnoteType.Footnote) method provided by Spire.Doc for Python to easily add a footnote for a specific paragraph. The detailed steps are as follows.
- Create an object of the Document class.
- Load a Word document using Document.LoadFromFile() method.
- Get a specific section in the document using Document.Section[int] property and then get a specific paragraph of the section using Section.Paragraphs[int] property.
- Add a footnote at the end of the paragraph using Paragraph.AppendFootnote(FootnoteType.Footnote) method.
- Set the text content of the footnote, and then set the font and color for the footnote text and the footnote reference mark.
- Save the result document using Document.SaveToFile() method.
- Python
from spire.doc import *
from spire.doc.common import *

# Create a Document instance
document = Document()
# Load a sample Word document
document.LoadFromFile("Sample.docx")

# Get a specific section
section = document.Sections.get_Item(0)

# Get a specific paragraph
paragraph = section.Paragraphs.get_Item(3)

# Add a footnote at the end of the paragraph
footnote = paragraph.AppendFootnote(FootnoteType.Footnote)

# Set the text content of the footnote
text = footnote.TextBody.AddParagraph().AppendText("The industry code list is available online.")

# Set the text font and color
text.CharacterFormat.FontName = "Arial"
text.CharacterFormat.FontSize = 12
text.CharacterFormat.TextColor = Color.get_DarkBlue()

# Set the font and color of the footnote reference mark
footnote.MarkerCharacterFormat.FontName = "Calibri"
footnote.MarkerCharacterFormat.FontSize = 15
footnote.MarkerCharacterFormat.Bold = True
footnote.MarkerCharacterFormat.TextColor = Color.get_DarkCyan()

# Save the result document
document.SaveToFile("AddFootnoteForParagraph.docx", FileFormat.Docx2016)
document.Close()
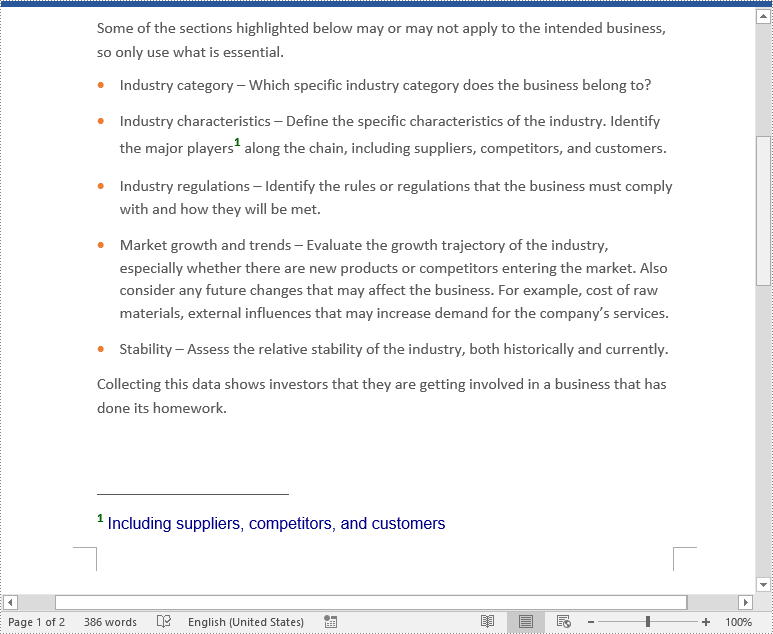
Insert a Footnote for a Specific Text in Word in Python
To add a footnote for a specific text, you need to find the text in the document, get the location of the text in its owner paragraph, and then insert the footnote after the text. The detailed steps are as follows.
- Create an object of the Document class.
- Load a Word document using Document.LoadFromFile() method.
- Find a specific text using Document.FindString() method.
- Get the found text as a single text range using TextSelection.GetAsOneRange() method.
- Get the paragraph where the text range is located using TextRange.OwnerParagraph property.
- Get the index position of the text range in the paragraph using Paragraph.ChildObjects.IndexOf() method.
- Add a footnote to the paragraph using Paragraph.AppendFootnote(FootnoteType.Footnote) method, and then insert the footnote after the specific text using Paragraph.ChildObjects.Insert() method.
- Set the text content of the footnote, and then set the font and color for the footnote text and the footnote reference mark.
- Save the result document using Document.SaveToFile() method.
- Python
from spire.doc import *
from spire.doc.common import *

# Create a Document instance
document = Document()
# Load a sample Word document
document.LoadFromFile("Sample.docx")

# Find a specific text
selection = document.FindString("major players", False, True)

# Get the found text as a single text range
textRange = selection.GetAsOneRange()

# Get the paragraph where the text range is located
paragraph = textRange.OwnerParagraph

# Get the index position of the text range in the paragraph
index = paragraph.ChildObjects.IndexOf(textRange)

# Add a footnote to the paragraph
footnote = paragraph.AppendFootnote(FootnoteType.Footnote)

# Insert the footnote after the text range
paragraph.ChildObjects.Insert(index + 1, footnote)

# Set the text content of the footnote
text = footnote.TextBody.AddParagraph().AppendText("Including suppliers, competitors, and customers")

# Set the text font and color
text.CharacterFormat.FontName = "Arial"
text.CharacterFormat.FontSize = 12
text.CharacterFormat.TextColor = Color.get_DarkBlue()

# Set the font and color of the footnote reference mark
footnote.MarkerCharacterFormat.FontName = "Calibri"
footnote.MarkerCharacterFormat.FontSize = 15
footnote.MarkerCharacterFormat.Bold = True
footnote.MarkerCharacterFormat.TextColor = Color.get_DarkGreen()

# Save the result document
document.SaveToFile("AddFootnoteForText.docx", FileFormat.Docx2016)
document.Close()
Remove Footnotes in a Word Document in Python
When the footnotes of a Word document are no longer needed, you can remove them to make the document neater. The detailed steps are as follows.
- Create an object of the Document class.
- Load a Word document using Document.LoadFromFile() method.
- Get a specific section using Document.Sections[int] property.
- Loop through each paragraph in the section to find the footnotes.
- Remove the footnotes using Paragraph.ChildObjects.RemoveAt() method.
- Save the result document using Document.SaveToFile() method.
- Python
from spire.doc import *
from spire.doc.common import *

# Create a Document instance
document = Document()
# Load a sample Word document
document.LoadFromFile("AddFootnoteForParagraph.docx")

# Get the first section of the document
section = document.Sections[0]

# Loop through the paragraphs in the section
for y in range(section.Paragraphs.Count):
    para = section.Paragraphs.get_Item(y)
    index = -1
    i = 0
    cnt = para.ChildObjects.Count
    while i < cnt:
        pBase = para.ChildObjects[i] if isinstance(para.ChildObjects[i], ParagraphBase) else None
        if isinstance(pBase, Footnote):
            index = i
            break
        i += 1
    if index > -1:
        # Remove the footnotes from the paragraph
        para.ChildObjects.RemoveAt(index)

# Save the result document
document.SaveToFile("RemoveFootnotes.docx", FileFormat.Docx)
document.Close()
Apply for a Temporary License
If you'd like to remove the evaluation message from the generated documents, or to get rid of the function limitations, please request a 30-day trial license for yourself.
Python: Create Tables in a Word Document
A table is a powerful tool in a Word document that allows you to organize and present information in a structured manner. It consists of rows and columns, forming a grid-like structure. Tables are commonly used for various purposes, such as creating schedules, comparing data, or displaying data in a neat and organized format. In this article, you will learn how to programmatically create tables in a Word document in Python using Spire.Doc for Python.
- Create a Simple Table in Word in Python
- Create a Table from an HTML String in Python
- Merge and Split Cells in a Table in Python
- Fill a Table with Data in Word in Python
Install Spire.Doc for Python
This scenario requires Spire.Doc for Python and plum-dispatch v1.7.4. They can be easily installed in your Windows through the following pip command.
pip install Spire.Doc
If you are unsure how to install, please refer to this tutorial: How to Install Spire.Doc for Python on Windows
Prerequisite Knowledge
Spire.Doc for Python offers the Table class to represent a table in a Word document. You can create table objects either through the constructor or the Section.AddTable() method. After the table object is created, you can use the Table.AddRow() method to dynamically add rows to the table, or specify the number of rows and columns of the table, and then populate it with data in a single pass.
Also, Spire.Doc for Python supports creating tables from an HTML string. This method does not return an object of Table. Therefore, you cannot use the properties or methods under the Table class to deal with the table created from an HTML string. You need to set up the content and style of the table in the HTML string.
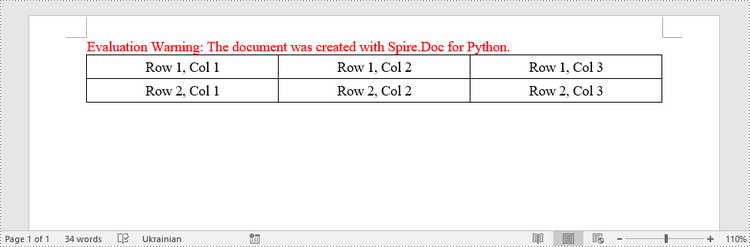
Create a Simple Table in Word in Python
This example demonstrates how to create a simple plain table using the Table class and how to add rows one by one. Here are the main steps.
- Create a Document object.
- Add a section to it using Document.AddSection() method.
- Create a Table object.
- Add a row to it using Table.AddRow() method.
- Get a specific cell of the row through Row.Cells[index] property.
- Add text to the cell using TableCell.AddParagraph().AppendText() method.
- Add the table to the document using Section.AddTable() method.
- Save the document to a .docx file using Document.SaveToFile() method.
- Python
from spire.doc import *
from spire.doc.common import *

# Create a Document object
doc = Document()

# Add a section
section = doc.AddSection()

# Create a table
table = Table(doc, True)

# Set the width of table
table.PreferredWidth = PreferredWidth(WidthType.Percentage, int(100))

# Set the border of table
table.TableFormat.Borders.BorderType = BorderStyle.Single
table.TableFormat.Borders.Color = Color.get_Black()

# Add a row
row = table.AddRow(False, 3)
row.Height = 20.0

# Add data to the cells
cell = row.Cells[0]
cell.CellFormat.VerticalAlignment = VerticalAlignment.Middle
paragraph = cell.AddParagraph()
paragraph.Format.HorizontalAlignment = HorizontalAlignment.Center
paragraph.AppendText("Row 1, Col 1")
cell = row.Cells[1]
cell.CellFormat.VerticalAlignment = VerticalAlignment.Middle
paragraph = cell.AddParagraph()
paragraph.Format.HorizontalAlignment = HorizontalAlignment.Center
paragraph.AppendText("Row 1, Col 2")
cell = row.Cells[2]
cell.CellFormat.VerticalAlignment = VerticalAlignment.Middle
paragraph = cell.AddParagraph()
paragraph.Format.HorizontalAlignment = HorizontalAlignment.Center
paragraph.AppendText("Row 1, Col 3")

# Add the second row
row = table.AddRow(False, 3)
row.Height = 20.0
cell = row.Cells[0]
cell.CellFormat.VerticalAlignment = VerticalAlignment.Middle
paragraph = cell.AddParagraph()
paragraph.Format.HorizontalAlignment = HorizontalAlignment.Center
paragraph.AppendText("Row 2, Col 1")
cell = row.Cells[1]
cell.CellFormat.VerticalAlignment = VerticalAlignment.Middle
paragraph = cell.AddParagraph()
paragraph.Format.HorizontalAlignment = HorizontalAlignment.Center
paragraph.AppendText("Row 2, Col 2")
cell = row.Cells[2]
cell.CellFormat.VerticalAlignment = VerticalAlignment.Middle
paragraph = cell.AddParagraph()
paragraph.Format.HorizontalAlignment = HorizontalAlignment.Center
paragraph.AppendText("Row 2, Col 3")

# Add the table to the section
section.Tables.Add(table)

# Save the document
doc.SaveToFile("output/CreateTable.docx", FileFormat.Docx2013)
doc.Close()
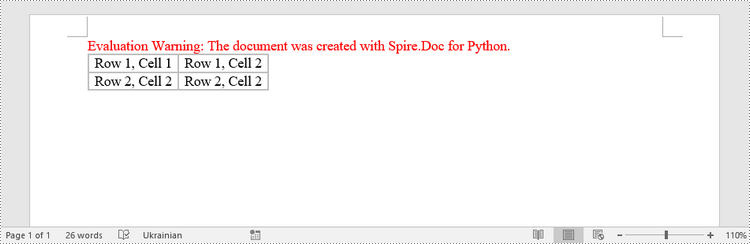
Create a Table from an HTML String in Python
To create a table from an HTML string, use the Paragraph.AppendHTML() method. The following are the steps.
- Create a Document object.
- Add a section to it using Document.AddSection() method.
- Specify the HTML string for generating the table.
- Add a paragraph using Section.AddParagraph() method.
- Add the HTML table to the paragraph using Paragraph.AppendHTML() method.
- Save the document to a .docx file using Document.SaveToFile() method.
- Python
from spire.doc import *
from spire.doc.common import *

# Create a Document object
document = Document()

# Add a section
section = document.AddSection()

# Specify HTML string
HTML = "<table border='2px'>" + "<tr>" + "<td>Row 1, Cell 1</td>" + "<td>Row 1, Cell 2</td>" + \
    "</tr>" + "<tr>" + "<td>Row 2, Cell 2</td>" + \
    "<td>Row 2, Cell 2</td>" + "</tr>" + "</table>"

# Add a paragraph
paragraph = section.AddParagraph()

# Append HTML string to the paragraph
paragraph.AppendHTML(HTML)

# Save to Word document
document.SaveToFile("output/HtmlTable.docx", FileFormat.Docx2013)
document.Close()
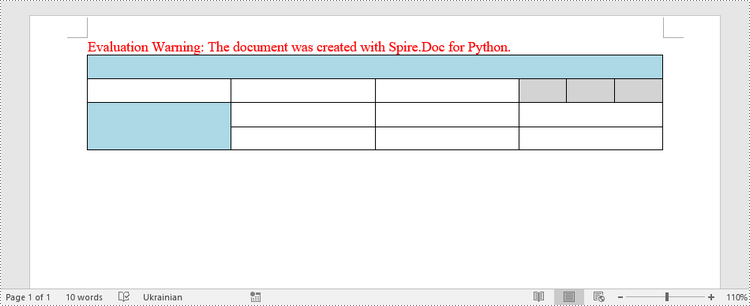
Merge and Split Cells in a Table in Python
When working with tables, the ability to merge or split cells provides a powerful way to customize and format data. This example shows you how to combine adjacent cells into a single cell and how to divide a single cell into multiple smaller cells using Spire.Doc for Python.
- Create a Document object.
- Add a section using Document.AddSection() method.
- Add a table using Section.AddTable() method.
- Set the column number and row number of the table using Table.ResetCells() method.
- Horizontally merge cells using Table.ApplyHorizontalMerge() method.
- Vertically merge cells using Table.ApplyVerticalMerge() method.
- Split a cell into multiple smaller cells using TableCell.SplitCell() method.
- Save the document to a .docx file using Document.SaveToFile() method.
- Python
from spire.doc import *
from spire.doc.common import *

# Create a Document object
document = Document()

# Add a section
section = document.AddSection()

# Create a table
table = section.AddTable(True)

# Set the row number and column number of table
table.ResetCells(4, 4)

# Set the width of table
table.PreferredWidth = PreferredWidth(WidthType.Percentage, int(100))

# Set row height
for i in range(0, table.Rows.Count):
    table.Rows[i].Height = 20.0

# Horizontally merge cells
table.ApplyHorizontalMerge(0, 0, 3)

# Vertically merge cells
table.ApplyVerticalMerge(0, 2, 3)

# Get a cell
cell = table.Rows.get_Item(1).Cells.get_Item(3)

# Split the cell into 3 smaller cells
cell.SplitCell(3, 0)

# Fill specified cells with color
table.Rows[0].Cells[0].CellFormat.BackColor = Color.get_LightBlue()
table.Rows[2].Cells[0].CellFormat.BackColor = Color.get_LightBlue()
table.Rows[1].Cells[3].CellFormat.BackColor = Color.get_LightGray()
table.Rows[1].Cells[4].CellFormat.BackColor = Color.get_LightGray()
table.Rows[1].Cells[5].CellFormat.BackColor = Color.get_LightGray()

# Save to Word document
document.SaveToFile("output/MergeAndSplit.docx", FileFormat.Docx2013)
document.Close()
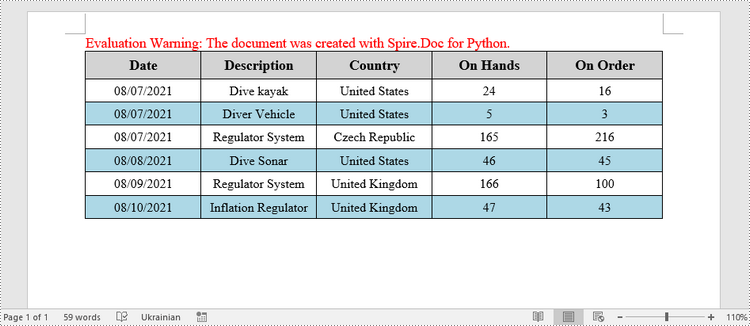
Fill a Table with Data in Word in Python
This example creates a 5x7 table, writes the data from lists into the cells, and applies different formatting to the header row and other rows. The following are the main steps.
- Create a Document object.
- Add a section using Document.AddSection() method.
- Add a table using Section.AddTable() method.
- Specify the data for filling the table in two lists.
- Reset the row number and column number of the table depending on the height and width of the data using Table.ResetCells() method.
- Write data into the corresponding cells using TableCell.AddParagraph().AppendText() method.
- Apply different colors to different rows through TableCell.CellFormat.BackColor property.
- Save the document to a .docx file using Document.SaveToFile() method.
- Python
import math
from spire.doc import *
from spire.doc.common import *

# Create a Document object
doc = Document()

# Add a section
section = doc.AddSection()

# Create a table
table = section.AddTable(True)

# Specify table data
header_data = ["Date", "Description", "Country", "On Hands", "On Order"]
row_data = [ ["08/07/2021","Dive kayak","United States","24","16"],
                ["08/07/2021","Diver Vehicle","United States","5","3"],
                ["08/07/2021","Regulator System","Czech Republic","165","216"],
                ["08/08/2021","Dive Sonar","United States","46","45"],
                ["08/09/2021","Regulator System","United Kingdom","166","100"],
                ["08/10/2021","Inflation Regulator","United Kingdom","47","43"]]

# Set the row number and column number of table
table.ResetCells(len(row_data) + 1, len(header_data))

# Set the width of table
table.PreferredWidth = PreferredWidth(WidthType.Percentage, int(100))

# Get header row
headerRow = table.Rows[0]
headerRow.IsHeader = True
headerRow.Height = 23
headerRow.RowFormat.BackColor = Color.get_LightGray()

# Fill the header row with data and set the text formatting
i = 0
while i < len(header_data):
    headerRow.Cells[i].CellFormat.VerticalAlignment = VerticalAlignment.Middle
    paragraph = headerRow.Cells[i].AddParagraph()
    paragraph.Format.HorizontalAlignment = HorizontalAlignment.Center
    txtRange = paragraph.AppendText(header_data[i])
    txtRange.CharacterFormat.Bold = True
    txtRange.CharacterFormat.FontSize = 12
    i += 1

# Fill the rest rows with data and set the text formatting
r = 0
while r < len(row_data):
    dataRow = table.Rows[r + 1]
    dataRow.Height = 20
    dataRow.HeightType = TableRowHeightType.Exactly
    c = 0
    while c < len(row_data[r]):
        dataRow.Cells[c].CellFormat.VerticalAlignment = VerticalAlignment.Middle
        paragraph = dataRow.Cells[c].AddParagraph()
        paragraph.Format.HorizontalAlignment = HorizontalAlignment.Center
        txtRange =  paragraph.AppendText(row_data[r][c])
        txtRange.CharacterFormat.FontSize = 11
        c += 1
    r += 1

# Alternate row color
for j in range(1, table.Rows.Count):
    if math.fmod(j, 2) == 0:
        row2 = table.Rows[j]
        for f in range(row2.Cells.Count):
            row2.Cells[f].CellFormat.BackColor = Color.get_LightBlue()

# Set the border of table
table.TableFormat.Borders.BorderType = BorderStyle.Single
table.TableFormat.Borders.LineWidth = 1.0
table.TableFormat.Borders.Color = Color.get_Black()

# Save the document
doc.SaveToFile("output/Table.docx", FileFormat.Docx2013)
Apply for a Temporary License
If you'd like to remove the evaluation message from the generated documents, or to get rid of the function limitations, please request a 30-day trial license for yourself.
Python: Add Stamps to a PDF Document
Stamps are a powerful tool in PDF documents that allow users to mark and annotate specific areas or sections of a PDF file. Often used for approval, review, or to indicate a specific status, stamps can greatly enhance collaboration and document management. In PDF, stamps can take various forms, such as a simple checkmark, a customized graphic, a date and time stamp, or even a signature. In this article, you will learn how to add image stamps and dynamic stamps to a PDF document in Python using Spire.PDF for Python.
Install Spire.PDF for Python
This scenario requires Spire.PDF for Python and plum-dispatch v1.7.4. They can be easily installed in your Windows through the following pip command.
pip install Spire.PDF
If you are unsure how to install, please refer to this tutorial: How to Install Spire.PDF for Python on Windows
Add an Image Stamp to PDF Documents in Python
Spire.PDF for Python offers the PdfRubberStampAnnotation class to represent a rubber stamp in a PDF document. In order to create the appearance of a rubber stamp, the PdfTemplate class is used. The PdfTemplate is a piece of canvas on which you can draw whatever information you want, such as text, images, date, and time.
Image stamps can include logos, signatures, watermarks, or any other custom graphics that you want to overlay onto your PDFs. The main steps to add an image stamp to PDF using Spire.PDF for Python are as follows.
- Create a PdfDocument object.
- Load a PDF file using PdfDocument.LoadFromFile() method.
- Load an image that you want to stamp on PDF using PdfImage.FromFile() method.
- Create a PdfTemplate object with the dimensions of the image.
- Draw the image on the template using PdfTemplate.Graphics.DrawImage() method.
- Create a PdfRubberStampAnnotation object, and set the template as its appearance.
- Add the stamp to a specific PDF page using PdfPageBase.AnnotationsWidget.Add() method.
- Save the document to a different file using PdfDocument.SaveToFile() method.
- Python
from spire.pdf.common import *
from spire.pdf import *

# Create a PdfDocument object
doc = PdfDocument()

# Load a PDF document
doc.LoadFromFile("C:\\Users\\Administrator\\Desktop\\input.pdf")

# Get a specific page
page = doc.Pages.get_Item(2)

# Load an image file
image = PdfImage.FromFile("C:\\Users\\Administrator\\Desktop\\secret.png")

# Get the width and height of the image
width = (float)(image.Width)
height = (float)(image.Height)

# Create a PdfTemplate object based on the size of the image
template = PdfTemplate(width, height, True)

# Draw image on the template
template.Graphics.DrawImage(image, 0.0, 0.0, width, height)

# Create a rubber stamp annotation, specifying its location and position
rect = RectangleF((float) (page.ActualSize.Width - width - 50), (float) (page.ActualSize.Height - height - 40), width, height)
stamp = PdfRubberStampAnnotation(rect)

# Create a PdfAppearance object
pdfAppearance = PdfAppearance(stamp)

# Set the template as the normal state of the appearance
pdfAppearance.Normal = template

# Apply the appearance to the stamp
stamp.Appearance = pdfAppearance

# Add the stamp annotation to PDF
page.AnnotationsWidget.Add(stamp)

# Save the file
doc.SaveToFile("output/ImageStamp.pdf")
doc.Close()

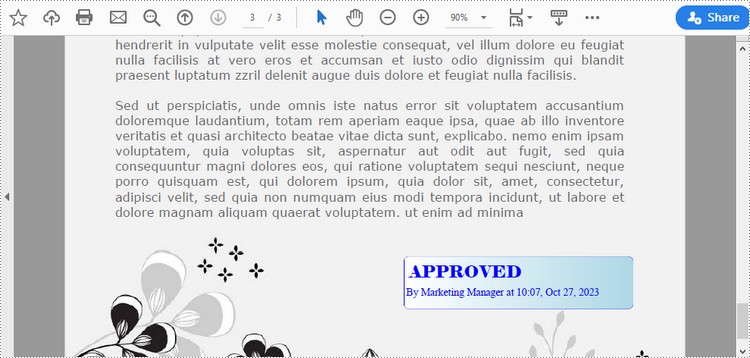
Add a Dynamic Stamp to PDF in Python
Unlike static stamps, dynamic stamps can contain variable information such as the date, time, or user input. The following are the steps to create a dynamic stamp in PDF using Spire.PDF for Python.
- Create a PdfDocument object.
- Load a PDF file using PdfDocument.LoadFromFile() method.
- Create a PdfTemplate object with desired size.
- Draw strings on the template using PdfTemplate.Graphics.DrawString() method.
- Create a PdfRubberStampAnnotation object, and set the template as its appearance.
- Add the stamp to a specific PDF page using PdfPageBase.AnnotationsWidget.Add() method.
- Save the document to a different file using PdfDocument.SaveToFile() method.
- Python
from spire.pdf.common import *
from spire.pdf import *

# Create a PdfDocument object
doc = PdfDocument()

# Load a PDF document
doc.LoadFromFile("C:\\Users\\Administrator\\Desktop\\input.pdf")

# Get a specific page
page = doc.Pages.get_Item(2)

# Create a PdfTemplate object
template = PdfTemplate(220.0, 50.0, True)

# Create two fonts
font1 = PdfTrueTypeFont("Elephant", 16.0, 0, True)
font2 = PdfTrueTypeFont("Times New Roman", 10.0, 0, True)

# Create a solid brush and a gradient brush
solidBrush = PdfSolidBrush(PdfRGBColor(Color.get_Blue()))
rectangle1 = RectangleF(PointF(0.0, 0.0), template.Size)
linearGradientBrush = PdfLinearGradientBrush(rectangle1, PdfRGBColor(Color.get_White()), PdfRGBColor(Color.get_LightBlue()), PdfLinearGradientMode.Horizontal)

# Create a pen
pen = PdfPen(solidBrush)

# Create a rounded rectangle path
CornerRadius = 10.0
path = PdfPath()
path.AddArc(template.GetBounds().X, template.GetBounds().Y, CornerRadius, CornerRadius, 180.0, 90.0)
path.AddArc(template.GetBounds().X + template.Width - CornerRadius, template.GetBounds().Y, CornerRadius, CornerRadius, 270.0, 90.0)
path.AddArc(template.GetBounds().X + template.Width - CornerRadius, template.GetBounds().Y + template.Height - CornerRadius, CornerRadius, CornerRadius, 0.0, 90.0)
path.AddArc(template.GetBounds().X, template.GetBounds().Y + template.Height - CornerRadius, CornerRadius, CornerRadius, 90.0, 90.0)
path.AddLine(template.GetBounds().X, template.GetBounds().Y + template.Height - CornerRadius, template.GetBounds().X, template.GetBounds().Y + CornerRadius / 2)

# Draw path on the template
template.Graphics.DrawPath(pen, path)
template.Graphics.DrawPath(linearGradientBrush, path)

# Draw text on the template
string1 = "APPROVED\n"
string2 = "By Marketing Manager at " + DateTime.get_Now().ToString("HH:mm, MMM dd, yyyy")
template.Graphics.DrawString(string1, font1, solidBrush, PointF(5.0, 5.0))
template.Graphics.DrawString(string2, font2, solidBrush, PointF(2.0, 28.0))

# Create a rubber stamp, specifying its size and location
rectangle2 = RectangleF((float) (page.ActualSize.Width - 220.0 - 50.0), (float) (page.ActualSize.Height - 50.0 - 100.0), 220.0, 50.0)
stamp = PdfRubberStampAnnotation(rectangle2)

# Create a PdfAppearance object and apply the template as its normal state
apprearance = PdfAppearance(stamp)
apprearance.Normal = template

# Apply the appearance to stamp
stamp.Appearance = apprearance

# Add the stamp annotation to annotation collection
page.AnnotationsWidget.Add(stamp)

# Save the file
doc.SaveToFile("output/DynamicStamp.pdf", FileFormat.PDF)
doc.Dispose()
Apply for a Temporary License
If you'd like to remove the evaluation message from the generated documents, or to get rid of the function limitations, please request a 30-day trial license for yourself.
Python: Create Various Types of Lists in a Word Document
Lists are a powerful organizational tool that can be used to present information in a structured and easy-to-follow manner. Whether you want to create numbered lists, bulleted lists, or even custom lists with specific formatting, Word provides flexible options to suit your needs. By utilizing different list styles, you can improve the readability and visual appeal of your documents, making it simpler for readers to grasp key points and navigate through the content. In this article, you will learn how to programmatically create various types of lists in a Word document in Python using Spire.Doc for Python.
- Create a Numbered List in Word in Python
- Create a Bulleted List in Word in Python
- Create a Multi-Level Numbered List in Word in Python
- Create a Multi-Level Mixed-Type List in Word in Python
Install Spire.Doc for Python
This scenario requires Spire.Doc for Python and plum-dispatch v1.7.4. They can be easily installed in your Windows through the following pip command.
pip install Spire.Doc
If you are unsure how to install, please refer to this tutorial: How to Install Spire.Doc for Python on Windows
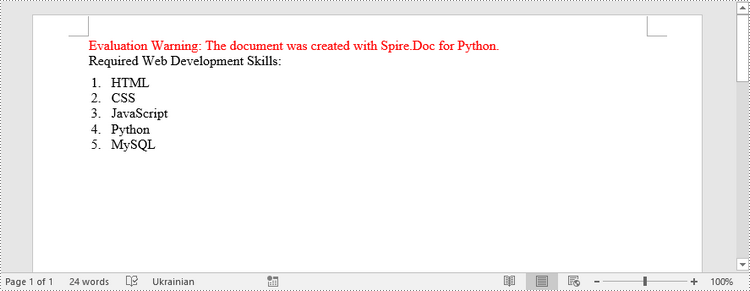
Create a Numbered List in Word in Python
Spire.Doc for Python provides the ListStyle class, which enables you to establish either a numbered list style or a bulleted style. Subsequently, you can utilize the Paragraph.ListFormat.ApplyStyle() method to apply the defined list style to a paragraph. The steps to create a numbered list are as follows.
- Create a Document object.
- Add a section using Document.AddSection() method.
- Create an instance of ListStyle class, specifying the list type to Numbered.
- Get a specific level of the list through ListStyle.Levels[index] property, and set the numbering type through ListLevel.PatternType property.
- Add the list style to the document using Document.ListStyles.Add() method.
- Add several paragraphs to the document using Section.AddParagraph() method.
- Apply the list style to a specific paragraph using Paragraph.ListFormat.ApplyStyle() method.
- Specify the list level through Paragraph.ListFormat.ListLevelNumber property.
- Save the document to a Word file using Document.SaveToFile() method.
- Python
from spire.doc import *
from spire.doc.common import *

# Create a Document object
doc = Document()

# Add a section
section = doc.AddSection()

# Create a numbered list style
listStyle = doc.Styles.Add(ListType.Numbered,"numberedList")
Levels = listStyle.ListRef.Levels
Levels[0].PatternType = ListPatternType.Arabic
Levels[0].TextPosition = 20

# Add a paragraph
paragraph = section.AddParagraph()
paragraph.AppendText("Required Web Development Skills:")
paragraph.Format.AfterSpacing = 5.0

# Add a paragraph and apply the numbered list style to it
paragraph = section.AddParagraph()
paragraph.AppendText("HTML")
paragraph.ListFormat.ApplyStyle("numberedList")
paragraph.ListFormat.ListLevelNumber = 0

# Add another four paragraphs and apply the numbered list style to them
paragraph = section.AddParagraph()
paragraph.AppendText("CSS")
paragraph.ListFormat.ApplyStyle("numberedList")
paragraph.ListFormat.ListLevelNumber = 0

paragraph = section.AddParagraph()
paragraph.AppendText("JavaScript")
paragraph.ListFormat.ApplyStyle("numberedList")
paragraph.ListFormat.ListLevelNumber = 0

paragraph = section.AddParagraph()
paragraph.AppendText("Python")
paragraph.ListFormat.ApplyStyle("numberedList")
paragraph.ListFormat.ListLevelNumber = 0

paragraph = section.AddParagraph()
paragraph.AppendText("MySQL")
paragraph.ListFormat.ApplyStyle("numberedList")
paragraph.ListFormat.ListLevelNumber = 0

# Save the document to file
doc.SaveToFile("output/NumberedList.docx", FileFormat.Docx)
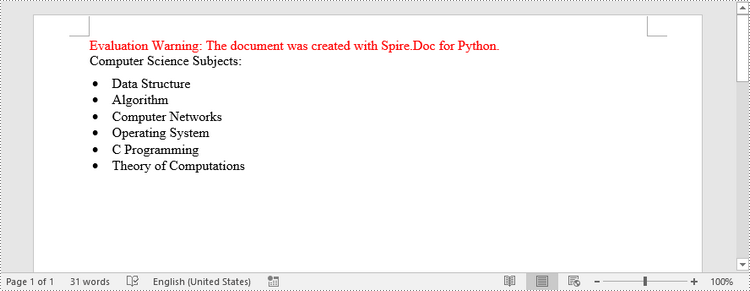
Create a Bulleted List in Word in Python
Creating a bulleted list follows a similar process to creating a numbered list, with the main difference being that you need to specify the list type as "Bulleted" and assign a bullet symbol to it. The following are the detailed steps.
- Create a Document object.
- Add a section using Document.AddSection() method.
- Create an instance of ListStyle class, specifying the list type to Bulleted.
- Get a specific level of the list through ListStyle.Levels[index] property, and set the bullet symbol through ListLevel.BulletCharacter property.
- Add the list style to the document using Document.ListStyles.Add() method.
- Add several paragraphs to the document using Section.AddParagraph() method.
- Apply the list style to a specific paragraph using Paragraph.ListFormat.ApplyStyle() method.
- Specify the list level through Paragraph.ListFormat.ListLevelNumber property.
- Save the document to a Word file using Document.SaveToFile() method.
- Python
from spire.doc import *
from spire.doc.common import *

# Create a Document object
doc = Document()

# Add a section
section = doc.AddSection()

# Create a bulleted list style
listStyle = doc.Styles.Add(ListType.Bulleted,"bulletedList")
Levels = listStyle.ListRef.Levels
Levels[0].BulletCharacter = "\u00B7"
Levels[0].CharacterFormat.FontName = "Symbol"
Levels[0].TextPosition = 20

# Add a paragraph
paragraph = section.AddParagraph()
paragraph.AppendText("Computer Science Subjects:")
paragraph.Format.AfterSpacing = 5.0

# Add a paragraph and apply the bulleted list style to it
paragraph = section.AddParagraph()
paragraph.AppendText("Data Structure")
paragraph.ListFormat.ApplyStyle("bulletedList")
paragraph.ListFormat.ListLevelNumber = 0

# Add another five paragraphs and apply the bulleted list style to them
paragraph = section.AddParagraph()
paragraph.AppendText("Algorithm")
paragraph.ListFormat.ApplyStyle("bulletedList")
paragraph.ListFormat.ListLevelNumber = 0

paragraph = section.AddParagraph()
paragraph.AppendText("Computer Networks")
paragraph.ListFormat.ApplyStyle("bulletedList")
paragraph.ListFormat.ListLevelNumber = 0

paragraph = section.AddParagraph()
paragraph.AppendText("Operating System")
paragraph.ListFormat.ApplyStyle("bulletedList")
paragraph.ListFormat.ListLevelNumber = 0

paragraph = section.AddParagraph()
paragraph.AppendText("C Programming")
paragraph.ListFormat.ApplyStyle("bulletedList")
paragraph.ListFormat.ListLevelNumber = 0

paragraph = section.AddParagraph()
paragraph.AppendText("Theory of Computations")
paragraph.ListFormat.ApplyStyle("bulletedList")
paragraph.ListFormat.ListLevelNumber = 0

# Save the document to file
doc.SaveToFile("output/BulletedList.docx", FileFormat.Docx);
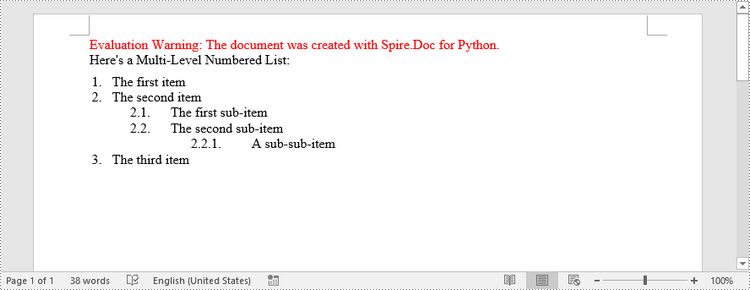
Create a Multi-Level Numbered List in Word in Python
A multi-level list consists of at least two different levels. A certain level of a nested list can be accessed by the ListStyle.Levels[index] property, through which you can set the numbering type and prefix. The following are the steps to create a multi-level numbered list in Word.
- Create a Document object.
- Add a section using Document.AddSection() method.
- Create an instance of ListStyle class, specifying the list type to Numbered.
- Get a specific level of the list through ListStyle.Levels[index] property, and set the numbering type and prefix.
- Add the list style to the document using Document.ListStyles.Add() method.
- Add several paragraphs to the document using Section.AddParagraph() method.
- Apply the list style to a specific paragraph using Paragraph.ListFormat.ApplyStyle() method.
- Specify the list level through Paragraph.ListFormat.ListLevelNumber property.
- Save the document to a Word file using Document.SaveToFile() method.
- Python
from spire.doc import *
from spire.doc.common import *

# Create a Document object
doc = Document()

# Add a section
section = doc.AddSection()

# Create a numbered list style, specifying number prefix and pattern type of each level
listStyle = doc.Styles.Add(ListType.Numbered,"levelstyle")
Levels = listStyle.ListRef.Levels
Levels[0].PatternType = ListPatternType.Arabic
Levels[0].TextPosition = 20.0
Levels[1].NumberPrefix = "%1."
Levels[1].PatternType = ListPatternType.Arabic
Levels[2].NumberPrefix = "%1.%2."
Levels[2].PatternType = ListPatternType.Arabic

# Add a paragraph
paragraph = section.AddParagraph()
paragraph.AppendText("Here's a Multi-Level Numbered List:")
paragraph.Format.AfterSpacing = 5.0

# Add a paragraph and apply the numbered list style to it
paragraph = section.AddParagraph()
paragraph.AppendText("The first item")
paragraph.ListFormat.ApplyStyle("levelstyle")
paragraph.ListFormat.ListLevelNumber = 0

# Add another five paragraphs and apply the numbered list stype to them
paragraph = section.AddParagraph()
paragraph.AppendText("The second item")
paragraph.ListFormat.ApplyStyle("levelstyle")
paragraph.ListFormat.ListLevelNumber = 0

paragraph = section.AddParagraph()
paragraph.AppendText("The first sub-item")
paragraph.ListFormat.ApplyStyle("levelstyle")
paragraph.ListFormat.ListLevelNumber = 1

paragraph = section.AddParagraph()
paragraph.AppendText("The second sub-item")
paragraph.ListFormat.ContinueListNumbering()
paragraph.ListFormat.ApplyStyle("levelstyle")

paragraph = section.AddParagraph()
paragraph.AppendText("A sub-sub-item")
paragraph.ListFormat.ApplyStyle("levelstyle")
paragraph.ListFormat.ListLevelNumber = 2

paragraph = section.AddParagraph()
paragraph.AppendText("The third item")
paragraph.ListFormat.ApplyStyle("levelstyle")
paragraph.ListFormat.ListLevelNumber = 0

# Save the document to file
doc.SaveToFile("output/MultilevelNumberedList.docx", FileFormat.Docx)
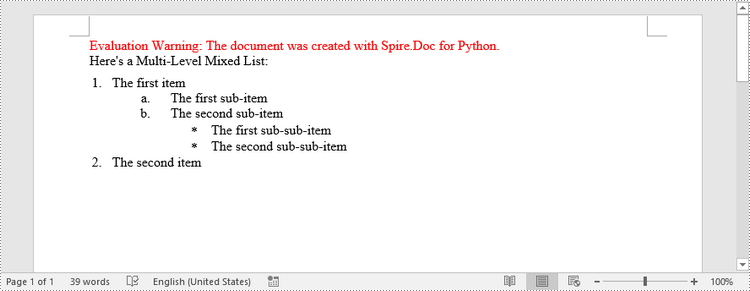
Create a Multi-Level Mixed-Type List in Word in Python
To combine number and symbol bullet points in a multi-level list, create separate list styles (numbered and bulleted) and apply them to different paragraphs. The detailed steps are as follows.
- Create a Document object.
- Add a section using Document.AddSection() method.
- Create a numbered list style and a bulleted list style.
- Add several paragraphs to the document using Section.AddParagraph() method.
- Apply different list style to different paragraphs using Paragraph.ListFormat.ApplyStyle() method.
- Save the document to a Word file using Document.SaveToFile() method.
- Python
from spire.doc import *
from spire.doc.common import *

# Create a Document object
doc = Document()

# Add a section
section = doc.AddSection()

# Create a numbered list style
numberList = doc.Styles.Add(ListType.Numbered, "numberedStyle")
Levels = numberList.ListRef.Levels
Levels[0].PatternType = ListPatternType.Arabic
Levels[0].TextPosition = 20
Levels[1].PatternType = ListPatternType.LowLetter

# Create a bulleted list style
bulletedListStyle = doc.Styles.Add(ListType.Bulleted, "bulletedStyle")
Levels = bulletedListStyle.ListRef.Levels
Levels[2].BulletCharacter = "\u002A"
Levels[2].CharacterFormat.FontName = "Symbol"

# Add a paragraph
paragraph = section.AddParagraph()
paragraph.AppendText("Here's a Multi-Level Mixed List:")
paragraph.Format.AfterSpacing = 5.0

# Add a paragraph and apply the numbered list style to it
paragraph = section.AddParagraph()
paragraph.AppendText("The first item")
paragraph.ListFormat.ApplyStyle("numberedStyle")
paragraph.ListFormat.ListLevelNumber = 0

# Add the other five paragraphs and apply different list stype to them
paragraph = section.AddParagraph()
paragraph.AppendText("The first sub-item")
paragraph.ListFormat.ApplyStyle("numberedStyle")
paragraph.ListFormat.ListLevelNumber = 1

paragraph = section.AddParagraph()
paragraph.AppendText("The second sub-item")
paragraph.ListFormat.ListLevelNumber = 1
paragraph.ListFormat.ApplyStyle("numberedStyle")

paragraph = section.AddParagraph()
paragraph.AppendText("The first sub-sub-item")
paragraph.ListFormat.ApplyStyle("bulletedStyle")
paragraph.ListFormat.ListLevelNumber = 2

paragraph = section.AddParagraph()
paragraph.AppendText("The second sub-sub-item")
paragraph.ListFormat.ApplyStyle("bulletedStyle")
paragraph.ListFormat.ListLevelNumber = 2

paragraph = section.AddParagraph()
paragraph.AppendText("The second item")
paragraph.ListFormat.ApplyStyle("numberedStyle")
paragraph.ListFormat.ListLevelNumber = 0

# Save the document to file
doc.SaveToFile("output/MultilevelMixedList.docx", FileFormat.Docx)
Apply for a Temporary License
If you'd like to remove the evaluation message from the generated documents, or to get rid of the function limitations, please request a 30-day trial license for yourself.
Python: Insert Page Break into Word Documents
A page break is a formatting element used in documents to indicate the end of one page and the beginning of a new page. It is typically represented by a horizontal line or other visual indicator that separates content into different pages. This feature is commonly used when creating lengthy documents such as reports, essays, or books to enhance the overall layout and readability. In this article, you will learn how to how to insert page break into Word documents in Python using Spire.Doc for Python.
Install Spire.Doc for Python
This scenario requires Spire.Doc for Python and plum-dispatch v1.7.4. They can be easily installed in your Windows through the following pip command.
pip install Spire.Doc
If you are unsure how to install, please refer to this tutorial: How to Install Spire.Doc for Python on Windows
Insert Page Break after a Specific Paragraph
Spire.Doc for Python provides Paragraph.AppendBreak(BreakType.PageBreak) method to insert a page break after a specific paragraph. The following are detailed steps.
- Create an object of Document class.
- Load a sample file from disk using Document.LoadFromFile() method.
- Get the first section of this file by Document.Sections[sectionIndex] property.
- Get the second paragraph in the section by Section.Paragraphs[paragraphIndex] property.
- Insert a page break after this paragraph using Paragraph.AppendBreak(BreakType.PageBreak) method.
- Save the result file using Document.SaveToFile() method.
- Python
from spire.doc import *
from spire.doc.common import *

inputFile =  "sample.docx"
outputFile = "InsertPageBreak.docx"

#Create an object of Document class
document = Document()

#Load a sample file from disk
document.LoadFromFile(inputFile)

#Insert a page break after this paragraph
paragraph.AppendBreak(BreakType.PageBreak)

#Save the result file
document.SaveToFile(outputFile, FileFormat.Docx2013)
document.Close()
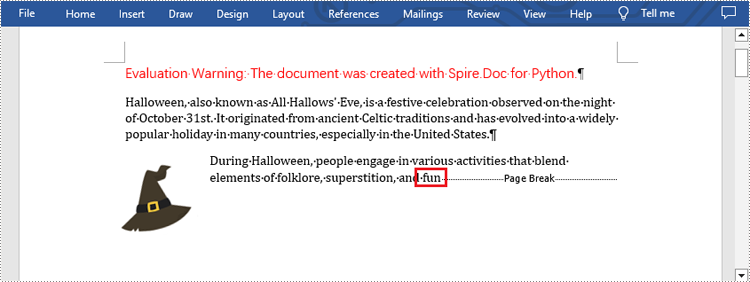
Insert Page Break after a Specific Text
What's more, you are also allowed to insert page break after a specific text by using Paragraph.ChildObjects.Insert() method provided by this library. The following are detailed steps.
- Create an object of Document class.
- Load a sample file from disk using Document.LoadFromFile() method.
- Find a specific text using Document.FindAllString() method.
- Loop through all searched text and access the text range of it by calling TextSelection.GetAsOneRange() method.
- Get the paragraph where the text range is located by ParagraphBase.OwnerParagraph property.
- Get the position index of the text range in the paragraph using Paragraph.ChildObjects.IndexOf() method.
- Create an object of Break class to create a page break.
- Insert page break after the searched text using Paragraph.ChildObjects.Insert() method.
- Save the result file using Document.SaveToFile() method.
- Python
from spire.doc import *
from spire.doc.common import *

inputFile = "sample.docx"
outputFile =  "InsertPageBreakAfterText.docx"

#Create an object of Document class
document = Document()

#Load a sample file from disk
document.LoadFromFile(inputFile)

#Find the specified text
selection = document.FindAllString("fun", True, True)

#Loop through all searched text
for ts in selection:

    #Get the text range of the searched text
    range = ts.GetAsOneRange()

    #Get the paragraph where the text range is located
    paragraph = range.OwnerParagraph

    #Get the position index of the text range in the paragraph
    index = paragraph.ChildObjects.IndexOf(range)

    #Create an object of Break class
    pageBreak = Break(document, BreakType.PageBreak)

    #Insert page break after the searched text
    paragraph.ChildObjects.Insert(index + 1, pageBreak)

#Save the result file
document.SaveToFile(outputFile, FileFormat.Docx2013)
document.Close()
Apply for a Temporary License
If you'd like to remove the evaluation message from the generated documents, or to get rid of the function limitations, please request a 30-day trial license for yourself.
Python: Add Headers and Footers to Excel
Headers and footers are areas located at the top and bottom of each page in a document, used to add additional information or elements. Headers typically include document titles, company names, dates, and other information, while footers often contain page numbers, file paths, copyright statements, and other details. By setting headers and footers in Excel, documents can be made more professional and organized. In this article, we will show you how to add headers and footers to Excel by using Spire.XLS for Python.
Spire.XLS for Python provides the PageSetup class to work with the page setup in Excel including headers and footers. Specifically, it contains LeftHeader property, CenterHeader property, RightHeader property, LeftFooter property, etc. to represent the left section, center section and right section of a header or footer. To add fields to headers or footers, or to apply formatting to text, you'll need to use the scripts listed in the following table.
| Script | Description |
| &P | The current page numbers. |
| &N | The total number of pages. |
| &D | The current data. |
| &T | The current time. |
| &G | A picture. |
| &A | The worksheet name. |
| &F | The file name. |
| &B | Make text bold. |
| &I | Italicize text. |
| &U | Underline text. |
| &"font name" | Represents a font name, for example, &"Arial". |
| & + Integer | Represents font size, for example, &12. |
| &K + Hex color code | Represents font color, for example, &KFF0000. |
Install Spire.XLS for Python
This scenario requires Spire.XLS for Python and plum-dispatch v1.7.4. They can be easily installed in your Windows through the following pip command.
pip install Spire.XLS
If you are unsure how to install, please refer to this tutorial: How to Install Spire.XLS for Python on Windows
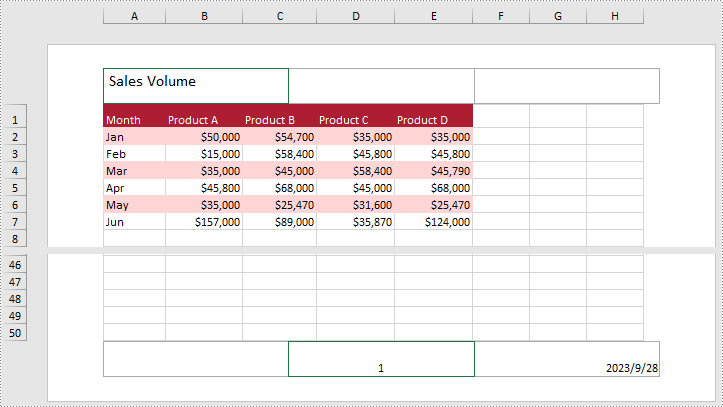
Add Text to the Header or Footer in Excel
Spire.XLS for Python allows you to add formatted text to the certain section of the header or footer. In this way, you can set different elements in Excel, such as file titles, page numbers or date. Here are the detailed steps.
- Create an object of Workbook class.
- Load a sample Excel file using Workbook.LoadFromFile() method.
- Get the specific worksheet by Workbook.Worksheets[index] property.
- Add text to the left header by setting PageSetup.LeftHeader property as you like.
- Add page number to the center footer by setting PageSetup.CenterFooter property to &P.
- Add the current date to the right footer by setting PageSetup.RightFooter property to &D.
- Save the result file using Workbook.SaveToFile() method.
- Python
from spire.xls import *
from spire.xls.common import *

inputFile = "sample.xlsx"
outputFile = "TextHeaderFooter.xlsx"

#Create an object of Workbook class
workbook = Workbook()

#Load a sample file from disk
workbook.LoadFromFile(inputFile)

#Get the first worksheet of this file
Worksheet = workbook.Worksheets[0]

#Add text to the left header
Worksheet.PageSetup.LeftHeader = "&\"Calibri\"&14 Sales Volume"

#Add page number to the center footer
Worksheet.PageSetup.CenterFooter = "&P"

#Add the current date to the right footer
Worksheet.PageSetup.RightFooter = "&D"

#Set the view mode of the sheet
Worksheet.ViewMode = ViewMode.Layout

#Save the result file
workbook.SaveToFile(outputFile, ExcelVersion.Version2010)
workbook.Dispose()
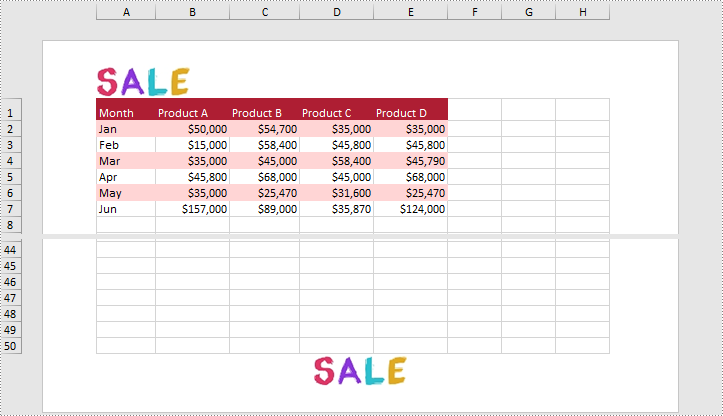
Add Images to the Header or Footer in Excel
What's more, Spire.XLS for Python also supports adding images to the header or footer. The following are detailed steps.
- Create an object of Workbook class.
- Load a sample Excel file using Workbook.LoadFromFile() method.
- Get the specific worksheet by Workbook.Worksheets[index] property.
- Load an image and set it as the image source of the left header by PageSetup.LeftHeaderImage property.
- Display the image in the left header section by setting PageSetup.LeftHeader property to “&G”.
- Set it as the image source of the center footer by PageSetup.CenterFooterImage property.
- Display the image in the center footer section by setting PageSetup.CenterFooter property to “&G”.
- Save the result file using Workbook.SaveToFile() method.
- Python
from spire.xls import *
from spire.xls.common import *

inputFile = "sample.xlsx"
inputImage = "Logo.png"
outputFile = "ImageHeaderFooter.xlsx"

#Create an object of workbook class
workbook = Workbook()

#Load a sample file from disk
workbook.LoadFromFile(inputFile)

#Get the first sheet of this file
sheet = workbook.Worksheets[0]

#Load an image from disk
image = Image.FromFile(inputImage)

#Add the image to the left header
sheet.PageSetup.LeftHeaderImage = image
sheet.PageSetup.LeftHeader = "&G"

#Add the image to the center footer
sheet.PageSetup.CenterFooterImage = image
sheet.PageSetup.CenterFooter = "&G"

#Set the view mode of the sheet
sheet.ViewMode = ViewMode.Layout

#Save the result file
workbook.SaveToFile(outputFile, ExcelVersion.Version2010)
workbook.Dispose()
Apply for a Temporary License
If you'd like to remove the evaluation message from the generated documents, or to get rid of the function limitations, please request a 30-day trial license for yourself.
Python: Add, Replace, or Remove Images in a PDF Document
Alongside textual content, images in a PDF play a crucial role in conveying messages effectively. Being able to manipulate images within a PDF document, such as adding, replacing, or removing them, can be incredibly useful for enhancing the visual appeal, updating outdated graphics, or modifying the document's content. In this article, you will learn how to add, replace, or delete images in a PDF document in Python using Spire.PDF for Python.
- Add an Image to a PDF Document in Python
- Replace an Image in a PDF Document in Python
- Remove an Image from a PDF Document in Python
Install Spire.PDF for Python
This scenario requires Spire.PDF for Python and plum-dispatch v1.7.4. They can be easily installed in your Windows through the following pip command.
pip install Spire.PDF
If you are unsure how to install, please refer to this tutorial: How to Install Spire.PDF for Python on Windows
Add an Image to a PDF Document in Python
To add an image to a PDF page, you can use the PdfPage.Canvas.DrawImage() method. The following are the detailed steps.
- Create a PdfDocument object.
- Add a page to the document using PdfDocument.Pages.Add() method.
- Load an image using PdfImage.FromFile() method.
- Draw the image on the page using PdfPageBase.Canvas.DrawImage() method.
- Save the document using PdfDocument.SaveToFile() method.
- Python
from spire.pdf.common import *
from spire.pdf import *

# Create a PdfDocument instance
doc = PdfDocument()

# Set the page margins
doc.PageSettings.SetMargins(30.0, 30.0, 30.0, 30.0)

# Add a page
page = doc.Pages.Add()

# Load an image
image = PdfImage.FromFile('C:/Users/Administrator/Desktop/logo.png')

# Specify the size of the image in the document
width = image.Width * 0.70
height = image.Height * 0.70

# Specify the X and Y coordinates where the image will be drawn
x = 10.0
y = 30.0

# Draw the image at a specified location on the page
page.Canvas.DrawImage(image, x, y, width, height)

# Save the result document
doc.SaveToFile("output/AddImage.pdf", FileFormat.PDF)
Replace an Image in a PDF Document in Python
Spire.PDF for Python offers the PdfImageHelper class to help us get and deal with the images in a certain page. To replace an image with a new one, you can use the PdfImageHelper.ReplaceImage() method. The following are the steps.
- Create a PdfDocument object.
- Load a PDF document using PdfDocument.LoadFromFile() method.
- Get a specific page through PdfDocument.Pages[index] property.
- Load an image using PdfImage.FromFile() method.
- Create a PdfImageHelper object, and get the image information from the specified page using PdfImageHelper.GetImagesInfo() method.
- Replace an existing image in the page with the new image using PdfImageHelper.ReplaceImage() method.
- Save the document using PdfDocument.SaveToFile() method.
- Python
from spire.pdf.common import *
from spire.pdf import *

# Create a PdfDocument instance
doc = PdfDocument()

# Load a PDF document
doc.LoadFromFile('C:/Users/Administrator/Desktop/input.pdf')

# Get the first page
page = doc.Pages.get_Item(0)

# Load an image
image = PdfImage.FromFile('C:/Users/Administrator/Desktop/newImage.png')

# Create a PdfImageHelper instance
imageHelper = PdfImageHelper()

# Get the image information from the page
imageInfo = imageHelper.GetImagesInfo(page)

# Replace the first image on the page with the loaded image
imageHelper.ReplaceImage(imageInfo[0], image)

# Save the result document
doc.SaveToFile("output/ReplaceImage.pdf", FileFormat.PDF)
Remove an Image from a PDF Document in Python
To remove a specific image from a page, use the PdfPageBase.DeleteImage(index) method. The following are the steps.
- Create a PdfDocument object.
- Load a PDF document using PdfDocument.LoadFromFile() method.
- Get a specific page through PdfDocument.Pages[index] property.
- Delete a certain image in the page by its index using PdfPageBase.DeleteImage() method.
- Save the document using PdfDocument.SaveToFile() method.
- Python
from spire.pdf.common import *
from spire.pdf import *

# Create a PdfDocument instance
doc = PdfDocument()

# Load a PDF document
doc.LoadFromFile('C:/Users/Administrator/Desktop/input.pdf')

# Get the first page
page = doc.Pages.get_Item(0)

# Delete the first image on the page
page.DeleteImage(0)

# Save the result document
doc.SaveToFile('output/DeleteImage.pdf', FileFormat.PDF)
Apply for a Temporary License
If you'd like to remove the evaluation message from the generated documents, or to get rid of the function limitations, please request a 30-day trial license for yourself.
Extract Text from PDF in Python: A Complete Guide with Practical Code Samples
PDF files are everywhere—from contracts and research papers to eBooks and invoices. While they preserve formatting perfectly, extracting text from PDFs can be challenging, especially with large or complex documents. Manual copying is not only slow but often inaccurate.
Whether you’re a developer automating workflows, a data analyst processing content, or simply someone needing quick text extraction, programmatic methods can save you valuable time and effort.
In this comprehensive guide, you’ll learn how to extract text from PDF files in Python using Spire.PDF for Python — a powerful and easy-to-use PDF processing library. We’ll cover extracting all text, targeting specific pages or areas, ignoring hidden text, and capturing layout details such as text position and size.
Table of Contents
- Why Extract Text from PDF Files
- Install Spire.PDF for Python: Powerful PDF Parser Library
- Extract Text from PDF (Basic Example)
- Advanced Text Extraction Features
- Conclusion
- FAQs
Why Extract Text from PDF Files
Text extraction from PDFs is essential for many use cases, including:
- Automating data entry and document processing
- Enabling full-text search and indexing
- Performing data analysis on reports and surveys
- Extracting content for machine learning and NLP
- Converting PDFs to other editable formats
Install Spire.PDF for Python: Powerful PDF Parser Library
Spire.PDF for Python is a comprehensive and easy-to-use PDF processing library that simplifies all your PDF manipulation needs. It offers advanced text extraction capabilities that work seamlessly with both simple and complex PDF documents.
Installation
The library can be installed easily via pip. Open your terminal and run the following command:
pip install spire.pdf
Need help with the installation? Follow this step-by-step guide: How to Install Spire.PDF for Python on Windows
Extract Text from PDF (Basic Example)
If you just want to quickly read all the text from a PDF, this simple example shows how to do it. It iterates over each page, extracts the full text using PdfTextExtractor, and saves it to a text file with spacing and line breaks preserved.
from spire.pdf.common import *
from spire.pdf import *

# Create a PdfDocument object
doc = PdfDocument()

# Load a PDF document
doc.LoadFromFile('C:/Users/Administrator/Desktop/Terms of service.pdf')

# Prepare a variable to hold the extracted text
all_text = ""

# Create a PdfTextExtractOptions object
extractOptions = PdfTextExtractOptions()
# Extract all text including whitespaces
extractOptions.IsExtractAllText = True

# Loop through all pages and extract text
for i in range(doc.Pages.Count):
    page = doc.Pages.get_Item(i)
    textExtractor = PdfTextExtractor(page)
    text = textExtractor.ExtractText(extractOptions)
    # Append text from each page
    all_text += text + "\n"

# Write all extracted text to a file
with open('output/TextOfAllPages.txt', 'w', encoding='utf-8') as file:
    file.write(all_text)
Advanced Text Extraction Features
For greater control over what and how text is extracted, Spire.PDF for Python offers advanced options. You can selectively extract content from specific pages or regions, or even with layout details, such as text position and size, to better suit your specific data processing needs.
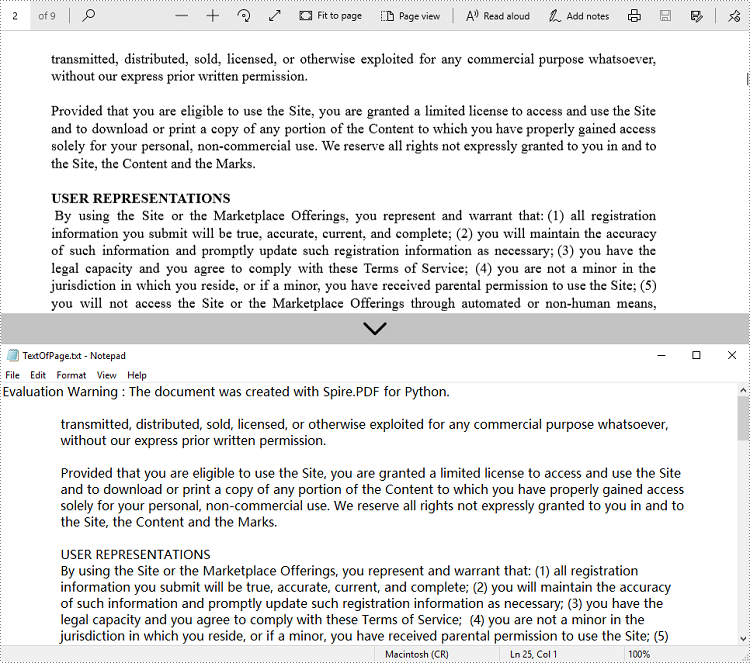
Retrieve Text from Selected Pages
Instead of processing an entire PDF, you can target specific pages for text extraction. This is especially useful for large documents where only certain sections are relevant for your task.
from spire.pdf.common import *
from spire.pdf import *

# Create a PdfDocument object
doc = PdfDocument()

# Load a PDF document
doc.LoadFromFile('C:/Users/Administrator/Desktop/Terms of service.pdf')

# Create a PdfTextExtractOptions object and enable full text extraction
extractOptions = PdfTextExtractOptions()
# Extract all text including whitespaces
extractOptions.IsExtractAllText = True

# Get a specific page (e.g., page 2)
page = doc.Pages.get_Item(1)

# Create a PdfTextExtractor object
textExtractor = PdfTextExtractor(page)

# Extract text from the page
text = textExtractor.ExtractText(extractOptions)

# Write the extracted text to a file using UTF-8 encoding
with open('output/TextOfPage.txt', 'w', encoding='utf-8') as file:
    file.write(text)
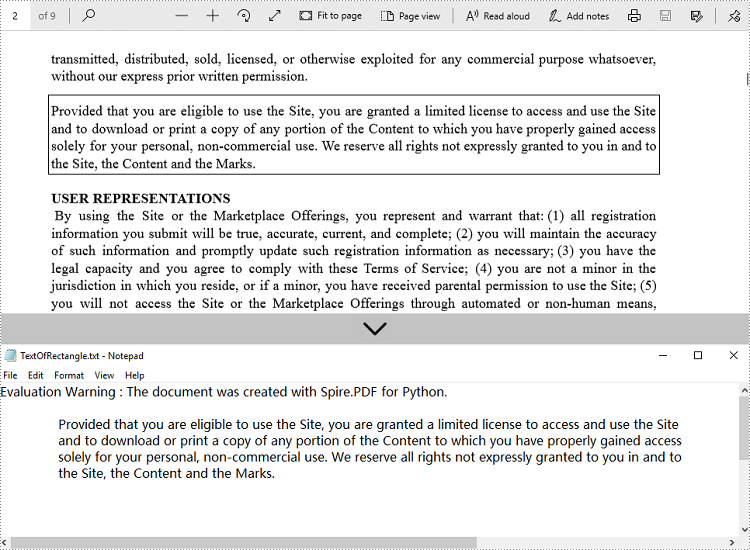
Get Text from Defined Area
When dealing with structured documents like forms or invoices, extracting text from a specific region can be more efficient. You can define a rectangular area and extract only the text within that boundary on the page.
from spire.pdf.common import *
from spire.pdf import *

# Create a PdfDocument object
doc = PdfDocument()

# Load a PDF document
doc.LoadFromFile('C:/Users/Administrator/Desktop/Terms of service.pdf')

# Get a specific page (e.g., page 2)
page = doc.Pages.get_Item(1)

# Create a PdfTextExtractor object
textExtractor = PdfTextExtractor(page)

# Create a PdfTextExtractOptions object
extractOptions = PdfTextExtractOptions()

# Define the rectangular area to extract text from
# RectangleF(left, top, width, height)
extractOptions.ExtractArea = RectangleF(0.0, 100.0, 890.0, 80.0)

# Extract text from the specified area, keeping white spaces
text = textExtractor.ExtractText(extractOptions)

# Write the extracted text to a file using UTF-8 encoding
with open('output/TextOfRectangle.txt', 'w', encoding='utf-8') as file:
    file.write(text)
Ignore Hidden Text During Extraction
Some PDFs contain hidden or invisible text, often used for accessibility or OCR layers. You can choose to ignore such content during extraction to focus only on what is actually visible to users.
from spire.pdf.common import *
from spire.pdf import *

# Create a PdfDocument object
doc = PdfDocument()

# Load a PDF document
doc.LoadFromFile('C:/Users/Administrator/Desktop/Terms of service.pdf')

# Create a PdfTextExtractOptions object
extractOptions = PdfTextExtractOptions()
# Ignore hidden text during extraction
extractOptions.IsShowHiddenText = False

# Get a specific page (e.g., page 2)
page = doc.Pages.get_Item(1)

# Create a PdfTextExtractor object
textExtractor = PdfTextExtractor(page)

# Extract text from the page
text = textExtractor.ExtractText(extractOptions)

# Write the extracted text to a file using UTF-8 encoding
with open('output/ExcludeHiddenText.txt', 'w', encoding='utf-8') as file:
    file.write(text)
Retrieve Text with Position (Coordinates) and Size Information
For layout-sensitive applications—such as converting PDF content into editable formats or reconstructing page structure—you can extract text along with its position and size. This provides precise control over how content is interpreted and used.
from spire.pdf.common import *
from spire.pdf import *

# Create a PdfDocument object
doc = PdfDocument()

# Load a PDF document
doc.LoadFromFile('C:/Users/Administrator/Desktop/Terms of service.pdf')

# Loop through all pages of the document
for i in range(doc.Pages.Count):
    page = doc.Pages.get_Item(i)

    # Create a PdfTextFinder object for the current page
    finder = PdfTextFinder(page)

    # Find all text fragments on the page
    fragments = finder.FindAllText()

    print(f"Page {i + 1}:")

    # Loop through all text fragments
    for fragment in fragments:
        # Extract text content from the current text fragment
        text = fragment.Text

        # Get bounding rectangles with position and size
        rects = fragment.Bounds

        print(f'Text: "{text}"')

        # Iterate through all rectangles
        for rect in rects:
            # Print the position and size information of the current rectangle
            print(f"Position: ({rect.X}, {rect.Y}), Size: ({rect.Width} x {rect.Height})")

        print()
Conclusion
Extracting text from PDF files in Python becomes efficient and flexible with Spire.PDF for Python. Whether you need to process entire documents or extract text from specific pages or regions, Spire.PDF provides a robust set of tools to meet your needs. By automating text extraction, you can streamline workflows, power intelligent search systems, or prepare data for analysis and machine learning.
FAQs
Q1: Can text be extracted from password-protected PDFs?
A1: Yes, Spire.PDF for Python can open and extract text from secured files by providing the correct password when loading the PDF document.
Q2: Is batch text extraction from multiple PDFs supported?
A2: Yes, you can programmatically iterate through a directory of PDF files and apply text extraction to each file efficiently using Spire.PDF for Python.
Q3: Is it possible to extract images or tables from PDFs?
A3: While this guide focuses on text extraction, Spire.PDF for Python also supports image extraction and table extraction.
Q4: Can text be extracted from scanned (image-based) PDFs?
A4: Extracting text from scanned PDFs requires OCR (Optical Character Recognition). Spire.PDF for Python does not include built-in OCR, but you can combine it with an OCR library like Spire.OCR for image-to-text conversion.
Get a Free License
To fully experience the capabilities of Spire.PDF for Python without any evaluation limitations, you can request a free 30-day trial license.
Extract Images from PDF in Python – A Complete Guide
PDF files often contain critical embedded images (e.g., charts, diagrams, scanned documents). For developers, knowing how to extract images from PDF in Python allows them to repurpose graphical content for automated report generation or feed these visuals into machine learning models for analysis and OCR tasks.

This article explores how to leverage the Spire.PDF for Python library to extract images from PDF files via Python, covering the following aspects:
- Installation & Environment Setup
- How to Extract Images from PDFs using Python
- Handle Different Image Formats While Extraction
- Frequently Asked Questions
- Conclusion (Extract Text and More)
Installation & Environment Setup
Before you start using Spire.PDF for Python to extract images from PDF, make sure you have the following in place:
-
Python Environment: Ensure that you have Python installed on your system. It is recommended to use the latest stable version for the best compatibility and performance.
-
Spire.PDF for Python Library: You need to install the Python PDF SDK, and the easiest way is using pip, the Python package installer.
Open your command prompt or terminal and run the following command:
pip install Spire.PDF
How to Extract Images from PDFs using Python
Example 1: Extract Images from a PDF Page
Here’s a complete Python script to extract and save images from a specified page in PDF:
from spire.pdf.common import *
from spire.pdf import *

# Create a PdfDocument instance
pdf = PdfDocument()

# Load a PDF file
pdf.LoadFromFile("template1.pdf")

# Get the first page
page = pdf.Pages.get_Item(0)

# Create a PdfImageHelper instance
imageHelper = PdfImageHelper()

# Get the image information on the page
imageInfo = imageHelper.GetImagesInfo(page)

# Iterate through the image information
for i in range(0, len(imageInfo)):
    # Save images to file
    imageInfo[i].Image.Save("PageImage\\Image" + str(i) + ".png")

# Release resources
pdf.Dispose()
Key Steps Explained:
- Load the PDF: Use the LoadFromFile() method to load a PDF file.
- Access a Page: Access a specified PDF page by index.
- Extract Image information:
- Create a PdfImageHelper instance to facilitate image extraction.
- Use the GetImagesInfo() method to retrieve image information from the specified page, and return a list of PdfImageInfo objects.
- Save Images to Files:
- Loops through all detected images on the page
- Use the PdfImageInfo[].Image.Save() method to save the image to disk.
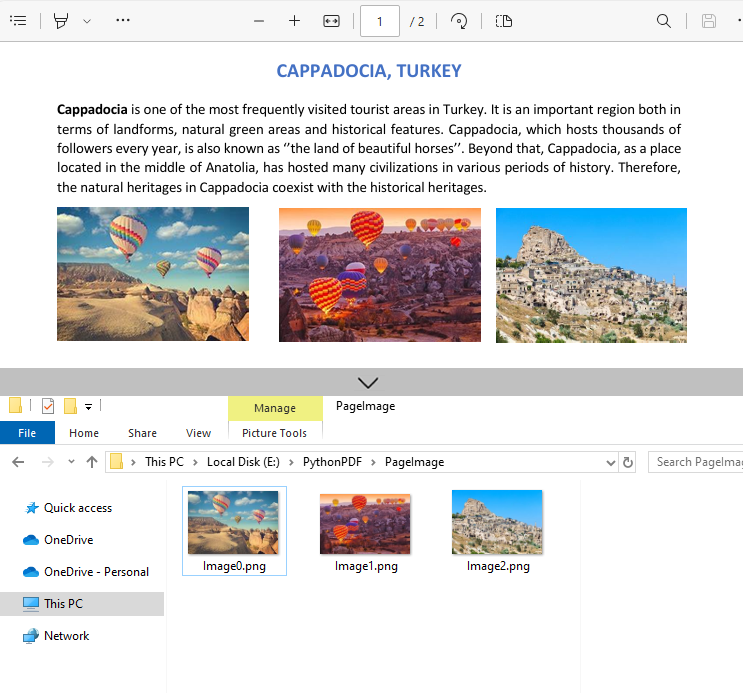
Output:
Example 2: Extract All Images from a PDF File
Building on the single-page extraction method, you can iterate through all pages of the PDF document to extract every embedded image.
Python code example:
from spire.pdf.common import *
from spire.pdf import *

# Create a PdfDocument instance
pdf = PdfDocument()

# Load a PDF file
pdf.LoadFromFile("template1.pdf")

# Create a PdfImageHelper instance
imageHelper = PdfImageHelper()

# Iterate through the pages in the document
for i in range(0, pdf.Pages.Count):
    # Get the current page
    page = pdf.Pages.get_Item(i)
    # Get the image information on the page
    imageInfo = imageHelper.GetImagesInfo(page)
    # Iterate through the image information items
    for j in range(0, len(imageInfo)):
        # Save the current image to file
        imageInfo[j].Image.Save(f"Images\\Image{i}_{j}.png")

# Release resources
pdf.Close()
Output:
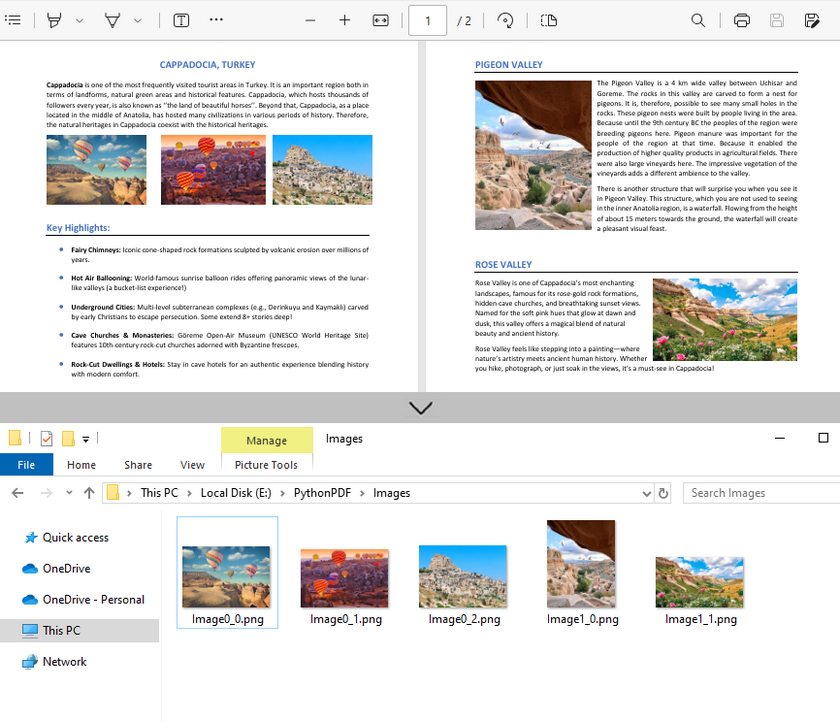
Handle Different Image Formats While Extraction
Spire.PDF for Python supports extracting images in various formats such as PNG, JPG/JPEG, BMP, etc. When saving the extracted images, you can choose the appropriate format based on your needs.
Common Image Formats:
| Format | Best Use Cases | PDF Extraction Notes |
|---|---|---|
| JPG/JPEG | Photos, scanned documents | Common in PDFs; quality loss on re-compress |
| PNG | Web graphics, diagrams, screenshots | Preserves transparency; larger file sizes |
| BMP | Windows applications, temp storage | Rare in modern PDFs; avoid for web use |
| TIFF | Archiving, print, OCR input | Ideal for document preservation; multi-page |
| EMF | Windows vector editing | Editable in Illustrator/Inkscape |
Frequently Asked Questions
Q1: Is Spire.PDF for Python a free library?
Spire.PDF for Python offers both free and commercial versions. The free version has limitations, such as a maximum of 10 pages per PDF. For commercial use or to remove these restrictions, you can request a trial license here.
Q2: Can I extract images from a specified page range only?
Yes. Instead of iterating through all pages, specify the page indices you want. For example, to extract images from the pages 2 to 5:
# Extract images from pages 2 to 5
for i in range(1, 4): # Pages are zero-indexed
    page = pdf.Pages.get_Item(i)
    # Process images as before
Q3: Is it possible to extract text from images?
Yes. For scanned PDF files, after extracting the images, you can extract the text in the images in conjunction with the Spire.OCR for Python library.
A step-by-step guide: How to Extract Text from Image Using Python (OCR Code Examples)
Conclusion (Extract Text and More)
Spire.PDF simplifies image extraction from PDF in Python with minimal code. By following this guide, you can:
- Extract images from single pages or entire PDF documents.
- Save images from PDF in various formats (PNG, JPG, BMP or TIFF).
As a PDF document can contain different elements, the Python PDF library is also capable of: