Replace Text in PDF in Bulk: 3 Practical Methods
PDFs are widely used for reports, manuals, and documentation. Editing text in a PDF is not as straightforward as in Word, and manually replacing each occurrence of a word can be tedious. This guide will show you three practical ways to replace text in a single PDF efficiently, so you can fix typos, update terms, or correct errors across the entire document without editing each instance manually.
Quick Navigation:
- Method 1: Using Adobe Acrobat Pro
- Method 2: Using an Online Tool (PDF4me)
- Method 3: Using a .NET API (Programmatic Approach)
Why Replace Text in PDF?
Replacing text in a PDF is often necessary because PDFs are designed to preserve content and layout, making manual edits difficult. Common scenarios include:
- Correcting typos or errors – Even professionally prepared PDFs can contain mistakes that need to be fixed.
- Updating outdated information – Names, dates, company details, or product references may need to be revised without recreating the entire document.
- Standardizing terminology – For consistency across reports or manuals, specific terms may need to be updated throughout the document.
- Legal or compliance updates – Certain documents may require text changes to meet regulatory or contractual requirements.
- Improving readability – Replacing awkward phrasing, abbreviations, or technical terms can make documents clearer for readers.
By replacing text efficiently, you save time, maintain professional formatting, and avoid the hassle of recreating PDFs from scratch.
Method 1: Using Adobe Acrobat Pro
Adobe Acrobat Pro is one of the most robust and professional PDF editing tools available. It allows you to replace text throughout a document while preserving the original formatting, layout, and fonts. This is especially useful when you are dealing with complex PDFs that include tables, images, headers, or footers.
The software ensures that the replacement does not distort text alignment or page structure, which is a common issue with simpler tools. Adobe Acrobat Pro is ideal for office users or professionals who need a reliable desktop solution for precise text editing.
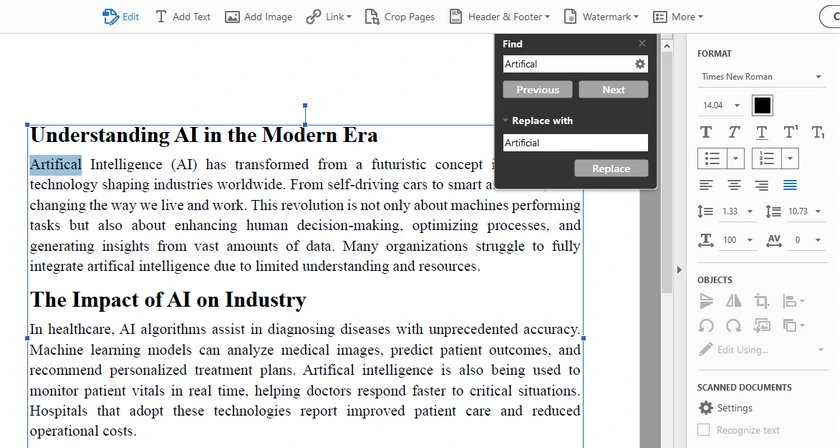
Step-by-Step Instruction
-
Open your PDF in Adobe Acrobat Pro.
-
Go to Edit → Find / Replace → Replace Text .
-
Enter the text you want to replace in the Find field.
-
Enter the new text in the Replace with field.
-
Configure the Case Sensitive option based on your needs.
- Enable it if you only want to replace text with the exact capitalization.
- Disable it if you want Acrobat to replace all capitalization variations automatically.
-
Click Replace until every occurrence in the document is replaced.
Note: Pay close attention to capitalization when replacing text. For example, "Artifical" and "artifical" may be treated differently depending on whether Case Sensitive matching is enabled. Incorrect settings may cause some occurrences to be skipped or unintentionally replaced.
Pros
- Preserves formatting, fonts, and layout.
- Simple and reliable for single documents.
Cons
- Paid software.
- Less suitable for fully automated workflows.
Method 2: Using an Online Tool (PDF4me)
Online tools such as PDF4me are convenient for users who need a quick solution without installing any software. They allow you to replace all occurrences of a word or phrase across a single PDF directly in your browser. This method is particularly useful when you are working on a computer where you cannot install software, or when you need a fast fix for small to medium-sized documents.
While online tools are generally easy to use, they may have limitations on file size or number of replacements per session, and you should be cautious about uploading sensitive documents.
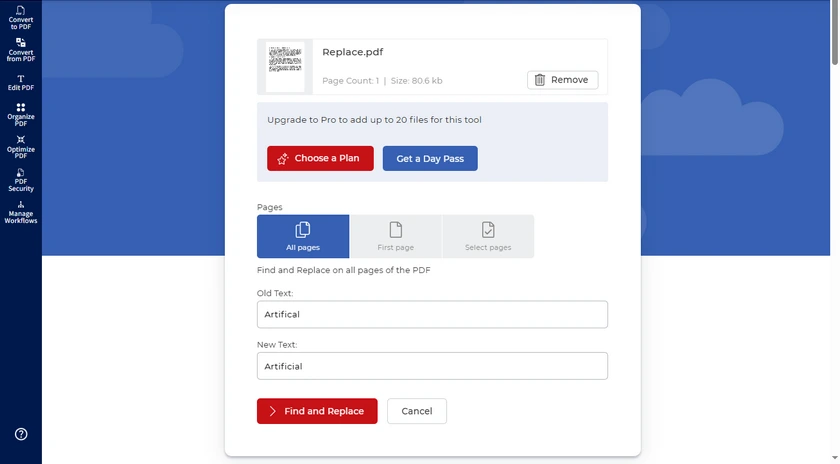
Step-by-Step Instruction
- Open PDF4me's Find and Replace Tool in your browser.
- Upload the PDF you want to edit.
- Enter the text to find and the replacement text.
- Click Find and Replace and download the updated PDF.
Pros
- No installation needed; works in any browser.
- Quick and user-friendly for occasional edits.
Cons
- May have file size or session limits.
- Less suitable for confidential documents.
Method 3: Using a .NET API (Programmatic Approach)
For developers or power users, Spire.PDF for .NET provides a programmatic solution for replacing text across an entire PDF. Unlike manual or online methods, this approach allows precise control over every replacement and ensures that all pages, fonts, and layouts are preserved. It is particularly beneficial if you need to replace multiple terms at once or integrate text replacement into an automated workflow.
Step-by-Step Instruction
- Open your development environment (Visual Studio, etc.).
- Install and reference Spire.PDF for .NET in your project.
- Use the following C# code to replace all occurrences of a word:
PM> Install-Package Spire.PDF
using Spire.Pdf;
using Spire.Pdf.Texts;

namespace ReplaceInEntireDocument
{
    class Program
    {
        static void Main(string[] args)
        {
            // Load a PDF file
            PdfDocument doc = new PdfDocument();
            doc.LoadFromFile("Input.pdf");

            // Create a PdfTextReplaceOptions object
            PdfTextReplaceOptions textReplaceOptions = new PdfTextReplaceOptions();

            // Specify the options for text replacement
            textReplaceOptions.ReplaceType = PdfTextReplaceOptions.ReplaceActionType.WholeWord | PdfTextReplaceOptions.ReplaceActionType.AutofitWidth;

            for (int i = 0; i < doc.Pages.Count; i++) {

                // Get a specific page
                PdfPageBase page = doc.Pages[i];

                // Create a PdfTextReplacer object based on the page
                PdfTextReplacer textReplacer = new PdfTextReplacer(page);

                // Set the replace options
                textReplacer.Options = textReplaceOptions;

                // Replace all occurrence of target text with new text
                textReplacer.ReplaceAllText("artifical", "artificial");
                textReplacer.ReplaceAllText("Artifical", "Artificial");
            }

            // Save the document to a different PDF file
            doc.SaveToFile("Replaced.pdf");

            // Dispose resources
            doc.Dispose();
        }
    }
}
Output:

Note: In Spire.PDF, text replacement is case-sensitive by default. This means "artifical" and "Artifical" are considered different strings.
That is why the example includes two replacement statements:
textReplacer.ReplaceAllText("artifical", "artificial");
textReplacer.ReplaceAllText("Artifical", "Artificial");
If your document contains multiple capitalization styles, make sure to replace each variation separately.
Advanced Features for Power Users
Spire.PDF offers several advanced find-and-replace capabilities that go beyond simple “replace all”:
- Replace text on a specific page – You can target just one page instead of all pages.
- Replace the first occurrence – Useful when only the first instance of a word needs updating.
- Find and replace using Regex – Allows complex pattern matching and replacement (e.g., dates, email addresses, or variable formats).
You can implement these features by adjusting the PdfTextReplacer or ReplaceAllText methods in your code. For example, you can loop through only the page you want, or use Regex in the search string to match patterns instead of exact words. For more use cases, refer to Replace Text in a PDF Document Using C#.
Pros
- Fully automated; flexible text replacement options.
- Preserves font, layout, and formatting.
- Can be integrated into desktop or server workflows for repeated tasks.
Cons
- Requires programming knowledge.
- Commercial license may be needed for full features.
In addition to replacing text, you can also replace images, fonts, and other document elements programmatically using Spire.PDF for .NET. This makes it a more comprehensive solution for PDF modification beyond simple text updates.
Conclusion
Replacing text in a PDF doesn’t have to be difficult. For most users, replacing all occurrences in a single PDF is sufficient and practical. Depending on your needs:
- Adobe Acrobat Pro – Best for professional, desktop editing with perfect formatting.
- PDF4me – Quick and easy online solution for occasional use.
- Spire.PDF for .NET – Ideal for developers needing automated, precise replacements.
By choosing the method that fits your workflow, you can fix typos, update terms, or correct errors efficiently without manually editing each instance.
FAQs
Q1: Can I replace text in a scanned PDF?
No. Scanned PDFs are essentially images. To replace text, you first need to perform OCR (Optical Character Recognition) to convert the images into editable text.
Q2: Will the formatting break after replacing text?
It depends on the method. Adobe Acrobat Pro and Spire.PDF preserve fonts, layout, and alignment. Online tools may slightly affect formatting, especially in complex PDFs.
Q3: Can I replace multiple different words at the same time?
Yes. In Spire.PDF, you can add multiple ReplaceAllText commands for different terms. In Adobe Acrobat, you need to repeat the Find & Replace for each term.
Q4: Do I need a paid license to replace text?
Adobe Acrobat Pro is paid, and Spire.PDF’s full features may require a commercial license. PDF4me offers free trials or limited replacements, but large edits may require a subscription.
Q5: Can I undo replacements if something goes wrong?
Always save a backup of your original PDF before replacing text. Adobe Acrobat Pro has an Undo feature, but online tools and programmatic methods require a backup to restore the original content.
See Also
How to Print Excel Sheet on One Page: 7 Effective Ways
Table of Contents
- Why Excel Sheets Don’t Fit on One Page
- Method 1: Use “Fit Sheet on One Page” Option
- Method 2: Adjust Page Scaling Manually
- Method 3: Change Page Orientation
- Method 4: Reduce Margins and Remove Extra Columns
- Method 5: Set a Custom Print Area
- Method 6: Change Paper Size
- Method 7: Print Excel Sheet on One Page Using C#
- Quick Comparison Table
- FAQs
- Conclusion
Excel spreadsheets often look perfect on screen but become difficult to print properly. Large tables may spill across multiple pages, columns get cut off, or the printed result becomes messy and hard to read.
Fortunately, Excel provides several built-in tools to help fit worksheets onto a single page when printing. Whether you're printing invoices, reports, schedules, dashboards, or financial statements, these methods can help create cleaner and more professional printouts.
In this guide, you'll learn 7 effective ways to print an Excel sheet on one page, ranging from beginner-friendly Excel settings to advanced C# automation using Spire.XLS.
Quick Navigation:
- Method 1: Use “Fit Sheet on One Page” Option
- Method 2: Adjust Page Scaling Manually
- Method 3: Change Page Orientation
- Method 4: Reduce Margins and Remove Extra Columns
- Method 5: Set a Custom Print Area
- Method 6: Change Paper Size
- Method 7: Print Excel Sheet on One Page Using C#
Why Excel Sheets Don’t Fit on One Page
Excel automatically separates worksheets into multiple printed pages based on page size, margins, scaling, and content dimensions. If a worksheet contains too many columns or rows, Excel may split the content into several pages during printing.
Common reasons include:
- Wide tables with many columns
- Large font sizes
- Excessive blank spaces
- Wide page margins
- Incorrect page orientation
- Unused cells extending the print range
As a result, reports can become difficult to read and waste paper unnecessarily. The following methods will help you optimize your worksheet layout and fit the content onto a single printed page.
Method 1: Use “Fit Sheet on One Page” Option
This is the easiest and most commonly used method. Excel includes a built-in scaling feature that automatically shrinks worksheet content to fit onto one printed page.
It works particularly well for invoices, schedules, reports, and medium-sized tables.
Steps
- Open your Excel worksheet.
- Click File > Print.
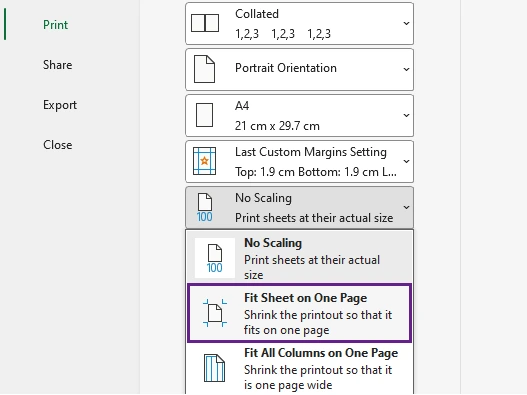
- Under Settings, click No Scaling.
- Select Fit Sheet on One Page.
- Preview the result in the Print Preview pane.
- Click Print to print the worksheet.
What Happens
Excel automatically scales the worksheet so all rows and columns fit within a single page during printing.
Pros
- Extremely easy to use
- No manual resizing required
- Built directly into Excel
Cons
- Text may become too small for very large worksheets
Method 2: Adjust Page Scaling Manually
Instead of forcing everything onto one page automatically, you can manually reduce the scaling percentage. This provides more control over readability and print appearance.
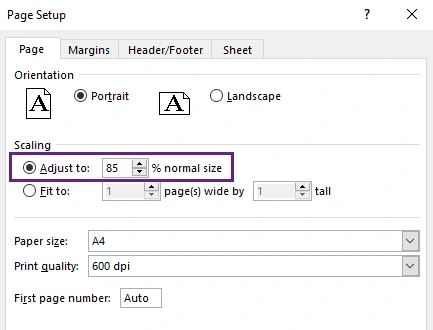
For example, reducing scaling to 85% or 90% may fit the content nicely while keeping text readable.
Steps
- Open your Excel worksheet and click File > Print.
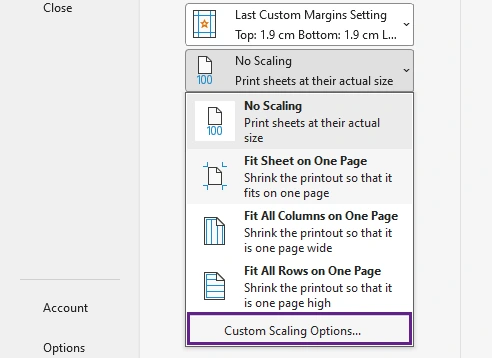
- Under Settings, click No Scaling.
- Select Custom Scaling Options.
- In the scaling settings, reduce the scaling percentage until the worksheet fits better on the page.
- Check the layout in the Print Preview pane and continue adjusting if needed.
- Once the worksheet fits properly on one page, click Print.
Best For
- Financial reports
- Tables with slightly oversized columns
- Worksheets where readability matters
Tip: Avoid reducing scaling too aggressively. Tiny text can make printed documents difficult to read.
Method 3: Change Page Orientation
Many Excel worksheets are wider than they are tall. Switching from Portrait orientation to Landscape orientation provides more horizontal space and can instantly reduce page breaks.
This simple adjustment is especially effective for spreadsheets with many columns.
Steps
- Open your Excel worksheet and click File > Print.
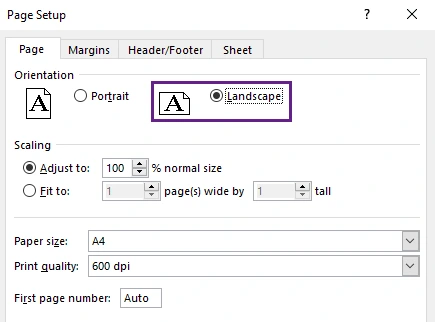
- In the print settings window, click Page Setup.
- Under the Page tab, select Landscape orientation.
- Click OK to apply the setting.
- Review the layout in the Print Preview pane.
- If the worksheet fits properly on one page, click Print.
Why It Helps
Landscape mode increases printable width, allowing more columns to fit onto a single page.
Best For
- Wide data tables
- Dashboards
- Reports with many columns
Method 4: Reduce Margins and Remove Extra Columns
Large page margins and unused worksheet areas consume valuable printing space. Reducing margins and removing unnecessary content can significantly improve page fitting.
This method is often combined with scaling for better results.
Steps
- Open your Excel worksheet and remove unnecessary content, such as blank rows, empty columns, oversized fonts, excessive spacing, or data that does not need to be printed.
- Click File > Print.
- Under Settings, click Normal Margins.
- Select Narrow to reduce the page margins and create more printable space.
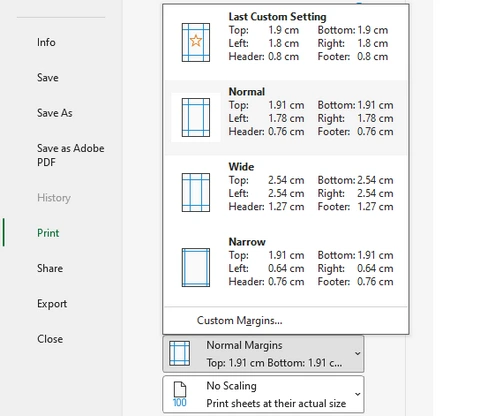
- If you need additional space, select Custom Margins and manually reduce the top, bottom, left, and right margins further.
- Review the result in the Print Preview pane.
- Once the worksheet fits properly on one page, click Print.
Why It Works
Smaller margins provide more printable area, while cleaning unused content prevents Excel from printing unnecessary pages.
Tip: Press Ctrl + End to see Excel’s last used cell. Sometimes hidden formatting extends far beyond your actual data.
Method 5: Set a Custom Print Area
Sometimes only part of the worksheet needs to be printed. By defining a custom print area, Excel ignores unnecessary cells and focuses only on the selected content.
This is one of the most effective ways to prevent blank pages and oversized print ranges.
Steps
- Select the cells or range you want to print.
- Go to the Page Layout tab.
- Click Print Area in the Page Setup group.
- Select Set Print Area.
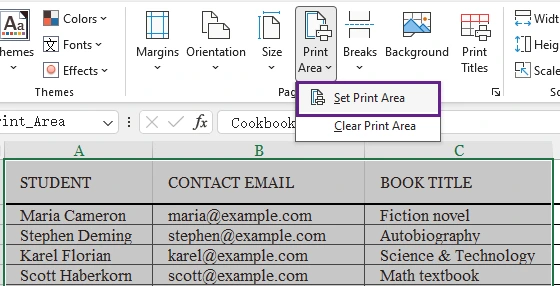
- Click File > Print to open the printing settings.
- Review the selected content in the Print Preview pane.
- If the layout looks correct, click Print.
Best For
- Reports
- Dashboards
- Summaries
- Invoice sections
Pros
- Prevents extra blank pages
- Faster printing
- Cleaner output
Method 6: Change Paper Size
Using a larger paper size provides additional printable space and reduces the need for excessive scaling. This method is commonly used in offices for large spreadsheets and detailed reports.
For example, switching from Letter to Legal paper can dramatically improve print layout.
Steps
- Open your Excel worksheet and click File > Print.
- Under Settings, click the current paper size (such as A4).
- Select a larger paper size, such as Legal , A3, or Tabloid.
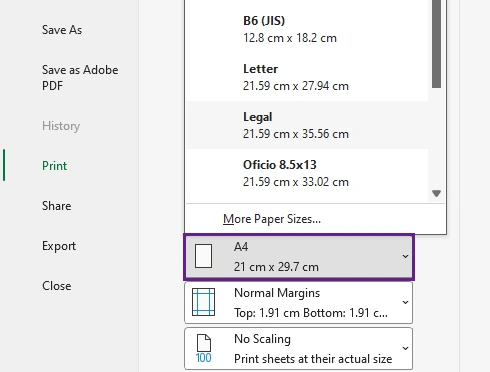
- Review the layout in the Print Preview pane.
- If the worksheet fits properly on the page, click Print .
Best For
- Large reports
- Financial spreadsheets
- Wide tables
Important Note
Make sure your printer supports the selected paper size.
Method 7: Print Excel Sheet on One Page Using C#
If you need to print Excel worksheets programmatically, C# automation provides a much more efficient solution than manual printing. This approach is ideal for enterprise systems, reporting platforms, scheduled tasks, and batch document processing.
Using Spire.XLS for .NET, you can automatically configure page settings and fit worksheets onto a single printed page.
The key setting is:
pageSetup.IsFitToPage = true;
This property automatically scales worksheet content to fit within one page during printing.
Install Spire.XLS
You can install Spire.XLS via NuGet:
Install-Package Spire.XLS
C# Example: Print Excel Sheet on One Page
using Spire.Xls;
using System.Drawing.Printing;

namespace PrintExcel
{
    class Program
    {
        static void Main(string[] args)
        {
            // Load an Excel document
            Workbook workbook = new Workbook();
            workbook.LoadFromFile("Sample.xlsx");

            // Loop through the worksheets
            for (int i = 0; i < workbook.Worksheets.Count; i++)
            {
                // Get a specific worksheet
                Worksheet worksheet = workbook.Worksheets[i];

                // Get the PageSetup object
                PageSetup pageSetup = worksheet.PageSetup;

                // Set page margins
                pageSetup.TopMargin = 0.3;
                pageSetup.BottomMargin = 0.3;
                pageSetup.LeftMargin = 0.3;
                pageSetup.RightMargin = 0.3;

                // Allow to print with gridlines
                pageSetup.IsPrintGridlines = true;

                // Fit worksheet on one page
                pageSetup.IsFitToPage = true;
            }

            // Get PrinterSettings
            PrinterSettings settings = workbook.PrintDocument.PrinterSettings;

            // Specify printer name
            settings.PrinterName = "Your Printer Name";

            // Specify page range to print
            settings.FromPage = 1;
            settings.ToPage = 3;

            // Execute printing
            workbook.PrintDocument.Print();
        }
    }
}
Advantages of This Method
- Fully automated Excel printing
- Supports batch processing
- Suitable for enterprise applications
- Eliminates manual Excel operations
- Easy to integrate into reporting systems
As a comprehensive Excel API for .NET, Spire.XLS for .NET allows developers to control worksheet printing entirely through code, including scaling, print areas, margins, orientation, headers, footers, and page breaks.
Beyond printing, it also supports Excel creation, editing, data import/export, formula calculation, chart processing, and conversion between Excel, PDF, CSV, HTML, and image formats. It is widely used for report generation, business automation, financial systems, and large-scale spreadsheet processing applications.
Quick Comparison Table
| Method | Difficulty | Best For | Automation |
|---|---|---|---|
| Fit Sheet on One Page | Easy | Quick printing | No |
| Manual Scaling | Easy | Better readability | No |
| Landscape Orientation | Easy | Wide worksheets | No |
| Reduce Margins | Easy | Minor layout fixes | No |
| Set Print Area | Easy | Partial worksheet printing | No |
| Change Paper Size | Easy | Large reports | No |
| C# with Spire.XLS | Advanced | Batch/automatic printing | Yes |
Conclusion
Printing Excel worksheets on a single page can greatly improve document readability and presentation quality. Excel offers several built-in features—including scaling, landscape orientation, print area configuration, and margin adjustment—to help optimize print layouts quickly.
For developers and enterprise users, programmatic printing with Spire.XLS provides a powerful automation solution. By enabling the IsFitToPage property, Excel worksheets can automatically fit onto one printed page, making batch printing and report generation much more efficient.
FAQs
Q1. Why is my Excel sheet still printing on multiple pages?
Your worksheet may contain hidden data, unused formatted cells, large margins, or too many columns. Check the print area and scaling settings.
Q2. Does fitting a sheet onto one page reduce print quality?
No. Excel only scales the content size. However, excessive shrinking may make text difficult to read.
Q3. Can I fit only columns onto one page?
Yes. Under Settings , click No Scaling , and choose Fit All Columns on One Page. This keeps rows flowing naturally while fitting all columns onto one page.
Q4. Is Landscape mode better for printing Excel sheets?
For wide spreadsheets, yes. Landscape orientation provides more horizontal printing space.
Q5. Can I automate Excel printing in backend applications?
Yes. Libraries such as Spire.XLS allow developers to print Excel files programmatically using C# without manually opening Excel.
See Also
How to Print PDFs on Windows: 5 Easy & Effective Ways
Table of Contents
Printing PDF files on Windows is simple once you know the right tools to use. Whether you want a quick way to print a single PDF, need more advanced print settings, or want to automate printing in your own application, Windows offers several practical options.
In this guide, you’ll learn 5 effective ways to print PDFs on Windows, including built-in solutions, browser-based methods, and a C# programming approach for developers.
Overview of the methods covered:
- Method 1: Print PDFs Using Microsoft Edge
- Method 2: Print PDFs with Adobe Acrobat Reader
- Method 3: Print PDFs Using Google Chrome
- Method 4: Print PDFs from File Explorer (Quick Print)
- Method 5: Print PDFs Programmatically in C#
Method 1: Print PDFs Using Microsoft Edge
Best For: Everyday users who want a fast and simple printing solution
Microsoft Edge comes pre-installed on Windows 10 and Windows 11, making it one of the most accessible ways to print PDF files. The browser includes a built-in PDF viewer that supports common printing features without requiring any third-party software. For users who only need occasional PDF printing, Edge offers a lightweight and convenient solution.
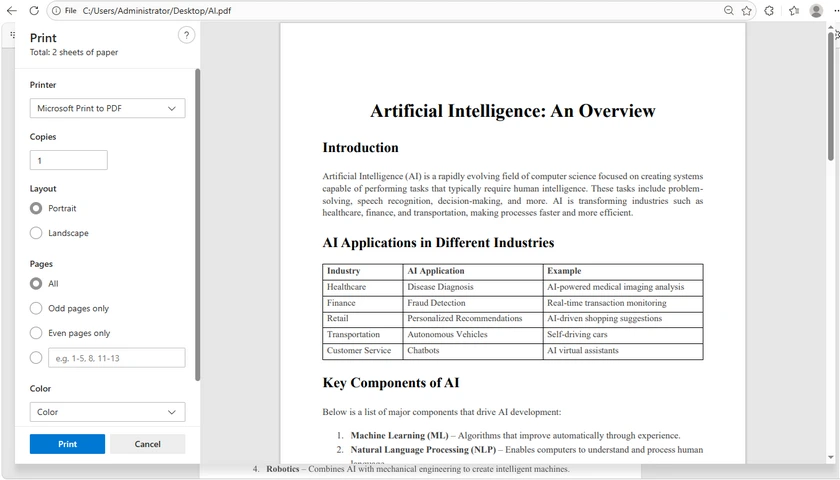
Steps
- Right-click your PDF file.
- Choose Open with > Microsoft Edge .
- Press Ctrl + P or click the Print icon in the toolbar.
- Configure the print settings:
- Printer
- Copies
- Page range
- Orientation
- Color mode
- Scale
- Click Print .
Advantages
- No additional installation required
- Fast and lightweight
- Easy for beginners
Limitations
- Limited advanced printing features
- Not ideal for professional print layouts
Method 2: Print PDFs with Adobe Acrobat Reader
Best For: Accurate printing and advanced print settings
Adobe Acrobat Reader is one of the most widely used PDF applications and is known for its reliable PDF rendering engine. It provides more advanced printing capabilities than most built-in viewers, making it suitable for business documents, forms, presentations, and print-ready files. If you frequently work with complex PDFs, Acrobat Reader usually delivers the most consistent results.
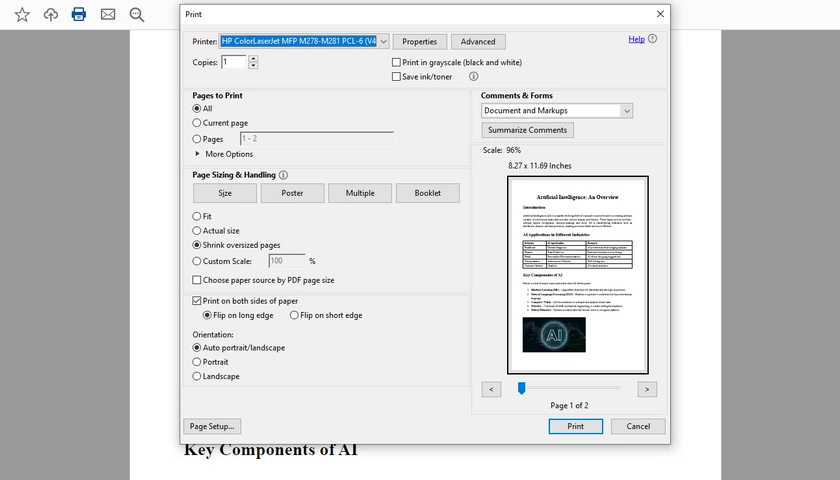
Steps
- Open the PDF file in Adobe Acrobat Reader.
- Press Ctrl + P .
- Adjust print settings such as:
- Duplex printing
- Grayscale printing
- Poster printing
- Multiple pages per sheet
- Booklet printing
- Click Print .
Advantages
- Excellent compatibility with complex PDFs
- Advanced print customization
- Accurate PDF rendering
Limitations
- Larger installation size
- Can consume more system resources
Method 3: Print PDFs Using Google Chrome
Best For: Users who frequently work inside a web browser
Google Chrome includes a built-in PDF viewer that allows users to open and print PDF files directly from the browser window. Since many people already use Chrome daily, this method is convenient and requires almost no learning curve. It is especially useful when downloading PDFs from websites or email attachments and printing them immediately.
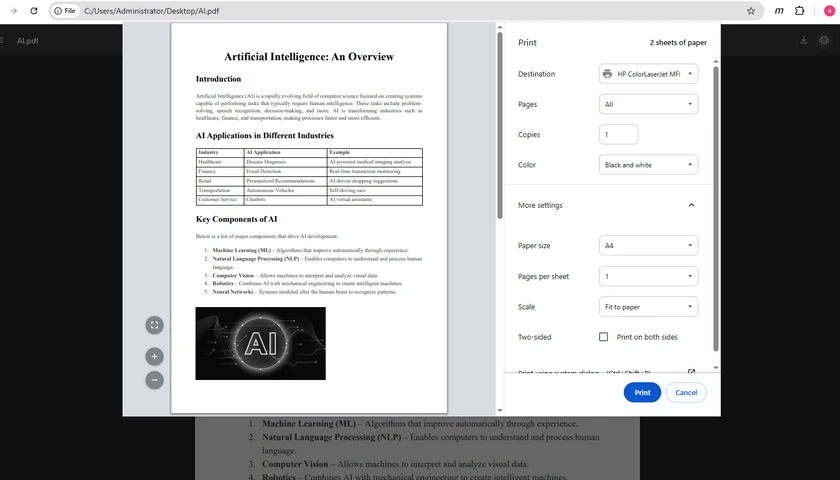
Steps
- Drag and drop the PDF into Chrome.
- Press Ctrl + P .
- Configure print settings.
- Click Print .
Advantages
- Convenient and easy to use
- Quick startup
- No dedicated PDF software required
Limitations
- Fewer professional print options
- Less suitable for very large PDFs
Method 4: Print PDFs from File Explorer (Quick Print)
Best For: One-click PDF printing
Windows File Explorer includes a built-in “Print” shortcut that allows users to print PDF files directly from the right-click context menu. This method is extremely fast because you do not need to manually open the document first. It works well for quick printing tasks, especially when dealing with simple documents or routine office workflows.
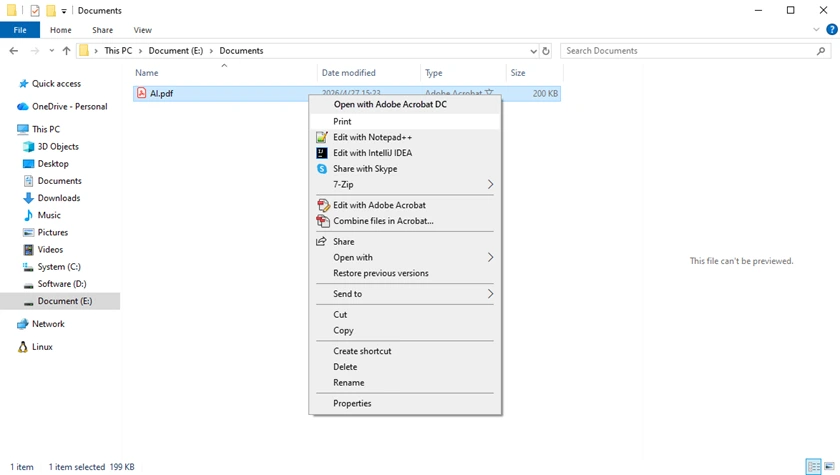
Steps
- Locate the PDF file on your computer.
- Right-click the file.
- Select Print .
Windows will automatically send the PDF to your default printer using the default PDF application.
Advantages
- Extremely fast
- Simple one-click workflow
- Useful for quick printing tasks
Limitations
- Minimal control over print settings
- Relies on the default PDF viewer
Method 5: Print PDFs Programmatically in C#
Best For: Developers building automated PDF workflows
If you need to print PDFs automatically inside desktop applications, enterprise systems, or backend services, using C# is a much more flexible solution.
With Spire.PDF for .NET, developers can print PDF files with advanced settings such as page ranges, duplex printing, grayscale printing, printer selection, and batch processing.
Install the Library
Install-Package Spire.PDF
C# Example: Print a PDF File
using Spire.Pdf;
using System.Drawing.Printing;

namespace PrintPdf
{
    class Program
    {
        static void Main(string[] args)
        {
            // Load a pdf file
            PdfDocument doc = new PdfDocument();
            doc.LoadFromFile("Input.pdf");

            // Specify the printer name
            doc.PrintSettings.PrinterName = "Your Printer Name";

            // Select a page range to print
            doc.PrintSettings.SelectPageRange(1, 5);

            // Or select discontinuous pages
            // doc.PrintSettings.SelectSomePages(new int[] { 1, 3, 5, 7 });

            // Specify copies
            doc.PrintSettings.Copies = 1;

            // Enable duplex printing
            doc.PrintSettings.Duplex = Duplex.Default;

            // Enable grayscale printing
            doc.PrintSettings.Color = false;

            // Execute printing
            doc.Print();

            // Dispose resources
            doc.Dispose();
        }
    }
}
C# Example: Batch Print PDF Files
using Spire.Pdf;
using System.IO;

namespace BatchPrintPdf
{
    class Program
    {
        static void Main(string[] args)
        {
            // Specify the folder containing PDF files
            string folderPath = @"C:\PDFs\";

            // Get all PDF files in the folder
            string[] files = Directory.GetFiles(folderPath, "*.pdf");

            // Loop through each PDF file
            foreach (string file in files)
            {
                // Load the PDF document
                PdfDocument doc = new PdfDocument();
                doc.LoadFromFile(file);

                // Specify printer name
                doc.PrintSettings.PrinterName = "Your Printer Name";

                // Print the PDF
                doc.Print();

                // Dispose resources
                doc.Dispose();
            }
        }
    }
}
Read Further: How to Print PDF Documents in C# (Without Adobe)
Advantages
- Full automation support
- Advanced print customization
- Suitable for enterprise workflows
- Supports silent and batch printing
Limitations
- Requires programming knowledge
- Needs development environment setup
As a professional .NET PDF library, Spire.PDF for .NET not only supports PDF printing, but also enables developers to create, edit, convert, split, merge, secure, and extract content from PDF documents programmatically. It is suitable for desktop applications, ASP.NET projects, cloud services, and automated document processing systems.
Quick Comparison Table
| Method | Best For | Difficulty | Advanced Features |
|---|---|---|---|
| Microsoft Edge | Basic PDF printing | Easy | Low |
| Adobe Acrobat Reader | Professional printing | Easy | High |
| Google Chrome | Browser-based printing | Easy | Medium |
| File Explorer Quick Print | One-click printing | Very Easy | Low |
| C# Programming | Automation & enterprise workflows | Advanced | Very High |
Conclusion
There are several easy ways to print PDFs on Windows, depending on your needs. For casual users, built-in tools like Microsoft Edge and Google Chrome provide fast and convenient printing. Adobe Acrobat Reader offers more professional print controls and better compatibility with complex PDF files.
For developers and enterprises, programmatic printing in C# provides the highest level of flexibility and automation. Using libraries like Spire.PDF for .NET, you can integrate PDF printing directly into your own applications and document workflows with minimal code.
FAQs
Q1. Can Windows print PDFs without Adobe Reader?
Yes. Windows users can print PDFs using built-in tools like Microsoft Edge or web browsers such as Google Chrome without installing Adobe Reader.
Q2. Why is my PDF not printing correctly?
Incorrect scaling, unsupported fonts, corrupted PDF files, or outdated printer drivers can all cause printing issues. Trying another PDF viewer or updating the printer driver often helps resolve the problem.
Q3. How do I print only specific pages from a PDF?
Most PDF viewers allow you to specify a custom page range in the print dialog. For example, you can print pages 1-3, 5, or 7-10 instead of the entire document.
Q4. Can I print PDFs in black and white?
Yes. Most PDF printing tools include a grayscale or monochrome option in the print settings. This helps reduce color ink usage.
Q5. How can developers automate PDF printing in C#?
Developers can use PDF libraries such as Spire.PDF for .NET to automate PDF printing with features like printer selection, page range printing, duplex mode, and silent printing.
Remove Protection from Word Files: 5 Easy Ways
Table of Contents
- Why Remove Protection from a Word File?
- Before You Start: Types of Word Protection
- Method 1: Remove Protection Using Microsoft Word
- Method 2: Remove Basic Editing Restrictions in Word
- Method 3: Remove Protection Using Google Docs
- Method 4: Remove Protection Using VBA Macros
- Method 5: Automate Removal Using Python (Spire.Doc)
- Which Method Should You Choose?
- Conclusion
- FAQs

Password-protected Word documents are useful for keeping sensitive information secure—but they can also become a hassle when you need to edit, share, or automate documents. This is especially common when working with files received from others or older documents with forgotten settings.
Whether you know the password or are dealing with editing restrictions , this guide covers 5 effective ways to remove protection from Word files, including free tools, built-in features, and a Python automation method using Spire.Doc.
Overview of the methods covered:
- Method 1: Remove Protection Using Microsoft Word
- Method 2: Remove Basic Editing Restrictions in Word
- Method 3: Remove Protection Using Google Docs
- Method 4: Remove Protection Using VBA Macros
- Method 5: Automate Removal Using Python (Spire.Doc)
Why Remove Protection from a Word File?
Here are some common reasons users want to remove protection:
- You already know the password and want quicker access.
- You need to edit a restricted document.
- You want to remove unnecessary limitations before sharing.
- You need to process files in bulk (automation).
The right method depends on the type of protection applied to the document.
Before You Start: Types of Word Protection
Understanding these differences is critical, because not all methods work for every case.
1. Open Password (Encryption)
Strong encryption required to open the file; cannot be bypassed without the correct password.
2. Editing Restrictions (No Password)
Files open normally with limited editing access; no protection password needed to unlock.
3. Editing Restrictions with Protection Password
Files open freely, but editing is locked. A protection password is required for official removal, and this weak protection can be bypassed by most tools.
Note: This type of protection is weaker than encryption and may be removed by some tools without needing the protection password.
Method 1: Remove Protection Using Microsoft Word
Applicable Scope: Documents with known open passwords or known protection passwords; all mainstream Word versions (2016/2019/2021/365)
Best For: Beginners, formal office scenarios, files requiring 100% format and content integrity
This is the most secure, official solution provided by Microsoft. It modifies document encryption and restriction settings natively, with zero risk of file corruption, formatting loss, or content distortion. It supports canceling both open encryption and editing restrictions, but you must enter the correct corresponding password to complete the operation.
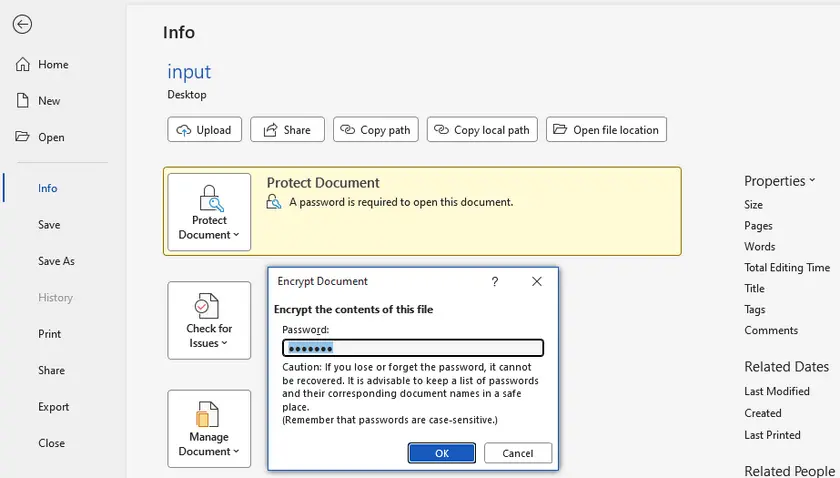
Step-by-Step Instructions
- Double-click to open the protected Word file and enter the required open password if prompted.
- Navigate to File > Info > Protect Document .
- Select Encrypt with Password .
- Delete all characters in the password input box and leave it blank.
- Click OK , then press Ctrl+S to save changes permanently.
- For editing restrictions: Go to Review > Restrict Editing, enter the protection password, and stop protection.
Method 2: Remove Basic Editing Restrictions in Word
Applicable Scope: Documents with editing limits but no protection password set; no full open encryption
Best For: Lightly restricted daily documents, quick one-click unlocking
This native Word solution targets low-level editing locks with no protection password. You can disable all restrictions in seconds without external tools or technical operations. It only works for simple permission limits and will fail if a protection password is configured.
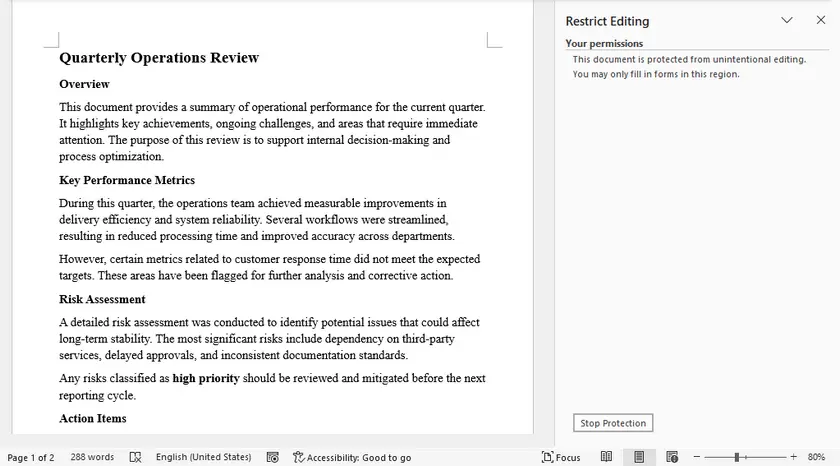
Step-by-Step Instructions
- Open the restricted Word document normally.
- Switch to the Review tab on the top ribbon.
- Click Restrict Editing on the right sidebar.
- Directly click Stop Protection; no password input is needed.
- Save the file to retain unrestricted editing access.
Method 3: Remove Protection Using Google Docs
Applicable Scope: Unencrypted Word files or files with a known open password; documents locked by protection password
Best For: Users without local Word admin rights, free cross-device unlocking, unknown protection password scenarios
Google Docs automatically strips Word’s custom editing restriction rules during format conversion. It is the most popular free trick to bypass unknown protection passwords. As long as you can open the file (with an open password if needed), all editing locks will be removed after re-downloading.
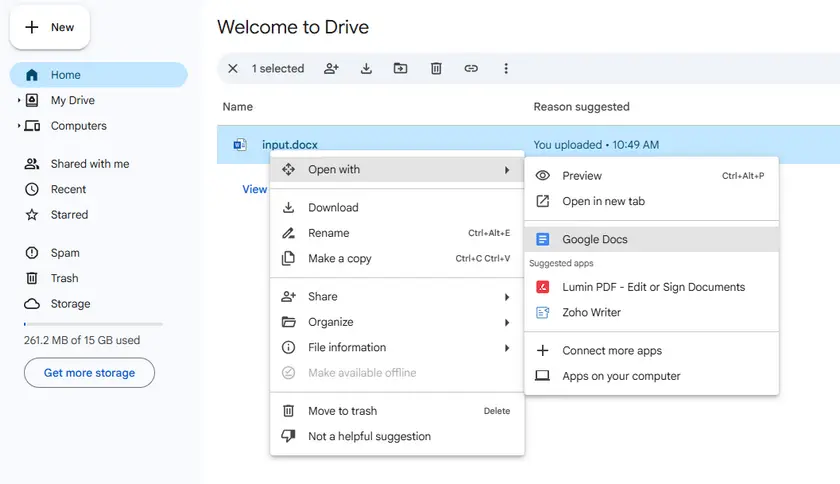
Step-by-Step Instructions
- Log in to Google Drive and upload your protected Word (.docx/.doc) file.
- Right-click the uploaded file and select Open with > Google Docs.
- Enter the open password if the document is encrypted.
- Once loaded, all editing restrictions and protection password limits are automatically lifted.
- Navigate to File > Download > Microsoft Word (.docx).
- The downloaded new file is fully unlocked and editable.
Method 4: Remove Protection Using VBA Macros
Applicable Scope: Windows-only Microsoft Word automation, requires correct passwords (does not bypass protection)
Best For: Intermediate users, offline office environments, frequent unlocking demands
VBA macros run locally in Microsoft Word and can be used to programmatically remove document protection. Unlike some online tools, this method does not bypass passwords —you must provide the correct open password to access the document and the correct editing (permission) password to remove restrictions. Once the document is accessible, the macro can automate the process of disabling protection and saving an unprotected copy. This makes it a useful offline solution for batch processing or repetitive tasks, but it cannot break or bypass any password-protected encryption.
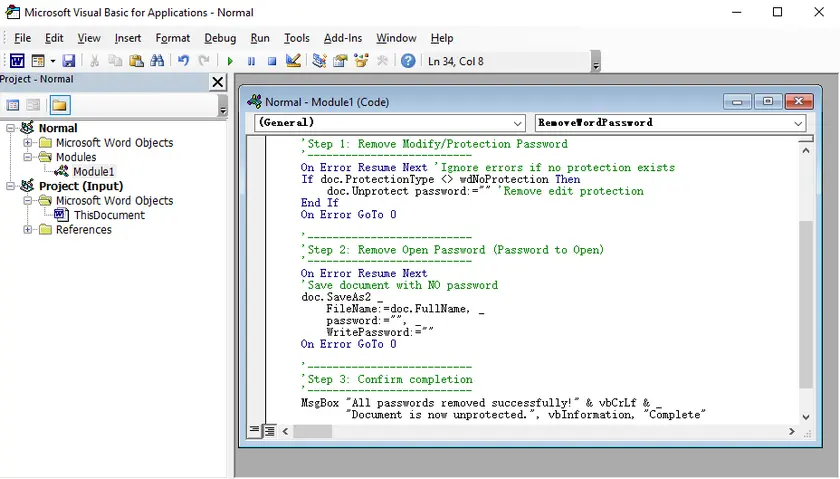
Step-by-Step Instructions (Batch Processing)
- Prepare a folder containing all the Word documents you want to unlock. Make sure you know the open password (if any) and the editing restriction password used in these files.
- Open Microsoft Word (no need to open a specific document).
- Press Alt + F11 to launch the VBA Editor.
- In the top menu, click Insert > Module to create a new module.
- Paste the batch VBA code into the module window.
- Update the following variables in the code:
- folderPath → the path to your target folder
- openPwd → the document open password (leave empty if none)
- editPwd → the editing restriction password
- Press F5 (or click Run ) to execute the macro.
- The macro will process all .docx files in the folder and save unlocked copies (e.g.,unlocked_filename.docx) in the same directory.
VBA Code:
Sub BatchRemoveProtection()

    Dim folderPath As String
    Dim fileName As String
    Dim doc As Document

    '==========================
    ' User Inputs
    '==========================
    folderPath = "C:\Docs\"   ' <-- update folder path
    Dim openPwd As String
    openPwd = ""              ' <-- set if files have open password

    Dim editPwd As String
    editPwd = "your_edit_password"   ' <-- set editing restriction password

    '==========================
    ' Loop through all DOCX files
    '==========================
    fileName = Dir(folderPath & "*.docx")

    While fileName <> ""

        ' Open document (with optional open password)
        Set doc = Documents.Open( _
            FileName:=folderPath & fileName, _
            PasswordDocument:=openPwd, _
            ReadOnly:=False)

        ' Remove editing restrictions
        If doc.ProtectionType <> wdNoProtection Then
            doc.Unprotect Password:=editPwd
        End If

        ' Remove read-only recommendation
        doc.ReadOnlyRecommended = False

        ' Save as new file
        doc.SaveAs2 _
            FileName:=folderPath & "unlocked_" & fileName, _
            Password:="", _
            WritePassword:=""

        doc.Close SaveChanges:=False

        fileName = Dir()
    Wend

    MsgBox "Batch processing completed!"

End Sub
Method 5: Automate Removal Using Python (Spire.Doc)
Applicable Scope: Bulk document processing, customized automation workflows, developer integration; files with known open passwords
Best For: Developers, enterprise batch processing, backend system integration, repetitive workflow automation
Combining Python and the Spire.Doc library enables programmable document decryption and protection removal. This method is designed for mass file processing and secondary development, with stable performance and complete format retention for formal business scenarios.
Step-by-Step Instructions
1. Install the Spire.Doc Library
pip install spire.doc
2. Remove Password with Python
from spire.doc import *
from spire.doc.common import *

# Load the document with password
document = Document()
document.LoadFromFile("input.docx", FileFormat.Auto, "open-pwd")

# Remove encryption
document.RemoveEncryption()

# Remove the editing restriction by setting the restriction type to None
document.Protect(ProtectionType.NoProtection)

# Save the unlocked document
document.SaveToFile("unlocked.docx", FileFormat.Docx)
document.Close()
Why Use Python for This Task?
- Process dozens of locked Word files in one batch.
- Embed unlocking functions into internal office systems.
- Reduce manual repetitive operations and improve work efficiency.
As a comprehensive Word library, Spire.Doc not only enables you to remove passwords and editing restrictions, but also provides powerful document cleanup capabilities such as removing watermarks, deleting hyperlinks, and modifying document structure programmatically.
You can further extend your workflow by integrating features like content extraction, formatting control, and batch document transformation for more advanced automation scenarios. This makes it easy to build end-to-end document processing pipelines without relying on Microsoft Word.
Which Method Should You Choose?
| Method | Core Use Case | Key Feature |
|---|---|---|
| Native Word Official | Known password, secure office use | Official, no file damage |
| Basic Restriction Removal | Simple editing locks, no password | Fast one-click unlock |
| Google Docs | Bypass unknown protection password | Free, no extra software |
| VBA Script | Offline Windows local unlocking | Automated unlock |
| Python + Spire.Doc | Custom automation & developer tasks | Code-based automatic processing |
Conclusion
Word document protection is designed for data security, but unreasonable restriction settings often hinder daily collaboration and editing.
We have sorted out 5 differentiated unlocking solutions covering casual office, free workaround, offline scripting, and enterprise automation. Always confirm your document’s protection type first:
- For open password encryption , both official and third party tools with the correct password work;
- For protection password editing locks , Google Docs and Python can remove editing restrictions in many cases.
Choose the corresponding solution based on your device system, network environment, and file volume to quickly remove Word protection without damaging original content and formatting.
FAQs
Q1: Can these methods crack a Word file with an unknown open password?
No. Open password adopts strong encryption. All methods above require the correct password to open the file. Only editing protection passwords can be bypassed.
Q2: Will unlocking damage my Word formatting, images or tables?
Official Word and Python Spire.Doc ensure full format retention. Google Docs may distort complex layouts; VBA has almost no impact on file content.
Q3: Is VBA safe for sensitive company documents?
Yes. The VBA script runs locally offline, with no data upload or leakage risk, making it suitable for confidential internal files.
Q4: Does this work for old .doc format and new .docx format?
All methods support mainstream .docx; Google Docs and Spire.Doc are also compatible with legacy .doc files.
See Also
Extract Tables from PDF: 4 Easy-to-Advanced Methods
Table of Contents
PDFs are great for preserving document layouts, but extracting tabular data from them can be frustrating. The main reason is that PDFs are designed for consistent visual rendering across devices, not for structured data extraction. As a result, tables may exist as selectable text in digital PDFs or as images in scanned files, with structures varying widely.
Fortunately, there are several practical ways to extract tables from PDFs, depending on your needs and technical comfort level. In this guide, we’ll walk through four effective methods, from simple no-code tools like Excel and Google Docs to a powerful Python-based solution for full control and automation.
Method overview:
- Method 1: Microsoft Excel (Built-in PDF Import)
- Method 2: Google Docs (Free & Simple)
- Method 3: Adobe Acrobat Pro (Export Feature)
- Method 4: Python (Full Control & Automation)
Method 1: Microsoft Excel (Built-in PDF Import)
Best for: Windows users with Microsoft Office 365 or Excel 2016+ (Windows only).
Microsoft Excel has a native PDF import feature that works surprisingly well for digital PDFs. It connects directly to the file and attempts to detect and convert tables.
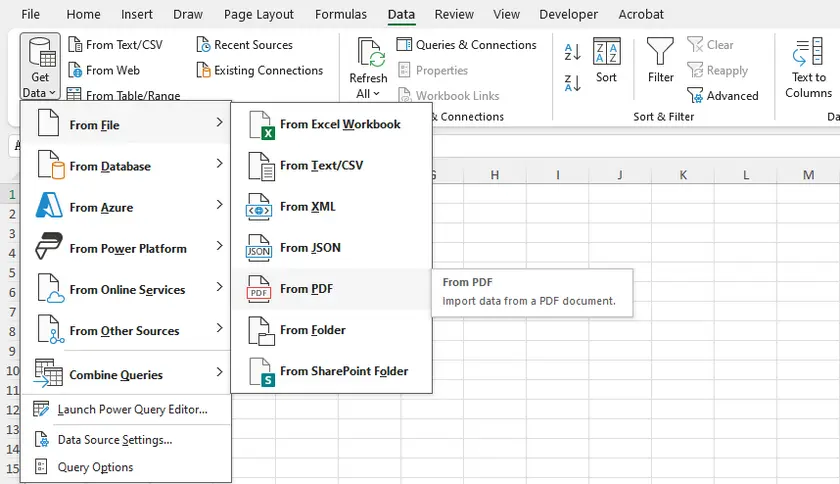
Step-by-Step Instructions
- Open Microsoft Excel.
- Go to Data → Get Data → From File → From PDF.
- Browse and select your PDF file.
- A navigator window will appear showing all detected tables and pages.
- Select the table(s) you want and click Load (to import directly) or Transform Data (to clean up before loading).
- Excel will import the table into a worksheet, preserving row/column structure reasonably well.
Pros & Cons
| Pros | Cons |
|---|---|
| No extra software needed (with Office) | Windows-only |
| Preserves numeric formats | Struggles with merged cells |
| Good for digital, text-based PDFs | No OCR for scanned PDFs |
| Can refresh data if PDF updates | Can be slow on large PDFs |
Method 2: Google Docs (Free & Simple)
Best for: Quick, one-off extractions when you don't have Excel or paid tools.
Google Docs offers a hidden but free method to extract tables from PDFs. It works by converting the entire PDF into an editable Google Doc, where tables become text-based grids.
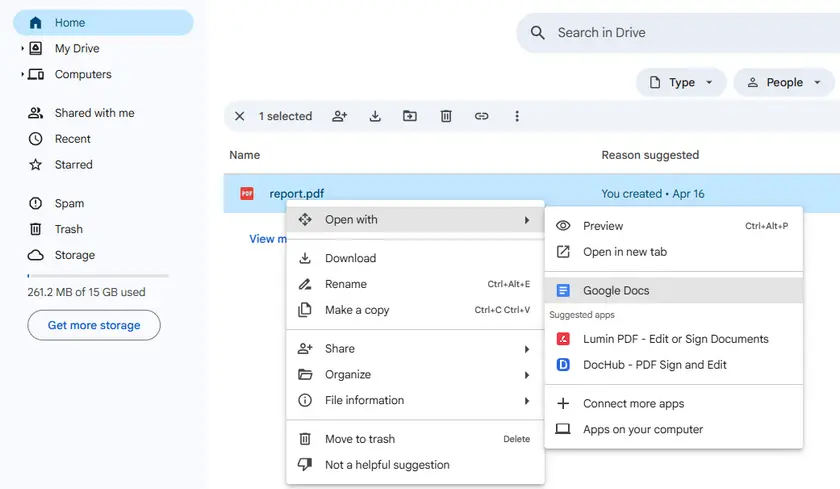
Step-by-Step Instructions
- Upload the PDF to Google Drive.
- Right-click the PDF → Open with → Google Docs.
- Wait for Google Docs to process the file.
- Scroll to find the table. It will appear as a text-based grid (rows and columns separated by spaces or tabs).
- Copy the table area and paste it into Google Sheets or Microsoft Excel.
Pros & Cons
| Pros | Cons |
|---|---|
| Completely free | No true table detection (just text alignment) |
| No software installation | Messy results with complex tables |
| Works on any OS with a browser | Poor handling of merged cells or multi-line cells |
| Handles simple tables reliably | No OCR (scanned PDFs appear as images) |
Method 3: Adobe Acrobat Pro (Export Feature)
Best for: Professionals who already have Acrobat Pro and need reliable exports from digital PDFs.
Adobe Acrobat Pro (not the free Reader) has a built-in export function that converts PDF tables directly to Excel or CSV. It preserves more formatting than free tools.
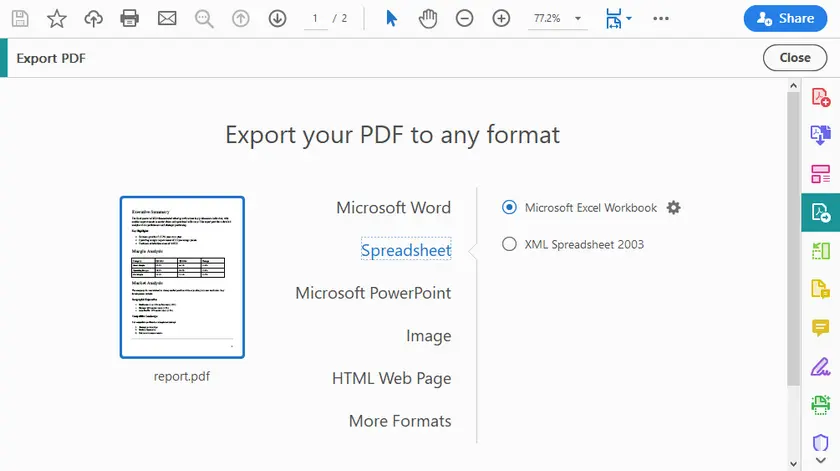
Step-by-Step Instructions
- Open the PDF in Adobe Acrobat Pro.
- Click Export PDF (right-hand toolbar).
- Select Spreadsheet → Microsoft Excel Workbook (or CSV).
- Click Export.
- Choose a location and save.
- Open the generated Excel file and verify the tables.
Additional Tips
- Use the Recognize Text (OCR) option first if dealing with scanned PDFs.
- For multi-page tables, Acrobat often concatenates them intelligently.
- You can export selected pages only to save time.
Pros & Cons
| Pros | Cons |
|---|---|
| High accuracy for digital PDFs | Expensive (subscription required) |
| Handles multi-page tables well | No fine-grained control over extraction |
| Preserves formulas and numbers | Still struggles with highly complex nested tables |
| Batch processing available | Windows/macOS only (no web version) |
Method 4: Python (Full Control & Automation)
Best for: Developers, data scientists, and advanced users who need maximum flexibility, handle scanned PDFs, or process batch files.
Python gives you complete control over the extraction process. You can handle digital PDFs with libraries like pdfplumber, camelot, or Spire.PDF for Python (a commercial library with a free version available). Below is a practical example using Spire.PDF to extract tables and save them as clean text files.
Installation
pip install spire.pdf
Complete Code Example (Extract Tables to TXT Files)
The following code extracts all tables from a specific PDF page and saves each table as a separate text file in CSV-like format:
from spire.pdf.common import *
from spire.pdf import *

# Create a PdfDocument object
doc = PdfDocument()

# Load a PDF file
doc.LoadFromFile("report.pdf")

# Create a PdfTableExtractor object
extractor = PdfTableExtractor(doc)

# Extract tables from a specific page (page index starts from 0)
tableList = extractor.ExtractTable(0)

# Determine if the table list is not empty
if tableList is not None:

    # Loop through the tables on the page
    for i in range(len(tableList)):

        # Create a new list to store data for this table
        builder = []

        # Get a specific table
        table = tableList[i]

        # Get row number and column number
        row = table.GetRowCount()
        column = table.GetColumnCount()

        # Loop through each row and column
        for m in range(row):
            for n in range(column):

                # Get text from the specific cell
                text = table.GetText(m, n)

                # Add the text followed by a comma (CSV-style)
                builder.append(text + ",")
            builder.append("\n")  # End of row
        builder.append("\n")      # Blank line between tables

        # Write the content into a text file
        with open(f"output/Table-{i + 1}.txt", "w", encoding="utf-8") as file:
            file.write("".join(builder))

# Close the document
doc.Close()
Output:
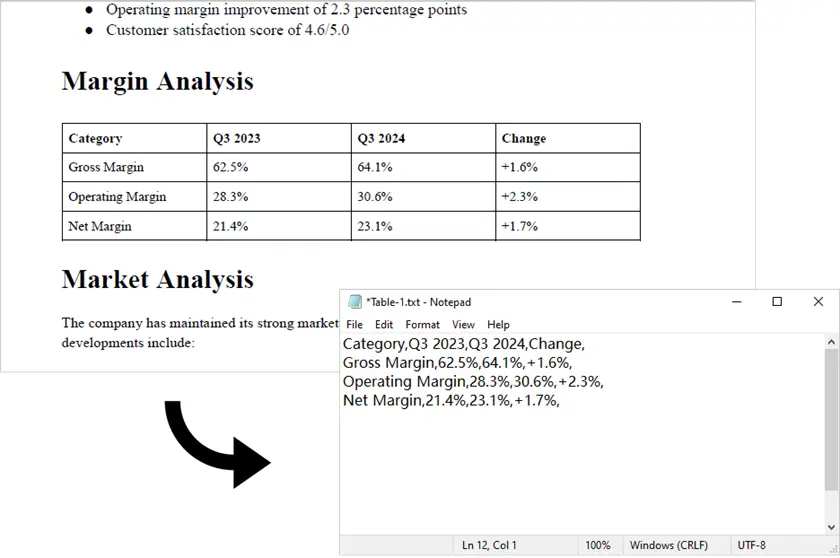
Note: This script works only with digitally generated PDFs (text-based). For scanned PDFs, Spire.PDF alone is not sufficient. In such cases, you can first convert the PDF to images using Spire.PDF, then apply an OCR engine like pytesseract along with additional processing logic to detect and extract table data.
Why Python?
- Handles both digital and scanned PDFs (with OCR integration)
- Batch processing of hundreds of files
- Customizable post-processing (cleaning, merging, validating)
- Can be integrated into web apps, APIs, or ETL pipelines
- You control exactly how tables are formatted and saved
As a comprehensive PDF library, Spire.PDF for Python not only extracts tables from PDFs but also supports extracting images, metadata, and attachments. In addition, it can export entire documents to formats such as Word, Excel, and TXT.
Pros & Cons
| Pros | Cons |
|---|---|
| Full control over extraction logic | Requires programming knowledge |
| Handles complex and multi-page tables | Steeper learning curve |
| Batch processing of thousands of files | Spire.PDF requires a license for commercial use (free for personal) |
| Clean, reproducible results | Table detection isn't perfect on all PDFs |
| Easy to integrate with pandas, Excel, or databases |
Comparison Table: Choosing the Right Method
| Method | Ease of Use | Handles Scanned PDFs | Batch Processing | Cost | Best For |
|---|---|---|---|---|---|
| Excel | Medium | x | x | Requires Office | Quick, one-off digital tables |
| Google Docs | High | x | x | Free | Simple tables, no software |
| Adobe Acrobat Pro | High | √ | x | Paid | Professional, non-technical users |
| Python | Low | √ | √ | Free / Paid | Maximum flexibility, large-scale, scanned PDFs |
Conclusion
Extracting tables from PDFs doesn't have to be a headache. The right method depends entirely on your specific situation:
- For a one-time, simple table → Try Google Docs or an online tool first.
- For professional, polished results → Use Excel or Adobe Acrobat Pro if you have access.
- For maximum control, complex tables, or scanned documents → Python is your best bet.
Start with the simplest method that meets your needs. As your requirements grow (more files, scanned documents, custom cleaning), you can always graduate to more powerful tools like Python. The key is to recognize that table extraction is not a one-size-fits-all problem—and now you have four ways to solve it.
FAQs
Q1. Why is it hard to extract tables from PDFs?
Because PDFs store content as positioned text rather than structured data tables, making extraction less straightforward.
Q2. Which method gives the most accurate results?
Adobe Acrobat Pro generally provides the best accuracy for complex tables.
Q3. Can I extract tables from scanned PDFs?
Yes, but it requires OCR (Optical Character Recognition). Tools like Adobe Acrobat or Spire.PDF (with an OCR component) can convert scanned images into machine-readable text, after which table data can be detected and extracted.
Q4. Is Python better than other methods?
It depends. Python is best for automation and large-scale processing, but overkill for one-time tasks.
Q5. Can I convert extracted tables directly to Excel?
Yes. Most tools (Excel, Acrobat) support direct export to .xlsx, while Python can be extended to do the same.
See Also
Convert SVG to PDF: 4 Easy Methods (Batch & Merge Supported)
Table of Contents
SVG files are widely used in web and design workflows because they are lightweight, scalable, and resolution-independent. However, when it comes to printing, sharing, or archiving documents, PDF is often the preferred format due to its universal compatibility.
In this guide, you’ll learn four practical ways to convert SVG to PDF, including online tools, free desktop software, browser-based conversion, and a powerful Python automation method for single and batch processing.
Method overview:
- Method 1 — Convert SVG to PDF Online (Fast & No Installation)
- Method 2 — Convert SVG to PDF with Inkscape (Free & Open Source)
- Method 3 — Convert SVG to PDF Using Browser Print Feature
- Method 4 — Convert SVG to PDF Using Python (Batch & Merge)
Method 1 — Convert SVG to PDF Online (Fast & No Installation)
Online SVG to PDF converters are the fastest way to handle occasional conversion tasks without installing any software. These tools are especially useful when you’re working across devices or need a quick result on the go. With just a few clicks, you can upload your SVG file and download a ready-to-use PDF.
Best for: Quick one-time conversions
Steps:
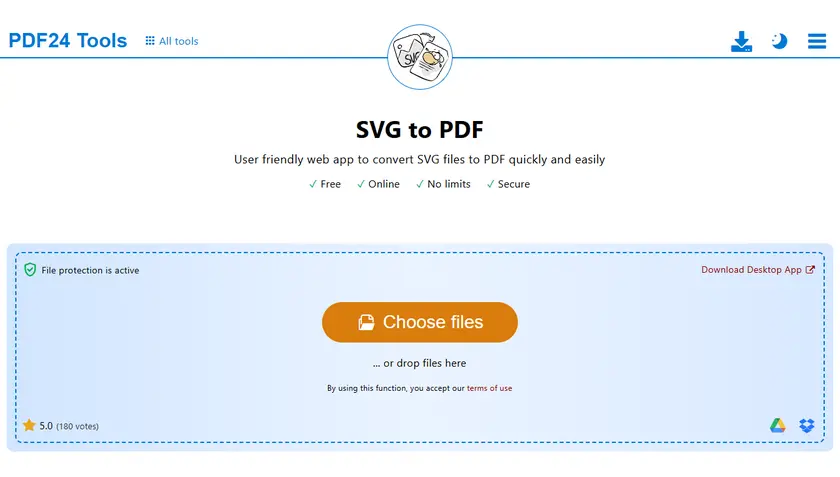
- Upload your SVG file to an online converter (e.g. PDF24).
- Click Convert, then download the result.
Pros:
- No installation required.
- Works on any device.
- Fast and convenient.
Cons:
- File size limitations.
- Not suitable for sensitive files.
- Limited customization options.
Method 2 — Convert SVG to PDF with Inkscape (Free & Open Source)
Inkscape provides a powerful and reliable way to convert SVG files to PDF while preserving vector quality. As a dedicated vector graphics editor, it gives you more control over layout, scaling, and export settings compared to online tools. This makes it a great choice for designers or users who need consistent, high-quality output.
Best for: Designers and offline conversion needs
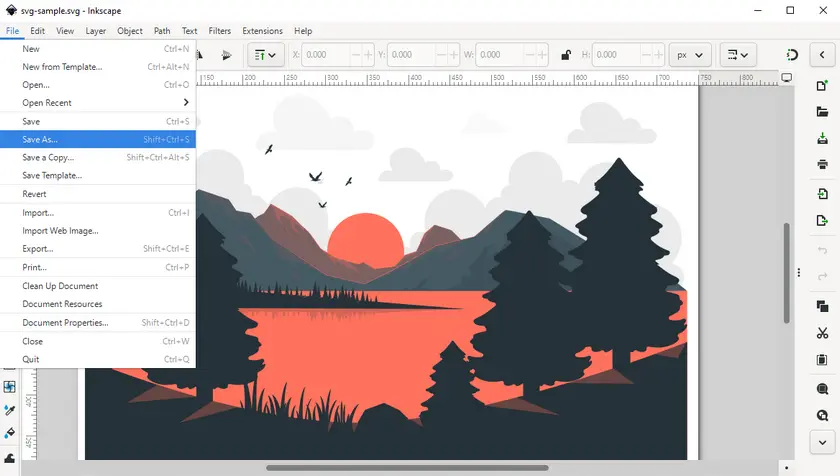
Steps:
- Download Inkscape and install it on your computer.
- Open the SVG file in Inkscape.
- Go to File → Save As.
- Select PDF format.
- Adjust export settings if needed.
- Save the file.
Pros:
- Completely free.
- High-quality vector output.
- Works offline.
Cons:
- Slight learning curve.
- Interface may feel complex for beginners.
Method 3 — Convert SVG to PDF Using Browser Print Feature
Modern web browsers can render SVG files directly, making them a surprisingly effective tool for quick PDF conversion. By using the built-in print feature, you can export SVG content as a PDF without any additional software. While it’s not the most precise method, it’s extremely convenient for simple use cases.
Best for: Instant and lightweight conversion
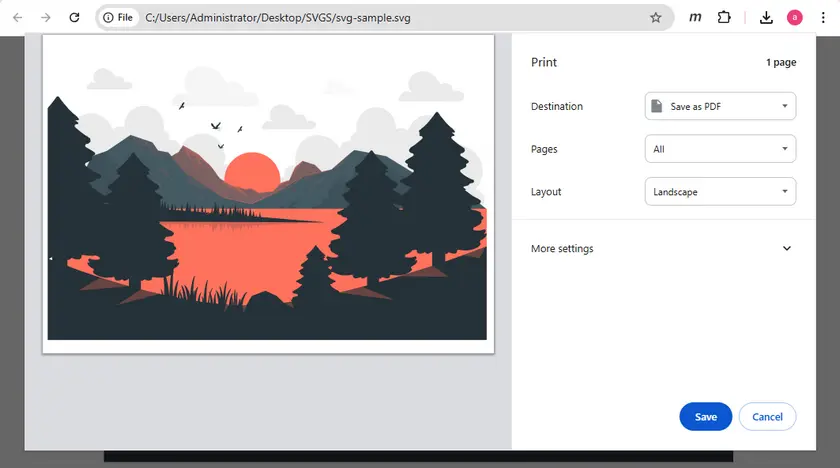
Steps:
- Open the SVG file in your browser.
- Press Ctrl + P (or Cmd + P on Mac).
- Choose Save as PDF.
- Adjust scale or margins if needed.
- Save the file.
Pros:
- Extremely simple.
- No additional tools required.
- Works instantly.
Cons:
- Limited layout control.
- Output may vary across browsers.
Method 4 — Convert SVG to PDF Using Python (Batch & Merge)
For developers or teams handling large volumes of files, Python offers a highly efficient and scalable solution. This approach allows you to automate SVG to PDF conversion and integrate it into backend systems or workflows. It’s especially useful when you need to process multiple files or merge them into a single PDF programmatically.
Best for: Developers, automation, and bulk processing
In this scenario, we’ll use Spire.PDF for Python, a professional library for creating and manipulating PDF documents in Python. Before getting started, install it from PyPI:
pip install spire.pdf
Example 1. Convert a Single SVG to PDF
from spire.pdf.common import *
from spire.pdf import *

document = PdfDocument()
document.LoadFromSvg("svg-sample.svg")
document.SaveToFile("ToPdf.pdf", FileFormat.PDF)
document.Dispose()
How it works:
- LoadFromSvg() loads the SVG file into a PDF document object.
- SaveToFile() exports it as a PDF.
Example 2. Merge Multiple SVG Files into One PDF
import os
from spire.pdf import *
from spire.pdf.common import *

svg_folder = r"C:\Users\Administrator\Desktop\SVGS"

# 1. Get sorted SVG files
svg_files = sorted(f for f in os.listdir(svg_folder) if f.endswith(".svg"))

pdf_streams = []

# 2. Convert SVG → PDF Stream (in memory)
for f in svg_files:
    pdf = PdfDocument()
    pdf.LoadFromSvg(os.path.join(svg_folder, f))

    s = Stream()
    pdf.SaveToStream(s)
    pdf.Close()

    pdf_streams.append(s)

# 3. Merge PDF streams directly
merged = PdfDocument.MergeFiles(pdf_streams)

# 4. Save final PDF
output_path = os.path.join(svg_folder, "MergedSVG.pdf")
merged.Save(output_path, FileFormat.PDF)
merged.Close()
How it works:
- All SVG files are read from the folder and sorted to keep a consistent order.
- Each SVG is loaded into a PdfDocument and converted into a PDF in memory.
- All PDF streams are passed directly into MergeFiles().
- The final merged PDF is saved to disk.
Output:

Why use Python for SVG to PDF conversion?
- Fully automated workflow.
- Supports batch processing.
- Easy integration into backend systems.
- Ideal for report generation pipelines.
In addition to converting SVG files to PDF, you can also explore converting PDF to SVG, which is useful when you need to extract and reuse vector graphics from existing PDF documents. You may also want to try adding text to PDF, which allows you to insert labels, or dynamic content into generated files. These additional features help extend your document workflow beyond simple format conversion.
Compare the Methods
| Method | Ease of Use | Quality | Batch Conversion (Multi → Multi) | Merge (Multi → One PDF) | Best For |
|---|---|---|---|---|---|
| Online Tools | ★★★★★ | ★★★★ | ✔ | ✘ | Quick tasks |
| Inkscape | ★★★ | ★★★★★ | ✘ | ✘ | Designers |
| Browser | ★★★★★ | ★★★ | ✘ | ✘ | Simple exports |
| Python | ★★★ | ★★★★★ | ✔ | ✔ | Automation |
Conclusion
Converting SVG to PDF is simple and can be done in multiple ways depending on your needs. Online tools and browsers are great for quick tasks, while Inkscape offers a free offline solution. For developers and advanced users, Python stands out as the most powerful and scalable approach, especially for batch processing and automation.
SVG to PDF FAQs
1. Will SVG lose quality when converting to PDF?
No. Both SVG and PDF are vector-based formats, so quality is preserved.
2. Can I merge multiple SVG files into one PDF?
Yes. You can use Python or advanced tools to combine multiple SVGs into a single PDF document.
3. Is online conversion safe?
It is generally safe for non-sensitive files, but desktop or local methods are recommended for confidential data.
4. Which method is best overall?
- Quick use → Online tools
- Free offline use → Inkscape
- Simple export → Browser
- Automation → Python
See Also
Sort Data in Excel: 5 Simple and Advanced Methods Explained
Table of Contents
- Before You Start
- Method 1: Sort Data by a Single Column in Excel (Quick & Essential)
- Method 2: Sort Data by Multiple Columns in Excel (Custom Sort)
- Method 3: Sort Data in Excel Using Formulas (SORT & SORTBY)
- Method 4: Sort Filtered Data in Excel (Flexible Exploration)
- Method 5: Sort Excel Data Using Python (Automation & Scalability)
- Comparison Table: Which Method Should You Choose
- Final Thoughts
- FAQs

Sorting data in Excel is an essential skill for organizing, analyzing, and making sense of information. Whether you're working with customer lists, financial reports, or large datasets, sorting helps you quickly identify patterns, trends, and outliers.
In this guide, you'll learn 5 practical ways to sort data in Excel, including single-column sorting, multi-column sorting, dynamic formula-based sorting, and automation using Python.
Quick Navigation
- Method 1: Sort Data by a Single Column in Excel (Quick & Essential)
- Method 2: Sort Data by Multiple Columns in Excel (Custom Sort)
- Method 3: Sort Data in Excel Using Formulas (SORT & SORTBY)
- Method 4: Sort Filtered Data in Excel (Flexible Exploration)
- Method 5: Sort Excel Data Using Python (Automation & Scalability)
Before You Start
Before sorting data in Excel, make sure:
- Your dataset includes a header row
- There are no completely blank rows or columns in the middle
- Each column contains consistent data types (e.g., numbers, dates, text)
These checks help prevent sorting errors and data misalignment.
Method 1: Sort Data by a Single Column in Excel (Quick & Essential)
The built-in Sort tool is the fastest way to sort data by a single column. It’s ideal for simple tasks such as sorting names alphabetically or numbers from smallest to largest.
Step-by-Step Instructions:
- Select the single column you want to sort.
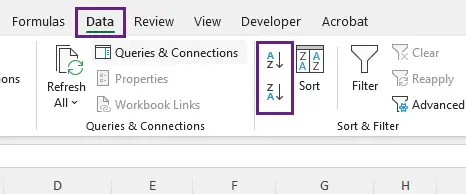
- Go to the Data tab in the Excel ribbon.
- Click either Sort A to Z (ascending order: A→Z, 1→100) or Sort Z to A (descending order: Z→A, 100→1).
- A pop-up window will appear: Expand the selection . Keep this option checked.
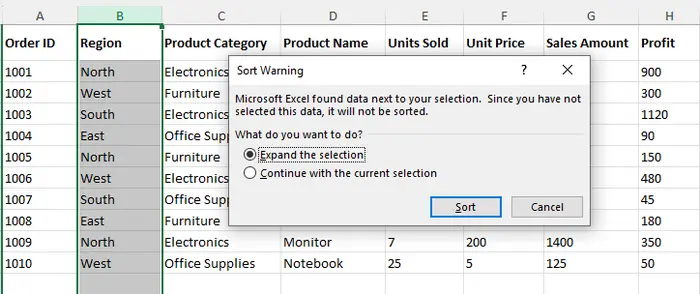
- Click Sort to complete the process.
Pro Tip:
- The Expand the selection option ensures all related data in adjacent columns sorts alongside the selected column. In most cases, you should keep this option checked to avoid breaking data relationships.
- If your data has a header row (e.g., “Name”, “Email”), check the My data has headers box in the pop-up window. This prevents Excel from sorting the header itself (e.g., “Name” won’t end up at the bottom of the column).
Method 2: Sort Data by Multiple Columns in Excel (Custom Sort)
For more complex datasets, sorting by a single column isn’t enough. For example, you might want to sort sales data first by “Region” (ascending) and then by “Sales Amount” (descending) to see top performers in each region. This is where Custom Sort comes in.
Step-by-Step Instructions:
- Select any cell within your dataset (this ensures Excel recognizes the entire table).
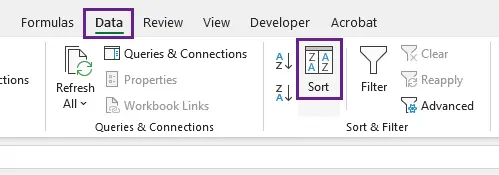
- Go to the Data tab and click Sort (not the A→Z/Z→A buttons).
- In the Custom Sort window:
- Choose the first column (e.g., “Region”) and set order to A to Z.
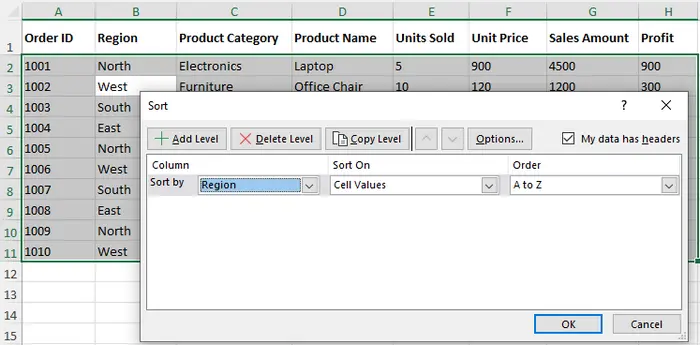
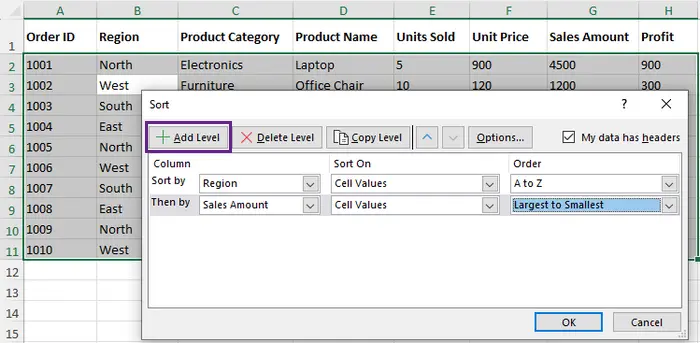
- Click Add Level to add another column (e.g., “Sales Amount”) and set order to Largest to Smallest.
- Choose the first column (e.g., “Region”) and set order to A to Z.
- Click OK to apply the sort. Your data will now be organized by the "Region" column, with ties broken by the "Sales Amount" column.
Key Insight:
Excel applies sorting hierarchically —it sorts by the first column, then resolves ties using the next column.
Use Case:
- Sales reports (Region → Revenue)
- Employee lists (Department → Role)
- Inventory (Category → Stock level)
Method 3: Sort Data in Excel Using Formulas (SORT & SORTBY)
If your data updates frequently, manual sorting becomes inefficient. Excel formulas like SORT and SORTBY allow you to create dynamic, auto-updating sorted lists.
Unlike traditional sorting, these functions do not modify the original data . Instead, they generate a dynamically sorted copy that updates automatically.
Using the SORT Function (Simplest for Modern Excel)
The SORT function sorts a range of data and returns a new sorted array. Syntax: =SORT(range, [sort_column], [sort_order], [by_col])
- In an empty cell (e.g., J1), enter the formula: =SORT(A1:H11, 1, -1, FALSE)
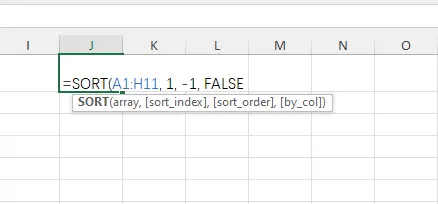
- A1:H11: The entire dataset you want to sort.
- 1: The column to sort by.
- -1: Sort order (1 = ascending, -1 = descending).
- FALSE: Sort by rows (default; use TRUE to sort by columns).
- Press Enter. Excel will generate a dynamic sorted list in the range starting at J1. If you update the original data (e.g., change a sales amount), the sorted list will update automatically.
Using the SORTBY Function (More Flexible)
=SORTBY(A1:H11, G1:G11, -1)
The SORTBY function sorts a dataset based on values in one or more separate ranges. Unlike the SORT function, which relies on column positions, SORTBY lets you define exactly which range controls the sorting order.
How It Works:
- A1:H11 → The dataset to return (the full table)
- G1:G11 → The range used as the sorting key (e.g., “Sales Amount”)
- -1 → Sort order (1 = ascending, -1 = descending)
Example Use Case:
Sort a sales table by revenue without changing the original dataset.
Method 4: Sort Filtered Data in Excel (Flexible Exploration)
Filters allow you to quickly explore and sort specific subsets of your data without permanently changing the original dataset. This is especially useful when working with large datasets, such as analyzing sales from a specific region or time period.
Step-by-Step Instructions:
- Select your dataset, including the header row.
- Go to the Data tab and click Filter (or use the shortcut: Ctrl+Shift+L). Small drop-down arrows will appear in each header cell.
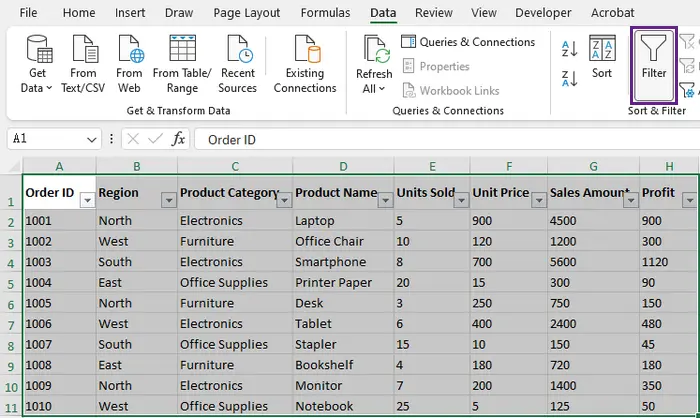
- Click the drop-down arrow in the column you want to sort (e.g., “Region”), uncheck the regions you don’t need (e.g., “East”, “North”, “South”), and then click OK.
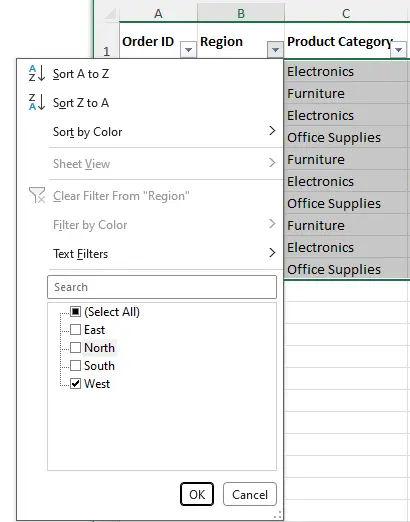
- Click the drop-down arrow in the Sales Amount column, and choose Sort Smallest to Largest (ascending), or Sort Largest to Smallest (descending). This will sort only the filtered (visible) rows.
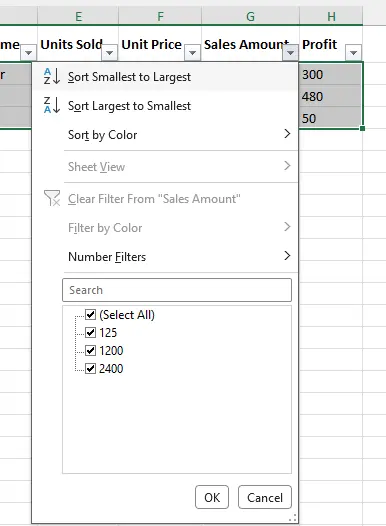
- To remove the filter and return to the original dataset, click Filter again (or Ctrl+Shift+L).
Key Advantage:
Filters let you combine sorting with data filtering, making it easy to explore specific subsets (e.g., sort high-value sales in the specific Region only) without altering the original data structure.
Method 5: Sort Excel Data Using Python (Automation & Scalability)
For large datasets (10,000+ rows) or repetitive sorting tasks (e.g., sorting daily Excel reports), Python automation is a game-changer. We’ll use Spire.XLS for Python —a powerful library that simplifies Excel file manipulation, including sorting, without requiring Excel to be installed on your machine.
Prerequisites:
- Install Spire.XLS for Python: Run pip install Spire.XLS in your terminal/command prompt.
- Prepare your input Excel file (e.g., “Input.xlsx”) with the data you want to sort.
Step-by-Step Python Code (with Explanations):
from spire.xls.common import *
from spire.xls import *

# Create a Workbook instance
workbook = Workbook()

# Load the input Excel file
workbook.LoadFromFile("Input.xlsx")

# Get the first worksheet
worksheet = workbook.Worksheets[0]

# Define the sorting rule: Sort Column B (index 1) by values in ascending order
workbook.DataSorter.SortColumns.Add(1, SortComparsionType.Values, OrderBy.Ascending)

# Specify the cell range to sort
workbook.DataSorter.Sort(worksheet["A1:H11"])

# Save the sorted data to a new Excel file
workbook.SaveToFile("SortByColumns.xlsx", ExcelVersion.Version2016)
workbook.Dispose()
How to Customize the Code:
- Sort a different column: Change the first parameter in Add() (e.g., 0 for Column A, 1 for Column B).
- Descending sort: Replace OrderBy.Ascending with OrderBy.Descending.
- Sort a larger range: Modify worksheet["A1:H11"] (e.g., worksheet["A1:G1000"] for 1000 rows, 7 columns).
- Multiple columns: Add a second sorting rule with workbook.DataSorter.SortColumns.Add() (e.g., sort Column A ascending, then Column B descending).
Use Case:
This method is perfect for automating repetitive tasks—e.g., sorting 50+ Excel files daily, or sorting datasets too large for Excel to handle smoothly.
In addition to sorting data, you can also use Python to automate other Excel tasks such as formatting worksheets, applying styles, and exporting Excel files to PDF. These capabilities make it easy to build complete document processing workflows.
Comparison Table: Which Method Should You Choose
| Method | Best For | Pros | Cons |
|---|---|---|---|
| Built-in Sort | Quick, single-column sorting | Easy to use, no setup required | Limited to basic sorting; manual |
| Custom Sort | Multi-column, hierarchical sorting | Flexible, handles complex datasets | Requires a few extra steps |
| Excel Formulas | Dynamic, auto-updating sorted lists | No manual re-sorting; updates with data | SORT function only available in modern Excel |
| Filters | Temporary sorting/exploring subsets | Non-destructive; combines with filtering | Not ideal for permanent sorting |
| Python (Spire.XLS) | Large datasets, automation | Scalable, repetitive tasks, no Excel required | Requires basic Python knowledge |
Final Thoughts
Sorting in Excel is more than just arranging data—it’s about making information usable and meaningful.
- Use built-in sorting for quick tasks
- Use custom sort for structured analysis
- Use formulas for dynamic results
- Use filters for flexible exploration
- Use Python for automation at scale
Mastering these methods will allow you to handle everything from simple spreadsheets to complex data workflows with ease.
FAQs
Q1: Why is my Excel data misaligned after sorting?
This usually happens when Expand the selection is not selected. Always ensure related columns are included when sorting.
Q2: Can I sort by cell color or font color?
Yes. In the Sort dialog, choose Cell Color or Font Color under “Sort On”.
Q3: Can I sort data with blank cells?
Yes. Excel places blanks at the bottom (ascending) or top (descending). You can filter them out if needed.
Q4: How do I undo a sort?
Press Ctrl + Z immediately after sorting. If you've made other changes, undo may not be available.
Q5: Why is Excel sort not working?
Common causes include:
- Mixed data types
- Hidden rows or columns
- Incorrect selection range
See Also
Add Page Borders in Word (Any Page): 4 Simple Ways
Adding page borders in Microsoft Word is a simple way to enhance document appearance, whether you're creating reports, certificates, or styled documents. However, Word’s built-in border options are mainly designed for entire documents or sections, which can limit flexibility in certain layout scenarios.
In this guide, you’ll learn 4 simple and practical methods to add page borders in Word—covering the entire document, specific sections, and even any single page using reliable workarounds.
Quick Navigation:
- Method 1: Using Page Borders Feature in Word
- Method 2: Using a Shape as a Border
- Method 3: Using a Text Box as a Border
- Method 4: Using Python Add Borders Automatically
Method 1: Using Page Borders Feature in Word
The built-in Page Borders feature is the most straightforward way to add borders in Word. It works best when you want to apply borders to the entire document or a section. However, it comes with limitations when targeting a specific page.
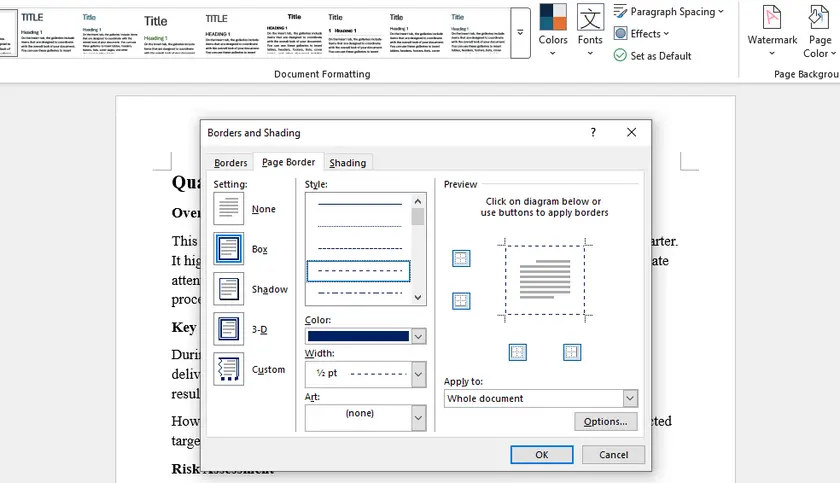
How to Add Borders to the Whole Document or a Section
- Open your Word document.
- Go to Design → Page Borders .
- In the Borders and Shading dialog:
- Choose a border style (Box, Shadow, 3-D, Custom).
- Set color and width.
- Under Apply to , select:
- Whole document, or
- This section
- Click OK .
Understanding the Limitation
Word’s Page Borders feature only provides these options:
- Whole document
- This section
- This section – First page only
- This section – All except first page
There is no direct “This page only” option.
Workaround: Apply Border to a Specific Page
To add a border to a single page using this method:
- Place your cursor at the start of the target page.
- Go to Layout → Breaks → Next Page (insert a section break).
- Place the cursor at the end of that page and insert another Next Page section break.
- Now go to Design → Page Borders .
- Select Apply to: This section – First page only .
- Click OK .
This works because the page becomes the first page of a new section.
Method 2: Using a Shape as a Border
If you need to add a border to any specific page without dealing with sections, using a shape is one of the easiest and most flexible methods. It allows full control over appearance and works independently of Word’s border limitations.
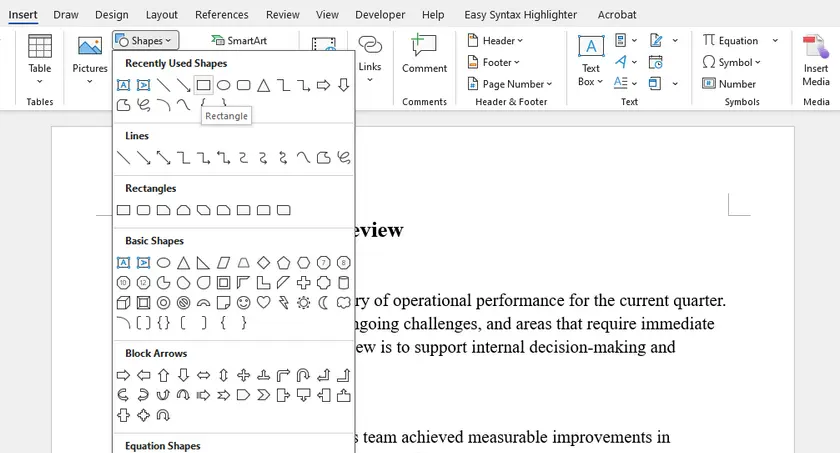
Steps
- Go to Insert → Shapes → Rectangle .
- Draw the rectangle to fit within the page margins.
- Right-click the shape → Format Shape :
- Set Fill → No Fill
- Customize Line (color, width, style)
- Set the shape layout to Behind Text .
Why Use This Method?
- Works on any page
- No need for section breaks
- Highly customizable
Method 3: Using a Text Box as a Border
If you want to add a border to any specific page with extra flexibility—such as including decorative text or designs—a Text Box is a great choice. It works independently of Word’s border limitations and does not require creating sections.
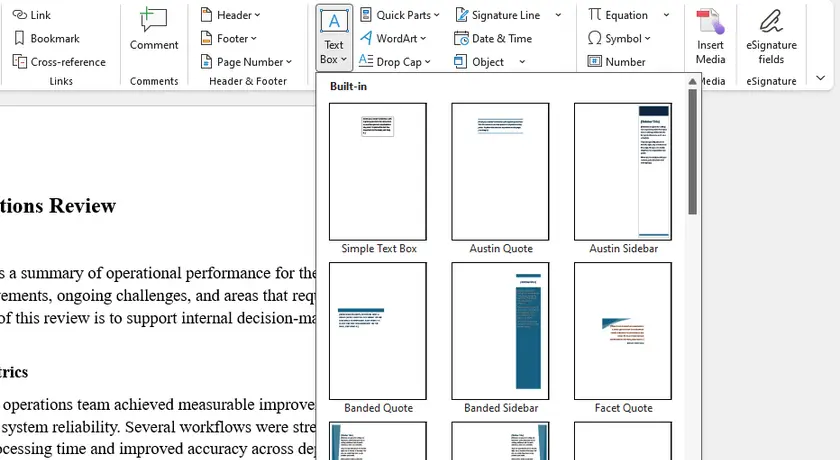
Steps
- Go to Insert → Text Box → Draw Text Box .
- Set the Text Box Layout to Behind Text to prevent moving existing content.
- Delete the placeholder text inside the Text Box.
- Adjust the Text Box position and size so it covers the page edges as desired.
- Right-click → Format Shape :
- Set Fill to No Fill
- Customize Line (color, width, style)
Why Use This Method?
- Works on any page, no section breaks needed
- Does not disturb existing content when layout is set first
- Can include decorative text or designs inside the border
- Stable and flexible for single-page borders
Tip: If you only need a simple border without text, a Shape works just as well and is slightly lighter.
Method 4: Using Python to Add Borders Automatically
If you need to apply page borders to multiple Word documents or automate the process, using Python is the most efficient solution. Libraries like Spire.Doc for Python allow you to programmatically add and customize page borders with precision.
Install Required Library
pip install spire.doc
Code Example: Add Borders to Word in Python
from spire.doc import *
from spire.doc.common import *

# Load document
doc = Document()
doc.LoadFromFile(r"C:\Users\Administrator\Desktop\Input-en.docx")

# Apply borders to all sections
for i in range(len(doc.Sections)):
    section = doc.Sections[i]
    setup = section.PageSetup
    borders = setup.Borders

    setup.PageBordersApplyType = PageBordersApplyType.AllPages
    borders.BorderType(BorderStyle.DotDotDash)
    borders.LineWidth(1)
    borders.Color(Color.get_Blue())

    # Set spacing for all sides
    for side in [borders.Top, borders.Bottom, borders.Left, borders.Right]:
        side.Space = 20.0

# Save result
doc.SaveToFile("AddWordPageBorders.docx", FileFormat.Docx)
doc.Dispose()
Output:

Why Use This Method?
- Ideal for batch processing
- Ensures consistent formatting
- Perfect for automation workflows
This approach is especially useful for generating documents like reports, invoices, or certificates at scale.
In addition to adding borders, you can also use Spire.Doc to adjust page margins for precise layout control; you can apply background colors or watermarks to Word pages, enhancing the visual design of your documents.
Quick Comparison Table
| Method | Best For | Can Target Any Page | Difficulty |
|---|---|---|---|
| Page Borders | Whole document / sections | ✗ (needs workaround) | Easy |
| Section Break + Page Borders | Specific page | √ | Medium |
| Shape | Single page or multiple pages | √ | Easy |
| Text Box | Single page with optional text/decor | √ | Easy |
| Python (Spire.Doc) | Automation / batch processing | √ | Advanced |
Conclusion
Adding page borders in Word depends on your specific needs and the level of control you want over your document:
- Page Borders are ideal for adding borders to the entire document or specific sections quickly and consistently.
- Section breaks are useful if you want to leverage Word’s built-in border feature for a single page while maintaining proper layout.
- Shapes or Text Boxes provide a fast, flexible way to add borders on any page without affecting existing content; Text Boxes are especially handy if you want to include decorative text or designs.
- Python automation is perfect for batch processing multiple documents, ensuring consistent borders across all files.
By choosing the right method, you can overcome Word’s limitations, save time, and create professional-looking documents that match your design vision.
FAQs
Why can’t I add a border to just one page in Word?
Because Word’s border feature is section-based, not page-based. There’s no built-in “this page only” option.
What’s the easiest way to add a border to a single page?
Using a shape (rectangle) is the quickest and simplest method.
Which method is best for professional documents?
For consistency, use Page Borders with sections or Python automation.
Do text boxes affect document layout?
Text Box will not disturb existing content if its layout is set to Behind Text.
See Also
Convert XPS to PDF: Built-in, Online & Scripted Methods
Table of Contents
Need to convert an XPS file to PDF? You’re not alone. From businesses archiving documents to individuals sharing reports, converting XPS to PDF ensures your files are accessible, compatible, and professional-looking.
In this article, we’ll walk you through four reliable ways to convert XPS to PDF, including built-in tools, online converters, command-line options, and Python-based batch processing, so you can pick the method that best fits your needs.
Quick Navigation:
- Method 1 - Using XPS Viewer + Microsoft Print to PDF
- Method 2 - Using Online Converters
- Method 3 - Using Command-Line Tools
- Method 4 - Using Python Libraries (Batch Processing)
XPS vs PDF: What’s the Difference?
PDF is Adobe’s long-standing, cross-platform standard. It’s feature-rich—supporting forms, annotations, encryption, digital signatures, and advanced print and archival profiles—and is backed by a vast ecosystem of viewers, editors, and professional tools. PDF ensures reliable rendering, accessibility, and robust security across devices and industries.
XPS is Microsoft’s XML-based, ZIP-packaged fixed-layout format, mainly used in certain Windows printing workflows. Its feature set and third-party support are limited compared with PDF, resulting in weaker interoperability and fewer tools. Because PDF offers superior compatibility, features, and industry adoption, converting XPS to PDF is often necessary.
Method 1 - Using XPS Viewer + Microsoft Print to PDF
For Windows users, the simplest way to convert an XPS file is through the built-in XPS Viewer and Microsoft Print to PDF. This method requires no extra software and is ideal for one-off conversions or occasional use. By leveraging the system’s print-to-PDF functionality, you can quickly generate a PDF without compromising basic layout.
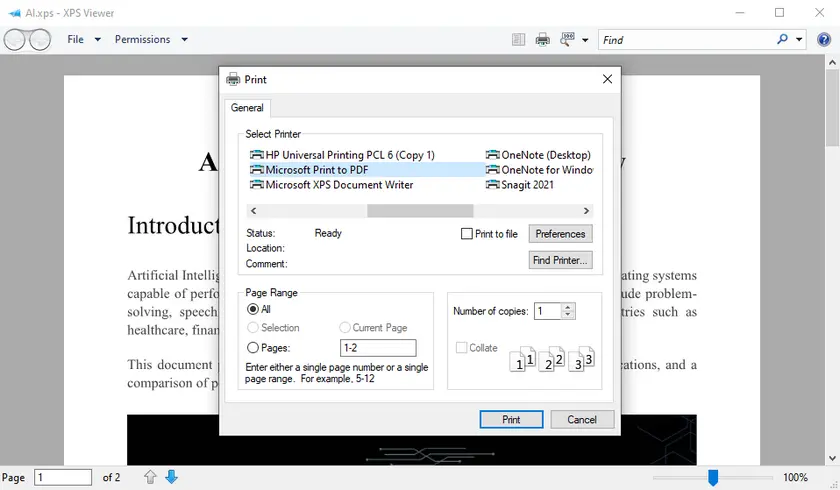
Steps:
- Open your XPS file using XPS Viewer.
- Click Print in the toolbar.
- Select Microsoft Print to PDF as the printer.
- Choose the output location and save your PDF.
Pros:
- Free and requires no installation.
- Simple interface for casual users.
Cons:
- Cannot process multiple files at once.
- Complex formatting may shift slightly.
Method 2 - Using Online Converters
Online converters offer a convenient way to convert XPS to PDF without installing software. They are particularly useful if you need a quick conversion or are using a non-Windows platform. Most online tools are as simple as uploading your file, selecting PDF as the output format, and downloading the result.
Steps:
- Visit a reputable online converter, such as CloudConvert.
- Upload your XPS file.
- Choose PDF as the target format.
- Click Convert and download the resulting PDF.
Pros:
- Works on any platform (Windows, Mac, mobile).
- No software installation needed.
- Quick drag-and-drop interface.
Cons:
- File size limits may apply.
- Internet connection required.
- Potential privacy concerns for sensitive files.
Method 3 - Using Command-Line Tools (MuPDF)
For advanced users or automation workflows, command-line tools offer flexible conversion options. MuPDF provides a lightweight command-line utility ( mutool ) that can convert XPS files to PDF, either individually or in batch scripts. This method is ideal for developers or IT administrators who need consistent results across multiple files.
Steps:
-
Download MuPDF.
- Go to the official MuPDF website: https://mupdf.com/downloads/
- Download the MuPDF tools package for your operating system (Windows, macOS, or Linux)
- Extract the package to a folder, e.g., C:\MuPDF
-
Open a Command Prompt / Terminal.
- Windows: Press Win + R, type cmd, press Enter
- macOS/Linux: Open Terminal
-
Navigate to your XPS file folder.
Use the cd command to change the directory to where your XPS file is located. Example:
cd C:\Users\Administrator\Desktop\XPSFiles -
Run the conversion command.
Use mutool convert with the -o option to specify the output PDF:
C:\MuPDF\mutool.exe convert -o output.pdf input.xpsExplanation:
- convert → tells MuPDF to convert file formats
- -o output.pdf → specifies the PDF output file name
- input.xps → your XPS file
On Linux/macOS, it might look like:
./mutool convert -o output.pdf input.xps -
Check the output PDF in your target folder.
Pros:
- Automatable and scriptable for bulk processing.
- Cross-platform (Windows, Mac, Linux).
Cons:
- Requires technical knowledge.
- Setup and syntax may be complex for beginners.
Method 4 - Using Python Libraries (Batch Processing with Spire.PDF)
For developers or businesses needing batch processing, Python libraries provide an efficient solution. Using Spire.PDF for Python , you can convert multiple XPS files into PDFs programmatically while preserving high-quality images and layout integrity. This approach is ideal for automating large workflows or integrating into backend systems.
Steps:
- Install the required library.
- Use the following script to convert a single XPS to a PDF file.
pip install spire.pdffrom spire.pdf.common import *
from spire.pdf import *
# Load an XPS file
doc = PdfDocument()
doc.LoadFromFile("Input.xps", FileFormat.XPS)
# Preserve images' quality
doc.ConvertOptions.SetXpsToPdfOptions(True)
# Save to PDF
doc.SaveToFile("XpsToPdf.pdf", FileFormat.PDF)
doc.Dispose()
Output:

Batch Processing Example:
import os
from spire.pdf.common import *
from spire.pdf import *

folder = r"C:\path\to\your\folder"

for name in os.listdir(folder):
    if not name.lower().endswith(".xps"):
        continue
    in_path = os.path.join(folder, name)
    out_path = os.path.join(folder, os.path.splitext(name)[0] + ".pdf")

    doc = PdfDocument()
    doc.LoadFromFile(in_path, FileFormat.XPS)
    doc.ConvertOptions.SetXpsToPdfOptions(True)
    doc.SaveToFile(out_path, FileFormat.PDF)
    doc.Dispose()
Pros:
- Full control over batch conversion.
- High fidelity preservation of layout and images.
- Easily integrates into automated workflows.
Cons:
- Requires coding knowledge.
- Library installation needed.
In addition to converting XPS to PDF, Spire.PDF for Python also lets you programmatically apply watermarks, add annotations, and encrypt PDF documents. You can explore these features to enhance or secure your PDF files directly from your code, making it a versatile solution for many PDF automation tasks.
Comparison – Which Method Should You Choose?
| Method | Ease of Use | Batch Support | Platform | Pros | Cons |
|---|---|---|---|---|---|
| XPS Viewer | ★★★★ | ✗ | Windows | Free, simple | Single file, formatting issues |
| Online Converters | ★★★★ | ✗ | Any | No installation, fast | Privacy, file size limits |
| MuPDF | ★★ | ✓ | Windows / Mac / Linux | Automatable | Technical setup required |
| Python / Spire.PDF | ★★ | ✓ | Cross-platform | Batch processing, high fidelity | Requires coding knowledge |
Conclusion
Choosing the right method depends on your needs: casual users may prefer XPS Viewer or online converters, while developers and businesses handling multiple files will benefit from MuPDF or Python/Spire.PDF for batch processing. For high-quality, automated, and scalable conversion, Spire.PDF is a robust solution that ensures your PDF output maintains the integrity of the original XPS files.
FAQs
Q1: Can I convert multiple XPS files at once?
Yes, batch conversion is possible using command-line tools like MuPDF or Python libraries such as Spire.PDF.
Q2: Are online converters safe for confidential documents?
It depends on the platform. For sensitive files, it’s recommended to use offline tools like XPS Viewer or Spire.PDF.
Q3: Can Python convert XPS to PDF on Mac/Linux?
Yes, Spire.PDF for Python supports cross-platform conversion, and the command-line tool provided by MuPDF is also compatible with Mac and Linux.
Q4: Will the PDF retain the original layout and images?
Most methods preserve the layout, but batch and programmatic solutions like Spire.PDF provide the highest fidelity, especially for complex XPS files.
See Also
Convert Word to XPS: 4 Easy Methods (Free & Automated)
Table of Contents
Converting Word documents to XPS format is a useful way to preserve layout, ensure consistent viewing, and prepare files for sharing or printing. Whether you're working with reports, contracts, or technical documents, XPS provides a fixed-layout format similar to PDF but natively supported in Windows environments.
In this guide, you’ll learn four easy methods to convert Word to XPS, including manual approaches, online tools, and automated solutions for batch processing.
Quick Navigation:
- Method 1 - Using Microsoft Word
- Method 2 - Using Windows Print to XPS
- Method 3 - Using Online Converters
- Method 4 - Using Python (Batch Processing)
Why Convert Word to XPS?
XPS (XML Paper Specification) is designed to maintain document fidelity across different systems and devices. It locks in formatting, fonts, and layout, making it ideal for final versions of documents that should not be edited.
Additionally, XPS files integrate well with Windows systems and can be viewed without needing third-party software. For developers and businesses, XPS is also useful in workflows that require consistent document rendering.
Method 1 – Using Microsoft Word
Microsoft Word includes a built-in feature that allows you to save documents directly as XPS files. Since the conversion is handled internally by Word, this method offers both simplicity and high fidelity.
Best for: Quick, one-off conversions where accuracy is important.
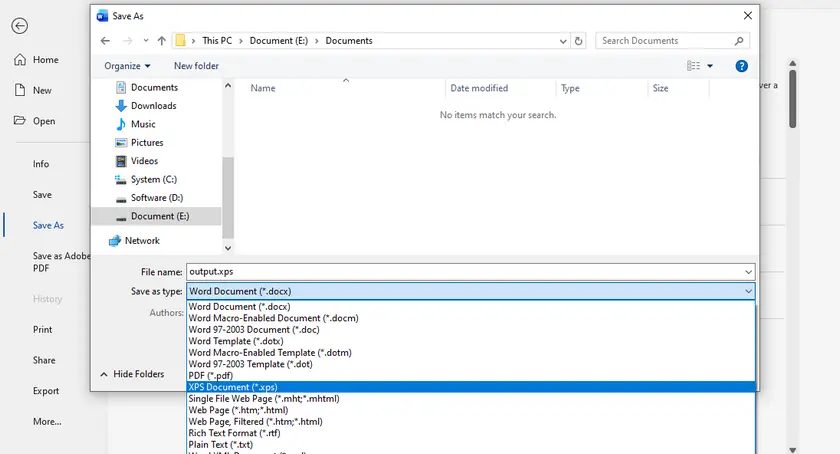
Steps to Convert Word to XPS Using MS Word
- Open your Word document in Microsoft Word.
- Click File → Save As .
- Choose the location where you want to save the file.
- Select XPS Document (*.xps) from the file type dropdown.
- Click Save .
Pros
- High-quality output with accurate formatting.
- Simple and beginner-friendly.
Cons
- Requires Microsoft Word installation.
- No support for batch processing.
Method 2 – Using Windows Print to XPS
Windows includes a virtual printer called Microsoft XPS Document Writer that allows you to convert any printable document to XPS format. This method works with virtually any application that supports printing—not just Word.
Best for: When you prefer not to rely on application-specific export features.
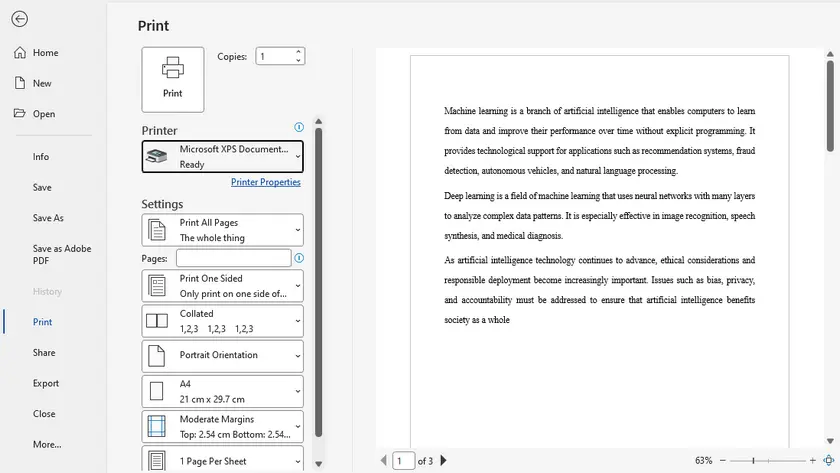
Steps to Convert Word to XPS Using XPS Document Writer
- Open the Word document.
- Go to File → Print .
- Select Microsoft XPS Document Writer as the printer.
- Click Print .
- Choose a file name and save location.
Pros
- Built into Windows (no installation needed).
- Works with multiple applications.
- Reliable for preserving layout.
Cons
- Manual process, not suitable for bulk conversion.
- Slightly slower than direct export.
Method 3 – Using Online Converters
Online converters offer a convenient way to convert Word files to XPS without installing any software. These tools typically support drag-and-drop uploads and quick downloads, making them accessible on any device.
Best for: Occasional use or when working on systems where you cannot install software.

Steps to Convert Word to XPS Online
- Open an online converter website (e.g., cloudxdocs).
- Upload your Word document.
- The conversion automatically starts as soon as uploading is finished.
- Download the converted file.
Pros
- No installation required.
- Accessible from any device.
- Quick and easy for occasional use.
Cons
- File size limits on free plans.
- Potential privacy/security concerns.
- Requires internet connection.
Method 4 – Using Python (Batch Processing)
For developers or users handling multiple files, automation is the most efficient solution. Using libraries like Spire.Doc for Python, you can programmatically convert Word documents to XPS in bulk with minimal effort.
This approach is ideal for backend systems, document workflows, or large-scale processing tasks where manual conversion would be too time-consuming.

Steps to Batch Convert Word to XPS in Python
- Create a Python program.
- Install the Spire.Doc library for Python.
- Run the following script to perform the conversion.
import os
from spire.doc import *
from spire.doc.common import *

# Input and output folders
input_folder = "input_docs"
output_folder = "output_xps"

# Create output folder if it doesn't exist
if not os.path.exists(output_folder):
    os.makedirs(output_folder)

# Loop through all files in the input folder
for file_name in os.listdir(input_folder):
    if file_name.endswith((".doc", ".docx")):
        input_path = os.path.join(input_folder, file_name)
        output_name = os.path.splitext(file_name)[0] + ".xps"
        output_path = os.path.join(output_folder, output_name)

        # Create a Document object
        doc = Document()

        # Load the Word document
        doc.LoadFromFile(input_path)

        # Save as XPS
        doc.SaveToFile(output_path, FileFormat.XPS)

        # Dispose the document
        doc.Dispose()

        print(f"Converted: {file_name} → {output_name}")

print("Batch conversion completed.")
Pros
- Supports batch conversion (high efficiency).
- Fully automated workflow.
- Easy to integrate into systems or pipelines.
Cons
- Requires programming knowledge.
- Needs environment setup and dependencies.
- Initial setup takes more time than manual methods.
In addition to XPS conversion, Spire.Doc allows you to convert Word to PDF, or export Word as images, giving you full control over how your documents are shared and displayed.
Comparison Table – Which Method Should You Choose?
| Method | Best For | Ease of Use | Batch Support | Requires Installation | Cost |
|---|---|---|---|---|---|
| Microsoft Word | Quick, high-quality conversion | ★★★★★ | x | √ | Paid (Office license) |
| Print to XPS | Flexible, works with any app | ★★★★★ | x | x (built-in) | Free |
| Online Tools | Convenience, no setup | ★★★★★ | x | x | Free (limited) / Paid |
| Python (Spire.Doc) | Automation, bulk processing | ★★★☆☆ | √ | √ | Free (limited) / Paid |
Best Practices for High-Quality XPS Output
Before converting, make sure your Word document is finalized, including fonts, images, and layout. Since XPS preserves formatting exactly, any issues in the original file will carry over to the output.
It’s also a good idea to embed fonts and avoid unsupported elements to ensure compatibility across different systems. For batch processing, test a few files first to confirm consistent results.
Conclusion
Converting Word to XPS can be done using a variety of methods depending on your needs. For quick and reliable results, built-in options like Microsoft Word or Windows Print to XPS work well. If you need flexibility or portability, online tools are a solid choice.
For advanced users and developers, Python automation with libraries like Spire.Doc provides a powerful way to handle large volumes of documents efficiently.
FAQs
Q1: Is XPS better than PDF?
XPS and PDF are similar in that both preserve document layout. PDF is more widely supported, while XPS is more tightly integrated with Windows systems.
Q2: Can I convert XPS back to Word?
Yes, but it usually requires third-party tools or intermediate conversion (e.g., XPS → PDF → Word), and formatting may not be perfectly preserved.
Q3: Does converting to XPS reduce file quality?
No, XPS maintains the original layout and quality. However, compression settings and embedded resources can affect file size.
Q4: Which method is best for bulk conversion?
The Python method using Spire.Doc is the best choice for batch processing and automation.
Q5: How to open an XPS file?
You can open an XPS file using the built-in XPS Viewer on Windows. Simply double-click the file, or right-click and choose Open with → XPS Viewer .