Convertir Word a TIFF (con Adobe, herramientas online y Python)
Tabla de contenidos
Instalar con Pypi
pip install Spire.Doc
pip install pillow
Enlaces relacionados
Convertir Word a TIFF puede parecer una tarea de nicho, pero es sorprendentemente esencial para muchos profesionales. TIFF (Tagged Image File Format) es apreciado por su alta calidad, compresión sin pérdidas y compatibilidad con el diseño gráfico, la impresión y las industrias legales. Ya sea que necesite preservar el formato de un contrato, compartir un documento con imágenes de alta resolución o cumplir con requisitos de envío específicos, saber cómo convertir Word a TIFF correctamente es clave.
Esta guía explora tres métodos eficientes para convertir Word DOC/DOCX a TIFF, utilizando Adobe Acrobat, herramientas en línea y automatización con Python.
- ¿Qué es TIFF? Características clave
- Herramientas fiables para la conversión de Word a TIFF
- Cómo convertir Word a TIFF: 3 métodos sencillos
- Consideraciones finales
¿Qué es TIFF? Características clave
TIFF no es un formato de imagen promedio como JPEG o PNG. Es un formato de mapa de bits robusto, flexible y sin pérdidas, diseñado para una alta calidad, preservación de detalles y versatilidad. Sus características clave incluyen:
- Compresión sin pérdidas: A diferencia de JPEG, TIFF (especialmente con compresión LZW o ZIP) conserva todos los datos originales de la imagen sin degradar la calidad, lo cual es crucial para el archivo o la reproducción.
- Alta fidelidad: Preserva perfectamente detalles intrincados como texto, arte lineal, diagramas e imágenes escaneadas.
- Soporte de múltiples páginas: Un solo archivo TIFF puede contener varias páginas (como un documento escaneado), lo que lo hace ideal para documentos de Word de varias páginas.
- Rico en metadatos: Admite la inserción de metadatos extensos (como autor, derechos de autor, palabras clave).
- Profundidad de color: Maneja varios modos de color (1 bit B/N, escala de grises, RGB, CMYK) esenciales para la impresión y el archivo profesionales.
Herramientas fiables para la conversión de Word a TIFF
La elección de la herramienta adecuada depende de sus necesidades, ya sea que desee un flujo de trabajo de escritorio rápido, la comodidad en línea o una solución programable. Aquí hay un desglose de las mejores opciones:
| Tipo de herramienta | Nombre de la herramienta | Características clave |
| Escritorio | Adobe Acrobat | Conversión de Word → PDF → TIFF, salida de alta calidad, configuraciones avanzadas. |
| En línea | Zamzar | Conversión por lotes, interfaz de arrastrar y soltar, no se necesita software. |
| Basado en código | Python (Spire.Doc + Pillow) | Automatiza conversiones masivas, se integra con flujos de trabajo. |
Cómo convertir Word a TIFF: 3 métodos sencillos
Método 1: Adobe Acrobat Pro (conversión profesional)
Adobe Acrobat admite la conversión de Word a PDF y luego la exportación como TIFF. Este método es perfecto para documentos complejos con imágenes, tablas o diseños personalizados, ya que la representación avanzada de Acrobat minimiza los errores de formato.
Pasos:
1. Abra su documento de Word en Acrobat:
- Vaya a "Archivo -> Crear -> PDF desde archivo".
- Seleccione un documento .docx o .doc y haga clic en "Abrir". Acrobat convertirá automáticamente el Word a un PDF en segundo plano.
2. Convierta el PDF a TIFF:
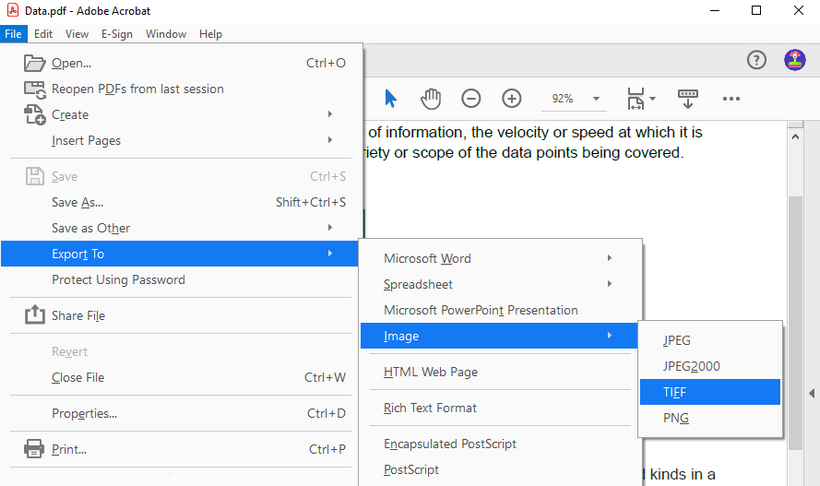
- Una vez que el PDF esté abierto en Acrobat, vaya a "Archivo -> Exportar a -> Imagen -> TIFF".
- Seleccione el icono de configuración para cambiar las preferencias de exportación, como personalizar la resolución, el espacio de color y la compresión.
Ventajas: Alta precisión para documentos complejos, seguro, conserva bien el formato.
Desventajas: Requiere una suscripción de pago, el acceso sin conexión requiere la instalación de escritorio.
Método 2: Convertidores en línea gratuitos (rápido, para archivos pequeños)
Para conversiones puntuales sin instalar software, las herramientas en línea ofrecen una solución conveniente para convertir documentos simples como cartas de una página o currículos básicos.
Pasos:
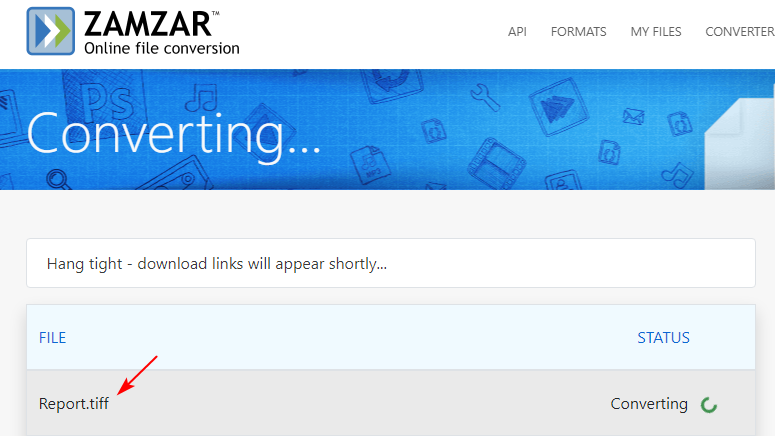
- Vaya al sitio web del convertidor gratuito (por ejemplo, Zamzar / Convertio).
- Cargue su archivo de Word (desde su computadora, Google Drive o Dropbox).
- Seleccione TIFF como formato de salida.
- Haga clic en "Convertir" y descargue el TIFF de salida.
Ventajas: Gratis (para uso básico), sin instalación de software, accesibilidad multiplataforma.
Desventajas: Límites de tamaño de archivo (generalmente 100 MB o menos), más lento para archivos grandes, posibles riesgos de privacidad con documentos sensibles.
Método 3: Script de Python (Spire.Doc + Pillow) para automatización
Para los desarrolladores que necesitan automatizar conversiones masivas, este método de Python es una solución ideal. Utiliza Spire.Doc for Python para manejar archivos de Word y Pillow (PIL) para crear TIFF de varias páginas mediante programación.
Pasos:
1. Instale las bibliotecas necesarias
Primero, instale las herramientas necesarias a través de pip:
pip install Spire.Doc
pip install pillow
2. Ejecute el script de conversión de Word a TIFF
Use el siguiente código de Python para convertir un documento de Word a un TIFF de varias páginas:
from spire.doc import *
from spire.doc.common import *

from PIL import Image
from io import BytesIO

# Crear un objeto Document
doc = Document()

# Cargar un documento de Word
doc.LoadFromFile("C:\\Users\\Administrator\\Desktop\\Input.docx")

# Crear una lista vacía para almacenar imágenes de PIL
images = []

# Iterar a través de las páginas del documento
for i in range(doc.GetPageCount()):

    # Convertir una página específica a un flujo de imágenes
    with doc.SaveImageToStreams(i, ImageType.Bitmap) as imageData:

        # Abrir un flujo de imágenes específico como una imagen de PIL
        img = Image.open(BytesIO(imageData.ToArray()))

        # Agregar la imagen de PIL a la lista
        images.append(img)

# Guardar las imágenes de PIL como un archivo TIFF de varias páginas
images[0].save("Output/ToTIFF.tiff", save_all=True, append_images=images[1:])

# Liberar recursos
doc.Dispose()
Procesamiento por lotes: envuelva el script en un bucle para convertir todos los archivos de Word en una carpeta:
import os
for file in os.listdir("F:\\Reports"):
    if file.endswith((".docx", ".doc")):
        doc.LoadFromFile(os.path.join("F:\\Reports", file))
        # Inserte el código de conversión de Word a TIFF aquí
Ventajas: Control programático total, automatiza conversiones masivas, sin dependencia de Adobe.
Desventajas: Necesita habilidades básicas de codificación, requiere configuración de bibliotecas, no es ideal para usuarios no técnicos.
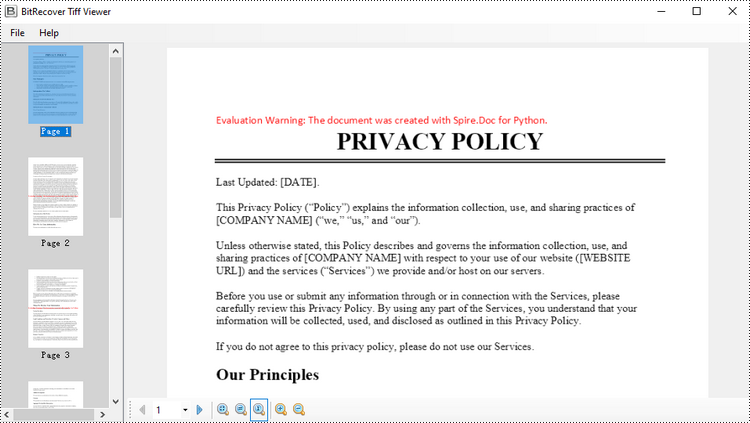
Consejo: Solicite una licencia de prueba gratuita aquí para eliminar la marca de agua.
Consideraciones finales
Convertir Word a TIFF es esencial para la preservación a largo plazo de los documentos. Este artículo proporciona tres métodos procesables de conversión de Word a TIFF, adaptados a diferentes necesidades. Ya sea que sea un profesional que necesita precisión (Adobe Acrobat), un usuario ocasional que busca velocidad (herramientas en línea) o un desarrollador que automatiza tareas masivas (scripts de Python), ahora sabe cuál es el mejor método para elegir. Al desglosar los pros, los contras y los procesos paso a paso, se elimina la confusión, ayudándole a proteger archivos confidenciales y a obtener salidas TIFF de alta calidad.
Véase también
Word in TIFF konvertieren (mit Adobe, Online-Tools und Python)
Inhaltsverzeichnis
Installation mit Pypi
pip install Spire.Doc
pip install pillow
Verwandte Links
Die Konvertierung von Word in TIFF mag wie eine Nischenaufgabe erscheinen, ist aber für viele Fachleute überraschend wichtig. TIFF (Tagged Image File Format) wird für seine hohe Qualität, verlustfreie Komprimierung und Kompatibilität mit Grafikdesign, Druck und der Rechtsbranche geschätzt. Ob Sie die Formatierung für einen Vertrag beibehalten, ein Dokument mit hochauflösenden Bildern teilen oder spezifische Einreichungsanforderungen erfüllen müssen, das Wissen, wie man Word korrekt in TIFF konvertiert, ist entscheidend.
Dieser Leitfaden untersucht drei effiziente Methoden zur Konvertierung von Word DOC/DOCX in TIFF - mit Adobe Acrobat, Online-Tools und Python-Automatisierung.
- Was ist TIFF? Hauptmerkmale
- Zuverlässige Tools zur Konvertierung von Word in TIFF
- Wie man Word in TIFF konvertiert: 3 einfache Methoden
- Abschließende Gedanken
Was ist TIFF? Hauptmerkmale
TIFF ist nicht Ihr durchschnittliches Bildformat wie JPEG oder PNG. Es ist ein robustes, flexibles, verlustfreies Rasterformat, das für hohe Qualität, Detailerhaltung und Vielseitigkeit entwickelt wurde. Zu den Hauptmerkmalen gehören:
- Verlustfreie Komprimierung: Im Gegensatz zu JPEG behält TIFF (insbesondere mit LZW- oder ZIP-Komprimierung) alle ursprünglichen Bilddaten ohne Qualitätsverlust bei, was für die Archivierung oder Reproduktion entscheidend ist.
- Hohe Wiedergabetreue: Bewahrt komplexe Details wie Text, Strichzeichnungen, Diagramme und gescannte Bilder perfekt.
- Unterstützung für mehrere Seiten: Eine einzelne TIFF-Datei kann mehrere Seiten enthalten (wie ein gescanntes Dokument), was sie ideal für mehrseitige Word-Dokumente macht.
- Reich an Metadaten: Unterstützt das Einbetten umfangreicher Metadaten (wie Autor, Urheberrecht, Schlüsselwörter).
- Farbtiefe: Verarbeitet verschiedene Farbmodi (1-Bit S/W, Graustufen, RGB, CMYK), die für den professionellen Druck und die Archivierung unerlässlich sind.
Zuverlässige Tools zur Konvertierung von Word in TIFF
Die Wahl des richtigen Werkzeugs hängt von Ihren Bedürfnissen ab - ob Sie einen schnellen Desktop-Workflow, Online-Komfort oder eine programmierbare Lösung wünschen. Hier ist eine Aufschlüsselung der besten Optionen:
| Werkzeugtyp | Werkzeugname | Hauptmerkmale |
| Desktop | Adobe Acrobat | Word → PDF → TIFF-Konvertierung, hochwertige Ausgabe, erweiterte Einstellungen. |
| Online | Zamzar | Stapelkonvertierung, Drag-and-Drop-Oberfläche, keine Software erforderlich. |
| Code-basiert | Python (Spire.Doc + Pillow) | Automatisiert Massenkonvertierungen, integriert sich in Arbeitsabläufe. |
Wie man Word in TIFF konvertiert: 3 einfache Methoden
Methode 1: Adobe Acrobat Pro (Professionelle Konvertierung)
Adobe Acrobat unterstützt die Konvertierung von Word in PDF und den anschließenden Export als TIFF. Diese Methode ist perfekt für komplexe Dokumente mit Bildern, Tabellen oder benutzerdefinierten Layouts, da die fortschrittliche Wiedergabe von Acrobat Formatierungsfehler minimiert.
Schritte:
1. Öffnen Sie Ihr Word-Dokument in Acrobat:
- Gehen Sie zu „Datei -> Erstellen -> PDF aus Datei“.
- Wählen Sie ein .docx- oder .doc-Dokument und klicken Sie auf „Öffnen“. Acrobat konvertiert das Word-Dokument automatisch im Hintergrund in ein PDF.
2. Konvertieren Sie das PDF in TIFF:
- Sobald das PDF in Acrobat geöffnet ist, gehen Sie zu „Datei -> Exportieren nach -> Bild -> TIFF“.
- Wählen Sie das Einstellungssymbol, um die Exportpräferenzen zu ändern, wie z. B. die Anpassung von Auflösung, Farbraum und Komprimierung.
Vorteile: Hohe Genauigkeit bei komplexen Dokumenten, sicher, gute Beibehaltung der Formatierung.
Nachteile: Erfordert ein kostenpflichtiges Abonnement, Offline-Zugriff erfordert eine Desktop-Installation.
Methode 2: Kostenlose Online-Konverter (schnell, für kleine Dateien)
Für einmalige Konvertierungen ohne Softwareinstallation bieten Online-Tools eine bequeme Lösung zur Konvertierung einfacher Dokumente wie einseitiger Briefe oder einfacher Lebensläufe.
Schritte:
- Gehen Sie zur Website des kostenlosen Konverters (z. B. Zamzar / Convertio).
- Laden Sie Ihre Word-Datei hoch (von Ihrem Computer, Google Drive oder Dropbox).
- Wählen Sie TIFF als Ausgabeformat.
- Klicken Sie auf „Konvertieren“ und laden Sie die TIFF-Ausgabedatei herunter.
Vorteile: Kostenlos (für den Grundgebrauch), keine Softwareinstallation, plattformübergreifende Zugänglichkeit.
Nachteile: Dateigrößenbeschränkungen (normalerweise 100 MB oder weniger), langsamer bei großen Dateien, potenzielle Datenschutzrisiken bei sensiblen Dokumenten.
Methode 3: Python-Skript (Spire.Doc + Pillow) zur Automatisierung
Für Entwickler, die Massenkonvertierungen automatisieren müssen, ist diese Python-Methode eine ideale Lösung. Sie verwendet Spire.Doc for Python zur Verarbeitung von Word-Dateien und Pillow (PIL) zur programmgesteuerten Erstellung von mehrseitigen TIFFs.
Schritte:
1. Erforderliche Bibliotheken installieren
Installieren Sie zunächst die notwendigen Werkzeuge über pip:
pip install Spire.Doc
pip install pillow
2. Führen Sie das Word-zu-TIFF-Konvertierungsskript aus
Verwenden Sie den folgenden Python-Code, um ein Word-Dokument in ein mehrseitiges TIFF zu konvertieren:
from spire.doc import *
from spire.doc.common import *

from PIL import Image
from io import BytesIO

# Erstellen Sie ein Document-Objekt
doc = Document()

# Laden Sie ein Word-Dokument
doc.LoadFromFile("C:\\Users\\Administrator\\Desktop\\Input.docx")

# Erstellen Sie eine leere Liste zum Speichern von PIL-Bildern
images = []

# Iterieren Sie durch die Seiten im Dokument
for i in range(doc.GetPageCount()):

    # Konvertieren Sie eine bestimmte Seite in einen Bildstream
    with doc.SaveImageToStreams(i, ImageType.Bitmap) as imageData:

        # Öffnen Sie einen bestimmten Bildstream als PIL-Bild
        img = Image.open(BytesIO(imageData.ToArray()))

        # Fügen Sie das PIL-Bild zur Liste hinzu
        images.append(img)

# Speichern Sie die PIL-Bilder als mehrseitige TIFF-Datei
images[0].save("Output/ToTIFF.tiff", save_all=True, append_images=images[1:])

# Ressourcen freigeben
doc.Dispose()
Stapelverarbeitung: Umschließen Sie das Skript mit einer Schleife, um alle Word-Dateien in einem Ordner zu konvertieren:
import os
for file in os.listdir("F:\\Reports"):
    if file.endswith((".docx", ".doc")):
        doc.LoadFromFile(os.path.join("F:\\Reports", file))
        # Fügen Sie hier den Konvertierungscode von Word zu TIFF ein
Vorteile: Volle programmatische Kontrolle, automatisiert Massenkonvertierungen, keine Abhängigkeit von Adobe.
Nachteile: Benötigt grundlegende Programmierkenntnisse, erfordert die Einrichtung von Bibliotheken, nicht ideal für nicht-technische Benutzer.
Tipp: Fordern Sie hier eine kostenlose Testlizenz an, um das Wasserzeichen zu entfernen.
Abschließende Gedanken
Die Konvertierung von Word in TIFF ist für die langfristige Aufbewahrung von Dokumenten unerlässlich. Dieser Artikel bietet drei umsetzbare Methoden zur Konvertierung von Word in TIFF, die auf unterschiedliche Bedürfnisse zugeschnitten sind. Egal, ob Sie ein Profi sind, der Präzision benötigt (Adobe Acrobat), ein gelegentlicher Benutzer, der Geschwindigkeit sucht (Online-Tools), oder ein Entwickler, der Massenaufgaben automatisiert (Python-Skripte), Sie kennen jetzt die beste Methode, die Sie wählen können. Durch die Aufschlüsselung von Vor- und Nachteilen und schrittweisen Prozessen wird Verwirrung beseitigt, sodass Sie sensible Dateien sichern und hochwertige TIFF-Ausgaben erhalten können.
Siehe auch
Преобразование Word в TIFF (с помощью Adobe, онлайн-сервисов и Python)
Оглавление
Установка через Pypi
pip install Spire.Doc
pip install pillow
Похожие ссылки
Преобразование Word в TIFF может показаться нишевой задачей, но она удивительно важна для многих профессионалов. TIFF (Tagged Image File Format) ценится за высокое качество, сжатие без потерь и совместимость с графическим дизайном, полиграфией и юридической отраслью. Независимо от того, нужно ли вам сохранить форматирование для контракта, поделиться документом с изображениями высокого разрешения или соответствовать определенным требованиям к подаче документов, знание того, как правильно преобразовать Word в TIFF, является ключевым.
В этом руководстве рассматриваются три эффективных метода преобразования Word DOC/DOCX в TIFF - с помощью Adobe Acrobat, онлайн-инструментов и автоматизации на Python.
- Что такое TIFF? Ключевые особенности
- Надежные инструменты для преобразования Word в TIFF
- Как преобразовать Word в TIFF: 3 простых метода
- Заключительные мысли
Что такое TIFF? Ключевые особенности
TIFF — это не обычный формат изображений, как JPEG или PNG. Это надежный, гибкий, растровый формат без потерь, разработанный для высокого качества, сохранения деталей и универсальности. Ключевые характеристики включают:
- Сжатие без потерь: В отличие от JPEG, TIFF (особенно со сжатием LZW или ZIP) сохраняет все исходные данные изображения без ухудшения качества, что крайне важно для архивирования или воспроизведения.
- Высокая точность: Идеально сохраняет сложные детали, такие как текст, штриховые рисунки, диаграммы и отсканированные изображения.
- Поддержка многостраничности: Один файл TIFF может содержать несколько страниц (например, отсканированный документ), что делает его идеальным для многостраничных документов Word.
- Богат метаданными: Поддерживает встраивание обширных метаданных (например, автор, авторское право, ключевые слова).
- Глубина цвета: Поддерживает различные цветовые режимы (1-битный ч/б, оттенки серого, RGB, CMYK), что необходимо для профессиональной печати и архивирования.
Надежные инструменты для преобразования Word в TIFF
Выбор правильного инструмента зависит от ваших потребностей — хотите ли вы быстрый рабочий процесс на настольном компьютере, удобство онлайн-инструментов или программируемое решение. Вот обзор лучших вариантов:
| Тип инструмента | Название инструмента | Ключевые особенности |
| Настольный | Adobe Acrobat | Преобразование Word → PDF → TIFF, высокое качество вывода, расширенные настройки. |
| Онлайн | Zamzar | Пакетное преобразование, интерфейс перетаскивания, не требуется программное обеспечение. |
| На основе кода | Python (Spire.Doc + Pillow) | Автоматизирует массовые преобразования, интегрируется с рабочими процессами. |
Как преобразовать Word в TIFF: 3 простых метода
Метод 1: Adobe Acrobat Pro (профессиональное преобразование)
Adobe Acrobat поддерживает преобразование Word в PDF, а затем экспорт в TIFF. Этот метод идеально подходит для сложных документов с изображениями, таблицами или пользовательскими макетами, поскольку усовершенствованный рендеринг Acrobat минимизирует ошибки форматирования.
Шаги:
1. Откройте ваш документ Word в Acrobat:
- Перейдите в «Файл -> Создать -> PDF из файла».
- Выберите документ .docx или .doc и нажмите «Открыть». Acrobat автоматически преобразует Word в PDF в фоновом режиме.
2. Преобразуйте PDF в TIFF:
- Когда PDF откроется в Acrobat, перейдите в «Файл -> Экспортировать в -> Изображение -> TIFF».
- Выберите значок настроек, чтобы изменить параметры экспорта, такие как настройка разрешения, цветового пространства и сжатия.
Плюсы: Высокая точность для сложных документов, безопасность, хорошее сохранение форматирования.
Минусы: Требуется платная подписка, для офлайн-доступа требуется установка на рабочий стол.
Метод 2: Бесплатные онлайн-конвертеры (быстро, для небольших файлов)
Для одноразовых преобразований без установки программного обеспечения онлайн-инструменты предлагают удобное решение для конвертации простых документов, таких как одностраничные письма или базовые резюме.
Шаги:
- Перейдите на сайт бесплатного конвертера (например, Zamzar / Convertio).
- Загрузите ваш файл Word (с компьютера, Google Диска или Dropbox).
- Выберите TIFF в качестве выходного формата.
- Нажмите «Конвертировать» и загрузите выходной файл TIFF.
Плюсы: Бесплатно (для базового использования), не требует установки программного обеспечения, доступность на разных платформах.
Минусы: Ограничения на размер файла (обычно 100 МБ или меньше), медленнее для больших файлов, потенциальные риски для конфиденциальности при работе с чувствительными документами.
Метод 3: Скрипт на Python (Spire.Doc + Pillow) для автоматизации
Для разработчиков, которым необходимо автоматизировать массовые преобразования, этот метод на Python является идеальным решением. Он использует Spire.Doc for Python для обработки файлов Word и Pillow (PIL) для программного создания многостраничных TIFF.
Шаги:
1. Установите необходимые библиотеки
Сначала установите необходимые инструменты с помощью pip:
pip install Spire.Doc
pip install pillow
2. Запустите скрипт для преобразования Word в TIFF
Используйте приведенный ниже код на Python для преобразования документа Word в многостраничный TIFF:
from spire.doc import *
from spire.doc.common import *

from PIL import Image
from io import BytesIO

# Создайте объект Document
doc = Document()

# Загрузите документ Word
doc.LoadFromFile("C:\\Users\\Administrator\\Desktop\\Input.docx")

# Создайте пустой список для хранения изображений PIL
images = []

# Переберите страницы в документе
for i in range(doc.GetPageCount()):

    # Преобразуйте определенную страницу в поток изображений
    with doc.SaveImageToStreams(i, ImageType.Bitmap) as imageData:

        # Откройте определенный поток изображений как изображение PIL
        img = Image.open(BytesIO(imageData.ToArray()))

        # Добавьте изображение PIL в список
        images.append(img)

# Сохраните изображения PIL как многостраничный файл TIFF
images[0].save("Output/ToTIFF.tiff", save_all=True, append_images=images[1:])

# Освободите ресурсы
doc.Dispose()
Пакетная обработка: оберните скрипт в цикл для преобразования всех файлов Word в папке:
import os
for file in os.listdir("F:\\Reports"):
    if file.endswith((".docx", ".doc")):
        doc.LoadFromFile(os.path.join("F:\\Reports", file))
        # Вставьте сюда код для преобразования word в tiff
Плюсы: Полный программный контроль, автоматизация массовых преобразований, отсутствие зависимости от Adobe.
Минусы: Требуются базовые навыки программирования, необходима настройка библиотек, не идеально для нетехнических пользователей.
Совет: Запросите бесплатную пробную лицензию здесь, чтобы убрать водяной знак.
Заключительные мысли
Преобразование Word в TIFF необходимо для долгосрочного сохранения документов. В этой статье представлены три действенных метода преобразования Word в TIFF, адаптированных к различным потребностям. Независимо от того, являетесь ли вы профессионалом, нуждающимся в точности (Adobe Acrobat), случайным пользователем, ищущим скорость (онлайн-инструменты), или разработчиком, автоматизирующим массовые задачи (скрипты на Python), теперь вы знаете, какой метод выбрать. Разбирая плюсы, минусы и пошаговые процессы, это устраняет путаницу, помогая вам защитить конфиденциальные файлы и получить высококачественные TIFF-файлы.
Смотрите также
Convert Word to TIFF (Adobe, Online & Python)
Table of Contents
Install with Pypi
pip install Spire.Doc
pip install pillow
Related Links
Converting Word to TIFF might seem like a niche task, but it's surprisingly essential for many professionals. TIFF (Tagged Image File Format) is prized for its high quality, lossless compression, and compatibility with graphic design, printing, and legal industries. Whether you need to preserve formatting for a contract, share a document with high-resolution images, or meet specific submission requirements, knowing how to convert Word to TIFF correctly is key.
This guide explores three efficient methods to convert Word DOC/DOCX to TIFF - using Adobe Acrobat, online tools, and Python automation.
- What is TIFF? Key Features
- Reliable Tools for Word to TIFF Conversion
- How to Convert Word to TIFF: 3 Easy Methods
- Final Thoughts
What is TIFF? Key Features
TIFF isn't your average image format like JPEG or PNG. It's a robust, flexible, lossless raster format designed for high-quality, detail preservation, and versatility. Key characteristics include:
- Lossless Compression: Unlike JPEG, TIFF (especially with LZW or ZIP compression) retains all original image data without degrading quality, crucial for archival or reproduction.
- High Fidelity: Perfectly preserves intricate details like text, line art, diagrams, and scanned images.
- Multi-Page Support: A single TIFF file can contain multiple pages (like a scanned document), making it ideal for multi-page Word docs.
- Metadata Rich: Supports embedding extensive metadata (like author, copyright, keywords).
- Color Depth: Handles various color modes (1-bit B&W, Grayscale, RGB, CMYK) essential for professional printing and archiving.
Reliable Tools for Word to TIFF Conversion
Choosing the right tool depends on your needs - whether you want a quick desktop workflow, online convenience, or a programmable solution. Here's a breakdown of the best options:
| Tool Type | Tool Name | Key Features |
| Desktop | Adobe Acrobat | Word → PDF → TIFF conversion, high-quality output, advanced settings. |
| Online | Zamzar | Batch conversion, drag-and-drop interface, no software needed. |
| Code-Based | Python (Spire.Doc + Pillow) | Automates bulk conversions, integrates with workflows. |
How to Convert Word to TIFF: 3 Easy Methods
Method 1: Adobe Acrobat Pro (Professional Conversion)
Adobe Acrobat supports converting Word to PDF and then exporting as TIFF. This method is perfect for complex documents with images, tables, or custom layouts, as Acrobat's advanced rendering minimizes formatting errors.
Steps:
1. Open your Word document in Acrobat:
- Go to "File -> Create -> PDF from File" .
- Select a .docx or .doc document and click "Open". Acrobat will automatically convert the Word to a PDF in the background.
2. Convert the PDF to TIFF:
- Once the PDF is open in Acrobat, go to "File -> Export To -> Image -> TIFF".
- Select the settings icon to change the export preferences, such as customizing resolution, color space, and compression.
Pros: High accuracy for complex docs, secure, preserves formatting well.
Cons: Requires paid subscription, offline access requires desktop installation.
Method 2: Free Online Converters (Quick, for Small Files)
For one-off conversions without installing software, online tools offer a convenient solution for converting simple documents like single-page letters or basic resumes.
Steps:
- Go to the free converter's website (e.g.,Zamzar/ Convertio).
- Upload your Word file (from your computer, Google Drive, or Dropbox).
- Select TIFF as the output format.
- Click "Convert" and download the output TIFF.
Pros: Free (for basic use), no software installation, cross-platform accessibility.
Cons: File size limits (usually 100MB or less), slower for large files, potential privacy risks with sensitive documents.
Method 3: Python Script (Spire.Doc + Pillow) for Automation
For developers needing to automate bulk conversions, this Python method is an ideal solution. It uses Spire.Doc for Python to handle Word files and Pillow (PIL) to create multi-page TIFFs programmatically.
Steps:
1. Install Required Libraries
First, install the necessary tools via pip:
pip install Spire.Doc
pip install pillow
2. Run the Word to TIFF Conversion Script
Use the below Python code to convert a Word document to a multi-page TIFF:
from spire.doc import *
from spire.doc.common import *

from PIL import Image
from io import BytesIO

# Create a Document object
doc = Document()

# Load a Word document
doc.LoadFromFile("C:\\Users\\Administrator\\Desktop\\Input.docx")

# Create an empty list to store PIL Images
images = []

# Iterate through pages in the document
for i in range(doc.GetPageCount()):

    # Convert a specific page to image stream
    with doc.SaveImageToStreams(i, ImageType.Bitmap) as imageData:

        # Open a specific image stream as a PIL image
        img = Image.open(BytesIO(imageData.ToArray()))

        # Append the PIL image to list
        images.append(img)

# Save the PIL Images as a multi-page TIFF file
images[0].save("Output/ToTIFF.tiff", save_all=True, append_images=images[1:])

# Dispose resources
doc.Dispose()
Bulk Processing: Wrap the script in a loop to convert all Word files in a folder:
import os
for file in os.listdir("F:\\Reports"):
    if file.endswith((".docx", ".doc")):
        doc.LoadFromFile(os.path.join("F:\\Reports", file))
        # Insert word to tiff conversion code here
Pros: Full programmatic control, automates bulk conversions, no dependency on Adobe.
Cons: Needs basic coding skills, requires library setup, not ideal for non-technical users.
Tip: Request a free trial license here to remove the watermark.
Final Thoughts
Converting Word to TIFF is essential for long-term preservation of documents. This article provides three actionable Word-to-TIFF conversion methods, tailored to different needs. Whether you're a professional needing precision (Adobe Acrobat), a casual user seeking speed (online tools), or a developer automating bulk tasks (Python scripts), you now know the best method to choose. By breaking down pros, cons, and step-by-step processes, it eliminates confusion, helping you secure sensitive files and get high-quality TIFF outputs.
See Also
Spire.PDF for Android via Java 10.6.8 supports extracting text from PDF
We’re excited to announce the release of Spire.PDF for Android via Java 10.6.8. This update supports extracting text from PDFs, finding and highlighting text, and finding and replacing text. Additionally, an issue related to PDF encryption has been fixed. More details are provided below.
Here is a list of changes made in this release:
| Category | ID | Description |
| Adjustment | - | Adjusted the license applying method to “com.spire.pdf.license.LicenseProvider.setLicenseKey("");”. |
| New feature | - | Added support for 'text extraction' functionality using the 'PdfTextExtractor' class.
for (PdfPageBase page : (Iterable<PdfPageBase>) doc.getPages()) {
    PdfTextExtractor textExtractor = new PdfTextExtractor(page);
    PdfTextExtractOptions option = new PdfTextExtractOptions();
    buffer.append(textExtractor.extract(option));
}
|
| New feature | - | Added support for 'finding and highlighting' functionality using the 'PdfTextFinder' class.
for (PdfPageBase pageObj :(Iterable<PdfPageBase>) pdf.getPages()) {
    PdfTextFinder finds = new PdfTextFinder(pageObj);
    PdfTextFindOptions Options = new PdfTextFindOptions();
    Options.setTextFindParameter(EnumSet.of(TextFindParameter.None));
    List<PdfTextFragment> result = finds.find("science",Options);
    for (PdfTextFragment find : result)
    {
        find.highLight();
    }
}
|
| New feature | - | Added support for 'finding and replacing' functionality using the 'PdfTextFinder' class.
PdfTextFinder finds = new PdfTextFinder(page);
PdfTextFindOptions Options = new PdfTextFindOptions();
Options.setTextFindParameter(EnumSet.of(TextFindParameter.None));
List<PdfTextFragment> result = finds.find("Spire.PDF for Java",Options);

for (PdfTextFragment find : result)
{
    RectF rec = new RectF();
    rec.set(find.getPositions()[0].x, find.getPositions()[0].y, find.getSizes()[0].getWidth()+find.getPositions()[0].x, find.getSizes()[0].getHeight()+find.getPositions()[0].y);
    page.getCanvas().drawRectangle(PdfBrushes.getWhite(), rec);
    // Draws new text as defined font and color
    page.getCanvas().drawString(newText, font, brush, rec);
}
|
| Bug | SPIREPDF-7550 | Fixed the issue where the field names of text boxes were garbled when encrypting PDF documents. |
Spire.Office for Java 10.7.0 is released
We're pleased to announce the release of Spire.Office for Java 10.7.0. In this version, the Spire.Doc for Java supports the "Two Lines in One" function. Spire.XLS for Java supports Array data binding in MarkerDesigner. Spire.PDF for Java supports converting PDF to Markdown. Spire.OCR for Java supports automatically rotating images. In addition, many known issues that occurred when converting and processing Word/ Excel/ PDF/PowerPoint files have been successfully fixed. More details are listed below.
Here is a list of changes made in this release
Spire.Doc for Java
| Category | ID | Description |
| New feature | SPIREDOC-11113 SPIREDOC-11320 SPIREDOC-11338 |
Supports the "Two Lines in One" function. |
| Bug | SPIREDOC-11280 | Fixes the issue where MailMerge.executeWidthRegion(dataSource) incorrectly reads image paths from XML. |
| Bug | SPIREDOC-11283 | Fixes the issue that Word document comparison results were incorrect. |
| Bug | SPIREDOC-11296 | Fixes the issue that the program threw the "java.lang.ClassCastException" when loading Word documents. |
| Bug | SPIREDOC-11297 | Fixes the issue where the program would hang for extended periods when loading Word documents. |
| Bug | SPIREDOC-11300 | Fixes the issue that page numbers were incorrect when converting Word to PDF. |
| Bug | SPIREDOC-11304 | Fixes the issue that output file sizes were excessively large when converting Word to PDF. |
| Bug | SPIREDOC-11306 | Fixes the issue that content was missing during Word to PDF conversion. |
| Bug | SPIREDOC-11337 | Fixes the issue that the program threw "Culture Name: - is not a supported culture" when loading .odt documents. |
| Bug | SPIREDOC-11276 | Fixes the issue where accepting revisions did not affect the content in content controls. |
| Bug | SPIREDOC-11314 | Fixes the issue where converting Word to PDF caused a "NullPointerException" to be thrown. |
| Bug | SPIREDOC-11325 | Fixes the issue where retrieving Word document properties was incorrect. |
| Bug | SPIREDOC-11333 | Fixes the issue where converting Word to Markdown resulted in disorganized bullet points. |
| Bug | SPIREDOC-11360 | Fixes the issue where converting Word to PDF caused vertically oriented text in tables to be incorrect. |
| Bug | SPIREDOC-11364 | Fixes the issue where replacing bookmark content caused an "IllegalArgumentException" to be thrown. |
| Bug | SPIREDOC-11389 | Fixes the issue where loading a Word document caused an "IllegalArgumentException: List level must be less than 8 and greater than 0" to be thrown. |
| Bug | SPIREDOC-11390 | Fixes the issue where accepting revisions did not produce the correct effect. |
| Bug | SPIREDOC-11398 | Fixes the issue where using "pictureWatermark.setPicture(bufferedImage)" caused a "java.lang.NullPointerException" to be thrown. |
Spire.XLS for Java
| Category | ID | Description |
| New feature | SPIREXLS-5874 | Supports Array data binding in MarkerDesigner.
Workbook workbook = new Workbook();
// Get the first worksheet from the workbook
Worksheet sheet = workbook.getWorksheets().get(0);
// Set the value of cell range A1 to "&=Array"
sheet.getCellRange("A1").setValue("&=Array");
// Add a parameter named "Array" with an array of strings as its value
workbook.getMarkerDesigner().addArray("Array", new String[] { "Spire.Xls", "Spire.Doc", "Spire.PDF", "Spire.Presentation", "Spire.Email" });
// Apply the marker design to the workbook
workbook.getMarkerDesigner().apply();
// Calculate all the values in the workbook
workbook.calculateAllValue();
// Auto-fit the rows and columns in the allocated range of the worksheet
sheet.getAllocatedRange().autoFitRows();
sheet.getAllocatedRange().autoFitColumns();
// Save the workbook to the specified file path using Excel 2013 format
workbook.saveToFile(outputFile, ExcelVersion.Version2013);
// Clean up and release resources used by the workbook
workbook.dispose();
|
| Bug | SPIREXLS-5861 SPIREXLS-5873 |
Fixes the issue that font rendering was incorrect when converting Excel to PDF in Linux environments. |
| Bug | SPIREXLS-5869 | Fixes the issue that the behavior of isWriteUnMergedColSpan(false) was incorrect when converting Excel to HTML. |
| Bug | SPIREXLS-5870 | Fixes the issue that "Invalid formula: =#REF!" error happened when loading Excel documents. |
| Bug | SPIREXLS-5875 | Fixes the issue that the layout rendering was incorrect when converting Excel to PDF. |
| Bug | SPIREXLS-5876 | Fixes the issue that the program threw a java.lang.NullPointerException error when loading Excel files. |
| Bug | SPIREXLS-5877 | Removed dependencies on sun.misc.BASE64Decoder. |
Spire.PDF for Java
| Category | ID | Description |
| New feature | SPIREPDF-5995 | Added support for converting PDF files to Markdown format.
PdfDocument doc = new PdfDocument("input.pdf");
doc.saveToFile("output.md", FileFormat.Markdown);
|
| Adjustment | SPIREPDF-7597 | Internal adjustments were made to references of "sun.misc.BASE64Decoder". |
| Bug | SPIREPDF-7405 | Fixed the issue where text became garbled when converting PDF to images. |
| Bug | SPIREPDF-7546 | Fixed the issue that caused the program to throw a "NegativeArraySizeException" when converting PDF to images. |
| Bug | SPIREPDF-7563 | Fixed the issue where the CSS directory name was incorrect when converting PDF to HTML on Linux systems. |
| Bug | SPIREPDF-7564 | Fixed the issue where content was rotated when converting OFD to PDF. |
| Bug | SPIREPDF-7596 | Fixed the issue that caused the program to throw a "NegativeArraySizeException" when using pdfGrayConverter.toGrayPdf. |
| Bug | SPIREPDF-7599 | Fixed the issue where bookmark navigation positions were incorrect when merging PDFs. |
| Bug | SPIREPDF-7622 | Fixed the issue where LicenseProvider.setLicense(path) would throw an error if the path contained backslashes (""). |
| Bug | SPIREPDF-7513 | Fixed the issue where text search was failing. |
| Bug | SPIREPDF-7532 | Fixed the issue where the printed PDF content was scaled down when the system DPI was set to 150%. |
| Bug | SPIREPDF-7548 | Fixed the issue where SVG-to-PDF conversion produced incorrect results. |
Spire.Presentation for Java
| Category | ID | Description |
| Bug | SPIREPPT-2922 | Fixed the issue where the program threw 'java. lang. OutOfCacheError: Java heap space' when splitting PowerPoint documents. |
Spire.OCR for Java
| Category | ID | Description |
| New feature | - | Added support for Linux-ARM platform. |
| New feature | SPIREOCR-84 | Added support for automatically rotating images when necessary.
ConfigureOptions configureOptions = new ConfigureOptions(); configureOptions.SetAutoRotate(true); |
| New feature | SPIREOCR-107 | Added support for preserving the original image layout in text output.
VisualTextAligner visualTextAligner = new VisualTextAligner(scanner.getText()); String scannedText = visualTextAligner.toString(); |
| Bug | SPIREOCR-103 | Fixed the issue where the cleanup of the temporary folder "temp" was not functioning correctly. |
| Bug | SPIREOCR-104 | Fixed the issue where an "Error occurred during ConfigureDependencies" message appeared when the path contained Chinese characters. |
| Bug | SPIREOCR-108 | Fixed the issue where the content extraction order was incorrect. |
Read Email in C# via IMAP and POP3 (Outlook Example Included)

Reading emails using C# is a common task in enterprise applications where automatic email processing is needed. For example, customer support systems retrieve tickets from email inboxes, financial platforms extract PDF invoices from attachments, and workflow tools react to notification emails. These applications require access to message content, metadata (sender, subject, timestamp), and attachments.
In this article, we’ll walk through how to read emails in C# using IMAP and POP3, and access Gmail or Outlook mailboxes securely with OAuth 2.0. We'll use Spire.Email for .NET, a library that simplifies email client implementation by providing a unified API for IMAP, POP3, and SMTP. It supports both OAuth and password-based authentication, and allows parsing full MIME messages including headers, bodies, and attachments.
This article covers:
- Environment Setup
- Authenticate Email Access via OAuth
- Read Emails Using IMAP in C#
- Read Emails via POP3 in C#
- Extract Attachments and Plain Text
- Summary
- Frequently Asked Questions
Environment Setup
To follow this tutorial, you’ll need the following:
- A .NET development environment (e.g., Visual Studio)
- Spire.Email for .NET (Install via NuGet: Install-Package Spire.Email)
- Access to a Gmail or Outlook account with OAuth 2.0 enabled
Spire.Email for .NET supports standard email protocols—IMAP, POP3, and SMTP—and provides built-in functionality for MIME parsing, attachments, HTML rendering, and encoding handling.
You can also try Free Spire.Email for .NET if your project is small or for evaluation.
Authenticate Email Access via OAuth
Modern email providers such as Gmail and Outlook require OAuth 2.0 for secure and token-based access to IMAP and POP3 services. Gmail still supports app passwords for POP3 in some cases, but OAuth is the preferred and more secure method.
Here’s how to use MSAL.NET to acquire an access token for Outlook:
var app = PublicClientApplicationBuilder
    .Create("your-client-id")
    .WithDefaultRedirectUri()
    .Build();

string[] scopes = new[] { "https://outlook.office365.com/IMAP.AccessAsUser.All" };

AuthenticationResult result = await app
    .AcquireTokenInteractive(scopes)
    .ExecuteAsync();

string accessToken = result.AccessToken;
For Gmail, you can use Google.Apis.Auth or any OAuth 2.0 compliant method to retrieve a token with the https://mail.google.com/ scope. This token can then be passed to Spire.Email for authentication.
Read Emails Using IMAP in C# from Outlook and Gmail
To read emails from Outlook or Gmail in C#, IMAP is a widely used protocol that allows access to mailbox folders, message flags, and full message content. With Spire.Email for .NET, you can use the ImapClient class to connect securely to IMAP servers using OAuth tokens.
The following C# example demonstrates how to read emails from Outlook's IMAP server:
using Spire.Email;
using Spire.Email.IMap;
using System.Text;

class Program
{
    static void Main()
    {
        ImapClient client = new ImapClient();

        // Connect to IMAP server (Outlook)
        client.Host = "outlook.office365.com";
        client.Port = 993;
        client.ConnectionProtocols = ConnectionProtocols.Ssl;

        // Use OAuth 2.0
        client.UseOAuth = true;
        client.Username = "your-email@outlook.com";
        client.AccessToken = "your-access-token";

        client.Connect();
        client.Login();

        // Retrieve message count in the Inbox
        int messageCount = client.GetMessageCount("Inbox");
        StringBuilder messageDetails = new StringBuilder();

        for (int i = 0; i <= messageCount; i++)
        {
            MailMessage message = client.GetFullMessage(i);
            messageDetails.AppendLine("Message: " + i);
            messageDetails.AppendLine("Subject: " + message.Subject);
            messageDetails.AppendLine("From: " + message.From.Address);
            messageDetails.AppendLine("Date: " + message.Date);
            messageDetails.AppendLine("Body (HTML): " + message.BodyHtml);
        }

        File.WriteAllText("MessageInfo.txt", messageDetails.ToString());
        client.Disconnect();
    }
}
Technical Details
- ImapClient: Represents an IMAP client connection. It handles server communication and supports OAuth-based authentication via the UseOAuth property.
- Host and Port: Set the server address and port number. For Outlook, you can use "outlook.office365.com" and port 993 with SSL.
- AccessToken: Replace "your-access-token" with a valid token obtained via Microsoft or Google OAuth 2.0 flow.
- GetMessageCount("Inbox"): Retrieves the number of emails in the specified folder.
- GetFullMessage(i): Retrieves the full content of the message at the specified index as a MailMessage object.
- MailMessage: Represents an email message. Properties like Subject, From, Date, and BodyHtml allow structured access to message details.
The following screenshot shows the extracted email subject, sender, and HTML body saved from Outlook using IMAP:
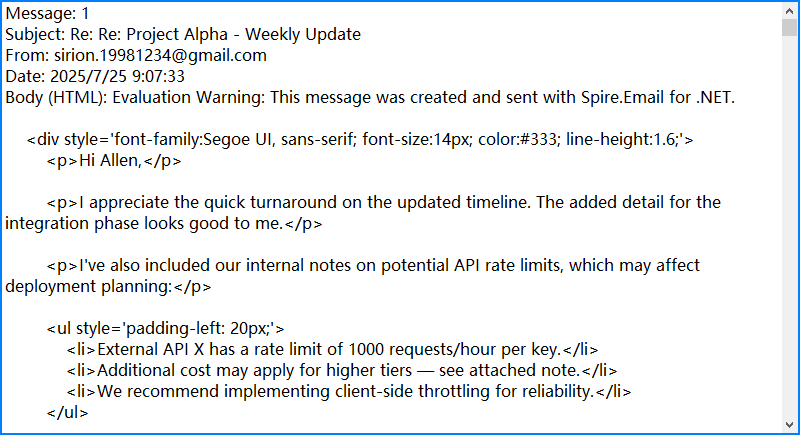
By combining Spire.Email’s IMAP interface with OAuth security and flexible MIME parsing, you can reliably automate email reading in C# with full access to both content and context.
If you need examples of how to send emails, please refer to How to Send Emails Using C#.
Read Emails via POP3 in C#
If folder management and server-side search are not required, POP3 offers a simpler alternative to IMAP. The following example demonstrates how to read emails using POP3 with Spire.Email.
using Spire.Email;
using Spire.Email.Pop3;

Pop3Client popClient = new Pop3Client();
popClient.Host = "pop.gmail.com";
popClient.Port = 995;
popClient.EnableSsl = true;
popClient.Username = "your-address@gmail.com";
popClient.Password = "your-password";

// Or use OAuth
// popClient.UseOAuth = true;
// popClient.AccessToken = "your-access-token";

popClient.Connect();
popClient.Login();

for (int i = 1; i < popClient.GetMessageCount(); i++)
{
    MailMessage msg = popClient.GetMessage(i);
    Console.WriteLine("Message - " + i);
    Console.WriteLine("Subject: " + msg.Subject);
    Console.WriteLine("From: " + msg.From.Address);
}

popClient.Disconnect();
This screenshot displays the console output after fetching messages via POP3 from Gmail:
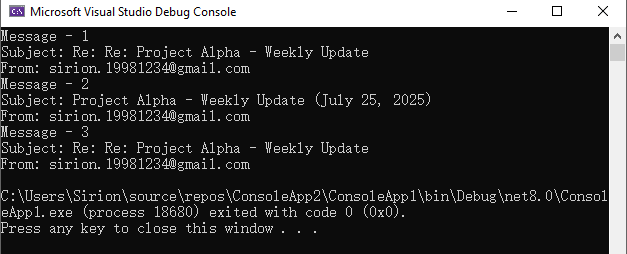
Unlike IMAP, POP3 downloads messages but does not maintain folder structure or message states on the server. Choose POP3 for simple retrieval scenarios.
Advanced Email Parsing in C#: Extract Attachments and Plain Text
In many cases, it's necessary to extract the plain-text content of an email for further processing, or to retrieve attachments for downstream use such as storage, analysis, or forwarding. The following C# example demonstrates how to access and save both the plain-text body and attachments using the MailMessage object.
MailMessage message = client.GetFullMessage(index);

// Retrieve plain text content
string plainText = message.BodyText;

// Extract attachments
foreach (Attachment attachment in message.Attachments)
{
    string path = Path.Combine("Attachments", attachment.ContentType.Name);
    Directory.CreateDirectory("Attachments");
    using (var fileStream = new FileStream(path, FileMode.Create, FileAccess.Write))
    {
        attachment.Data.Position = 0;
        attachment.Data.CopyTo(fileStream);
    }
}
Notes:
- Most emails contain both HTML and plain text bodies; use the format appropriate for your application.
- To skip embedded images (like inline logos), check that attachment.ContentDisposition.DispositionType != "Inline".
Below is a sample output showing saved attachments and extracted plain text from the retrieved email:
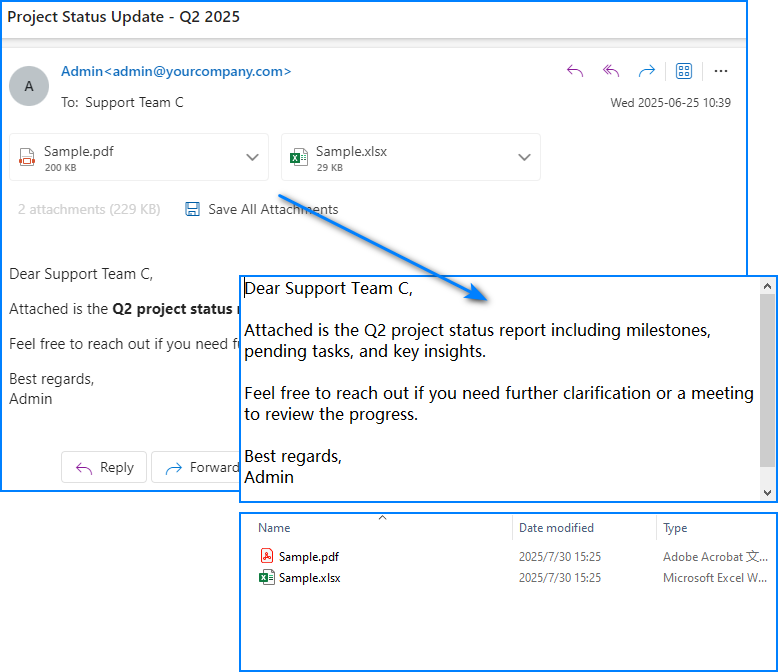
For more detailed operations such as managing email folders—creating, deleting, or moving messages—please refer to our guide on Email Folder Management in C#.
Summary
With Spire.Email for .NET, you can programmatically access Gmail or Outlook inboxes in C# using either IMAP or POP3. The library supports OAuth 2.0 authentication, parses both HTML and plain-text email bodies, and enables attachment extraction for downstream processing. Whether you're building an internal automation tool, an alerting system, or an email parser, Spire.Email provides the essential components for email integration in .NET applications.
If you'd like to explore all features without limitations, you can apply for a free temporary license.
Frequently Asked Questions
Can I use Spire.Email for sending emails too?
Yes. Spire.Email for .NET includes support for SMTP as well, allowing you to send HTML-formatted emails, add attachments, and configure encoding and headers.
Does Spire.Email work with other email providers?
Yes. As long as the provider supports standard IMAP, POP3, or SMTP protocols, and offers compatible authentication (OAuth or basic), it will work with Spire.Email.
How do I get the access token programmatically?
For Outlook, you can use Microsoft’s MSAL.NET; for Gmail, use Google.Apis.Auth or any other OAuth library that retrieves a valid token with mail access scopes. These tokens can then be passed to the email client for secure login.
Come eliminare pagine da un PDF con o senza Adobe Acrobat
Installa con Nuget
PM> Install-Package Spire.PDF
Link correlati
Introduzione:
I PDF sono ottimi per condividere e preservare la formattazione dei documenti, ma a volte contengono pagine non necessarie di cui non hai bisogno. Che si tratti di una pagina bianca alla fine di un report o di contenuti obsoleti in un contratto, sapere come eliminare pagine da un PDF in modo rapido ed efficiente può farti risparmiare tempo e migliorare il tuo flusso di lavoro.
In questa guida, ti illustreremo tre semplici metodi per rimuovere pagine da un PDF su Windows e Mac utilizzando Adobe Acrobat, uno strumento online e persino soluzioni di codice automatizzate per sviluppatori o attività in batch. La tabella seguente contiene alcune informazioni di base sui tre metodi. Puoi avere un'anteprima e passare al tutorial corrispondente.
| Metodo | Ideale per | Vantaggi | Svantaggi |
| Adobe Acrobat | Utenti occasionali con un abbonamento | Affidabile, preciso | metodo a pagamento |
| Strumento online | Modifiche rapide e una tantum | Nessuna installazione, facile da usare | Nessuna idea sulla sicurezza dei file |
| Codice (Spire.PDF) | Sviluppatori e aziende | Completamente automatizzato, scalabile | Richiede conoscenze di programmazione |
Metodo 1. Eliminare pagine da PDF su Windows e Mac con Adobe Acrobat
Se hai già installato Adobe Acrobat, è uno degli strumenti più affidabili e professionali per la gestione dei file PDF. Che tu stia lavorando con documenti di grandi dimensioni o abbia bisogno di rimuovere solo alcune pagine indesiderate, Acrobat offre una soluzione semplice.
Iniziamo esplorando come eliminare pagine da un PDF utilizzando Adobe Acrobat.
Per utenti Windows:
- Passaggio 1. Apri il tuo file PDF con Adobe Acrobat.
- Passaggio 2. Vai alla scheda "Strumenti" e seleziona "Organizza pagine".
- Passaggio 3. Appariranno le miniature di tutte le pagine: fai clic sulla/e pagina/e che desideri eliminare.
- Passaggio 4. Fai clic sull'icona del cestino o fai clic con il pulsante destro del mouse e scegli "Elimina pagine".
- Passaggio 5. Salva il tuo file PDF aggiornato.
Per utenti Mac:
- Passaggio 1. Avvia Adobe Acrobat e apri il tuo PDF.
- Passaggio 2. Fai clic su "Visualizza" > "Strumenti" > "Organizza pagine".
- Passaggio 3. Seleziona le pagine che desideri rimuovere.
- Passaggio 4. Premi l'icona di eliminazione o fai clic con il pulsante destro del mouse e scegli "Elimina pagine".
- Passaggio 5. Salva le modifiche e puoi scegliere di salvare il file PDF come nuovo.
Metodo 2. Eliminare pagine PDF con uno strumento online
Se non hai un abbonamento ad Adobe Acrobat e l'eliminazione è urgente, come puoi eliminare pagine da un file PDF senza Adobe Acrobat? Cerca su Google e prova uno strumento online per eliminare le tue pagine PDF. Il vantaggio di utilizzare uno strumento online è che non sono necessari download e installazioni aggiuntive. È molto comodo e gratuito se devi eliminare solo poche pagine.
In questa sezione, prenderò SmallPDF come esempio per mostrarti come fare.
Segui i passaggi seguenti e scopri come utilizzare uno strumento online per eliminare pagine da un file PDF:
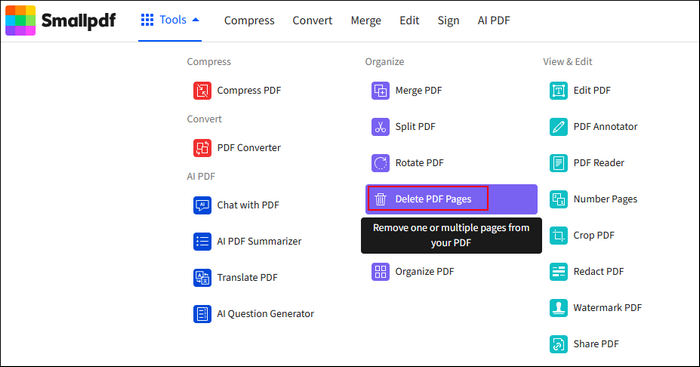
Passaggio 1. Cerca su Google e vai al sito ufficiale di SmallPDF. Trova la parte "Strumenti" dal menu in alto e vai alla funzione "Elimina pagine PDF".
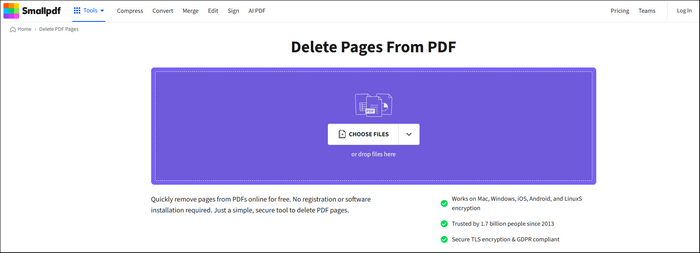
Passaggio 2. Puoi caricare i tuoi file PDF tramite la funzione di navigazione o trascinare direttamente il file nell'interfaccia principale.
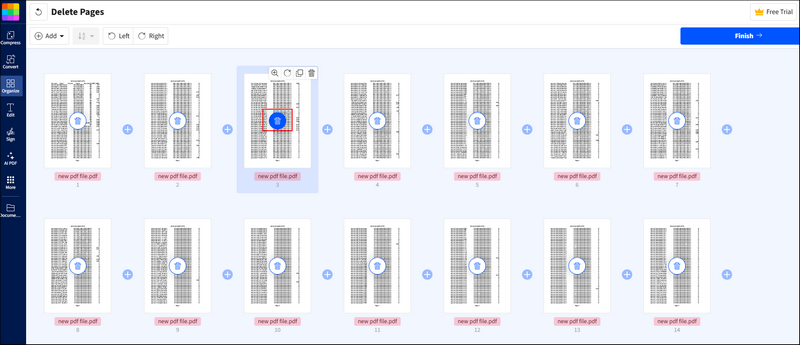
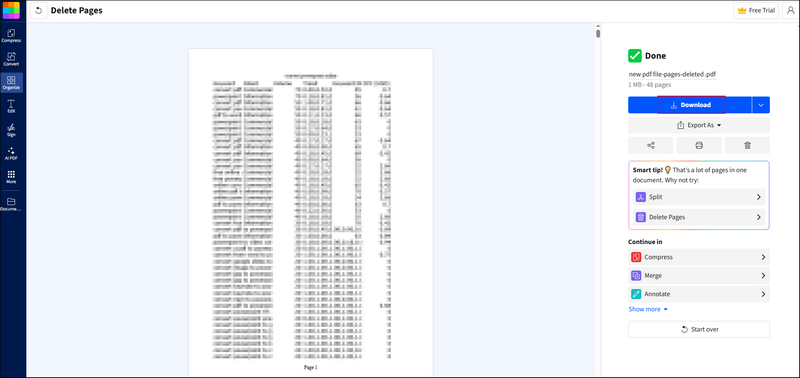
Passaggio 3. SmallPDF inizierà automaticamente ad analizzare il tuo file PDF. Vedrai il file PDF nel formato seguente. C'è un pulsante del cestino per ogni pagina. Trova semplicemente la pagina che desideri eliminare e fai clic sul pulsante del cestino.
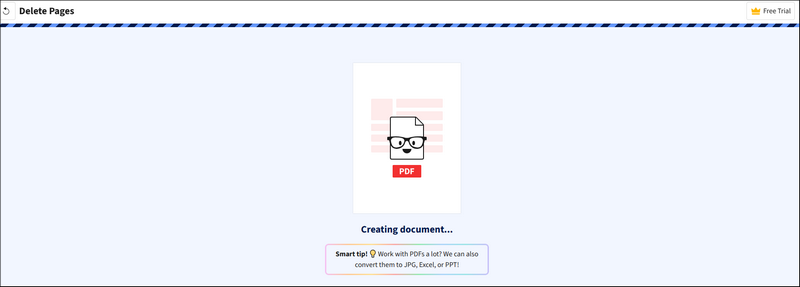
Passaggio 4. Quindi, fai clic sul pulsante Fine e attendi il processo.
Passaggio 5. Dopo l'eliminazione, puoi fare clic sul pulsante "Scarica" per salvare il tuo file PDF.
Metodo 3. Eliminare pagine da un file PDF automaticamente con il codice
Per gli sviluppatori o gli utenti avanzati che devono eliminare un gran numero di pagine da più file PDF a livello di codice, l'uso del codice è l'opzione più efficiente. Con la potente API del codice, non è necessario eliminare manualmente le pagine una per una.
Prima di fornire il codice di esempio, dovresti anche sapere che la scelta di una potente libreria di codice gioca un ruolo importante per un processo fluido. Lascia che ti presenti Spire.PDF for .NET, una versatile libreria PDF progettata per gli sviluppatori .NET per creare, leggere, modificare, convertire e proteggere facilmente i documenti PDF all'interno delle loro applicazioni. È completamente indipendente e non richiede Adobe Acrobat o strumenti esterni, supportando una vasta gamma di attività PDF, dalla generazione di report PDF dinamici alla conversione di PDF in Word, Excel, HTML e formati di immagine.
Ecco i passaggi per utilizzare Spire.PDF for .NET per eliminare pagine da un file PDF:
Passaggio 1. Installa Spire.PDF for .NET nel tuo ambiente C#. Puoi scaricare l'API del codice dalla pagina di download ufficiale o installarla con NuGet con il seguente codice:
PM> Install-Package Spire.PDF
- Suggerimento: Se desideri rimuovere il messaggio di valutazione dai documenti generati o eliminare le limitazioni delle funzioni, richiedi una licenza di prova di 30 giorni per te.
Passaggio 2. Copia il codice di esempio qui sotto e non dimenticare di configurare la posizione e il nome del file in base alla tua situazione specifica.
Codice di esempio in C# con Spire.PDF for .NET:
using Spire.Pdf;

namespace RemovePage
{
    class Program
    {
        static void Main(string[] args)
        {
            //Crea un oggetto PdfDocument
            PdfDocument document = new PdfDocument();

            //Carica un documento PDF di esempio
            document.LoadFromFile(@"E:\Files\input.pdf");

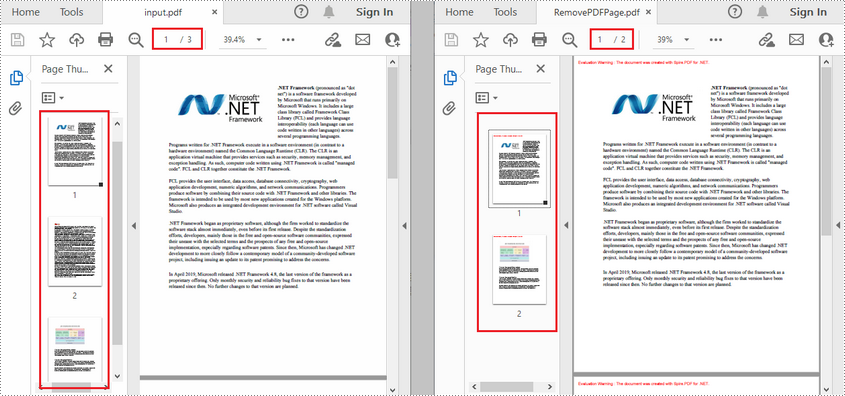
            //Rimuovi la seconda pagina
            document.Pages.RemoveAt(1);

            //Salva il documento risultante
            document.SaveToFile("RemovePDFPage.pdf");
        }
    }
}
RISULTATO:
Cerchi un tutorial più dettagliato? Il seguente post ti sarà d'aiuto:
C#/VB.NET: Eliminare pagine da un PDF
Riepilogo
Non esiste un metodo unico per eliminare le pagine da un PDF. La soluzione migliore dipende dalle tue esigenze specifiche, dai dispositivi e dal tuo livello di comfort tecnico.
Ora che sai come eliminare le pagine da un PDF, puoi scegliere il metodo che meglio si adatta al tuo flusso di lavoro. Che tu stia lavorando a una rapida correzione di un documento o costruendo un processo di automazione completo, questi strumenti rendono l'eliminazione delle pagine semplice e senza stress.
Leggi anche:
Como excluir páginas de um PDF com ou sem o Adobe Acrobat
Instalar com Nuget
PM> Install-Package Spire.PDF
Links Relacionados
Introdução:
Os PDFs são ótimos para compartilhar e preservar a formatação de documentos, mas às vezes eles contêm páginas desnecessárias que você не precisa. Seja uma página em branco no final de um relatório ou conteúdo desatualizado em um contrato, saber como excluir páginas de um PDF de forma rápida e eficiente pode economizar seu tempo e melhorar seu fluxo de trabalho.
Neste guia, mostraremos três métodos fáceis para remover páginas de um PDF no Windows e Mac usando o Adobe Acrobat, uma ferramenta online e até mesmo soluções de código automatizadas para desenvolvedores ou tarefas em lote. A tabela a seguir contém algumas informações básicas dos três métodos. Você pode obter uma prévia e pular para o tutorial correspondente.
| Método | Melhor Para | Prós | Contras |
| Adobe Acrobat | Usuários ocasionais com uma assinatura | Confiável, preciso | método pago |
| Ferramenta Online | Edições rápidas e únicas | Sem instalação, fácil de usar | Nenhuma ideia sobre a segurança do arquivo |
| Código (Spire.PDF) | Desenvolvedores e empresas | Totalmente automatizado, escalável | Requer conhecimento de programação |
Método 1. Excluir Páginas de PDF no Windows e Mac com o Adobe Acrobat
Se você já tem o Adobe Acrobat instalado, é uma das ferramentas mais confiáveis e profissionais para gerenciar arquivos PDF. Quer esteja trabalhando com documentos grandes ou precise remover apenas algumas páginas indesejadas, o Acrobat oferece uma solução direta.
Vamos começar explorando como excluir páginas de um PDF usando o Adobe Acrobat.
Para usuários do Windows:
- Passo 1. Abra seu arquivo PDF com o Adobe Acrobat.
- Passo 2. Vá para a guia "Ferramentas" e selecione "Organizar Páginas".
- Passo 3. Miniaturas de todas as páginas aparecerão — clique na(s) página(s) que deseja excluir.
- Passo 4. Clique no ícone da lixeira ou clique com o botão direito e escolha "Excluir Páginas".
- Passo 5. Salve seu arquivo PDF atualizado.
Para usuários de Mac:
- Passo 1. Inicie o Adobe Acrobat e abra seu PDF.
- Passo 2. Clique em "Visualizar" > "Ferramentas" > "Organizar Páginas".
- Passo 3. Selecione as páginas que deseja remover.
- Passo 4. Pressione o ícone de exclusão ou clique com o botão direito e escolha "Excluir Páginas".
- Passo 5. Salve suas alterações e você pode optar por salvar o arquivo PDF como um novo.
Método 2. Excluir Páginas de PDF com uma Ferramenta Online
Se você não tem uma assinatura do Adobe Acrobat e a exclusão é urgente, como pode excluir páginas de um arquivo PDF sem o Adobe Acrobat? Pesquise no Google e experimente uma ferramenta online para excluir suas páginas de PDF. O benefício de usar uma ferramenta online é que não há download e instalação extras. É bastante conveniente e gratuito se você tiver apenas algumas páginas para excluir.
Nesta seção, usarei o SmallPDF como exemplo para mostrar como fazer.
Siga os passos abaixo e veja como usar uma ferramenta online para excluir páginas de um arquivo PDF:
Passo 1. Pesquise no Google e acesse o site oficial do SmallPDF. Encontre a parte "Ferramentas" no menu superior e vá para a função "Excluir Páginas de PDF".
Passo 2. Você pode enviar seus arquivos PDF através da função de navegação ou arrastar diretamente o arquivo para a interface principal.
Passo 3. O SmallPDF começará a analisar seu arquivo PDF automaticamente. Você verá o arquivo PDF no formato abaixo. Há um botão de lixeira para cada página. Basta encontrar a página que você gostaria de excluir e clicar no botão da lixeira.
Passo 4. Em seguida, clique no botão de concluir e aguarde o processo.
Passo 5. Após a exclusão, você pode clicar no botão "Baixar" para salvar seu arquivo PDF.
Método 3. Excluir Páginas de um Arquivo PDF Automaticamente com Código
Para desenvolvedores ou usuários avançados que precisam excluir um grande número de páginas de vários arquivos PDF programaticamente, usar código é a opção mais eficiente. Com a poderosa API de código, você não precisa excluir manualmente as páginas uma por uma.
Antes de fornecer o código de exemplo, você também deve saber que a escolha de uma biblioteca de código poderosa também desempenha um papel importante para um processo tranquilo. Deixe-me apresentar o Spire.PDF for .NET, uma biblioteca de PDF versátil projetada para desenvolvedores .NET para criar, ler, editar, converter e proteger documentos PDF facilmente em suas aplicações. É totalmente independente e не requer o Adobe Acrobat ou ferramentas externas, suportando uma ampla gama de tarefas de PDF — desde a geração de relatórios dinâmicos em PDF até a conversão de PDFs para Word, Excel, HTML e formatos de imagem.
Aqui estão os passos para usar o Spire.PDF for .NET para excluir páginas de um arquivo PDF:
Passo 1. Instale o Spire.PDF for .NET em seu ambiente C#. Você pode baixar a API de código na página de download oficial ou instalar com o NuGet com o seguinte código:
PM> Install-Package Spire.PDF
- Dica: Se você quiser remover a mensagem de avaliação dos documentos gerados, ou se livrar das limitações de funções, por favor, solicite uma licença de teste de 30 dias para você.
Passo 2. Copie o código de exemplo abaixo e não se esqueça de configurar a localização e o nome do arquivo de acordo com sua situação específica.
Código de exemplo em C# com Spire.PDF for .NET:
using Spire.Pdf;

namespace RemovePage
{
    class Program
    {
        static void Main(string[] args)
        {
            //Criar um objeto PdfDocument
            PdfDocument document = new PdfDocument();

            //Carregar um documento PDF de exemplo
            document.LoadFromFile(@"E:\Files\input.pdf");

            //Remover a segunda página
            document.Pages.RemoveAt(1);

            //Salvar o documento resultante
            document.SaveToFile("RemovePDFPage.pdf");
        }
    }
}
RESULTADO:
Procurando um tutorial mais detalhado? A postagem a seguir lhe dará alguma ajuda:
C#/VB.NET: Excluir Páginas de PDF
Resumo
Não existe um método único para excluir páginas de um PDF. A melhor solução depende de suas necessidades específicas, dispositivos e nível de conforto técnico.
Agora que você sabe como excluir páginas de um PDF, pode escolher o método que melhor se adapta ao seu fluxo de trabalho. Esteja você trabalhando em uma correção rápida de um documento ou construindo um processo de automação completo, essas ferramentas tornam a exclusão de páginas simples e sem estresse.
Leia também:
Adobe Acrobat을 사용하거나 사용하지 않고 PDF 페이지를 삭제하는 방법
Nuget으로 설치
PM> Install-Package Spire.PDF
관련 링크
소개:
PDF는 문서 서식을 공유하고 보존하는 데 유용하지만 때로는 필요 없는 페이지가 포함되어 있습니다. 보고서 끝에 있는 빈 페이지이든 계약서의 오래된 내용이든 PDF에서 페이지를 삭제하는 방법을 빠르고 효율적으로 알면 시간을 절약하고 작업 흐름을 개선할 수 있습니다.
이 가이드에서는 Adobe Acrobat, 온라인 도구, 심지어 개발자나 일괄 작업을 위한 자동화된 코드 솔루션을 사용하여 Windows 및 Mac에서 PDF 페이지를 제거하는 세 가지 쉬운 방법을 안내합니다. 다음 표에는 세 가지 방법에 대한 기본 정보가 포함되어 있습니다. 미리 보고 해당 튜토리얼로 이동할 수 있습니다.
| 방법 | 가장 적합한 대상 | 장점 | 단점 |
| Adobe Acrobat | 구독이 있는 비정기 사용자 | 신뢰성, 정밀성 | 유료 방법 |
| 온라인 도구 | 빠른, 일회성 편집 | 설치 불필요, 사용하기 쉬움 | 파일 보안에 대해 알 수 없음 |
| 코드 (Spire.PDF) | 개발자 및 기업 | 완전 자동화, 확장 가능 | 프로그래밍 지식 필요 |
방법 1. Adobe Acrobat을 사용하여 Windows 및 Mac에서 PDF 페이지 삭제
Adobe Acrobat이 이미 설치되어 있다면 PDF 파일을 관리하는 가장 신뢰할 수 있고 전문적인 도구 중 하나입니다. 대용량 문서를 다루거나 몇 개의 불필요한 페이지만 제거해야 하는 경우 Acrobat은 간단한 솔루션을 제공합니다.
Adobe Acrobat을 사용하여 PDF에서 페이지를 삭제하는 방법을 살펴보겠습니다.
Windows 사용자용:
- 1단계. Adobe Acrobat으로 PDF 파일을 엽니다.
- 2단계. "도구" 탭으로 이동하여 "페이지 구성"을 선택합니다.
- 3단계. 모든 페이지의 축소판이 나타납니다. 삭제하려는 페이지를 클릭합니다.
- 4단계. 휴지통 아이콘을 클릭하거나 마우스 오른쪽 버튼을 클릭하고 "페이지 삭제"를 선택합니다.
- 5단계. 업데이트된 PDF 파일을 저장합니다.
Mac 사용자용:
- 1단계. Adobe Acrobat을 실행하고 PDF를 엽니다.
- 2단계. "보기" > "도구" > "페이지 구성"을 클릭합니다.
- 3단계. 제거하려는 페이지를 선택합니다.
- 4단계. 삭제 아이콘을 누르거나 마우스 오른쪽 버튼을 클릭하고 "페이지 삭제"를 선택합니다.
- 5단계. 변경 사항을 저장하고 PDF 파일을 새 파일로 저장하도록 선택할 수 있습니다.
방법 2. 온라인 도구로 PDF 페이지 삭제
Adobe Acrobat 구독이 없고 삭제가 시급한 경우 Adobe Acrobat 없이 PDF 파일에서 페이지를 어떻게 삭제할 수 있을까요? Google에서 검색하여 PDF 페이지를 삭제할 수 있는 온라인 도구를 사용해 보십시오. 온라인 도구 사용의 이점은 추가 다운로드 및 설치가 없다는 것입니다. 몇 페이지만 삭제하면 되므로 매우 편리하고 비용이 들지 않습니다.
이 섹션에서는 SmallPDF를 예로 들어 방법을 보여 드리겠습니다.
아래 단계를 따르고 온라인 도구를 사용하여 PDF 파일에서 페이지를 삭제하는 방법을 확인하십시오.
1단계. Google에서 검색하여 SmallPDF 공식 사이트로 이동합니다. 상단 메뉴에서 "도구" 부분을 찾아 "PDF 페이지 삭제" 기능으로 이동합니다.
2단계. 탐색 기능을 통해 PDF 파일을 업로드하거나 파일을 주 인터페이스로 직접 드래그할 수 있습니다.
3단계. SmallPDF가 자동으로 PDF 파일 분석을 시작합니다. 아래 형식으로 PDF 파일이 표시됩니다. 각 페이지에는 휴지통 버튼이 있습니다. 삭제하려는 페이지를 찾아 휴지통 버튼을 클릭하기만 하면 됩니다.
4단계. 그런 다음 완료 버튼을 클릭하고 프로세스를 기다립니다.
5단계. 삭제 후 "다운로드" 버튼을 클릭하여 PDF 파일을 저장할 수 있습니다.
방법 3. 코드를 사용하여 PDF 파일에서 자동으로 페이지 삭제
프로그래밍 방식으로 여러 PDF 파일에서 많은 수의 페이지를 삭제해야 하는 개발자나 고급 사용자에게는 코드를 사용하는 것이 가장 효율적인 옵션입니다. 강력한 코드 API를 사용하면 페이지를 하나씩 수동으로 삭제할 필요가 없습니다.
샘플 코드를 제공하기 전에 강력한 코드 라이브러리를 선택하는 것도 원활한 프로세스를 위해 중요한 역할을 한다는 것을 알아야 합니다. .NET 개발자를 위해 설계된 다목적 PDF 라이브러리인 Spire.PDF for .NET을 소개합니다. 이 라이브러리를 사용하면 애플리케이션 내에서 PDF 문서를 쉽게 생성, 읽기, 편집, 변환 및 보호할 수 있습니다. 완전히 독립적이며 Adobe Acrobat이나 외부 도구가 필요 없으며 동적 PDF 보고서 생성부터 PDF를 Word로 변환, Excel, HTML 및 이미지 형식으로 변환하는 것까지 광범위한 PDF 작업을 지원합니다.
다음은 Spire.PDF for .NET을 사용하여 PDF 파일에서 페이지를 삭제하는 단계입니다.
1단계. C# 환경에 Spire.PDF for .NET을 설치합니다. 공식 다운로드 페이지에서 코드 API를 다운로드하거나 다음 코드를 사용하여 NuGet으로 설치할 수 있습니다.
PM> Install-Package Spire.PDF
- 팁: 생성된 문서에서 평가 메시지를 제거하거나 기능 제한을 없애려면 30일 평가판 라이선스를 요청하십시오.
2단계. 아래 샘플 코드를 복사하고 특정 상황에 맞게 파일 위치와 이름을 구성하는 것을 잊지 마십시오.
C#의 샘플 코드(Spire.PDF for .NET 사용):
using Spire.Pdf;

namespace RemovePage
{
    class Program
    {
        static void Main(string[] args)
        {
            //PdfDocument 객체 생성
            PdfDocument document = new PdfDocument();

            //샘플 PDF 문서 로드
            document.LoadFromFile(@"E:\Files\input.pdf");

            //두 번째 페이지 제거
            document.Pages.RemoveAt(1);

            //결과 문서 저장
            document.SaveToFile("RemovePDFPage.pdf");
        }
    }
}
결과:
더 자세한 튜토리얼을 찾고 계신가요? 다음 게시물이 도움이 될 것입니다.
요약
PDF에서 페이지를 삭제하는 데 만능인 방법은 없습니다. 최상의 솔루션은 특정 요구 사항, 장치 및 기술적 편의 수준에 따라 다릅니다.
이제 PDF에서 페이지를 삭제하는 방법을 알았으니 작업 흐름에 가장 적합한 방법을 선택할 수 있습니다. 빠른 문서 수정 작업을 하든 전체 자동화 프로세스를 구축하든 이 도구들은 페이지 삭제를 간단하고 스트레스 없이 만듭니다.
또한 읽기: