Java convierte palabras en imágenes (JPG, PNG y SVG)
Tabla de contenido
Instalar con Maven
<dependency>
    <groupId>e-iceblue</groupId>
    <artifactId>spire.doc</artifactId>
    <version>12.2.2</version>
</dependency>
enlaces relacionados
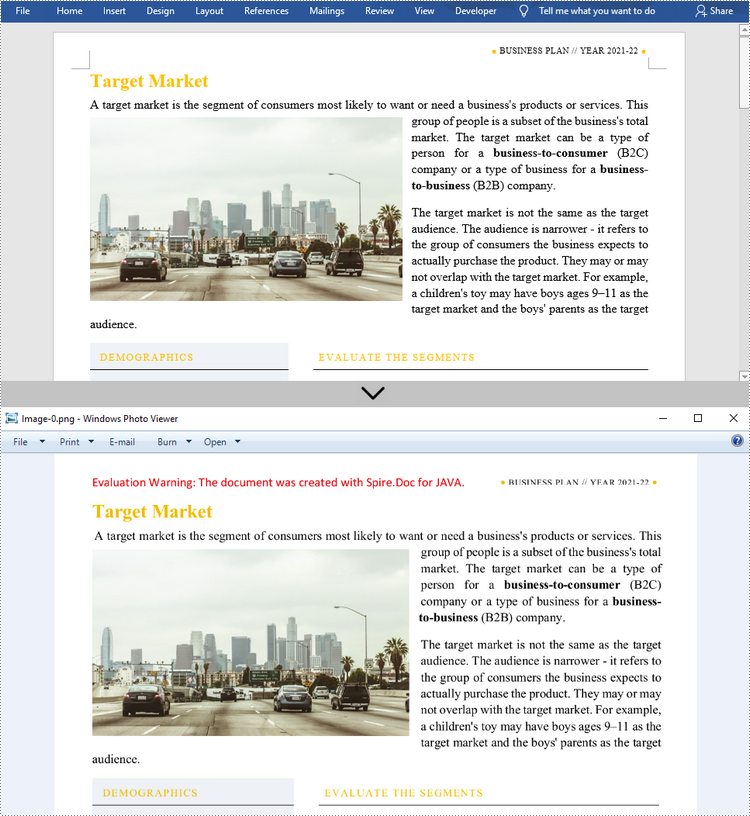
Hay muchas razones por las que es posible que necesites convertir documentos de Word en imágenes. Por ejemplo, muchos dispositivos pueden abrir y mostrar imágenes directamente sin ningún software especial, y cuando se transmiten imágenes, es difícil alterar su contenido. En este artículo, aprenderá cómo convertir Word a formatos de imagen populares como JPG, PNG y SVG usando Spire.Doc for Java.
- Convertir Word a JPG en Java
- Convertir Word a SVG en Java
- Convierta Word a PNG con resolución personalizada
Instalar Spire.Doc for Java
Primero, debe agregar el archivo Spire.Doc.jar como una dependencia en su programa Java. El archivo JAR se puede descargar desde este enlace.Si usa Maven, puede importar fácilmente el archivo JAR en su aplicación agregando el siguiente código al archivo pom.xml de su proyecto.
<repositories>
    <repository>
        <id>com.e-iceblue</id>
        <name>e-iceblue</name>
        <url>https://repo.e-iceblue.com/nexus/content/groups/public/</url>
    </repository>
</repositories>
<dependencies>
    <dependency>
        <groupId>e-iceblue</groupId>
        <artifactId>spire.doc</artifactId>
        <version>14.6.0</version>
    </dependency>
</dependencies>
Convertir Word a JPG en Java
Spire.Doc for Java ofrece el método Document.saveToImages() para convertir un documento completo de Word en imágenes BufferedImage individuales. Luego, cada BufferedImage se puede guardar como un archivo BMP, EMF, JPEG, PNG, GIF, o WMF. Los siguientes son los pasos para convertir Word a JPG usando esta biblioteca.
- Crea un objeto de documento.
- Cargue un documento de Word utilizando el método Document.loadFromFile().
- Convierta el documento en imágenes BufferedImage utilizando el método Document.saveToImages().
- Recorra la colección de imágenes para obtener la específica.
- Vuelva a escribir la imagen con un espacio de color diferente.
- Escriba la imagen almacenada en un archivo JPG.
- Java
import com.spire.doc.Document;
    import com.spire.doc.documents.ImageType;
    import javax.imageio.ImageIO;
    import java.awt.image.BufferedImage;
    import java.io.File;
    import java.io.IOException;

    public class ConvertWordToJPG {

        public static void main(String[] args) throws IOException {

            //Create a Document object
            Document doc = new Document();

            //Load a Word document
            doc.loadFromFile("C:\\Users\\Administrator\\Desktop\\ConvertTemplate.docx");

            //Convert the whole document into individual buffered images
            BufferedImage[] images = doc.saveToImages(ImageType.Bitmap);

            //Loop through the images
            for (int i = 0; i < images.length; i++) {

                //Get the specific image
                BufferedImage image = images[i];

                //Re-write the image with a different color space
                BufferedImage newImg = new BufferedImage(image.getWidth(), image.getHeight(), BufferedImage.TYPE_INT_RGB);
                newImg.getGraphics().drawImage(image, 0, 0, null);

                //Write to a JPG file
                File file = new File("C:\\Users\\Administrator\\Desktop\\Images\\" + String.format(("Image-%d.jpg"), i));
                ImageIO.write(newImg, "JPEG", file);
            }
        }
    }
Convertir Word a SVG en Java
Con Spire.Doc for Java, puede guardar un documento de Word como una lista de matrices de bytes. Luego, cada matriz de bytes se puede escribir como un archivo SVG. Los pasos detallados para convertir Word a SVG son los siguientes.
- Crea un objeto de documento.
- Cargue un archivo de Word usando el método Document.loadFromFile().
- Guarde el documento como una lista de matrices de bytes utilizando el método Document.saveToSVG().
- Recorra los elementos de la lista para obtener una matriz de bytes específica.
- Escriba la matriz de bytes en un archivo SVG.
- Java
import com.spire.doc.Document;
    import java.io.FileOutputStream;
    import java.io.IOException;
    import java.util.List;

    public class ConvertWordToSVG {

        public static void main(String[] args) throws IOException {

            //Create a Document object
            Document doc = new Document();

            //Load a Word document
            doc.loadFromFile("C:\\Users\\Administrator\\Desktop\\ConvertTemplate.docx");

            //Save the document as a list of byte arrays
            List<byte[]> svgBytes = doc.saveToSVG();

            //Loop through the items in the list
            for (int i = 0; i < svgBytes.size(); i++)
            {
                //Get a specific byte array
                byte[] byteArray = svgBytes.get(i);

                //Specify the output file name
                String outputFile = String.format("Image-%d.svg", i);

                //Write the byte array to a SVG file
                try (FileOutputStream stream = new FileOutputStream("C:\\Users\\Administrator\\Desktop\\Images\\" + outputFile)) {
                    stream.write(byteArray);
                }
            }
        }
    }
Convierta Word a PNG con resolución personalizada
Una imagen con mayor resolución generalmente es más clara. Puede personalizar la resolución de la imagen mientras convierte Word a PNG siguiendo los siguientes pasos.
- Crea un objeto de documento.
- Cargue un archivo de Word usando el método Document.loadFromFile().
- Convierta el documento en imágenes BufferedImage con la resolución especificada utilizando el método Document.saveToImages().
- Recorra la colección de imágenes para obtener la específica y guárdela como un archivo PNG.
- Java
import com.spire.doc.Document;
    import com.spire.doc.documents.ImageType;
    import javax.imageio.ImageIO;
    import java.awt.image.BufferedImage;
    import java.io.File;
    import java.io.IOException;

    public class ConvertWordToPNG {

        public static void main(String[] args) throws IOException {

            //Create a Document object
            Document doc = new Document();

            //Load a Word document
            doc.loadFromFile("C:\\Users\\Administrator\\Desktop\\ConvertTemplate.docx");

            //Convert the whole document into individual buffered images with customized resolution
            BufferedImage[] images = doc.saveToImages(0, doc.getPageCount(), ImageType.Bitmap, 150, 150);

            //Loop through the images
            for (int i = 0; i < images.length; i++) {

                //Get the specific image
                BufferedImage image = images[i];

                //Write to a PNG file
                File file = new File("C:\\Users\\Administrator\\Desktop\\Images\\" + String.format(("Image-%d.png"), i));
                ImageIO.write(image, "PNG", file);
            }
        }
    }
Solicitar una licencia temporal
Si desea eliminar el mensaje de evaluación de los documentos generados o deshacerse de las limitaciones de la función, por favor solicitar una licencia de prueba de 30 días para ti.
Java Word를 이미지로 변환(JPG, PNG 및 SVG)
목차
메이븐으로 설치
<dependency>
    <groupId>e-iceblue</groupId>
    <artifactId>spire.doc</artifactId>
    <version>12.2.2</version>
</dependency>
관련된 링크들
Word 문서를 이미지로 변환해야 하는 데에는 여러 가지 이유가 있습니다. 예를 들어, 많은 장치에서는 특별한 소프트웨어 없이도 이미지를 직접 열고 표시할 수 있으며, 이미지가 전송될 때 콘텐츠를 변조하기가 어렵습니다. 이 기사에서는 다음 방법을 배웁니다 Word를 널리 사용되는 이미지 형식으로 변환 Spire.Doc for Java 사용하여 JPG, PNG 및 SVG와 같은 파일을 만들 수 있습니다.
Spire.Doc for Java 설치
먼저 Spire.Doc.jar 파일을 Java 프로그램의 종속성으로 추가해야 합니다. JAR 파일은 이 링크에서 다운로드할 수 있습니다. Maven을 사용하는 경우 프로젝트의 pom.xml 파일에 다음 코드를 추가하여 애플리케이션에서 JAR 파일을 쉽게 가져올 수 있습니다.
<repositories>
    <repository>
        <id>com.e-iceblue</id>
        <name>e-iceblue</name>
        <url>https://repo.e-iceblue.com/nexus/content/groups/public/</url>
    </repository>
</repositories>
<dependencies>
    <dependency>
        <groupId>e-iceblue</groupId>
        <artifactId>spire.doc</artifactId>
        <version>14.6.0</version>
    </dependency>
</dependencies>
Java에서 Word를 JPG로 변환
Spire.Doc for Java 전체 Word 문서를 개별 BufferedImage 이미지로 변환하는 Document.saveToImages() 메서드를 제공합니다. 그런 다음 각 BufferedImage를 BMP, EMF, JPEG, PNG, GIF 또는 WMF 파일로 저장할 수 있습니다. 다음은 이 라이브러리를 사용하여 Word를 JPG로 변환하는 단계입니다.
- 문서 개체를 만듭니다.
- Document.loadFromFile() 메서드를 사용하여 Word 문서를 로드합니다.
- Document.saveToImages() 메서드를 사용하여 문서를 BufferedImage 이미지로 변환합니다.
- 특정 컬렉션을 얻으려면 이미지 컬렉션을 반복하세요.
- 다른 색상 공간으로 이미지를 다시 작성합니다.
- BufferedImage를 JPG 파일에 씁니다.
- Java
import com.spire.doc.Document;
    import com.spire.doc.documents.ImageType;
    import javax.imageio.ImageIO;
    import java.awt.image.BufferedImage;
    import java.io.File;
    import java.io.IOException;

    public class ConvertWordToJPG {

        public static void main(String[] args) throws IOException {

            //Create a Document object
            Document doc = new Document();

            //Load a Word document
            doc.loadFromFile("C:\\Users\\Administrator\\Desktop\\ConvertTemplate.docx");

            //Convert the whole document into individual buffered images
            BufferedImage[] images = doc.saveToImages(ImageType.Bitmap);

            //Loop through the images
            for (int i = 0; i < images.length; i++) {

                //Get the specific image
                BufferedImage image = images[i];

                //Re-write the image with a different color space
                BufferedImage newImg = new BufferedImage(image.getWidth(), image.getHeight(), BufferedImage.TYPE_INT_RGB);
                newImg.getGraphics().drawImage(image, 0, 0, null);

                //Write to a JPG file
                File file = new File("C:\\Users\\Administrator\\Desktop\\Images\\" + String.format(("Image-%d.jpg"), i));
                ImageIO.write(newImg, "JPEG", file);
            }
        }
    }
Java에서 Word를 SVG로 변환
Spire.Doc for Java 사용하면 Word 문서를 바이트 배열 목록으로 저장할 수 있습니다. 그런 다음 각 바이트 배열을 SVG 파일로 작성할 수 있습니다. Word를 SVG로 변환하는 자세한 단계는 다음과 같습니다.
- 문서 개체를 만듭니다.
- Document.loadFromFile() 메서드를 사용하여 Word 파일을 로드합니다.
- Document.saveToSVG() 메서드를 사용하여 문서를 바이트 배열 목록으로 저장합니다.
- 특정 바이트 배열을 얻으려면 목록의 항목을 반복하세요.
- 바이트 배열을 SVG 파일에 씁니다.
- Java
import com.spire.doc.Document;
    import java.io.FileOutputStream;
    import java.io.IOException;
    import java.util.List;

    public class ConvertWordToSVG {

        public static void main(String[] args) throws IOException {

            //Create a Document object
            Document doc = new Document();

            //Load a Word document
            doc.loadFromFile("C:\\Users\\Administrator\\Desktop\\ConvertTemplate.docx");

            //Save the document as a list of byte arrays
            List<byte[]> svgBytes = doc.saveToSVG();

            //Loop through the items in the list
            for (int i = 0; i < svgBytes.size(); i++)
            {
                //Get a specific byte array
                byte[] byteArray = svgBytes.get(i);

                //Specify the output file name
                String outputFile = String.format("Image-%d.svg", i);

                //Write the byte array to a SVG file
                try (FileOutputStream stream = new FileOutputStream("C:\\Users\\Administrator\\Desktop\\Images\\" + outputFile)) {
                    stream.write(byteArray);
                }
            }
        }
    }
사용자 정의된 해상도로 Word를 PNG로 변환
일반적으로 해상도가 높은 이미지가 더 선명합니다. 다음 단계에 따라 Word를 PNG로 변환하는 동안 이미지 해상도를 사용자 지정할 수 있습니다.
- 문서 개체를 만듭니다.
- Document.loadFromFile() 메서드를 사용하여 Word 파일을 로드합니다.
- Document.saveToImages() 메서드를 사용하여 문서를 지정된 해상도의 BufferedImage 이미지로 변환합니다.
- 이미지 컬렉션을 반복하여 특정 컬렉션을 얻고 PNG 파일로 저장합니다.
- Java
import com.spire.doc.Document;
    import com.spire.doc.documents.ImageType;
    import javax.imageio.ImageIO;
    import java.awt.image.BufferedImage;
    import java.io.File;
    import java.io.IOException;

    public class ConvertWordToPNG {

        public static void main(String[] args) throws IOException {

            //Create a Document object
            Document doc = new Document();

            //Load a Word document
            doc.loadFromFile("C:\\Users\\Administrator\\Desktop\\ConvertTemplate.docx");

            //Convert the whole document into individual buffered images with customized resolution
            BufferedImage[] images = doc.saveToImages(0, doc.getPageCount(), ImageType.Bitmap, 150, 150);

            //Loop through the images
            for (int i = 0; i < images.length; i++) {

                //Get the specific image
                BufferedImage image = images[i];

                //Write to a PNG file
                File file = new File("C:\\Users\\Administrator\\Desktop\\Images\\" + String.format(("Image-%d.png"), i));
                ImageIO.write(image, "PNG", file);
            }
        }
    }
임시 라이센스 신청
생성된 문서에서 평가 메시지를 제거하고 싶거나, 기능 제한을 없애고 싶다면 30일 평가판 라이센스 요청 자신을 위해.
Java Converti Word in Immagini (JPG, PNG e SVG)
Sommario
Installa con Maven
<dependency>
    <groupId>e-iceblue</groupId>
    <artifactId>spire.doc</artifactId>
    <version>12.2.2</version>
</dependency>
Link correlati
Esistono molti motivi per cui potrebbe essere necessario convertire i documenti Word in immagini. Ad esempio, molti dispositivi possono aprire e visualizzare le immagini direttamente senza alcun software speciale e quando le immagini vengono trasmesse il loro contenuto è difficile da manomettere. In questo articolo imparerai come farlo convertire Word nei formati di immagine più diffusi come JPG, PNG e SVG utilizzando Spire.Doc for Java.
- Converti Word in JPG in Java
- Converti Word in SVG in Java
- Converti Word in PNG con risoluzione personalizzata
Installa Spire.Doc for Java
Innanzitutto, devi aggiungere il file Spire.Doc.jar come dipendenza nel tuo programma Java. Il file JAR può essere scaricato da questo collegamento. Se utilizzi Maven, puoi importare facilmente il file JAR nella tua applicazione aggiungendo il seguente codice al file pom.xml del tuo progetto.
<repositories>
    <repository>
        <id>com.e-iceblue</id>
        <name>e-iceblue</name>
        <url>https://repo.e-iceblue.com/nexus/content/groups/public/</url>
    </repository>
</repositories>
<dependencies>
    <dependency>
        <groupId>e-iceblue</groupId>
        <artifactId>spire.doc</artifactId>
        <version>14.6.0</version>
    </dependency>
</dependencies>
Converti Word in JPG in Java
Spire.Doc for Java offre il metodo Document.saveToImages() per convertire un intero documento Word in singole immagini BufferedImage. Quindi, ciascuna BufferedImage può essere salvata come file BMP, EMF, JPEG, PNG, GIF o WMF. Di seguito sono riportati i passaggi per convertire Word in JPG utilizzando questa libreria.
- Creare un oggetto Documento.
- Carica un documento Word utilizzando il metodo Document.loadFromFile().
- Converti il documento in immagini BufferedImage utilizzando il metodo Document.saveToImages().
- Sfoglia la raccolta di immagini per ottenere quella specifica.
- Riscrivi l'immagine con uno spazio colore diverso.
- Scrivi BufferedImage in un file JPG.
- Java
import com.spire.doc.Document;
    import com.spire.doc.documents.ImageType;
    import javax.imageio.ImageIO;
    import java.awt.image.BufferedImage;
    import java.io.File;
    import java.io.IOException;

    public class ConvertWordToJPG {

        public static void main(String[] args) throws IOException {

            //Create a Document object
            Document doc = new Document();

            //Load a Word document
            doc.loadFromFile("C:\\Users\\Administrator\\Desktop\\ConvertTemplate.docx");

            //Convert the whole document into individual buffered images
            BufferedImage[] images = doc.saveToImages(ImageType.Bitmap);

            //Loop through the images
            for (int i = 0; i < images.length; i++) {

                //Get the specific image
                BufferedImage image = images[i];

                //Re-write the image with a different color space
                BufferedImage newImg = new BufferedImage(image.getWidth(), image.getHeight(), BufferedImage.TYPE_INT_RGB);
                newImg.getGraphics().drawImage(image, 0, 0, null);

                //Write to a JPG file
                File file = new File("C:\\Users\\Administrator\\Desktop\\Images\\" + String.format(("Image-%d.jpg"), i));
                ImageIO.write(newImg, "JPEG", file);
            }
        }
    }
Converti Word in SVG in Java
Utilizzando Spire.Doc for Java, è possibile salvare un documento Word come elenco di array di byte. Ogni array di byte può quindi essere scritto come file SVG. I passaggi dettagliati per convertire Word in SVG sono i seguenti.
- Creare un oggetto Documento.
- Carica un file Word utilizzando il metodo Document.loadFromFile().
- Salva il documento come elenco di array di byte utilizzando il metodo Document.saveToSVG().
- Passa in rassegna gli elementi nell'elenco per ottenere un array di byte specifico.
- Scrivi l'array di byte in un file SVG.
- Java
import com.spire.doc.Document;
    import java.io.FileOutputStream;
    import java.io.IOException;
    import java.util.List;

    public class ConvertWordToSVG {

        public static void main(String[] args) throws IOException {

            //Create a Document object
            Document doc = new Document();

            //Load a Word document
            doc.loadFromFile("C:\\Users\\Administrator\\Desktop\\ConvertTemplate.docx");

            //Save the document as a list of byte arrays
            List<byte[]> svgBytes = doc.saveToSVG();

            //Loop through the items in the list
            for (int i = 0; i < svgBytes.size(); i++)
            {
                //Get a specific byte array
                byte[] byteArray = svgBytes.get(i);

                //Specify the output file name
                String outputFile = String.format("Image-%d.svg", i);

                //Write the byte array to a SVG file
                try (FileOutputStream stream = new FileOutputStream("C:\\Users\\Administrator\\Desktop\\Images\\" + outputFile)) {
                    stream.write(byteArray);
                }
            }
        }
    }
Converti Word in PNG con risoluzione personalizzata
Un'immagine con una risoluzione più elevata è generalmente più chiara. È possibile personalizzare la risoluzione dell'immagine durante la conversione di Word in PNG seguendo i seguenti passaggi.
- Creare un oggetto Documento.
- Carica un file Word utilizzando il metodo Document.loadFromFile().
- Converti il documento in immagini BufferedImage con la risoluzione specificata utilizzando il metodo Document.saveToImages().
- Sfoglia la raccolta di immagini per ottenere quella specifica e salvarla come file PNG.
- Java
import com.spire.doc.Document;
    import com.spire.doc.documents.ImageType;
    import javax.imageio.ImageIO;
    import java.awt.image.BufferedImage;
    import java.io.File;
    import java.io.IOException;

    public class ConvertWordToPNG {

        public static void main(String[] args) throws IOException {

            //Create a Document object
            Document doc = new Document();

            //Load a Word document
            doc.loadFromFile("C:\\Users\\Administrator\\Desktop\\ConvertTemplate.docx");

            //Convert the whole document into individual buffered images with customized resolution
            BufferedImage[] images = doc.saveToImages(0, doc.getPageCount(), ImageType.Bitmap, 150, 150);

            //Loop through the images
            for (int i = 0; i < images.length; i++) {

                //Get the specific image
                BufferedImage image = images[i];

                //Write to a PNG file
                File file = new File("C:\\Users\\Administrator\\Desktop\\Images\\" + String.format(("Image-%d.png"), i));
                ImageIO.write(image, "PNG", file);
            }
        }
    }
Richiedi una licenza temporanea
Se desideri rimuovere il messaggio di valutazione dai documenti generati o eliminare le limitazioni della funzione, per favore richiedere una licenza di prova di 30 giorni per te.
Java Convertir des mots en images (JPG, PNG et SVG)
Table des matières
Installer avec Maven
<dependency>
    <groupId>e-iceblue</groupId>
    <artifactId>spire.doc</artifactId>
    <version>12.2.2</version>
</dependency>
Liens connexes
Il existe de nombreuses raisons pour lesquelles vous devrez peut-être convertir des documents Word en images. Par exemple, de nombreux appareils peuvent ouvrir et afficher des images directement sans aucun logiciel spécial, et lorsque les images sont transmises, leur contenu est difficile à falsifier. Dans cet article, vous apprendrez comment convertir Word en formats d'image populaires tels que JPG, PNG et SVG en utilisant Spire.Doc for Java.
- Convertir Word en JPG en Java
- Convertir Word en SVG en Java
- Convertir Word en PNG avec une résolution personnalisée
Installer Spire.Doc for Java
Tout d'abord, vous devez ajouter le fichier Spire.Doc.jar en tant que dépendance dans votre programme Java. Le fichier JAR peut être téléchargé à partir de ce lien. Si vous utilisez Maven, vous pouvez facilement importer le fichier JAR dans votre application en ajoutant le code suivant au fichier pom.xml de votre projet.
<repositories>
    <repository>
        <id>com.e-iceblue</id>
        <name>e-iceblue</name>
        <url>https://repo.e-iceblue.com/nexus/content/groups/public/</url>
    </repository>
</repositories>
<dependencies>
    <dependency>
        <groupId>e-iceblue</groupId>
        <artifactId>spire.doc</artifactId>
        <version>14.6.0</version>
    </dependency>
</dependencies>
Convertir Word en JPG en Java
Spire.Doc for Java propose la méthode Document.saveToImages() pour convertir un document Word entier en images BufferedImage individuelles. Ensuite, chaque BufferedImage peut être enregistrée sous forme de fichier BMP, EMF, JPEG, PNG, GIF ou WMF. Voici les étapes pour convertir Word en JPG à l'aide de cette bibliothèque.
- Créez un objet Document.
- Chargez un document Word à l'aide de la méthode Document.loadFromFile().
- Convertissez le document en images BufferedImage à l’aide de la méthode Document.saveToImages().
- Parcourez la collection d’images pour obtenir celle spécifique.
- Réécrivez l'image avec un espace colorimétrique différent.
- Écrivez BufferedImage dans un fichier JPG.
- Java
import com.spire.doc.Document;
    import com.spire.doc.documents.ImageType;
    import javax.imageio.ImageIO;
    import java.awt.image.BufferedImage;
    import java.io.File;
    import java.io.IOException;

    public class ConvertWordToJPG {

        public static void main(String[] args) throws IOException {

            //Create a Document object
            Document doc = new Document();

            //Load a Word document
            doc.loadFromFile("C:\\Users\\Administrator\\Desktop\\ConvertTemplate.docx");

            //Convert the whole document into individual buffered images
            BufferedImage[] images = doc.saveToImages(ImageType.Bitmap);

            //Loop through the images
            for (int i = 0; i < images.length; i++) {

                //Get the specific image
                BufferedImage image = images[i];

                //Re-write the image with a different color space
                BufferedImage newImg = new BufferedImage(image.getWidth(), image.getHeight(), BufferedImage.TYPE_INT_RGB);
                newImg.getGraphics().drawImage(image, 0, 0, null);

                //Write to a JPG file
                File file = new File("C:\\Users\\Administrator\\Desktop\\Images\\" + String.format(("Image-%d.jpg"), i));
                ImageIO.write(newImg, "JPEG", file);
            }
        }
    }
Convertir Word en SVG en Java
À l'aide de Spire.Doc for Java, vous pouvez enregistrer un document Word sous forme de liste de tableaux d'octets. Chaque tableau d'octets peut ensuite être écrit sous forme de fichier SVG. Les étapes détaillées pour convertir Word en SVG sont les suivantes.
- Créez un objet Document.
- Chargez un fichier Word à l'aide de la méthode Document.loadFromFile().
- Enregistrez le document sous forme de liste de tableaux d'octets à l'aide de la méthode Document.saveToSVG().
- Parcourez les éléments de la liste pour obtenir un tableau d’octets spécifique.
- Écrivez le tableau d'octets dans un fichier SVG.
- Java
import com.spire.doc.Document;
    import java.io.FileOutputStream;
    import java.io.IOException;
    import java.util.List;

    public class ConvertWordToSVG {

        public static void main(String[] args) throws IOException {

            //Create a Document object
            Document doc = new Document();

            //Load a Word document
            doc.loadFromFile("C:\\Users\\Administrator\\Desktop\\ConvertTemplate.docx");

            //Save the document as a list of byte arrays
            List<byte[]> svgBytes = doc.saveToSVG();

            //Loop through the items in the list
            for (int i = 0; i < svgBytes.size(); i++)
            {
                //Get a specific byte array
                byte[] byteArray = svgBytes.get(i);

                //Specify the output file name
                String outputFile = String.format("Image-%d.svg", i);

                //Write the byte array to a SVG file
                try (FileOutputStream stream = new FileOutputStream("C:\\Users\\Administrator\\Desktop\\Images\\" + outputFile)) {
                    stream.write(byteArray);
                }
            }
        }
    }
Convertir Word en PNG avec une résolution personnalisée
Une image avec une résolution plus élevée est généralement plus claire. Vous pouvez personnaliser la résolution de l'image lors de la conversion de Word en PNG en suivant les étapes suivantes.
- Créez un objet Document.
- Chargez un fichier Word à l'aide de la méthode Document.loadFromFile().
- Convertissez le document en images BufferedImage avec la résolution spécifiée à l'aide de la méthode Document.saveToImages().
- Parcourez la collection d’images pour obtenir celle spécifique et enregistrez-la sous forme de fichier PNG.
- Java
import com.spire.doc.Document;
    import com.spire.doc.documents.ImageType;
    import javax.imageio.ImageIO;
    import java.awt.image.BufferedImage;
    import java.io.File;
    import java.io.IOException;

    public class ConvertWordToPNG {

        public static void main(String[] args) throws IOException {

            //Create a Document object
            Document doc = new Document();

            //Load a Word document
            doc.loadFromFile("C:\\Users\\Administrator\\Desktop\\ConvertTemplate.docx");

            //Convert the whole document into individual buffered images with customized resolution
            BufferedImage[] images = doc.saveToImages(0, doc.getPageCount(), ImageType.Bitmap, 150, 150);

            //Loop through the images
            for (int i = 0; i < images.length; i++) {

                //Get the specific image
                BufferedImage image = images[i];

                //Write to a PNG file
                File file = new File("C:\\Users\\Administrator\\Desktop\\Images\\" + String.format(("Image-%d.png"), i));
                ImageIO.write(image, "PNG", file);
            }
        }
    }
Demander une licence temporaire
Si vous souhaitez supprimer le message d'évaluation des documents générés ou vous débarrasser des limitations fonctionnelles, veuillez demander une licence d'essai de 30 jours pour toi.
C# Edit or Delete Comments in Excel
Table of Contents
Installed via NuGet
PM> Install-Package Spire.XLS
Related Links
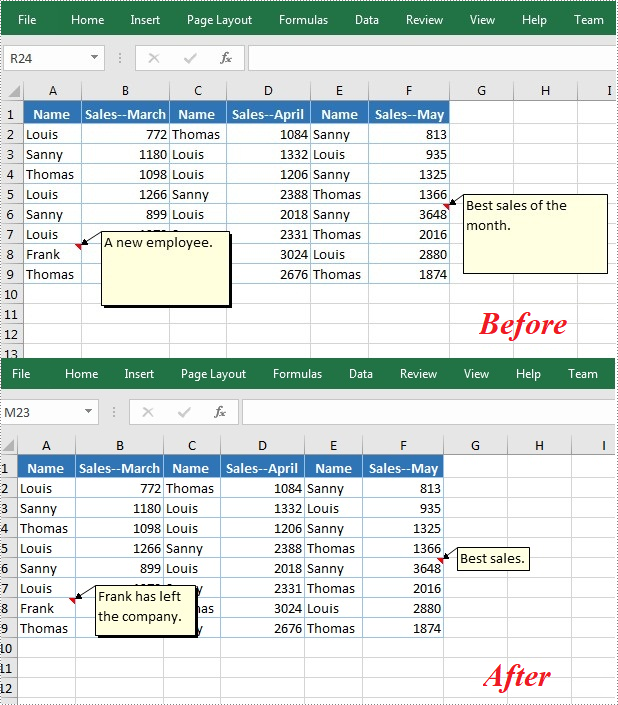
Excel comments are additional notes or commentary that can be added to specified cells to provide more in-depth explanations or to offer tips to other users. Once a comment’s been added, Excel provides users with the flexibility to format, edit, delete and show/hide the comment in the worksheet. In this article, you will learn how to programmatically edit or delete existing comments in Excel using Spire.XLS for .NET.
Install Spire.XLS for .NET
To begin with, you need to add the DLL files included in the Spire.XLS for.NET package as references in your .NET project. The DLLs files can be either downloaded from this link or installed via NuGet.
PM> Install-Package Spire.XLS
Edit Comments in Excel
After adding comments to your Excel workbook, you may sometimes need to make changes to the added comments. The below table lists some of the core classes and properties used to get the existing comments and then set new text as well as formatting for the comments.
| Name | Description |
| CellRange.Comment Property | Returns a Comment object that represents the comment associated with the cell in the upper-left corner of the range. |
| ExcelCommentObject Class | Represents a comment. |
| ExcelCommentObject.Text Property | Gets or sets the comment text. |
| ExcelCommentObject.Height Property | Gets or sets height of a comment. |
| ExcelCommentObject.Width Property | Gets or sets width of a comment. |
| ExcelCommentObject.AutoSize Property | Indicates whether the size of the specified object is changed automatically to fit text within its boundaries. |
The following are steps to edit comments in Excel:
- Create a Workbook instance.
- Load an Excel file using Workbook.LoadFromFile() method.
- Get the first worksheet of the Excel file using Workbook.Worksheets[] property.
- Get a comment in a specific cell range using Worksheet.Range.Comment property.
- Set new text and height/width or auto size for the existing comment using the properties of ExcelCommentObject class.
- Save the document to another file using Workbook.SaveToFile() method.
- C#
- VB.NET
using Spire.Xls;

        namespace EditExcelComment
        {
            class Program
            {
                static void Main(string[] args)
                {
                    // Create a Workbook instance
                    Workbook workbook = new Workbook();

                    // Load an Excel file
                    workbook.LoadFromFile("Comments.xlsx");

                    // Get the first worksheet
                    Worksheet sheet = workbook.Worksheets[0];

                    //Get comments in specific cells and set new comments
                    sheet.Range["A8"].Comment.Text = "Frank has left the company.";
                    sheet.Range["F6"].Comment.Text = "Best sales.";

                    // Set the height and width of the new comments
                    sheet.Range["A8"].Comment.Height = 50;
                    sheet.Range["A8"].Comment.Width = 100;
                    sheet.Range["F6"].Comment.AutoSize = true;


                    // Save to file.
                    workbook.SaveToFile("ModifyComment.xlsx", ExcelVersion.Version2013);
                }
            }
        }
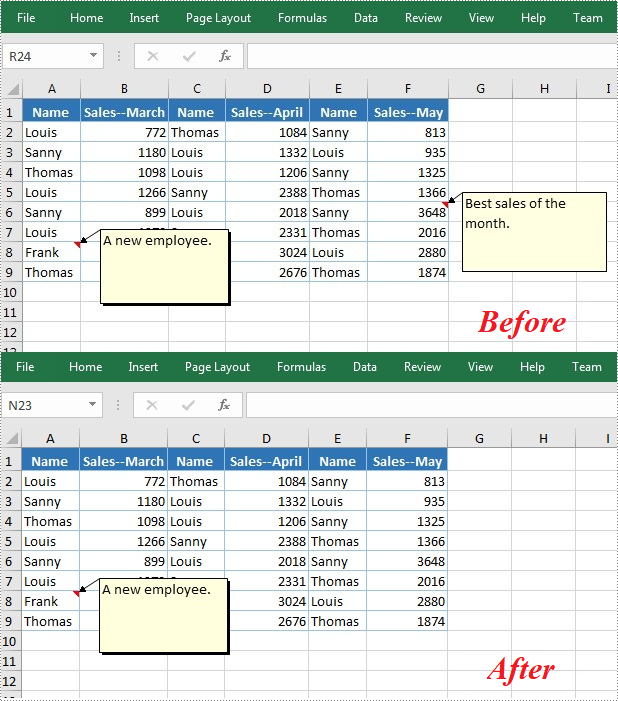
Delete Comments in Excel
The ExcelCommentObject.Remove() method offered by Spire.XLS for .NET allows you to remove a specified comment easily. The detailed steps are as follows:
- Create a Workbook instance.
- Load an Excel file using Workbook.LoadFromFile() method.
- Get the first worksheet of the Excel file using Workbook.Worksheets[] property.
- Get a comment in a specific cell range using Worksheet.Range.Comment property and then delete the comment using ExcelCommentObject.Remove() method.
- Save the document to another file using Workbook.SaveToFile() method.
- C#
- VB.NET
using Spire.Xls;

        namespace EditExcelComment
        {
            class Program
            {
                static void Main(string[] args)
                {
                    // Create a Workbook instance
                    Workbook workbook = new Workbook();

                    // Load an Excel file
                    workbook.LoadFromFile("Comments.xlsx");

                    // Get the first worksheet
                    Worksheet sheet = workbook.Worksheets[0];

                    //Get the comment in a specific cell and remove it
                    sheet.Range["F6"].Comment.Remove();

                    // Save to file.
                    workbook.SaveToFile("DeleteComment.xlsx", ExcelVersion.Version2013);
                }
            }
        }
Apply for a Temporary License
If you'd like to remove the evaluation message from the generated documents, or to get rid of the function limitations, please request a 30-day trial license for yourself.
C# Editar ou excluir comentários no Excel
Índice
Instalado via NuGet
PM> Install-Package Spire.XLS
Links Relacionados
Os comentários do Excel são notas ou comentários adicionais que podem ser adicionados a células específicas para fornecer explicações mais aprofundadas ou para oferecer dicas a outros usuários. Depois que um comentário é adicionado, o Excel oferece aos usuários flexibilidade para formatar, editar, excluir e mostrar/ocultar o comentário na planilha. Neste artigo, você aprenderá como programar edite ou exclua comentários existentes no Excel usando Spire.XLS for .NET.
Instale o Spire.XLS for .NET
Para começar, você precisa adicionar os arquivos DLL incluídos no pacote Spire.XLS for.NET como referências em seu projeto .NET. Os arquivos DLLs podem ser baixados deste link ou instalados via NuGet.
PM> Install-Package Spire.XLS
Editar comentários no Excel
Depois de adicionar comentários à sua pasta de trabalho do Excel, às vezes você pode precisar fazer alterações nos comentários adicionados. A tabela abaixo lista algumas das principais classes e propriedades usadas para obter os comentários existentes e, em seguida, definir o novo texto, bem como a formatação dos comentários.
| Nome | Descrição |
| Propriedade CellRange.Comment | Retorna um objeto Comment que representa o comentário associado à célula no canto superior esquerdo do intervalo. |
| Classe ExcelCommentObject | Representa um comentário. |
| Propriedade ExcelCommentObject.Text | Obtém ou define o texto do comentário. |
| Propriedade ExcelCommentObject.Height | Obtém ou define a altura de um comentário. |
| Propriedade ExcelCommentObject.Width | Obtém ou define a largura de um comentário. |
| Propriedade ExcelCommentObject.AutoSize | Indica se o tamanho do objeto especificado é alterado automaticamente para ajustar o texto dentro de seus limites. |
A seguir estão as etapas para editar comentários no Excel:
- Crie uma instância de pasta de trabalho.
- Carregue um arquivo Excel usando o método Workbook.LoadFromFile().
- Obtenha a primeira planilha do arquivo Excel usando a propriedade Workbook.Worksheets[].
- Obtenha um comentário em um intervalo de células específico usando a propriedade Worksheet.Range.Comment.
- Defina o novo texto e altura/largura ou tamanho automático para o comentário existente usando as propriedades da classe ExcelCommentObject.
- Salve o documento em outro arquivo usando o método Workbook.SaveToFile().
- C#
- VB.NET
using Spire.Xls;

    namespace EditExcelComment
    {
        class Program
        {
            static void Main(string[] args)
            {
                // Create a Workbook instance
                Workbook workbook = new Workbook();

                // Load an Excel file
                workbook.LoadFromFile("Comments.xlsx");

                // Get the first worksheet
                Worksheet sheet = workbook.Worksheets[0];

                //Get comments in specific cells and set new comments
                sheet.Range["A8"].Comment.Text = "Frank has left the company.";
                sheet.Range["F6"].Comment.Text = "Best sales.";

                // Set the height and width of the new comments
                sheet.Range["A8"].Comment.Height = 50;
                sheet.Range["A8"].Comment.Width = 100;
                sheet.Range["F6"].Comment.AutoSize = true;


                // Save to file.
                workbook.SaveToFile("ModifyComment.xlsx", ExcelVersion.Version2013);
            }
        }
    }
Excluir comentários no Excel
O método ExcelCommentObject.Remove() oferecido pelo Spire.XLS for .NET permite remover facilmente um comentário especificado. As etapas detalhadas são as seguintes:
- Crie uma instância de pasta de trabalho.
- Carregue um arquivo Excel usando o método Workbook.LoadFromFile().
- Obtenha a primeira planilha do arquivo Excel usando a propriedade Workbook.Worksheets[].
- Obtenha um comentário em um intervalo de células específico usando a propriedade Worksheet.Range.Comment e exclua o comentário usando o método ExcelCommentObject.Remove().
- Salve o documento em outro arquivo usando o método Workbook.SaveToFile().
- C#
- VB.NET
using Spire.Xls;

    namespace EditExcelComment
    {
        class Program
        {
            static void Main(string[] args)
            {
                // Create a Workbook instance
                Workbook workbook = new Workbook();

                // Load an Excel file
                workbook.LoadFromFile("Comments.xlsx");

                // Get the first worksheet
                Worksheet sheet = workbook.Worksheets[0];

                //Get the comment in a specific cell and remove it
                sheet.Range["F6"].Comment.Remove();

                // Save to file.
                workbook.SaveToFile("DeleteComment.xlsx", ExcelVersion.Version2013);
            }
        }
    }
Solicite uma licença temporária
Se desejar remover a mensagem de avaliação dos documentos gerados ou se livrar das limitações de função, por favor solicite uma licença de teste de 30 dias para você mesmo.
C# Редактирование или удаление комментариев в Excel
Оглавление
Установлено через NuGet
PM> Install-Package Spire.XLS
Ссылки по теме
Комментарии Excel — это дополнительные примечания или комментарии, которые можно добавлять к указанным ячейкам, чтобы предоставить более подробные пояснения или дать советы другим пользователям. После добавления комментария Excel предоставляет пользователям возможность форматировать, редактировать, удалять и показывать/скрывать комментарий на листе. В этой статье вы узнаете, как программно редактировать или удалять существующие комментарии в Excel с помощью Spire.XLS for .NET.
Установите Spire.XLS for .NET
Для начала вам необходимо добавить файлы DLL, включенные в пакет Spire.XLS for.NET, в качестве ссылок в ваш проект .NET. Файлы DLL можно загрузить по этой ссылке или установить через NuGet.
PM> Install-Package Spire.XLS
Редактировать комментарии в Excel
После добавления комментариев в книгу Excel иногда может потребоваться внести изменения в добавленные комментарии. В таблице ниже перечислены некоторые основные классы и свойства, используемые для получения существующих комментариев, а затем установки нового текста, а также форматирования комментариев.
| Имя | Описание |
| Свойство CellRange.Comment | Возвращает объект Comment, который представляет комментарий, связанный с ячейкой в верхнем левом углу диапазона. |
| Класс ExcelCommentObject | Представляет комментарий. |
| Свойство ExcelCommentObject.Text | Получает или задает текст комментария. |
| Свойство ExcelCommentObject.Height | Получает или задает высоту комментария. |
| Свойство ExcelCommentObject.Width | Получает или задает ширину комментария. |
| Свойство ExcelCommentObject.AutoSize | Указывает, изменяется ли размер указанного объекта автоматически, чтобы текст помещался в его границах. |
Ниже приведены шаги для редактирования комментариев в Excel:
- Создайте экземпляр рабочей книги.
- Загрузите файл Excel с помощью метода Workbook.LoadFromFile().
- Получите первый лист файла Excel, используя свойство Workbook.Worksheets[].
- Получите комментарий в определенном диапазоне ячеек, используя свойство Worksheet.Range.Comment.
- Установите новый текст и высоту/ширину или автоматический размер для существующего комментария, используя свойства класса ExcelCommentObject.
- Сохраните документ в другой файл с помощью метода Workbook.SaveToFile().
- C#
- VB.NET
using Spire.Xls;

    namespace EditExcelComment
    {
        class Program
        {
            static void Main(string[] args)
            {
                // Create a Workbook instance
                Workbook workbook = new Workbook();

                // Load an Excel file
                workbook.LoadFromFile("Comments.xlsx");

                // Get the first worksheet
                Worksheet sheet = workbook.Worksheets[0];

                //Get comments in specific cells and set new comments
                sheet.Range["A8"].Comment.Text = "Frank has left the company.";
                sheet.Range["F6"].Comment.Text = "Best sales.";

                // Set the height and width of the new comments
                sheet.Range["A8"].Comment.Height = 50;
                sheet.Range["A8"].Comment.Width = 100;
                sheet.Range["F6"].Comment.AutoSize = true;


                // Save to file.
                workbook.SaveToFile("ModifyComment.xlsx", ExcelVersion.Version2013);
            }
        }
    }
Удалить комментарии в Excel
Метод ExcelCommentObject.Remove(), предлагаемый Spire.XLS for .NET, позволяет легко удалить указанный комментарий. Подробные шаги следующие:
- Создайте экземпляр рабочей книги.
- Загрузите файл Excel с помощью метода Workbook.LoadFromFile().
- Получите первый лист файла Excel, используя свойство Workbook.Worksheets[].
- Получите комментарий в определенном диапазоне ячеек, используя свойство Worksheet.Range.Comment, а затем удалите комментарий, используя метод ExcelCommentObject.Remove().
- Сохраните документ в другой файл с помощью метода Workbook.SaveToFile().
- C#
- VB.NET
using Spire.Xls;

    namespace EditExcelComment
    {
        class Program
        {
            static void Main(string[] args)
            {
                // Create a Workbook instance
                Workbook workbook = new Workbook();

                // Load an Excel file
                workbook.LoadFromFile("Comments.xlsx");

                // Get the first worksheet
                Worksheet sheet = workbook.Worksheets[0];

                //Get the comment in a specific cell and remove it
                sheet.Range["F6"].Comment.Remove();

                // Save to file.
                workbook.SaveToFile("DeleteComment.xlsx", ExcelVersion.Version2013);
            }
        }
    }
Подать заявку на временную лицензию
Если вы хотите удалить сообщение об оценке из сгенерированных документов или избавиться от ограничений функции, пожалуйста запросите 30-дневную пробную лицензию для себя.
C# Kommentare in Excel bearbeiten oder löschen
Inhaltsverzeichnis
Über NuGet installiert
PM> Install-Package Spire.XLS
verwandte Links
Excel-Kommentare sind zusätzliche Notizen oder Kommentare, die zu bestimmten Zellen hinzugefügt werden können, um tiefergehende Erklärungen zu geben oder anderen Benutzern Tipps zu geben. Sobald ein Kommentar hinzugefügt wurde, bietet Excel Benutzern die Flexibilität, den Kommentar im Arbeitsblatt zu formatieren, zu bearbeiten, zu löschen und ein-/auszublenden. In diesem Artikel erfahren Sie, wie Sie programmgesteuert vorgehen Bearbeiten oder löschen Sie vorhandene Kommentare in Excel mit Spire.XLS for .NET.
Installieren Sie Spire.XLS for .NET
Zunächst müssen Sie die im Spire.XLS for.NET-Paket enthaltenen DLL-Dateien als Referenzen in Ihrem .NET-Projekt hinzufügen. Die DLLs-Dateien können entweder über diesen Link heruntergeladen oder über NuGet installiert werden.
PM> Install-Package Spire.XLS
Bearbeiten Sie Kommentare in Excel
Nachdem Sie Kommentare zu Ihrer Excel-Arbeitsmappe hinzugefügt haben, müssen Sie möglicherweise manchmal Änderungen an den hinzugefügten Kommentaren vornehmen. Die folgende Tabelle listet einige der Kernklassen und Eigenschaften auf, die verwendet werden, um die vorhandenen Kommentare abzurufen und dann neuen Text sowie die Formatierung für die Kommentare festzulegen.
| Name | Beschreibung |
| CellRange.Comment-Eigenschaft | Gibt ein Comment-Objekt zurück, das den Kommentar darstellt, der der Zelle in der oberen linken Ecke des Bereichs zugeordnet ist. |
| ExcelCommentObject-Klasse | Stellt einen Kommentar dar. |
| ExcelCommentObject.Text-Eigenschaft | Ruft den Kommentartext ab oder legt ihn fest. |
| ExcelCommentObject.Height-Eigenschaft | Ruft die Höhe eines Kommentars ab oder legt diese fest. |
| ExcelCommentObject.Width-Eigenschaft | Ruft die Breite eines Kommentars ab oder legt diese fest. |
| ExcelCommentObject.AutoSize-Eigenschaft | Gibt an, ob die Größe des angegebenen Objekts automatisch geändert wird, um den Text innerhalb seiner Grenzen anzupassen. |
Im Folgenden finden Sie die Schritte zum Bearbeiten von Kommentaren in Excel:
- Erstellen Sie eine Arbeitsmappeninstanz.
- Laden Sie eine Excel-Datei mit der Methode Workbook.LoadFromFile().
- Rufen Sie das erste Arbeitsblatt der Excel-Datei mit der Eigenschaft Workbook.Worksheets[] ab.
- Rufen Sie mit der Eigenschaft Worksheet.Range.Comment einen Kommentar in einem bestimmten Zellbereich ab.
- Legen Sie mithilfe der Eigenschaften der ExcelCommentObject-Klasse neuen Text und Höhe/Breite oder automatische Größe für den vorhandenen Kommentar fest.
- Speichern Sie das Dokument mit der Methode Workbook.SaveToFile() in einer anderen Datei.
- C#
- VB.NET
using Spire.Xls;

    namespace EditExcelComment
    {
        class Program
        {
            static void Main(string[] args)
            {
                // Create a Workbook instance
                Workbook workbook = new Workbook();

                // Load an Excel file
                workbook.LoadFromFile("Comments.xlsx");

                // Get the first worksheet
                Worksheet sheet = workbook.Worksheets[0];

                //Get comments in specific cells and set new comments
                sheet.Range["A8"].Comment.Text = "Frank has left the company.";
                sheet.Range["F6"].Comment.Text = "Best sales.";

                // Set the height and width of the new comments
                sheet.Range["A8"].Comment.Height = 50;
                sheet.Range["A8"].Comment.Width = 100;
                sheet.Range["F6"].Comment.AutoSize = true;


                // Save to file.
                workbook.SaveToFile("ModifyComment.xlsx", ExcelVersion.Version2013);
            }
        }
    }
Kommentare in Excel löschen
Mit der von Spire.XLS for .NET angebotenen Methode ExcelCommentObject.Remove() können Sie einen bestimmten Kommentar einfach entfernen. Die detaillierten Schritte sind wie folgt:
- Erstellen Sie eine Arbeitsmappeninstanz.
- Laden Sie eine Excel-Datei mit der Methode Workbook.LoadFromFile().
- Rufen Sie das erste Arbeitsblatt der Excel-Datei mit der Eigenschaft Workbook.Worksheets[] ab.
- Rufen Sie mit der Eigenschaft Worksheet.Range.Comment einen Kommentar in einem bestimmten Zellbereich ab und löschen Sie den Kommentar dann mit der Methode ExcelCommentObject.Remove().
- Speichern Sie das Dokument mit der Methode Workbook.SaveToFile() in einer anderen Datei.
- C#
- VB.NET
using Spire.Xls;

    namespace EditExcelComment
    {
        class Program
        {
            static void Main(string[] args)
            {
                // Create a Workbook instance
                Workbook workbook = new Workbook();

                // Load an Excel file
                workbook.LoadFromFile("Comments.xlsx");

                // Get the first worksheet
                Worksheet sheet = workbook.Worksheets[0];

                //Get the comment in a specific cell and remove it
                sheet.Range["F6"].Comment.Remove();

                // Save to file.
                workbook.SaveToFile("DeleteComment.xlsx", ExcelVersion.Version2013);
            }
        }
    }
Beantragen Sie eine temporäre Lizenz
Wenn Sie die Bewertungsmeldung aus den generierten Dokumenten entfernen oder die Funktionseinschränkungen beseitigen möchten, wenden Sie sich bitte an uns Fordern Sie eine 30-Tage-Testlizenz an für sich selbst.
C# Editar o eliminar comentarios en Excel
Tabla de contenido
Instalado a través de NuGet
PM> Install-Package Spire.XLS
enlaces relacionados
Los comentarios de Excel son notas o comentarios adicionales que se pueden agregar a celdas específicas para proporcionar explicaciones más detalladas u ofrecer sugerencias a otros usuarios. Una vez que se ha agregado un comentario, Excel brinda a los usuarios la flexibilidad de formatear,editar,eliminar y mostrar/ocultar el comentario en la hoja de trabajo. En este artículo, aprenderá cómo programar edite o elimine comentarios existentes en Excel usando Spire.XLS for .NET.
Instalar Spire.XLS for .NET
Para empezar, debe agregar los archivos DLL incluidos en el paquete Spire.XLS for .NET como referencias en su proyecto .NET. Los archivos DLL se pueden descargar desde este enlace o instalar a través de NuGet.
PM> Install-Package Spire.XLS
Editar comentarios en Excel
Después de agregar comentarios a su libro de Excel, es posible que en ocasiones necesite realizar cambios en los comentarios agregados. La siguiente tabla enumera algunas de las clases y propiedades principales utilizadas para obtener los comentarios existentes y luego establecer texto nuevo y formato para los comentarios.
| Nombre | Descripción |
| CellRange.Comment Propiedad | Devuelve un objeto Comentario que representa el comentario asociado con la celda en la esquina superior izquierda del rango. |
| Clase ExcelCommentObject | Representa un comentario. |
| Propiedad ExcelCommentObject.Text | Obtiene o establece el texto del comentario. |
| Propiedad ExcelCommentObject.Height | Obtiene o establece la altura de un comentario. |
| Propiedad ExcelCommentObject.Width | Obtiene o establece el ancho de un comentario. |
| Propiedad ExcelCommentObject.AutoSize | Indica si el tamaño del objeto especificado se cambia automáticamente para ajustar el texto dentro de sus límites. |
Los siguientes son pasos para editar comentarios en Excel:
- Cree una instancia de libro de trabajo.
- Cargue un archivo de Excel usando el método Workbook.LoadFromFile().
- Obtenga la primera hoja de trabajo del archivo de Excel usando la propiedad Workbook.Worksheets[].
- Obtenga un comentario en un rango de celdas específico usando la propiedad Worksheet.Range.Comment.
- Establezca un nuevo texto y alto/ancho o tamaño automático para el comentario existente utilizando las propiedades de la clase ExcelCommentObject.
- Guarde el documento en otro archivo utilizando el método Workbook.SaveToFile().
- C#
- VB.NET
using Spire.Xls;

    namespace EditExcelComment
    {
        class Program
        {
            static void Main(string[] args)
            {
                // Create a Workbook instance
                Workbook workbook = new Workbook();

                // Load an Excel file
                workbook.LoadFromFile("Comments.xlsx");

                // Get the first worksheet
                Worksheet sheet = workbook.Worksheets[0];

                //Get comments in specific cells and set new comments
                sheet.Range["A8"].Comment.Text = "Frank has left the company.";
                sheet.Range["F6"].Comment.Text = "Best sales.";

                // Set the height and width of the new comments
                sheet.Range["A8"].Comment.Height = 50;
                sheet.Range["A8"].Comment.Width = 100;
                sheet.Range["F6"].Comment.AutoSize = true;


                // Save to file.
                workbook.SaveToFile("ModifyComment.xlsx", ExcelVersion.Version2013);
            }
        }
    }
Eliminar comentarios en Excel
El método ExcelCommentObject.Remove() ofrecido por Spire.XLS for .NET le permite eliminar fácilmente un comentario específico. Los pasos detallados son los siguientes:
- Cree una instancia de libro de trabajo.
- Cargue un archivo de Excel usando el método Workbook.LoadFromFile().
- Obtenga la primera hoja de trabajo del archivo de Excel usando la propiedad Workbook.Worksheets[].
- Obtenga un comentario en un rango de celdas específico usando la propiedad Worksheet.Range.Comment y luego elimine el comentario usando el método ExcelCommentObject.Remove().
- Guarde el documento en otro archivo utilizando el método Workbook.SaveToFile().
- C#
- VB.NET
using Spire.Xls;

    namespace EditExcelComment
    {
        class Program
        {
            static void Main(string[] args)
            {
                // Create a Workbook instance
                Workbook workbook = new Workbook();

                // Load an Excel file
                workbook.LoadFromFile("Comments.xlsx");

                // Get the first worksheet
                Worksheet sheet = workbook.Worksheets[0];

                //Get the comment in a specific cell and remove it
                sheet.Range["F6"].Comment.Remove();

                // Save to file.
                workbook.SaveToFile("DeleteComment.xlsx", ExcelVersion.Version2013);
            }
        }
    }
Solicite una licencia temporal
Si desea eliminar el mensaje de evaluación de los documentos generados o deshacerse de las limitaciones de la función, por favor solicitar una licencia de prueba de 30 días para ti.
C# Excel에서 주석 편집 또는 삭제
NuGet을 통해 설치됨
PM> Install-Package Spire.XLS
관련된 링크들
Excel 주석은 더 자세한 설명을 제공하거나 다른 사용자에게 팁을 제공하기 위해 지정된 셀에 추가할 수 있는 추가 메모 또는 설명입니다. 메모가 추가되면 Excel은 워크시트에서 메모의 형식을지정하고, 편집하고, 삭제하고, 표시/숨길 수 있는 유연성을 사용자에게 제공합니다. 이 기사에서는 프로그래밍 방식으로 방법을 배웁니다 Spire.XLS for .NET사용하여 Excel에서 기존 주석을 편집하거나 삭제합니다.
Spire.XLS for .NET 설치
먼저 Spire.XLS for.NET 패키지에 포함된 DLL 파일을 .NET 프로젝트의 참조로 추가해야 합니다. DLL 파일은 이 링크 에서 다운로드하거나 NuGet을 통해 설치할 수 있습니다.
PM> Install-Package Spire.XLS
Excel에서 주석 편집
Excel 통합 문서에 메모를 추가한 후 추가된 메모를 변경해야 하는 경우가 있습니다. 아래 표에는 기존 주석을 가져온 다음 새 텍스트와 주석 서식을 설정하는 데 사용되는 일부 핵심 클래스와 속성이 나열되어 있습니다.
| 이름 | 설명 |
| CellRange.Comment 속성 | 범위의 왼쪽 위 모서리에 있는 셀과 연결된 설명을 나타내는 Comment 개체를 반환합니다. |
| ExcelCommentObject 클래스 | 댓글을 나타냅니다. |
| ExcelCommentObject.Text 속성 | 주석 텍스트를 가져오거나 설정합니다. |
| ExcelCommentObject.Height 속성 | 댓글의 높이를 가져오거나 설정합니다. |
| ExcelCommentObject.Width 속성 | 주석의 너비를 가져오거나 설정합니다. |
| ExcelCommentObject.AutoSize 속성 | 지정된 개체의 크기가 해당 경계 내에 텍스트에 맞게 자동으로 변경되는지 여부를 나타냅니다. |
Excel에서 주석을 편집하는 단계는 다음과 같습니다.
- 통합 문서 인스턴스를 만듭니다.
- Workbook.LoadFromFile() 메서드를 사용하여 Excel 파일을 로드합니다.
- Workbook.Worksheets[] 속성을 사용하여 Excel 파일의 첫 번째 워크시트를 가져옵니다.
- Worksheet.Range.Comment 속성을 사용하여 특정 셀 범위에서 주석을 가져옵니다.
- ExcelCommentObject 클래스의 속성을 사용하여 기존 주석의 새 텍스트와 높이/너비 또는 자동 크기를 설정합니다.
- Workbook.SaveToFile() 메서드를 사용하여 문서를 다른 파일에 저장합니다.
- C#
- VB.NET
using Spire.Xls;

    namespace EditExcelComment
    {
        class Program
        {
            static void Main(string[] args)
            {
                // Create a Workbook instance
                Workbook workbook = new Workbook();

                // Load an Excel file
                workbook.LoadFromFile("Comments.xlsx");

                // Get the first worksheet
                Worksheet sheet = workbook.Worksheets[0];

                //Get comments in specific cells and set new comments
                sheet.Range["A8"].Comment.Text = "Frank has left the company.";
                sheet.Range["F6"].Comment.Text = "Best sales.";

                // Set the height and width of the new comments
                sheet.Range["A8"].Comment.Height = 50;
                sheet.Range["A8"].Comment.Width = 100;
                sheet.Range["F6"].Comment.AutoSize = true;


                // Save to file.
                workbook.SaveToFile("ModifyComment.xlsx", ExcelVersion.Version2013);
            }
        }
    }
Excel에서 메모 삭제
Spire.XLS for .NET에서 제공하는 ExcelCommentObject.Remove() 메서드를 사용하면 지정된 주석을 쉽게 제거할 수 있습니다. 자세한 단계는 다음과 같습니다.
- 통합 문서 인스턴스를 만듭니다.
- Workbook.LoadFromFile() 메서드를 사용하여 Excel 파일을 로드합니다.
- Workbook.Worksheets[] 속성을 사용하여 Excel 파일의 첫 번째 워크시트를 가져옵니다.
- Worksheet.Range.Comment 속성을 사용하여 특정 셀 범위의 메모를 가져온 다음 ExcelCommentObject.Remove() 메서드를 사용하여 메모를 삭제합니다.
- Workbook.SaveToFile() 메서드를 사용하여 문서를 다른 파일에 저장합니다.
- C#
- VB.NET
using Spire.Xls;

    namespace EditExcelComment
    {
        class Program
        {
            static void Main(string[] args)
            {
                // Create a Workbook instance
                Workbook workbook = new Workbook();

                // Load an Excel file
                workbook.LoadFromFile("Comments.xlsx");

                // Get the first worksheet
                Worksheet sheet = workbook.Worksheets[0];

                //Get the comment in a specific cell and remove it
                sheet.Range["F6"].Comment.Remove();

                // Save to file.
                workbook.SaveToFile("DeleteComment.xlsx", ExcelVersion.Version2013);
            }
        }
    }
임시 라이센스 신청
생성된 문서에서 평가 메시지를 제거하고 싶거나, 기능 제한을 없애고 싶다면 30일 평가판 라이센스 요청 자신을 위해.