
JavaScript (107)
Configuring page setup is essential for preparing Excel documents for printing or PDF export. Spire.XLS for JavaScript runs entirely in the browser via WebAssembly, using a virtual file system (VFS) to manage input and output files — no backend server required. It provides comprehensive page setup capabilities through the PageSetup object, allowing you to control margins, orientation, paper size, print area, zoom scaling, and fit-to-page options.
The PageSetup object in Spire.XLS offers a rich set of properties for controlling how a worksheet is printed or displayed. Key properties include:
| Property | Description |
|---|---|
| TopMargin / BottomMargin / LeftMargin / RightMargin | Sets the page margins |
| Orientation | Sets the page orientation (Portrait or Landscape) |
| PaperSize | Sets the paper size (A4, Letter, etc.) |
| PrintArea | Specifies the cell range to print |
| Zoom | Sets the worksheet zoom scaling percentage |
| FitToPagesTall / FitToPagesWide | Scales the worksheet to fit a specified number of pages |
This article covers six core features:
- Adjust Excel Page Margins
- Adjust Excel Page Orientation
- Adjust Excel Paper Size
- Adjust Excel Print Area
- Adjust Excel Zoom Scale
- Fit Excel Table to 1 Page
For installation and project setup, refer to Integrating Spire.XLS for JavaScript in a React Project. The examples below assume Spire.XLS is installed and the WebAssembly module is initialized.
Adjust Excel Page Margins
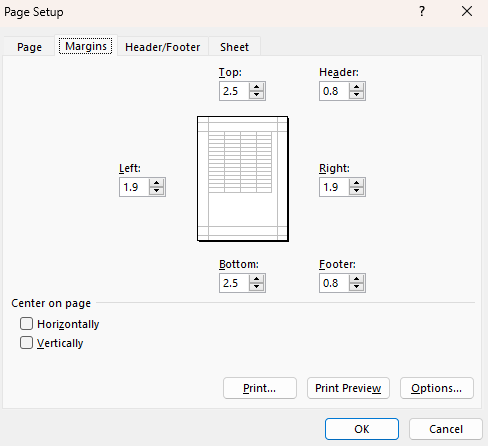
Page margins define the blank space around the edges of a printed worksheet. The steps are as follows:
- Create a
Workbookobject usingnew xlsModule.Workbook(). - Get the default worksheet using the
workbook.Worksheets.get(index)method. - Access the
PageSetupobject throughsheet.PageSetup. - Set page margins using the
TopMargin,BottomMargin,LeftMargin, andRightMarginproperties. - Save the workbook to an Excel file using the
workbook.SaveToFile()method.
Below is a complete code example demonstrating how to adjust page margins in React:
function App() {
  const adjustPageMargins = async () => {
    // Get the Spire.XLS WASM module
    const xlsModule = window.wasmModule?.spirexls;

    // Check if the module is ready
    if (!xlsModule) {
      alert('Spire.Xls is not ready yet');
      return;
    }

    // Create a workbook and load the existing file
    await window.spire.FetchFileToVFS('Sample.xlsx', '', `${process.env.PUBLIC_URL}data/`);

    const workbook = new xlsModule.Workbook();
    workbook.LoadFromFile({ fileName: 'Sample.xlsx' });
    const sheet = workbook.Worksheets.get(0);

    // Get the PageSetup object
    const pageSetup = sheet.PageSetup;

    // Set the top, bottom, left, right, header, and footer margins
    pageSetup.TopMargin = 1;
    pageSetup.BottomMargin = 1;
    pageSetup.LeftMargin = 0.75;
    pageSetup.RightMargin = 0.75;

    // Save the workbook
    const outputFileName = 'AdjustMargins.xlsx';
    workbook.SaveToFile(outputFileName);
    workbook.Dispose();

    // Read the file from VFS and trigger download
    const fileArray = window.dotnetRuntime.Module.FS.readFile(outputFileName);
    const blob = new Blob([fileArray], { type: 'application/vnd.openxmlformats-officedocument.spreadsheetml.sheet' });
    const url = URL.createObjectURL(blob);
    const a = document.createElement('a');
    a.href = url;
    a.download = outputFileName;
    a.click();
    URL.revokeObjectURL(url);
  };

  return (
    <div style={{ textAlign: 'center', height: '300px' }}>
      <h1>Adjust Page Margins</h1>
      <button onClick={adjustPageMargins}>
        Generate
      </button>
    </div>
  );
}

export default App;
Page margins adjusted with Spire.XLS for JavaScript
Adjust Excel Page Orientation
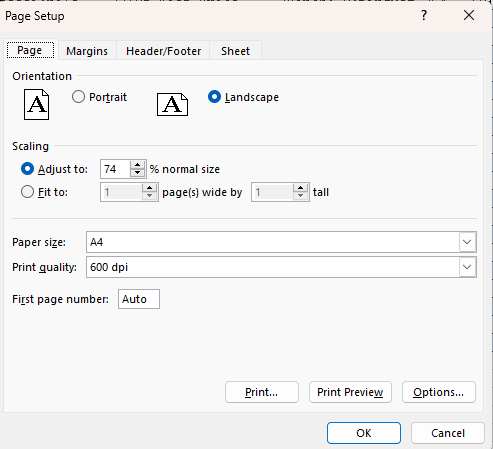
Page orientation determines whether a worksheet is printed in portrait (vertical) or landscape (horizontal) layout. Landscape orientation is especially useful for wide tables with many columns. The steps are as follows:
- Create a
Workbookobject usingnew xlsModule.Workbook(). - Get the default worksheet using the
workbook.Worksheets.get(index)method. - Access the
PageSetupobject throughsheet.PageSetup. - Set the page orientation using the
Orientationproperty. - Save the workbook to an Excel file using the
workbook.SaveToFile()method.
Below is a complete code example demonstrating how to set the page orientation to landscape in React:
function App() {
  const setPageOrientation = async () => {
    // Get the Spire.XLS WASM module
    const xlsModule = window.wasmModule?.spirexls;

    // Check if the module is ready
    if (!xlsModule) {
      alert('Spire.Xls is not ready yet');
      return;
    }

    // Create a workbook and load the existing file
    // Load the sample file into VFS
    await window.spire.FetchFileToVFS('Sample.xlsx', '', `${process.env.PUBLIC_URL}data/`);

    const workbook = new xlsModule.Workbook();
    workbook.LoadFromFile({ fileName: 'Sample.xlsx' });
    const sheet = workbook.Worksheets.get(0);

    // Set the page orientation to Landscape
    sheet.PageSetup.Orientation = xlsModule.PageOrientationType.Landscape;

    // Save the workbook
    const outputFileName = 'SetOrientation.xlsx';
    workbook.SaveToFile(outputFileName);
    workbook.Dispose();

    // Read the file from VFS and trigger download
    const fileArray = window.dotnetRuntime.Module.FS.readFile(outputFileName);
    const blob = new Blob([fileArray], { type: 'application/vnd.openxmlformats-officedocument.spreadsheetml.sheet' });
    const url = URL.createObjectURL(blob);
    const a = document.createElement('a');
    a.href = url;
    a.download = outputFileName;
    a.click();
    URL.revokeObjectURL(url);
  };

  return (
    <div style={{ textAlign: 'center', height: '300px' }}>
      <h1>Set Page Orientation</h1>
      <button onClick={setPageOrientation}>
        Generate
      </button>
    </div>
  );
}

export default App;
Page orientation set to landscape with Spire.XLS for JavaScript
Adjust Excel Paper Size
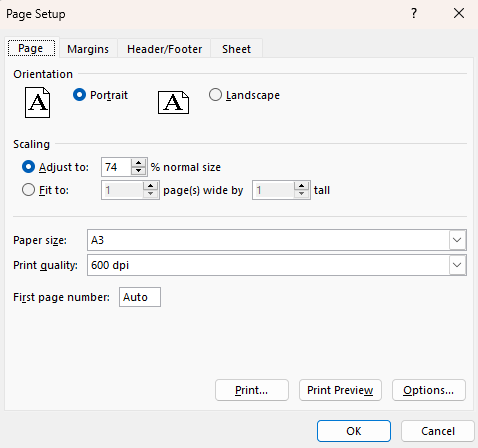
Different printers and regions use different standard paper sizes. Spire.XLS for JavaScript supports a wide range of paper sizes through the PaperSizeType enumeration, including A4, Letter, A3, and many more. The steps are as follows:
- Create a
Workbookobject usingnew xlsModule.Workbook(). - Get the default worksheet using the
workbook.Worksheets.get(index)method. - Access the
PageSetupobject throughsheet.PageSetup. - Set the paper size using the
PaperSizeproperty. - Save the workbook to an Excel file using the
workbook.SaveToFile()method.
Below is a complete code example demonstrating how to set the paper size to A3 in React:
function App() {
  const setPaperSize = async () => {
    // Get the Spire.XLS WASM module
    const xlsModule = window.wasmModule?.spirexls;

    // Check if the module is ready
    if (!xlsModule) {
      alert('Spire.Xls is not ready yet');
      return;
    }

    // Create a workbook and load the existing file
    // Load the sample file into VFS
    await window.spire.FetchFileToVFS('Sample.xlsx', '', `${process.env.PUBLIC_URL}data/`);

    const workbook = new xlsModule.Workbook();
    workbook.LoadFromFile({ fileName: 'Sample.xlsx' });
    const sheet = workbook.Worksheets.get(0);

    // Get the PageSetup object
    const pageSetup = sheet.PageSetup;

    // Set the paper size to A3
    pageSetup.PaperSize = xlsModule.PaperSizeType.PaperA3;

    // Save the workbook
    const outputFileName = 'SetPaperSize.xlsx';
    workbook.SaveToFile(outputFileName);
    workbook.Dispose();

    // Read the file from VFS and trigger download
    const fileArray = window.dotnetRuntime.Module.FS.readFile(outputFileName);
    const blob = new Blob([fileArray], { type: 'application/vnd.openxmlformats-officedocument.spreadsheetml.sheet' });
    const url = URL.createObjectURL(blob);
    const a = document.createElement('a');
    a.href = url;
    a.download = outputFileName;
    a.click();
    URL.revokeObjectURL(url);
  };

  return (
    <div style={{ textAlign: 'center', height: '300px' }}>
      <h1>Set Paper Size</h1>
      <button onClick={setPaperSize}>
        Generate
      </button>
    </div>
  );
}

export default App;
Paper size set to A3 with Spire.XLS for JavaScript
Adjust Excel Print Area
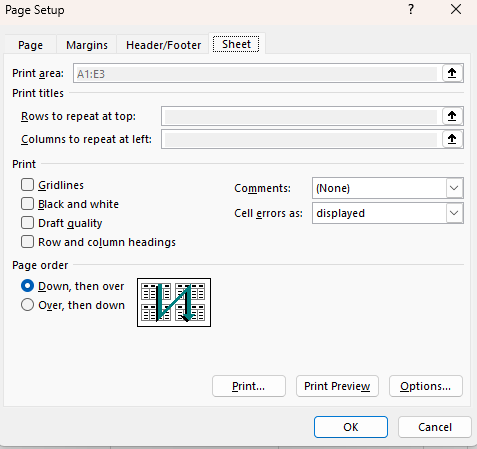
The print area defines which portion of a worksheet will be printed. The steps are as follows:
- Create a
Workbookobject usingnew xlsModule.Workbook(). - Get the default worksheet using the
workbook.Worksheets.get(index)method. - Populate sample data using the
sheet.Rangeproperty. - Access the
PageSetupobject throughsheet.PageSetup. - Set the print area using the
PrintAreaproperty. - Save the workbook to an Excel file using the
workbook.SaveToFile()method.
Below is a complete code example demonstrating how to set the print area in React:
function App() {
  const setPrintArea = async () => {
    // Get the Spire.XLS WASM module
    const xlsModule = window.wasmModule?.spirexls;

    // Check if the module is ready
    if (!xlsModule) {
      alert('Spire.Xls is not ready yet');
      return;
    }

    // Create a workbook and load the existing file
    // Load the sample file into VFS
    await window.spire.FetchFileToVFS('Sample.xlsx', '', `${process.env.PUBLIC_URL}data/`);

    const workbook = new xlsModule.Workbook();
    workbook.LoadFromFile({ fileName: 'Sample.xlsx' });
    const sheet = workbook.Worksheets.get(0);

    // Set the print area to A1:E3
    sheet.PageSetup.PrintArea = "A1:E3";

    // Save the workbook
    const outputFileName = 'SetPrintArea.xlsx';
    workbook.SaveToFile(outputFileName);
    workbook.Dispose();

    // Read the file from VFS and trigger download
    const fileArray = window.dotnetRuntime.Module.FS.readFile(outputFileName);
    const blob = new Blob([fileArray], { type: 'application/vnd.openxmlformats-officedocument.spreadsheetml.sheet' });
    const url = URL.createObjectURL(blob);
    const a = document.createElement('a');
    a.href = url;
    a.download = outputFileName;
    a.click();
    URL.revokeObjectURL(url);
  };

  return (
    <div style={{ textAlign: 'center', height: '300px' }}>
      <h1>Set Print Area</h1>
      <button onClick={setPrintArea}>
        Generate
      </button>
    </div>
  );
}

export default App;
Print area set with Spire.XLS for JavaScript
Adjust Excel Zoom Scale
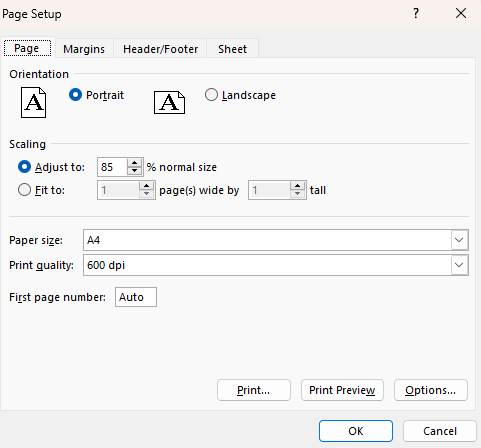
The zoom scale controls the magnification level at which a worksheet is displayed on screen. The value ranges from 10 to 400, representing a percentage of normal size. The steps are as follows:
- Create a
Workbookobject usingnew xlsModule.Workbook(). - Get the default worksheet using the
workbook.Worksheets.get(index)method. - Set the zoom scale using the
Zoomproperty. - Save the workbook to an Excel file using the
workbook.SaveToFile()method.
Below is a complete code example demonstrating how to set the zoom scale in React:
function App() {
  const setZoomScale = async () => {
    // Get the Spire.XLS WASM module
    const xlsModule = window.wasmModule?.spirexls;

    // Check if the module is ready
    if (!xlsModule) {
      alert('Spire.Xls is not ready yet');
      return;
    }

    // Create a workbook and load the existing file
    // Load the sample file into VFS
    await window.spire.FetchFileToVFS('Sample.xlsx', '', `${process.env.PUBLIC_URL}data/`);

    const workbook = new xlsModule.Workbook();
    workbook.LoadFromFile({ fileName: 'Sample.xlsx' });
    const sheet = workbook.Worksheets.get(0);

    // Set the zoom scale to 85%
    const pageSetup = sheet.PageSetup;
    pageSetup.Zoom = 85;

    // Save the workbook
    const outputFileName = 'SetZoomScale.xlsx';
    workbook.SaveToFile(outputFileName);
    workbook.Dispose();

    // Read the file from VFS and trigger download
    const fileArray = window.dotnetRuntime.Module.FS.readFile(outputFileName);
    const blob = new Blob([fileArray], { type: 'application/vnd.openxmlformats-officedocument.spreadsheetml.sheet' });
    const url = URL.createObjectURL(blob);
    const a = document.createElement('a');
    a.href = url;
    a.download = outputFileName;
    a.click();
    URL.revokeObjectURL(url);
  };

  return (
    <div style={{ textAlign: 'center', height: '300px' }}>
      <h1>Set Zoom Scale</h1>
      <button onClick={setZoomScale}>
        Generate
      </button>
    </div>
  );
}

export default App;
Zoom scale set to 85% with Spire.XLS for JavaScript
Fit Excel Table to 1 Page
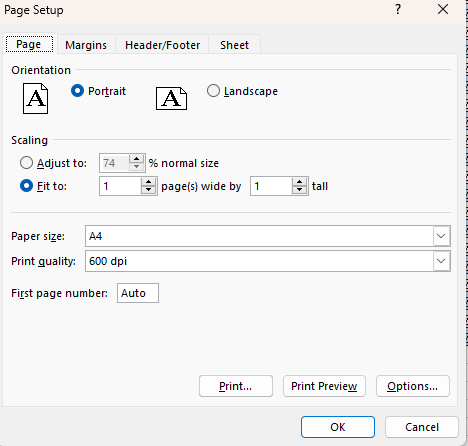
When printing a large worksheet, the content may span multiple pages, making it difficult to read. The steps are as follows:
- Create a
Workbookobject usingnew xlsModule.Workbook(). - Get the default worksheet using the
workbook.Worksheets.get(index)method. - Populate sample data using the
sheet.Rangeproperty. - Access the
PageSetupobject throughsheet.PageSetup. - Set the fit-to-page properties using the
FitToPagesTallandFitToPagesWideproperties. - Save the workbook to an Excel file using the
workbook.SaveToFile()method.
Below is a complete code example demonstrating how to fit a worksheet to one page in React:
function App() {
  const fitToPage = async () => {
    // Get the Spire.XLS WASM module
    const xlsModule = window.wasmModule?.spirexls;

    // Check if the module is ready
    if (!xlsModule) {
      alert('Spire.Xls is not ready yet');
      return;
    }

    // Create a workbook and load the existing file
    // Load the sample file into VFS
    await window.spire.FetchFileToVFS('Sample.xlsx', '', `${process.env.PUBLIC_URL}data/`);

    const workbook = new xlsModule.Workbook();
    workbook.LoadFromFile({ fileName: 'Sample.xlsx' });
    const sheet = workbook.Worksheets.get(0);

    // Fit the worksheet content to 1 page
    const pageSetup = sheet.PageSetup;
    pageSetup.FitToPagesTall = 1;
    pageSetup.FitToPagesWide = 1;

    // Save the workbook
    const outputFileName = 'FitToPage.xlsx';
    workbook.SaveToFile(outputFileName);
    workbook.Dispose();

    // Read the file from VFS and trigger download
    const fileArray = window.dotnetRuntime.Module.FS.readFile(outputFileName);
    const blob = new Blob([fileArray], { type: 'application/vnd.openxmlformats-officedocument.spreadsheetml.sheet' });
    const url = URL.createObjectURL(blob);
    const a = document.createElement('a');
    a.href = url;
    a.download = outputFileName;
    a.click();
    URL.revokeObjectURL(url);
  };

  return (
    <div style={{ textAlign: 'center', height: '300px' }}>
      <h1>Fit Worksheet to 1 Page</h1>
      <button onClick={fitToPage}>
        Generate
      </button>
    </div>
  );
}

export default App;
Worksheet scaled to fit one page with Spire.XLS for JavaScript
FAQ
How to print gridlines or row/column headings
Cause: By default, gridlines and row/column headings are not printed, which can make the data harder to read on paper.
Solution: Use the IsPrintGridlines and IsPrintHeadings properties of the PageSetup object:
pageSetup.IsPrintGridlines = true;
pageSetup.IsPrintHeadings = true;
How to get the actual page dimensions
Cause: You may need to know the actual width and height of the current paper size to adjust content layout.
Solution: Retrieve the values using the PageWidth and PageHeight properties of the PageSetup object:
var pageWidth = pageSetup.PageWidth;
var pageHeight = pageSetup.PageHeight;
Get a Free License
Spire.XLS for JavaScript offers a 30-day full-featured free trial license with no functional limitations. Apply here to evaluate before purchasing.
Adding charts to Excel files is one of the most common data visualization requirements in web applications. Spire.XLS for JavaScript runs entirely in the browser via WebAssembly, using a virtual file system (VFS) to manage input and output files — no backend server required. It supports creating a wide variety of chart types, including column charts, pie charts, doughnut charts, line charts, scatter charts, and more.
This article covers three core features:
For installation and project setup, refer to Integrating Spire.XLS for JavaScript in a React Project. The examples below assume Spire.XLS is installed and the WebAssembly module is initialized.
Create a Column Chart
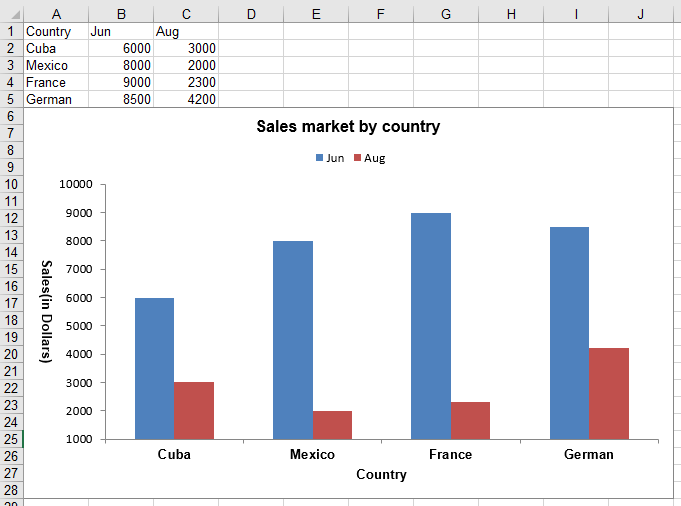
Column charts are one of the most commonly used chart types for comparing values across categories. With Spire.XLS for JavaScript, you can create a clustered column chart by first populating a worksheet with data, then adding a chart object, setting the chart type to ColumnClustered, and configuring the chart title, axes, and data labels. The steps are as follows:
- Create a
Workbookobject and get the default worksheet. - Populate the worksheet with category labels and numeric data.
- Add a chart to the worksheet using
sheet.Charts.Add(). - Set the chart's
DataRangeto the data range and specify the chart type asExcelChartType.ColumnClustered. - Configure the chart position, title, axis titles, and legend.
- Save the workbook to an Excel file using
SaveToFile().
Below is a complete code example demonstrating how to create a clustered column chart in React:
function App() {
  const createColumnChart = async () => {
    // Get the Spire.XLS WASM module
    const xlsModule = window.wasmModule?.spirexls;

    // Check if the module is ready
    if (!xlsModule) {
      alert('Spire.Xls is not ready yet');
      return;
    }

    // Create a new workbook and get the default worksheet
    const workbook = new xlsModule.Workbook();
    const sheet = workbook.Worksheets.get(0);
    sheet.Name = "ClusteredColumn";

    // Populate chart data
    sheet.Range.get("A1").Value = "Country";
    sheet.Range.get("A2").Value = "Cuba";
    sheet.Range.get("A3").Value = "Mexico";
    sheet.Range.get("A4").Value = "France";
    sheet.Range.get("A5").Value = "German";

    sheet.Range.get("B1").Value = "Jun";
    sheet.Range.get("B2").NumberValue = 6000;
    sheet.Range.get("B3").NumberValue = 8000;
    sheet.Range.get("B4").NumberValue = 9000;
    sheet.Range.get("B5").NumberValue = 8500;

    sheet.Range.get("C1").Value = "Aug";
    sheet.Range.get("C2").NumberValue = 3000;
    sheet.Range.get("C3").NumberValue = 2000;
    sheet.Range.get("C4").NumberValue = 2300;
    sheet.Range.get("C5").NumberValue = 4200;

    // Add a chart and set its data range
    const chart = sheet.Charts.Add();
    chart.DataRange = sheet.Range.get("A1:C5");
    chart.SeriesDataFromRange = false;

    // Set the chart position
    chart.LeftColumn = 1;
    chart.TopRow = 6;
    chart.RightColumn = 11;
    chart.BottomRow = 29;

    // Set the chart type to clustered column
    chart.ChartType = xlsModule.ExcelChartType.ColumnClustered;

    // Configure chart title
    chart.ChartTitle = "Sales market by country";
    chart.ChartTitleArea.IsBold = true;
    chart.ChartTitleArea.Size = 12;

    // Configure axis titles
    chart.PrimaryCategoryAxis.Title = "Country";
    chart.PrimaryCategoryAxis.Font.IsBold = true;
    chart.PrimaryCategoryAxis.TitleArea.IsBold = true;

    chart.PrimaryValueAxis.Title = "Sales(in Dollars)";
    chart.PrimaryValueAxis.HasMajorGridLines = false;
    chart.PrimaryValueAxis.MinValue = 1000;
    chart.PrimaryValueAxis.TitleArea.IsBold = true;
    chart.PrimaryValueAxis.TitleArea.TextRotationAngle = 90;

    // Configure data labels: show numeric value on each data point
    for (let i = 0; i < chart.Series.Length; i++) {
      let cs = chart.Series.get(i);
      cs.Format.Options.IsVaryColor = true;
      cs.DataPoints.DefaultDataPoint.DataLabels.HasValue = true; // Show value labels
    }

    // Set legend position
    chart.Legend.Position = xlsModule.LegendPositionType.Top;

    // Save the workbook
    const outputFileName = 'ClusteredColumn.xlsx';
    workbook.SaveToFile(outputFileName);
    workbook.Dispose();

    // Read the file from VFS and trigger download
    const fileArray = window.dotnetRuntime.Module.FS.readFile(outputFileName);
    const blob = new Blob([fileArray], { type: 'application/vnd.openxmlformats-officedocument.spreadsheetml.sheet' });
    const url = URL.createObjectURL(blob);
    const a = document.createElement('a');
    a.href = url;
    a.download = outputFileName;
    a.click();
    URL.revokeObjectURL(url);
  };

  return (
    <div style={{ textAlign: 'center', height: '300px' }}>
      <h1>Create Clustered Column Chart</h1>
      <button onClick={createColumnChart}>
        Generate
      </button>
    </div>
  );
}

export default App;
Clustered column chart created with Spire.XLS for JavaScript
Create a Pie Chart
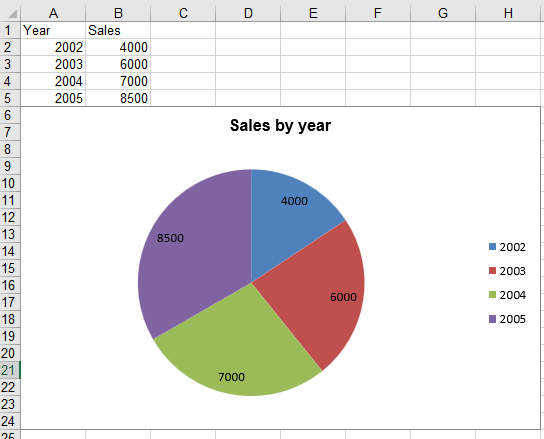
Pie charts are ideal for displaying the proportional distribution of data across categories. With Spire.XLS for JavaScript, you can create a pie chart by specifying the chart type as Pie when adding the chart, then binding category labels and data values. The steps are as follows:
- Create a
Workbookobject and get the default worksheet. - Populate the worksheet with category labels and numeric values.
- Add a chart with
ExcelChartType.Pieusingsheet.Charts.Add(). - Set the chart data range and bind category labels and values.
- Configure the chart position, title, and data labels.
- Save the workbook to an Excel file using
SaveToFile().
Below is a complete code example demonstrating how to create a pie chart in React:
function App() {
  const createPieChart = async () => {
    // Get the Spire.XLS WASM module
    const xlsModule = window.wasmModule?.spirexls;

    // Check if the module is ready
    if (!xlsModule) {
      alert('Spire.Xls is not ready yet');
      return;
    }

    // Create a new workbook and get the default worksheet
    const workbook = new xlsModule.Workbook();
    let sheet = workbook.Worksheets.get(0);
    sheet.Name = "Pie Chart";

    // Populate chart data
    sheet.Range.get("A1").Value = "Year";
    sheet.Range.get("A2").Value = "2002";
    sheet.Range.get("A3").Value = "2003";
    sheet.Range.get("A4").Value = "2004";
    sheet.Range.get("A5").Value = "2005";

    sheet.Range.get("B1").Value = "Sales";
    sheet.Range.get("B2").NumberValue = 4000;
    sheet.Range.get("B3").NumberValue = 6000;
    sheet.Range.get("B4").NumberValue = 7000;
    sheet.Range.get("B5").NumberValue = 8500;

    // Add a pie chart
    let chart = sheet.Charts.Add({ chartType: xlsModule.ExcelChartType.Pie });
    chart.DataRange = sheet.Range.get("B2:B5");
    chart.SeriesDataFromRange = false;

    // Set the chart position
    chart.LeftColumn = 1;
    chart.TopRow = 6;
    chart.RightColumn = 9;
    chart.BottomRow = 25;

    // Configure chart title
    chart.ChartTitle = "Sales by year";
    chart.ChartTitleArea.IsBold = true;
    chart.ChartTitleArea.Size = 12;

    // Bind category labels and values
    let cs = chart.Series.get(0);
    cs.CategoryLabels = sheet.Range.get("A2:A5");
    cs.Values = sheet.Range.get("B2:B5");
    cs.DataPoints.DefaultDataPoint.DataLabels.HasValue = true; // Show value labels

    chart.PlotArea.Fill.Visible = false;

    // Save the workbook
    const outputFileName = 'Pie.xlsx';
    workbook.SaveToFile(outputFileName);
    workbook.Dispose();

    // Read the file from VFS and trigger download
    const fileArray = window.dotnetRuntime.Module.FS.readFile(outputFileName);
    const blob = new Blob([fileArray], { type: 'application/vnd.openxmlformats-officedocument.spreadsheetml.sheet' });
    const url = URL.createObjectURL(blob);
    const a = document.createElement('a');
    a.href = url;
    a.download = outputFileName;
    a.click();
    URL.revokeObjectURL(url);
  };

  return (
    <div style={{ textAlign: 'center', height: '300px' }}>
      <h1>Create Pie Chart</h1>
      <button onClick={createPieChart}>
        Generate
      </button>
    </div>
  );
}

export default App;
Pie chart created with Spire.XLS for JavaScript
Create a Doughnut Chart
A doughnut chart is similar to a pie chart but with a hollow center, which can display multiple data series. With Spire.XLS for JavaScript, you can create a doughnut chart by setting the chart type to Doughnut and configuring percentage data labels. The steps are as follows:
- Create a
Workbookobject and get the default worksheet. - Populate the worksheet with category labels and numeric values.
- Add a chart and set its
ChartTypetoExcelChartType.Doughnut. - Configure the chart position, title, and percentage data labels.
- Save the workbook to an Excel file using
SaveToFile().
Below is a complete code example demonstrating how to create a doughnut chart in React:
function App() {
  const createDoughnutChart = async () => {
    // Get the Spire.XLS WASM module
    const xlsModule = window.wasmModule?.spirexls;

    // Check if the module is ready
    if (!xlsModule) {
      alert('Spire.Xls is not ready yet');
      return;
    }

    // Create a new workbook and get the default worksheet
    const workbook = new xlsModule.Workbook();
    let sheet = workbook.Worksheets.get(0);

    // Populate chart data
    sheet.Range.get("A1").Value = "Country";
    sheet.Range.get("A1").Style.Font.IsBold = true;
    sheet.Range.get("A2").Value = "Cuba";
    sheet.Range.get("A3").Value = "Mexico";
    sheet.Range.get("A4").Value = "France";
    sheet.Range.get("A5").Value = "German";
    sheet.Range.get("B1").Value = "Sales";
    sheet.Range.get("B1").Style.Font.IsBold = true;
    sheet.Range.get("B2").NumberValue = 6000;
    sheet.Range.get("B3").NumberValue = 8000;
    sheet.Range.get("B4").NumberValue = 9000;
    sheet.Range.get("B5").NumberValue = 8500;

    // Add a doughnut chart
    let chart = sheet.Charts.Add();
    chart.ChartType = xlsModule.ExcelChartType.Doughnut;
    chart.DataRange = sheet.Range.get("A1:B5");
    chart.SeriesDataFromRange = false;

    // Set the chart position
    chart.LeftColumn = 4;
    chart.TopRow = 2;
    chart.RightColumn = 12;
    chart.BottomRow = 22;

    // Configure chart title
    chart.ChartTitle = "Market share by country";
    chart.ChartTitleArea.IsBold = true;
    chart.ChartTitleArea.Size = 12;

    // Show percentage data labels
    for (let i = 0; i < chart.Series.Count; i++) {
      chart.Series.get(i).DataPoints.DefaultDataPoint.DataLabels.HasPercentage = true;
    }

    // Set legend position
    chart.Legend.Position = xlsModule.LegendPositionType.Top;

    // Save the workbook
    const outputFileName = 'CreateDoughnutChart.xlsx';
    workbook.SaveToFile(outputFileName);
    workbook.Dispose();

    // Read the file from VFS and trigger download
    const fileArray = window.dotnetRuntime.Module.FS.readFile(outputFileName);
    const blob = new Blob([fileArray], { type: 'application/vnd.openxmlformats-officedocument.spreadsheetml.sheet' });
    const url = URL.createObjectURL(blob);
    const a = document.createElement('a');
    a.href = url;
    a.download = outputFileName;
    a.click();
    URL.revokeObjectURL(url);
  };

  return (
    <div style={{ textAlign: 'center', height: '300px' }}>
      <h1>Create Doughnut Chart</h1>
      <button onClick={createDoughnutChart}>
        Generate
      </button>
    </div>
  );
}

export default App;
Doughnut chart created with Spire.XLS for JavaScript
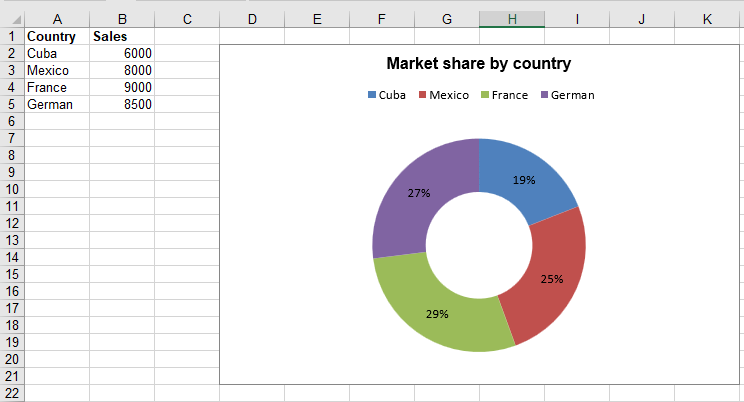
Chart Type Reference
The examples above covered column charts, pie charts, and doughnut charts. In addition, Spire.XLS supports all standard Excel chart types, which are defined in the Spire.Xls.ExcelChartType enumeration. The complete list of 81 chart types is as follows:
| Chart Type | Description |
|---|---|
| 1. ColumnClustered | Represents Clustered Column Chart |
| 2. ColumnStacked | Represents Stacked Column Chart |
| 3. Column100PercentStacked | Represents 100% Stacked Column Chart |
| 4. Column3DClustered | Represents 3D Clustered Column Chart |
| 5. Column3DStacked | Represents 3D Stacked Column Chart |
| 6. Column3D100PercentStacked | Represents 3D 100% Stacked Column Chart |
| 7. Column3D | Represents 3D Column Chart |
| 8. BarClustered | Represents Clustered Bar Chart |
| 9. BarStacked | Represents Stacked Bar Chart |
| 10. Bar100PercentStacked | Represents 100% Stacked Bar Chart |
| 11. Bar3DClustered | Represents 3D Clustered Bar Chart |
| 12. Bar3DStacked | Represents 3D Stacked Bar Chart |
| 13. Bar3D100PercentStacked | Represents 100% 3D Stacked Bar Chart |
| 14. Line | Represents Line Chart |
| 15. LineStacked | Represents Stacked Line Chart |
| 16. Line100PercentStacked | Represents 100% Stacked Line Chart |
| 17. LineMarkers | Represents Markers Line Chart |
| 18. LineMarkersStacked | Represents Stacked Markers Line Chart |
| 19. LineMarkers100PercentStacked | Represents 100% Stacked Markers Line Chart |
| 20. Line3D | Represents 3D Line Chart |
| 21. Pie | Represents Pie Chart |
| 22. Pie3D = 21 | Represents 3D Pie Chart |
| 23. PieOfPie | Represents Pie of Pie chart |
| 24. PieExploded | Represents Exploded Pie Chart |
| 25. Pie3DExploded | Represents 3D Exploded Pie Chart |
| 26. PieBar | Represents Bar Pie Chart |
| 27. ScatterMarkers | Represents Markers Scatter Chart |
| 28. ScatterSmoothedLineMarkers | Represents ScatterSmoothedLineMarkers Chart |
| 29. ScatterSmoothedLine | Represents ScatterSmoothedLine Chart |
| 30. ScatterLineMarkers | Represents ScatterLineMarkers Chart |
| 31. ScatterLine | Represents ScatterLine Chart |
| 32. Area | Represents Area Chart |
| 33. AreaStacked | Represents AreaStacked Chart |
| 34. Area100PercentStacked | Represents Area100PercentStacked Chart |
| 35. Area3D | Represents Area3D Chart |
| 36. Area3DStacked | Represents Area3DStacked Chart |
| 37. Area3D100PercentStacked | Represents Area3D100PercentStacked Chart |
| 38. Doughnut | Represents Doughnut Chart |
| 39. DoughnutExploded | Represents DoughnutExploded Chart |
| 40. Radar | Represents Radar Chart |
| 41. RadarMarkers | Represents RadarMarkers Chart |
| 42. RadarFilled | Represents RadarFilled Chart |
| 43. Surface3D | Represents Surface3D Chart |
| 44. Surface3DNoColor | Represents Surface3DNoColor Chart |
| 45. SurfaceContour | Represents SurfaceContour Chart |
| 46. SurfaceContourNoColor | Represents SurfaceContourNoColor Chart |
| 47. Bubble | Represents Bubble Chart |
| 48. Bubble3D | Represents Bubble3D Chart |
| 49. StockHighLowClose | Represents StockHighLowClose Chart |
| 50. StockOpenHighLowClose | Represents StockOpenHighLowClose Chart |
| 51. StockVolumeHighLowClose | Represents StockVolumeHighLowClose Chart |
| 52. StockVolumeOpenHighLowClose | Represents StockVolumeOpenHighLowClose Chart |
| 53. CylinderClustered | Represents CylinderClustered Chart |
| 54. CylinderStacked | Represents CylinderStacked Chart |
| 55. Cylinder100PercentStacked | Represents Cylinder100PercentStacked Chart |
| 56. CylinderBarClustered | Represents CylinderBarClustered Chart |
| 57. CylinderBarStacked | Represents CylinderBarStacked Chart |
| 58. CylinderBar100PercentStacked | Represents CylinderBar100PercentStacked Chart |
| 59. Cylinder3DClustered | Represents Cylinder3DClustered Chart |
| 60. ConeClustered | Represents ConeClustered Chart |
| 61. ConeStacked | Represents ConeStacked Chart |
| 62. Cone100PercentStacked | Represents Cone100PercentStacked Chart |
| 63. ConeBarClustered | Represents ConeBarClustered Chart |
| 64. ConeBarStacked | Represents ConeBarStacked Chart |
| 65. ConeBar100PercentStacked | Represents ConeBar100PercentStacked Chart |
| 66. Cone3DClustered | Represents Cone3DClustered Chart |
| 67. PyramidClustered | Represents PyramidClustered Chart |
| 68. PyramidStacked | Represents PyramidStacked Chart |
| 69. Pyramid100PercentStacked | Represents Pyramid100PercentStacked Chart |
| 70. PyramidBarClustered | Represents PyramidBarClustered Chart |
| 71. PyramidBarStacked | Represents PyramidBarStacked Chart |
| 72. PyramidBar100PercentStacked | Represents PyramidBar100PercentStacked Chart |
| 73. Pyramid3DClustered | Represents Pyramid3DClustered Chart |
| 74. CombinationChart | Represents Combination Chart |
| 75. Funnel | Represents Funnel Chart |
| 76. WaterFall | Represents Waterfall Chart |
| 77. BoxAndWhisker | Represents Box and Whisker Chart |
| 78. Histogram | Represents Histogram Chart |
| 79. Pareto | Represents Pareto Chart |
| 80. TreeMap | Represents Tree Map Chart |
| 81. SunBurst | Represents Sunburst Chart |
FAQ
How to show values or percentages on pie/doughnut chart labels
Solution: Choose the appropriate label property based on your needs:
// Show value labels
cs.DataPoints.DefaultDataPoint.DataLabels.HasValue = true; // Show value labels
// Or show percentage labels
cs.DataPoints.DefaultDataPoint.DataLabels.HasPercentage = true;
Legend in the generated Excel file is truncated or not fully displayed
Cause: The chart area is too small to accommodate all legend items, or the legend position setting causes overlap with the chart data area.
Solution: Increase the vertical range of the chart or adjust the legend position:
// Increase chart height
chart.BottomRow = 35;
// Or adjust legend position
chart.Legend.Position = xlsModule.LegendPositionType.Bottom;
Get a Free License
Spire.XLS for JavaScript offers a 30-day full-featured free trial license with no functional limitations. Apply here to evaluate before purchasing.
Detect and Remove Digital Signatures in Excel with JavaScript in React
2026-07-28 09:35:47 Written by jie zouDigital signatures ensure the authenticity of an Excel file's source and verify that its content has not been tampered with. Spire.XLS for JavaScript runs entirely in the browser via WebAssembly, using a virtual file system (VFS) to manage input and output files — no backend server required.
This article covers two core features:
For installation and project setup, refer to Integrating Spire.XLS for JavaScript in a React Project. The examples below assume Spire.XLS is installed and the WebAssembly module is initialized.
Detect Whether an Excel File Is Signed
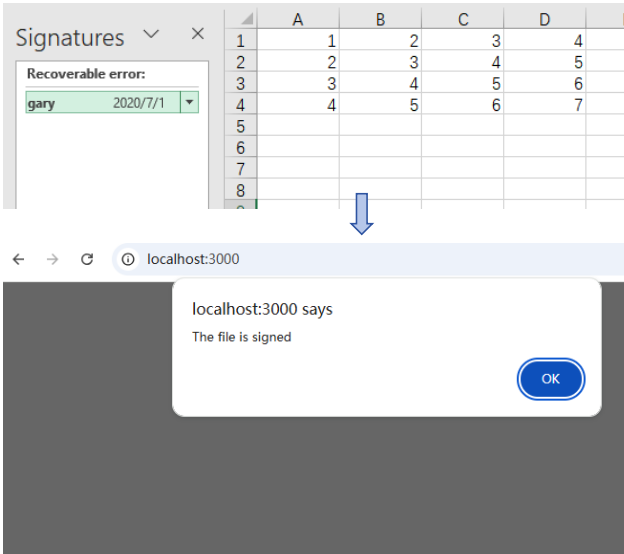
Before processing a signed Excel file, checking its signature status can prevent unintended operations. Spire.XLS provides the IsDigitallySigned property to determine whether a workbook contains digital signatures. The core process consists of three stages: first, load the font files and the target Excel file into the WASM virtual file system via FetchFileToVFS; then, instantiate a Workbook and load the file; finally, retrieve the signature status through the IsDigitallySigned property.
function App() {
  const detectDigitalSignature = async () => {
    // Get the Spire.XLS WASM module
    const xlsModule = window.wasmModule?.spirexls;

    // Check if the module is ready
    if (!xlsModule) {
      alert('Spire.Xls is not ready yet');
      return;
    }

    // Load fonts and Excel file into VFS
    await window.spire.FetchFileToVFS('arial.ttf', '/Library/Fonts/', `${process.env.PUBLIC_URL}/font/`);
    const inputFileName = 'Sample.xlsx';
    await window.spire.FetchFileToVFS(inputFileName, '', `${process.env.PUBLIC_URL}data/`);

    // Load the workbook
    const workbook = new xlsModule.Workbook();
    workbook.LoadFromFile({ fileName: inputFileName });

    // Detect if the workbook contains digital signatures
    const isSigned = workbook.IsDigitallySigned;

    // Dispose of the workbook object to release resources
    workbook.Dispose();

    // Show the detection result
    alert(isSigned ? 'The file is signed' : 'The file is not signed');
  };

  return (
    <div style={{ textAlign: 'center', height: '300px' }}>
      <h1>Detect Digital Signature</h1>
      <button onClick={detectDigitalSignature}>
        Detect
      </button>
    </div>
  );
}

export default App;
Detection result dialog showing whether the file is signed
Remove Digital Signatures from an Excel File
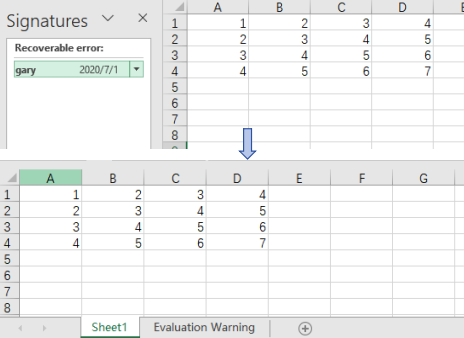
In cases where signature information needs to be updated, certificates replaced, or digital authentication canceled, the existing digital signatures must be removed from the Excel file. Using Spire.XLS, the core process consists of three stages: first, load the font files and the signed Excel file into the WASM virtual file system via FetchFileToVFS; then, instantiate a Workbook and load the file, calling RemoveAllDigitalSignatures to remove all digital signatures from the workbook at once; finally, save the workbook file with signatures removed via SaveToFile.
function App() {
  const removeDigitalSignatures = async () => {
    // Get the Spire.XLS WASM module
    const xlsModule = window.wasmModule?.spirexls;

    // Check if the module is ready
    if (!xlsModule) {
      alert('Spire.Xls is not ready yet');
      return;
    }

    // Load fonts and Excel file into VFS
    await window.spire.FetchFileToVFS('arial.ttf', '/Library/Fonts/', `${process.env.PUBLIC_URL}/font/`);
    const inputFileName = 'Sample.xlsx';
    await window.spire.FetchFileToVFS(inputFileName, '', `${process.env.PUBLIC_URL}data/`);

    // Load the signed workbook
    const workbook = new xlsModule.Workbook();
    workbook.LoadFromFile({ fileName: inputFileName });

    // Remove all digital signatures
    workbook.RemoveAllDigitalSignatures();

    // Save the workbook without signatures
    const outputFileName = 'SignatureRemoved.xlsx';
    workbook.SaveToFile({ fileName: outputFileName, version: xlsModule.ExcelVersion.Version2010 });

    // Dispose of the workbook object to release resources
    workbook.Dispose();

    // Read the file from VFS and trigger download
    const fileArray = window.dotnetRuntime.Module.FS.readFile(outputFileName);
    const blob = new Blob([fileArray], { type: 'application/vnd.openxmlformats-officedocument.spreadsheetml.sheet' });
    const url = URL.createObjectURL(blob);
    const a = document.createElement('a');
    a.href = url;
    a.download = outputFileName;
    a.click();
    URL.revokeObjectURL(url);
  };

  return (
    <div style={{ textAlign: 'center', height: '300px' }}>
      <h1>Remove Digital Signatures</h1>
      <button onClick={removeDigitalSignatures}>
        Remove Signatures
      </button>
    </div>
  );
}

export default App;
Output document after removing digital signatures
FAQ
Can I detect a signature on a specific worksheet instead of the entire workbook?
Cause: Digital signatures are applied to the entire workbook, not individual worksheets.
Solution: Digital signatures operate at the workbook level. It is not possible to detect or remove signatures on a single worksheet. Both IsDigitallySigned and RemoveAllDigitalSignatures are workbook-level methods.
How do I batch detect or remove signatures from multiple Excel files?
Cause: Real-world projects often involve processing large numbers of files, making manual processing inefficient.
Solution: Use a loop to process files in batch:
const files = ['report1.xlsx', 'report2.xlsx', 'report3.xlsx'];
for (const file of files) {
  await window.spire.FetchFileToVFS(file, '', dataPath);
  const wb = new xlsModule.Workbook();
  wb.LoadFromFile({ fileName: file });
  if (wb.IsDigitallySigned) {
    wb.RemoveAllDigitalSignatures();
  }
  wb.SaveToFile({ fileName: `unsigned_${file}`, version: xlsModule.ExcelVersion.Version2016 });
  wb.Dispose();
}
Get a Free License
Spire.XLS for JavaScript offers a 30-day full-featured free trial license with no functional limitations. Apply here to evaluate before purchasing.
Convert PDF to PDF/A and Vice Versa with JavaScript in React
2026-07-17 02:47:13 Written by Nina TangPDF/A is an ISO-standardized long-term archival format that embeds fonts, color profiles, and metadata into a unified compliance level, ensuring documents remain faithfully reproducible for decades regardless of the PDF reader used. In contrast, standard PDF offers greater flexibility for everyday editing and content extraction. Real-world business often requires switching between these two formats: converting contracts to PDF/A for regulatory compliance during archiving, and restoring them to standard PDF for text extraction during audit review.
Spire.PDF for JavaScript performs bidirectional PDF/PDF/A conversion entirely in the browser via WebAssembly, managing input and output files through a virtual file system (VFS) with no backend server required.
This article covers two core features:
For installation and project setup, refer to Integrating Spire.PDF for JavaScript in a React Project. The examples below assume Spire.PDF is installed and the WebAssembly module is initialized.
Convert PDF to PDF/A
The core of PDF/A archival conversion is to consolidate fonts, color profiles, and metadata in a standard PDF into ISO-compliant levels. Spire.PDF handles this in one step through the PdfStandardsConverter component, supporting multiple compliance levels including PDF/A-1a, PDF/A-1b, PDF/A-2a, PDF/A-2b, PDF/A-3a, and PDF/A-3b.
The conversion standards supported by PdfStandardsConverter and their use cases are as follows:
| Method | Standard | Description |
|---|---|---|
ToPdfA1B |
PDF/A-1b | Based on PDF 1.4, guarantees visual appearance reproducibility only — the most commonly used archival level |
ToPdfA1A |
PDF/A-1a | Requires document tags and structure information on top of 1b, supports accessible reading |
ToPdfA2A |
PDF/A-2a | Based on PDF 1.7, requires tags and structure info, supports layers and transparency |
ToPdfA2B |
PDF/A-2b | PDF/A-2 basic conformance level, allows transparency, layers, and embedded OLE objects |
ToPdfA3A |
PDF/A-3a | Allows embedding XML, Excel, and other arbitrary format files as attachments on top of 2a |
ToPdfA3B |
PDF/A-3b | PDF/A-3 basic conformance level, supports embedding arbitrary format attachments |
ToPdfX1A2001 |
PDF/X-1a:2001 | Print exchange standard, suitable for publishing and printing workflows |
The following example demonstrates converting a PDF to PDF/A-2B using ToPdfA2B:
function App() {
  const convertToPDFA = async () => {
    // Get the Spire.PDF WASM module
    const pdfModule = window.wasmModule?.spirepdf;

    // Check if the WASM module is ready
    if (!pdfModule) {
      alert('Spire.PDF is not ready yet');
      return;
    }

    // Load fonts and PDF file into VFS
    await window.spire.FetchFileToVFS('arial.ttf', '/Library/Fonts/', `${process.env.PUBLIC_URL}/font/`);
    const inputFileName = 'MovieCatalog.pdf';
    await window.spire.FetchFileToVFS(inputFileName, "", `${process.env.PUBLIC_URL}/data/`);

    // Create PdfStandardsConverter
    let converter = new pdfModule.PdfStandardsConverter({ filePath: inputFileName });

    // Convert to PDF/A-2B format
    const outputFileName = 'ToPDFA_result.pdf';
    converter.ToPdfA2B({ filePath: outputFileName });

    // // Convert to PDF/A-1a
    // converter.ToPdfA1A({ filePath: outputFileName });

    // // Convert to PDF/A-2a
    // converter.ToPdfA2A({ filePath: outputFileName });

    // // Convert to PDF/A-2b
    // converter.ToPdfA2B({ filePath: outputFileName });

    // // Convert to PDF/A-3a
    // converter.ToPdfA3A({ filePath: outputFileName });

    // // Convert to PDF/A-3b
    // converter.ToPdfA3B({ filePath: outputFileName });

    // // Convert to PDF/X-1a:2001
    // converter.ToPdfX1A2001({ filePath: outputFileName });

    // Read the converted file from VFS and trigger download
    const fileArray = window.dotnetRuntime.Module.FS.readFile(outputFileName);
    const blob = new Blob([fileArray], { type: 'application/pdf' });
    const url = URL.createObjectURL(blob);
    const a = document.createElement('a');
    a.href = url;
    a.download = outputFileName;
    a.click();
    URL.revokeObjectURL(url);

    // Release resources
    converter.Dispose();
  };

  return (
    <div style={{ textAlign: 'center', height: '300px' }}>
      <h1>Convert PDF To PDF/A</h1>
      <button onClick={convertToPDFA}>
        Generate
      </button>
    </div>
  );
}

export default App;
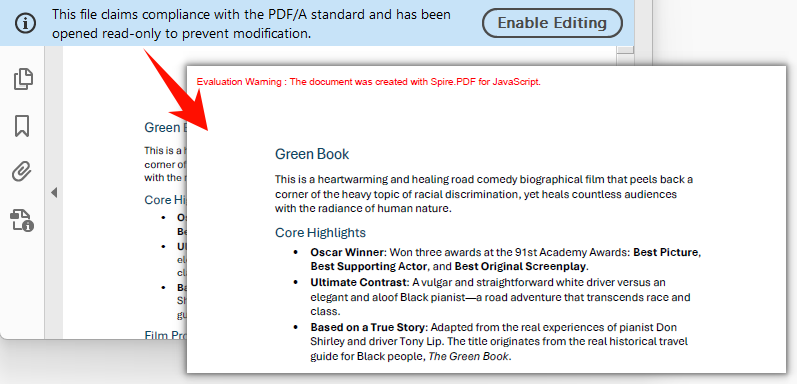
PDF/A output generated after conversion via PdfStandardsConverter

Convert PDF/A to PDF
PDF/A is the standard format for long-term archiving, but in everyday editing and content extraction scenarios, you may need to restore PDF/A back to standard PDF. Spire.PDF for JavaScript achieves this reverse conversion by loading the PDF/A document and copying content page by page into a new document, ensuring the output standard PDF is free of PDF/A compliance constraints.
function App() {
  const convertToNormalPDF = async () => {
    // Get the Spire.PDF WASM module
    const pdfModule = window.wasmModule?.spirepdf;

    // Check if the WASM module is ready
    if (!pdfModule) {
      alert('Spire.PDF is not ready yet');
      return;
    }

    // Load fonts and PDF file into VFS
    await window.spire.FetchFileToVFS('arial.ttf', '/Library/Fonts/', `${process.env.PUBLIC_URL}/font/`);
    const inputFileName = 'PDFA_Sample.pdf';
    await window.spire.FetchFileToVFS(inputFileName, "", `${process.env.PUBLIC_URL}/data/`);

    // Create PdfDocument object
    let doc = new pdfModule.PdfDocument();
    doc.LoadFromFile(inputFileName);

    // Create a new PDF document to draw content onto
    let newDoc = new pdfModule.PdfNewDocument();
    newDoc.CompressionLevel = pdfModule.PdfCompressionLevel.None;

    // Iterate through each page in the original document
    for (let i = 0; i < doc.Pages.Count; i++) {
      let page = doc.Pages.get_Item(i);
      // Get the current page size
      let size = page.Size;

      // Add a new page with the same size and no margins
      let newPage = newDoc.Pages.Add({ size: size, margins: new pdfModule.PdfMargins() });

      // Draw the original page content onto the new page
      let template = page.CreateTemplate();
      let layoutWidget = new pdfModule.PdfLayoutWidget(template.H);
      layoutWidget.Draw({ page: newPage, x: 0, y: 0 });
      // page.CreateTemplate().Draw({page: newPage, x: 0, y: 0});
    }

    // Define the output file name
    const outputFileName = "PDFAToPdf_result.pdf";

    // Save the document to the specified path
    newDoc.Save(outputFileName);

    // Read the generated file from VFS and trigger download
    const fileArray = window.dotnetRuntime.Module.FS.readFile(outputFileName);
    const blob = new Blob([fileArray], { type: 'application/pdf' });
    const url = URL.createObjectURL(blob);
    const a = document.createElement('a');
    a.href = url;
    a.download = outputFileName;
    a.click();
    URL.revokeObjectURL(url);

    // Release resources
    newDoc.Dispose();
    doc.Dispose();
  };

  return (
    <div style={{ textAlign: 'center', height: '300px' }}>
      <h1>Convert PDF/A To Normal PDF</h1>
      <button onClick={convertToNormalPDF}>
        Generate
      </button>
    </div>
  );
}

export default App;
Standard PDF output generated by creating a new document and copying pages
FAQ
Converted PDF/A file size is much larger than the original
PDF/A requires all fonts used in the document to be fully embedded to ensure correct rendering on any device. If the original document uses non-embedded system fonts, the font data will be written completely into the output file during conversion, resulting in a larger file size. This is an inherent requirement of PDF/A compliance. To minimize file size, consider using font subsetting (embedding only the characters actually used) or compressing image content before generating the source PDF.
Can encrypted PDFs be converted to PDF/A?
Encrypted PDFs that require a password to open cannot be processed directly by PdfStandardsConverter. The password must be provided when loading the document.
The PdfStandardsConverter constructor supports a password parameter for converting password-protected PDFs to PDF/A:
// Create PdfStandardsConverter with password
let converter = new pdfModule.PdfStandardsConverter({ filePath: inputFileName, password: "123456" });
converter.ToPdfA2A({ filePath: outputFileName });
converter.Dispose();
"File not found" or "Invalid PDF format" error when loading PDF/A
PDF/A documents must first be converted via PdfStandardsConverter, or properly loaded into the virtual file system (VFS) via FetchFileToVFS. Common mistakes include passing the wrong file name or path, or executing subsequent operations before the file has finished loading. Verify that the file has been loaded into VFS via FetchFileToVFS and that the file name (including extension) matches exactly. Use await to ensure the file is ready before proceeding.
Get a Free License
Spire.PDF for JavaScript offers a 30-day full-featured free trial license with no functional limitations. Apply here to evaluate before purchasing.
Get, Replace, Delete Word Bookmark Content and Insert Elements with JavaScript in React
2026-07-17 02:45:00 Written by Nina TangBookmarks are invisible positioning markers in Word documents that act as coordinates, precisely marking a location or a range of text. But the true value of bookmarks goes beyond positioning—by programmatically retrieving content within a bookmark range, replacing placeholder text, removing unwanted content, or inserting text, paragraphs, tables, and images at bookmark positions, developers can implement advanced document processing workflows such as automatic contract template filling, dynamic report data injection, and batch form content cleanup. The combination of "read, write, delete, and insert" operations around bookmark content forms the core of Word automation.
Spire.Doc for JavaScript runs entirely in the browser via WebAssembly, handling bookmark content retrieval, replacement, deletion, and element insertion directly — all managed through a virtual file system (VFS) with no backend server required.
This article covers four core features:
- Get Bookmark Content
- Replace Bookmark Content
- Delete Bookmark Content
- Insert Text, Paragraphs, Tables, and Images at a Bookmark
For installation and project setup, refer to Integrating Spire.Doc for JavaScript in a React Project. The examples below assume Spire.Doc is installed and the WebAssembly module is initialized.
Get Bookmark Content
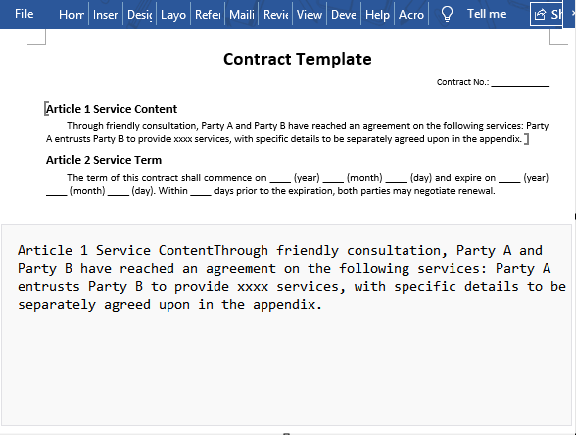
Getting bookmark content is the prerequisite for any bookmark operation. After locating a bookmark with BookmarksNavigator, the GetBookmarkContent method returns the content within the bookmark range as a TextBodyPart object, which developers can iterate through its BodyItems collection to retrieve elements.
function App() {
  const bookmarkContent = async () => {
    // Get the Spire.Doc WASM module
    const docModule = window.wasmModule?.spiredoc;

    // Check if the WASM module is ready
    if (!docModule) {
      alert('Spire.Doc is not ready yet');
      return;
    }

    // Load the Word file into VFS
    const inputFileName = 'ContractTemplate_en.docx';
    await window.spire.FetchFileToVFS(inputFileName, '', `${process.env.PUBLIC_URL}/data/`);

    // Load the Word document
    const doc = new docModule.Document();
    doc.LoadFromFile(inputFileName);

    // Create a BookmarksNavigator and move to the bookmark
    let navigator = new docModule.BookmarksNavigator(doc);
    navigator.MoveToBookmark("myBookmark");
    let textBodyPart = navigator.GetBookmarkContent();

    // Iterate through elements in the bookmark content and extract text
    let text = "";
    for (let i = 0; i < textBodyPart.BodyItems.Count; i++) {
      let item = textBodyPart.BodyItems.get_Item(i);
      if (item instanceof docModule.Paragraph) {
        for (let j = 0; j < item.ChildObjects.Count; j++) {
          let childObject = item.ChildObjects.get_Item(j);
          if (childObject instanceof docModule.TextRange) {
            text += childObject.Text;
          }
        }
      }
    }

    // Save as a .txt file
    const outputFileName = "GetBookmarkContent.txt";

    // Write the text file to VFS and trigger download
    window.dotnetRuntime.Module.FS.writeFile(outputFileName, text);

    const fileArray = window.dotnetRuntime.Module.FS.readFile(outputFileName);
    const blob = new Blob([fileArray], { type: 'text/plain' });
    const url = URL.createObjectURL(blob);
    const a = document.createElement('a');
    a.href = url;
    a.download = outputFileName;
    a.click();
    URL.revokeObjectURL(url);

    // Release resources
    doc.Dispose();
  };

  return (
    <div style={{ textAlign: 'center', height: '300px' }}>
      <h1>Get Bookmark Content from Word Document</h1>
      <button onClick={bookmarkContent}>
        Generate
      </button>
    </div>
  );
}

export default App;
Executing the code above extracts the text content from the bookmark "myBookmark" and saves it as a separate .txt file:
Replace Bookmark Content
Replacing bookmark content is the most common operation in document template filling. After locating a bookmark with BookmarksNavigator, the ReplaceBookmarkContent method supports replacement with both plain text and complex elements like tables, making it ideal for placeholder replacement in contract generation, report filling, and similar scenarios.
function App() {
  const replaceBookmarkContent = async () => {
    // Get the Spire.Doc WASM module
    const docModule = window.wasmModule?.spiredoc;

    // Check if the WASM module is ready
    if (!docModule) {
      alert('Spire.Doc is not ready yet');
      return;
    }

    // Load fonts and Word file into VFS
    await window.spire.FetchFileToVFS('ARIAL.TTF', '/Library/Fonts/', `${process.env.PUBLIC_URL}/font/`);
    const inputFileName = 'BookmarkSample.docx';
    await window.spire.FetchFileToVFS(inputFileName, '', `${process.env.PUBLIC_URL}/data/`);

    // Load the Word document
    const doc = new docModule.Document();
    doc.LoadFromFile(inputFileName);

    // Create a BookmarksNavigator and move to the bookmark
    let navigator = new docModule.BookmarksNavigator(doc);
    navigator.MoveToBookmark("Bookmark1");

    // Replace the content of "书签1" — with text
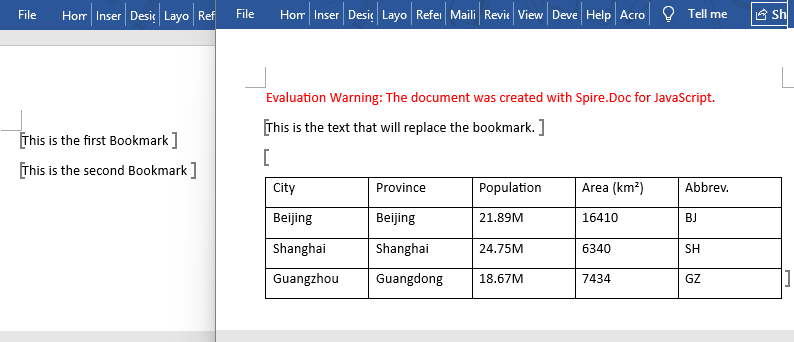
    navigator.ReplaceBookmarkContent({ text: "This is the text that will replace the bookmark.", saveFormatting: true });

    // Continue to replace "书签2" — with a table
    navigator.MoveToBookmark("Bookmark2");

    // Create a table
    let table = new docModule.Table(doc, true);
    table.ResetCells(4, 5);

    // Create data and fill it into the table
    let dt = [
      ["City", "Province", "Population", "Area (km²)", "Abbrev."],
      ["Beijing", "Beijing", "21.89M", "16410", "BJ"],
      ["Shanghai", "Shanghai", "24.75M", "6340", "SH"],
      ["Guangzhou", "Guangdong", "18.67M", "7434", "GZ"]];
    for (let i = 0; i < 4; i++) {
      for (let j = 0; j < 5; j++) {
        table.Rows.get_Item(i).Cells.get_Item(j).AddParagraph().AppendText(dt[i][j]);
      }
    }

    // Create a TextBodyPart instance and add the table to it
    let part = new docModule.TextBodyPart({ doc: doc });
    part.BodyItems.Add(table);

    // Replace the current bookmark content with the TextBodyPart
    navigator.ReplaceBookmarkContent({ bodyPart: part });

    // Save as a new .docx file
    const outputFileName = "ReplaceBookmark.docx";
    doc.SaveToFile({ fileName: outputFileName, fileFormat: docModule.FileFormat.Docx2013 });

    // Read the generated file from VFS and trigger download
    const fileArray = window.dotnetRuntime.Module.FS.readFile(outputFileName);
    const blob = new Blob([fileArray], { type: 'application/vnd.openxmlformats-officedocument.wordprocessingml.document' });
    const url = URL.createObjectURL(blob);
    const a = document.createElement('a');
    a.href = url;
    a.download = outputFileName;
    a.click();
    URL.revokeObjectURL(url);

    // Release resources
    doc.Dispose();
  };

  return (
    <div style={{ textAlign: 'center', height: '300px' }}>
      <h1>Replace Bookmark Content in Word</h1>
      <button onClick={replaceBookmarkContent}>
        Generate
      </button>
    </div>
  );
}

export default App;
This method supports replacing bookmark content with plain text or complex elements like tables. The bookmark marker itself is preserved after replacement, making it easy to locate again later. The figure below shows the result:
Delete Bookmark Content
Deleting bookmark content and removing a bookmark marker are two different operations. After locating a bookmark with BookmarksNavigator, calling DeleteBookmarkContent removes the text content within the bookmark range while preserving the bookmark marker itself for later refilling. If you only need to clear the content while keeping the positioning marker, this method is the preferred choice.
function App() {
  const deleteBookmarkContent = async () => {
    // Get the Spire.Doc WASM module
    const docModule = window.wasmModule?.spiredoc;

    // Check if the WASM module is ready
    if (!docModule) {
      alert('Spire.Doc is not ready yet');
      return;
    }

    // Load the Word file into VFS
    const inputFileName = 'ContractTemplate_en.docx';
    await window.spire.FetchFileToVFS(inputFileName, '', `${process.env.PUBLIC_URL}/data/`);

    // Load the Word document
    const doc = new docModule.Document();
    doc.LoadFromFile(inputFileName);

    // Create a BookmarksNavigator and move to the bookmark
    let navigator = new docModule.BookmarksNavigator(doc);
    navigator.MoveToBookmark("myBookmark");

    // Delete bookmark content, keep the bookmark marker
    navigator.DeleteBookmarkContent(true);

    // Save as a new .docx file
    const outputFileName = "RemoveBookmark.docx";

    doc.SaveToFile({ fileName: outputFileName, fileFormat: docModule.FileFormat.Docx2013 });

    // Read the generated file from VFS and trigger download
    const fileArray = window.dotnetRuntime.Module.FS.readFile(outputFileName);
    const blob = new Blob([fileArray], { type: 'application/vnd.openxmlformats-officedocument.wordprocessingml.document' });
    const url = URL.createObjectURL(blob);
    const a = document.createElement('a');
    a.href = url;
    a.download = outputFileName;
    a.click();
    URL.revokeObjectURL(url);

    // Release resources
    doc.Dispose();
  };

  return (
    <div style={{ textAlign: 'center', height: '300px' }}>
      <h1>Delete Bookmark Content in Word</h1>
      <button onClick={deleteBookmarkContent}>
        Generate
      </button>
    </div>
  );
}

export default App;
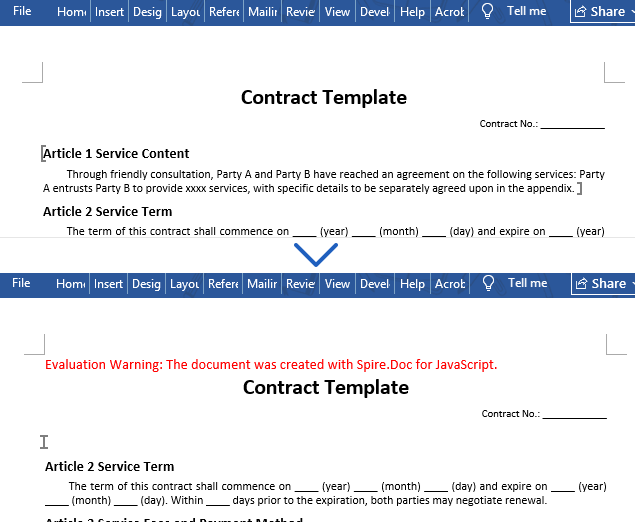
DeleteBookmarkContentremoves only the text content within the bookmark range — the bookmark marker itself remains.Bookmarks.Remove, on the other hand, removes the bookmark marker, leaving the text within the range unaffected.
After execution, the text within the bookmark "myBookmark" is removed, but the bookmark marker stays in the document:
Insert Text, Paragraphs, Tables, and Images at a Bookmark
Spire.Doc supports flexibly inserting various types of document elements at bookmark positions. It provides InsertText, InsertParagraph, and InsertTable methods for inserting text, paragraphs, and tables. Elements can also be inserted based on the index of the bookmark start node within the paragraph's ChildObjects collection.
function App() {
  const insertElementsAtBookmark = async () => {
    // Get the Spire.Doc WASM module
    const docModule = window.wasmModule?.spiredoc;

    // Check if the WASM module is ready
    if (!docModule) {
      alert('Spire.Doc is not ready yet');
      return;
    }

    // Load fonts and Word file into VFS
    await window.spire.FetchFileToVFS('ARIAL.TTF', '/Library/Fonts/', `${process.env.PUBLIC_URL}/font/`);
    const inputFileName = 'BookmarkSample1.docx';
    await window.spire.FetchFileToVFS(inputFileName, '', `${process.env.PUBLIC_URL}/data/`);

    // Create a Document object and load the file
    const doc = new docModule.Document();
    doc.LoadFromFile(inputFileName);

    // Move to the bookmark position
    let navigator = new docModule.BookmarksNavigator(doc);
    navigator.MoveToBookmark("Bookmark1");

    // 1. Insert text
    navigator.InsertText("This is the inserted text content.", true);

    // 2. Insert paragraph
    let newParagraph = new docModule.Paragraph(doc);
    newParagraph.AppendText("This is the inserted paragraph content.")
    navigator.MoveToBookmark("Bookmark2");
    navigator.InsertParagraph(newParagraph);

    // 3. Insert table — 2 rows, 3 columns
    let table = new docModule.Table(doc, true);
    table.ResetCells(2, 3);
    table.Rows.get_Item(0).Cells.get_Item(0).AddParagraph().AppendText("Name");
    table.Rows.get_Item(0).Cells.get_Item(1).AddParagraph().AppendText("Quantity");
    table.Rows.get_Item(0).Cells.get_Item(2).AddParagraph().AppendText("Note");
    table.Rows.get_Item(1).Cells.get_Item(0).AddParagraph().AppendText("Product A");
    table.Rows.get_Item(1).Cells.get_Item(1).AddParagraph().AppendText("100");
    table.Rows.get_Item(1).Cells.get_Item(2).AddParagraph().AppendText("In Stock");

    navigator.MoveToBookmark("Bookmark3");
    navigator.InsertTable(table);

    // 4. Insert image
    const imageFileName = 'pic.png';
    await window.spire.FetchFileToVFS(imageFileName, '', `${process.env.PUBLIC_URL}/data/`);
    let picture = new docModule.DocPicture(doc);
    picture.LoadImage(imageFileName);
    picture.Width = 100;
    picture.Height = 200;

    navigator.MoveToBookmark("Bookmark4");
    // Get the bookmark start node
    let start = navigator.CurrentBookmark.BookmarkStart;
    // Get the paragraph containing the bookmark
    let bookmarkPara = start.OwnerParagraph;
    // Get the index of the bookmark start node in the paragraph
    let startIndex = bookmarkPara.ChildObjects.IndexOf(start);
    // Insert the image after the bookmark start node
    bookmarkPara.ChildObjects.Insert(startIndex + 1, picture);

    // Save as a .docx file
    const outputFileName = "InsertToBookmark.docx";

    doc.SaveToFile({ fileName: outputFileName, fileFormat: docModule.FileFormat.Docx2013 });

    // Read the generated file from VFS and trigger download
    const fileArray = window.dotnetRuntime.Module.FS.readFile(outputFileName);
    const blob = new Blob([fileArray], { type: 'application/vnd.openxmlformats-officedocument.wordprocessingml.document' });
    const url = URL.createObjectURL(blob);
    const a = document.createElement('a');
    a.href = url;
    a.download = outputFileName;
    a.click();
    URL.revokeObjectURL(url);

    // Release Document resources
    doc.Dispose();
  };

  return (
    <div style={{ textAlign: 'center', height: '300px' }}>
      <h1>Insert Elements at Bookmark Position</h1>
      <button onClick={insertElementsAtBookmark}>
        Generate
      </button>
    </div>
  );
}

export default App;
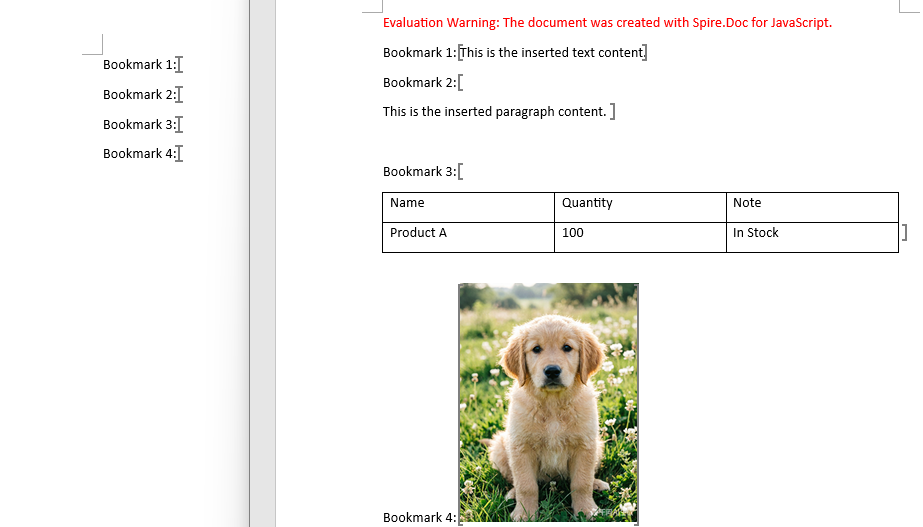
The figure below shows the generated document with text, paragraph, table, and image inserted at bookmark positions:
FAQ
Formatting (font, size, color) is lost after replacing bookmark content — how to keep it?
ReplaceBookmarkContent replaces with plain text by default, discarding the original formatting. To preserve the bookmark's existing formatting, pass saveFormatting: true:
navigator.ReplaceBookmarkContent({ text: "New content", saveFormatting: true });
The replacement text will then inherit the original font, size, color, and other formatting from the bookmark.
How to batch process multiple bookmarks in a document?
Iterate through the doc.Bookmarks collection, locating and operating on each bookmark one by one:
for (let i = 0; i < doc.Bookmarks.Count; i++) {
    let bookmark = doc.Bookmarks.get_Item(i);
    navigator.MoveToBookmark(bookmark.Name);
    // Perform replace, delete, or insert operations
}
What's the difference between DeleteBookmarkContent and removing a bookmark marker?
DeleteBookmarkContent: Clears only the content within the bookmark range. The bookmark marker stays in the document, so you can still locate it by name and fill in new content later.Bookmarks.Remove: Removes the bookmark marker itself. The content within the bookmark range is unaffected, but the bookmark name disappears and can no longer be located.
Choose the appropriate operation based on your needs: use DeleteBookmarkContent if you need to keep the "placeholder" capability, or remove the marker if the bookmark is no longer needed.
When inserting multiple elements at the same bookmark, why does only the last one take effect?
Methods like InsertText, InsertParagraph, and InsertTable insert based on the bookmark's current position. When inserting multiple times at the same bookmark, subsequent insertions may overwrite or shift previously inserted content. It is recommended to use separate bookmarks for each insertion, or re-locate the bookmark after each insert before proceeding with the next operation.
Get a Free License
Spire.Doc for JavaScript offers a 30-day full-featured free trial license with no functional limitations. Apply here to evaluate before purchasing.
A bookmark is like an invisible "anchor" in a Word document, able to accurately locate a specific position or selected text. Whether it's a fill-in area in a contract template, a key section to jump to in a long document, or a data insertion point when generating reports in batch, bookmarks are the critical anchor behind these operations. Developers can use bookmarks for dynamic content filling, navigation, content extraction, and other advanced features, making bookmark management one of the most commonly used capabilities in Word automation.
Spire.Doc for JavaScript runs entirely in the browser via WebAssembly, handling bookmark creation, navigation, and deletion directly — all managed through a virtual file system (VFS) with no backend server required.
This article covers three core features:
For installation and project setup, refer to Integrating Spire.Doc for JavaScript in a React Project. The examples below assume Spire.Doc is installed and the WebAssembly module is initialized.
Add a Bookmark to a Paragraph
To add a bookmark in an existing document, use AppendBookmarkStart and AppendBookmarkEnd to mark the bookmark region on a paragraph. You can add bookmark markers to existing paragraphs or append a new paragraph with a bookmark. Spire.Doc also supports nested bookmarks for building hierarchical structures.
function App() {
  const createBookmarkInWord = async () => {
    // Get the Spire.Doc WASM module
    const docModule = window.wasmModule?.spiredoc;

    // Check if the module is ready
    if (!docModule) {
      alert('Spire.Doc is not ready yet');
      return;
    }

    // Load the Word file into VFS
    const inputFileName = 'ChinaTravelGuide.docx';
    await window.spire.FetchFileToVFS(inputFileName, '', `${process.env.PUBLIC_URL}/data/`);

    // Load the document
    const doc = new docModule.Document();
    doc.LoadFromFile(inputFileName);

    // Get the first section and add bookmarks
    let section = doc.Sections.get_Item(0);

    AddBookmark(section);

    // Save as a .docx file
    const outputFileName = "AddBookmark.docx";

    doc.SaveToFile({ fileName: outputFileName, fileFormat: docModule.FileFormat.Docx2013 });

    // Read the file from VFS and trigger download
    const fileArray = window.dotnetRuntime.Module.FS.readFile(outputFileName);
    const blob = new Blob([fileArray], { type: 'application/vnd.openxmlformats-officedocument.wordprocessingml.document' });
    const url = URL.createObjectURL(blob);
    const a = document.createElement('a');
    a.href = url;
    a.download = outputFileName;
    a.click();
    URL.revokeObjectURL(url);

    // Release resources
    doc.Dispose();
  };

  function AddBookmark(section) {
    // Bookmark 1: add bookmark markers around existing paragraphs
    let paraStart = section.Paragraphs.get_Item(1);
    let paraEnd = section.Paragraphs.get_Item(3);

    paraStart.AppendBookmarkStart("Bookmark1");
    paraEnd.AppendBookmarkEnd("Bookmark1");

    // Bookmark 2: add a new paragraph with a bookmark
    let paragraph = section.AddParagraph();
    paragraph.AppendBookmarkStart("Bookmark2");
    paragraph.AppendText("This is a new paragraph");
    paragraph.AppendBookmarkEnd("Bookmark2");
  }

  return (
    <div style={{ textAlign: 'center', height: '300px' }}>
      <h1>Add Bookmark in Word</h1>
      <button onClick={createBookmarkInWord}>
        Generate
      </button>
    </div>
  );
}

export default App;
Bookmarks added to the generated Word document

Add a Bookmark to Selected Text
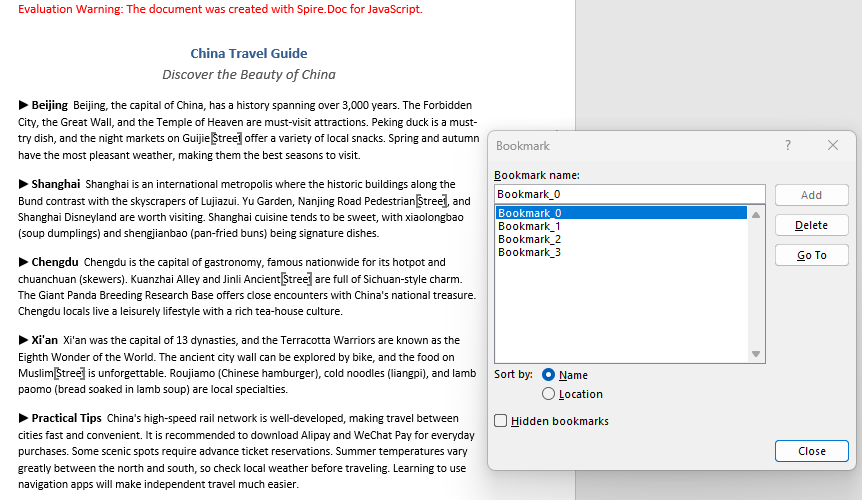
To add a bookmark to specific text within an existing paragraph, first locate the text with FindAllString, create bookmark objects using the BookmarkStart and BookmarkEnd constructors, then insert the start marker before and the end marker after the matched TextRange via ChildObjects.Insert.
function App() {
  const addBookmarkForMatchedText = async () => {
    // Get the Spire.Doc WASM module
    const docModule = window.wasmModule?.spiredoc;

    // Check if the WASM module is ready
    if (!docModule) {
      alert('Spire.Doc is not ready yet');
      return;
    }

    // Load the Word file into VFS
    const inputFileName = 'ChinaTravelGuide.docx';
    await window.spire.FetchFileToVFS(inputFileName, '', `${process.env.PUBLIC_URL}/data/`);

    // Load the Word document
    const doc = new docModule.Document();
    doc.LoadFromFile(inputFileName);

    // Find all occurrences of "Street" in the document
    let textSelections = doc.FindAllString('Street', false, true);

    // Iterate over each match and insert bookmark start/end markers
    for (let i = 0; i < textSelections.length; i++) {

      // Create bookmark start and end objects (named "Bookmark_0", "Bookmark_1", ...)
      let start = new docModule.BookmarkStart(doc, "Bookmark_" + i);
      let end = new docModule.BookmarkEnd(doc, "Bookmark_" + i);

      let selection = textSelections[i];

      // Get the TextRange of the matched text
      let textRange = selection.GetAsOneRange();

      // Get the paragraph containing the matched text
      let para = textRange.OwnerParagraph;

      // Get the index of the TextRange within the paragraph's child objects
      let index = para.ChildObjects.IndexOf(textRange);

      // Insert the bookmark start before the TextRange and the bookmark end after it
      para.ChildObjects.Insert(index, start);
      para.ChildObjects.Insert(index + 2, end);
    }

    // Save as a new .docx file
    const outputFileName = "AddBookmark.docx";

    doc.SaveToFile({ fileName: outputFileName, fileFormat: docModule.FileFormat.Docx2013 });

    // Read the generated file from VFS and trigger download
    const fileArray = window.dotnetRuntime.Module.FS.readFile(outputFileName);
    const blob = new Blob([fileArray], { type: 'application/vnd.openxmlformats-officedocument.wordprocessingml.document' });
    const url = URL.createObjectURL(blob);
    const a = document.createElement('a');
    a.href = url;
    a.download = outputFileName;
    a.click();
    URL.revokeObjectURL(url);

    // Release document resources
    doc.Dispose();
  };

  return (
    <div style={{ textAlign: 'center', height: '300px' }}>
      <h1>Add Bookmarks for Specific Text in Word Documents</h1>
      <button onClick={addBookmarkForMatchedText}>
        Generate
      </button>
    </div>
  );
}

export default App;
This approach is ideal for scenarios where you need to add positioning markers on top of an existing document, such as marking fill-in areas in a completed contract. The figure below shows the result after execution:
Remove a Bookmark
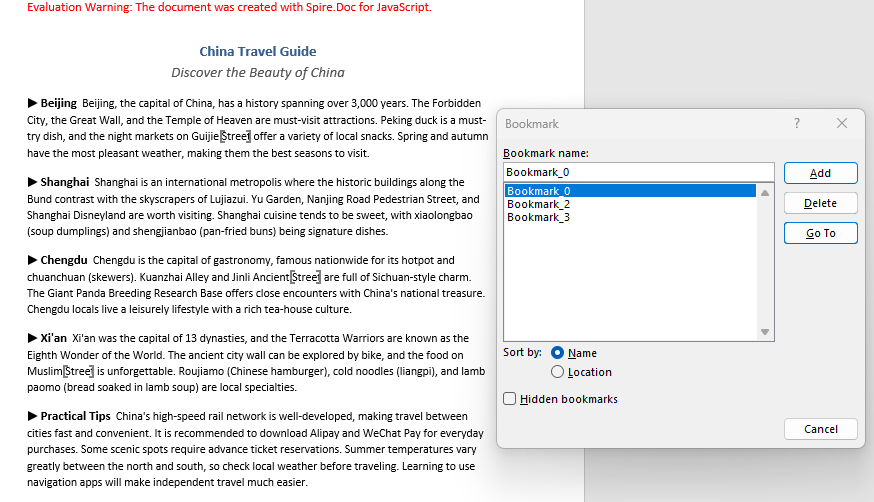
Removing a bookmark only removes the bookmark markers themselves — the text content within the bookmark range is preserved. Retrieve the bookmark object from the document.Bookmarks collection, then call the Remove method to delete it.
function App() {
  const deleteBookmark = async () => {
    // Get the Spire.Doc WASM module
    const docModule = window.wasmModule?.spiredoc;

    // Check if the WASM module is ready
    if (!docModule) {
      alert('Spire.Doc is not ready yet');
      return;
    }

    // Load the Word file into VFS
    const inputFileName = 'AddBookmark.docx';
    await window.spire.FetchFileToVFS(inputFileName, '', `${process.env.PUBLIC_URL}/data/`);

    // Load the Word document
    const doc = new docModule.Document();
    doc.LoadFromFile(inputFileName);

    // Get the bookmark by name
    let bookmark = doc.Bookmarks.get_Item("Bookmark_1");

    // // Get the bookmark by index
    // let bookmark = doc.Bookmarks.get_Item(0);

    // Remove the bookmark (keep its content)
    doc.Bookmarks.Remove(bookmark);

    // Save as a new .docx file
    const outputFileName = "DeleteBookmark.docx";

    doc.SaveToFile({ fileName: outputFileName, fileFormat: docModule.FileFormat.Docx2013 });

    // Read the generated file from VFS and trigger download
    const fileArray = window.dotnetRuntime.Module.FS.readFile(outputFileName);
    const blob = new Blob([fileArray], { type: 'application/vnd.openxmlformats-officedocument.wordprocessingml.document' });
    const url = URL.createObjectURL(blob);
    const a = document.createElement('a');
    a.href = url;
    a.download = outputFileName;
    a.click();
    URL.revokeObjectURL(url);

    // Release document resources
    doc.Dispose();
  };

  return (
    <div style={{ textAlign: 'center', height: '300px' }}>
      <h1>Delete Bookmark in Word Document</h1>
      <button onClick={deleteBookmark}>
        Generate
      </button>
    </div>
  );
}

export default App;
After the bookmark is removed, its markers disappear from the document, but the text within the bookmark range is preserved.
FAQ
Duplicate bookmark name error
Cause: Bookmark names must be unique within a Word document. Adding a bookmark with a duplicate name causes an error.
Solution: Check whether the name already exists before adding the bookmark:
if (document.Bookmarks.FindByName("MyBookmark") === null) {
    paragraph.AppendBookmarkStart("MyBookmark");
    paragraph.AppendText("Content");
    paragraph.AppendBookmarkEnd("MyBookmark");
}
What is the difference between removing a bookmark and deleting its content?
Cause: Spire.Doc's Bookmarks.Remove only removes the bookmark markers (start and end), leaving the text content between them untouched.
Solution: Choose the appropriate operation based on your needs:
// Remove only the bookmark markers, keep the text
document.Bookmarks.Remove(bookmark);

// Remove the bookmark and its content (via BookmarksNavigator)
let navigator = new docModule.BookmarksNavigator(doc);
navigator.MoveToBookmark("MyBookmark");
navigator.DeleteBookmarkContent();
Do AppendBookmarkStart and AppendBookmarkEnd have to be on the same paragraph?
Cause: The start and end markers can be on different paragraphs — the "Bookmark1" example in the code above demonstrates cross-paragraph usage. The key constraint is that the document object structure within the bookmark range must remain intact. Bookmarks cannot span across table cells, since cells are independent containers and doing so may cause the bookmark to be unrecognized.
Solution: If the bookmark range crosses a table cell boundary, adjust the start or end position so that the bookmark closes within the same cell.
Get a Free License
Spire.Doc for JavaScript offers a 30-day full-featured free trial license with no functional limitations. Apply here to evaluate before purchasing.
Replace Placeholders in Word Documents with HTML or Paragraphs from Another Document Using JavaScript in React
2026-07-14 03:05:11 Written by Amy ZhaoReplacing placeholders in documents with HTML content or paragraphs from another document is a highly practical need in document automation — for example, inserting rich HTML content authored in a WYSIWYG editor into placeholder positions in a Word template, or extracting specific paragraphs from a standard clause library and replacing corresponding placeholders in a contract template. Spire.Doc for JavaScript handles such replacement operations entirely in the browser via WebAssembly, using a virtual file system (VFS) to manage fonts and document files — no backend server required.
This article covers two core features:
For installation and project setup, refer to Integrating Spire.Doc for JavaScript in a React Project. The examples below assume Spire.Doc is installed and the WebAssembly module is initialized.
Replace Placeholder with HTML
Replacing a placeholder with HTML involves three stages: first, load the font files, the HTML file, and the target Word document into the WASM virtual file system via FetchFileToVFS; then, create a temporary Section, render the HTML string into document objects using AppendHTML, collect them into a replacement list, find all [#placeholder] occurrences with FindAllString, sort the matched positions, and insert the replacement content one by one via ChildObjects.Insert while removing the original text; finally, remove the temporary Section, save the document, read the generated file from VFS, wrap it as a Blob, and trigger a browser download.
import React, { useState } from 'react';

function App() {
  // Define the placeholder replacement logic
  function ReplacedWithHTML(location, replacement) {
    let textRange = location.Text;
    let index = location.Index;
    let paragraph = location.Owner;
    let sectionBody = paragraph.OwnerTextBody;
    let paragraphIndex = sectionBody.ChildObjects.IndexOf(paragraph);

    let replacementIndex = -1;
    if (index === 0) {
      paragraph.ChildObjects.RemoveAt(0);
      replacementIndex = sectionBody.ChildObjects.IndexOf(paragraph);
    } else if (index === paragraph.ChildObjects.Count - 1) {
      paragraph.ChildObjects.RemoveAt(index);
      replacementIndex = paragraphIndex + 1;
    } else {
      let paragraph1 = paragraph.Clone();
      while (paragraph.ChildObjects.Count > index) {
        paragraph.ChildObjects.RemoveAt(index);
      }
      let i = 0;
      let count = index + 1;
      while (i < count) {
        paragraph1.ChildObjects.RemoveAt(0);
        i += 1;
      }
      sectionBody.ChildObjects.Insert(paragraphIndex + 1, paragraph1);
      replacementIndex = paragraphIndex + 1;
    }

    for (let i = 0; i <= replacement.length - 1; i++) {
      sectionBody.ChildObjects.Insert(replacementIndex + i, replacement[i].Clone());
    }
  }

  function TextRangeLocation(TextRange) {
    this.Text = TextRange;
    this.Owner = this.Text.OwnerParagraph;
    this.Index = this.Owner.ChildObjects.IndexOf(this.Text);
    this.CompareTo = function (other) {
      return -(this.Index - other.Index);
    };
  }

  const ReplaceWithHTML = async () => {
    // Get the Spire.Doc WASM module
    const docModule = window.wasmModule?.spiredoc;

    // Check if the module is ready
    if (!docModule) {
      alert('Spire.Doc is not ready yet');
      return;
    }

    // Load the font file into the virtual file system (VFS)
    await window.spire.FetchFileToVFS('arial.ttf', '/Library/Fonts/', `${process.env.PUBLIC_URL}/font/`);

    // Load the HTML file and Word document into VFS
    let HTMLName = 'InputHtml.txt';
    await window.spire.FetchFileToVFS(HTMLName, '', `${process.env.PUBLIC_URL}/data/`);
    const HTML = window.dotnetRuntime.Module.FS.readFile(HTMLName);

    let inputFileName = 'ReplaceWithHtml.docx';
    await window.spire.FetchFileToVFS(inputFileName, '', `${process.env.PUBLIC_URL}/data/`);

    // Load the document
    let doc = new docModule.Document();
    doc.LoadFromFile(inputFileName);

    // Create a temporary Section and render the HTML
    let replacement = [];
    let tempSection = doc.AddSection();
    let par = tempSection.AddParagraph();
    const decoder = new TextDecoder('utf-8');
    const HTMLString = decoder.decode(HTML);
    par.AppendHTML(HTMLString);

    // Collect the rendered document objects
    for (let i = 0; i < tempSection.Body.ChildObjects.Count; i++) {
      let docObj = tempSection.Body.ChildObjects.get_Item(i);
      replacement.push(docObj);
    }

    // Find all placeholders and sort
    let selections = doc.FindAllString('[#placeholder]', false, true);
    let locations = [];
    for (let selection of selections) {
      locations.push(new TextRangeLocation(selection.GetAsOneRange()));
    }
    locations.sort();

    // Replace one by one
    for (let location of locations) {
      ReplacedWithHTML(location, replacement);
    }

    // Remove the temporary Section
    doc.Sections.Remove(tempSection);

    // Define the output file name and save
    const outputFileName = 'ReplaceWithHtml_output.docx';
    doc.SaveToFile({ fileName: outputFileName, fileFormat: docModule.FileFormat.Docx2013 });

    // Release resources
    doc.Dispose();

    // Read the generated file from VFS and trigger download
    const modifiedFileArray = window.dotnetRuntime.Module.FS.readFile(outputFileName);
    const blob = new Blob([modifiedFileArray], { type: 'application/vnd.openxmlformats-officedocument.wordprocessingml.document' });
    const url = URL.createObjectURL(blob);
    const a = document.createElement('a');
    a.href = url;
    a.download = outputFileName;
    a.click();
    URL.revokeObjectURL(url);
  };

  return (
    <div style={{ textAlign: 'center', height: '300px' }}>
      <h1>Replace Placeholder with HTML in a Word Document</h1>
      <button onClick={ReplaceWithHTML}>
        Generate
      </button>
    </div>
  );
}

export default App;
The [#placeholder] placeholders in the document are replaced with rich text content rendered from HTML
![The [#placeholder] placeholders in the document are replaced with rich text content rendered from HTML](https://cdn.e-iceblue.com/images/art_images/replace-placeholder-with-html-or-paragraph-en-1.webp)
Replace Placeholder with Paragraphs from Another Document
Replacing a placeholder with paragraphs from another document involves three stages: first, load the font files and two Word documents into the WASM virtual file system via FetchFileToVFS; then, load the main document and the source document separately, use FindAllPattern with a regular expression to find placeholders (such as [MY_DOCUMENT]), iterate through all Sections and Paragraphs of the source document, insert each paragraph into the corresponding position in the main document using ChildObjects.Insert, and finally remove the original placeholder text; lastly, save the document, read the generated file from VFS, wrap it as a Blob, and trigger a browser download.
import React, { useState } from 'react';

function App() {
  const ReplaceContentWithDoc = async () => {
    // Get the Spire.Doc WASM module
    const docModule = window.wasmModule?.spiredoc;

    // Check if the module is ready
    if (!docModule) {
      alert('Spire.Doc is not ready yet');
      return;
    }

    // Load the two Word documents into VFS
    let inputFileName1 = 'ReplaceContentWithDoc.docx';
    await window.spire.FetchFileToVFS(inputFileName1, '', `${process.env.PUBLIC_URL}/data/`);

    let inputFileName2 = 'Insert.docx';
    await window.spire.FetchFileToVFS(inputFileName2, '', `${process.env.PUBLIC_URL}/data/`);

    // Load the main document
    let document1 = new docModule.Document();
    document1.LoadFromFile(inputFileName1);

    // Load the source document (contains paragraphs to insert)
    let document2 = new docModule.Document();
    document2.LoadFromFile(inputFileName2);

    // Get the first Section of the main document
    let section1 = document1.Sections.get_Item(0);

    // Create a regex to find the placeholder
    let regex = new docModule.Regex('\\[MY_DOCUMENT\\]', docModule.RegexOptions.None);

    // Find all matching placeholders
    let textSections = document1.FindAllPattern({ pattern: regex });

    // Iterate through each match
    for (let i = 0; i < textSections.length; i++) {
      let selection = textSections[i];
      let para = selection.GetAsOneRange().OwnerParagraph;
      let textRange = selection.GetAsOneRange();
      let index = section1.Body.ChildObjects.IndexOf(para);

      // Insert all paragraphs from the source document at the placeholder position
      for (let i = 0; i < document2.Sections.Count; i++) {
        let section2 = document2.Sections.get_Item(i);
        for (let j = 0; j < section2.Paragraphs.Count; j++) {
          let paragraph = section2.Paragraphs.get_Item(j);
          section1.Body.ChildObjects.Insert(index++, paragraph.Clone());
        }
      }

      // Remove the original placeholder text
      para.ChildObjects.Remove(textRange);
    }

    // Define the output file name and save
    const outputFileName = 'ReplaceContentWithDoc_output.docx';
    document1.SaveToFile({ fileName: outputFileName, fileFormat: docModule.FileFormat.Docx2013 });

    // Release resources
    document1.Dispose();

    // Read the generated file from VFS and trigger download
    const modifiedFileArray = window.dotnetRuntime.Module.FS.readFile(outputFileName);
    const blob = new Blob([modifiedFileArray], { type: 'application/vnd.openxmlformats-officedocument.wordprocessingml.document' });
    const url = URL.createObjectURL(blob);
    const a = document.createElement('a');
    a.href = url;
    a.download = outputFileName;
    a.click();
    URL.revokeObjectURL(url);
  };

  return (
    <div style={{ textAlign: 'center', height: '300px' }}>
      <h1>Replace Placeholder with Paragraphs from Another Document</h1>
      <button onClick={ReplaceContentWithDoc}>
        Generate
      </button>
    </div>
  );
}

export default App;
The [MY_DOCUMENT] placeholder in the main document is replaced with all paragraphs from the source document
![The [MY_DOCUMENT] placeholder in the main document is replaced with all paragraphs from the source document](https://cdn.e-iceblue.com/images/art_images/replace-placeholder-with-html-or-paragraph-en-2.webp)
FAQ
HTML content formatting is not displayed correctly
Cause: The AppendHTML method supports a limited range of HTML tags, only recognizing basic block-level and inline tags (such as <p>, <b>, <i>, <table>, etc.). Complex CSS styles, JavaScript code, or HTML5-specific tags are ignored.
Solution: Ensure the input HTML uses only basic tags and defines formatting through inline styles (such as style="color:red") rather than CSS class names:
<p style="font-size:14pt; color:#2E75B6;">This is blue heading text</p>
<ul><li>Item one</li><li>Item two</li></ul>
Inserted paragraph order does not match expectations
Cause: When replacing multiple placeholders, the matched positions are not sorted before processing. Replacing sequentially from beginning to end causes the indices of subsequent positions to shift, leading to paragraphs being inserted at incorrect locations.
Solution: Sort all matched positions in descending order by index (replacing from the end of the document backward), or track the original index offset for each position:
let locations = [];
for (let selection of selections) {
  locations.push(new TextRangeLocation(selection.GetAsOneRange()));
}
locations.sort(); // Descending order, replace from back to front
Get a Free License
Spire.Doc for JavaScript offers a 30-day full-featured free trial license with no functional limitations. Apply here to evaluate before purchasing.
Replace Text with Image or Table in Word with JavaScript in React
2026-07-14 03:03:05 Written by Amy ZhaoReplacing specific placeholder text with images or tables is a common requirement in real-world development — such as replacing a "(Seal)" marker at the end of a contract with a company stamp image, or swapping a data summary placeholder with a statistics table. Spire.Doc for JavaScript runs entirely in the browser via WebAssembly, using a virtual file system (VFS) to manage fonts, images, and document files — no backend server required.
This article covers two core features:
For installation and project setup, refer to Integrating Spire.Doc for JavaScript in a React Project. The examples below assume Spire.Doc is installed and the WebAssembly module is initialized.
Replace Text with Image
Replacing text with an image involves three steps: first, load the font files, the target image, and the Word document into the WASM virtual file system via FetchFileToVFS; then call FindAllString to locate all matching text, iterate through each match, load the image with DocPicture, insert it using ChildObjects.Insert, and remove the original text via ChildObjects.Remove; finally, save the document, read the generated file from VFS, wrap it as a Blob, and trigger a browser download.
import React, { useState } from 'react';

function App() {
  const ReplaceWithImage = async () => {
    // Get the Spire.Doc WASM module
    const docModule = window.wasmModule?.spiredoc;

    // Check if the module is ready
    if (!docModule) {
      alert('Spire.Doc is not ready yet');
      return;
    }

    // Load the image and Word document into VFS
    let pngName = 'E-iceblue.png';
    await window.spire.FetchFileToVFS(pngName, '', `${process.env.PUBLIC_URL}/data/`);

    let inputFileName = 'Template.docx';
    await window.spire.FetchFileToVFS(inputFileName, '', `${process.env.PUBLIC_URL}/data/`);

    // Load the document
    const doc = new docModule.Document();
    doc.LoadFromFile(inputFileName);

    // Find all matching text
    let selections = doc.FindAllString('E-iceblue', true, true);

    // Iterate through each match and replace text with the image
    for (let i = 0; i < selections.length; i++) {
      // Create a DocPicture object and load the image
      let pic = new docModule.DocPicture(doc);
      pic.LoadImage(pngName);
      let selection = selections[i];
      // Get the current text range
      let range = selection.GetAsOneRange();
      // Get the index of the TextRange in its owner paragraph's ChildObjects
      let index = range.OwnerParagraph.ChildObjects.IndexOf(range);
      // Insert the image at the TextRange position
      range.OwnerParagraph.ChildObjects.Insert(index, pic);
      // Remove the original TextRange
      range.OwnerParagraph.ChildObjects.Remove(range);
    }

    // Define the output file name and save
    const outputFileName = 'ReplaceWithImage_output.docx';
    doc.SaveToFile({ fileName: outputFileName, fileFormat: docModule.FileFormat.Docx2013 });

    // Release resources
    doc.Dispose();

    // Read the generated file from VFS and trigger download
    const modifiedFileArray = window.dotnetRuntime.Module.FS.readFile(outputFileName);
    const blob = new Blob([modifiedFileArray], { type: 'application/vnd.openxmlformats-officedocument.wordprocessingml.document' });
    const url = URL.createObjectURL(blob);
    const a = document.createElement('a');
    a.href = url;
    a.download = outputFileName;
    a.click();
    URL.revokeObjectURL(url);
  };

  return (
    <div style={{ textAlign: 'center', height: '300px' }}>
      <h1>Replace text with image in Word document</h1>
      <button onClick={ReplaceWithImage}>
        Generate
      </button>
    </div>
  );
}

export default App;
Target text in the document is found and replaced with the specified image
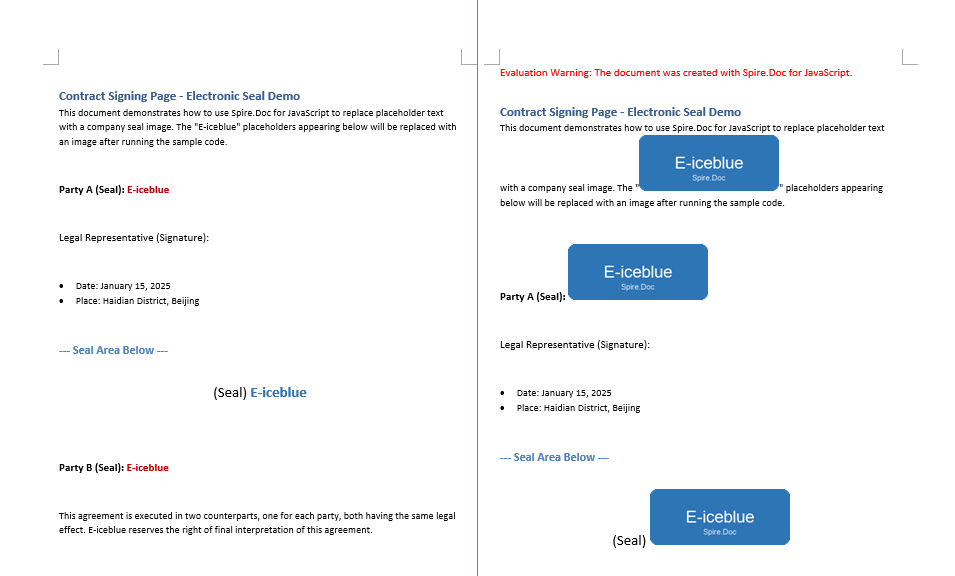
Replace Text with Table
Replacing text with a table involves three steps: first, load the font files and the target Word document into the WASM virtual file system via FetchFileToVFS; then call FindString to locate the target text, retrieve the text range with GetAsOneRange, get the paragraph index via OwnerTextBody.ChildObjects, create a new table, remove the original paragraph with ChildObjects.Remove, and insert the table at the same position with ChildObjects.Insert; finally, save the document, read the generated file from VFS, wrap it as a Blob, and trigger a browser download.
import React, { useState } from 'react';

function App() {
  const ReplaceTextWithTable = async () => {
    // Get the Spire.Doc WASM module
    const docModule = window.wasmModule?.spiredoc;

    // Check if the module is ready
    if (!docModule) {
      alert('Spire.Doc is not ready yet');
      return;
    }

    // Load the font file into VFS
    await window.spire.FetchFileToVFS('ARIALUNI.TTF', '/Library/Fonts/', `${process.env.PUBLIC_URL}/font/`);

    // Load the Word document into VFS
    let inputFileName = 'Template_Docx_1.docx';
    await window.spire.FetchFileToVFS(inputFileName, '', `${process.env.PUBLIC_URL}/data/`);

    // Load the document
    const doc = new docModule.Document();
    doc.LoadFromFile(inputFileName);

    // Get the first section
    let section = doc.Sections.get_Item(0);

    // Find the target text
    let selection = doc.FindString('Christmas Day, December 25', true, true);

    // Get the text range and its owner paragraph
    let range = selection.GetAsOneRange();
    let paragraph = range.OwnerParagraph;

    // Get the text body and calculate the paragraph index
    let body = paragraph.OwnerTextBody;
    let index = body.ChildObjects.IndexOf(paragraph);

    // Create a 3x3 table
    let table = section.AddTable(true);
    table.ResetCells(3, 3);

    // Remove the original paragraph and insert the table at the same position
    body.ChildObjects.Remove(paragraph);
    body.ChildObjects.Insert(index, table);

    // Define the output file name and save
    const outputFileName = 'ReplaceTextWithTable_output.docx';
    doc.SaveToFile({ fileName: outputFileName, fileFormat: docModule.FileFormat.Docx2013 });

    // Release resources
    doc.Dispose();

    // Read the generated file from VFS and trigger download
    const modifiedFileArray = window.dotnetRuntime.Module.FS.readFile(outputFileName);
    const blob = new Blob([modifiedFileArray], { type: 'application/vnd.openxmlformats-officedocument.wordprocessingml.document' });
    const url = URL.createObjectURL(blob);
    const a = document.createElement('a');
    a.href = url;
    a.download = outputFileName;
    a.click();
    URL.revokeObjectURL(url);
  };

  return (
    <div style={{ textAlign: 'center', height: '300px' }}>
      <h1>Replace text with table in Word document</h1>
      <button onClick={ReplaceTextWithTable}>
        Generate
      </button>
    </div>
  );
}

export default App;
The target paragraph is removed and a table is inserted at the same position
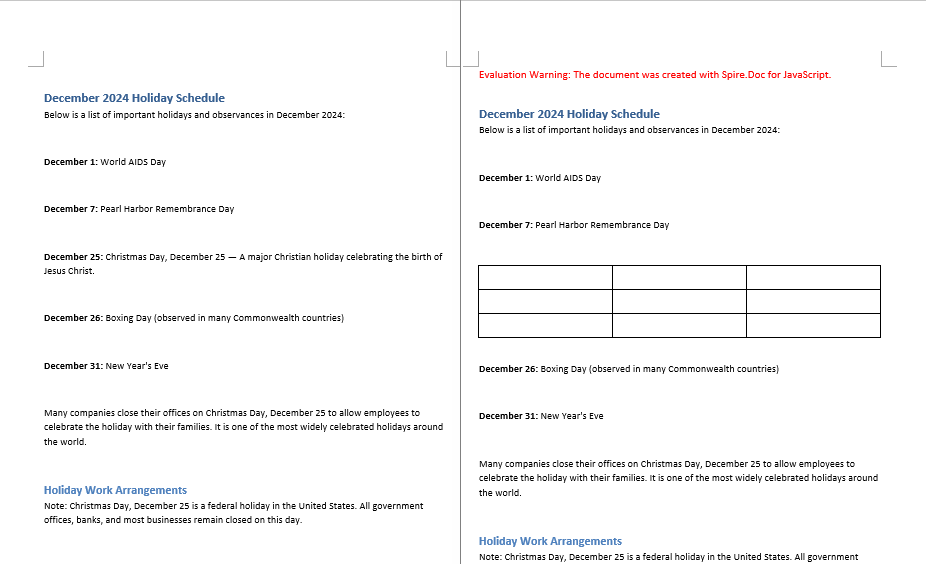
FAQ
Image does not appear in the document after insertion
Cause: The image file was not loaded into the WASM virtual file system, or the FetchFileToVFS path is incorrect, causing DocPicture.LoadImage to fail when reading the image data from VFS.
Solution: Ensure the image file is properly loaded into VFS via FetchFileToVFS before calling LoadImage, and verify the file name and path match:
await window.spire.FetchFileToVFS(
  'E-iceblue.png', '', `${process.env.PUBLIC_URL}/data/`
);
Table is inserted at the wrong position
Cause: The paragraph index obtained via OwnerTextBody.ChildObjects.IndexOf is inaccurate, or the selected text spans multiple paragraphs, causing an index offset that places the table in the wrong location.
Solution: Verify that the text searched by FindString resides within a single paragraph, then use GetAsOneRange to obtain the correct OwnerParagraph before retrieving its index in OwnerTextBody.ChildObjects:
let range = selection.GetAsOneRange();
let paragraph = range.OwnerParagraph;
let body = paragraph.OwnerTextBody;
let index = body.ChildObjects.IndexOf(paragraph);
Get a Free License
Spire.Doc for JavaScript offers a 30-day full-featured free trial license with no functional limitations. Apply here to evaluate before purchasing.
Find and Replace Text in Word Documents with JavaScript in React
2026-07-14 03:01:11 Written by Amy ZhaoText replacement is one of the most common operations in Word document processing — whether it's batch-replacing placeholders in contracts, standardizing terminology, or normalizing text of a specific pattern, the find-and-replace feature handles it efficiently. Spire.Doc for JavaScript processes Word documents directly in the browser via WebAssembly, using a virtual file system (VFS) to manage fonts and file resources — no backend server required.
This article covers two core features:
For installation and project setup, refer to Integrating Spire.Doc for JavaScript in a React Project. The examples below assume Spire.Doc is installed and the WebAssembly module is initialized.
Replace Specific Text
Replacing specific text is the most basic text operation — it replaces a word or phrase in a document with another string, with options for case sensitivity and whole-word matching. The core process involves three steps: first, load font files and the target Word document into the WASM virtual file system via FetchFileToVFS; then instantiate a Document, load the file, and call the Replace method to match a specified string and replace it with new text, controlling the matching rules through caseSensitive and wholeWord parameters; finally, save the document, read the generated file from VFS, wrap it as a Blob, and trigger a browser download.
import React, { useState } from 'react';

function App() {

  const ReplaceWithText = async () => {
      // Get the Spire.Doc WASM module
      const docModule = window.wasmModule?.spiredoc;

       // Check if the module is ready
       if (!docModule) {
        alert('Spire.Doc is not ready yet');
        return;
       }
        // Load the sample file into VFS
        let inputFileName = 'Sample.docx';
        await window.spire.FetchFileToVFS(inputFileName, '', `${process.env.PUBLIC_URL}/data/`);

        // Create a new document
        const doc = new docModule.Document();

        // Load the document from the virtual file system
        doc.LoadFromFile(inputFileName);

        // Replace text: "word" → "ReplacedText", case-insensitive, whole-word match
        doc.Replace({ matchString: 'word', newValue: 'ReplacedText', caseSensitive: false, wholeWord: true });

        // Define the output file name and save
        const outputFileName = 'ReplaceWithText_output.docx';
        doc.SaveToFile({ fileName: outputFileName, fileFormat: docModule.FileFormat.Docx2013 });

        // Release resources
        doc.Dispose();

        // Read the generated file from VFS and trigger download
        const modifiedFileArray = window.dotnetRuntime.Module.FS.readFile(outputFileName);
        const blob = new Blob([modifiedFileArray], { type: 'application/vnd.openxmlformats-officedocument.wordprocessingml.document'});
        const url = URL.createObjectURL(blob);
        const a = document.createElement('a');
        a.href = url;
        a.download = outputFileName;
        a.click();
        URL.revokeObjectURL(url);
  };

  return (
    <div style={{ textAlign: 'center', height: '300px' }}>
      <h1>Replace text in a Word document.</h1>
      <button onClick={ReplaceWithText}>
        Generate
      </button>
    </div>
    );
  };

export default App;
Target strings in the document are uniformly replaced with the new content after using the Replace method
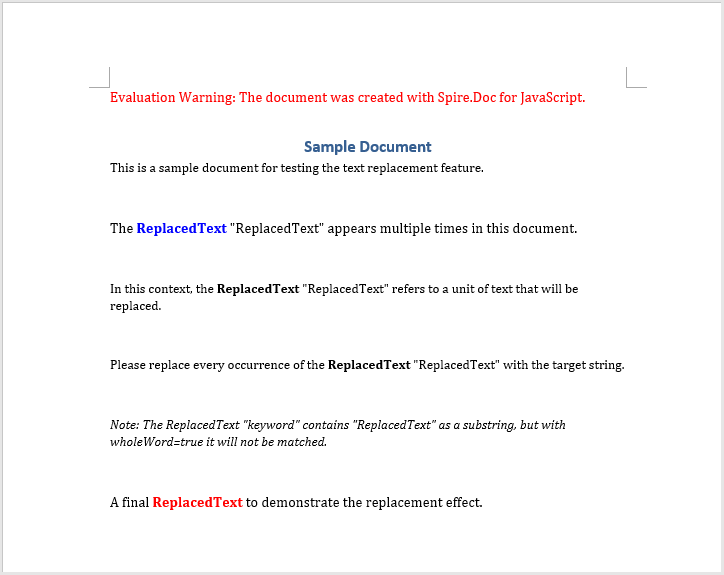
Replace Text Using Regex
When you need to match text with variable formatting, regex is the most powerful tool — for example, replacing all hashtag labels starting with # with a fixed string. The core process involves three steps: first, load font files and the target Word document into the WASM virtual file system via FetchFileToVFS; then create a Regex object to define the matching pattern, and call the Replace method to uniformly replace all matched text with the specified content; finally, save the document, read the generated file from VFS, wrap it as a Blob, and trigger a browser download.
import React, { useState } from 'react';

function App() {

  const ReplaceWithText = async () => {
      // Get the Spire.Doc WASM module
      const docModule = window.wasmModule?.spiredoc;

       // Check if the module is ready
       if (!docModule) {
        alert('Spire.Doc is not ready yet');
        return;
       }
       // Load the sample file into VFS
        let inputFileName = 'Sample.docx';
        await window.spire.FetchFileToVFS(inputFileName, '', `${process.env.PUBLIC_URL}/data/`);

        // Create a new document
        const doc = new docModule.Document();

        // Load the document from the virtual file system
        doc.LoadFromFile(inputFileName);

        // Create a regex pattern to match whole words
        let regex = new docModule.Regex('\\bword\\b', docModule.RegexOptions.None);

        // Replace text using the regex
        doc.Replace(regex, 'Spire.Doc');

        // Define the output file name and save
        const outputFileName = 'ReplaceTextByRegex_output.docx';
        doc.SaveToFile({fileName: outputFileName, fileFormat: docModule.FileFormat.Docx2013 });

        // Release resources
        doc.Dispose();

        // Read the generated file from VFS and trigger download
        const modifiedFileArray = window.dotnetRuntime.Module.FS.readFile(outputFileName);
        const blob = new Blob([modifiedFileArray], { type: 'application/vnd.openxmlformats-officedocument.wordprocessingml.document'});
        const url = URL.createObjectURL(blob);
        const a = document.createElement('a');
        a.href = url;
        a.download = outputFileName;
        a.click();
        URL.revokeObjectURL(url);
  };

  return (
    <div style={{ textAlign: 'center', height: '300px' }}>
      <h1>Replace text in a Word document.</h1>
      <button onClick={ReplaceWithText}>
        Generate
      </button>
    </div>
    );
  };

export default App;
All strings matching the pattern are uniformly replaced after regex-based text replacement
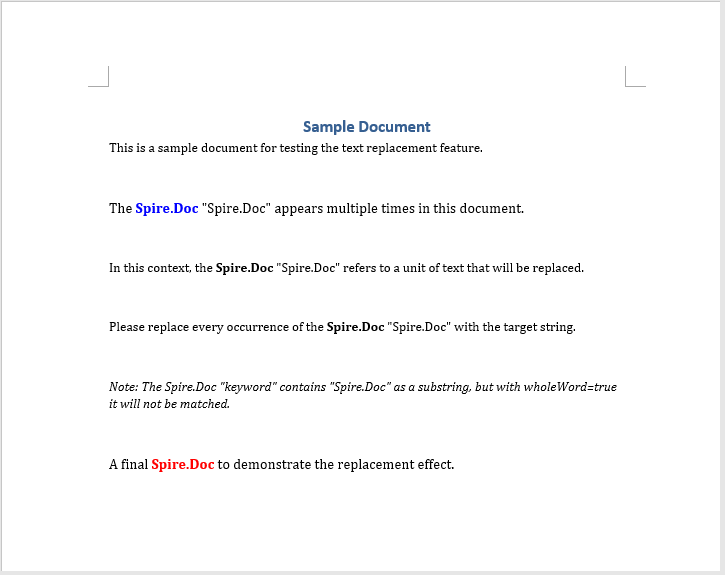
FAQ
Text replacement does not take effect (text is not replaced)
Cause: The caseSensitive or wholeWord parameters are set incorrectly, causing the match to fail — the actual text does not meet the matching criteria.
Solution: Check whether the case matches, or set caseSensitive to false to ignore case, and wholeWord to false to match partial words:
doc.Replace({ matchString: 'word', newValue: 'ReplacedText', caseSensitive: false, wholeWord: false });
Regex pattern does not match the target content
Cause: Special characters (such as #, \) in the regex pattern are not properly escaped, causing the match to fail.
Solution: Ensure that special characters in the regex pattern are correctly escaped. For example, when matching #tag-style text:
let regex = new wasmModule.Regex('#\\S+', wasmModule.RegexOptions.None);
Get a Free License
Spire.Doc for JavaScript offers a 30-day full-featured free trial license with no functional limitations. Apply here to evaluate before purchasing.
Replace Text with Field or Another Document in Word with JavaScript in React
2026-07-14 02:58:48 Written by Amy ZhaoReplacing specific text with field codes or another document's content is a highly practical need in document automation — such as replacing a "current date" placeholder with a DATE field that automatically updates to the system date each time the document is opened, or swapping a "terms" placeholder in a contract template with detailed clause content from another Word document for modular document assembly. Spire.Doc for JavaScript runs entirely in the browser via WebAssembly, using a virtual file system (VFS) to manage fonts and document files — no backend server required.
This article covers two core features:
For installation and project setup, refer to Integrating Spire.Doc for JavaScript in a React Project. The examples below assume Spire.Doc is installed and the WebAssembly module is initialized.
Replace Text with a Field
Replacing text with a field involves three steps: first, load the font files and the target Word document into the WASM virtual file system via FetchFileToVFS; then call FindString to locate the target text, retrieve its paragraph and position index, create a Field object with the desired field type (such as FieldDate), sequentially insert Field, FieldMark(FieldSeparator), and FieldMark(FieldEnd) into the paragraph to construct a complete field structure, and finally remove the original text; finally, save the document, read the generated file from VFS, wrap it as a Blob, and trigger a browser download.
import React, { useState } from 'react';

function App() {
  const ReplaceTextWithField = async () => {
    // Get the Spire.Doc WASM module
    const docModule = window.wasmModule?.spiredoc;

    // Check if the module is ready
    if (!docModule) {
      alert('Spire.Doc is not ready yet');
      return;
    }

    // Load the Word document into VFS
    let inputFileName = 'ReplaceTextWithField.docx';
    await window.spire.FetchFileToVFS(inputFileName, '', `${process.env.PUBLIC_URL}/data/`);

    // Load the document
    const doc = new docModule.Document();
    doc.LoadFromFile(inputFileName);

    // Find the target text
    let selection = doc.FindString({
      stringValue: 'summary',
      caseSensitive: false,
      wholeWord: true,
    });

    // Get the text range and its owner paragraph
    let textRange = selection.GetAsOneRange();
    let ownParagraph = textRange.OwnerParagraph;
    let rangeIndex = ownParagraph.ChildObjects.IndexOf(textRange);

    // Create a DATE field
    let eqField = new docModule.Field(doc);
    eqField.Type = docModule.FieldType.FieldDate;
    eqField.Code = 'DATE \\@ "yyyyMMdd "';

    // Insert Field, FieldSeparator, and FieldEnd in sequence
    ownParagraph.ChildObjects.Insert(rangeIndex, eqField);

    let mark = new docModule.FieldMark(doc, docModule.FieldMarkType.FieldSeparator);
    ownParagraph.ChildObjects.Insert(rangeIndex + 1, mark);

    let end = new docModule.FieldMark(doc, docModule.FieldMarkType.FieldEnd);
    ownParagraph.ChildObjects.Insert(rangeIndex + 2, end);

    // Remove the original text
    ownParagraph.ChildObjects.Remove(textRange);

    // Define the output file name and save
    const outputFileName = 'ReplaceTextWithField_output.docx';
    doc.SaveToFile({ fileName: outputFileName, fileFormat: docModule.FileFormat.Docx2013 });

    // Release resources
    doc.Dispose();

    // Read the generated file from VFS and trigger download
    const modifiedFileArray = window.dotnetRuntime.Module.FS.readFile(outputFileName);
    const blob = new Blob([modifiedFileArray], { type: 'application/vnd.openxmlformats-officedocument.wordprocessingml.document' });
    const url = URL.createObjectURL(blob);
    const a = document.createElement('a');
    a.href = url;
    a.download = outputFileName;
    a.click();
    URL.revokeObjectURL(url);
  };

  return (
    <div style={{ textAlign: 'center', height: '300px' }}>
      <h1>Replace text with field in Word document</h1>
      <button onClick={ReplaceTextWithField}>
        Generate
      </button>
    </div>
  );
}

export default App;
The target text is replaced with a DATE field that automatically displays the current system date when the document is opened
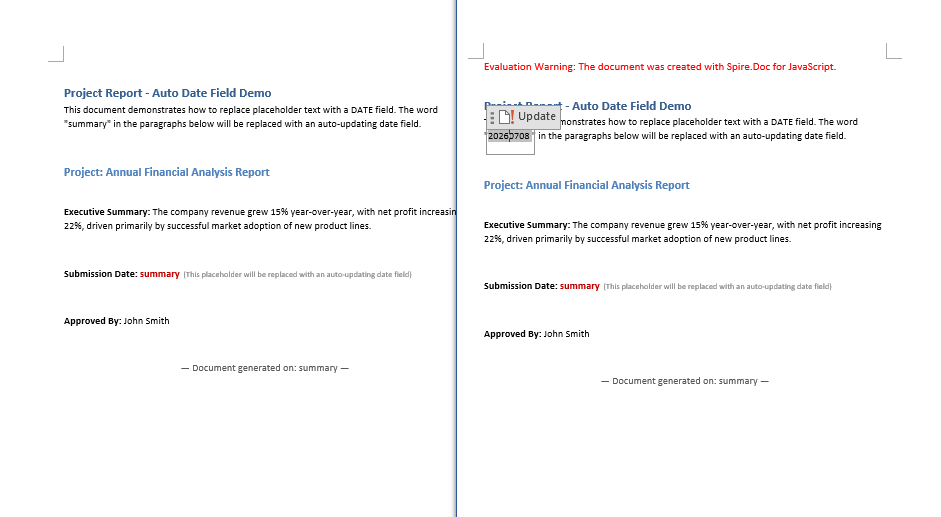
Replace Text with Another Document
Replacing text with another document involves three steps: first, load the font files and two Word documents (the main document and the replacement content document) into the WASM virtual file system via FetchFileToVFS; then instantiate two Document objects to load both documents, call the Replace method on the main document with the matchDoc parameter pointing to the replacement document object, substituting the matching text with the full content of that document; finally, save the document, read the generated file from VFS, wrap it as a Blob, and trigger a browser download.
import React, { useState } from 'react';

function App() {
  const ReplaceWithDocument = async () => {
    // Get the Spire.Doc WASM module
    const docModule = window.wasmModule?.spiredoc;

    // Check if the module is ready
    if (!docModule) {
      alert('Spire.Doc is not ready yet');
      return;
    }

    // Load the two Word documents into VFS
    let inputFileName1 = 'Text2.docx';
    await window.spire.FetchFileToVFS(inputFileName1, '', `${process.env.PUBLIC_URL}/data/`);

    let inputFileName2 = 'Text1.docx';
    await window.spire.FetchFileToVFS(inputFileName2, '', `${process.env.PUBLIC_URL}/data/`);

    // Load the main document
    let doc = new docModule.Document();
    doc.LoadFromFile(inputFileName1);

    // Load the replacement document
    let replaceDoc = new docModule.Document();
    replaceDoc.LoadFromFile(inputFileName2);

    // Replace the specified text with the content of another document
    doc.Replace({
      matchString: 'Document1',
      matchDoc: replaceDoc,
      caseSensitive: false,
      wholeWord: true,
    });

    // Define the output file name and save
    const outputFileName = 'ReplaceWithDocument_output.docx';
    doc.SaveToFile({ fileName: outputFileName, fileFormat: docModule.FileFormat.Docx2013 });

    // Release resources
    doc.Dispose();

    // Read the generated file from VFS and trigger download
    const modifiedFileArray = window.dotnetRuntime.Module.FS.readFile(outputFileName);
    const blob = new Blob([modifiedFileArray], { type: 'application/vnd.openxmlformats-officedocument.wordprocessingml.document' });
    const url = URL.createObjectURL(blob);
    const a = document.createElement('a');
    a.href = url;
    a.download = outputFileName;
    a.click();
    URL.revokeObjectURL(url);
  };

  return (
    <div style={{ textAlign: 'center', height: '300px' }}>
      <h1>Replace text with another document in Word</h1>
      <button onClick={ReplaceWithDocument}>
        Generate
      </button>
    </div>
  );
}

export default App;
The placeholder text in the main document is replaced with the full content of another document
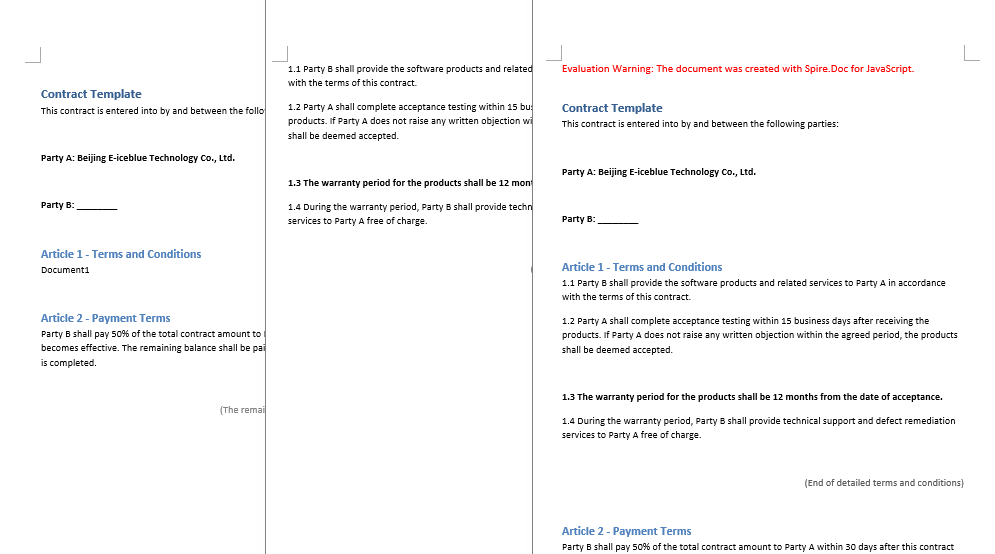
FAQ
Field value does not appear in the document after insertion
Cause: The Field, FieldMark(FieldSeparator), and FieldMark(FieldEnd) are not inserted in the correct order, breaking the integrity of the field structure and preventing Word from properly recognizing and evaluating the field value.
Solution: Ensure that Field, FieldSeparator, and FieldEnd are inserted sequentially with consecutive indices:
ownParagraph.ChildObjects.Insert(rangeIndex, eqField);
ownParagraph.ChildObjects.Insert(rangeIndex + 1, mark);
ownParagraph.ChildObjects.Insert(rangeIndex + 2, end);
Replacement with another document does not work
Cause: The document object passed via the matchDoc parameter in the Replace method was not properly loaded into VFS, or the file path/name does not match what was used in FetchFileToVFS, causing LoadFromFile to fail to locate the target file.
Solution: Ensure both documents are loaded into VFS via FetchFileToVFS, and create separate Document objects that successfully load before calling Replace:
let doc = new docModule.Document();
doc.LoadFromFile('Text2.docx');

let replaceDoc = new docModule.Document();
replaceDoc.LoadFromFile('Text1.docx');

doc.Replace({
  matchString: 'Document1',
  matchDoc: replaceDoc,
  caseSensitive: false,
  wholeWord: true,
});
Get a Free License
Spire.Doc for JavaScript offers a 30-day full-featured free trial license with no functional limitations. Apply here to evaluate before purchasing.
