
JavaScript (102)
Add, Get, and Remove Excel Data Validation with JavaScript in React
2026-08-27 08:46:45 Written by Lisa LiData validation is an effective way to control the input content of Excel cells. It can intercept incorrect input at the data entry stage, ensuring that data is standardized and accurate. Spire.XLS for JavaScript uses WebAssembly to add, read, and remove data validation directly in the browser, managing input and output files through a virtual file system (VFS) — no backend server required.
This article covers three core features:
For installation and project configuration, refer to Integrating Spire.XLS for JavaScript in a React Project. The examples below assume Spire.XLS is installed and the WebAssembly module is initialized.
Add Data Validation
In daily forms and reports, we often need to restrict the input of cells, for example only allowing numbers or dates within a certain range, or limiting the text length. Spire.XLS for JavaScript sets validation rules through the DataValidation property of a cell, supporting multiple validation types such as Decimal, Whole Number, Date, Time, Text Length, and List.
function App() {
  const sheetToSVG = async () => {
    // Get the Spire.XLS WASM module
    const xlsModule = window.wasmModule?.spirexls;

    // Check if the module is ready
    if (!xlsModule) {
      alert('Spire.Xls is not ready yet');
      return;
    }

    // Load the font into VFS
    await window.spire.FetchFileToVFS('ARIAL.TTF', '/Library/Fonts/', `${process.env.PUBLIC_URL}/font/`);

    // Create a new workbook
    const workbook = new xlsModule.Workbook();

    // Get the first worksheet
    const sheet = workbook.Worksheets.get(0);

    // Add a decimal validation: cell B12 can only accept numbers between 3 and 6
    sheet.Range.get("B11").Text = "Input Number(3-6):";
    let rangeNumber = sheet.Range.get("B12");
    rangeNumber.DataValidation.CompareOperator = xlsModule.ValidationComparisonOperator.Between;
    rangeNumber.DataValidation.Formula1 = "3";
    rangeNumber.DataValidation.Formula2 = "6";
    rangeNumber.DataValidation.AllowType = xlsModule.CellDataType.Decimal;
    rangeNumber.DataValidation.ErrorMessage = "Please input correct number!";
    rangeNumber.DataValidation.ShowError = true;
    rangeNumber.Style.KnownColor = xlsModule.ExcelColors.Gray25Percent;

    // Add a date validation: cell B15 can only accept dates within the year 2024
    sheet.Range.get("B14").Text = "Input Date: 1/1/2024";
    let rangeDate = sheet.Range.get("B15");
    rangeDate.DataValidation.AllowType = xlsModule.CellDataType.Date;
    rangeDate.DataValidation.CompareOperator = xlsModule.ValidationComparisonOperator.Between;
    rangeDate.DataValidation.Formula1 = "1/1/2024";
    rangeDate.DataValidation.Formula2 = "12/31/2024";
    rangeDate.DataValidation.ErrorMessage = "Please input correct date!";
    rangeDate.DataValidation.ShowError = true;
    // Supports setting AlertStyleType.Warning; AlertStyleType.Info; AlertStyleType.Stop
    rangeDate.DataValidation.AlertStyle = xlsModule.AlertStyleType.Warning;
    rangeDate.Style.KnownColor = xlsModule.ExcelColors.Gray25Percent;

    // Add a text length validation: the text length in cell B18 cannot exceed 5 characters
    sheet.Range.get("B17").Text = "Input Text:";
    let rangeTextLength = sheet.Range.get("B18");
    rangeTextLength.DataValidation.AllowType = xlsModule.CellDataType.TextLength;
    rangeTextLength.DataValidation.CompareOperator = xlsModule.ValidationComparisonOperator.LessOrEqual;
    rangeTextLength.DataValidation.Formula1 = "5";
    rangeTextLength.DataValidation.ErrorMessage = "Enter a Valid String!";
    rangeTextLength.DataValidation.ShowError = true;
    rangeTextLength.DataValidation.AlertStyle = xlsModule.AlertStyleType.Stop;
    rangeTextLength.Style.KnownColor = xlsModule.ExcelColors.Gray25Percent;

    // Auto-fit the width of column 2
    sheet.AutoFitColumn(2);

    const outputFileName = "DataValidation_out.xlsx";
    workbook.SaveToFile({ fileName: outputFileName, version: xlsModule.ExcelVersion.Version2010 });

    // Release the workbook object to free resources
    workbook.Dispose();

    // Read the converted file from VFS and trigger the download
    const fileArray = window.dotnetRuntime.Module.FS.readFile(outputFileName);
    const blob = new Blob([fileArray], { type: "application/vnd.openxmlformats-officedocument.spreadsheetml.sheet" });
    const url = URL.createObjectURL(blob);
    const a = document.createElement('a');
    a.href = url;
    a.download = outputFileName;
    a.click();
    URL.revokeObjectURL(url);
  };

  return (
    <div style={{ textAlign: 'center', height: '300px' }}>
      <h1>Add Data Validation</h1>
      <button onClick={sheetToSVG}>
        Start
      </button>
    </div>
  );
}

export default App;
Add data validation 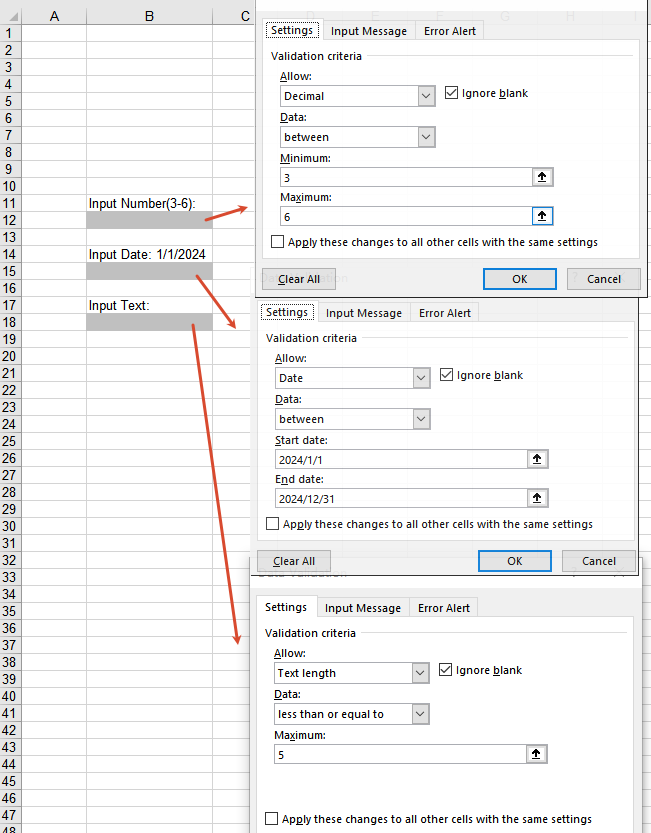
Get Data Validation Settings
When processing an Excel document that already has data validation, you may sometimes need to read the validation rules to understand the input constraints of a cell. Through the DataValidation property of a cell, you can obtain the validation object and then read settings such as AllowType (validation type), CompareOperator (comparison operator), Formula1 (minimum/lower limit), Formula2 (maximum/upper limit), and IgnoreBlank (whether blank values are ignored).
function App() {
  const sheetToSVG = async () => {
    // Get the Spire.XLS WASM module
    const xlsModule = window.wasmModule?.spirexls;

    // Check if the module is ready
    if (!xlsModule) {
      alert('Spire.Xls is not ready yet');
      return;
    }

    // Load the font and Excel file into VFS
    await window.spire.FetchFileToVFS('ARIAL.TTF', '/Library/Fonts/', `${process.env.PUBLIC_URL}/font/`);
    const inputFileName = 'GetSettingsOfDataValidation.xlsx';
    await window.spire.FetchFileToVFS(inputFileName, '', `${process.env.PUBLIC_URL}/static/data/`);

    // Load the workbook
    const workbook = new xlsModule.Workbook();
    workbook.LoadFromFile({ fileName: inputFileName });

    // Get the first worksheet
    const worksheet = workbook.Worksheets.get(0);

    // Cell B4 has a decimal validation set
    const cell = worksheet.Range.get("B4");

    // Get the data validation object of this cell
    const validation = cell.DataValidation;

    // Get the validation settings
    let allowType = validation.AllowType.toString();
    let data = validation.CompareOperator.toString();
    let minimum = validation.Formula1.toString();
    let maximum = validation.Formula2.toString();
    let ignoreBlank = validation.IgnoreBlank.toString();

    // Concatenate the result into a string
    let result = `Settings of Validation: \r\nAllow Type: ${allowType}\r\nData: ${data}\r\nMinimum: ${minimum}\r\nMaximum: ${maximum}\r\nIgnoreBlank: ${ignoreBlank}`;

    const outputFileName = 'GetSettingsOfDataValidation-out.txt';

    // Write the result to a txt file
    window.dotnetRuntime.Module.FS.writeFile(outputFileName, result);

    // Release the workbook object to free resources
    workbook.Dispose();

    // Read the converted file from VFS and trigger the download
    const fileArray = window.dotnetRuntime.Module.FS.readFile(outputFileName);
    const blob = new Blob([fileArray], { type: 'text/plain' });
    const url = URL.createObjectURL(blob);
    const a = document.createElement('a');
    a.href = url;
    a.download = outputFileName;
    a.click();
    URL.revokeObjectURL(url);
  };

  return (
    <div style={{ textAlign: 'center', height: '300px' }}>
      <h1>Get Data Validation Settings</h1>
      <button onClick={sheetToSVG}>
        Start
      </button>
    </div>
  );
}

export default App;
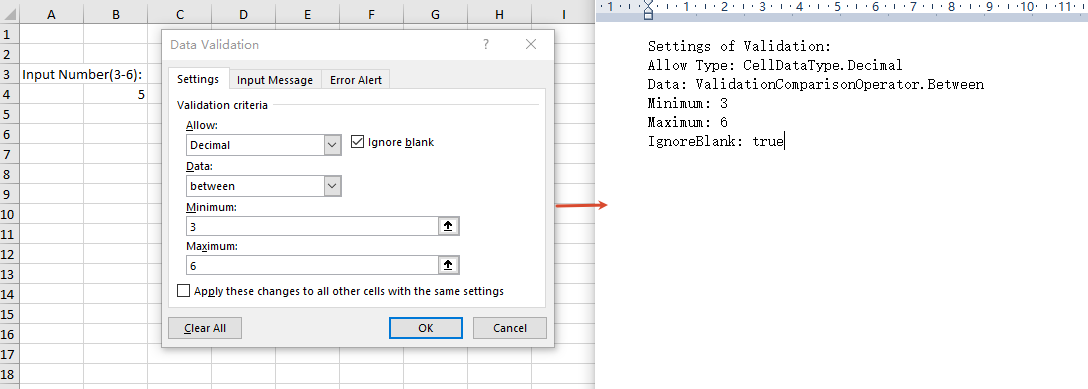
Remove Data Validation
When the validation rules are no longer needed, you can remove data validation in bulk by cell range through the Remove method of the worksheet's DVTable. When removing, you need to pass in an array composed of rectangles, which are used to locate the ranges in the worksheet where the validations should be removed.
function App() {
  const sheetToSVG = async () => {
    // Get the Spire.XLS WASM module
    const xlsModule = window.wasmModule?.spirexls;

    // Check if the module is ready
    if (!xlsModule) {
      alert('Spire.Xls is not ready yet');
      return;
    }

    // Load the font and Excel file into VFS
    await window.spire.FetchFileToVFS('ARIAL.TTF', '/Library/Fonts/', `${process.env.PUBLIC_URL}/font/`);
    const inputFileName = 'RemoveDataValidation.xlsx';
    await window.spire.FetchFileToVFS(inputFileName, '', `${process.env.PUBLIC_URL}/static/data/`);

    // Load the workbook
    const workbook = new xlsModule.Workbook();
    workbook.LoadFromFile({ fileName: inputFileName });

    // Create an array of rectangles, which is used to locate the ranges in the worksheet
    let rectangles = [];

    // Add a rectangle to the array. This rectangle specifies the cells from A1 to B3.
    rectangles.push(xlsModule.Rectangle.FromLTRB(0, 0, 1, 2));

    // Remove the validations in the ranges represented by the rectangles
    workbook.Worksheets.get(0).DVTable.Remove(rectangles);

    const outputFileName = 'RemoveDataValidation-out.xlsx';
    workbook.SaveToFile({ fileName: outputFileName, version: xlsModule.ExcelVersion.Version2010 });

    // Release the workbook object to free resources
    workbook.Dispose();

    // Read the converted file from VFS and trigger the download
    const fileArray = window.dotnetRuntime.Module.FS.readFile(outputFileName);
    const blob = new Blob([fileArray], { type: "application/vnd.openxmlformats-officedocument.spreadsheetml.sheet" });
    const url = URL.createObjectURL(blob);
    const a = document.createElement('a');
    a.href = url;
    a.download = outputFileName;
    a.click();
    URL.revokeObjectURL(url);
  };

  return (
    <div style={{ textAlign: 'center', height: '300px' }}>
      <h1>Remove Data Validation</h1>
      <button onClick={sheetToSVG}>
        Start
      </button>
    </div>
  );
}

export default App;
Remove data validation 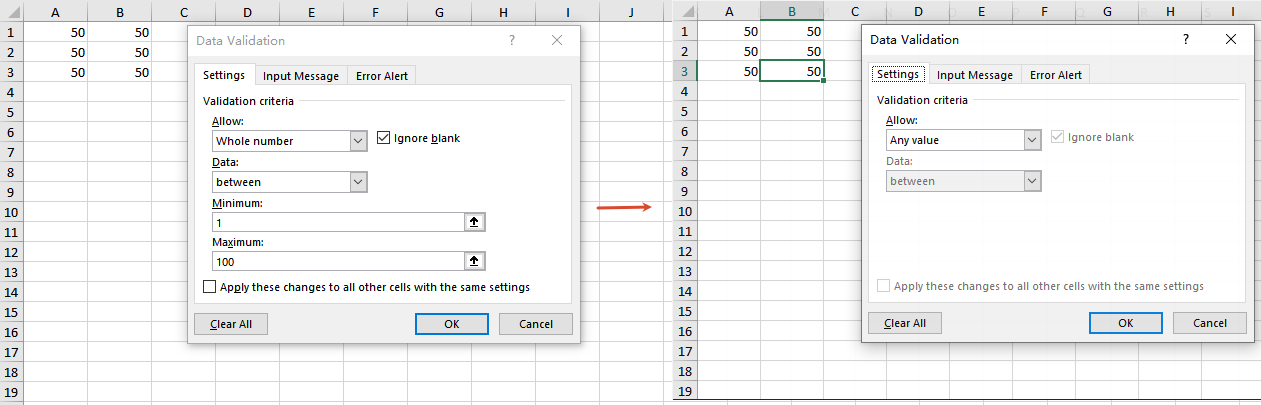
Frequently Asked Questions
The added data validation does not take effect
Cause: Other validation rules already exist on the target cell, or the validation type or comparison operator does not match the requirement.
Solution: Make sure the validation rule is applied to the correct cell range, and check whether the values of properties such as AllowType, CompareOperator, Formula1, and Formula2 meet the expectation.
The result is empty when getting data validation settings
Cause: No data validation is set on the target cell, or the cell range being read does not match the location of the validation.
Solution: Make sure the cell has data validation set, and check whether the cell address referenced by the Range.get method is correct.
Data validation still exists after removal
Cause: The rectangle range passed to the DVTable.Remove method does not cover the actual validation area.
Solution: Adjust the coordinates in the Rectangle.FromLTRB method according to the cell range covered by the validations, ensuring that the rectangle range includes all the cells whose validations need to be removed.
Get a Free License
If you want to remove the evaluation messages in the output documents, or get rid of the feature limitations, please contact our sales team to obtain a free 30-day temporary license.
During daily Excel data processing, filtering is one of the most common ways to quickly locate and view target data. The AutoFilter feature allows users to quickly filter out data rows that match the conditions by clicking the drop-down arrow on the column header, avoiding the need to search manually through large amounts of data. Spire.XLS for JavaScript, powered by WebAssembly, completes this operation directly in the browser, managing input and output files through a Virtual File System (VFS) with no backend service required.
This article covers three key features:
For installation and project configuration, please refer to How to Integrate Spire.XLS for JavaScript in a React Project. The examples below assume that Spire.XLS is already installed and the WebAssembly module has been initialized.
Add AutoFilters
In Excel, the AutoFilter is an important feature for quickly processing large amounts of data. Through the drop-down arrow on the right side of the column header, you can set filter conditions for each column. Spire.XLS for JavaScript provides the AutoFilters.Range property — you can add AutoFilters to a worksheet simply by setting the worksheet's auto-filter range to the cell range of the header row.
function App() {
  const addAutoFilter = async () => {
    // Get the Spire.XLS WASM module
    const xlsModule = window.wasmModule?.spirexls;

    // Check if the module is ready
    if (!xlsModule) {
      alert('Spire.Xls is not ready yet');
      return;
    }

    // Load the font and Excel file into VFS
    await window.spire.FetchFileToVFS('ARIAL.TTF', '/Library/Fonts/', `${process.env.PUBLIC_URL}/font/`);
    const inputFileName = 'FilterData.xlsx';
    await window.spire.FetchFileToVFS(inputFileName, '', `${process.env.PUBLIC_URL}data/`);

    // Load the workbook
    const workbook = new xlsModule.Workbook();
    workbook.LoadFromFile({ fileName: inputFileName });

    // Get the first worksheet
    const sheet = workbook.Worksheets.get(0);

    // Set the auto filter range: columns A to C of the header row
    sheet.AutoFilters.Range = sheet.Range.get("A1:C1");

    // Save the result file, specifying Excel version 2016
    const outputFileName = "AddAutoFilter_output.xlsx";
    workbook.SaveToFile({ fileName: outputFileName, version: xlsModule.ExcelVersion.Version2016 });

    // Dispose of the workbook object to release resources
    workbook.Dispose();

    // Read the converted file from VFS and trigger the download
    const fileArray = window.dotnetRuntime.Module.FS.readFile(outputFileName);
    const blob = new Blob([fileArray], { type: "application/vnd.openxmlformats-officedocument.spreadsheetml.sheet" });
    const url = URL.createObjectURL(blob);
    const a = document.createElement('a');
    a.href = url;
    a.download = outputFileName;
    a.click();
    URL.revokeObjectURL(url);
  };

  return (
    <div style={{ textAlign: 'center', height: '300px' }}>
      <h1>Add AutoFilter</h1>
      <button onClick={addAutoFilter}>
        Start
      </button>
    </div>
  );
}

export default App;
Add AutoFilters 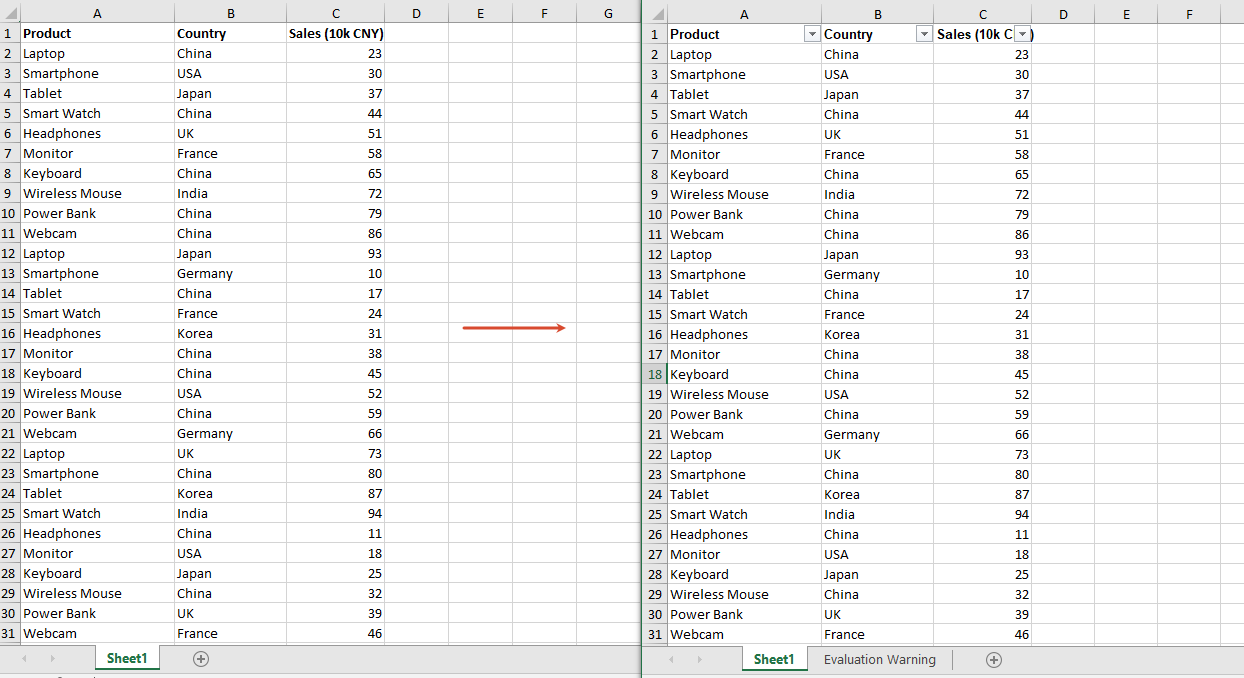
Apply Filter Conditions to Filter Data
After adding AutoFilters, you can also set a custom filter condition for a specified column through the CustomFilter method in code, and then call the Filter method to apply the filter, so that data rows matching the condition are automatically filtered out. For example, the following code sets the filter condition of the second column (Country) to equal "China"; after applying the filter, only data rows whose country is "China" are kept, and the remaining rows are hidden.
function App() {
  const applyFilter = async () => {
    // Get the Spire.XLS WASM module
    const xlsModule = window.wasmModule?.spirexls;

    // Check if the module is ready
    if (!xlsModule) {
      alert('Spire.Xls is not ready yet');
      return;
    }

    // Load the font and Excel file into VFS
    await window.spire.FetchFileToVFS('ARIAL.TTF', '/Library/Fonts/', `${process.env.PUBLIC_URL}/font/`);
    const inputFileName = 'FilterData.xlsx';
    await window.spire.FetchFileToVFS(inputFileName, '', `${process.env.PUBLIC_URL}data/`);

    // Load the workbook
    const workbook = new xlsModule.Workbook();
    workbook.LoadFromFile({ fileName: inputFileName });

    // Get the first worksheet
    const sheet = workbook.Worksheets.get(0);

    // Set the auto filter range: the header and data rows of the second column (Country)
    sheet.AutoFilters.Range = sheet.Range.get("B1:B51");

    // Get the first column of the auto filters
    const filterColumn = sheet.AutoFilters.get(0);

    // Set the custom filter condition: filter rows whose country is "China"
    const strCrt = "China";
    sheet.AutoFilters.CustomFilter({
      column: filterColumn,
      operatorType: xlsModule.FilterOperatorType.Equal,
      criteria: new xlsModule.String(strCrt)
    });

    // Apply the filter
    sheet.AutoFilters.Filter();

    // Save the result file, specifying Excel version 2016
    const outputFileName = "ApplyFilter_output.xlsx";
    workbook.SaveToFile({ fileName: outputFileName, version: xlsModule.ExcelVersion.Version2016 });

    // Dispose of the workbook object to release resources
    workbook.Dispose();

    // Read the converted file from VFS and trigger the download
    const fileArray = window.dotnetRuntime.Module.FS.readFile(outputFileName);
    const blob = new Blob([fileArray], { type: "application/vnd.openxmlformats-officedocument.spreadsheetml.sheet" });
    const url = URL.createObjectURL(blob);
    const a = document.createElement('a');
    a.href = url;
    a.download = outputFileName;
    a.click();
    URL.revokeObjectURL(url);
  };

  return (
    <div style={{ textAlign: 'center', height: '300px' }}>
      <h1>Apply Filter Condition</h1>
      <button onClick={applyFilter}>
        Start
      </button>
    </div>
  );
}

export default App;
Apply Filter Conditions to Filter Data 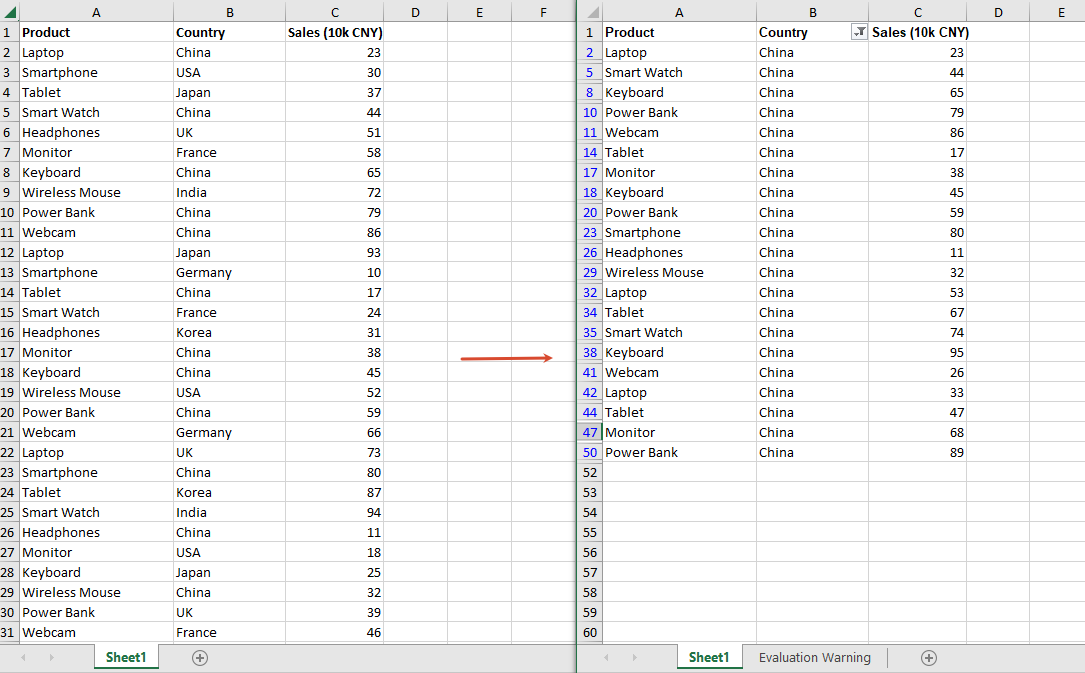
Remove AutoFilters
When you no longer need to filter data, you can remove all AutoFilters from the worksheet through the AutoFilters.Clear method, so that the data is fully displayed again.
function App() {
  const removeAutoFilter = async () => {
    // Get the Spire.XLS WASM module
    const xlsModule = window.wasmModule?.spirexls;

    // Check if the module is ready
    if (!xlsModule) {
      alert('Spire.Xls is not ready yet');
      return;
    }

    // Load the font and Excel file into VFS
    await window.spire.FetchFileToVFS('ARIAL.TTF', '/Library/Fonts/', `${process.env.PUBLIC_URL}/font/`);
    const inputFileName = 'FilteredData.xlsx';
    await window.spire.FetchFileToVFS(inputFileName, '', `${process.env.PUBLIC_URL}data/`);

    // Load the workbook
    const workbook = new xlsModule.Workbook();
    workbook.LoadFromFile({ fileName: inputFileName });

    // Get the first worksheet
    const sheet = workbook.Worksheets.get(0);

    // Remove all AutoFilters from the worksheet
    sheet.AutoFilters.Clear();

    // Save the result file, specifying Excel version 2016
    const outputFileName = "RemoveAutoFilter_output.xlsx";
    workbook.SaveToFile({ fileName: outputFileName, version: xlsModule.ExcelVersion.Version2016 });

    // Dispose of the workbook object to release resources
    workbook.Dispose();

    // Read the converted file from VFS and trigger the download
    const fileArray = window.dotnetRuntime.Module.FS.readFile(outputFileName);
    const blob = new Blob([fileArray], { type: "application/vnd.openxmlformats-officedocument.spreadsheetml.sheet" });
    const url = URL.createObjectURL(blob);
    const a = document.createElement('a');
    a.href = url;
    a.download = outputFileName;
    a.click();
    URL.revokeObjectURL(url);
  };

  return (
    <div style={{ textAlign: 'center', height: '300px' }}>
      <h1>Remove AutoFilter</h1>
      <button onClick={removeAutoFilter}>
        Start
      </button>
    </div>
  );
}

export default App;
Remove AutoFilters 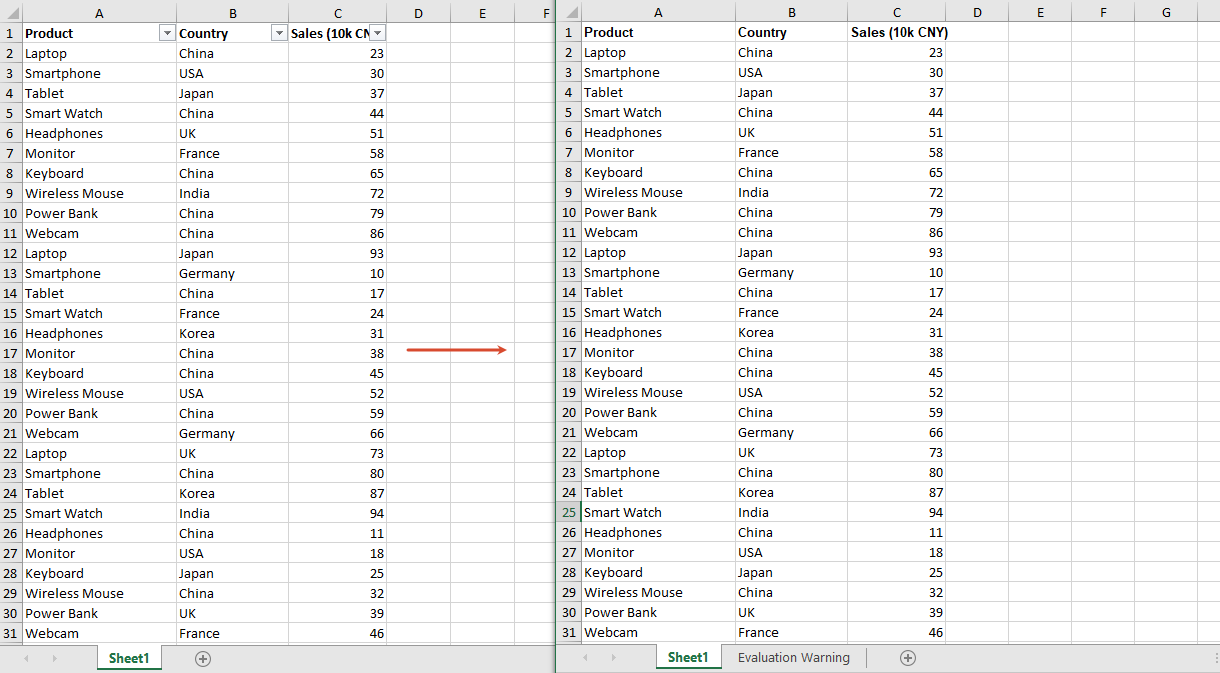
Frequently Asked Questions
Data rows are not hidden after filtering
Reason: The Filter() method was not called to apply the filter after the filter condition was set, or the range set by AutoFilters.Range does not cover the data rows you want to filter.
Solution: Call sheet.AutoFilters.Filter() after setting the filter condition, and make sure AutoFilters.Range covers the header row and all data rows, for example "B1:B51" in the example above.
Filtering by Chinese content fails
Reason: The filter condition is an exact match. If the filter value does not exactly match the cell content (for example, it contains leading or trailing spaces), it will not match.
Solution: Make sure the filter value exactly matches the cell content.
Get a Free License
If you wish to remove the evaluation message from the result documents, or get rid of the feature limitations, please contact sales to get a 30-day temporary license.
Splitting PDF documents is a common requirement in web applications. For example, you may need to divide a long report into single-page files, extract the cover page separately, or separate the first page from the remaining pages for further processing. Instead of uploading files to a server, you can perform these operations directly in a React application with JavaScript.
Spire.PDF for JavaScript enables developers to load, manipulate, and save PDF documents in browser-based applications. It works with WebAssembly and a virtual file system, allowing PDF files to be processed on the client side.
This article demonstrates how to split PDF documents using JavaScript in React with Spire.PDF for JavaScript.
Install Spire.PDF for JavaScript in a React Project
Open a terminal in the root directory of your React project and install the spire.office package:
npm i spire.office
After the installation is complete, copy the following runtime files and folder from the installed package to the React project's public folder:
public/
├── _framework/
├── spire.pdf.js
├── Spire.Pdf.Wasm.zip
├── spire.common.js
└── Spire.Common.Wasm.zip
The JavaScript loader, WebAssembly resources, and supporting framework files must remain accessible as static assets when the application runs. For detailed setup instructions and the exact integration process, see How to Integrate Spire.PDF for JavaScript in a React Project.
In the examples below, the PDF file to be split is named input.pdf. Place this file in the public folder as well, so that it can be loaded in the React application.
public/
├── input.pdf
└── ...
Split a PDF into Individual Files by Page in JavaScript
If you want to split a PDF document into multiple single-page PDF files, you can use the Split() method. This method separates the original PDF into individual documents and saves each page as a new PDF file.
The following example loads input.pdf, splits it page by page, and downloads each generated PDF file in the browser.
import React, { useState, useEffect } from 'react';

function App() {
  const [wasmModule, setWasmModule] = useState(null);

  useEffect(() => {
    (async () => {
      const publicUrl = process.env.PUBLIC_URL || '';
      const spireModule = await import(/* webpackIgnore: true */ `${publicUrl}/spire.pdf.js`);
      const rawModule = spireModule.default || spireModule;
      window.wasmModule = typeof rawModule === 'function'
        ? await rawModule({ locateFile: p => p.endsWith('.wasm') ? `${publicUrl}/${p}` : p })
        : rawModule;
      setWasmModule(window.wasmModule);
    })();
  }, []);

  const loadPdfToVfs = async (fileName) => {
    const publicUrl = process.env.PUBLIC_URL || '';
    const response = await fetch(`${publicUrl}/${fileName}`);
    const fileBytes = new Uint8Array(await response.arrayBuffer());
    window.dotnetRuntime.Module.FS.writeFile(fileName, fileBytes, { flags: 'w+' });
    return fileName;
  };

  const SplitPdf = async () => {
    const wasmModule = window.wasmModule?.spirepdf;
    if (!wasmModule) return;

    const inputFile = await loadPdfToVfs('input.pdf');

    const doc = new wasmModule.PdfDocument();
    doc.LoadFromFile(inputFile);

    const pageCount = doc.Pages.Count;
    const outFileName = 'SplitDocument_result-{0}.pdf';
    doc.Split(outFileName);

    for (let i = 0; i < pageCount; i++) {
      const splitFileName = `SplitDocument_result-${i}.pdf`;
      const fileArray = window.dotnetRuntime.Module.FS.readFile(splitFileName);
      const file = new Blob([fileArray], { type: 'application/pdf' });
      const url = URL.createObjectURL(file);
      const a = document.createElement('a');
      a.href = url;
      a.download = splitFileName;
      document.body.appendChild(a);
      a.click();
      document.body.removeChild(a);
      URL.revokeObjectURL(url);
    }
  };

  return (
    <div style={{ textAlign: 'center', height: '300px' }}>
      <h1>Split PDF Documents in React</h1>
      <button onClick={SplitPdf} disabled={!wasmModule}>
        Split PDF
      </button>
    </div>
  );
}

export default App;
Output:
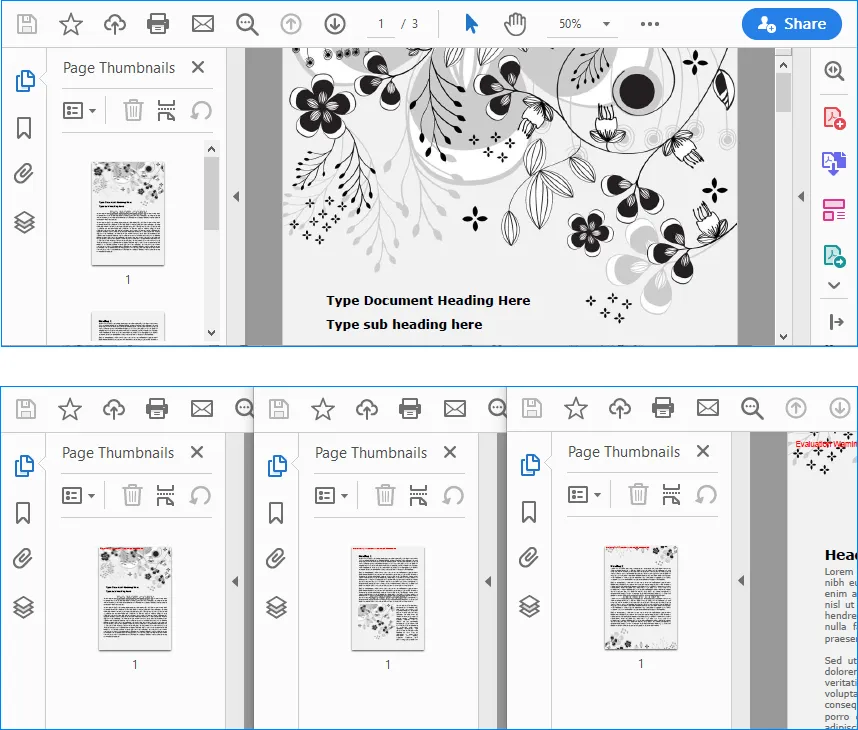
Code Explanation
The code first imports and initializes the Spire.PDF WebAssembly module when the React component is mounted.
const spireModule = await import(/* webpackIgnore: true */ `${publicUrl}/spire.pdf.js`);
Then, the loadPdfToVfs() function loads input.pdf from the public folder and writes it into the virtual file system:
window.dotnetRuntime.Module.FS.writeFile(fileName, fileBytes, { flags: 'w+' });
After the PDF file is loaded, a PdfDocument object is created and the source PDF is opened:
const doc = new wasmModule.PdfDocument();
doc.LoadFromFile(inputFile);
The Split() method splits the PDF document into separate PDF files. The {0} placeholder in the output file name is replaced by the page index:
const outFileName = 'SplitDocument_result-{0}.pdf';
doc.Split(outFileName);
Finally, the generated PDF files are read from the virtual file system, converted into Blob objects, and downloaded in the browser.
Split a PDF by Page Range in JavaScript
In some cases, you may not want to split every page into a separate file. Instead, you may want to extract one page as an individual PDF and save the remaining pages as another PDF. This can be done by creating new PdfDocument objects and inserting selected pages from the source document.
The following example splits input.pdf into two files:
Split-1.pdf: contains the first pageSplit-2.pdf: contains the remaining pages
import React, { useState, useEffect } from 'react';

function App() {
  const [wasmModule, setWasmModule] = useState(null);

  useEffect(() => {
    (async () => {
      const publicUrl = process.env.PUBLIC_URL || '';
      const spireModule = await import(/* webpackIgnore: true */ `${publicUrl}/spire.pdf.js`);
      const rawModule = spireModule.default || spireModule;
      window.wasmModule = typeof rawModule === 'function'
        ? await rawModule({ locateFile: p => p.endsWith('.wasm') ? `${publicUrl}/${p}` : p })
        : rawModule;
      setWasmModule(window.wasmModule);
    })();
  }, []);

  const loadPdfToVfs = async (fileName) => {
    const publicUrl = process.env.PUBLIC_URL || '';
    const response = await fetch(`${publicUrl}/${fileName}`);
    const fileBytes = new Uint8Array(await response.arrayBuffer());
    window.dotnetRuntime.Module.FS.writeFile(fileName, fileBytes, { flags: 'w+' });
    return fileName;
  };

  const SplitPdf = async () => {
    const wasmModule = window.wasmModule?.spirepdf;
    if (!wasmModule) return;

    const inputFile = await loadPdfToVfs('input.pdf');

    const doc = new wasmModule.PdfDocument();
    doc.LoadFromFile(inputFile);

    const newDoc1 = new wasmModule.PdfDocument();
    const newDoc2 = new wasmModule.PdfDocument();

    newDoc1.InsertPage(doc, 0);
    newDoc2.InsertPageRange(doc, 1, doc.Pages.Count - 1);

    newDoc1.SaveToFile('Split-1.pdf');
    newDoc2.SaveToFile('Split-2.pdf');

    for (const splitFileName of ['Split-1.pdf', 'Split-2.pdf']) {
      const fileArray = window.dotnetRuntime.Module.FS.readFile(splitFileName);
      const file = new Blob([fileArray], { type: 'application/pdf' });
      const url = URL.createObjectURL(file);
      const a = document.createElement('a');
      a.href = url;
      a.download = splitFileName;
      document.body.appendChild(a);
      a.click();
      document.body.removeChild(a);
      URL.revokeObjectURL(url);
    }
  };

  return (
    <div style={{ textAlign: 'center', height: '300px' }}>
      <h1>Split PDF Documents in React</h1>
      <button onClick={SplitPdf} disabled={!wasmModule}>
        Split PDF
      </button>
    </div>
  );
}

export default App;
Output:
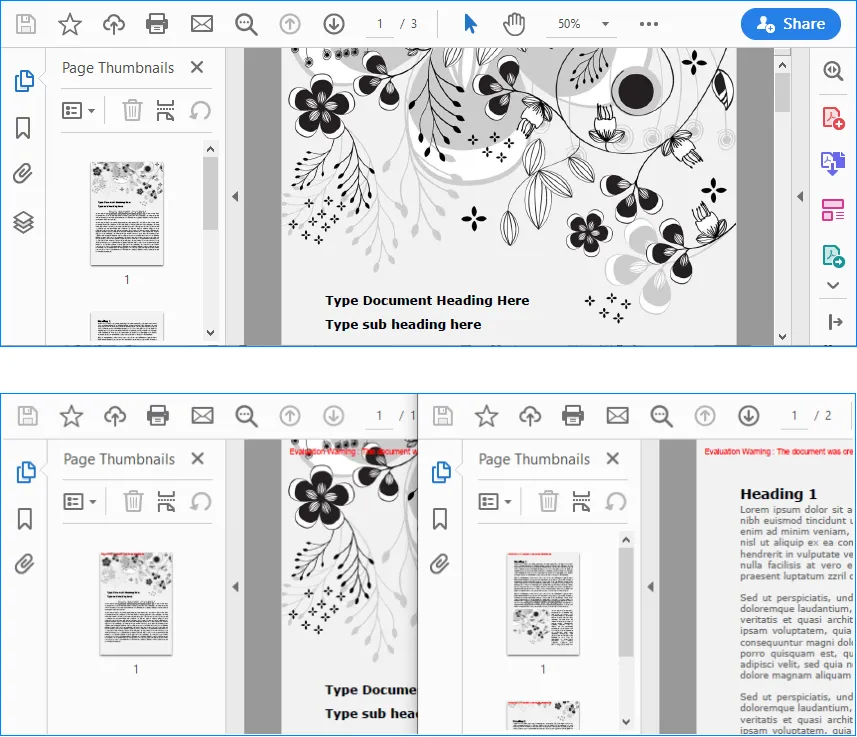
Code Explanation
This example also starts by loading the source PDF file into the virtual file system and opening it with PdfDocument.
const doc = new wasmModule.PdfDocument();
doc.LoadFromFile(inputFile);
Then, two new PDF documents are created:
const newDoc1 = new wasmModule.PdfDocument();
const newDoc2 = new wasmModule.PdfDocument();
The first page of the source PDF is inserted into newDoc1:
newDoc1.InsertPage(doc, 0);
The remaining pages are inserted into newDoc2 with InsertPageRange():
newDoc2.InsertPageRange(doc, 1, doc.Pages.Count - 1);
Here, page indexes are zero-based. The number 1 means the second page of the original PDF, and doc.Pages.Count - 1 means all remaining pages after the first page.
After inserting the selected pages, the two new PDF documents are saved:
newDoc1.SaveToFile('Split-1.pdf');
newDoc2.SaveToFile('Split-2.pdf');
Finally, both output files are read from the virtual file system and downloaded to the local computer.
Conclusion
This article demonstrated how to split PDF documents in a React application using Spire.PDF for JavaScript. With the Split() method, you can divide a PDF into separate single-page documents. With InsertPage() and InsertPageRange(), you can extract specific pages or page ranges into new PDF files.
These methods are useful for building browser-based PDF tools, document management systems, online file-processing applications, and other React applications that require PDF splitting without server-side processing.
FAQs
Can I split a PDF into one file per page in React?
Yes. You can use the Split() method provided by Spire.PDF for JavaScript to split a PDF document into separate PDF files. Each page of the original PDF will be saved as an individual PDF file.
Can I split only a specific page range from a PDF?
Yes. Instead of splitting every page, you can create a new PdfDocument object and use InsertPage() or InsertPageRange() to copy selected pages from the source PDF into a new PDF document.
Are page indexes zero-based in Spire.PDF for JavaScript?
Yes. Page indexes start from 0. For example, page index 0 refers to the first page, and page index 1 refers to the second page. When using InsertPageRange(), make sure the start index and page count are set correctly.
Do I need a server to split PDF documents in React?
No. With Spire.PDF for JavaScript, the PDF can be loaded, processed, and saved in the browser using WebAssembly and the virtual file system. This makes it possible to split PDF documents directly in a React application without sending the file to a server.
PDF has a fixed layout and is easy to distribute, but the tabular data within it is hard to edit and analyze directly; Excel (XLSX) is the common format in the spreadsheet domain, supporting formulas, sorting, filtering, and further processing. Real-world business often requires converting reports, invoices, and data tables in PDF to Excel for continued editing, summarization, or entry into systems. Because the underlying models of PDF and Excel differ significantly, the layout strategy during conversion has a notable impact on result quality.
Spire.PDF for JavaScript completes PDF-to-Excel conversion entirely in the browser via WebAssembly, managing input and output files through a virtual file system (VFS) with no backend server required. In addition to simple regular conversion, it also provides two types of conversion options, XlsxLineLayoutOptions and XlsxTextLayoutOptions, to help you control the row layout and text layout of the converted result.
This article covers three core features:
- Convert PDF to Excel Using the Regular Method
- Convert PDF to Excel Using XlsxLineLayoutOptions
- Convert PDF to Excel Using XlsxTextLayoutOptions
For installation and project setup, refer to Integrating Spire.PDF for JavaScript in a React Project. The examples below assume Spire.PDF is installed and the WebAssembly module is initialized.
Convert PDF to Excel Using the Regular Method
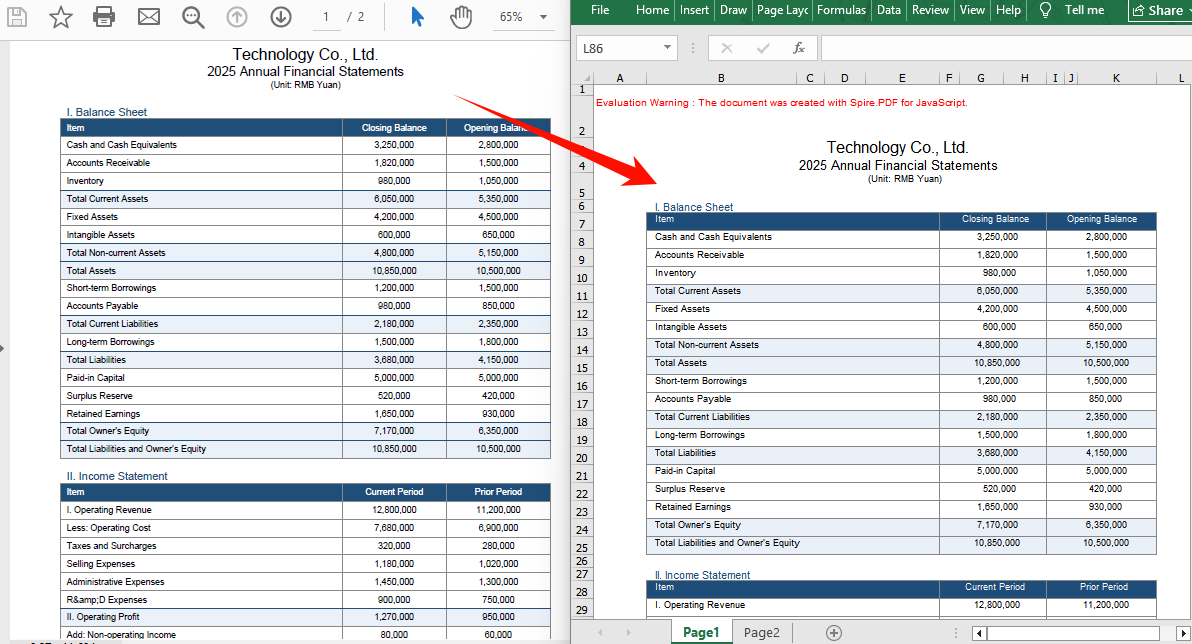
The regular conversion is the most direct way to convert PDF to Excel: after creating a PdfDocument object and loading the PDF, simply save it as an Excel document by specifying FileFormat.XLSX in the SaveToFile method, without setting any conversion options. Spire.PDF parses the text, table, and graphic content of the PDF using the default strategy, which suits most conversion needs for regular documents; when the default result cannot meet specific layout requirements, consider using XlsxLineLayoutOptions or XlsxTextLayoutOptions for fine-grained control.
function App() {
  const convertToExcel = async () => {
    // Get the Spire.PDF WASM module
    const pdfModule = window.wasmModule?.spirepdf;

    // Check if the WASM module is ready
    if (!pdfModule) {
      alert('Spire.PDF is not ready yet');
      return;
    }

    // Load the PDF file and fonts into VFS
    await window.spire.FetchFileToVFS('ARIAL.TTF', '/Library/Fonts/', `${process.env.PUBLIC_URL}/font/`);
    const inputFileName = 'FinancialStatement2025.pdf';
    await window.spire.FetchFileToVFS(inputFileName, "", `${process.env.PUBLIC_URL}/data/`);

    // Create PdfDocument object and load the PDF document
    let doc = new pdfModule.PdfDocument();
    doc.LoadFromFile(inputFileName);

    // Define the output file name in Excel format
    const outputFileName = 'OutputExcel.xlsx';

    // Save as Excel format
    doc.SaveToFile({ fileName: outputFileName, fileFormat: pdfModule.FileFormat.XLSX });
    doc.Close();

    // Read the converted file from VFS and trigger download
    const fileArray = window.dotnetRuntime.Module.FS.readFile(outputFileName);
    const blob = new Blob([fileArray], { type: 'application/vnd.openxmlformats-officedocument.spreadsheetml.sheet' });
    const url = URL.createObjectURL(blob);
    const a = document.createElement('a');
    a.href = url;
    a.download = outputFileName;
    a.click();
    URL.revokeObjectURL(url);
  };

  return (
    <div style={{ textAlign: 'center', height: '300px' }}>
      <h1>Convert PDF To Excel</h1>
      <button onClick={convertToExcel}>
        Generate
      </button>
    </div>
  );
}

export default App;
Excel document generated using the regular conversion method
Convert PDF to Excel Using XlsxLineLayoutOptions
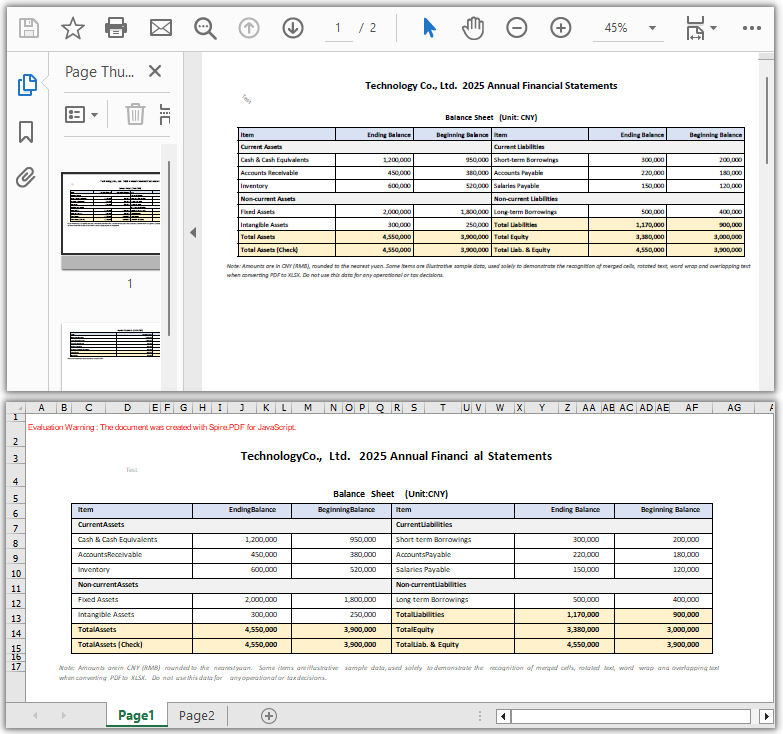
Line elements such as table borders, separator lines, and graphics need to be controlled through row layout options for their preservation during conversion to Excel. XlsxLineLayoutOptions provides several row layout parameters: whether to convert to multiple worksheets, whether to keep rotated text, whether to split cells containing multiple lines of text, whether to wrap text, and whether to keep overlapping text. Pass this option to the ConvertOptions SetPdfToXlsxOptions method, then save with SaveToFile specifying FileFormat.XLSX to complete the conversion.
function App() {
  const convertToExcel = async () => {
    // Get the Spire.PDF WASM module
    const pdfModule = window.wasmModule?.spirepdf;

    // Check if the WASM module is ready
    if (!pdfModule) {
      alert('Spire.PDF is not ready yet');
      return;
    }

    // Load the PDF file and fonts into VFS
    await window.spire.FetchFileToVFS('ARIAL.TTF', '/Library/Fonts/', `${process.env.PUBLIC_URL}/font/`);
    const inputFileName = 'FinancialStatement.pdf';
    await window.spire.FetchFileToVFS(inputFileName, "", `${process.env.PUBLIC_URL}/data/`);

    // Create PdfDocument object and load the PDF document
    let doc = new pdfModule.PdfDocument();
    doc.LoadFromFile(inputFileName);

    // Create row layout conversion options
    // Parameters: whether to convert to multiple worksheets, whether to keep rotated text, whether to split cells, whether to wrap text, whether to keep overlapping text
    let lineLayoutOptions = new pdfModule.XlsxLineLayoutOptions(true, true, false, true, true);
    doc.ConvertOptions.SetPdfToXlsxOptions(lineLayoutOptions);

    // Define the output file name in Excel format
    const outputFileName = 'LineLayoutOptions.xlsx';

    // Save as Excel format
    doc.SaveToFile({ fileName: outputFileName, fileFormat: pdfModule.FileFormat.XLSX });
    doc.Close();

    // Read the converted file from VFS and trigger download
    const fileArray = window.dotnetRuntime.Module.FS.readFile(outputFileName);
    const blob = new Blob([fileArray], { type: 'application/vnd.openxmlformats-officedocument.spreadsheetml.sheet' });
    const url = URL.createObjectURL(blob);
    const a = document.createElement('a');
    a.href = url;
    a.download = outputFileName;
    a.click();
    URL.revokeObjectURL(url);
  };

  return (
    <div style={{ textAlign: 'center', height: '300px' }}>
      <h1>Convert PDF To Excel using XlsxLineLayoutOptions</h1>
      <button onClick={convertToExcel}>
        Generate
      </button>
    </div>
  );
}

export default App;
Excel document generated using the XlsxLineLayoutOptions conversion option
Convert PDF to Excel Using XlsxTextLayoutOptions
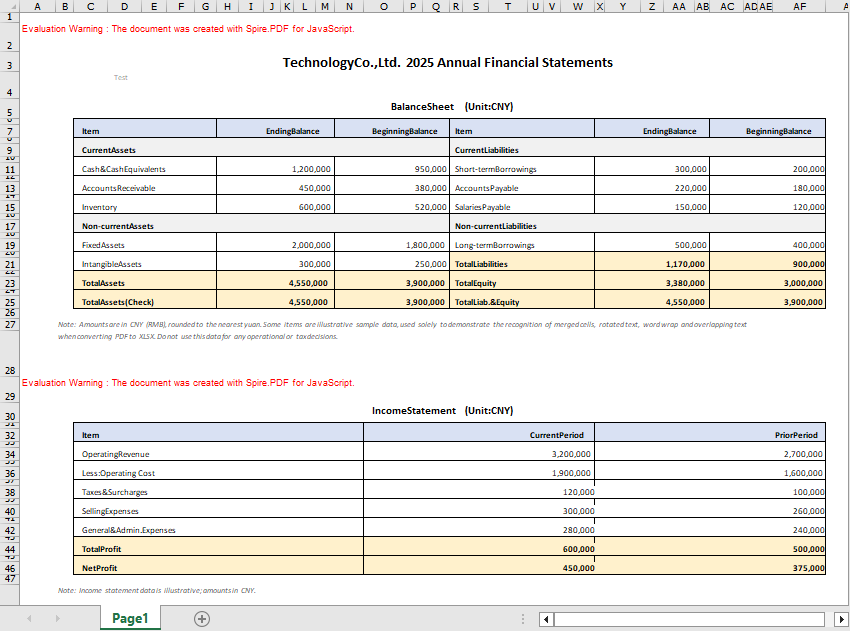
When the PDF content consists mainly of text and numeric values, you can switch to XlsxTextLayoutOptions to control text layout conversion parameters, such as whether to convert to multiple worksheets and whether to keep rotated text. Unlike the row layout option, this option focuses more on the arrangement of text content and is suitable for documents with few table lines and mainly text. The usage is the same: pass the option to the ConvertOptions SetPdfToXlsxOptions method, then save as XLSX.
function App() {
  const convertToExcel = async () => {
    // Get the Spire.PDF WASM module
    const pdfModule = window.wasmModule?.spirepdf;

    // Check if the WASM module is ready
    if (!pdfModule) {
      alert('Spire.PDF is not ready yet');
      return;
    }

    // Load the PDF file and fonts into VFS
    await window.spire.FetchFileToVFS('ARIAL.TTF', '/Library/Fonts/', `${process.env.PUBLIC_URL}/font/`);
    const inputFileName = 'Report.pdf';
    await window.spire.FetchFileToVFS(inputFileName, "", `${process.env.PUBLIC_URL}/data/`);

    // Create PdfDocument object and load the PDF document
    let doc = new pdfModule.PdfDocument();
    doc.LoadFromFile(inputFileName);

    // Create text layout conversion options
    // Parameters: whether to convert to multiple worksheets, whether to keep rotated text
    let textLayoutOptions = new pdfModule.XlsxTextLayoutOptions(false, true);
    doc.ConvertOptions.SetPdfToXlsxOptions(textLayoutOptions);

    // Define the output file name in Excel format
    const outputFileName = 'TextLayoutOptions.xlsx';

    // Save as Excel format
    doc.SaveToFile({ fileName: outputFileName, fileFormat: pdfModule.FileFormat.XLSX });
    doc.Close();

    // Read the converted file from VFS and trigger download
    const fileArray = window.dotnetRuntime.Module.FS.readFile(outputFileName);
    const blob = new Blob([fileArray], { type: 'application/vnd.openxmlformats-officedocument.spreadsheetml.sheet' });
    const url = URL.createObjectURL(blob);
    const a = document.createElement('a');
    a.href = url;
    a.download = outputFileName;
    a.click();
    URL.revokeObjectURL(url);
  };

  return (
    <div style={{ textAlign: 'center', height: '300px' }}>
      <h1>Convert PDF To Excel using XlsxTextLayoutOptions</h1>
      <button onClick={convertToExcel}>
        Generate
      </button>
    </div>
  );
}

export default App;
Excel document generated using the XlsxTextLayoutOptions conversion option
FAQ
What is the difference between regular conversion and conversion using the options?
Reason: When no conversion option is set, Spire.PDF converts the PDF content to Excel using the default layout strategy.
Solution: Regular conversion (without calling SetPdfToXlsxOptions) involves the fewest steps and suits documents with a simple content structure where the default layout is sufficient; when you need to control details such as multi-worksheet splitting, rotated text, cell splitting, and text wrapping, choose XlsxLineLayoutOptions (oriented toward graphics and lines) or XlsxTextLayoutOptions (oriented toward text) based on the document content.
What is the difference between XlsxLineLayoutOptions and XlsxTextLayoutOptions?
Reason: The two types of options control how different content is preserved during PDF-to-Excel conversion.
Solution: XlsxLineLayoutOptions targets graphic elements such as table borders and lines, controlling behaviors like multi-worksheet splitting, rotated text, cell splitting, text wrapping, and overlapping text; XlsxTextLayoutOptions targets text content, controlling whether to merge into a single worksheet and whether to keep rotated text. Choose the appropriate option based on whether the PDF content is graphics-oriented or text-oriented.
Can encrypted PDF files be converted to Excel?
Reason: Password-protected encrypted PDF files cannot be converted directly; the document needs to be decrypted first.
Solution: Pass the password as the second parameter of LoadFromFile when loading the PDF to decrypt it, then convert and save as Excel:
// Load the password-protected PDF document
let doc = new pdfModule.PdfDocument();
doc.LoadFromFile(inputFileName, "password");

// Save as Excel format
doc.SaveToFile({ fileName: outputFileName, fileFormat: pdfModule.FileFormat.XLSX });
doc.Close();
Get a Free License
If you want to remove the evaluation messages in the resulting documents or get rid of functional limitations, contact sales to obtain a 30-day temporary license.
Apply Conditional Formatting to Excel with JavaScript in React
2026-08-20 06:52:21 Written by Lisa LiConditional formatting is an important means to visually display data in Excel. It automatically applies colors, bars, and other visual effects to cells based on their values or dates, so that high and low values and key dates in a report are clear at a glance. Spire.XLS for JavaScript applies conditional formatting to cell ranges directly in the browser based on WebAssembly, managing input and output files through a virtual file system (VFS) without the need for backend services.
This article covers three core features:
- Apply Data Bars to a Cell Range
- Conditionally Format Dates
- Create a Formula-Based Conditional Format
For installation and project configuration, refer to How to Integrate Spire.XLS for JavaScript in a React Project. The examples below assume that Spire.XLS has been installed and the WebAssembly module has been initialized.
Apply Data Bars to a Cell Range
Data bars intuitively reflect the relative size of values through the length of the horizontal bars filled in cells — the larger the value, the longer the bar. Spire.XLS for JavaScript creates a conditional format collection with the ConditionalFormats.Add method, adds a data bar condition with AddCondition, and customizes the bar color with DataBar.BarColor.
function App() {
  const sheetToSVG = async () => {
    // Get the Spire.XLS WASM module
    const xlsModule = window.wasmModule?.spirexls;

    // Check if the module is ready
    if (!xlsModule) {
      alert('Spire.Xls is not ready yet');
      return;
    }

    // Load the font file into the VFS
    await window.spire.FetchFileToVFS('ARIAL.TTF', '/Library/Fonts/', `${process.env.PUBLIC_URL}/font/`);

    // Create a workbook
    const workbook = new xlsModule.Workbook();

    // Get the first worksheet
    const sheet = workbook.Worksheets.get(0);

    // Insert data into the cell range A1:C4
    sheet.Range.get("A1").NumberValue = 582;
    sheet.Range.get("A2").NumberValue = 234;
    sheet.Range.get("A3").NumberValue = 314;
    sheet.Range.get("A4").NumberValue = 50;
    sheet.Range.get("B1").NumberValue = 150;
    sheet.Range.get("B2").NumberValue = 894;
    sheet.Range.get("B3").NumberValue = 560;
    sheet.Range.get("B4").NumberValue = 900;
    sheet.Range.get("C1").NumberValue = 134;
    sheet.Range.get("C2").NumberValue = 700;
    sheet.Range.get("C3").NumberValue = 920;
    sheet.Range.get("C4").NumberValue = 450;
    sheet.AllocatedRange.RowHeight = 15;
    sheet.AllocatedRange.ColumnWidth = 17;

    // Add a conditional format and apply it to the data range
    const xcfs = sheet.ConditionalFormats.Add();
    xcfs.AddRange(sheet.AllocatedRange);

    // Add a data bar conditional format and set the bar color
    const format = xcfs.AddCondition();
    format.FormatType = xlsModule.ConditionalFormatType.DataBar;
    format.DataBar.BarColor = xlsModule.Color.get_CadetBlue();

    const outputFileName = 'ApplyDataBarsToCellRange_out.xlsx';
    workbook.SaveToFile({ fileName: outputFileName, version: xlsModule.ExcelVersion.Version2010 });

    // Dispose of the workbook object to free resources
    workbook.Dispose();

    // Read the converted file from the VFS and trigger the download
    const fileArray = window.dotnetRuntime.Module.FS.readFile(outputFileName);
    const blob = new Blob([fileArray], { type: "application/vnd.openxmlformats-officedocument.spreadsheetml.sheet" });
    const url = URL.createObjectURL(blob);
    const a = document.createElement('a');
    a.href = url;
    a.download = outputFileName;
    a.click();
    URL.revokeObjectURL(url);
  };

  return (
    <div style={{ textAlign: 'center', height: '300px' }}>
      <h1>Apply Data Bars to Cell Range</h1>
      <button onClick={sheetToSVG}>
        Start
      </button>
    </div>
  );
}

export default App;
Apply Data Bars to a Cell Range Effect 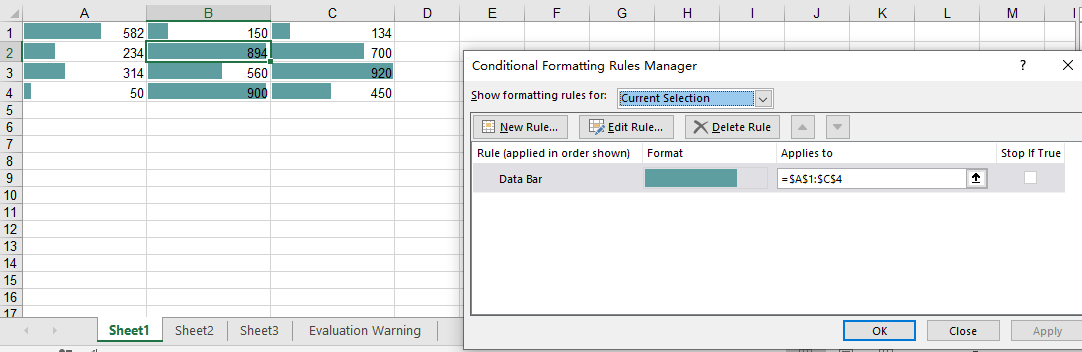
Conditionally Format Dates
In scenarios such as project management and sales reports, we often need to highlight dates within a recent period, for example records from the last 7 days. Spire.XLS for JavaScript adds a time-period-based date conditional format with the AddTimePeriodCondition method, and specifies the time range with the TimePeriodType enumeration.
function App() {
  const sheetToSVG = async () => {
    // Get the Spire.XLS WASM module
    const xlsModule = window.wasmModule?.spirexls;

    // Check if the module is ready
    if (!xlsModule) {
      alert('Spire.Xls is not ready yet');
      return;
    }

    // Load the font and Excel file into the VFS
    await window.spire.FetchFileToVFS('ARIAL.TTF', '/Library/Fonts/', `${process.env.PUBLIC_URL}/font/`);
    const inputFileName = 'ConditionallyFormatDate.xlsx';
    await window.spire.FetchFileToVFS(inputFileName, '', `${process.env.PUBLIC_URL}data/`);

    // Load the workbook
    const workbook = new xlsModule.Workbook();
    workbook.LoadFromFile({ fileName: inputFileName });

    // Get the first worksheet
    const sheet = workbook.Worksheets.get(0);

    // Add a conditional format and apply it to the data range
    const xcfs = sheet.ConditionalFormats.Add();
    xcfs.AddRange(sheet.AllocatedRange);

    // Highlight cells whose date falls within the last 7 days
    const conditionalFormat = xcfs.AddTimePeriodCondition(xlsModule.TimePeriodType.Last7Days);
    conditionalFormat.BackColor = xlsModule.Color.get_Orange();

    const outputFileName = 'ConditionallyFormatDate_out.xlsx';
    workbook.SaveToFile({ fileName: outputFileName, version: xlsModule.ExcelVersion.Version2010 });

    // Dispose of the workbook object to free resources
    workbook.Dispose();

    // Read the converted file from the VFS and trigger the download
    const fileArray = window.dotnetRuntime.Module.FS.readFile(outputFileName);
    const blob = new Blob([fileArray], { type: "application/vnd.openxmlformats-officedocument.spreadsheetml.sheet" });
    const url = URL.createObjectURL(blob);
    const a = document.createElement('a');
    a.href = url;
    a.download = outputFileName;
    a.click();
    URL.revokeObjectURL(url);
  };

  return (
    <div style={{ textAlign: 'center', height: '300px' }}>
      <h1>Conditionally Format Date</h1>
      <button onClick={sheetToSVG}>
        Start
      </button>
    </div>
  );
}

export default App;
Before Applying Date Conditional Formatting 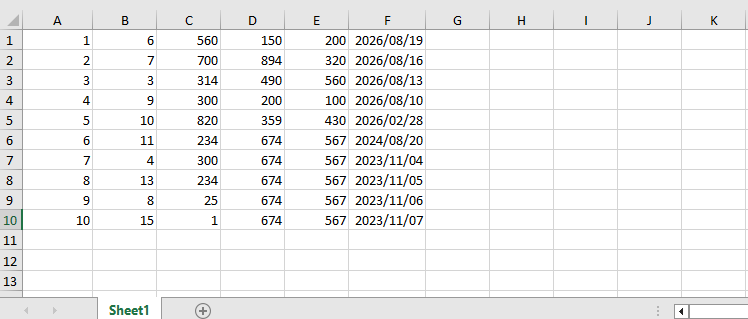 After Applying Date Conditional Formatting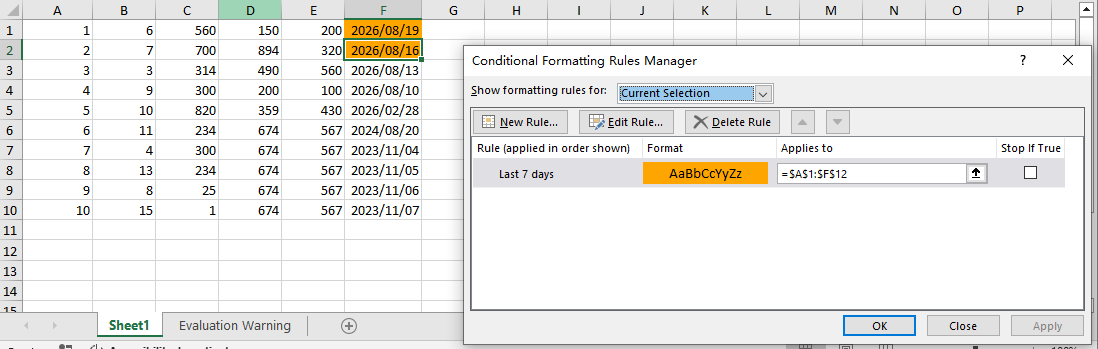
Create a Formula-Based Conditional Format
When the built-in conditional formats cannot meet your requirements, you can use a formula to define a custom judgment rule. Spire.XLS for JavaScript supports setting ConditionalFormatType to Formula and specifying the judgment formula with FirstFormula; cells that satisfy the formula will apply the configured background color.
function App() {
  const sheetToSVG = async () => {
    // Get the Spire.XLS WASM module
    const xlsModule = window.wasmModule?.spirexls;

    // Check if the module is ready
    if (!xlsModule) {
      alert('Spire.Xls is not ready yet');
      return;
    }

    // Load the font and Excel file into the VFS
    await window.spire.FetchFileToVFS('ARIAL.TTF', '/Library/Fonts/', `${process.env.PUBLIC_URL}/font/`);
    const inputFileName = 'ConditionallyFormatDate.xlsx';
    await window.spire.FetchFileToVFS(inputFileName, '', `${process.env.PUBLIC_URL}data/`);

    // Load the workbook
    const workbook = new xlsModule.Workbook();
    workbook.LoadFromFile({ fileName: inputFileName });

    // Get the first worksheet and its first column
    const sheet = workbook.Worksheets.get(0);
    const range = sheet.Columns.get(0);

    // Add a conditional format and apply it to the first column
    const xcfs = sheet.ConditionalFormats.Add();
    xcfs.AddRange(range);

    // Set the conditional format formula: apply the format when a cell in column A is less than the cell in column B of the same row
    const conditional = xcfs.AddCondition();
    conditional.FormatType = xlsModule.ConditionalFormatType.Formula;
    conditional.FirstFormula = "=($A1<$B1)";
    conditional.BackKnownColor = xlsModule.ExcelColors.Yellow;

    const outputFileName = 'CreateFormulaConditionalFormat_out.xlsx';
    workbook.SaveToFile({ fileName: outputFileName, version: xlsModule.ExcelVersion.Version2010 });

    // Dispose of the workbook object to free resources
    workbook.Dispose();

    // Read the converted file from the VFS and trigger the download
    const fileArray = window.dotnetRuntime.Module.FS.readFile(outputFileName);
    const blob = new Blob([fileArray], { type: "application/vnd.openxmlformats-officedocument.spreadsheetml.sheet" });
    const url = URL.createObjectURL(blob);
    const a = document.createElement('a');
    a.href = url;
    a.download = outputFileName;
    a.click();
    URL.revokeObjectURL(url);
  };

  return (
    <div style={{ textAlign: 'center', height: '300px' }}>
      <h1>Create Formula Conditional Format</h1>
      <button onClick={sheetToSVG}>
        Start
      </button>
    </div>
  );
}

export default App;
Apply Formula Conditional Formatting 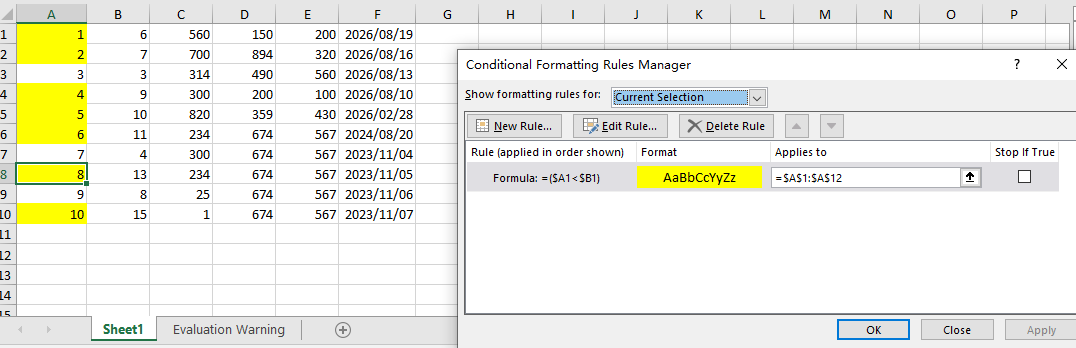
FAQ
Conditional formatting is not displayed when the file is opened in older versions of Excel
Cause: Conditional formats such as data bars, time periods, and formulas belong to the Excel 2007+ (XLSX) format capabilities. Saving with an older format may cause the conditional formatting to be lost or not displayed.
Solution: Explicitly specify the file version as Excel 2010 when saving, for example:
workbook.SaveToFile({
  fileName: 'output.xlsx',
  version: xlsModule.ExcelVersion.Version2010
});
The date conditional format has no effect
Cause: The date data in the target cells is actually stored as text or plain numbers rather than real date values, so the time-period-based judgment cannot match.
Solution: Make sure the dates in the worksheet are stored as dates, for example by writing date-type values directly when generating the data, instead of strings.
The formula conditional format references the wrong range
Cause: The relative references in the FirstFormula formula do not correspond to the cell range, so the judgment result does not match expectations.
Solution: Confirm that the row and column references in the formula are consistent with the selected range. For example, when applying =($A1<$B1) to the entire column A, the formula uses the first cell of the selected range as the reference starting point.
Get a Free License
If you want to remove the evaluation message from the result documents, or get rid of the function limitations, please contact sales to get a temporary license valid for 30 days.
Hide, Unhide, and Control the Conversion of Excel Worksheets with JavaScript in React
2026-08-18 06:41:57 Written by Lisa LiIn daily work, we often need to hide some worksheets to simplify the interface display or protect sensitive data, and we can unhide them when necessary. In addition, when converting a workbook to HTML, you may also need to control whether hidden worksheets appear in the conversion result. Spire.XLS for JavaScript performs these operations directly in the browser based on WebAssembly, managing input and output files through the virtual file system (VFS), without any backend service support.
This article covers three core feature points:
- Hide a Worksheet
- Show a Hidden Worksheet
- Control Whether to Include Hidden Worksheets When Converting to HTML
For installation and project configuration, please refer to How to Integrate Spire.XLS for JavaScript in a React Project. The following examples assume that Spire.XLS is installed and the WebAssembly module has been initialized.
Hide a Worksheet
Hiding a worksheet is often used to simplify the display of a workbook or protect internal data. With Spire.XLS for JavaScript, you can hide a specified worksheet by setting the Visibility property of the worksheet object to WorksheetVisibility.Hidden.
function App() {
  const hideSheet = async () => {
    // Get the Spire.XLS WASM module
    const xlsModule = window.wasmModule?.spirexls;

    // Check if the module is ready
    if (!xlsModule) {
      alert('Spire.Xls is not ready yet');
      return;
    }

    // Load the font and Excel file into VFS
    await window.spire.FetchFileToVFS('ARIAL.TTF', '/Library/Fonts/', `${process.env.PUBLIC_URL}/font/`);
    const inputFileName = 'HideOrShowWorksheet.xlsx';
    await window.spire.FetchFileToVFS(inputFileName, '', `${process.env.PUBLIC_URL}data/`);

    // Load the workbook
    const workbook = new xlsModule.Workbook();
    workbook.LoadFromFile({ fileName: inputFileName });

    // Get the worksheet named "Sheet1" and hide it
    let sheet1 = workbook.Worksheets.get("Sheet1");
    sheet1.Visibility = xlsModule.WorksheetVisibility.Hidden;

    // Save the workbook
    const outputFileName = "HideWorksheet_output.xlsx";
    workbook.SaveToFile({ fileName: outputFileName });

    // Dispose of the workbook object to release resources
    workbook.Dispose();

    // Read the converted file from VFS and trigger the download
    const fileArray = window.dotnetRuntime.Module.FS.readFile(outputFileName);
    const blob = new Blob([fileArray], { type: "application/vnd.openxmlformats-officedocument.spreadsheetml.sheet" });
    const url = URL.createObjectURL(blob);
    const a = document.createElement('a');
    a.href = url;
    a.download = outputFileName;
    a.click();
    URL.revokeObjectURL(url);
  };

  return (
    <div style={{ textAlign: 'center', height: '300px' }}>
      <h1>Hide Worksheet</h1>
      <button onClick={hideSheet}>
        Start
      </button>
    </div>
  );
}

export default App;
Original document (Sheet2 is already hidden) 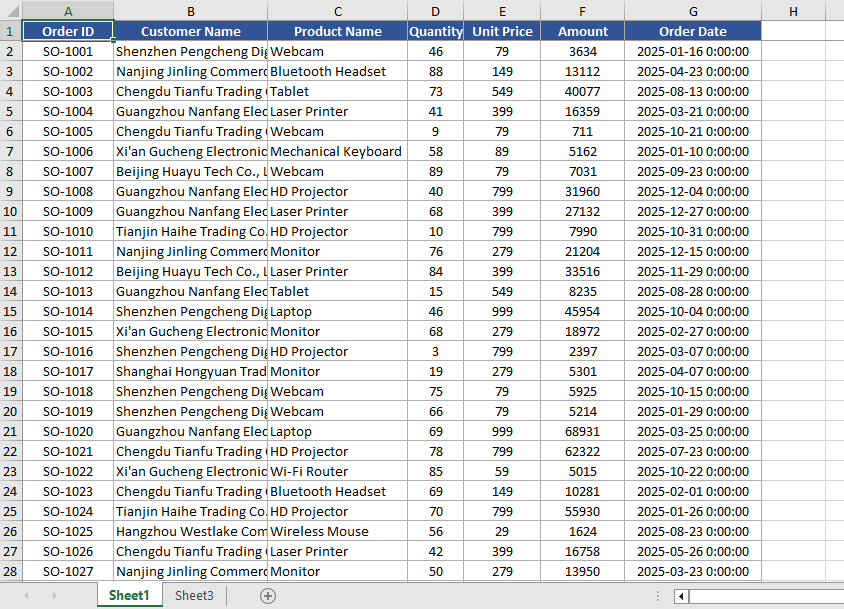 Hide Sheet1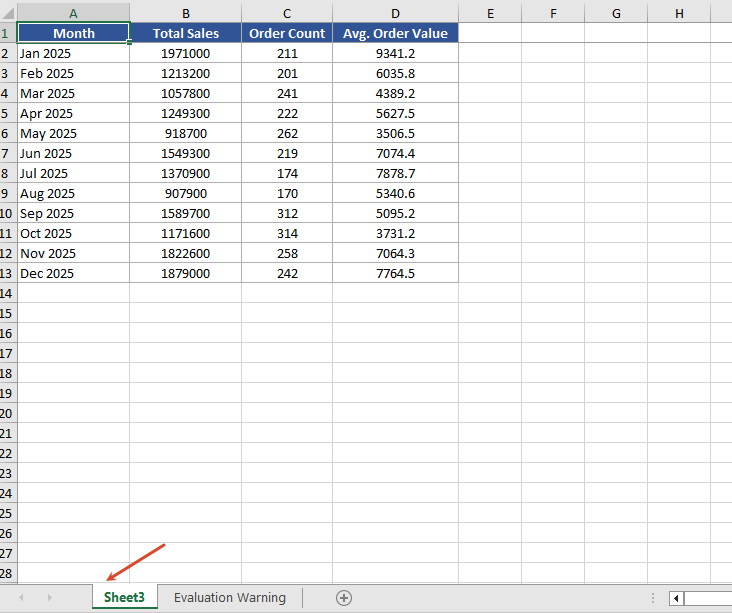
Show a Hidden Worksheet
When you need to view or edit a hidden worksheet again, you can show it again by setting the Visibility property to WorksheetVisibility.Visible.
function App() {
  const showSheet = async () => {
    // Get the Spire.XLS WASM module
    const xlsModule = window.wasmModule?.spirexls;

    // Check if the module is ready
    if (!xlsModule) {
      alert('Spire.Xls is not ready yet');
      return;
    }

    // Load the font and Excel file into VFS
    await window.spire.FetchFileToVFS('ARIAL.TTF', '/Library/Fonts/', `${process.env.PUBLIC_URL}/font/`);
    const inputFileName = 'HideOrShowWorksheet.xlsx';
    await window.spire.FetchFileToVFS(inputFileName, '', `${process.env.PUBLIC_URL}data/`);

    // Load the workbook
    const workbook = new xlsModule.Workbook();
    workbook.LoadFromFile({ fileName: inputFileName });

    // Get the second worksheet and set it as visible
    let sheet2 = workbook.Worksheets.get(1);
    sheet2.Visibility = xlsModule.WorksheetVisibility.Visible;

    // Save the workbook
    const outputFileName = "ShowWorksheet_output.xlsx";
    workbook.SaveToFile({ fileName: outputFileName });

    // Dispose of the workbook object to release resources
    workbook.Dispose();

    // Read the converted file from VFS and trigger the download
    const fileArray = window.dotnetRuntime.Module.FS.readFile(outputFileName);
    const blob = new Blob([fileArray], { type: "application/vnd.openxmlformats-officedocument.spreadsheetml.sheet" });
    const url = URL.createObjectURL(blob);
    const a = document.createElement('a');
    a.href = url;
    a.download = outputFileName;
    a.click();
    URL.revokeObjectURL(url);
  };

  return (
    <div style={{ textAlign: 'center', height: '300px' }}>
      <h1>Show Worksheet</h1>
      <button onClick={showSheet}>
        Start
      </button>
    </div>
  );
}

export default App;
Unhide Sheet2 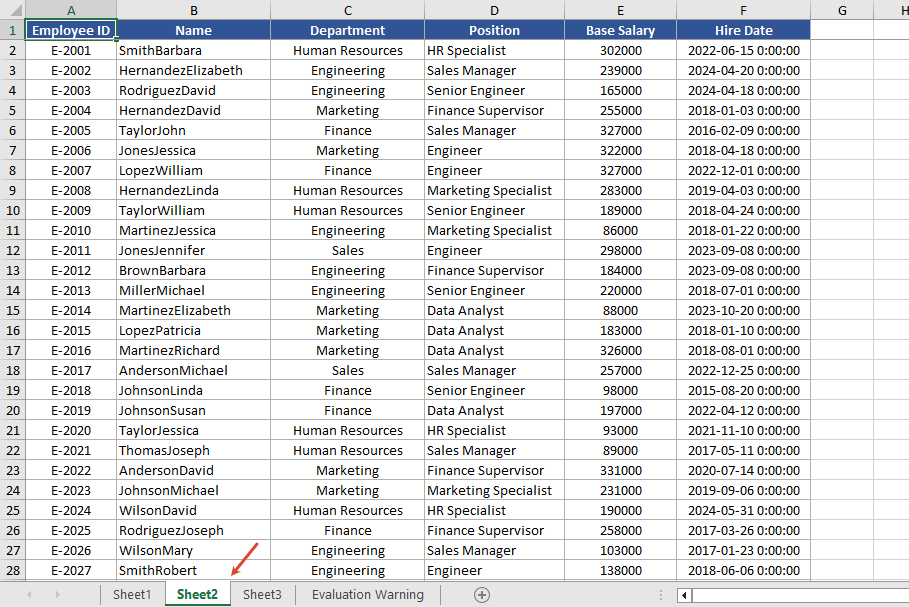
Control Whether to Include Hidden Worksheets When Converting to HTML
When converting to HTML, you can use the skipHideSheet parameter of the SaveToHtml method to control whether hidden worksheets are included in the conversion result. When set to false, the generated HTML includes hidden worksheets; when set to true, hidden worksheets are skipped and only visible worksheets remain in the HTML.
function App() {
  const saveToHtml = async () => {
    // Get the Spire.XLS WASM module
    const xlsModule = window.wasmModule?.spirexls;

    // Check if the module is ready
    if (!xlsModule) {
      alert('Spire.Xls is not ready yet');
      return;
    }

    // Load the font and Excel file into VFS
    await window.spire.FetchFileToVFS('ARIAL.TTF', '/Library/Fonts/', `${process.env.PUBLIC_URL}/font/`);
    const inputFileName = 'HideOrShowWorksheet.xlsx';
    await window.spire.FetchFileToVFS(inputFileName, '', `${process.env.PUBLIC_URL}data/`);

    // Load the workbook
    const workbook = new xlsModule.Workbook();
    workbook.LoadFromFile({ fileName: inputFileName });

    // Hide the worksheet named "Sheet1"
    let sheet1 = workbook.Worksheets.get("Sheet1");
    sheet1.Visibility = xlsModule.WorksheetVisibility.Hidden;

    // Set the output HTML file name
    const result = "result.html";

    // false --- Save HTML with hidden worksheets
    // true --- Save HTML without hidden worksheets
    workbook.SaveToHtml({
      fileName: result,
      skipHideSheet: false
    });

    // Dispose of the workbook object to release resources
    workbook.Dispose();

    // Read the converted file from VFS and trigger the download
    const fileArray = window.dotnetRuntime.Module.FS.readFile(result);
    const blob = new Blob([fileArray], { type: 'text/html' });
    const url = URL.createObjectURL(blob);
    const a = document.createElement('a');
    a.href = url;
    a.download = result;
    a.click();
    URL.revokeObjectURL(url);
  };

  return (
    <div style={{ textAlign: 'center', height: '300px' }}>
      <h1>Convert Workbook to HTML</h1>
      <button onClick={saveToHtml}>
        Start
      </button>
    </div>
  );
}

export default App;
After conversion 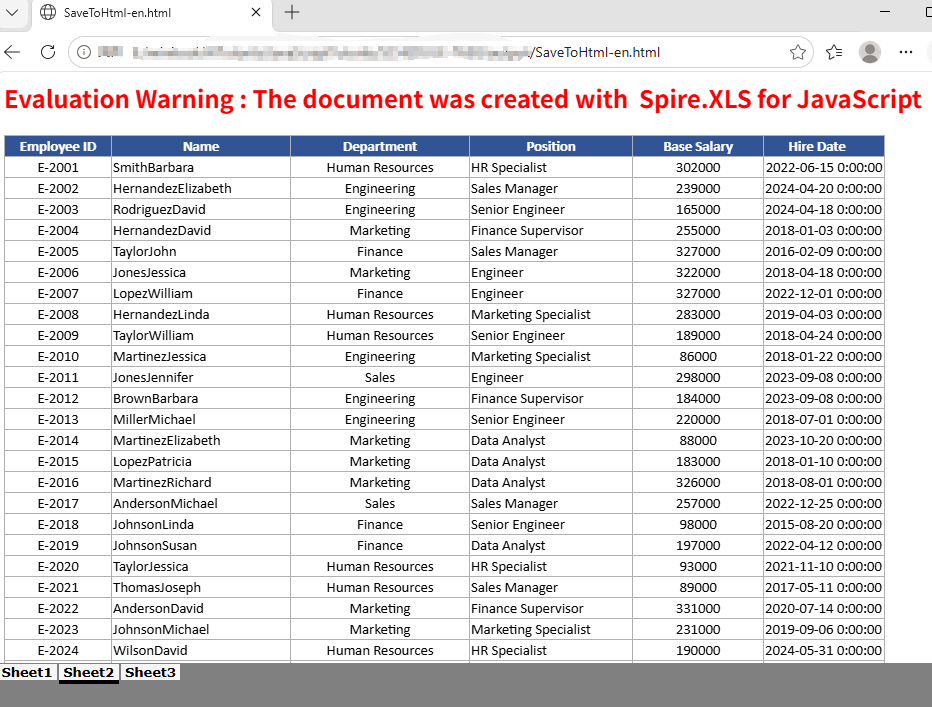
FAQ
The HTML conversion result contains extra worksheets
Cause: The original Excel document has multiple hidden worksheets. When the skipHideSheet parameter of SaveToHtml is set to false, all hidden worksheets appear in the conversion result.
Solution: You can use the following code to iterate through and check the hidden state of all sheets in the Excel file.
    const sheetCount = workbook.Worksheets.Count;
    for (let i = 0; i < sheetCount; i++) {
        let sheet = workbook.Worksheets.get(i);
        const visibility = sheet.Visibility;
    }
Get a Free License
If you want to remove the evaluation message in the generated documents or get rid of functional limitations, please contact us to get a temporary license valid for 30 days.
Combining PDF files is a common requirement in document management applications. For example, a React application may need to assemble invoices, reports, contracts, or scanned pages into a single PDF before the file is archived or shared. When the source documents do not need to be uploaded to a server, performing the operation in the browser can also simplify the workflow.
In this tutorial, you will learn how to merge PDF documents in a React application using Spire.PDF for JavaScript. The first example combines several complete PDF files in one operation. The second example provides more precise control by taking selected pages from different PDFs and adding them to a new document.
On this page:
- Install Spire.PDF for JavaScript in a React Project
- Merge Multiple PDF Documents in React
- Merge Selected Pages from Different PDF Documents in React
- Important Implementation Notes
- Conclusion
Install Spire.PDF for JavaScript in a React Project
Open a terminal in the root directory of your React project and install the spire.office package:
npm i spire.office
After the installation is complete, copy the following runtime files and folder from the installed package to the React project's public folder:
public/
├── _framework/
├── spire.pdf.js
├── Spire.Pdf.Wasm.zip
├── spire.common.js
└── Spire.Common.Wasm.zip
The JavaScript loader, WebAssembly resources, and supporting framework files must remain accessible as static assets when the application runs. For detailed setup instructions and the exact integration process, see How to Integrate Spire.PDF for JavaScript in a React Project.
For the examples in this article, also place the input PDF files in the public folder so that the application can retrieve them with fetch():
public/
├── input_1.pdf
├── input_2.pdf
├── input_3.pdf
└── ...
Merge Multiple PDF Documents in React
If every page in every source file should appear in the result, the most direct approach is to use the PdfMerger.Merge() method. It accepts an array of input file paths, merges the files in the order in which they appear in the array, and writes the result to the WebAssembly virtual file system.
The following React component merges input_1.pdf, input_2.pdf, and input_3.pdf into a single document named MergedPdf.pdf:
import React, { useState, useEffect } from 'react';

function App() {
  const [wasmModule, setWasmModule] = useState(null);
  const [isGenerating, setIsGenerating] = useState(false);
  const [errorMessage, setErrorMessage] = useState('');

  useEffect(() => {
    (async () => {
      try {
        const publicUrl = process.env.PUBLIC_URL || '';
        const spireModule = await import(/* webpackIgnore: true */ `${publicUrl}/spire.pdf.js`);
        const rawModule = spireModule.default || spireModule;
        window.wasmModule = typeof rawModule === 'function'
          ? await rawModule({ locateFile: p => p.endsWith('.wasm') ? `${publicUrl}/${p}` : p })
          : rawModule;
        setWasmModule(window.wasmModule);
      } catch (error) {
        console.error('Failed to load spire.pdf.js:', error);
      }
    })();
  }, []);

  const loadPdfToVfs = async (fileName) => {
    const publicUrl = process.env.PUBLIC_URL || '';
    const response = await fetch(`${publicUrl}/${fileName}`);

    if (!response.ok) {
      throw new Error(`Failed to load ${fileName}: ${response.status} ${response.statusText}`);
    }

    const fileBytes = new Uint8Array(await response.arrayBuffer());
    const pdfHeader = String.fromCharCode(...fileBytes.slice(0, 4));

    if (pdfHeader !== '%PDF') {
      throw new Error(`${fileName} was loaded, but it is not a valid PDF file.`);
    }

    window.dotnetRuntime.Module.FS.writeFile(fileName, fileBytes, { flags: 'w+' });
    return fileName;
  };

  const MergePdfs = async () => {
    const wasmModule = window.wasmModule?.spirepdf;
    if (!wasmModule || isGenerating) {
      return;
    }

    setIsGenerating(true);
    setErrorMessage('');

    try {
      const inputFiles = await Promise.all([
        loadPdfToVfs('input_1.pdf'),
        loadPdfToVfs('input_2.pdf'),
        loadPdfToVfs('input_3.pdf'),
      ]);

      const outputFileName = 'MergedPdf.pdf';
      const mergeOp = new wasmModule.MergerOptions();
      wasmModule.PdfMerger.Merge({
        inputFiles,
        outputFile: outputFileName,
        pdfMergeOptions: mergeOp
      });

      const modifiedFileArray = window.dotnetRuntime.Module.FS.readFile(outputFileName);
      const modifiedFile = new Blob([modifiedFileArray], { type: 'application/pdf' });
      const url = URL.createObjectURL(modifiedFile);
      const a = document.createElement('a');

      a.href = url;
      a.download = outputFileName;
      document.body.appendChild(a);
      a.click();
      document.body.removeChild(a);
      URL.revokeObjectURL(url);
    } catch (error) {
      console.error('Failed to merge PDFs:', error);
      setErrorMessage(error.message || 'Failed to merge PDFs.');
    } finally {
      setIsGenerating(false);
    }
  };

  return (
    <div style={{ textAlign: 'center', height: '300px' }}>
      <h1>Merge PDF Documents in React</h1>
      <button onClick={MergePdfs} disabled={!wasmModule || isGenerating}>
        {isGenerating ? 'Generating...' : 'Generate'}
      </button>
      {errorMessage && <p style={{ color: 'crimson' }}>{errorMessage}</p>}
    </div>
  );
}

export default App;
Output:
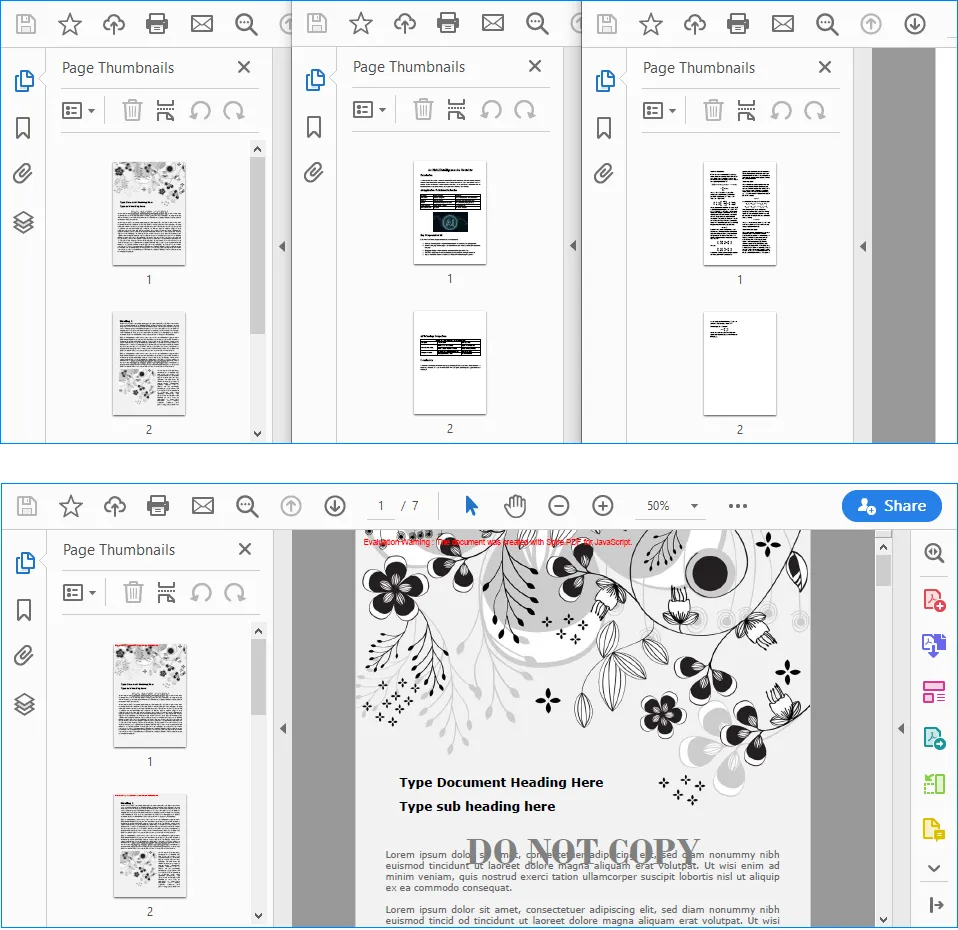
How the Code Works
The component first loads spire.pdf.js inside useEffect(). Because the module is initialized asynchronously, the Generate button remains disabled until the runtime is ready.
The loadPdfToVfs() function then performs three tasks for each source document:
- It retrieves the PDF from the
publicdirectory withfetch(). - It checks the first four bytes for the
%PDFsignature to help catch missing files or non-PDF responses. - It writes the file bytes to the WebAssembly virtual file system, where Spire.PDF can access them.
After all three files have been loaded, PdfMerger.Merge() combines them in the order specified by inputFiles. The output is read from the virtual file system, converted to a PDF Blob, and downloaded through a temporary object URL.
To change the merge order, simply rearrange the entries in the array. For example, the following order would place input_3.pdf first:
const inputFiles = await Promise.all([
  loadPdfToVfs('input_3.pdf'),
  loadPdfToVfs('input_1.pdf'),
  loadPdfToVfs('input_2.pdf'),
]);
Merge Selected Pages from Different PDF Documents in React
Merging complete documents is not always necessary. You may instead need to create a new PDF from a cover page in one file and a page range in another file. In this situation, load the source files as PdfDocument objects and use InsertPage() and InsertPageRange() to construct the output document.
The following example takes the first page from input_1.pdf, appends every page from input_2.pdf, and saves the selected content as MergedPdf.pdf:
import React, { useState, useEffect } from 'react';

function App() {
  const [wasmModule, setWasmModule] = useState(null);
  const [isGenerating, setIsGenerating] = useState(false);
  const [errorMessage, setErrorMessage] = useState('');

  useEffect(() => {
    (async () => {
      try {
        const publicUrl = process.env.PUBLIC_URL || '';
        const spireModule = await import(/* webpackIgnore: true */ `${publicUrl}/spire.pdf.js`);
        const rawModule = spireModule.default || spireModule;
        window.wasmModule = typeof rawModule === 'function'
          ? await rawModule({ locateFile: p => p.endsWith('.wasm') ? `${publicUrl}/${p}` : p })
          : rawModule;
        setWasmModule(window.wasmModule);
      } catch (error) {
        console.error('Failed to load spire.pdf.js:', error);
      }
    })();
  }, []);

  const loadPdfToVfs = async (fileName) => {
    const publicUrl = process.env.PUBLIC_URL || '';
    const response = await fetch(`${publicUrl}/${fileName}`);

    if (!response.ok) {
      throw new Error(`Failed to load ${fileName}: ${response.status} ${response.statusText}`);
    }

    const fileBytes = new Uint8Array(await response.arrayBuffer());
    const pdfHeader = String.fromCharCode(...fileBytes.slice(0, 4));

    if (pdfHeader !== '%PDF') {
      throw new Error(`${fileName} was loaded, but it is not a valid PDF file.`);
    }

    window.dotnetRuntime.Module.FS.writeFile(fileName, fileBytes, { flags: 'w+' });
    return fileName;
  };

  const MergePdfs = async () => {
    const wasmModule = window.wasmModule?.spirepdf;
    if (!wasmModule || isGenerating) {
      return;
    }

    setIsGenerating(true);
    setErrorMessage('');

    try {
      const [firstInputFile, secondInputFile] = await Promise.all([
        loadPdfToVfs('input_1.pdf'),
        loadPdfToVfs('input_2.pdf'),
      ]);

      const outputFileName = 'MergedPdf.pdf';
      const firstDocument = new wasmModule.PdfDocument();
      const secondDocument = new wasmModule.PdfDocument();
      const mergedDocument = new wasmModule.PdfDocument();

      firstDocument.LoadFromFile({ fileName: firstInputFile });
      secondDocument.LoadFromFile({ fileName: secondInputFile });

      if (firstDocument.Pages.Count < 1) {
        throw new Error('The first PDF does not contain any pages.');
      }

      if (secondDocument.Pages.Count < 1) {
        throw new Error('The second PDF does not contain any pages.');
      }

      mergedDocument.InsertPage({ ldDoc: firstDocument, pageIndex: 0 });
      mergedDocument.InsertPageRange(secondDocument, 0, secondDocument.Pages.Count - 1);
      mergedDocument.SaveToFile({ fileName: outputFileName });

      const modifiedFileArray = window.dotnetRuntime.Module.FS.readFile(outputFileName);
      const modifiedFile = new Blob([modifiedFileArray], { type: 'application/pdf' });
      const url = URL.createObjectURL(modifiedFile);
      const a = document.createElement('a');

      a.href = url;
      a.download = outputFileName;
      document.body.appendChild(a);
      a.click();
      document.body.removeChild(a);
      URL.revokeObjectURL(url);
    } catch (error) {
      console.error('Failed to merge PDFs:', error);
      setErrorMessage(error.message || 'Failed to merge PDFs.');
    } finally {
      setIsGenerating(false);
    }
  };

  return (
    <div style={{ textAlign: 'center', height: '300px' }}>
      <h1>Merge PDF Documents in React</h1>
      <button onClick={MergePdfs} disabled={!wasmModule || isGenerating}>
        {isGenerating ? 'Generating...' : 'Generate'}
      </button>
      {errorMessage && <p style={{ color: 'crimson' }}>{errorMessage}</p>}
    </div>
  );
}

export default App;
Output:
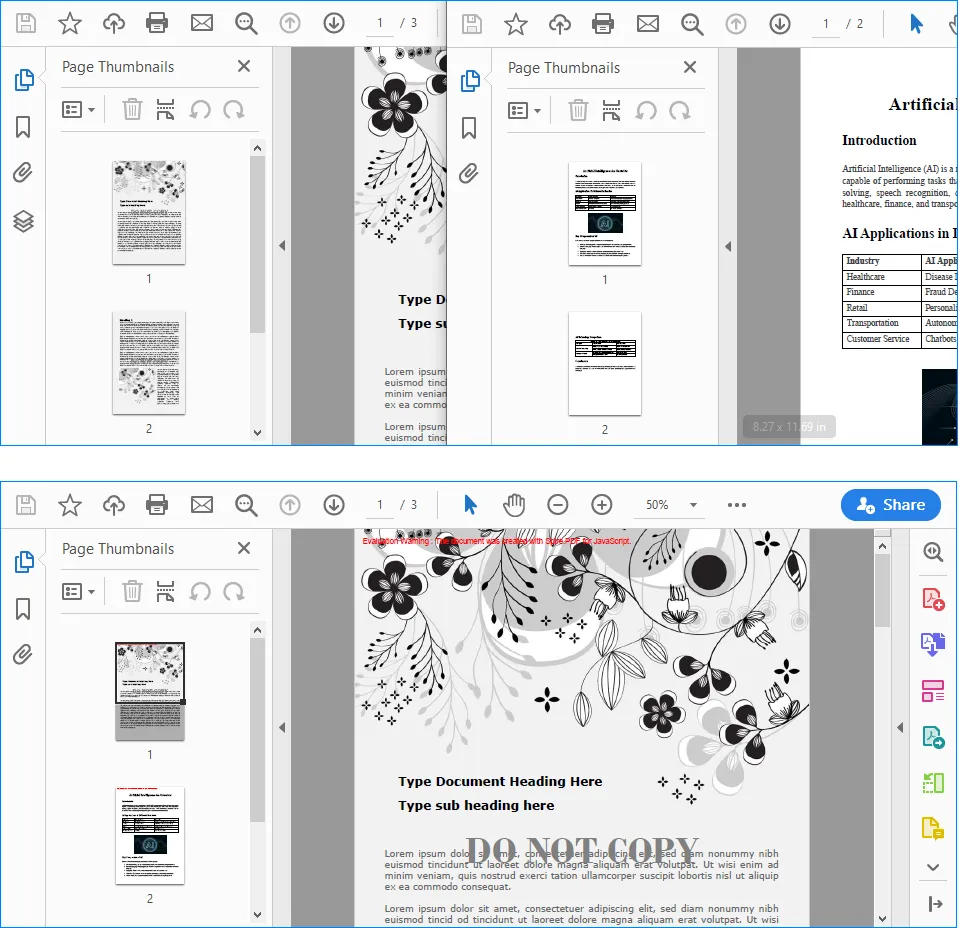
Understanding the Page Selection Logic
The three PdfDocument instances have different roles:
firstDocumentrepresentsinput_1.pdf.secondDocumentrepresentsinput_2.pdf.mergedDocumentis the new PDF that receives the selected pages.
PDF page indexes are zero-based in this example. Therefore, pageIndex: 0 refers to the first page:
mergedDocument.InsertPage({ ldDoc: firstDocument, pageIndex: 0 });
The following statement inserts a continuous range from secondDocument. Its start index is 0, while its end index is secondDocument.Pages.Count - 1, so the complete document is appended:
mergedDocument.InsertPageRange(
  secondDocument,
  0,
  secondDocument.Pages.Count - 1
);
You can change these indexes to merge only the pages required by your application. For instance, this statement inserts pages 2 through 5 from secondDocument because their zero-based indexes are 1 through 4:
mergedDocument.InsertPageRange(secondDocument, 1, 4);
Before using fixed page indexes, make sure the source document contains enough pages. The sample already checks for empty PDFs, but a production application should also validate user-supplied start and end indexes against Pages.Count.
Important Implementation Notes
Keep Runtime and Input Paths Correct
Files stored in the React public directory are requested by URL at runtime. The code uses process.env.PUBLIC_URL so it can construct paths correctly when the application is deployed under a non-root public path. A missing or incorrect file path may return an HTML error page instead of a PDF, which is why the sample verifies the %PDF header before writing the data to the virtual file system.
Wait for WebAssembly Initialization
Spire.PDF cannot process a document until its runtime has finished loading. The wasmModule state controls the button's disabled status, while isGenerating prevents the same operation from being started repeatedly before the current merge has finished.
Validate Page Ranges
When pages are chosen dynamically, check that the start and end indexes are non-negative, that the start index does not exceed the end index, and that both values fall within the source document's page count. This avoids invalid range errors and makes it easier to show a useful message in the React interface.
Release the Download URL
URL.createObjectURL() creates a temporary URL for the generated Blob. Calling URL.revokeObjectURL(url) after the download starts releases that URL and prevents it from remaining in browser memory longer than necessary.
Conclusion
Spire.PDF for JavaScript enables React applications to combine PDF content through a WebAssembly-based workflow. When all pages are required, PdfMerger.Merge() provides a concise way to merge several complete documents in a defined order. When the output must contain only specific content, PdfDocument, InsertPage(), and InsertPageRange() provide page-level control over the result.
With the runtime files configured in the public directory, these techniques can be integrated into document portals, reporting tools, contract workflows, and other React applications that need to assemble PDFs directly in the browser.
Convert Excel to ODS or ODS to Excel with JavaScript in React
2026-08-18 02:51:43 Written by jie zouIn daily office work, data often needs to be exchanged between Excel spreadsheets and OpenDocument spreadsheets (ODS). ODS is an open-standard spreadsheet format widely used in open-source office software such as LibreOffice and OpenOffice. Spire.XLS for JavaScript runs entirely in the browser via WebAssembly, using a virtual file system (VFS) to manage input and output files — no backend server is required. It provides simple, easy-to-use APIs that make format conversion more convenient.
With Spire.XLS for JavaScript, you can save an Excel workbook as ODS format to work seamlessly with open-source office software, or import an ODS file to create a fully formatted Excel workbook. This makes data migration between different applications more convenient and efficient.
This article covers two core features:
For installation and project setup, refer to Integrating Spire.XLS for JavaScript in a React Project. The examples below assume Spire.XLS is installed and the WebAssembly module is initialized.
Convert Excel Workbook to ODS File
Exporting Excel data as ODS format makes it easy to open and edit directly in open-source office software such as LibreOffice and OpenOffice. With Spire.XLS for JavaScript, you can save an entire workbook as an ODS file, preserving table structure, styles, and data while enabling cross-platform data sharing. The steps are as follows:
- Create a
Workbookobject and load an existing Excel file. - Call the workbook's
SaveToFile()method, specifying the output filename and theFileFormat.ODSfile format. - Dispose of the workbook resources, read the result file from VFS, and trigger the download.
Below is a complete code example demonstrating how to convert Excel to ODS in React:
function App() {
  const convertToODS = async () => {
    // Get the Spire.XLS WASM module
    const xlsModule = window.wasmModule?.spirexls;

    // Check if the module is ready
    if (!xlsModule) {
      alert('Spire.Xls is not ready yet');
      return;
    }

    // Load the font file to ensure proper text rendering
    await window.spire.FetchFileToVFS('ARIAL.TTF', '/Library/Fonts/', `${process.env.PUBLIC_URL}font/`);

    // Load the sample Excel file into VFS
    await window.spire.FetchFileToVFS('Sample.xlsx', '', `${process.env.PUBLIC_URL}data/`);

    // Create a workbook object and load the Excel file
    const workbook = new xlsModule.Workbook();
    workbook.LoadFromFile({ fileName: 'Sample.xlsx' });

    // Save the workbook as an ODS file
    const outputFileName = 'ExcelToODS.ods';
    workbook.SaveToFile({ fileName: outputFileName, fileFormat: xlsModule.FileFormat.ODS });
    workbook.Dispose();

    // Read the file from VFS and trigger download
    const fileArray = window.dotnetRuntime.Module.FS.readFile(outputFileName);
    const blob = new Blob([fileArray], { type: 'application/vnd.oasis.opendocument.spreadsheet' });
    const url = URL.createObjectURL(blob);
    const a = document.createElement('a');
    a.href = url;
    a.download = outputFileName;
    a.click();
    URL.revokeObjectURL(url);
  };

  return (
    <div style={{ textAlign: 'center', height: '300px' }}>
      <h1>Convert Excel to ODS</h1>
      <button onClick={convertToODS}>
        Generate
      </button>
    </div>
  );
}

export default App;
Excel converted to ODS with Spire.XLS for JavaScript
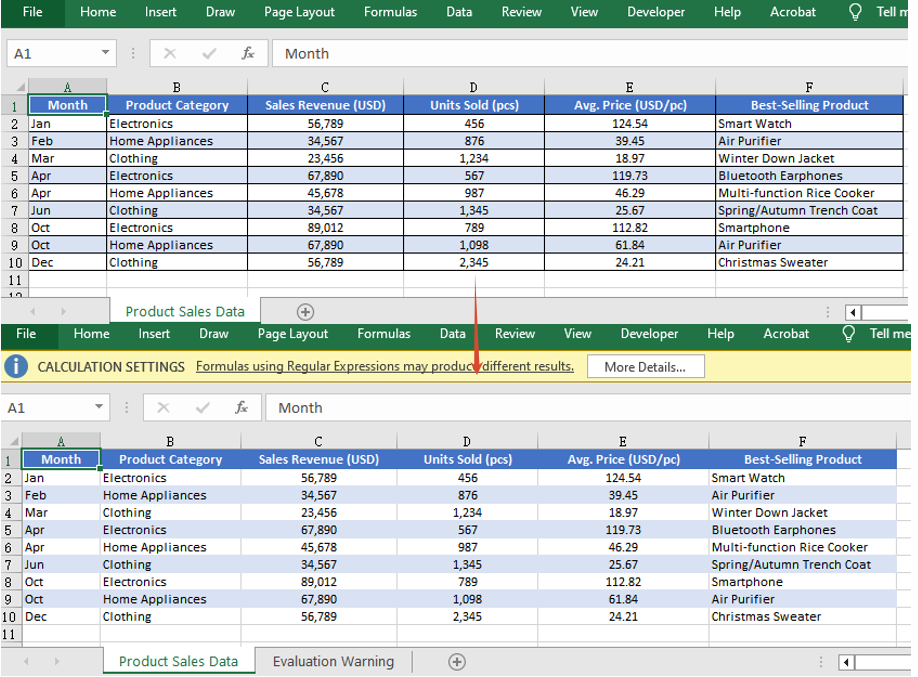
Convert ODS File to Excel Workbook
Importing an ODS file into an Excel spreadsheet allows you to take full advantage of Excel's powerful formatting, calculation, and charting capabilities. Spire.XLS for JavaScript supports loading an ODS file directly via the LoadFromFile() method, which automatically detects its file format, and then you can save the workbook as an Excel file. The steps are as follows:
- Load the font file and ODS sample file into the VFS.
- Create a
Workbookobject and load the ODS file via theLoadFromFile()method. - Save the workbook as an Excel file and trigger the download.
Below is a complete code example demonstrating how to convert ODS to Excel in React:
function App() {
  const convertToExcel = async () => {
    // Get the Spire.XLS WASM module
    const xlsModule = window.wasmModule?.spirexls;

    // Check if the module is ready
    if (!xlsModule) {
      alert('Spire.Xls is not ready yet');
      return;
    }

    // Load the font file to ensure proper text rendering
    await window.spire.FetchFileToVFS('ARIAL.TTF', '/Library/Fonts/', `${process.env.PUBLIC_URL}font/`);

    // Load the ODS sample file into VFS
    await window.spire.FetchFileToVFS('Sample.ods', '', `${process.env.PUBLIC_URL}data/`);

    // Create a workbook object and load the ODS file
    const workbook = new xlsModule.Workbook();
    workbook.LoadFromFile({ fileName: 'Sample.ods' });

    // Save the workbook and release resources
    const outputFileName = 'ODSToExcel.xlsx';
    workbook.SaveToFile({ fileName: outputFileName, version: xlsModule.ExcelVersion.Version2010 });
    workbook.Dispose();

    // Read the file from VFS and trigger download
    const fileArray = window.dotnetRuntime.Module.FS.readFile(outputFileName);
    const blob = new Blob([fileArray], { type: 'application/vnd.openxmlformats-officedocument.spreadsheetml.sheet' });
    const url = URL.createObjectURL(blob);
    const a = document.createElement('a');
    a.href = url;
    a.download = outputFileName;
    a.click();
    URL.revokeObjectURL(url);
  };

  return (
    <div style={{ textAlign: 'center', height: '300px' }}>
      <h1>Convert ODS to Excel</h1>
      <button onClick={convertToExcel}>
        Generate
      </button>
    </div>
  );
}

export default App;
ODS converted to Excel with Spire.XLS for JavaScript

FAQ
Why can't the generated ODS file be opened properly?
Cause: When saving the workbook with the SaveToFile() method, if the correct output file format is not specified via the fileFormat parameter, the generated file format may not match the extension, causing it to fail to open.
Solution: Specify the specific file format enum value xlsModule.FileFormat.ODS when saving as ODS:
const outputFileName = 'ExcelToODS.ods';
workbook.SaveToFile({ fileName: outputFileName, fileFormat: xlsModule.FileFormat.ODS });
How to handle the downloaded ODS file being opened as another type or unrecognized?
Cause: The MIME type is not set correctly when creating the Blob, so the browser cannot recognize the downloaded file as an ODS document, which may cause it to open as another type or display garbled text.
Solution: Specify the correct MIME type when downloading and make sure the download filename ends with .ods:
const blob = new Blob([fileArray], { type: 'application/vnd.oasis.opendocument.spreadsheet' });
const a = document.createElement('a');
a.href = URL.createObjectURL(blob);
a.download = 'ExcelToODS.ods';
a.click();
Get a Free License
Spire.XLS for JavaScript offers a 30-day full-featured free trial license with no functional limitations. Apply here to evaluate before purchasing.
Create and Save Excel Files through Streams with JavaScript in React
2026-08-14 08:13:24 Written by jie zouOperating Excel files as streams in web applications allows developers to dynamically create, load, modify, and save Excel files, enabling flexible and efficient data processing. Spire.XLS for JavaScript runs entirely in the browser via WebAssembly, using a virtual file system (VFS) to manage input and output files — no backend server is required. It provides a simple, easy-to-use Stream API that makes creating and saving Excel files through streams more convenient.
Working with streams greatly reduces direct disk I/O operations, improving application performance and responsiveness, especially in scenarios that involve real-time data processing or limited storage. With Spire.XLS for JavaScript, you can dynamically create an Excel file and save it to a stream, load and read workbook data from a stream, or modify content in a stream and save it as a new Excel file — all directly in the browser, simplifying data exchange and system integration.
This article covers three core features:
- Dynamically Create an Excel File and Save It to a Stream
- Load and Read an Excel File from a Stream
- Modify and Save an Excel File in a Stream
For installation and project setup, refer to Integrating Spire.XLS for JavaScript in a React Project. The examples below assume Spire.XLS is installed and the WebAssembly module is initialized.
Dynamically Create an Excel File and Save It to a Stream
With Spire.XLS for JavaScript, you can dynamically create an Excel file in the browser, fill it with data and formatting, and then save the workbook to a file stream via the SaveToStream() method. This approach eliminates the need to store files directly on disk while improving application performance and responsiveness. The steps are as follows:
- Create a
Workbookinstance to generate a new Excel workbook, clear the default worksheets, and add a new worksheet. - Access a specific worksheet using the
Worksheets.get()method. - Define the data to write to the worksheet, for example, organizing data with a two-dimensional array.
- Use the
Range.get_Item()method to access cells and set their values one by one. - Format the worksheet cells, such as setting colors, fonts, borders, or adjusting column widths.
- Create a
Streamobject and save the workbook to the file stream using theSaveToStream()method. The saved stream can be used for further processing, such as downloading as a file or transferring over the network.
Below is a complete code example demonstrating how to dynamically create an Excel file and save it to a stream in React:
function App() {
  const createAndSaveToStream = async () => {
    // Get the Spire.XLS WASM module
    const xlsModule = window.wasmModule?.spirexls;

    // Check if the module is ready
    if (!xlsModule) {
      alert('Spire.Xls is not ready yet');
      return;
    }

    // Load the font file to ensure proper text rendering
    await window.spire.FetchFileToVFS('ARIAL.TTF', '/Library/Fonts/', `${process.env.PUBLIC_URL}font/`);

    // Create a new workbook instance
    const workbook = new xlsModule.Workbook();

    // Clear the default worksheets and add a new worksheet
    workbook.Worksheets.Clear();
    const sheet = workbook.Worksheets.Add('Data');

    // Define the sample data to write to the worksheet (two-dimensional array)
    const headers = ['ID', 'Name', 'Age', 'Country', 'Salary (¥)'];
    const data = [
      [1, 'Zhang Wei', 29, 'China', 8000],
      [2, 'Li Na', 35, 'China', 12000],
      [3, 'Wang Qiang', 42, 'China', 15000],
      [4, 'Jack', 26, 'USA', 9500],
      [5, 'Chen Si', 31, 'China', 11000],
      [6, 'Ishihara Yasuko', 28, 'Japan', 8800]
    ];

    // Write the headers to the first row
    for (let col = 0; col < headers.length; col++) {
      sheet.Range.get_Item({ row: 1, column: col + 1 }).Text = headers[col];
    }

    // Write the data to the following rows
    for (let row = 0; row < data.length; row++) {
      for (let col = 0; col < data[row].length; col++) {
        sheet.Range.get_Item({ row: row + 2, column: col + 1 }).Text = String(data[row][col]);
      }
    }

    // Format the header row
    sheet.Range.get('A1:E1').Style.Color = xlsModule.Color.get_LightSkyBlue();
    sheet.Range.get('A1:E1').Style.Font.FontName = 'Arial';
    sheet.Range.get('A1:E1').Style.Font.Size = 12;
    sheet.Range.get('A1:E1').Style.Font.IsBold = true;

    // Format the data rows
    for (let i = 2; i <= data.length + 1; i++) {
      const dataRange = sheet.Range.get({
        row: i, column: 1,
        lastRow: i, lastColumn: headers.length
      });
      dataRange.Style.Color = xlsModule.Color.get_LightGray();
      dataRange.Style.Font.FontName = 'Arial';
      dataRange.Style.Font.Size = 11;
    }

    // Add borders to the header and all data cells
    const usedRange = sheet.Range.get({
      row: 1, column: 1,
      lastRow: data.length + 1,
      lastColumn: headers.length
    });
    usedRange.Borders.LineStyle = xlsModule.LineStyleType.Thin;
    usedRange.Borders.Color = xlsModule.Color.get_LightSteelBlue();

    // Adjust column widths to fit the content
    for (let col = 1; col <= headers.length; col++) {
      sheet.AutoFitColumn(col);
    }

    // Create a stream and save the workbook to it
    const outputFileName = 'CreateExcelToStream.xlsx';
    const fileStream = new xlsModule.Stream(outputFileName);
    workbook.SaveToStream(fileStream, xlsModule.FileFormat.Version2010);

    // Dispose of the workbook object to release resources
    workbook.Dispose();

    // Read the file from VFS and trigger download
    const fileArray = window.dotnetRuntime.Module.FS.readFile(outputFileName);
    const blob = new Blob([fileArray], { type: 'application/vnd.openxmlformats-officedocument.spreadsheetml.sheet' });
    const url = URL.createObjectURL(blob);
    const a = document.createElement('a');
    a.href = url;
    a.download = outputFileName;
    a.click();
    URL.revokeObjectURL(url);
  };

  return (
    <div style={{ textAlign: 'center', height: '300px' }}>
      <h1>Create Excel and Save to Stream</h1>
      <button onClick={createAndSaveToStream}>
        Generate
      </button>
    </div>
  );
}

export default App;
Excel file dynamically created and saved to a stream with Spire.XLS for JavaScript
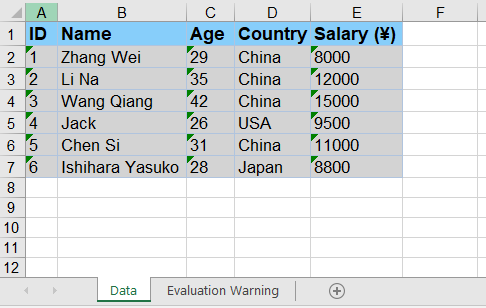
Load and Read an Excel File from a Stream
With Spire.XLS for JavaScript, you can load an Excel file directly from a stream using the LoadFromStream() method. Once loaded, the cell data of the Excel file in the stream can be easily read, enabling fast and flexible data processing without file I/O operations. The steps are as follows:
- Create a
Streamobject pointing to the Excel file to be loaded. - Create a
Workbookobject and load the file from the stream using theLoadFromStream()method. - Get the first worksheet using the
Worksheets.get()method. - Iterate through the rows and columns of the worksheet and extract cell data using the
Range.get()method. - Display the extracted data on the page, or use it for other operations.
Below is a complete code example demonstrating how to load and read an Excel file from a stream in React:
import React, { useState } from 'react';

function App() {
  const [extractedData, setExtractedData] = useState('');

  const loadAndReadFromStream = async () => {
    // Get the Spire.XLS WASM module
    const xlsModule = window.wasmModule?.spirexls;

    // Check if the module is ready
    if (!xlsModule) {
      alert('Spire.Xls is not ready yet');
      return;
    }

    // Load the font file to ensure proper text rendering
    await window.spire.FetchFileToVFS('ARIAL.TTF', '/Library/Fonts/', `${process.env.PUBLIC_URL}font/`);

    // Load the sample Excel file into VFS
    await window.spire.FetchFileToVFS('Sample.xlsx', '', `${process.env.PUBLIC_URL}data/`);

    // Create a workbook object and load the Excel file from a stream
    const workbook = new xlsModule.Workbook();
    const fileStream = new xlsModule.Stream('Sample.xlsx');
    workbook.LoadFromStream(fileStream, xlsModule.FileFormat.Auto);

    // Get the first worksheet of the workbook
    const sheet = workbook.Worksheets.get(0);

    // Iterate through the rows and columns to extract cell data
    const data = [];
    for (let row = sheet.FirstRow; row <= sheet.LastRow; row++) {
      const line = [];
      for (let col = sheet.FirstColumn; col <= sheet.LastColumn; col++) {
        line.push(sheet.Range.get({ row: row, column: col }).Text);
      }
      data.push(line.join(' | '));
    }

    // Dispose of the workbook object to release resources
    workbook.Dispose();

    // Display the extracted data on the page
    setExtractedData(data.join('\n'));
  };

  return (
    <div style={{ textAlign: 'center', height: '300px' }}>
      <h1>Load and Read Excel Data from Stream</h1>
      <button onClick={loadAndReadFromStream}>
        Read
      </button>
      <pre style={{ marginTop: '20px', textAlign: 'left' }}>{extractedData}</pre>
    </div>
  );
}

export default App;
Excel file loaded and read from a stream with Spire.XLS for JavaScript
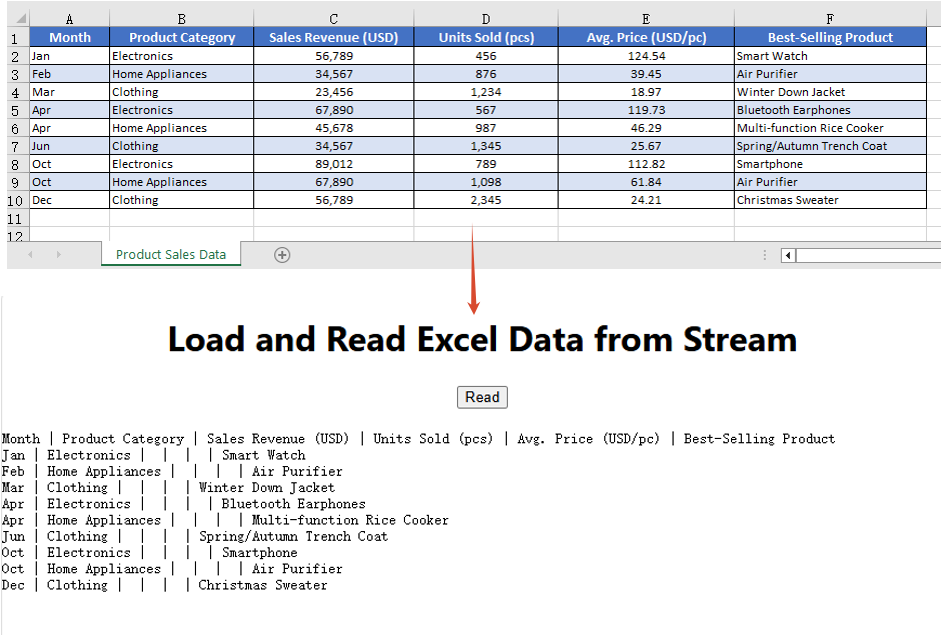
Modify and Save an Excel File in a Stream
With Spire.XLS for JavaScript, you can modify an Excel file in memory. First load the Excel file in the stream into a Workbook object via the LoadFromStream() method; after completing modifications such as changing cell styles or content, save the file back to a stream using the SaveToStream() method. This enables real-time changes to Excel file data without relying on direct file storage operations. The steps are as follows:
- Create a
Streamobject pointing to the Excel file and load the file from the stream via theLoadFromStream()method. - Access the worksheet using the
Worksheets.get()method. - Modify the styles of the header row and data rows (font name, size, background color, etc.) through the
CellRange.Styleproperty. - Use the
AutoFitColumn()method to automatically adjust column widths to fit the content. - Set the border style of the cells.
- Create a new
Streamobject, save the modified workbook to the stream using theSaveToStream()method, read the result file from VFS, and trigger the download.
Below is a complete code example demonstrating how to modify and save an Excel file in a stream in React:
function App() {
  const modifyAndSaveInStream = async () => {
    // Get the Spire.XLS WASM module
    const xlsModule = window.wasmModule?.spirexls;

    // Check if the module is ready
    if (!xlsModule) {
      alert('Spire.Xls is not ready yet');
      return;
    }

    // Load the font file to ensure proper text rendering
    await window.spire.FetchFileToVFS('ARIAL.TTF', '/Library/Fonts/', `${process.env.PUBLIC_URL}font/`);

    // Load the sample Excel file into VFS
    await window.spire.FetchFileToVFS('Sample.xlsx', '', `${process.env.PUBLIC_URL}data/`);

    // Create a workbook object and load the Excel file from a stream
    const workbook = new xlsModule.Workbook();
    const fileStream = new xlsModule.Stream('Sample.xlsx');
    workbook.LoadFromStream(fileStream, xlsModule.FileFormat.Auto);

    // Get the first worksheet of the workbook
    const sheet = workbook.Worksheets.get(0);

    // Modify the style of the header row
    const headerRow = sheet.Range.get({
      row: sheet.FirstRow, column: sheet.FirstColumn,
      lastRow: sheet.FirstRow, lastColumn: sheet.LastColumn
    });
    headerRow.Style.Font.FontName = 'Arial';
    headerRow.Style.Font.Size = 12;
    headerRow.Style.Font.IsBold = true;
    headerRow.Style.Color = xlsModule.Color.get_LightSkyBlue();

    // Modify the styles of the data rows, with alternating colors (even rows)
    for (let i = sheet.FirstRow + 1; i <= sheet.LastRow; i++) {
      const dataRow = sheet.Range.get({
        row: i, column: sheet.FirstColumn,
        lastRow: i, lastColumn: sheet.LastColumn
      });
      dataRow.Style.Font.FontName = 'Arial';
      dataRow.Style.Font.Size = 10;
      dataRow.Style.Color = xlsModule.Color.get_LightGray();
      if (i % 2 === 0) {
        dataRow.Style.Color = xlsModule.Color.get_DarkGray();
      }
    }

    // Adjust column widths to fit the content
    for (let col = sheet.FirstColumn; col <= sheet.LastColumn; col++) {
      sheet.AutoFitColumn(col);
    }

    // Set the border color
    sheet.AllocatedRange.Borders.Color = xlsModule.Color.get_White();

    // Save the modified workbook to a new stream
    const outputFileName = 'ModifyExcelInStream.xlsx';
    const outStream = new xlsModule.Stream(outputFileName);
    workbook.SaveToStream(outStream, xlsModule.FileFormat.Version2010);

    // Dispose of the workbook object to release resources
    workbook.Dispose();

    // Read the file from VFS and trigger download
    const fileArray = window.dotnetRuntime.Module.FS.readFile(outputFileName);
    const blob = new Blob([fileArray], { type: 'application/vnd.openxmlformats-officedocument.spreadsheetml.sheet' });
    const url = URL.createObjectURL(blob);
    const a = document.createElement('a');
    a.href = url;
    a.download = outputFileName;
    a.click();
    URL.revokeObjectURL(url);
  };

  return (
    <div style={{ textAlign: 'center', height: '300px' }}>
      <h1>Modify and Save Excel in Stream</h1>
      <button onClick={modifyAndSaveInStream}>
        Generate
      </button>
    </div>
  );
}

export default App;
Excel file modified and saved in a stream with Spire.XLS for JavaScript
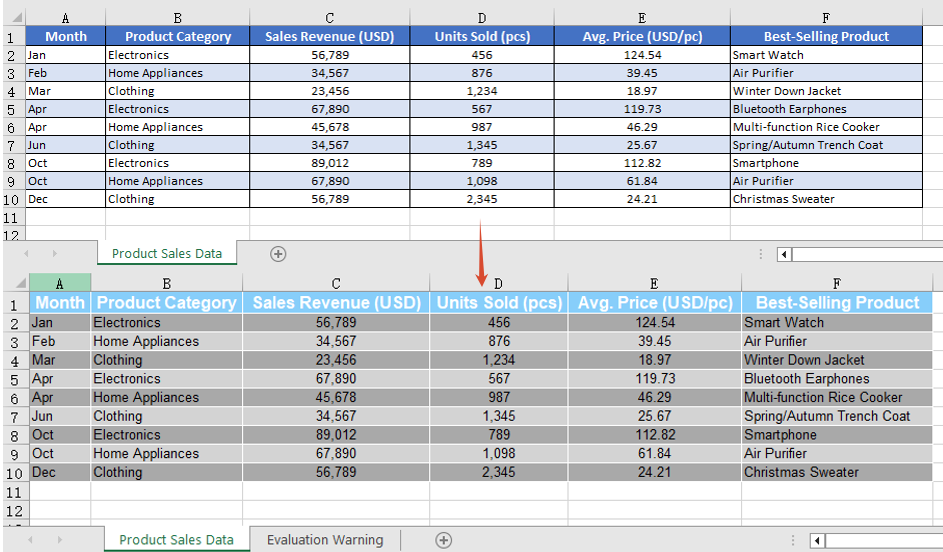
FAQ
How to handle the stream-saved file being unable to open in Excel?
Cause: When saving a workbook via the SaveToStream() method, if the correct output file format is not specified through the FileFormat parameter, the generated file format may not match its extension, causing it to fail to open properly.
Solution: Specify a concrete file format enum value when saving to a stream, such as xlsModule.FileFormat.Version2010:
const fileStream = new xlsModule.Stream(outputFileName);
workbook.SaveToStream(fileStream, xlsModule.FileFormat.Version2010);
How to ensure the workbook loaded from a stream correctly recognizes the file format?
Cause: The LoadFromStream() method needs to identify the file type based on the actual format of the stream data. If the format parameter is set incorrectly, loading may fail or data parsing may produce errors.
Solution: Use xlsModule.FileFormat.Auto when loading so that the library automatically detects the format of the file in the stream:
const fileStream = new xlsModule.Stream('Sample.xlsx');
workbook.LoadFromStream(fileStream, xlsModule.FileFormat.Auto);
Get a Free License
Spire.XLS for JavaScript offers a 30-day full-featured free trial license with no functional limitations. Apply here to evaluate before purchasing.
Convert Excel to Markdown or Markdown to Excel with JavaScript in React
2026-08-14 08:08:14 Written by jie zouIn daily office work, data often needs to be exchanged between Excel spreadsheets and Markdown files. Markdown is a lightweight markup language widely used for documentation, blogs, and technical notes. Spire.XLS for JavaScript runs entirely in the browser via WebAssembly, using a virtual file system (VFS) to manage input and output files — no backend server is required. It provides simple, easy-to-use APIs that make format conversion more convenient.
With Spire.XLS for JavaScript, you can export Excel worksheet data as well-structured, easy-to-read Markdown tables, or import Markdown files containing table syntax to create fully formatted Excel workbooks. This makes data migration between different applications more convenient and efficient.
This article covers two core features:
For installation and project setup, refer to Integrating Spire.XLS for JavaScript in a React Project. The examples below assume Spire.XLS is installed and the WebAssembly module is initialized.
Convert Excel Workbook to Markdown File
Exporting Excel data as a Markdown table makes it convenient to read and share spreadsheet data directly in documents, blogs, or version control systems. With Spire.XLS for JavaScript, you can save an entire workbook as a Markdown file, and the resulting table is well-structured and easy to maintain. The steps are as follows:
- Create a
Workbookobject and load an existing Excel file. - Call the workbook's
SaveToFile()method, specifying the output filename and theFileFormat.Markdownfile format. - Dispose of the workbook resources, read the result file from VFS, and trigger the download.
Below is a complete code example demonstrating how to convert Excel to Markdown in React:
function App() {
  const convertToMarkdown = async () => {
    // Get the Spire.XLS WASM module
    const xlsModule = window.wasmModule?.spirexls;

    // Check if the module is ready
    if (!xlsModule) {
      alert('Spire.Xls is not ready yet');
      return;
    }

    // Load the sample Excel file into VFS
    await window.spire.FetchFileToVFS('Sample.xlsx', '', `${process.env.PUBLIC_URL}data/`);

    // Load the font file to ensure proper text rendering
    await window.spire.FetchFileToVFS('ARIAL.TTF', '/Library/Fonts/', `${process.env.PUBLIC_URL}font/`);

    // Create a workbook object and load the Excel file
    const workbook = new xlsModule.Workbook();
    workbook.LoadFromFile({ fileName: 'Sample.xlsx' });

    // Save the workbook as a Markdown file
    const outputFileName = 'ExcelToMarkdown.md';
    workbook.SaveToFile({ fileName: outputFileName, fileFormat: xlsModule.FileFormat.Markdown });
    workbook.Dispose();

    // Read the file from VFS and trigger download
    const fileArray = window.dotnetRuntime.Module.FS.readFile(outputFileName);
    const blob = new Blob([fileArray], { type: 'text/markdown' });
    const url = URL.createObjectURL(blob);
    const a = document.createElement('a');
    a.href = url;
    a.download = outputFileName;
    a.click();
    URL.revokeObjectURL(url);
  };

  return (
    <div style={{ textAlign: 'center', height: '300px' }}>
      <h1>Convert Excel to Markdown</h1>
      <button onClick={convertToMarkdown}>
        Generate
      </button>
    </div>
  );
}

export default App;
Excel converted to Markdown with Spire.XLS for JavaScript
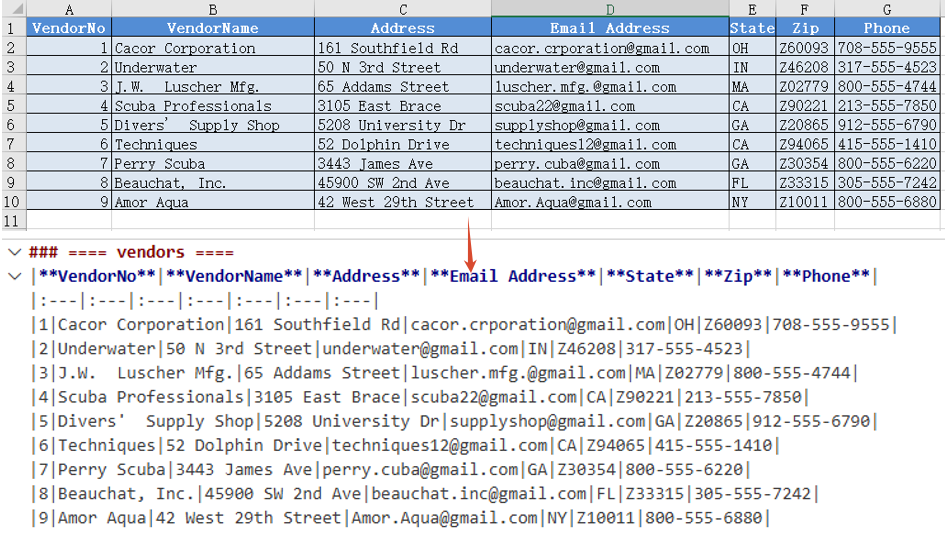
Convert Markdown File to Excel Workbook
Importing a Markdown file into an Excel spreadsheet allows you to take full advantage of Excel's formatting, calculation, and charting capabilities. Spire.XLS for JavaScript supports loading a Markdown file directly via the LoadFromMarkdown() method and converting its table data into worksheet cells. The steps are as follows:
- Load the font file and Markdown sample file into the VFS.
- Create a
Workbookobject and load the Markdown file via theLoadFromMarkdown()method. - Save the workbook as an Excel file and trigger the download.
Below is a complete code example demonstrating how to convert Markdown to Excel in React:
function App() {
  const convertToExcel = async () => {
    // Get the Spire.XLS WASM module
    const xlsModule = window.wasmModule?.spirexls;

    // Check if the module is ready
    if (!xlsModule) {
      alert('Spire.Xls is not ready yet');
      return;
    }

    // Load the font file to ensure proper text rendering
    await window.spire.FetchFileToVFS('ARIAL.TTF', '/Library/Fonts/', `${process.env.PUBLIC_URL}font/`);

    // Load the Markdown sample file into VFS
    await window.spire.FetchFileToVFS('Sample.md', '', `${process.env.PUBLIC_URL}data/`);

    // Create a workbook object and load the Markdown file
    const workbook = new xlsModule.Workbook();
    workbook.LoadFromMarkdown('Sample.md');

    // Save the workbook and release resources
    const outputFileName = 'MarkdownToExcel.xlsx';
    workbook.SaveToFile({ fileName: outputFileName, version: xlsModule.ExcelVersion.Version2010 });
    workbook.Dispose();

    // Read the file from VFS and trigger download
    const fileArray = window.dotnetRuntime.Module.FS.readFile(outputFileName);
    const blob = new Blob([fileArray], { type: 'application/vnd.openxmlformats-officedocument.spreadsheetml.sheet' });
    const url = URL.createObjectURL(blob);
    const a = document.createElement('a');
    a.href = url;
    a.download = outputFileName;
    a.click();
    URL.revokeObjectURL(url);
  };

  return (
    <div style={{ textAlign: 'center', height: '300px' }}>
      <h1>Convert Markdown to Excel</h1>
      <button onClick={convertToExcel}>
        Generate
      </button>
    </div>
  );
}

export default App;
Markdown converted to Excel with Spire.XLS for JavaScript
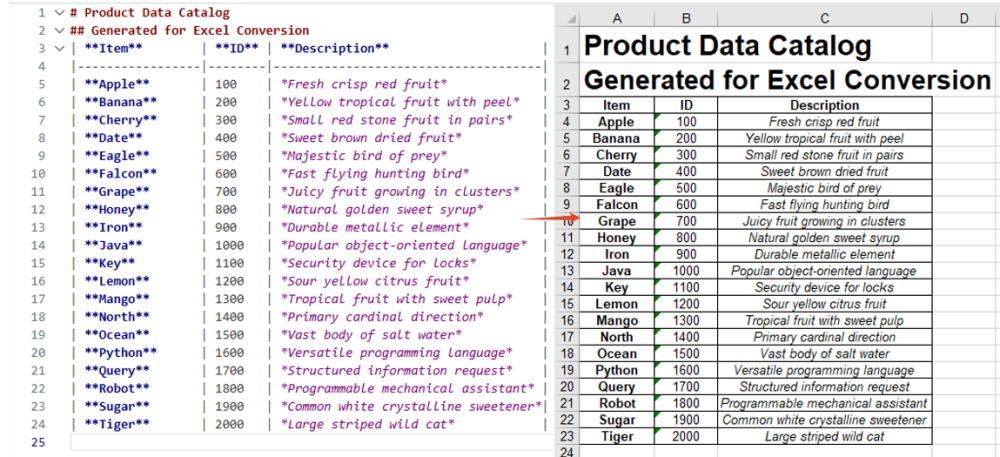
FAQ
How to handle font file missing issues during conversion?
Cause: If font files are not loaded into the WASM virtual file system (VFS), the exported Markdown content or imported cell text may not render correctly, especially when it contains non-ASCII characters such as Chinese.
Solution: Load the font files into VFS via FetchFileToVFS before conversion:
await window.spire.FetchFileToVFS(
  'ARIAL.TTF', '/Library/Fonts/', `${process.env.PUBLIC_URL}font/`
);
How to handle the downloaded Markdown file being opened as another type or showing garbled text?
Cause: The MIME type is not set correctly when creating the Blob, so the browser cannot recognize the downloaded file as Markdown text, which may cause it to open as another type or display garbled text.
Solution: Specify the correct MIME type when downloading and make sure the download filename ends with .md:
const blob = new Blob([fileArray], { type: 'text/markdown' });
const a = document.createElement('a');
a.href = URL.createObjectURL(blob);
a.download = 'ExcelToMarkdown.md';
a.click();
Get a Free License
Spire.XLS for JavaScript offers a 30-day full-featured free trial license with no functional limitations. Apply here to evaluate before purchasing.
