
JavaScript (103)
Creating tables in Word documents is one of the most common requirements in daily office development — whether for data reports, product catalogs, or statistical analysis, tables present information clearly in a structured format. Spire.Doc for JavaScript runs entirely in the browser via WebAssembly, using a virtual file system (VFS) to manage font and file resources — no backend server required.
This article covers three core features:
For installation and project setup, refer to Integrating Spire.Doc for JavaScript in a React Project. The examples below assume Spire.Doc is installed and the WebAssembly module is initialized.
Create a Formatted Data Table
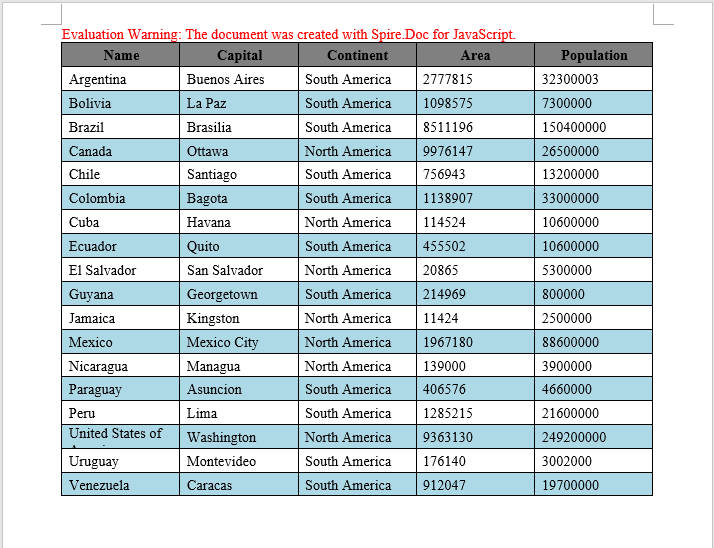
In real-world development, the most common scenario is writing data returned from a backend into a Word document as a table. The core workflow involves three steps: first, load font files into the WASM virtual file system via FetchFileToVFS; then instantiate a Document to create the document, add a table via AddTable, populate it with data, and configure header rows, alignment, and alternating row colors; finally, save the document, read the generated file from VFS, wrap it as a Blob, and trigger a browser download.
function addTable(section) {
  let docModule = window.wasmModule.spiredoc;
  let header = ["Name", "Capital", "Continent", "Area", "Population"];
  let data =
    [
      ["Argentina", "Buenos Aires", "South America", "2777815", "32300003"],
      ["Bolivia", "La Paz", "South America", "1098575", "7300000"],
      ["Brazil", "Brasilia", "South America", "8511196", "150400000"],
      ["Canada", "Ottawa", "North America", "9976147", "26500000"],
      ["Chile", "Santiago", "South America", "756943", "13200000"],
      ["Colombia", "Bagota", "South America", "1138907", "33000000"],
      ["Cuba", "Havana", "North America", "114524", "10600000"],
      ["Ecuador", "Quito", "South America", "455502", "10600000"],
      ["El Salvador", "San Salvador", "North America", "20865", "5300000"],
      ["Guyana", "Georgetown", "South America", "214969", "800000"],
      ["Jamaica", "Kingston", "North America", "11424", "2500000"],
      ["Mexico", "Mexico City", "North America", "1967180", "88600000"],
      ["Nicaragua", "Managua", "North America", "139000", "3900000"],
      ["Paraguay", "Asuncion", "South America", "406576", "4660000"],
      ["Peru", "Lima", "South America", "1285215", "21600000"],
      ["United States of America", "Washington", "North America", "9363130", "249200000"],
      ["Uruguay", "Montevideo", "South America", "176140", "3002000"],
      ["Venezuela", "Caracas", "South America", "912047", "19700000"]
    ];
  let table = section.AddTable({ showBorder: true });
  table.ResetCells(data.length + 1, header.length);

  // Set up the header row
  let row = table.Rows.get_Item(0);
  row.IsHeader = true;
  row.Height = 20;
  row.HeightType = docModule.TableRowHeightType.Exactly;
  for (let i = 0; i < row.Cells.Count; i++) {
    row.Cells.get_Item(i).CellFormat.Shading.BackgroundPatternColor = docModule.Color.get_Gray();
  }

  for (let i = 0; i < header.length; i++) {
    row.Cells.get_Item(i).CellFormat.VerticalAlignment = docModule.VerticalAlignment.Middle;
    let p = row.Cells.get_Item(i).AddParagraph();
    p.Format.HorizontalAlignment = docModule.HorizontalAlignment.Center;
    let txtRange = p.AppendText(header[i]);
    txtRange.CharacterFormat.Bold = true;
  }

  // Populate data rows with alternating row colors
  for (let r = 0; r < data.length; r++) {
    let dataRow = table.Rows.get_Item(r + 1);
    dataRow.Height = 20;
    dataRow.HeightType = docModule.TableRowHeightType.Exactly;
    for (let i = 0; i < dataRow.Cells.Count; i++) {
      dataRow.Cells.get_Item(i).CellFormat.Shading.BackgroundPatternColor = docModule.Color.Empty();
    }
    for (let c = 0; c < data[r].length; c++) {
      dataRow.Cells.get_Item(c).CellFormat.VerticalAlignment = docModule.VerticalAlignment.Middle;
      dataRow.Cells.get_Item(c).AddParagraph().AppendText(data[r][c]);
    }
  }

  // Apply light blue background to even rows
  for (let j = 1; j < table.Rows.Count; j++) {
    if (j % 2 == 0) {
      let row2 = table.Rows.get_Item(j);
      for (let f = 0; f < row2.Cells.Count; f++) {
        row2.Cells.get_Item(f).CellFormat.Shading.BackgroundPatternColor = docModule.Color.get_LightBlue();
      }
    }
  }
}

function App() {
  const CreateTable = async () => {
    // Get the Spire.Doc WASM module
    const docModule = window.wasmModule?.spiredoc;

    // Check if the module is ready
    if (!docModule) {
      alert('Spire.Doc is not ready yet');
      return;
    }

    // Load font files into VFS
    await window.spire.FetchFileToVFS('ARIALUNI.TTF', '/Library/Fonts/', `${process.env.PUBLIC_URL}/font/`);

    // Create a blank document
    let doc = new docModule.Document();
    let section = doc.AddSection();

    // Add the table
    addTable(section);

    // Define the output file name
    const outputFileName = "CreateTable_output.docx";

    // Save the document
    doc.SaveToFile({ fileName: outputFileName, fileFormat: docModule.FileFormat.Docx2013 });

    // Release resources
    doc.Dispose();

    // Read the generated file from VFS and trigger download
    const modifiedFileArray = window.dotnetRuntime.Module.FS.readFile(outputFileName);
    const blob = new Blob([modifiedFileArray], { type: 'application/vnd.openxmlformats-officedocument.wordprocessingml.document' });
    const url = URL.createObjectURL(blob);
    const a = document.createElement('a');
    a.href = url;
    a.download = outputFileName;
    a.click();
    URL.revokeObjectURL(url);
  };

  return (
    <div style={{ textAlign: 'center', height: '300px' }}>
      <h1>Click the button below to create a table in a Word document.</h1>
      <button onClick={CreateTable}>
        Generate
      </button>
    </div>
  );
}

export default App;
Word output generated from a formatted data table
Create a Table from HTML
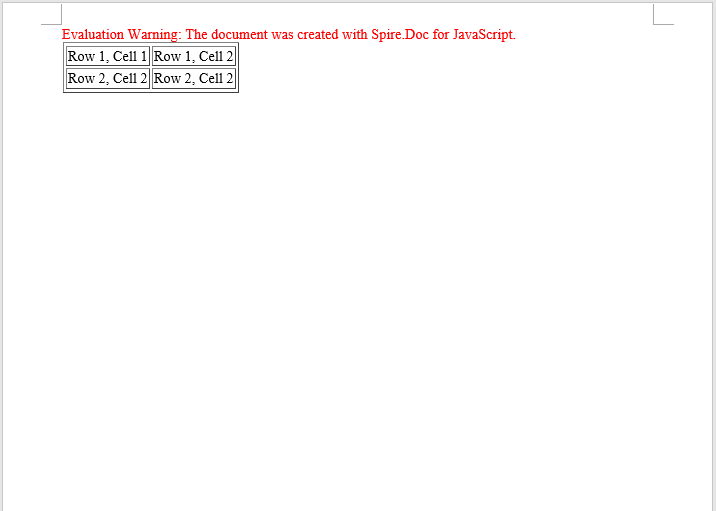
In web development, HTML tables are a universal format for displaying data. Spire.Doc provides the AppendHTML method, which can parse an HTML string directly into a Word document table, greatly simplifying the conversion from web content to Word documents. This is particularly useful for scenarios where you need to export table data from a web page to a Word document.
function App() {
  const CreateTableFromHTML = async () => {
    // Get the Spire.Doc WASM module
    const docModule = window.wasmModule?.spiredoc;

    // Check if the module is ready
    if (!docModule) {
      alert('Spire.Doc is not ready yet');
      return;
    }

    // Load font files into VFS
    await window.spire.FetchFileToVFS('ARIALUNI.TTF', '/Library/Fonts/', `${process.env.PUBLIC_URL}/font/`);

    // HTML string
    let HTML = "<table border='2px'>" +
      "<tr>" +
      "<td>Row 1, Cell 1</td>" +
      "<td>Row 1, Cell 2</td>" +
      "</tr>" +
      "<tr>" +
      "<td>Row 2, Cell 2</td>" +
      "<td>Row 2, Cell 2</td>" +
      "</tr>" +
      "</table>";

    // Create a Word document
    let doc = new docModule.Document();

    // Add a section
    let section = doc.AddSection();

    // Add a paragraph and append the HTML string
    section.AddParagraph().AppendHTML(HTML);

    // Define the output file name
    const outputFileName = "CreateTableFromHTML_output.docx";

    // Save the document
    doc.SaveToFile({ fileName: outputFileName, fileFormat: docModule.FileFormat.Docx2013 });

    // Release resources
    doc.Dispose();

    // Read the generated file from VFS and trigger download
    const modifiedFileArray = window.dotnetRuntime.Module.FS.readFile(outputFileName);
    const blob = new Blob([modifiedFileArray], { type: 'application/vnd.openxmlformats-officedocument.wordprocessingml.document' });
    const url = URL.createObjectURL(blob);
    const a = document.createElement('a');
    a.href = url;
    a.download = outputFileName;
    a.click();
    URL.revokeObjectURL(url);
  };

  return (
    <div style={{ textAlign: 'center', height: '300px' }}>
      <h1>Click the button below to create a table from HTML in a Word document.</h1>
      <button onClick={CreateTableFromHTML}>
        Generate
      </button>
    </div>
  );
}

export default App;
Word table created from HTML
Create a Nested Table
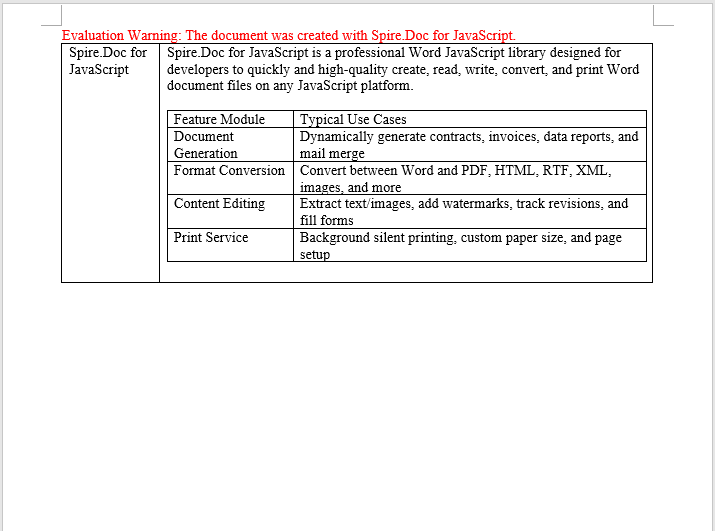
A nested table is a table inserted within a cell of another table. This is commonly used for complex document layouts — for example, in a product catalog, the main table displays product names and descriptions, while a sub-table containing specification parameters (number, item, price) is embedded inside the description cell. Spire.Doc makes nested table creation easy with the Cell.AddTable method.
function App() {
  const CreateNestedTable = async () => {
    // Get the Spire.Doc WASM module
    const docModule = window.wasmModule?.spiredoc;

    // Check if the module is ready
    if (!docModule) {
      alert('Spire.Doc is not ready yet');
      return;
    }

   // Load font and document files into VFS
    await window.spire.FetchFileToVFS('ARIALUNI.TTF', '/Library/Fonts/', `${process.env.PUBLIC_URL}/font/`);

    // Create a new document
    let doc = new docModule.Document();
    let section = doc.AddSection();

    // Add main table (2 rows, 2 columns)
    let table = section.AddTable({ showBorder: true });
    table.ResetCells(1, 2);

    // Set column widths
    table.Rows.get_Item(0).Cells.get_Item(0).SetCellWidth(70, docModule.CellWidthType.Point);
    table.Rows.get_Item(0).Cells.get_Item(1).SetCellWidth(150, docModule.CellWidthType.Point);
    table.Rows.get_Item(0).Height=200;
    table.AutoFit(docModule.AutoFitBehaviorType.AutoFitToWindow);

    // Insert content into cells
    table.Rows.get_Item(0).Cells.get_Item(0).AddParagraph().AppendText("Spire.Doc for JavaScript");
    let text = "Spire.Doc for JavaScript is a professional Word " +
      "JavaScript library designed for developers to quickly and " +
      "high-quality create, read, write, convert, and print Word " +
      "document files on any JavaScript platform.";
    table.Rows.get_Item(0).Cells.get_Item(1).AddParagraph().AppendText(text);

    table.Rows.get_Item(0).Cells.get_Item(1).AddParagraph();

    // Add a nested table in the cell (first row, second column)
    let nestedTable = table.Rows.get_Item(0).Cells.get_Item(1).AddTable({ showBorder: true });
    nestedTable.ResetCells(5, 2);
    nestedTable.AutoFit(docModule.AutoFitBehaviorType.AutoFitToContents);

    // Fill nested table content
    nestedTable.Rows.get_Item(0).Cells.get_Item(0).AddParagraph().AppendText("Feature Module");
    nestedTable.Rows.get_Item(0).Cells.get_Item(1).AddParagraph().AppendText("Typical Use Cases");

    nestedTable.Rows.get_Item(1).Cells.get_Item(0).AddParagraph().AppendText("Document Generation");
    nestedTable.Rows.get_Item(2).Cells.get_Item(0).AddParagraph().AppendText("Format Conversion");
    nestedTable.Rows.get_Item(3).Cells.get_Item(0).AddParagraph().AppendText("Content Editing");
    nestedTable.Rows.get_Item(4).Cells.get_Item(0).AddParagraph().AppendText("Print Service");

    nestedTable.Rows.get_Item(1).Cells.get_Item(1).AddParagraph().AppendText("Dynamically generate contracts, invoices, data reports, and mail merge");
    nestedTable.Rows.get_Item(2).Cells.get_Item(1).AddParagraph().AppendText("Convert between Word and PDF, HTML, RTF, XML, images, and more");
    nestedTable.Rows.get_Item(3).Cells.get_Item(1).AddParagraph().AppendText("Extract text/images, add watermarks, track revisions, and fill forms");
    nestedTable.Rows.get_Item(4).Cells.get_Item(1).AddParagraph().AppendText("Background silent printing, custom paper size, and page setup");

    // Define the output file name
    const outputFileName = "CreateNestedTable_output-en.docx";

    // Save the document
    doc.SaveToFile({ fileName: outputFileName, fileFormat: docModule.FileFormat.Docx2013 });

    // Release resources
    doc.Dispose();

    // Read the generated file from VFS and trigger download
    const modifiedFileArray = window.dotnetRuntime.Module.FS.readFile(outputFileName);
    const blob = new Blob([modifiedFileArray], { type: 'application/vnd.openxmlformats-officedocument.wordprocessingml.document' });
    const url = URL.createObjectURL(blob);
    const a = document.createElement('a');
    a.href = url;
    a.download = outputFileName;
    a.click();
    URL.revokeObjectURL(url);
  };

  return (
    <div style={{ textAlign: 'center', height: '300px' }}>
      <h1>Click the button below to create a nested table in a Word document.</h1>
      <button onClick={CreateNestedTable}>
        Generate
      </button>
    </div>
  );
}

export default App;
Nested table output in Word
FAQ
The downloaded file cannot be opened or appears corrupted
Cause: The MIME type is incorrect when creating the Blob, so the browser cannot properly identify the file format.
Solution: Use the correct Word document MIME type:
const modifiedFile = new Blob([fileArray], {
  type: "application/vnd.openxmlformats-officedocument.wordprocessingml.document"
});
Table borders are missing or inconsistent
Cause: When adding a table with AddTable({ showBorder: true }), borders are enabled by default, but tables created directly via the Table constructor need borders set manually.
Solution: When creating a table via the constructor, explicitly set the border type:
let table = new wasmModule.Table(doc, false);
table.Format.Borders.BorderType = wasmModule.BorderStyle.Single;
Get a Free License
If you want to remove the evaluation message from the result document, or eliminate functional limitations, contact our sales team to request a 30-day temporary license.
In document management systems, splitting Word documents is a common requirement — separating merged multi-chapter documents into independent files by section breaks, or dividing long documents into shorter ones by page breaks. Spire.Doc for JavaScript performs document splitting directly in the browser via WebAssembly, using a virtual file system (VFS) to manage input and output files — no backend server required.
This article covers two core features:
For installation and project setup, refer to Integrating Spire.Doc for JavaScript in a React Project. The examples below assume Spire.Doc is installed and the WebAssembly module is initialized.
Split by Section Break
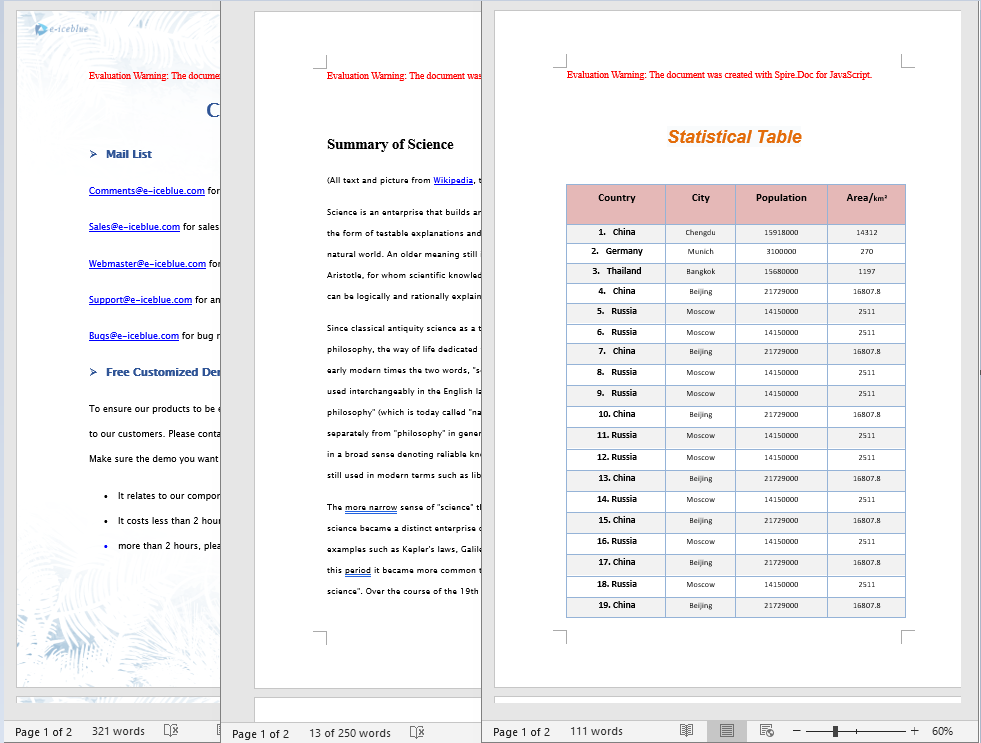
Section breaks in a Word document separate different chapters or page layouts. Each section can have its own headers, footers, page numbering, and page setup. Splitting by section breaks is the most common and stable approach, ideal for restoring merged multi-chapter documents back into independent files.
The core workflow consists of three stages: first, load the font files and the target Word file into the WASM virtual file system; then instantiate a Document, load the file, iterate through all sections, and clone each section into a new Document object via Section.Clone(); finally, package the split files into a ZIP archive and trigger a browser download.
function App() {
  const splitBySectionBreak = async () => {
    // Get the Spire.Doc WASM module
    const docModule = window.wasmModule?.spiredoc;

    // Check if the module is ready
    if (!docModule) {
      alert('Spire.Doc is not ready yet');
      return;
    }

    const inputFileName = 'Template_Docx_4.docx';
    await window.spire.FetchFileToVFS(inputFileName, '', `${process.env.PUBLIC_URL}data/`);

    // Create output directory
    let outputDir = 'output/';
    window.dotnetRuntime.Module.FS.mkdirTree(outputDir);

    // Load the document
    const doc = new docModule.Document();
    doc.LoadFromFile(inputFileName);

    // Iterate through each section and clone into independent documents
    for (let i = 0; i < doc.Sections.Count; i++) {
      const newWord = new docModule.Document();
      newWord.Sections.Add(doc.Sections.get_Item(i).Clone());
      newWord.SaveToFile({
        fileName: outputDir + `Section-${i}.docx`,
        fileFormat: docModule.FileFormat.Docx2013
      });
      newWord.Dispose();
    }
    doc.Dispose();

    // Read output files from VFS and package into ZIP for download
    const JSZip = require('jszip');
    const zip = new JSZip();
    let items = window.dotnetRuntime.Module.FS.readdir(outputDir);
    items = items.filter(item => item !== '.' && item !== '..');
    for (const item of items) {
      const fileData = window.dotnetRuntime.Module.FS.readFile(outputDir + item);
      zip.file(item, fileData);
    }
    const zipBlob = await zip.generateAsync({ type: 'blob' });
    const url = URL.createObjectURL(zipBlob);
    const a = document.createElement('a');
    a.href = url;
    a.download = 'SplitBySectionBreak.zip';
    a.click();
    URL.revokeObjectURL(url);
  };

  return (
    <div style={{ textAlign: 'center', height: '300px' }}>
      <h1>Split Word Document By Section Break</h1>
      <button onClick={splitBySectionBreak}>Generate</button>
    </div>
  );
}

export default App;
Independent Word documents generated after splitting by section break
Split by Page Break
Page breaks are manual or automatic pagination markers inserted within a document. Splitting by page breaks is suitable for dividing long documents by page, saving each page's content as an independent document — commonly used for report pagination, contract clause splitting, and similar scenarios.
Unlike splitting by section breaks, page breaks reside at the child-object level within paragraphs. This requires traversing the document's sections, paragraphs, and paragraph child objects layer by layer to detect Break elements with the PageBreak type. When splitting, you also need to clone the original document's styles and themes using methods such as CloneDefaultStyleTo, CloneThemesTo, and CloneCompatibilityTo to ensure the split documents retain full formatting.
function App() {
  const splitByPageBreak = async () => {
    // Get the Spire.Doc WASM module
    const docModule = window.wasmModule?.spiredoc;

    // Check if the module is ready
    if (!docModule) {
      alert('Spire.Doc is not ready yet');
      return;
    }

    const inputFileName = 'SplitWordFileByPageBreak.docx';
    await window.spire.FetchFileToVFS(inputFileName, '', `${process.env.PUBLIC_URL}data/`);

    // Create output directory
    let outputDir = 'output/';
    window.dotnetRuntime.Module.FS.mkdirTree(outputDir);

    // Load the original document
    const original = new docModule.Document();
    original.LoadFromFile(inputFileName);

    // Create a new document and clone styles and themes
    let newWord = new docModule.Document();
    let section = newWord.AddSection();
    original.CloneDefaultStyleTo(newWord);
    original.CloneThemesTo(newWord);
    original.CloneCompatibilityTo(newWord);

    let index = 0;

    // Iterate through all sections
    for (let i = 0; i < original.Sections.Count; i++) {
      let sec = original.Sections.get_Item(i);

      // Iterate through all child objects in the section (paragraphs, tables, etc.)
      for (let j = 0; j < sec.Body.ChildObjects.Count; j++) {
        let obj = sec.Body.ChildObjects.get_Item(j);

        if (obj instanceof docModule.Paragraph) {
          let para = obj;
          sec.CloneSectionPropertiesTo(section);
          section.Body.ChildObjects.Add(para.Clone());

          // Detect page breaks within paragraph child objects
          for (let k = 0; k < para.ChildObjects.Count; k++) {
            let parobj = para.ChildObjects.get_Item(k);
            if (parobj instanceof docModule.Break &&
                parobj.BreakType === docModule.BreakType.PageBreak) {

              let breakIndex = para.ChildObjects.IndexOf(parobj);

              // Remove the page break from the paragraph
              section.Body.LastParagraph.ChildObjects.RemoveAt(breakIndex);

              // Save the current document
              newWord.SaveToFile({
                fileName: outputDir + `Page-${index}.docx`,
                fileFormat: docModule.FileFormat.Docx2013
              });
              index++;

              // Create a new document to continue
              newWord = new docModule.Document();
              section = newWord.AddSection();
              original.CloneDefaultStyleTo(newWord);
              original.CloneThemesTo(newWord);
              original.CloneCompatibilityTo(newWord);
              sec.CloneSectionPropertiesTo(section);

              // Handle remaining content after the page break
              section.Body.ChildObjects.Add(para.Clone());
              if (section.Paragraphs.get_Item(0).ChildObjects.Count === 0) {
                section.Body.ChildObjects.RemoveAt(0);
              } else {
                while (breakIndex >= 0) {
                  section.Paragraphs.get_Item(0).ChildObjects.RemoveAt(breakIndex);
                  breakIndex--;
                }
              }
            }
          }
        }

        if (obj instanceof docModule.Table) {
          section.Body.ChildObjects.Add(obj.Clone());
        }
      }
    }

    // Save the last document
    newWord.SaveToFile({
      fileName: outputDir + `Page-${index}.docx`,
      fileFormat: docModule.FileFormat.Docx2013
    });

    original.Dispose();
    newWord.Dispose();

    // Package into ZIP for download
    const JSZip = require('jszip');
    const zip = new JSZip();
    let items = window.dotnetRuntime.Module.FS.readdir(outputDir);
    items = items.filter(item => item !== '.' && item !== '..');
    for (const item of items) {
      const fileData = window.dotnetRuntime.Module.FS.readFile(outputDir + item);
      zip.file(item, fileData);
    }
    const zipBlob = await zip.generateAsync({ type: 'blob' });
    const url = URL.createObjectURL(zipBlob);
    const a = document.createElement('a');
    a.href = url;
    a.download = 'SplitByPageBreak.zip';
    a.click();
    URL.revokeObjectURL(url);
  };

  return (
    <div style={{ textAlign: 'center', height: '300px' }}>
      <h1>Split Word Document By Page Break</h1>
      <button onClick={splitByPageBreak}>Generate</button>
    </div>
  );
}

export default App;
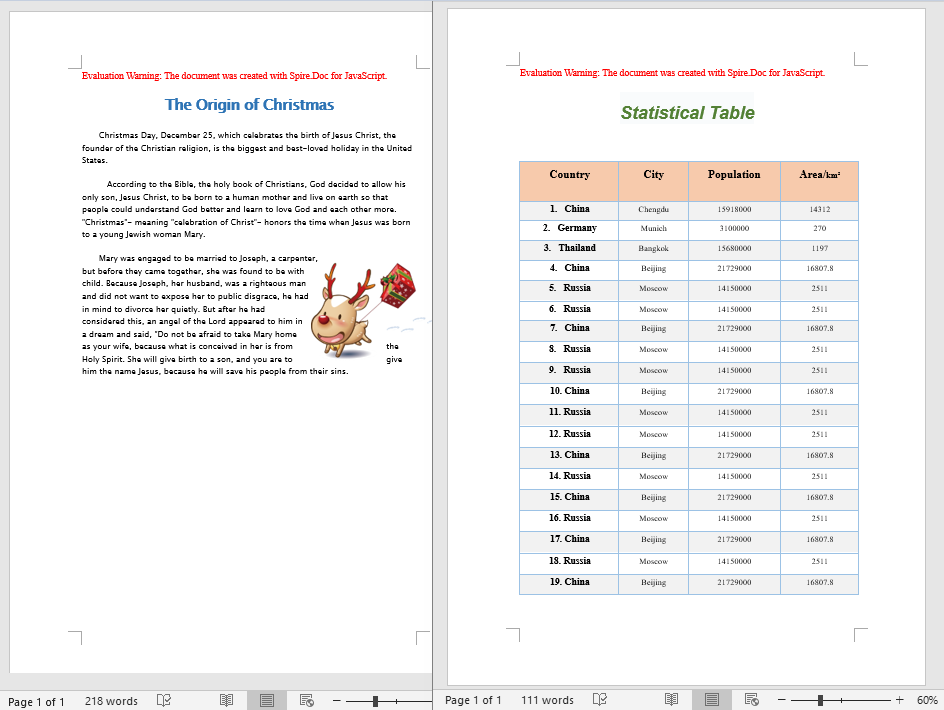
Word documents generated after splitting by page break
FAQ
Split document formatting differs from the original
Cause: When splitting by page break, only the paragraph content is cloned without also cloning the original document's styles, themes, and section properties. This causes the split documents to lose formatting information such as fonts, colors, and page setup.
Solution: After creating a new document, clone the original document's styles and themes using the following methods:
original.CloneDefaultStyleTo(newWord);
original.CloneThemesTo(newWord);
original.CloneCompatibilityTo(newWord);
sec.CloneSectionPropertiesTo(section);
Page break cannot be detected
Cause: Page breaks reside within paragraph child objects and are identified via the BreakType enumeration. If the traversal hierarchy is incorrect, or the instanceof check is not used to determine the object type, the page break may not be properly recognized.
Solution: Ensure detection follows the order: Paragraph.ChildObjects → instanceof Break → BreakType == BreakType.PageBreak:
for (let k = 0; k < para.ChildObjects.Count; k++) {
  let parobj = para.ChildObjects.get_Item(k);
  if (parobj instanceof docModule.Break &&
      parobj.BreakType === docModule.BreakType.PageBreak) {
    // Page break found
  }
}
Get a Free License
Spire.Doc for JavaScript offers a 30-day full-featured free trial license with no functional limitations. Apply here to evaluate before purchasing.
Comments are an indispensable feature in Word document collaboration, widely used for review, proofreading, and team discussion scenarios. Spire.Doc for JavaScript runs entirely in the browser via WebAssembly, using a virtual file system (VFS) to manage document files — no backend server or Microsoft Word installation required.
This article covers three core features:
For installation and project setup, refer to Integrating Spire.Doc for JavaScript in a React Project. The examples below assume Spire.Doc is installed and the WebAssembly module is initialized.
Add a Comment to Specific Text
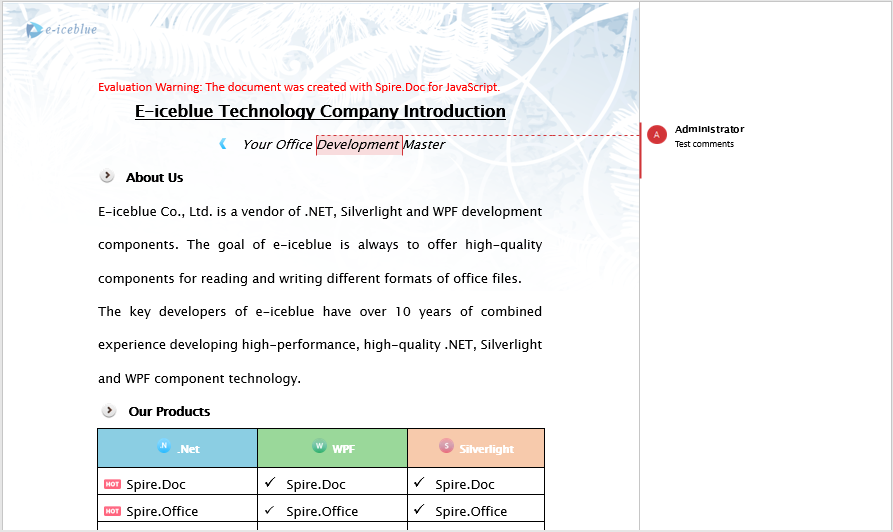
In real-world document review scenarios, we often need to add comments to a specific piece of text. The approach is: first, use the FindString method to locate the target text; then insert CommentMarkStart and CommentMarkEnd markers before and after the text; finally, add the Comment object to the paragraph, associating the comment with the specified text.
function App() {
  const AddCommentForSpecificText = async () => {
    // Get the Spire.Doc WASM module
    const docModule = window.wasmModule?.spiredoc;

    // Check if the module is ready
    if (!docModule) {
      alert('Spire.Doc is not ready yet');
      return;
    }

    // Load the target Word document into VFS
    const inputFileName = "CommentTemplate.docx";
    await window.spire.FetchFileToVFS(inputFileName, '', `${process.env.PUBLIC_URL}/data/`);

    // Create a Document instance and load the file
    let doc = new docModule.Document();
    doc.LoadFromFile(inputFileName);

    // Call the custom function to add a comment to the specified text
    InsertComments(doc, "Development", docModule);

    // Save the document
    const outputFileName = "AddCommentForSpecificText.docx";
    doc.SaveToFile({ fileName: outputFileName, fileFormat: docModule.FileFormat.Docx2013 });

    const modifiedFileArray = window.dotnetRuntime.Module.FS.readFile(outputFileName);
    const blob = new Blob([modifiedFileArray], { type: 'application/vnd.openxmlformats-officedocument.wordprocessingml.document' });

    // Release resources
    doc.Dispose();

    const url = URL.createObjectURL(blob);
    const a = document.createElement('a');
    a.href = url;
    a.download = outputFileName;
    a.click();
    URL.revokeObjectURL(url);
  };

  // Custom function: add a comment for the specified keyword
  function InsertComments(doc, keystring, wasmModule) {
      // Find the target string in the document
      let find = doc.FindString(keystring, false, true);

      // Create comment start and end markers
      let commentMarkStart = new wasmModule.CommentMark(doc, 1, wasmModule.CommentMarkType.CommentStart);
      let commentMarkEnd = new wasmModule.CommentMark(doc, 1, wasmModule.CommentMarkType.CommentEnd);

      // Create a comment object, set content and author
      let comment = new wasmModule.Comment(doc);
      comment.Body.AddParagraph().Text = "Test comments";
      comment.Format.Author = "Administrator";

      // Get the found text range and its containing paragraph
      let range = find.GetAsOneRange();
      let para = range.OwnerParagraph;

      // Get the index of the text range within the paragraph
      let index = para.ChildObjects.IndexOf(range);

      // Add the comment to the paragraph
      para.ChildObjects.Add(comment);

      // Insert comment start and end markers before and after the target text
      para.ChildObjects.Insert(index, commentMarkStart);
      para.ChildObjects.Insert(index + 2, commentMarkEnd);
  }

  return (
      <div style={{ textAlign: 'center', height: '300px' }}>
        <h1>Add Comment for Specific Text</h1>
        <button onClick={AddCommentForSpecificText}>
          Generate
        </button>
      </div>
    );
};

export default App;
With the code above, you can search for a specific keyword in the document, insert comment markers at its position, and accurately associate the comment with the target text.
Extract Comments from a Document
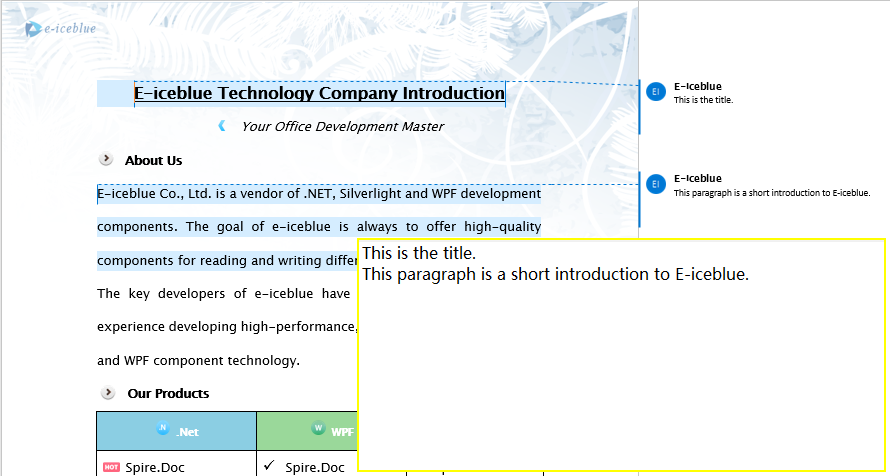
After a document has been reviewed by multiple people, it often contains numerous comments. Extracting these comments in bulk makes it easy to consolidate review feedback or perform further processing. Spire.Doc provides the Comments collection, which we can iterate through to read the text content of each comment and then export it as a text file.
function App() {
  const ExtractComment = async () => {
    // Get the Spire.Doc WASM module
    const docModule = window.wasmModule?.spiredoc;

    // Check if the module is ready
    if (!docModule) {
      alert('Spire.Doc is not ready yet');
      return;
    }

    // Load the target Word document into VFS
    const inputFileName = "CommentSample.docx";
    await window.spire.FetchFileToVFS(inputFileName, '', `${process.env.PUBLIC_URL}/data/`);

    // Create a Document instance and load the file
    let doc = new docModule.Document();
    doc.LoadFromFile(inputFileName);

    // Iterate through all comments and extract text content
    let stringB = [];
    for (let i = 0; i < doc.Comments.Count; i++) {
        let comment = doc.Comments.get_Item(i);
        for (let j = 0; j < comment.Body.Paragraphs.Count; j++) {
            let p = comment.Body.Paragraphs.get_Item(j);
            stringB.push(p.Text + "\n");
        }
    }

    // Save the extracted comment content as a text file
    const outputFileName = 'ExtractComment.txt';

    const blob = new Blob([stringB.toString()], { type: "text/plain;charset=utf-8" });

    // Release resources
    doc.Dispose();

    const url = URL.createObjectURL(blob);
    const a = document.createElement('a');
    a.href = url;
    a.download = outputFileName;
    a.click();
    URL.revokeObjectURL(url);
  };
  return (
      <div style={{ textAlign: 'center', height: '300px' }}>
        <h1>Extract Comments from Document</h1>
        <button onClick={ExtractComment}>
          Generate
        </button>
      </div>
    );
};

export default App;
The doc.Comments collection provides access to all comments in the document, and the text content of each comment is retrieved via comment.Body.Paragraphs. The extracted content can be saved as a plain text file for easy review or import into other systems.
Reply to and Modify Comments
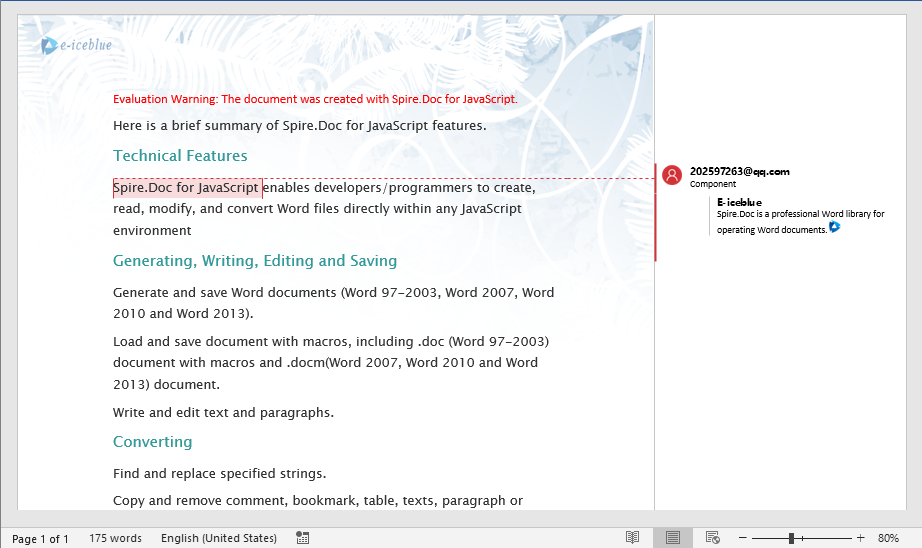
In team collaboration scenarios, replying to existing comments and modifying their content are common needs. Spire.Doc supports adding replies to comments via the ReplyToComment method, as well as modifying comment content or deleting unwanted comments. The following example demonstrates how to get the first comment in a document and add a reply containing an image.
function App() {
  const ReplyToComment = async () => {
    // Get the Spire.Doc WASM module
    const docModule = window.wasmModule?.spiredoc;

    // Check if the module is ready
    if (!docModule) {
      alert('Spire.Doc is not ready yet');
      return;
    }

    // Load the target document and image into VFS
    const inputFileName = "Comment.docx";
    await window.spire.FetchFileToVFS(inputFileName, '', `${process.env.PUBLIC_URL}/data/`);

    const imageFile = "logo.png";
    await window.spire.FetchFileToVFS(imageFile, '', `${process.env.PUBLIC_URL}/data/`);

    // Create a Document instance and load the file
    let doc = new docModule.Document();
    doc.LoadFromFile(inputFileName);

    // Get the first comment in the document
    let comment1 = doc.Comments.get_Item(0);

    // Create a reply comment, set author and content
    let replyComment1 = new docModule.Comment(doc);
    replyComment1.Format.Author = "E-iceblue";
    replyComment1.Body.AddParagraph().AppendText("Spire.Doc is a professional Word library for operating Word documents.");

    // Add the reply comment to the original comment
    comment1.ReplyToComment(replyComment1);

    // Load the image and insert it into the reply comment
    let docPicture = new docModule.DocPicture(doc);
    docPicture.LoadImage(imageFile);
    replyComment1.Body.Paragraphs.get_Item(0).ChildObjects.Add(docPicture);

    // Save the document
    const outputFileName = "ReplyToComment.docx";
    doc.SaveToFile({ fileName: outputFileName, fileFormat: docModule.FileFormat.Docx });

    const modifiedFileArray = window.dotnetRuntime.Module.FS.readFile(outputFileName);
    const blob = new Blob([modifiedFileArray], { type: 'application/vnd.openxmlformats-officedocument.wordprocessingml.document' });

    // Release resources
    doc.Dispose();

    const url = URL.createObjectURL(blob);
    const a = document.createElement('a');
    a.href = url;
    a.download = outputFileName;
    a.click();
    URL.revokeObjectURL(url);
  };
  return (
      <div style={{ textAlign: 'center', height: '300px' }}>
        <h1>Reply to Comment</h1>
        <button onClick={ReplyToComment}>
          Generate
        </button>
      </div>
    );
};

export default App;
In addition to replying to comments, you can delete a specific comment using the Comments.RemoveAt(index) method, or modify the text content of a comment using Body.Paragraphs.get_Item(0).Replace(...):
// Modify the content of the first comment
doc.Comments.get_Item(0).Body.Paragraphs.get_Item(0).Replace({ given: "original text", replace: "modified text", caseSensitive: false, wholeWord: false });

// Delete the second comment
doc.Comments.RemoveAt(1);
FAQ
Comments not displaying correctly in Word
Cause: The CommentMarkStart and CommentMarkEnd markers are inserted at incorrect positions, or the Comment object is not properly added to the paragraph. The start marker must be placed before the commented text, the end marker after it, and the Comment object itself must also be added to the same paragraph.
Solution: Ensure the correct sequence — first get the index of the target text, then insert CommentMarkStart, add the Comment to the paragraph, and finally insert CommentMarkEnd after the text.
Empty output when extracting comments
Cause: The document may contain no comments, or the comment content is stored in a nested structure. Additionally, if the document is loaded from an incorrect path or the file is not successfully loaded into VFS, comments cannot be read.
Solution: Check doc.Comments.Count before extraction to confirm it is greater than 0. Also ensure the document file is properly loaded via FetchFileToVFS:
await window.spire.FetchFileToVFS(
  'CommentSample.docx', '', `${process.env.PUBLIC_URL}/static/data/`
);
Original comment lost after replying
Cause: The ReplyToComment method should be called on the original comment. If the reply comment is mistakenly used as the caller, or the method is called multiple times causing reference confusion, the comment structure may become corrupted.
Solution: Always call ReplyToComment on the existing original comment object in the document, passing the newly created Comment object as the parameter:
// Correct: original comment calls ReplyToComment, new comment as parameter
existingComment.ReplyToComment(replyComment);
Get a Free License
If you want to remove the evaluation message from the result documents or eliminate functional limitations, please contact sales to obtain a 30-day temporary license.
Word document variables (DocVariable) provide a lightweight field mechanism that lets you define placeholders in a document and dynamically populate or update their content through code. This approach is especially useful for template-based document generation, batch mail merges, and automated report output. Spire.Doc for JavaScript runs entirely in the browser via WebAssembly, using a virtual file system (VFS) to manage input and output files — no backend server required.
This article covers three core features:
For installation and project setup, refer to Integrating Spire.Doc for JavaScript in a React Project. The examples below assume Spire.Doc is installed and the WebAssembly module is initialized.
Add Document Variables
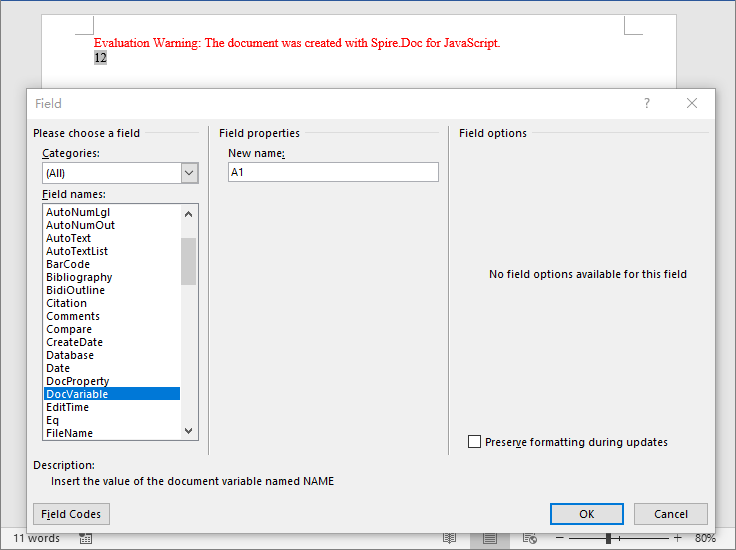
Adding document variables follows three main steps: first, load font files into the WASM virtual file system via FetchFileToVFS; then instantiate a Document, insert a DocVariable field in a paragraph, and assign a value to the variable using Variables.Add; finally, save the document, read the generated file from VFS, wrap it as a Blob, and trigger a browser download.
import React from 'react';

function App() {
  const addVariables = async () => {
    // Get the Spire.Doc WASM module
    const docModule = window.wasmModule?.spiredoc;

    // Check if the module is ready
    if (!docModule) {
      alert('Spire.Doc is not ready yet');
      return;
    }

    // Create a document object
    const doc = new docModule.Document();

    // Add a section
    const section = doc.AddSection();

    // Add a paragraph
    const paragraph = section.AddParagraph();

    // Insert a DocVariable field into the paragraph
    paragraph.AppendField("A1", docModule.FieldType.FieldDocVariable);

    // Assign a value to the variable
    doc.Variables.Add("A1", "12");

    // Update fields to display variable values
    doc.IsUpdateFields = true;

    // Define the output file name
    const outputFileName = "AddVariables_out.docx";

    // Save the document
    doc.SaveToFile({ fileName: outputFileName, fileFormat: docModule.FileFormat.Docx2013 });

    // Release resources
    doc.Dispose();

    const modifiedFileArray = window.dotnetRuntime.Module.FS.readFile(outputFileName);
    const blob = new Blob([modifiedFileArray], { type: 'application/vnd.openxmlformats-officedocument.wordprocessingml.document' });

    const url = URL.createObjectURL(blob);
    const a = document.createElement('a');
    a.href = url;
    a.download = outputFileName;
    a.click();
    URL.revokeObjectURL(url);
  };
  return (
      <div style={{ textAlign: 'center', height: '300px' }}>
        <h1>Add Document Variables</h1>
        <button onClick={addVariables}>
          Generate
        </button>
      </div>
    );
};

export default App;
After adding variables via the Variables.Add method, the DocVariable fields in the document are replaced with the corresponding variable values.
Retrieve Document Variables
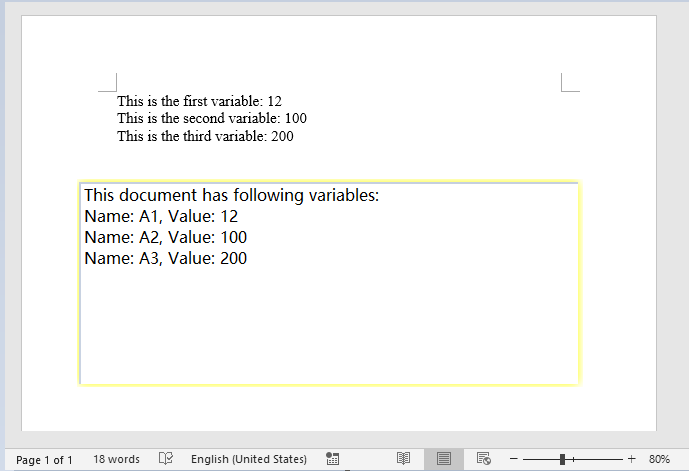
For Word template documents that already contain variables, you can retrieve variable information by index or by variable name. Spire.Doc provides multiple retrieval methods: getting the variable name and value by index, or getting the value directly by variable name.
import React from 'react';

function App() {
  const retrieveVariables = async () => {
    // Get the Spire.Doc WASM module
    const docModule = window.wasmModule?.spiredoc;

    // Check if the module is ready
    if (!docModule) {
      alert('Spire.Doc is not ready yet');
      return;
    }

    const inputFileName = 'Template_Docx_6.docx';
    await window.spire.FetchFileToVFS(inputFileName, '', `${process.env.PUBLIC_URL}/data/`);

    // Load the document
    const doc = new docModule.Document();
    doc.LoadFromFile(inputFileName);

    // Get variable name and value by index
    const nameByIndex = doc.Variables.GetNameByIndex(0);
    const valueByIndex = doc.Variables.GetValueByIndex(0);

    // Get value directly by variable name
    const valueByName = doc.Variables.get_Item("A1");

    // Iterate through all variables
    let stringBuilder = [];
    stringBuilder.push("This document has following variables:\n");
    for (let i = 0; i < doc.Variables.Count; i++) {
        let name = doc.Variables.GetNameByIndex(i);
        let value = doc.Variables.GetValueByIndex(i);
        stringBuilder.push("Name: " + name + ", " + "Value: " + value + "\n");
    }

    // Write the result to a text file
    const outputFileName = "RetrieveVariables_out.txt";
    window.dotnetRuntime.Module.FS.writeFile(outputFileName, stringBuilder.join(""));

    // Read the file from VFS and trigger download
    const modifiedFileArray = window.dotnetRuntime.Module.FS.readFile(outputFileName);
    const blob = new Blob([modifiedFileArray], { type: 'text/plain' });
    const url = URL.createObjectURL(blob);
    const a = document.createElement('a');
    a.href = url;
    a.download = outputFileName;
    a.click();
    URL.revokeObjectURL(url);
  };

  return (
    <div style={{ textAlign: 'center', height: '300px' }}>
      <h1>Retrieve Document Variables</h1>
      <button onClick={retrieveVariables}>
        Generate
      </button>
    </div>
  );
}

export default App;
The retrieval result is output as a text file, clearly listing all variable names and their corresponding values in the document.
Remove Document Variables
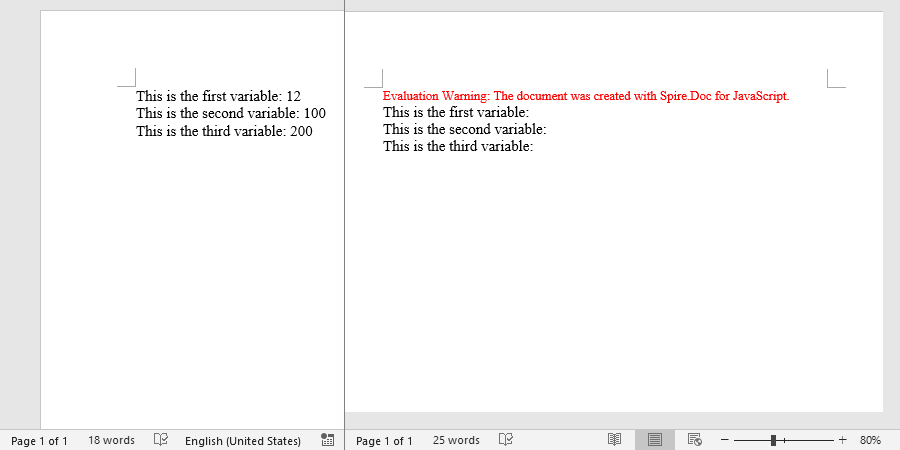
When a template document contains variables that are no longer needed, you can remove them by name using the Variables.Remove method. After removal, set the IsUpdateFields property to update the fields, ensuring the generated document is clean and free of redundant data.
function App() {
  const removeVariables = async () => {
    // Get the Spire.Doc WASM module
    const docModule = window.wasmModule?.spiredoc;

    // Check if the module is ready
    if (!docModule) {
      alert('Spire.Doc is not ready yet');
      return;
    }
    const inputFileName = 'Template_Docx_6.docx';
    await window.spire.FetchFileToVFS(inputFileName, '', `${process.env.PUBLIC_URL}/data/`);

    // Load the document
    const doc = new docModule.Document();
    doc.LoadFromFile(inputFileName);

    // Remove variable by name
    doc.Variables.Remove("A1");

    let name = doc.Variables.GetNameByIndex(0);
    doc.Variables.Remove(name);

    doc.Variables.Remove(doc.Variables.GetNameByIndex(0));

    doc.IsUpdateFields = true;

    // Define the output file name
    const outputFileName = "RemoveVariables_out.docx";

    // Save the document
    doc.SaveToFile({ fileName: outputFileName, fileFormat: docModule.FileFormat.Docx2013 });

    // Read the file from VFS and trigger download
    const modifiedFileArray = window.dotnetRuntime.Module.FS.readFile(outputFileName);
    const blob = new Blob([modifiedFileArray], { type: 'application/vnd.openxmlformats-officedocument.wordprocessingml.document' });
    const url = URL.createObjectURL(blob);
    const a = document.createElement('a');
    a.href = url;
    a.download = outputFileName;
    a.click();
    URL.revokeObjectURL(url);
  };

  return (
    <div style={{ textAlign: 'center', height: '300px' }}>
      <h1>Remove Document Variables</h1>
      <button onClick={removeVariables}>
        Generate
      </button>
    </div>
  );
}

export default App;
After removing variables, the target variables and their corresponding DocVariable fields are cleared from the generated document, resulting in cleaner content.
FAQ
Field codes still display instead of actual values after adding variables
Cause: After creating a DocVariable field, the document does not automatically update to show the variable value. If the IsUpdateFields property is not set, the field code text remains in the document.
Solution: Set IsUpdateFields to true before saving the document:
document.IsUpdateFields = true;
Getting a variable value by name returns empty
Cause: The variable name passed in does not match the actual variable name in the document (case or spelling mismatch), causing the lookup to fail.
Solution: First iterate through the document.Variables collection using GetNameByIndex to confirm the actual variable names in the document, then retrieve the value by the exact name:
for (let i = 0; i < document.Variables.Count; i++) {
    let name = document.Variables.GetNameByIndex(i);
    let value = document.Variables.GetValueByIndex(i);
    console.log("Name: " + name + ", Value: " + value);
}
Get a Free License
Spire.Doc for JavaScript offers a 30-day full-featured free trial license with no functional limitations. Apply here to evaluate before purchasing.
Footnotes are a commonly used annotation tool in Word documents, allowing you to add supplementary explanations or citation references at the bottom of each page. Spire.Doc for JavaScript runs entirely in the browser via WebAssembly, enabling you to insert, format, and remove footnotes directly using a virtual file system (VFS) to manage fonts and files — no backend server required.
This article covers three core features:
For installation and project setup, refer to Integrating Spire.Doc for JavaScript in a React Project. The examples below assume Spire.Doc is installed and the WebAssembly module is initialized.
1. Insert Footnotes
Inserting footnotes is a fundamental operation for adding annotations to a document — ideal for defining specific terms, citing sources, or providing supplementary explanations. Spire.Doc for JavaScript uses the AppendFootnote method to create footnotes and gives developers precise control over three aspects: where the footnote is inserted relative to the target text, the textual content displayed in the footnote body at the bottom of the page, and the visual style of the superscript footnote marker.
function App() {
  const insertFootnote = async () => {
    // Get the Spire.Doc WASM module
    const wasmModule = window.wasmModule?.spiredoc;

    // Check if the module is ready
    if (!wasmModule) {
      alert('Spire.Doc is not ready yet');
      return;
    }

    const inputFileName = 'SampleB_2.docx';
    await window.spire.FetchFileToVFS(inputFileName, '', `${process.env.PUBLIC_URL}/data/`);

    // Load the document
    const doc = new wasmModule.Document();
    doc.LoadFromFile(inputFileName);

    // Find the first matching string in the document
    let selection = doc.FindString("Spire.Doc", false, true);

    // Get the TextRange of the matched text
    let textRange = selection.GetAsOneRange();

    // Get the paragraph that contains the matched text
    let paragraph = textRange.OwnerParagraph;

    // Get the index position of the TextRange in the paragraph
    let index = paragraph.ChildObjects.IndexOf(textRange);

    // Append a footnote to the paragraph
    let footnote = paragraph.AppendFootnote({ type: wasmModule.FootnoteType.Footnote });

    // Insert the footnote after the matched text
    paragraph.ChildObjects.Insert(index + 1, footnote);

    // Add content to the footnote text body
    textRange = footnote.TextBody.AddParagraph().AppendText("Welcome to evaluate Spire.Doc");

    // Set the font format of the footnote content
    textRange.CharacterFormat.FontName = "Arial Black";
    textRange.CharacterFormat.FontSize = 10;
    textRange.CharacterFormat.TextColor = wasmModule.Color.get_DarkGray();

    // Set the format of the footnote marker (superscript number)
    footnote.MarkerCharacterFormat.FontName = "Calibri";
    footnote.MarkerCharacterFormat.FontSize = 12;
    footnote.MarkerCharacterFormat.Bold = true;
    footnote.MarkerCharacterFormat.TextColor = wasmModule.Color.get_DarkGreen();

    // Define the output file name
    const outputFileName = "InsertFootnote.docx";

    // Save the document
    doc.SaveToFile({ fileName: outputFileName, fileFormat: wasmModule.FileFormat.Docx2013 });

    // Release resources
    doc.Dispose();

    // Read the generated file from VFS and trigger download
    const modifiedFileArray = window.dotnetRuntime.Module.FS.readFile(outputFileName);
    const blob = new Blob([modifiedFileArray], { type: 'application/vnd.openxmlformats-officedocument.wordprocessingml.document' });
    const url = URL.createObjectURL(blob);
    const a = document.createElement('a');
    a.href = url;
    a.download = outputFileName;
    a.click();
    URL.revokeObjectURL(url);
  };

  return (
    <div style={{ textAlign: 'center', height: '300px' }}>
      <h1>Insert Footnotes</h1>
      <button onClick={insertFootnote}>
        Generate
      </button>
    </div>
  );
}

export default App;
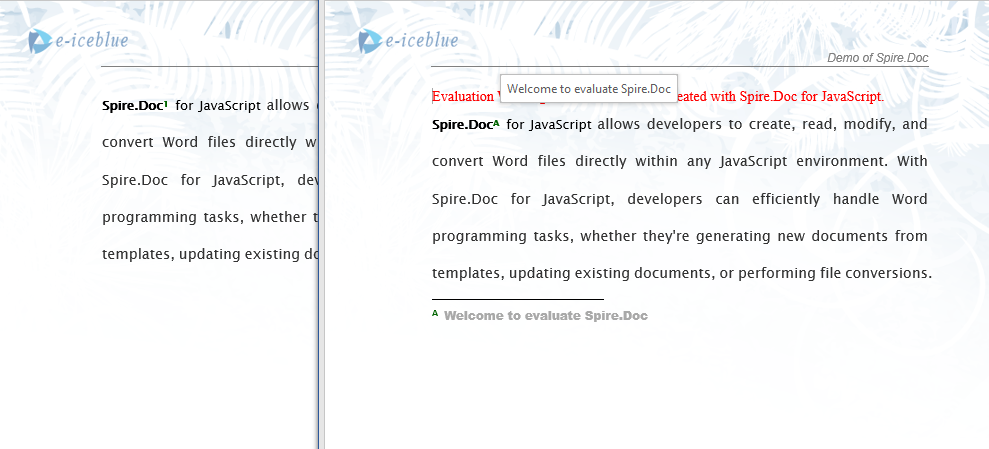
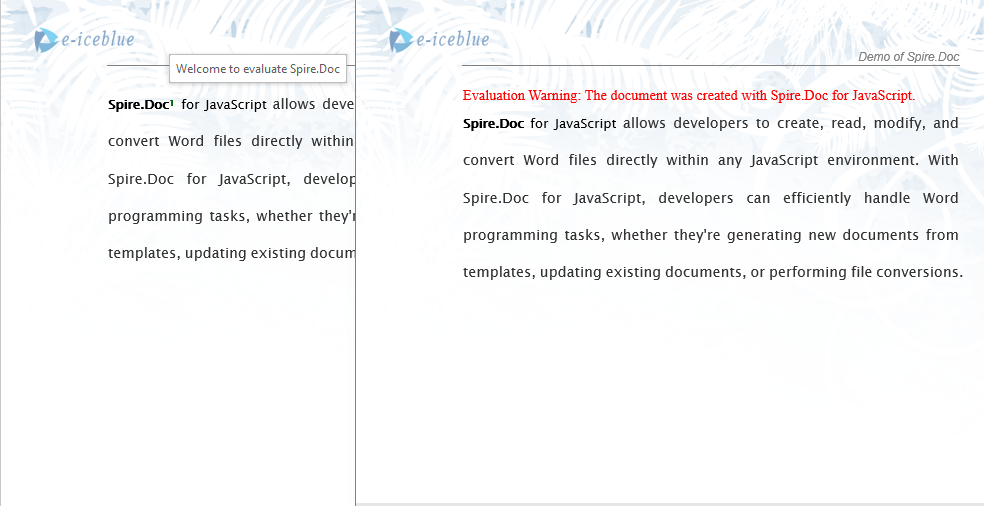
After inserting a footnote via the AppendFootnote method, the annotation content appears at the bottom of the page, and a superscript footnote marker appears next to the corresponding text in the body.

2. Set Footnote Position and Number Format
By default, Word footnotes use Arabic numerals (1, 2, 3...) and restart at the beginning of each page's bottom area. However, academic papers, technical manuals, and publications with strict formatting guidelines often require different numbering schemes — such as letters or Roman numerals — and may need footnotes to be grouped at the end of each section rather than at the page bottom. Spire.Doc for JavaScript provides the FootnoteOptions object to give developers per-section control over the number format, restart rule, and display position, making it easy to comply with a wide range of typographic standards.
function App() {
  const setFootnoteFormat = async () => {
    // Get the Spire.Doc WASM module
    const wasmModule = window.wasmModule?.spiredoc;

    // Check if the module is ready
    if (!wasmModule) {
      alert('Spire.Doc is not ready yet');
      return;
    }

    // Load fonts and the document file into VFS
    await window.spire.FetchFileToVFS('ARIALUNI.TTF', '/Library/Fonts/', `${process.env.PUBLIC_URL}/font/`);
    const inputFileName = 'Footnote.docx';
    await window.spire.FetchFileToVFS(inputFileName, '', `${process.env.PUBLIC_URL}/data/`);

    // Load the document
    const doc = new wasmModule.Document();
    doc.LoadFromFile(inputFileName);

    // Get the first section
    let sec = doc.Sections.get_Item(0);

    // Set footnote number format to uppercase letters
    sec.FootnoteOptions.NumberFormat = wasmModule.FootnoteNumberFormat.UpperCaseLetter;

    // Set footnote restart rule to restart per page
    sec.FootnoteOptions.RestartRule = wasmModule.FootnoteRestartRule.RestartPage;

    // Set footnote position to the end of the section
    sec.FootnoteOptions.Position = wasmModule.FootnotePosition.PrintAsEndOfSection;

    // Define the output file name
    const outputFileName = "SetPositionAndNumberFormat.docx";

    // Save the document
    doc.SaveToFile({ fileName: outputFileName, fileFormat: wasmModule.FileFormat.Docx2013 });

    // Release resources
    doc.Dispose();

    // Read the generated file from VFS and trigger download
    const modifiedFileArray = window.dotnetRuntime.Module.FS.readFile(outputFileName);
    const blob = new Blob([modifiedFileArray], { type: 'application/vnd.openxmlformats-officedocument.wordprocessingml.document' });
    const url = URL.createObjectURL(blob);
    const a = document.createElement('a');
    a.href = url;
    a.download = outputFileName;
    a.click();
    URL.revokeObjectURL(url);
  };

  return (
    <div style={{ textAlign: 'center', height: '300px' }}>
      <h1>Set Footnote Format</h1>
      <button onClick={setFootnoteFormat}>
        Generate
      </button>
    </div>
  );
}

export default App;
After modifying the number format and position through the FootnoteOptions object, the footnotes in the document are reorganized according to the specified style. For example, setting NumberFormat to UpperCaseLetter (A, B, C...) and Position to PrintAsEndOfSection is well suited for appendices or chapter-based documents where footnotes should appear collectively at each section's end. Setting RestartRule to RestartPage ensures that footnote numbering resets on every page, preventing the counter from growing too large across long documents. Since these settings apply per section, different chapters or sections within the same document can each have their own footnote rules — a valuable feature for multi-chapter or collaborative authoring workflows.
3. Remove Footnotes
After multiple rounds of review or content updates, some footnotes may become obsolete or need to be removed. Spire.Doc for JavaScript handles this by iterating through all paragraphs in each section, checking every child object with instanceof to detect Footnote instances, and calling RemoveAt to delete them from the paragraph's child object collection. This paragraph-by-paragraph traversal approach reliably locates footnotes anywhere in the document without requiring prior knowledge of specific page numbers or index offsets.
function App() {
  const removeFootnote = async () => {
    // Get the Spire.Doc WASM module
    const wasmModule = window.wasmModule?.spiredoc;

    // Check if the module is ready
    if (!wasmModule) {
      alert('Spire.Doc is not ready yet');
      return;
    }

    // Load fonts and the document file into VFS
    await window.spire.FetchFileToVFS('ARIALUNI.TTF', '/Library/Fonts/', `${process.env.PUBLIC_URL}/font/`);
    const inputFileName = 'Footnote.docx';
    await window.spire.FetchFileToVFS(inputFileName, '', `${process.env.PUBLIC_URL}/data/`);

    // Load the document
    const doc = new wasmModule.Document();
    doc.LoadFromFile(inputFileName);

    // Get the first section
    let section = doc.Sections.get_Item(0);

    // Traverse all paragraphs in the section to find and remove footnotes
    for (let p = 0; p < section.Paragraphs.Count; p++) {
      let para = section.Paragraphs.get_Item(p);
      let index = -1;

      // Check if each child object in the paragraph is a footnote
      for (let i = 0, cnt = para.ChildObjects.Count; i < cnt; i++) {
        let pBase = para.ChildObjects.get_Item(i);
        if (pBase instanceof wasmModule.Footnote) {
          index = i;
          break;
        }
      }

      // If a footnote is found, remove it from the paragraph
      if (index > -1) {
        para.ChildObjects.RemoveAt(index);
      }
    }

    // Define the output file name
    const outputFileName = "RemoveFootnote.docx";

    // Save the document
    doc.SaveToFile({ fileName: outputFileName, fileFormat: wasmModule.FileFormat.Docx2013 });

    // Release resources
    doc.Dispose();

    // Read the generated file from VFS and trigger download
    const modifiedFileArray = window.dotnetRuntime.Module.FS.readFile(outputFileName);
    const blob = new Blob([modifiedFileArray], { type: 'application/vnd.openxmlformats-officedocument.wordprocessingml.document' });
    const url = URL.createObjectURL(blob);
    const a = document.createElement('a');
    a.href = url;
    a.download = outputFileName;
    a.click();
    URL.revokeObjectURL(url);
  };

  return (
    <div style={{ textAlign: 'center', height: '300px' }}>
      <h1>Remove Footnotes</h1>
      <button onClick={removeFootnote}>
        Generate
      </button>
    </div>
  );
}

export default App;
After removing footnotes, both the superscript markers in the body text and the annotation content at the page bottom are cleared, while the main text remains unaffected.
FAQ
Inserted footnote does not appear at the expected position
Cause: The footnote was appended to the paragraph but was not inserted into the correct child object order via the Insert method, causing the footnote marker to appear at the end of the paragraph instead of after the target text.
Solution: Use ChildObjects.IndexOf to get the index position of the target text, then use the Insert method to place the footnote after that position:
let index = paragraph.ChildObjects.IndexOf(textRange);
paragraph.ChildObjects.Insert(index + 1, footnote);
Footnote number format changes do not take effect
Cause: The footnote number format was set on the wrong section, or the document contains multiple sections but only the first section was modified.
Solution: Identify the section that contains the target footnotes and set the number format for each section that has footnotes:
for (let i = 0; i < document.Sections.Count; i++) {
  let sec = document.Sections.get_Item(i);
  sec.FootnoteOptions.NumberFormat = wasmModule.FootnoteNumberFormat.UpperCaseLetter;
}
Get a Free License
Spire.Doc for JavaScript offers a 30-day full-featured free trial license with no functional limitations. Apply here to evaluate before purchasing.
Hyperlinks are essential interactive elements in Word documents, widely used to link to web pages, email addresses, internal document locations, or external files. Spire.Doc for JavaScript runs entirely in the browser via WebAssembly, enabling you to insert, find, modify, and remove hyperlinks directly using a virtual file system (VFS) to manage fonts and files — no backend server required.
This article covers three core features:
For installation and project setup, refer to Integrating Spire.Doc for JavaScript in a React Project. The examples below assume Spire.Doc is installed and the WebAssembly module is initialized.
1. Insert Hyperlinks
Inserting hyperlinks involves three steps: first, load image files into the WASM virtual file system via FetchFileToVFS; then instantiate a Document, add paragraphs, and call AppendHyperlink to insert web links, email links, or image links; finally, save the document, read the generated file from VFS, wrap it as a Blob, and trigger a browser download.
function App() {
  const insertHyperlinks = async () => {
    // Get the Spire.Doc WASM module
    const docModule = window.wasmModule?.spiredoc;

    // Check if the module is ready
    if (!docModule) {
      alert('Spire.Doc is not ready yet');
      return;
    }

    const imageFileName = 'Spire.Doc.png';
    await window.spire.FetchFileToVFS(imageFileName, '', `${process.env.PUBLIC_URL}/data/`);

    // Create a document
    const doc = new docModule.Document();
    const section = doc.AddSection();

    // Insert a web link
    let paragraph = section.AddParagraph();
    paragraph.AppendText("Home page");
    paragraph.ApplyStyle({ builtinStyle: docModule.BuiltinStyle.Heading2 });
    paragraph = section.AddParagraph();
    paragraph.AppendHyperlink("www.e-iceblue.com", "www.e-iceblue.com", docModule.HyperlinkType.WebLink);

    // Insert an email link
    paragraph = section.AddParagraph();
    paragraph.AppendText("Contact US");
    paragraph.ApplyStyle({ builtinStyle: docModule.BuiltinStyle.Heading2 });
    paragraph = section.AddParagraph();
    paragraph.AppendHyperlink("mailto:support@e-iceblue.com", "support@e-iceblue.com", docModule.HyperlinkType.EMailLink);

    // Insert a link on an image
    paragraph = section.AddParagraph();
    paragraph.AppendText("Insert Link On Image");
    paragraph.ApplyStyle({ builtinStyle: docModule.BuiltinStyle.Heading2 });
    paragraph = section.AddParagraph();
    const picture = paragraph.AppendPicture({ imgFile: imageFileName });
    paragraph.AppendHyperlink("www.e-iceblue.com", picture, docModule.HyperlinkType.WebLink);

    // Define the output file name
    const outputFileName = "Hyperlink_output.docx";

    // Save the document
    doc.SaveToFile({ fileName: outputFileName, fileFormat: docModule.FileFormat.Docx2013 });

    // Read the generated file from VFS and trigger download
    const modifiedFileArray = window.dotnetRuntime.Module.FS.readFile(outputFileName);
    const blob = new Blob([modifiedFileArray], { type: 'application/vnd.openxmlformats-officedocument.wordprocessingml.document' });
    const url = URL.createObjectURL(blob);
    const a = document.createElement('a');
    a.href = url;
    a.download = outputFileName;
    a.click();
    URL.revokeObjectURL(url);
  };

  return (
    <div style={{ textAlign: 'center', height: '300px' }}>
      <h1>Insert Hyperlinks</h1>
      <button onClick={insertHyperlinks}>
        Generate
      </button>
    </div>
  );
}

export default App;
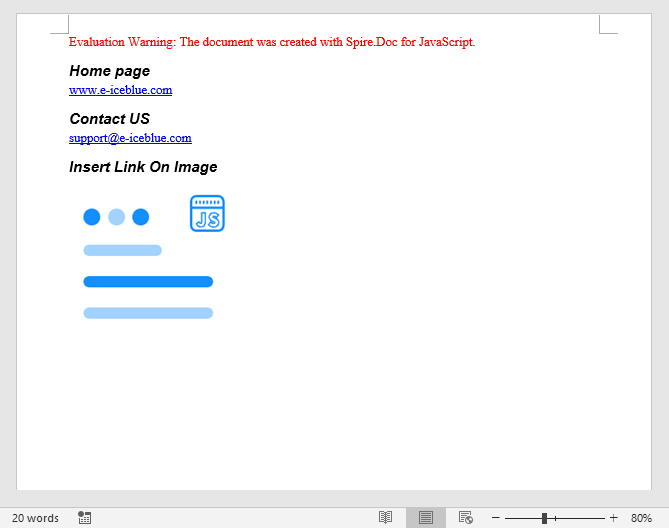
The resulting Word document contains clickable hyperlinks, including a text-based web link, an email link, and an image with an embedded hyperlink.
2. Find and Modify Hyperlinks
For existing Word documents that already contain hyperlinks, you can traverse the document object model to locate all hyperlink fields and read or modify their display text.
function App() {
  const findAndModifyHyperlinks = async () => {
    // Get the Spire.Doc WASM module
    const docModule = window.wasmModule?.spiredoc;

    // Check if the module is ready
    if (!docModule) {
      alert('Spire.Doc is not ready yet');
      return;
    }

    const inputFileName = 'Hyperlinks.docx';
    await window.spire.FetchFileToVFS(inputFileName, '', `${process.env.PUBLIC_URL}/data/`);

    // Load the document
    const doc = new docModule.Document();
    doc.LoadFromFile(inputFileName);

    // Traverse all hyperlinks in the document
    let hyperlinks = [];
    for (let i = 0; i < doc.Sections.Count; i++) {
      let section = doc.Sections.get_Item(i);
      for (let j = 0; j < section.Body.ChildObjects.Count; j++) {
        let sec = section.Body.ChildObjects.get_Item(j);
        if (sec.DocumentObjectType == docModule.DocumentObjectType.Paragraph) {
          for (let k = 0; k < sec.ChildObjects.Count; k++) {
            let para = sec.ChildObjects.get_Item(k);
            if (para.DocumentObjectType == docModule.DocumentObjectType.Field) {
              let field = para;
              if (field.Type == docModule.FieldType.FieldHyperlink) {
                hyperlinks.push(field);
              }
            }
          }
        }
      }
    }

    // Modify the display text of the first hyperlink
    hyperlinks[0].FieldText = "Spire.Doc component";

    // Define the output file name
    const outputFileName = "ModifyHyperlinkText_output.docx";

    // Save the document
    doc.SaveToFile({ fileName: outputFileName, fileFormat: docModule.FileFormat.Docx2013 });

    // Read the generated file from VFS and trigger download
    const modifiedFileArray = window.dotnetRuntime.Module.FS.readFile(outputFileName);
    const blob = new Blob([modifiedFileArray], { type: 'application/vnd.openxmlformats-officedocument.wordprocessingml.document' });
    const url = URL.createObjectURL(blob);
    const a = document.createElement('a');
    a.href = url;
    a.download = outputFileName;
    a.click();
    URL.revokeObjectURL(url);

    // Release resources
    doc.Dispose();
  };

  return (
    <div style={{ textAlign: 'center', height: '300px' }}>
      <h1>Find & Modify Hyperlinks</h1>
      <button onClick={findAndModifyHyperlinks}>
        Generate
      </button>
    </div>
  );
}

export default App;
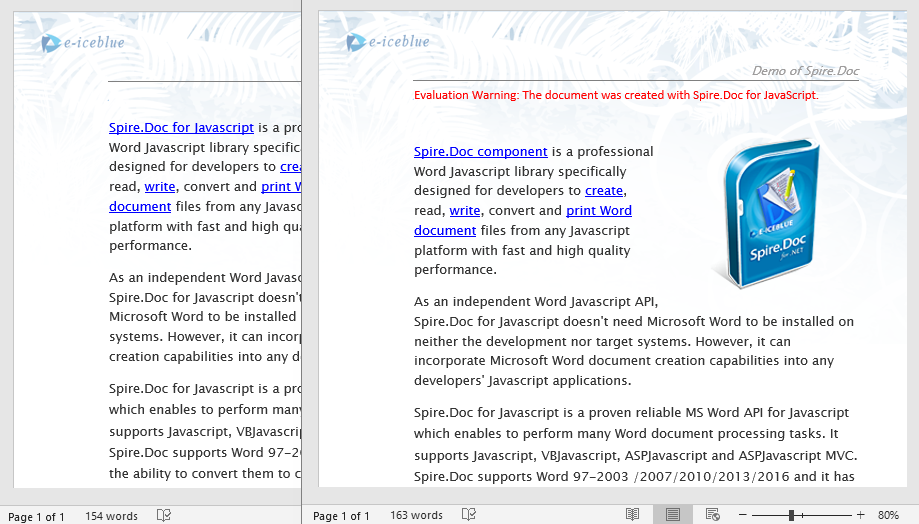
After traversing the document object model, you can read or modify the display text and target address of each hyperlink, making it easy to batch-update links.
3. Remove Hyperlinks
When hyperlinks in a document are no longer needed, you can remove them while keeping the associated text content. The key approach is to locate all hyperlink fields, then flatten the field structure so that only plain text remains without the hyperlink formatting.
// Find all hyperlinks in the document
function FindAllHyperlinks(document) {
  let docModule = window.wasmModule.spiredoc;
  let hyperlinks = [];
  for (let i = 0; i < document.Sections.Count; i++) {
    let section = document.Sections.get_Item(i);
    for (let j = 0; j < section.Body.ChildObjects.Count; j++) {
      let sec = section.Body.ChildObjects.get_Item(j);
      if (sec.DocumentObjectType == docModule.DocumentObjectType.Paragraph) {
        for (let k = 0; k < sec.ChildObjects.Count; k++) {
          let para = sec.ChildObjects.get_Item(k);
          if (para.DocumentObjectType == docModule.DocumentObjectType.Field) {
            let field = para;
            if (field.Type == docModule.FieldType.FieldHyperlink) {
              hyperlinks.push(field);
            }
          }
        }
      }
    }
  }
  return hyperlinks;
}

// Remove hyperlink formatting, keep only the text
function FormatFieldResultText(ownerBody, sepOwnerParaIndex, endOwnerParaIndex, sepIndex, endIndex) {
  let docModule = window.wasmModule.spiredoc;
  for (let i = sepOwnerParaIndex; i <= endOwnerParaIndex; i++) {
    let para = ownerBody.ChildObjects.get_Item(i);
    if (i == sepOwnerParaIndex && i == endOwnerParaIndex) {
      for (let j = sepIndex + 1; j < endIndex; j++) {
        let tr = para.ChildObjects.get_Item(j);
        tr.CharacterFormat.TextColor = docModule.Color.get_Black();
        tr.CharacterFormat.UnderlineStyle = docModule.UnderlineStyle.None;
      }
    } else if (i == sepOwnerParaIndex) {
      for (let j = sepIndex + 1; j < para.ChildObjects.Count; j++) {
        let tr = para.ChildObjects.get_Item(j);
        tr.CharacterFormat.TextColor = docModule.Color.get_Black();
        tr.CharacterFormat.UnderlineStyle = docModule.UnderlineStyle.None;
      }
    } else if (i == endOwnerParaIndex) {
      for (let j = 0; j < endIndex; j++) {
        let tr = para.ChildObjects.get_Item(j);
        tr.CharacterFormat.TextColor = docModule.Color.get_Black();
        tr.CharacterFormat.UnderlineStyle = docModule.UnderlineStyle.None;
      }
    } else {
      for (let j = 0; j < para.ChildObjects.Count; j++) {
        let tr = para.ChildObjects.get_Item(j);
        tr.CharacterFormat.TextColor = docModule.Color.get_Black();
        tr.CharacterFormat.UnderlineStyle = docModule.UnderlineStyle.None;
      }
    }
  }
}

function FlattenHyperlinks(field) {
  // Get the position indices of each hyperlink field component
  let ownerParaIndex = field.OwnerParagraph.OwnerTextBody.ChildObjects.IndexOf(field.OwnerParagraph);
  let fieldIndex = field.OwnerParagraph.ChildObjects.IndexOf(field);
  let sepOwnerPara = field.Separator.OwnerParagraph;
  let sepOwnerParaIndex = field.Separator.OwnerParagraph.OwnerTextBody.ChildObjects.IndexOf(field.Separator.OwnerParagraph);
  let sepIndex = field.Separator.OwnerParagraph.ChildObjects.IndexOf(field.Separator);
  let endIndex = field.End.OwnerParagraph.ChildObjects.IndexOf(field.End);
  let endOwnerParaIndex = field.End.OwnerParagraph.OwnerTextBody.ChildObjects.IndexOf(field.End.OwnerParagraph);

  // Remove hyperlink formatting (blue underlined text)
  FormatFieldResultText(field.Separator.OwnerParagraph.OwnerTextBody, sepOwnerParaIndex, endOwnerParaIndex, sepIndex, endIndex);

  // Remove the hyperlink field structure
  field.End.OwnerParagraph.ChildObjects.RemoveAt(endIndex);
  for (let i = sepOwnerParaIndex; i >= ownerParaIndex; i--) {
    if (i == sepOwnerParaIndex && i == ownerParaIndex) {
      for (let j = sepIndex; j >= fieldIndex; j--) {
        field.OwnerParagraph.ChildObjects.RemoveAt(j);
      }
    } else if (i == ownerParaIndex) {
      for (let j = field.OwnerParagraph.ChildObjects.Count - 1; j >= fieldIndex; j--) {
        field.OwnerParagraph.ChildObjects.RemoveAt(j);
      }
    } else if (i == sepOwnerParaIndex) {
      for (let j = sepIndex; j >= 0; j--) {
        sepOwnerPara.ChildObjects.RemoveAt(j);
      }
    } else {
      field.OwnerParagraph.OwnerTextBody.ChildObjects.RemoveAt(i);
    }
  }
}

function App() {
  const removeHyperlinks = async () => {
    // Get the Spire.Doc WASM module
    const docModule = window.wasmModule?.spiredoc;

    // Check if the module is ready
    if (!docModule) {
      alert('Spire.Doc is not ready yet');
      return;
    }

    const inputFileName = 'Hyperlinks.docx';
    await window.spire.FetchFileToVFS(inputFileName, '', `${process.env.PUBLIC_URL}/data/`);

    // Load the document
    const doc = new docModule.Document();
    doc.LoadFromFile(inputFileName);

    // Find all hyperlinks
    let hyperlinks = FindAllHyperlinks(doc);

    // Flatten all hyperlinks (remove hyperlink formatting, keep text)
    for (let i = hyperlinks.length - 1; i >= 0; i--) {
      FlattenHyperlinks(hyperlinks[i]);
    }

    // Define the output file name
    const outputFileName = "RemoveHyperlinks_output.docx";

    // Save the document
    doc.SaveToFile({ fileName: outputFileName, fileFormat: docModule.FileFormat.Docx2013 });

    // Read the generated file from VFS and trigger download
    const modifiedFileArray = window.dotnetRuntime.Module.FS.readFile(outputFileName);
    const blob = new Blob([modifiedFileArray], { type: 'application/vnd.openxmlformats-officedocument.wordprocessingml.document' });
    const url = URL.createObjectURL(blob);
    const a = document.createElement('a');
    a.href = url;
    a.download = outputFileName;
    a.click();
    URL.revokeObjectURL(url);

    // Release resources
    doc.Dispose();
  };

  return (
    <div style={{ textAlign: 'center', height: '300px' }}>
      <h1>Remove Hyperlinks</h1>
      <button onClick={removeHyperlinks}>
        Generate
      </button>
    </div>
  );
}

export default App;
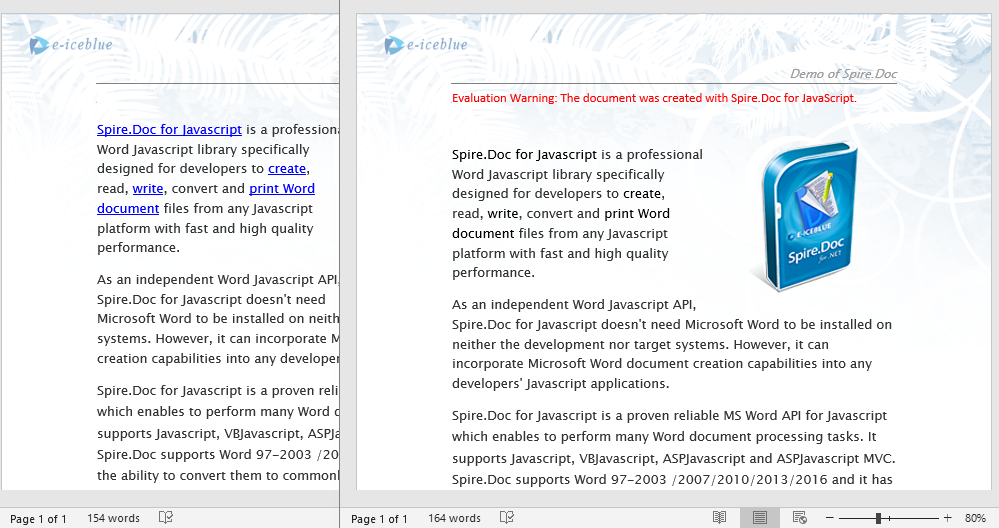
After removing the hyperlinks, the original link text remains as plain text, with the blue underline style cleared while the content stays unchanged.
FAQ
Inserted hyperlinks are not clickable in the document
Cause: The target URL format is incorrect, e.g., missing the protocol prefix (such as http:// or mailto:) so Word cannot recognize it as a valid clickable link.
Solution: Ensure web links use a complete URL and email links include the mailto: prefix:
// Correct web link
paragraph.AppendHyperlink("https://www.e-iceblue.com", "e-iceblue", wasmModule.HyperlinkType.WebLink);

// Correct email link
paragraph.AppendHyperlink("mailto:support@e-iceblue.com", "support@e-iceblue.com", wasmModule.HyperlinkType.EMailLink);
Text style is abnormal after removing hyperlinks
Cause: Only the hyperlink field structure was removed, but the text color and underline style were not reset to normal text formatting.
Solution: When flattening hyperlinks, also set the text color to black and the underline style to none:
tr.CharacterFormat.TextColor = wasmModule.Color.get_Black();
tr.CharacterFormat.UnderlineStyle = wasmModule.UnderlineStyle.None;
Get a Free License
Spire.Doc for JavaScript offers a 30-day full-featured free trial license with no functional limitations. Apply here to evaluate before purchasing.
Copying worksheets is one of the most common and efficient operations in everyday Excel document processing — whether you are quickly creating similar reports from a template or consolidating data across multiple documents. Spire.XLS for JavaScript handles this entirely in the browser via WebAssembly, using a virtual file system (VFS) to manage input and output files — no backend server required.
This article covers three core features:
- Copy a worksheet within the same workbook
- Copy a worksheet across workbooks
- Copy a selected cell range
For installation and project setup, refer to Integrating Spire.XLS for JavaScript in a React Project. The examples below assume Spire.XLS is installed and the WebAssembly module is initialized.
Copy a Worksheet Within the Same Workbook
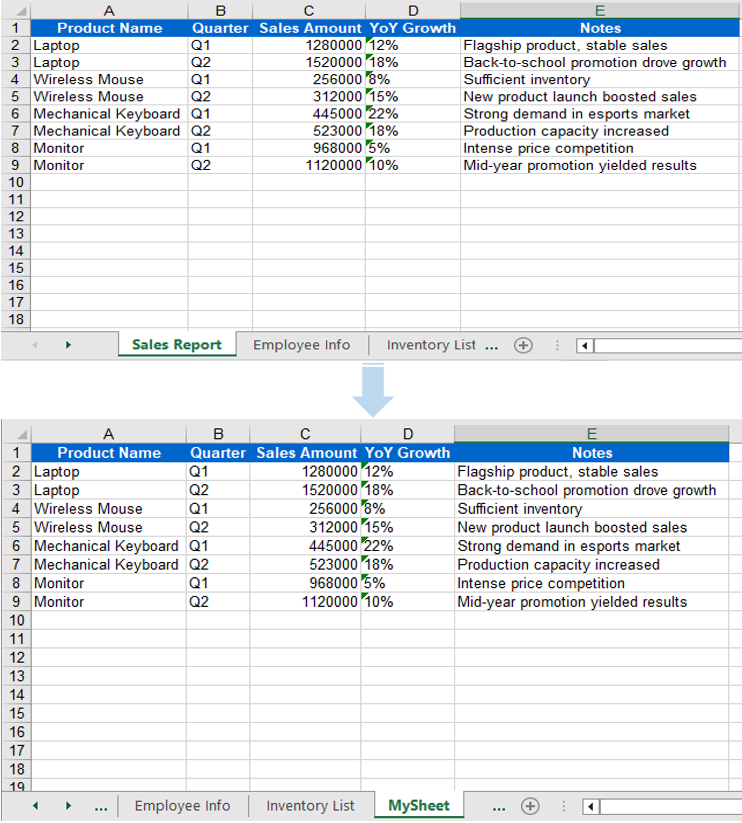
Duplicating a worksheet within the same workbook is a frequent development task — for example, quickly creating next month's report copy from a monthly template. Spire.XLS for JavaScript provides the CopyFrom method to duplicate a worksheet. The copied sheet retains all content from the source worksheet, including data, styles, fonts, colors, borders, column widths, and row heights.
function App() {
  const sheetToSVG = async () => {
    // Get the Spire.XLS WASM module
    const xlsModule = window.wasmModule?.spirexls;

    // Check if the module is ready
    if (!xlsModule) {
      alert('Spire.Xls is not ready yet');
      return;
    }

    // Load fonts and the Excel file into VFS
    await window.spire.FetchFileToVFS('ARIAL.TTF', '/Library/Fonts/', `${process.env.PUBLIC_URL}/font/`);
    const inputFileName = 'Sample.xlsx';
    await window.spire.FetchFileToVFS(inputFileName, '', `${process.env.PUBLIC_URL}data/`);

    // Load the workbook
    const workbook = new xlsModule.Workbook();
    workbook.LoadFromFile({ fileName: inputFileName });

    // Get the first worksheet
    let sheet = workbook.Worksheets.get(0);

    // Add a new worksheet
    let sheet1 = workbook.Worksheets.Add("MySheet");

    // Copy the first worksheet into the newly added sheet
    sheet1.CopyFrom(sheet);

    const outputFileName = "CopySheetWithinWorkbook_output.xlsx";
    workbook.SaveToFile({ fileName: outputFileName });

    // Release the workbook object to free resources
    workbook.Dispose();

    // Read the converted file from VFS and trigger download
    const fileArray = window.dotnetRuntime.Module.FS.readFile(outputFileName);
    const blob = new Blob([fileArray], { type: "application/vnd.openxmlformats-officedocument.spreadsheetml.sheet" });
    const url = URL.createObjectURL(blob);
    const a = document.createElement('a');
    a.href = url;
    a.download = outputFileName;
    a.click();
    URL.revokeObjectURL(url);
  };

  return (
    <div style={{ textAlign: 'center', height: '300px' }}>
      <h1>Copy Worksheet Within Workbook</h1>
      <button onClick={sheetToSVG}>
        Start
      </button>
    </div>
  );
}

export default App;
When using CopyFrom, data, styles, fonts, colors, borders, and column widths from the source worksheet are fully preserved in the new sheet.
Copy a Worksheet Across Workbooks
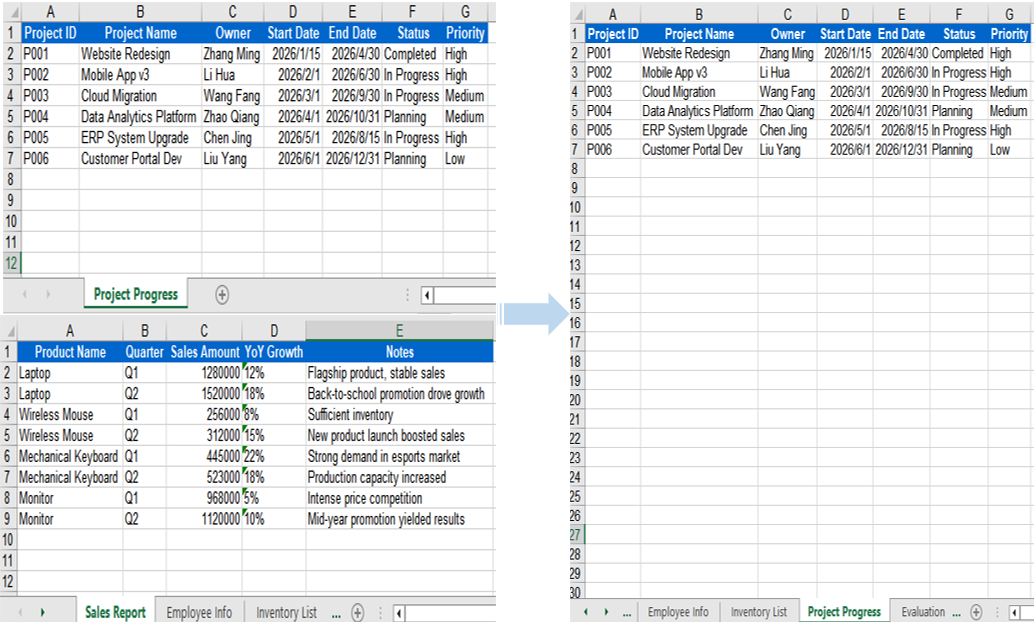
In real-world scenarios, data from multiple Excel files often needs to be consolidated into a single workbook — for example, extracting specific sheets from departmental reports and merging them into a master sheet. The AddCopy method lets you copy a worksheet from the source workbook into the target workbook with all its content intact.
function App() {
  const sheetToSVG = async () => {
    // Get the Spire.XLS WASM module
    const xlsModule = window.wasmModule?.spirexls;

    // Check if the module is ready
    if (!xlsModule) {
      alert('Spire.Xls is not ready yet');
      return;
    }

    // Load fonts and the Excel files into VFS
    await window.spire.FetchFileToVFS('arial.ttf', '/Library/Fonts/', `${process.env.PUBLIC_URL}/font/`);
    const sourceFileName = 'ReadImages.xlsx';
    const targetFileName = 'Sample.xlsx';
    await window.spire.FetchFileToVFS(sourceFileName, '', `${process.env.PUBLIC_URL}data/`);
    await window.spire.FetchFileToVFS(targetFileName, '', `${process.env.PUBLIC_URL}data/`);

    // Load the source workbook
    const sourceWorkbook = new xlsModule.Workbook();
    sourceWorkbook.LoadFromFile({ fileName: sourceFileName });

    // Get the first worksheet of the source workbook
    const srcWorksheet = sourceWorkbook.Worksheets.get(0);

    // Load the target workbook
    const targetWorkbook = new xlsModule.Workbook();
    targetWorkbook.LoadFromFile({ fileName: targetFileName });

    // Add a new worksheet in the target workbook and copy the source sheet into it
    targetWorkbook.Worksheets.AddCopy({ sheet: srcWorksheet });

    // Save the target workbook
    const outputFileName = "CopyAcrossWorkbooks_output.xlsx";
    targetWorkbook.SaveToFile({ fileName: outputFileName });

    // Release resources
    sourceWorkbook.Dispose();
    targetWorkbook.Dispose();

    // Read the converted file from VFS and trigger download
    const fileArray = window.dotnetRuntime.Module.FS.readFile(outputFileName);
    const blob = new Blob([fileArray], { type: "application/vnd.openxmlformats-officedocument.spreadsheetml.sheet"});
    const url = URL.createObjectURL(blob);
    const a = document.createElement('a');
    a.href = url;
    a.download = outputFileName;
    a.click();
    URL.revokeObjectURL(url);
  };

  return (
    <div style={{ textAlign: 'center', height: '300px' }}>
      <h1>Copy Worksheet Across Workbooks</h1>
      <button onClick={sheetToSVG}>
        Start
      </button>
    </div>
  );
}

export default App;
When copying across workbooks, all data and styles from the source worksheet are preserved — AddCopy copies the complete worksheet content into the target workbook.
Copy a Selected Cell Range
Sometimes you do not need to copy an entire worksheet — you only need to copy a specific cell range (such as a particular data table or summary result) to a target location. Spire.XLS for JavaScript provides the Copy method, which copies data, styles, and formatting from the source range to the starting position of the target range.
function App() {
  const sheetToSVG = async () => {
    // Get the Spire.XLS WASM module
    const xlsModule = window.wasmModule?.spirexls;

    // Check if the module is ready
    if (!xlsModule) {
      alert('Spire.Xls is not ready yet');
      return;
    }

    // Load the source Excel file into VFS
    await window.spire.FetchFileToVFS('ARIAL.TTF', '/Library/Fonts/', `${process.env.PUBLIC_URL}/font/`);
    const inputFileName = 'Sample.xlsx';
    await window.spire.FetchFileToVFS(inputFileName, '', `${process.env.PUBLIC_URL}data/`);

    // Load the workbook
    const workbook = new xlsModule.Workbook();
    workbook.LoadFromFile({ fileName: inputFileName });

    // Get the first row of the first worksheet as the source range
    const sheet = workbook.Worksheets.get(0);
    const sourceRange = sheet.Range.get("A1:E1");

    // Add a new worksheet
    let sheet1 = workbook.Worksheets.Add("AddSheet");

    // Copy the source range to the starting position of the target worksheet
    sheet.Copy(sourceRange, sheet1, sheet.FirstRow, sheet.FirstColumn, true);

    // Save the workbook
    const outputFileName = "CopyRange_output22.xlsx";
    workbook.SaveToFile({ fileName: outputFileName });

    // Release resources
    workbook.Dispose();

    // Read the converted file from VFS and trigger download
    const fileArray = window.dotnetRuntime.Module.FS.readFile(outputFileName);
    const blob = new Blob([fileArray], { type: "application/vnd.openxmlformats-officedocument.spreadsheetml.sheet" });
    const url = URL.createObjectURL(blob);
    const a = document.createElement('a');
    a.href = url;
    a.download = outputFileName;
    a.click();
    URL.revokeObjectURL(url);
  };

  return (
    <div style={{ textAlign: 'center', height: '300px' }}>
      <h1>Copy Range</h1>
      <button onClick={sheetToSVG}>
        Start
      </button>
    </div>
  );
}

export default App;
The Copy method transfers data, styles, and formatting from the source range to the target range — ideal for lightweight scenarios where only partial data extraction is needed.
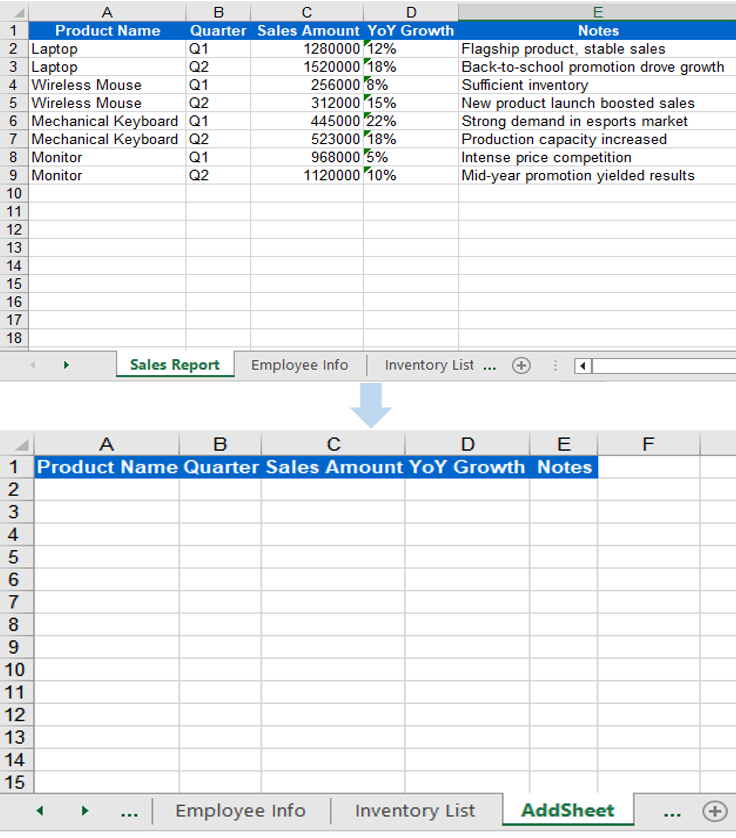
FAQ
Column width differs after copying
Cause: Font mismatch between the source and target workbooks.
Solution: Ensure all required font files are loaded into the VFS environment of the target workbook before copying across workbooks:
await window.spire.FetchFileToVFS(
  'arial.ttf', '/Library/Fonts/', '/'
);
Range content is pasted at the wrong position
Cause: Incorrect destRow and destColumn parameters in the Copy method, causing data to be pasted at an unexpected location.
Solution: Confirm that the destination row and column indices start from 1 (not 0), and verify the row and column range of the target worksheet before copying.
Get a Free License
Spire.XLS for JavaScript offers a 30-day full-featured free trial license with no functional limitations. Apply here to evaluate before purchasing.
Add, Remove, and Move Excel Worksheets with JavaScript in React
2026-06-15 03:56:24 Written by Lisa LiManaging worksheets — adding, removing, and reordering them — is one of the most fundamental and frequently used operations in Excel document processing. Spire.XLS for JavaScript handles these operations entirely in the browser via WebAssembly, using a virtual file system (VFS) to manage input and output files — no backend server required.
This article covers three core features:
For installation and project setup, refer to Integrating Spire.XLS for JavaScript in a React Project. The examples below assume Spire.XLS is installed and the WebAssembly module is initialized.
Add Worksheet
Adding new worksheets to a workbook is a common requirement in daily development. Spire.XLS for JavaScript provides the Add method to create a new worksheet and give it a name. After adding, you can write data to the new sheet's cells and save the workbook.
function App() {
  const startProcessing = async () => {
    // Get the Spire.XLS WASM module
    const xlsModule = window.wasmModule?.spirexls;
    if (!xlsModule) {
      alert('Spire.Xls is not ready yet');
      return;
    }

    // Load fonts and the Excel file into VFS
    await window.spire.FetchFileToVFS('ARIAL.TTF', '/Library/Fonts/', `${process.env.PUBLIC_URL}/font/`);
    const inputFileName = 'AddWorksheet.xlsx';
    await window.spire.FetchFileToVFS(inputFileName, '', `${process.env.PUBLIC_URL}/data/`);

    // Create a workbook instance and load the file
    const workbook = new xlsModule.Workbook();
    workbook.LoadFromFile({ fileName: inputFileName });

    // Add a new worksheet named "NewSheet"
    const sheet = workbook.Worksheets.Add("NewSheet");
    sheet.Range.get("C5").Text = "This is an inserted sheet.";

    // Auto-fit columns
    sheet.AllocatedRange.AutoFitColumns();

    // Save the workbook
    const outputFileName = "AddWorksheet_output.xlsx";
    workbook.SaveToFile({ fileName: outputFileName });

    // Release resources
    workbook.Dispose();

    // Read the output file from VFS, wrap it as a Blob, and trigger download
    const modifiedFileArray = window.dotnetRuntime.Module.FS.readFile(outputFileName);
    const blob = new Blob([modifiedFileArray], { type: "application/vnd.openxmlformats-officedocument.spreadsheetml.sheet" });
    const url = URL.createObjectURL(blob);
    const a = document.createElement('a');
    a.href = url;
    a.download = outputFileName;
    a.click();
    URL.revokeObjectURL(url);
  };

  return (
    <div style={{ textAlign: 'center', height: '300px' }}>
      <h1>Add Worksheet</h1>
      <button onClick={startProcessing}>
        Start
      </button>
    </div>
  );
}

export default App;
Adding a new worksheet after the existing ones via the Add method.
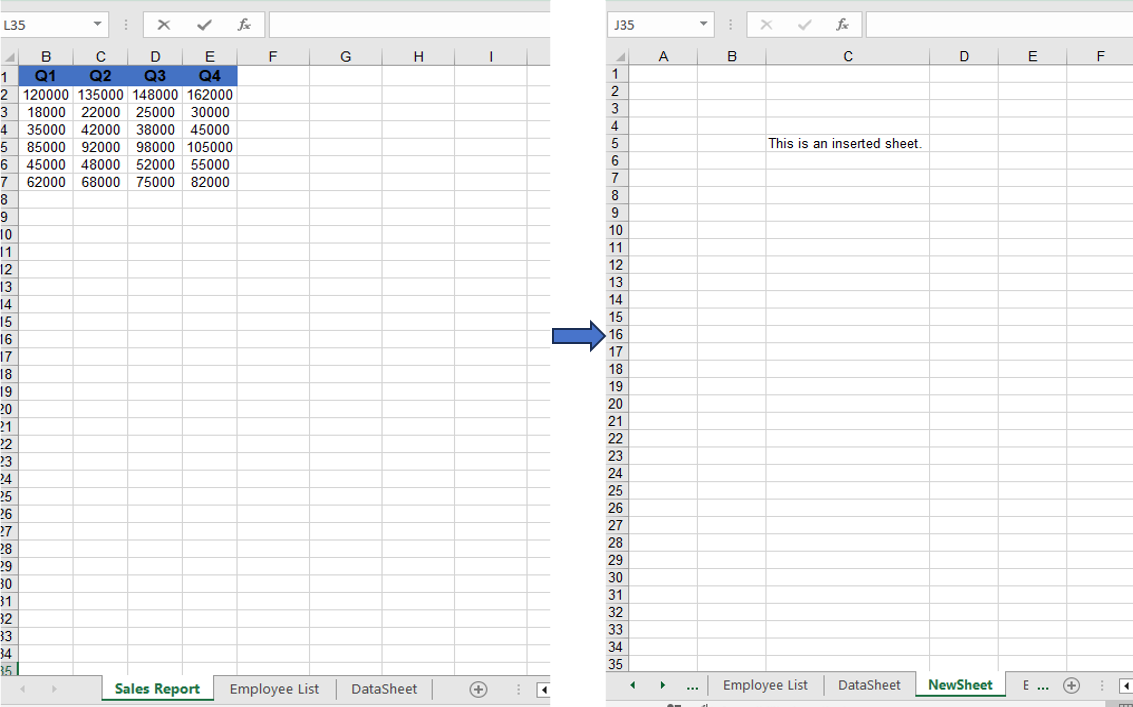
Remove Worksheet
When you need to clean up unwanted worksheets from a workbook, you can remove them directly by name. Spire.XLS for JavaScript's Remove method precisely locates and removes the target worksheet.
function App() {
  const startProcessing = async () => {
    // Get the Spire.XLS WASM module
    const xlsModule = window.wasmModule?.spirexls;
    if (!xlsModule) {
      alert('Spire.Xls is not ready yet');
      return;
    }

    // Load fonts and the Excel file into VFS
    await window.spire.FetchFileToVFS('ARIAL.TTF', '/Library/Fonts/', `${process.env.PUBLIC_URL}/font/`);
    const inputFileName = 'RemoveWorksheet.xlsx';
    await window.spire.FetchFileToVFS(inputFileName, '', `${process.env.PUBLIC_URL}/data/`);

    // Create a workbook instance and load the file
    const workbook = new xlsModule.Workbook();
    workbook.LoadFromFile({ fileName: inputFileName });

    // Remove a worksheet by name
    const sheet = workbook.Worksheets.get("Sheet2");
    workbook.Worksheets.Remove(sheet);
    // Remove by index
    //workbook.Worksheets.RemoveAt(1);

    // Save the workbook
    const outputFileName = "RemoveWorksheet_output.xlsx";
    workbook.SaveToFile({ fileName: outputFileName });

    // Release resources
    workbook.Dispose();

    // Read the output file from VFS, wrap it as a Blob, and trigger download
    const modifiedFileArray = window.dotnetRuntime.Module.FS.readFile(outputFileName);
    const blob = new Blob([modifiedFileArray], { type: "application/vnd.openxmlformats-officedocument.spreadsheetml.sheet" });
    const url = URL.createObjectURL(blob);
    const a = document.createElement('a');
    a.href = url;
    a.download = outputFileName;
    a.click();
    URL.revokeObjectURL(url);
  };

  return (
    <div style={{ textAlign: 'center', height: '300px' }}>
      <h1>Remove Worksheet</h1>
      <button onClick={startProcessing}>
        Start
      </button>
    </div>
  );
}

export default App;
Using Remove to delete a worksheet by name.
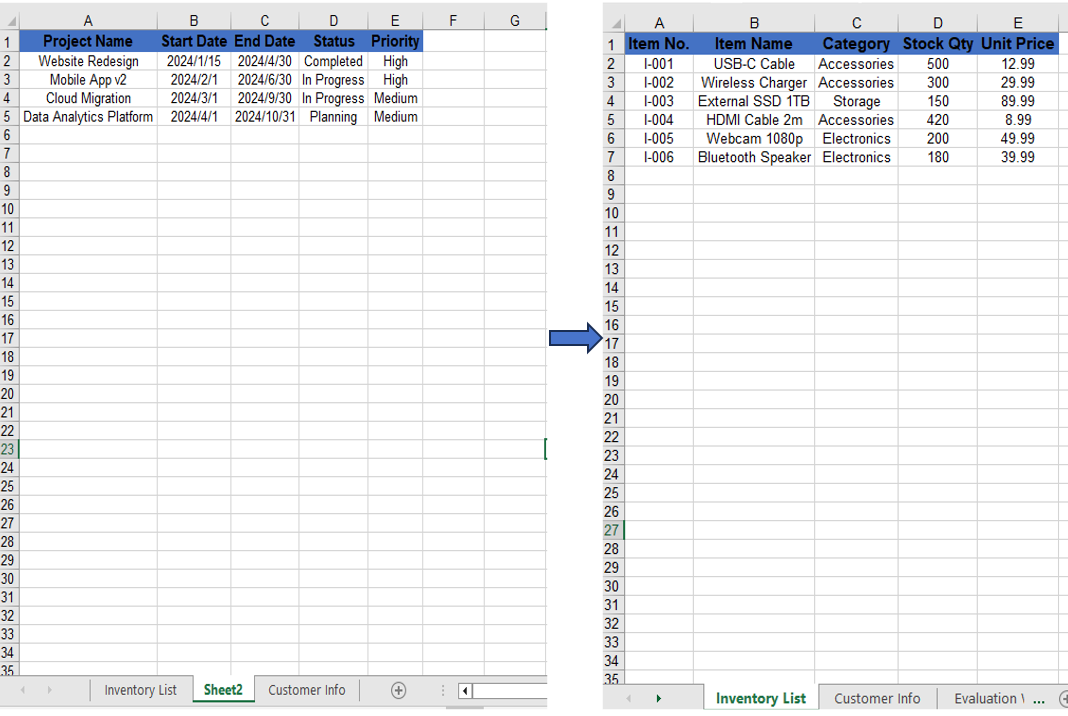
Move and Reorder Worksheets
Reordering worksheets is a common task when organizing an Excel document. With Spire.XLS for JavaScript's MoveWorksheet method, you can move a worksheet to a target index position, effectively reordering the sheets within the workbook.
function App() {
  const startProcessing = async () => {
    // Get the Spire.XLS WASM module
    const xlsModule = window.wasmModule?.spirexls;
    if (!xlsModule) {
      alert('Spire.Xls is not ready yet');
      return;
    }

    // Load fonts and the Excel file into VFS
    await window.spire.FetchFileToVFS('ARIAL.TTF', '/Library/Fonts/', `${process.env.PUBLIC_URL}/font/`);
    const inputFileName = 'Sample.xlsx';
    await window.spire.FetchFileToVFS(inputFileName, '', `${process.env.PUBLIC_URL}/data/`);

    // Create a workbook instance and load the file
    const workbook = new xlsModule.Workbook();
    workbook.LoadFromFile({ fileName: inputFileName });

    // Get the first worksheet and move it to index 1
    const sheet = workbook.Worksheets.get(0);
    sheet.MoveWorksheet(1);

    // Save the workbook
    const outputFileName = "MoveWorksheet_output.xlsx";
    workbook.SaveToFile({ fileName: outputFileName });

    // Release resources
    workbook.Dispose();

    // Read the output file from VFS, wrap it as a Blob, and trigger download
    const modifiedFileArray = window.dotnetRuntime.Module.FS.readFile(outputFileName);
    const blob = new Blob([modifiedFileArray], { type: "application/vnd.openxmlformats-officedocument.spreadsheetml.sheet" });
    const url = URL.createObjectURL(blob);
    const a = document.createElement('a');
    a.href = url;
    a.download = outputFileName;
    a.click();
    URL.revokeObjectURL(url);
  };

  return (
    <div style={{ textAlign: 'center', height: '300px' }}>
      <h1>Move Worksheet</h1>
      <button onClick={startProcessing}>
        Start
      </button>
    </div>
  );
}

export default App;
Moving the first worksheet to the second sheet position via the MoveWorksheet method.
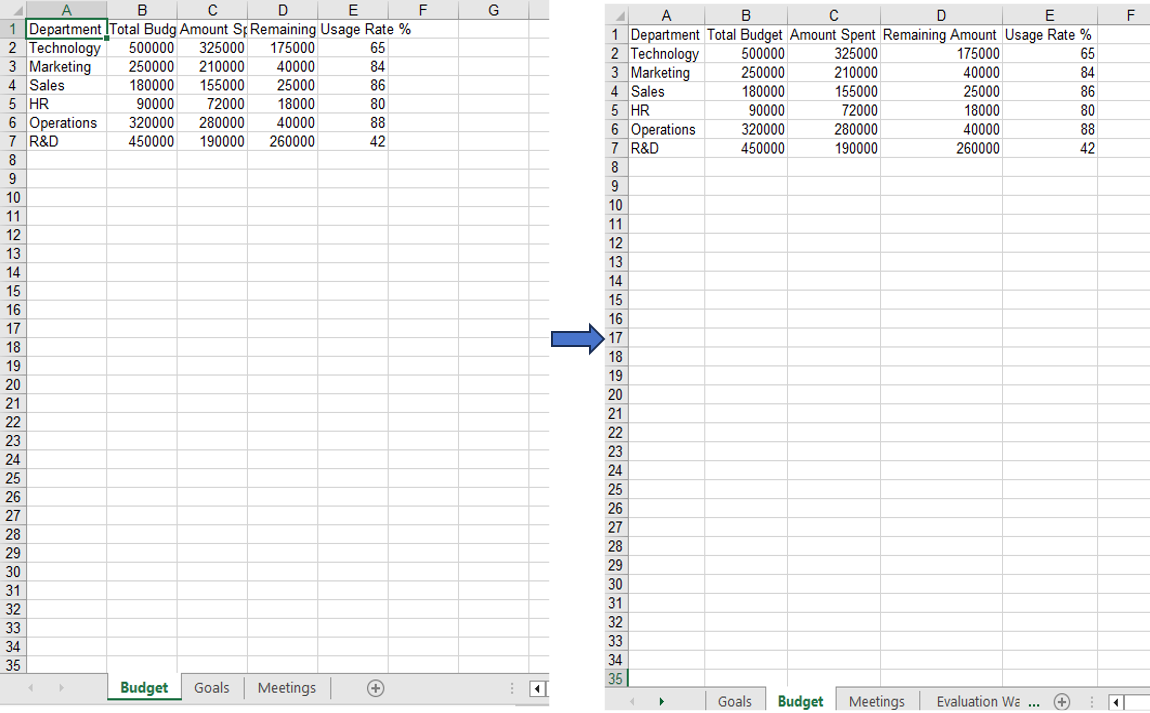
FAQ
Index out of range when operating on worksheets
Cause: The index parameter is outside the range of the current worksheet collection in the workbook.
Solution: Verify the total number of worksheets before performing the operation, ensuring the index is within 0 to worksheets.Count-1. Use workbook.Worksheets.Count to get the current total:
const count = workbook.Worksheets.Count;
Worksheet not found when removing by name
Cause: The specified worksheet name does not exactly match the actual name in the workbook.
Solution: Iterate through the worksheet names to confirm before removal:
for (let i = 0; i < workbook.Worksheets.Count; i++) {
  let name = workbook.Worksheets.get(i).Name;
  console.log(name);
}
Get a Free License
Spire.XLS for JavaScript offers a 30-day full-featured free trial license with no functional limitations. Apply here to evaluate before purchasing.
Exporting Excel worksheets and charts to SVG vector graphics lets you display data clearly at any resolution on the web, while keeping text selectable and searchable. Spire.XLS for JavaScript runs entirely in the browser via WebAssembly, using a virtual file system (VFS) to manage input and output files — no backend server required.
This article covers two core features:
For installation and project setup, refer to Integrating Spire.XLS for JavaScript in a React Project. The examples below assume Spire.XLS is installed and the WebAssembly module is initialized.
Worksheet to SVG
Converting a worksheet to SVG involves three steps: first, load the font files and the target Excel file into the WASM virtual file system via FetchFileToVFS; then instantiate a Workbook, load the file, retrieve the target worksheet, and call ToSVGStream to render it into a Stream object; finally, read the generated SVG file from VFS, wrap it as a Blob, and trigger a browser download.
function App() {
  const sheetToSVG = async () => {
    // Get the Spire.XLS WASM module
    const xlsModule = window.wasmModule?.spirexls;

    // Check if the module is ready
    if (!xlsModule) {
      alert('Spire.Xls is not ready yet');
      return;
    }

    // Load fonts and the Excel file into VFS
    await window.spire.FetchFileToVFS('arial.ttf', '/Library/Fonts/', `${process.env.PUBLIC_URL}/font/`);
    const inputFileName = 'ImageHeaderFooter.xlsx';
    await window.spire.FetchFileToVFS(inputFileName, '', `${process.env.PUBLIC_URL}data/`);

    // Load the workbook and get the first worksheet
    const workbook = new xlsModule.Workbook();
    workbook.LoadFromFile({ fileName: inputFileName });
    const sheet = workbook.Worksheets.get(0);

    // Convert the worksheet to an SVG stream
    const outputFileName = "Worksheet.svg";
    let fs = new xlsModule.Stream(outputFileName);
    sheet.ToSVGStream(fs, 0, 0, 0, 0);
    fs.Flush();
    fs.Dispose();

    // Read the converted file from VFS and trigger download
    const fileArray = window.dotnetRuntime.Module.FS.readFile(outputFileName);
    const blob = new Blob([fileArray], { type: "image/svg+xml;charset=utf-8"});
    const url = URL.createObjectURL(blob);
    const a = document.createElement('a');
    a.href = url;
    a.download = outputFileName;
    a.click();
    URL.revokeObjectURL(url);

    // Release resources
    workbook.Dispose();
  };

  return (
    <div style={{ textAlign: 'center', height: '300px' }}>
      <h1>Convert Excel To SVG</h1>
      <button onClick={sheetToSVG}>
        Generate
      </button>
    </div>
  );
}

export default App;
SVG output generated from a worksheet via ToSVGStream
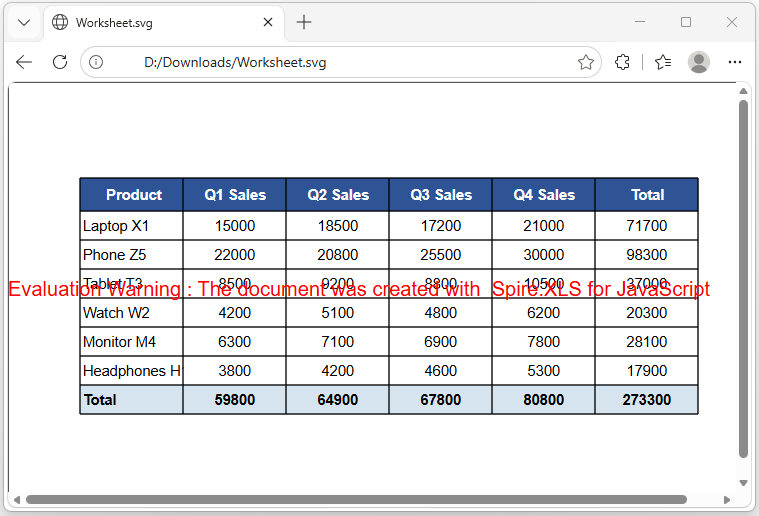
ChartSheet to SVG
A ChartSheet is a special type of worksheet that contains an embedded chart instead of cell data. The conversion process is similar to worksheet-to-SVG, with two key differences: retrieve the chartsheet by name using GetChartSheetByName("Chart1") instead of by index; and call ToSVGStream(fs) without specifying cell range parameters, since the rendering area is determined by the chart itself.
function App() {
  const chartsheetToSVG = async () => {
    // Get the Spire.XLS WASM module
    const xlsModule = window.wasmModule?.spirexls;

    // Check if the module is ready
    if (!xlsModule) {
      alert('Spire.Xls is not ready yet');
      return;
    }

    // Load fonts and the Excel file into VFS
    await window.spire.FetchFileToVFS('arial.ttf', '/Library/Fonts/', `${process.env.PUBLIC_URL}/font/`);
    const inputFileName = 'ChartSheet.xlsx';
    await window.spire.FetchFileToVFS(inputFileName, '', `${process.env.PUBLIC_URL}data/`);

    // Load the workbook
    const workbook = new xlsModule.Workbook();
    workbook.LoadFromFile({ fileName: inputFileName });

    // Get the chartsheet by name
    let cs = workbook.GetChartSheetByName("Chart1");

    // Define the output file name
    const outputFileName = 'ChartSheetToSVG-out.svg';

    // Create a stream and convert the chartsheet to SVG
    const fs = new xlsModule.Stream(outputFileName);
    cs.ToSVGStream(fs);
    fs.Flush();

    // Read the converted file from VFS and trigger download
    const fileArray = window.dotnetRuntime.Module.FS.readFile(outputFileName);
    const blob = new Blob([fileArray], { type: "image/svg+xml;charset=utf-8" });
    const url = URL.createObjectURL(blob);
    const a = document.createElement('a');
    a.href = url;
    a.download = outputFileName;
    a.click();
    URL.revokeObjectURL(url);

    // Release resources
    workbook.Dispose();
  };

  return (
    <div style={{ textAlign: 'center', height: '300px' }}>
      <h1>Convert Chartsheet To SVG</h1>
      <button onClick={chartsheetToSVG}>
        Generate
      </button>
    </div>
  );
}

export default App;
SVG output generated from a chartsheet via ToSVGStream
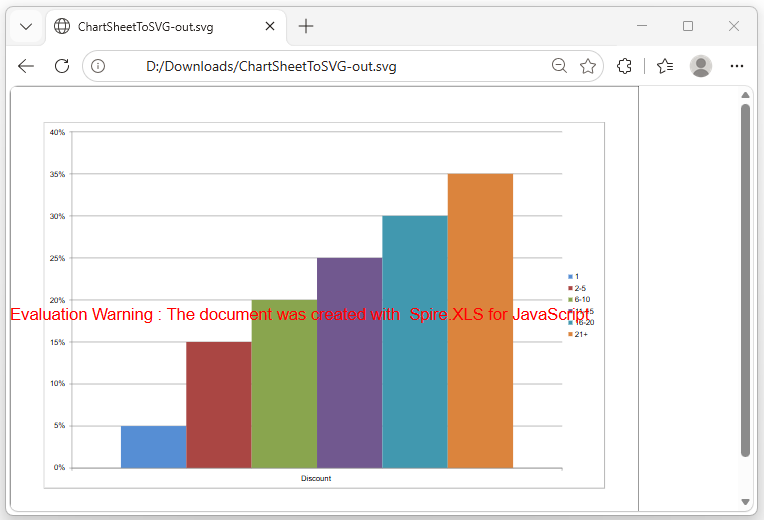
SVG vs PNG Comparison
| Feature | SVG | PNG |
|---|---|---|
| Scaling Quality | Sharp at any zoom | Blurry when enlarged |
| Text | Selectable and searchable | Rasterized (flat image) |
| File Size | Small (a few KB) | Large at high resolutions |
| CSS Styling | Supports inline styles | Not supported |
| Post-processing | Editable in Illustrator, Inkscape | Requires pixel-level editing |
| Browser Embedding | <img> or <embed> |
<img> tag |
Recommendation: Use SVG for web reports or scenarios where selectable text matters; use PNG when compatibility with image editors or legacy systems is required.
FAQ
Missing or garbled SVG text
Cause: The required font files are not present in the WASM virtual file system. ToSVGStream reads fonts from VFS when rendering text — if fonts are not preloaded, text areas will appear blank or garbled.
Solution: Load the font files into VFS via FetchFileToVFS before conversion:
await window.spire.FetchFileToVFS(
  'ARIAL.TTF', '/Library/Fonts/', '/'
);
SVG file cannot be opened or appears corrupted
Cause: The MIME type is incorrect when creating the Blob, so the browser cannot properly identify the file format.
Solution: Use the correct SVG MIME type:
const blob = new Blob([data], {
  type: "image/svg+xml;charset=utf-8"
});
Get a Free License
Spire.XLS for JavaScript offers a 30-day full-featured free trial license with no functional limitations. Apply here to evaluate before purchasing.
How to Download / Export Excel Files in JavaScript & React
2026-05-28 02:21:57 Written by Allen Yang
Modern web applications often need to generate downloadable Excel reports directly in the browser without relying on backend services. Whether you're building dashboards, reporting tools, or data-heavy business applications, browser-based spreadsheet export has become a common frontend requirement.
The challenge lies in creating Excel files that work across different browsers while maintaining formatting, supporting multiple output formats, and ensuring fast downloads—all without sending sensitive data to a server. Traditional approaches often require complex server-side processing or rely on limited client-side libraries.
Spire.XLS for JavaScript enables developers to generate, export, and download Excel files using JS entirely in the browser using WebAssembly technology. This approach provides true client-side Excel generation with support for multiple formats including XLS, XLSX, XLSB, ODS, PDF, XML, and XPS.
This article demonstrates how to generate and download Excel files in modern JavaScript and React applications using browser-side processing with Spire.XLS for JavaScript. We'll cover basic file generation, stream-based exports, React integration, and HTML table conversion with practical code examples.
Quick Navigation
- Why Export Excel in Browser
- Install Spire.XLS for JavaScript
- Download Excel File in JavaScript
- Export HTML Table to Excel
- React JS Export Excel Example
- About Client-Side Excel Export
- Troubleshooting
- Conclusion
- FAQ
Why Export Excel in Browser
Browser-side Excel export provides significant advantages over traditional server-side approaches:
- Enhanced Privacy – Sensitive data never leaves the client device, reducing security risks and compliance concerns
- Faster Downloads – Eliminating server round-trips reduces latency and improves user experience
- No Server-Side Processing – Reduces backend infrastructure costs and eliminates server bottlenecks
- Works Offline – Client-side generation functions even without network connectivity
- Scalable Architecture – Each user's browser handles their own export, distributing computational load
- Framework Agnostic – Works seamlessly with React, Vue, Angular, and vanilla JavaScript applications
By implementing Excel export functionality in the browser, developers can create responsive, secure, and cost-effective solutions that scale naturally with user demand.
Install Spire.XLS for JavaScript
Before generating and downloading Excel files in JavaScript, you need to install Spire.XLS for JavaScript and configure it in your development environment.
Installation via npm
Spire.XLS for JavaScript can be installed via npm:
npm i spire.xls
After installation, include the library in your project:
import { Workbook } from '@e-iceblue/spire.xls';
Note: The current WebAssembly runtime is provided through the spire.office package structure internally, even when installing spire.xls from npm. This is why initialization imports reference /node_modules/spire.office/.
Manual Installation
Alternatively, you can download the package from the e-iceblue website and copy the dependencies to your project directory.
For detailed setup instructions, refer to the Getting Started with Spire.XLS for JavaScript.
Initialize the WASM Module
Before using Spire.XLS, you must initialize the WebAssembly module. The initialization process loads required resources and sets up the runtime:
// Import and initialize the common module first
import('/node_modules/spire.office/spire.common.js').then(async (commonModule) => {
    // Initialize the WASM runtime
    await commonModule.initializeWasm();

    // Load the XLS module
    await import('/node_modules/spire.office/spire.xls.js');

    console.log('Spire.XLS ready');
});
Important Notes:
- Initialization is required before accessing
window.spirexlsorwindow.xlswasm - The browser downloads required WebAssembly resources during first load
- Always verify the module exists before performing Excel operations
Version Note: This article uses spire.office v11.4.1+. The module is accessed via window.spirexls or window.xlswasm. Older examples using window.wasmModule.spirexls may require updates.
Spire.XLS for JavaScript integrates seamlessly with all major frontend frameworks and build tools:
- React – Use with hooks (
useState,useEffect) for state-driven Excel export components - Vue.js – Integrate with Vue's reactive data system and lifecycle methods
- Angular – Compatible with Angular services and dependency injection patterns
- Next.js – Works in client-side components for server-rendered React applications
The WebAssembly module loads once at application initialization and can be shared across components, making it efficient for multi-page applications regardless of the framework choice.
Download Excel File in JavaScript
The following example demonstrates how to generate an Excel file with Spire.XLS for JavaScript and download it directly in the browser.
Create and Download an XLSX File
// Ensure the WASM module has been initialized
if (!window.spirexls && !window.xlswasm) {
    console.error("Spire.XLS is not initialized.");
    return;
}

// Get the initialized WebAssembly module
const wasmModule = window.spirexls || window.xlswasm;

// Create a new workbook
const workbook = new wasmModule.Workbook();
const worksheet = workbook.Worksheets.get(0);

// Create sample data
const products = [
    ["Product", "Quantity", "Price"],
    ["Laptop", 10, 999.99]
    ["Mouse", 50, 24.99]
]

// Insert data into the worksheet
for (let i = 0; i < products.length; i++) {
    for (let j = 0; j < products[i].length; j++) {
        if (typeof products[i][j] === "string") {
            worksheet.Range.get({ row: i + 1, column: j + 1 }).Text = products[i][j];
        }
        else {
            worksheet.Range.get({ row: i + 1, column: j + 1 }).NumberValue = products[i][j];
        }
    }
}

// Add a total column
worksheet.Range.get({ row: 1, column: products[0].length + 1 }).Text = "Total";
worksheet.Range.get({ row: 2, column: products[0].length + 1 }).Formula = "=B2*C2";
worksheet.Range.get({ row: 3, column: products[0].length + 1 }).Formula = "=B3*C3";

// Save the workbook to the virtual file system (VFS)
const outputFileName = "Report.xlsx";

workbook.SaveToFile({
    fileName: outputFileName,
    version: wasmModule.ExcelVersion.Version2016
});

// Release workbook resources
workbook.Dispose();

// Read the generated file from VFS
const fileArray =
    window.dotnetRuntime.Module.FS.readFile(outputFileName);

// Create a Blob object
const excelBlob = new Blob(
    [fileArray],
    {
        type: "application/vnd.openxmlformats-officedocument.spreadsheetml.sheet"
    }
);

// Trigger browser download
const url = URL.createObjectURL(excelBlob);
const a = document.createElement("a");
a.href = url;
a.download = outputFileName;
document.body.appendChild(a);
a.click();
document.body.removeChild(a);
URL.revokeObjectURL(url);
Below is a preview of the generated XLSX file:
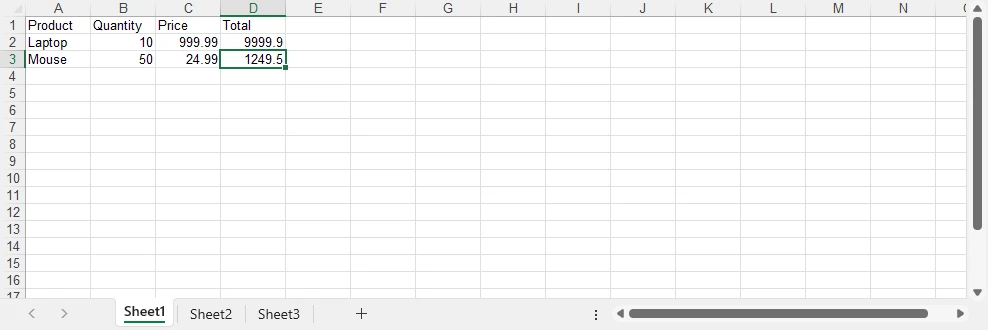
How the Export Process Works
- Create a workbook and populate worksheet data
- Save the workbook into the WebAssembly virtual file system (VFS)
- Read the generated XLSX file from VFS
- Convert the file data into a Blob object
- Trigger the browser download using a temporary URL
About the Virtual File System (VFS)
The file generated by SaveToFile() is stored in the WebAssembly virtual file system rather than the user's physical disk. This in-memory file system allows Spire.XLS to perform standard file operations securely inside the browser environment. The downloaded XLSX file is created after reading the generated file data from VFS and converting it into a browser Blob object.
Advantages of This Approach
- Works entirely in the browser
- No server-side processing required
- Uses standard browser Blob download APIs
- Supports direct XLSX file generation with Spire.XLS
If you also need to work with lightweight data exchange formats, you can further explore how to convert Excel files to CSV and import CSV data into Excel using JavaScript.
Export HTML Tables to Excel in JavaScript
In dashboard and reporting applications, business data is often displayed as HTML tables. Instead of rebuilding spreadsheet structures manually, you can directly convert existing frontend tables into Excel workbooks using Spire.XLS for JavaScript.
The following example demonstrates a complete browser-side workflow that:
- Reads an existing HTML table from the page
- Converts the HTML table into an Excel workbook
- Applies Excel-native formatting
- Downloads the generated XLSX file directly in the browser
HTML Table Export Example
async function exportTableToExcel() {

    if (!window.spirexls && !window.xlswasm) {
        alert("Spire.XLS module not loaded yet.");
        return;
    }

    const button = document.getElementById("exportBtn");

    button.disabled = true;
    button.innerText = "Exporting...";

    const wasmModule = window.spirexls || window.xlswasm;

    try {

        // Get HTML table
        const tableHtml =
            document.getElementById("salesTable").outerHTML;

        // Remove inline styles
        const safeTableHtml =
            tableHtml.replace(/style="[^"]*"/g, '');

        const htmlContent = `
            <!DOCTYPE html>
            <html>
            <head>
                <meta charset="UTF-8">
            </head>
            <body>
                ${safeTableHtml}
            </body>
            </html>
        `;

        const htmlFileName = "Table.html";

        window.dotnetRuntime.Module.FS.writeFile(
            htmlFileName,
            htmlContent
        );

        const workbook = new wasmModule.Workbook();

        workbook.LoadFromHtml(htmlFileName);

        const sheet = workbook.Worksheets.get(0);

        const lastRow = Number(sheet.LastRow);
        const lastCol = Number(sheet.LastColumn);

        const headerRow =
            sheet.Range.get_Item(1, 1, 1, lastCol);

        headerRow.BuiltInStyle =
            wasmModule.BuiltInStyles.Heading3;

        for (let i = 2; i <= lastRow; i++) {

            const row =
                sheet.Range.get_Item(i, 1, i, lastCol);

            row.BuiltInStyle =
                i % 2 === 0
                    ? wasmModule.BuiltInStyles.Accent3_20
                    : wasmModule.BuiltInStyles.Accent3_60;
        }

        for (let j = 1; j <= lastCol; j++) {
            sheet.AutoFitColumn(j);
        }

        const outputFileName = "SalesReport.xlsx";

        workbook.SaveToFile({
            fileName: outputFileName,
            version: wasmModule.ExcelVersion.Version2016
        });

        workbook.Dispose();

        const fileData =
            window.dotnetRuntime.Module.FS.readFile(outputFileName);

        const blob = new Blob([fileData], {
            type:
                "application/vnd.openxmlformats-officedocument.spreadsheetml.sheet"
        });

        const url = URL.createObjectURL(blob);

        const a = document.createElement("a");

        a.href = url;
        a.download = outputFileName;

        document.body.appendChild(a);
        a.click();

        document.body.removeChild(a);

        URL.revokeObjectURL(url);

    } catch (error) {

        alert("Export failed: " + error.message);

    } finally {

        button.disabled = false;
        button.innerText = "Export Excel";
    }
}
The following screenshot shows the HTML-based sales report table example displayed in the browser before export.

After exporting, the generated Excel workbook preserves the tabular structure and applies additional Excel-native formatting.
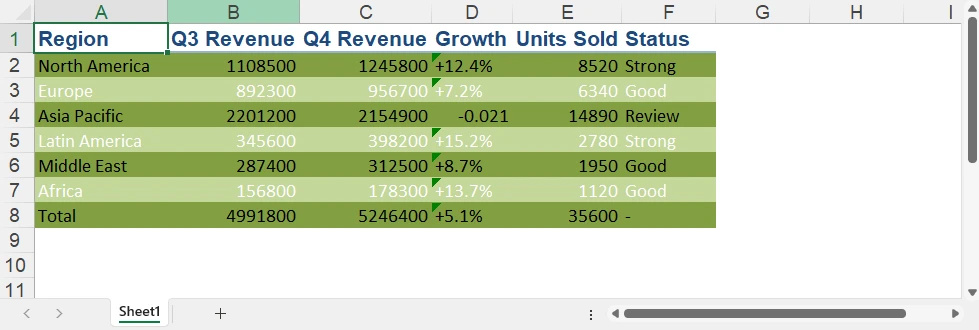
Why Use HTML-based Excel Export
Using HTML-based export provides several advantages for modern web applications:
- Reuse existing frontend tables without rebuilding spreadsheet layouts
- Reduce duplicate data formatting and export logic
- Apply Excel-native styles after importing HTML tables
- Export business reports directly from dashboard pages
With Spire.XLS for JavaScript, you can quickly convert browser-rendered HTML tables into downloadable Excel files while keeping the entire export workflow on the client side.
For scenarios that require rendering Excel spreadsheets as browser-based HTML tables, you can also refer to our article about converting Excel to HTML in JavaScript.
Export Excel in React with JavaScript
Integrating Excel export into React applications is straightforward. The key is initializing the WebAssembly runtime before rendering React components and properly releasing workbook resources after export operations.
Initialize Spire.XLS in React
Before creating export components, initialize the WebAssembly module in your app entry file (main.jsx or index.js):
import { StrictMode } from 'react';
import { createRoot } from 'react-dom/client';
import App from './App.jsx';

// Initialize Spire.XLS before mounting React
const initializeSpire = async () => {

    // Load the common runtime
    const commonModule = await import(
        '/node_modules/spire.office/spire.common.js'
    );

    // Initialize WebAssembly runtime
    await commonModule.initializeWasm();

    // Load Spire.XLS module
    await import(
        '/node_modules/spire.office/spire.xls.js'
    );

    // Optional: preload fonts if needed
    // await window.spire.FetchFileToVFS(
    //     'ARIAL.TTF',
    //     '/Library/Fonts/',
    //     '/'
    // );
};

// Start React app after initialization
initializeSpire().then(() => {

    createRoot(document.getElementById('root')).render(
        <StrictMode>
            <App />
        </StrictMode>
    );

});
Then use the React export component below in your application.
Simplified React Excel Export Component
Here's a minimal React component that demonstrates the core export pattern:
import { useState } from 'react'

const ExcelExportButton = () => {
    const [isProcessing, setIsProcessing] = useState(false);

    const handleExport = async () => {
        if ((!window.spirexls && !window.xlswasm) || isProcessing) return;

        setIsProcessing(true);
        const wasmModule = window.spirexls || window.xlswasm;

        try {
            // Create a new workbook and get the first default worksheet
            const workbook = new wasmModule.Workbook();
            const worksheet = workbook.Worksheets.get(0);

            // Insert data into the worksheet
            worksheet.Range.get("A1").Text = "Product";
            worksheet.Range.get("B1").Text = "Revenue";
            worksheet.Range.get("A2").Text = "Laptop";
            worksheet.Range.get("B2").NumberValue = 9999.90;
            worksheet.Range.get("A3").Text = "Smartphone";
            worksheet.Range.get("B3").NumberValue = 4999.99;

            const outputFileName = "Report.xlsx";

            // Save the workbook to a file in the VFS
            workbook.SaveToFile({
                fileName: outputFileName,
                version: wasmModule.ExcelVersion.Version2016
            });

            workbook.Dispose();

            const fileArray = window.dotnetRuntime.Module.FS.readFile(outputFileName);

            const excelBlob = new Blob([fileArray], {
                type: "application/vnd.openxmlformats-officedocument.spreadsheetml.sheet"
            });

            const url = URL.createObjectURL(excelBlob);

            const a = document.createElement('a');
            a.href = url;
            a.download = outputFileName;
            document.body.appendChild(a);
            a.click();
            document.body.removeChild(a);

            URL.revokeObjectURL(url);

        } catch (error) {
            console.error("Excel export failed:", error);
        } finally {
            setIsProcessing(false);
        }
    };

    return (
        <button onClick={handleExport} disabled={isProcessing}>
            {isProcessing ? "Generating..." : "Export to Excel"}
        </button>
    );
}

export default function App() {
    return (
        <div>
            <h1>Spire.XLS Demo</h1>
            <ExcelExportButton />
        </div>
    );
}
Key Implementation Details:
- Minimal state – Only track
isProcessingto disable the button during export - Direct download – Trigger download immediately without storing URLs in state
- Resource cleanup – Always call
Dispose()on workbook objects to prevent memory leaks - Error handling – Wrap export logic in try-catch blocks for robust error management
- Loading states – Disable buttons during processing to prevent duplicate exports
Usage in Your App:
import { ExcelExportButton } from './ExcelExportButton';

function App() {
    return (
        <div>
            <h1>Sales Dashboard</h1>
            <ExcelExportButton />
        </div>
    );
}
This simplified approach focuses on the essential export flow without unnecessary complexity. For more advanced scenarios like loading external files or fonts, refer to the complete documentation.
If you also need browser-side document distribution workflows, you can further explore how to convert Excel files to PDF in JavaScript and React applications.
Client-Side Excel Generation in JavaScript Without Backend
Modern web applications increasingly generate Excel files directly in the browser instead of relying on backend services. With Spire.XLS for JavaScript, spreadsheet creation, formatting, and export operations run entirely on the client side using WebAssembly.
Why No Backend Server Is Needed
Traditional Excel export workflows usually require a server to:
- Receive frontend data
- Generate spreadsheet files
- Return downloadable files to the browser
With WebAssembly-based processing, these steps happen entirely inside the browser runtime instead.
Benefits of Browser-side Excel Export
Compared with traditional server-side export workflows, client-side Excel generation provides several advantages:
| Feature | Browser-side Export | Server-side Export |
|---|---|---|
| Data Processing | Runs locally in browser | Requires backend server |
| Privacy | Data stays on client device | Data sent over network |
| Response Speed | Instant local processing | Depends on network latency |
| Infrastructure Cost | No export server required | Requires backend resources |
| Offline Support | Supported | Usually unavailable |
| Scalability | Handled by client devices | Limited by server capacity |
How Browser-side Export Works
When using Spire.XLS for JavaScript:
- The WebAssembly runtime loads in the browser
- Spreadsheet processing runs locally in memory
- Files are temporarily stored in the browser virtual file system (VFS)
- JavaScript converts the generated file into a downloadable Blob
- The browser triggers the download directly
This architecture makes browser-based Excel export especially suitable for dashboards, reporting systems, internal business tools, and privacy-sensitive applications.
Troubleshooting and Best Practices
When using Spire.XLS for JavaScript in browser environments, the following issues are commonly encountered.
WASM Module Not Initialized
If window.spirexls or window.xlswasm is undefined, ensure the WebAssembly runtime is fully initialized before using the API:
await commonModule.initializeWasm();
await import('/node_modules/spire.office/spire.xls.js');
Missing Resource or ZIP Loading Errors
If the browser console shows 404 errors or WebAssembly loading failures:
- Ensure ZIP and WASM resources are placed in the correct static directory
- Vite projects should place assets in the
public/folder - Verify the browser can successfully load
.zipand.wasmfiles
Font-related Warnings
Some environments may display warnings such as:
"Arial font is not installed"
You can preload fonts before creating workbooks:
await window.spire.FetchFileToVFS(
    'ARIAL.TTF',
    '/Library/Fonts/',
    '/'
);
Invalid or Corrupted XLSX Files
If Excel opens with repair warnings, explicitly specify the Excel version during export:
workbook.SaveToFile({
    fileName: outputFileName,
    version: wasmModule.ExcelVersion.Version2016
});
Memory Management
Always release workbook resources after export to avoid memory leaks in long-running applications:
const workbook = new wasmModule.Workbook();

try {
    // Excel operations
} finally {
    workbook.Dispose();
}
Browser-side Performance Considerations
For very large datasets, browser-side processing may become slow or memory-intensive. In such scenarios:
- Show loading indicators during export
- Avoid exporting extremely large datasets in a single operation
- Consider server-side processing for enterprise-scale reports
Conclusion
Spire.XLS for JavaScript provides a practical way to generate and export Excel files directly in modern web applications using JavaScript and WebAssembly. Its browser-based architecture makes it suitable for dashboards, reporting systems, and frontend applications that require downloadable spreadsheet generation without relying on backend services.
The examples in this article demonstrate how to build browser-based Excel export workflows using JavaScript, React, and WebAssembly while keeping spreadsheet processing entirely on the client side. You can apply for a 30-day free license to evaluate all features before purchasing.
FAQ
Q1: Can I download Excel files in JavaScript without a backend server?
A1: Yes. Spire.XLS for JavaScript uses WebAssembly technology to generate and download Excel files entirely in the browser. The workbook is created in browser memory and downloaded directly without requiring any backend API or server-side processing.
Q2: How do I export HTML tables to Excel in JavaScript?
A2: You can extract an existing HTML table from the DOM, write the HTML into the WebAssembly virtual file system, and load it into a workbook using LoadFromHtml(). This approach allows you to reuse browser-rendered tables without rebuilding spreadsheet layouts manually.
Q3: Can I use Spire.XLS for JavaScript in React applications?
A3: Yes. Spire.XLS for JavaScript works with React, Vite, and other modern frontend frameworks. You only need to initialize the WebAssembly module before rendering components and then perform Excel operations directly inside React components or utility functions.
Q4: Why does Excel show a repair warning when opening exported files?
A4: This usually happens when the Excel version is not explicitly specified during export. To avoid compatibility issues, specify the output version when calling SaveToFile():
workbook.SaveToFile({
    fileName: outputFileName,
    version: wasmModule.ExcelVersion.Version2016
});
