
Knowledgebase (2417)
Children categories
PDF supports actions. And Spire.PDF, a very powerful .NET component enables developers to add action chain to PDF file. Action chain means an action get executed automatically after another one.
In this article, a solution is introduced to add action chain to PDF file.
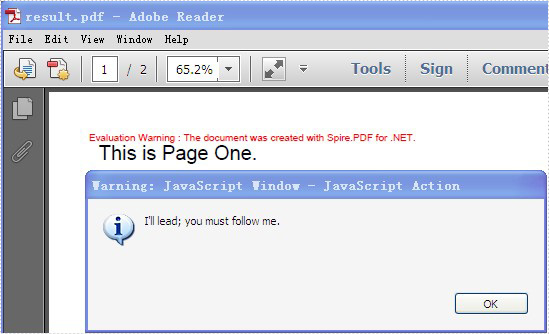
Step 1: Set the action that gets performed right after PDF document is opened
String script
                = "app.alert({"
                + "    cMsg: \"I'll lead; you must follow me.\","
                + "    nIcon: 3,"
                + "    cTitle: \"JavaScript Action\""
                + "});";
PdfJavaScriptAction action1 = new PdfJavaScriptAction(script);
document.AfterOpenAction = action1;
Spire.PDF provides you a class called PdfJavaScriptAction that executes JavaScript code. Create a PdfJavaScriptAction instance “action1” using JavaScript code. And set the property AfterOpenAction of “document” to action1.
Step 2: Set the action that gets performed after “action1” using the property NextAction
script
                = "app.alert({"
                + "    cMsg: \"The firt page!\","
                + "    nIcon: 3,"
                + "    cTitle: \"JavaScript Action\""
                + "});";
PdfJavaScriptAction action2 = new PdfJavaScriptAction(script);
action1.NextAction = action2;
Step 3: Set the action that gets performed after “action2”
PdfDestination dest = new PdfDestination(pagetwo);
dest.Zoom = 1;
PdfGoToAction action3 = new PdfGoToAction(dest);
action2.NextAction = action3;
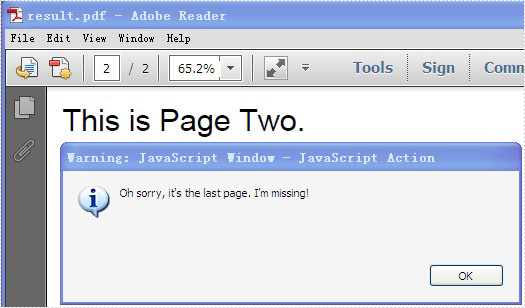
PdfDestination can mark a specified page or location in PDF. Create a PdfDestination instance “dest” using “pagetwo”. Then create a PdfGoToAction instance “action3” using “dest”.
Step 4: Set the action that gets performed after “action3”
script
                = "app.alert({"
                + "    cMsg: \"Oh sorry, it's the last page. I'm missing!\","
                + "    nIcon: 3,"
                + "    cTitle: \"JavaScript Action\""
                + "});";
PdfJavaScriptAction action4 = new PdfJavaScriptAction(script);
action3.NextAction = action4;
Step 5: Save the file
document.SaveToFile("result.pdf");
Full code:
using Spire.Pdf;
using Spire.Pdf.Actions;
using Spire.Pdf.General;
using Spire.Pdf.Graphics;
using System;
using System.Drawing;


namespace AddActionChain
{
    class Program
    {
        static void Main(string[] args)
        {
            PdfDocument document = new PdfDocument();

            PdfPageBase pageone = document.Pages.Add();
            pageone.Canvas.DrawString("This is Page One.",
                                   new PdfFont(PdfFontFamily.Helvetica, 20f),
                                   new PdfSolidBrush(Color.Black),
                                   10, 10);
            PdfPageBase pagetwo = document.Pages.Add();
            pagetwo.Canvas.DrawString("This is Page Two.",
                                   new PdfFont(PdfFontFamily.Helvetica, 20f),
                                   new PdfSolidBrush(Color.Black),
                                   10, 10);

            String script
                = "app.alert({"
                + "    cMsg: \"I'll lead; you must follow me.\","
                + "    nIcon: 3,"
                + "    cTitle: \"JavaScript Action\""
                + "});";
            PdfJavaScriptAction action1 = new PdfJavaScriptAction(script);
            document.AfterOpenAction = action1;

            script
                = "app.alert({"
                + "    cMsg: \"The first page!\","
                + "    nIcon: 3,"
                + "    cTitle: \"JavaScript Action\""
                + "});";
            PdfJavaScriptAction action2 = new PdfJavaScriptAction(script);
            action1.NextAction = action2;

            PdfDestination dest = new PdfDestination(pagetwo);
            dest.Zoom = 1;
            PdfGoToAction action3 = new PdfGoToAction(dest);
            action2.NextAction = action3;

            script
                = "app.alert({"
                + "    cMsg: \"Oh sorry, it's the last page. I'm missing!\","
                + "    nIcon: 3,"
                + "    cTitle: \"JavaScript Action\""
                + "});";
            PdfJavaScriptAction action4 = new PdfJavaScriptAction(script);
            action3.NextAction = action4;

            document.SaveToFile("result.pdf");

            System.Diagnostics.Process.Start("result.pdf");
        }
    }
}
Screenshot:
Draw text in PDF document is an important part and it is not easy to finish. With the help of Spire.PDF, a PDF component, you can not only draw text in PDF document easily for .NET and WPF, you can do this job easily for Silverlight.
We have introduced how to draw text for PDF .NET and PDF WPF. This article will give clear information of how to draw text with C# code for Silverlight.
Make sure Spire.PDF (or Spire.Office) has been installed correctly. Add Spire.PDF.dll as reference in the downloaded Bin folder though the below path: "..\Spire.PDF\Bin\Silverlight4\ Spire.PDF.dll".
Here comes to the steps:
Step 1: Create a PDF document and a page
//create a pdf document
PdfDocument document = new PdfDocument();
//create one page
PdfPageBase page = document.Pages.Add();
Step 2: Draw Text
//Draw Text - alignment
PdfFont font = new PdfFont(PdfFontFamily.Helvetica, 20f);
PdfSolidBrush brush = new PdfSolidBrush(Color.FromArgb(10, 0, 255, 0));

PdfStringFormat leftAlignment = new PdfStringFormat(PdfTextAlignment.Left, PdfVerticalAlignment.Middle);
page.Canvas.DrawString("Left!", font, brush, 0, 20, leftAlignment);
page.Canvas.DrawString("Left!", font, brush, 0, 50, leftAlignment);

PdfStringFormat rightAlignment = new PdfStringFormat(PdfTextAlignment.Right, PdfVerticalAlignment.Middle);
page.Canvas.DrawString("Right!", font, brush, page.Canvas.ClientSize.Width, 30, rightAlignment);
page.Canvas.DrawString("Right!", font, brush, page.Canvas.ClientSize.Width, 60, rightAlignment);

PdfStringFormat centerAlignment = new PdfStringFormat(PdfTextAlignment.Center, PdfVerticalAlignment.Middle);
page.Canvas.DrawString("Go! Turn Around! Go! Go! Go!", font, brush, page.Canvas.ClientSize.Width / 2, 40, centerAlignment);

//Draw the text - align in rectangle
PdfFont font = new PdfFont(PdfFontFamily.Helvetica, 10f);
PdfSolidBrush brush = new PdfSolidBrush(Color.FromArgb(10, 0, 0, 255));
RectangleF rctg1 = new RectangleF(0, 70, page.Canvas.ClientSize.Width / 2, 100);
RectangleF rctg2 = new RectangleF(page.Canvas.ClientSize.Width / 2, 70, page.Canvas.ClientSize.Width / 2, 100);
page.Canvas.DrawRectangle(new PdfSolidBrush(Color.FromArgb(1, 0, 0, 100)), rctg1);
page.Canvas.DrawRectangle(new PdfSolidBrush(Color.FromArgb(1, 0, 0, 150)), rctg2);

PdfStringFormat leftAlignment = new PdfStringFormat(PdfTextAlignment.Left, PdfVerticalAlignment.Top);
page.Canvas.DrawString("Left! Left!", font, brush, rctg1, leftAlignment);
page.Canvas.DrawString("Left! Left!", font, brush, rctg2, leftAlignment);

PdfStringFormat rightAlignment = new PdfStringFormat(PdfTextAlignment.Right, PdfVerticalAlignment.Middle);
page.Canvas.DrawString("Right! Right!", font, brush, rctg1, rightAlignment);
page.Canvas.DrawString("Right! Right!", font, brush, rctg2, rightAlignment);

PdfStringFormat centerAlignment = new PdfStringFormat(PdfTextAlignment.Center, PdfVerticalAlignment.Bottom);
page.Canvas.DrawString("Go! Turn Around! Go! Go! Go!", font, brush, rctg1, centerAlignment);
page.Canvas.DrawString("Go! Turn Around! Go! Go! Go!", font, brush, rctg2, centerAlignment);

//Draw text - brush
String text = "Go! Turn Around! Go! Go! Go!";
PdfPen pen = PdfPens.DeepSkyBlue;
PdfSolidBrush brush = new PdfSolidBrush(Color.FromArgb(10, 0, 0, 0));
PdfStringFormat format = new PdfStringFormat();
PdfFont font = new PdfFont(PdfFontFamily.Helvetica, 18f, PdfFontStyle.Italic);
SizeF size = font.MeasureString(text, format);
RectangleF rctg= new RectangleF(page.Canvas.ClientSize.Width / 2 + 10, 180,
size.Width / 3 * 2, size.Height * 2);
page.Canvas.DrawString(text, font, pen, brush, rctg, format);
Step 3: Save the document to stream
using (Stream ms = saveFiledialog.OpenFile())
{
    document.SaveToStream(ms);

}
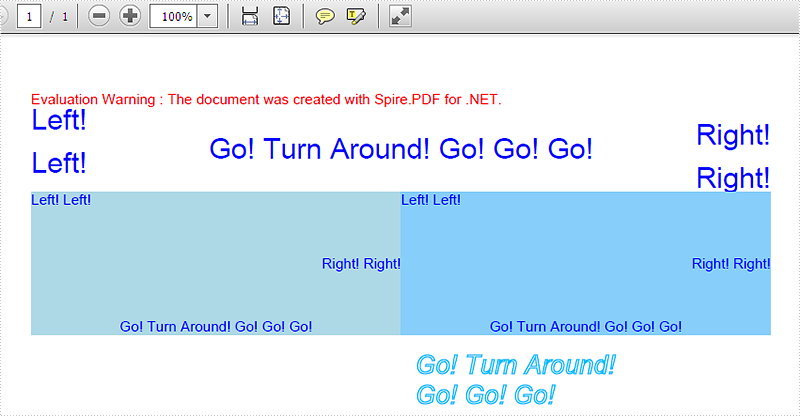
Now check the effective screenshot:
Excel Freeze Panes keeps rows and columns visible while the rest of the worksheet scrolls. Likewise, we need to unfreeze Excel panes due to work needs in some cases. This article aims at introducing the solution to unfreeze the Excel top row in c# and VB.NET through a utility Excel .NET library Spire.XLS.
First we need to complete the preparatory work:
- Download the latest Spire.XLS and install it on your machine.
- Add the Spire.XLS.dll files as reference.
- Open bin folder and select the three dll files under .NET 4.0.
- Right click property and select properties in its menu.
- Set the target framework as .NET 4.
- Add Spire.XLS as namespace.
Here comes to the explanation of the C# code:
Step 1: Create an instance of Spire.XLS.Workbook.
Workbook workbook = new Workbook();
Step 2: Load the file base on a specified file path.
workbook.LoadFromFile("sample.xls");
Step 3: Get the first worksheet.
Worksheet sheet = workbook.Worksheets[0];
Step 4: Unfreeze the top row.
sheet.RemovePanes();
Step 5: Save as the generated file.
workbook.SaveToFile("sample.xls",ExcelVersion.Version97to2003);
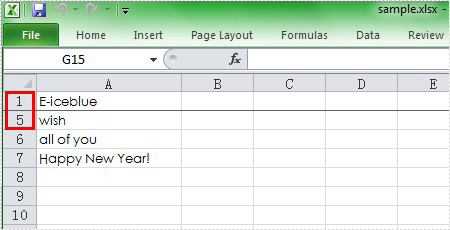
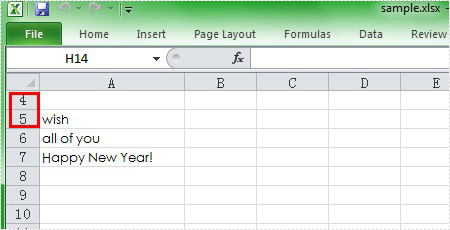
Please preview the freeze panes effect screenshot:
And the unfreeze panes effect screenshot:
Here is the full code in C# and VB.NET:
using Spire.Xls;
namespace UnfreezeExcelPane
{
    class Program
    {

        static void Main(string[] args)
        {
            Workbook workbook = new Workbook();
            workbook.LoadFromFile("Sample.xls");
            Worksheet sheet = workbook.Worksheets[0];
            sheet.RemovePanes();
            workbook.SaveToFile("sample.xls", ExcelVersion.Version97to2003);

        }
    }
}
Imports Spire.Xls
Namespace UnfreezeExcelPane
	Class Program

		Private Shared Sub Main(args As String())
			Dim workbook As New Workbook()
			workbook.LoadFromFile("Sample.xls")
			Dim sheet As Worksheet = workbook.Worksheets(0)
			sheet.RemovePanes()
			workbook.SaveToFile("sample.xls", ExcelVersion.Version97to2003)

		End Sub
	End Class
End Namespace
