Knowledgebase (2417)
Children categories
Unmerging and merging Excel cells are indispensable for handling Excel worksheet. This article aims at introducing the solution to unmerge Excel cells in c# through several lines of code. We need an Excel .NET component called Spire.XLS to help us complete the process.
First we need to complete the preparatory work before unmerge Excel cells in C#:
- Download the Spire.XLS and install it on your machine.
- Add the Spire.XLS.dll files as reference.
- Open bin folder and select the three dll files under .NET 4.0.
- Right click property and select properties in its menu.
- Set the target framework as .NET 4.
- Add Spire.XLS as namespace.
Here comes to the explanation of the code:
Step 1: Create an instance of Spire.XLS.Workbook.
Workbook book = new Workbook();
Step 2: Load the file base on a specified file path.
book.LoadFromFile(@"..\..\abc.xlsx");
Step 3: Get the first worksheet.
Worksheet sheet = book.Worksheets[0];
Step 4: Unmerge the cells.
sheet.Range["A2"].UnMerge();
Step5: Save as the generated file.
book.SaveToFile(@"..\..\result.xlsx", ExcelVersion.Version2010);
Here is the whole code:
using Spire.Xls;
namespace UnmergeExcelCell
{
    class Program
    {

        static void Main(string[] args)
        {
            Workbook book = new Workbook();
            book.LoadFromFile(@"..\..\abc.xlsx");
            Worksheet sheet = book.Worksheets[0];
            sheet.Range["A2"].UnMerge();
            book.SaveToFile(@"..\..\result.xlsx", ExcelVersion.Version2010);
        }

    }
}
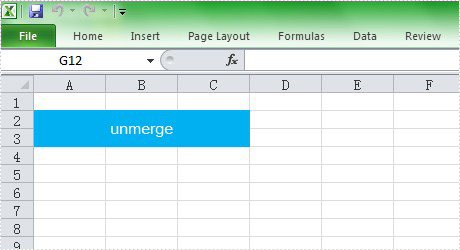
Please preview the original effect screenshot:
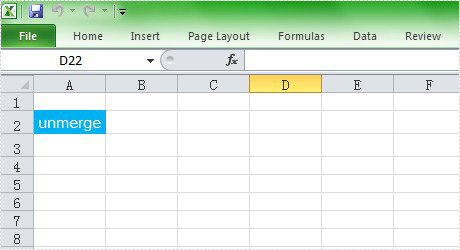
And the generated effect screenshot:
C#/VB.NET: Alternate Row Colors in Excel Using Conditional Formatting
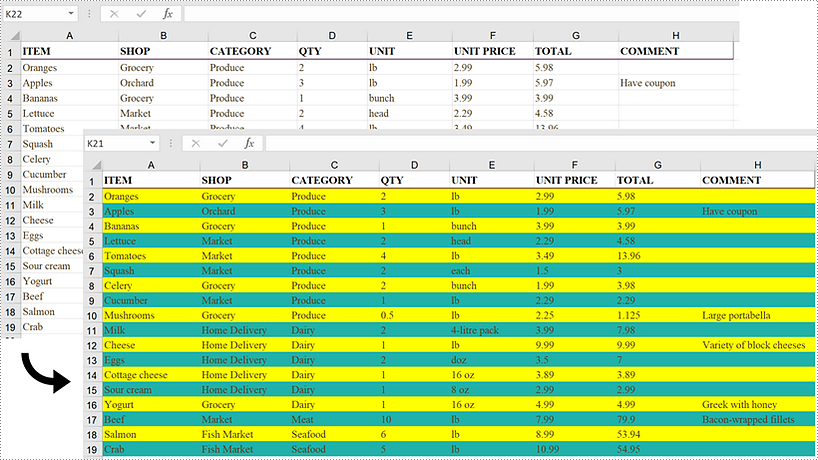
2022-09-08 08:20:00 Written by AdministratorA large worksheet can be made easier to scan and read by adding color to alternative rows or columns. Applying a built-in table style or using conditional formatting are two quick ways to alternate row colors. This article focuses on how to highlight alternative rows using conditional formatting in C# and VB.NET using Spire.XLS for .NET.
Install Spire.XLS for .NET
To begin with, you need to add the DLL files included in the Spire.XLS for .NET package as references in your .NET project. The DLL files can be either downloaded from this link or installed via NuGet.
PM> Install-Package Spire.XLS
Alternate Row Colors in Excel Using Conditional Formatting
The following are the steps to add color to alternative rows in Excel using Spire.XLS for .NET.
- Create a Workbook object.
- Load an Excel file using Workbook.LoadFromFile() method.
- Get a specific worksheet from the workbook through Workbook.Worsheets[index] property.
- Add a conditional formatting to the worksheet using Worksheet.ConditionalFormats.Add() method and return an object of XlsConditionalFormats class.
- Set the cell range where the conditional formatting will be applied using XlsConditionalFormats.AddRange() method.
- Add a condition using XlsConditionalFormats.AddCondition() method, then set the conditional formula and the cell color of even rows.
- Add another condition to change the format of the cells of odd rows.
- Save the workbook to an Excel file using Workbook.SaveToFile() method.
- C#
- VB.NET
using Spire.Xls;
using Spire.Xls.Core;
using Spire.Xls.Core.Spreadsheet.Collections;
using System.Drawing;

namespace AlternateRowColors
{
    class Program
    {
        static void Main(string[] args)
        {
            //Create a Workbook object
            Workbook workbook = new Workbook();

            //Load an Excel file
            workbook.LoadFromFile(@"C:\Users\Administrator\Desktop\sample.xlsx");

            //Get the first worksheet
            Worksheet sheet = workbook.Worksheets[0];

            //Add a conditional format to the worksheet
            XlsConditionalFormats format = sheet.ConditionalFormats.Add();

            //Set the range where the conditional format will be applied
            format.AddRange(sheet.Range[2, 1, sheet.LastRow, sheet.LastColumn]);

            //Add a condition to change the format of the cells based on formula
            IConditionalFormat condition1 = format.AddCondition();
            condition1.FirstFormula = "=MOD(ROW(),2)=0";
            condition1.FormatType = ConditionalFormatType.Formula;
            condition1.BackColor = Color.Yellow;

            //Add another condition to change the format of the cells based on formula
            IConditionalFormat condition2 = format.AddCondition();
            condition2.FirstFormula = "=MOD(ROW(),2)=1";
            condition2.FormatType = ConditionalFormatType.Formula;
            condition2.BackColor = Color.LightSeaGreen;

            //Save the workbook to an Excel file
            workbook.SaveToFile("AlternateRowColors.xlsx", ExcelVersion.Version2016);
        }
    }
}
Apply for a Temporary License
If you'd like to remove the evaluation message from the generated documents, or to get rid of the function limitations, please request a 30-day trial license for yourself.
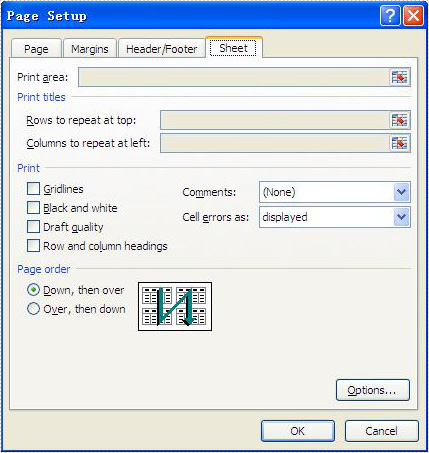
Excel print options (also called as sheet options) allow users to control how worksheet pages are printed, such as set print paper size, print area, print titles, page order and so on. This article mainly discusses how developers set print options in C# by using Spire.XLS.
Here comes to the details of how developers configure print options in C#:
- Download Spire.XLS for .NET (or Spire.Office for .NET) and install it on your system.
- Add Spire.XLS.dll as reference in the downloaded Bin folder thought the below path: "..\Spire.XLS\Bin\NET4.0\ Spire.XLS.dll".
- You can use the class PageSetup to set the print options.
Set print paper size:
By default, the paper size is A4; you can set the PaperSize property of the worksheet to set the print paper size you desired.
//set print paper size as A3
sheet.PageSetup.PaperSize = PaperSizeType.PaperA3;
Set Print Area:
By default, the print area means all areas of the worksheet that contain data. You can set the PrintArea property of the worksheet to set the print area you want.
//set print area from cell "B2" to cell "F8"
sheet.PageSetup.PrintArea = "B2:F8";
Set Print Titles:
Spire.XLS allows you to designate row and column headers to repeat on all pages of a printed worksheet. To do so, use the PageSetup class' PrintTitleColumns and PrintTitleRows properties.
//Set column numbers A & B as title columns
sheet.PageSetup.PrintTitleColumns = "$A:$B";

//Set row numbers 1 & 2 as title rows
sheet.PageSetup.PrintTitleRows = "$1:$2";
Set Page Order:
The PageSetup class provides the Order property that is used to order multiple pages of your worksheet to be printed. There are two possibilities to order the pages as follows:
//set page order from down then over
sheet.PageSetup.Order = OrderType.DownThenOver;

//set page order from over then down
sheet.PageSetup.Order = OrderType.OverThenDown;
Below picture shows the Microsoft Excel's page print options: