
Knowledgebase (2345)
Children categories
doc.LoadFromFile(@"..\Sample.pdf");
System.Drawing.Image image = System.Drawing.Image.FromFile(@"..\MS.jpg");
doc.LoadFromFile("..\Sample.pdf")
Dim image As System.Drawing.Image = System.Drawing.Image.FromFile("..\MS.jpg")
//adjust image size
int width = image.Width;
int height = image.Height;
float schale = 0.7f;
System.Drawing.Size size = new System.Drawing.Size((int)(width * schale), (int)(height * schale));
Bitmap schaleImage = new Bitmap(image, size);
//draw image into the first PDF page at specific position
PdfImage pdfImage = PdfImage.FromImage(schaleImage);
PdfPageBase page0 = doc.Pages[0];
PointF position = new PointF((page0.Canvas.ClientSize.Width - schaleImage.Width) / 8, 10);
page0.Canvas.DrawImage(pdfImage, position);
'adjust image size
Dim width As Integer = image.Width
Dim height As Integer = image.Height
Dim schale As Single = 0.7F
Dim size As New System.Drawing.Size(CInt(Math.Truncate(width * schale)), CInt(Math.Truncate(height * schale)))
Dim schaleImage As New Bitmap(image, size)
'draw image into the first PDF page at specific position
Dim pdfImage__1 As PdfImage = PdfImage.FromImage(schaleImage)
Dim page0 As PdfPageBase = doc.Pages(0)
Dim position As New PointF((page0.Canvas.ClientSize.Width - schaleImage.Width) / 8, 10)
page0.Canvas.DrawImage(pdfImage__1, position)
It is not an easy task for WPF developers moving worksheet to another location in a workbook, as calculations or charts that are based on worksheet data might become inaccurate if you move the worksheet in WPF application. Here presents a solution that saves you from these worries. Apply Spire.Xls for WPF in your application, and you easily can move worksheet in your WPF application.
Spire.XLS for WPF is a professional Excel component which enables developers/programmers to fast generate, read, write and modify Excel document in WPF applications. Spire.XLS for .NET embed a method - Spire.Xls.WorkShee.MoveWorksheet(int destIndex) in its class design used to move a worksheet to another location in the spreadsheet. The method takes the target worksheet index as a parameter and lead no inaccuracy on these calculations or charts.
Now Feel free to download Spire.XLS for WPF and use the code samples below to move worksheet in WPF application.
using Spire.Xls;
using System.Windows;

namespace WpfApplication1
{
    public partial class MainWindow : Window
    {
        public MainWindow()
        {
            InitializeComponent();
        }
        private void button2_Click(object sender, RoutedEventArgs e)
        {
            //open Excel
            Workbook mywbk = new Workbook();
            mywbk.LoadFromFile(@"..\test.xls");

            // Locate the Worksheet
            Worksheet mysht = mywbk.Worksheets[0];

            //Move Worksheet
            mysht.MoveWorksheet(2);

            //Save and Launch
            mywbk.SaveToFile("result.xls");
            System.Diagnostics.Process.Start("result.xls");

        }
    }
}
Imports Spire.Xls
Imports System.Windows

Namespace WpfApplication1
	Public Partial Class MainWindow
		Inherits Window
		Public Sub New()
			InitializeComponent()
		End Sub
		Private Sub button2_Click(sender As Object, e As RoutedEventArgs)
			'open Excel
			Dim mywbk As New Workbook()
			mywbk.LoadFromFile("..\test.xls")

			' Locate the Worksheet
			Dim mysht As Worksheet = mywbk.Worksheets(0)

			'Move Worksheet
			mysht.MoveWorksheet(2)

			'Save and Launch
			mywbk.SaveToFile("result.xls")
			System.Diagnostics.Process.Start("result.xls")

		End Sub
	End Class
End Namespace
When working with Excel files that contain multiple worksheets, you may sometimes find that some of the worksheets are no longer necessary or need to be organized in a different way. In these cases, you have the option of moving or deleting the worksheets to better manage your spreadsheet. In this article, you will learn how to move or delete worksheets in Excel in C# using Spire.XLS for .NET.
Install Spire.XLS for .NET
To begin with, you need to add the DLL files included in the Spire.XLS for .NET package as references in your .NET project. The DLL files can be either downloaded from this link or installed via NuGet.
PM> Install-Package Spire.XLS
Move a Worksheet in Excel in C#
Spire.XLS for .NET provides the Worksheet.MoveWorksheet(int destIndex) method to move an Excel worksheet to a desired position by specifying the index. The following are the detailed steps:
- Create a Workbook instance.
- Load an Excel file using Workbook.LoadFromFile() method.
- Get a specific worksheet using Workbook.Worksheet[] property.
- Move the worksheet to another position using Worksheet.MoveWorksheet() method.
- Save the result file using Workbook.SaveToFile() method.
- C#
using Spire.Xls;
namespace MoveSheet
{
class Program
{
static void Main(string[] args)
{
//Create a Workbook instance
Workbook workbook = new Workbook();
//Load an Excel file
workbook.LoadFromFile("Budget.xlsx");
//Get the first worksheet
Worksheet sheet = workbook.Worksheets[0];
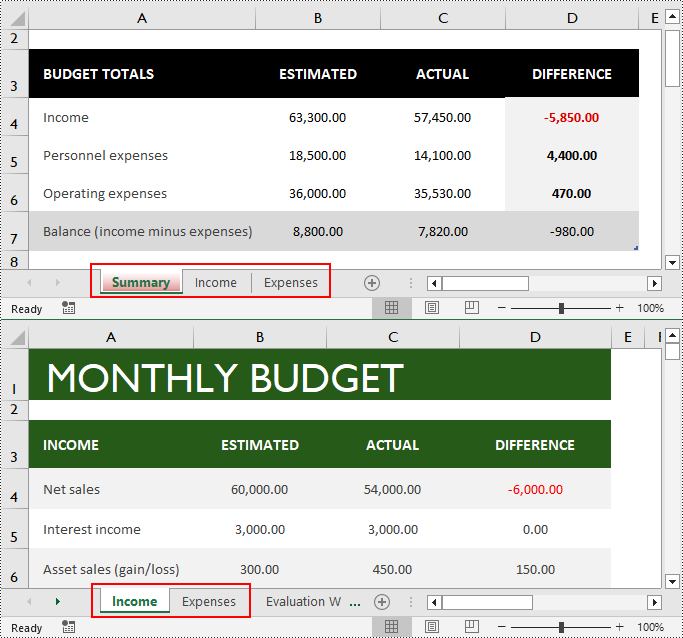
//Move the worksheet to the 3rd position
sheet.MoveWorksheet(2);
//Save the result file
workbook.SaveToFile("MoveWorksheet.xlsx", ExcelVersion.Version2016);
}
}
}

Delete a Worksheet in Excel in C#
You can remove a specific worksheet from Excel by sheet index or name using the Workbook.Worksheets.RemoveAt(int index) or Workbook.Worksheets.Remove(string sheetName) method. The following are the detailed steps:
- Create a Workbook instance.
- Load an Excel file using Workbook.LoadFromFile() method.
- Delete a specific worksheet from the file using Workbook.Worksheets.RemoveAt() or Workbook.Worksheets.Remove() method.
- Save the result file using Workbook.SaveToFile() method.
- C#
using Spire.Xls;

namespace RemoveSheet
{
    class Program
    {
        static void Main(string[] args)
        {
            //Create a Workbook instance
            Workbook workbook = new Workbook();

            //Load an Excel file
            workbook.LoadFromFile("Budget.xlsx");

            //Remove a specific worksheet by index
            workbook.Worksheets.RemoveAt(0);
            //Remove a specific worksheet by name
            //workbook.Worksheets.Remove("Summary");

            //Save the result file
            workbook.SaveToFile("DeleteWorksheet.xlsx", ExcelVersion.Version2016);

        }
    }
}
Apply for a Temporary License
If you'd like to remove the evaluation message from the generated documents, or to get rid of the function limitations, please request a 30-day trial license for yourself.
