So konvertieren Sie TXT-Dateien schnell in Excel-Tabellen
Inhaltsverzeichnis
Mit Maven installieren
Install-Package Spire.XLS
Verwandte Links

Seiteninhalt:
- Methode 1. Text in Microsoft Excel importieren und als Excel-Format speichern
- Methode 2. TXT mit C# in das Excel-Format konvertieren
Einführung
Das Arbeiten mit reinen Textdateien (.txt) ist üblich, aber wenn es um die Verwaltung großer Datensätze geht, fehlt es TXT-Dateien oft an Struktur und Benutzerfreundlichkeit. Durch die Konvertierung von TXT in Excel können Sie die Funktionen von Excel wie Filtern, Formeln, Pivot-Tabellen und Datenvisualisierung nutzen. In diesem Leitfaden lernen Sie drei effektive Methoden kennen, um TXT-Dateien in das Excel-Format (XLSX oder CSV) zu konvertieren – mit Microsoft Excel, einem kostenlosen Online-TXT-zu-Excel-Konverter und Python-Programmierung.
Unterschiede zwischen TXT-, CSV- und Excel-Dateien
Bevor Sie mit der Konvertierung beginnen, ist es wichtig, die Unterschiede zwischen diesen Formaten zu verstehen:
- TXT-Dateien – Speichern unstrukturierter oder reiner Text, oft durch Leerzeichen, Tabulatoren oder benutzerdefinierte Trennzeichen getrennt.
- CSV-Dateien – Eine strukturierte Form einer Textdatei, bei der Daten durch Kommas getrennt sind, was den Import in Tabellenkalkulationen oder Datenbanken erleichtert.
- Excel-Dateien (XLS/XLSX) – Native Microsoft Excel-Formate, die erweiterte Datenmanipulationsfunktionen wie Formeln, Diagramme und mehrere Arbeitsblätter unterstützen.
Die Konvertierung von TXT in Excel ermöglicht es Ihnen, Roh-Textdaten in ein strukturiertes und interaktives Format umzuwandeln.
Methode 1. Text in Microsoft Excel importieren und als Excel-Format speichern
Für Benutzer, die lieber nicht auf externe Tools angewiesen sind, bietet Excel selbst eine zuverlässige Methode, um TXT-Dateien in strukturierte Tabellenkalkulationen zu konvertieren. Mit dieser Methode müssen Sie keine anderen APIs oder Software herunterladen. Solange Sie Zugriff auf Microsoft Excel haben, können Sie die Konvertierung in Sekunden durchführen.
Befolgen Sie die folgenden Schritte, um zu beginnen:
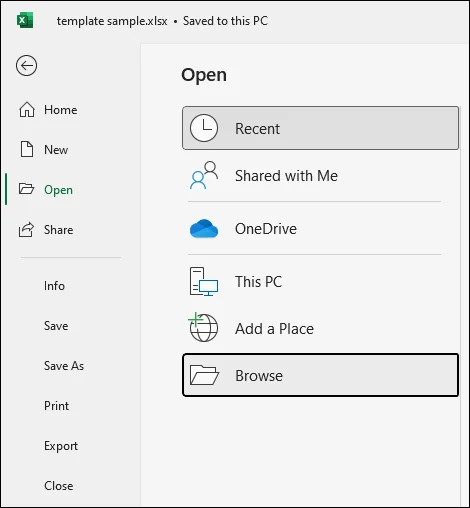
Schritt 1. Öffnen Sie Microsoft Excel und gehen Sie zu Datei > Öffnen > Durchsuchen, um Ihre TXT-Datei zu öffnen.
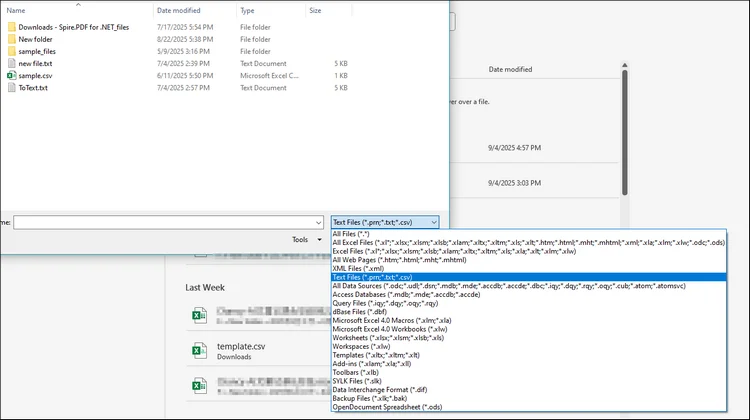
Schritt 2. Ein Fenster wird geöffnet, in dem Sie eine Datei auswählen können. Das Standard-Dateiformat enthält nur Excel-Dateien, daher sollten Sie das Dateiformat in der rechten unteren Ecke auf „Alle Dateien“ oder „Textdateien“ ändern.
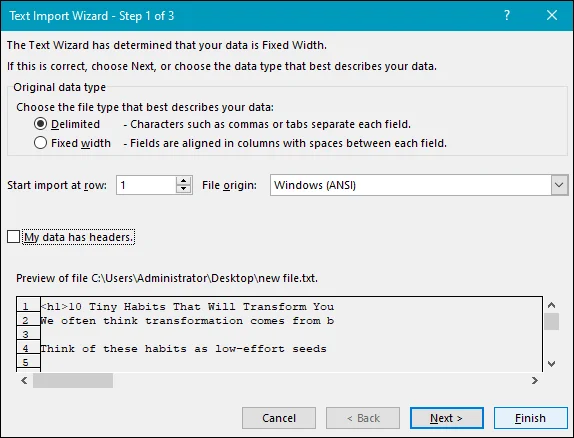
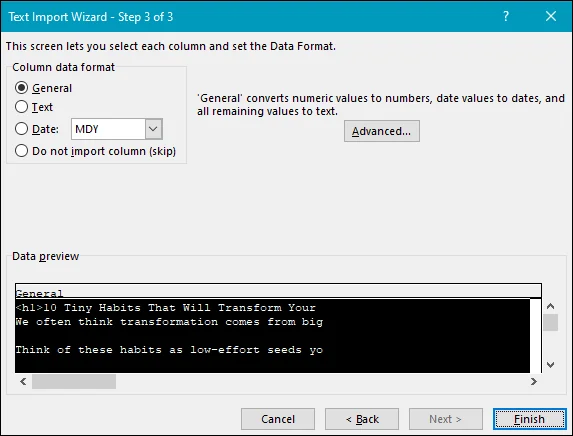
Schritt 3. Der Textimport-Assistent wird angezeigt. Wählen Sie den Dateityp (Getrennt oder Feste Breite).
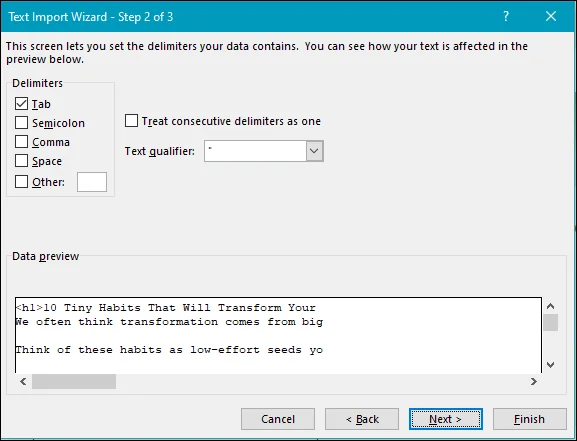
Wählen Sie das richtige Trennzeichen (wie Tabulator, Leerzeichen oder Komma).
Passen Sie bei Bedarf die Spaltendatenformate an und klicken Sie dann auf Fertig stellen.
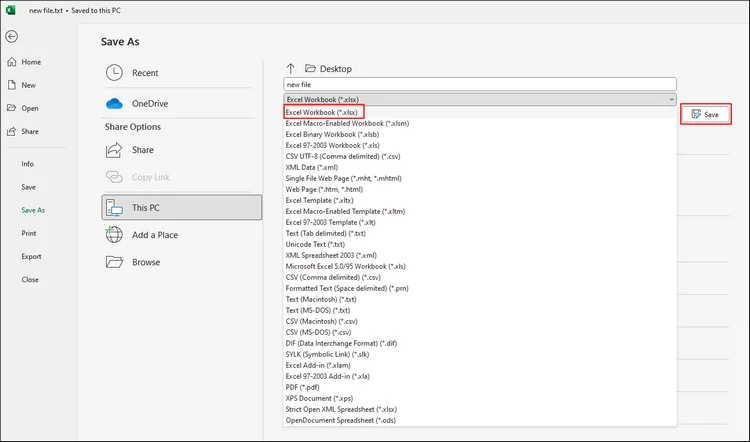
Schritt 4. Speichern Sie die Datei als .xlsx oder .csv.
Methode 2. TXT mit C# in das Excel-Format konvertieren
Für Entwickler oder fortgeschrittene Benutzer, die große Datenmengen verarbeiten, bietet Code eine zuverlässige Möglichkeit, die Konvertierung von TXT in Excel zu automatisieren. Lassen Sie mich Ihnen Spire.XLS for .NET vorstellen, eine professionelle Excel-Bibliothek, die für Entwickler entwickelt wurde, um Excel-Dateien zu erstellen, zu lesen, zu bearbeiten, zu konvertieren und Excel-Dateien zu drucken, ohne auf Microsoft Excel angewiesen zu sein.
Spire.XLS for .NET unterstützt sowohl XLS- als auch XLSX-Formate sowie CSV, ODS, PDF, HTML und andere Dateitypen und ist somit eine flexible Lösung für die Verarbeitung von Tabellenkalkulationsdaten. Mit seinem reichhaltigen Funktionsumfang – einschließlich Formelberechnung, Diagrammerstellung, Pivot-Tabellen, Datenimport/-export und erweiterter Formatierung. Es hilft Entwicklern, Excel-bezogene Aufgaben effizient zu automatisieren und gewährleistet gleichzeitig hohe Leistung und einfache Integration.
Befolgen Sie nun die folgenden Schritte, um Ihre TXT-Dateien mit Spire.XLS for .NET in das Excel-Format zu konvertieren:
Schritt 1. Installieren Sie die Spire.XLS-DLL auf Ihrem Computer mit NuGet unter Verwendung des folgenden Codes oder laden Sie sie von der offiziellen Website herunter.
Schritt 2. Kopieren Sie den folgenden Code und vergessen Sie nicht, ihn an Ihre spezifischen Dateianforderungen anzupassen:
using Spire.Xls;
using System.IO;
using System.Collections.Generic;

class TxtToExcelConverter
{
    static void Main()
    {
        // Open a text file and read all lines in it
        string[] lines = File.ReadAllLines("Data.txt");

        // Create a list to store the data in text file
        List<string[]> data = new List<string[]>();

        // Split data into rows and columns and add to the list
        foreach (string line in lines)
        {
            data.Add(line.Trim().Split('\t')); // Adjust delimiter as needed
        }

        // Create a Workbook object
        Workbook workbook = new Workbook();

        // Get the first worksheet
        Worksheet sheet = workbook.Worksheets[0];

        // Iterate through the rows and columns in the data list
        for (int row = 0; row < data.Count; row++)
        {
            for (int col = 0; col < data[row].Length; col++)
            {
                // Write the text data in specified cells
                sheet.Range[row + 1, col + 1].Value = data[row][col];

                // Set the header row to Bold
                sheet.Range[1, col + 1].Style.Font.IsBold = true;
            }
        }

        // Autofit columns
        sheet.AllocatedRange.AutoFitColumns();

        // Save the Excel file
        workbook.SaveToFile("TXTtoExcel.xlsx", ExcelVersion.Version2016);
        workbook.Dispose();
    }
}
ERGEBNIS: 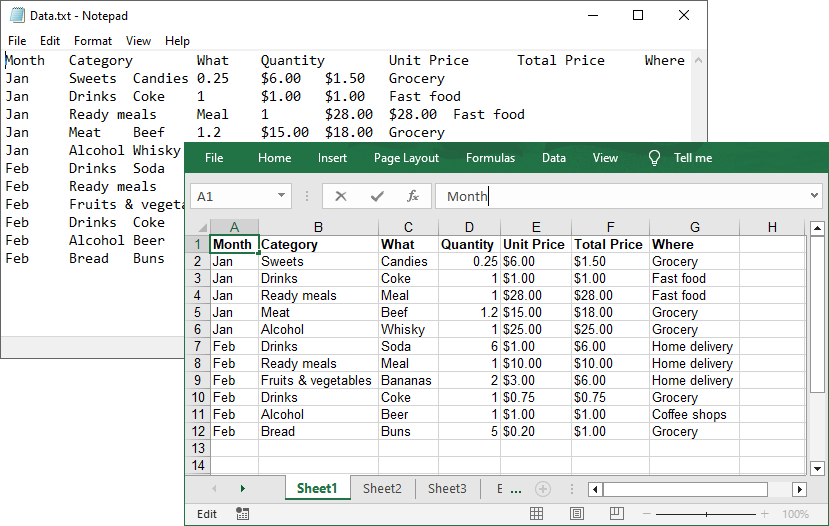
Fazit
Die Konvertierung von TXT-Dateien in das Excel-Format erleichtert die Analyse, Organisation und Weitergabe Ihrer Daten. In diesem Beitrag haben wir drei Methoden untersucht:
- Microsoft Excel-Import – schnell und integriert für manuelle Konvertierungen.
- Python-Skripting – leistungsstark und flexibel für die Automatisierung und große Datensätze.
Wählen Sie die Methode, die Ihren Bedürfnissen am besten entspricht, und beginnen Sie, reinen Text in strukturierte, nutzbare Excel-Tabellen umzuwandeln.
Holen Sie sich eine kostenlose Lizenz
Um die Funktionen von Spire.XLS for .NET ohne Evaluierungseinschränkungen vollständig zu erleben, können Sie eine kostenlose 30-Tage-Testlizenz anfordern.
Siehe auch:
Как быстро конвертировать TXT-файлы в таблицы Excel
Содержание
Установить с помощью Maven
Install-Package Spire.XLS
Похожие ссылки
Содержание страницы:
- Метод 1. Импорт текста в Microsoft Excel и сохранение в формате Excel
- Метод 2. Преобразование TXT в формат Excel с помощью C#
Введение
Работа с обычными текстовыми файлами (.txt) является обычным делом, но когда речь заходит об управлении большими наборами данных, TXT-файлам часто не хватает структуры и удобства использования. Преобразуя TXT в Excel, вы можете воспользоваться такими функциями Excel, как фильтрация, формулы, сводные таблицы и визуализация данных. В этом руководстве вы узнаете о трех эффективных методах преобразования TXT-файлов в формат Excel (XLSX или CSV) — с помощью Microsoft Excel, бесплатного онлайн-конвертера TXT в Excel и программирования на Python.
Различия между файлами TXT, CSV и Excel
Прежде чем начать преобразование, важно понять различия между этими форматами:
- Файлы TXT – хранят неструктурированный или обычный текст, часто разделенный пробелами, табуляциями или пользовательскими разделителями.
- Файлы CSV – структурированная форма текстового файла, где данные разделены запятыми, что облегчает их импорт в электронные таблицы или базы данных.
- Файлы Excel (XLS/XLSX) – нативные форматы Microsoft Excel, которые поддерживают расширенные функции обработки данных, включая формулы, диаграммы и несколько листов.
Преобразование TXT в Excel позволяет превратить необработанные текстовые данные в структурированный и интерактивный формат.
Метод 1. Импорт текста в Microsoft Excel и сохранение в формате Excel
Для пользователей, которые предпочитают не полагаться на внешние инструменты, сам Excel предоставляет надежный метод преобразования TXT-файлов в структурированные электронные таблицы. С этим методом вам не нужно загружать какие-либо другие API или программное обеспечение. Пока у вас есть доступ к Microsoft Excel, вы можете выполнить преобразование за считанные секунды.
Следуйте приведенным ниже шагам, чтобы начать:
Шаг 1. Откройте Microsoft Excel и перейдите в Файл > Открыть > Обзор, чтобы открыть ваш TXT-файл.
Шаг 2. Появится окно для выбора файла. По умолчанию формат файла содержит только файлы Excel, поэтому вам следует изменить формат файла в правом нижнем углу на «Все файлы» или «Текстовые файлы».
Шаг 3. Появится Мастер импорта текста. Выберите тип файла (С разделителями или Фиксированной ширины).
Выберите правильный разделитель (например, табуляция, пробел или запятая).
При необходимости настройте форматы данных столбцов, затем нажмите Готово.
Шаг 4. Сохраните файл как .xlsx или .csv.
Метод 2. Преобразование TXT в формат Excel с помощью C#
Для разработчиков или продвинутых пользователей, работающих с большими объемами данных, код предоставляет надежный способ автоматизации преобразования TXT в Excel. Позвольте мне представить вам Spire.XLS for .NET, профессиональную библиотеку Excel, разработанную для создания, чтения, редактирования, преобразования и печати файлов Excel в .NET-приложениях без зависимости от Microsoft Excel.
Spire.XLS for .NET поддерживает форматы XLS и XLSX, а также CSV, ODS, PDF, HTML и другие типы файлов, что делает его гибким решением для обработки данных электронных таблиц. С его богатым набором функций, включая вычисление формул, создание диаграмм, сводные таблицы, импорт/экспорт данных и расширенное форматирование, он помогает разработчикам эффективно автоматизировать задачи, связанные с Excel, обеспечивая высокую производительность и простоту интеграции.
Теперь следуйте приведенным ниже шагам, чтобы преобразовать ваши TXT-файлы в формат Excel с помощью Spire.XLS for .NET:
Шаг 1. Установите DLL Spire.XLS на свой компьютер с помощью NuGet, используя следующий код, или загрузите с официального сайта.
Шаг 2. Скопируйте следующий код и не забудьте настроить его в соответствии с вашими конкретными потребностями файла:
using Spire.Xls;
using System.IO;
using System.Collections.Generic;

class TxtToExcelConverter
{
    static void Main()
    {
        // Open a text file and read all lines in it
        string[] lines = File.ReadAllLines("Data.txt");

        // Create a list to store the data in text file
        List<string[]> data = new List<string[]>();

        // Split data into rows and columns and add to the list
        foreach (string line in lines)
        {
            data.Add(line.Trim().Split('\t')); // Adjust delimiter as needed
        }

        // Create a Workbook object
        Workbook workbook = new Workbook();

        // Get the first worksheet
        Worksheet sheet = workbook.Worksheets[0];

        // Iterate through the rows and columns in the data list
        for (int row = 0; row < data.Count; row++)
        {
            for (int col = 0; col < data[row].Length; col++)
            {
                // Write the text data in specified cells
                sheet.Range[row + 1, col + 1].Value = data[row][col];

                // Set the header row to Bold
                sheet.Range[1, col + 1].Style.Font.IsBold = true;
            }
        }

        // Autofit columns
        sheet.AllocatedRange.AutoFitColumns();

        // Save the Excel file
        workbook.SaveToFile("TXTtoExcel.xlsx", ExcelVersion.Version2016);
        workbook.Dispose();
    }
}
РЕЗУЛЬТАТ:
Заключение
Преобразование TXT-файлов в формат Excel облегчает анализ, организацию и обмен данными. В этом посте мы рассмотрели три метода:
- Импорт в Microsoft Excel – быстрый и встроенный способ для ручных преобразований.
- Скрипты на Python – мощный и гибкий инструмент для автоматизации и работы с большими наборами данных.
Выберите метод, который наилучшим образом соответствует вашим потребностям, и начните превращать обычный текст в структурированные и удобные для использования электронные таблицы Excel.
Получить бесплатную лицензию
Чтобы в полной мере оценить возможности Spire.XLS for .NET без каких-либо ограничений, вы можете запросить бесплатную 30-дневную пробную лицензию.
Смотрите также:
How to Convert HTML to Markdown in Python: Step-by-Step Guide

Converting HTML to Markdown using Python is a common task for developers managing web content, documentation, or API data. While HTML provides powerful formatting and structure, it can be verbose and harder to maintain for tasks like technical writing or static site generation. Markdown, by contrast, is lightweight, human-readable, and compatible with platforms such as GitHub, GitLab, Jekyll, and Hugo.
Automating HTML to Markdown conversion with Python streamlines workflows, reduces errors, and ensures consistent output. This guide covers everything from converting HTML files and strings to batch processing multiple files, along with best practices to ensure accurate Markdown results.
What You Will Learn
- Why Convert HTML to Markdown
- Install HTML to Markdown Library for Python
- Convert an HTML File to Markdown in Python
- Convert an HTML String to Markdown in Python
- Batch Conversion of Multiple HTML Files
- Best Practices for HTML to Markdown Conversion
- Conclusion
- FAQs
Why Convert HTML to Markdown?
Before diving into the code, let’s look at why developers often prefer Markdown over raw HTML in many workflows:
- Simplicity and Readability
Markdown is easier to read and edit than verbose HTML tags. - Portability Across Tools
Markdown is supported by GitHub, GitLab, Bitbucket, Obsidian, Notion, and static site generators like Hugo and Jekyll. - Better for Version Control
Being plain text, Markdown makes it easier to track changes with Git, review diffs, and collaborate. - Faster Content Creation
Writing Markdown is quicker than remembering HTML tag structures. - Integration with Static Site Generators
Popular frameworks rely on Markdown as the main content format. Converting from HTML ensures smooth migration. - Cleaner Documentation Workflows
Many documentation systems and wikis use Markdown as their primary format.
In short, converting HTML to Markdown improves maintainability, reduces clutter, and fits seamlessly into modern developer workflows.
Install HTML to Markdown Library for Python
Before converting HTML content to Markdown in Python, you’ll need a library that can handle both formats effectively. Spire.Doc for Python is a reliable choice that allows you to transform HTML files or HTML strings into Markdown while keeping headings, lists, images, and links intact.
You can install it from PyPI using pip:
pip install spire.doc
Once installed, you can automate the HTML to Markdown conversion in your Python scripts. The same library also supports broader scenarios. For example, when you need editable documents, you can rely on its HTML to Word conversion feature to transform web pages into Word files. And for distribution or archiving, HTML to PDF conversion is especially useful for generating standardized, platform-independent documents.
Convert an HTML File to Markdown in Python
One of the most common use cases is converting an existing .html file into a .md file. This is especially useful when migrating old websites, technical documentation, or blog posts into Markdown-based workflows, such as static site generators (Jekyll, Hugo) or Git-based documentation platforms (GitHub, GitLab, Read the Docs).
Steps
- Create a new Document instance.
- Load the .html file into the document using LoadFromFile().
- Save the document as a .md file using SaveToFile() with FileFormat.Markdown.
- Close the document to release resources.
Code Example
from spire.doc import *

# Create a Document instance
doc = Document()

# Load an existing HTML file
doc.LoadFromFile("input.html", FileFormat.Html)

# Save as Markdown file
doc.SaveToFile("output.md", FileFormat.Markdown)

# Close the document
doc.Close()
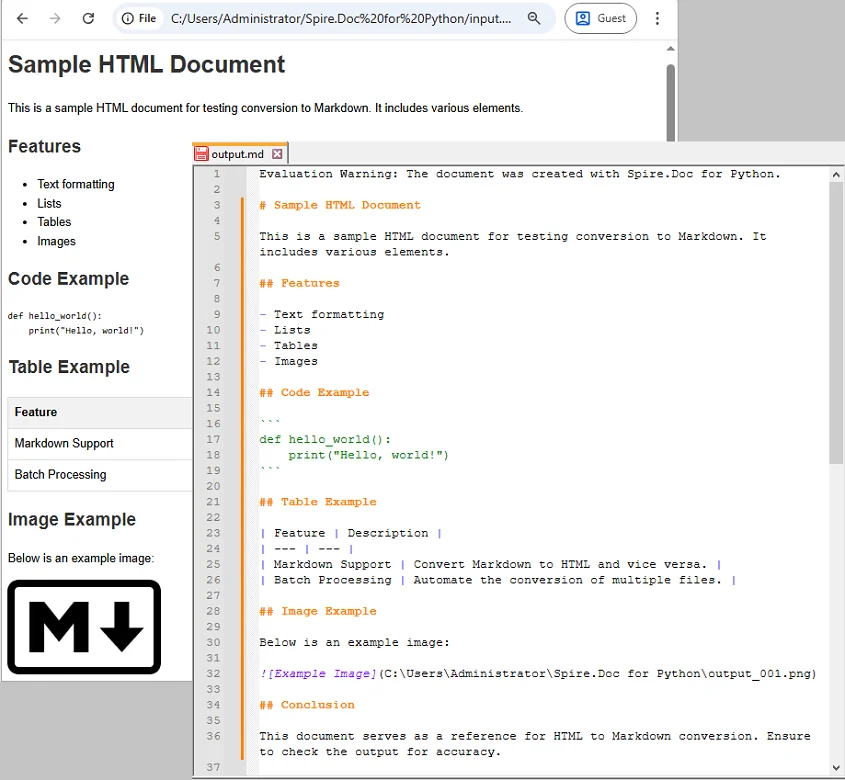
This converts input.html into output.md, preserving structural elements such as headings, paragraphs, lists, links, and images.
If you’re also interested in the reverse process, check out our guide on converting Markdown to HTML in Python.
Convert an HTML String to Markdown in Python
Sometimes, HTML content is not stored in a file but is dynamically generated—for example, when retrieving web content from an API or scraping. In these scenarios, you can convert directly from a string without needing to create a temporary HTML file.
Steps
- Create a new Document instance.
- Add a Section to the document.
- Add a Paragraph to the section.
- Append the HTML string to the paragraph using AppendHTML().
- Save the document as a Markdown file using SaveToFile().
- Close the document to release resources.
Code Example
from spire.doc import *

# Sample HTML string
html_content = """
<h1>Welcome</h1>
<p>This is a <strong>sample</strong> paragraph with <em>emphasis</em>.</p>
<ul>
  <li>First item</li>
  <li>Second item</li>
</ul>
"""

# Create a Document instance
doc = Document()

# Add a section
section = doc.AddSection()

# Add a paragraph and append the HTML string
paragraph = section.AddParagraph()
paragraph.AppendHTML(html_content)

# Save the document as Markdown
doc.SaveToFile("string_output.md", FileFormat.Markdown)

# close the document to release resources
doc.Close()
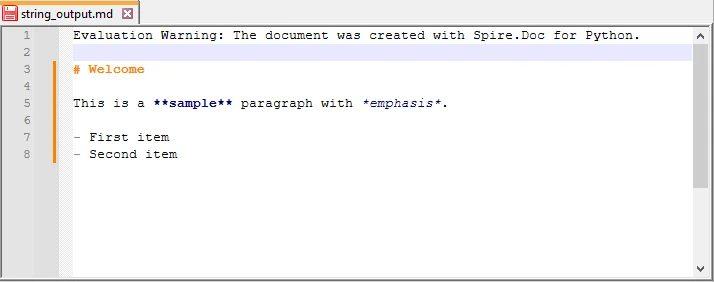
The resulting Markdown will look like this:
Batch Conversion of Multiple HTML Files
For larger projects, you may need to convert multiple .html files in bulk. A simple loop can automate the process.
import os
from spire.doc import *

# Define the folder containing HTML files to convert
input_folder = "html_files"

# Define the folder where converted Markdown files will be saved
output_folder = "markdown_files"

# Create the output folder if it doesn't exist
os.makedirs(output_folder, exist_ok=True)

# Loop through all files in the input folder
for filename in os.listdir(input_folder):
    # Process only files with .html extension
    if filename.endswith(".html"):
        # Create a new Document object
        doc = Document()

        # Load the HTML file into the Document object
        doc.LoadFromFile(os.path.join(input_folder, filename), FileFormat.Html)

        # Generate the output file path by replacing .html with .md
        output_file = os.path.join(output_folder, filename.replace(".html", ".md"))

        # Save the Document as a Markdown file
        doc.SaveToFile(output_file, FileFormat.Markdown)

        # Close the Document to release resources
        doc.Close()
This script processes all .html files inside html_files/ and saves the Markdown results into markdown_files/.
Best Practices for HTML to Markdown Conversion
Turning HTML to Markdown makes content easier to read, manage, and version-control. To ensure accurate and clean conversion, follow these best practices:
- Validate HTML Before Conversion
Ensure your HTML is properly structured. Invalid tags can cause incomplete or broken Markdown output. - Understand Markdown Limitations
Markdown does not support advanced CSS styling or custom HTML tags. Some formatting might get lost. - Choose File Encoding Carefully
Always be aware of character encoding. Open and save your files with a specific encoding (like UTF-8) to prevent issues with special characters. - Batch Processing
If converting multiple files, create a robust script that includes error handling (try-except blocks), logging, and skips problematic files instead of halting the entire process.
Conclusion
Converting HTML to Markdown in Python is a valuable skill for developers handling documentation pipelines, migrating web content, or processing data from APIs. With Spire.Doc for Python, you can:
- Convert individual HTML files into Markdown with ease.
- Transform HTML strings directly into .md files.
- Automate batch conversions to efficiently manage large projects.
By applying these methods, you can streamline your workflows and ensure your content remains clean, maintainable, and ready for modern publishing platforms.
FAQs
Q1: Can I convert Markdown back to HTML in Python?
A1: Yes, Spire.Doc supports the conversion of Markdown to HTML, allowing for seamless transitions between these formats.
Q2: Will the conversion preserve complex HTML elements like tables?
A2: While Spire.Doc effectively handles standard HTML elements, it's advisable to review complex layouts, such as tables and nested elements, to ensure accurate conversion results.
Q3: Can I automate batch conversion for multiple HTML files?
A3: Absolutely! You can automate batch conversion using scripts in Python, enabling efficient processing of multiple HTML files at once.
Q4: Is Spire.Doc free to use?
A4: Spire.Doc provides both free and commercial versions, giving developers the flexibility to access essential features at no cost or unlock advanced functionality with a license.
How to Integrate Spire.PDFViewer for MAUI in .NET Project
Spire.PDFViewer for MAUI is a dedicated PDF viewing component tailored for .NET Multi-platform App UI (MAUI) frameworks. This guide will show you how to configure it in your .NET MAUI project, including environment setup, product installation, and core PDF viewing feature implementation.
1. Prerequisites & Environment Setup
Ensure your development environment meets the following requirements before you begin.
1.1 Required Software
- IDE: Visual Studio 2022 (version 17.8 or later) for Windows, or Visual Studio 2022 for Mac (version 17.6 or later).
- Target Frameworks:
- Android 5.0 (API 21) or higher
- Windows 11, or Windows 10 Version 1809 or higher
1.2 Install the .NET MAUI Workload
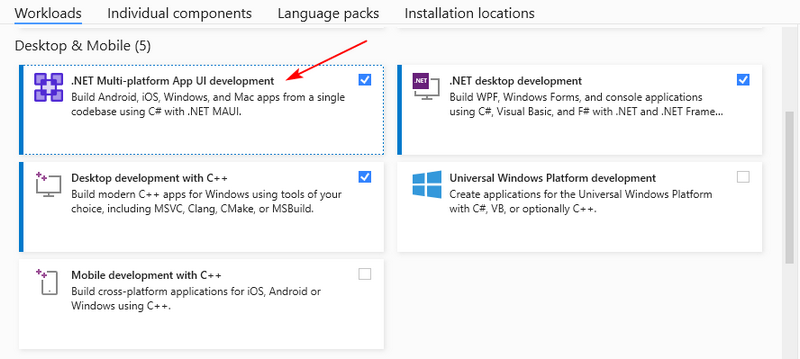
The .NET Multi-platform App UI development workload is mandatory for MAUI projects. Follow these steps to install it:
- Open Visual Studio Installer:
- Search for "Visual Studio Installer" in your Start Menu (usually under the "Visual Studio 2022" folder).
- Alternatively, open Visual Studio, go to “Tools > Get Tools and Features”.
- Modify Your Installation:
- Click "Modify" next to your Visual Studio 2022 edition.
- Navigate to the "Workloads" tab.
- Check the box for ".NET Multi-platform App UI development".
- Ensure the optional components you need are selected.
- Click "Modify" to start the installation
2. Create a New .NET MAUI Project
After installing MAUI, follow these steps to create a new .NET MAUI project:
2.1 Select the Project Template
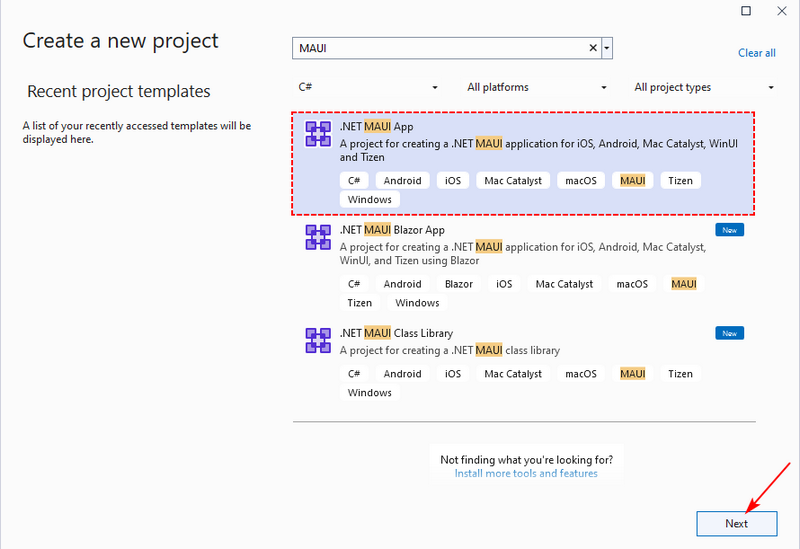
- Open Visual Studio and click “Create a new project”.
- Search for "MAUI" and select the .NET MAUI App template (C#).
- Click “Next” to proceed.
2.2 Configure Project Details
- Enter a project name (e.g., "PdfViewerMauiApp") and choose a Save location.
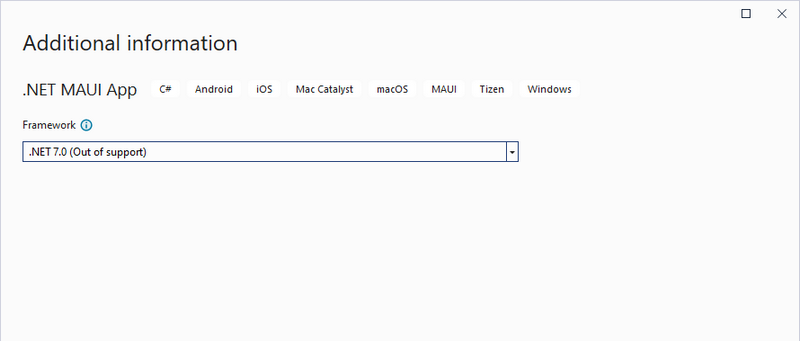
- Next, select .NET 7.0 or later (e.g., .NET 8.0) as the target framework.
- Click “Create” to generate the project.
3. Install Spire.PDFViewer and Dependencies
To implement the PDF viewer in .NET MAUI, you need to install the dependent NuGet packages and add Spire.PDFViewer DLLs.
3.1 Install Dependent NuGet Packages
- Go to “Tools > NuGet Package Manager > Package Manager Console”.
- Run the following command to install all required packages at once:
Install-Package Microsoft.Win32.Registry -Version 5.0.0
Install-Package System.Security.Permissions -Version 4.7.0
Install-Package System.Text.Encoding.CodePages -Version 4.7.0
Install-Package System.Security.Cryptography.Pkcs -Version 4.7.0
Install-Package System.Security.Cryptography.Xml -Version 4.7.1
Install-Package HarfBuzzSharp -Version 8.3.0.1
Install-Package SkiaSharp -Version 3.116.1
Install-Package SkiaSharp.Views.Maui.Controls -Version 2.88.5
Install-Package System.Buffers -Version 4.5.1
Install-Package System.Memory -Version 4.5.5
3.2 Add Spire.PDFViewer DLLs
- Download the Spire.PdfViewer package from the official website.
- Unzip the downloaded file to a specified file path.
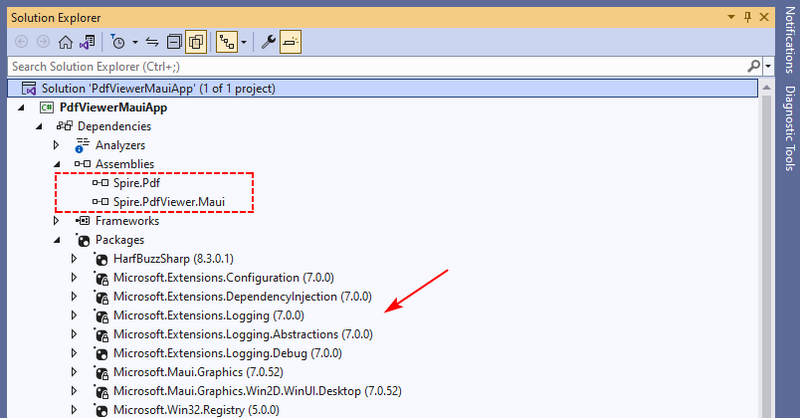
- In Visual Studio’s Solution Explorer, right-click the project > Add > Project Reference.
- Click “Browse”, navigate to the unzipped folder (BIN\NET7.0\windows10.0.19041.0), and add both:
- Spire.PdfViewer.Maui.dll
- Spire.Pdf.dll
3.3 Restrict Target Platform to Windows
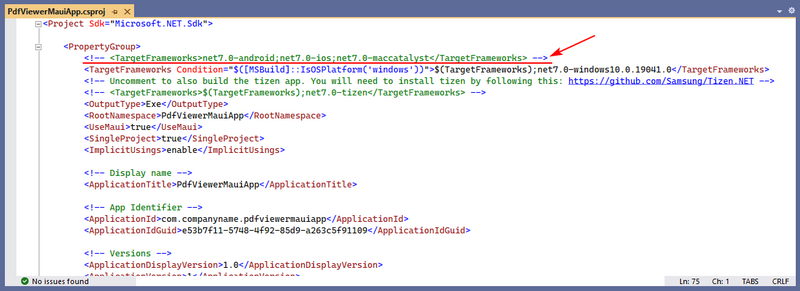
Currently, the Spire.PDFViewer for MAUI only supports the Windows platform. Therefore, it’s necessary to modify the project file (.csproj) to remove non-Windows target frameworks:
- In Solution Explorer, right-click the project and select “Edit Project File”.
- Locate the
<TargetFrameworks>element and delete or comment out this line. - Save the file (Ctrl+S) and reload the project when prompted by Visual Studio.
4. Add PDF Viewer to the Project
4.1 Initialize Spire.PDFViewer
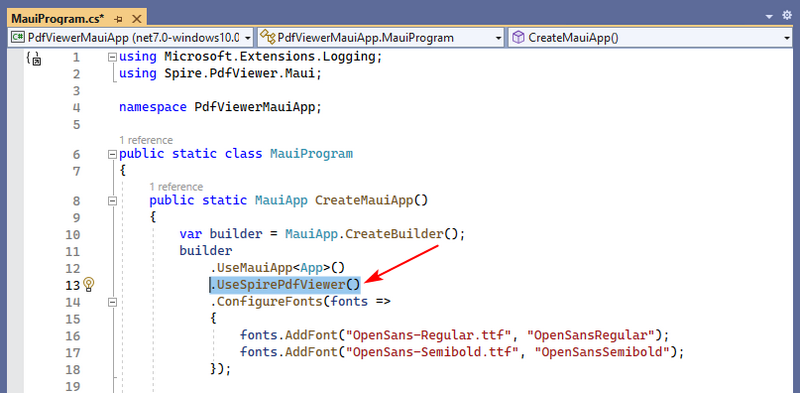
In “MauiProgram.cs”, add the .UseSpirePdfViewer() method in the MauiAppBuilder chain:
4.2 Option 1: Use the Default PDF Viewer UI
For a quick setup with a pre-built toolbar (supports loading, zooming, and searching), use the minimal XAML configuration:
- Replace the default XAML content of “MainPage.xaml” with the following:
<?xml version="1.0" encoding="utf-8" ?>
<ContentPage xmlns="http://schemas.microsoft.com/dotnet/2021/maui"
             xmlns:x="http://schemas.microsoft.com/winfx/2009/xaml"
             xmlns:spire="clr-namespace:Spire.PdfViewer.Maui;assembly=Spire.PdfViewer.Maui"
             x:Class="PdfViewerMauiApp.MainPage"> <!-- Modify “PdfViewerMauiApp” to match your project name -->

    <Grid ColumnDefinitions="Auto, *" ColumnSpacing="0">
        <!-- Default PDF Viewer with built-in toolbar -->
        <spire:PdfViewer x:Name="PdfDocumentViewer1" Grid.Column="1" />
    </Grid>
</ContentPage>
- Open “MainPage.xaml.cs” and ensure the namespace matches your project name:
namespace PdfViewerMauiApp; // Match the project name in the x:Class value

public partial class MainPage : ContentPage
{

    public MainPage()
    {
        InitializeComponent();
    }

}
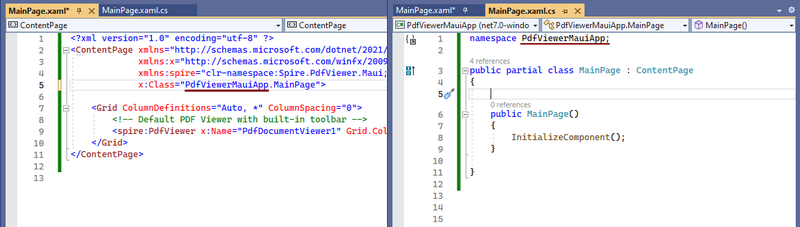
When you run the project, a PDF viewer with a built-in toolbar (Home, Zoom, Find) will appear. You can load PDFs directly via the toolbar and use its default features.

4.3 Option 2: Customize the UI Layout & Functionality
For a tailored experience (e.g., a dedicated "Load PDF" button or page navigation), design a custom layout and implement core logic.
Step 1: Design the Custom UI (MainPage.xaml)
Replace the default XAML content of “MainPage.xaml” with a two-column grid (left: control panel; right: PDF viewer):
<?xml version="1.0" encoding="utf-8" ?>
<ContentPage xmlns="http://schemas.microsoft.com/dotnet/2021/maui"
             xmlns:x="http://schemas.microsoft.com/winfx/2009/xaml"
             xmlns:spire="clr-namespace:Spire.PdfViewer.Maui;assembly=Spire.PdfViewer.Maui"
             x:Class="PdfViewerMauiApp.MainPage"> <!-- Modify “PdfViewerMauiApp” to match your project name -->

    <Grid ColumnDefinitions="Auto, *" ColumnSpacing="0">
        <!-- Left Control Panel -->
        <VerticalStackLayout Grid.Column="0" WidthRequest="220"
                           Padding="10" Spacing="10">
            <!-- Button to load PDF files -->
            <Button Text="Load PDF File"
                   Clicked="LoadFromFile_Clicked"
                   HeightRequest="40"/>

            <!-- Page Navigation: Entry + Button -->
            <HorizontalStackLayout Spacing="10">
                <Entry x:Name="pageEntry"
                       WidthRequest="100"
                       HeightRequest="40"
                       Keyboard="Numeric"
                       Placeholder="Page Number"/>

                <Button Text="Go To"
                       Clicked="GoPages_Clicked"
                       WidthRequest="80"
                       HeightRequest="40"/>
            </HorizontalStackLayout>
            <Label x:Name="lbl1" HeightRequest="30"/>
        </VerticalStackLayout>

        <!-- Right PDF Viewing Area -->
        <spire:PdfDocumentViewer x:Name="PdfDocumentViewer1" Grid.Column="1" />
    </Grid>
</ContentPage>
Step 2: Add Functionality (MainPage.xaml.cs)
Add event handlers in “MainPage.xaml.cs” to enable PDF loading and page navigation:
namespace PdfViewerMauiApp; // Match your project name

    public partial class MainPage : ContentPage
    {
        public MainPage()
        {
            InitializeComponent();
        }

        // Click event for the Load PDF File button
        private async void LoadFromFile_Clicked(object sender, EventArgs e)
        {
            try
            {
                // Restrict file picker to PDF files only
                var result = await FilePicker.PickAsync(new PickOptions
                {
                    FileTypes = FilePickerFileType.Pdf,
                    PickerTitle = "Choose a PDF file"
                });

                if (result != null)
                {
                    // Load the PDF file from the selected path
                    PdfDocumentViewer1.LoadFromFile(result.FullPath);

                }
            }
            catch (Exception ex)
            {
                // Display error message
                lbl1.Text = $"Loading failed: {ex.Message}";
            }
        }

        // Click event for page navigation button
        private void GoPages_Clicked(object sender, EventArgs e)
        {

            if (int.TryParse(pageEntry.Text, out int pageNumber) && pageNumber > 0)
            {
                    // Verify that the page number is within the valid range.
                if (pageNumber <= PdfDocumentViewer1.PageCount)
                 {
                        // Jump to a specific page number
                     PdfDocumentViewer1.GotoPage(pageNumber, true);
                     lbl1.Text = $"Navigated to Page: {pageNumber}/{PdfDocumentViewer1.PageCount}";
                 }
                 else
                 {
                     lbl1.Text = $"Out of Range (Max Page: {PdfDocumentViewer1.PageCount})";
                 }
             }
             else
             {
                 lbl1.Text = "Please enter a valid page number.";
             }
         }
     }
Step 3: Run the Project
Run the application, and test the PDF viewer functionality:
-
Click “Load PDF File” to select and open a PDF.
-
Enter a page number and click “Go To” to navigate to that page.
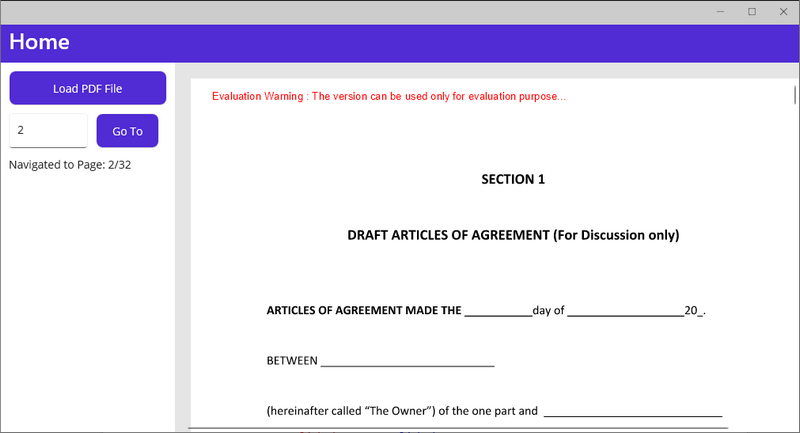
Integrating Spire.PDFViewer into a .NET MAUI project enables developers to quickly add robust, user-friendly PDF viewing capabilities, including document loading, page navigation, and built-in/ custom UI controls. By following the steps outlined here, developers can avoid common pitfalls (e.g., version mismatches, missing dependencies) and deploy a functional PDF viewer in minimal time.
How to Convert Markdown to HTML in Python: Step-by-Step Guide

Markdown (.md) is widely used in web development, documentation, and technical writing. Its simple syntax makes content easy to write and read. However, web browsers do not render Markdown directly. Converting Markdown to HTML ensures your content is structured, readable, and compatible with web platforms.
In this step-by-step guide, you will learn how to efficiently convert Markdown (.md) files into HTML using Python and Spire.Doc for Python, complete with practical code examples, clear instructions, and best practices for both single-file and batch conversions.
Table of Contents
- What is Markdown
- Why Convert Markdown to HTML
- Introducing Spire.Doc for Python
- Step-by-Step Guide: Converting Markdown to HTML in Python
- Automating Batch Conversion
- Best Practices for Markdown to HTML Conversion
- Conclusion
- FAQs
What is Markdown?
Markdown is a lightweight markup language designed for readability and ease of writing. Unlike HTML, which can be verbose and harder to write by hand, Markdown uses simple syntax to indicate headings, lists, links, images, and more.
Example Markdown:
# This is a Heading

This is a paragraph with \*\*bold text\*\* and \*italic text\*.

- Item 1

- Item 2
Even in its raw form, Markdown is easy to read, which makes it popular for documentation, blogging, README files, and technical writing.
For more on Markdown syntax, see the Markdown Guide.
Why Convert Markdown to HTML?
While Markdown is excellent for authoring content, web browsers cannot render it natively. Converting Markdown to HTML allows you to:
- Publish content on websites – Most CMS platforms require HTML for web pages.
- Enhance styling – HTML supports CSS and JavaScript for advanced formatting and interactivity.
- Maintain compatibility – HTML is universally supported by browsers, ensuring content displays correctly everywhere.
- Integrate with web frameworks – Frameworks like React, Vue, and Angular require HTML as the base for rendering components.
Introducing Spire.Doc for Python
Spire.Doc for Python is a robust library for handling multiple document formats. It supports reading and writing Word documents, Markdown files, and exporting content to HTML. The library allows developers to convert Markdown directly to HTML with minimal code, preserving proper formatting and structure.
In addition to HTML, Spire.Doc for Python also allows you to convert Markdown to Word in Python or convert Markdown to PDF in Python, making it particularly useful for developers who want a unified tool for handling Markdown across different output formats.
Benefits of Using Spire.Doc for Python for Markdown to HTML Conversion
- Easy-to-use API – Simple, intuitive methods that reduce development effort.
- Accurate formatting – Preserves all Markdown elements such as headings, lists, links, and emphasis in HTML.
- No extra dependencies – Eliminates the need for manual parsing or third-party libraries.
- Flexible usage – Supports both single-file conversion and automated batch processing.
Step-by-Step Guide: Converting Markdown to HTML in Python
Now that you understand the purpose and benefits of converting Markdown to HTML, let’s walk through a clear, step-by-step process to transform your Markdown files into structured, web-ready HTML.
Step 1: Install Spire.Doc for Python
First, ensure that Spire.Doc for Python is installed in your environment. You can install it directly from PyPI using pip:
pip install spire.doc
Step 2: Prepare Your Markdown File
Next, create a sample Markdown file that you want to convert. For example, example.md:
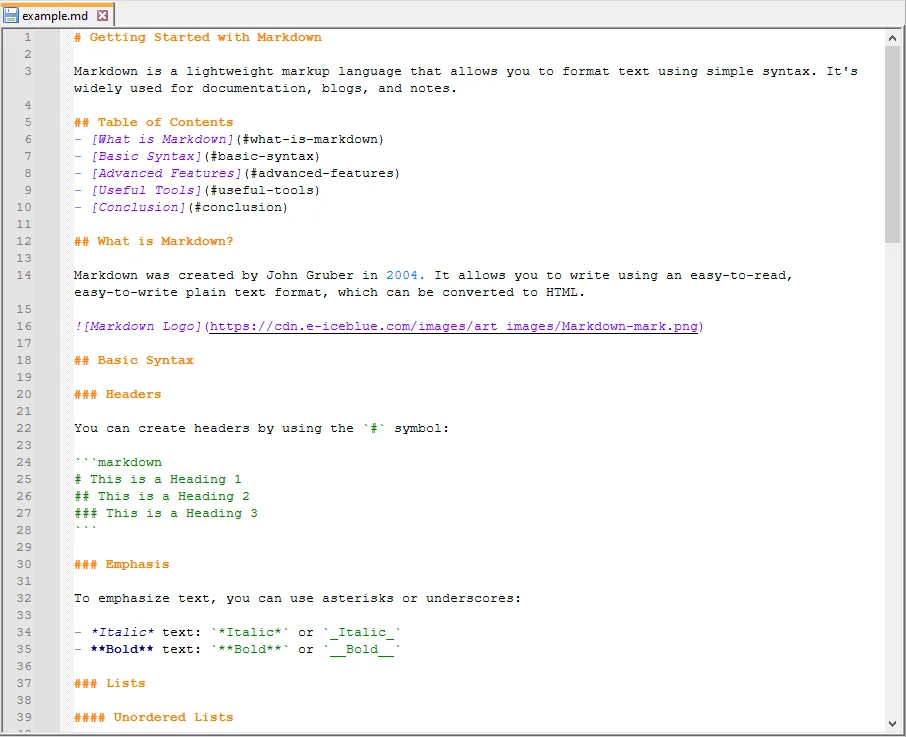
Step 3: Write the Python Script
Now, write a Python script that loads the Markdown file and converts it to HTML:
from spire.doc import *

# Create a Document object
doc = Document()

# Load the Markdown file
doc.LoadFromFile("example.md", FileFormat.Markdown)

# Save the document as HTML
doc.SaveToFile("example.html", FileFormat.Html)

# Close the document
doc.Close()
Explanation of the code:
- Document() initializes a new document object.
- LoadFromFile("example.md", FileFormat.Markdown) loads the Markdown file into memory.
- SaveToFile("example.html", FileFormat.Html) converts the loaded content into HTML and saves it to disk.
- doc.Close() ensures resources are released properly, which is particularly important when processing multiple files or running batch operations.
Step 4: Verify the HTML Output
Finally, open the generated example.html file in a web browser or HTML editor. Verify that the Markdown content has been correctly converted.

Automating Batch Conversion
You can convert multiple Markdown files in a folder automatically:
import os
from spire.doc import *

# Set the folder containing Markdown files
input_folder = "markdown_files"

# Set the folder where HTML files will be saved
output_folder = "html_files"

# Create the output folder if it doesn't exist
os.makedirs(output_folder, exist_ok=True)

# Loop through all files in the input folder
for filename in os.listdir(input_folder):
    # Process only Markdown files
    if filename.endswith(".md"):
        # Create a new Document object for each file
        doc = Document()

        # Load the Markdown file into the Document object
        doc.LoadFromFile(os.path.join(input_folder, filename), FileFormat.Markdown)

        # Construct the output file path by replacing .md extension with .html
        output_file = os.path.join(output_folder, filename.replace(".md", ".html"))

        # Save the loaded Markdown content as HTML
        doc.SaveToFile(output_file, FileFormat.Html)

        # Close the document to release resources
        doc.Close()
This approach allows you to process multiple Markdown files efficiently and generate corresponding HTML files automatically.
Best Practices for Markdown to HTML Conversion
While the basic steps are enough to complete a Markdown-to-HTML conversion, following a few best practices will help you avoid common pitfalls, improve compatibility, and ensure your output is both clean and professional:
- Use proper Markdown syntax – Ensure headings, lists, links, and emphasis are correctly written.
- Use UTF-8 Encoding: Always save your Markdown files in UTF-8 encoding to avoid issues with special characters or non-English text.
- Batch Processing: If you need to convert multiple files, wrap your script in a loop and process entire folders. This saves time and ensures consistent formatting across documents.
- Enhance Styling: Remember that HTML gives you the flexibility to add CSS and JavaScript for custom layouts, responsive design, and interactivity—something not possible in raw Markdown.
Conclusion
Converting Markdown to HTML using Python with Spire.Doc is simple, reliable, and efficient. It preserves formatting, supports automation, and produces clean HTML output ready for web use. By following this guide, you can implement a smooth Markdown to HTML workflow for both single documents and batch operations.
FAQs
Q1: Can I convert multiple Markdown files to HTML in Python?
A1: Yes, you can automate batch conversions by iterating through Markdown files in a directory and applying the conversion logic to each file.
Q2: Will the HTML preserve all Markdown formatting?
A2: Yes, Spire.Doc effectively preserves all essential Markdown formatting, including headings, lists, bold and italic text, links, and more.
Q3: Is there a way to handle images in Markdown during conversion?
A3: Yes, Spire.Doc supports the conversion of images embedded in Markdown, ensuring they are included in the resulting HTML.
Q4: Do I need additional libraries besides Spire.Doc?
A4: No additional libraries are required. Spire.Doc for Python provides a comprehensive solution for converting Markdown to HTML without any external dependencies.
Q5: Can I use the generated HTML in web frameworks?
A5: Yes, the HTML produced is fully compatible with popular web frameworks such as React, Vue, and Angular, making integration seamless.
C# Write to Excel Guide: Insert Data into Worksheets Easily

Excel remains one of the most widely used tools for managing and analyzing data due to its powerful features and user-friendly interface. In C# applications, developers often need to generate reports, export database results, or automate tasks by writing directly to Excel files.
To achieve this efficiently, developers often turn to third-party libraries. Spire.XLS for .NET makes it simple to write to Excel programmatically without relying on Microsoft Excel. With Spire.XLS, you can insert text, numbers, dates, formulas, or even bulk datasets such as arrays, DataTables, and lists into Excel worksheets. This provides a fast, flexible, and reliable way to automate Excel writing in C# applications.
On this page:
- Getting Started with Spire.XLS for .NET
- How to Create a New Excel File in C#
- Write Different Data Types to Excel Cells
- Write Bulk Data to Excel Sheets
- Save and Export Excel Files
- Common Issues and Solutions
- Conclusion
- FAQs
Getting Started with Spire.XLS for .NET
What’s Spire.XLS for .NET
Spire.XLS for .NET is a professional .NET Excel library developed by E-iceblue. It allows developers to write to Excel files in C# and perform a wide range of operations including creating, editing, reading, and exporting Excel documents—without requiring Microsoft Excel to be installed.
Key features include:
- Write and update Excel files programmatically.
- Support for Excel formats (XLS, XLSX, CSV, ODS).
- Advanced features such as formulas, charts, pivot tables, and data validation.
- Export Excel to PDF, HTML, and image formats.
- High performance with large datasets, suitable for desktop, server, and web applications.
How to Install Spire.XLS for .NET
Option 1: Install via NuGet (recommended)
- Open Visual Studio.
- Navigate to Tools > NuGet Package Manager > Manage NuGet Packages for Solution.
- Search for Spire.XLS and install it.
Or, install it directly using the Package Manager Console :
PM> Install-Package Spire.XLS
Option 2: Manual installation
- Download the Spire.XLS package from our official website
- Add a reference to Spire.Xls.dll in your project.
Once installed, you’re ready to start writing to Excel in C#.
How to Create a New Excel File in C#
The first step is to create a new workbook and add a worksheet. Here’s how:
using Spire.Xls;

namespace CreateNewExcel
{
    class Program
    {
        static void Main(string[] args)
        {
            // Create a new workbook
            Workbook workbook = new Workbook();

            // Remove default worksheets
            workbook.Worksheets.Clear();

            // Add a worksheet
            Worksheet sheet = workbook.Worksheets.Add("Report");

            // Save the empty Excel file
            workbook.SaveToFile("NewExcelFile.xlsx", ExcelVersion.Version2016);
            workbook.Dispose();
        }
    }
}
At this point, you have created an empty Excel file with a worksheet named “Report”. Next, let’s write data into it.
Write Different Data Types to Excel Cells in C#
Spire.XLS allows you to write various data types directly to Excel cells. Below are common examples:
Write Text Values
sheet.Range["A1"].Text = "Hello Excel!";
Write Numeric Values
sheet.Range["A2"].NumberValue = 123.45;
Write Date and Time
sheet.Range["A3"].DateTimeValue = DateTime.Now;
sheet.Range["A3"].NumberFormat = "yyyy-mm-dd hh:mm";
Write Boolean Values
sheet.Range["A4"].BooleanValue = true;
Write TimeSpan Values
sheet.Range["A5"].TimeSpanValue = new TimeSpan(2, 30, 0); // 2 hours 30 minutes;
sheet.Range["A5"].NumberFormat = "[h]:mm:ss";
Insert Formulas
sheet.Range["A6"].Formula = "=SUM(A2,100)";
Insert HTML Formatted Strings
string htmlText = "<span style=\"font-family: Times New Roman; color: blue; font-size: 15pt;\">Hello
<strong>Spire.XLS</strong></span>";
sheet.Range["A7"].HtmlString = htmlText;
Write General Values Without Specific Type
sheet.Range["A8"].Value = "General Value";
Output:

You might also be interested in: How to Read Excel Files in C#
Write Bulk Data to Excel Sheets in C#
When dealing with larger datasets, writing values cell by cell isn’t efficient. Spire.XLS provides methods to insert arrays , and DataTables directly. Other data structures can be converted to arrays or DataTables before being written to the Excel sheet.
Write Arrays to Excel
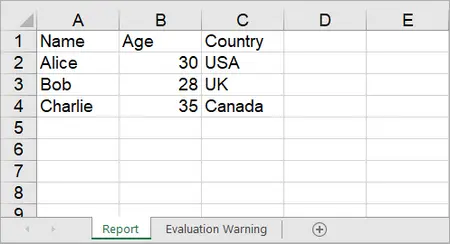
Spire.XLS provides the Worksheet.InsertArray(string[] stringArray, int firstRow, int firstColumn, bool isVertical) method, allowing developers to insert one-dimensional or two-dimensional arrays into a specified range of cells in a worksheet.
string[,] data = {
    { "Name", "Age", "Country" },
    { "Alice", "30", "USA" },
    { "Bob", "28", "UK" },
    { "Charlie", "35", "Canada" }
};
sheet.InsertArray(data, 1, 1);
Output:
Write DataTables to Excel
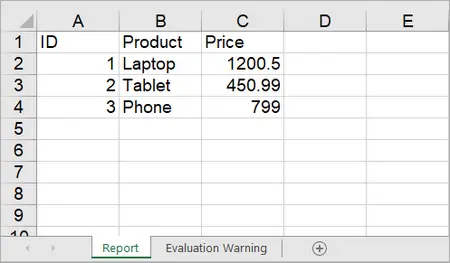
To import data from a DataTable to a worksheet, use the Worksheet.InsertDataTable(DataTable dataTable, bool columnHeaders, int firstRow, int firstColumn, bool transTypes) method.
using System.Data;

DataTable dt = new DataTable();
dt.Columns.Add("ID", typeof(int));
dt.Columns.Add("Product", typeof(string));
dt.Columns.Add("Price", typeof(double));

// Add rows
dt.Rows.Add(1, "Laptop", 1200.5);
dt.Rows.Add(2, "Tablet", 450.99);
dt.Rows.Add(3, "Phone", 799.0);

// Insert DataTable starting at cell A1
sheet.InsertDataTable(dt, true, 1, 1, true);
Output:
On the contrary, you can export data from Excel to DataTable by using the ExportDataTable method of the Worksheet class.
Write Lists to Excel
While Spire.XLS does not provide a direct method for writing lists to Excel, you can convert lists to a DataTable and then use the InsertDataTable method to write the DataTable to Excel.
using Spire.Xls;
using System.Data;

namespace WriteListToExcel
{
    class Program
    {
        static void Main(string[] args)
        {
            // Create a Workbook instance
            Workbook workbook = new Workbook();

            // Remove default worksheets
            workbook.Worksheets.Clear();

            // Add a worksheet and name it
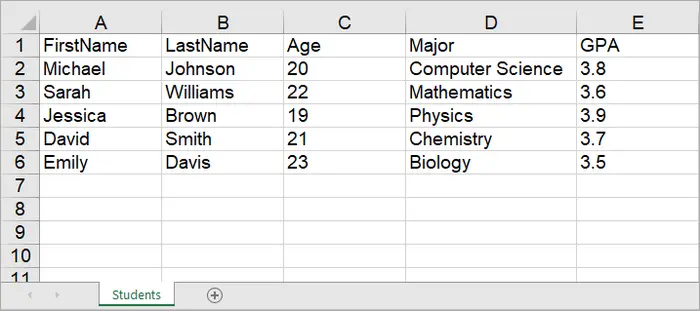
            Worksheet worksheet = workbook.Worksheets.Add("Students");

            // Create a list with student data
            List<Student> students = new List<Student>
            {
                new Student("Michael", "Johnson", 20, "Computer Science", 3.8),
                new Student("Sarah", "Williams", 22, "Mathematics", 3.6),
                new Student("Jessica", "Brown", 19, "Physics", 3.9),
                new Student("David", "Smith", 21, "Chemistry", 3.7),
                new Student("Emily", "Davis", 23, "Biology", 3.5)
            };

            // Convert the list to DataTable
            DataTable dataTable = ConvertListToDataTable(students);

            // Write DataTable to the worksheet
            worksheet.InsertDataTable(dataTable, true, 1, 1, true);

            // Set column width
            worksheet.AllocatedRange.ColumnWidth = 12;

            // Align content to left
            worksheet.AllocatedRange.HorizontalAlignment = HorizontalAlignType.Left;

            // Save to an Excel file
            workbook.SaveToFile("InsertStudents.xlsx", ExcelVersion.Version2016);

            // Dispose resources
            workbook.Dispose();
        }

        static DataTable ConvertListToDataTable(List<Student> students)
        {
            DataTable dataTable = new DataTable();

            // Add columns
            dataTable.Columns.Add("FirstName", typeof(string));
            dataTable.Columns.Add("LastName", typeof(string));
            dataTable.Columns.Add("Age", typeof(int));
            dataTable.Columns.Add("Major", typeof(string));
            dataTable.Columns.Add("GPA", typeof(double));

            // Add rows
            foreach (var student in students)
            {
                DataRow row = dataTable.NewRow();
                row["FirstName"] = student.FirstName;
                row["LastName"] = student.LastName;
                row["Age"] = student.Age;
                row["Major"] = student.Major;
                row["GPA"] = student.GPA;
                dataTable.Rows.Add(row);
            }

            return dataTable;
        }
    }

    class Student
    {
        public string FirstName { get; set; }
        public string LastName { get; set; }
        public int Age { get; set; }
        public string Major { get; set; }
        public double GPA { get; set; }

        public Student(string firstName, string lastName, int age, string major, double gpa)
        {
            FirstName = firstName;
            LastName = lastName;
            Age = age;
            Major = major;
            GPA = gpa;
        }
    }
}
Output:
Save and Export Excel Files
After writing data, you’ll want to save or export the Excel file. Spire.XLS supports multiple formats including XLSX, CSV, and PDF .
// Save as XLSX
workbook.SaveToFile("Output.xlsx", ExcelVersion.Version2016);

// Save as CSV
workbook.SaveToFile("Output.csv", ",", Encoding.UTF8);

// Export as PDF
workbook.SaveToFile("Output.pdf", FileFormat.PDF);
For web applications, you can also save to a MemoryStream :
using (MemoryStream ms = new MemoryStream())
{
    workbook.SaveToStream(ms, FileFormat.Version2016);
    // Write to Response in ASP.NET if needed
}
Common Issues and Solutions
1. Incorrect Date or Time Format
Issue: Dates/times appear as serial numbers.
Solution :
- Apply a proper number format to the cell:
sheet.Range["A1"].DateTimeValue = DateTime.Now;
sheet.Range["A1"].NumberFormat = "yyyy-mm-dd hh:mm";
2. Data Overwriting or Misaligned
Issue : Writing arrays or DataTables overwrites existing data unintentionally.
Solution :
- Check firstRow and firstColumn parameters in InsertArray() or InsertDataTable().
- Use separate worksheets or offset ranges if necessary.
3. Large Dataset Performance Issues
Issue : Writing thousands of rows is slow.
Solution :
- Use bulk writing methods instead of looping cell by cell.
- Apply styles after inserting data to avoid repeated formatting overhead.
4. Formula Not Calculating Correctly
Issue : Excel formulas inserted via sheet.Range["A1"].Formula do not return expected results.
Solution :
- Ensure the formula syntax is correct for Excel (e.g., =SUM(A2:A10)).
- Call workbook.CalculateAllValue() to update all formulas before saving if needed.
Conclusion
Writing to Excel in C# doesn’t have to be complex. With Spire.XLS for .NET , you can seamlessly write different data types—whether individual values or large datasets—into Excel worksheets. The library also provides support for styling, formulas, and advanced formatting, ensuring your Excel files are not only accurate but also presentation-ready.
By using efficient bulk-writing techniques like arrays and DataTables, you can handle both small and large data operations with ease. If your goal is to write to Excel files quickly and reliably , Spire.XLS gives you the tools you need—without the overhead of Microsoft Excel.
FAQs
Q1. Can I write to an existing Excel file with Spire.XLS?
Yes. Use workbook.LoadFromFile("file.xlsx") to open an existing file, then modify and save it.
Q2. Does Spire.XLS require Microsoft Excel to be installed?
No. It’s a standalone library that works without Excel.
Q3. Can Spire.XLS handle large Excel files with thousands of rows?
Yes. It’s optimized for high performance with large datasets.
Q4. How do I format cells while writing data?
You can style cells using properties like font, color, borders, and alignment:
sheet.Range["A1"].Style.Font.IsBold = true;
sheet.Range["A1"].Style.Color = Color.Yellow;
sheet.Range["A1"].Style.HorizontalAlignment  = HorizontalAlignType.Left;
Get a Free License
To fully experience the capabilities of Spire.XLS for .NET without any evaluation limitations, you can request a free 30-day trial license.
Conversione da XLS a XLSX: metodi manuali, online e batch
Indice dei contenuti
Installa con Maven
pip install Spire.Xls
Link Correlati
XLS è un vecchio formato di file per fogli di calcolo sviluppato da Microsoft Excel, ed è ancora utilizzato da alcuni utenti oggi. A partire da Excel 2007, Microsoft ha adottato il nuovo formato XLSX. A causa delle differenze tra questi formati, l'apertura di un file XLS in una versione più recente di Excel può talvolta causare problemi di compatibilità, influenzando la modifica e l'elaborazione dei dati. Di conseguenza, eseguire una conversione da XLS a XLSX è diventato un compito comune nella gestione dei fogli di calcolo. Fortunatamente, questo articolo introduce tre metodi semplici ed efficaci per aiutarti a convertire i file XLS in XLSX in modo rapido e semplice.
- Conversione da XLS a XLSX: Manualmente
- Converti XLS in XLSX Online
- Converti in blocco XLS in XLSX automaticamente
- Domande frequenti
Esegui la conversione da XLS a XLSX manualmente
Il primo e più semplice modo per convertire XLS in XLSX è la conversione manuale, che funziona meglio quando si ha solo un piccolo numero di file. Questo metodo non richiede alcun software speciale o conoscenza di programmazione, rendendolo ideale per gli utenti che necessitano di una soluzione rapida. Esistono due approcci comuni per la conversione manuale:
- Cambia l'estensione del file
Individua il file XLS che desideri convertire, fai clic con il pulsante destro del mouse su di esso e seleziona Rinomina. Sostituisci l'estensione del file da .xls a .xlsx.
- Salva con nome
Apri il file di origine in Excel, fai clic sulla scheda File nel menu in alto, quindi seleziona Salva con nome dal pannello di sinistra. Nel menu a discesa Salva come, scegli XLSX e infine fai clic su Salva.

Converti XLS in XLSX Online
Se trovi le operazioni manuali troppo dispendiose in termini di tempo, poiché richiedono clic ripetuti, puoi utilizzare invece un convertitore online da XLS a XLSX. Un esempio è CloudConvert, uno strumento di conversione file online gratuito. Non solo converte i file dei fogli di calcolo, ma supporta anche documenti di testo, immagini, formati audio e video. Usarlo è semplice: basta seguire questi passaggi:
-
Vai al sito web e fai clic sul pulsante rosso Seleziona file per scegliere il file che desideri convertire, oppure trascinalo semplicemente sul pulsante.
-
Una volta caricato il file, fai clic sul pulsante rosso a destra per avviare la conversione.
-
Attendi qualche secondo. Quando vedi lo stato Completato, fai clic sul pulsante verde Scarica per salvare il file XLSX convertito sul tuo computer.
Questo metodo è ideale quando è necessario convertire rapidamente solo pochi file XLS in XLSX senza installare alcun software.
Converti in blocco XLS in XLSX in modo sicuro
Se devi convertire centinaia o addirittura migliaia di file, i metodi di conversione manuali o online non sono più pratici. Allo stesso modo, se la sicurezza dei dati è una priorità assoluta, l'opzione migliore è eseguire conversioni in blocco localmente con il codice. Questo approccio garantisce che i dati dei tuoi file rimangano completamente al sicuro, poiché non si basa su alcun servizio online.
A tal fine, consigliamo di utilizzare Spire.XLS, una libreria Excel di terze parti professionale che può essere integrata in sistemi aziendali o flussi di lavoro automatizzati, consentendo conversioni su larga scala da XLS a XLSX.

L'esempio seguente dimostra come ciò possa essere ottenuto in Python:
from spire.xls import *
from spire.xls.common import *
import os

# Specify the input and output folders
inputFolder = "/input/XLS SAMPLES/"
outputFolder = "/output/TO XLSX/"

# Loop through all .xls files in the input folder
for file in os.listdir(inputFolder):
    if file.endswith(".xls"):
        # Build full file paths
        inputFile = os.path.join(inputFolder, file)
        outputFile = os.path.join(outputFolder, os.path.splitext(file)[0] + ".xlsx")

        # Create a Workbook object
        workbook = Workbook()
        # Load the XLS file
        workbook.LoadFromFile(inputFile)

        # Save as XLSX format
        workbook.SaveToFile(outputFile, ExcelVersion.Version2016)
        workbook.Dispose()

print("Batch conversion completed successfully!")
Ecco un'anteprima che confronta i file di origine con quelli convertiti:
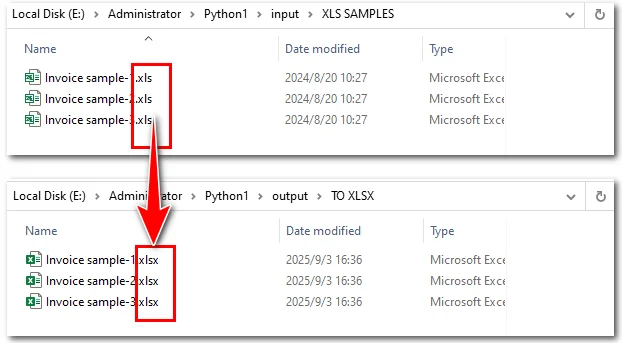
Passaggi spiegati:
- Importa Spire.XLS e i moduli Python.
- Scorri tutti i file .xls nella cartella di input.
- Carica ogni file in un oggetto Workbook.
- Converti XLS in XLSX salvandolo in formato .xlsx tramite il metodo Workbook.saveToFile().
Se vuoi convertire un file XLSX di nuovo in XLS, puoi anche utilizzare il metodo Workbook.saveToFile(). Spire.XLS supporta anche l'uso di questo metodo per convertire file Excel in PDF, immagini e altro ancora.
Domande frequenti sulla conversione da XLS a XLSX
- Come salvo il mio file Excel come XLSX?
Puoi salvare un file Excel come XLSX utilizzando la funzione Salva con nome in Excel o utilizzando strumenti di conversione online o programmatici, a seconda del numero di file e delle tue esigenze.
- Quando Excel è passato da XLS a XLSX?
Microsoft ha introdotto il formato XLSX a partire da Excel 2007 per sostituire il vecchio formato XLS. XLSX offre prestazioni migliori, dimensioni dei file ridotte e una migliore compatibilità con le moderne funzionalità di Excel.
- XLS è la stessa cosa di XLSX?
No. XLS è il vecchio formato di file binario utilizzato in Excel 97-2003, mentre XLSX è il nuovo formato basato su XML introdotto in Excel 2007. Differiscono per struttura, compatibilità e funzionalità supportate.
- Gli strumenti online possono convertire XLS in XLSX?
Sì, molti strumenti online ti consentono di convertire file XLS in XLSX. Sono convenienti per un piccolo numero di file ma potrebbero non essere adatti per grandi lotti o dati sensibili.
- Qual è il modo migliore per convertire un gran numero di file XLS in XLSX in modo sicuro?
Per centinaia o migliaia di file, o quando la sicurezza dei dati è importante, l'uso di codice con una libreria come Spire.XLS per la conversione in blocco sulla tua macchina locale è il metodo più efficiente e sicuro.
La Conclusione
In sintesi, la conversione da XLS a XLSX può essere gestita in diversi modi a seconda delle tue esigenze. Per una manciata di file, Excel o gli strumenti online possono essere sufficienti. Ma per file su larga scala o sensibili, l'automazione con il codice è la scelta migliore. Sfruttando Spire.XLS, puoi integrare conversioni massive direttamente nel tuo flusso di lavoro, garantendo sia velocità che sicurezza. Sia che tu debba aggiornare file legacy, ottimizzare i processi interni o preparare i dati per i sistemi moderni, Spire.XLS offre una soluzione professionale e flessibile.
LEGGI ANCHE
Converti Excel (XLSX/XLS) in CSV in Python
Python: Converti Excel in PDF facilmente e rapidamente
Converti CSV in Excel (XLSX) in Python – Singolo e in blocco
Conversão de XLS para XLSX: métodos manuais, online e em lote
Índice
Instalar com Maven
pip install Spire.Xls
Links Relacionados
XLS é um formato de arquivo de planilha mais antigo desenvolvido pelo Microsoft Excel, e ainda é usado por alguns usuários hoje. Desde o Excel 2007, a Microsoft adotou o formato mais novo, XLSX. Devido às diferenças entre esses formatos, abrir um arquivo XLS em uma versão mais recente do Excel pode, às vezes, causar problemas de compatibilidade, afetando a edição e o processamento de dados. Como resultado, realizar uma conversão de XLS para XLSX tornou-se uma tarefa comum na gestão de planilhas. Felizmente, este artigo apresenta três métodos simples e eficazes para ajudá-lo a converter arquivos XLS para XLSX de forma rápida e fácil.
- Conversão de XLS para XLSX: Manualmente
- Converter XLS para XLSX Online
- Converter XLS para XLSX em Lote Automaticamente
- FAQs
Realizar a Conversão de XLS para XLSX Manualmente
A primeira e mais direta maneira de converter XLS para XLSX é a conversão manual, que funciona melhor quando você tem apenas um pequeno número de arquivos. Este método не требует nenhum software especial ou conhecimento de programação, tornando-o ideal para usuários que precisam de uma solução rápida. Existem duas abordagens comuns для a conversão manual:
- Alterar a extensão do arquivo
Localize o arquivo XLS que deseja converter, clique com o botão direito nele e selecione Renomear. Substitua a extensão do arquivo de .xls para .xlsx.
- Salvar Como
Abra o arquivo de origem no Excel, clique na guia Arquivo no menu superior e, em seguida, selecione Salvar Como no painel esquerdo. Na lista suspensa Salvar como tipo, escolha XLSX e, finalmente, clique em Salvar.
Converter XLS para XLSX Online
Se você acha as operações manuais muito demoradas, pois exigem cliques repetidos, pode usar um conversor online de XLS para XLSX. Um exemplo é o CloudConvert, uma ferramenta gratuita de conversão de arquivos online. Ele não apenas converte arquivos de planilha, mas também suporta documentos de texto, imagens, áudio e formatos de vídeo. Usá-lo é simples — basta seguir estes passos:
-
Navegue até o site e clique no botão vermelho Selecionar Arquivo para escolher o arquivo que deseja converter, ou simplesmente arraste e solte-o no botão.
-
Uma vez que o arquivo for carregado, clique no botão vermelho à direita para iniciar a conversão.
-
Aguarde alguns segundos. Quando vir o status Concluído, clique no botão verde Baixar para salvar o arquivo XLSX convertido em seu computador.
Este método é ideal quando você só precisa converter alguns arquivos XLS para XLSX rapidamente, sem instalar nenhum software.
Converter em Lote XLS para XLSX com Segurança
Se você precisa converter centenas ou até milhares de arquivos, os métodos de conversão manual ou online não são mais práticos. Da mesma forma, se a segurança dos dados é uma prioridade, a melhor opção é realizar conversões em lote localmente com código. Essa abordagem garante que os dados dos seus arquivos permaneçam completamente seguros, pois не depende de nenhum serviço online.
Para este propósito, recomendamos o uso do Spire.XLS, uma biblioteca profissional de Excel de terceiros que pode ser integrada a sistemas empresariais ou fluxos de trabalho automatizados, permitindo conversões em grande escala de XLS para XLSX.
O exemplo a seguir demonstra como isso pode ser alcançado em Python:
from spire.xls import *
from spire.xls.common import *
import os

# Specify the input and output folders
inputFolder = "/input/XLS SAMPLES/"
outputFolder = "/output/TO XLSX/"

# Loop through all .xls files in the input folder
for file in os.listdir(inputFolder):
    if file.endswith(".xls"):
        # Build full file paths
        inputFile = os.path.join(inputFolder, file)
        outputFile = os.path.join(outputFolder, os.path.splitext(file)[0] + ".xlsx")

        # Create a Workbook object
        workbook = Workbook()
        # Load the XLS file
        workbook.LoadFromFile(inputFile)

        # Save as XLSX format
        workbook.SaveToFile(outputFile, ExcelVersion.Version2016)
        workbook.Dispose()

print("Batch conversion completed successfully!")
Aqui está uma prévia comparando os arquivos de origem com os convertidos:
Passos explicados:
- Importar Spire.XLS e módulos Python.
- Percorrer todos os arquivos .xls na pasta de entrada.
- Carregar cada arquivo em um objeto Workbook.
- Converter XLS para XLSX salvando-o no formato .xlsx através do método Workbook.saveToFile().
Se você quiser converter um arquivo XLSX de volta para XLS, você também pode usar o método Workbook.saveToFile(). O Spire.XLS também suporta o uso deste método para converter arquivos do Excel em PDF, imagens e muito mais.
FAQs sobre a Conversão de XLS para XLSX
- Como eu salvo meu arquivo do Excel como XLSX?
Você pode salvar um arquivo do Excel como XLSX usando o recurso Salvar Como no Excel ou usando ferramentas de conversão online ou programáticas, dependendo do número de arquivos e de suas necessidades.
- Quando o Excel mudou de XLS para XLSX?
A Microsoft introduziu o formato XLSX a partir do Excel 2007 para substituir o formato XLS mais antigo. O XLSX oferece melhor desempenho, tamanho de arquivo reduzido e compatibilidade aprimorada com os recursos modernos do Excel.
- XLS é o mesmo que XLSX?
Não. XLS é o formato de arquivo binário mais antigo usado no Excel 97-2003, enquanto XLSX é o formato mais novo baseado em XML introduzido no Excel 2007. Eles diferem em estrutura, compatibilidade e recursos suportados.
- As ferramentas online podem converter XLS para XLSX?
Sim, muitas ferramentas online permitem que você converta arquivos XLS para XLSX. Elas são convenientes para um pequeno número de arquivos, mas podem не ser adequadas para grandes lotes ou dados sensíveis.
- Qual é a melhor maneira de converter um grande número de arquivos XLS para XLSX com segurança?
Para centenas ou milhares de arquivos, ou quando a segurança dos dados é importante, usar código com uma biblioteca como o Spire.XLS para conversão em lote em sua máquina local é o método mais eficiente e seguro.
A Conclusão
Em resumo, a conversão de XLS para XLSX pode ser tratada de diferentes maneiras, dependendo de suas necessidades. Para um punhado de arquivos, o Excel ou ferramentas online podem ser suficientes. Mas para arquivos em grande escala ou sensíveis, a automação com código é a melhor escolha. Ao aproveitar o Spire.XLS, você pode integrar conversões em massa diretamente em seu fluxo de trabalho, garantindo velocidade e segurança. Seja para atualizar arquivos legados, otimizar processos internos ou preparar dados para sistemas modernos, o Spire.XLS oferece uma solução profissional e flexível.
LEIA TAMBÉM
Converter Excel (XLSX/XLS) para CSV em Python
Python: Converter Excel para PDF de forma fácil e rápida
XLS를 XLSX로 변환: 수동, 온라인 및 배치 방법
Maven으로 설치
pip install Spire.Xls
관련 링크
XLS는 Microsoft Excel에서 개발한 오래된 스프레드시트 파일 형식이며, 오늘날에도 일부 사용자들이 사용하고 있습니다. 2007년 Excel부터 Microsoft는 새로운 XLSX 형식을 채택했습니다. 이러한 형식 간의 차이로 인해 최신 버전의 Excel에서 XLS 파일을 열면 호환성 문제가 발생하여 편집 및 데이터 처리에 영향을 줄 수 있습니다. 결과적으로 XLS를 XLSX로 변환하는 것은 스프레드시트 관리에서 일반적인 작업이 되었습니다. 다행히도 이 기사에서는 XLS 파일을 XLSX로 빠르고 쉽게 변환하는 데 도움이 되는 세 가지 간단하고 효과적인 방법을 소개합니다.
수동으로 XLS에서 XLSX로 변환 수행
XLS를 XLSX로 변환하는 첫 번째이자 가장 간단한 방법은 수동 변환이며, 파일 수가 적을 때 가장 효과적입니다. 이 방법은 특별한 소프트웨어나 프로그래밍 지식이 필요하지 않으므로 빠른 해결책이 필요한 사용자에게 이상적입니다. 수동 변환에는 두 가지 일반적인 접근 방식이 있습니다.
- 파일 확장자 변경
변환하려는 XLS 파일을 찾아 마우스 오른쪽 버튼으로 클릭하고 이름 바꾸기를 선택합니다. 파일 확장자를 .xls에서 .xlsx로 바꿉니다.
- 다른 이름으로 저장
Excel에서 원본 파일을 열고 상단 메뉴의 파일 탭을 클릭한 다음 왼쪽 패널에서 다른 이름으로 저장을 선택합니다. 파일 형식 드롭다운에서 XLSX를 선택하고 마지막으로 저장을 클릭합니다.
온라인에서 XLS를 XLSX로 변환
반복적인 클릭이 필요하기 때문에 수동 작업이 너무 시간이 많이 걸린다고 생각되면 온라인 XLS-XLSX 변환기를 대신 사용할 수 있습니다. 한 가지 예는 무료 온라인 파일 변환 도구인 CloudConvert입니다. 스프레드시트 파일뿐만 아니라 텍스트 문서, 이미지, 오디오 및 비디오 형식도 지원합니다. 사용 방법은 간단하며 다음 단계를 따르기만 하면 됩니다.
-
웹사이트로 이동하여 빨간색 파일 선택 버튼을 클릭하여 변환하려는 파일을 선택하거나 버튼 위로 파일을 끌어다 놓습니다.
-
파일이 업로드되면 오른쪽의 빨간색 버튼을 클릭하여 변환을 시작합니다.
-
몇 초간 기다립니다. 완료 상태가 표시되면 녹색 다운로드 버튼을 클릭하여 변환된 XLSX 파일을 컴퓨터에 저장합니다.
이 방법은 소프트웨어를 설치하지 않고 몇 개의 XLS 파일을 XLSX로 빠르게 변환해야 할 때 이상적입니다.
안전하게 XLS를 XLSX로 일괄 변환
수백 또는 수천 개의 파일을 변환해야 하는 경우 수동 또는 온라인 변환 방법은 더 이상 실용적이지 않습니다. 마찬가지로 데이터 보안이 최우선 순위인 경우 코드를 사용하여 로컬에서 일괄 변환을 수행하는 것이 최선의 선택입니다. 이 접근 방식은 온라인 서비스에 의존하지 않으므로 파일 데이터가 완전히 안전하게 유지되도록 보장합니다.
이를 위해 엔터프라이즈 시스템이나 자동화된 워크플로에 통합할 수 있는 전문적인 타사 Excel 라이브러리인 Spire.XLS를 사용하는 것을 권장합니다. 이를 통해 대규모 XLS-XLSX 변환이 가능합니다.
다음 예제는 Python에서 이를 어떻게 달성할 수 있는지 보여줍니다.
from spire.xls import *
from spire.xls.common import *
import os

# Specify the input and output folders
inputFolder = "/input/XLS SAMPLES/"
outputFolder = "/output/TO XLSX/"

# Loop through all .xls files in the input folder
for file in os.listdir(inputFolder):
    if file.endswith(".xls"):
        # Build full file paths
        inputFile = os.path.join(inputFolder, file)
        outputFile = os.path.join(outputFolder, os.path.splitext(file)[0] + ".xlsx")

        # Create a Workbook object
        workbook = Workbook()
        # Load the XLS file
        workbook.LoadFromFile(inputFile)

        # Save as XLSX format
        workbook.SaveToFile(outputFile, ExcelVersion.Version2016)
        workbook.Dispose()

print("Batch conversion completed successfully!")
다음은 원본 파일과 변환된 파일을 비교한 미리보기입니다.
단계 설명:
- Spire.XLS 및 Python 모듈을 가져옵니다.
- 입력 폴더의 모든 .xls 파일을 반복합니다.
- 각 파일을 Workbook 객체에 로드합니다.
- Workbook.saveToFile() 메서드를 통해 .xlsx 형식으로 저장하여 XLS를 XLSX로 변환합니다.
XLSX 파일을 다시 XLS로 변환하려면 Workbook.saveToFile() 메서드를 사용할 수도 있습니다. Spire.XLS는 이 메서드를 사용하여 Excel 파일을 PDF, 이미지 등으로 변환하는 것도 지원합니다.
XLS에서 XLSX로 변환에 대한 자주 묻는 질문
- Excel 파일을 XLSX로 어떻게 저장하나요?
Excel에서 다른 이름으로 저장 기능을 사용하거나 파일 수와 필요에 따라 온라인 또는 프로그래밍 방식의 변환 도구를 사용하여 Excel 파일을 XLSX로 저장할 수 있습니다.
- Excel은 언제 XLS에서 XLSX로 전환했나요?
Microsoft는 이전 XLS 형식을 대체하기 위해 Excel 2007부터 XLSX 형식을 도입했습니다. XLSX는 더 나은 성능, 감소된 파일 크기 및 최신 Excel 기능과의 향상된 호환성을 제공합니다.
- XLS와 XLSX는 같은 것인가요?
아니요. XLS는 Excel 97-2003에서 사용된 이전 바이너리 파일 형식이며, XLSX는 Excel 2007에서 도입된 최신 XML 기반 형식입니다. 구조, 호환성 및 지원되는 기능이 다릅니다.
- 온라인 도구로 XLS를 XLSX로 변환할 수 있나요?
예, 많은 온라인 도구를 사용하여 XLS 파일을 XLSX로 변환할 수 있습니다. 소량의 파일에는 편리하지만 대량 배치나 민감한 데이터에는 적합하지 않을 수 있습니다.
- 많은 수의 XLS 파일을 안전하게 XLSX로 변환하는 가장 좋은 방법은 무엇인가요?
수백 또는 수천 개의 파일이나 데이터 보안이 중요한 경우, 로컬 컴퓨터에서 일괄 변환을 위해 Spire.XLS와 같은 라이브러리를 사용하여 코드를 사용하는 것이 가장 효율적이고 안전한 방법입니다.
결론
요약하자면, XLS에서 XLSX로의 변환은 필요에 따라 다른 방식으로 처리할 수 있습니다. 소수의 파일의 경우 Excel이나 온라인 도구로 충분할 수 있습니다. 그러나 대규모 또는 민감한 파일의 경우 코드를 사용한 자동화가 최선의 선택입니다. Spire.XLS를 활용하여 대량 변환을 워크플로에 직접 통합하여 속도와 안전성을 모두 보장할 수 있습니다. 레거시 파일을 업그레이드하거나 내부 프로세스를 간소화하거나 최신 시스템을 위해 데이터를 준비해야 하는 경우 Spire.XLS는 전문적이고 유연한 솔루션을 제공합니다.
함께 읽기
Python에서 Excel(XLSX/XLS)을 CSV로 변환
Conversion de XLS en XLSX : méthodes manuelles, en ligne et par lots
Table des matières
Installer avec Maven
pip install Spire.Xls
Liens connexes
XLS est un ancien format de fichier de tableur développé par Microsoft Excel, et il est encore utilisé par certains utilisateurs aujourd'hui. Depuis Excel 2007, Microsoft a adopté le nouveau format XLSX. En raison des différences entre ces formats, l'ouverture d'un fichier XLS dans une version plus récente d'Excel peut parfois entraîner des problèmes de compatibilité, affectant l'édition et le traitement des données. Par conséquent, effectuer une conversion de XLS en XLSX est devenue une tâche courante dans la gestion des tableurs. Heureusement, cet article présente trois méthodes simples et efficaces pour vous aider à convertir rapidement et facilement des fichiers XLS en XLSX.
- Conversion XLS en XLSX : Manuellement
- Convertir XLS en XLSX en ligne
- Conversion par lots de XLS en XLSX automatiquement
- FAQ
Effectuer la conversion de XLS en XLSX manuellement
La première et la plus simple façon de convertir XLS en XLSX est la conversion manuelle, qui fonctionne le mieux lorsque vous n'avez qu'un petit nombre de fichiers. Cette méthode ne nécessite aucun logiciel spécial ni connaissance en programmation, ce qui la rend idéale pour les utilisateurs qui ont besoin d'une solution rapide. Il existe deux approches courantes pour la conversion manuelle :
- Changer l'extension du fichier
Localisez le fichier XLS que vous souhaitez convertir, faites un clic droit dessus et sélectionnez Renommer. Remplacez l'extension du fichier de .xls par .xlsx.
- Enregistrer sous
Ouvrez le fichier source dans Excel, cliquez sur l'onglet Fichier dans le menu supérieur, puis sélectionnez Enregistrer sous dans le panneau de gauche. Dans le menu déroulant Type de fichier, choisissez XLSX, et enfin cliquez sur Enregistrer.
Convertir XLS en XLSX en ligne
Si vous trouvez les opérations manuelles trop longues, car elles nécessitent des clics répétés, vous pouvez utiliser un convertisseur XLS en XLSX en ligne à la place. Un exemple est CloudConvert, un outil de conversion de fichiers en ligne gratuit. Il ne convertit pas seulement les fichiers de tableur, mais prend également en charge les documents texte, les images, les formats audio et vidéo. Son utilisation est simple — il suffit de suivre ces étapes :
-
Accédez au site web et cliquez sur le bouton rouge Sélectionner un fichier pour choisir le fichier que vous souhaitez convertir, ou faites-le simplement glisser et déposez-le sur le bouton.
-
Une fois le fichier téléchargé, cliquez sur le bouton rouge à droite pour démarrer la conversion.
-
Attendez quelques secondes. Lorsque vous voyez le statut Terminé, cliquez sur le bouton vert Télécharger pour enregistrer le fichier XLSX converti sur votre ordinateur.
Cette méthode est idéale lorsque vous n'avez besoin de convertir que quelques fichiers XLS en XLSX rapidement sans installer de logiciel.
Conversion par lots sécurisée de XLS en XLSX
Si vous devez convertir des centaines, voire des milliers de fichiers, les méthodes de conversion manuelles ou en ligne ne sont plus pratiques. De même, si la sécurité des données est une priorité absolue, la meilleure option est d'effectuer des conversions par lots localement avec du code. Cette approche garantit que les données de vos fichiers restent totalement sécurisées, car elle ne dépend d'aucun service en ligne.
À cette fin, nous vous recommandons d'utiliser Spire.XLS, une bibliothèque Excel tierce professionnelle qui peut être intégrée dans des systèmes d'entreprise ou des flux de travail automatisés, permettant des conversions XLS en XLSX à grande échelle.
L'exemple suivant montre comment cela peut être réalisé en Python :
from spire.xls import *
from spire.xls.common import *
import os

# Specify the input and output folders
inputFolder = "/input/XLS SAMPLES/"
outputFolder = "/output/TO XLSX/"

# Loop through all .xls files in the input folder
for file in os.listdir(inputFolder):
    if file.endswith(".xls"):
        # Build full file paths
        inputFile = os.path.join(inputFolder, file)
        outputFile = os.path.join(outputFolder, os.path.splitext(file)[0] + ".xlsx")

        # Create a Workbook object
        workbook = Workbook()
        # Load the XLS file
        workbook.LoadFromFile(inputFile)

        # Save as XLSX format
        workbook.SaveToFile(outputFile, ExcelVersion.Version2016)
        workbook.Dispose()

print("Batch conversion completed successfully!")
Voici un aperçu comparant les fichiers sources avec les fichiers convertis :
Étapes expliquées :
- Importer Spire.XLS et les modules Python.
- Parcourir tous les fichiers .xls dans le dossier d'entrée.
- Charger chaque fichier dans un objet Workbook.
- Convertir XLS en XLSX en l'enregistrant au format .xlsx via la méthode Workbook.saveToFile().
Si vous souhaitez convertir un fichier XLSX en XLS, vous pouvez également utiliser la méthode Workbook.saveToFile(). Spire.XLS prend également en charge l'utilisation de cette méthode pour convertir des fichiers Excel en PDF, images, et plus encore.
FAQ sur la conversion de XLS en XLSX
- Comment puis-je enregistrer mon fichier Excel en tant que XLSX ?
Vous pouvez enregistrer un fichier Excel en tant que XLSX en utilisant la fonction Enregistrer sous dans Excel ou en utilisant des outils de conversion en ligne ou programmatiques, en fonction du nombre de fichiers et de vos besoins.
- Quand Excel est-il passé de XLS à XLSX ?
Microsoft a introduit le format XLSX à partir d'Excel 2007 pour remplacer l'ancien format XLS. XLSX offre de meilleures performances, une taille de fichier réduite et une compatibilité améliorée avec les fonctionnalités modernes d'Excel.
- XLS est-il identique à XLSX ?
Non. XLS est l'ancien format de fichier binaire utilisé dans Excel 97-2003, tandis que XLSX est le nouveau format basé sur XML introduit dans Excel 2007. Ils diffèrent par leur structure, leur compatibilité et les fonctionnalités prises en charge.
- Les outils en ligne peuvent-ils convertir XLS en XLSX ?
Oui, de nombreux outils en ligne vous permettent de convertir des fichiers XLS en XLSX. Ils sont pratiques pour un petit nombre de fichiers mais peuvent ne pas convenir pour de grands lots ou des données sensibles.
- Quelle est la meilleure façon de convertir un grand nombre de fichiers XLS en XLSX en toute sécurité ?
Pour des centaines ou des milliers de fichiers, ou lorsque la sécurité des données est importante, l'utilisation de code avec une bibliothèque comme Spire.XLS pour la conversion par lots sur votre machine locale est la méthode la plus efficace et la plus sûre.
La Conclusion
En résumé, la conversion de XLS en XLSX peut être gérée de différentes manières en fonction de vos besoins. Pour une poignée de fichiers, Excel ou les outils en ligne peuvent être suffisants. Mais pour des fichiers à grande échelle ou sensibles, l'automatisation avec du code est le meilleur choix. En tirant parti de Spire.XLS, vous pouvez intégrer des conversions en masse directement dans votre flux de travail, garantissant à la fois vitesse et sécurité. Que vous ayez besoin de mettre à niveau des fichiers hérités, de rationaliser les processus internes ou de préparer des données pour des systèmes modernes, Spire.XLS offre une solution professionnelle et flexible.
LIRE AUSSI
Convertir Excel (XLSX/XLS) en CSV en Python
Python : Convertir Excel en PDF facilement et rapidement
Convertir CSV en Excel (XLSX) en Python – Unique et par lots