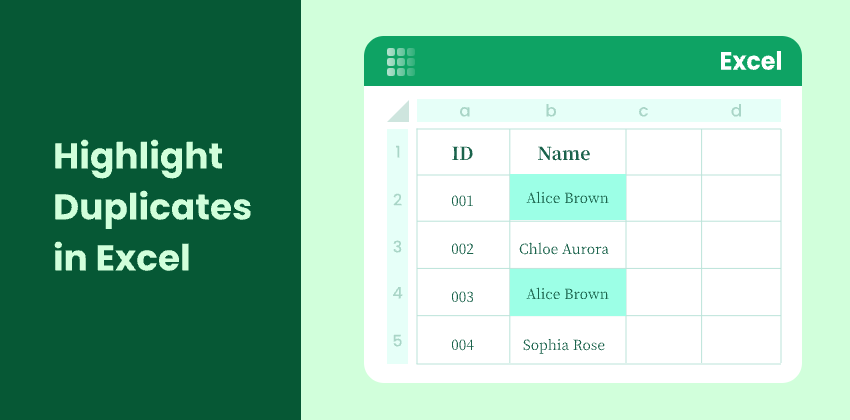
Surligner les doublons dans Excel : 4 méthodes simples
Table des matières
- Méthode 1. Mise en forme conditionnelle (intégrée – la plus simple)
- Méthode 2. Utiliser une formule avec la mise en forme conditionnelle
- Méthode 3. Utiliser une colonne d'aide avec NB.SI
- Méthode 4. Utiliser Python avec Spire.XLS pour l'automatisation
- Comparer les différentes méthodes
- Réflexions finales
- FAQ sur la mise en évidence des doublons dans Excel
Les valeurs en double sont un problème courant dans les feuilles de calcul Excel. Que vous travailliez avec des listes de clients, des inventaires de produits, des factures ou des résultats d'enquêtes, les données en double peuvent entraîner des erreurs, des rapports inexacts et de mauvaises décisions.
Heureusement, Excel offre plusieurs moyens simples et efficaces de mettre en évidence les doublons afin que vous puissiez facilement les repérer et les gérer. Dans cet article, vous apprendrez quatre méthodes faciles pour trouver et mettre en évidence les valeurs en double dans Excel, des outils intégrés aux solutions automatisées utilisant Python.
Aperçu des méthodes :
- Méthode 1. Mise en forme conditionnelle (intégrée – la plus simple)
- Méthode 2. Utiliser une formule avec la mise en forme conditionnelle
- Méthode 3. Utiliser une colonne d'aide avec NB.SI
- Méthode 4. Utiliser Python avec Spire.XLS pour l'automatisation
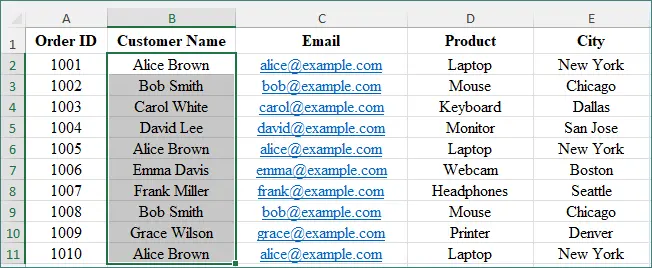
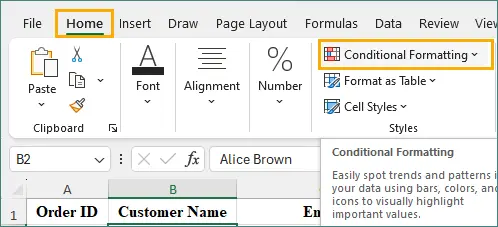
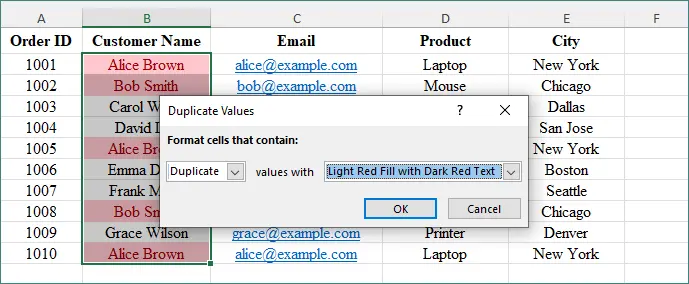
Méthode 1 : Mise en forme conditionnelle (intégrée – la plus simple)
C'est le moyen le plus rapide et le plus convivial pour les débutants de mettre en évidence les doublons dans Excel. Il utilise les règles visuelles intégrées d'Excel, donc aucune formule ou compétence technique n'est requise. En quelques clics, Excel analyse automatiquement la plage sélectionnée et marque les valeurs en double. Cette méthode est idéale pour des vérifications rapides et des ensembles de données de petite à moyenne taille.
Étapes
-
Sélectionnez la plage de cellules que vous souhaitez vérifier (par exemple, B2:B11).
-
Allez dans Accueil → Mise en forme conditionnelle.
-
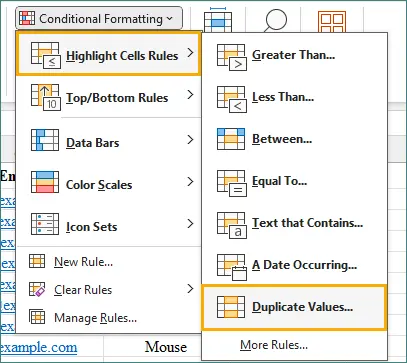
Cliquez sur Règles de mise en surbrillance des cellules → Valeurs en double.
-
Choisissez un style de mise en forme (couleur de remplissage, couleur du texte).
-
Cliquez sur OK.
Excel mettra instantanément en surbrillance toutes les valeurs en double dans la plage sélectionnée.
Principaux avantages
- Idéal pour des vérifications visuelles rapides
- Aucune formule requise
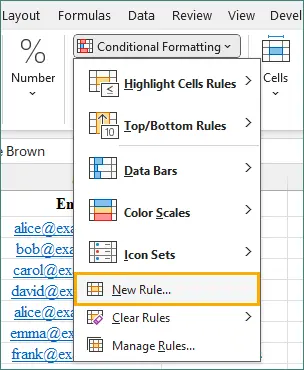
Méthode 2 : Utiliser une formule avec la mise en forme conditionnelle
Cette méthode vous permet de définir exactement comment Excel identifie les doublons, par exemple en ne mettant en évidence que les valeurs répétées ou en excluant la première occurrence. Elle nécessite une compréhension de base des formules mais vous offre une flexibilité bien plus grande que les règles intégrées. Cette approche fonctionne particulièrement bien pour les ensembles de données structurés ou complexes.
Exemple de formule
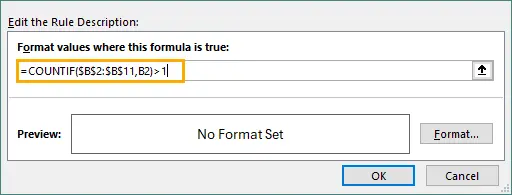
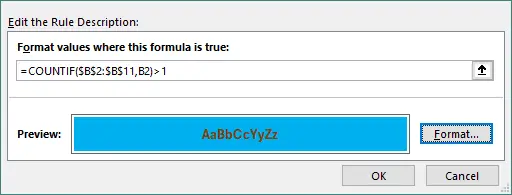
Pour mettre en évidence toutes les valeurs en double (y compris la première occurrence) :
=NB.SI($B$2:$B$11;B2)>1
Ce que signifie cette formule :
- NB.SI($B$2:$B$11; B2) compte combien de fois la valeur de la cellule B2 apparaît dans la plage B2:B11.
- Si le compte est supérieur à 1, Excel traite la valeur comme un doublon.
En termes simples, cette formule indique à Excel de mettre en évidence toute cellule dont la valeur apparaît plus d'une fois dans la plage sélectionnée. Les signes dollar ($) verrouillent la plage de recherche afin qu'elle reste fixe lorsque la règle est appliquée à d'autres cellules.
Pour plus d'exemples de NB.SI, consultez la documentation officielle de Microsoft.
Étapes
-
Sélectionnez votre plage de données.
-
Allez dans Mise en forme conditionnelle → Nouvelle règle.
-
Sélectionnez Utiliser une formule pour déterminer pour quelles cellules le format sera appliqué.

-
Entrez la formule ci-dessus.
-
Choisissez un format et cliquez sur OK.
Cette méthode est utile lorsque vous souhaitez personnaliser la manière dont Excel traite les doublons.
Principaux avantages
- Plus de flexibilité
- Fonctionne bien avec les ensembles de données complexes
Méthode 3 : Utiliser une colonne d'aide avec NB.SI
Cette méthode repose sur une colonne d'aide pour compter combien de fois chaque valeur apparaît dans votre ensemble de données. Elle offre une vue claire et transparente des doublons, facile à auditer et à valider. Comme les résultats se mettent à jour automatiquement, elle est idéale pour les feuilles de calcul dynamiques qui changent fréquemment. Cette approche fonctionne bien lorsque la précision et la traçabilité sont importantes.
Étapes
-
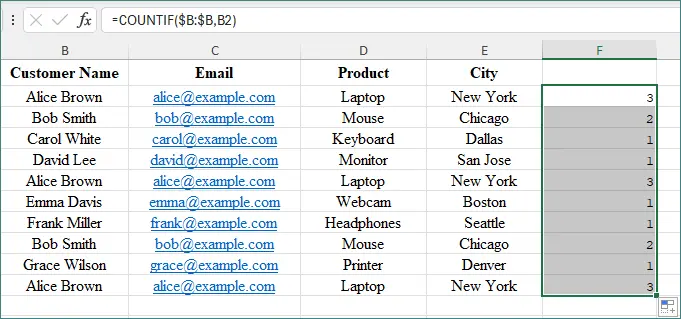
Dans une colonne vide (par exemple, F2), entrez :
=NB.SI($B:$B;B2)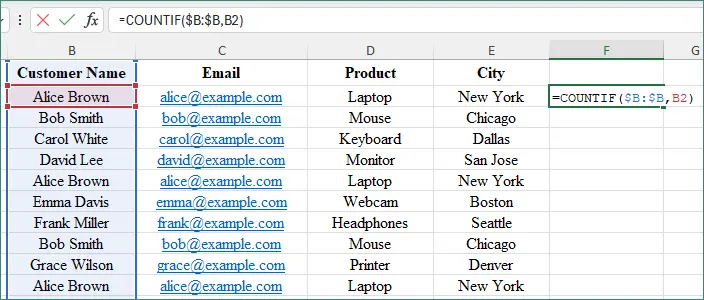
-
Ensuite, faites glisser la formule vers le bas.
Comment ça marche
- Un résultat de 1 signifie que la valeur est unique.
- Un résultat supérieur à 1 signifie que c'est un doublon.
Vous pouvez ensuite appliquer une mise en forme conditionnelle à la colonne d'aide pour mettre visuellement en évidence les doublons.
Principaux avantages
- Idéal pour les rapports dynamiques et actualisables
- Facile à auditer et à suivre les doublons
Méthode 4 : Utiliser Python avec Spire.XLS pour l'automatisation
Si vous travaillez fréquemment avec de gros fichiers Excel ou des tâches répétitives, vous pouvez utiliser Python avec Spire.XLS pour l'automatisation. Cette méthode vous permet d'analyser et de mettre en évidence les doublons par programmation, sans effort manuel. Elle permet de gagner du temps, de réduire les erreurs humaines et de traiter les fichiers en masse. Cette approche est idéale pour les développeurs ou les équipes qui ont besoin de solutions Excel évolutives.
Qu'est-ce que Spire.XLS for Python ?
Spire.XLS for Python est une bibliothèque puissante qui vous permet de lire, écrire, formater et manipuler des fichiers Excel en utilisant Python, sans qu'aucune installation de Microsoft Excel ne soit requise.
Installation
pip install spire.xls
Exemple de code pour mettre en évidence les doublons
from spire.xls import *
from spire.xls.common import *
# Charger le fichier Excel
workbook = Workbook()
workbook.LoadFromFile("C:/Users/Administrator/Desktop/input.xlsx")
# Obtenir la première feuille de calcul
sheet = workbook.Worksheets[0]
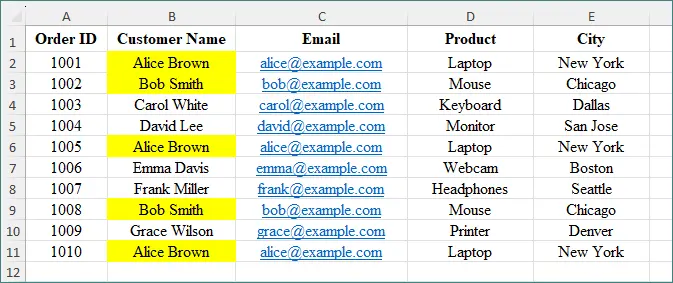
# Utiliser la mise en forme conditionnelle pour mettre en évidence les valeurs en double dans la plage de cellules spécifiée
conditional_format = sheet.Range["B2:B11"].ConditionalFormats.AddCondition()
conditional_format.FormatType = ConditionalFormatType.DuplicateValues
conditional_format.BackColor = Color.get_Yellow()
# Enregistrer le fichier
workbook.SaveToFile("HighlightDuplicates.xlsx", ExcelVersion.Version2013)
workbook.Dispose()
résultat :
Principaux avantages
- Idéal pour le traitement par lots
- Parfait pour les flux de travail d'automatisation d'entreprise
La mise en forme conditionnelle peut faire bien plus que simplement mettre en évidence les doublons dans Excel. Elle vous permet également d'appliquer des couleurs de lignes alternées et de mettre en évidence les valeurs les mieux ou les moins bien classées. Pour en savoir plus, consultez ce tutoriel : Appliquer la mise en forme conditionnelle dans Excel en Python.
Comparaison des méthodes
| Méthode | Facilité d'utilisation | Idéal pour | Automatisation |
|---|---|---|---|
| Mise en forme conditionnelle | ⭐⭐⭐⭐⭐ | Vérifications visuelles rapides | x |
| Formule + Mise en forme conditionnelle | ⭐⭐⭐⭐ | Logique personnalisée | x |
| Colonne d'aide (NB.SI) | ⭐⭐⭐⭐⭐ | Rapports dynamiques | x |
| Python + Spire.XLS | ⭐⭐ | Gros fichiers, travail par lots | √ |
Réflexions finales
La mise en évidence des doublons dans Excel contribue à améliorer la précision des données et à réduire les erreurs coûteuses. Si vous n'avez besoin que d'une analyse visuelle rapide, la mise en forme conditionnelle intégrée est l'option la plus rapide. Pour un contrôle plus avancé, les formules et les colonnes d'aide fonctionnent bien.
Si vous manipulez fréquemment de gros fichiers, l'utilisation de Python avec Spire.XLS peut considérablement améliorer l'efficacité grâce à l'automatisation.
La meilleure méthode dépend de votre charge de travail, de la taille de vos fichiers et de votre niveau de confort technique.
FAQ sur la mise en évidence des doublons dans Excel
Q1. Excel peut-il mettre en évidence les doublons automatiquement ?
Oui. La fonction de mise en forme conditionnelle intégrée met instantanément en évidence les doublons.
Q2. Puis-je mettre en évidence les doublons sur plusieurs colonnes ?
Oui. Vous pouvez sélectionner plusieurs colonnes avant d'appliquer la mise en forme conditionnelle ou utiliser une formule personnalisée.
Q3. La mise en évidence des doublons supprime-t-elle des données ?
Non. La mise en évidence ne modifie que la mise en forme des cellules et n'affecte pas les données sous-jacentes.
Q4. Quelle est la meilleure méthode pour les gros fichiers Excel ?
Pour les grands ensembles de données ou les tâches répétées, l'automatisation à l'aide de Python et de Spire.XLS est l'approche la plus efficace.
Vous pourriez également être intéressé par
Resaltar duplicados en Excel: 4 métodos sencillos
Tabla de Contenidos
- Método 1. Formato Condicional (Incorporado – La Forma Más Fácil)
- Método 2. Usar una Fórmula con Formato Condicional
- Método 3. Usar una Columna Auxiliar con CONTAR.SI
- Método 4. Usar Python con Spire.XLS para Automatización
- Comparar los Diferentes Métodos
- Conclusiones Finales
- Preguntas Frecuentes Sobre Resaltar Duplicados en Excel
Los valores duplicados son un problema común en las hojas de cálculo de Excel. Ya sea que esté trabajando con listas de clientes, inventarios de productos, facturas o resultados de encuestas, los datos duplicados pueden provocar errores, informes inexactos y malas decisiones.
Afortunadamente, Excel ofrece varias formas sencillas y eficaces de resaltar los duplicados para que pueda detectarlos y gestionarlos fácilmente. En este artículo, aprenderá cuatro métodos sencillos para buscar y resaltar valores duplicados en Excel, desde herramientas integradas hasta soluciones automatizadas con Python.
Resumen del método:
- Método 1. Formato Condicional (Incorporado – La Forma Más Fácil)
- Método 2. Usar una Fórmula con Formato Condicional
- Método 3. Usar una Columna Auxiliar con CONTAR.SI
- Método 4. Usar Python con Spire.XLS para Automatización
Método 1: Formato Condicional (Incorporado – La Forma Más Fácil)
Esta es la forma más rápida y amigable para principiantes de resaltar duplicados en Excel. Utiliza las reglas visuales integradas de Excel, por lo que no se requieren fórmulas ni habilidades técnicas. Con solo unos pocos clics, Excel escanea automáticamente el rango seleccionado y marca los valores duplicados. Este método es ideal para comprobaciones rápidas y conjuntos de datos de tamaño pequeño a mediano.
Pasos
-
Seleccione el rango de celdas que desea comprobar (por ejemplo, B2:B11).
-
Vaya a Inicio → Formato Condicional.
-
Haga clic en Reglas para Resaltar Celdas → Valores Duplicados.
-
Elija un estilo de formato (color de relleno, color de texto).
-
Haga clic en Aceptar.
Excel resaltará instantáneamente todos los valores duplicados en el rango seleccionado.
Beneficios Clave
- Ideal para comprobaciones visuales rápidas
- No se requieren fórmulas
Método 2: Usar una Fórmula con Formato Condicional
Este método le permite definir exactamente cómo Excel identifica los duplicados, como resaltar solo los valores repetidos o excluir la primera aparición. Requiere una comprensión básica de las fórmulas, pero le brinda una flexibilidad mucho mayor que las reglas integradas. Este enfoque funciona especialmente bien para conjuntos de datos estructurados o complejos.
Fórmula de Ejemplo
Para resaltar todos los valores duplicados (incluida la primera aparición):
=COUNTIF($B$2:$B$11,B2)>1
Lo que significa esta fórmula:
- CONTAR.SI($B$2:$B$11, B2) cuenta cuántas veces aparece el valor de la celda B2 en el rango B2:B11.
- Si el recuento es mayor que 1, Excel trata el valor como un duplicado.
En términos simples, esta fórmula le dice a Excel que resalte cualquier celda cuyo valor aparezca más de una vez en el rango seleccionado. Los signos de dólar ($) bloquean el rango de búsqueda para que permanezca fijo cuando la regla se aplica a otras celdas.
Para obtener más ejemplos de CONTAR.SI, consulte la documentación oficial de Microsoft.
Pasos
-
Seleccione su rango de datos.
-
Vaya a Formato Condicional → Nueva Regla.
-
Seleccione Utilice una fórmula para determinar qué celdas formatear.
-
Ingrese la fórmula anterior.
-
Elija un formato y haga clic en Aceptar.
Este método es útil cuando desea personalizar cómo Excel trata los duplicados.
Beneficios Clave
- Más flexibilidad
- Funciona bien con conjuntos de datos complejos
Método 3: Usar una Columna Auxiliar con CONTAR.SI
Este método se basa en una columna auxiliar para contar cuántas veces aparece cada valor en su conjunto de datos. Proporciona una vista clara y transparente de los duplicados que es fácil de auditar y validar. Debido a que los resultados se actualizan automáticamente, es ideal para hojas de trabajo dinámicas que cambian con frecuencia. Este enfoque funciona bien cuando la precisión y la trazabilidad son importantes.
Pasos
-
En una columna en blanco (por ejemplo, F2), ingrese:
=COUNTIF($B:$B,B2) -
Luego arrastre la fórmula hacia abajo.
Cómo Funciona
- Un resultado de 1 significa que el valor es único.
- Un resultado mayor que 1 significa que es un duplicado.
Luego puede aplicar formato condicional a la columna auxiliar para resaltar visualmente los duplicados.
Beneficios Clave
- Ideal para informes dinámicos y actualizables
- Fácil de auditar y rastrear duplicados
Método 4: Usar Python con Spire.XLS para Automatización
Si trabaja con frecuencia con archivos grandes de Excel o tareas repetitivas, puede usar Python con Spire.XLS para la automatización. Este método le permite escanear y resaltar duplicados mediante programación sin esfuerzo manual. Ayuda a ahorrar tiempo, reducir el error humano y procesar archivos en masa. Este enfoque es ideal para desarrolladores o equipos que necesitan soluciones de Excel escalables.
¿Qué es Spire.XLS para Python?
Spire.XLS para Python es una potente biblioteca que le permite leer, escribir, formatear y manipular archivos de Excel usando Python, sin necesidad de instalar Microsoft Excel.
Instalación
pip install spire.xls
Código de Muestra para Resaltar Duplicados
from spire.xls import *
from spire.xls.common import *

# Cargar el archivo de Excel
workbook = Workbook()
workbook.LoadFromFile("C:/Users/Administrator/Desktop/input.xlsx")

# Obtener la primera hoja de trabajo
sheet = workbook.Worksheets[0]

# Usar formato condicional para resaltar valores duplicados en el rango de celdas especificado
conditional_format = sheet.Range["B2:B11"].ConditionalFormats.AddCondition()
conditional_format.FormatType = ConditionalFormatType.DuplicateValues
conditional_format.BackColor = Color.get_Yellow()

# Guardar el archivo
workbook.SaveToFile("HighlightDuplicates.xlsx", ExcelVersion.Version2013)
workbook.Dispose()
resultado:
Beneficios Clave
- Ideal para procesamiento por lotes
- Perfecto para flujos de trabajo de automatización empresarial
El formato condicional puede hacer mucho más que resaltar duplicados en Excel. También le permite aplicar colores de fila alternos y resaltar los valores de mayor o menor clasificación. Para obtener más información, consulte este tutorial: Aplicar Formato Condicional en Excel en Python.
Comparación de los Métodos
| Método | Facilidad de Uso | Ideal Para | Automatización |
|---|---|---|---|
| Formato Condicional | ⭐⭐⭐⭐⭐ | Comprobaciones visuales rápidas | x |
| Fórmula + Formato Condicional | ⭐⭐⭐⭐ | Lógica personalizada | x |
| Columna Auxiliar (CONTAR.SI) | ⭐⭐⭐⭐⭐ | Informes dinámicos | x |
| Python + Spire.XLS | ⭐⭐ | Archivos grandes, trabajo por lotes | √ |
Conclusiones Finales
Resaltar duplicados en Excel ayuda a mejorar la precisión de los datos y reduce los errores costosos. Si solo necesita un escaneo visual rápido, el Formato Condicional incorporado es la opción más rápida. Para un control más avanzado, las fórmulas y las columnas auxiliares funcionan bien.
Si maneja archivos grandes con frecuencia, usar Python con Spire.XLS puede mejorar drásticamente la eficiencia a través de la automatización.
El mejor método depende de su carga de trabajo, el tamaño del archivo y su nivel de comodidad técnica.
Preguntas Frecuentes Sobre Resaltar Duplicados en Excel
P1. ¿Puede Excel resaltar duplicados automáticamente?
Sí. La función de Formato Condicional incorporada resalta los duplicados al instante.
P2. ¿Puedo resaltar duplicados en varias columnas?
Sí. Puede seleccionar varias columnas antes de aplicar el Formato Condicional o usar una fórmula personalizada.
P3. ¿Resaltar duplicados elimina datos?
No. Resaltar solo cambia el formato de la celda y no afecta los datos subyacentes.
P4. ¿Cuál es el mejor método para archivos grandes de Excel?
Para grandes conjuntos de datos o tareas repetidas, la automatización con Python y Spire.XLS es el enfoque más eficiente.
También le Puede Interesar
Duplikate in Excel hervorheben: 4 einfache Methoden
Inhaltsverzeichnis
- Methode 1. Bedingte Formatierung (Integriert – Einfachster Weg)
- Methode 2. Eine Formel mit bedingter Formatierung verwenden
- Methode 3. Eine Hilfsspalte mit ZÄHLENWENN verwenden
- Methode 4. Python mit Spire.XLS für die Automatisierung verwenden
- Vergleich der verschiedenen Methoden
- Abschließende Gedanken
- Häufig gestellte Fragen zum Hervorheben von Duplikaten in Excel
Doppelte Werte sind ein häufiges Problem in Excel-Tabellen. Ob Sie mit Kundenlisten, Produktbeständen, Rechnungen oder Umfrageergebnissen arbeiten, doppelte Daten können zu Fehlern, ungenauen Berichten und schlechten Entscheidungen führen.
Glücklicherweise bietet Excel mehrere einfache und effektive Möglichkeiten, Duplikate hervorzuheben, damit Sie sie leicht erkennen und verwalten können. In diesem Artikel lernen Sie vier einfache Methoden kennen, um doppelte Werte in Excel zu finden und hervorzuheben – von integrierten Werkzeugen bis hin zu automatisierten Lösungen mit Python.
Methodenübersicht:
- Methode 1. Bedingte Formatierung (Integriert – Einfachster Weg)
- Methode 2. Eine Formel mit bedingter Formatierung verwenden
- Methode 3. Eine Hilfsspalte mit ZÄHLENWENN verwenden
- Methode 4. Python mit Spire.XLS für die Automatisierung verwenden
Methode 1: Bedingte Formatierung (Integriert – Einfachster Weg)
Dies ist der schnellste und anfängerfreundlichste Weg, um Duplikate in Excel hervorzuheben. Er verwendet die integrierten visuellen Regeln von Excel, sodass keine Formeln oder technischen Fähigkeiten erforderlich sind. Mit nur wenigen Klicks scannt Excel automatisch den ausgewählten Bereich und markiert doppelte Werte. Diese Methode ist ideal für schnelle Überprüfungen und kleine bis mittelgroße Datensätze.
Schritte
-
Wählen Sie den Zellbereich aus, den Sie überprüfen möchten (zum Beispiel B2:B11).
-
Gehen Sie zu Start → Bedingte Formatierung.
-
Klicken Sie auf Regeln zum Hervorheben von Zellen → Doppelte Werte.
-
Wählen Sie einen Formatierungsstil (Füllfarbe, Textfarbe).
-
Klicken Sie auf OK.
Excel hebt sofort alle doppelten Werte im ausgewählten Bereich hervor.
Wesentliche Vorteile
- Am besten für schnelle, visuelle Überprüfungen
- Keine Formeln erforderlich
Methode 2: Eine Formel mit bedingter Formatierung verwenden
Mit dieser Methode können Sie genau definieren, wie Excel Duplikate identifiziert, z. B. nur wiederholte Werte hervorheben oder das erste Vorkommen ausschließen. Sie erfordert ein grundlegendes Verständnis von Formeln, bietet Ihnen aber viel mehr Flexibilität als integrierte Regeln. Dieser Ansatz eignet sich besonders gut für strukturierte oder komplexe Datensätze.
Beispielformel
Um alle doppelten Werte (einschließlich des ersten Vorkommens) hervorzuheben:
=ZÄHLENWENN($B$2:$B$11;B2)>1
Was diese Formel bedeutet:
- ZÄHLENWENN($B$2:$B$11; B2) zählt, wie oft der Wert in Zelle B2 im Bereich B2:B11 vorkommt.
- Wenn die Anzahl größer als 1 ist, behandelt Excel den Wert als Duplikat.
Einfach ausgedrückt, weist diese Formel Excel an, jede Zelle hervorzuheben, deren Wert mehr als einmal im ausgewählten Bereich vorkommt. Die Dollarzeichen ($) sperren den Suchbereich, sodass er bei der Anwendung der Regel auf andere Zellen fest bleibt.
Weitere Beispiele für ZÄHLENWENN finden Sie in der offiziellen Dokumentation von Microsoft.
Schritte
-
Wählen Sie Ihren Datenbereich aus.
-
Gehen Sie zu Bedingte Formatierung → Neue Regel.
-
Wählen Sie Formel zur Ermittlung der zu formatierenden Zellen verwenden.
-
Geben Sie die obige Formel ein.
-
Wählen Sie ein Format und klicken Sie auf OK.
Diese Methode ist nützlich, wenn Sie anpassen möchten, wie Excel Duplikate behandelt.
Wesentliche Vorteile
- Mehr Flexibilität
- Funktioniert gut mit komplexen Datensätzen
Methode 3: Eine Hilfsspalte mit ZÄHLENWENN verwenden
Diese Methode verwendet eine Hilfsspalte, um zu zählen, wie oft jeder Wert in Ihrem Datensatz vorkommt. Sie bietet eine klare, transparente Ansicht von Duplikaten, die leicht zu überprüfen und zu validieren ist. Da die Ergebnisse automatisch aktualisiert werden, ist sie ideal für dynamische Arbeitsblätter, die sich häufig ändern. Dieser Ansatz eignet sich gut, wenn Genauigkeit und Nachverfolgbarkeit wichtig sind.
Schritte
-
Geben Sie in eine leere Spalte (zum Beispiel F2) ein:
=ZÄHLENWENN($B:$B;B2) -
Ziehen Sie dann die Formel nach unten.
Wie es funktioniert
- Ein Ergebnis von 1 bedeutet, der Wert ist einzigartig.
- Ein Ergebnis größer als 1 bedeutet, es ist ein Duplikat.
Sie können dann die bedingte Formatierung auf die Hilfsspalte anwenden, um Duplikate visuell hervorzuheben.
Wesentliche Vorteile
- Ideal für dynamische, aktualisierbare Berichte
- Einfach zu überprüfen und Duplikate zu verfolgen
Methode 4: Python mit Spire.XLS für die Automatisierung verwenden
Wenn Sie häufig mit großen Excel-Dateien oder sich wiederholenden Aufgaben arbeiten, können Sie Python mit Spire.XLS zur Automatisierung verwenden. Mit dieser Methode können Sie Duplikate programmatisch scannen und hervorheben, ohne manuellen Aufwand. Dies hilft, Zeit zu sparen, menschliche Fehler zu reduzieren und Dateien stapelweise zu verarbeiten. Dieser Ansatz ist ideal für Entwickler oder Teams, die skalierbare Excel-Lösungen benötigen.
Was ist Spire.XLS for Python?
Spire.XLS for Python ist eine leistungsstarke Bibliothek, mit der Sie Excel-Dateien mit Python lesen, schreiben, formatieren und bearbeiten können – ohne dass Microsoft Excel installiert sein muss.
Installation
pip install spire.xls
Beispielcode zum Hervorheben von Duplikaten
from spire.xls import *
from spire.xls.common import *

# Die Excel-Datei laden
workbook = Workbook()
workbook.LoadFromFile("C:/Users/Administrator/Desktop/input.xlsx")

# Das erste Arbeitsblatt abrufen
sheet = workbook.Worksheets[0]

# Bedingte Formatierung verwenden, um doppelte Werte im angegebenen Zellbereich hervorzuheben
conditional_format = sheet.Range["B2:B11"].ConditionalFormats.AddCondition()
conditional_format.FormatType = ConditionalFormatType.DuplicateValues
conditional_format.BackColor = Color.get_Yellow()

# Die Datei speichern
workbook.SaveToFile("HighlightDuplicates.xlsx", ExcelVersion.Version2013)
workbook.Dispose()
Ausgabe:
Wesentliche Vorteile
- Ideal für die Stapelverarbeitung
- Perfekt für Automatisierungs-Workflows in Unternehmen
Die bedingte Formatierung kann viel mehr als nur Duplikate in Excel hervorheben. Sie ermöglicht es Ihnen auch, abwechselnde Zeilenfarben anzuwenden und die höchsten oder niedrigsten Werte hervorzuheben. Um mehr zu erfahren, sehen Sie sich dieses Tutorial an: Bedingte Formatierung in Excel mit Python anwenden.
Vergleich der Methoden
| Methode | Benutzerfreundlichkeit | Am besten für | Automatisierung |
|---|---|---|---|
| Bedingte Formatierung | ⭐⭐⭐⭐⭐ | Schnelle visuelle Überprüfungen | x |
| Formel + Bedingte Formatierung | ⭐⭐⭐⭐ | Benutzerdefinierte Logik | x |
| Hilfsspalte (ZÄHLENWENN) | ⭐⭐⭐⭐⭐ | Dynamische Berichte | x |
| Python + Spire.XLS | ⭐⭐ | Große Dateien, Stapelverarbeitung | √ |
Abschließende Gedanken
Das Hervorheben von Duplikaten in Excel hilft, die Datengenauigkeit zu verbessern und kostspielige Fehler zu reduzieren. Wenn Sie nur eine schnelle visuelle Überprüfung benötigen, ist die integrierte Bedingte Formatierung die schnellste Option. Für erweiterte Kontrolle eignen sich Formeln und Hilfsspalten gut.
Wenn Sie häufig große Dateien bearbeiten, kann die Verwendung von Python mit Spire.XLS die Effizienz durch Automatisierung erheblich verbessern.
Die beste Methode hängt von Ihrer Arbeitsbelastung, Dateigröße und Ihrem technischen Komfortniveau ab.
Häufig gestellte Fragen zum Hervorheben von Duplikaten in Excel
F1. Kann Excel Duplikate automatisch hervorheben?
Ja. Die integrierte Funktion „Bedingte Formatierung“ hebt Duplikate sofort hervor.
F2. Kann ich Duplikate über mehrere Spalten hinweg hervorheben?
Ja. Sie können mehrere Spalten auswählen, bevor Sie die bedingte Formatierung anwenden, oder eine benutzerdefinierte Formel verwenden.
F3. Werden durch das Hervorheben von Duplikaten Daten gelöscht?
Nein. Das Hervorheben ändert nur die Zellformatierung und hat keinen Einfluss auf die zugrunde liegenden Daten.
F4. Was ist die beste Methode für große Excel-Dateien?
Für große Datensätze oder sich wiederholende Aufgaben ist die Automatisierung mit Python und Spire.XLS der effizienteste Ansatz.
Das könnte Sie auch interessieren
Выделение дубликатов в Excel: 4 простых метода
Содержание
- Метод 1. Условное форматирование (встроенный — самый простой способ)
- Метод 2. Использование формулы с условным форматированием
- Метод 3. Использование вспомогательного столбца с функцией СЧЁТЕСЛИ
- Метод 4. Использование Python со Spire.XLS для автоматизации
- Сравнение различных методов
- Заключительные мысли
- Часто задаваемые вопросы о выделении дубликатов в Excel
Повторяющиеся значения — распространенная проблема в электронных таблицах Excel. Независимо от того, работаете ли вы со списками клиентов, товарными запасами, счетами-фактурами или результатами опросов, дублирующиеся данные могут привести к ошибкам, неточным отчетам и неверным решениям.
К счастью, Excel предоставляет несколько простых и эффективных способов выделить дубликаты, чтобы вы могли легко их обнаружить и управлять ими. В этой статье вы узнаете четыре простых метода поиска и выделения повторяющихся значений в Excel — от встроенных инструментов до автоматизированных решений с использованием Python.
Обзор методов:
- Метод 1. Условное форматирование (встроенный — самый простой способ)
- Метод 2. Использование формулы с условным форматированием
- Метод 3. Использование вспомогательного столбца с функцией СЧЁТЕСЛИ
- Метод 4. Использование Python со Spire.XLS для автоматизации
Метод 1: Условное форматирование (встроенный — самый простой способ)
Это самый быстрый и удобный для новичков способ выделить дубликаты в Excel. Он использует встроенные визуальные правила Excel, поэтому не требует формул или технических навыков. Всего за несколько кликов Excel автоматически сканирует выбранный диапазон и помечает повторяющиеся значения. Этот метод идеально подходит для быстрой проверки и наборов данных малого и среднего размера.
Шаги
-
Выберите диапазон ячеек, который вы хотите проверить (например, B2:B11).
-
Перейдите в Главная → Условное форматирование.
-
Нажмите Правила выделения ячеек → Повторяющиеся значения.
-
Выберите стиль форматирования (цвет заливки, цвет текста).
-
Нажмите OK.
Excel мгновенно выделит все повторяющиеся значения в выбранном диапазоне.
Ключевые преимущества
- Лучше всего подходит для быстрой визуальной проверки
- Формулы не требуются
Метод 2: Использование формулы с условным форматированием
Этот метод позволяет вам точно определить, как Excel идентифицирует дубликаты, например, выделяя только повторяющиеся значения или исключая первое вхождение. Он требует базового понимания формул, но дает гораздо большую гибкость, чем встроенные правила. Этот подход особенно хорошо работает для структурированных или сложных наборов данных.
Пример формулы
Чтобы выделить все повторяющиеся значения (включая первое вхождение):
=СЧЁТЕСЛИ($B$2:$B$11,B2)>1
Что означает эта формула:
- СЧЁТЕСЛИ($B$2:$B$11, B2) подсчитывает, сколько раз значение в ячейке B2 появляется в диапазоне B2:B11.
- Если счетчик больше 1, Excel рассматривает значение как дубликат.
Проще говоря, эта формула указывает Excel выделить любую ячейку, значение которой появляется в выбранном диапазоне более одного раза. Знаки доллара ($) фиксируют диапазон поиска, чтобы он оставался неизменным при применении правила к другим ячейкам.
Для получения дополнительных примеров использования СЧЁТЕСЛИ см. официальную документацию Microsoft.
Шаги
-
Выберите ваш диапазон данных.
-
Перейдите в Условное форматирование → Новое правило.
-
Выберите Использовать формулу для определения форматируемых ячеек.
-
Введите формулу выше.
-
Выберите формат и нажмите OK.
Этот метод полезен, когда вы хотите настроить, как Excel обрабатывает дубликаты.
Ключевые преимущества
- Больше гибкости
- Хорошо работает со сложными наборами данных
Метод 3: Использование вспомогательного столбца с функцией СЧЁТЕСЛИ
Этот метод основан на использовании вспомогательного столбца для подсчета количества появлений каждого значения в вашем наборе данных. Он обеспечивает ясное, прозрачное представление дубликатов, которое легко проверять и подтверждать. Поскольку результаты обновляются автоматически, он идеально подходит для динамических листов, которые часто меняются. Этот подход хорошо работает, когда важны точность и отслеживаемость.
Шаги
-
В пустом столбце (например, F2) введите:
=СЧЁТЕСЛИ($B:$B,B2) -
Затем перетащите формулу вниз.
Как это работает
- Результат 1 означает, что значение уникально.
- Результат больше 1 означает, что это дубликат.
Затем вы можете применить условное форматирование к вспомогательному столбцу, чтобы визуально выделить дубликаты.
Ключевые преимущества
- Отлично подходит для динамических, обновляемых отчетов
- Легко проверять и отслеживать дубликаты
Метод 4: Использование Python со Spire.XLS для автоматизации
Если вы часто работаете с большими файлами Excel или повторяющимися задачами, вы можете использовать Python со Spire.XLS для автоматизации. Этот метод позволяет программно сканировать и выделять дубликаты без ручного вмешательства. Это помогает сэкономить время, уменьшить количество человеческих ошибок и обрабатывать файлы в пакетном режиме. Этот подход идеален для разработчиков или команд, которым нужны масштабируемые решения для Excel.
Что такое Spire.XLS для Python?
Spire.XLS для Python — это мощная библиотека, которая позволяет вам читать, записывать, форматировать и манипулировать файлами Excel с помощью Python — установка Microsoft Excel не требуется.
Установка
pip install spire.xls
Пример кода для выделения дубликатов
from spire.xls import *
from spire.xls.common import *

# Загрузить файл Excel
workbook = Workbook()
workbook.LoadFromFile("C:/Users/Administrator/Desktop/input.xlsx")

# Получить первый рабочий лист
sheet = workbook.Worksheets[0]

# Использовать условное форматирование для выделения повторяющихся значений в указанном диапазоне ячеек
conditional_format = sheet.Range["B2:B11"].ConditionalFormats.AddCondition()
conditional_format.FormatType = ConditionalFormatType.DuplicateValues
conditional_format.BackColor = Color.get_Yellow()

# Сохранить файл
workbook.SaveToFile("HighlightDuplicates.xlsx", ExcelVersion.Version2013)
workbook.Dispose()
вывод:
Ключевые преимущества
- Идеально для пакетной обработки
- Идеально подходит для рабочих процессов автоматизации на предприятии
Условное форматирование может делать гораздо больше, чем просто выделять дубликаты в Excel. Оно также позволяет применять чередующиеся цвета строк и выделять верхние или нижние ранжированные значения. Чтобы узнать больше, см. это руководство: Применение условного форматирования в Excel на Python.
Сравнение методов
| Метод | Простота использования | Лучше всего для | Автоматизация |
|---|---|---|---|
| Условное форматирование | ⭐⭐⭐⭐⭐ | Быстрых визуальных проверок | x |
| Формула + Условное форматирование | ⭐⭐⭐⭐ | Пользовательской логики | x |
| Вспомогательный столбец (СЧЁТЕСЛИ) | ⭐⭐⭐⭐⭐ | Динамических отчетов | x |
| Python + Spire.XLS | ⭐⭐ | Больших файлов, пакетной работы | √ |
Заключительные мысли
Выделение дубликатов в Excel помогает повысить точность данных и уменьшить количество дорогостоящих ошибок. Если вам нужен только быстрый визуальный просмотр, встроенное условное форматирование — самый быстрый вариант. Для более продвинутого контроля хорошо работают формулы и вспомогательные столбцы.
Если вы часто работаете с большими файлами, использование Python со Spire.XLS может значительно повысить эффективность за счет автоматизации.
Лучший метод зависит от вашей рабочей нагрузки, размера файла и уровня технического комфорта.
Часто задаваемые вопросы о выделении дубликатов в Excel
В1. Может ли Excel автоматически выделять дубликаты?
Да. Встроенная функция условного форматирования мгновенно выделяет дубликаты.
В2. Могу ли я выделить дубликаты в нескольких столбцах?
Да. Вы можете выбрать несколько столбцов перед применением условного форматирования или использовать пользовательскую формулу.
В3. Удаляет ли выделение дубликатов данные?
Нет. Выделение изменяет только форматирование ячеек и не влияет на исходные данные.
В4. Какой метод лучше всего подходит для больших файлов Excel?
Для больших наборов данных или повторяющихся задач автоматизация с использованием Python и Spire.XLS является наиболее эффективным подходом.
Вам также может быть интересно
Converter PDF para PDF/A: 4 Maneiras Fáceis
Índice
- O que é PDF/A
- Por que converter PDF para PDF/A
- Método 1: Converter PDF para PDF/A usando o Adobe Acrobat Pro DC
- Método 2: Converter PDF para PDF/A usando conversores online gratuitos
- Método 3: Converter PDF para PDF/A usando o Ghostscript
- Método 4: Converter arquivos PDF para PDF/A em lote usando Python
- Solução de problemas comuns na conversão de PDF para PDF/A
- Conclusão: Como escolher o método certo
A conversão de PDF para PDF/A garante que seus documentos sejam preservados a longo prazo, atendam à conformidade regulatória e permaneçam acessíveis em todos os sistemas. Esteja você trabalhando com documentos legais, governamentais ou empresariais, o PDF/A garante legibilidade e consistência. Este guia explora quatro abordagens comuns: usar o Adobe Acrobat Pro DC, conversores online gratuitos, Ghostscript e programação em Python.
Navegação Rápida
- O que é PDF/A
- Por que converter PDF para PDF/A
- Método 1: Converter PDF para PDF/A usando o Adobe Acrobat Pro DC
- Método 2: Converter PDF para PDF/A usando conversores online gratuitos
- Método 3: Converter PDF para PDF/A usando o Ghostscript
- Método 4: Converter arquivos PDF para PDF/A em lote usando Python
- Solução de problemas comuns na conversão de PDF para PDF/A
- Conclusão: Como escolher o método certo
O que é PDF/A?
PDF/A é uma versão padronizada pela ISO do PDF, projetada especificamente para arquivamento de longo prazo. Ao contrário dos PDFs comuns, o PDF/A restringe o uso de recursos que podem comprometer a estabilidade do documento no futuro.
Principais características do PDF/A
O PDF/A impõe regras rígidas para garantir longevidade e consistência, incluindo:
- Todas as fontes devem ser incorporadas (sem dependências de fontes externas)
- Sem elementos de áudio, vídeo ou multimídia
- Sem criptografia ou proteção por senha
- Perfis de cores padronizados para renderização consistente
- Sem referências externas, garantindo que o documento seja totalmente autocontido
Versões do PDF/A
O PDF/A vem em várias versões, cada uma projetada para atender a necessidades específicas de arquivamento e preservação de documentos. A tabela abaixo resume as principais versões do PDF/A e seus casos de uso ideais:
| Versão do PDF/A | Principais Recursos | Melhor Caso de Uso |
|---|---|---|
| PDF/A-1 (ISO 19005-1) | O padrão original e mais restritivo; garante máxima estabilidade e ampla compatibilidade | Preservação a longo prazo de documentos legais, governamentais e relacionados à conformidade |
| PDF/A-2 (ISO 19005-2) | Adiciona suporte para transparência, camadas e imagens JPEG2000, oferecendo maior flexibilidade | Documentos modernos que incluem gráficos, conteúdo em camadas ou layouts complexos |
| PDF/A-3 (ISO 19005-3) | Permite incorporar arquivos que não são PDF/A, como XML, CSV e Excel | Faturas eletrônicas, relatórios de negócios e fluxos de trabalho que exigem o anexo de arquivos de origem |
Por que converter PDF para PDF/A?
Existem várias razões pelas quais a conversão de um PDF para PDF/A pode ser necessária:
- Preservação a Longo Prazo : O PDF/A garante que os documentos permanecerão acessíveis e utilizáveis por muitos anos, tornando-o ideal para fins legais, governamentais e de arquivamento.
- Conformidade com Regulamentos : Certas indústrias, incluindo direito e saúde, exigem que os documentos sejam armazenados no formato PDF/A para conformidade com regulamentos como a ISO 19005.
- Consistência na Visualização : Como o PDF/A incorpora todas as fontes, imagens e outros recursos, o documento será exibido de forma consistente em diferentes sistemas, sem dependências de arquivos externos.
Método 1: Converter PDF para PDF/A usando o Adobe Acrobat Pro DC
O Adobe Acrobat Pro DC continua sendo o padrão da indústria para manipulação de PDF. Ele fornece a maneira mais estável e precisa de converter PDF para PDF/A com ferramentas de validação integradas.
Passos:
-
Abra o PDF que você deseja converter no Adobe Acrobat Pro DC.
-
Vá para Arquivo > Salvar como outro > PDF arquivável (PDF/A) .
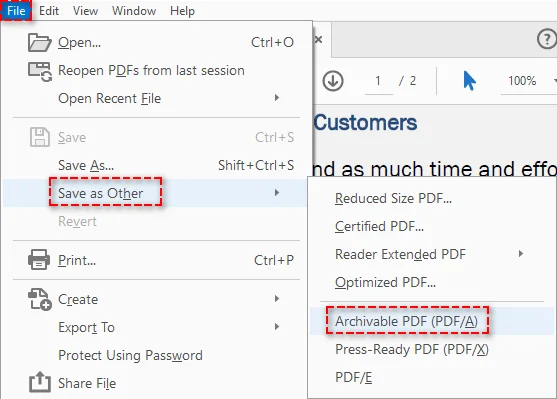
-
Selecione o padrão PDF/A desejado (como PDF/A-1a, PDF/A-1b, PDF/A-2a ou PDF/A-2b).
-
Salve o arquivo PDF/A.
Prós:
- Fácil de usar com uma ferramenta de nível profissional.
- Suporta diferentes padrões de PDF/A.
- Garante a conformidade com os requisitos do PDF/A.
Contras:
- Requer o Adobe Acrobat Pro DC, que é um software pago.
Método 2: Converter PDF para PDF/A usando conversores online gratuitos
Se você precisa apenas de conversões ocasionais e prefere não instalar software, conversores online gratuitos como PDF2GO e AvePDF fornecem uma solução rápida e acessível. Essas ferramentas funcionam inteiramente no seu navegador, tornando-as ideais para documentos não sensíveis.
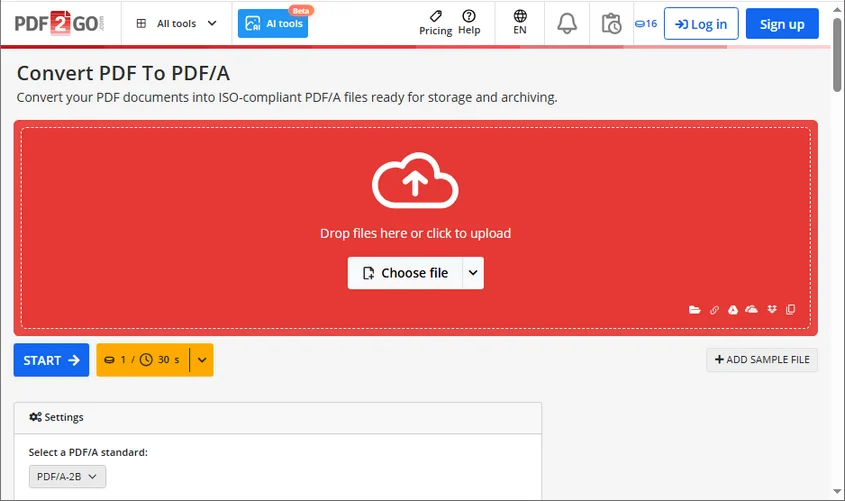
Passos (usando PDF2GO como exemplo):
- Visite o conversor online gratuito de PDF para PDF/A do PDF2GO.
- Clique em Escolher arquivo para enviar seu PDF ou arraste e solte o arquivo na área designada.
- Escolha o padrão PDF/A desejado como formato de saída.
- Clique em Iniciar para começar o processo de conversão.
- Baixe a versão PDF/A do seu documento.
Prós:
- Gratuito.
- Nenhuma instalação de software necessária.
- Rápido e fácil para conversões ocasionais.
Contras:
- As ferramentas online podem ter limitações de tamanho de arquivo.
- Não é ideal para documentos sensíveis ou confidenciais devido a potenciais riscos de segurança.
Método 3: Converter PDF para PDF/A usando o Ghostscript
O Ghostscript é uma ferramenta de linha de comando robusta e de código aberto, amplamente utilizada para o processamento automatizado de PDF. Ele oferece uma maneira flexível e gratuita de converter PDFs para documentos compatíveis com PDF/A.
Passos:
-
Baixe e instale o Ghostscript em seu site oficial.
-
Abra um prompt de comando ou janela de terminal.
-
Execute o seguinte comando para converter seu arquivo PDF para PDF/A (exemplo para PDF/A-1b):
D:\Applications\Ghostscript\gs10.06.0\bin\gswin64.exe -dPDFA=1 -dBATCH -dNOPAUSE -sProcessColorModel=DeviceRGB -sDEVICE=pdfwrite -sPDFACompatibilityPolicy=1 -sColorConversionStrategy=UseDeviceIndependentColor -sOutputFile="C:/Users/Administrator/Documents/output.pdf" "C:/Users/Administrator/Documents/input.pdf"Importante:
- Substitua
"D:\Applications\Ghostscript\gs10.06.0\bin\gswin64.exe"pelo caminho real para o seu executável do Ghostscript (gswin64.exe). - Substitua
C:/Users/Administrator/Documents/input.pdfpelo caminho para o seu arquivo PDF de origem eC:/Users/Administrator/Documents/output.pdfpelo nome e local desejados para o seu arquivo convertido.
- Substitua
Prós:
- Gratuito e de código aberto.
- Altamente personalizável.
- Ideal para automação.
Contras:
- Requer conhecimento de linha de comando.
- Configuração mais complexa em comparação com ferramentas gráficas.
Método 4: Converter arquivos PDF para PDF/A em lote usando Python
Para usuários que preferem uma abordagem mais programática, o Python é uma ótima escolha, especialmente para processamento em lote ou integração da conversão de PDF para PDF/A em aplicativos ou serviços de backend. Com bibliotecas como o Spire.PDF para Python, você pode converter vários arquivos PDF para PDF/A em lote sem esforço. Além disso, a biblioteca também suporta a conversão de PDFs para Word e outros formatos, tornando-a uma ferramenta versátil para a conversão de documentos.
Passos:
-
Instale o Spire.PDF do PyPI usando o seguinte comando:
pip install spire-pdf -
Escreva um script Python para converter vários arquivos PDF para o formato PDF/A-1b em lote:
import os
from spire.pdf import *

# Define input and output folder paths
inputFolder = "path/to/your/input/folder/"
outputFolder = "path/to/your/output/folder/"

# Get a list of all PDF files in the input folder
pdfFiles = [f for f in os.listdir(inputFolder) if f.endswith('.pdf')]

# Iterate through each PDF file and convert
for pdfFile in pdfFiles:
    # Construct the full input and output file paths
    inputFile = os.path.join(inputFolder, pdfFile)
    outputFile = os.path.join(outputFolder, f"ToPdfA1B_{pdfFile}")

    # Create a PdfStandardsConverter object
    converter = PdfStandardsConverter(inputFile)

    # Perform the PDF to PDF/A-1b conversion
    converter.ToPdfA1B(outputFile)
    print(f"Converted: {inputFile} to {outputFile}")

print("Batch conversion completed.")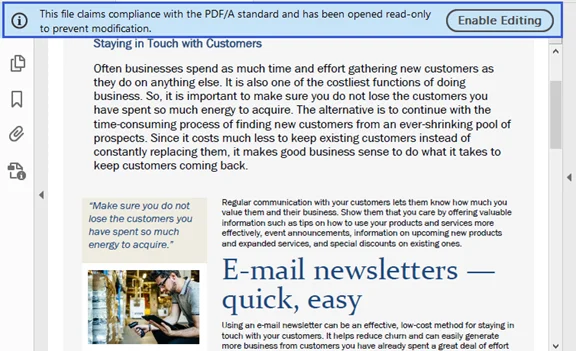
Prós:
- Ideal para processamento em lote e automação.
- Pode ser integrado em fluxos de trabalho ou aplicativos existentes.
Contras:
- Requer conhecimento de programação em Python.
- É necessário instalar a biblioteca Spire.PDF.
Para configurações mais avançadas sobre esta conversão, visite o guia oficial do Spire.PDF: Python: Converter PDF para PDF/A e vice-versa.
Solução de problemas comuns na conversão de PDF para PDF/A
Ao converter um PDF para PDF/A, você pode encontrar erros de validação ou exportações com falha. Abaixo estão os problemas mais comuns e as soluções rápidas:
- Fontes ausentes ou não incorporadas
- Sintomas: Erro "Fonte não incorporada" ou exibição de texto incorreta.
- Solução: Incorpore todas as fontes ou substitua as fontes não suportadas por fontes padrão (por exemplo, Arial, Times New Roman).
- Problemas de transparência ou camada
- Sintomas: A conversão falha devido à transparência ou camadas (especialmente para PDF/A-1).
- Solução: Use PDF/A-2b ou PDF/A-3b, ou achate a transparência antes da conversão.
- Links externos, anexos ou multimídia
- Sintomas: Conversão bloqueada devido a conteúdo externo (anexos, JavaScript, multimídia).
- Solução: Remova os anexos ou converta-os em conteúdo estático e elimine scripts ou elementos multimídia.
- Perfis de cores incorretos
- Sintomas: Erros de validação relacionados a perfis de cores.
- Solução: Aplique um perfil de cor padrão (por exemplo, sRGB) e garanta que as imagens usem espaços de cores suportados.
- Validação falhou após a exportação
- Sintomas: A conversão é concluída, mas o arquivo falha na conformidade com o PDF/A.
- Solução: Valide usando ferramentas como veraPDF, Adobe Acrobat Preflight ou validadores de PDF/A online para identificar e corrigir erros.
- PDFs criptografados ou protegidos por senha
- Sintomas: Conversão não permitida devido à proteção por senha.
- Solução: Remova as configurações de segurança ou senhas antes de converter.
Conclusão: Como escolher o método certo
A conversão de PDF para PDF/A é crucial para garantir a longevidade, acessibilidade e conformidade do documento. O melhor método para converter PDF para PDF/A depende de suas necessidades específicas:
- Para conversões ocasionais : as ferramentas online gratuitas são uma opção rápida e fácil.
- Para conversões profissionais e compatíveis : o Adobe Acrobat Pro DC é a escolha mais confiável.
- Para aqueles que preferem ferramentas de código aberto : o Ghostscript oferece uma solução robusta, embora intensiva em linha de comando.
- Para automação ou processamento em lote : o Python é ideal para integração em sistemas maiores.
Dica : Independentemente do método escolhido, sempre valide os arquivos convertidos para conformidade com o PDF/A e mantenha backups dos documentos originais.
FAQs: PDF para PDF/A
P1: O que é PDF/A?
R1: PDF/A é um PDF padronizado pela ISO, projetado para arquivamento de longo prazo. Ele incorpora todas as fontes, metadados e perfis de cores para garantir que os documentos sejam renderizados da mesma forma no futuro.
P2: Posso converter PDF para PDF/A gratuitamente?
R2: Sim, ferramentas gratuitas como PDF2GO e Ghostscript permitem a conversão para PDF/A sem nenhum custo.
P3: O PDF/A é compatível com todos os leitores de PDF?
R3: A maioria dos leitores de PDF modernos suporta PDF/A, mas alguns recursos avançados podem não ser exibidos em softwares mais antigos.
P4: Qual versão do PDF/A devo usar?
R4: Para arquivamento simples, o PDF/A-1b é suficiente. Para recursos modernos como camadas e anexos, o PDF/A-2 ou PDF/A-3 é recomendado.
P5: Posso automatizar a conversão para PDF/A para vários arquivos?
R5: Sim, usando ferramentas programáticas como Spire.PDF ou scripts do Ghostscript, a conversão em lote é possível.
Veja também
PDF를 PDF/A로 변환: 4가지 쉬운 방법
PDF를 PDF/A로 변환하면 문서를 장기간 보존하고 규제 준수를 충족하며 시스템 전반에서 접근성을 유지할 수 있습니다. 법률, 정부 또는 기업 문서로 작업하든 PDF/A는 가독성과 일관성을 보장합니다. 이 가이드에서는 Adobe Acrobat Pro DC, 무료 온라인 변환기, Ghostscript 및 Python 프로그래밍을 사용하는 네 가지 일반적인 접근 방식을 살펴봅니다.
빠른 탐색
- PDF/A란 무엇인가
- PDF를 PDF/A로 변환해야 하는 이유
- 방법 1: Adobe Acrobat Pro DC를 사용하여 PDF를 PDF/A로 변환
- 방법 2: 무료 온라인 변환기를 사용하여 PDF를 PDF/A로 변환
- 방법 3: Ghostscript를 사용하여 PDF를 PDF/A로 변환
- 방법 4: Python을 사용하여 PDF 파일을 PDF/A로 일괄 변환
- PDF에서 PDF/A로 변환 시 일반적인 문제 해결
- 결론: 올바른 방법 선택하기
PDF/A란 무엇인가?
PDF/A는 장기 보관을 위해 특별히 설계된 ISO 표준 PDF 버전입니다. 일반 PDF와 달리 PDF/A는 향후 문서 안정성을 저해할 수 있는 기능의 사용을 제한합니다.
PDF/A의 주요 특징
PDF/A는 수명과 일관성을 보장하기 위해 다음과 같은 엄격한 규칙을 적용합니다.
- 모든 글꼴은 포함되어야 합니다 (외부 글꼴 종속성 없음)
- 오디오, 비디오 또는 멀티미디어 요소 없음
- 암호화 또는 비밀번호 보호 없음
- 일관된 렌더링을 위한 표준화된 색상 프로필
- 외부 참조가 없어 문서가 완전히 독립적임을 보장
PDF/A 버전
PDF/A는 특정 보관 및 문서 보존 요구 사항을 충족하도록 설계된 여러 버전으로 제공됩니다. 아래 표는 주요 PDF/A 버전과 이상적인 사용 사례를 요약한 것입니다.
| PDF/A 버전 | 주요 기능 | 최적 사용 사례 |
|---|---|---|
| PDF/A-1 (ISO 19005-1) | 가장 제한적인 원본 표준으로, 최대의 안정성과 광범위한 호환성을 보장합니다. | 법률, 정부 및 규정 준수 관련 문서의 장기 보존 |
| PDF/A-2 (ISO 19005-2) | 투명도, 레이어 및 JPEG2000 이미지 지원을 추가하여 유연성을 높입니다. | 그래픽, 레이어드 콘텐츠 또는 복잡한 레이아웃을 포함하는 최신 문서 |
| PDF/A-3 (ISO 19005-3) | XML, CSV 및 Excel과 같은 비 PDF/A 파일 포함을 허용합니다. | 전자 인보이스, 비즈니스 보고서 및 소스 파일 첨부가 필요한 워크플로 |
PDF를 PDF/A로 변환해야 하는 이유?
PDF를 PDF/A로 변환해야 하는 몇 가지 이유가 있습니다.
- 장기 보존 : PDF/A는 문서가 수년 동안 접근 가능하고 사용 가능하도록 보장하여 법률, 정부 및 보관 목적에 이상적입니다.
- 규정 준수 : 법률 및 의료를 포함한 특정 산업에서는 ISO 19005와 같은 규정을 준수하기 위해 문서를 PDF/A 형식으로 저장해야 합니다.
- 보기의 일관성 : PDF/A는 모든 글꼴, 이미지 및 기타 리소스를 포함하므로 문서는 외부 파일에 대한 종속성 없이 다른 시스템에서 일관되게 표시됩니다.
방법 1: Adobe Acrobat Pro DC를 사용하여 PDF를 PDF/A로 변환
Adobe Acrobat Pro DC는 PDF 조작의 업계 표준입니다. 내장된 유효성 검사 도구를 사용하여 PDF를 PDF/A로 변환하는 가장 안정적이고 정확한 방법을 제공합니다.
단계:
-
Adobe Acrobat Pro DC에서 변환하려는 PDF를 엽니다.
-
파일 > 다른 이름으로 저장 > 보관용 PDF(PDF/A)로 이동합니다.
-
원하는 PDF/A 표준(예: PDF/A-1a, PDF/A-1b, PDF/A-2a 또는 PDF/A-2b)을 선택합니다.
-
PDF/A 파일을 저장합니다.
장점:
- 전문가 수준의 도구로 사용하기 쉽습니다.
- 다양한 PDF/A 표준을 지원합니다.
- PDF/A 요구 사항 준수를 보장합니다.
단점:
- 유료 소프트웨어인 Adobe Acrobat Pro DC가 필요합니다.
방법 2: 무료 온라인 변환기를 사용하여 PDF를 PDF/A로 변환
가끔 변환이 필요하고 소프트웨어를 설치하고 싶지 않다면 PDF2GO 및 AvePDF와 같은 무료 온라인 변환기가 빠르고 접근 가능한 솔루션을 제공합니다. 이러한 도구는 브라우저에서 완전히 실행되므로 민감하지 않은 문서에 이상적입니다.
단계 (PDF2GO를 예로 사용):
- PDF2GO의 무료 온라인 PDF에서 PDF/A로 변환기를 방문하십시오.
- 파일 선택을 클릭하여 PDF를 업로드하거나 지정된 영역으로 파일을 드래그 앤 드롭합니다.
- 출력 형식으로 원하는 PDF/A 표준을 선택합니다.
- 시작을 클릭하여 변환 프로세스를 시작합니다.
- 문서의 PDF/A 버전을 다운로드합니다.
장점:
- 무료로 사용할 수 있습니다.
- 소프트웨어 설치가 필요 없습니다.
- 가끔 변환할 때 빠르고 쉽습니다.
단점:
- 온라인 도구에는 파일 크기 제한이 있을 수 있습니다.
- 잠재적인 보안 위험으로 인해 민감하거나 기밀 문서에는 이상적이지 않습니다.
방법 3: Ghostscript를 사용하여 PDF를 PDF/A로 변환
Ghostscript는 자동화된 PDF 처리에 널리 사용되는 강력한 오픈 소스 명령줄 도구입니다. PDF를 PDF/A 호환 문서로 변환하는 유연하고 비용 없는 방법을 제공합니다.
단계:
-
공식 웹사이트에서 Ghostscript를 다운로드하여 설치합니다.
-
명령 프롬프트 또는 터미널 창을 엽니다.
-
다음 명령을 실행하여 PDF 파일을 PDF/A로 변환합니다(PDF/A-1b 예시):
D:\Applications\Ghostscript\gs10.06.0\bin\gswin64.exe -dPDFA=1 -dBATCH -dNOPAUSE -sProcessColorModel=DeviceRGB -sDEVICE=pdfwrite -sPDFACompatibilityPolicy=1 -sColorConversionStrategy=UseDeviceIndependentColor -sOutputFile="C:/Users/Administrator/Documents/output.pdf" "C:/Users/Administrator/Documents/input.pdf"중요:
"D:\Applications\Ghostscript\gs10.06.0\bin\gswin64.exe"를 Ghostscript 실행 파일(gswin64.exe)의 실제 경로로 바꾸십시오.C:/Users/Administrator/Documents/input.pdf를 소스 PDF 파일의 경로로,C:/Users/Administrator/Documents/output.pdf를 변환된 파일의 원하는 이름과 위치로 바꾸십시오.
장점:
- 무료이며 오픈 소스입니다.
- 고도로 사용자 정의할 수 있습니다.
- 자동화에 이상적입니다.
단점:
- 명령줄 지식이 필요합니다.
- 그래픽 도구에 비해 설정이 더 복잡합니다.
방법 4: Python을 사용하여 PDF 파일을 PDF/A로 일괄 변환
보다 프로그래밍적인 접근 방식을 선호하는 사용자의 경우, 특히 일괄 처리 또는 PDF에서 PDF/A로의 변환을 응용 프로그램이나 백엔드 서비스에 통합하는 데 Python이 훌륭한 선택입니다. Spire.PDF for Python과 같은 라이브러리를 사용하면 여러 PDF 파일을 PDF/A로 손쉽게 일괄 변환할 수 있습니다. 또한 이 라이브러리는 PDF를 Word로 변환 및 기타 형식으로 변환하는 것도 지원하므로 문서 변환을 위한 다목적 도구입니다.
단계:
-
다음 명령을 사용하여 PyPI에서 Spire.PDF를 설치합니다.
pip install spire-pdf -
여러 PDF 파일을 PDF/A-1b 형식으로 일괄 변환하는 Python 스크립트를 작성합니다.
import os
from spire.pdf import *

# 입력 및 출력 폴더 경로 정의
inputFolder = "path/to/your/input/folder/"
outputFolder = "path/to/your/output/folder/"

# 입력 폴더의 모든 PDF 파일 목록 가져오기
pdfFiles = [f for f in os.listdir(inputFolder) if f.endswith('.pdf')]

# 각 PDF 파일을 반복하고 변환
for pdfFile in pdfFiles:
    # 전체 입력 및 출력 파일 경로 구성
    inputFile = os.path.join(inputFolder, pdfFile)
    outputFile = os.path.join(outputFolder, f"ToPdfA1B_{pdfFile}")

    # PdfStandardsConverter 객체 생성
    converter = PdfStandardsConverter(inputFile)

    # PDF에서 PDF/A-1b로 변환 수행
    converter.ToPdfA1B(outputFile)
    print(f"변환됨: {inputFile}에서 {outputFile}로")

print("일괄 변환이 완료되었습니다.")
장점:
- 일괄 처리 및 자동화에 이상적입니다.
- 기존 워크플로 또는 응용 프로그램에 통합할 수 있습니다.
단점:
- Python 프로그래밍 지식이 필요합니다.
- Spire.PDF 라이브러리를 설치해야 합니다.
이 변환에 대한 고급 설정에 대해서는 Spire.PDF의 공식 가이드인 Python: PDF를 PDF/A로 변환 및 그 반대를 방문하십시오.
PDF에서 PDF/A로 변환 시 일반적인 문제 해결
PDF를 PDF/A로 변환할 때 유효성 검사 오류나 내보내기 실패가 발생할 수 있습니다. 다음은 가장 일반적인 문제와 빠른 해결 방법입니다.
- 누락되거나 포함되지 않은 글꼴
- 증상: "글꼴이 포함되지 않음" 오류 또는 잘못된 텍스트 표시.
- 해결책: 모든 글꼴을 포함하거나 지원되지 않는 글꼴을 표준 글꼴(예: Arial, Times New Roman)로 교체합니다.
- 투명도 또는 레이어 문제
- 증상: 투명도 또는 레이어로 인해 변환 실패(특히 PDF/A-1의 경우).
- 해결책: PDF/A-2b 또는 PDF/A-3b를 사용하거나 변환 전에 투명도를 병합합니다.
- 외부 링크, 첨부 파일 또는 멀티미디어
- 증상: 외부 콘텐츠(첨부 파일, JavaScript, 멀티미디어)로 인해 변환이 차단됨.
- 해결책: 첨부 파일을 제거하거나 정적 콘텐츠로 변환하고 스크립트 또는 멀티미디어 요소를 제거합니다.
- 잘못된 색상 프로필
- 증상: 색상 프로필과 관련된 유효성 검사 오류.
- 해결책: 표준 색상 프로필(예: sRGB)을 적용하고 이미지가 지원되는 색 공간을 사용하는지 확인합니다.
- 내보내기 후 유효성 검사 실패
- 증상: 변환이 완료되었지만 파일이 PDF/A 규정을 준수하지 않음.
- 해결책: veraPDF, Adobe Acrobat Preflight 또는 온라인 PDF/A 유효성 검사기와 같은 도구를 사용하여 오류를 식별하고 수정합니다.
- 암호화되거나 비밀번호로 보호된 PDF
- 증상: 비밀번호 보호로 인해 변환이 허용되지 않음.
- 해결책: 변환하기 전에 보안 설정이나 비밀번호를 제거합니다.
결론: 올바른 방법 선택하기
PDF를 PDF/A로 변환하는 것은 문서의 수명, 접근성 및 규정 준수를 보장하는 데 중요합니다. PDF를 PDF/A로 변환하는 최상의 방법은 특정 요구 사항에 따라 다릅니다.
- 가끔 변환하는 경우 : 무료 온라인 도구는 빠르고 쉬운 옵션입니다.
- 전문적이고 규정을 준수하는 변환의 경우 : Adobe Acrobat Pro DC가 가장 신뢰할 수 있는 선택입니다.
- 오픈 소스 도구를 선호하는 경우 : Ghostscript는 강력하지만 명령줄 중심의 솔루션을 제공합니다.
- 자동화 또는 일괄 처리의 경우 : Python은 대규모 시스템에 통합하는 데 이상적입니다.
팁 : 선택한 방법에 관계없이 항상 변환된 파일의 PDF/A 규정 준수를 확인하고 원본 문서의 백업을 보관하십시오.
자주 묻는 질문: PDF에서 PDF/A로
Q1: PDF/A란 무엇인가요?
A1: PDF/A는 장기 보관을 위해 설계된 ISO 표준 PDF입니다. 모든 글꼴, 메타데이터 및 색상 프로필을 포함하여 문서가 미래에도 동일하게 렌더링되도록 보장합니다.
Q2: PDF를 PDF/A로 무료로 변환할 수 있나요?
A2: 예, PDF2GO 및 Ghostscript와 같은 무료 도구를 사용하면 비용 없이 PDF/A로 변환할 수 있습니다.
Q3: PDF/A는 모든 PDF 리더와 호환되나요?
A3: 대부분의 최신 PDF 리더는 PDF/A를 지원하지만 일부 고급 기능은 이전 소프트웨어에서 표시되지 않을 수 있습니다.
Q4: 어떤 PDF/A 버전을 사용해야 하나요?
A4: 간단한 보관의 경우 PDF/A-1b로 충분합니다. 레이어 및 첨부 파일과 같은 최신 기능의 경우 PDF/A-2 또는 PDF/A-3이 권장됩니다.
Q5: 여러 파일에 대해 PDF/A 변환을 자동화할 수 있나요?
A5: 예, Spire.PDF 또는 Ghostscript 스크립트와 같은 프로그래밍 도구를 사용하여 일괄 변환이 가능합니다.
참고 항목
Converti PDF in PDF/A: 4 modi semplici
Indice
- Cos'è il PDF/A
- Perché convertire PDF in PDF/A
- Metodo 1: Convertire PDF in PDF/A usando Adobe Acrobat Pro DC
- Metodo 2: Convertire PDF in PDF/A usando convertitori online gratuiti
- Metodo 3: Convertire PDF in PDF/A usando Ghostscript
- Metodo 4: Convertire in batch file PDF in PDF/A usando Python
- Risoluzione dei problemi comuni nella conversione da PDF a PDF/A
- Conclusione: Come scegliere il metodo giusto
La conversione da PDF a PDF/A garantisce che i tuoi documenti vengano conservati a lungo termine, soddisfino la conformità normativa e rimangano accessibili su tutti i sistemi. Che tu stia lavorando con documenti legali, governativi o aziendali, il formato PDF/A garantisce leggibilità e coerenza. Questa guida esplora quattro approcci comuni: l'uso di Adobe Acrobat Pro DC, convertitori online gratuiti, Ghostscript e la programmazione in Python.
Navigazione Rapida
- Cos'è il PDF/A
- Perché convertire PDF in PDF/A
- Metodo 1: Convertire PDF in PDF/A usando Adobe Acrobat Pro DC
- Metodo 2: Convertire PDF in PDF/A usando convertitori online gratuiti
- Metodo 3: Convertire PDF in PDF/A usando Ghostscript
- Metodo 4: Convertire in batch file PDF in PDF/A usando Python
- Risoluzione dei problemi comuni nella conversione da PDF a PDF/A
- Conclusione: Come scegliere il metodo giusto
Cos'è il PDF/A?
PDF/A è una versione standardizzata ISO del PDF progettata specificamente per l'archiviazione a lungo termine. A differenza dei normali PDF, il PDF/A limita l'uso di funzionalità che potrebbero compromettere la stabilità del documento in futuro.
Caratteristiche principali del PDF/A
Il PDF/A impone regole rigide per garantire longevità e coerenza, tra cui:
- Tutti i caratteri devono essere incorporati (nessuna dipendenza da caratteri esterni)
- Nessun elemento audio, video o multimediale
- Nessuna crittografia o protezione con password
- Profili colore standardizzati per un rendering coerente
- Nessun riferimento esterno, garantendo che il documento sia completamente autonomo
Versioni di PDF/A
Il PDF/A è disponibile in diverse versioni, ognuna progettata per soddisfare specifiche esigenze di archiviazione e conservazione dei documenti. La tabella seguente riassume le principali versioni di PDF/A e i loro casi d'uso ideali:
| Versione PDF/A | Caratteristiche Principali | Miglior Caso d'Uso |
|---|---|---|
| PDF/A-1 (ISO 19005-1) | Lo standard originale e più restrittivo; garantisce la massima stabilità e un'ampia compatibilità | Conservazione a lungo termine di documenti legali, governativi e relativi alla conformità |
| PDF/A-2 (ISO 19005-2) | Aggiunge il supporto per trasparenza, livelli e immagini JPEG2000, offrendo maggiore flessibilità | Documenti moderni che includono grafica, contenuti a più livelli o layout complessi |
| PDF/A-3 (ISO 19005-3) | Consente di incorporare file non PDF/A come XML, CSV ed Excel | Fatture elettroniche, report aziendali e flussi di lavoro che richiedono l'allegato di file sorgente |
Perché convertire PDF in PDF/A?
Ci sono diverse ragioni per cui potrebbe essere necessario convertire un PDF in PDF/A:
- Conservazione a lungo termine: Il PDF/A garantisce che i documenti rimangano accessibili e utilizzabili per molti anni, rendendolo ideale per scopi legali, governativi e di archiviazione.
- Conformità alle normative: Alcuni settori, tra cui quello legale e sanitario, richiedono che i documenti siano archiviati in formato PDF/A per conformarsi a normative come la ISO 19005.
- Coerenza nella visualizzazione: Poiché il PDF/A incorpora tutti i caratteri, le immagini e le altre risorse, il documento verrà visualizzato in modo coerente su sistemi diversi senza dipendere da file esterni.
Metodo 1: Convertire PDF in PDF/A usando Adobe Acrobat Pro DC
Adobe Acrobat Pro DC rimane lo standard del settore per la manipolazione dei PDF. Fornisce il modo più stabile e accurato per convertire PDF in PDF/A con strumenti di convalida integrati.
Passaggi:
-
Apri il PDF che desideri convertire in Adobe Acrobat Pro DC.
-
Vai su File > Salva come altro > PDF archiviabile (PDF/A).
-
Seleziona lo standard PDF/A desiderato (come PDF/A-1a, PDF/A-1b, PDF/A-2a o PDF/A-2b).
-
Salva il file PDF/A.
Vantaggi:
- Facile da usare con uno strumento di livello professionale.
- Supporta diversi standard PDF/A.
- Garantisce la conformità ai requisiti PDF/A.
Svantaggi:
- Richiede Adobe Acrobat Pro DC, che è un software a pagamento.
Metodo 2: Convertire PDF in PDF/A usando convertitori online gratuiti
Se hai solo bisogno di conversioni occasionali e preferisci non installare software, i convertitori online gratuiti come PDF2GO e AvePDF offrono una soluzione rapida e accessibile. Questi strumenti funzionano interamente nel tuo browser, rendendoli ideali per documenti non sensibili.
Passaggi (usando PDF2GO come esempio):
- Visita il convertitore online gratuito da PDF a PDF/A di PDF2GO.
- Fai clic su Scegli file per caricare il tuo PDF o trascina e rilascia il file nell'area designata.
- Scegli lo standard PDF/A desiderato come formato di output.
- Fai clic su Avvia per iniziare il processo di conversione.
- Scarica la versione PDF/A del tuo documento.
Vantaggi:
- Gratuito da usare.
- Nessuna installazione di software richiesta.
- Veloce e facile per conversioni occasionali.
Svantaggi:
- Gli strumenti online possono avere limitazioni sulla dimensione dei file.
- Non ideale per documenti sensibili o confidenziali a causa di potenziali rischi per la sicurezza.
Metodo 3: Convertire PDF in PDF/A usando Ghostscript
Ghostscript è un robusto strumento a riga di comando open source ampiamente utilizzato per l'elaborazione automatizzata dei PDF. Offre un modo flessibile e gratuito per convertire i PDF in documenti conformi a PDF/A.
Passaggi:
-
Scarica e installa Ghostscript dal suo sito ufficiale.
-
Apri un prompt dei comandi o una finestra di terminale.
-
Esegui il seguente comando per convertire il tuo file PDF in PDF/A (esempio per PDF/A-1b):
D:\Applications\Ghostscript\gs10.06.0\bin\gswin64.exe -dPDFA=1 -dBATCH -dNOPAUSE -sProcessColorModel=DeviceRGB -sDEVICE=pdfwrite -sPDFACompatibilityPolicy=1 -sColorConversionStrategy=UseDeviceIndependentColor -sOutputFile="C:/Users/Administrator/Documents/output.pdf" "C:/Users/Administrator/Documents/input.pdf"Importante:
- Sostituisci
"D:\Applications\Ghostscript\gs10.06.0\bin\gswin64.exe"con il percorso effettivo del tuo eseguibile Ghostscript (gswin64.exe). - Sostituisci
C:/Users/Administrator/Documents/input.pdfcon il percorso del tuo file PDF di origine, eC:/Users/Administrator/Documents/output.pdfcon il nome e la posizione desiderati per il file convertito.
- Sostituisci
Vantaggi:
- Gratuito e open-source.
- Altamente personalizzabile.
- Ideale per l'automazione.
Svantaggi:
- Richiede conoscenza della riga di comando.
- Configurazione più complessa rispetto agli strumenti grafici.
Metodo 4: Convertire in batch file PDF in PDF/A usando Python
Per gli utenti che preferiscono un approccio più programmatico, Python è un'ottima scelta, specialmente per l'elaborazione in batch o l'integrazione della conversione da PDF a PDF/A in applicazioni o servizi di backend. Con librerie come Spire.PDF per Python, puoi convertire in batch più file PDF in PDF/A senza sforzo. Inoltre, la libreria supporta anche la conversione di PDF in Word e altri formati, rendendola uno strumento versatile per la conversione di documenti.
Passaggi:
-
Installa Spire.PDF da PyPI usando il seguente comando:
pip install spire-pdf -
Scrivi uno script Python per convertire in batch più file PDF nel formato PDF/A-1b:
import os
from spire.pdf import *

# Definisci i percorsi delle cartelle di input e output
inputFolder = "percorso/della/tua/cartella/input/"
outputFolder = "percorso/della/tua/cartella/output/"

# Ottieni un elenco di tutti i file PDF nella cartella di input
pdfFiles = [f for f in os.listdir(inputFolder) if f.endswith('.pdf')]

# Itera attraverso ogni file PDF e converti
for pdfFile in pdfFiles:
    # Costruisci i percorsi completi dei file di input e output
    inputFile = os.path.join(inputFolder, pdfFile)
    outputFile = os.path.join(outputFolder, f"ToPdfA1B_{pdfFile}")

    # Crea un oggetto PdfStandardsConverter
    converter = PdfStandardsConverter(inputFile)

    # Esegui la conversione da PDF a PDF/A-1b
    converter.ToPdfA1B(outputFile)
    print(f"Convertito: {inputFile} in {outputFile}")

print("Conversione batch completata.")
Vantaggi:
- Ideale per l'elaborazione in batch e l'automazione.
- Può essere integrato in flussi di lavoro o applicazioni esistenti.
Svantaggi:
- Richiede conoscenza della programmazione Python.
- È necessario installare la libreria Spire.PDF.
Per impostazioni più avanzate relative a questa conversione, visita la guida ufficiale di Spire.PDF: Python: Convertire PDF in PDF/A e viceversa.
Risoluzione dei problemi comuni nella conversione da PDF a PDF/A
Durante la conversione di un PDF in PDF/A, potresti riscontrare errori di convalida o esportazioni non riuscite. Di seguito sono riportati i problemi più comuni e le soluzioni rapide:
- Caratteri mancanti o non incorporati
- Sintomi: errore "Carattere non incorporato" o visualizzazione errata del testo.
- Soluzione: incorpora tutti i caratteri o sostituisci i caratteri non supportati con quelli standard (ad es. Arial, Times New Roman).
- Problemi di trasparenza o di livelli
- Sintomi: la conversione non riesce a causa di trasparenza o livelli (specialmente per PDF/A-1).
- Soluzione: utilizza PDF/A-2b o PDF/A-3b, oppure appiattisci la trasparenza prima della conversione.
- Collegamenti esterni, allegati o multimedia
- Sintomi: conversione bloccata a causa di contenuti esterni (allegati, JavaScript, multimedia).
- Soluzione: rimuovi gli allegati o convertili in contenuto statico ed elimina script o elementi multimediali.
- Profili colore non corretti
- Sintomi: errori di convalida relativi ai profili colore.
- Soluzione: applica un profilo colore standard (ad es. sRGB) e assicurati che le immagini utilizzino spazi colore supportati.
- Convalida non riuscita dopo l'esportazione
- Sintomi: la conversione viene completata, ma il file non è conforme a PDF/A.
- Soluzione: convalida utilizzando strumenti come veraPDF, Adobe Acrobat Preflight o validatori PDF/A online per identificare e correggere gli errori.
- PDF crittografati o protetti da password
- Sintomi: conversione non consentita a causa della protezione con password.
- Soluzione: rimuovi le impostazioni di sicurezza o le password prima della conversione.
Conclusione: Come scegliere il metodo giusto
La conversione da PDF a PDF/A è fondamentale per garantire la longevità, l'accessibilità e la conformità dei documenti. Il metodo migliore per convertire PDF in PDF/A dipende dalle tue esigenze specifiche:
- Per conversioni occasionali: gli strumenti online gratuiti sono un'opzione rapida e semplice.
- Per conversioni professionali e conformi: Adobe Acrobat Pro DC è la scelta più affidabile.
- Per coloro che preferiscono strumenti open-source: Ghostscript offre una soluzione robusta, sebbene intensiva da riga di comando.
- Per l'automazione o l'elaborazione in batch: Python è ideale per l'integrazione in sistemi più grandi.
Suggerimento: indipendentemente dal metodo scelto, convalida sempre i file convertiti per la conformità PDF/A e conserva i backup dei documenti originali.
Domande frequenti: da PDF a PDF/A
D1: Cos'è il PDF/A?
R1: PDF/A è un PDF standardizzato ISO progettato per l'archiviazione a lungo termine. Incorpora tutti i caratteri, i metadati e i profili colore per garantire che i documenti vengano visualizzati allo stesso modo in futuro.
D2: Posso convertire PDF in PDF/A gratuitamente?
R2: Sì, strumenti gratuiti come PDF2GO e Ghostscript consentono la conversione in PDF/A senza alcun costo.
D3: Il PDF/A è compatibile con tutti i lettori PDF?
R3: La maggior parte dei lettori PDF moderni supporta il PDF/A, ma alcune funzionalità avanzate potrebbero non essere visualizzate nei software più vecchi.
D4: Quale versione di PDF/A dovrei usare?
R4: Per l'archiviazione semplice, PDF/A-1b è sufficiente. Per funzionalità moderne come livelli e allegati, si consiglia PDF/A-2 o PDF/A-3.
D5: Posso automatizzare la conversione in PDF/A per più file?
R5: Sì, utilizzando strumenti programmatici come Spire.PDF o script Ghostscript, è possibile la conversione in batch.
Vedi anche
Convertir PDF en PDF/A : 4 méthodes faciles
Table des matières
- Qu'est-ce que le PDF/A
- Pourquoi convertir un PDF en PDF/A
- Méthode 1 : Convertir un PDF en PDF/A avec Adobe Acrobat Pro DC
- Méthode 2 : Convertir un PDF en PDF/A avec des convertisseurs en ligne gratuits
- Méthode 3 : Convertir un PDF en PDF/A avec Ghostscript
- Méthode 4 : Convertir par lots des fichiers PDF en PDF/A avec Python
- Dépannage des problèmes courants lors de la conversion de PDF en PDF/A
- Conclusion : Comment choisir la bonne méthode
La conversion de PDF en PDF/A garantit que vos documents sont conservés à long terme, respectent la conformité réglementaire et restent accessibles sur tous les systèmes. Que vous travailliez avec des documents juridiques, gouvernementaux ou d'entreprise, le format PDF/A garantit la lisibilité et la cohérence. Ce guide explore quatre approches courantes : l'utilisation d'Adobe Acrobat Pro DC, les convertisseurs en ligne gratuits, Ghostscript et la programmation en Python.
Navigation rapide
- Qu'est-ce que le PDF/A
- Pourquoi convertir un PDF en PDF/A
- Méthode 1 : Convertir un PDF en PDF/A avec Adobe Acrobat Pro DC
- Méthode 2 : Convertir un PDF en PDF/A avec des convertisseurs en ligne gratuits
- Méthode 3 : Convertir un PDF en PDF/A avec Ghostscript
- Méthode 4 : Convertir par lots des fichiers PDF en PDF/A avec Python
- Dépannage des problèmes courants lors de la conversion de PDF en PDF/A
- Conclusion : Comment choisir la bonne méthode
Qu'est-ce que le PDF/A ?
Le PDF/A est une version normalisée ISO du PDF conçue spécifiquement pour l'archivage à long terme. Contrairement aux PDF ordinaires, le PDF/A restreint l'utilisation de fonctionnalités susceptibles de compromettre la stabilité du document à l'avenir.
Caractéristiques clés du PDF/A
Le PDF/A impose des règles strictes pour garantir la longévité et la cohérence, notamment :
- Toutes les polices doivent être incorporées (pas de dépendances de polices externes)
- Aucun élément audio, vidéo ou multimédia
- Aucun cryptage ni protection par mot de passe
- Profils de couleur standardisés pour un rendu cohérent
- Aucune référence externe, garantissant que le document est entièrement autonome
Versions de PDF/A
Le PDF/A existe en plusieurs versions, chacune conçue pour répondre à des besoins spécifiques d'archivage et de préservation de documents. Le tableau ci-dessous résume les principales versions de PDF/A et leurs cas d'utilisation idéaux :
| Version PDF/A | Caractéristiques clés | Meilleur cas d'utilisation |
|---|---|---|
| PDF/A-1 (ISO 19005-1) | La norme originale et la plus restrictive ; assure une stabilité maximale et une large compatibilité | Préservation à long terme de documents juridiques, gouvernementaux et liés à la conformité |
| PDF/A-2 (ISO 19005-2) | Ajoute la prise en charge de la transparence, des calques et des images JPEG2000, offrant une plus grande flexibilité | Documents modernes incluant des graphiques, du contenu en couches ou des mises en page complexes |
| PDF/A-3 (ISO 19005-3) | Permet d'incorporer des fichiers non-PDF/A tels que XML, CSV et Excel | Factures électroniques, rapports d'activité et flux de travail nécessitant de joindre des fichiers sources |
Pourquoi convertir un PDF en PDF/A ?
Il y a plusieurs raisons pour lesquelles la conversion d'un PDF en PDF/A peut être nécessaire :
- Préservation à long terme : Le PDF/A garantit que les documents resteront accessibles et utilisables pendant de nombreuses années, ce qui le rend idéal à des fins juridiques, gouvernementales et d'archivage.
- Conformité aux réglementations : Certaines industries, notamment le droit et la santé, exigent que les documents soient stockés au format PDF/A pour se conformer à des réglementations telles que la norme ISO 19005.
- Cohérence de l'affichage : Étant donné que le PDF/A incorpore toutes les polices, images et autres ressources, le document s'affichera de manière cohérente sur différents systèmes sans dépendre de fichiers externes.
Méthode 1 : Convertir un PDF en PDF/A avec Adobe Acrobat Pro DC
Adobe Acrobat Pro DC reste la norme de l'industrie pour la manipulation de PDF. Il offre le moyen le plus stable et le plus précis de convertir un PDF en PDF/A avec des outils de validation intégrés.
Étapes :
-
Ouvrez le PDF que vous souhaitez convertir dans Adobe Acrobat Pro DC.
-
Allez dans Fichier > Enregistrer sous un autre format > PDF archivable (PDF/A) .
-
Sélectionnez la norme PDF/A souhaitée (telle que PDF/A-1a, PDF/A-1b, PDF/A-2a ou PDF/A-2b).
-
Enregistrez le fichier PDF/A.
Avantages :
- Facile à utiliser avec un outil de qualité professionnelle.
- Prend en charge différentes normes PDF/A.
- Garantit la conformité avec les exigences PDF/A.
Inconvénients :
- Nécessite Adobe Acrobat Pro DC, qui est un logiciel payant.
Méthode 2 : Convertir un PDF en PDF/A avec des convertisseurs en ligne gratuits
Si vous n'avez besoin que de conversions occasionnelles et préférez ne pas installer de logiciel, les convertisseurs en ligne gratuits comme PDF2GO et AvePDF offrent une solution rapide et accessible. Ces outils fonctionnent entièrement dans votre navigateur, ce qui les rend idéaux pour les documents non sensibles.
Étapes (en utilisant PDF2GO comme exemple) :
- Visitez le convertisseur PDF en PDF/A en ligne gratuit de PDF2GO.
- Cliquez sur Choisir un fichier pour télécharger votre PDF ou glissez-déposez le fichier dans la zone désignée.
- Choisissez la norme PDF/A souhaitée comme format de sortie.
- Cliquez sur Démarrer pour commencer le processus de conversion.
- Téléchargez la version PDF/A de votre document.
Avantages :
- Utilisation gratuite.
- Aucune installation de logiciel requise.
- Rapide et facile pour les conversions occasionnelles.
Inconvénients :
- Les outils en ligne peuvent avoir des limitations de taille de fichier.
- Non idéal pour les documents sensibles ou confidentiels en raison des risques de sécurité potentiels.
Méthode 3 : Convertir un PDF en PDF/A avec Ghostscript
Ghostscript est un outil en ligne de commande open-source robuste, largement utilisé pour le traitement automatisé des PDF. Il offre un moyen flexible et gratuit de convertir des PDF en documents conformes à la norme PDF/A.
Étapes :
-
Téléchargez et installez Ghostscript depuis son site officiel.
-
Ouvrez une invite de commande ou une fenêtre de terminal.
-
Exécutez la commande suivante pour convertir votre fichier PDF en PDF/A (exemple pour PDF/A-1b) :
D:\Applications\Ghostscript\gs10.06.0\bin\gswin64.exe -dPDFA=1 -dBATCH -dNOPAUSE -sProcessColorModel=DeviceRGB -sDEVICE=pdfwrite -sPDFACompatibilityPolicy=1 -sColorConversionStrategy=UseDeviceIndependentColor -sOutputFile="C:/Users/Administrator/Documents/output.pdf" "C:/Users/Administrator/Documents/input.pdf"Important :
- Remplacez
"D:\Applications\Ghostscript\gs10.06.0\bin\gswin64.exe"par le chemin d'accès réel à votre exécutable Ghostscript (gswin64.exe). - Remplacez
C:/Users/Administrator/Documents/input.pdfpar le chemin d'accès à votre fichier PDF source, etC:/Users/Administrator/Documents/output.pdfpar le nom et l'emplacement souhaités pour votre fichier converti.
- Remplacez
Avantages :
- Gratuit et open-source.
- Hautement personnalisable.
- Idéal pour l'automatisation.
Inconvénients :
- Nécessite des connaissances en ligne de commande.
- Configuration plus complexe par rapport aux outils graphiques.
Méthode 4 : Convertir par lots des fichiers PDF en PDF/A avec Python
Pour les utilisateurs qui préfèrent une approche plus programmatique, Python est un excellent choix, en particulier pour le traitement par lots ou l'intégration de la conversion PDF en PDF/A dans des applications ou des services backend. Avec des bibliothèques comme Spire.PDF pour Python, vous pouvez convertir par lots plusieurs fichiers PDF en PDF/A sans effort. De plus, la bibliothèque prend également en charge la conversion de PDF en Word et d'autres formats, ce qui en fait un outil polyvalent pour la conversion de documents.
Étapes :
-
Installez Spire.PDF depuis PyPI en utilisant la commande suivante :
pip install spire-pdf -
Écrivez un script Python pour convertir par lots plusieurs fichiers PDF au format PDF/A-1b :
import os
from spire.pdf import *

# Define input and output folder paths
inputFolder = "path/to/your/input/folder/"
outputFolder = "path/to/your/output/folder/"

# Get a list of all PDF files in the input folder
pdfFiles = [f for f in os.listdir(inputFolder) if f.endswith('.pdf')]

# Iterate through each PDF file and convert
for pdfFile in pdfFiles:
    # Construct the full input and output file paths
    inputFile = os.path.join(inputFolder, pdfFile)
    outputFile = os.path.join(outputFolder, f"ToPdfA1B_{pdfFile}")

    # Create a PdfStandardsConverter object
    converter = PdfStandardsConverter(inputFile)

    # Perform the PDF to PDF/A-1b conversion
    converter.ToPdfA1B(outputFile)
    print(f"Converted: {inputFile} to {outputFile}")

print("Batch conversion completed.")
Avantages :
- Idéal pour le traitement par lots et l'automatisation.
- Peut être intégré dans des flux de travail ou des applications existants.
Inconvénients :
- Nécessite des connaissances en programmation Python.
- Nécessite d'installer la bibliothèque Spire.PDF.
Pour des paramètres plus avancés concernant cette conversion, veuillez consulter le guide officiel de Spire.PDF : Python : Convertir un PDF en PDF/A et vice versa.
Dépannage des problèmes courants lors de la conversion de PDF en PDF/A
Lors de la conversion d'un PDF en PDF/A, vous pouvez rencontrer des erreurs de validation ou des exportations échouées. Voici les problèmes les plus courants et leurs solutions rapides :
- Polices manquantes ou non incorporées
- Symptômes : Erreur "Police non incorporée" ou affichage incorrect du texte.
- Solution : Incorporez toutes les polices ou remplacez les polices non prises en charge par des polices standard (par exemple, Arial, Times New Roman).
- Problèmes de transparence ou de calques
- Symptômes : La conversion échoue en raison de la transparence ou des calques (en particulier pour le PDF/A-1).
- Solution : Utilisez PDF/A-2b ou PDF/A-3b, ou aplatissez la transparence avant la conversion.
- Liens externes, pièces jointes ou multimédia
- Symptômes : Conversion bloquée en raison de contenu externe (pièces jointes, JavaScript, multimédia).
- Solution : Supprimez les pièces jointes ou convertissez-les en contenu statique, et éliminez les scripts ou les éléments multimédias.
- Profils de couleur incorrects
- Symptômes : Erreurs de validation liées aux profils de couleur.
- Solution : Appliquez un profil de couleur standard (par exemple, sRGB) et assurez-vous que les images utilisent des espaces colorimétriques pris en charge.
- Échec de la validation après l'exportation
- Symptômes : La conversion se termine, mais le fichier n'est pas conforme à la norme PDF/A.
- Solution : Validez à l'aide d'outils comme veraPDF, Adobe Acrobat Preflight ou des validateurs PDF/A en ligne pour identifier et corriger les erreurs.
- PDF cryptés ou protégés par mot de passe
- Symptômes : Conversion non autorisée en raison de la protection par mot de passe.
- Solution : Supprimez les paramètres de sécurité ou les mots de passe avant la conversion.
Conclusion : Comment choisir la bonne méthode
La conversion de PDF en PDF/A est cruciale pour garantir la longévité, l'accessibilité et la conformité des documents. La meilleure méthode pour convertir un PDF en PDF/A dépend de vos besoins spécifiques :
- Pour les conversions occasionnelles : les outils en ligne gratuits sont une option rapide et facile.
- Pour les conversions professionnelles et conformes : Adobe Acrobat Pro DC est le choix le plus fiable.
- Pour ceux qui préfèrent les outils open-source : Ghostscript offre une solution robuste, bien qu'intensive en ligne de commande.
- Pour l'automatisation ou le traitement par lots : Python est idéal pour l'intégration dans des systèmes plus vastes.
Conseil : Quelle que soit la méthode choisie, validez toujours les fichiers convertis pour la conformité PDF/A et conservez des sauvegardes des documents originaux.
FAQ : PDF vers PDF/A
Q1 : Qu'est-ce que le PDF/A ?
R1 : Le PDF/A est un PDF normalisé ISO conçu pour l'archivage à long terme. Il incorpore toutes les polices, métadonnées et profils de couleur pour garantir que les documents s'affichent de la même manière à l'avenir.
Q2 : Puis-je convertir un PDF en PDF/A gratuitement ?
R2 : Oui, des outils gratuits comme PDF2GO et Ghostscript permettent la conversion en PDF/A sans aucun coût.
Q3 : Le PDF/A est-il compatible avec tous les lecteurs PDF ?
R3 : La plupart des lecteurs PDF modernes prennent en charge le PDF/A, mais certaines fonctionnalités avancées peuvent ne pas s'afficher dans les logiciels plus anciens.
Q4 : Quelle version de PDF/A dois-je utiliser ?
R4 : Pour un archivage simple, le PDF/A-1b est suffisant. Pour les fonctionnalités modernes comme les calques et les pièces jointes, le PDF/A-2 ou le PDF/A-3 est recommandé.
Q5 : Puis-je automatiser la conversion en PDF/A pour plusieurs fichiers ?
R5 : Oui, en utilisant des outils programmatiques comme Spire.PDF ou des scripts Ghostscript, la conversion par lots est possible.
Voir aussi
Convertir PDF a PDF/A: 4 formas sencillas
Tabla de Contenidos
- ¿Qué es PDF/A?
- ¿Por qué convertir PDF a PDF/A?
- Método 1: Convertir PDF a PDF/A usando Adobe Acrobat Pro DC
- Método 2: Convertir PDF a PDF/A usando convertidores en línea gratuitos
- Método 3: Convertir PDF a PDF/A usando Ghostscript
- Método 4: Convertir archivos PDF a PDF/A por lotes usando Python
- Solución de problemas comunes en la conversión de PDF a PDF/A
- Conclusión: Cómo elegir el método correcto
Convertir PDF a PDF/A asegura que sus documentos se conserven a largo plazo, cumplan con las normativas y sigan siendo accesibles en todos los sistemas. Ya sea que trabaje con documentos legales, gubernamentales o empresariales, PDF/A garantiza la legibilidad y la coherencia. Esta guía explora cuatro enfoques comunes: el uso de Adobe Acrobat Pro DC, convertidores en línea gratuitos, Ghostscript y la programación en Python.
Navegación Rápida
- ¿Qué es PDF/A?
- ¿Por qué convertir PDF a PDF/A?
- Método 1: Convertir PDF a PDF/A usando Adobe Acrobat Pro DC
- Método 2: Convertir PDF a PDF/A usando convertidores en línea gratuitos
- Método 3: Convertir PDF a PDF/A usando Ghostscript
- Método 4: Convertir archivos PDF a PDF/A por lotes usando Python
- Solución de problemas comunes en la conversión de PDF a PDF/A
- Conclusión: Cómo elegir el método correcto
¿Qué es PDF/A?
PDF/A es una versión estandarizada por ISO de PDF diseñada específicamente para el archivado a largo plazo. A diferencia de los PDF normales, PDF/A restringe el uso de características que pueden comprometer la estabilidad del documento en el futuro.
Características clave de PDF/A
PDF/A impone reglas estrictas para garantizar la longevidad y la coherencia, que incluyen:
- Todas las fuentes deben estar incrustadas (sin dependencias de fuentes externas)
- Sin elementos de audio, video o multimedia
- Sin cifrado ni protección por contraseña
- Perfiles de color estandarizados para una representación coherente
- Sin referencias externas, asegurando que el documento sea totalmente autónomo
Versiones de PDF/A
PDF/A viene en varias versiones, cada una diseñada para satisfacer necesidades específicas de archivado y preservación de documentos. La siguiente tabla resume las principales versiones de PDF/A y sus casos de uso ideales:
| Versión de PDF/A | Características Clave | Mejor Caso de Uso |
|---|---|---|
| PDF/A-1 (ISO 19005-1) | El estándar original y más restrictivo; asegura la máxima estabilidad y una amplia compatibilidad | Preservación a largo plazo de documentos legales, gubernamentales y relacionados con el cumplimiento |
| PDF/A-2 (ISO 19005-2) | Añade soporte para transparencia, capas e imágenes JPEG2000, ofreciendo una mayor flexibilidad | Documentos modernos que incluyen gráficos, contenido en capas o diseños complejos |
| PDF/A-3 (ISO 19005-3) | Permite incrustar archivos que no son PDF/A, como XML, CSV y Excel | Facturas electrónicas, informes comerciales y flujos de trabajo que requieren adjuntar archivos de origen |
¿Por qué convertir PDF a PDF/A?
Hay varias razones por las que podría ser necesario convertir un PDF a PDF/A:
- Preservación a largo plazo: PDF/A asegura que los documentos seguirán siendo accesibles y utilizables durante muchos años, lo que lo hace ideal para fines legales, gubernamentales y de archivo.
- Cumplimiento de normativas: Ciertas industrias, como la legal y la sanitaria, exigen que los documentos se almacenen en formato PDF/A para cumplir con normativas como la ISO 19005.
- Coherencia en la visualización: Dado que PDF/A incrusta todas las fuentes, imágenes y otros recursos, el documento se mostrará de manera coherente en diferentes sistemas sin depender de archivos externos.
Método 1: Convertir PDF a PDF/A usando Adobe Acrobat Pro DC
Adobe Acrobat Pro DC sigue siendo el estándar de la industria para la manipulación de PDF. Proporciona la forma más estable y precisa de convertir PDF a PDF/A con herramientas de validación integradas.
Pasos:
-
Abra el PDF que desea convertir en Adobe Acrobat Pro DC.
-
Vaya a Archivo > Guardar como otro > PDF archivable (PDF/A).
-
Seleccione el estándar PDF/A deseado (como PDF/A-1a, PDF/A-1b, PDF/A-2a o PDF/A-2b).
-
Guarde el archivo PDF/A.
Ventajas:
- Fácil de usar con una herramienta de nivel profesional.
- Admite diferentes estándares de PDF/A.
- Asegura el cumplimiento de los requisitos de PDF/A.
Desventajas:
- Requiere Adobe Acrobat Pro DC, que es un software de pago.
Método 2: Convertir PDF a PDF/A usando convertidores en línea gratuitos
Si solo necesita conversiones ocasionales y prefiere no instalar software, los convertidores en línea gratuitos como PDF2GO y AvePDF brindan una solución rápida y accesible. Estas herramientas se ejecutan completamente en su navegador, lo que las hace ideales para documentos no sensibles.
Pasos (usando PDF2GO como ejemplo):
- Visite el convertidor gratuito en línea de PDF a PDF/A de PDF2GO.
- Haga clic en Elegir archivo para cargar su PDF o arrastre y suelte el archivo en el área designada.
- Elija el estándar PDF/A deseado como formato de salida.
- Haga clic en Iniciar para comenzar el proceso de conversión.
- Descargue la versión PDF/A de su documento.
Ventajas:
- Gratis de usar.
- No requiere instalación de software.
- Rápido y fácil para conversiones ocasionales.
Desventajas:
- Las herramientas en línea pueden tener limitaciones de tamaño de archivo.
- No es ideal para documentos sensibles o confidenciales debido a posibles riesgos de seguridad.
Método 3: Convertir PDF a PDF/A usando Ghostscript
Ghostscript es una robusta herramienta de línea de comandos de código abierto ampliamente utilizada para el procesamiento automatizado de PDF. Ofrece una forma flexible y gratuita de convertir archivos PDF a documentos compatibles con PDF/A.
Pasos:
-
Descargue e instale Ghostscript desde su sitio web oficial.
-
Abra una ventana de símbolo del sistema o terminal.
-
Ejecute el siguiente comando para convertir su archivo PDF a PDF/A (ejemplo para PDF/A-1b):
D:\Applications\Ghostscript\gs10.06.0\bin\gswin64.exe -dPDFA=1 -dBATCH -dNOPAUSE -sProcessColorModel=DeviceRGB -sDEVICE=pdfwrite -sPDFACompatibilityPolicy=1 -sColorConversionStrategy=UseDeviceIndependentColor -sOutputFile="C:/Users/Administrator/Documents/output.pdf" "C:/Users/Administrator/Documents/input.pdf"Importante:
- Reemplace
"D:\Applications\Ghostscript\gs10.06.0\bin\gswin64.exe"con la ruta real a su ejecutable de Ghostscript (gswin64.exe). - Reemplace
C:/Users/Administrator/Documents/input.pdfcon la ruta a su archivo PDF de origen, yC:/Users/Administrator/Documents/output.pdfcon el nombre y la ubicación deseados para su archivo convertido.
- Reemplace
Ventajas:
- Gratuito y de código abierto.
- Altamente personalizable.
- Ideal para la automatización.
Desventajas:
- Requiere conocimientos de la línea de comandos.
- Configuración más compleja en comparación con las herramientas gráficas.
Método 4: Convertir archivos PDF a PDF/A por lotes usando Python
Para los usuarios que prefieren un enfoque más programático, Python es una excelente opción, especialmente para el procesamiento por lotes o la integración de la conversión de PDF a PDF/A en aplicaciones o servicios de backend. Con bibliotecas como Spire.PDF para Python, puede convertir por lotes múltiples archivos PDF a PDF/A sin esfuerzo. Además, la biblioteca también admite la conversión de PDF a Word y otros formatos, lo que la convierte en una herramienta versátil para la conversión de documentos.
Pasos:
-
Instale Spire.PDF desde PyPI usando el siguiente comando:
pip install spire-pdf -
Escriba un script de Python para convertir por lotes múltiples archivos PDF al formato PDF/A-1b:
import os
from spire.pdf import *

# Define las rutas de las carpetas de entrada y salida
inputFolder = "ruta/a/su/carpeta/de/entrada/"
outputFolder = "ruta/a/su/carpeta/de/salida/"

# Obtiene una lista de todos los archivos PDF en la carpeta de entrada
pdfFiles = [f for f in os.listdir(inputFolder) if f.endswith('.pdf')]

# Itera a través de cada archivo PDF y lo convierte
for pdfFile in pdfFiles:
    # Construye las rutas completas de los archivos de entrada y salida
    inputFile = os.path.join(inputFolder, pdfFile)
    outputFile = os.path.join(outputFolder, f"ToPdfA1B_{pdfFile}")

    # Crea un objeto PdfStandardsConverter
    converter = PdfStandardsConverter(inputFile)

    # Realiza la conversión de PDF a PDF/A-1b
    converter.ToPdfA1B(outputFile)
    print(f"Convertido: {inputFile} a {outputFile}")

print("Conversión por lotes completada.")
Ventajas:
- Ideal para el procesamiento por lotes y la automatización.
- Se puede integrar en flujos de trabajo o aplicaciones existentes.
Desventajas:
- Requiere conocimientos de programación en Python.
- Es necesario instalar la biblioteca Spire.PDF.
Para configuraciones más avanzadas sobre esta conversión, visite la guía oficial de Spire.PDF: Python: Convertir PDF a PDF/A y viceversa.
Solución de problemas comunes en la conversión de PDF a PDF/A
Al convertir un PDF a PDF/A, puede encontrar errores de validación o exportaciones fallidas. A continuación se presentan los problemas más comunes y las soluciones rápidas:
- Fuentes faltantes o no incrustadas
- Síntomas: error "Fuente no incrustada" o visualización incorrecta del texto.
- Solución: Incruste todas las fuentes o reemplace las fuentes no compatibles con otras estándar (por ejemplo, Arial, Times New Roman).
- Problemas de transparencia o capas
- Síntomas: la conversión falla debido a la transparencia o las capas (especialmente para PDF/A-1).
- Solución: use PDF/A-2b o PDF/A-3b, o acople la transparencia antes de la conversión.
- Enlaces externos, archivos adjuntos o multimedia
- Síntomas: conversión bloqueada debido a contenido externo (archivos adjuntos, JavaScript, multimedia).
- Solución: elimine los archivos adjuntos o conviértalos en contenido estático y elimine los scripts o elementos multimedia.
- Perfiles de color incorrectos
- Síntomas: errores de validación relacionados con los perfiles de color.
- Solución: aplique un perfil de color estándar (por ejemplo, sRGB) y asegúrese de que las imágenes utilicen espacios de color compatibles.
- La validación falló después de la exportación
- Síntomas: la conversión se completa, pero el archivo no cumple con PDF/A.
- Solución: valide utilizando herramientas como veraPDF, Adobe Acrobat Preflight o validadores de PDF/A en línea para identificar y corregir errores.
- PDF cifrados o protegidos con contraseña
- Síntomas: conversión no permitida debido a la protección con contraseña.
- Solución: elimine la configuración de seguridad o las contraseñas antes de convertir.
Conclusión: Cómo elegir el método correcto
Convertir PDF a PDF/A es crucial para garantizar la longevidad, accesibilidad y cumplimiento de los documentos. El mejor método para convertir PDF a PDF/A depende de sus necesidades específicas:
- Para conversiones ocasionales: las herramientas gratuitas en línea son una opción rápida y fácil.
- Para conversiones profesionales y compatibles: Adobe Acrobat Pro DC es la opción más confiable.
- Para aquellos que prefieren herramientas de código abierto: Ghostscript ofrece una solución robusta, aunque intensiva en la línea de comandos.
- Para la automatización o el procesamiento por lotes: Python es ideal para la integración en sistemas más grandes.
Consejo: Independientemente del método elegido, siempre valide los archivos convertidos para verificar el cumplimiento de PDF/A y guarde copias de seguridad de los documentos originales.
Preguntas frecuentes: PDF a PDF/A
P1: ¿Qué es PDF/A?
R1: PDF/A es un PDF estandarizado por ISO diseñado para el archivado a largo plazo. Incrusta todas las fuentes, metadatos y perfiles de color para garantizar que los documentos se representen de la misma manera en el futuro.
P2: ¿Puedo convertir PDF a PDF/A de forma gratuita?
R2: Sí, herramientas gratuitas como PDF2GO y Ghostscript permiten la conversión a PDF/A sin costo alguno.
P3: ¿Es PDF/A compatible con todos los lectores de PDF?
R3: La mayoría de los lectores de PDF modernos admiten PDF/A, pero es posible que algunas funciones avanzadas no se muestren en software más antiguo.
P4: ¿Qué versión de PDF/A debo usar?
R4: Para un archivo simple, PDF/A-1b es suficiente. Para funciones modernas como capas y archivos adjuntos, se recomienda PDF/A-2 o PDF/A-3.
P5: ¿Puedo automatizar la conversión a PDF/A para múltiples archivos?
R5: Sí, utilizando herramientas programáticas como Spire.PDF o scripts de Ghostscript, es posible la conversión por lotes.
Ver También
PDF in PDF/A konvertieren: 4 einfache Wege
Inhaltsverzeichnis
- Was ist PDF/A
- Warum PDF in PDF/A konvertieren
- Methode 1: PDF in PDF/A mit Adobe Acrobat Pro DC konvertieren
- Methode 2: PDF in PDF/A mit kostenlosen Online-Konvertern konvertieren
- Methode 3: PDF in PDF/A mit Ghostscript konvertieren
- Methode 4: PDF-Dateien stapelweise mit Python in PDF/A konvertieren
- Fehlerbehebung bei häufigen Problemen bei der Konvertierung von PDF in PDF/A
- Fazit: Wie man die richtige Methode wählt
Die Konvertierung von PDF in PDF/A stellt sicher, dass Ihre Dokumente langfristig erhalten bleiben, gesetzliche Vorschriften erfüllen und systemübergreifend zugänglich bleiben. Ob Sie mit juristischen, behördlichen oder unternehmerischen Dokumenten arbeiten, PDF/A garantiert Lesbarkeit und Konsistenz. Dieser Leitfaden untersucht vier gängige Ansätze: die Verwendung von Adobe Acrobat Pro DC, kostenlosen Online-Konvertern, Ghostscript und Python-Programmierung.
Schnellnavigation
- Was ist PDF/A
- Warum PDF in PDF/A konvertieren
- Methode 1: PDF in PDF/A mit Adobe Acrobat Pro DC konvertieren
- Methode 2: PDF in PDF/A mit kostenlosen Online-Konvertern konvertieren
- Methode 3: PDF in PDF/A mit Ghostscript konvertieren
- Methode 4: PDF-Dateien stapelweise mit Python in PDF/A konvertieren
- Fehlerbehebung bei häufigen Problemen bei der Konvertierung von PDF in PDF/A
- Fazit: Wie man die richtige Methode wählt
Was ist PDF/A?
PDF/A ist eine ISO-standardisierte Version von PDF, die speziell für die Langzeitarchivierung entwickelt wurde. Im Gegensatz zu normalen PDFs schränkt PDF/A die Verwendung von Funktionen ein, die die Stabilität des Dokuments in Zukunft beeinträchtigen könnten.
Hauptmerkmale von PDF/A
PDF/A erzwingt strenge Regeln, um Langlebigkeit und Konsistenz zu gewährleisten, einschließlich:
- Alle Schriftarten müssen eingebettet sein (keine externen Schriftartabhängigkeiten)
- Keine Audio-, Video- oder Multimedia-Elemente
- Keine Verschlüsselung oder Passwortschutz
- Standardisierte Farbprofile für eine konsistente Wiedergabe
- Keine externen Referenzen, um sicherzustellen, dass das Dokument vollständig eigenständig ist
PDF/A-Versionen
PDF/A gibt es in mehreren Versionen, die jeweils auf spezifische Archivierungs- und Dokumentenerhaltungsanforderungen zugeschnitten sind. Die folgende Tabelle fasst die wichtigsten PDF/A-Versionen und ihre idealen Anwendungsfälle zusammen:
| PDF/A-Version | Hauptmerkmale | Bester Anwendungsfall |
|---|---|---|
| PDF/A-1 (ISO 19005-1) | Der ursprüngliche und restriktivste Standard; gewährleistet maximale Stabilität und breite Kompatibilität | Langzeitarchivierung von juristischen, behördlichen und konformitätsbezogenen Dokumenten |
| PDF/A-2 (ISO 19005-2) | Fügt Unterstützung für Transparenz, Ebenen und JPEG2000-Bilder hinzu und bietet so mehr Flexibilität | Moderne Dokumente, die Grafiken, mehrschichtige Inhalte oder komplexe Layouts enthalten |
| PDF/A-3 (ISO 19005-3) | Ermöglicht das Einbetten von Nicht-PDF/A-Dateien wie XML, CSV und Excel | E-Rechnungen, Geschäftsberichte und Workflows, die das Anhängen von Quelldateien erfordern |
Warum PDF in PDF/A konvertieren?
Es gibt mehrere Gründe, warum die Konvertierung eines PDFs in PDF/A erforderlich sein könnte:
- Langzeitarchivierung : PDF/A stellt sicher, dass Dokumente über viele Jahre hinweg zugänglich und nutzbar bleiben, was es ideal für juristische, behördliche und archivarische Zwecke macht.
- Einhaltung von Vorschriften : Bestimmte Branchen, einschließlich Recht und Gesundheitswesen, verlangen, dass Dokumente im PDF/A-Format gespeichert werden, um Vorschriften wie ISO 19005 zu erfüllen.
- Konsistenz bei der Anzeige : Da PDF/A alle Schriftarten, Bilder und andere Ressourcen einbettet, wird das Dokument auf verschiedenen Systemen konsistent angezeigt, ohne von externen Dateien abhängig zu sein.
Methode 1: PDF in PDF/A mit Adobe Acrobat Pro DC konvertieren
Adobe Acrobat Pro DC ist nach wie vor der Industriestandard für die PDF-Bearbeitung. Es bietet die stabilste und genaueste Möglichkeit, PDF in PDF/A zu konvertieren, mit integrierten Validierungswerkzeugen.
Schritte:
-
Öffnen Sie das PDF, das Sie konvertieren möchten, in Adobe Acrobat Pro DC.
-
Gehen Sie zu Datei > Speichern unter > Archivierbares PDF (PDF/A) .
-
Wählen Sie den gewünschten PDF/A-Standard (z. B. PDF/A-1a, PDF/A-1b, PDF/A-2a oder PDF/A-2b).
-
Speichern Sie die PDF/A-Datei.
Vorteile:
- Einfach zu bedienen mit einem professionellen Werkzeug.
- Unterstützt verschiedene PDF/A-Standards.
- Stellt die Einhaltung der PDF/A-Anforderungen sicher.
Nachteile:
- Erfordert Adobe Acrobat Pro DC, eine kostenpflichtige Software.
Methode 2: PDF in PDF/A mit kostenlosen Online-Konvertern konvertieren
Wenn Sie nur gelegentliche Konvertierungen benötigen und keine Software installieren möchten, bieten kostenlose Online-Konverter wie PDF2GO und AvePDF eine schnelle und zugängliche Lösung. Diese Tools laufen vollständig in Ihrem Browser und sind daher ideal für nicht vertrauliche Dokumente.
Schritte (am Beispiel von PDF2GO):
- Besuchen Sie den kostenlosen Online-PDF-zu-PDF/A-Konverter von PDF2GO.
- Klicken Sie auf Datei auswählen, um Ihr PDF hochzuladen, oder ziehen Sie die Datei per Drag & Drop in den dafür vorgesehenen Bereich.
- Wählen Sie den gewünschten PDF/A-Standard als Ausgabeformat.
- Klicken Sie auf Start, um den Konvertierungsprozess zu beginnen.
- Laden Sie die PDF/A-Version Ihres Dokuments herunter.
Vorteile:
- Kostenlos zu verwenden.
- Keine Softwareinstallation erforderlich.
- Schnell und einfach für gelegentliche Konvertierungen.
Nachteile:
- Online-Tools können Dateigrößenbeschränkungen haben.
- Nicht ideal für sensible oder vertrauliche Dokumente aufgrund potenzieller Sicherheitsrisiken.
Methode 3: PDF in PDF/A mit Ghostscript konvertieren
Ghostscript ist ein robustes, Open-Source-Befehlszeilentool, das häufig für die automatisierte PDF-Verarbeitung verwendet wird. Es bietet eine flexible und kostenlose Möglichkeit, PDFs in PDF/A-konforme Dokumente zu konvertieren.
Schritte:
-
Laden Sie Ghostscript von der offiziellen Website herunter und installieren Sie es.
-
Öffnen Sie eine Eingabeaufforderung oder ein Terminalfenster.
-
Führen Sie den folgenden Befehl aus, um Ihre PDF-Datei in PDF/A zu konvertieren (Beispiel für PDF/A-1b):
D:\Applications\Ghostscript\gs10.06.0\bin\gswin64.exe -dPDFA=1 -dBATCH -dNOPAUSE -sProcessColorModel=DeviceRGB -sDEVICE=pdfwrite -sPDFACompatibilityPolicy=1 -sColorConversionStrategy=UseDeviceIndependentColor -sOutputFile="C:/Users/Administrator/Documents/output.pdf" "C:/Users/Administrator/Documents/input.pdf"Wichtig:
- Ersetzen Sie
"D:\Applications\Ghostscript\gs10.06.0\bin\gswin64.exe"durch den tatsächlichen Pfad zu Ihrer Ghostscript-Programmdatei (gswin64.exe). - Ersetzen Sie
C:/Users/Administrator/Documents/input.pdfdurch den Pfad zu Ihrer Quell-PDF-Datei undC:/Users/Administrator/Documents/output.pdfdurch den gewünschten Namen und Speicherort für Ihre konvertierte Datei.
- Ersetzen Sie
Vorteile:
- Kostenlos und Open-Source.
- Hochgradig anpassbar.
- Ideal für die Automatisierung.
Nachteile:
- Erfordert Kenntnisse der Befehlszeile.
- Komplexere Einrichtung im Vergleich zu grafischen Werkzeugen.
Methode 4: PDF-Dateien stapelweise mit Python in PDF/A konvertieren
Für Benutzer, die einen programmatischen Ansatz bevorzugen, ist Python eine gute Wahl, insbesondere für die Stapelverarbeitung oder die Integration der PDF-zu-PDF/A-Konvertierung in Anwendungen oder Backend-Dienste. Mit Bibliotheken wie Spire.PDF für Python können Sie mühelos mehrere PDF-Dateien stapelweise in PDF/A konvertieren. Darüber hinaus unterstützt die Bibliothek auch die Konvertierung von PDFs in Word und andere Formate, was sie zu einem vielseitigen Werkzeug für die Dokumentenkonvertierung macht.
Schritte:
-
Installieren Sie Spire.PDF von PyPI mit dem folgenden Befehl:
pip install spire-pdf -
Schreiben Sie ein Python-Skript, um mehrere PDF-Dateien stapelweise in das PDF/A-1b-Format zu konvertieren:
import os
from spire.pdf import *

# Define input and output folder paths
inputFolder = "pfad/zu/ihrem/eingabeordner/"
outputFolder = "pfad/zu/ihrem/ausgabeordner/"

# Get a list of all PDF files in the input folder
pdfFiles = [f for f in os.listdir(inputFolder) if f.endswith('.pdf')]

# Iterate through each PDF file and convert
for pdfFile in pdfFiles:
    # Construct the full input and output file paths
    inputFile = os.path.join(inputFolder, pdfFile)
    outputFile = os.path.join(outputFolder, f"ToPdfA1B_{pdfFile}")

    # Create a PdfStandardsConverter object
    converter = PdfStandardsConverter(inputFile)

    # Perform the PDF to PDF/A-1b conversion
    converter.ToPdfA1B(outputFile)
    print(f"Konvertiert: {inputFile} zu {outputFile}")

print("Stapelkonvertierung abgeschlossen.")
Vorteile:
- Ideal für Stapelverarbeitung und Automatisierung.
- Kann in bestehende Arbeitsabläufe oder Anwendungen integriert werden.
Nachteile:
- Erfordert Python-Programmierkenntnisse.
- Die Spire.PDF-Bibliothek muss installiert werden.
Für erweiterte Einstellungen zu dieser Konvertierung besuchen Sie bitte den offiziellen Leitfaden von Spire.PDF: Python: PDF in PDF/A konvertieren und umgekehrt.
Fehlerbehebung bei häufigen Problemen bei der Konvertierung von PDF in PDF/A
Bei der Konvertierung eines PDFs in PDF/A können Validierungsfehler oder fehlgeschlagene Exporte auftreten. Nachfolgend finden Sie die häufigsten Probleme und die schnellen Lösungen:
- Fehlende oder nicht eingebettete Schriftarten
- Symptome: Fehler "Schriftart nicht eingebettet" oder falsche Textanzeige.
- Lösung: Betten Sie alle Schriftarten ein oder ersetzen Sie nicht unterstützte Schriftarten durch Standardschriftarten (z. B. Arial, Times New Roman).
- Transparenz- oder Ebenenprobleme
- Symptome: Die Konvertierung schlägt aufgrund von Transparenz oder Ebenen fehl (insbesondere bei PDF/A-1).
- Lösung: Verwenden Sie PDF/A-2b oder PDF/A-3b oder reduzieren Sie die Transparenz vor der Konvertierung.
- Externe Links, Anhänge oder Multimedia
- Symptome: Konvertierung aufgrund externer Inhalte (Anhänge, JavaScript, Multimedia) blockiert.
- Lösung: Entfernen Sie Anhänge oder konvertieren Sie sie in statische Inhalte und eliminieren Sie Skripte oder Multimedia-Elemente.
- Falsche Farbprofile
- Symptome: Validierungsfehler im Zusammenhang mit Farbprofilen.
- Lösung: Wenden Sie ein Standardfarbprofil (z. B. sRGB) an und stellen Sie sicher, dass Bilder unterstützte Farbräume verwenden.
- Validierung nach dem Export fehlgeschlagen
- Symptome: Die Konvertierung wird abgeschlossen, aber die Datei entspricht nicht der PDF/A-Konformität.
- Lösung: Validieren Sie mit Tools wie veraPDF, Adobe Acrobat Preflight oder Online-PDF/A-Validatoren, um Fehler zu identifizieren und zu beheben.
- Verschlüsselte oder passwortgeschützte PDFs
- Symptome: Konvertierung aufgrund von Passwortschutz nicht zulässig.
- Lösung: Entfernen Sie Sicherheitseinstellungen oder Passwörter vor der Konvertierung.
Fazit: Wie man die richtige Methode wählt
Die Konvertierung von PDF in PDF/A ist entscheidend für die Gewährleistung der Langlebigkeit, Zugänglichkeit und Konformität von Dokumenten. Die beste Methode zur Konvertierung von PDF in PDF/A hängt von Ihren spezifischen Anforderungen ab:
- Für gelegentliche Konvertierungen : Kostenlose Online-Tools sind eine schnelle und einfache Option.
- Für professionelle und konforme Konvertierungen : Adobe Acrobat Pro DC ist die zuverlässigste Wahl.
- Für diejenigen, die Open-Source-Tools bevorzugen : Ghostscript bietet eine robuste, wenn auch befehlszeilenintensive Lösung.
- Für die Automatisierung oder Stapelverarbeitung : Python ist ideal für die Integration in größere Systeme.
Tipp : Unabhängig von der gewählten Methode sollten Sie konvertierte Dateien immer auf PDF/A-Konformität validieren und Sicherungskopien der Originaldokumente aufbewahren.
FAQs: PDF zu PDF/A
F1: Was ist PDF/A?
A1: PDF/A ist ein ISO-standardisiertes PDF, das für die Langzeitarchivierung entwickelt wurde. Es bettet alle Schriftarten, Metadaten und Farbprofile ein, um sicherzustellen, dass Dokumente in Zukunft auf die gleiche Weise gerendert werden.
F2: Kann ich PDF kostenlos in PDF/A konvertieren?
A2: Ja, kostenlose Tools wie PDF2GO und Ghostscript ermöglichen die PDF/A-Konvertierung ohne Kosten.
F3: Ist PDF/A mit allen PDF-Readern kompatibel?
A3: Die meisten modernen PDF-Reader unterstützen PDF/A, aber einige erweiterte Funktionen werden in älterer Software möglicherweise nicht angezeigt.
F4: Welche PDF/A-Version sollte ich verwenden?
A4: Für die einfache Archivierung ist PDF/A-1b ausreichend. Für moderne Funktionen wie Ebenen und Anhänge wird PDF/A-2 oder PDF/A-3 empfohlen.
F5: Kann ich die PDF/A-Konvertierung für mehrere Dateien automatisieren?
A5: Ja, mit programmatischen Werkzeugen wie Spire.PDF oder Ghostscript-Skripten ist eine Stapelkonvertierung möglich.