
Knowledgebase (2345)
Children categories
C#/VB.NET: Convert Images (PNG, JPG, BMP, etc.) to PowerPoint
2022-11-14 01:40:53 Written by AdministratorThere are times when you need to create a PowerPoint document from a group of pre-created image files. As an example, you have been provided with some beautiful flyers by your company, and you need to combine them into a single PowerPoint document in order to display each picture in an orderly manner. In this article, you will learn how to convert image files (in any popular image format) to a PowerPoint document in C# and VB.NET using Spire.Presentation for .NET.
- Convert Image to Background in PowerPoint in C# and VB.NET
- Convert Image to Shape in PowerPoint in C# and VB.NET
- Convert Image to PowerPoint with Customized Slide Size in C# and VB.NET
Install Spire.Presentation for .NET
To begin with, you need to add the DLL files included in the Spire.Presentation for.NET package as references in your .NET project. The DLL files can be either downloaded from this link or installed via NuGet.
PM> Install-Package Spire.Presentation
Convert Image to Background in PowerPoint in C# and VB.NET
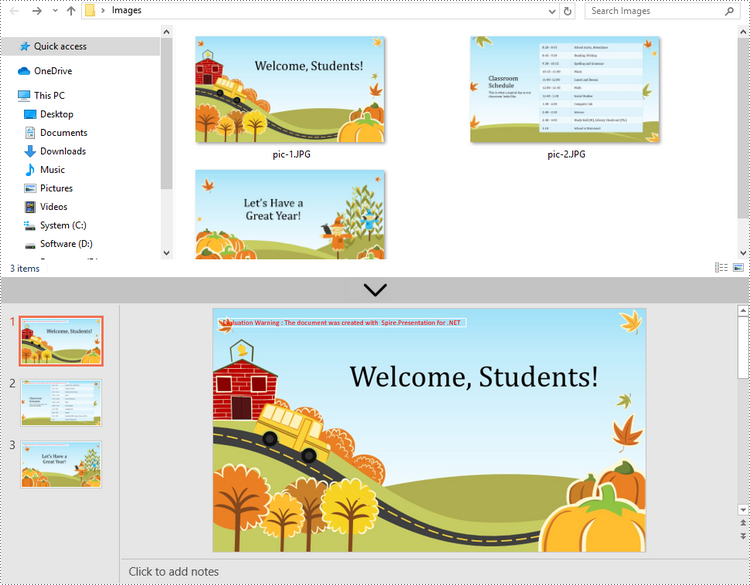
When images are converted as background of each slide in a PowerPoint document, they cannot be moved or scaled. The following are the steps to convert a set of images to a PowerPoint file as background images using Spire.Presentation for .NET.
- Create a Presentation object.
- Set the slide size type to Sreen16x9.
- Get the image paths from a folder and save in a string array.
- Traverse through the images.
- Get a specific image and append it to the image collection of the document using Presentation.Images.Append() method.
- Add a slide to the document using Presentation.Slides.Append() method.
- Set the image as the background of the slide through the properties under ISlide.SlideBackground object.
- Save the document to a PowerPoint file using Presentation.SaveToFile() method.
- C#
- VB.NET
using Spire.Presentation;
using Spire.Presentation.Drawing;
using System.Drawing;
using System.IO;

namespace ConvertImageToBackground
{
    class Program
    {
        static void Main(string[] args)
        {
            //Create a Presentation object
            Presentation presentation = new Presentation();

            //Set slide size type
            presentation.SlideSize.Type = SlideSizeType.Screen16x9;

            //Remove the default slide
            presentation.Slides.RemoveAt(0);

            //Get file paths in a string array
            string[] picFiles = Directory.GetFiles(@"C:\Users\Administrator\Desktop\Images");

            //Loop through the images
            for (int i = 0; i < picFiles.Length; i++)
            {
                //Add a slide
                ISlide slide = presentation.Slides.Append();

                //Get a specific image
                string imageFile = picFiles[i];
                Image image = Image.FromFile(imageFile);

                //Append it to the image collection
                IImageData imageData = presentation.Images.Append(image);

                //Set the image as the background image of the slide
                slide.SlideBackground.Type = BackgroundType.Custom;
                slide.SlideBackground.Fill.FillType = FillFormatType.Picture;
                slide.SlideBackground.Fill.PictureFill.FillType = PictureFillType.Stretch;
                slide.SlideBackground.Fill.PictureFill.Picture.EmbedImage = imageData;
            }

            //Save to file
            presentation.SaveToFile("ImagesToBackground.pptx", FileFormat.Pptx2013);
        }
    }
}
Convert Image to Shape in PowerPoint in C# and VB.NET
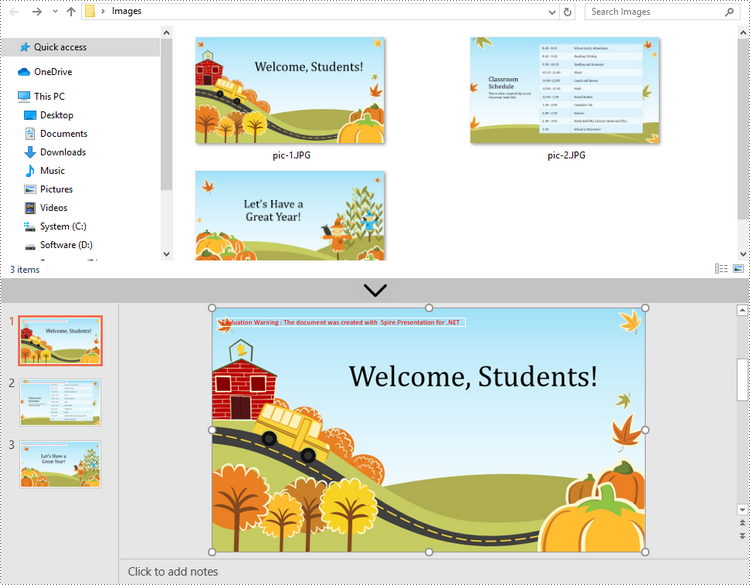
If you would like the images are moveable and resizable in the PowerPoint file, you can convert them as shapes. Below are the steps to convert images to shapes in a PowerPoint document using Spire.Presentation for .NET.
- Create a Presentation object.
- Set the slide size type to Sreen16x9.
- Get the image paths from a folder and save in a string array.
- Traverse through the images.
- Get a specific image and append it to the image collection of the document using Presentation.Images.Append() method.
- Add a slide to the document using Presentation.Slides.Append() method.
- Add a shape with the size equal to the slide using ISlide.Shapes.AppendShape() method.
- Fill the shape with the image through the properties under IAutoShape.Fill object.
- Save the document to a PowerPoint file using Presentation.SaveToFile() method.
- C#
- VB.NET
using Spire.Presentation;
using Spire.Presentation.Drawing;
using System.Drawing;
using System.IO;

namespace ConvertImageToShape
{
    class Program
    {
        static void Main(string[] args)
        {
            //Create a Presentation object
            Presentation presentation = new Presentation();

            //Set slide size type
            presentation.SlideSize.Type = SlideSizeType.Screen16x9;

            //Remove the default slide
            presentation.Slides.RemoveAt(0);

            //Get file paths in a string array
            string[] picFiles = Directory.GetFiles(@"C:\Users\Administrator\Desktop\Images");

            //Loop through the images
            for (int i = 0; i < picFiles.Length; i++)
            {
                //Add a slide
                ISlide slide = presentation.Slides.Append();

                //Get a specific image
                string imageFile = picFiles[i];
                Image image = Image.FromFile(imageFile);

                //Append it to the image collection
                IImageData imageData = presentation.Images.Append(image);

                //Add a shape with a size equal to the slide
                IAutoShape shape = slide.Shapes.AppendShape(ShapeType.Rectangle, new RectangleF(new PointF(0, 0), presentation.SlideSize.Size));

                //Fill the shape with image
                shape.Line.FillType = FillFormatType.None;
                shape.Fill.FillType = FillFormatType.Picture;
                shape.Fill.PictureFill.FillType = PictureFillType.Stretch;
                shape.Fill.PictureFill.Picture.EmbedImage = imageData;
            }

            //Save to file
            presentation.SaveToFile("ImageToShape.pptx", FileFormat.Pptx2013);
        }
    }
}
Convert Image to PowerPoint with Customized Slide Size in C# and VB.NET
If the aspect ratio of your images is not 16:9, or they are not in a standard slide size, you can create slides based on the actual size of the pictures. This will prevent the image from being over stretched or compressed. The following are the steps to convert images to a PowerPoint document with customized slide size using Spire.Presentation for .NET.
- Create a Presentation object.
- Create a PdfUnitConvertor object, which is used to convert pixel to point.
- Get the image paths from a folder and save in a string array.
- Traverse through the images.
- Get a specific image and append it to the image collection of the document using Presentation.Images.Append() method.
- Get the image width and height, and convert them to point.
- Set the slide size of the presentation based on the image size through Presentation.SlideSize.Size property.
- Add a slide to the document using Presentation.Slides.Append() method.
- Set the image as the background image of the slide through the properties under ISlide.SlideBackground object.
- Save the document to a PowerPoint file using Presentation.SaveToFile() method.
- C#
- VB.NET
using Spire.Pdf.Graphics;
using Spire.Presentation;
using Spire.Presentation.Drawing;
using System.Drawing;
using System.IO;

namespace CustomSlideSize
{
    class Program
    {
        static void Main(string[] args)
        {
            //Create a Presentation object
            Presentation presentation = new Presentation();

            //Remove the default slide
            presentation.Slides.RemoveAt(0);

            //Get file paths in a string array
            string[] picFiles = Directory.GetFiles(@""C:\Users\Administrator\Desktop\Images"");

            TextBox picBox = new TextBox();

            Graphics g = picBox.CreateGraphics();

            float dpiY = g.DpiY;

            //Loop through the images
            for (int i = 0; i < picFiles.Length; i++)
            {
                //Get a specific image
                string imageFile = picFiles[i];
                Image image = Image.FromFile(imageFile);

                //Append it to the image collection
                IImageData imageData = presentation.Images.Append(image);

                //Get image height and width in pixel
                int heightpixels = imageData.Height;
                int widthpixels = imageData.Width;

                //Convert pixel to point
                float widthPoint = widthpixels * 72.0f / dpiY;

                float heightPoint = heightpixels * 72.0f / dpiY;

                //Set slide size
                presentation.SlideSize.Size = new SizeF(widthPoint, heightPoint);

                //Add a slide
                ISlide slide = presentation.Slides.Append();

                //Set the image as the background image of the slide
                slide.SlideBackground.Type = BackgroundType.Custom;
                slide.SlideBackground.Fill.FillType = FillFormatType.Picture;
                slide.SlideBackground.Fill.PictureFill.FillType = PictureFillType.Stretch;
                slide.SlideBackground.Fill.PictureFill.Picture.EmbedImage = imageData;
            }

            //Save to file
            presentation.SaveToFile(""CustomizeSlideSize.pptx"", FileFormat.Pptx2013);
        }
    }
}
Apply for a Temporary License
If you'd like to remove the evaluation message from the generated documents, or to get rid of the function limitations, please request a 30-day trial license for yourself.
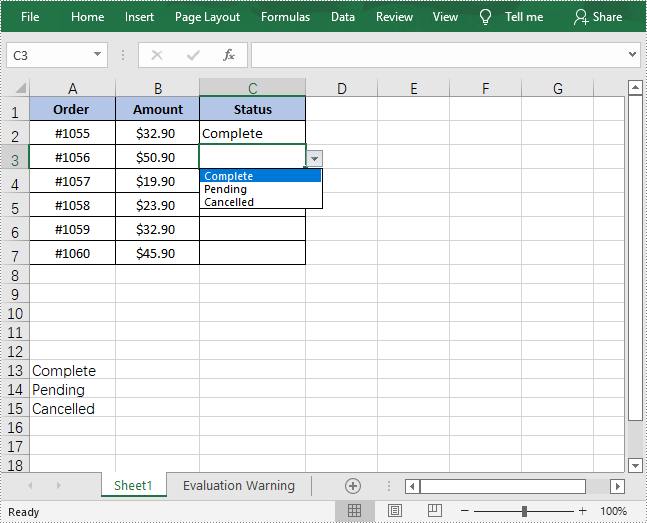
The drop-down list in Excel enables users to select a desired item from a pre-defined list of items as input data. It restricts the input of unwanted or ambiguous data and reduces the occurrence of spelling errors, which is a great option for speeding up data entry tasks. In this article, you will learn how to programmatically create a drop-down list in Excel using Spire.XLS for Java.
- Create a Drop-Down List Based on Values in a Cell Range
- Create a Drop-Down List Based on Values in a String Array
Install Spire.XLS for Java
First of all, you're required to add the Spire.Xls.jar file as a dependency in your Java program. The JAR file can be downloaded from this link. If you use Maven, you can easily import the JAR file in your application by adding the following code to your project's pom.xml file.
<repositories>
    <repository>
        <id>com.e-iceblue</id>
        <name>e-iceblue</name>
        <url>https://repo.e-iceblue.com/nexus/content/groups/public/</url>
    </repository>
</repositories>
<dependencies>
    <dependency>
        <groupId>e-iceblue</groupId>
        <artifactId>spire.xls</artifactId>
        <version>16.6.5</version>
    </dependency>
</dependencies>
Create a Drop-Down List Based on Values in a Cell Range
With Spire.XLS for Java, you can add values to a range of cells and then refer to that range of cells as the data validation source to create a drop-down list. This method might be slightly time-consuming, but it allows you to easily update the items in the drop-down list by directly modifying the values in the cells of the result document. The detailed steps are as follows.
- Create a Workbook object.
- Load a sample Excel document using Workbook.loadFromFile() method.
- Get a specified worksheet using Workbook.getWorksheets().get() method.
- Get a specified cell or cell range using Worksheet.getCellRange() method.
- Add values to specified cells using CellRange.setValue() method.
- Get data validation of the specified cell range using CellRange.getDataValidation() method.
- Create a drop-down list by referring to a specified data range as the data validation source using Validation.setDataRange() method.
- Save the result document using Workbook.saveToFile() method.
- Java
import com.spire.xls.*;

public class DropdownList {
    public static void main(String[] args) {

        //Create a Workbook object
        Workbook workbook = new Workbook();

        //Load a sample Excel document
        workbook.loadFromFile("input.xlsx");

        //Get the first worksheet
        Worksheet sheet = workbook.getWorksheets().get(0);

        //Add values to specified cells
        sheet.getCellRange("A13").setValue("Complete");
        sheet.getCellRange("A14").setValue("Pending");
        sheet.getCellRange("A15").setValue("Cancelled");

        //Create a drop-down list by referring to a specified data range as the data validation source
        sheet.getCellRange("C2:C7").getDataValidation().setDataRange(sheet.getCellRange("A13:A15"));

        //Save the result document
        workbook.saveToFile("ExcelDropdownList.xlsx", ExcelVersion.Version2013);
    }
}
Create a Drop-Down List Based on Values in a String Array
In Excel, you can create a drop-down list by manually entering a list of values in the “Source” box of the Data Validation menu. By doing this, you don't need to add data in Excel cells, which keeps your Excel document neat and organized. The following steps shows how to use Spire.XLS for Java to achieve the same functionality.
- Create a Workbook object.
- Get a specified worksheet using Workbook.getWorksheets().get() method.
- Add text to a cell and set its font style.
- Get a specified cell or cell range using Worksheet.getCellRange() method.
- Get data validation of the specified cell range using CellRange.getDataValidation() method.
- Set the values of the drop-down list using Validation.setValues() method.
- Create a drop-down list in the specified cell by setting the values of Validation.isSuppressDropDownArrow() method to false.
- Save the result document using Workbook.saveToFile() method.
- Java
import com.spire.xls.*;
public class DropdownList2 {
public static void main(String[] args) {
//Create a Workbook object
Workbook workbook = new Workbook();
//Get the first worksheet
Worksheet sheet = workbook.getWorksheets().get(0);
//Add text to cell B2 and set its font style
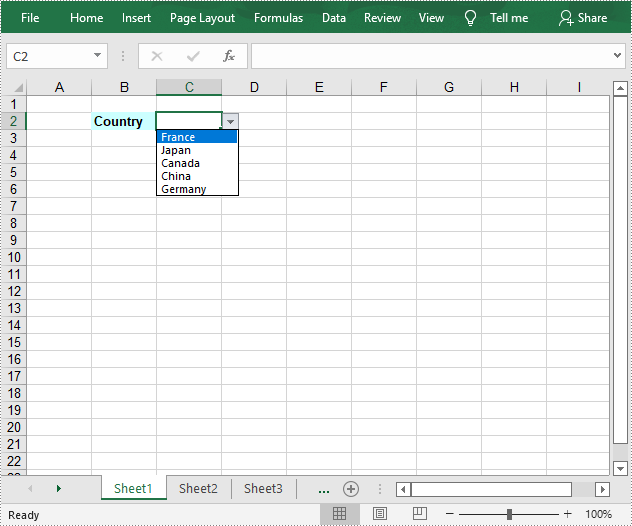
sheet.getCellRange("B2").setValue("Country");
sheet.getCellRange("B2").getStyle().getFont().isBold(true);
sheet.getCellRange("B2").getStyle().setKnownColor(ExcelColors.LightTurquoise);
//Set the values of the drop-down list
sheet.getCellRange("C2").getDataValidation().setValues(new String[]{"France", "Japan", "Canada", "China", "Germany"});
//Create a drop-down list in the specified cell
sheet.getCellRange("C2").getDataValidation().isSuppressDropDownArrow(false);
//Save the result document
workbook.saveToFile("ExcelDropdownList2.xlsx", ExcelVersion.Version2013);
}
}
Apply for a Temporary License
If you'd like to remove the evaluation message from the generated documents, or to get rid of the function limitations, please request a 30-day trial license for yourself.
When you have a fairly long Word document that requires teamwork, it may be necessary to split the document into several shorter files and assign them to different people to speed up the workflow. Instead of manually cutting and pasting, this article will demonstrate how to programmatically split a Word document using Spire.Doc for Java .
Install Spire.Doc for Java
First, you're required to add the Spire.Doc.jar file as a dependency in your Java program. The JAR file can be downloaded from this link. If you use Maven, you can easily import the JAR file in your application by adding the following code to your project's pom.xml file.
<repositories>
    <repository>
        <id>com.e-iceblue</id>
        <name>e-iceblue</name>
        <url>https://repo.e-iceblue.com/nexus/content/groups/public/</url>
    </repository>
</repositories>
<dependencies>
    <dependency>
        <groupId>e-iceblue</groupId>
        <artifactId>spire.doc</artifactId>
        <version>14.6.0</version>
    </dependency>
</dependencies>
Split a Word Document by Page Break
A Word document can contain multiple pages separated by page breaks. To split a Word document by page break, you can refer to the below steps and code.
- Create a Document instance.
- Load a sample Word document using Document.loadFromFile() method.
- Create a new Word document and add a section to it.
- Traverse through all body child objects of each section in the original document and determine whether the child object is a paragraph or a table.
- If the child object of the section is a table, directly add it to the section of new document using Section.getBody().getChildObjects().add() method.
- If the child object of the section is a paragraph, first add the paragraph object to the section of the new document. Then traverse through all child objects of the paragraph and determine whether the child object is a page break.
- If the child object is a page break, get its index and then remove the page break from its paragraph by index.
- Save the new Word document and then repeat the above processes.
- Java
import com.spire.doc.*;
import com.spire.doc.documents.*;
public class splitDocByPageBreak {
public static void main(String[] args) throws Exception {
// Create a Document instance
Document original = new Document();
// Load a sample Word document
original.loadFromFile("E:\\Files\\SplitByPageBreak.docx");
// Create a new Word document and add a section to it
Document newWord = new Document();
Section section = newWord.addSection();
int index = 0;
//Traverse through all sections of original document
for (int s = 0; s < original.getSections().getCount(); s++) {
Section sec = original.getSections().get(s);
//Traverse through all body child objects of each section.
for (int c = 0; c < sec.getBody().getChildObjects().getCount(); c++) {
DocumentObject obj = sec.getBody().getChildObjects().get(c);
if (obj instanceof Paragraph) {
Paragraph para = (Paragraph) obj;
sec.cloneSectionPropertiesTo(section);
//Add paragraph object in original section into section of new document
section.getBody().getChildObjects().add(para.deepClone());
for (int i = 0; i < para.getChildObjects().getCount(); i++) {
DocumentObject parobj = para.getChildObjects().get(i);
if (parobj instanceof Break) {
Break break1 = (Break) parobj;
if (break1.getBreakType().equals(BreakType.Page_Break)) {
//Get the index of page break in paragraph
int indexId = para.getChildObjects().indexOf(parobj);
//Remove the page break from its paragraph
Paragraph newPara = (Paragraph) section.getBody().getLastParagraph();
newPara.getChildObjects().removeAt(indexId);
//Save the new Word document
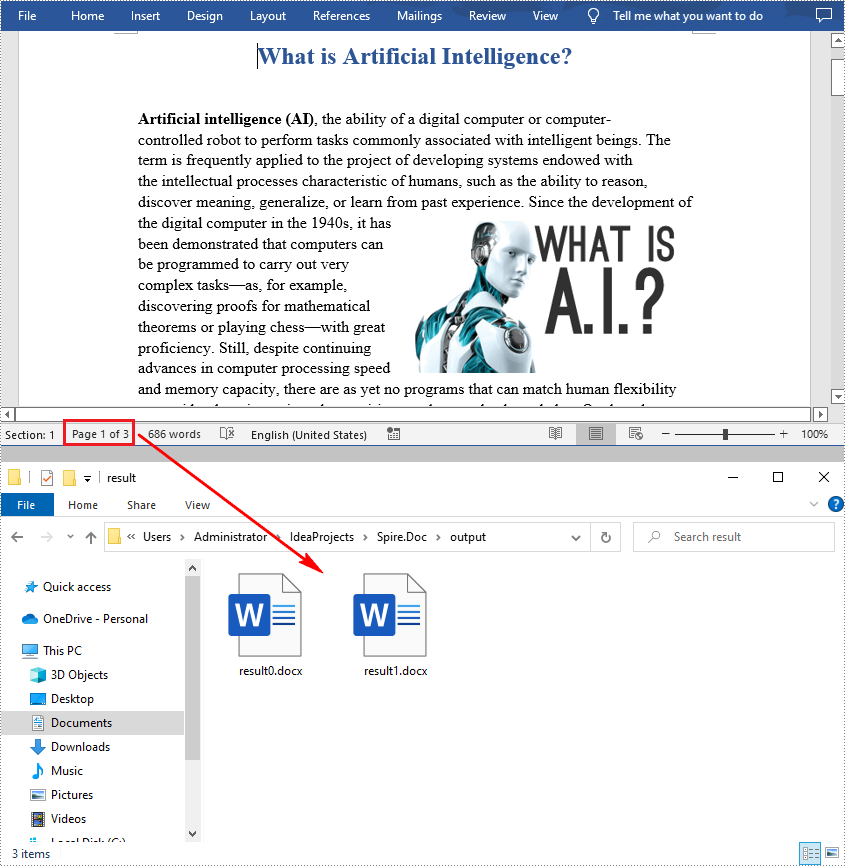
newWord.saveToFile("output/result"+index+".docx", FileFormat.Docx);
index++;
//Create a new document and add a section
newWord = new Document();
section = newWord.addSection();
//Add paragraph object in original section into section of new document
section.getBody().getChildObjects().add(para.deepClone());
if (section.getParagraphs().get(0).getChildObjects().getCount() == 0) {
//Remove the first blank paragraph
section.getBody().getChildObjects().removeAt(0);
} else {
//Remove the child objects before the page break
while (indexId >= 0) {
section.getParagraphs().get(0).getChildObjects().removeAt(indexId);
indexId--;
}
}
}
}
}
}
if (obj instanceof Table) {
//Add table object in original section into section of new document
section.getBody().getChildObjects().add(obj.deepClone());
}
}
}
//Save to file
newWord.saveToFile("output/result"+index+".docx", FileFormat.Docx);
}
}
Split a Word Document by Section Break
In Word, a section is a part of a document that contains its own page formatting. For documents that contain multiple sections, Spire.Doc for .NET also supports splitting documents by section breaks. The detailed steps are as follows.
- Create a Document instance.
- Load a sample Word document using Document.LoadFromFile() method.
- Define a new Word document object.
- Traverse through all sections of the original Word document.
- Clone each section of the original document using Section.deepClone() method.
- Add the cloned section to the new document as a new section using Document.getSections().add() method.
- Save the result document using Document.saveToFile() method.
- Java
import com.spire.doc.*;
public class splitDocBySectionBreak {
public static void main(String[] args) throws Exception {
//Create Document instance
Document document = new Document();
//Load a sample Word document
document.loadFromFile("E:\\Files\\SplitBySectionBreak.docx");
//Define a new Word document object
Document newWord;
//Traverse through all sections of the original Word document
for (int i = 0; i < document.getSections().getCount(); i++){
newWord = new Document();
//Clone each section of the original document and add it to the new document as new section
newWord.getSections().add(document.getSections().get(i).deepClone());
//Save the result document
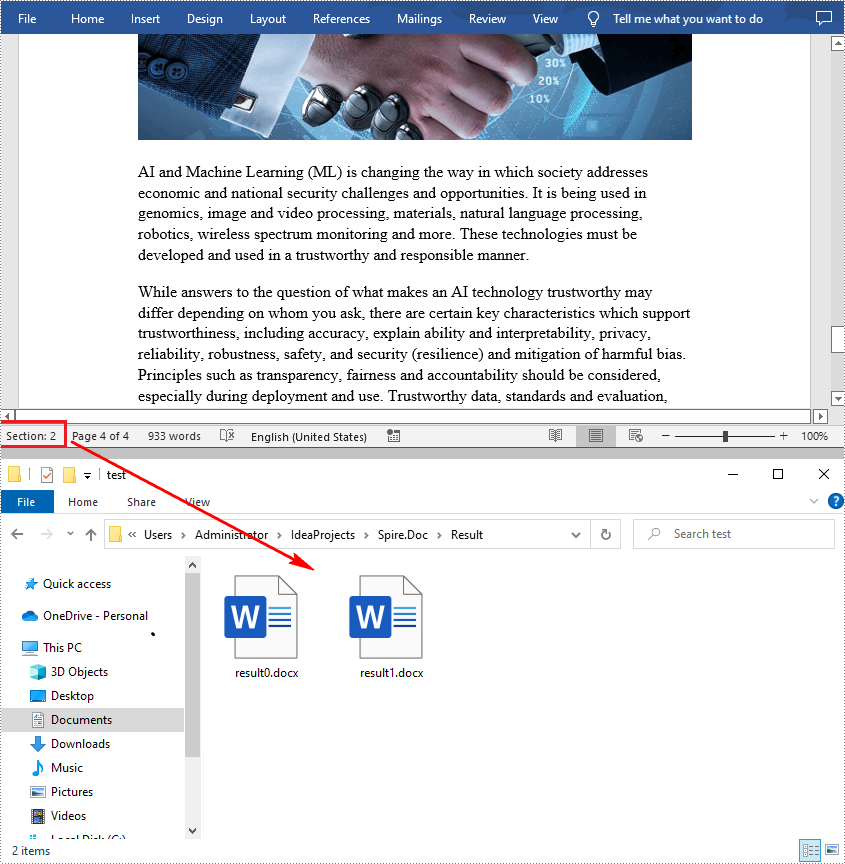
newWord.saveToFile("Result/result"+i+".docx");
}
}
}
Apply for a Temporary License
If you'd like to remove the evaluation message from the generated documents, or to get rid of the function limitations, please request a 30-day trial license for yourself.
