
Knowledgebase (2417)
Children categories
Grouping rows and columns in Excel is a valuable feature that can simplify working with large or complex datasets. This feature enables you to hide or show individual sections of data for better viewing and analysis. For instance, if you have a worksheet with data for various regions or departments, you can group the rows for each region or department together. Once grouped, you can collapse or expand each group as required, which makes it easier for you to focus on specific parts of the data while keeping the rest of the worksheet unaffected. In this article, you will learn how to group or ungroup rows and columns, along with how to expand or collapse groups in Excel in C++ using Spire.XLS for C++.
- Group Rows and Columns in Excel in C++
- Ungroup Rows and Columns in Excel in C++
- Expand or Collapse Groups in Excel in C++
Install Spire.XLS for C++
There are two ways to integrate Spire.XLS for C++ into your application. One way is to install it through NuGet, and the other way is to download the packageThere are two ways to integrate Spire.XLS for C++ into your application. One way is to install it through NuGet, and the other way is to download the package from our website and copy the libraries into your program. Installation via NuGet is simpler and more recommended. You can find more details by visiting the following link.from our website and copy the libraries into your program. Installation via NuGet is simpler and more recommended. You can find more details by visiting the following link.
Integrate Spire.XLS for C++ in a C++ Application
Group Rows and Columns in Excel in C++
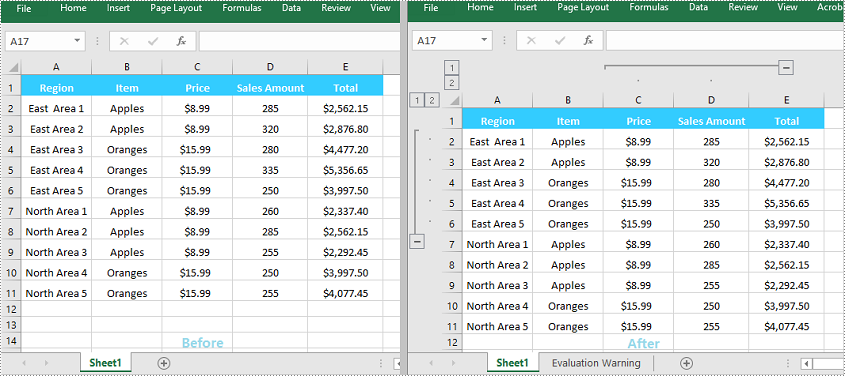
The XlsWorksheet->GroupByRows(int firstRow, int lastRow, bool isCollapsed) and XlsWorksheet->GroupByColumns (int firstColumn, int lastColumn, bool isCollapsed) methods in Spire.XLS for C++ can be used to group specific rows and columns in an Excel worksheet. The detailed steps are as follows:
- Initialize an instance of the Workbook class.
- Load an Excel file using the Workbook->LoadFromFile(LPCWSTR_S fileName) method.
- Get a specific worksheet by its index using the Workbook->GetWorksheets()->Get(int index) method.
- Group specific rows in the worksheet using the XlsWorksheet->GroupByRows(int firstRow, int lastRow, bool isCollapsed) method.
- Group specific columns in the worksheet using the XlsWorksheet->GroupByColumns (int firstColumn, int lastColumn, bool isCollapsed) method.
- Save the result file using the Workbook->SaveToFile (LPCWSTR_S fileName, ExcelVersion version) method.
- C++
#include "Spire.Xls.o.h";

using namespace Spire::Xls;

int main()
{
	//Initialize an instance of the Workbook class
	intrusive_ptr<Workbook> workbook = new Workbook();

	//Load an Excel file
	workbook->LoadFromFile(L"Sample.xlsx");

	//Get the first worksheet
	intrusive_ptr<Worksheet> sheet = dynamic_pointer_cast<Worksheet>(workbook->GetWorksheets()->Get(0));

	//Group the 2nd, 3rd, 4th, 5th and 6th rows
	sheet->GroupByRows(2, 6, false);
	//Group the 3rd and 4th columns
	sheet->GroupByColumns(3, 4, false);

	//Save the result file
	workbook->SaveToFile(L"GroupRowsAndColumns.xlsx", ExcelVersion::Version2013);
	workbook->Dispose();
}
Ungroup Rows and Columns in Excel in C++
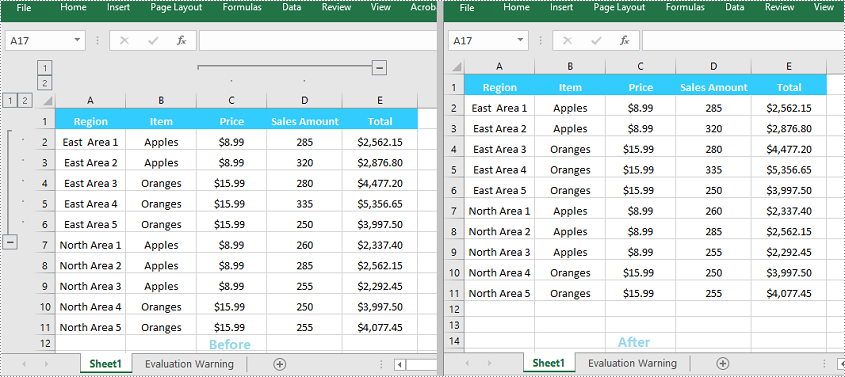
By ungrouping rows and columns, you can restore each cell to its initial, standalone state, helping you view the data as it was originally presented.
Spire.XLS for C++ offers the XlsWorksheet->UngroupByRows(int firstRow, int lastRow) and XlsWorksheet->UngroupByColumns (int firstColumn, int lastColumn) methods to help you ungroup rows and columns. The detailed steps are as follows:
- Initialize an instance of the Workbook class.
- Load an Excel file using the Workbook->LoadFromFile(LPCWSTR_S fileName) method.
- Get a specific worksheet by its index using the Workbook->GetWorksheets()->Get(int index) method.
- Ungroup specific rows in the worksheet using the XlsWorksheet->UngroupByRows(int firstRow, int lastRow) method.
- Ungroup specific columns in the worksheet using the XlsWorksheet->UngroupByColumns (int firstColumn, int lastColumn) method.
- Save the result file using the Workbook->SaveToFile (LPCWSTR_S fileName, ExcelVersion version) method.
- C++
#include "Spire.Xls.o.h";

using namespace Spire::Xls;

int main()
{
	//Initialize an instance of the Workbook class
	intrusive_ptr<Workbook> workbook = new Workbook();

	//Load an Excel file
	workbook->LoadFromFile(L" GroupRowsAndColumns.xlsx");

	//Get the first worksheet
	intrusive_ptr<Worksheet> sheet = dynamic_pointer_cast<Worksheet>(workbook->GetWorksheets()->Get(0));

	//Ungroup the 2nd, 3rd, 4th, 5th and 6th rows
	sheet->UngroupByRows(2, 6);

	//Ungroup the 3rd and 4th columns
	sheet->UngroupByColumns(3, 4);

	//Save the result file
	workbook->SaveToFile(L"UngroupRowsAndColumns.xlsx", ExcelVersion::Version2013);
	workbook->Dispose();
}
Expand or Collapse Groups in Excel in C++
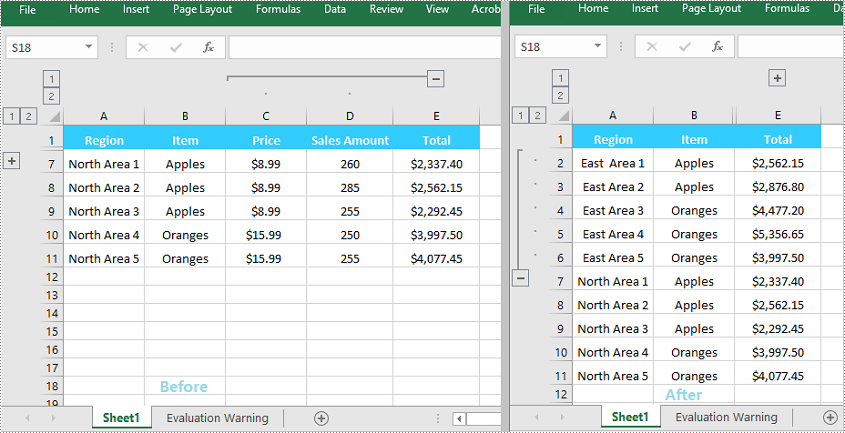
When grouping rows or columns in Excel, you can click the expand (+) or collapse (-) button to show or hide the grouped data. In Spire.XLS for C++, you can use the Worksheet->GetRange(LPCWSTR_S name)->ExpandGroup(GroupByType groupBy) method or the Worksheet->GetRange(LPCWSTR_S name)->CollapseGroup(GroupByType groupBy) method to achieve the same expanding or collapsing effect. The detailed steps are as follows:
- Initialize an instance of the Workbook class.
- Load an Excel file using the Workbook->LoadFromFile(LPCWSTR_S fileName) method.
- Get a specific worksheet by its index using the Workbook->GetWorksheets()->Get(int index) method.
- Expand a specific group using the Worksheet->GetRange(LPCWSTR_S name)->ExpandGroup(GroupByType groupBy) method.
- Collapse a specific group using the Worksheet->GetRange(LPCWSTR_S name)->CollapseGroup(GroupByType groupBy) method.
- Save the result file using the Workbook->SaveToFile (LPCWSTR_S fileName, ExcelVersion version) method.
- C++
#include "Spire.Xls.o.h";

using namespace Spire::Xls;

int main()
{
	//Initialize an instance of the Workbook class
	intrusive_ptr<Workbook> workbook = new Workbook();

	//Load an Excel file
	workbook->LoadFromFile(L"Input.xlsx");

	//Get the first worksheet
	intrusive_ptr<Worksheet> sheet = dynamic_pointer_cast<Worksheet>(workbook->GetWorksheets()->Get(0));

	//Expand a group
	sheet->GetRange(L"A2:E6")->ExpandGroup(GroupByType::ByRows);

	//Collapse a group
	sheet->GetRange(L"C1:D11")->CollapseGroup(GroupByType::ByColumns);

	//Save the result file
	workbook->SaveToFile(L"ExpandOrCollapseGroups.xlsx", ExcelVersion::Version2013);
	workbook->Dispose();
}
Apply for a Temporary License
If you'd like to remove the evaluation message from the generated documents, or to get rid of the function limitations, please request a 30-day trial license for yourself.
Comparison of two versions of a document is the process of checking the new version against the previous one to identify changes made by different contributors. By comparing documents, legal staffs can easily review contracts to determine what changes have been made or still need to be made, and teachers can quickly compare student papers to determine whether or not necessary changes have been applied. In this article, you will learn how to compare two Word documents in C++ using Spire.Doc for C++.
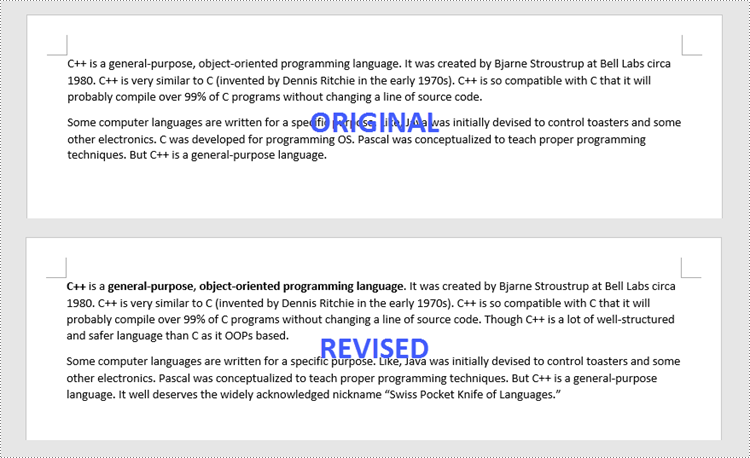
The following is a screenshot of the two Word documents we’re going to compare.
Install Spire.Doc for C++
There are two ways to integrate Spire.Doc for C++ into your application. One way is to install it through NuGet, and the other way is to download the package from our website and copy the libraries into your program. Installation via NuGet is simpler and more recommended. You can find more details by visiting the following link.
Integrate Spire.Doc for C++ in a C++ Application
Compare Two Word Documents in C++
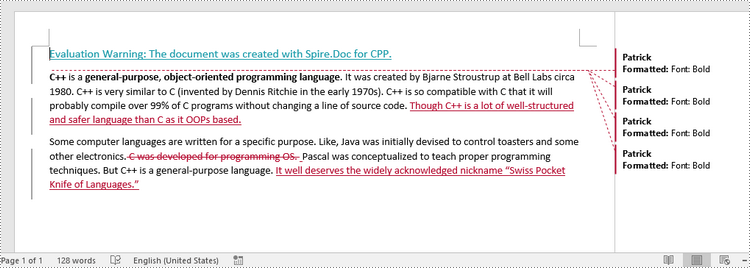
Spire.Doc for C++ allows to compare two Word documents and save the result in a third document. When opening this document with MS Word, you can see all changes that have been made to the original document, including insertions, deletions as well as formatting modifications. The following are the detailed steps.
- Load two Word documents separately while initialing two different Document objects.
- Compare these two documents using Document->Compare() method.
- Save the result in a third Word document using Document->SaveToFile() method.
- C++
#include "Spire.Doc.o.h"

using namespace Spire::Doc;

int main() {

 //Load the first document
 intrusive_ptr<Document> doc1 = new Document(L"C:\\Users\\Administrator\\Desktop\\Original.docx");

 //Load the second document
 intrusive_ptr<Document> doc2 = new Document(L"C:\\Users\\Administrator\\Desktop\\Revised.docx");

 //Compare the second document on the basis of the first document
 doc1->Compare(doc2, L"Patrick");

 //Save to a docx file
 doc1->SaveToFile(L"output/Result.docx", Spire::Doc::FileFormat::Docx2013);

 doc1->Close();
 doc2->Close();
}
Apply for a Temporary License
If you'd like to remove the evaluation message from the generated documents, or to get rid of the function limitations, please request a 30-day trial license for yourself.
PDF margins are blank areas between content and page edges. In most cases, we set moderate or narrow margins in order to create a compact appearance. However, if we wish to place a company logo or other relevant information in the margins, we need to make the margins a bit wider. In this article, you will learn how to increase or decrease the margins of an existing PDF document in C# and VB.NET using Spire.PDF for .NET.
- Increase the Margins of a PDF Document in C#, VB.NET
- Decrease the Margins of a PDF Document in C#, VB.NET
Install Spire.PDF for .NET
To begin with, you need to add the DLL files included in the Spire.PDF for.NET package as references in your .NET project. The DLL files can be either downloaded from this link or installed via NuGet.
PM> Install-Package Spire.PDF
Increase the Margins of a PDF Document in C#, VB.NET
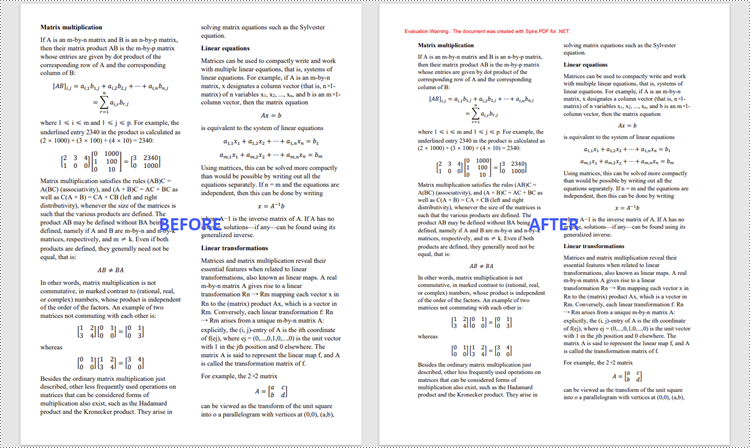
The way to enlarge the margins of a PDF document is to create a new PDF that has a larger page size, and then draw the source page on the large page at the appropriate location. The following are the steps to increase the margins of a PDF document using Spire.PDF for .NET.
- Load the original PDF document while initialing the PdfDocument object.
- Create another PdfDocument object, which is used to create a new PDF document that has a larger page size.
- Set the increasing values of the margins.
- Calculate the page size of the new PDF document.
- Loop through the pages in the original document, and create a template based on a specific page using PdfPageBase.CreateTemplate() method.
- Add a page to the new PDF document using PdfDocument.Pages.Add() method.
- Draw the template on the page at the coordinate (0, 0) using PdfTemplate.Draw() method.
- Save the new PDF document to file using PdfDocument.SaveToFile() method.
- C#
- VB.NET
using Spire.Pdf;
using Spire.Pdf.Graphics;
using System.Drawing;

namespace IncreaseMargins
{
    class Program
    {
        static void Main(string[] args)
        {
            //Load the original PDF document
            PdfDocument originalPdf = new PdfDocument("C:\\Users\\Administrator\\Desktop\\sample.pdf");

            //Get the first page
            PdfPageBase firstPage = originalPdf.Pages[0];

            //Create a new PdfDocument object
            PdfDocument newPdf = new PdfDocument();

            //Set increasing value of the margins
            PdfMargins margins = newPdf.PageSettings.Margins;
            margins.Top = 40;
            margins.Bottom=40;
            margins.Left=40;
            margins.Right= 40;

            //Calculate the new page size
            SizeF sizeF = new SizeF(firstPage.Size.Width + margins.Left + margins.Right, firstPage.Size.Height + margins.Top + margins.Bottom);

            //Loop through the pages in the original document
            for (int i = 0; i < originalPdf.Pages.Count; i++)
            {
                //Create a template based on a spcific page
                PdfTemplate pdfTemplate = originalPdf.Pages[i].CreateTemplate();

                //Add a page to the new PDF
                PdfPageBase page = newPdf.Pages.Add(sizeF);

                //Draw template on the page
                pdfTemplate.Draw(page, 0, 0);
            }

            //Save the new document
            newPdf.SaveToFile("IncreaseMargins.pdf", FileFormat.PDF);
        }
    }
}
Decrease the Margins of a PDF Document in C#, VB.NET
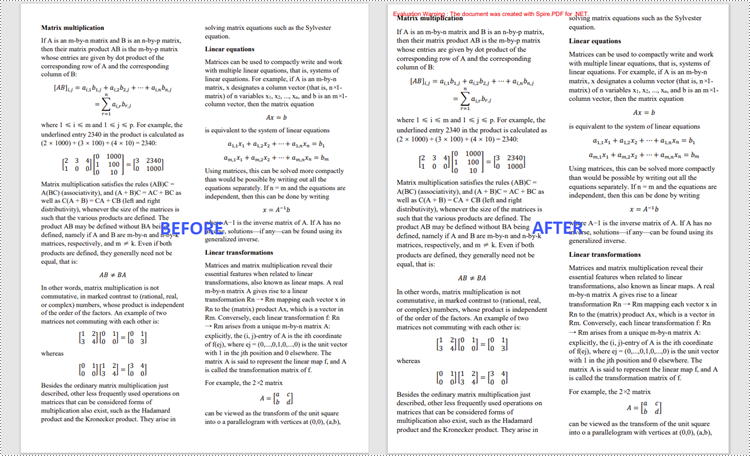
The way to decrease the margins of a PDF is to create a new PDF that has a smaller page size, and then draw the source page on the small page at a specified coordinate. The following are the steps to decrease the margins of a PDF document using Spire.PDF for .NET.
- Load the original PDF document while initialing the PdfDocument object.
- Create another PdfDocument object, which is used to create a new PDF document that has a smaller page size.
- Set the decreasing values of the margins.
- Calculate the page size of the new PDF document.
- Loop through the pages in the original document, and create a template based on a specific page using PdfPageBase.CreateTemplate() method.
- Add a page to the new PDF document using PdfDocument.Pages.Add() method.
- Draw the template on the page at a specified coordinate using PdfTemplate.Draw() method.
- Save the new PDF document to file using PdfDocument.SaveToFile() method.
- C#
- VB.NET
using Spire.Pdf;
using Spire.Pdf.Graphics;
using System.Drawing;

namespace DecreaseMargins
{
    class Program
    {
        static void Main(string[] args)
        {
            //Load the original PDF document
            PdfDocument originalPdf = new PdfDocument("C:\\Users\\Administrator\\Desktop\\sample.pdf");

            //Get the first page
            PdfPageBase firstPage = originalPdf.Pages[0];

            //Create a new PdfDocument object
            PdfDocument newPdf = new PdfDocument();

            //Set decreasing value
            float left = -20;
            float right = -20;
            float top = -20;
            float bottom = -20;

            //Calculate the new page size
            SizeF sizeF = new SizeF(firstPage.Size.Width + left + right, firstPage.Size.Height + top + bottom);

            //Loop through the pages in the original document
            for (int i = 0; i < originalPdf.Pages.Count; i++)
            {
                //Create a template based on a specific page
                PdfTemplate pdfTemplate = originalPdf.Pages[i].CreateTemplate();

                //Add a page to the new PDF
                PdfPageBase page = newPdf.Pages.Add(sizeF, new PdfMargins(0));

                //Draw template on the page
                pdfTemplate.Draw(page, left, top);
            }

            //Save the new document
            newPdf.SaveToFile("DecreaseMargins.pdf", FileFormat.PDF);
        }
    }
}
Apply for a Temporary License
If you'd like to remove the evaluation message from the generated documents, or to get rid of the function limitations, please request a 30-day trial license for yourself.
