
Knowledgebase (2417)
Children categories
C++: Convert PowerPoint Presentations to Images (JPG, PNG, SVG)
2023-03-23 00:57:10 Written by AdministratorConverting PowerPoint presentations to images brings you multiple benefits. For example, it makes it easy for you to share the content with others who may not have access to PowerPoint software; it preserves the formatting of the original presentation, ensuring that the content appears exactly as intended; and it protects the content in the presentation from being edited or modified by others. In this article, you will learn how to convert a PowerPoint Presentation to different image formats in C++ using Spire.Presentation for C++.
- Convert PowerPoint Presentation to JPG or PNG Images
- Convert PowerPoint Presentation to JPG or PNG Images with Specific Size
- Convert PowerPoint Presentation to SVG Images
Install Spire.Presentation for C++
There are two ways to integrate Spire.Presentation for C++ into your application. One way is to install it through NuGet, and the other way is to download the package from our website and copy the libraries into your program. Installation via NuGet is simpler and more recommended. You can find more details by visiting the following link.
Integrate Spire.Presentation for C++ in a C++ Application
Convert PowerPoint Presentation to JPG or PNG Images in C++
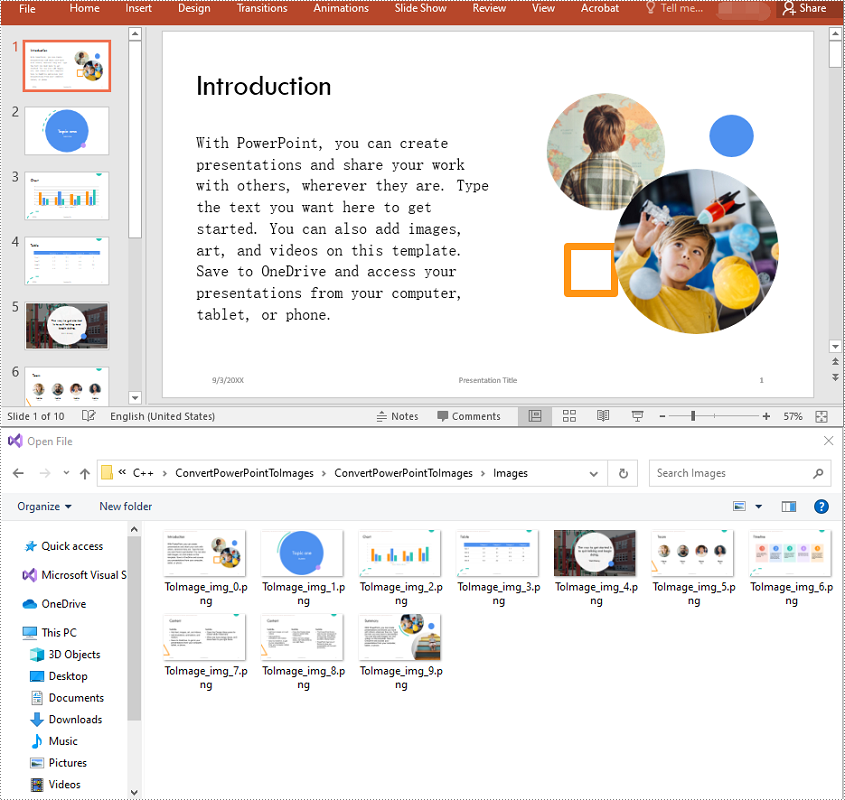
Spire.Presentation for C++ offers the ISlide->SaveAsImage() method which enables you to convert the slides in a PowerPoint presentation to JPG or PNG images. The detailed steps are as follows:
- Initialize an instance of the Presentation class.
- Load a PowerPoint presentation using Presentation->LoadFromFile() method.
- Access the slide collection of the presentation using Presentation->GetSlides() method.
- Iterate through the slides in the collection.
- Save each slide to an image stream using ISlide->SaveAsImage() method.
- Save the image stream to a JPG or PNG file using Stream->Save() method.
- C++
#include "Spire.Presentation.o.h";
using namespace Spire::Presentation;
using namespace std;
int main()
{
//Initialize an instance of the Presentation class
intrusive_ptrPresentation> ppt = new Presentation();
//Load a PowerPoint presentation
ppt->LoadFromFile(L"Sample.pptx");
//Get the slide collection of the presentation
intrusive_ptrSlideCollection> slides = ppt->GetSlides();
//Iterate through the slides in the collection
for (int i = 0; i < slides->GetCount(); i++)
{
intrusive_ptrISlide> slide = slides->GetItem(i);
//Save each slide to a PNG image
intrusive_ptrStream> image = slide->SaveAsImage();
image->Save((L"Images\\ToImage_img_" + to_wstring(i) + L".png").c_str());
}
ppt->Dispose();
}
Convert PowerPoint Presentation to JPG or PNG Images with Specific Size in C++
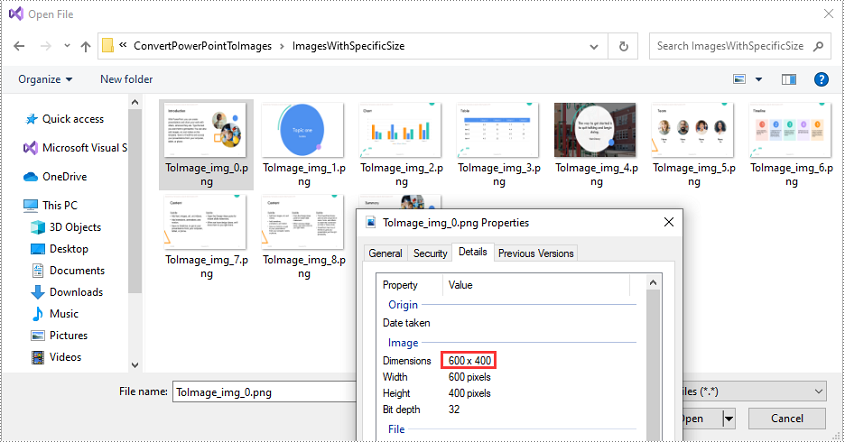
You can convert the slides in a PowerPoint presentation to JPG or PNG images with a specific size using ISlide->SaveAsImage(int width, int height) method. The detailed steps are as follows:
- Initialize an instance of the Presentation class.
- Load a PowerPoint presentation using Presentation->LoadFromFile() method.
- Access the slide collection of the presentation using Presentation->GetSlides() method.
- Iterate through the slides in the collection.
- Save each slide to an image stream using ISlide->SaveAsImage(int width, int height) method.
- Save the image stream to a JPG or PNG file using Stream->Save() method.
- C++
#include "Spire.Presentation.o.h";
using namespace Spire::Presentation;
using namespace std;
int main()
{
//Initialize an instance of the Presentation class
intrusive_ptrPresentation> ppt = new Presentation();
//Load a PowerPoint presentation
ppt->LoadFromFile(L"Sample.pptx");
//Get the slide collection of the presentation
intrusive_ptrSlideCollection> slides = ppt->GetSlides();
//Iterate through the slides in the collection
for (int i = 0; i < slides->GetCount(); i++)
{
intrusive_ptrISlide> slide = slides->GetItem(i);
//Save each slide to a PNG image with a size of 600 x 400 pixels
intrusive_ptrStream> image = slide->SaveAsImage(600, 400);
image->Save((L"ImagesWithSpecificSize\\ToImage_img_" + to_wstring(i) + L".png").c_str());
}
ppt->Dispose();
}
Convert PowerPoint Presentation to SVG Images in C++
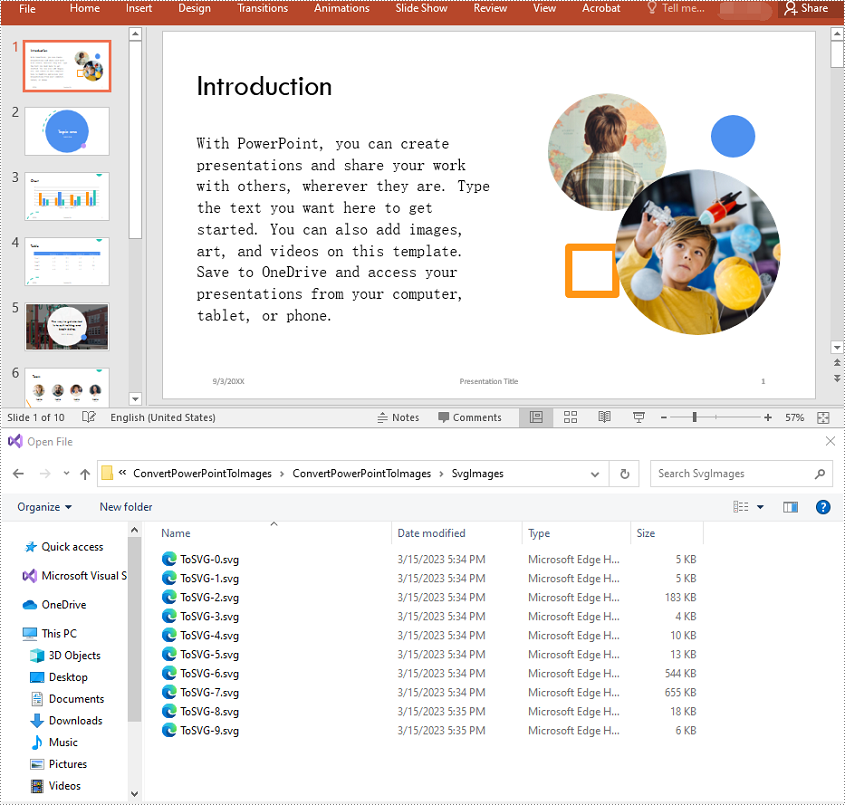
To convert the slides in a PowerPoint presentation to SVG images, you can use the ISlide->SaveToSVG() method. The detailed steps are as follows:
- Initialize an instance of the Presentation class.
- Load a PowerPoint presentation using Presentation->LoadFromFile() method.
- Access the slide collection of the presentation using Presentation->GetSlides() method.
- Iterate through the slides in the collection.
- Save each slide to an SVG stream using ISlide->SaveToSVG() method.
- Save the SVG stream to an SVG file using Stream->Save() method.
- C++
#include "Spire.Presentation.o.h";
using namespace Spire::Presentation;
using namespace std;
int main()
{
//Initialize an instance of the Presentation class
intrusive_ptrPresentation> ppt = new Presentation();
//Load a PowerPoint presentation
ppt->LoadFromFile(L"Sample.pptx");
//Get the slide collection of the presentation
intrusive_ptrSlideCollection> slides = ppt->GetSlides();
//Set whether to retain notes while converting PowerPoint to SVG
ppt->SetIsNoteRetained(true);
//Iterate through the slides in the collection
for (int i = 0; i < slides->GetCount(); i++)
{
intrusive_ptrISlide> slide = slides->GetItem(i);
//Save each slide to an SVG image
intrusive_ptrStream> svg = slide->SaveToSVG();
svg->Save((L"SvgImages\\ToSVG-" + to_wstring(i) + L".svg").c_str());
}
ppt->Dispose();
}
Apply for a Temporary License
If you'd like to remove the evaluation message from the generated documents, or to get rid of the function limitations, please request a 30-day trial license for yourself.
Spire.OCR for .NET is a professional OCR library that supports recognizing text from Images (such as JPG, PNG, GIF, BMP, and TIFF) in both .NET Framework and .NET Core applications. In this article, we will explain how to use Spire.OCR for .NET to read text from images in .NET Framework applications.
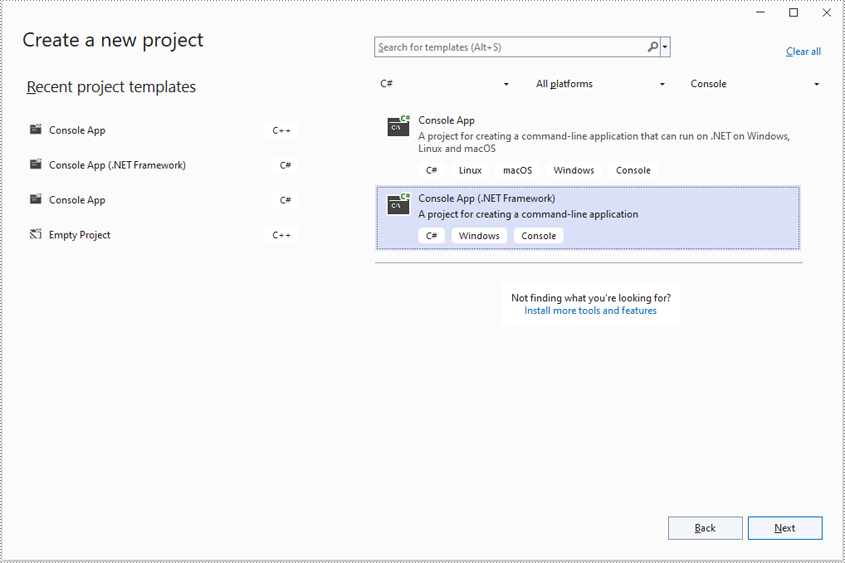
Step 1: Create a console application (.NET Framework) in Visual Studio.
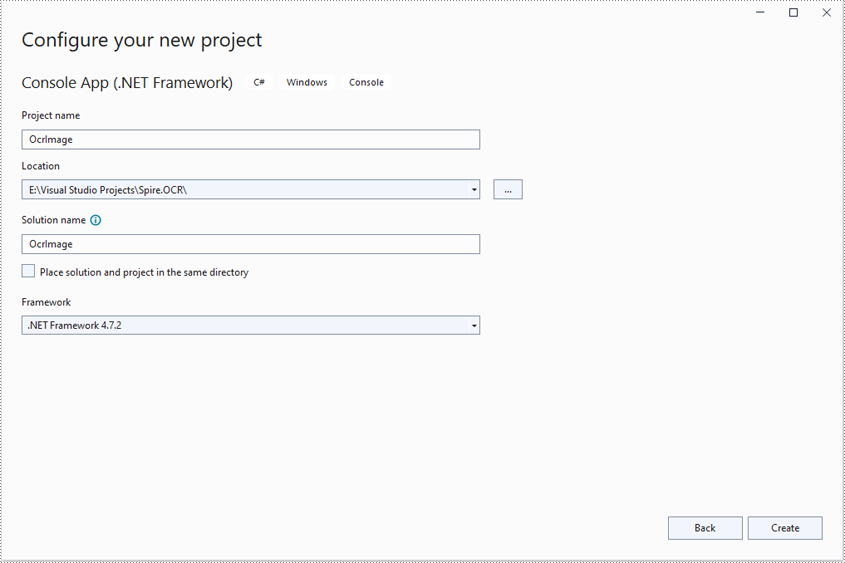
Step 2: Change the platform target of the application to X64.
In the application's solution explorer, right-click on the solution name and then click "Properties".
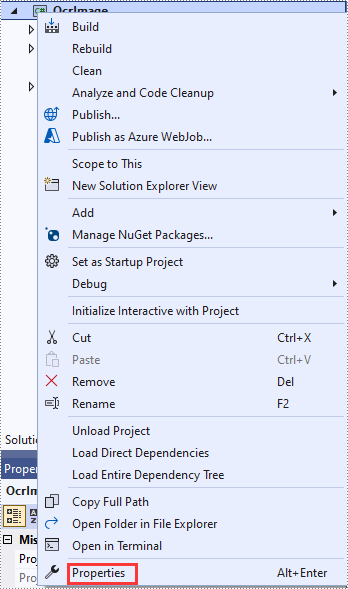
Change the platform target of the application to X64. This step must be performed since Spire.OCR only supports 64-bit platforms.
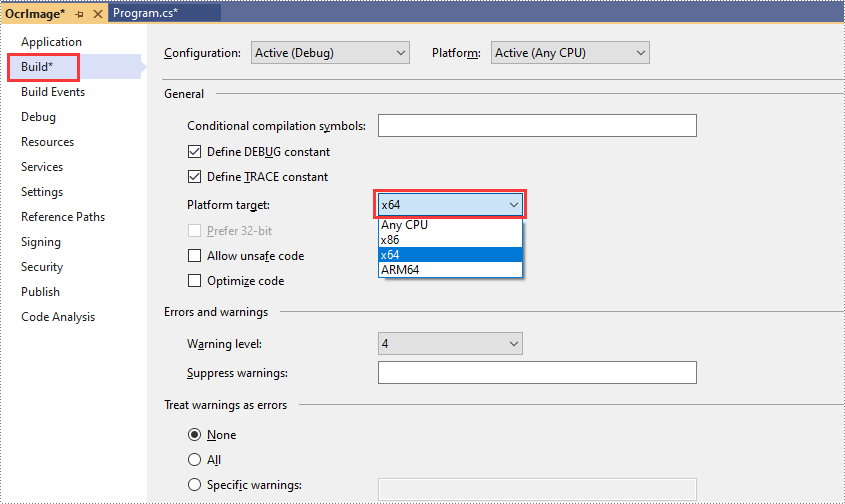
Step 3: Add a reference to Spire.OCR for .NET DLL in the application.
We recommend installing Spire.OCR for .NET through NuGet (Note: only Spire.OCR for .NET Version 1.8.0 or above supports working with .NET Framework). The detailed steps are as follows:
- In the application's solution explorer, right-click on the solution name or "References" and select "Manage NuGet Packages".
- Click the "Browse" tab and search for Spire.OCR.
- Click "Install" to install Spire.OCR.
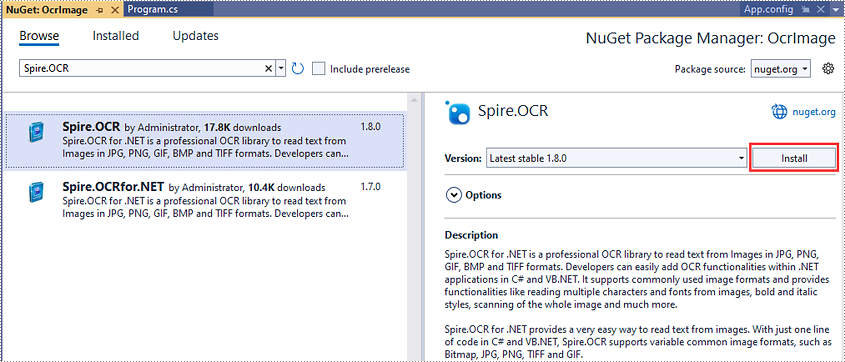
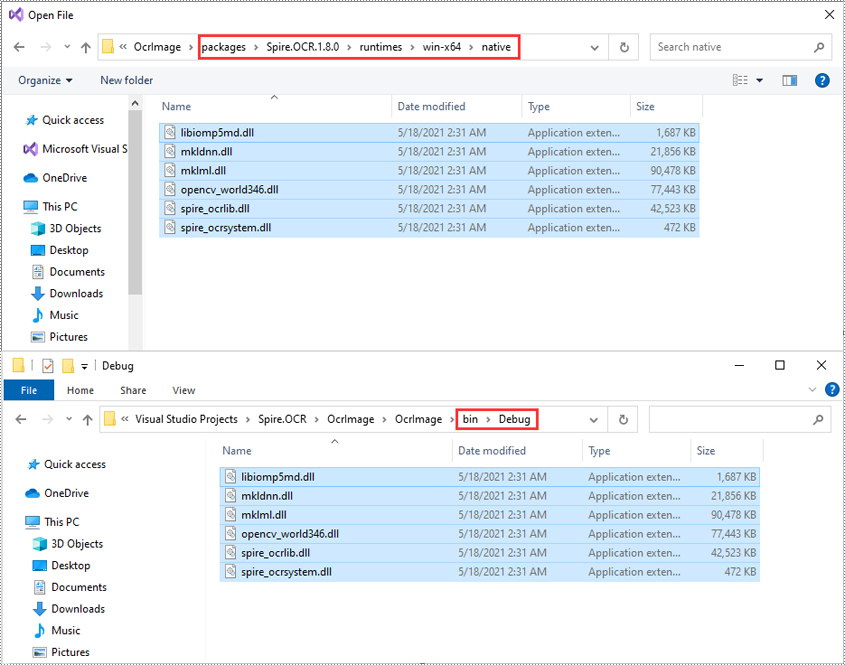
Step 4: Copy DLLs from the "packages" directory to the "Debug" directory in the application.
When you install Spire.OCR through NuGet, NuGet downloads the packages and puts them in your application under a directory called "packages". You need to find the "Spire.OCR" directory under the "packages" directory, then copy the DLLs under the "Spire.OCR" directory (packages\Spire.OCR.1.8.0\runtimes\win-x64\native) to the "Debug" directory of your application.
Now you have successfully included Spire.OCR in your .NET Framework application. You can refer to the following code example to read text from images using Spire.OCR.
- C#
using Spire.OCR;
using System.IO;

namespace OcrImage
{
    internal class Program
    {
        static void Main(string[] args)
        {
            //Create an instance of the OcrScanner class
            OcrScanner scanner = new OcrScanner();

            //Call the OcrScanner.Scan() method to scan text from an image
            scanner.Scan("image.png");

            //Save the scanned text to a .txt file
            string text = scanner.Text.ToString();
            File.WriteAllText("output.txt", text);
        }
    }
}
Apply for a Temporary License
If you'd like to remove the evaluation message from the generated documents, or to get rid of the function limitations, please request a 30-day trial license for yourself.
When you are handling a PDF document with lots of pages, you will most likely need to add new pages to include more information or remove some redundant pages. In this article, you will learn how to programmatically add or delete pages in a PDF document using Spire.PDF for C++.
- Add a Blank Page at the End of a PDF Document in C++
- Insert a Blank Page After a Specific Page in PDF in C++
- Delete an Existing Page in a PDF Document in C++
Install Spire.PDF for C++
There are two ways to integrate Spire.PDF for C++ into your application. One way is to install it through NuGet, and the other way is to download the package from our website and copy the libraries into your program. Installation via NuGet is simpler and more recommended. You can find more details by visiting the following link.
Integrate Spire.PDF for C++ in a C++ Application
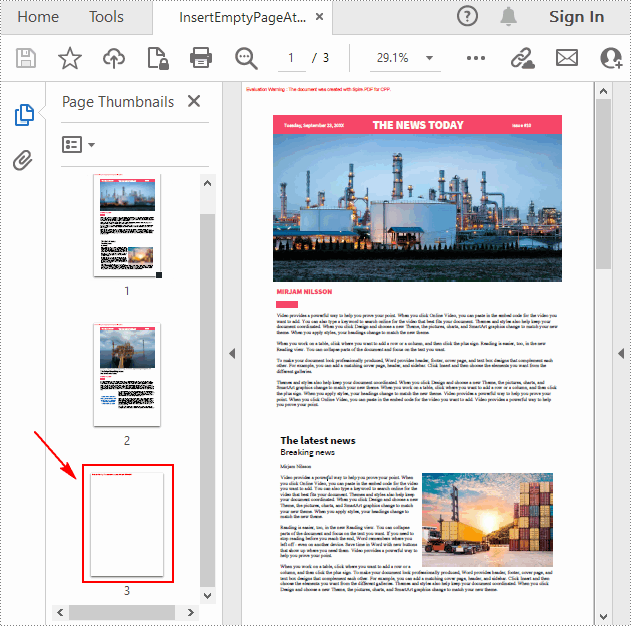
Add a Blank Page at the End of a PDF Document in C++
Spire.PDF for C++ allows you to add an empty page with specific size and margins at the end of the document using PdfDocument->GetPages()->Add(SizeF* size, PdfMargins* margins) method. The following are the detailed steps.
- Create a PdfDocument object.
- Load a sample PDF document using PdfDocument->LoadFromFile() method.
- Create an empty page with the specified size and margins and then append it to the end of the document using PdfDocument->GetPages()->Add(SizeF* size, PdfMargins* margins) method.
- Save the result document using PdfDocument->SaveToFile () method.
- C++
#include "Spire.Pdf.o.h"

using namespace Spire::Pdf;
using namespace std;

int main() {
	//Specify input and output file paths
	wstring inputFile = L"Data\\input.pdf";
	wstring outputFile = L"Output\\InsertEmptyPageAtEnd.pdf";

	//Create a PdfDocument object
	PdfDocument* pdf = new PdfDocument();

	//Load a PDF document
	pdf->LoadFromFile(inputFile.c_str());

	//Add an empty page at the end of the document
	PdfMargins tempVar(0, 0);
	pdf->GetPages()->Add(new SizeF(PdfPageSize::A4()), &tempVar);

	//Save the result document
	pdf->SaveToFile(outputFile.c_str());
	pdf->Close();

	delete pdf;
}
Insert a Blank Page After a Specific Page in PDF in C++
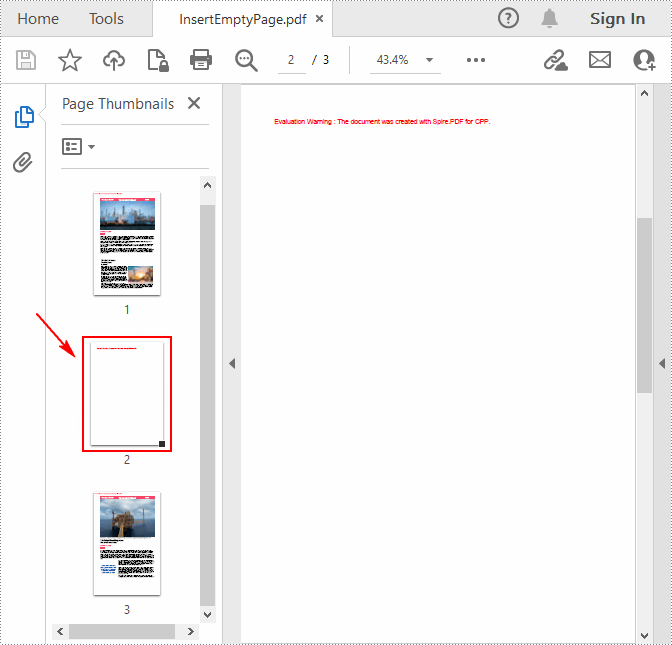
If you want to insert an empty page into a specific position of a PDF document, you can use the PdfDocument->GetPages()->Insert(int index) method. The following are the detailed steps.
- Create a PdfDocument object.
- Load a sample PDF document using PdfDocument->LoadFromFile() method.
- Create a blank page and insert it after a specified PDF page using PdfDocument->GetPages()->Insert(int index) method.
- Save the result document using PdfDocument->SaveToFile () method.
- C++
#include "Spire.Pdf.o.h"

using namespace Spire::Pdf;
using namespace std;

int main() {
	//Specify input and output file paths
	wstring inputFile = L"Data\\input.pdf";
	wstring outputFile = L"Output\\InsertEmptyPage.pdf";

	//Create a PdfDocument object
	PdfDocument* pdf = new PdfDocument();

	//Load a PDF document
	pdf->LoadFromFile(inputFile.c_str());

	//Insert a blank page as the second page
	pdf->GetPages()->Insert(1);

	//Save the result document
	pdf->SaveToFile(outputFile.c_str());
	pdf->Close();

	delete pdf;
}
Delete an Existing Page in a PDF Document in C++
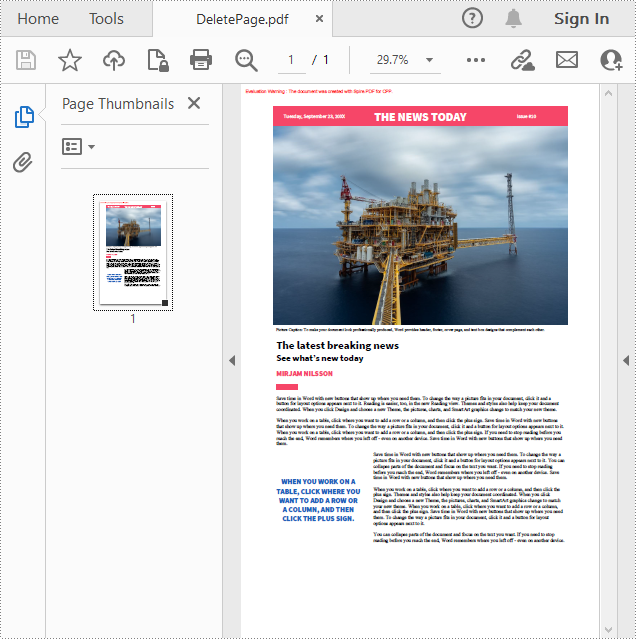
For PDF pages containing useless information, you can also remove them using Spire.PDF for C++. The following are the steps to delete a specific page in PDF.
- Create a PdfDocument object.
- Load a sample PDF document using PdfDocument->LoadFromFile() method.
- Remove a specified page from the document using PdfDocument->GetPages()->RemoveAt(int index) method.
- Save the result document using PdfDocument->SaveToFile () method.
- C++
#include "Spire.Pdf.o.h"

using namespace Spire::Pdf;
using namespace std;

int main() {
	//Specify input and output file paths
	wstring inputFile = L"Data\\input.pdf";
	wstring outputFile = L"Output\\DeletePage.pdf";

	//Create a PdfDocument object
	PdfDocument* pdf = new PdfDocument();

	//Load a PDF document
	pdf->LoadFromFile(inputFile.c_str());

	//Delete the first page in the document
	pdf->GetPages()->RemoveAt(0);

	//Save the result document
	pdf->SaveToFile(outputFile.c_str());
	pdf->Close();

	delete pdf;
}
Apply for a Temporary License
If you'd like to remove the evaluation message from the generated documents, or to get rid of the function limitations, please request a 30-day trial license for yourself.
