Knowledgebase (2417)
Children categories
Merging cells means combining multiple adjacent cells into a larger one. The merged cell will inherit all the properties and contents of the original cells. This feature is particularly useful when you need to create a larger cell to accommodate more content or create a header row. Unmerging cells, on the other hand, involves reverting the merged cells back to the original multiple cells. The unmerged cells will revert back to their original independent state, and you can input different content into each individual cell. Merging and unmerging cells are common operations in spreadsheet software, allowing you to adjust the layout and structure of a table as needed, making the data clearer and easier to understand. In this article, you will learn how to merge or unmerge cells in Excel in Python by using Spire.XLS for Python.
- Merge the Cells of the Specified Row or Column
- Merge Ranges of Cells
- Unmerge the Cells of the Specified Row or Column
- Unmerge Ranges of Cells
Install Spire.XLS for Python
This scenario requires Spire.XLS for Python and plum-dispatch v1.7.4. They can be easily installed in your Windows through the following pip command.
pip install Spire.XLS
If you are unsure how to install, please refer to this tutorial: How to Install Spire.XLS for Python on Windows
Merge the Cells of the Specified Row or Column
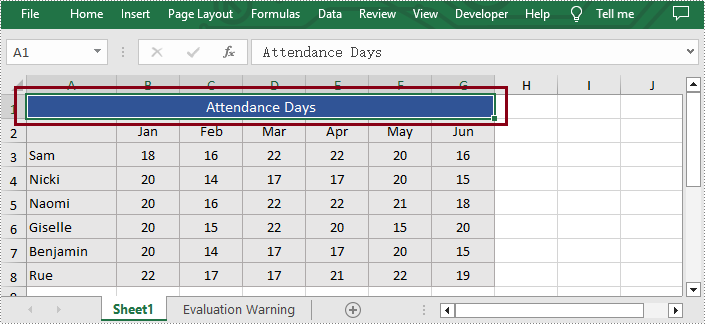
With Spire.XLS for Python, users are able to effortlessly merge the cells of the specific column or row in Excel, thereby enhancing their data manipulation capabilities. The following are the detailed steps.
- Create an object of Workbook class.
- Load a sample Excel file using Workbook.LoadFromFile() method.
- Get the desired worksheet by using Workbook.Worksheets[] property.
- Access the cells of the specific column or row and merge them by calling Worksheet.Columns[].Merge() or Worksheet.Rows[].Merge() methods.
- Save the result file using Workbook.SaveToFile() method.
- Python
from spire.xls import *
from spire.xls.common import *

inputFile = "Sample.xlsx"
outputFile = "MergeRowColumn.xlsx"

#Create an object of Workbook class
workbook = Workbook()

#Load a sample Excel file from disk
workbook.LoadFromFile(inputFile)

#Get the first worksheet of this file
sheet = workbook.Worksheets[0]

#Merge the first column in Excel
#sheet.Columns[0].Merge()

#Merge the first row in Excel
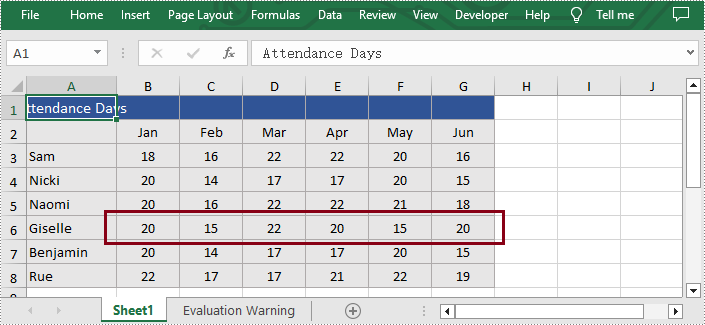
sheet.Rows[0].Merge()

#Save the result file
workbook.SaveToFile(outputFile, ExcelVersion.Version2013)
workbook.Dispose()
Merge Ranges of Cells
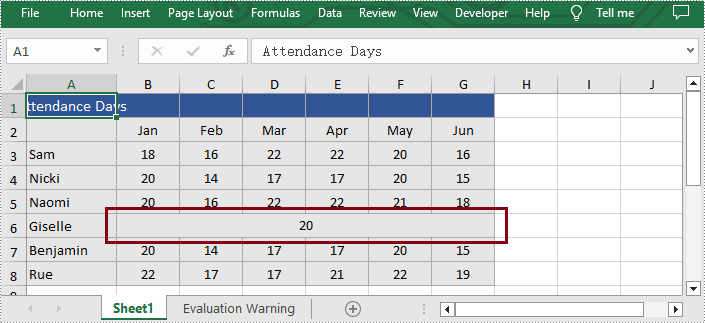
In addition to merging the specific column or row, Spire.XLS for Python also supports users to merge the specified cell ranges. The following are the detailed steps.
- Create an object of Workbook class.
- Load a sample Excel file using Workbook.LoadFromFile() method.
- Get the desired worksheet by using Workbook.Worksheets[] property.
- Access the specific range of cells and merge them together by calling Worksheet.Range[].Merge() method.
- Save the result file using Workbook.SaveToFile() method.
- Python
from spire.xls import *
from spire.xls.common import *

inputFile = "Sample.xlsx"
outputFile = "MergeCellRange.xlsx"

#Create an object of Workbook class
workbook = Workbook()

#Load a sample Excel file from disk
workbook.LoadFromFile(inputFile)

#Get the first worksheet of this file
sheet = workbook.Worksheets[0]

#Merge the particular cell range in Excel
sheet.Range["B6:G6"].Merge()

#Save the result file
workbook.SaveToFile(outputFile, ExcelVersion.Version2013)
workbook.Dispose()
Unmerge the Cells of the Specified Row or Column
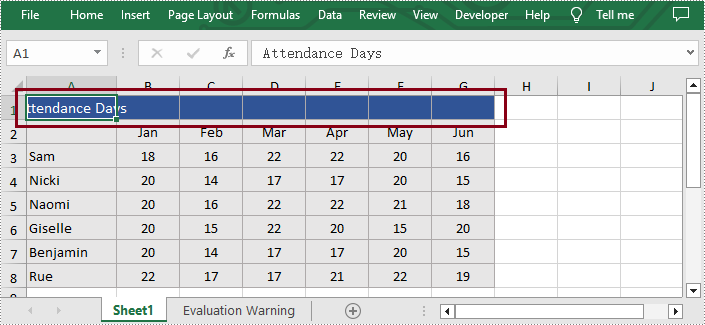
Additionally, users are also allowed to unmerge the merged cells of the specific column or row at any time with Spire.XLS for Python. The following are the detailed steps.
- Create an object of Workbook class.
- Load a sample Excel file using Workbook.LoadFromFile() method.
- Get the desired worksheet by using Workbook.Worksheets[] property.
- Access the merged cells of the specific column or row and unmerge them by calling Worksheet.Columns[].UnMerge() and Worksheet.Rows[].UnMerge() methods.
- Save the result file using Workbook.SaveToFile() method.
- Python
from spire.xls import *
from spire.xls.common import *

inputFile = "MergeRowColumn.xlsx"
outputFile = "UnmergeRowColumn.xlsx"

#Create an object of Workbook class
workbook = Workbook()

#Load a sample file from disk
workbook.LoadFromFile(inputFile)

#Get the first worksheet of this file
sheet = workbook.Worksheets[0]

#Unmerge the first column in Excel
#sheet.Columns[0].UnMerge()

#Unmerge the first column in Excel
sheet.Rows[0].UnMerge()

#Save to file.
workbook.SaveToFile(outputFile, ExcelVersion.Version2013)
workbook.Dispose()
Unmerge Ranges of Cells
What's more, users are also able to unmerge the specified cell ranges using Spire.XLS for Python. The following are the detailed steps.
- Create an object of Workbook class.
- Load a sample Excel file using Workbook.LoadFromFile() method.
- Get the desired worksheet by using Workbook.Worksheets[] property.
- Access the specific cell ranges and unmerge them by calling Worksheet.Range[].UnMerge() method.
- Save the result file using Workbook.SaveToFile() method.
- Python
from spire.xls import *
from spire.xls.common import *

inputFile = "MergeCellRange.xlsx"
outputFile = "UnmergeCellRange.xlsx"

#Create an object of Workbook class
workbook = Workbook()

#Load a sample file from disk
workbook.LoadFromFile(inputFile)

#Get the first worksheet of this file
sheet = workbook.Worksheets[0]

#Unmerge the particular cell range in Excel
sheet.Range["B6:G6"].UnMerge()

#Save to file.
workbook.SaveToFile(outputFile, ExcelVersion.Version2013)
workbook.Dispose()
Apply for a Temporary License
If you'd like to remove the evaluation message from the generated documents, or to get rid of the function limitations, please request a 30-day trial license for yourself.
Hyperlinks are a useful tool in Microsoft Excel that allows users to create clickable links within their spreadsheets. By adding hyperlinks, you can conveniently navigate between different sheets, workbooks, websites, or even specific cells within the same workbook. Whether you need to reference external resources, connect related data, or create interactive reports, hyperlinks can help you achieve your purpose with ease. In this article, we will demonstrate how to add hyperlinks to Excel in Python using Spire.XLS for Python.
Install Spire.XLS for Python
This scenario requires Spire.XLS for Python and plum-dispatch v1.7.4. They can be easily installed in your Windows through the following pip command.
pip install Spire.XLS
If you are unsure how to install, please refer to this tutorial: How to Install Spire.XLS for Python on Windows
Add Text Hyperlinks to Excel in Python
Text hyperlinks in Excel are clickable words or phrases that can direct users to different parts of the Excel file, external resources, or email addresses. The following steps explain how to add a text hyperlink to an Excel file using Spire.XLS for Python:
- Create a Workbook object.
- Get the desired worksheet using Workbook.Worksheets[] property.
- Access the specific cell that you want to add a hyperlink to using Worksheet.Range[] property.
- Add a hyperlink to the cell using Worksheet.HyperLinks.Add() method.
- Set the type, display text and address of the hyperlink using XlsHyperLink.Type, XlsHyperLink.TextToDisplay and XlsHyperLink.Address properties.
- Save the resulting file using Workbook.SaveToFile() method.
- Python
from spire.xls import *
from spire.xls.common import *

# Create a Workbook object
workbook = Workbook()

# Get the first worksheet
sheet = workbook.Worksheets[0]

# Add a text hyperlink that leads to a webpage
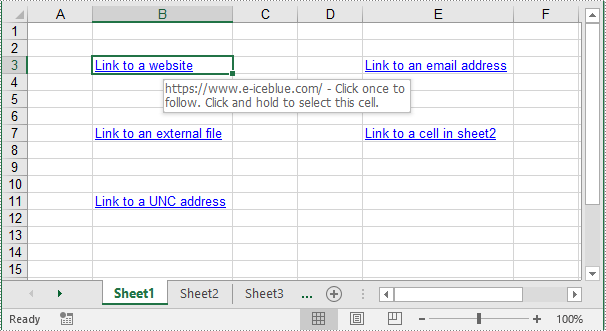
cell1 = sheet.Range["B3"]
urlLink = sheet.HyperLinks.Add(cell1)
urlLink.Type = HyperLinkType.Url
urlLink.TextToDisplay = "Link to a website"
urlLink.Address = "https://www.e-iceblue.com/"

# Add a text hyperlink that leads to an email address
cell2 = sheet.Range["E3"]
mailLink = sheet.HyperLinks.Add(cell2)
mailLink.Type = HyperLinkType.Url
mailLink.TextToDisplay = "Link to an email address"
mailLink.Address = "mailto:example@outlook.com"

# Add a text hyperlink that leads to an external file
cell3 = sheet.Range["B7"]
fileLink = sheet.HyperLinks.Add(cell3)
fileLink.Type = HyperLinkType.File
fileLink.TextToDisplay = "Link to an external file"
fileLink.Address = "C:\\Users\\Administrator\\Desktop\\Report.xlsx"

# Add a text hyperlink that leads to a cell in another sheet
cell4 = sheet.Range["E7"]
linkToSheet = sheet.HyperLinks.Add(cell4)
linkToSheet.Type = HyperLinkType.Workbook
linkToSheet.TextToDisplay = "Link to a cell in sheet2"
linkToSheet.Address = "Sheet2!B5"

# Add a text hyperlink that leads to a UNC address
cell5 = sheet.Range["B11"]
uncLink = sheet.HyperLinks.Add(cell5)
uncLink.Type = HyperLinkType.Unc
uncLink.TextToDisplay = "Link to a UNC address"
uncLink.Address = "\\\\192.168.0.121"

# Autofit column widths
sheet.AutoFitColumn(2)
sheet.AutoFitColumn(5)

# Save the resulting file
workbook.SaveToFile("AddTextHyperlinks.xlsx", ExcelVersion.Version2016)
workbook.Dispose()
Add Image Hyperlinks to Excel in Python
Image hyperlinks in Excel work similarly to text hyperlinks but use images as clickable elements instead of words or phrases. They provide a visually appealing and intuitive way to navigate within the spreadsheet or to external resources. The following steps explain how to add an image hyperlink to an Excel file using Spire.XLS for Python:
- Create a Workbook object.
- Get the desired worksheet using Workbook.Worksheets[] property.
- Insert an image into the worksheet using Worksheet.Pictures.Add() method.
- Add a hyperlink to the image using XlsBitmapShape.SetHyperLink() method.
- Save the result file using Workbook.SaveToFile() method.
- Python
from spire.xls import *
from spire.xls.common import *

# Create a Workbook object
workbook = Workbook()

# Get the first worksheet
sheet = workbook.Worksheets[0]

# Add text to the worksheet
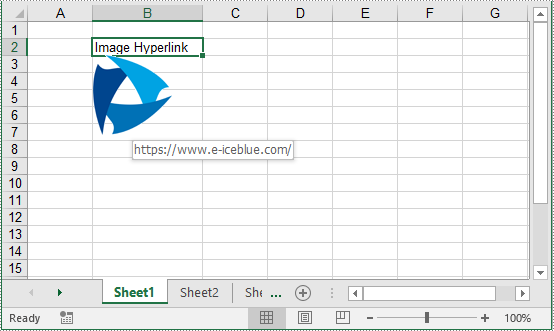
sheet.Range["B2"].Text = "Image Hyperlink"
# Set the width of the second column
sheet.Columns[1].ColumnWidth = 15

# Insert an image into the worksheet
picture = sheet.Pictures.Add(3, 2, "logo2.png")

# Add a hyperlink to the image
picture.SetHyperLink("https://www.e-iceblue.com", True)

# Save the resulting file
workbook.SaveToFile("AddImageHyperlink.xlsx", ExcelVersion.Version2013)
workbook.Dispose()
Apply for a Temporary License
If you'd like to remove the evaluation message from the generated documents, or to get rid of the function limitations, please request a 30-day trial license for yourself.
Spire.Presentation for Python is a Python library for reading, creating, editing and converting PowerPoint (.ppt or .pptx) files in any Python application. This article shows you how to install Spire.Presentation for Python on Windows.
Step 1
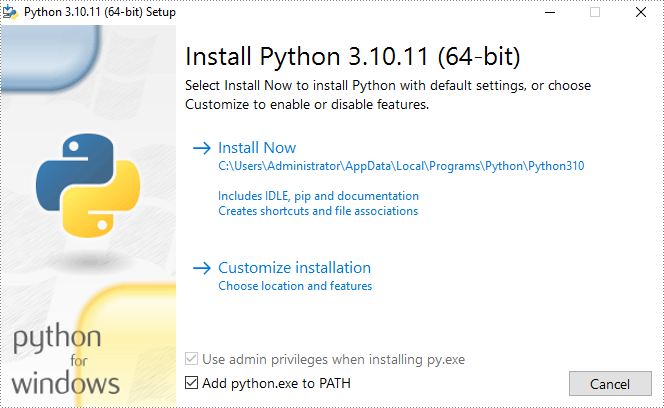
Download the latest version of Python and install it on your computer. If you have already installed it, skip to step 2.
Step 2
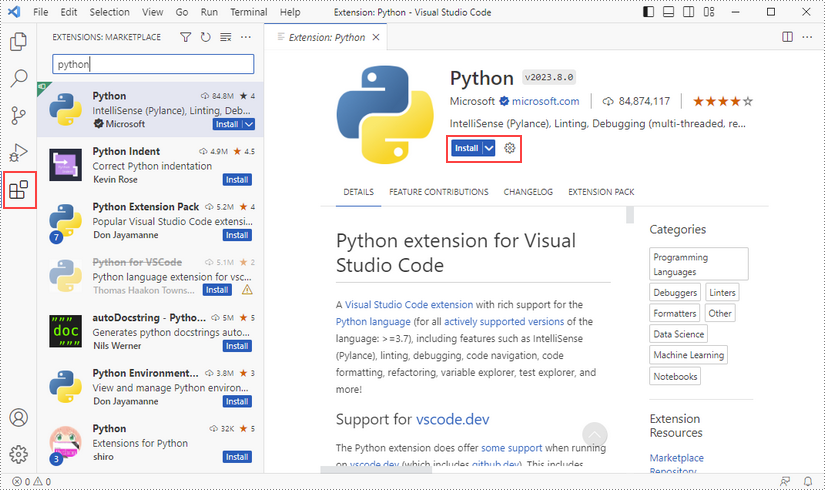
Click "Extensions" in VS Code, search for "Python" and then install it.
Step 3
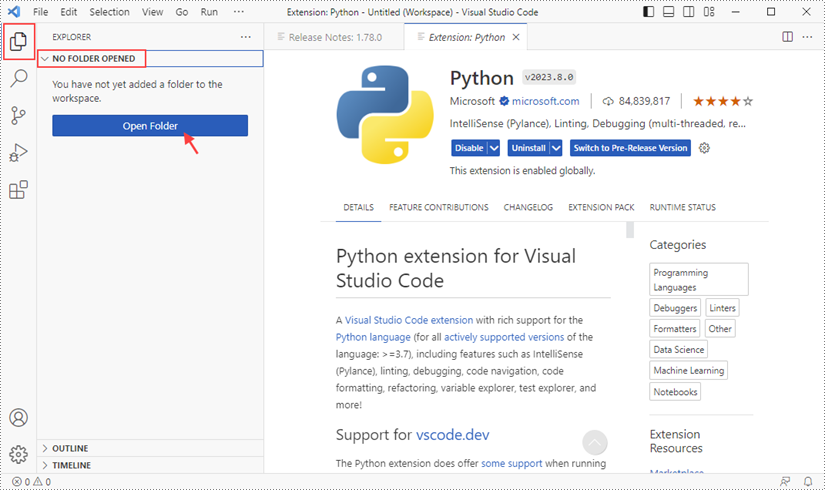
Click "Explorer" - "NO FOLRDER OPENED" - "Open Folder".
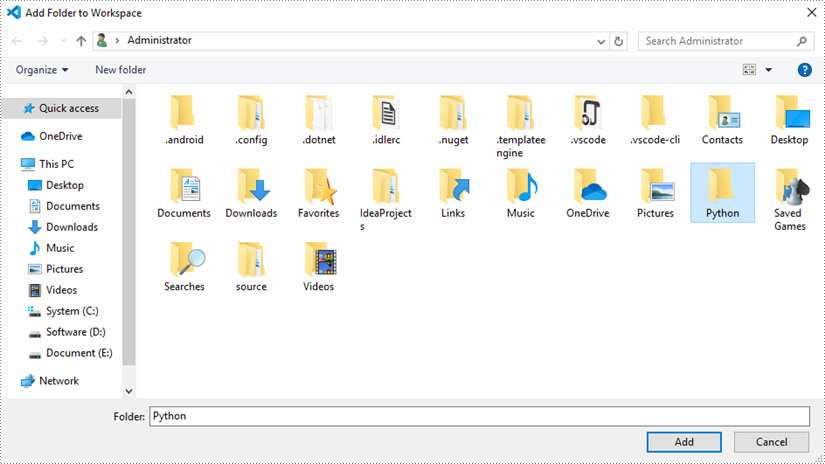
Choose an existing folder as the workspace, or you can create a new folder and then select it.
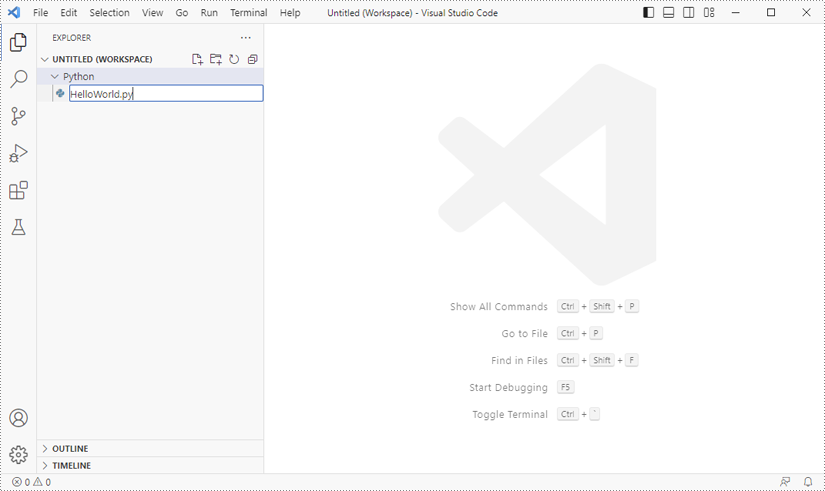
Add a .py file to the folder you just added (Python folder in this case), and name it whatever you like.
Step 4
Click "Terminal" and then "New Terminal".
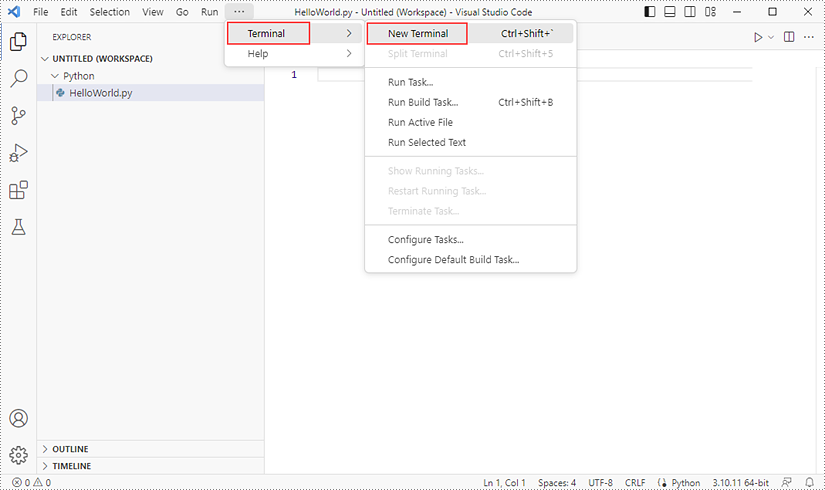
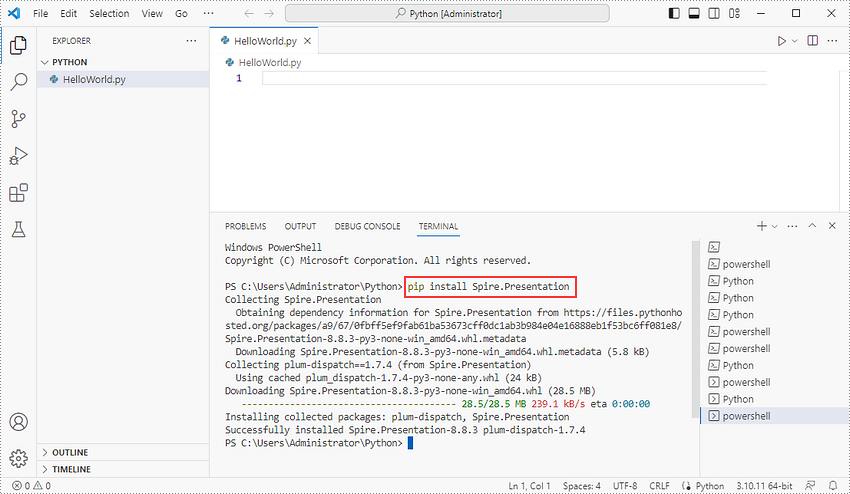
Input the following pip command to install Spire.Presentation for Python and plum-dispatch v1.7.4.
pip install Spire.Presentation
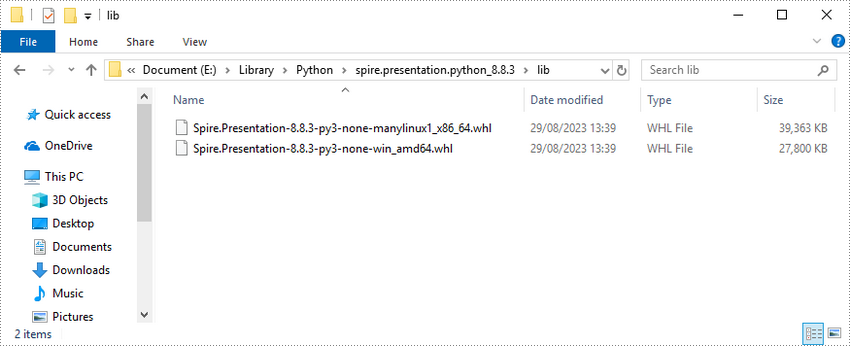
Alternatively, you can download Spire.Presentation for Python from our website, and unzip it to get two .whl files from the "lib" folder. They're for Linux system and Windows system respectively.
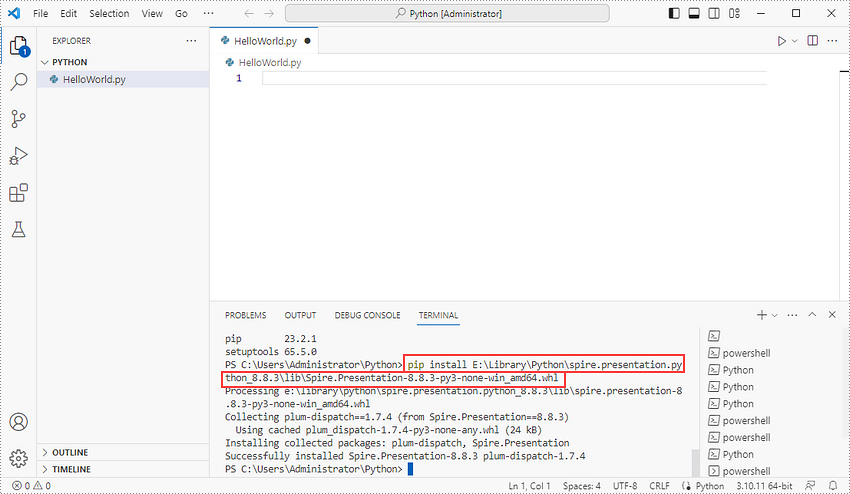
After that, install Spire.Presentation for Python and plum-dispatch v1.7.4 by running the following pip command.
pip install E:\Library\Python\spire.presentation.python_8.8.3\lib\Spire.Presentation-8.8.3-py3-none-win_amd64.whl
Step 5
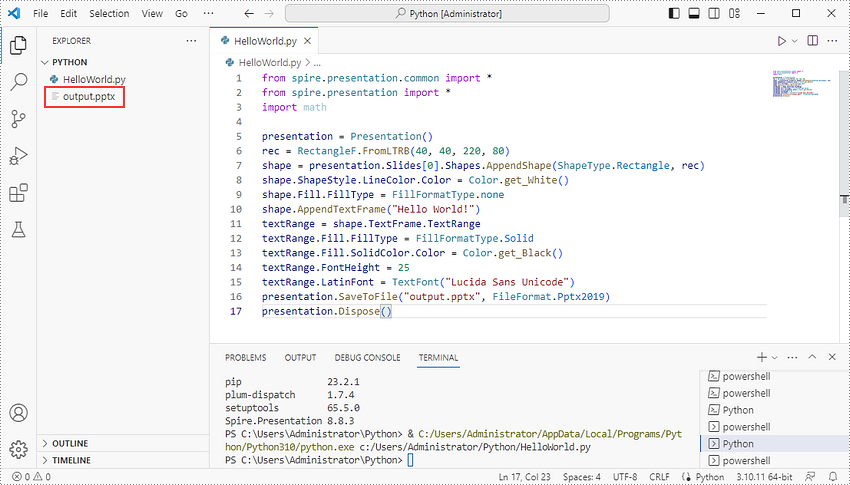
Add the following code snippet to the "HelloWorld.py" file.
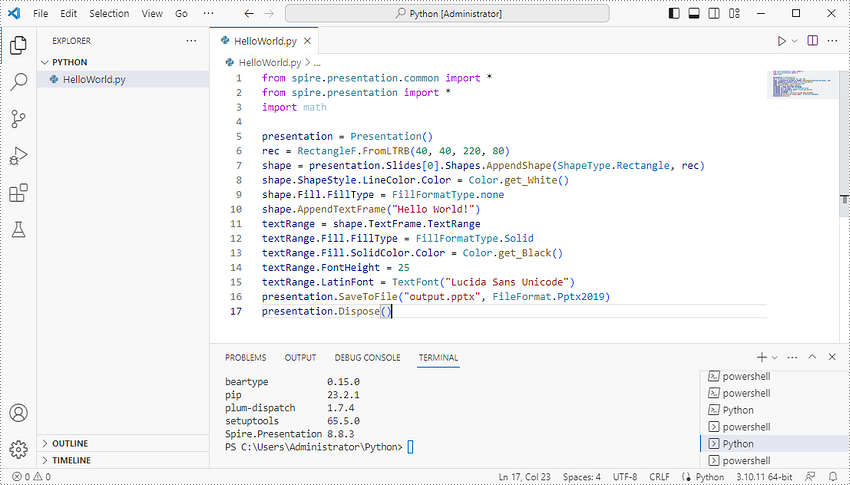
Once you run the Python file, you'll see the result PowerPoint document in the "EXPORER" panel.