
Knowledgebase (2417)
Children categories
Merging and unmerging cells are two essential features in Microsoft Excel that allow users to create a more organized and visually appealing spreadsheet. Merging cells enables users to combine adjacent cells to create a single cell that spans multiple columns or rows. This feature is particularly useful for creating headers, titles, or labels for tables, as well as for combining data into a more concise format.
Unmerging cells, on the other hand, is the process of separating a merged cell back into individual cells. This feature is useful when users need to apply different formatting or styles to individual cells within a merged cell or when they want to separate data that were previously combined.
In this article, we will demonstrate how to merge or unmerge cells in an Excel file in C++ using Spire.XLS for C++ library.
- Merge Specific Cells in Excel in C++
- Unmerge Specific Merged Cells in Excel in C++
- Unmerge All Merged Cells in Excel in C++
Install Spire.XLS for C++
There are two ways to integrate Spire.XLS for C++ into your application. One way is to install it through NuGet, and the other way is to download the package from our website and copy the libraries into your program. Installation via NuGet is simpler and more recommended. You can find more details by visiting the following link.
Integrate Spire.XLS for C++ in a C++ Application
Merge Specific Cells in Excel in C++
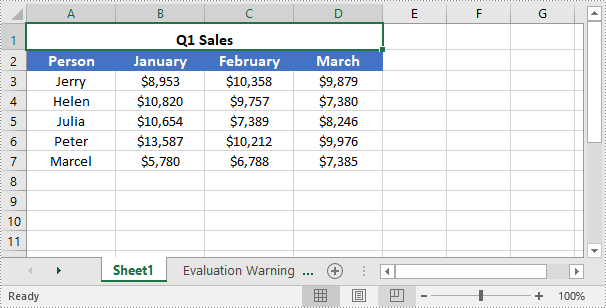
You can easily use the IXLSRange->Merge() method provided by Spire.XLS for C++ to merge a specific range of cells into a single cell. The detailed steps are as follows:
- Initialize an instance of the Workbook instance.
- Load an Excel file using the Workbook->LoadFromFile(LPCWSTR_S fileName) method.
- Get a specific worksheet of the file using the Workbbok->GetWorksheets()->Get(int index) method.
- Get the cell range that you want to merge using the Worksheet->GetRange(LPCWSTR_S name) method.
- Merge the cell range using the IXLSRange->Merge() method.
- Center the text in the merged cell using the IXLSRange->GetStyle()->SetHorizontalAlignment(HorizontalAlignType::Center) method.
- Save the result file to a specific location using the Workbook->SaveToFile(LPCWSTR_S fileName, ExcelVersion version) method.
- C++
#include "Spire.Xls.o.h";

using namespace Spire::Xls;
using namespace std;


int main()
{
	//Specify the input and output file paths
	wstring inputFile = L"Template.xlsx";
	wstring outputFile = L"MergeCells.xlsx";

	//Initialize an instance of the Workbook instance
	intrusive_ptr<Workbook> workbook = new Workbook();

	//Load an Excel file
	workbook->LoadFromFile(inputFile.c_str());

	//Get the first worksheet of the file
	intrusive_ptr<Worksheet> sheet = dynamic_pointer_cast<Worksheet>(workbook->GetWorksheets()->Get(0));

	//Merge a particular range of cells in the worksheet
	intrusive_ptr<IXLSRange> range = sheet->GetRange(L"A1:D1");
	range->Merge();

	//Center the text in the merged cell
	range->GetStyle()->SetHorizontalAlignment(HorizontalAlignType::Center);

	//Save the result file to the specific path
	workbook->SaveToFile(outputFile.c_str(), ExcelVersion::Version2013);
	workbook->Dispose();
}
Unmerge Specific Merged Cells in Excel in C++
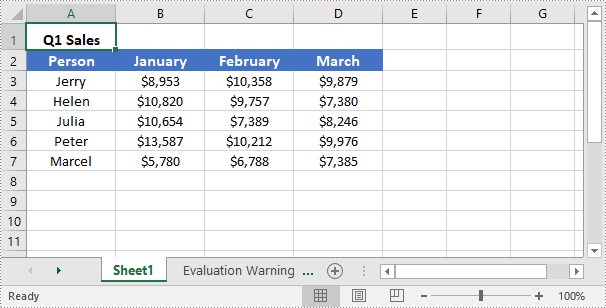
To unmerge merged cells, you can use the IXLSRange->UnMerge() method. The detailed steps are as follows:
- Initialize an instance of the Workbook instance.
- Load an Excel file using the Workbook->LoadFromFile(LPCWSTR_S fileName) method.
- Get a specific worksheet of the file using the Workbbok->GetWorksheets()->Get(int index) method.
- Get the cell that you want to unmerge using the Worksheet->GetRange(LPCWSTR_S name) method.
- Unmerge the cell using the IXLSRange->UnMerge() method.
- Save the result file to a specific location using the Workbook->SaveToFile(LPCWSTR_S fileName, ExcelVersion version) method.
- C++
#include "Spire.Xls.o.h";

using namespace Spire::Xls;
using namespace std;

int main()
{
	//Specify the input and output file paths
	wstring inputFile = L"MergeCells.xlsx";
	wstring outputFile = L"UnmergeCells.xlsx";

	//Initialize an instance of the Workbook instance
	intrusive_ptr<Workbook> workbook = new Workbook();

	//Load an Excel file
	workbook->LoadFromFile(inputFile.c_str());

	//Get the first worksheet of the file
	intrusive_ptr<Worksheet> sheet = dynamic_pointer_cast<Worksheet>(workbook->GetWorksheets()->Get(0));

	//Unmerge a specific merged cell in the worksheet
	intrusive_ptr<IXLSRange> range = sheet->GetRange(L"A1");
	range->UnMerge();

	//Save the result file to the specific path
	workbook->SaveToFile(outputFile.c_str(), ExcelVersion::Version2013);
	workbook->Dispose();
}
Unmerge All Merged Cells in Excel in C++
Spire.XLS for C++ provides the Worksheet->GetMergedCells() method which enables you to obtain all merged cells in a specific worksheet. Once the merged cells are obtained, you can use the IXLSRange->UnMerge() method to unmerge them. The detailed steps are as follows:
- Initialize an instance of the Workbook instance.
- Load an Excel file using the Workbook->LoadFromFile(LPCWSTR_S fileName) method.
- Get a specific worksheet of the file using the Workbbok->GetWorksheets()->Get(int index) method.
- Get the merged cells in the worksheet using the Worksheet->GetMergedCells() method.
- Iterate through all the merged cells, then unmerge each merged cell using the IXLSRange->UnMerge() method.
- Save the result file to a specific location using the Workbook->SaveToFile(LPCWSTR_S fileName, ExcelVersion version) method.
- C++
#include ""Spire.Xls.o.h"";

using namespace Spire::Xls;
using namespace std;

int main()
{
	//Specify the input and output file paths
	wstring inputFile = L""MergeCells.xlsx"";
	wstring outputFile = L""UnmergeAllCells.xlsx"";

	//Initialize an instance of the Workbook class
	intrusive_ptr<Workbook> workbook = new Workbook();

	//Load an Excel file
	workbook->LoadFromFile(inputFile.c_str());

	//Get the first worksheet
	intrusive_ptr<Worksheet> sheet = dynamic_pointer_cast<Worksheet>(workbook->GetWorksheets()->Get(0));

	//Get the merged cell ranges in the first worksheet
	intrusive_ptr<Spire::Xls::IList<XlsRange>> range = dynamic_pointer_cast<Spire::Xls::IList<XlsRange>>(sheet->GetMergedCells());

	//Iterate through the merged cells
	for (int i = 0; i < range->GetCount(); i++)
	{
		intrusive_ptr<XlsRange> cell = range->GetItem(i);
		//Unmerge each merged cell
		cell->UnMerge();
	}

	//Save the result file to the specific path
	workbook->SaveToFile(outputFile.c_str(), ExcelVersion::Version2013);
	workbook->Dispose();
}
Apply for a Temporary License
If you'd like to remove the evaluation message from the generated documents, or to get rid of the function limitations, please request a 30-day trial license for yourself.
Merging Word documents can be useful when you want to consolidate information from multiple files. For example, if you have a series of reports that relate to a specific project or topic, you may want to merge them into one document for easier access, distribution, and archiving purposes. In this article, we will demonstrate how to merge Word documents into one in C++ using Spire.Doc for C++.
Install Spire.Doc for C++
There are two ways to integrate Spire.Doc for C++ into your application. One way is to install it through NuGet, and the other way is to download the package from our website and copy the libraries into your program. Installation via NuGet is simpler and more recommended. You can find more details by visiting the following link.
Integrate Spire.Doc for C++ in a C++ Application
Merge Word Documents by Inserting Files in C++
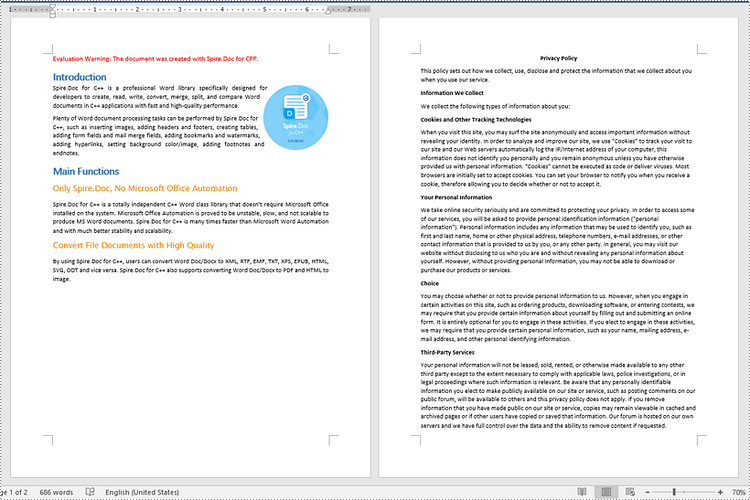
The Document->InsertTextFromFile(LPCWSTR_S fileName, FileFormat fileFormat) method provided by Spire.Doc for C++ enables developers to merge Word documents by inserting the contents of other Word documents into the original Word document. Using this method, the inserted contents will begin on a new page. The detailed steps are as follows:
- Initialize an instance of the Document class.
- Load a Word document using the Document->LoadFromFile(LPCWSTR_S fileName) method.
- Insert another document into the loaded Word document using the Document->InsertTextFromFile(LPCWSTR_S fileName, FileFormat fileFormat) method.
- Save the result document to a specific location using the Document->SaveToFile(LPCWSTR_S fileName, FileFormat fileFormat) method.
- C++
#include "Spire.Doc.o.h"

using namespace Spire::Doc;
using namespace std;

int main()
{
	//Specify the input file paths
	wstring inputFile_1 = L"Sample1.docx";
	wstring inputFile_2 = L"Sample2.docx";
	//Specify the output file path
	wstring outputFile = L"MergeWordDocumentsByInsertingFile.docx";

	//Initialize an instance of the Document class
	intrusive_ptr<Document> doc = new Document();
	//Load a Word document
	doc->LoadFromFile(inputFile_1.c_str());

	//Insert another document into the loaded document
	doc->InsertTextFromFile(inputFile_2.c_str(), FileFormat::Auto);

	//Save the result document to a specific location
	doc->SaveToFile(outputFile.c_str(), FileFormat::Docx2013);
	doc->Close();
}
Merge Word Documents by Cloning Contents in C++
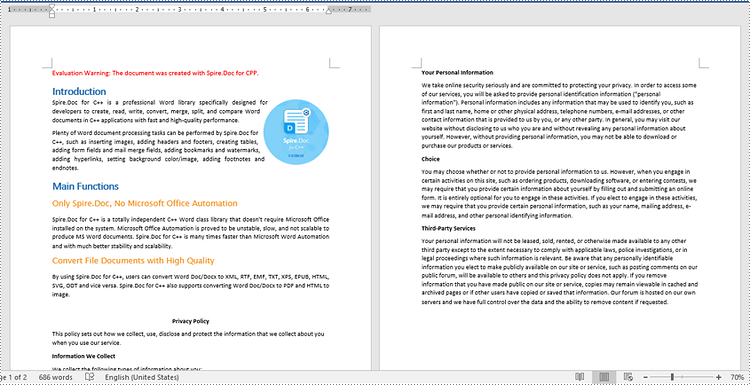
If you want to merge documents without starting from a new page, you can clone the contents of other documents and add them to the end of the original document. This approach can avoid creating unwanted section breaks. The detailed steps are as follows:
- Initialize an instance of the Document class.
- Load the first Word document using the Document->LoadFromFile(LPCWSTR_S fileName) method.
- Get the last section of the first Word document using the Document->GetLastSection() method.
- Initialize an instance of the Document class.
- Load the second Word document using the Document->LoadFromFile(LPCWSTR_S fileName) method.
- Iterate through all sections of the second Word document, and then iterate through all child objects of each section.
- Clone each child object using the DocumentObject->Clone() method.
- Add the cloned child object to the end of the last section of the first Word document using the Section->GetBody()->GetChildObjects()->Add(intrusive_ptr<IDocumentObject> entity) method.
- Save the first Word document to a specific location using the Document->SaveToFile(LPCWSTR_S fileName, FileFormat fileFormat) method.
- C++
#include "Spire.Doc.o.h"

using namespace Spire::Doc;
using namespace std;

int main()
{
	//Specify the input file paths
	wstring inputFile_1 = L"Sample1.docx";
	wstring inputFile_2 = L"Sample2.docx";
	//Specify the output file path
	wstring outputFile =  L"MergeWordDocumentsByCloningContents.docx";

	//Initialize an instance of the Document class
	intrusive_ptr<Document> document1 = new Document();
	//Load the first Word document
	document1->LoadFromFile(inputFile_1.c_str(), FileFormat::Auto);
	//Get the last section of the first Word document
	intrusive_ptr<Section> lastSection = document1->GetLastSection();

	//Initialize an instance of the Document class
	intrusive_ptr<Document> document2 = new Document();
	//Load the second Word document
	document2->LoadFromFile(inputFile_2.c_str(), FileFormat::Auto);

	//Get the number of sections of the second Word document
	int sectionCount = document2->GetSections()->GetCount();

	//Iterate through the sections of the second Word document
	for (int i = 0; i < sectionCount; i++)
	{
		intrusive_ptr<Section> section = document2->GetSections()->GetItemInSectionCollection(i);
		int sectionChildObjectsCount = section->GetBody()->GetChildObjects()->GetCount();
		//Iterate through the child objects in each section of the second Word document
		for (int j = 0; j < sectionChildObjectsCount; j++)
		{
			intrusive_ptr<DocumentObject> documentObject = section->GetBody()->GetChildObjects()->GetItem(j);
			//Clone each child object
			intrusive_ptr<DocumentObject> clonedObject = documentObject->Clone();
			//Add each cloned child object to the end of the last section of the first Word document
			lastSection->GetBody()->GetChildObjects()->Add(clonedObject);
		}
	}

	//Save the first Word document to a specific location
	document1->SaveToFile(outputFile.c_str(), FileFormat::Docx);
	document1->Close();
	document2->Close();
}
Apply for a Temporary License
If you'd like to remove the evaluation message from the generated documents, or to get rid of the function limitations, please request a 30-day trial license for yourself.
When it comes to creating professional documents, choosing the right font is crucial. Using multiple fonts in one document can help distinguish different types of content such as headings, body text or annotations, ultimately enhancing the document's readability. Moreover, different fonts have unique emotional tones and styles. For instance, handwritten fonts often convey warmth and intimacy while serif fonts are ideal for traditional and formal contexts.
In this article, you will learn how to set the font in a Word document in Java using Spire.Doc for Java.
- Apply a Font to a Paragraph in Java
- Apply Multiple Fonts to a Paragraph in Java
- Use a Private Font in a Word Document in Java
- Change the Font of the Specified Text in Java
Install Spire.Doc for Java
First of all, you're required to add the Spire.Doc.jar file as a dependency in your Java program. The JAR file can be downloaded from this link. If you use Maven, you can easily import the JAR file in your application by adding the following code to your project's pom.xml file.
<repositories>
    <repository>
        <id>com.e-iceblue</id>
        <name>e-iceblue</name>
        <url>https://repo.e-iceblue.com/nexus/content/groups/public/</url>
    </repository>
</repositories>
<dependencies>
    <dependency>
        <groupId>e-iceblue</groupId>
        <artifactId>spire.doc</artifactId>
        <version>14.8.4</version>
    </dependency>
</dependencies>
Apply a Font to a Paragraph in Java
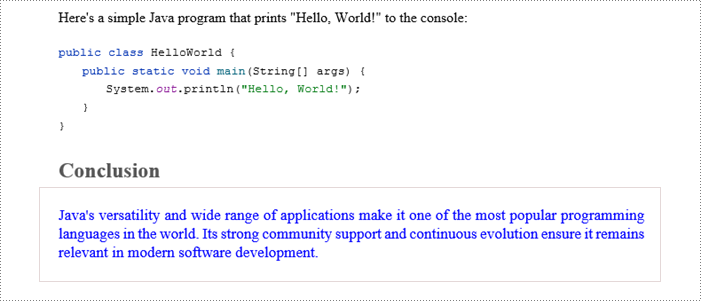
Typically, a consistent font style throughout a paragraph keeps the text looking neat. Spire.Doc for Java provides the ParagraphStyle class, allowing you to define the font name, size, style, and text color using a single object. After creating a style, you can easily apply it to format a paragraph according to your preferred settings.
The steps to set the font for a paragraph using Java are as follows:
- Create a Document object.
- Load a Word file, and add a paragraph to it.
- Append text to the paragraph.
- Create a ParagraphStyle object.
- Get the CharacterFormat object using the ParagraphStyle.getCharacterFormat() method.
- Set the font style, name, size and text color using the methods under the CharacterFormat object.
- Add the style to the document using the Document.getStyles().add() method.
- Apply the defined style to the paragraph using the Paragraph.applyStyle() method.
- Save the document to a different Word file.
- Java
import com.spire.doc.Document;
import com.spire.doc.FileFormat;
import com.spire.doc.Section;
import com.spire.doc.documents.Paragraph;
import com.spire.doc.documents.ParagraphStyle;

import java.awt.*;

public class ApplyFontToParagraph {

    public static void main(String[] args) {

        // Create a Document instance
        Document document = new Document();

        // Load a Word document
        document.loadFromFile("C:\\Users\\Administrator\\Desktop\\sample.docx");

        // Get the last section
        Section section = document.getLastSection();

        // Add a paragraph
        Paragraph paragraph = section.addParagraph();

        // Append text to the paragraph
        paragraph.appendText("Java's versatility and wide range of applications make it one of the most popular " +
                "programming languages in the world. Its strong community support and continuous evolution ensure " +
                "it remains relevant in modern software development.");

        // Create a ParagraphStyle object
        ParagraphStyle style = new ParagraphStyle(document);

        // Set the style name
        style.setName("MyStyle");

        // Set the font style, name, size and text color
        style.getCharacterFormat().setBold(false);
        style.getCharacterFormat().setTextColor(Color.blue);
        style.getCharacterFormat().setFontName("Times New Roman");
        style.getCharacterFormat().setFontSize(13f);

        // Add the style to document
        document.getStyles().add(style);

        // Apply the style to the paragraph
        paragraph.applyStyle(style.getName());

        // Apply the style to an existing paragraph
        // section.getParagraphs().get(1).applyStyle(style.getName());

        // Save the document to file
        document.saveToFile("output/ApplyFont.docx", FileFormat.Docx);

        // Dispose resources
        document.dispose();
    }
}
Apply Multiple Fonts to a Paragraph in Java
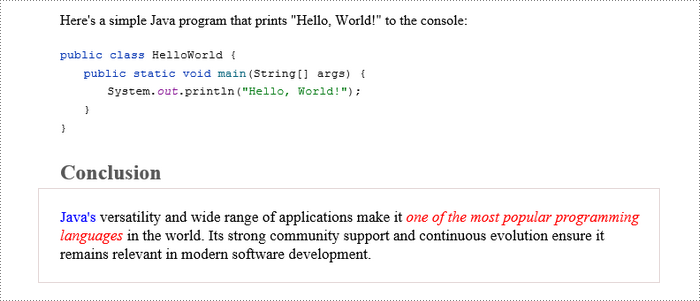
In certain situations, you might want to apply different fonts to various parts of the same paragraph to highlight important information. Spire.Doc for Java offers the TextRange class, which enables you to assign distinct styles to specific segments of text within a paragraph. To achieve this, ensure that the text requiring different styles is organized into separate text ranges.
The steps to apply multiple fonts in a paragraph using Java are as follows:
- Create a Document object.
- Load a Word file, and add a paragraph to it.
- Append text to the paragraph using the Paragraph.appendText() method, which returns a TextRange object.
- Append more text that needs to be styled differently to the paragraph and return different TextRange objects.
- Create a ParagraphStyle object with the basic font information and apply it to the paragraph.
- Change the font name, style, size and text color of the specified text range using the methods under the specific TextRange object.
- Save the document to a different Word file.
- Java
import com.spire.doc.Document;
import com.spire.doc.FileFormat;
import com.spire.doc.Section;
import com.spire.doc.documents.HorizontalAlignment;
import com.spire.doc.documents.Paragraph;
import com.spire.doc.documents.ParagraphStyle;
import com.spire.doc.fields.TextRange;

import java.awt.*;

public class ApplyMultipleFonts {

    public static void main(String[] args) {

        // Create a Document object
        Document document = new Document();

        // Load a Word document
        document.loadFromFile("C:\\Users\\Administrator\\Desktop\\sample.docx");

        // Get the last section
        Section section = document.getLastSection();

        // Add a paragraph
        Paragraph paragraph = section.addParagraph();

        // Append text to the paragraph
        TextRange textRange1 = paragraph.appendText("Java's");
        TextRange textRange2 = paragraph.appendText(" versatility and wide range of applications make it ");
        TextRange textRange3 = paragraph.appendText("one of the most popular programming languages");
        TextRange textRange4 = paragraph.appendText(" in the world. Its strong community support and continuous evolution " +
                "ensure it remains relevant in modern software development.");

        // Create a ParagraphStyle object
        ParagraphStyle style = new ParagraphStyle(document);
        style.setName("MyStyle");
        style.getCharacterFormat().setBold(false);
        style.getCharacterFormat().setTextColor(Color.black);
        style.getCharacterFormat().setFontName("Times New Roman");
        style.getCharacterFormat().setFontSize(13f);

        // Add the style the document
        document.getStyles().add(style);

        // Apply the style to the paragraph
        paragraph.applyStyle(style.getName());

        // Change the font style of the specified text ranges
        textRange1.getCharacterFormat().setTextColor(Color.blue);
        textRange3.getCharacterFormat().setItalic(true);
        textRange3.getCharacterFormat().setTextColor(Color.red);

        // Change the font name and size if you want
        // textRange1.getCharacterFormat().setFontName("Arial");
        // textRange1.getCharacterFormat().setFontSize(15f);

        // Set the horizontal alignment
        paragraph.getFormat().setHorizontalAlignment(HorizontalAlignment.Left);

        // Save the document to a docx file
        document.saveToFile("output/ApplyMultipleFonts.docx", FileFormat.Docx_2019);

        // Dispose resources
        document.dispose();
    }
}
Use a Private Font in a Word Document in Java
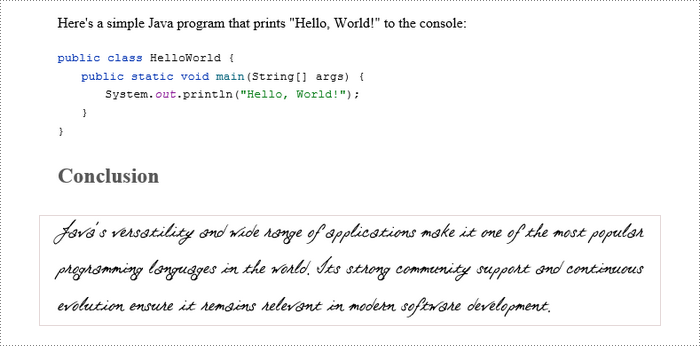
In creative fields like graphic design and marketing, incorporating private fonts in a Word document can enhance aesthetics, making it more engaging and visually unique. To add a custom font to a document, use the Document.getPrivateFontList().add() method. To ensure the document displays correctly on systems without the font installed, embed the font using the Document.setEmbedFontsInFile() method.
The steps to incorporate private fonts in a Word document are as follows:
- Create a Document object.
- Load a Word file, and add a paragraph to it.
- Create a PrivateFontPath object, specifying the name and path of a private font.
- Add the font to document using the Document.getPrivateFontList().add() method.
- Embed fonts in the generated file by passing true to the Document.setEmbedFontsInFile() method.
- Apply the font to the paragraph using the TextRange.getCharacterFormat().setFontName() method.
- Save the document to a different Word file.
- Java
import com.spire.doc.Document;
import com.spire.doc.FileFormat;
import com.spire.doc.PrivateFontPath;
import com.spire.doc.Section;
import com.spire.doc.documents.Paragraph;
import com.spire.doc.fields.TextRange;

public class ApplyPrivateFont {

    public static void main(String[] args) {

        // Create a Document instance
        Document document = new Document();

        // Load a Word document
        document.loadFromFile("C:\\Users\\Administrator\\Desktop\\sample.docx");

        // Get the last section
        Section section = document.getLastSection();

        // Add a paragraph
        Paragraph paragraph = section.addParagraph();

        // Append text to the paragraph
        TextRange textRange = paragraph.appendText("Java's versatility and wide range of applications make it one of the most popular " +
                "programming languages in the world. Its strong community support and continuous evolution ensure " +
                "it remains relevant in modern software development.");

        // Create a PrivateFontPath object, specifying font name and path
        PrivateFontPath fontPath = new PrivateFontPath();
        fontPath.setFontName("Otto");
        fontPath.setFontPath("C:\\Users\\Administrator\\Desktop\\Otto.ttf");

        // Add the private font to the document
        document.getPrivateFontList().add(fontPath);

        // Embed fonts in the generated file
        document.setEmbedFontsInFile(true);

        // Apply font to text range
        textRange.getCharacterFormat().setFontName("Otto");
        textRange.getCharacterFormat().setFontSize(28f);

        // Save the document to file
        document.saveToFile("output/ApplyPrivateFont.docx", FileFormat.Docx);

        // Dispose resources
        document.dispose();
    }
}
Change the Font of the Specified Text in Java
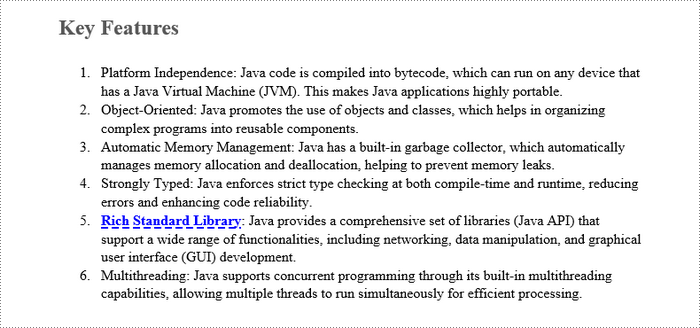
Changing the font of specific text can highlight key information, enhancing its visibility for readers. Spire.Doc for Java offers the Document.findAllString() method, allowing developers to search for a specified string within an existing document. Once the text is located, you can assign it to a TextRange object, which provides various APIs for formatting the text.
The steps to change the of the specified text in a Word document using Java are as follows:
- Create a Document object.
- Load a Word file.
- Find all the occurrences of the specified string using the Document.findAllString() method.
- Iterate through the occurrences.
- Get the specific occurrence (TextSection) as a TextRange object.
- Get the CharacterFormat object using the TextRange.getCharacterFormat() method.
- Change the font name, style, size and text color of the text range using the methods under the CharacterFormat object.
- Save the document to a different Word file.
- Java
import com.spire.doc.Document;
import com.spire.doc.FileFormat;
import com.spire.doc.documents.TextSelection;
import com.spire.doc.documents.UnderlineStyle;
import com.spire.doc.fields.TextRange;

import java.awt.*;

public class ChangeFontOfText {

    public static void main(String[] args) {

        // Create a Document instance
        Document document = new Document();

        // Load a Word document
        document.loadFromFile("C:\\Users\\Administrator\\Desktop\\sample.docx");

        // Find the text you wish to modify the font for
        TextSelection[] textSelections = document.findAllString("Rich Standard Library", false, true);

        // Iterate through the find results
        for (int i = 0; i < textSelections.length; i++) {

            // Get a specific text selection as a text range
            TextRange textRange = textSelections[i].getAsOneRange();

            // Change the text color and style
            textRange.getCharacterFormat().setTextColor(Color.blue);
            textRange.getCharacterFormat().setUnderlineStyle(UnderlineStyle.Dash);
            textRange.getCharacterFormat().setBold(true);

            // Change font name and size if you want
            // textRange.getCharacterFormat().setFontName("Calibri");
            // textRange.getCharacterFormat().setFontSize(18f);
        }

        // Save the result document
        document.saveToFile("output/ChangeFontOfText.docx", FileFormat.Docx_2019);

        // Dispose resources
        document.dispose();
    }
}
Apply for a Temporary License
If you'd like to remove the evaluation message from the generated documents, or to get rid of the function limitations, please request a 30-day trial license for yourself.
