
Knowledgebase (2417)
Children categories
In Excel, a page break is a separator that divides a worksheet into several different pages/segments for the purpose of better printing. By inserting page breaks where necessary, you can avoid misalignment of data and ensure a desired print result, which is especially useful when working with a large data set. This article will demonstrate how to programmatically insert horizontal or vertical page breaks in Excel using Spire.XLS for .NET.
- Insert Horizontal Page Breaks in an Excel Worksheet
- Insert Vertical Page Breaks in an Excel Worksheet
Install Spire.XLS for .NET
To begin with, you need to add the DLL files included in the Spire.XLS for .NET package as references in your .NET project. The DLL files can be either downloaded from this link or installed via NuGet.
PM> Install-Package Spire.XLS
Insert Horizontal Page Breaks in an Excel Worksheet
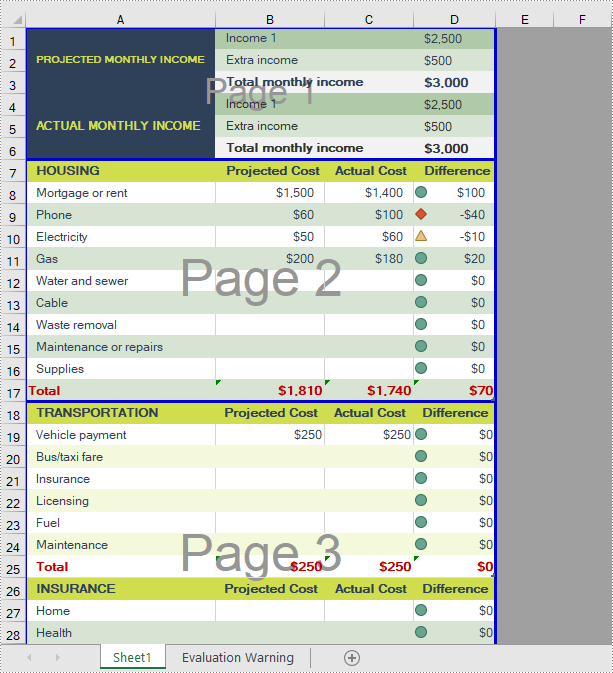
A horizontal page break is inserted between a selected row and the row above it. After insertion, the selected row will become the top row of the new page. With Spire.XLS for .NET, developers are allowed to use the Worksheet.HPageBreaks.Add(CellRange) method to insert horizontal page breaks. The detailed steps are as follows.
- Create a Workbook instance.
- Load a sample Excel file using Workbook.LoadFromFile() method.
- Get a specified worksheet using Workbook.Worksheets[sheetIndex] property.
- Add horizontal page break to a specified cell range using Worksheet.HPageBreaks.Add(CellRange) method.
- Set view mode to Preview mode using Worksheet.ViewMode property.
- Save the result file using Workbook.SaveToFile() method.
- C#
- VB.NET
using Spire.Xls;

namespace EditExcelComment
{
    class Program
    {
        static void Main(string[] args)
        {
            //Create a Workbook instance
            Workbook workbook = new Workbook();

            //Load a sample Excel document
            workbook.LoadFromFile("input.xlsx");

            //Get the first worksheet
            Worksheet sheet = workbook.Worksheets[0];

            //Set Excel page break horizontally
            sheet.HPageBreaks.Add(sheet.Range["A7"]);
            sheet.HPageBreaks.Add(sheet.Range["A18"]);

            //Set view mode to Preview mode
            sheet.ViewMode = ViewMode.Preview;

            //Save the result document
            workbook.SaveToFile("SetHorizontalPageBreak.xlsx");
        }
    }
}
Insert Vertical Page Breaks in an Excel Worksheet
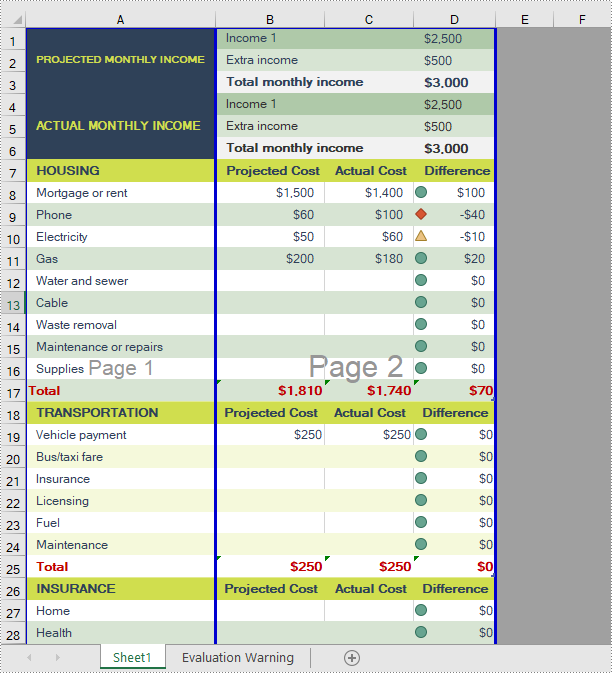
A vertical page break is inserted between a selected column and the column to its left. After insertion, the selected column will become the left most column of the new page. To insert vertical page breaks, developers can use the Worksheet.VPageBreaks.Add(CellRange) method offered by Spire.XLS for .NET offers. The detailed steps are as follows.
- Create a Workbook instance.
- Load a sample Excel file using Workbook.LoadFromFile() method.
- Get a specified worksheet using Workbook.Worksheets[sheetIndex] property.
- Add vertical page break to a specified cell range using Worksheet.VPageBreaks.Add(CellRange) method.
- Set view mode to Preview mode using Worksheet.ViewMode property.
- Save the result file using Workbook.SaveToFile() method.
- C#
- VB.NET
using Spire.Xls;

namespace EditExcelComment
{
    class Program
    {
        static void Main(string[] args)
        {
            //Create a Workbook instance
            Workbook workbook = new Workbook();

            //Load a sample Excel document
            workbook.LoadFromFile("input.xlsx");

            //Get the first worksheet
            Worksheet sheet = workbook.Worksheets[0];

            //Set Excel page break vertically
            sheet.VPageBreaks.Add(sheet.Range["B1"]);

            //Set view mode to Preview mode
            sheet.ViewMode = ViewMode.Preview;

            //Save the result document
            workbook.SaveToFile("SetVerticalPageBreak.xlsx");
        }
    }
}
Apply for a Temporary License
If you'd like to remove the evaluation message from the generated documents, or to get rid of the function limitations, please request a 30-day trial license for yourself.
Converting HTML to images enables the transformation of dynamic web content-such as text, graphics, and layouts-into static formats like PNG or JPEG. This process is ideal for capturing web pages for documentation, generating thumbnails, or ensuring visually consistent content across platforms, providing both accuracy and versatility.
In this article, you'll learn how to convert HTML files and strings to images using C# with Spire.Doc for .NET.
Install Spire.Doc for .NET
To begin with, you need to add the DLL files included in the Spire.Doc for .NET package as references in your .NET project. The DLL files can be either downloaded from this link or installed via NuGet.
PM> Install-Package Spire.Doc
Convert an HTML File to Image in C#
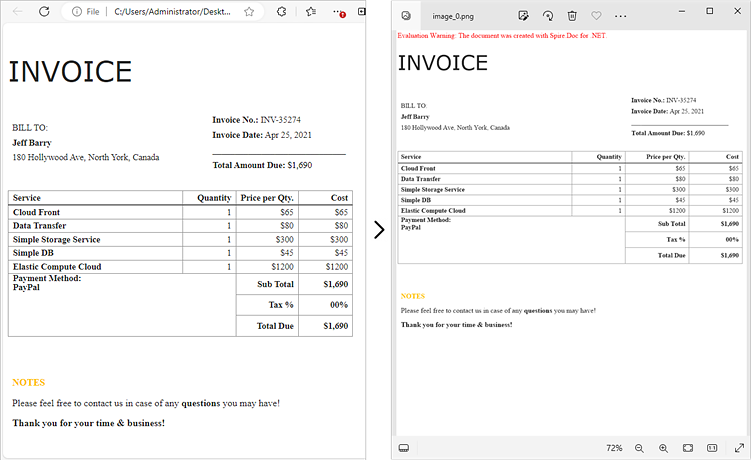
Using Spire.Doc for .NET, you can directly load an HTML file by utilizing the Document.LoadFromFile() method. Once loaded, you can convert the document into Bitmap images with the Document.SaveToImages() method. Afterward, you can loop through the generated images and save each one in widely-used image formats such as PNG, JPG, or BMP.
The following are the steps to convert an HTML file to images using Spire.Doc in C#:
- Create a Document object.
- Load an HTML file using the Document.LoadFromFile() method.
- Adjust properties such as margins, which will affect the output image's layout.
- Call the Document.SaveToImages() method to convert the loaded document into an array of Bitmap images.
- Iterate through the images and save each one to your desired output format.
- C#
using Spire.Doc;
using Spire.Doc.Documents;
using System.Drawing;
using System.Drawing.Imaging;

namespace ConvertHtmlFileToPng
{
    class Program
    {
        static void Main(string[] args)
        {
            // Create a Document object
            Document document = new Document();

            // Load an HTML file
            document.LoadFromFile(@"C:\Users\Administrator\Desktop\MyHtml.html", FileFormat.Html, XHTMLValidationType.None);

            // Get the first section
            Section section = document.Sections[0];

            // Set the page margins
            section.PageSetup.Margins.All = 2;

            // Convert the document to an array of bitmap images
            Image[] images = document.SaveToImages(ImageType.Bitmap);

            // Iterate through the images
            for (int index = 0; index < images.Length; index++)
            {
                // Specify the output file name
                string fileName = string.Format(@"C:\Users\Administrator\Desktop\Output\image_{0}.png", index);

                // Save each image as a PNG file
                images[index].Save(fileName, ImageFormat.Png);

            }

            // Dispose resources
            document.Dispose();
        }
    }
}
Convert an HTML String to Image in C#
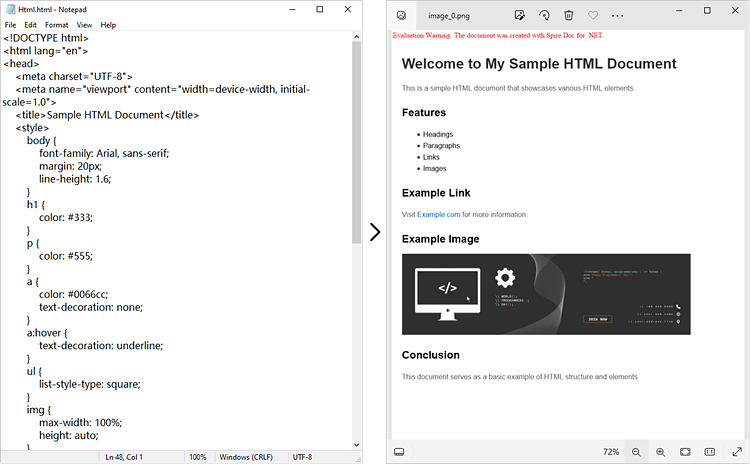
In certain scenarios, you might need to convert an HTML string directly into an image. This approach is especially beneficial for handling dynamically generated content or when you prefer not to depend on external HTML files.
Here is how you can convert an HTML string to images using Spire.Doc in C#:
- Create a Document object.
- Add a section and a paragraph to the document.
- Adjust properties such as margins, which will affect the output image's layout.
- Read the HTML string from a file or define it directly in the script.
- Use the Paragraph.AppendHTML() method to render the HTML content in the document.
- Call the Document.SaveToImages() method to convert the document into an array of Bitmap images.
- Iterate through the images and save each one to your desired output format.
- C#
using Spire.Doc;
using Spire.Doc.Documents;
using System.Drawing;
using System.Drawing.Imaging;

namespace ConvertHtmlStringToPng
{
    class Program
    {
        static void Main(string[] args)
        {
            // Create a Document object
            Document document = new Document();

            // Add a section to the document
            Section section = document.AddSection();

            // Set the page margins
            section.PageSetup.Margins.All = 2;

            // Add a paragraph to the section
            Paragraph paragraph = section.AddParagraph();

            // Read HTML string from a file
            string htmlFilePath = @"C:\Users\Administrator\Desktop\Html.html";
            string htmlString = File.ReadAllText(htmlFilePath, System.Text.Encoding.UTF8);

            // Append the HTML string to the paragraph
            paragraph.AppendHTML(htmlString);

            // Convert the document to an array of bitmap images
            Image[] images = document.SaveToImages(ImageType.Bitmap);

            // Iterate through the images
            for (int index = 0; index < images.Length; index++)
            {
                // Specify the output file name
                string fileName = string.Format(@"C:\Users\Administrator\Desktop\Output\image_{0}.png", index);

                // Save each image as a PNG file
                images[index].Save(fileName, ImageFormat.Png);

            }

            // Dispose resources
            document.Dispose();
        }
    }
}
Apply for a Temporary License
If you'd like to remove the evaluation message from the generated documents, or to get rid of the function limitations, please request a 30-day trial license for yourself.
Excel's Find and Replace feature is an indispensable tool for users when editing large Excel spreadsheets. It allows users to search for specific values within a worksheet or cell range and update them with new values quickly and accurately. With this feature, users don't need to perform manual searches, which significantly improves their working efficiency. In this article, we will introduce how to programmatically find and replace data in Excel in C# and VB.NET using Spire.XLS for .NET library.
- Find and Replace Data in a Worksheet in Excel
- Find and Replace Data in a Specific Cell Range in Excel
Install Spire.XLS for .NET
To begin with, you need to add the DLL files included in the Spire.XLS for .NET package as references in your .NET project. The DLL files can be either downloaded from this link or installed via NuGet.
PM> Install-Package Spire.XLS
Find and Replace Data in a Worksheet in Excel in C# and VB.NET
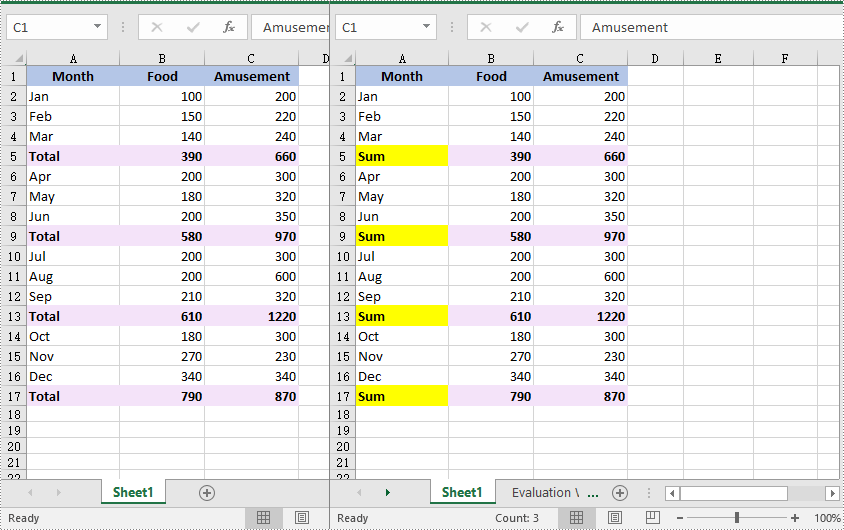
Spire.XLS for .NET offers the Worksheet.FindAllString(string stringValue, bool formula, bool formulaValue) method which enables you to find the cells containing specific data values in an Excel worksheet. Once the cells are found, you can use the CellRange.Text property to update their values with new values. The detailed steps are as follows:
- Initialize an instance of the Workbook class.
- Load an Excel file using the Workbook.LoadFromFile(string fileName) method.
- Get a specific worksheet of the file using the Workbook.Worksheets[int index] property.
- Find the cells containing a specific value in the worksheet using the Worksheet.FindAllString(string stringValue, bool formula, bool formulaValue) method.
- Iterate through the found cells.
- Update the value of each cell with another value using the CellRange.Text property.
- Set a background for the cell so you can easily find the updated cells using the CellRange.Style.Color property.
- Save the result file to a specific location using the Workbook.SaveToFile(string fileName, ExcelVersion version) method.
- C#
- VB.NET
using Spire.Xls;
using System.Drawing;

namespace ReplaceDataInWorksheet
{
    internal class Program
    {
        static void Main(string[] args)
        {
            //Initialize an instance of the Workbook class
            Workbook workbook = new Workbook();
            //Load an Excel file
            workbook.LoadFromFile(@"Sample.xlsx");

            //Get the first worksheet
            Worksheet worksheet = workbook.Worksheets[0];

            //Find the cells with the specific string value “Total” in the worksheet
            CellRange[] cells = worksheet.FindAllString("Total", true, true);

            //Iterate through the found cells
            foreach (CellRange cell in cells)
            {
                //Replace the value of the cell with another value
                cell.Text = "Sum";
                //Set a background color for the cell
                cell.Style.Color = Color.Yellow;
            }

            //Save the result file to a specific location
            workbook.SaveToFile("ReplaceDataInWorksheet.xlsx", ExcelVersion.Version2016);
            workbook.Dispose();
        }
    }
}
Find and Replace Data in a Specific Cell Range in Excel in C# and VB.NET
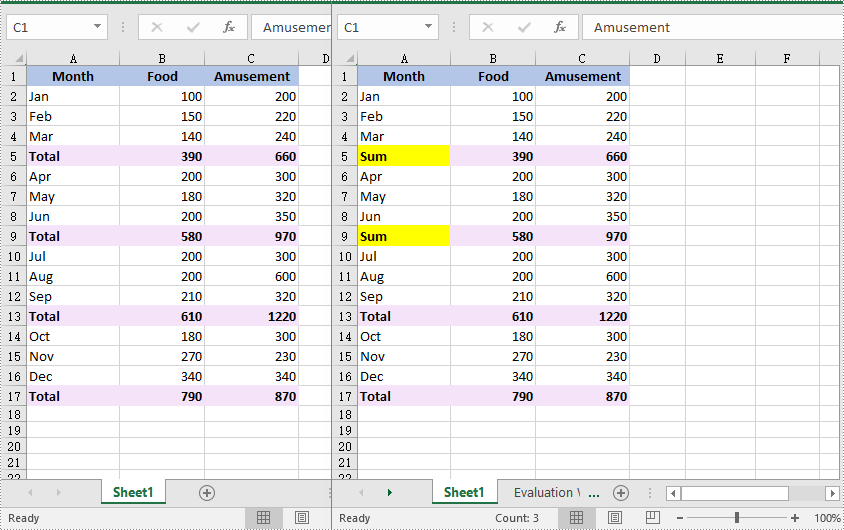
You can find the cells containing a specific value in a cell range using the CellRange.FindAllString(string stringValue, bool formula, bool formulaValue) method. Then you can update the value of each found cell with another value using the CellRange.Text property. The detailed steps are as follows:
- Initialize an instance of the Workbook class.
- Load an Excel file using the Workbook.LoadFromFile(string fileName) method.
- Get a specific worksheet of the file using the Workbook.Worksheets[int index] property.
- Get a specific cell range of the worksheet using the Worksheet.Range[string rangeName] property.
- Find the cells with a specific value in the cell range using the CellRange.FindAllString(string stringValue, bool formula, bool formulaValue) method.
- Iterate through the found cells.
- Update the value of each found cell to another value using the CellRange.Text property.
- Set a background for the cell so you can easily find the updated cells using the CellRange.Style.Color property.
- Save the result file to a specific location using the Workbook.SaveToFile(string fileName, ExcelVersion version) method.
- C#
- VB.NET
using Spire.Xls;
using System.Drawing;

namespace ReplaceDataInCellRange
{
    internal class Program
    {
        static void Main(string[] args)
        {
            //Initialize an instance of the Workbook class
            Workbook workbook = new Workbook();
            //Load an Excel file
            workbook.LoadFromFile(@"Sample.xlsx");

            //Get the first worksheet
            Worksheet worksheet = workbook.Worksheets[0];

            //Get a specific cell range
            CellRange range = worksheet.Range["A1:C9"];

            //Find the cells with the specific value "Total" in the cell range
            CellRange[] cells = range.FindAllString("Total", true, true);

            //Iterate through the found cells
            foreach (CellRange cell in cells)
            {
                //Replace the value of the cell with another value
                cell.Text = "Sum";
                //Set a background color for the cell
                cell.Style.Color = Color.Yellow;
            }

            //Save the result file to a specific location
            workbook.SaveToFile("ReplaceDataInCellRange.xlsx", ExcelVersion.Version2016);
            workbook.Dispose();
        }
    }
}
Apply for a Temporary License
If you'd like to remove the evaluation message from the generated documents, or to get rid of the function limitations, please request a 30-day trial license for yourself.
