
Knowledgebase (2344)
Children categories
Managing PDF documents often involves removing annotations. Whether you're preparing documents for a presentation, sharing the final files with clients when questions are settled down, or archiving important records, deleting annotations can be essential.
Spire.PDF for Python allows users to delete annotations from PDFs in Python efficiently. Follow the instructions below to clean up your PDF files seamlessly.
- Delete Specified Annotations
- Delete All Annotations from a Page
- Delete All Annotations from the PDF Document
Install Spire.PDF for Python
This scenario requires Spire.PDF for Python and plum-dispatch v1.7.4. They can be easily installed in your Windows through the following pip command.
pip install Spire.PDF
If you are unsure how to install it, please refer to this tutorial: How to Install Spire.PDF for Python on Windows.
Delete Specified Annotations from PDF in Python
To delete a specified annotation from PDF documents, you need to target the annotation to be removed at first. Then you can remove it by calling the Page.AnnotationsWidget.RemoveAt() method offered by Spire.PDF for Python. This section will guide you through the whole process step by step.
Steps to remove an annotation from a page:
- Create a new PdfDocument object.
- Load a PDF document from files using PdfDocument.LoadFromFile() method.
- Get the specific page of the PDF with PdfDocument.Pages.get_Item() method.
- Delete the annotation from the page by calling Page.AnnotationsWidget.RemoveAt() method.
- Save the resulting document using PdfDocument.SaveToFile() method.
Here's the code example for you to refer to:
- Python
from spire.pdf.common import *
from spire.pdf import *

# Create a new PDF document
doc = PdfDocument()

# Open the PDF document to be modified from the disk
doc.LoadFromFile("sample1.pdf")

# Get the first page of the document
page = doc.Pages.get_Item(0)

# Remove the 2nd annotation from the page
page.AnnotationsWidget.RemoveAt(1)

# Save the PDF document
doc.SaveToFile("output/delete_2nd_annotation.pdf", FileFormat.PDF)

doc.Close()
Delete All Annotations from a PDF Page in Python
The Pages.AnnotationsWidget.Clear() method provided by Spire.PDF for Python helps you to complete the task of removing each annotation from a page. This part will demonstrate how to delete all annotations from a page in Python with a detailed guide and a code example.
Steps to delete all annotations from a page:
- Create an instance of the PdfDocument class.
- Read the PDF document from the disk by PdfDocument.LoadFromFile() method.
- Remove annotations on the page using Pages.AnnotationsWidget.Clear() method.
- Write the document to disk with PdfDocument.SaveToFile() method.
Below is the code example of deleting annotations from the first page:
- Python
from spire.pdf.common import *
from spire.pdf import *


# Create a new PDF document
document = PdfDocument()

# Load the file from the disk
document.LoadFromFile("sample1.pdf")

# Remove all annotations from the first page
document.Pages[0].AnnotationsWidget.Clear()

# Save the document
document.SaveToFile("output/delete_annotations_page.pdf", FileFormat.PDF)

document.Close()
Delete All Annotations of PDF Documents in Python
Removing all annotations from a PDF document involves retrieving the annotations first, which means you need to loop through each page to ensure that every annotation is deleted. The section will introduce how to accomplish the task in Python, providing detailed steps and an example to assist in cleaning up PDF documents.
Steps to remove all annotations of the whole PDF document:
- Instantiate a PdfDocument object.
- Open the document from files using PdfDocument.LoadFromFile() method.
- Loop through pages of the PDF document.
- Get each page of the PDF document with PdfDocument.Pages.get_Item() method.
- Remove all annotations from each page using Page.AnnotationsWidget.Clear() method.
- Save the document to your local file with PdfDocument.SaveToFile() method.
Here is the example for reference:
- Python
from spire.pdf.common import *
from spire.pdf import *


# Create an object of PDF class
document = PdfDocument()

# Load the file to be operated from the disk
document.LoadFromFile("sample1.pdf")

# Loop through all pages in the PDF document
for i in range(document.Pages.Count):
    # Get a specific page
    page = document.Pages.get_Item(i)
    # Remove all annotations from the page
    page.AnnotationsWidget.Clear()

# Save the resulting document
document.SaveToFile("output/delete_all_annotations.pdf", FileFormat.PDF)

document.Close()
Apply for a Temporary License
If you'd like to remove the evaluation message from the generated documents, or to get rid of the function limitations, please request a 30-day trial license for yourself.
Page setup in Excel refers to the various settings that control how an Excel worksheet will be printed or displayed in a print preview. These settings determine the appearance and layout of the printed document, ensuring that it meets the desired formatting and readability standards. Page setup options include page margins, orientation, paper size, print area, headers, footers, scaling, and other print-related settings. In this article, we will explain how to set page setup options in Excel in Python using Spire.XLS for Python.
- Set Page Margins in Excel in Python
- Set Page Orientation in Excel in Python
- Set Paper Size in Excel in Python
- Set Print Area in Excel in Python
- Set Scaling Factor in Excel in Python
- Set FitToPages Options in Excel in Python
- Set Headers and Footers in Excel in Python
Install Spire.XLS for Python
This scenario requires Spire.XLS for Python and plum-dispatch v1.7.4. They can be easily installed in your Windows through the following pip command.
pip install Spire.XLS
If you are unsure how to install, please refer to this tutorial: How to Install Spire.XLS for Python on Windows
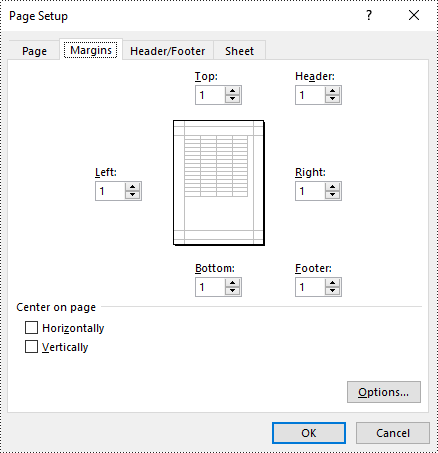
Set Page Margins in Excel in Python
In Spire.XLS for Python, the PageSetup class is used to configure page setup options for Excel worksheets. You can access the PageSetup object of a worksheet through the Worksheet.PageSetup property. Then, you can use properties like PageSetup.TopMargin, PageSetup.BottomMargin, PageSetup.LeftMargin, PageSetup.RightMargin, PageSetup.HeaderMarginInch, and PageSetup.FooterMarginInch to set the respective margins for the worksheet. The detailed steps are as follows:
- Create an object of the Workbook class.
- Load an Excel file using Workbook.LoadFromFile() method.
- Get a specific worksheet using Workbook.Worksheets[index] property.
- Access the PageSetup object of the worksheet using Worksheet.PageSetup property.
- Set the top, bottom, left, right, header, and footer margins using PageSetup.TopMargin, PageSetup.BottomMargin, PageSetup.LeftMargin, PageSetup.RightMargin, PageSetup.HeaderMarginInch, and PageSetup.FooterMarginInch properties.
- Save the modified workbook to a new file using Workbook.SaveToFile() method.
- Python
from spire.xls import *
from spire.xls.common import *

# Create a Workbook object
workbook = Workbook()
# Load an Excel file
workbook.LoadFromFile("Sample.xlsx")

# Get the first worksheet
sheet = workbook.Worksheets[0]

# Get the PageSetup object of the worksheet
pageSetup = sheet.PageSetup

# Set top, bottom, left, and right page margins for the worksheet
# The measure of the unit is Inch (1 inch = 2.54 cm)
pageSetup.TopMargin = 1
pageSetup.BottomMargin = 1
pageSetup.LeftMargin = 1
pageSetup.RightMargin = 1
pageSetup.HeaderMarginInch= 1
pageSetup.FooterMarginInch= 1

# Save the modified workbook to a new file
workbook.SaveToFile("SetPageMargins.xlsx", ExcelVersion.Version2016)
workbook.Dispose()
Set Page Orientation in Excel in Python
To set the page orientation for an Excel worksheet, you can use the PageSetup.Orientation property. The detailed steps are as follows.
- Create an object of the Workbook class.
- Load an Excel file using Workbook.LoadFromFile() method.
- Get a specific worksheet using Workbook.Worksheets[index] property.
- Access the PageSetup object of the worksheet using Worksheet.PageSetup property.
- Set the page orientation using PageSetup.Orientation property.
- Save the modified workbook to a new file using Workbook.SaveToFile() method.
- Python
from spire.xls import *
from spire.xls.common import *

# Create a Workbook object
workbook = Workbook()
# Load an Excel file
workbook.LoadFromFile("Sample.xlsx")

# Get the first worksheet
sheet = workbook.Worksheets[0]

# Get the PageSetup object of the worksheet
pageSetup = sheet.PageSetup

# Set the page orientation for printing the worksheet to landscape mode
pageSetup.Orientation = PageOrientationType.Landscape

# Save the modified workbook to a new file
workbook.SaveToFile("SetPageOrientation.xlsx", ExcelVersion.Version2016)
workbook.Dispose()
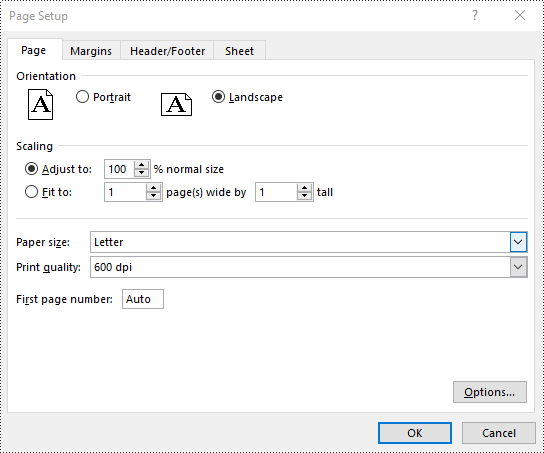
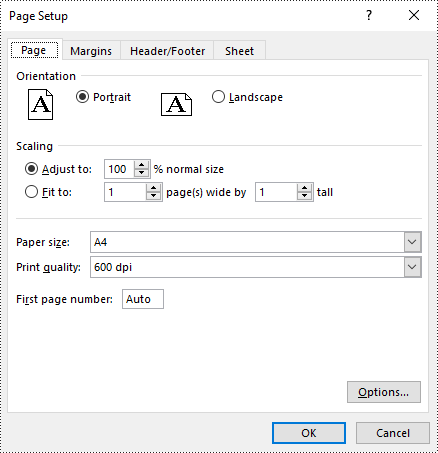
Set Paper Size in Excel in Python
You can set a wide range of paper sizes, such as A3, A4, A5, B4, B5, Letter, Legal, and Tabloid for printing an Excel worksheet using the PageSetup.PaperSize property. The detailed steps are as follows:
- Create an object of the Workbook class.
- Load an Excel file using Workbook.LoadFromFile() method.
- Get a specific worksheet using Workbook.Worksheets[index] property.
- Access the PageSetup object of the worksheet using Worksheet.PageSetup property.
- Set the paper size using PageSetup.PaperSize property.
- Save the modified workbook to a new file using Workbook.SaveToFile() method.
- Python
from spire.xls import *
from spire.xls.common import *

# Create a Workbook object
workbook = Workbook()
# Load an Excel file
workbook.LoadFromFile("Sample.xlsx")

# Get the first worksheet
sheet = workbook.Worksheets[0]

# Get the PageSetup object of the worksheet
pageSetup = sheet.PageSetup

# Set the paper size to A4
pageSetup.PaperSize = PaperSizeType.PaperA4

# Save the modified workbook to a new file
workbook.SaveToFile("SetPaperSize.xlsx", ExcelVersion.Version2016)
workbook.Dispose()
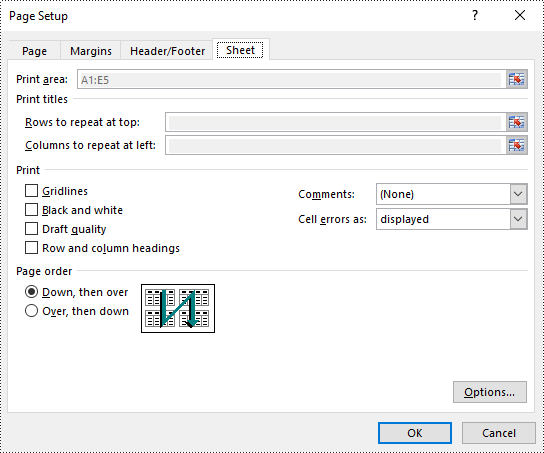
Set Print Area in Excel in Python
The print area of an Excel worksheet can be customized using the PageSetup.PringArea property. The detailed steps are as follows.
- Create an object of the Workbook class.
- Load an Excel file using Workbook.LoadFromFile() method.
- Get a specific worksheet using Workbook.Worksheets[index] property.
- Access the PageSetup object of the worksheet using Worksheet.PageSetup property.
- Set the print area using PageSetup.PringArea property.
- Save the modified workbook to a new file using Workbook.SaveToFile() method.
- Python
from spire.xls import *
from spire.xls.common import *

# Create a Workbook object
workbook = Workbook()
# Load an Excel file
workbook.LoadFromFile("Sample.xlsx")

# Get the first worksheet
sheet = workbook.Worksheets[0]

# Get the PageSetup object of the worksheet
pageSetup = sheet.PageSetup

# Set the print area of the worksheet to "A1:E5"
pageSetup.PrintArea = "A1:E5"

# Save the modified workbook to a new file
workbook.SaveToFile("SetPrintArea.xlsx", ExcelVersion.Version2016)
workbook.Dispose()
Set Scaling Factor in Excel in Python
You can scale the content of a worksheet to a specific percentage of its original size with the PageSetup.Zoom property. The detailed steps are as follows.
- Create an object of the Workbook class.
- Load an Excel file using Workbook.LoadFromFile() method.
- Get a specific worksheet using Workbook.Worksheets[index] property.
- Access the PageSetup object of the worksheet using Worksheet.PageSetup property.
- Set the scaling factor using PageSetup.Zoom property.
- Save the modified workbook to a new file using Workbook.SaveToFile() method.
- Python
from spire.xls import *
from spire.xls.common import *

# Create a Workbook object
workbook = Workbook()
# Load an Excel file
workbook.LoadFromFile("Sample.xlsx")

# Get the first worksheet
sheet = workbook.Worksheets[0]

# Get the PageSetup object of the worksheet
pageSetup = sheet.PageSetup

# Set the scaling factor of the worksheet to 90%
pageSetup.Zoom = 90

# Save the modified workbook to a new file
workbook.SaveToFile("SetScalingFactor.xlsx", ExcelVersion.Version2016)
workbook.Dispose()

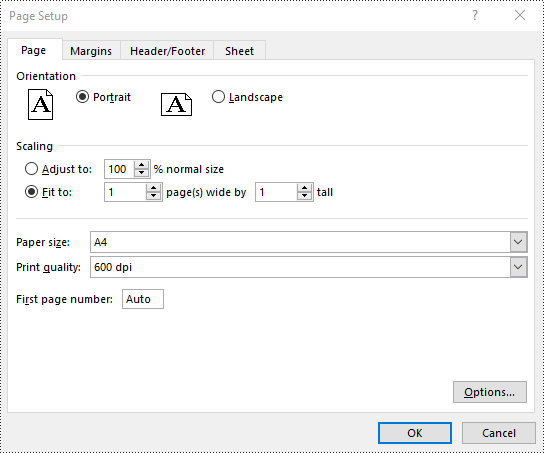
Set FitToPages Options in Excel in Python
In addition to scaling the content of a worksheet to a specific percentage of its original size, you can also fit the content of a worksheet to a specific number of pages using PageSetup.FitToPagesTall and PageSetup.FitToPagesWide properties. The detailed steps are as follows.
- Create an object of the Workbook class.
- Load an Excel file using Workbook.LoadFromFile() method.
- Get a specific worksheet using Workbook.Worksheets[index] property.
- Access the PageSetup object of the worksheet using Worksheet.PageSetup property.
- Fit the content of the worksheet to one page using PageSetup.FitToPagesTall and PageSetup.FitToPagesWide properties.
- Save the modified workbook to a new file using Workbook.SaveToFile() method.
- Python
from spire.xls import *
from spire.xls.common import *

# Create a Workbook object
workbook = Workbook()
# Load an Excel file
workbook.LoadFromFile("Sample.xlsx")

# Get the first worksheet
sheet = workbook.Worksheets[0]

# Get the PageSetup object of the worksheet
pageSetup = sheet.PageSetup

# Fit the content of the worksheet within one page vertically (i.e., all rows will fit on a single page)
pageSetup.FitToPagesTall = 1
# Fit the content of the worksheet within one page horizontally (i.e., all columns will fit on a single page)
pageSetup.FitToPagesWide = 1

# Save the modified workbook to a new file
workbook.SaveToFile("FitToPages.xlsx", ExcelVersion.Version2016)
workbook.Dispose()
Set Headers and Footers in Excel in Python
For setting headers and footers in Excel, please check this article: Python: Add Headers and Footers to Excel.
Apply for a Temporary License
If you'd like to remove the evaluation message from the generated documents, or to get rid of the function limitations, please request a 30-day trial license for yourself.
Tables in Word documents allow users to organize data in a clear and structured manner. However, as documents grow in complexity, the need to adjust table structures often arises. Whether you need to combine multiple tables for a comprehensive view or divide a large table for better readability, mastering the art of merging and splitting tables in Word can significantly improve the presentation of your data. In this article, you will learn how to merge or split tables in Word in C# using Spire.Doc for .NET.
Install Spire.Doc for .NET
To begin with, you need to add the DLL files included in the Spire.Doc for.NET package as references in your .NET project. The DLL files can be either downloaded from this link or installed via NuGet.
PM> Install-Package Spire.Doc
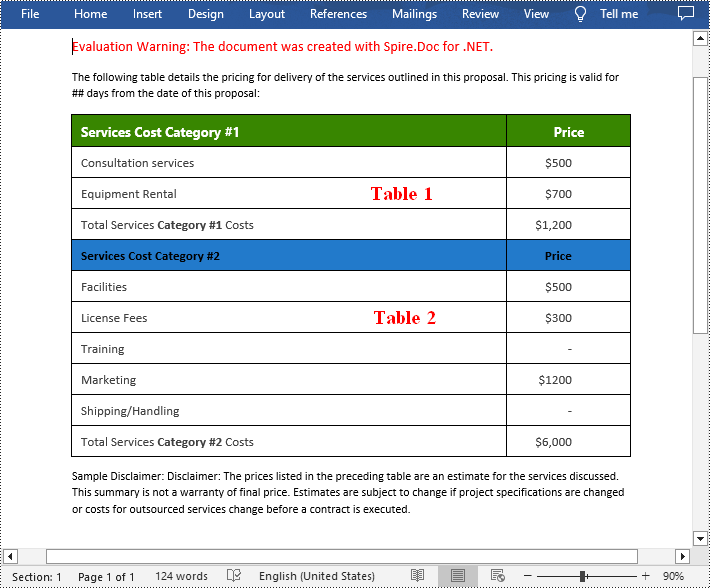
Merge Tables in Word in C#
With Spire.Doc for .NET, you can combine two or more tables into one by copying all rows from other tables to the target table and then deleting the other tables. The following are the detailed steps.
- Create a Document instance.
- Load a Word document using Document.LoadFromFile() method.
- Get a specified section using Document.Sections[] property.
- Get two tables in the section using section.Tables[] property.
- Iterate through all rows in the second table and copy them using Table.Rows[].Clone() method.
- Add the rows of the second table to the first table using Table.Rows.Add() method.
- Save the result document using Document.SaveToFile() method.
- C#
using Spire.Doc;

namespace CombineTables
{
    class Program
    {
        static void Main(string[] args)
        {
            //Create a Document instance
            Document doc = new Document();

            //Load a Word document
            doc.LoadFromFile("Cost.docx");

            //Get the first section
            Section section = doc.Sections[0];

            //Get the first and second table in the section
            Table table1 = section.Tables[0] as Table;
            Table table2 = section.Tables[1] as Table;

            //Add the rows of table2 to table1
            for (int i = 0; i < table2.Rows.Count; i++)
            {
                table1.Rows.Add(table2.Rows[i].Clone());
            }

            //Remove the table2
            section.Tables.Remove(table2);

            //Save the result document
            doc.SaveToFile("CombineTables.docx", FileFormat.Docx);
        }
    }
}
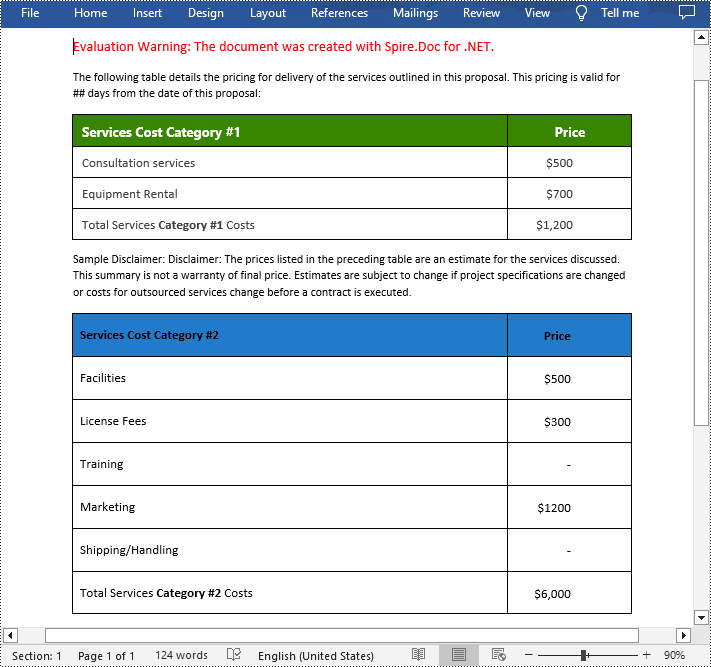
Split Tables in Word in C#
To split a table into two or more tables, you need to create a new table, then copy the specified rows from the original table to the new table, and then delete those rows from the original table. The following are the detailed steps.
- Create a Document instance.
- Load a Word document using Document.LoadFromFile() method.
- Get a specified section using Document.Sections[] property.
- Get a specified table in the section using section.Tables[] property.
- Specify the row index where the table will be split.
- Create a new instance of the Table class.
- Iterate through the specified rows in the original table and copy them using Table.Rows[].Clone() method.
- Add the specified rows to the new table using Table.Rows.Add() method.
- Iterate through the copied rows and remove each row from the original table using Table.Rows.RemoveAt() method.
- Add the new table to the section using Section.Tables.Add() method.
- Save the result document using Document.SaveToFile() method.
- C#
using Spire.Doc;

namespace SplitWordTable
{
    class Program
    {
        static void Main(string[] args)
        {
            //Create a Document instance
            Document doc = new Document();

            //Load a Word document
            doc.LoadFromFile("CombineTables.docx");

            //Get the first section
            Section section = doc.Sections[0];

            //Get the first table in the section
            Table table = section.Tables[0] as Table;

            //Specify to split the table from the fifth row
            int splitIndex = 4;

            //Create a new table
            Table newTable = new Table(section.Document);

            //Adds rows (from the 5th to the last row) to the new table
            for (int i = splitIndex; i < table.Rows.Count; i++)
            {
                newTable.Rows.Add(table.Rows[i].Clone());
            }

            //Delete rows from the original table
            for (int i = table.Rows.Count - 1; i >= splitIndex; i--)
            {
                table.Rows.RemoveAt(i);
            }

            //Add the new table to the section
            section.Tables.Add(newTable);

            //Save the result document
            doc.SaveToFile("SplitTable.docx", FileFormat.Docx);
        }
    }
}
Apply for a Temporary License
If you'd like to remove the evaluation message from the generated documents, or to get rid of the function limitations, please request a 30-day trial license for yourself.
