
Knowledgebase (2344)
Children categories
Page borders can be a useful design element in Microsoft Word documents. They can help to frame the content and provide a polished, professional. Page borders draw the reader's eye to the main content area and create a sense of structure and cohesion. Conversely, you may want to remove page borders if they are not needed or if they distract from the content.
In this article, you will learn how to add, adjust, and remove page borders in a Word document using Java and Spire.Doc for Java.
- Add Page Borders to a Word Document
- Adjust Page Borders in a Word Document
- Remove Page Borders from a Word Document
Install Spire.Doc for Java
First of all, you're required to add the Spire.Doc.jar file as a dependency in your Java program. The JAR file can be downloaded from this link. If you use Maven, you can easily import the JAR file in your application by adding the following code to your project's pom.xml file.
<repositories>
    <repository>
        <id>com.e-iceblue</id>
        <name>e-iceblue</name>
        <url>https://repo.e-iceblue.com/nexus/content/groups/public/</url>
    </repository>
</repositories>
<dependencies>
    <dependency>
        <groupId>e-iceblue</groupId>
        <artifactId>spire.doc</artifactId>
        <version>14.6.0</version>
    </dependency>
</dependencies>
Add Page Borders to a Word Document in Java
Spire.Doc for Java includes the Borders class, which enables developers to manage the page borders in a Word document. This class provides a collection of methods that allow you to control various aspects of the page border, such as the border type, color, and line width.
To add borders to all pages in a Word document using Java, the general steps are as follows:
- Create a Document object.
- Load a Word file from the given file path.
- Iterate through the sections in the document.
- Get a specific section.
- Get the PageSetup object of the section.
- Apply borders to all page by passing PageBordersApplyType.All_Pages as the parameter of PageSetup.setPageBordersApplyType() method.
- Get the Borders object using PageSetup.getBorders() method.
- Set the border type, color, line width and other attributes using the methods under the Borders object.
- Save the updated document to a different Word file.
- Java
import com.spire.doc.*;
import com.spire.doc.documents.BorderStyle;
import java.awt.*;
public class AddPageBorder {
public static void main(String[] args) {
// Create a Document object
Document doc = new Document();
// Load a Word file
doc.loadFromFile("C:\\Users\\Administrator\\Desktop\\Input.docx");
// Iterate through the sections in the document
for (int i = 0; i < doc.getSections().getCount(); i++)
{
// Get a specific section
Section section = doc.getSections().get(i);
// Get page setup object
PageSetup pageSetup = section.getPageSetup();
// Apply page border to all pages
pageSetup.setPageBordersApplyType(PageBordersApplyType.All_Pages);
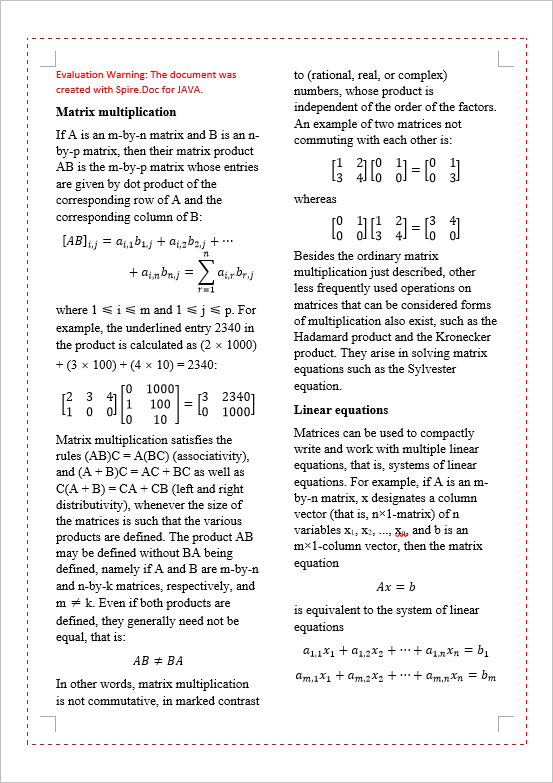
// Set the border type
pageSetup.getBorders().setBorderType(BorderStyle.Dash_Large_Gap);
// Set the border width
pageSetup.getBorders().setLineWidth(2);
// Set the border color
pageSetup.getBorders().setColor(Color.RED);
// Set the spacing between borders and text within them
pageSetup.getBorders().getTop().setSpace(30);
pageSetup.getBorders().getBottom().setSpace(30);
pageSetup.getBorders().getLeft().setSpace(30);
pageSetup.getBorders().getRight().setSpace(30);
}
// Save the updated document to a different file
doc.saveToFile("AddPageBorder.docx", FileFormat.Docx);
// Dispose resources
doc.dispose();
}
}
Adjust Page Borders in a Word Document in Java
The page borders of an existing Word document can be obtained using the PageSetup.getBorders() method. You can change the appearance of the page borders using the setBorderType(), setColor(), and setLineWidth() methods.
The steps to adjust page borders in a Word document using Java are as follows.
- Create a Document object.
- Load a Word file from the given file path.
- Iterate through the sections in the document.
- Get a specific section.
- Get the PageSetup object of the section.
- Get the Borders object using PageSetup.getBorders() method.
- Set the border type, color, line width and other attributes using the methods under the Borders object.
- Save the updated document to a different Word file.
- Java
import com.spire.doc.Document;
import com.spire.doc.FileFormat;
import com.spire.doc.PageSetup;
import com.spire.doc.Section;
import com.spire.doc.documents.BorderStyle;
import java.awt.*;
public class AdjustPageBorders {
public static void main(String[] args) {
// Create a Document object
Document doc = new Document();
// Load a Word file
doc.loadFromFile("C:\\Users\\Administrator\\Desktop\\Borders.docx");
// Iterate through the sections in the document
for (int i = 0; i < doc.getSections().getCount(); i++)
{
// Get a specific section
Section section = doc.getSections().get(i);
// Get page setup of the section
PageSetup pageSetup = section.getPageSetup();
// Change the border type
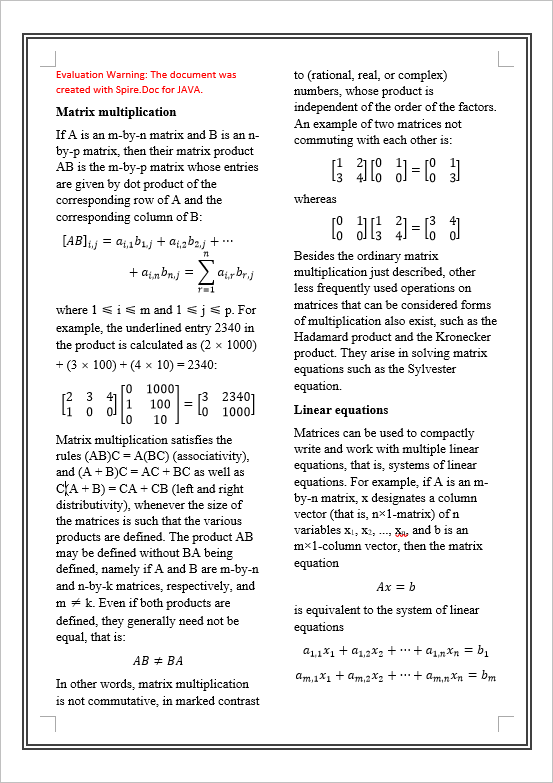
section.getPageSetup().getBorders().setBorderType(BorderStyle.Double);
// Change the border color
section.getPageSetup().getBorders().setColor(Color.DARK_GRAY);
// Change the border width
section.getPageSetup().getBorders().setLineWidth(3);
}
// Save the updated document to a different file
doc.saveToFile("AdjustBorder.docx", FileFormat.Docx);
// Dispose resources
doc.dispose();
}
}
Remove Page Borders from a Word Document in Java
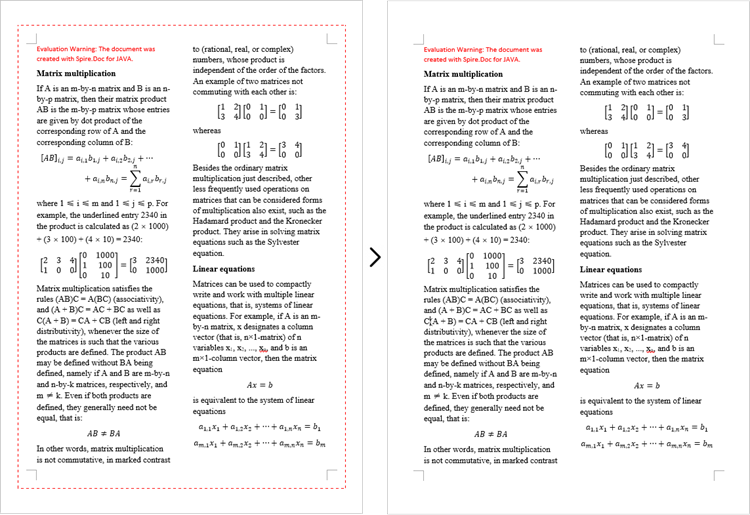
To move page borders from a Word document, pass the BorderStyle.None as the parameter of the Borders.setBorderType() method. By setting the border type as none, you are instructing the document to remove any existing page borders, resulting in a clean, border-free document layout.
The steps to remove page borders from a Word document using Java are as follows:
- Create a Document object.
- Load a Word file from the given file path.
- Iterate through the sections in the document.
- Get a specific section.
- Get the PageSetup object of the section.
- Get the Borders object using PageSetup.getBorders() method.
- Set the border type as BorderStyle.None using Borders.setBorderType() method.
- Save the updated document to a different Word file.
- Java
import com.spire.doc.Document;
import com.spire.doc.FileFormat;
import com.spire.doc.PageSetup;
import com.spire.doc.Section;
import com.spire.doc.documents.BorderStyle;

public class RemovePageBorders {

    public static void main(String[] args) {

        // Create a Document object
        Document doc = new Document();

        // Load a Word file
        doc.loadFromFile("C:\\Users\\Administrator\\Desktop\\Borders.docx");

        // Iterate through the sections in the document
        for (int i = 0; i < doc.getSections().getCount(); i++)
        {
            // Get a specific section
            Section section = doc.getSections().get(i);

            // Get page setup object
            PageSetup pageSetup = section.getPageSetup();

            // Set the border type to none
            pageSetup.getBorders().setBorderType(BorderStyle.None);
        }

        // Save the updated document to a different file
        doc.saveToFile("RemovePageBorders.docx", FileFormat.Docx);

        // Dispose resources
        doc.dispose();
    }
}
Apply for a Temporary License
If you'd like to remove the evaluation message from the generated documents, or to get rid of the function limitations, please request a 30-day trial license for yourself.
Adjusting the column widths in a Word table is crucial for making the document look neat and easy to read. Particularly in tables with a lot of text, appropriate column widths can facilitate smoother reading. Word offers two approaches: percentage-based and fixed widths. Setting column widths by percentage can adapt to various screen sizes, keeping content neatly formatted and more pleasant to read. Using fixed widths stabilizes the table structure, precisely aligning each section, which is especially suitable for tables requiring strict alignment of numbers or complex designs. This article will introduce how to set Word table column widths based on percentage or fixed values using Spire.Doc for Java in Java projects.
Install Spire.Doc for Java
First, you're required to add the Spire.Doc.jar file as a dependency in your Java program. The JAR file can be downloaded from this link. If you use Maven, you can easily import the JAR file in your application by adding the following code to your project's pom.xml file.
<repositories>
    <repository>
        <id>com.e-iceblue</id>
        <name>e-iceblue</name>
        <url>https://repo.e-iceblue.com/nexus/content/groups/public/</url>
    </repository>
</repositories>
<dependencies>
    <dependency>
        <groupId>e-iceblue</groupId>
        <artifactId>spire.doc</artifactId>
        <version>14.6.0</version>
    </dependency>
</dependencies>
Set Column Width Based on Percentage in Java
To set column widths in a Word table using percentage values, you first need to define the table's width type as percentage. This can be achieved with Table.SetPreferredWidth(new PreferredWidth(WidthType.Percentage, (short)100)). Then, iterate through each column and set their widths to either the same or different percentage values. Here are the detailed steps:
- Create a Document object.
- Load a document using the Document.loadFromFile() method.
- Retrieve the first section of the document using Document.getSections().get(0).
- Get the first table within the section using Section.getTables().get(0).
- Use a for loop to iterate through all rows in the table.
- Set the column width for cells in different columns to percentage values using the TableRow.getCells().get(index).setCellWidth(value, CellWidthType.Percentage) method, where value is the percentage width you wish to apply.
- Save the changes to the Word document using the Document.saveToFile() method.
- Java
import com.spire.doc.*;
public class PercentageColumnWidth {
public static void main(String[] args) {
// Create a new Document object
Document doc = new Document();
// Load the document
doc.loadFromFile("Sample.docx");
// Get the first Section of the document
Section section = doc.getSections().get(0);
// Cast the first Table in the Section to a Table type
Table table = section.getTables().get(0);
// Create a PreferredWidth object, set the width type to Percentage, and set the width value to 100%
PreferredWidth percentageWidth = new PreferredWidth(WidthType.Percentage, (short) 100);
// Set the Table's preferred width to the PreferredWidth object created above
table.setPreferredWidth(percentageWidth);
// Define a variable of type TableRow
TableRow tableRow;
// Iterate over all rows in the Table
for (int i = 0; i < table.getRows().getCount(); i++) {
// Get the current row
tableRow = table.getRows().get(i);
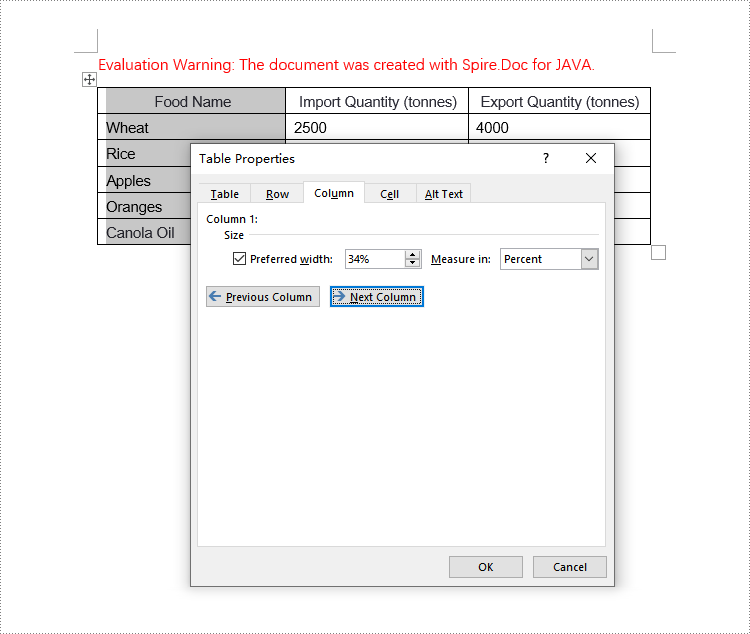
// Set the width of the first cell to 34%, type as Percentage
tableRow.getCells().get(0).setCellWidth(34, CellWidthType.Percentage);
// Set the width of the second cell to 33%, type as Percentage
tableRow.getCells().get(1).setCellWidth(33, CellWidthType.Percentage);
// Set the width of the third cell to 33%, type as Percentage
tableRow.getCells().get(2).setCellWidth(33, CellWidthType.Percentage);
}
// Save the modified document, specifying the file format as Docx2016
doc.saveToFile("SetColumnWidthsWithPercentageValues.docx", FileFormat.Docx_2016);
// Close the document
doc.close();
}
}
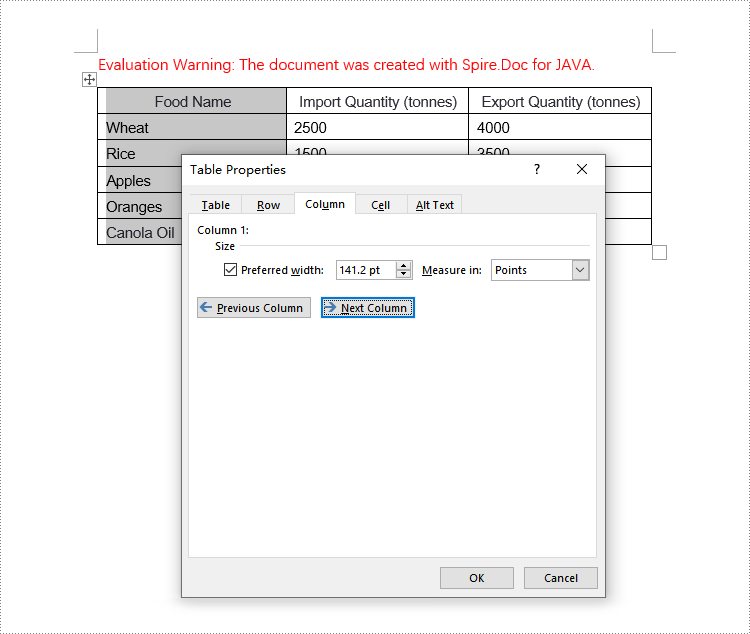
Set Column Width Based on Fixed Value in Java
When setting column widths in a Word table using fixed values, you first need to set the table to a fixed layout. This is done with Table.getTableFormat().setLayoutType(LayoutType.Fixed), then iterate through each column and set the width to the same or different fixed values as required. Here are the detailed steps:
- Create a Document object.
- Load a document using the Document.loadFromFile() method.
- Retrieve the first section of the document using Document.getSections().get(0).
- Get the first table within the section using Section.getTables().get(0).
- Use a for loop to iterate through all rows in the table.
- Set the column width for cells in different columns to fixed values using the TableRow.getCells().get(index).setCellWidth(value, CellWidthType.Point) method.
- Save the changes to the Word document using the Document.saveToFile() method.
- Java
import com.spire.doc.*;

public class FixedColumnWidth {
    public static void main(String[] args) {

        // Create a new Document object
        Document doc = new Document();

        // Load the document
        doc.loadFromFile("Sample.docx");

        // Get the first Section of the document
        Section section = doc.getSections().get(0);

        // Cast the first Table in the Section to a Table type
        Table table = section.getTables().get(0);

        // Set the table layout type to Fixed
        table.getFormat().setLayoutType(LayoutType.Fixed);

        // Set the table resizing method to not Auto
        table.getFormat().setAllowAutoFit(false);

        // Get the left margin
        float leftMargin = section.getPageSetup().getMargins().getLeft();

        // Get the right margin
        float rightMargin = section.getPageSetup().getMargins().getRight();

        // Calculate the page width minus left and right margins
        double pageWidth = section.getPageSetup().getPageSize().getWidth() - leftMargin - rightMargin;

        // Define a variable of type TableRow
        TableRow tableRow;

        // Iterate through all rows in the Table
        for (int i = 0; i < table.getRows().getCount(); i++) {
            // Get the current row
            tableRow = table.getRows().get(i);

            // Set the first column cell width to 34% of the page width
            tableRow.getCells().get(0).setCellWidth((float) (pageWidth * 0.34), CellWidthType.Point);

            // Set the second column cell width to 33% of the page width
            tableRow.getCells().get(1).setCellWidth((float) (pageWidth * 0.33), CellWidthType.Point);

            // Set the third column cell width to 33% of the page width
            tableRow.getCells().get(2).setCellWidth((float) (pageWidth * 0.33), CellWidthType.Point);
        }

        // Save the modified document, specifying the file format as Docx2016
        doc.saveToFile("SetColumnWidthsWithFixedValues.docx", FileFormat.Docx_2016);

        // Close the document
        doc.close();
    }
}
Apply for a Temporary License
If you'd like to remove the evaluation message from the generated documents, or to get rid of the function limitations, please request a 30-day trial license for yourself.
Setting the column width in Word tables is crucial for optimizing document readability and aesthetics. Appropriate column widths prevent long lines of text from hindering readability, particularly in text-dense tables. Word offers two approaches: percentages and fixed values. Setting column widths using percentage values allows tables to adapt to different screen sizes, keeping content neatly aligned and enhancing the reading experience. Using fixed values, on the other hand, precisely controls the structure of the table, ensuring consistency and professionalism, making it suitable for designs with strict data alignment requirements or complex layouts. This article will introduce how to set Word table column width based on percentage or fixed value settings using Spire.Doc for .NET in C# projects.
Install Spire.Doc for .NET
To begin with, you need to add the DLL files included in the Spire.Doc for .NET package as references in your .NET project. The DLL files can be either downloaded from this link or installed via NuGet.
PM> Install-Package Spire.Doc
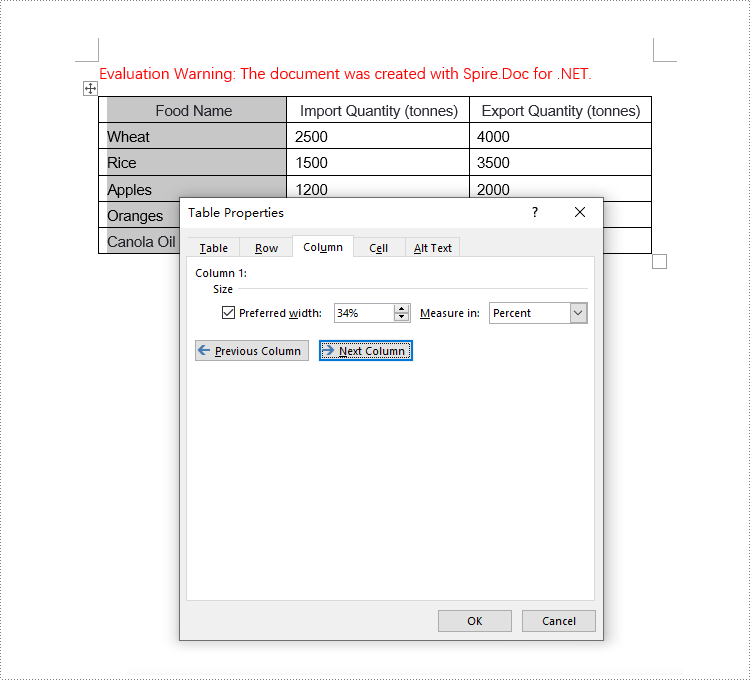
Set Column Width Based on Percentage in C#
When setting column widths in a Word table using percentage values, you first need to set the table's preferred width type to percentage. This is done with Table.PreferredWidth = new PreferredWidth(WidthType.Percentage, (short)100). Then, iterate through each column and set the width to the same or different percentage values as required. Here are the detailed steps:
- Create a Document object.
- Load a document using the Document.LoadFromFile() method.
- Retrieve the first section of the document using Document.Sections[0].
- Get the first table within the section using Section.Tables[0].
- Use a for loop to iterate through all rows in the table.
- Set the column width for cells in different columns to percentage values using the TableRow.Cells[index].SetCellWidth(value, CellWidthType.Percentage) method.
- Save the changes to the Word document using the Document.SaveToFile() method.
- C#
using Spire.Doc;

namespace SpireDocDemo
{
    internal class Program
    {
        static void Main(string[] args)
        {
            // Create a new Document object
            Document doc = new Document();

            // Load the document named "example.docx"
            doc.LoadFromFile("Sample.docx");

            // Get the first Section of the document
            Section section = doc.Sections[0];

            // Cast the first Table in the Section to Table type
            Table table = (Table)section.Tables[0];

            // Create a PreferredWidth object, set the width type to Percentage, and set the width value to 100%
            PreferredWidth percentageWidth = new PreferredWidth(WidthType.Percentage, (short)100);

            // Set the preferred width of the Table to the PreferredWidth object created above
            table.PreferredWidth = percentageWidth;

            // Define a variable of type TableRow
            TableRow tableRow;

            // Iterate through all rows in the Table
            for (int i = 0; i < table.Rows.Count; i++)
            {
                // Get the current row
                tableRow = table.Rows[i];

                // Set the width of the first column cell to 34%, with the type as Percentage
                tableRow.Cells[0].SetCellWidth(34, CellWidthType.Percentage);

                // Set the width of the second column cell to 33%, with the type as Percentage
                tableRow.Cells[1].SetCellWidth(33, CellWidthType.Percentage);

                // Set the width of the third column cell to 33%, with the type as Percentage
                tableRow.Cells[2].SetCellWidth(33, CellWidthType.Percentage);
            }

            // Save the modified document, specifying the file format as Docx2016
            doc.SaveToFile("set_column_width_by_percentage.docx", FileFormat.Docx2016);

            // Close the document
            doc.Close();
        }
    }
}
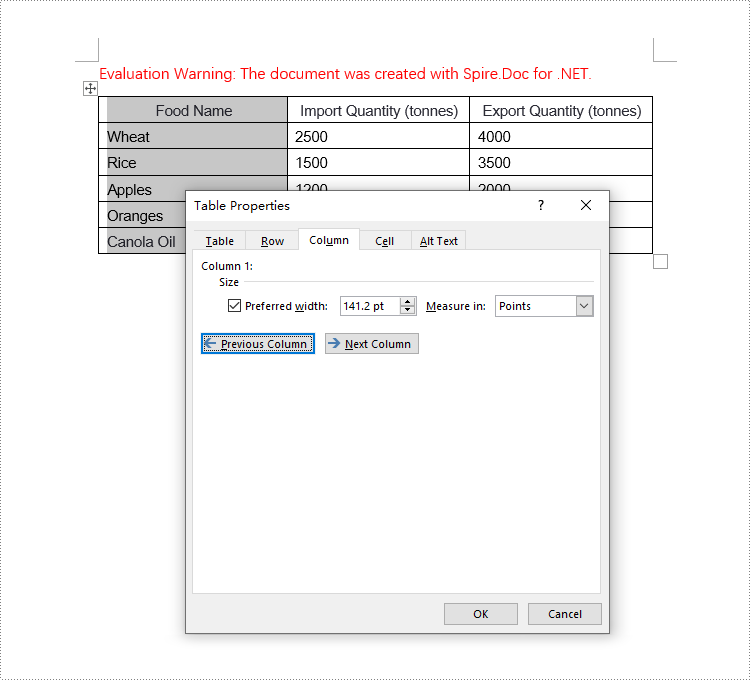
Set Column Width Based on Fixed Value in C#
When setting column widths in a Word table using fixed values, you first need to set the table's layout to fixed. This is done with Table.TableFormat.LayoutType = LayoutType.Fixed. Then, iterate through each column and set the width to the same or different fixed values as required. Here are the detailed steps:
- Create a Document object.
- Load a document using the Document.LoadFromFile() method.
- Retrieve the first section of the document using Document.Sections[0].
- Get the first table within the section using Section.Tables[0].
- Use a for loop to iterate through all rows in the table.
- Set the column width for cells in different columns to fixed values using the TableRow.Cells[index].SetCellWidth(value, CellWidthType.Point) method. Note that value should be replaced with the desired width in points.
- Save the changes to the Word document using the Document.SaveToFile() method.
- C#
using Spire.Doc;

namespace SpireDocDemo
{
    internal class Program
    {
        static void Main(string[] args)
        {
            // Create a new Document object
            Document doc = new Document();

            // Load the document
            doc.LoadFromFile("Sample.docx");

            // Get the first Section of the document
            Section section = doc.Sections[0];

            // Cast the first Table in the Section to Table type
            Table table = (Table)section.Tables[0];

            // Set the table layout type to Fixed
            table.Format.LayoutType = LayoutType.Fixed;

            // Get the left margin
            float leftMargin = section.PageSetup.Margins.Left;

            // Get the right margin
            float rightMargin = section.PageSetup.Margins.Right;

            // Calculate the page width minus the left and right margins
            double pageWidth = section.PageSetup.PageSize.Width - leftMargin - rightMargin;

            // Define a variable of type TableRow
            TableRow tableRow;

            // Loop through all rows in the Table
            for (int i = 0; i < table.Rows.Count; i++)
            {
                // Get the current row
                tableRow = table.Rows[i];

                // Set the width of the first column cell to 34% of the page width
                tableRow.Cells[0].SetCellWidth((float)(pageWidth * 0.34), CellWidthType.Point);

                // Set the width of the second column cell to 33% of the page width
                tableRow.Cells[1].SetCellWidth((float)(pageWidth * 0.33), CellWidthType.Point);

                // Set the width of the third column cell to 33% of the page width
                tableRow.Cells[2].SetCellWidth((float)(pageWidth * 0.33), CellWidthType.Point);
            }

            // Save the modified document, specifying the file format as Docx2016
            doc.SaveToFile("set_column_width_to_fixed_value.docx", FileFormat.Docx2016);

            // Close the document
            doc.Close();
        }
    }
}
Apply for a Temporary License
If you'd like to remove the evaluation message from the generated documents, or to get rid of the function limitations, please request a 30-day trial license for yourself.
