
Knowledgebase (2344)
Children categories
When creating a new PDF document, you can add information about the company, icons, and page numbers as the header and footer to enhance the appearance and professionalism of PDF documents.
This detailed guide will introduce how to add a header and footer when creating a new PDF Document in Python with Spire.PDF for Python effortlessly. Read on.
- Add Header with Python When Creating a PDF Document
- Add Footer with Python When Creating a PDF Document
Install Spire.PDF for Python
This scenario requires Spire.PDF for Python and plum-dispatch v1.7.4. They can be easily installed in your Windows through the following pip command.
pip install Spire.PDF
If you are unsure how to install, please refer to this tutorial: How to Install Spire.PDF for Python on Windows.
Background Knowledge
Spire.PDF for Python offers the PdfPageTemplateElement class for defining page template elements. It provides users with PdfPageTemplateElement.Graphics.DrawString(), PdfPageTemplateElement.Graphics.DrawLine(), PdfPageTemplateElement.Graphics.DrawImage(), and more to draw text, lines, and images. Furthermore, Spire.PDF for Python supports drawing automatic fields like PdfPageCountField and PdfPageNumberField to the template element by PdfGraphicsWidget.Draw() method.
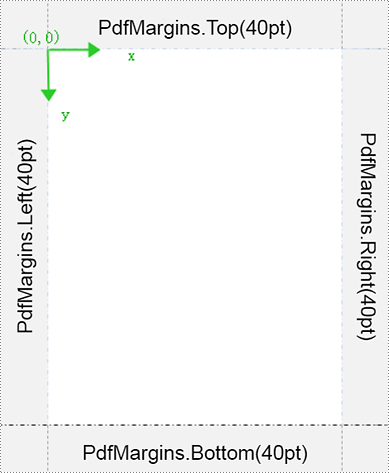
To draw content on the PdfPageTemplateElement template element, the coordinate system settings are as follows:
- The coordinates system's origin is positioned at the top left corner of the template.
- The x-axis extends to the right, and the y-axis extends downward.
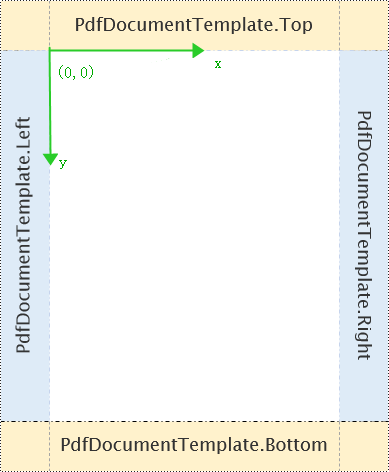
Spire.PDF for Python provides PdfDocumentTemplate class to design the entire page templates of a PDF. The defined PdfPageTemplateElement page template elements above can be applied to the PdfDocumentTemplate page template directly.
PdfDocumentTemplate can apply one or more PdfPageTemplateElement page template elements. For example, apply them to PdfDocumentTemplate.Top and PdfDocumentTemplate.Bottom page templates to create a header and footer in the PDF.
The new page generated by Spire.PDF contains margins by default. The initialization coordinates for the PdfDocumentTemplate page template are set as follows:
Content cannot be drawn in the margins. To apply PdfPageTemplateElement to PdfDocumentTemplate for the header and footer, you can reset the PDF margins to 0. This way, the coordinate system of the PdfDocumentTemplate page template on the new page will adjust based on the size set by the PdfPageTemplateElement. For example:
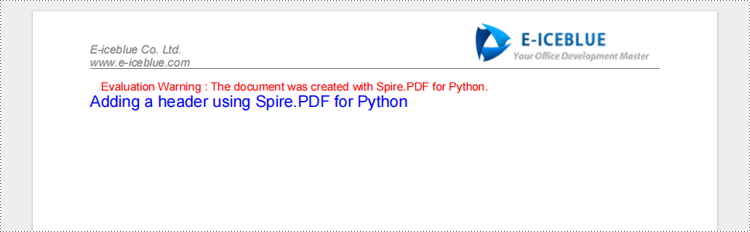
Add a Header with Python When Creating a PDF Document
The following explains how to add text, images, and lines to the header using Spire.PDF for Python when creating a new PDF.
Part 1: Design the header template elements by customizing the CreateHeaderTemplate() method.
- Create PdfPageTemplateElement objects.
- Set the font, brush, pen, and text alignment format for drawing the content of the header by defining PdfTrueTypeFont, PdfBrushes, PdfPen, and PdfTextAlignment.
- Load images to be drawn in the header with PdfImage.FromFile() method.
- Draw text, lines, and images at specified positions in the header template elements using PdfPageTemplateElement.Graphics.DrawString(), PdfPageTemplateElement.Graphics.DrawLine(), and PdfPageTemplateElement.Graphics.DrawImage() methods.
Part 2: Create PDF document objects and call the custom method above to add the header
- Create a new PdfDocument object.
- Set page size by PdfDocoment.PageSettings.Size. Reset the top, bottom, left, and right margins to 0 using PageSettings.Margins.
- Create a new PdfMargins object to set the sizes of the header, the footer, and the left and right templates.
- Call the custom method CreateHeaderTemplate() to add a header.
- Add pages using PdfDocument.Pages.Add() method.
- Define PdfTrueTypeFont and PdfBrushes to set font and brushes for drawing the main content.
- Draw content in the specified area on the newly created page using PdfPageBase.Canvas.DrawString() method.
- Save the resulting file with PdfDocument.SaveToFile() method.
- Python
from spire.pdf.common import *
from spire.pdf import *

# Define CreateHeaderTemplate()
def CreateHeaderTemplate(doc, pageSize, margins):
    #Create a header template with a specified size
    headerSpace = PdfPageTemplateElement(pageSize.Width, margins.Top)
    headerSpace.Foreground = True
    doc.Template.Top = headerSpace

    # Initialize the x and y coordinate points
    x = margins.Left
    y = 0.0

    # Set font, brush, pen, and ext alignment format
    font = PdfTrueTypeFont("Arial", 10.0, PdfFontStyle.Italic, True)
    brush = PdfBrushes.get_Gray()
    pen = PdfPen(PdfBrushes.get_Gray(), 1.0)
    leftAlign = PdfTextAlignment.Left

    # Load the header image and get its height and width values
    headerImage = PdfImage.FromFile("E:\Administrator\Python1\header.png")
    width = headerImage.Width
    height = headerImage.Height
    unitCvtr = PdfUnitConvertor()
    pointWidth = unitCvtr.ConvertUnits(width, PdfGraphicsUnit.Pixel, PdfGraphicsUnit.Point)
    pointFeight = unitCvtr.ConvertUnits(height, PdfGraphicsUnit.Pixel, PdfGraphicsUnit.Point)

    # Draw a header image at the specified position
    headerSpace.Graphics.DrawImage(headerImage, headerSpace.Width-x-pointWidth, headerSpace.Height-pointFeight)

    # Draw the header text at the specified place
    headerSpace.Graphics.DrawString("E-iceblue Co. Ltd.\nwww.e-iceblue.com", font, brush, x, headerSpace.Height-font.Height*2, PdfStringFormat(leftAlign))

    # Draw the header line at the specified position
    headerSpace.Graphics.DrawLine(pen, x, margins.Top, pageSize.Width - x,  margins.Top)


# Create a PdfDocument object
doc = PdfDocument()

# Set the page size and margins
pageSize =PdfPageSize.A4()
doc.PageSettings.Size = pageSize
doc.PageSettings.Margins = PdfMargins(0.0)

# Create a new PdfMargins object to set the size of the header, footer, and left and right templates
margins = PdfMargins(50.0, 50.0, 50.0, 50.0)
doc.Template.Left = PdfPageTemplateElement(margins.Left, pageSize.Height-margins.Bottom-margins.Top)
doc.Template.Right = PdfPageTemplateElement(margins.Right, pageSize.Height-margins.Bottom-margins.Top)
doc.Template.Bottom = PdfPageTemplateElement(pageSize.Width, margins.Bottom)

# Call CreateHeaderTemplate() to add a header
CreateHeaderTemplate(doc, pageSize, margins)

# Add pages according to the settings above
page = doc.Pages.Add()

# Define the font and brush to be used for the page content
font = PdfTrueTypeFont("Arial", 14.0, PdfFontStyle.Regular, True)
brush = PdfBrushes.get_Blue()

# Draw text on the page
text = "Adding a header using Spire.PDF for Python"
page.Canvas.DrawString(text, font, brush, 0.0, 20.0)

# Save the document as PDF
doc.SaveToFile("output/result.pdf", FileFormat.PDF)

# Dispose document objects
doc.Close()
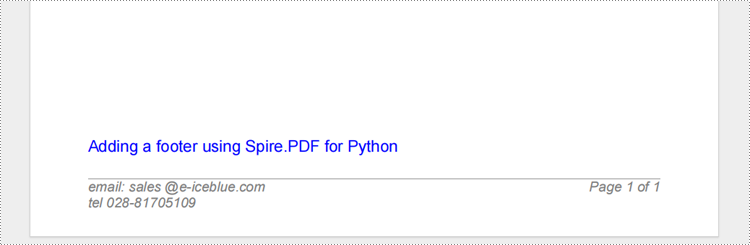
Adding A Footer When Creating A New PDF Document with Python
The following is about how to add text, lines, and page content to the footer by Spire.PDF for Python when creating a new PDF:
Part 1: Customize CreateFooterTemplate() to design footer template elements
- Create a PdfPageTemplateElement object.
- Define PdfTrueTypeFont, PdfBrushes, PdfPen, and PdfTextAlignment to set font, brush, pen, and the text alignment format for drawing the content of footers.
- Draw lines and text in the footer template element using PdfPageTemplateElement Graphics.DrawString() and PdfPageTemplateElement Graphics.DrawLine() methods.
- Create PdfPageNumberField () and PdfPageCountField() objects.
- Create a PdfCompositeField() object to set the composite format and convert it to a PdfGraphicsWidget type. Use PdfGraphicsWidget.Draw() method to draw the page number field content.
Part 2: Create PDF document objects and call the custom method above to add the footer
- Create a PdfDocument object.
- Set page size using PdfDocoment.PageSettings.Size. Reset the top, bottom, left, and right margins to 0 by PageSettings.Margins.
- Create a new PdfMargins object to set the sizes of the header, footer, and left and right templates.
- Call the custom method CreateFooterTemplate() to add a Footer.
- Add pages using PdfDocument.Pages.Add() method.
- Define PdfTrueTypeFont and PdfBrushes to set font and brushes for drawing the main content.
- Draw content in the specified area on the newly created page using PdfPageBase.Canvas.DrawString() method.
- Save the resulting file using PdfDocument.SaveToFile() method.
- Python
from spire.pdf.common import *
from spire.pdf import *

# Define CreateFooterTemplate()
def CreateFooterTemplate(doc, pageSize, margins):
    # Create a footer template with specified sizes
    footerSpace = PdfPageTemplateElement(pageSize.Width, margins.Bottom)
    footerSpace.Foreground = True
    doc.Template.Bottom = footerSpace

    # Initialize the x and y coordinate points
    x = margins.Left
    y = 0.0

    # Set font, brush, pen, and ext alignment format
    font = PdfTrueTypeFont("Arial", 12.0, PdfFontStyle.Italic, True)
    brush = PdfBrushes.get_Gray()
    pen = PdfPen(PdfBrushes.get_Gray(), 1.0)
    leftAlign = PdfTextAlignment.Left

     # Draw footer lines at the specified place
    footerSpace.Graphics.DrawLine(pen, x, y, pageSize.Width - x, y)

    # Draw footer text at the specified position
    footerSpace.Graphics.DrawString("email: sales @e-iceblue.com\ntel:028-81705109 ", font, brush, x, y, PdfStringFormat(leftAlign))

    # Create fields for page number and total page count
    number = PdfPageNumberField()
    count = PdfPageCountField()
    listAutomaticField = [number, count]

    # Create a composite field and set string formatting for drawing
    compositeField = PdfCompositeField(font, PdfBrushes.get_Gray(), "Page {0} of {1}", listAutomaticField)
    compositeField.StringFormat = PdfStringFormat(PdfTextAlignment.Right, PdfVerticalAlignment.Top)
    size = font.MeasureString(compositeField.Text)
    compositeField.Bounds = RectangleF(pageSize.Width -x-size.Width, y, size.Width, size.Height)
    newTemplate = compositeField
    templateGraphicsWidget = PdfGraphicsWidget(newTemplate.Ptr)
    templateGraphicsWidget.Draw(footerSpace.Graphics)


# Create a PdfDocument object
doc = PdfDocument()

# Set page sizes and the margin
pageSize =PdfPageSize.A4()
doc.PageSettings.Size = pageSize
doc.PageSettings.Margins = PdfMargins(0.0)

# Create a new PdfMargins object for setting sizes of the header, footer, and left and right templates

margins = PdfMargins(50.0, 50.0, 50.0, 50.0)
doc.Template.Left = PdfPageTemplateElement(margins.Left, pageSize.Height-margins.Top-margins.Bottom)
doc.Template.Right = PdfPageTemplateElement(margins.Right, pageSize.Height-margins.Top-margins.Bottom)
doc.Template.Top = PdfPageTemplateElement(pageSize.Width, margins.Top)

# Call CreateFooterTemplate() to add a footer
CreateFooterTemplate(doc, pageSize, margins)

# Add pages according to the settings above
page = doc.Pages.Add()

# Create font and brush for page content
font = PdfTrueTypeFont("Arial", 14.0, PdfFontStyle.Regular, True)
brush = PdfBrushes.get_Blue()

# Draw text on the page
text = "Adding a footer using Spire.PDF for Python"
page.Canvas.DrawString(text, font, brush, 0.0, pageSize.Height-margins.Bottom-margins.Top-font.Height-20)

# Save the document as PDF
doc.SaveToFile("output/result.pdf", FileFormat.PDF)

# Dispose document object
doc.Close()
Apply for a Temporary License
If you'd like to remove the evaluation message from the generated documents, or to get rid of the function limitations, please request a 30-day trial license for yourself.
Merge tables in Word can be useful when you want to combine data from multiple tables into a single, larger table to create a more comprehensive view of the information. On the contrary, split tables can help you divide a large table into smaller, more manageable sections so you can focus on specific data sets. This article will demonstrate how to merge or split tables in Word in Python using Spire.Doc for Python.
Install Spire.Doc for Python
This scenario requires Spire.Doc for Python and plum-dispatch v1.7.4. They can be easily installed in your Windows through the following pip commands.
pip install Spire.Doc
If you are unsure how to install, please refer to this tutorial: How to Install Spire.Doc for Python on Windows
Merge Tables in Word in Python
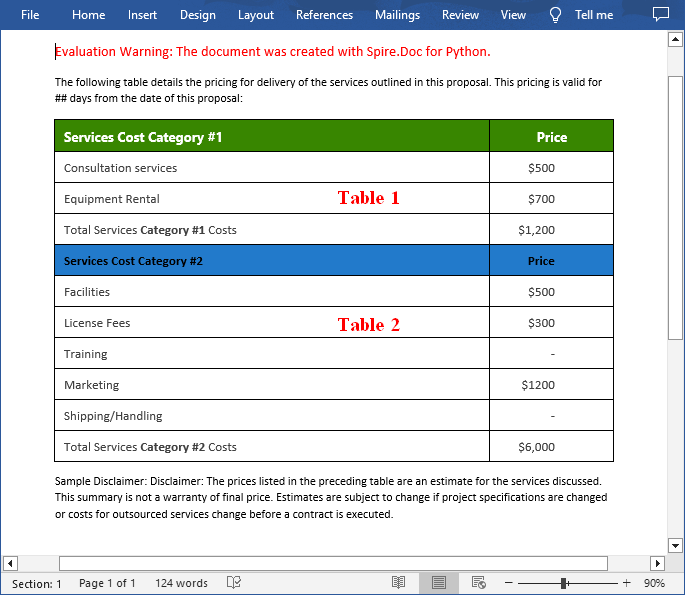
With Spire.Doc for Python, you can combine two or more tables into one by copying all rows from other tables to the target table and then deleting the other tables. The following are the detailed steps.
- Create a Document instance.
- Load a Word document using Document.LoadFromFile() method.
- Get a specified section using Document.Sections[] property.
- Get two tables in the section using Section.Tables[] property.
- Iterate through all rows in the second table and copy them using Table.Rows[].Clone() method.
- Add the rows of the second table to the first table using Table.Rows.Add() method.
- Save the result document using Document.SaveToFile() method.
- Python
from spire.doc import *
from spire.doc.common import *

inputFile = "Cost.docx"
outputFile = "CombineTables.docx"

# Create a Document instance
doc = Document()

# Load a Word document
doc.LoadFromFile(inputFile)

# Get the first section
section = doc.Sections[0]

# Get the first and second table in the section
table1 = section.Tables[0] if isinstance(section.Tables[0], Table) else None
table2 = section.Tables[1] if isinstance(section.Tables[1], Table) else None

# Add rows of the second table to the first table
for i in range(table2.Rows.Count):
    table1.Rows.Add(table2.Rows[i].Clone())

# Remove the second table
section.Tables.Remove(table2)

# Save the result document
section.Document.SaveToFile(outputFile, FileFormat.Docx2013)
doc.Close()
Spilt a Table in Word in Python
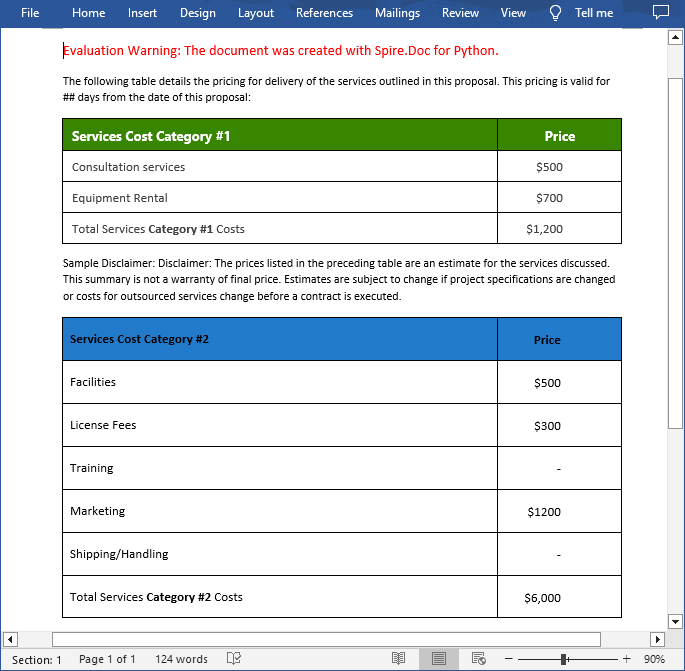
To split a table into two or more tables, you need to create a new table, then copy the specified rows from the original table to the new table, and then delete those rows from the original table. The following are the detailed steps.
- Create a Document instance.
- Load a Word document using Document.LoadFromFile() method.
- Get a specified section using Document.Sections[] property.
- Get a specified table in the section using Section.Tables[] property.
- Specify the row index where the table will be split.
- Create a new instance of the Table class.
- Iterate through the specified rows in the original table and copy them using Table.Rows[].Clone() method.
- Add the specified rows to the new table using Table.Rows.Add() method.
- Iterate through the copied rows and remove each row from the original table using Table.Rows.RemoveAt() method.
- Add the new table to the section using Section.Tables.Add() method.
- Save the result document using Document.SaveToFile() method.
- Python
from spire.doc import *
from spire.doc.common import *

inputFile = "CombineTables.docx"
outputFile = "SplitTable.docx"

# Create a Document instance
doc = Document()

# Load a Word document
doc.LoadFromFile(inputFile)

# Get the first section
section = doc.Sections[0]

# Get the first table in the section
table = section.Tables[0] if isinstance(section.Tables[0], Table) else None

# Specify to split the table from the fifth row
splitIndex = 4

# Create a new table
newTable = Table(section.Document, True)

# Adds rows (from the 5th to the last row) to the new table
for i in range(splitIndex, table.Rows.Count):
    newTable.Rows.Add(table.Rows[i].Clone())

# Delete rows from the original table
for i in range(table.Rows.Count - 1, splitIndex - 1, -1):
    table.Rows.RemoveAt(i)

# Add the new table to the section
section.Tables.Add(newTable)

# Save the result document
section.Document.SaveToFile(outputFile, FileFormat.Docx2013)
doc.Close()
Apply for a Temporary License
If you'd like to remove the evaluation message from the generated documents, or to get rid of the function limitations, please request a 30-day trial license for yourself.
The inclusion of line numbers in Word documents serves as a critical tool for enhancing readability, facilitating reference, and streamlining collaborative editing processes. Whether you're a lawyer marking up contracts, a researcher annotating scientific papers, or a student revising a thesis, line numbers provide a precise way to cite specific lines, making discussions and revisions more efficient.
The powerful Python programming language enables users to batch add or remove line numbers in Word documents, providing a robust means to automate document preparation workflows. This article will demonstrate how to utilize Spire.Doc for Python to add or remove line numbers in Word documents with Python code.
Install Spire.Doc for Python
This scenario requires Spire.Doc for Python and plum-dispatch v1.7.4. They can be easily installed in your Windows through the following pip command.
pip install Spire.Doc
If you are unsure how to install, please refer to: How to Install Spire.Doc for Python on Windows
Add Line Numbers to Word Documents with Python
Spire.Doc for Python provides properties under PageSetup class for line number formatting. The properties and their functions are as follows:
- LineNumberingStep: Used to set the interval of the line number display.
- LineNumberingStartValue: Used to set the start number of the line number.
- LineNumberingDistanceFromText: Used to set the distance between the line number and the text.
- LineNumberingRestartMode: Used to set when the line number restarts, like every page, every section, or continuously without restarting.
It is important to note that line numbers will only be displayed when the PageSetup.LineNumberingStep property is set to a value greater than 0.
The detailed steps for adding line numbers to Word documents are as follows:
- Create an instance of Document class.
- Load a Word document using Document.LoadFromFile() method.
- Iterate through the sections in the document:
- Get the current section using Document.Sections.get_Item() method.
- Get the page setup of the section through Section.PageSetup property.
- Set the display interval of the line numbers through PageSetup.LineNumberingStep property.
- Set the start number of the line numbers through PageSetup.LineNumberingStartValue property.
- Set the distance between line numbers and text through PageSetup.LineNumberingDistanceFromText property.
- Set the restarting mode of the line numbers through PageSetup.LineNumberingRestartMode property.
- Save the document using Document.SaveToFile() method.
- Python
from spire.doc import *
from spire.doc.common import *

# Create an instance of Document class
doc = Document()

# Load a Word document
doc.LoadFromFile("Sample.docx")

# Iterate through the sections
for i in range(0, doc.Sections.Count):
    # Get the current section
    section = doc.Sections.get_Item(i)
    # Get the page setup of the section
    pageSetup = section.PageSetup
    # Set the interval of the line numbering
    pageSetup.LineNumberingStep = 2
    # Set the start number of the line numbering
    pageSetup.LineNumberingStartValue = 1
    # Set the distance between the line number and text
    pageSetup.LineNumberingDistanceFromText = 20
    # Set the restarting mode of the line number
    pageSetup.LineNumberingRestartMode = LineNumberingRestartMode.Continuous

# Save the document
doc.SaveToFile("output/AddLineNumberWord.docx", FileFormat.Docx)
doc.Close()

Remove Line Numbers from Word Documents with Python
Since the value of the PageSetup.LineNumberingStep property directly determines the display of line numbers, developers can simply set the value to 0 to remove the line numbers from Word documents.
The detailed steps for removing line numbers from a Word document are as follows:
- Create an instance of Document class.
- Load a Word document using Document.LoadFromFile() method.
- Iterate through the sections in the document:
- Get the current section using Document.Sections.get_Item() method.
- Set the display interval of the line numbers to 0 through Section.PageSetup.LineNumberingStep property to remove the line numbers.
- Save the document using Document.SaveToFile() method.
- Python
from spire.doc import *
from spire.doc.common import *

# Create an instance of Document class
doc = Document()

# Load a Word document
doc.LoadFromFile("output/AddLineNumberWord.docx")

# Iterate through the sections
for i in range(0, doc.Sections.Count):
    # Get the current section
    section = doc.Sections.get_Item(i)
    # Set the interval of the line numbering to 0 to remove the line numbering
    section.PageSetup.LineNumberingStep = 0

# Save the document
doc.SaveToFile("output/RemoveLineNumberWord.docx", FileFormat.Docx)
doc.Close()

Apply for a Temporary License
If you'd like to remove the evaluation message from the generated documents, or to get rid of the function limitations, please request a 30-day trial license for yourself.
