
Knowledgebase (2344)
Children categories
When working with large amounts of information, the ability to quickly sort data can be very beneficial at times. By arranging data in ascending, descending, or customized order, users can easily spot trends, analyze relationships, and extract valuable insights. In this article, you will learn how to sort columns or rows in Excel in Python using Spire.XLS for Python.
- Sort By Columns in Excel in Python
- Sort By Custom List in Excel in Python
- Sort By Rows in Excel in Python
Install Spire.XLS for Python
This scenario requires Spire.XLS for Python and plum-dispatch v1.7.4. They can be easily installed in your Windows through the following pip command.
pip install Spire.XLS
If you are unsure how to install, please refer to this tutorial: How to Install Spire.XLS for Python on Windows
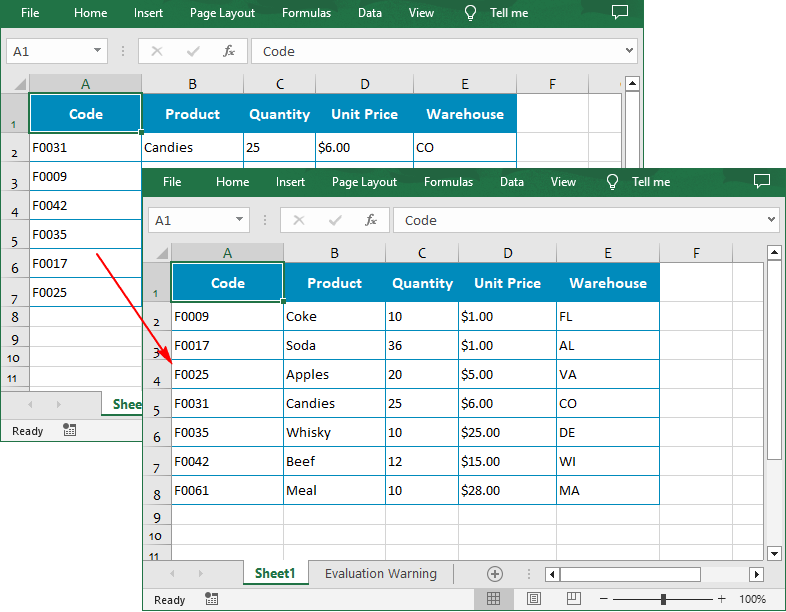
Sort By Columns in Excel in Python
The Workbook.DataSorter.SortColumns.Add(key: int, sortComparsionType: SortComparsionType, orderBy: OrderBy) method provided by Spire.XLS for Python allows users to sort data based on different criteria. For example, you can sort cell values, cell colors or font colors in ascending, descending, or other order.
The following are the steps to sort the values in a specified column:
- Create a Workbook instance.
- Load an Excel file using Workbook.LoadFromFile() method.
- Get a specified worksheet using Workbook.Worksheets[] property.
- Specify the sorting mode using Workbook.DataSorter.SortColumns.Add() method.
- Sort data in a specified cell range using Workbook.DataSorter.Sort() method.
- Save the result file using Workbook.SaveToFile() method.
- Python
from spire.xls.common import *
from spire.xls import *

# Create a Workbook instance
workbook = Workbook()

# Load an Excel file
workbook.LoadFromFile("Budget.xlsx")

# Get the first worksheet
worksheet = workbook.Worksheets[0]

# Sort values in the specified column in ascending order
workbook.DataSorter.SortColumns.Add(0, SortComparsionType.Values, OrderBy.Ascending)

# Sort in the specified cell range
workbook.DataSorter.Sort(worksheet["A1:E7"])

# Save the result file
workbook.SaveToFile("SortByColumns.xlsx", ExcelVersion.Version2016)
workbook.Dispose()
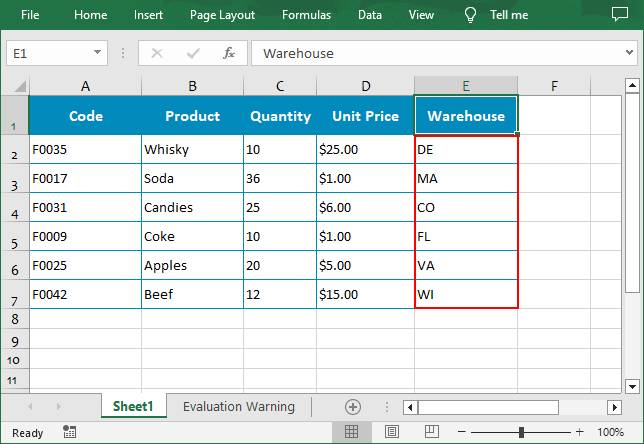
Sort By Custom List in Excel in Python
You can also create a custom list and then sort data based on it using the Workbook.DataSorter.SortColumns.Add(key: int, customSortOrder: List[str]) method.
The following are the steps to sort data using a custom list:
- Create a Workbook instance.
- Load an Excel file using Workbook.LoadFromFile() method.
- Get a specified worksheet using Workbook.Worksheets[] property.
- Create a custom sort list, and then sort a specified column using it though Workbook.DataSorter.SortColumns.Add() method.
- Sort data in a specified cell range using Workbook.DataSorter.Sort() method.
- Save the result file using Workbook.SaveToFile() method.
- Python
from spire.xls.common import *
from spire.xls import *

# Create a Workbook instance
workbook = Workbook()

# Load an Excel file
workbook.LoadFromFile("Budget.xlsx")

# Get the first worksheet
worksheet = workbook.Worksheets[0]

# Create a custom sort list
customList = ["DE","MA", "CO", "FL", "VA", "WI"]

# Sort a specified column using the custom list
workbook.DataSorter.SortColumns.Add(4, customList )

# Sort in the specified cell range
workbook.DataSorter.Sort(worksheet["A1:E7"])

# Save the result file
workbook.SaveToFile("CustomSortList.xlsx", ExcelVersion.Version2016)
workbook.Dispose()
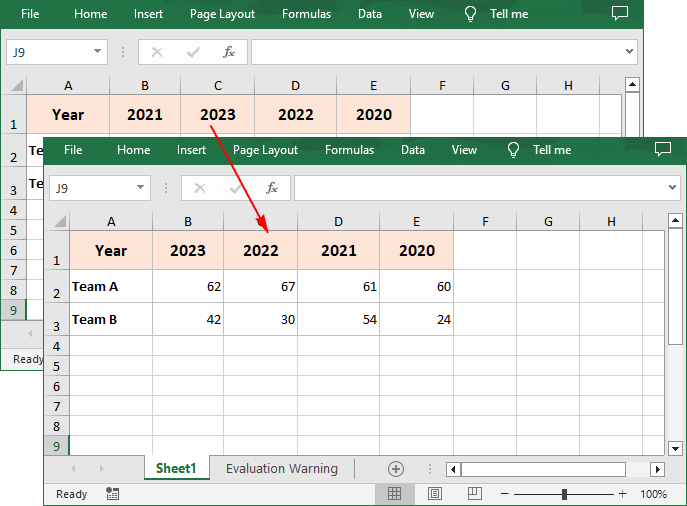
Sort By Rows in Excel in Python
To sort a specified row in Excel, you need to set the sort orientation to LeftToRight, specify the sort mode and sort row data accordingly.
The following are the steps to sort the values in a specified row:
- Create a Workbook instance.
- Load an Excel file using Workbook.LoadFromFile() method.
- Get a specified worksheet using Workbook.Worksheets[] property.
- Set whether to include titles when sorting using Workbook.DataSorter.IsIncludeTitle property.
- Set the sort orientation using Workbook.DataSorter.Orientation property.
- Specify the sorting mode, and then sort data in the first row using Workbook.DataSorter.Sort(Worksheet.Rows[0]) method.
- Save the result file using Workbook.SaveToFile() method.
- Python
from spire.xls.common import *
from spire.xls import *

# Create a Workbook instance
workbook = Workbook()

# Load an Excel file
workbook.LoadFromFile("Year.xlsx")

# Get the first worksheet
sheet = workbook.Worksheets[0]

# Set whether to include titles when sorting
workbook.DataSorter.IsIncludeTitle = True

# Set the sort orientation
workbook.DataSorter.Orientation = SortOrientationType.LeftToRight

# Specify the sorting mode
workbook.DataSorter.SortColumns.Add(0,SortComparsionType.Values,OrderBy.Descending)

# Sort data in the first row
workbook.DataSorter.Sort(sheet.Rows[0])

# Save the result file
workbook.SaveToFile("SortByRows.xlsx", ExcelVersion.Version2016)
workbook.Dispose()
Apply for a Temporary License
If you'd like to remove the evaluation message from the generated documents, or to get rid of the function limitations, please request a 30-day trial license for yourself.
Setting the number format for cells in Excel worksheets is crucial for data management and presentation, which enhances readability, ensures consistency, and facilitates accurate data analysis. Proper number formatting allows users to distinguish between different types of numerical data, such as currency, percentages, dates, and scientific notations, making complex datasets more comprehensible at a glance. In this article, we will explore how to automate the process of setting the number format for cells in Excel worksheets with Spire.XLS for Python in Python programs.
Install Spire.XLS for Python
This scenario requires Spire.XLS for Python and plum-dispatch v1.7.4. They can be easily installed in your Windows through the following pip command.
pip install Spire.XLS
If you are unsure how to install, please refer to: How to Install Spire.XLS for Python on Windows
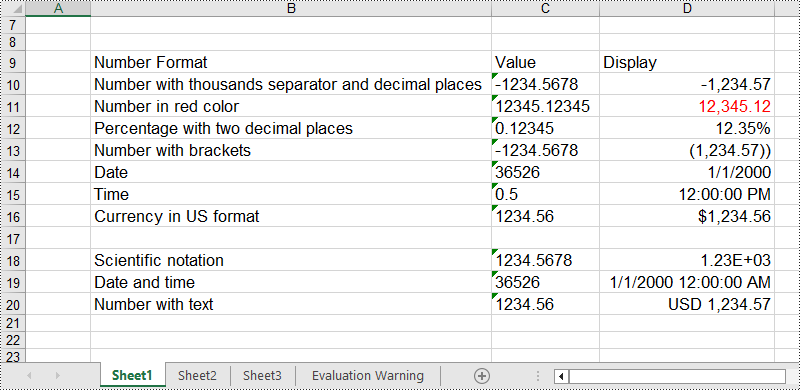
Set the Number Format for Cells in Excel Worksheets
In an Excel workbook, the number format of a cell is determined by its format code. Developers can utilize various symbols in format code to define how numerical data, date and time, currency, etc. are displayed. Below are some commonly used symbols in number format codes:
- #: Represents a digit placeholder that displays only non-zero digits.
- 0: Represents a digit placeholder and always occupies at least one position.
- ; (semicolon): Separates formats for positive numbers, negative numbers, and zero.
- / (slash): In date formats, separates year, month, and day.
- $: Currency symbol, used for representing monetary values, adaptable to system regional settings.
- () (parentheses): Formats negative numbers by enclosing them in parentheses.
- [ ] (square brackets): Utilized in conditional formatting, such as color settings [Red] or conditions like [<=100]"Low";[>100]"High".
Spire.XLS for Python provides the CellRange.NumberValue property to set the number value of a cell and the CellRange.NumberFormat property to set the number format with format code. Below are the steps for setting the number format for cells in Excel worksheets with Python:
- Create an instance of Workbook class to create an Excel workbook.
- Get the first default worksheet using Workbook.Worksheets.get_Item() method.
- Add text to header row through Worksheet.Range[].Text property.
- Add number value to cells through Worksheet.Range[].NumberValue property and set the number format for the cells with format code through Worksheet.Range[].NumberFormat property.
- Save the Excel workbook using Workbook.SaveToFile() method.
- Python
from spire.xls import *
from spire.xls.common import *

# Create an instance of Workbook
workbook = Workbook()

# Get the first worksheet
sheet = workbook.Worksheets.get_Item(0)

# Set the header row
sheet.Range["B9"].Text = "Number Format"
sheet.Range["C9"].Text = "Value"
sheet.Range["D9"].Text = "Display"

# Number with thousands separator and decimal places
sheet.Range["B10"].Text = "Number with thousands separator and decimal places"
sheet.Range["C10"].Text = "-1234.5678"
sheet.Range["D10"].NumberValue = -1234.5678
sheet.Range["D10"].NumberFormat = "#,##0.00"

# Number in red color
sheet.Range["B11"].Text = "Number in red color"
sheet.Range["C11"].Text = "12345.12345"
sheet.Range["D11"].NumberValue = 12345.12345
sheet.Range["D11"].NumberFormat = "[Red]#,##0.00"

# Percentage with two decimal places
sheet.Range["B12"].Text = "Percentage with two decimal places"
sheet.Range["C12"].Text = "0.12345"
sheet.Range["D12"].NumberValue = 0.12345
sheet.Range["D12"].NumberFormat = "0.00%"

# Number with brackets
sheet.Range["B13"].Text = "Number with brackets"
sheet.Range["C13"].Text = "-1234.5678"
sheet.Range["D13"].NumberValue = -1234.5678
sheet.Range["D13"].NumberFormat = "(#,##0.00;(#,##0.00))"

# Date
sheet.Range["B14"].Text = "Date"
sheet.Range["C14"].Text = "36526"
sheet.Range["D14"].NumberValue = 36526
sheet.Range["D14"].NumberFormat = "m/d/yyyy"

# Time
sheet.Range["B15"].Text = "Time"
sheet.Range["C15"].Text = "0.5"
sheet.Range["D15"].NumberValue = 0.5
sheet.Range["D15"].NumberFormat = "h:mm:ss AM/PM"

# Currency in US format
sheet.Range["B16"].Text = "Currency in US format"
sheet.Range["C16"].Text = "1234.56"
sheet.Range["D16"].NumberValue = 1234.56
sheet.Range["D16"].NumberFormat = "$#,##0.00"

# Scientific notation
sheet.Range["B18"].Text = "Scientific notation"
sheet.Range["C18"].Text = "1234.5678"
sheet.Range["D18"].NumberValue = 1234.5678
sheet.Range["D18"].NumberFormat = "0.00E+00"

# Date and time
sheet.Range["B19"].Text = "Date and time"
sheet.Range["C19"].Text = "36526"
sheet.Range["D19"].NumberValue = 36526
sheet.Range["D19"].NumberFormat = "m/d/yyyy h:mm:ss AM/PM"

# Number with text
sheet.Range["B20"].Text = "Number with text"
sheet.Range["C20"].Text = "1234.56"
sheet.Range["D20"].NumberValue = 1234.5678
sheet.Range["D20"].NumberFormat = "\"USD \"#,##0.00"

# Set the font size and autofit rows and columns
sheet.AllocatedRange.Style.Font.Size = 13
sheet.AllocatedRange.AutoFitRows()
sheet.AllocatedRange.AutoFitColumns()

# Save the file
workbook.SaveToFile("output/SetNumberFormatExcel.xlsx", FileFormat.Version2016)
workbook.Dispose()
Apply for a Temporary License
If you'd like to remove the evaluation message from the generated documents, or to get rid of the function limitations, please request a 30-day trial license for yourself.
Adding, modifying, and removing Word table borders can enhance the readability, aesthetics, and organization of data. Adding borders makes the content of the table clearer, distinguishing between different cells, which helps readers quickly identify information. Modifying border styles (such as line thickness, color, or pattern) can emphasize key data, guide visual flow, or conform to specific document styles and design requirements. Removing borders, in some cases, reduces visual clutter, making the content more compact and minimalist, especially suitable for data presentation where strict divisions are not needed or when you wish to downplay structural visibility. This article will introduce how to add, modify, or remove Word table borders in C# projects using Spire.Doc for .NET.
Install Spire.Doc for .NET
To begin with, you need to add the DLL files included in the Spire.Doc for .NET package as references in your .NET project. The DLL files can be either downloaded from this link or installed via NuGet.
PM> Install-Package Spire.Doc
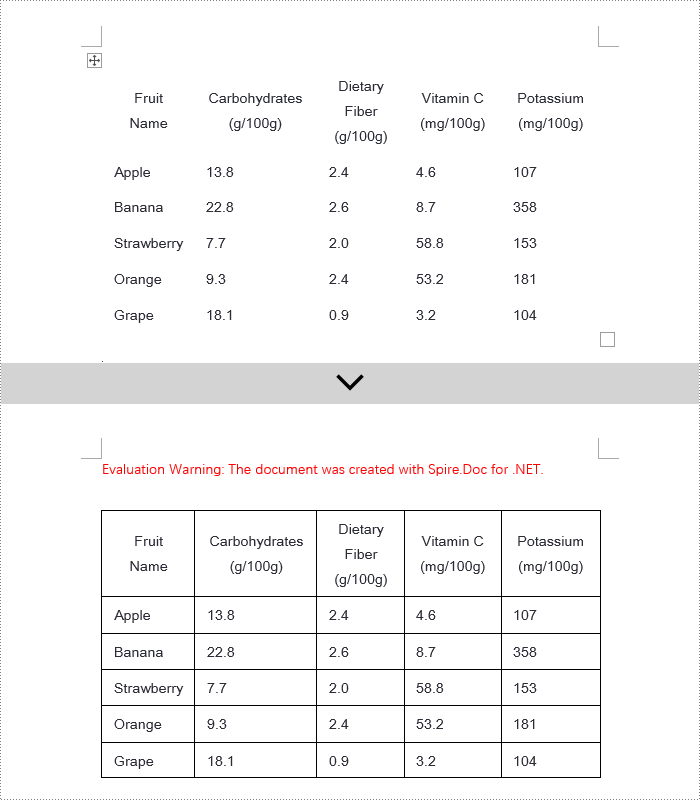
C# Add Word Table Borders
To set borders for all cells in an entire Word table, you need to iterate over each cell and set its visual border properties. Here are the detailed steps:
- Create a Document object.
- Use the Document.LoadFromFile() method to load a document.
- Retrieve the first section of the document using Document.Sections[0].
- Get the first table in that section by using Section.Tables[0].
- Use a for loop to iterate through all the cells in the table.
- Set TableCell.CellFormat.Borders.BorderType to BorderStyle.Single, which sets the cell border to a single line style.
- Set TableCell.CellFormat.Borders.LineWidth to 1.5, defining the border width to be 1.5 points.
- Set TableCell.CellFormat.Borders.Color to Color.Black, setting the border color to black.
- Save the changes to the Word document using the Document.SaveToFile() method.
- C#
using Spire.Doc;

namespace SpireDocDemo
{
    internal class Program
    {
        static void Main(string[] args)
        {
            // Create a new Document object
            Document doc = new Document();

            // Load the document from a file
            doc.LoadFromFile("TableExample1.docx");

            // Get the first section of the document
            Section section = doc.Sections[0];

            // Get the first table in that section
            Table table = (Table)section.Tables[0];

            // Declare TableRow and TableCell variables for use within loops
            TableRow tableRow;
            TableCell tableCell;

            // Iterate through all rows in the table
            for (int i = 0; i < table.Rows.Count; i++)
            {
                // Get the current row
                tableRow = table.Rows[i];

                // Iterate through all cells in the current row
                for (int j = 0; j < tableRow.Cells.Count; j++)
                {
                    // Get the current cell
                    tableCell = tableRow.Cells[j];

                    // Set the border style of the current cell to single line
                    tableCell.CellFormat.Borders.BorderType = Spire.Doc.Documents.BorderStyle.Single;
                }
            }

            // Save the modified document as a new file
            doc.SaveToFile("AddBorders.docx", FileFormat.Docx2016);

            // Close the document to release resources
            doc.Close();
        }
    }
}
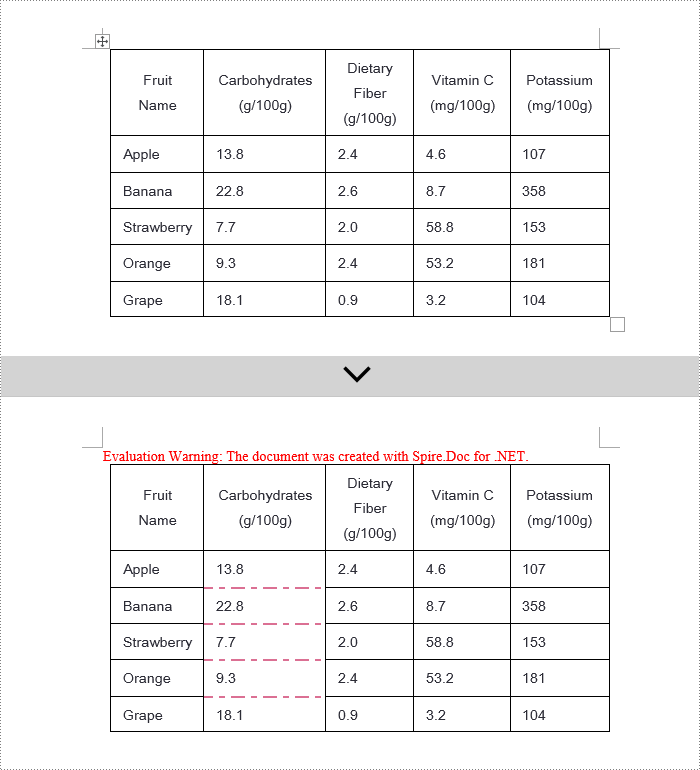
C# Modify Word Table Borders
Spire.Doc offers a range of border properties such as the border style TableCell.CellFormat.Borders.BorderType, border width TableCell.CellFormat.Borders.LineWidth, and border color TableCell.CellFormat.Borders.Color, among others. You can customize these properties to achieve the desired effects. Below are the detailed steps:
- Create a Document object.
- Load a document using the Document.LoadFromFile() method.
- Retrieve the first section of the document using Document.Sections[0].
- Get the first table in the section using Section.Tables[0].
- Use a for loop to iterate over the cells in the table whose border styles you wish to change.
- Change the bottom border color of the cell by setting TableCell.CellFormat.Borders.Bottom.Color to Color.PaleVioletRed.
- Change the bottom border style of the cell by setting TableCell.CellFormat.Borders.Bottom.BorderType to BorderStyle.DotDash.
- Change the bottom border width of the cell by setting TableCell.CellFormat.Borders.Bottom.LineWidth to 2 points.
- Save the changes to the document using the Document.SaveToFile() method.
- C#
using Spire.Doc;
using Spire.Doc.Documents;
using System.Drawing;

namespace SpireDocDemo
{
    internal class Program
    {
        static void Main(string[] args)
        {
            // Create a new Document object
            Document doc = new Document();

            // Load the document from a file
            doc.LoadFromFile("TableExample2.docx");

            // Get the first section of the document
            Section section = doc.Sections[0];

            // Get the first table in that section
            Table table = (Table)section.Tables[0];

            // Declare a TableRow to use within the loop
            TableRow tableRow;

            // Iterate through all rows of the table
            for (int i = 1; i < table.Rows.Count - 1; i++)
            {
                tableRow = table.Rows[i];

                // Set the border color of the current cell
                tableRow.Cells[1].CellFormat.Borders.Bottom.Color = Color.PaleVioletRed;

                // Set the border style of the current cell to DotDash
                tableRow.Cells[1].CellFormat.Borders.Bottom.BorderType = Spire.Doc.Documents.BorderStyle.DotDash;

                // Set the width of the border
                tableRow.Cells[1].CellFormat.Borders.Bottom.LineWidth = 2;
            }

            // Save the modified document as a new file
            doc.SaveToFile("ModifiedBorders.docx", FileFormat.Docx2016);

            // Close the document and release resources
            doc.Close();
        }
    }
}
C# Remove Word Table Borders
During the process of handling Word documents, not only can border styles be applied to entire tables, but customization can also be extended to individual cells. To completely remove all borders from a table, it is recommended to follow a two-step strategy: First, apply border removal settings to the table itself; second, visit each cell within the table individually to clear their border styles. Here are the detailed steps:
- Create a Document object.
- Load a document using the Document.LoadFromFile() method.
- Retrieve the first table in the section using Section.Tables[0].
- Use a for loop to iterate over all cells in the table.
- Set Table.TableFormat.Borders.BorderType = BorderStyle.None to remove borders from the table.
- Set TableCell.CellFormat.Borders.BorderType = BorderStyle.None to remove borders from each cell.
- Save the changes to the Word document using the Document.SaveToFile() method.
- C#
using Spire.Doc;
using Spire.Doc.Documents;
using System.Drawing;

namespace SpireDocDemo
{
    internal class Program
    {
        static void Main(string[] args)
        {
            // Create a new Document object
            Document doc = new Document();

            // Load the document from file
            doc.LoadFromFile("TableExample2.docx");

            // Get the first section of the document
            Section section = doc.Sections[0];

            // Get the first table in that section
            Table table = (Table)section.Tables[0];

            // Remove the borders set on the table
            table.Format.Borders.BorderType = BorderStyle.None;

            // Declare a TableRow to use in the loop
            TableRow tableRow;

            // Iterate through all rows in the table
            for (int i = 0; i < table.Rows.Count; i++)
            {
                tableRow = table.Rows[i];
                for (int j = 0; j < tableRow.Cells.Count; j++)
                {
                    // Remove all borders set on the cell
                    tableRow.Cells[j].CellFormat.Borders.BorderType = BorderStyle.None;
                }
            }

            // Save the modified document as a new file
            doc.SaveToFile("RemoveBorders.docx", FileFormat.Docx2016);

            // Close the document to release resources
            doc.Close();
        }
    }
}

Apply for a Temporary License
If you'd like to remove the evaluation message from the generated documents, or to get rid of the function limitations, please request a 30-day trial license for yourself.
