
Knowledgebase (2344)
Children categories
Set and Get Alternative Text (Title and Description) of PowerPoint Shapes in C#
2018-04-23 06:23:31 Written by zaki zouWith Spire.Presentation, we can programmatically set the Alternative Text for PowerPoint shapes along with get the Alternative Text of PowerPoint shapes. This article demonstrates how we can use Spire.Presentation to accomplish this function.
Detail steps:
Step 1: Instantiate a Presentation object and load the PowerPoint file.
Presentation ppt = new Presentation();
ppt.LoadFromFile("Input.pptx");
Step 2: Get the first slide.
ISlide slide = ppt.Slides[0];
Step 3: Set or get the alternative text of the first Shape in the slide.
//Set the alternative text (title and description)
slide.Shapes[0].AlternativeTitle = "Rectangle";
slide.Shapes[0].AlternativeText = "This is a Rectangle";

//Get the alternative text (title and description)
//string title = slide.Shapes[0].AlternativeTitle;
//string description = slide.Shapes[0].AlternativeText;
Step 4: Save the file.
ppt.SaveToFile("Output.pptx", FileFormat.Pptx2013);
Screenshot after setting alternative text:

Full code:
using Spire.Presentation;

namespace Set_and_Get_Alternative_Text_of_Shape
{
    class Program
    {
        static void Main(string[] args)
        {
            //Instantiate a Presentation object
            Presentation ppt = new Presentation();
            //Load the PowerPoint file
            ppt.LoadFromFile("Input.pptx");

            //Get the first slide
            ISlide slide = ppt.Slides[0];

            //Set the alternative text (title and description)
            slide.Shapes[0].AlternativeTitle = "Rectangle";
            slide.Shapes[0].AlternativeText = "This is a Rectangle";

            //Get the alternative text (title and description)
            //string title = slide.Shapes[0].AlternativeTitle;
            //string description = slide.Shapes[0].AlternativeText;

            //Save the file
            ppt.SaveToFile("Output.pptx", FileFormat.Pptx2013);
        }
    }
}
Replace Bookmark with a Table in Word Documents in C#, VB.NET
2018-04-20 07:35:06 Written by AdministratorBookmarks are a great way to specify important locations on a Word document. Spire.Doc supports to access the bookmarks within the document and insert objects such as text, image and table at the bookmark location. This article will show you how to access a specific bookmark and replace the current bookmark content with a table.
Step 1: Load a template Word document.
Document doc = new Document();
doc.LoadFromFile(@"C:\Users\Administrator\Desktop\employee.docx");
Step 2: Create a Table object.
Table table = new Table(doc,true);
Step 3: Fill the table with sample data.
DataTable dt = new DataTable();
dt.Columns.Add("id", typeof(string));
dt.Columns.Add("name", typeof(string));
dt.Columns.Add("job", typeof(string));
dt.Columns.Add("email", typeof(string));
dt.Columns.Add("salary", typeof(string));
dt.Rows.Add(new string[] { "Emp_ID", "Name", "Job", "E-mail", "Salary" });
dt.Rows.Add(new string[] { "0241","Andrews", "Engineer", "andrews@outlook.com" ,"3.8K"});
dt.Rows.Add(new string[] { "0242","White", "Manager", "white@outlook.com","4.2K" });
dt.Rows.Add(new string[] { "0243","Martin", "Secretary", "martin@gmail.com", "3.5K" });
table.ResetCells(dt.Rows.Count, dt.Columns.Count);
for (int i = 0; i < dt.Rows.Count; i++)
{
    for (int j = 0; j < dt.Columns.Count; j++)
    {
        table.Rows[i].Cells[j].AddParagraph().AppendText(dt.Rows[i][j].ToString());
    }
}
Step 4: Get the specific bookmark by its name.
BookmarksNavigator navigator = new BookmarksNavigator(doc);
navigator.MoveToBookmark("bookmark_employee");
Step 5: Create a TextBodyPart instance and add the table to it.
TextBodyPart part = new TextBodyPart(doc);
part.BodyItems.Add(table);
Step 6: Replace the current bookmark content with the TextBodyPart object.
navigator.ReplaceBookmarkContent(part);
Step 7: Save the file.
doc.SaveToFile("output.docx", FileFormat.Docx2013);
Result:

Full Code:
using Spire.Doc;
using Spire.Doc.Documents;
using System.Data;
namespace ReplaceBookmark
{
    class Program
    {

        static void Main(string[] args)
        {

            Document doc = new Document();
            doc.LoadFromFile(@"C:\Users\Administrator\Desktop\employee.docx");

            Table table = new Table(doc, true);
            DataTable dt = new DataTable();
            dt.Columns.Add("id", typeof(string));
            dt.Columns.Add("name", typeof(string));
            dt.Columns.Add("job", typeof(string));
            dt.Columns.Add("email", typeof(string));
            dt.Columns.Add("salary", typeof(string));
            dt.Rows.Add(new string[] { "Emp_ID", "Name", "Job", "E-mail", "Salary" });
            dt.Rows.Add(new string[] { "0241", "Andrews", "Engineer", "andrews@outlook.com", "3.8K" });
            dt.Rows.Add(new string[] { "0242", "White", "Manager", "white@outlook.com", "4.2K" });
            dt.Rows.Add(new string[] { "0243", "Martin", "Secretary", "martin@gmail.com", "3.5K" });
            table.ResetCells(dt.Rows.Count, dt.Columns.Count);
            for (int i = 0; i < dt.Rows.Count; i++)
            {
                for (int j = 0; j < dt.Columns.Count; j++)
                {
                    table.Rows[i].Cells[j].AddParagraph().AppendText(dt.Rows[i][j].ToString());
                }
            }

            BookmarksNavigator navigator = new BookmarksNavigator(doc);
            navigator.MoveToBookmark("bookmark_employee");
            TextBodyPart part = new TextBodyPart(doc);
            part.BodyItems.Add(table);
            navigator.ReplaceBookmarkContent(part);
            doc.SaveToFile("output.docx", FileFormat.Docx2013);
            System.Diagnostics.Process.Start("output.docx");

        }
    }
}
Imports Spire.Doc
Imports Spire.Doc.Documents
Imports System.Data
Namespace ReplaceBookmark
	Class Program

		Private Shared Sub Main(args As String())

			Dim doc As New Document()
			doc.LoadFromFile("C:\Users\Administrator\Desktop\employee.docx")

			Dim table As New Table(doc, True)
			Dim dt As New DataTable()
			dt.Columns.Add("id", GetType(String))
			dt.Columns.Add("name", GetType(String))
			dt.Columns.Add("job", GetType(String))
			dt.Columns.Add("email", GetType(String))
			dt.Columns.Add("salary", GetType(String))
			dt.Rows.Add(New String() {"Emp_ID", "Name", "Job", "E-mail", "Salary"})
			dt.Rows.Add(New String() {"0241", "Andrews", "Engineer", "andrews@outlook.com", "3.8K"})
			dt.Rows.Add(New String() {"0242", "White", "Manager", "white@outlook.com", "4.2K"})
			dt.Rows.Add(New String() {"0243", "Martin", "Secretary", "martin@gmail.com", "3.5K"})
			table.ResetCells(dt.Rows.Count, dt.Columns.Count)
			For i As Integer = 0 To dt.Rows.Count - 1
				For j As Integer = 0 To dt.Columns.Count - 1
					table.Rows(i).Cells(j).AddParagraph().AppendText(dt.Rows(i)(j).ToString())
				Next
			Next

			Dim navigator As New BookmarksNavigator(doc)
			navigator.MoveToBookmark("bookmark_employee")
			Dim part As New TextBodyPart(doc)
			part.BodyItems.Add(table)
			navigator.ReplaceBookmarkContent(part)
			doc.SaveToFile("output.docx", FileFormat.Docx2013)
			System.Diagnostics.Process.Start("output.docx")

		End Sub
	End Class
End Namespace
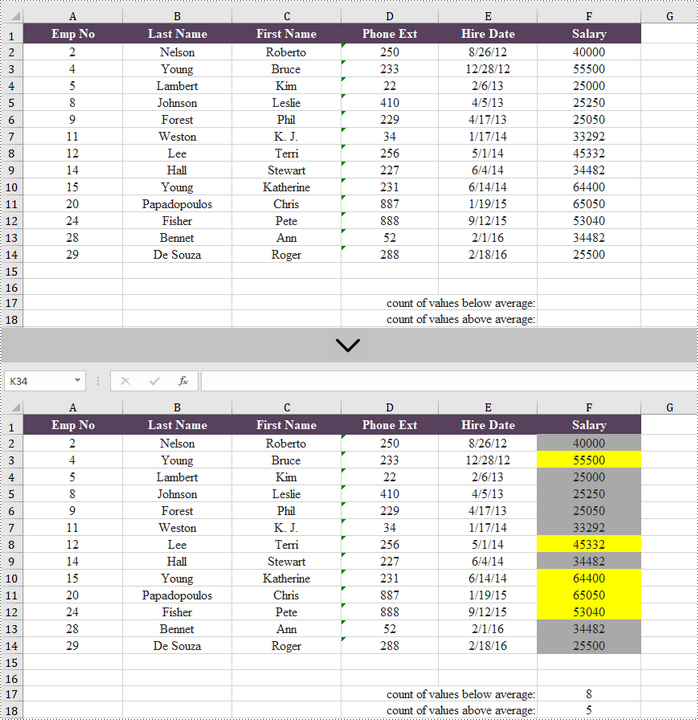
If you want to find values that are higher or lower than the average, you don't have to calculate the average, and then check those that are higher or lower. Using conditional formatting in Excel, you can automatically highlight those numbers. In this article, you will learn how to highlight values above average or below average with conditional formatting, by using Spire.XLS for .NET.
Install Spire.XLS for .NET
To begin with, you need to add the DLL files included in the Spire.XLS for .NET package as references in your .NET project. The DLL files can be either downloaded from this link or installed via NuGet.
PM> Install-Package Spire.XLS
Highlight Values Above or Below Average in Excel
Below are the steps to highlight values above or below average in Excel using Spire.XLS for .NET.
- Create a Workbook object.
- Load an Excel file using Workbook.LoadFromFile() method.
- Get a specific worksheet from the workbook through Workbook.Worsheets[index] property.
- Add a conditional formatting to the worksheet using Worksheet.ConditionalFormats.Add() method and return an object of XlsConditionalFormats class.
- Set the cell range where the conditional formatting will be applied using XlsConditionalFormats.AddRange() method.
- Add an average condition using XlsConditionalFormats.AddAverageCondition() method, specify the average type to above and change the background color of the cells that meet the condition to yellow.
- Add another average condition to change the background color of the below average values to dark gray.
- Save the workbook to an Excel file using Workbook.SaveToFile() method.
- C#
- VB.NET
using Spire.Xls;
using Spire.Xls.Core;
using Spire.Xls.Core.Spreadsheet.Collections;
using System.Drawing;

namespace HighlightValuesAboveAndBelowAverage
{
    class Program
    {
        static void Main(string[] args)
        {
            //Create a Workbook object
            Workbook workbook = new Workbook();

            //Load an Excel file
            workbook.LoadFromFile(@"C:\Users\Administrator\Desktop\sample.xlsx");

            //Get the first worksheet
            Worksheet sheet = workbook.Worksheets[0];

            //Add a conditional format to the worksheet
            XlsConditionalFormats format = sheet.ConditionalFormats.Add();

            //Set the range where the conditional format will be applied
            format.AddRange(sheet.Range["F2:F14"]);

            //Add a condition to highlight the top 2 ranked values
            IConditionalFormat condition1 = format.AddAverageCondition(AverageType.Above);
            condition1.BackColor = Color.Yellow;

            //Add a condition to highlight the bottom 2 ranked values
            IConditionalFormat condition2 = format.AddAverageCondition(AverageType.Below);
            condition2.BackColor = Color.DarkGray;

            //Get the count of values below average
            sheet.Range["F17"].Formula = "=COUNTIF(F2:F14,\"<\"&AVERAGE(F2:F14))";

            //Get the count of values above average
            sheet.Range["F18"].Formula = "=COUNTIF(F2:F14,\">\"&AVERAGE(F2:F14))";

            //Save the workbook to an Excel file
            workbook.SaveToFile("HighlightValues.xlsx", ExcelVersion.Version2016);
        }
    }
}
Apply for a Temporary License
If you'd like to remove the evaluation message from the generated documents, or to get rid of the function limitations, please request a 30-day trial license for yourself.
