
Knowledgebase (2344)
Children categories
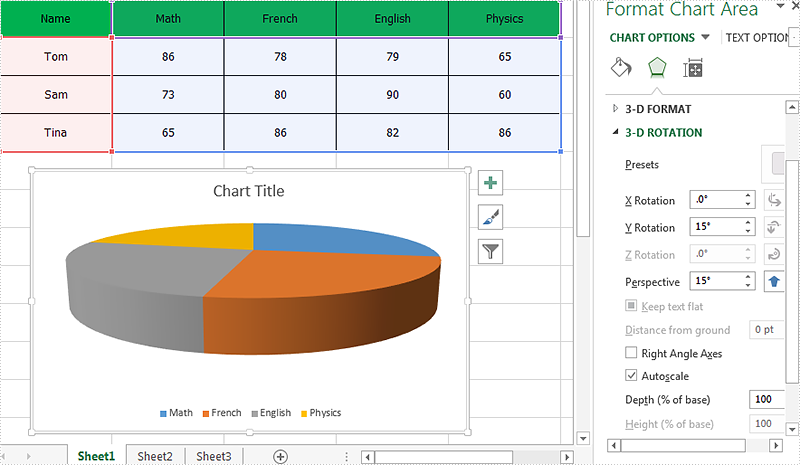
With Spire.XLS, we can set the 3-D rotation easily in C#. The following code example explains how to set the rotation of the 3D chart view in C#. We will use 3D pie chart for example. Firstly, view the original 3D pie chart:
Code snippet of how to set the 3D rotation for Excel Chart:
Step 1: Create a new instance of workbook and load the sample document from file.
Workbook workbook = new Workbook();
workbook.LoadFromFile("Sample.xlsx");
Step 2: Get the chart from the first worksheet.
Worksheet sheet = workbook.Worksheets[0];
Chart chart = sheet.Charts[0];
Step 3: Set Rotation of the 3D chart view for X and Y.
//X rotation:
chart.Rotation=30;
//Y rotation:
chart.Elevation = 20;
Step 4: Save the document to file.
workbook.SaveToFile("Result.xlsx", ExcelVersion.Version2010);
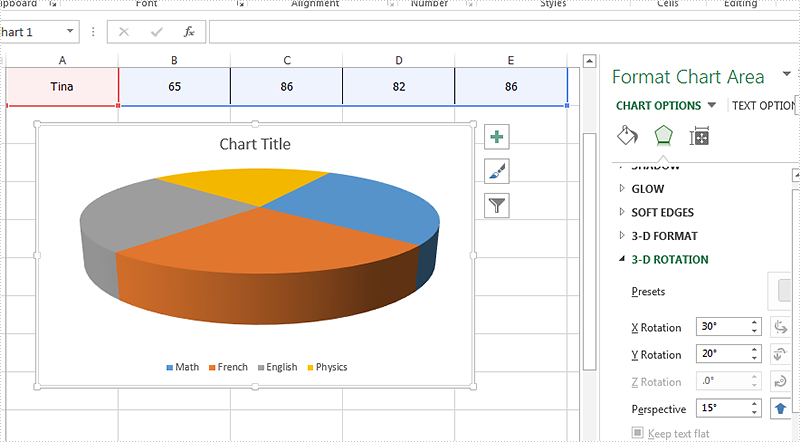
Effective screenshot of the Excel 3D chart rotation:
Full codes:
using Spire.Xls;
namespace SetRotation
{

    class Program
    {

        static void Main(string[] args)
        {
            Workbook workbook = new Workbook();
            workbook.LoadFromFile("Sample.xlsx");

            Worksheet sheet = workbook.Worksheets[0];
            Chart chart = sheet.Charts[0];

            //X rotation:
            chart.Rotation = 30;
            //Y rotation:
            chart.Elevation = 20;

            workbook.SaveToFile("Result.xlsx", ExcelVersion.Version2010);
        }
    }
}
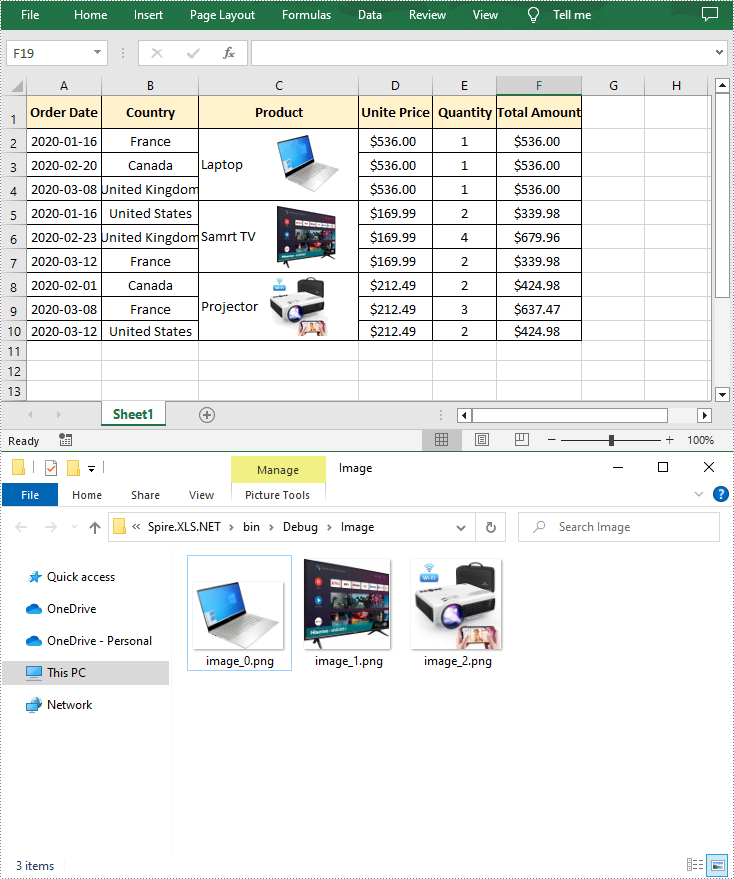
Although Excel files typically store numbers and data, they can also contain images associated with the file. After inserting images into Excel, it may sometimes be necessary to extract the images for use elsewhere, or to remove them to improve simplicity. In this article, you will learn how to programmatically extract or remove images from an Excel document using Spire.XLS for .NET.
Install Spire.XLS for .NET
To begin with, you need to add the DLL files included in the Spire.XLS for .NET package as references in your .NET project. The DLL files can be either downloaded from this link or installed via NuGet.
PM> Install-Package Spire.XLS
Extract Images from Excel in C# and VB.NET
Spire.XLS for .NET allows you to extract all images in an Excel worksheet at once. The following are the detailed steps.
- Create a Workbook instance.
- Load a sample Excel file using Workbook.LoadFromFile() method.
- Get a specific worksheet using Workbook.Worksheets[] property.
- Loop through to get all pictures in the worksheet using Worksheet.Pictures property.
- Extract pictures and save them to a specified file path using ExcelPicture.Picture.Save() method.
- C#
- VB.NET
using Spire.Xls;

namespace ExtractImages
{
    class Program
    {
        static void Main(string[] args)
        {
            //Create a Workbook instance
            Workbook workbook = new Workbook();

            //Load a sample Excel document
            workbook.LoadFromFile("input.xlsx");

            //Get the first worksheet
            Worksheet sheet = workbook.Worksheets[0];

            //Get all images in the worksheet
            for (int i = sheet.Pictures.Count - 1; i >= 0; i--)
            {
                ExcelPicture picture = sheet.Pictures[i];

                //Extract the images
                picture.Picture.Save(string.Format(@"Image\image_{0}.png", i));
            }
        }
    }
}
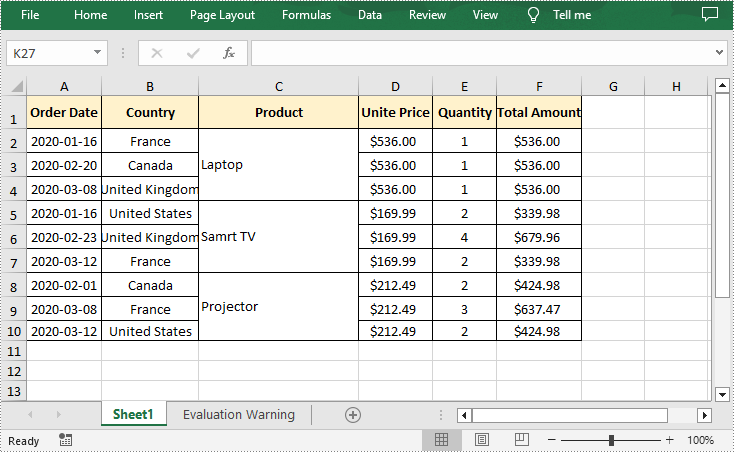
Delete Images from Excel in C# and VB.NET
To delete pictures from an Excel worksheet, you can use the Worksheet.Pictures.Remove() method. The following are the detailed steps.
- Create a Workbook instance.
- Load a sample Excel file using Workbook.LoadFromFile() method.
- Get a specific worksheet using Workbook.Worksheets[] property.
- Loop through all pictures in the worksheet and remove them using Worksheet.Pictures.Remove() method.
- Save the result document using Workbook.SaveToFile() method.
- C#
- VB.NET
using Spire.Xls;

namespace DeleteImages
{
    class Program
    {
        static void Main(string[] args)
        {
            //Create a Workbook instance
            Workbook workbook = new Workbook();

            //Load a sample Excel document
            workbook.LoadFromFile("input0.xlsx");

            //Get the first worksheet
            Worksheet sheet = workbook.Worksheets[0];

            //Delete all pictures from the worksheet
            for (int i = sheet.Pictures.Count - 1; i >= 0; i--)
            {
                sheet.Pictures[i].Remove();
            }

            //Save the result document
            workbook.SaveToFile("DeleteImages.xlsx", ExcelVersion.Version2016);
        }
    }
}
Apply for a Temporary License
If you'd like to remove the evaluation message from the generated documents, or to get rid of the function limitations, please request a 30-day trial license for yourself.
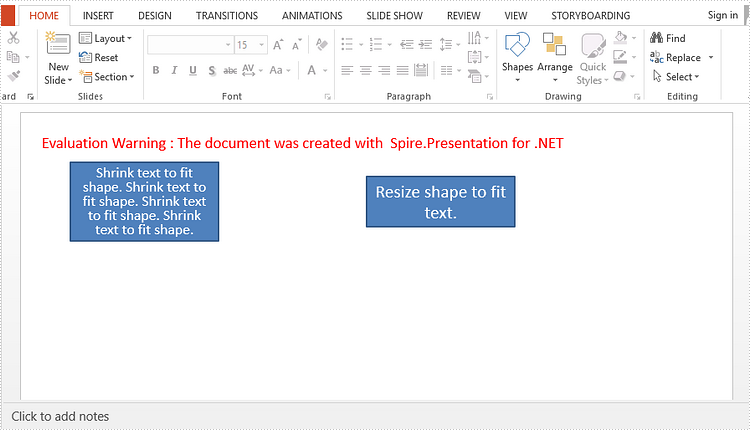
With auto-fit feature, you can automatically reduce the font size of text to fit a shape, or you can shrink or enlarge shape to fit the exact size of your text. This article will show you how to auto-fit text or shape using Spire.Presentation with C#, VB.NET.
Step 1: Create an instance of Presentation class.
Presentation presentation = new Presentation();
Step 2: Insert a shape, and set the AutofitType property to Normal, which means the text automatically shrinks to fit shape.
IAutoShape textShape1 = presentation.Slides[0].Shapes.AppendShape(ShapeType.Rectangle, new RectangleF(50, 50, 150, 80));
textShape1.TextFrame.Text = "Shrink text to fit shape. Shrink text to fit shape. Shrink text to fit shape. Shrink text to fit shape.";
textShape1.TextFrame.AutofitType = TextAutofitType.Normal;
Step 3: Insert a shape, and set the AutofitType property to Shape, which means the shape size automatically decreases or increases to fit text.
IAutoShape textShape2 = presentation.Slides[0].Shapes.AppendShape(ShapeType.Rectangle, new RectangleF(350, 50, 150, 80));
textShape2.TextFrame.Text = "Resize shape to fit text.";
textShape2.TextFrame.AutofitType = TextAutofitType.Shape;
Step 4: Save the file.
presentation.SaveToFile("output.pptx", FileFormat.Pptx2013);
Output:
Full Code:
using Spire.Presentation;
using System.Drawing;
namespace AutofitinPPT
{
    class Program
    {
        static void Main(string[] args)
        {

            Presentation presentation = new Presentation();

            IAutoShape textShape1 = presentation.Slides[0].Shapes.AppendShape(ShapeType.Rectangle, new RectangleF(50, 50, 150, 80));
            textShape1.TextFrame.Text = "Shrink text to fit shape. Shrink text to fit shape. Shrink text to fit shape. Shrink text to fit shape.";
            textShape1.TextFrame.AutofitType = TextAutofitType.Normal;

            IAutoShape textShape2 = presentation.Slides[0].Shapes.AppendShape(ShapeType.Rectangle, new RectangleF(350, 50, 150, 80));
            textShape2.TextFrame.Text = "Resize shape to fit text.";
            textShape2.TextFrame.AutofitType = TextAutofitType.Shape;

            presentation.SaveToFile("output.pptx", FileFormat.Pptx2013);
        }
    }
}
Imports Spire.Presentation
Imports System.Drawing
Namespace AutofitinPPT
	Class Program
		Private Shared Sub Main(args As String())

			Dim presentation As New Presentation()

			Dim textShape1 As IAutoShape = presentation.Slides(0).Shapes.AppendShape(ShapeType.Rectangle, New RectangleF(50, 50, 150, 80))
			textShape1.TextFrame.Text = "Shrink text to fit shape. Shrink text to fit shape. Shrink text to fit shape. Shrink text to fit shape."
			textShape1.TextFrame.AutofitType = TextAutofitType.Normal

			Dim textShape2 As IAutoShape = presentation.Slides(0).Shapes.AppendShape(ShapeType.Rectangle, New RectangleF(350, 50, 150, 80))
			textShape2.TextFrame.Text = "Resize shape to fit text."
			textShape2.TextFrame.AutofitType = TextAutofitType.Shape

			presentation.SaveToFile("output.pptx", FileFormat.Pptx2013)
		End Sub
	End Class
End Namespace
