
Knowledgebase (2344)
Children categories
Slicers in Excel offer a user-friendly way to filter data in pivot tables and tables, making data analysis both visually appealing and interactive. Unlike traditional filter options, which can be less intuitive, slicers present filter choices as buttons. This allows users to quickly and easily refine their data views. Whether you are handling large datasets or building dynamic dashboards, slicers improve the user experience by providing immediate feedback on the selected criteria. This article explains how to add, update, and remove slicers in Excel in C# using Spire.XLS for .NET.
- Add Slicers to Tables in Excel
- Add Slicers to Pivot Tables in Excel
- Update Slicers in Excel
- Remove Slicers from Excel
Install Spire.XLS for .NET
To begin with, you need to add the DLL files included in the Spire.XLS for .NET package as references in your .NET project. The DLL files can be either downloaded from this link or installed via NuGet.
PM> Install-Package Spire.XLS
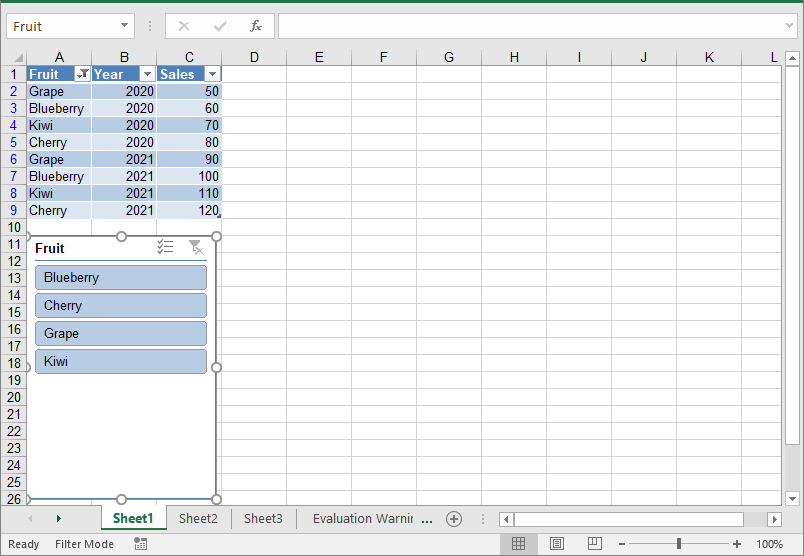
Add Slicers to Tables in Excel
Spire.XLS for .NET offers the Worksheet.Slicers.Add(IListObject table, string destCellName, int index) method to add a slicer to a table in an Excel worksheet. The detailed steps are as follows.
- Create an object of the Workbook class.
- Get the first worksheet using the Workbook.Worksheets[0] property.
- Add data to the worksheet using the Worksheet.Range[].Value property.
- Add a table to the worksheet using the Worksheet.IListObjects.Create() method.
- Add a slicer to the table using the Worksheeet.Slicers.Add(IListObject table, string destCellName, int index) method.
- Save the resulting file using the Workbook.SaveToFile() method.
- C#
using Spire.Xls;
using Spire.Xls.Core;

namespace AddSlicerToTable
{
    internal class Program
    {
        static void Main(string[] args)
        {
            // Create an object of the Workbook class
            Workbook workbook = new Workbook();
            // Get the first worksheet
            Worksheet worksheet = workbook.Worksheets[0];

            // Add data to the worksheet
            worksheet.Range["A1"].Value = "Fruit";
            worksheet.Range["A2"].Value = "Grape";
            worksheet.Range["A3"].Value = "Blueberry";
            worksheet.Range["A4"].Value = "Kiwi";
            worksheet.Range["A5"].Value = "Cherry";
            worksheet.Range["A6"].Value = "Grape";
            worksheet.Range["A7"].Value = "Blueberry";
            worksheet.Range["A8"].Value = "Kiwi";
            worksheet.Range["A9"].Value = "Cherry";

            worksheet.Range["B1"].Value = "Year";
            worksheet.Range["B2"].Value2 = 2020;
            worksheet.Range["B3"].Value2 = 2020;
            worksheet.Range["B4"].Value2 = 2020;
            worksheet.Range["B5"].Value2 = 2020;
            worksheet.Range["B6"].Value2 = 2021;
            worksheet.Range["B7"].Value2 = 2021;
            worksheet.Range["B8"].Value2 = 2021;
            worksheet.Range["B9"].Value2 = 2021;

            worksheet.Range["C1"].Value = "Sales";
            worksheet.Range["C2"].Value2 = 50;
            worksheet.Range["C3"].Value2 = 60;
            worksheet.Range["C4"].Value2 = 70;
            worksheet.Range["C5"].Value2 = 80;
            worksheet.Range["C6"].Value2 = 90;
            worksheet.Range["C7"].Value2 = 100;
            worksheet.Range["C8"].Value2 = 110;
            worksheet.Range["C9"].Value2 = 120;

            //Create a table from the specific data range
            IListObject table = worksheet.ListObjects.Create("Fruit Sales", worksheet.Range["A1:C9"]);

            // Add a slicer to cell "A11" to filter the data based on the first column of the table
            int index = worksheet.Slicers.Add(table, "A11", 0);
            // Set name and style for the slicer
            worksheet.Slicers[index].Name = "Fruit";
            worksheet.Slicers[index].StyleType = SlicerStyleType.SlicerStyleLight1;

            //Save the resulting file
            workbook.SaveToFile("AddSlicerToTable.xlsx", ExcelVersion.Version2013);
            workbook.Dispose();
        }
    }
}
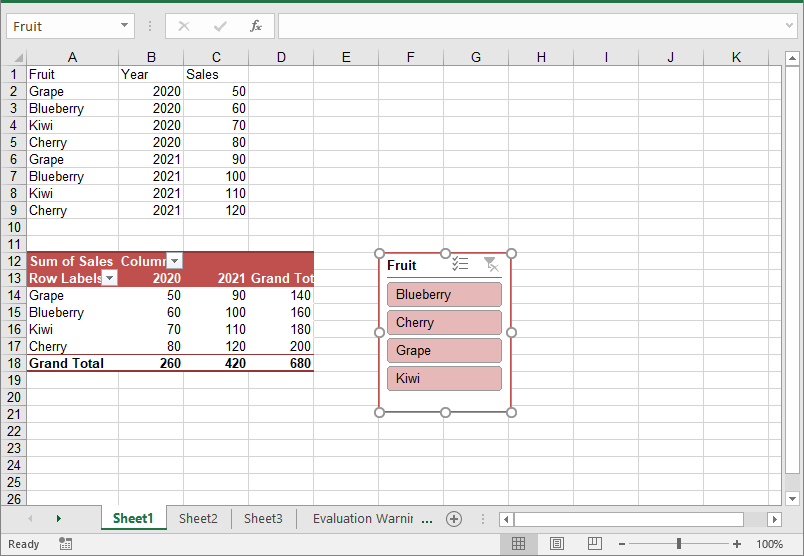
Add Slicers to Pivot Tables in Excel
In addition to adding slicers to tables, Spire.XLS for .NET also enables you to add slicers to pivot tables in Excel using the Worksheet.Slicers.Add(IPivotTable pivot, string destCellName, int baseFieldIndex) method. The detailed steps are as follows.
- Create an object of the Workbook class.
- Get the first worksheet using the Workbook.Worksheets[0] property.
- Add data to the worksheet using the Worksheet.Range[].Value property.
- Create a pivot cache from the data using the Workbook.PivotCaches.Add() method.
- Create a pivot table from the pivot cache using the Worksheet.PivotTables.Add() method.
- Drag the pivot fields to the row, column, and data areas. Then calculate the data in the pivot table.
- Add a slicer to the pivot table using the Worksheet.Slicers.Add(IPivotTable pivot, string destCellName, int baseFieldIndex) method.
- Set the properties, such as the name, width, height, style, and cross filter type for the slicer.
- Calculate the data in the pivot table.
- Save the resulting file using the Workbook.SaveToFile() method.
- C#
using Spire.Xls;
using Spire.Xls.Core;

namespace AddSlicerToPivotTable
{
    internal class Program
    {
        static void Main(string[] args)
        {
            // Create an object of the Workbook class
            Workbook workbook = new Workbook();
            // Get the first worksheet
            Worksheet worksheet = workbook.Worksheets[0];

            // Add data to the worksheet
            worksheet.Range["A1"].Value = "Fruit";
            worksheet.Range["A2"].Value = "Grape";
            worksheet.Range["A3"].Value = "Blueberry";
            worksheet.Range["A4"].Value = "Kiwi";
            worksheet.Range["A5"].Value = "Cherry";
            worksheet.Range["A6"].Value = "Grape";
            worksheet.Range["A7"].Value = "Blueberry";
            worksheet.Range["A8"].Value = "Kiwi";
            worksheet.Range["A9"].Value = "Cherry";

            worksheet.Range["B1"].Value = "Year";
            worksheet.Range["B2"].Value2 = 2020;
            worksheet.Range["B3"].Value2 = 2020;
            worksheet.Range["B4"].Value2 = 2020;
            worksheet.Range["B5"].Value2 = 2020;
            worksheet.Range["B6"].Value2 = 2021;
            worksheet.Range["B7"].Value2 = 2021;
            worksheet.Range["B8"].Value2 = 2021;
            worksheet.Range["B9"].Value2 = 2021;

            worksheet.Range["C1"].Value = "Sales";
            worksheet.Range["C2"].Value2 = 50;
            worksheet.Range["C3"].Value2 = 60;
            worksheet.Range["C4"].Value2 = 70;
            worksheet.Range["C5"].Value2 = 80;
            worksheet.Range["C6"].Value2 = 90;
            worksheet.Range["C7"].Value2 = 100;
            worksheet.Range["C8"].Value2 = 110;
            worksheet.Range["C9"].Value2 = 120;

            // Create a pivot cache from the specific data range
            CellRange dataRange = worksheet.Range["A1:C9"];
            PivotCache cache = workbook.PivotCaches.Add(dataRange);

            // Create a pivot table from the pivot cache
            PivotTable pt = worksheet.PivotTables.Add("Fruit Sales", worksheet.Range["A12"], cache);


            // Drag the fields to the row and column areas
            PivotField pf = pt.PivotFields["Fruit"] as PivotField;
            pf.Axis = AxisTypes.Row;
            PivotField pf2 = pt.PivotFields["Year"] as PivotField;
            pf2.Axis = AxisTypes.Column;

            // Drag the field to the data area
            pt.DataFields.Add(pt.PivotFields["Sales"], "Sum of Sales", SubtotalTypes.Sum);

            // Set style for the pivot table
            pt.BuiltInStyle = PivotBuiltInStyles.PivotStyleMedium10;

            // Calculate the pivot table data
            pt.CalculateData();

            // Add a Slicer to the pivot table
            int index_1 = worksheet.Slicers.Add(pt, "F12", 0);

            // Set the name, width, height, and style for the slicer
            worksheet.Slicers[index_1].Name = "Fruit";
            worksheet.Slicers[index_1].Width = 100;
            worksheet.Slicers[index_1].Height = 120;
            worksheet.Slicers[index_1].StyleType = SlicerStyleType.SlicerStyleLight2;

            // Set the cross filter type for the slicer
            XlsSlicerCache slicerCache = worksheet.Slicers[index_1].SlicerCache;
            slicerCache.CrossFilterType = SlicerCacheCrossFilterType.ShowItemsWithNoData;

            // Calculate the pivot table data
            pt.CalculateData();

            // Save the resulting file
            workbook.SaveToFile("AddSlicerToPivotTable.xlsx", ExcelVersion.Version2013);
            workbook.Dispose();
        }
    }
}
Update Slicers in Excel
You can update the properties of a slicer, such as its style, name, caption, and more using the corresponding properties of the XlsSlicer class. The detailed steps are as follows.
- Create an object of the Workbook class.
- Load an Excel file using the Workbook.LoadFromFile() method.
- Get a specific worksheet by its index using the Workbook.Worksheets[index] property.
- Get a specific slicer from the worksheet by its index using the Worksheet.Slicers[index] property.
- Update the properties of the slicer, such as its style, name, caption, and cross filter type using the properties of the XlsSlicer class.
- Save the resulting file using the Workbook.SaveToFile() method.
- C#
using Spire.Xls;
using Spire.Xls.Core;

namespace UpdateSlicer
{
    internal class Program
    {
        static void Main(string[] args)
        {
            // Create an object of the Workbook class
            Workbook workbook = new Workbook();
            // Load an Excel file
            workbook.LoadFromFile("AddSlicerToTable.xlsx");

            // Get the first worksheet
            Worksheet worksheet = workbook.Worksheets[0];

            // Get the first slicer in the worksheet
            XlsSlicer slicer = worksheet.Slicers[0];

            // Change the style, name, and caption for the slicer
            slicer.StyleType = SlicerStyleType.SlicerStyleDark4;
            slicer.Name = "Slicer";
            slicer.Caption = "Slicer";

            // Change the cross filter type for the slicer
            slicer.SlicerCache.CrossFilterType = SlicerCacheCrossFilterType.ShowItemsWithDataAtTop;

            // Deselect an item in the slicer
            XlsSlicerCacheItemCollection slicerCacheItems = slicer.SlicerCache.SlicerCacheItems;
            XlsSlicerCacheItem xlsSlicerCacheItem = slicerCacheItems[0];
            xlsSlicerCacheItem.Selected = false;

            // Save the resulting file
            workbook.SaveToFile("UpdateSlicer.xlsx", ExcelVersion.Version2013);
            workbook.Dispose();
        }
    }
}

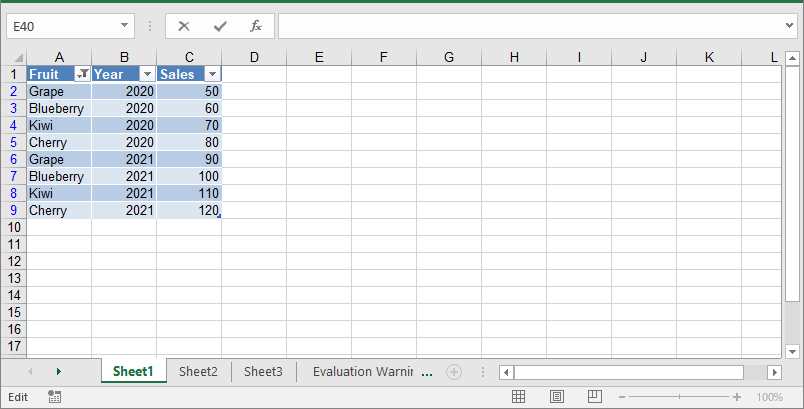
Remove Slicers from Excel
You can remove a specific slicer from an Excel worksheet using the Worksheet.Slicers.RemoveAt() method, or remove all slicers at once using the Worksheet.Slicers.Clear() method. The detailed steps are as follows.
- Create an object of the Workbook class.
- Load an Excel file using the Workbook.LoadFromFile() method.
- Get a specific worksheet by its index using the Workbook.Worksheets[index] property.
- Remove a specific slicer from the worksheet by its index using the Worksheet.Slicers.RemoveAt(index) method. Or remove all slicers from the worksheet using the Worksheet.Slicers.Clear() method.
- Save the resulting file using the Workbook.SaveToFile() method.
- C#
using Spire.Xls;
using Spire.Xls.Core;

namespace RemoveSlicer
{
    internal class Program
    {
        static void Main(string[] args)
        {
            // Create an object of the Workbook class
            Workbook workbook = new Workbook();
            // Load an Excel file
            workbook.LoadFromFile("AddSlicerToTable.xlsx");

            // Get the first worksheet
            Worksheet worksheet = workbook.Worksheets[0];

            // Remove the first slicer by index
            worksheet.Slicers.RemoveAt(0);

            //// Or remove all slicers
            //worksheet.Slicers.Clear();

            // Save the resulting file
            workbook.SaveToFile("RemoveSlicer.xlsx", ExcelVersion.Version2013);
            workbook.Dispose();
        }
    }
}
Apply for a Temporary License
If you'd like to remove the evaluation message from the generated documents, or to get rid of the function limitations, please request a 30-day trial license for yourself.
Merging Excel files is a common task that many people encounter when working with data. As projects expand or teams collaborate, you may find yourself with multiple spreadsheets that need to be combined into one cohesive document. This process not only helps in organizing information but also makes it easier to analyze and draw insights from your data. Whether you're dealing with financial records, project updates, or any other type of data, knowing how to merge Excel files effectively can save you time and effort. In this guide, we'll explain how to programmatically merge Excel files into one in React using Spire.XLS for JavaScript.
Install Spire.XLS for JavaScript
To get started with merging Excel files into one in a React application, you can either download Spire.XLS for JavaScript from our website or install it via npm with the following command:
npm i spire.office
The downloaded product package has been integrated Spire.Doc for JavaScript,Spire.XLS for JavaScript,Spire.PDF for JavaScript,Spire.Presentation for JavaScript. To use the functionality of Spire.XLS for JavaScript, you need to copy the corresponding files (spire.xls.js, Spire.Xls.Wasm.zip, spire.common.js, Spire.Common.Wasm.zip, and _framework) to the project's "public" folder. At the same time, in order to ensure text rendering, the related font files can be added with custom paths. In the following example, the font addition path is: public\static\font.
For more details, refer to the documentation: How to Integrate Spire.XLS for JavaScript in a React Project
Merge Multiple Excel Workbooks into One
Combining multiple Excel workbooks allows you to merge distinct files into a single workbook, which simplifies the management and analysis of diverse datasets for comprehensive reporting.
With Spire.XLS for JavaScript, developers can efficiently merge multiple workbooks by copying worksheets from the source workbooks into a newly created workbook using the XlsWorksheetsCollection.AddCopy() method. The key steps are as follows.
- Put the file paths of the workbooks to be merged into a list.
- Initialize a Workbook object to create a new workbook and clear its default worksheets.
- Initialize a temporary Workbook object.
- Loop through the list of file paths.
- Load each workbook specified by the file path in the list into the temporary Workbook object using Workbook.LoadFromFile() method.
- Loop through the worksheets in the temporary workbook, then copy each worksheet from the temporary workbook to the newly created workbook using XlsWorksheetsCollection.AddCopy() method.
- Save the resulting workbook using Workbook.SaveToFile() method.
- JavaScript
import React, { useState, useEffect } from 'react';
function App() {
  const [wasmModule, setWasmModule] = useState(null);
  // Load Spire.XLS
  useEffect(() => {
    (async () => {
      try {
        const publicUrl = process.env.PUBLIC_URL || '';
        const spireModule = await import(/* webpackIgnore: true */ `${publicUrl}/spire.xls.js`);
        const rawModule = spireModule.default || spireModule;
        window.wasmModule = typeof rawModule === 'function'
          ? await rawModule({ locateFile: p => p.endsWith('.wasm') ? `${publicUrl}/${p}` : p })
          : rawModule;
        setWasmModule(window.wasmModule);
      } catch (error) {
        console.error('Failed to load spire.xls.js WASM module:', error);
      }
    })();
  }, []);

  // Function to merge Excel workbooks into one
  const MergeExcelWorkbooks = async () => {
    const wasmModule = window.wasmModule.spirexls;

    if (wasmModule) {
      // Load font into Virtual File System (VFS)
      await window.spire.FetchFileToVFS('Arial.ttf', '/Library/Fonts/', `${process.env.PUBLIC_URL}/static/font/`);


      // Load the Excel files into the virtual file system (VFS)
      const files = [
        "File1.xlsx",
        "File2.xlsx",
        "File3.xlsx",
      ];
      for (const file of files) {
        await window.spire.FetchFileToVFS(file, '', `${process.env.PUBLIC_URL}/static/data/`);
      }

      // Create a new workbook
      let newbook = new wasmModule.Workbook();
      newbook.Version = wasmModule.ExcelVersion.Version2013;

      // Clear the default worksheets
      newbook.Worksheets.Clear();

      // Create a temp workbook
      let tempbook = new wasmModule.Workbook();

      for (const file of files) {

        // Load the current file
        tempbook.LoadFromFile(file.split("/").pop());

        for (let i = 0; i < tempbook.Worksheets.Count; i++) {
          let sheet = tempbook.Worksheets.get(i);

          // Copy every sheet in the current file to the new workbook
          wasmModule.XlsWorksheetsCollection.Convert(
            newbook.Worksheets
          ).AddCopy({
            sheet: sheet,
            flags: wasmModule.WorksheetCopyType.CopyAll,
          });
        }
      }

      let outputFileName = "MergeExcelWorkbooks.xlsx";
      // Save the resulting file
      newbook.SaveToFile({ fileName: outputFileName, version: wasmModule.ExcelVersion.Version2013 });

      // Read the saved file and convert to Blob object
      const modifiedFileArray = window.dotnetRuntime.Module.FS.readFile(outputFileName);
      const modifiedFile = new Blob([modifiedFileArray], { type: 'application/vnd.openxmlformats-officedocument.spreadsheetml.sheet' });

      // Create a URL for the Blob and initiate download
      const url = URL.createObjectURL(modifiedFile);
      const a = document.createElement('a');
      a.href = url;
      a.download = outputFileName;
      document.body.appendChild(a);
      a.click();
      document.body.removeChild(a);
      URL.revokeObjectURL(url);

      // Clean up resources used by the workbook
      newbook.Dispose();
    }
  };

  return (
    <div style={{ textAlign: 'center', height: '300px' }}>
      <h1>Merge Multiple Excel Workbooks into One Using JavaScript in React</h1>
      <button onClick={MergeExcelWorkbooks} disabled={!wasmModule}>
        Merge
      </button>
    </div>
  );
}

export default App;
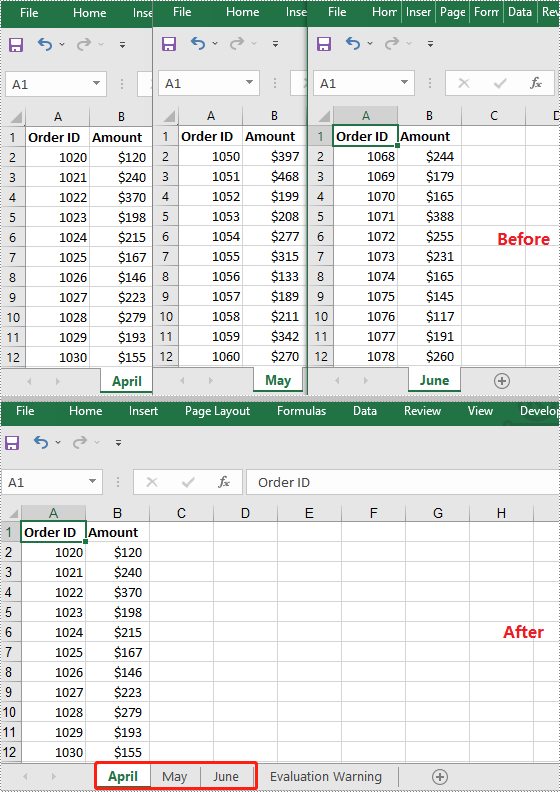
Run the code to launch the React app at localhost:3000. Once it's running, click on the "Merge" button to merge multiple Excel workbooks into one:

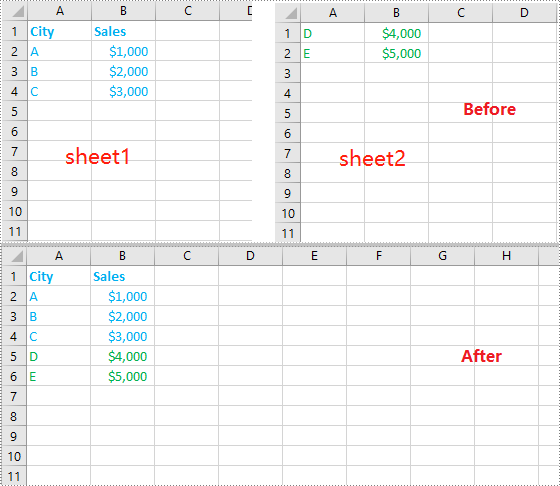
The screenshot below showcases the input workbooks and the output workbook:
Merge Multiple Excel Worksheets into One
Consolidating multiple worksheets into a single sheet enhances clarity and provides a comprehensive overview of related information.
Using Spire.XLS for JavaScript, developers can merge multiple worksheets by copying the used data ranges in these worksheets into a single worksheet using the CellRange.Copy() method. The key steps are as follows.
- Initialize a Workbook object and load an Excel workbook using Workbook.LoadFromFile() method.
- Get the two worksheets to be merged using Workbook.Worksheets.get() method.
- Get the used data range of the second worksheet using Worksheet.AllocatedRange property.
- Specify the destination range in the first worksheet using Worksheet.Range.get() method.
- Copy the used data range from the second worksheet to the specified destination range in the first worksheet using CellRange.Copy() method.
- Remove the second worksheet from the workbook.
- Save the resulting workbook using Workbook.SaveToFile() method.
- JavaScript
import React, { useState, useEffect } from 'react';
function App() {
  const [wasmModule, setWasmModule] = useState(null);
  // Load Spire.XLS
  useEffect(() => {
    (async () => {
      try {
        const publicUrl = process.env.PUBLIC_URL || '';
        const spireModule = await import(/* webpackIgnore: true */ `${publicUrl}/spire.xls.js`);
        const rawModule = spireModule.default || spireModule;
        window.wasmModule = typeof rawModule === 'function'
          ? await rawModule({ locateFile: p => p.endsWith('.wasm') ? `${publicUrl}/${p}` : p })
          : rawModule;
        setWasmModule(window.wasmModule);
      } catch (error) {
        console.error('Failed to load spire.xls.js WASM module:', error);
      }
    })();
  }, []);

  // Function to merge worksheets in an Excel workbook into one
  const MergeWorksheets = async () => {
    const wasmModule = window.wasmModule.spirexls;

    if (wasmModule) {
      // Load font into Virtual File System (VFS)
      await window.spire.FetchFileToVFS('Arial.ttf', '/Library/Fonts/', `${process.env.PUBLIC_URL}/static/font/`);


      // Load the Excel files into the virtual file system (VFS)
      let inputFileName = 'sample.xlsx';
      await window.spire.FetchFileToVFS(inputFileName, '', `${process.env.PUBLIC_URL}/static/data/`);


      // Create a new workbook
      let workbook = new wasmModule.Workbook();

      // Load the Excel file from the virtual file system
      workbook.LoadFromFile(inputFileName);

      // Get the first worksheet
      let sheet1 = workbook.Worksheets.get(0);
      // Get the second worksheet
      let sheet2 = workbook.Worksheets.get(1);

      // Get the used range in the second worksheet
      let fromRange = sheet2.AllocatedRange;
      // Specify the destination range in the first worksheet
      let toRange = sheet1.Range.get({ row: sheet1.LastRow + 1, column: 1 });

      // Copy the used range from the second worksheet to the destination range in the first worksheet
      fromRange.Copy({ destRange: toRange });

      // Remove the second worksheet
      sheet2.Remove();

      // Define the output file name
      const outputFileName = "MergeWorksheets.xlsx";

      // Save the workbook to the specified path
      workbook.SaveToFile({ fileName: outputFileName, version: wasmModule.ExcelVersion.Version2010 });

      // Read the saved file and convert to Blob object
      const modifiedFileArray = window.dotnetRuntime.Module.FS.readFile(outputFileName);
      const modifiedFile = new Blob([modifiedFileArray], { type: 'application/vnd.openxmlformats-officedocument.spreadsheetml.sheet' });

      // Create a URL for the Blob and initiate download
      const url = URL.createObjectURL(modifiedFile);
      const a = document.createElement('a');
      a.href = url;
      a.download = outputFileName;
      document.body.appendChild(a);
      a.click();
      document.body.removeChild(a);
      URL.revokeObjectURL(url);

      // Clean up resources used by the workbook
      workbook.Dispose();
    }
  };

  return (
    <div style={{ textAlign: 'center', height: '300px' }}>
      <h1>Merge Multiple Excel Worksheets into One Using JavaScript in React</h1>
      <button onClick={MergeWorksheets} disabled={!wasmModule}>
        Merge
      </button>
    </div>
  );
}

export default App;
Get a Free License
To fully experience the capabilities of Spire.XLS for JavaScript without any evaluation limitations, you can request a free 30-day trial license.
In MS word, images can quickly and easily convey complex information that may be difficult to explain in words alone. Whether you're creating a report, a presentation, a newsletter, or a simple document, adding images can make your content more engaging, informative, and visually appealing. In this article, you will learn how to add images to a Word document in React using Spire.Doc for JavaScript.
- Insert an Image in a Word Document in JavaScript
- Insert an Image at a Specified Location in Word in JavaScript
Install the JavaScript Library
To get started with inserting images in Word in a React application, you can either download Spire.Doc for JavaScript from our website or install it via npm with the following command:
npm i spire.officeThe downloaded product package integrates Spire.Doc for JavaScript, Spire.XLS for JavaScript, Spire.PDF for JavaScript, and Spire.Presentation for JavaScript. To use the features of Spire.Doc for JavaScript, you need to copy the corresponding files (spire.doc.js, Spire.Doc.Wasm.zip, spire.common.js, Spire.Common.Wasm.zip, and the _framework folder) to the public folder of your project. To ensure proper text rendering, you can add relevant font files with a custom path. In the following example, the font is added to the path: public\static\font.
For more details, refer to the documentation: How to Integrate Spire.Doc for JavaScript in a React Project
Insert an Image in a Word Document in JavaScript
The Paragraph.AppendPicture() method offered by Spire.Doc for JavaScript allows to insert an image into a Word document. The following are the main steps to insert an image in Word and set its size, text wrapping style using JavaScript.
- Create a new document using the new wasmModule.Document() method.
- Load a Word document using the Document.LoadFromFile() method.
- Get a specified section in the document using the Document.Sections.get_Item() method.
- Get a specified paragraph in the section using the Section.Paragraphs.get_Item() method.
- Add an image to the specified paragraph using the Paragraph.AppendPicture() method.
- Set width, height and text wrapping style for the image.
- Save the result document using Document.SaveToFile() method.
- JavaScript
import React, { useState, useEffect } from 'react';

function App() {
  const [wasmModule, setWasmModule] = useState(null);
  // Load Spire.Doc
  useEffect(() => {
    (async () => {
      try {
        const publicUrl = process.env.PUBLIC_URL || '';
        const spireModule = await import(/* webpackIgnore: true */ `${publicUrl}/spire.doc.js`);
        const rawModule = spireModule.default || spireModule;
        window.wasmModule = typeof rawModule === 'function'
          ? await rawModule({ locateFile: p => p.endsWith('.wasm') ? `${publicUrl}/${p}` : p })
          : rawModule;
        setWasmModule(window.wasmModule);
      } catch (error) {
        console.error('Failed to load spire.doc.js WASM module:', error);
      }
    })();
  }, []);

  // Function to insert an image in Word
  const InsertWordImage = async () => {
    const wasmModule = window.wasmModule.spiredoc;

    if (wasmModule) {
      // Load the font files into the virtual file system (VFS)
      await window.spire.FetchFileToVFS('Arial.ttf', '/Library/Fonts/', `${process.env.PUBLIC_URL}/static/font/`);

      // Specify the input file name and the output file name
      const inputFileName = 'input.docx';
      const outputFileName = "InsertImage.docx";
      const imageFile = "logo.png";

      // Fetch the input file and add it to the VFS
      await window.spire.FetchFileToVFS(inputFileName, '', `${process.env.PUBLIC_URL}/static/data/`);
      await window.spire.FetchFileToVFS(imageFile, '', `${process.env.PUBLIC_URL}/static/data/`);

      // Create an instance of the Document class
      const doc = new wasmModule.Document();

      // Load the Word document
      doc.LoadFromFile({ fileName: inputFileName });

      // Get the first section
      const section = doc.Sections.get_Item(0);

      // Get the first paragraph
      const paragraph = section.Paragraphs.get_Item(0);

      // Add the image to the first paragraph
      let picture = paragraph.AppendPicture({ imgFile: imageFile });

      // Set image width and height
      picture.Width = 100;
      picture.Height = 100;

      // Set text wrapping style for the image
      picture.TextWrappingStyle = wasmModule.TextWrappingStyle.Square;

      // Save the result document
      doc.SaveToFile({ fileName: outputFileName, fileFormat: wasmModule.FileFormat.Docx });

      // Release resources
      doc.Dispose();

      // Read the generated Word file from VFS
      const modifiedFileArray = window.dotnetRuntime.Module.FS.readFile(outputFileName);

      // Create a Blob object from the Word file
      const modifiedFile = new Blob([modifiedFileArray], { type: "application/vnd.openxmlformats-officedocument.wordprocessingml.document" });

      // Create a URL for the Blob
      const url = URL.createObjectURL(modifiedFile);

      // Create an anchor element to trigger the download
      const a = document.createElement("a");
      a.href = url;
      a.download = outputFileName;
      document.body.appendChild(a);
      a.click();
      document.body.removeChild(a);
      URL.revokeObjectURL(url);
    }
  };

  return (
    <div style={{ textAlign: 'center', height: '300px' }}>
      <h1>Insert an Image in a Word Document Using JavaScript in React</h1>
      <button onClick={InsertWordImage} disabled={!wasmModule}>
        Execute
      </button>
    </div>
  );
}

export default App;
Run the code to launch the React app at localhost:3000. Once it's running, click on the "Execute" button to download the result file:
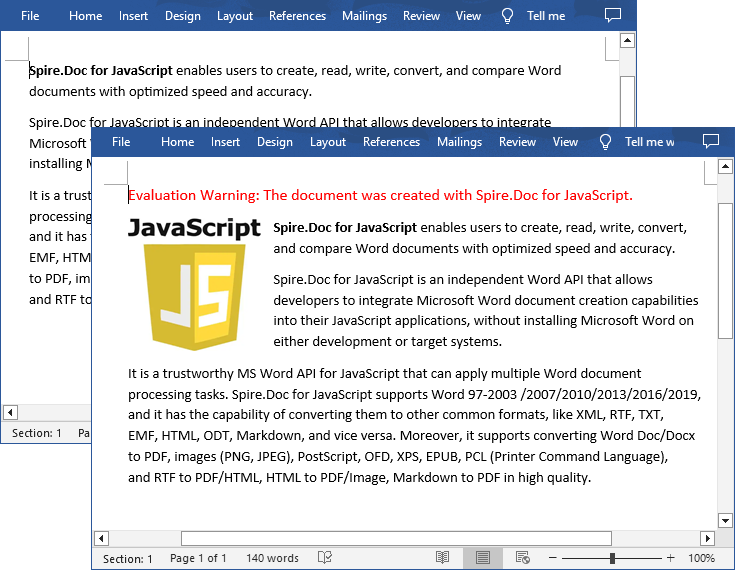
The input file and the result file:
Insert an Image at a Specified Location in Word in JavaScript
You can also place the image at any specified location in the Word document through the DocPicture.HorizontalPosition and DocPicture.VerticalPosition properties. The following are the main steps:
- Create a new document using the new wasmModule.Document() method.
- Add a section to the document using the Document.AddSection() method.
- Add a paragraph to the section using the Section.AddParagraph() method.
- Add text to the paragraph and set paragraph style.
- Add an image to the paragraph using the Paragraph.AppendPicture() method.
- Set the horizontal position and vertical position for the image through the DocPicture.HorizontalPosition and DocPicture.VerticalPosition properties.
- Set width, height and text wrapping style for the image.
- Save the result document using Document.SaveToFile() method.
- JavaScript
import React, { useState, useEffect } from 'react';

function App() {
  const [wasmModule, setWasmModule] = useState(null);
  // Load Spire.Doc
  useEffect(() => {
    (async () => {
      try {
        const publicUrl = process.env.PUBLIC_URL || '';
        const spireModule = await import(/* webpackIgnore: true */ `${publicUrl}/spire.doc.js`);
        const rawModule = spireModule.default || spireModule;
        window.wasmModule = typeof rawModule === 'function'
          ? await rawModule({ locateFile: p => p.endsWith('.wasm') ? `${publicUrl}/${p}` : p })
          : rawModule;
        setWasmModule(window.wasmModule);
      } catch (error) {
        console.error('Failed to load spire.doc.js WASM module:', error);
      }
    })();
  }, []);

  // Function to insert an image at a specified location in Word
  const InsertImage = async () => {
    const wasmModule = window.wasmModule.spiredoc;

    if (wasmModule) {
      // Load the font files into the virtual file system (VFS)
      await window.spire.FetchFileToVFS('Arial.ttf', '/Library/Fonts/', `${process.env.PUBLIC_URL}/static/font/`);

      // Specify the input file name and the output file name
      const outputFileName = "WordImage.docx";
      const imageFile = "logo.png";

      // Fetch the input file and add it to the VFS
      await window.spire.FetchFileToVFS(imageFile, '', `${process.env.PUBLIC_URL}/static/data/`);

      // Create an instance of the Document class
      const doc = new wasmModule.Document();

      // Add a section in the document
      let section = doc.AddSection();

      // Add a paragraph to the section
      let paragraph = section.AddParagraph();

      // Add text to the paragraph and set paragraph style
      paragraph.AppendText("The sample demonstrates how to insert an image at a specified location in a Word document.");
      paragraph.ApplyStyle({ builtinStyle: wasmModule.BuiltinStyle.Heading2 });

      //Add an image to the paragraph
      let picture = paragraph.AppendPicture({ imgFile: imageFile });

      // Set image position
      picture.HorizontalPosition = 150.0;
      picture.VerticalPosition = 70.0;

      // Set image width and height
      picture.Width = 100;
      picture.Height = 100;

      // Set text wrapping style for the image
      picture.TextWrappingStyle = wasmModule.TextWrappingStyle.Through;

      // Save the result document
      doc.SaveToFile({ fileName: outputFileName, fileFormat: wasmModule.FileFormat.Docx });

      // Release resources
      doc.Dispose();

      // Read the generated Word file from VFS
      const modifiedFileArray = window.dotnetRuntime.Module.FS.readFile(outputFileName);

      // Create a Blob object from the Word file
      const modifiedFile = new Blob([modifiedFileArray], { type: "application/vnd.openxmlformats-officedocument.wordprocessingml.document" });

      // Create a URL for the Blob
      const url = URL.createObjectURL(modifiedFile);

      // Create an anchor element to trigger the download
      const a = document.createElement("a");
      a.href = url;
      a.download = outputFileName;
      document.body.appendChild(a);
      a.click();
      document.body.removeChild(a);
      URL.revokeObjectURL(url);
    }
  };

  return (
    <div style={{ textAlign: 'center', height: '300px' }}>
      <h1>Insert an Image at a Specified Location in Word Using JavaScript in React</h1>
      <<button onClick={InsertImage} disabled={!wasmModule}>
      Execute
      </button>
    </div>
 );
}

export default App;
Get a Free License
To fully experience the capabilities of Spire.Doc for JavaScript without any evaluation limitations, you can request a free 30-day trial license.
