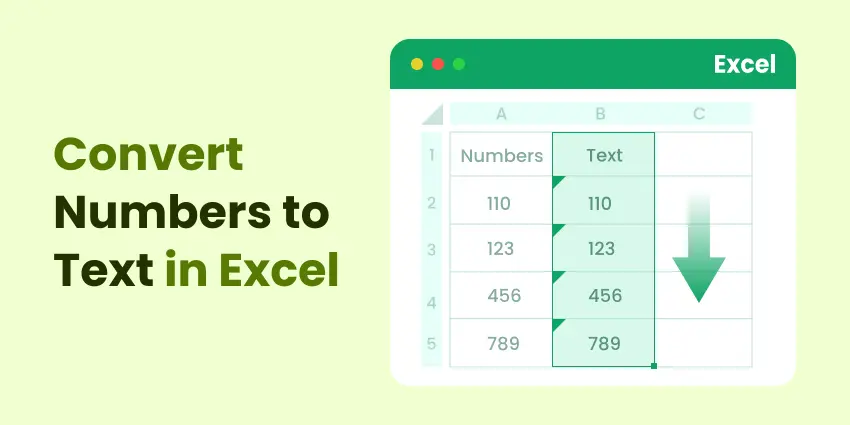
Cómo convertir números a texto en Excel (5 maneras fáciles)
Tabla de Contenidos
- ¿Por Qué Convertir Números a Texto?
- Método 1. Usando las Herramientas de Formato de Celda de Excel
- Método 2. Usando la Herramienta de Texto a Columnas
- Método 3. Usando Funciones de Excel que Devuelven Texto
- Método 4. Usando una Macro de VBA
- Método 5. Usando Automatización con Python
- Tabla Comparativa: ¿Qué Método Deberías Elegir?
- Resumen
- Preguntas Frecuentes
Ya sea que estés preparando informes, limpiando conjuntos de datos o automatizando facturas, a veces necesitas que los números se comporten como texto en Excel. Por ejemplo, es posible que desees conservar los ceros a la izquierda en los códigos postales, mostrar identificaciones como texto o dar formato a valores numéricos con símbolos y patrones específicos.
Convertir números a texto asegura que Excel deje de tratar esos valores como datos numéricos, evitando el redondeo automático, los cálculos no deseados o el formato de notación científica. Afortunadamente, Excel proporciona varias formas integradas y programáticas para manejar esto.
En este artículo, exploraremos cinco métodos efectivos para convertir números a texto en Excel, desde trucos de formato simples hasta soluciones automatizadas usando VBA y Python (Spire.XLS). Cada método satisface una necesidad diferente, para que puedas elegir el que mejor se adapte a tu flujo de trabajo.
Resumen de los métodos:
- Método 1. Usando las Herramientas de Formato de Celda de Excel
- Método 2. Usando la Herramienta de Texto a Columnas
- Método 3. Usando Funciones de Excel que Devuelven Texto
- Método 4. Usando una Macro de VBA
- Método 5. Usando Automatización con Python
¿Por Qué Convertir Números a Texto?
Los números en Excel generalmente se almacenan en formato numérico, lo que permite cálculos, fórmulas y gráficos. Sin embargo, en muchos casos del mundo real, los necesitas como cadenas de texto. Aquí hay algunas razones por las que:
- Preservar la integridad de los datos: Mantener los números de teléfono, las identificaciones de los empleados o los códigos postales exactamente como se ingresaron (p. ej., “00123” en lugar de “123”).
- Evitar errores de cálculo: Al fusionar conjuntos de datos, los valores numéricos pueden sumarse o redondearse accidentalmente; convertirlos a texto evita esto.
- Mejorar la flexibilidad del formato: Los números con formato de texto permiten prefijos, sufijos y estilos de visualización personalizados (p. ej., “USD 123.00”).
- Garantizar la coherencia para las exportaciones: Al exportar datos a otros sistemas (bases de datos, CSV o API), el formato de texto garantiza que los valores permanezcan intactos.
- Habilitar la automatización y los scripts: Algunos procesos automatizados requieren entradas de cadena en lugar de numéricas.
Método 1. Usando las Herramientas de Formato de Celda de Excel
Una de las formas más fáciles de convertir números a texto es a través de la función Formato de celdas de Excel. Este método no requiere fórmulas ni código, y es adecuado para conjuntos de datos pequeños a medianos.
Pasos:
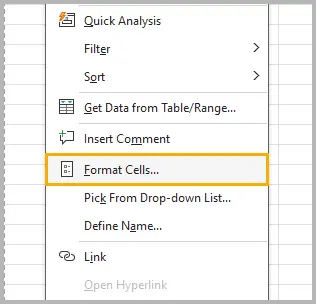
- Selecciona las celdas que contienen los números.
- Haz clic derecho y elige Formato de celdas .
- En la pestaña Número, selecciona Texto .
- Haz clic en Aceptar .
- Vuelve a ingresar los números (o presiona F2 → Enter para actualizar los valores existentes).

Excel ahora tratará esos valores como texto en lugar de números. Puedes confirmar esto verificando que el contenido de la celda esté alineado a la izquierda y que un pequeño triángulo verde (indicador de texto) aparezca en la esquina superior izquierda.
Alternativa:
Si prefieres un enfoque manual, puedes agregar un apóstrofo (') antes del número. Excel interpreta esto como texto pero oculta el apóstrofo cuando se muestra.
Ventajas:
- Rápido e intuitivo.
- No se requieren fórmulas ni codificación.
Desventajas:
- No es ideal para conjuntos de datos muy grandes.
- Debe repetirse si se agregan nuevos datos.
Método 2. Usando la Herramienta de Texto a Columnas
Si deseas convertir números a texto sin usar fórmulas ni codificación, la función Texto a columnas de Excel es un método rápido y práctico. Te permite reformatear valores numéricos en texto sin formato dentro de sus celdas originales.
Pasos:
- Selecciona el rango que contiene los números que deseas convertir.
- Ve a la pestaña Datos → haz clic en Texto a columnas .
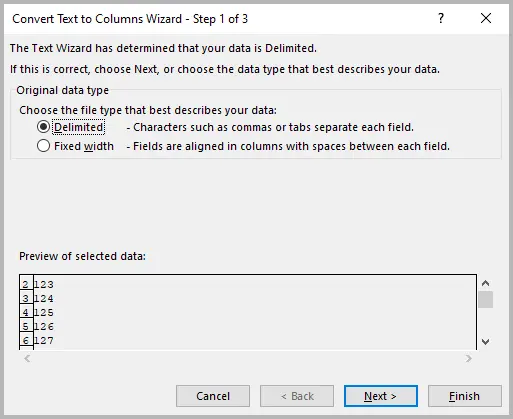
- En el Asistente para convertir texto en columnas , elige Delimitado → haz clic en Siguiente .
- Omite las opciones de delimitador → haz clic en Siguiente de nuevo.
- En Formato de datos de la columna , selecciona Texto .
- Haz clic en Finalizar .

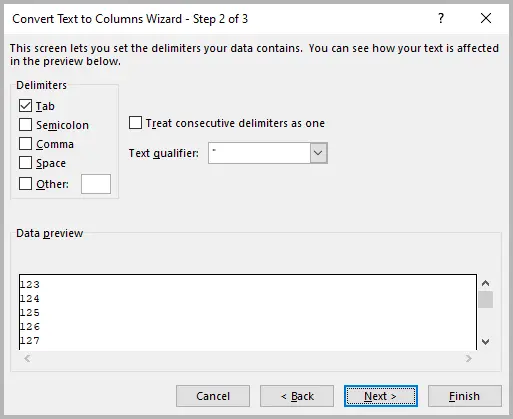
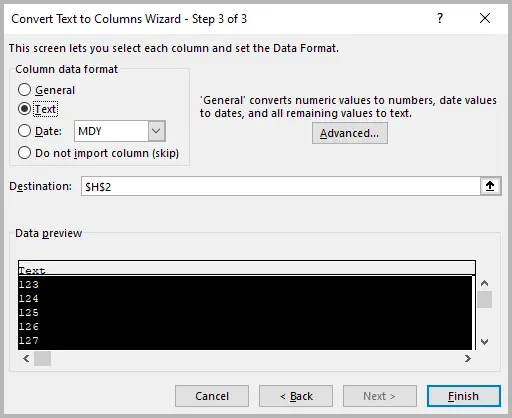
Después de aplicar Texto a columnas, los números se almacenan como valores de texto directamente en sus celdas originales (indicado por un pequeño triángulo verde en la esquina).
Ventajas:
- Convierte números a texto en el mismo lugar.
- No se necesitan columnas auxiliares ni fórmulas.
- Funciona en todas las versiones de Excel.
Desventajas:
- Proceso manual (no dinámico).
- Debe repetirse cuando se agregan nuevos datos.
Método 3. Usando Funciones de Excel que Devuelven Texto
Excel ofrece varias funciones que pueden convertir números a texto directamente en las fórmulas. Dos de las más útiles son TEXTO() y VALORATEXTO() .
Opción 1: Función TEXTO
La función TEXTO() convierte un valor numérico en texto mientras te permite especificar un formato personalizado.
Sintaxis:
=TEXTO(valor; formato_texto)
Ejemplos:
| A (Original) | B (Fórmula) |
|---|---|
| 1234.5 | =TEXTO(A1; "0,00") → “1234,50” |
| 5678 | =TEXTO(A2; "$#.##0") → “$5.678” |
La función TEXTO() es especialmente potente cuando quieres que tu salida de texto siga un patrón numérico, de fecha o de moneda específico.
Consejo: Combina TEXTO() con otras funciones de texto como CONCAT(), UNIRCADENAS() o el operador ampersand (&) para crear cadenas descriptivas:
="Importe total: " & TEXTO(A1; "$#.##0,00")
Opción 2: Función VALORATEXTO (Excel 365 / Excel 2021 y posteriores)
Si estás usando una versión moderna de Excel, la función VALORATEXTO() proporciona una conversión más directa y flexible.
Sintaxis:
=VALORATEXTO(valor; [formato])Parámetros:
- valor — El número que quieres convertir.
- [formato] — Opcional; usa 0 para texto simple o 1 para una salida compatible con JSON.
Ejemplos:
| A (Original) | B (Fórmula) |
|---|---|
| 9876 | =VALORATEXTO(A1) → “9876” |
| 543.21 | =VALORATEXTO(A2;1) → “543,21” |
Esta función es particularmente útil cuando trabajas con matrices dinámicas, scripts de automatización o exportas datos que necesitan permanecer como texto.
Ventajas:
- Basado en fórmulas y flexible.
- Funciona dinámicamente con datos cambiantes.
- Admite la personalización del formato.
Desventajas:
- VALORATEXTO() requiere versiones más nuevas de Excel.
- Los resultados dependen de las cadenas de formato correctas.
Consejo: Reemplaza los Números Originales con Valores de Texto
Cuando usas fórmulas como TEXTO() o VALORATEXTO(), Excel solo muestra el texto convertido en las celdas de la fórmula, no sobrescribe tus números originales.
Para reemplazar permanentemente los números con sus equivalentes en texto:
- Ingresa la fórmula en una columna en blanco (p. ej., columna B).
- Verifica que los resultados se vean correctos.
- Selecciona las celdas de la fórmula y cópialas.
- Haz clic derecho en la columna numérica original → elige Pegado especial → Valores .
- Elimina la columna auxiliar si ya no la necesitas.
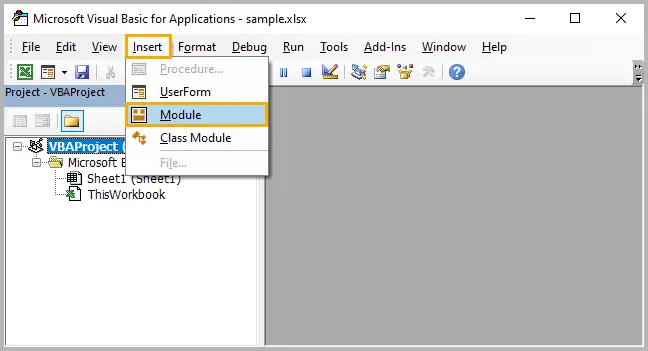
Método 4. Usando una Macro de VBA
Para los usuarios que necesitan convertir números a texto con frecuencia, crear una macro de VBA ofrece automatización y flexibilidad. Con solo unas pocas líneas de código, puedes convertir un rango completo con un solo clic.
Pasos:
- Presiona Alt + F11 para abrir el editor de VBA.
- Haz clic en Insertar → Módulo .
- Pega el siguiente código:
- Cierra el editor y vuelve a Excel.
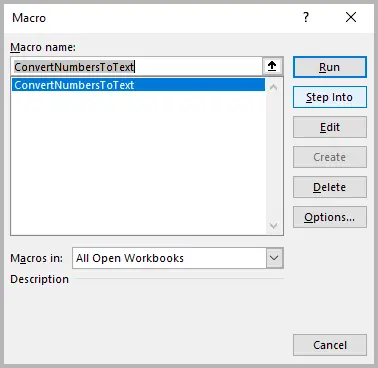
- Selecciona el rango de números que deseas convertir.
- Presiona Alt + F8 , elige ConvertNumbersToText , y haz clic en Ejecutar .
Sub ConvertNumbersToText()
    Dim cell As Range
    For Each cell In Selection
        If IsNumeric(cell.Value) Then
            cell.Value = CStr(cell.Value)
        End If
    Next cell
End Sub
Excel recorrerá tu selección y convertirá todos los valores numéricos en cadenas de texto usando la función CStr() de VBA.
Ventajas:
- Totalmente automatizado.
- Funciona en grandes rangos de datos.
- Se puede reutilizar en cualquier momento.
Desventajas:
- Requiere habilitar macros.
- Puede estar restringido por algunas políticas organizacionales.
Consejo: Si deseas conservar el formato numérico original, puedes mejorar la macro con lógica adicional usando Format() en lugar de CStr().
Método 5. Usando Automatización con Python (con Spire.XLS for Python)
Si trabajas con archivos de Excel de forma programática, Spire.XLS for Python proporciona una forma sencilla y fiable de convertir números a texto directamente en tus scripts. Este enfoque es especialmente valioso para la automatización a gran escala, el procesamiento por lotes o los sistemas basados en la web.
Código de Ejemplo:
from spire.xls import *
from spire.xls.common import *

# Crear un objeto Workbook
workbook = Workbook()

# Cargar un documento de Excel
workbook.LoadFromFile("C:\\Users\\Administrator\\Desktop\\Employee.xlsx")

# Obtener una hoja de cálculo específica
worksheet = workbook.Worksheets[0]

# Obtener un rango de celdas
cellRange = worksheet.Range["F2:F9"]

# Convertir los números del rango de celdas a texto
cellRange.NumberFormat = " @"

# Guardar el libro de trabajo en un archivo de Excel diferente
workbook.SaveToFile("output/NumbersToText.xlsx", ExcelVersion.Version2013)

# Liberar recursos
workbook.Dispose()
Cómo Funciona
- Gestión del Libro de Trabajo: El objeto Workbook te permite cargar y trabajar con archivos de Excel existentes usando el método
LoadFromFile. - Acceso a la Hoja de Cálculo: Cada libro de trabajo puede contener múltiples hojas de cálculo, a las que puedes acceder por índice.
- Selección de Rango de Celdas: El método
Rangeidentifica filas y columnas específicas para la manipulación de datos. - Formato de Celdas: Establecer la propiedad
NumberFormaten" @"convierte el formato de la celda de numérico a texto. - Guardar Cambios: El método
SaveToFileguarda el libro de trabajo modificado en un archivo nuevo o existente.
Para obtener instrucciones más detalladas, consulta el tutorial completo: Convertir Texto a Números y Números a Texto en Excel con Python
Ventajas:
- Ideal para conversiones masivas y automatizadas.
- Funciona sin necesidad de abrir Excel.
- Se integra fácilmente en canalizaciones de datos o aplicaciones web.
Desventajas:
- Requiere instalar y usar Spire.XLS.
- Más adecuado para usuarios familiarizados con la creación de scripts en Python.
Como una biblioteca completa de Excel para Python, Spire.XLS permite a los programadores gestionar y personalizar fácilmente el formato de Excel a través del código. ¿Quieres aprender más? Consulta este tutorial: Formatear Excel con Python
Tabla Comparativa: ¿Qué Método Deberías Elegir?
| Método | Tipo | ¿Funciona en el sitio? | Nivel de Automatización | Dificultad | Ideal Para |
|---|---|---|---|---|---|
| Formato de Celda | Manual | Sí | Ninguno | ★☆☆☆☆ | Solo formato simple |
| Texto a Columnas | Manual | Sí | Ninguno | ★★☆☆☆ | Conversión única |
| TEXTO / VALORATEXTO | Fórmula | No | Bajo | ★★☆☆☆ | Conversión dinámica |
| Macro VBA | Código | Sí | Alto | ★★★☆☆ | Conversiones frecuentes |
| Python (Spire.XLS) | Código | Sí | Muy Alto | ★★★★☆ | Procesamiento por lotes automatizado |
Resumen
Convertir números a texto en Excel puede ser tan simple, o tan avanzado, como necesites. Para la mayoría de los usuarios, las herramientas de formato de celda de Excel y la función Texto a columnas proporcionan formas rápidas e integradas de cambiar datos numéricos a texto sin usar ninguna fórmula.
Si deseas más control o necesitas salidas de texto con formato, las funciones TEXTO y VALORATEXTO de Excel son opciones flexibles que te permiten personalizar estilos de visualización o combinar números con texto descriptivo. Para tareas de conversión más grandes o recurrentes, la automatización a través de macros de VBA o Spire.XLS for Python ofrece velocidad, precisión y escalabilidad, perfecto para flujos de trabajo a nivel empresarial.
Al seleccionar un método, considera con qué frecuencia realizarás la tarea, si necesitas actualizaciones dinámicas y si la automatización es una prioridad. Con estos cinco métodos, puedes convertir números a texto en Excel de manera eficiente, sin importar tu nivel de habilidad o el tamaño de los datos.
Preguntas Frecuentes
P1: ¿Afectará a los cálculos la conversión de números a texto?
Sí. Una vez que un valor es texto, Excel ya no lo tratará como numérico en fórmulas como SUMA o PROMEDIO.
P2: ¿Cambiar el formato de celda a "Texto" convierte automáticamente los números existentes?
No. Deberás volver a ingresar o actualizar los valores (presiona F2 → Enter) después de cambiar el formato.
P3: ¿Puedo convertir números a texto sin perder el formato?
Sí. Usa la función TEXTO() y especifica la cadena de formato deseada (p. ej., "0,00" o "$#.##0,00").
P4: ¿Puedo revertir el proceso y volver a convertir el texto en números?
Absolutamente. Usa la función VALOR() o vuelve a convertir el formato de la columna a “Número.”
P5: ¿Es Spire.XLS de uso gratuito?
Spire.XLS ofrece una versión gratuita y una comercial. La versión gratuita admite la mayoría de las funciones comunes para tareas pequeñas y medianas.
También te puede interesar
Wie man Zahlen in Text in Excel umwandelt (5 einfache Wege)
Inhaltsverzeichnis
- Warum Zahlen in Text umwandeln?
- Methode 1. Verwendung von Excel-Zellenformatierungswerkzeugen
- Methode 2. Verwendung des Text-in-Spalten-Werkzeugs
- Methode 3. Verwendung von Excel-Funktionen, die Text zurückgeben
- Methode 4. Verwendung eines VBA-Makros
- Methode 5. Verwendung von Python-Automatisierung
- Vergleichstabelle: Welche Methode sollten Sie wählen?
- Zusammenfassung
- Häufig gestellte Fragen
Ob Sie Berichte vorbereiten, Datensätze bereinigen oder Rechnungen automatisieren – manchmal müssen sich Zahlen in Excel wie Text verhalten. Zum Beispiel möchten Sie vielleicht führende Nullen in Postleitzahlen beibehalten, IDs als Text anzeigen oder numerische Werte mit bestimmten Symbolen und Mustern formatieren.
Die Umwandlung von Zahlen in Text stellt sicher, dass Excel diese Werte nicht mehr als numerische Daten behandelt – was automatisches Runden, unerwünschte Berechnungen oder die Formatierung in wissenschaftlicher Notation verhindert. Glücklicherweise bietet Excel mehrere integrierte und programmatische Möglichkeiten, dies zu handhaben.
In diesem Artikel werden wir fünf effektive Methoden zur Umwandlung von Zahlen in Text in Excel untersuchen – von einfachen Formatierungstricks bis hin zu automatisierten Lösungen mit VBA und Python (Spire.XLS). Jede Methode dient einem anderen Zweck, sodass Sie diejenige auswählen können, die am besten zu Ihrem Arbeitsablauf passt.
Methodenübersicht:
- Methode 1. Verwendung von Excel-Zellenformatierungswerkzeugen
- Methode 2. Verwendung des Text-in-Spalten-Werkzeugs
- Methode 3. Verwendung von Excel-Funktionen, die Text zurückgeben
- Methode 4. Verwendung eines VBA-Makros
- Methode 5. Verwendung von Python-Automatisierung
Warum Zahlen in Text umwandeln?
Zahlen in Excel werden normalerweise in numerischer Form gespeichert, was Berechnungen, Formeln und Diagramme ermöglicht. In vielen realen Fällen benötigen Sie sie jedoch stattdessen als Textzeichenfolgen. Hier sind einige Gründe dafür:
- Datenintegrität wahren: Telefonnummern, Mitarbeiter-IDs oder Postleitzahlen genau so beibehalten, wie sie eingegeben wurden (z. B. „00123“ anstelle von „123“).
- Berechnungsfehler vermeiden: Beim Zusammenführen von Datensätzen können numerische Werte versehentlich summiert oder gerundet werden; die Umwandlung in Text verhindert dies.
- Formatierungsflexibilität verbessern: Textformatierte Zahlen ermöglichen benutzerdefinierte Präfixe, Suffixe und Anzeigestile (z. B. „USD 123.00“).
- Konsistenz bei Exporten sicherstellen: Beim Exportieren von Daten in andere Systeme (Datenbanken, CSVs oder APIs) stellt das Textformat sicher, dass die Werte intakt bleiben.
- Automatisierung und Skripting ermöglichen: Einige automatisierte Prozesse erfordern Zeichenfolgen-Eingaben anstelle von numerischen.
Methode 1. Verwendung von Excel-Zellenformatierungswerkzeugen
Eine der einfachsten Möglichkeiten, Zahlen in Text umzuwandeln, ist die Funktion Zellen formatieren von Excel. Diese Methode erfordert keine Formeln oder Code und eignet sich für kleine bis mittlere Datensätze.
Schritte:
- Wählen Sie die Zellen aus, die Zahlen enthalten.
- Klicken Sie mit der rechten Maustaste und wählen Sie Zellen formatieren.
- Wählen Sie im Tab Zahlen die Option Text aus.
- Klicken Sie auf OK.
- Geben Sie die Zahlen erneut ein (oder drücken Sie F2 → Enter, um vorhandene Werte zu aktualisieren).
Excel behandelt diese Werte nun als Text anstelle von Zahlen. Sie können dies bestätigen, indem Sie überprüfen, ob der Zellinhalt linksbündig ausgerichtet ist und ein kleines grünes Dreieck (Textindikator) in der oberen linken Ecke erscheint.
Alternative:
Wenn Sie einen manuellen Ansatz bevorzugen, können Sie ein Apostroph (') vor die Zahl setzen. Excel interpretiert dies als Text, blendet das Apostroph bei der Anzeige jedoch aus.
Vorteile:
- Schnell und intuitiv.
- Keine Formeln oder Codierung erforderlich.
Nachteile:
- Nicht ideal für sehr große Datensätze.
- Muss bei Hinzufügung neuer Daten wiederholt werden.
Methode 2. Verwendung des Text-in-Spalten-Werkzeugs
Wenn Sie Zahlen ohne Formeln oder Codierung in Text umwandeln möchten, ist die Funktion Text in Spalten von Excel eine schnelle und praktische Methode. Sie ermöglicht es Ihnen, numerische Werte in reinen Text innerhalb ihrer ursprünglichen Zellen umzuformatieren.
Schritte:
- Wählen Sie den Bereich aus, der die Zahlen enthält, die Sie umwandeln möchten.
- Gehen Sie zum Tab Daten → klicken Sie auf Text in Spalten.
- Wählen Sie im Textkonvertierungs-Assistent die Option Getrennt → klicken Sie auf Weiter.
- Überspringen Sie die Trennzeichenoptionen → klicken Sie erneut auf Weiter.
- Wählen Sie unter Datenformat der Spalten die Option Text aus.
- Klicken Sie auf Fertig stellen.
Nach der Anwendung von Text in Spalten werden die Zahlen als Textwerte direkt in ihren ursprünglichen Zellen gespeichert (angezeigt durch ein kleines grünes Dreieck in der Ecke).
Vorteile:
- Wandelt Zahlen an Ort und Stelle in Text um.
- Keine Hilfsspalten oder Formeln erforderlich.
- Funktioniert in allen Excel-Versionen.
Nachteile:
- Manueller Prozess (nicht dynamisch).
- Muss bei Hinzufügung neuer Daten wiederholt werden.
Methode 3. Verwendung von Excel-Funktionen, die Text zurückgeben
Excel bietet mehrere Funktionen, die Zahlen direkt in Formeln in Text umwandeln können. Zwei der nützlichsten sind TEXT() und WERTINTEXT().
Option 1: TEXT-Funktion
Die Funktion TEXT() wandelt einen numerischen Wert in Text um und ermöglicht es Ihnen, ein benutzerdefiniertes Format anzugeben.
Syntax:
=TEXT(Wert; Format_Text)
Beispiele:
| A (Original) | B (Formel) |
|---|---|
| 1234.5 | =TEXT(A1; "0,00") → „1234,50“ |
| 5678 | =TEXT(A2; "$#.##0") → „$5.678“ |
Die Funktion TEXT() ist besonders leistungsstark, wenn Sie möchten, dass Ihre Textausgabe einem bestimmten Zahlen-, Datums- oder Währungsmuster folgt.
Tipp: Kombinieren Sie TEXT() mit anderen Textfunktionen wie VERKETTEN(), TEXTKETTE() oder dem Und-Zeichen (&), um beschreibende Zeichenfolgen zu erstellen:
="Gesamtbetrag: " & TEXT(A1; "$#.##0,00")
Option 2: WERTINTEXT-Funktion (Excel 365 / Excel 2021 und neuer)
Wenn Sie eine moderne Excel-Version verwenden, bietet die Funktion WERTINTEXT() eine direktere und flexiblere Umwandlung.
Syntax:
=WERTINTEXT(Wert; [Format])Parameter:
- Wert — Die Zahl, die Sie umwandeln möchten.
- [Format] — Optional; verwenden Sie 0 für einfachen Text oder 1 für JSON-kompatible Ausgabe.
Beispiele:
| A (Original) | B (Formel) |
|---|---|
| 9876 | =WERTINTEXT(A1) → „9876“ |
| 543.21 | =WERTINTEXT(A2;1) → „543,21“ |
Diese Funktion ist besonders nützlich, wenn Sie mit dynamischen Arrays, Automatisierungsskripten arbeiten oder Daten exportieren, die textuell bleiben müssen.
Vorteile:
- Formelbasiert und flexibel.
- Funktioniert dynamisch mit sich ändernden Daten.
- Unterstützt die Anpassung der Formatierung.
Nachteile:
- WERTINTEXT() erfordert neuere Excel-Versionen.
- Die Ergebnisse hängen von korrekten Formatzeichenfolgen ab.
Tipp: Ersetzen Sie die ursprünglichen Zahlen durch Textwerte
Wenn Sie Formeln wie TEXT() oder WERTINTEXT() verwenden, zeigt Excel den konvertierten Text nur in den Formelzellen an – es überschreibt nicht Ihre ursprünglichen Zahlen.
Um Zahlen dauerhaft durch Textäquivalente zu ersetzen:
- Geben Sie die Formel in eine leere Spalte ein (z. B. Spalte B).
- Überprüfen Sie, ob die Ergebnisse korrekt aussehen.
- Wählen Sie die Formelzellen aus und kopieren Sie sie.
- Klicken Sie mit der rechten Maustaste auf die ursprüngliche numerische Spalte → wählen Sie Inhalte einfügen → Werte.
- Löschen Sie die Hilfsspalte, wenn Sie sie nicht mehr benötigen.
Methode 4. Verwendung eines VBA-Makros
Für Benutzer, die häufig Zahlen in Text umwandeln müssen, bietet die Erstellung eines VBA-Makros Automatisierung und Flexibilität. Mit nur wenigen Codezeilen können Sie einen ganzen Bereich mit einem Klick umwandeln.
Schritte:
- Drücken Sie Alt + F11, um den VBA-Editor zu öffnen.
- Klicken Sie auf Einfügen → Modul.
- Fügen Sie den folgenden Code ein:
- Schließen Sie den Editor und kehren Sie zu Excel zurück.
- Wählen Sie den Bereich der Zahlen aus, die Sie umwandeln möchten.
- Drücken Sie Alt + F8, wählen Sie ConvertNumbersToText und klicken Sie auf Ausführen.
Sub ConvertNumbersToText()
    Dim cell As Range
    For Each cell In Selection
        If IsNumeric(cell.Value) Then
            cell.Value = CStr(cell.Value)
        End If
    Next cell
End Sub
Excel durchläuft Ihre Auswahl und wandelt alle numerischen Werte mithilfe der VBA-Funktion CStr() in Textzeichenfolgen um.
Vorteile:
- Vollständig automatisiert.
- Funktioniert bei großen Datenbereichen.
- Kann jederzeit wiederverwendet werden.
Nachteile:
- Erfordert die Aktivierung von Makros.
- Kann durch einige Organisationsrichtlinien eingeschränkt sein.
Tipp: Wenn Sie die ursprüngliche numerische Formatierung beibehalten möchten, können Sie das Makro mit zusätzlicher Logik unter Verwendung von Format() anstelle von CStr() erweitern.
Methode 5. Verwendung von Python-Automatisierung (mit Spire.XLS for Python)
Wenn Sie programmgesteuert mit Excel-Dateien arbeiten, bietet Spire.XLS for Python eine unkomplizierte und zuverlässige Möglichkeit, Zahlen direkt in Ihren Skripten in Text umzuwandeln. Dieser Ansatz ist besonders wertvoll für groß angelegte Automatisierung, Stapelverarbeitung oder webbasierte Systeme.
Beispielcode:
from spire.xls import *
from spire.xls.common import *

# Erstellen Sie ein Workbook-Objekt
workbook = Workbook()

# Laden Sie ein Excel-Dokument
workbook.LoadFromFile("C:\\Users\\Administrator\\Desktop\\Employee.xlsx")

# Holen Sie sich ein bestimmtes Arbeitsblatt
worksheet = workbook.Worksheets[0]

# Holen Sie sich einen Zellbereich
cellRange = worksheet.Range["F2:F9"]

# Wandeln Sie Zahlen im Zellbereich in Text um
cellRange.NumberFormat = " @"

# Speichern Sie die Arbeitsmappe in einer anderen Excel-Datei
workbook.SaveToFile("output/NumbersToText.xlsx", ExcelVersion.Version2013)

# Ressourcen freigeben
workbook.Dispose()
Wie es funktioniert
- Arbeitsmappen-Verwaltung: Das Workbook-Objekt ermöglicht es Ihnen, vorhandene Excel-Dateien mit der
LoadFromFile-Methode zu laden und zu bearbeiten. - Zugriff auf Arbeitsblätter: Jede Arbeitsmappe kann mehrere Arbeitsblätter enthalten, auf die Sie über den Index zugreifen können.
- Zellbereichsauswahl: Die
Range-Methode identifiziert bestimmte Zeilen und Spalten für die Datenmanipulation. - Zellen formatieren: Das Setzen der
NumberFormat-Eigenschaft auf" @"wandelt das Zellformat von numerisch in Text um. - Änderungen speichern: Die
SaveToFile-Methode speichert die geänderte Arbeitsmappe in einer neuen oder vorhandenen Datei.
Für detailliertere Anweisungen schauen Sie sich das vollständige Tutorial an: Text in Zahlen und Zahlen in Text in Excel in Python umwandeln
Vorteile:
- Ideal für Massen- und automatisierte Konvertierungen.
- Funktioniert ohne Starten von Excel.
- Leicht in Datenpipelines oder Webanwendungen integrierbar.
Nachteile:
- Erfordert die Installation und Verwendung von Spire.XLS.
- Am besten für Benutzer geeignet, die mit Python-Skripting vertraut sind.
Als umfassende Python-Excel-Bibliothek ermöglicht Spire.XLS Programmierern die einfache Verwaltung und Anpassung der Excel-Formatierung durch Code. Möchten Sie mehr erfahren? Schauen Sie sich dieses Tutorial an: Excel mit Python formatieren
Vergleichstabelle: Welche Methode sollten Sie wählen?
| Methode | Typ | Funktioniert direkt? | Automatisierungsgrad | Schwierigkeit | Am besten für |
|---|---|---|---|---|---|
| Zellenformatierung | Manuell | Ja | Keine | ★☆☆☆☆ | Nur einfache Formatierung |
| Text in Spalten | Manuell | Ja | Keine | ★★☆☆☆ | Einmalige Umwandlung |
| TEXT / WERTINTEXT | Formel | Nein | Niedrig | ★★☆☆☆ | Dynamische Umwandlung |
| VBA-Makro | Code | Ja | Hoch | ★★★☆☆ | Häufige Umwandlungen |
| Python (Spire.XLS) | Code | Ja | Sehr hoch | ★★★★☆ | Automatisierte Stapelverarbeitung |
Zusammenfassung
Die Umwandlung von Zahlen in Text in Excel kann so einfach – oder so fortgeschritten – sein, wie Sie es benötigen. Für die meisten Benutzer bieten die Zellenformatierungswerkzeuge von Excel und die Funktion Text in Spalten schnelle, integrierte Möglichkeiten, numerische Daten ohne Formeln in Text umzuwandeln.
Wenn Sie mehr Kontrolle wünschen oder formatierte Textausgaben benötigen, sind die Excel-Funktionen TEXT und WERTINTEXT flexible Optionen, mit denen Sie Anzeigestile anpassen oder Zahlen mit beschreibendem Text kombinieren können. Für größere oder wiederkehrende Konvertierungsaufgaben bietet die Automatisierung durch VBA-Makros oder Spire.XLS for Python Geschwindigkeit, Genauigkeit und Skalierbarkeit – perfekt für Arbeitsabläufe auf Unternehmensebene.
Berücksichtigen Sie bei der Auswahl einer Methode, wie oft Sie die Aufgabe ausführen, ob Sie dynamische Aktualisierungen benötigen und ob Automatisierung eine Priorität ist. Mit diesen fünf Methoden können Sie Zahlen in Excel effizient in Text umwandeln, unabhängig von Ihrem Kenntnisstand oder der Datengröße.
Häufig gestellte Fragen
F1: Beeinflusst die Umwandlung von Zahlen in Text Berechnungen?
Ja. Sobald ein Wert Text ist, behandelt Excel ihn in Formeln wie SUMME oder MITTELWERT nicht mehr als numerisch.
F2: Wandelt das Ändern des Zellformats in „Text“ vorhandene Zahlen automatisch um?
Nein. Sie müssen die Werte nach dem Ändern des Formats erneut eingeben oder aktualisieren (drücken Sie F2 → Enter).
F3: Kann ich Zahlen in Text umwandeln, ohne die Formatierung zu verlieren?
Ja. Verwenden Sie die Funktion TEXT() und geben Sie Ihre gewünschte Formatzeichenfolge an (z. B. "0,00" oder "#.##0,00 €").
F4: Kann ich den Vorgang umkehren und Text wieder in Zahlen umwandeln?
Absolut. Verwenden Sie die Funktion WERT() oder wandeln Sie das Spaltenformat wieder in „Zahl“ um.
F5: Ist die Nutzung von Spire.XLS kostenlos?
Spire.XLS bietet sowohl eine kostenlose als auch eine kommerzielle Version. Die kostenlose Version unterstützt die meisten gängigen Funktionen für kleine bis mittlere Aufgaben.
Das könnte Sie auch interessieren
Как конвертировать числа в текст в Excel (5 простых способов)
Содержание
- Зачем конвертировать числа в текст?
- Метод 1. Использование инструментов форматирования ячеек Excel
- Метод 2. Использование инструмента "Текст по столбцам"
- Метод 3. Использование функций Excel, возвращающих текст
- Метод 4. Использование макроса VBA
- Метод 5. Использование автоматизации на Python
- Сравнительная таблица: какой метод выбрать?
- Итог
- Часто задаваемые вопросы
Готовите ли вы отчеты, очищаете наборы данных или автоматизируете счета-фактуры, иногда вам нужно, чтобы числа в Excel вели себя как текст. Например, вы можете захотеть сохранить ведущие нули в почтовых индексах, отображать идентификаторы как текст или форматировать числовые значения с помощью определенных символов и шаблонов.
Преобразование чисел в текст гарантирует, что Excel перестанет рассматривать эти значения как числовые данные, предотвращая автоматическое округление, нежелательные вычисления или форматирование в научном виде. К счастью, Excel предоставляет несколько встроенных и программных способов справиться с этой задачей.
В этой статье мы рассмотрим пять эффективных методов преобразования чисел в текст в Excel — от простых приемов форматирования до автоматизированных решений с использованием VBA и Python (Spire.XLS). Каждый метод служит для разных нужд, поэтому вы можете выбрать тот, который лучше всего подходит для вашего рабочего процесса.
Обзор методов:
- Метод 1. Использование инструментов форматирования ячеек Excel
- Метод 2. Использование инструмента "Текст по столбцам"
- Метод 3. Использование функций Excel, возвращающих текст
- Метод 4. Использование макроса VBA
- Метод 5. Использование автоматизации на Python
Зачем конвертировать числа в текст?
Числа в Excel обычно хранятся в числовом формате, что позволяет выполнять вычисления, использовать формулы и создавать диаграммы. Однако во многих реальных случаях они нужны вам в виде текстовых строк. Вот несколько причин, почему:
- Сохранение целостности данных: сохраняйте номера телефонов, идентификаторы сотрудников или почтовые индексы в точности так, как они были введены (например, «00123» вместо «123»).
- Избегание ошибок в вычислениях: при объединении наборов данных числовые значения могут случайно суммироваться или округляться; преобразование их в текст предотвращает это.
- Повышение гибкости форматирования: числа в текстовом формате позволяют использовать настраиваемые префиксы, суффиксы и стили отображения (например, «USD 123.00»).
- Обеспечение согласованности при экспорте: при экспорте данных в другие системы (базы данных, CSV или API) текстовый формат гарантирует, что значения останутся неизменными.
- Включение автоматизации и написания сценариев: некоторые автоматизированные процессы требуют строковых входных данных вместо числовых.
Метод 1. Использование инструментов форматирования ячеек Excel
Один из самых простых способов преобразовать числа в текст — это функция Excel Формат ячеек. Этот метод не требует формул или кода и подходит для небольших и средних наборов данных.
Шаги:
- Выберите ячейки, содержащие числа.
- Щелкните правой кнопкой мыши и выберите Формат ячеек .
- На вкладке Число выберите Текст .
- Нажмите OK .
- Повторно введите числа (или нажмите F2 → Enter, чтобы обновить существующие значения).
Теперь Excel будет рассматривать эти значения как текст, а не как числа. Вы можете убедиться в этом, проверив, что содержимое ячейки выровнено по левому краю и что в верхнем левом углу появился маленький зеленый треугольник (индикатор текста).
Альтернатива:
Если вы предпочитаете ручной подход, вы можете добавить апостроф (') перед числом. Excel интерпретирует это как текст, но скрывает апостроф при отображении.
Плюсы:
- Быстро и интуитивно понятно.
- Не требуются формулы или кодирование.
Минусы:
- Не идеально для очень больших наборов данных.
- Необходимо повторять при добавлении новых данных.
Метод 2. Использование инструмента "Текст по столбцам"
Если вы хотите преобразовать числа в текст без использования формул или кодирования, функция Excel Текст по столбцам — это быстрый и практичный метод. Он позволяет переформатировать числовые значения в обычный текст в их исходных ячейках.
Шаги:
- Выберите диапазон, содержащий числа, которые вы хотите преобразовать.
- Перейдите на вкладку Данные → нажмите Текст по столбцам .
- В Мастере преобразования текста в столбцы , выберите С разделителями → нажмите Далее .
- Пропустите параметры разделителя → снова нажмите Далее.
- В Формате данных столбца , выберите Текст .
- Нажмите Готово .
После применения функции "Текст по столбцам" числа сохраняются как текстовые значения непосредственно в их исходных ячейках (на что указывает маленький зеленый треугольник в углу).
Плюсы:
- Преобразует числа в текст на месте.
- Нет необходимости во вспомогательных столбцах или формулах.
- Работает во всех версиях Excel.
Минусы:
- Ручной процесс (не динамический).
- Необходимо повторять при добавлении новых данных.
Метод 3. Использование функций Excel, возвращающих текст
Excel предлагает несколько функций, которые могут преобразовывать числа в текст непосредственно в формулах. Две из самых полезных — это ТЕКСТ() и ЗНАЧКАТЕКСТ() .
Вариант 1: Функция ТЕКСТ
Функция ТЕКСТ() преобразует числовое значение в текст, позволяя указать пользовательский формат.
Синтаксис:
=ТЕКСТ(значение; формат)
Примеры:
| A (Исходный) | B (Формула) |
|---|---|
| 1234.5 | =ТЕКСТ(A1; "0,00") → “1234,50” |
| 5678 | =ТЕКСТ(A2; "# ##0 ₽") → “5 678 ₽” |
Функция ТЕКСТ() особенно полезна, когда вы хотите, чтобы ваш текстовый вывод следовал определенному числовому, датовому или валютному формату.
Совет: комбинируйте ТЕКСТ() с другими текстовыми функциями, такими как СЦЕП(), TEXTJOIN() или оператором амперсанда (&), чтобы создавать описательные строки:
="Общая сумма: " & ТЕКСТ(A1; "# ##0,00 ₽")
Вариант 2: Функция ЗНАЧКАТЕКСТ (Excel 365 / Excel 2021 и новее)
Если вы используете современную версию Excel, функция ЗНАЧКАТЕКСТ() обеспечивает более прямое и гибкое преобразование.
Синтаксис:
=ЗНАЧКАТЕКСТ(значение; [формат])Параметры:
- значение — число, которое вы хотите преобразовать.
- [формат] — необязательный; используйте 0 для простого текста или 1 для вывода, совместимого с JSON.
Примеры:
| A (Исходный) | B (Формула) |
|---|---|
| 9876 | =ЗНАЧКАТЕКСТ(A1) → “9876” |
| 543.21 | =ЗНАЧКАТЕКСТ(A2;1) → “543.21” |
Эта функция особенно полезна при работе с динамическими массивами, сценариями автоматизации или экспорте данных, которые должны оставаться текстовыми.
Плюсы:
- Основан на формулах и гибок.
- Динамически работает с изменяющимися данными.
- Поддерживает настройку форматирования.
Минусы:
- ЗНАЧКАТЕКСТ() требует более новых версий Excel.
- Результаты зависят от правильных строк формата.
Совет: Замените исходные числа текстовыми значениями
Когда вы используете формулы, такие как ТЕКСТ() или ЗНАЧКАТЕКСТ(), Excel отображает преобразованный текст только в ячейках с формулами — он не перезаписывает ваши исходные числа.
Чтобы навсегда заменить числа их текстовыми эквивалентами:
- Введите формулу в пустой столбец (например, столбец B).
- Убедитесь, что результаты выглядят правильно.
- Выберите ячейки с формулами и скопируйте их.
- Щелкните правой кнопкой мыши по исходному числовому столбцу → выберите Специальная вставка → Значения .
- Удалите вспомогательный столбец, если он вам больше не нужен.
Метод 4. Использование макроса VBA
Для пользователей, которым часто требуется преобразовывать числа в текст, создание макроса VBA предлагает автоматизацию и гибкость. С помощью всего нескольких строк кода вы можете преобразовать весь диапазон одним щелчком мыши.
Шаги:
- Нажмите Alt + F11, чтобы открыть редактор VBA.
- Нажмите Вставка → Модуль .
- Вставьте следующий код:
- Закройте редактор и вернитесь в Excel.
- Выберите диапазон чисел, которые вы хотите преобразовать.
- Нажмите Alt + F8 , выберите ConvertNumbersToText , и нажмите Выполнить .
Sub ConvertNumbersToText()
    Dim cell As Range
    For Each cell In Selection
        If IsNumeric(cell.Value) Then
            cell.Value = CStr(cell.Value)
        End If
    Next cell
End Sub
Excel просмотрит ваш выбор и преобразует все числовые значения в текстовые строки с помощью функции VBA CStr().
Плюсы:
- Полностью автоматизирован.
- Работает с большими диапазонами данных.
- Может быть использован в любое время.
Минусы:
- Требует включения макросов.
- Может быть ограничено некоторыми организационными политиками.
Совет: если вы хотите сохранить исходное числовое форматирование, вы можете улучшить макрос, добавив дополнительную логику с помощью функции Format() вместо CStr().
Метод 5. Использование автоматизации на Python (с Spire.XLS for Python)
Если вы работаете с файлами Excel программно, Spire.XLS for Python предоставляет простой и надежный способ преобразования чисел в текст непосредственно в ваших скриптах. Этот подход особенно ценен для крупномасштабной автоматизации, пакетной обработки или веб-систем.
Пример кода:
from spire.xls import *
from spire.xls.common import *

# Create a Workbook object
workbook = Workbook()

# Load an Excel document
workbook.LoadFromFile("C:\\Users\\Administrator\\Desktop\\Employee.xlsx")

# Get a specific worksheet
worksheet = workbook.Worksheets[0]

# Get a cell range
cellRange = worksheet.Range["F2:F9"]

# Convert numbers in the cell range to text
cellRange.NumberFormat = " @"

# Save the workbook to a different Excel file
workbook.SaveToFile("output/NumbersToText.xlsx", ExcelVersion.Version2013)

# Dispose resources
workbook.Dispose()
Как это работает
- Управление книгой: объект Workbook позволяет загружать и работать с существующими файлами Excel с помощью метода
LoadFromFile. - Доступ к листу: каждая книга может содержать несколько листов, к которым можно получить доступ по индексу.
- Выбор диапазона ячеек: метод
Rangeопределяет конкретные строки и столбцы для манипулирования данными. - Форматирование ячеек: установка свойства
NumberFormatв значение" @"преобразует формат ячейки из числового в текстовый. - Сохранение изменений: метод
SaveToFileсохраняет измененную книгу в новый или существующий файл.
Для получения более подробных инструкций ознакомьтесь с полным руководством: Преобразование текста в числа и чисел в текст в Excel на Python
Плюсы:
- Идеально подходит для массовых и автоматизированных преобразований.
- Работает без запуска Excel.
- Легко интегрируется в конвейеры данных или веб-приложения.
Минусы:
- Требуется установка и использование Spire.XLS.
- Лучше всего подходит для пользователей, знакомых с написанием сценариев на Python.
Как комплексная библиотека Python для Excel, Spire.XLS позволяет программистам легко управлять и настраивать форматирование Excel с помощью кода. Хотите узнать больше? Ознакомьтесь с этим руководством: Форматирование Excel с помощью Python
Сравнительная таблица: какой метод выбрать?
| Метод | Тип | Работает на месте? | Уровень автоматизации | Сложность | Лучше всего для |
|---|---|---|---|---|---|
| Форматирование ячеек | Ручной | Да | Нет | ★☆☆☆☆ | Только простое форматирование |
| Текст по столбцам | Ручной | Да | Нет | ★★☆☆☆ | Однократное преобразование |
| ТЕКСТ / ЗНАЧКАТЕКСТ | Формула | Нет | Низкий | ★★☆☆☆ | Динамическое преобразование |
| Макрос VBA | Код | Да | Высокий | ★★★☆☆ | Частые преобразования |
| Python (Spire.XLS) | Код | Да | Очень высокий | ★★★★☆ | Автоматизированная пакетная обработка |
Итог
Преобразование чисел в текст в Excel может быть настолько простым или сложным, насколько вам это нужно. Для большинства пользователей инструменты форматирования ячеек Excel и функция Текст по столбцам предоставляют быстрые встроенные способы изменения числовых данных в текст без использования каких-либо формул.
Если вам нужен больший контроль или требуются форматированные текстовые выводы, функции Excel ТЕКСТ и ЗНАЧКАТЕКСТ являются гибкими вариантами, которые позволяют настраивать стили отображения или комбинировать числа с описательным текстом. Для более крупных или повторяющихся задач преобразования автоматизация с помощью макросов VBA или Spire.XLS for Python предлагает скорость, точность и масштабируемость — идеально для рабочих процессов на уровне предприятия.
При выборе метода учитывайте, как часто вы будете выполнять задачу, нужны ли вам динамические обновления и является ли автоматизация приоритетом. С помощью этих пяти методов вы можете эффективно преобразовывать числа в текст в Excel, независимо от вашего уровня квалификации или размера данных.
Часто задаваемые вопросы
В1: Повлияет ли преобразование чисел в текст на вычисления?
Да. Как только значение станет текстом, Excel перестанет рассматривать его как числовое в таких формулах, как СУММ или СРЗНАЧ.
В2: Преобразует ли изменение формата ячейки на «Текст» существующие числа автоматически?
Нет. Вам нужно будет повторно ввести или обновить значения (нажать F2 → Enter) после изменения формата.
В3: Могу ли я преобразовать числа в текст, не теряя форматирования?
Да. Используйте функцию ТЕКСТ() и укажите желаемую строку формата (например, "0,00" или "# ##0,00 ₽").
В4: Могу ли я обратить процесс и снова превратить текст в числа?
Конечно. Используйте функцию ЗНАЧЕН() или преобразуйте формат столбца обратно в «Числовой».
В5: Является ли Spire.XLS бесплатным для использования?
Spire.XLS предлагает как бесплатную, так и коммерческую версию. Бесплатная версия поддерживает большинство общих функций для малых и средних задач.
Вам также может быть интересно
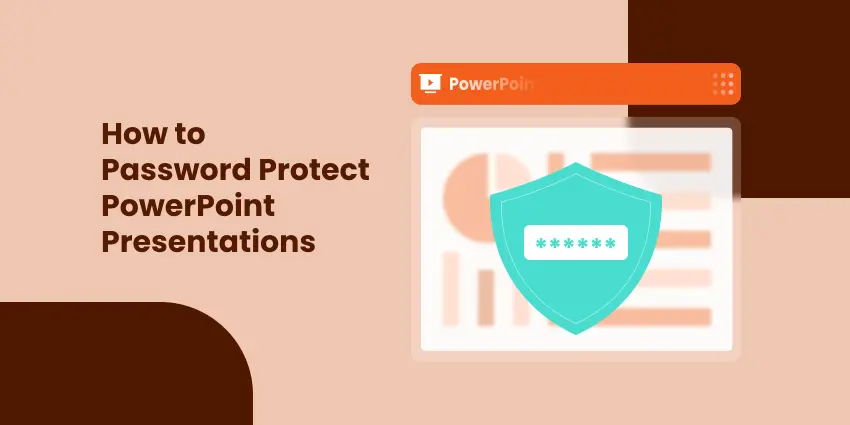
5 modi efficaci per proteggere con password i file PowerPoint
Indice
- Perché proteggere PowerPoint con una password
- Metodo 1. Criptare la presentazione con una password
- Metodo 2. Aggiungere una password di apertura o modifica tramite le opzioni di salvataggio
- Metodo 3. Proteggere PowerPoint con una password ZIP
- Metodo 4. Convertire in PDF con password
- Metodo 5. Automatizzare la protezione con password tramite codice
- Tabella di confronto: scegli il modo giusto per proteggere la tua presentazione
- Riepilogo
- Domande frequenti
Le presentazioni di PowerPoint contengono spesso informazioni sensibili o riservate: rapporti aziendali, piani di marketing o ricerche accademiche a cui non si desidera che altri accedano o che modifichino liberamente. Fortunatamente, PowerPoint offre diversi modi per proteggere le presentazioni con password o crittografia.
In questa guida imparerai cinque modi efficaci per proteggere con password i file di PowerPoint, dalla crittografia integrata alla protezione automatizzata tramite C#. Confronteremo anche i metodi in modo che tu possa scegliere il giusto livello di sicurezza per le tue esigenze.
Panoramica dei metodi:
- Metodo 1. Criptare la presentazione con una password
- Metodo 2. Aggiungere una password di apertura o modifica tramite le opzioni di salvataggio
- Metodo 3. Proteggere PowerPoint con una password ZIP
- Metodo 4. Convertire in PDF con password
- Metodo 5. Automatizzare la protezione con password tramite codice
Perché proteggere PowerPoint con una password
Sebbene PowerPoint sia ampiamente utilizzato per creare e condividere presentazioni, pochi utenti si rendono conto di quanto sia facile per le persone non autorizzate aprire, modificare o copiare contenuti se il file non è protetto. La protezione con password ti aiuta a controllare chi può visualizzare, modificare o riutilizzare il tuo lavoro.
Motivi per proteggere i file di PowerPoint con una password:
- Riservatezza: impedire agli utenti non autorizzati di visualizzare dati sensibili come rapporti finanziari interni o piani strategici.
- Integrità: impedire ad altri di modificare le diapositive o alterare i contenuti senza autorizzazione.
- Professionalità: assicurarsi che vengano distribuite solo le versioni finalizzate delle presentazioni.
- Conformità: alcune organizzazioni o clienti richiedono la protezione con password per soddisfare le politiche di sicurezza dei dati.
Livelli di protezione di PowerPoint:
- Protezione all'apertura: richiede una password per aprire il file.
- Protezione dalla modifica: consente la visualizzazione ma impedisce la modifica senza una password.
Esploriamo ora cinque modi pratici per applicare queste protezioni.
Metodo 1. Criptare la presentazione con una password
Il modo più semplice e sicuro per proteggere il tuo file PowerPoint è crittografarlo con una password utilizzando la funzione integrata di PowerPoint Crittografa con password. Questo metodo garantisce che nessuno possa aprire il file senza inserire la password corretta.
Come fare:
Passaggio 1: apri il tuo file PowerPoint.
Passaggio 2: fai clic su File → Informazioni → Proteggi presentazione → Crittografa con password.
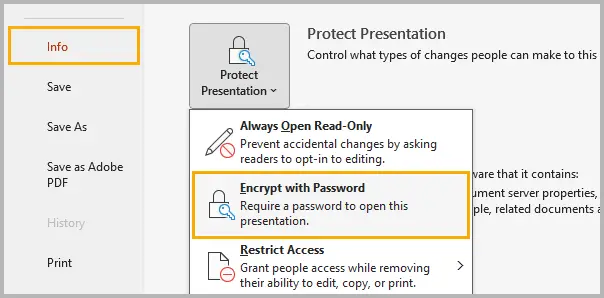
Passaggio 3: inserisci una password complessa che combini lettere maiuscole e minuscole, numeri e caratteri speciali.
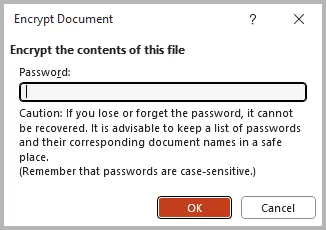
Passaggio 4: fai clic su OK, quindi salva la presentazione per applicare la protezione con password.
La prossima volta che qualcuno tenterà di aprire la presentazione, PowerPoint richiederà la password prima di caricare qualsiasi contenuto.
Suggerimenti:
- Utilizza una password lunga almeno 8-12 caratteri.
- Evita di salvare la password nella stessa cartella della presentazione.
- Se perdi la password, Microsoft non può recuperarla.
Metodo 2. Aggiungere una password di apertura o modifica tramite le opzioni di salvataggio
La funzione Opzioni di salvataggio di PowerPoint consente di applicare password di apertura e modifica direttamente durante il salvataggio della presentazione. Questa protezione integrata ti consente di decidere se altri possono visualizzare il file, modificarlo o entrambi.
Istruzioni passo passo:
Passaggio 1: fai clic su File → Salva con nome e seleziona la posizione desiderata.
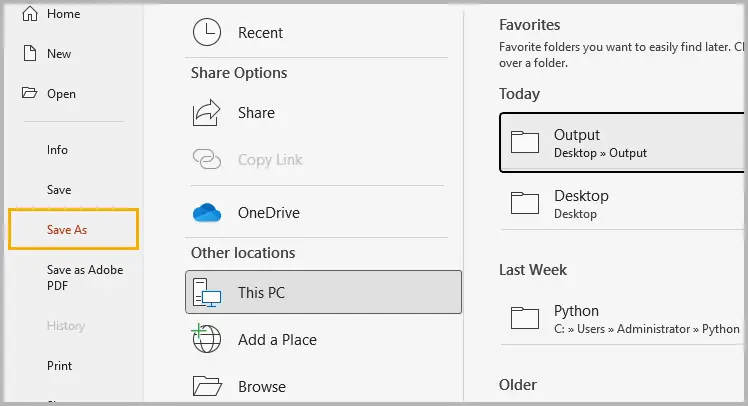
Passaggio 2: nella finestra di dialogo Salva con nome, fai clic su Strumenti → Opzioni generali (Windows) o Opzioni (Mac).
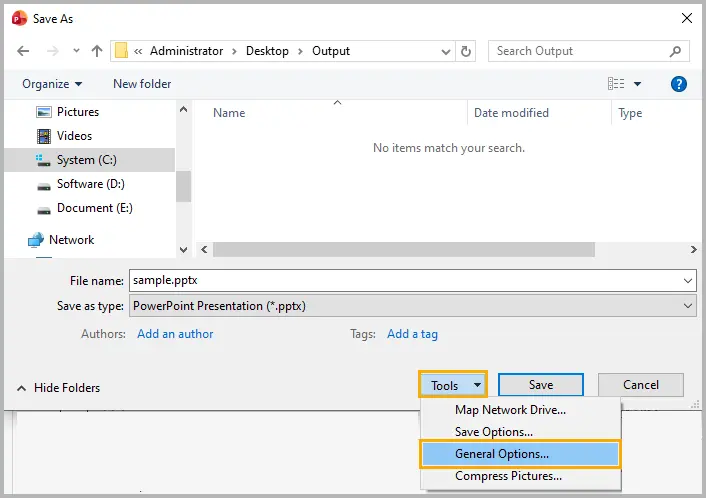
Passaggio 3: inserisci una password nel campo Password per l'apertura per limitare completamente l'accesso o in Password per la modifica per consentire la visualizzazione ma impedire la modifica.
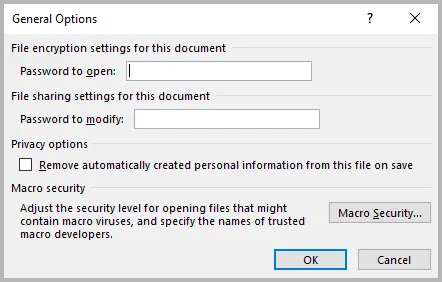
Passaggio 4: fai clic su OK, quindi salva il file per applicare la protezione.
Suggerimenti:
- Utilizza una password complessa e univoca for ogni presentazione.
- Distingui chiaramente tra password di apertura e di modifica per evitare confusione.
Metodo 3. Proteggere PowerPoint con una password ZIP
Se condividi spesso presentazioni tramite e-mail o archiviazione cloud, comprimerle e crittografarle in un file ZIP aggiunge un ulteriore livello di protezione. Questo metodo protegge il file anche prima che venga aperto in PowerPoint.
Passaggi (utilizzando 7-Zip o WinRAR):
Passaggio 1: seleziona uno o più file di PowerPoint sul tuo computer.
Passaggio 2: fai clic con il pulsante destro del mouse sui file selezionati e seleziona 7-Zip → Aggiungi all'archivio (o Comprimi su macOS).

Passaggio 3: scegli il formato ZIP o RAR.
Passaggio 4: inserisci una password complessa e abilita la crittografia AES-256 se disponibile.
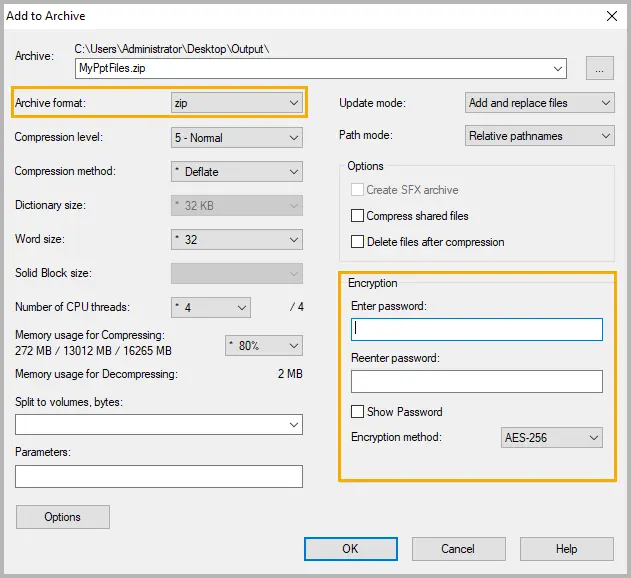
Passaggio 5: salva l'archivio e condividilo al posto del file originale.
Suggerimenti:
- Conserva la password separatamente dal file per impedire l'accesso non autorizzato.
- Per i progetti condivisi, crea password univoche per ogni archivio per ridurre al minimo i rischi.
Metodo 4. Convertire in PDF con password
Se devi solo condividere le diapositive di PowerPoint in formato di sola lettura, la conversione in un PDF protetto da password è una scelta pratica. I destinatari possono visualizzare le diapositive ma non possono modificarle o copiarle senza autorizzazione.
Segui questi passaggi:
Passaggio 1: apri il file di PowerPoint e vai su File → Esporta → Crea documento PDF/XPS → Crea PDF/XPS.
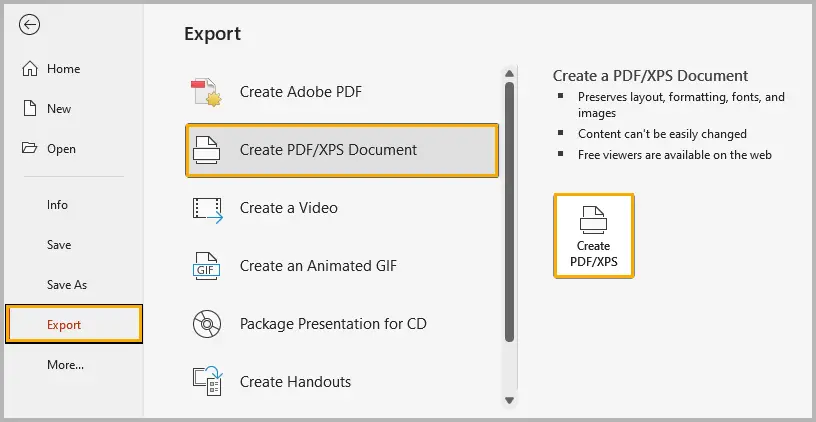
Passaggio 2: seleziona le opzioni di esportazione e fai clic su Pubblica per generare il PDF.
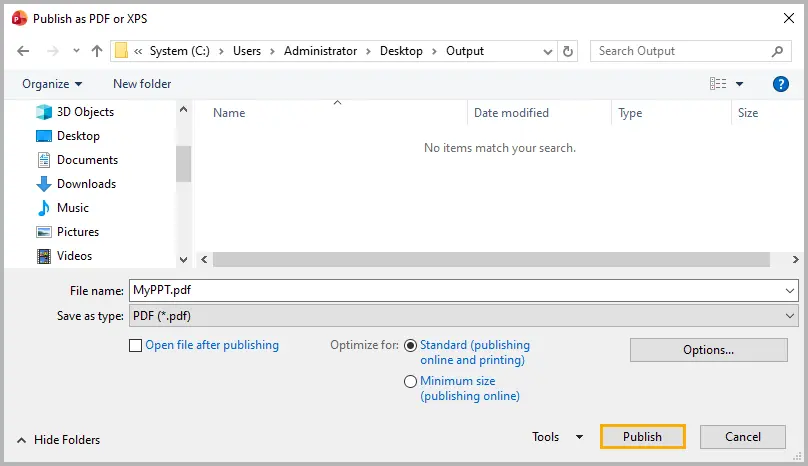
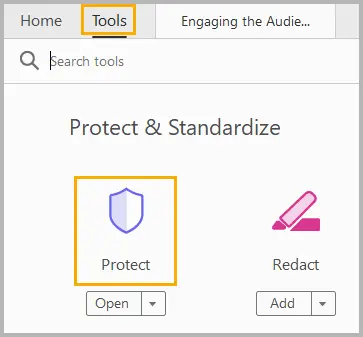
Passaggio 3: apri il PDF in Adobe Acrobat o in un altro editor PDF.
Passaggio 4: seleziona Strumenti, quindi fai clic su Proteggi.
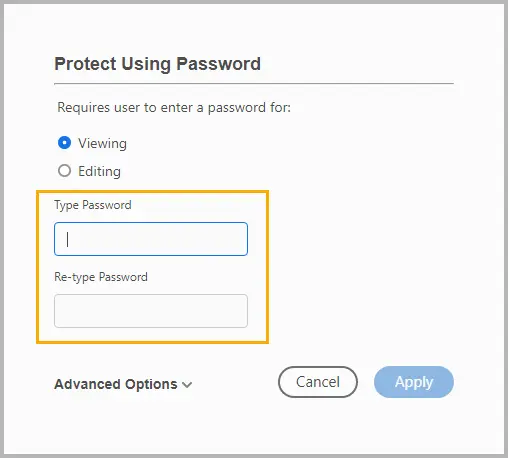
Passaggio 5: fai clic su Proteggi con password per impostare una password per visualizzare o modificare il PDF, quindi fai clic su Applica.
Suggerimenti:
- Imposta entrambe le password utente (apertura) e proprietario (modifica) per una protezione più efficace.
- Se condividi ampiamente, considera l'applicazione di restrizioni di stampa e copia nel tuo strumento PDF.
Se esporti spesso presentazioni come PDF crittografati, puoi automatizzare questo processo con il codice. Consulta il nostro tutorial: Convertire PowerPoint in PDF protetto da password in C#
Metodo 5. Automatizzare la protezione con password tramite codice
Per le organizzazioni che generano presentazioni automaticamente, come report, dashboard o proposte per i clienti, l'impostazione manuale della password non è scalabile. Invece, puoi automatizzare la crittografia di PowerPoint usando C#.
Con la libreria Spire.Presentation for .NET, puoi applicare la protezione con password a uno o più file a livello di codice.
Istruzioni passo passo:
Passaggio 1: installa Spire.Presentation tramite NuGet.
PM> Install-Package Spire.Presentation
Passaggio 2: carica il tuo file PowerPoint in C#.
Passaggio 3: applica la protezione con password utilizzando il metodo Encrypt().
Passaggio 4: salva la presentazione crittografata.
Esempio di codice completo:
using Spire.Presentation;

namespace ProtectPPTWithPassword
{
    class Program
    {
        static void Main(string[] args)
        {
            // Create a new Presentation instance
            Presentation presentation = new Presentation();

            // Load the PowerPoint document from file
            presentation.LoadFromFile("sample.pptx");

            // Encrypt the presentation using a specified password
            presentation.Encrypt("your password");

            // Save the encrypted presentation to a new file in PPTX format
            presentation.SaveToFile("Encrypted.pptx", FileFormat.Pptx2013);
            presentation.Dispose();
        }
    }
}
Vantaggi:
L'automazione della protezione con password con C# garantisce coerenza e accuratezza, riduce il rischio di errori umani e consente la crittografia batch di più presentazioni. Si integra anche facilmente con altre attività automatizzate, ottimizzando il flusso di lavoro e risparmiando tempo.
Leggi anche: Proteggere o non proteggere le presentazioni di PowerPoint utilizzando C#
Tabella di confronto: scegli il modo giusto per proteggere la tua presentazione
| Metodo | Tipo di protezione | Forza della crittografia | Difficoltà | Ideale per | Pro | Contro |
|---|---|---|---|---|---|---|
| Crittografa con password | Crittografia completa | AES a 128 bit o superiore | Facile | Presentazioni riservate o sensibili | Sicurezza integrata robusta | Recupero password impossibile |
| Opzioni di salvataggio | Password a livello di file | Moderata (RC4 legacy o parziale) | Facile | File modificabili condivisi | Opzioni flessibili di apertura/modifica | Crittografia più debole per i formati meno recenti |
| Strumenti di crittografia di terze parti | Protezione a livello di archivio | AES a 256 bit (dipende dallo strumento) | Medio | Condivisione e archiviazione di file | Funziona per più file | Richiede software di estrazione |
| PDF con password | Protezione di sola lettura | AES a 128 bit (standard Adobe) | Medio | Condivisione di contenuti finalizzati | Blocca i contenuti, impedisce le modifiche | Il PPT originale rimane non protetto |
| Automazione tramite C# | Crittografia completa a livello di codice | AES a 128 bit (Spire.Presentation) | Avanzato | Protezione batch o uso aziendale | Scalabile ed efficiente | Richiede conoscenze di programmazione |
Riepilogo
La protezione con password è uno dei modi più efficaci per proteggere le presentazioni di PowerPoint da accessi o modifiche non autorizzati. Che tu abbia bisogno di crittografare diapositive riservate, controllare le autorizzazioni di modifica o distribuire una versione sicura di sola lettura, PowerPoint offre opzioni flessibili per ogni situazione.
La funzione di crittografia integrata offre una protezione forte e immediata; le opzioni di password Salva con nome ti consentono di decidere chi può aprire o modificare il file; gli strumenti di crittografia di terze parti aggiungono un ulteriore livello di sicurezza per gli archivi condivisi; la conversione in PDF garantisce che il tuo pubblico possa solo visualizzare il contenuto; e l'automazione con C# semplifica la protezione per attività su larga scala o ripetitive.
Scegliendo il metodo di protezione con password giusto per il tuo flusso di lavoro, puoi mantenere le tue presentazioni private, professionali e sicure in ogni fase di utilizzo.
Domande frequenti
D1. Posso rimuovere una password da un file di PowerPoint?
Sì. Apri la presentazione utilizzando la password corretta, vai su File → Informazioni → Proteggi presentazione → Crittografa con password, e cancella il campo della password, quindi salva il file.
D2. Cosa succede se dimentico la password di PowerPoint?
Microsoft non offre un metodo di recupero per le presentazioni crittografate. È necessario ricreare il file o ripristinare un backup. Conserva sempre le password in modo sicuro in un gestore di password.
D3. La protezione con password di PowerPoint è sicura?
Sì. Le versioni moderne di PowerPoint (2010 e successive) utilizzano la crittografia AES a 128 bit, che fornisce una sicurezza elevata quando viene utilizzata una password complessa.
D4. Posso usare VBA o macro per impostare una password di PowerPoint?
Sì, puoi usare VBA per impostare o rimuovere automaticamente le password, ma le librerie C# come Spire.Presentation offrono opzioni più flessibili e moderne.
D5. Qual è la differenza tra password di apertura e di modifica?
Una password di apertura impedisce a chiunque di aprire il file senza di essa, mentre una password di modifica consente l'apertura ma limita la modifica.
Vedi anche
5 maneiras eficazes de proteger arquivos do PowerPoint com senha
Índice
- Por que proteger o PowerPoint com uma senha
- Método 1. Criptografar a apresentação com uma senha
- Método 2. Adicionar uma senha para abrir ou modificar via Opções de Salvamento
- Método 3. Proteger o PowerPoint com uma senha ZIP
- Método 4. Converter para PDF com senha
- Método 5. Automatizar a proteção por senha via código
- Tabela de comparação: Escolha a maneira certa de proteger sua apresentação
- Resumo
- Perguntas frequentes
As apresentações do PowerPoint geralmente contêm informações confidenciais ou sigilosas — relatórios de negócios, planos de marketing ou pesquisas acadêmicas que você não quer que outras pessoas acessem ou modifiquem livremente. Felizmente, o PowerPoint oferece várias maneiras de proteger suas apresentações com senhas ou criptografia.
Neste guia, você aprenderá cinco maneiras eficazes de proteger arquivos do PowerPoint com senha, desde a criptografia integrada até a proteção automatizada usando C#. Também compararemos os métodos para que você possa escolher o nível certo de segurança para suas necessidades.
Visão geral do método:
- Método 1. Criptografar a apresentação com uma senha
- Método 2. Adicionar uma senha para abrir ou modificar via Opções de Salvamento
- Método 3. Proteger o PowerPoint com uma senha ZIP
- Método 4. Converter para PDF com senha
- Método 5. Automatizar a proteção por senha via código
Por que proteger o PowerPoint com uma senha
Embora o PowerPoint seja amplamente utilizado para criar e compartilhar apresentações, poucos usuários percebem como é fácil para pessoas não autorizadas abrir, editar ou copiar conteúdo se o arquivo não estiver protegido. A proteção por senha ajuda você a controlar quem pode visualizar, editar ou reutilizar seu trabalho.
Razões para proteger seus arquivos do PowerPoint com uma senha:
- Confidencialidade: impeça que usuários não autorizados visualizem dados confidenciais, como relatórios financeiros internos ou planos estratégicos.
- Integridade: impeça que outras pessoas modifiquem seus slides ou alterem o conteúdo sem permissão.
- Profissionalismo: garanta que apenas as versões finalizadas das apresentações sejam distribuídas.
- Conformidade: algumas organizações ou clientes exigem proteção por senha para atender às políticas de segurança de dados.
Níveis de proteção do PowerPoint:
- Proteção de abertura: requer uma senha para abrir o arquivo.
- Proteção de modificação: permite a visualização, mas impede a edição sem uma senha.
Agora, vamos explorar cinco maneiras práticas de aplicar essas proteções.
Método 1. Criptografar a apresentação com uma senha
A maneira mais simples e segura de proteger seu arquivo do PowerPoint é criptografá-lo com uma senha usando o recurso integrado do PowerPoint Criptografar com Senha. Este método garante que ninguém possa abrir o arquivo sem inserir a senha correta.
Como fazer:
Etapa 1: Abra seu arquivo do PowerPoint.
Etapa 2: Clique em Arquivo → Informações → Proteger Apresentação → Criptografar com Senha.
Etapa 3: insira uma senha forte combinando letras maiúsculas e minúsculas, números e caracteres especiais.
Etapa 4: Clique em OK, depois salve sua apresentação para aplicar a proteção por senha.
Na próxima vez que alguém tentar abrir a apresentação, o PowerPoint solicitará a senha antes de carregar qualquer conteúdo.
Dicas:
- Use uma senha com pelo menos 8 a 12 caracteres.
- Evite salvar a senha na mesma pasta da sua apresentação.
- Se você perder a senha, a Microsoft não poderá recuperá-la.
Método 2. Adicionar uma senha para abrir ou modificar via Opções de Salvamento
O recurso Opções de Salvamento do PowerPoint permite que você aplique senhas de abertura e modificação diretamente ao salvar sua apresentação. Essa proteção integrada permite que você decida se outras pessoas podem visualizar o arquivo, editá-lo ou ambos.
Instruções passo a passo:
Etapa 1: Clique em Arquivo → Salvar como e selecione o local desejado.
Etapa 2: na caixa de diálogo Salvar como, clique em Ferramentas → Opções gerais (Windows) ou Opções (Mac).
Etapa 3: insira uma senha no campo Senha para abrir para restringir o acesso totalmente ou em Senha para modificar para permitir a visualização, mas impedir a edição.
Etapa 4: Clique em OK, depois salve o arquivo para aplicar a proteção.
Dicas:
- Use uma senha forte e exclusiva para cada apresentação.
- Diferencie claramente entre senhas de abertura e de modificação para evitar confusão.
Método 3. Proteger o PowerPoint com uma senha ZIP
Se você compartilha apresentações com frequência por e-mail ou armazenamento em nuvem, compactá-las e criptografá-las em um arquivo ZIP adiciona uma camada extra de proteção. Este método protege o arquivo mesmo antes de ser aberto no PowerPoint.
Etapas (usando 7-Zip ou WinRAR):
Etapa 1: Selecione um ou mais arquivos do PowerPoint em seu computador.
Etapa 2: Clique com o botão direito do mouse nos arquivos selecionados e selecione 7-Zip → Adicionar ao arquivo (ou Compactar no macOS).
Etapa 3: Escolha o formato ZIP ou RAR.
Etapa 4: insira uma senha forte e ative a criptografia AES-256 se disponível.
Etapa 5: Salve o arquivo e compartilhe-o em vez do arquivo original.
Dicas:
- Mantenha a senha separada do arquivo para impedir o acesso não autorizado.
- Para projetos compartilhados, crie senhas exclusivas por arquivo para minimizar o risco.
Método 4. Converter para PDF com senha
Se você só precisa compartilhar seus slides do PowerPoint em formato somente leitura, convertê-los para um PDF com proteção por senha é uma escolha prática. Os destinatários podem visualizar os slides, mas não podem editá-los ou copiá-los sem permissão.
Siga estas etapas:
Etapa 1: Abra seu arquivo do PowerPoint e vá para Arquivo → Exportar → Criar Documento PDF/XPS → Criar PDF/XPS.
Etapa 2: Selecione as opções de exportação e clique em Publicar para gerar o PDF.
Etapa 3: Abra o PDF no Adobe Acrobat ou em outro editor de PDF.
Etapa 4: Selecione Ferramentas, depois clique em Proteger.
Etapa 5: Clique em Proteger usando senha para definir uma senha para visualizar ou editar o PDF e, em seguida, clique em Aplicar.
Dicas:
- Defina as senhas de usuário (abrir) e de proprietário (editar) para uma proteção mais forte.
- Se for compartilhar amplamente, considere aplicar restrições de impressão e cópia em sua ferramenta de PDF.
Se você exporta apresentações com frequência como PDFs criptografados, pode automatizar esse processo com código. Confira nosso tutorial: Converter PowerPoint para PDF protegido por senha em C#
Método 5. Automatizar a proteção por senha via código
Para organizações que geram apresentações automaticamente — como relatórios, painéis ou propostas de clientes — a configuração manual de senhas não é escalável. Em vez disso, você pode automatizar a criptografia do PowerPoint usando C#.
Com a biblioteca Spire.Presentation for .NET, você pode aplicar proteção por senha a um ou vários arquivos programaticamente.
Instruções passo a passo:
Etapa 1: Instale o Spire.Presentation via NuGet.
PM> Install-Package Spire.Presentation
Etapa 2: Carregue seu arquivo do PowerPoint em C#.
Etapa 3: Aplique a proteção por senha usando o método Encrypt().
Etapa 4: Salve a apresentação criptografada.
Exemplo de código completo:
using Spire.Presentation;

namespace ProtectPPTWithPassword
{
    class Program
    {
        static void Main(string[] args)
        {
            // Create a new Presentation instance
            Presentation presentation = new Presentation();

            // Load the PowerPoint document from file
            presentation.LoadFromFile("sample.pptx");

            // Encrypt the presentation using a specified password
            presentation.Encrypt("your password");

            // Save the encrypted presentation to a new file in PPTX format
            presentation.SaveToFile("Encrypted.pptx", FileFormat.Pptx2013);
            presentation.Dispose();
        }
    }
}
Benefícios:
A automação da proteção por senha com C# garante consistência e precisão, reduz o risco de erro humano e permite a criptografia em lote de várias apresentações. Ele também se integra facilmente a outras tarefas automatizadas, otimizando seu fluxo de trabalho e economizando tempo.
Leia mais: Proteger ou desproteger apresentações do PowerPoint usando C#
Tabela de comparação: Escolha a maneira certa de proteger sua apresentação
| Método | Tipo de proteção | Força da criptografia | Dificuldade | Melhor para | Prós | Contras |
|---|---|---|---|---|---|---|
| Criptografar com senha | Criptografia completa | AES de 128 bits ou superior | Fácil | Apresentações confidenciais ou sigilosas | Segurança forte integrada | Recuperação de senha impossível |
| Opções de salvamento | Senha no nível do arquivo | Moderada (RC4 legado ou parcial) | Fácil | Arquivos editáveis compartilhados | Opções flexíveis de abrir/modificar | Criptografia mais fraca para formatos mais antigos |
| Ferramentas de criptografia de terceiros | Proteção no nível do arquivo | AES de 256 bits (depende da ferramenta) | Médio | Compartilhamento e armazenamento de arquivos | Funciona para vários arquivos | Requer software de extração |
| PDF com senha | Proteção somente leitura | AES de 128 bits (padrão Adobe) | Médio | Compartilhamento de conteúdo finalizado | Bloqueia o conteúdo, impede edições | O PPT original permanece desprotegido |
| Automação via C# | Criptografia completa programática | AES de 128 bits (Spire.Presentation) | Avançado | Proteção em lote ou uso empresarial | Escalável e eficiente | Requer conhecimento de codificação |
Resumo
A proteção por senha é uma das maneiras mais eficazes de proteger as apresentações do PowerPoint contra acesso ou modificação não autorizados. Se você precisa criptografar slides confidenciais, controlar permissões de edição ou distribuir uma versão segura somente leitura, o PowerPoint oferece opções flexíveis para cada situação.
O recurso de criptografia integrado oferece proteção forte e imediata; as opções de senha Salvar como permitem que você decida quem pode abrir ou editar o arquivo; as ferramentas de criptografia de terceiros adicionam uma camada extra de segurança para arquivos compartilhados; a conversão para PDF garante que seu público só possa visualizar o conteúdo; e a automação com C# simplifica a proteção para tarefas em grande escala ou repetitivas.
Ao escolher o método de proteção por senha certo para o seu fluxo de trabalho, você pode manter suas apresentações privadas, profissionais e seguras em todas as fases de uso.
Perguntas frequentes
P1. Posso remover uma senha de um arquivo do PowerPoint?
Sim. Abra a apresentação usando a senha correta, vá para Arquivo → Informações → Proteger Apresentação → Criptografar com Senha, limpe o campo da senha e salve o arquivo.
P2. O que acontece se eu esquecer minha senha do PowerPoint?
A Microsoft não oferece um método de recuperação para apresentações criptografadas. Você deve recriar o arquivo ou restaurar um backup. Sempre armazene senhas com segurança em um gerenciador de senhas.
P3. A proteção por senha do PowerPoint é segura?
Sim. As versões modernas do PowerPoint (2010 e posteriores) usam criptografia AES de 128 bits, que fornece segurança forte quando uma senha complexa é usada.
P4. Posso usar VBA ou macros para definir uma senha do PowerPoint?
Sim, você pode usar VBA para definir ou remover senhas automaticamente, mas bibliotecas C# como Spire.Presentation offerem opções mais flexíveis e modernas.
P5. Qual é a diferença entre senhas de abertura e de modificação?
Uma senha de abertura impede que qualquer pessoa abra o arquivo sem ela, enquanto uma senha de modificação permite a abertura, mas restringe a edição.
Veja também
PowerPoint 파일을 비밀번호로 보호하는 5가지 효과적인 방법
PowerPoint 프레젠테이션에는 비즈니스 보고서, 마케팅 계획 또는 다른 사람이 자유롭게 액세스하거나 수정하는 것을 원치 않는 학술 연구와 같은 민감하거나 기밀 정보가 포함되어 있는 경우가 많습니다. 다행히 PowerPoint는 암호나 암호화를 사용하여 프레젠테이션을 보호하는 여러 가지 방법을 제공합니다.
이 가이드에서는 내장된 암호화부터 C#을 사용한 자동화된 보호에 이르기까지 PowerPoint 파일을 암호로 보호하는 다섯 가지 효과적인 방법을 배웁니다. 또한 필요에 맞는 적절한 보안 수준을 선택할 수 있도록 각 방법을 비교해 보겠습니다.
방법 개요:
- 방법 1. 암호로 프레젠테이션 암호화하기
- 방법 2. 저장 옵션을 통해 열기 또는 수정 암호 추가하기
- 방법 3. ZIP 암호로 PowerPoint 보호하기
- 방법 4. 암호가 있는 PDF로 변환하기
- 방법 5. 코드를 통해 암호 보호 자동화하기
PowerPoint를 암호로 보호해야 하는 이유
PowerPoint는 프레젠테이션을 만들고 공유하는 데 널리 사용되지만, 파일이 보호되지 않으면 권한 없는 사람이 콘텐츠를 열거나, 편집하거나, 복사하는 것이 얼마나 쉬운지 아는 사용자는 거의 없습니다. 암호 보호는 누가 작업을 보거나, 편집하거나, 재사용할 수 있는지 제어하는 데 도움이 됩니다.
PowerPoint 파일을 암호로 보호해야 하는 이유:
- 기밀성: 권한 없는 사용자가 내부 재무 보고서나 전략 계획과 같은 민감한 데이터를 보는 것을 방지합니다.
- 무결성: 다른 사람이 허가 없이 슬라이드를 수정하거나 콘텐츠를 변경하는 것을 막습니다.
- 전문성: 최종 버전의 프레젠테이션만 배포되도록 합니다.
- 규정 준수: 일부 조직이나 고객은 데이터 보안 정책을 충족하기 위해 암호 보호를 요구합니다.
PowerPoint 보호 수준:
- 열기 보호: 파일을 열려면 암호가 필요합니다.
- 수정 보호: 보기는 허용하지만 암호 없이는 편집을 방지합니다.
이제 이러한 보호를 적용하는 다섯 가지 실용적인 방법을 살펴보겠습니다.
방법 1. 암호로 프레젠테이션 암호화하기
PowerPoint 파일을 보호하는 가장 간단하고 안전한 방법은 PowerPoint의 내장된 암호로 암호화 기능을 사용하여 암호로 암호화하는 것입니다. 이 방법을 사용하면 올바른 암호를 입력하지 않고는 아무도 파일을 열 수 없습니다.
방법:
1단계: PowerPoint 파일을 엽니다.
2단계: 파일 → 정보 → 프레젠테이션 보호 → 암호로 암호화를 클릭합니다.
3단계: 대문자와 소문자, 숫자, 특수 문자를 조합하여 강력한 암호를 입력합니다.
4단계: 확인을 클릭한 다음 프레젠테이션을 저장하여 암호 보호를 적용합니다.
다음에 누군가 프레젠테이션을 열려고 하면 PowerPoint는 콘텐츠를 로드하기 전에 암호를 묻는 메시지를 표시합니다.
팁:
- 최소 8~12자 길이의 암호를 사용하십시오.
- 프레젠테이션과 동일한 폴더에 암호를 저장하지 마십시오.
- 암호를 잃어버리면 Microsoft는 복구할 수 없습니다.
방법 2. 저장 옵션을 통해 열기 또는 수정 암호 추가하기
PowerPoint의 저장 옵션 기능을 사용하면 프레젠테이션을 저장하는 동안 열기 및 수정 암호를 직접 적용할 수 있습니다. 이 내장된 보호 기능을 통해 다른 사람이 파일을 보거나, 편집하거나, 둘 다 할 수 있는지 결정할 수 있습니다.
단계별 지침:
1단계: 파일 → 다른 이름으로 저장을 클릭하고 원하는 위치를 선택합니다.
2단계: 다른 이름으로 저장 대화 상자에서 도구 → 일반 옵션(Windows) 또는 옵션(Mac)을 클릭합니다.
3단계: 액세스를 완전히 제한하려면 열기 암호 필드에 암호를 입력하거나, 보기는 허용하지만 편집을 방지하려면 수정 암호 필드에 암호를 입력합니다.
4단계: 확인을 클릭한 다음 파일을 저장하여 보호를 적용합니다.
팁:
- 각 프레젠테이션에 대해 강력하고 고유한 암호를 사용하십시오.
- 혼동을 피하기 위해 열기 암호와 수정 암호를 명확하게 구분하십시오.
방법 3. ZIP 암호로 PowerPoint 보호하기
이메일이나 클라우드 저장소를 통해 프레젠테이션을 자주 공유하는 경우 ZIP 파일로 압축하고 암호화하면 추가적인 보호 계층이 추가됩니다. 이 방법은 PowerPoint에서 열기 전에도 파일을 보호합니다.
단계 (7-Zip 또는 WinRAR 사용):
1단계: 컴퓨터에서 하나 이상의 PowerPoint 파일을 선택합니다.
2단계: 선택한 파일을 마우스 오른쪽 버튼으로 클릭하고 7-Zip → 압축 파일에 추가(macOS에서는 압축)를 선택합니다.
3단계: ZIP 또는 RAR 형식을 선택합니다.
4단계: 강력한 암호를 입력하고, 가능한 경우 AES-256 암호화를 활성화합니다.
5단계: 압축 파일을 저장하고 원본 파일 대신 공유합니다.
팁:
- 권한 없는 액세스를 방지하기 위해 암호를 파일과 별도로 보관하십시오.
- 공유 프로젝트의 경우 위험을 최소화하기 위해 압축 파일당 고유한 암호를 만드십시오.
방법 4. 암호가 있는 PDF로 변환하기
PowerPoint 슬라이드를 읽기 전용 형식으로만 공유해야 하는 경우 암호 보호 기능이 있는 PDF로 변환하는 것이 실용적인 선택입니다. 수신자는 슬라이드를 볼 수 있지만 허가 없이는 편집하거나 복사할 수 없습니다.
다음 단계를 따르십시오:
1단계: PowerPoint 파일을 열고 파일 → 내보내기 → PDF/XPS 문서 만들기 → PDF/XPS 만들기로 이동합니다.
2단계: 내보내기 옵션을 선택하고 게시를 클릭하여 PDF를 생성합니다.
3단계: Adobe Acrobat 또는 다른 PDF 편집기에서 PDF를 엽니다.
4단계: 도구를 선택한 다음 보호를 클릭합니다.
5단계: 암호를 사용하여 보호를 클릭하여 PDF를 보거나 편집할 암호를 설정한 다음 적용을 클릭합니다.
팁:
- 더 강력한 보호를 위해 사용자(열기) 및 소유자(편집) 암호를 모두 설정하십시오.
- 널리 공유하는 경우 PDF 도구에서 인쇄 및 복사 제한을 적용하는 것을 고려하십시오.
암호화된 PDF로 프레젠테이션을 자주 내보내는 경우 코드로 이 프로세스를 자동화할 수 있습니다. 튜토리얼을 확인하십시오: C#에서 PowerPoint를 암호로 보호된 PDF로 변환하는 방법
방법 5. 코드를 통해 암호 보호 자동화하기
보고서, 대시보드 또는 고객 제안서와 같이 프레젠테이션을 자동으로 생성하는 조직의 경우 수동 암호 설정은 확장 가능하지 않습니다. 대신 C#을 사용하여 PowerPoint 암호화를 자동화할 수 있습니다.
Spire.Presentation for .NET 라이브러리를 사용하면 프로그래밍 방식으로 하나 또는 여러 파일에 암호 보호를 적용할 수 있습니다.
단계별 지침:
1단계: NuGet을 통해 Spire.Presentation을 설치합니다.
PM> Install-Package Spire.Presentation
2단계: C#에서 PowerPoint 파일을 로드합니다.
3단계: Encrypt() 메서드를 사용하여 암호 보호를 적용합니다.
4단계: 암호화된 프레젠테이션을 저장합니다.
전체 코드 예제:
using Spire.Presentation;

namespace ProtectPPTWithPassword
{
    class Program
    {
        static void Main(string[] args)
        {
            // 새 Presentation 인스턴스 생성
            Presentation presentation = new Presentation();

            // 파일에서 PowerPoint 문서 로드
            presentation.LoadFromFile("sample.pptx");

            // 지정된 암호를 사용하여 프레젠테이션 암호화
            presentation.Encrypt("your password");

            // 암호화된 프레젠테이션을 새 파일에 PPTX 형식으로 저장
            presentation.SaveToFile("Encrypted.pptx", FileFormat.Pptx2013);
            presentation.Dispose();
        }
    }
}
이점:
C#으로 암호 보호를 자동화하면 일관성과 정확성을 보장하고, 인적 오류의 위험을 줄이며, 여러 프레젠테이션의 일괄 암호화를 허용합니다. 또한 다른 자동화된 작업과 쉽게 통합되어 워크플로를 간소화하고 시간을 절약할 수 있습니다.
더 읽어보기: C#을 사용하여 PowerPoint 프레젠테이션 보호 또는 보호 해제
비교표: 프레젠테이션을 보호하는 올바른 방법 선택하기
| 방법 | 보호 유형 | 암호화 강도 | 난이도 | 최적 대상 | 장점 | 단점 |
|---|---|---|---|---|---|---|
| 암호로 암호화 | 전체 암호화 | AES 128비트 이상 | 쉬움 | 기밀 또는 민감한 프레젠테이션 | 내장된 강력한 보안 | 암호 복구 불가능 |
| 저장 옵션 | 파일 수준 암호 | 중간 (레거시 RC4 또는 부분) | 쉬움 | 공유 편집 가능 파일 | 유연한 열기/수정 옵션 | 이전 형식에 대한 약한 암호화 |
| 타사 암호화 도구 | 압축 파일 수준 보호 | AES 256비트 (도구에 따라 다름) | 중간 | 파일 공유 및 저장 | 여러 파일에 작동 | 추출 소프트웨어 필요 |
| 암호가 있는 PDF | 읽기 전용 보호 | AES 128비트 (Adobe 표준) | 중간 | 최종 콘텐츠 공유 | 콘텐츠 잠금, 편집 방지 | 원본 PPT는 보호되지 않은 상태로 남음 |
| C#을 통한 자동화 | 프로그래밍 방식 전체 암호화 | AES 128비트 (Spire.Presentation) | 고급 | 일괄 보호 또는 기업용 | 확장 가능하고 효율적 | 코딩 지식 필요 |
요약
암호 보호는 권한 없는 액세스나 수정으로부터 PowerPoint 프레젠테이션을 보호하는 가장 효과적인 방법 중 하나입니다. 기밀 슬라이드를 암호화하거나, 편집 권한을 제어하거나, 안전한 읽기 전용 버전을 배포해야 하는 경우 등 모든 상황에 대해 PowerPoint는 유연한 옵션을 제공합니다.
내장된 암호화 기능은 강력하고 즉각적인 보호를 제공하며, 다른 이름으로 저장 암호 옵션을 사용하면 누가 파일을 열거나 편집할 수 있는지 결정할 수 있습니다. 타사 암호화 도구는 공유된 압축 파일에 대한 추가 보안 계층을 추가하고, PDF 변환은 청중이 콘텐츠만 볼 수 있도록 보장하며, C#을 사용한 자동화는 대규모 또는 반복적인 작업에 대한 보호를 단순화합니다.
워크플로에 적합한 암호 보호 방법을 선택함으로써 모든 사용 단계에서 프레젠테이션을 비공개로, 전문적으로, 그리고 안전하게 유지할 수 있습니다.
자주 묻는 질문
Q1. PowerPoint 파일에서 암호를 제거할 수 있나요?
예. 올바른 암호를 사용하여 프레젠테이션을 열고 파일 → 정보 → 프레젠테이션 보호 → 암호로 암호화로 이동하여 암호 필드를 지운 다음 파일을 저장합니다.
Q2. PowerPoint 암호를 잊어버리면 어떻게 되나요?
Microsoft는 암호화된 프레젠테이션에 대한 복구 방법을 제공하지 않습니다. 파일을 다시 만들거나 백업을 복원해야 합니다. 항상 암호 관리자에 암호를 안전하게 저장하십시오.
Q3. PowerPoint 암호 보호는 안전한가요?
예. 최신 PowerPoint 버전(2010 이상)은 AES 128비트 암호화를 사용하며, 복잡한 암호를 사용할 경우 강력한 보안을 제공합니다.
Q4. VBA나 매크로를 사용하여 PowerPoint 암호를 설정할 수 있나요?
예, VBA를 사용하여 암호를 자동으로 설정하거나 제거할 수 있지만, Spire.Presentation과 같은 C# 라이브러리는 더 유연하고 현대적인 옵션을 제공합니다.
Q5. 열기 암호와 수정 암호의 차이점은 무엇인가요?
열기 암호는 암호 없이는 아무도 파일을 열 수 없도록 하는 반면, 수정 암호는 열기는 허용하지만 편집을 제한합니다.
참고 항목
5 façons efficaces de protéger par mot de passe les fichiers PowerPoint
Table des matières
- Pourquoi protéger PowerPoint avec un mot de passe
- Méthode 1. Chiffrer la présentation avec un mot de passe
- Méthode 2. Ajouter un mot de passe d'ouverture ou de modification via les options d'enregistrement
- Méthode 3. Protéger PowerPoint avec un mot de passe ZIP
- Méthode 4. Convertir en PDF avec mot de passe
- Méthode 5. Automatiser la protection par mot de passe via le code
- Tableau comparatif : Choisissez la bonne façon de protéger votre présentation
- Résumé
- FAQ
Les présentations PowerPoint contiennent souvent des informations sensibles ou confidentielles — rapports d'activité, plans marketing ou recherches universitaires que vous ne souhaitez pas que d'autres personnes consultent ou modifient librement. Heureusement, PowerPoint offre plusieurs moyens de sécuriser vos présentations avec des mots de passe ou un chiffrement.
Dans ce guide, vous apprendrez cinq moyens efficaces de protéger par mot de passe les fichiers PowerPoint, du chiffrement intégré à la protection automatisée à l'aide de C#. Nous comparerons également les méthodes afin que vous puissiez choisir le niveau de sécurité adapté à vos besoins.
Aperçu des méthodes :
- Méthode 1. Chiffrer la présentation avec un mot de passe
- Méthode 2. Ajouter un mot de passe d'ouverture ou de modification via les options d'enregistrement
- Méthode 3. Protéger PowerPoint avec un mot de passe ZIP
- Méthode 4. Convertir en PDF avec mot de passe
- Méthode 5. Automatiser la protection par mot de passe via le code
Pourquoi protéger PowerPoint avec un mot de passe
Bien que PowerPoint soit largement utilisé pour créer et partager des présentations, peu d'utilisateurs réalisent à quel point il est facile pour des personnes non autorisées d'ouvrir, de modifier ou de copier du contenu si le fichier n'est pas protégé. La protection par mot de passe vous aide à contrôler qui peut afficher, modifier ou réutiliser votre travail.
Raisons de sécuriser vos fichiers PowerPoint avec un mot de passe :
- Confidentialité : Empêchez les utilisateurs non autorisés de consulter des données sensibles telles que des rapports financiers internes ou des plans stratégiques.
- Intégrité : Empêchez les autres de modifier vos diapositives ou d'altérer le contenu sans autorisation.
- Professionnalisme : Assurez-vous que seules les versions finalisées des présentations sont distribuées.
- Conformité : Certaines organisations ou certains clients exigent une protection par mot de passe pour respecter les politiques de sécurité des données.
Niveaux de protection PowerPoint :
- Protection à l'ouverture : Nécessite un mot de passe pour ouvrir le fichier.
- Protection contre la modification : Permet la visualisation mais empêche la modification sans mot de passe.
Explorons maintenant cinq manières pratiques d'appliquer ces protections.
Méthode 1. Chiffrer la présentation avec un mot de passe
Le moyen le plus simple et le plus sécurisé de protéger votre fichier PowerPoint est de le chiffrer avec un mot de passe à l'aide de la fonctionnalité intégrée de PowerPoint Chiffrer avec mot de passe. Cette méthode garantit que personne ne peut ouvrir le fichier sans saisir le mot de passe correct.
Comment faire :
Étape 1 : Ouvrez votre fichier PowerPoint.
Étape 2 : Cliquez sur Fichier → Informations → Protéger la présentation → Chiffrer avec mot de passe.
Étape 3 : Saisissez un mot de passe fort combinant des lettres majuscules et minuscules, des chiffres et des caractères spéciaux.
Étape 4 : Cliquez sur OK, puis enregistrez votre présentation pour appliquer la protection par mot de passe.
La prochaine fois que quelqu'un essaiera d'ouvrir la présentation, PowerPoint demandera le mot de passe avant de charger tout contenu.
Conseils :
- Utilisez un mot de passe d'au moins 8 à 12 caractères.
- Évitez d'enregistrer le mot de passe dans le même dossier que votre présentation.
- Si vous perdez le mot de passe, Microsoft ne peut pas le récupérer.
Méthode 2. Ajouter un mot de passe d'ouverture ou de modification via les options d'enregistrement
La fonctionnalité Options d'enregistrement de PowerPoint vous permet d'appliquer des mots de passe d'ouverture et de modification directement lors de l'enregistrement de votre présentation. Cette protection intégrée vous permet de décider si d'autres personnes peuvent afficher le fichier, le modifier ou les deux.
Instructions étape par étape :
Étape 1 : Cliquez sur Fichier → Enregistrer sous et sélectionnez l'emplacement souhaité.
Étape 2 : Dans la boîte de dialogue Enregistrer sous, cliquez sur Outils → Options générales (Windows) ou Options (Mac).
Étape 3 : Saisissez un mot de passe dans le champ Mot de passe pour l'ouverture pour restreindre complètement l'accès, ou dans Mot de passe pour la modification pour autoriser la visualisation mais empêcher la modification.
Étape 4 : Cliquez sur OK, puis enregistrez le fichier pour appliquer la protection.
Conseils :
- Utilisez un mot de passe fort et unique pour chaque présentation.
- Différenciez clairement les mots de passe d'ouverture et de modification pour éviter toute confusion.
Méthode 3. Protéger PowerPoint avec un mot de passe ZIP
Si vous partagez fréquemment des présentations par e-mail ou stockage cloud, les compresser et les chiffrer dans un fichier ZIP ajoute une couche de protection supplémentaire. Cette méthode sécurise le fichier avant même son ouverture dans PowerPoint.
Étapes (avec 7-Zip ou WinRAR) :
Étape 1 : Sélectionnez un ou plusieurs fichiers PowerPoint sur votre ordinateur.
Étape 2 : Faites un clic droit sur les fichiers sélectionnés et sélectionnez 7-Zip → Ajouter à l'archive (ou Compresser sur macOS).
Étape 3 : Choisissez le format ZIP ou RAR.
Étape 4 : Saisissez un mot de passe fort et activez le chiffrement AES-256 si disponible.
Étape 5 : Enregistrez l'archive et partagez-la à la place du fichier original.
Conseils :
- Conservez le mot de passe séparément du fichier pour empêcher tout accès non autorisé.
- Pour les projets partagés, créez des mots de passe uniques par archive pour minimiser les risques.
Méthode 4. Convertir en PDF avec mot de passe
Si vous avez seulement besoin de partager vos diapositives PowerPoint en lecture seule, les convertir en PDF avec protection par mot de passe est un choix pratique. Les destinataires peuvent afficher les diapositives mais ne peuvent pas les modifier ou les copier sans autorisation.
Suivez ces étapes :
Étape 1 : Ouvrez votre fichier PowerPoint et allez dans Fichier → Exporter → Créer un document PDF/XPS → Créer PDF/XPS.
Étape 2 : Sélectionnez les options d'exportation et cliquez sur Publier pour générer le PDF.
Étape 3 : Ouvrez le PDF dans Adobe Acrobat ou un autre éditeur PDF.
Étape 4 : Sélectionnez Outils, puis cliquez sur Protéger.
Étape 5 : Cliquez sur Protéger à l'aide d'un mot de passe pour définir un mot de passe pour afficher ou modifier le PDF, puis cliquez sur Appliquer.
Conseils :
- Définissez des mots de passe utilisateur (ouverture) et propriétaire (modification) pour une protection renforcée.
- Si vous partagez largement, envisagez d'appliquer des restrictions d'impression et de copie dans votre outil PDF.
Si vous exportez fréquemment des présentations en tant que PDF chiffrés, vous pouvez automatiser ce processus avec du code. Consultez notre tutoriel : Convertir PowerPoint en PDF protégé par mot de passe en C#
Méthode 5. Automatiser la protection par mot de passe via le code
Pour les organisations qui génèrent automatiquement des présentations — telles que des rapports, des tableaux de bord ou des propositions de clients — la définition manuelle des mots de passe n'est pas évolutive. Au lieu de cela, vous pouvez automatiser le chiffrement de PowerPoint en utilisant C#.
Avec la bibliothèque Spire.Presentation for .NET, vous pouvez appliquer une protection par mot de passe à un ou plusieurs fichiers par programme.
Instructions étape par étape :
Étape 1 : Installez Spire.Presentation via NuGet.
PM> Install-Package Spire.Presentation
Étape 2 : Chargez votre fichier PowerPoint en C#.
Étape 3 : Appliquez la protection par mot de passe à l'aide de la méthode Encrypt().
Étape 4 : Enregistrez la présentation chiffrée.
Exemple de code complet :
using Spire.Presentation;

namespace ProtectPPTWithPassword
{
    class Program
    {
        static void Main(string[] args)
        {
            // Create a new Presentation instance
            Presentation presentation = new Presentation();

            // Load the PowerPoint document from file
            presentation.LoadFromFile("sample.pptx");

            // Encrypt the presentation using a specified password
            presentation.Encrypt("your password");

            // Save the encrypted presentation to a new file in PPTX format
            presentation.SaveToFile("Encrypted.pptx", FileFormat.Pptx2013);
            presentation.Dispose();
        }
    }
}
Avantages :
L'automatisation de la protection par mot de passe avec C# garantit la cohérence et la précision, réduit le risque d'erreur humaine et permet le chiffrement par lots de plusieurs présentations. Elle s'intègre également facilement à d'autres tâches automatisées, rationalisant votre flux de travail et vous faisant gagner du temps.
Lire la suite : Protéger ou déprotéger les présentations PowerPoint en C#
Tableau comparatif : Choisissez la bonne façon de protéger votre présentation
| Méthode | Type de protection | Force du chiffrement | Difficulté | Idéal pour | Avantages | Inconvénients |
|---|---|---|---|---|---|---|
| Chiffrer avec mot de passe | Chiffrement complet | AES 128 bits ou plus | Facile | Présentations confidentielles ou sensibles | Sécurité intégrée forte | Récupération du mot de passe impossible |
| Options d'enregistrement | Mot de passe au niveau du fichier | Modérée (RC4 hérité ou partiel) | Facile | Fichiers modifiables partagés | Options d'ouverture/modification flexibles | Chiffrement plus faible pour les anciens formats |
| Outils de chiffrement tiers | Protection au niveau de l'archive | AES 256 bits (dépend de l'outil) | Moyen | Partage et stockage de fichiers | Fonctionne pour plusieurs fichiers | Nécessite un logiciel d'extraction |
| PDF avec mot de passe | Protection en lecture seule | AES 128 bits (standard Adobe) | Moyen | Partage de contenu finalisé | Verrouille le contenu, empêche les modifications | Le PPT original reste non protégé |
| Automatisation via C# | Chiffrement complet par programme | AES 128 bits (Spire.Presentation) | Avancé | Protection par lots ou utilisation en entreprise | Évolutif et efficace | Nécessite des connaissances en codage |
Résumé
La protection par mot de passe est l'un des moyens les plus efficaces de protéger les présentations PowerPoint contre tout accès ou modification non autorisé. Que vous ayez besoin de chiffrer des diapositives confidentielles, de contrôler les autorisations de modification ou de distribuer une version sécurisée en lecture seule, PowerPoint offre des options flexibles pour chaque situation.
La fonctionnalité de chiffrement intégrée offre une protection forte et immédiate ; les options de mot de passe Enregistrer sous vous permettent de décider qui peut ouvrir ou modifier le fichier ; les outils de chiffrement tiers ajoutent une couche de sécurité supplémentaire pour les archives partagées ; la conversion PDF garantit que votre public ne peut que visualiser le contenu ; et l'automatisation avec C# simplifie la protection pour les tâches à grande échelle ou répétitives.
En choisissant la bonne méthode de protection par mot de passe pour votre flux de travail, vous pouvez garder vos présentations privées, professionnelles et sécurisées à chaque étape de leur utilisation.
FAQ
Q1. Puis-je supprimer un mot de passe d'un fichier PowerPoint ?
Oui. Ouvrez la présentation en utilisant le mot de passe correct, allez dans Fichier → Informations → Protéger la présentation → Chiffrer avec mot de passe, et effacez le champ du mot de passe, puis enregistrez le fichier.
Q2. Que se passe-t-il si j'oublie mon mot de passe PowerPoint ?
Microsoft ne propose pas de méthode de récupération pour les présentations chiffrées. Vous devez recréer le fichier ou restaurer une sauvegarde. Stockez toujours les mots de passe en toute sécurité dans un gestionnaire de mots de passe.
Q3. La protection par mot de passe de PowerPoint est-elle sécurisée ?
Oui. Les versions modernes de PowerPoint (2010 et ultérieures) utilisent un chiffrement AES 128 bits, qui offre une sécurité renforcée lorsqu'un mot de passe complexe est utilisé.
Q4. Puis-je utiliser VBA ou des macros pour définir un mot de passe PowerPoint ?
Oui, vous pouvez utiliser VBA pour définir ou supprimer automatiquement des mots de passe, mais les bibliothèques C# comme Spire.Presentation offrent des options plus flexibles et modernes.
Q5. Quelle est la différence entre les mots de passe d'ouverture et de modification ?
Un mot de passe d'ouverture empêche quiconque d'ouvrir le fichier sans lui, tandis qu'un mot de passe de modification autorise l'ouverture mais restreint la modification.
Voir aussi
- Supprimer le chiffrement d'un fichier PowerPoint protégé par mot de passe en C#
- Ajouter ou supprimer des signatures numériques dans PowerPoint en C#
- Comment changer les arrière-plans des diapositives PowerPoint — 5 méthodes
- 5 façons simples d'exporter des diapositives PPT en tant qu'images (PNG, JPG, TIFF)
5 maneras efectivas de proteger archivos de PowerPoint con contraseña
Tabla de Contenidos
- Por qué proteger PowerPoint con una contraseña
- Método 1. Cifrar la presentación con una contraseña
- Método 2. Añadir una contraseña de apertura o modificación a través de las opciones de guardado
- Método 3. Proteger PowerPoint con una contraseña ZIP
- Método 4. Convertir a PDF con contraseña
- Método 5. Automatizar la protección con contraseña mediante código
- Tabla comparativa: Elija la forma correcta de proteger su presentación
- Resumen
- Preguntas frecuentes
Las presentaciones de PowerPoint a menudo contienen información sensible o confidencial: informes comerciales, planes de marketing o investigaciones académicas a las que no desea que otros accedan o modifiquen libremente. Afortunadamente, PowerPoint ofrece varias formas de proteger sus presentaciones con contraseñas o cifrado.
En esta guía, aprenderá cinco formas efectivas de proteger con contraseña los archivos de PowerPoint, desde el cifrado integrado hasta la protección automatizada mediante C#. También compararemos los métodos para que pueda elegir el nivel de seguridad adecuado para sus necesidades.
Resumen de los métodos:
- Método 1. Cifrar la presentación con una contraseña
- Método 2. Añadir una contraseña de apertura o modificación a través de las opciones de guardado
- Método 3. Proteger PowerPoint con una contraseña ZIP
- Método 4. Convertir a PDF con contraseña
- Método 5. Automatizar la protección con contraseña mediante código
Por qué proteger PowerPoint con una contraseña
Aunque PowerPoint se utiliza ampliamente para crear y compartir presentaciones, pocos usuarios se dan cuenta de lo fácil que es para personas no autorizadas abrir, editar o copiar contenido si el archivo no está protegido. La protección con contraseña le ayuda a controlar quién puede ver, editar o reutilizar su trabajo.
Razones para proteger sus archivos de PowerPoint con una contraseña:
- Confidencialidad: Evite que usuarios no autorizados vean datos sensibles como informes financieros internos o planes estratégicos.
- Integridad: Impida que otros modifiquen sus diapositivas o alteren el contenido sin permiso.
- Profesionalismo: Asegúrese de que solo se distribuyan las versiones finalizadas de las presentaciones.
- Cumplimiento: Algunas organizaciones o clientes requieren protección con contraseña para cumplir con las políticas de seguridad de datos.
Niveles de protección de PowerPoint:
- Protección de apertura: Requiere una contraseña para abrir el archivo.
- Protección de modificación: Permite la visualización pero impide la edición sin una contraseña.
Ahora exploremos cinco formas prácticas de aplicar estas protecciones.
Método 1. Cifrar la presentación con una contraseña
La forma más sencilla y segura de proteger su archivo de PowerPoint es cifrándolo con una contraseña utilizando la función integrada de PowerPoint Cifrar con contraseña. Este método garantiza que nadie pueda abrir el archivo sin introducir la contraseña correcta.
Cómo hacerlo:
Paso 1: Abra su archivo de PowerPoint.
Paso 2: Haga clic en Archivo → Información → Proteger presentación → Cifrar con contraseña.
Paso 3: Introduzca una contraseña segura que combine letras mayúsculas y minúsculas, números y caracteres especiales.
Paso 4: Haga clic en Aceptar y, a continuación, guarde la presentación para aplicar la protección con contraseña.
La próxima vez que alguien intente abrir la presentación, PowerPoint le pedirá la contraseña antes de cargar cualquier contenido.
Consejos:
- Utilice una contraseña que tenga al menos entre 8 y 12 caracteres.
- Evite guardar la contraseña en la misma carpeta que su presentación.
- Si pierde la contraseña, Microsoft no podrá recuperarla.
Método 2. Añadir una contraseña de apertura o modificación a través de las opciones de guardado
La función Opciones de guardado de PowerPoint le permite aplicar contraseñas de apertura y modificación directamente al guardar la presentación. Esta protección integrada le permite decidir si otros pueden ver el archivo, editarlo o ambas cosas.
Instrucciones paso a paso:
Paso 1: Haga clic en Archivo → Guardar como y seleccione la ubicación deseada.
Paso 2: En el cuadro de diálogo Guardar como, haga clic en Herramientas → Opciones generales (Windows) u Opciones (Mac).
Paso 3: Introduzca una contraseña en el campo Contraseña de apertura para restringir el acceso por completo, o en Contraseña de modificación para permitir la visualización pero impedir la edición.
Paso 4: Haga clic en Aceptar y, a continuación, guarde el archivo para aplicar la protección.
Consejos:
- Utilice una contraseña segura y única para cada presentación.
- Diferencie claramente entre las contraseñas de apertura y de modificación para evitar confusiones.
Método 3. Proteger PowerPoint con una contraseña ZIP
Si comparte presentaciones con frecuencia por correo electrónico o almacenamiento en la nube, comprimirlas y cifrarlas en un archivo ZIP añade una capa extra de protección. Este método protege el archivo incluso antes de que se abra en PowerPoint.
Pasos (usando 7-Zip o WinRAR):
Paso 1: Seleccione uno o más archivos de PowerPoint en su ordenador.
Paso 2: Haga clic con el botón derecho en los archivos seleccionados y seleccione 7-Zip → Añadir al archivo (o Comprimir en macOS).
Paso 3: Elija el formato ZIP o RAR.
Paso 4: Introduzca una contraseña segura y active el cifrado AES-256 si está disponible.
Paso 5: Guarde el archivo y compártalo en lugar del archivo original.
Consejos:
- Mantenga la contraseña separada del archivo para evitar el acceso no autorizado.
- Para proyectos compartidos, cree contraseñas únicas por archivo para minimizar el riesgo.
Método 4. Convertir a PDF con contraseña
Si solo necesita compartir sus diapositivas de PowerPoint en formato de solo lectura, convertirlas a un PDF con protección por contraseña es una opción práctica. Los destinatarios pueden ver las diapositivas pero no pueden editarlas ni copiarlas sin permiso.
Siga estos pasos:
Paso 1: Abra su archivo de PowerPoint y vaya a Archivo → Exportar → Crear documento PDF/XPS → Crear PDF/XPS.
Paso 2: Seleccione las opciones de exportación y haga clic en Publicar para generar el PDF.
Paso 3: Abra el PDF en Adobe Acrobat u otro editor de PDF.
Paso 4: Seleccione Herramientas y, a continuación, haga clic en Proteger.
Paso 5: Haga clic en Proteger con contraseña para establecer una contraseña para ver o editar el PDF y, a continuación, haga clic en Aplicar.
Consejos:
- Establezca contraseñas de usuario (apertura) y de propietario (edición) para una protección más sólida.
- Si va a compartirlo ampliamente, considere la posibilidad de aplicar restricciones de impresión y copia en su herramienta de PDF.
Si exporta con frecuencia presentaciones como PDF cifrados, puede automatizar este proceso con código. Consulte nuestro tutorial: Convertir PowerPoint a PDF protegido con contraseña en C#
Método 5. Automatizar la protección con contraseña mediante código
Para las organizaciones que generan presentaciones automáticamente, como informes, paneles o propuestas de clientes, la configuración manual de contraseñas no es escalable. En su lugar, puede automatizar el cifrado de PowerPoint utilizando C#.
Con la biblioteca Spire.Presentation for .NET, puede aplicar protección con contraseña a uno o varios archivos mediante programación.
Instrucciones paso a paso:
Paso 1: Instale Spire.Presentation a través de NuGet.
PM> Install-Package Spire.Presentation
Paso 2: Cargue su archivo de PowerPoint en C#.
Paso 3: Aplique la protección con contraseña utilizando el método Encrypt().
Paso 4: Guarde la presentación cifrada.
Ejemplo de código completo:
using Spire.Presentation;

namespace ProtectPPTWithPassword
{
    class Program
    {
        static void Main(string[] args)
        {
            // Create a new Presentation instance
            Presentation presentation = new Presentation();

            // Load the PowerPoint document from file
            presentation.LoadFromFile("sample.pptx");

            // Encrypt the presentation using a specified password
            presentation.Encrypt("your password");

            // Save the encrypted presentation to a new file in PPTX format
            presentation.SaveToFile("Encrypted.pptx", FileFormat.Pptx2013);
            presentation.Dispose();
        }
    }
}
Beneficios:
La automatización de la protección con contraseña con C# garantiza la coherencia y la precisión, reduce el riesgo de error humano y permite el cifrado por lotes de varias presentaciones. También se integra fácilmente con otras tareas automatizadas, agilizando su flujo de trabajo y ahorrando tiempo.
Leer más: Proteger o desproteger presentaciones de PowerPoint con C#
Tabla comparativa: Elija la forma correcta de proteger su presentación
| Método | Tipo de protección | Fuerza de cifrado | Dificultad | Ideal para | Pros | Contras |
|---|---|---|---|---|---|---|
| Cifrar con contraseña | Cifrado completo | AES de 128 bits o superior | Fácil | Presentaciones confidenciales o sensibles | Seguridad sólida integrada | Recuperación de contraseña imposible |
| Opciones de guardado | Contraseña a nivel de archivo | Moderada (RC4 heredado o parcial) | Fácil | Archivos editables compartidos | Opciones flexibles de apertura/modificación | Cifrado más débil para formatos antiguos |
| Herramientas de cifrado de terceros | Protección a nivel de archivo | AES de 256 bits (depende de la herramienta) | Media | Uso compartido y almacenamiento de archivos | Funciona para varios archivos | Requiere software de extracción |
| PDF con contraseña | Protección de solo lectura | AES de 128 bits (estándar de Adobe) | Media | Compartir contenido finalizado | Bloquea el contenido, impide las ediciones | El PPT original permanece sin protección |
| Automatización a través de C# | Cifrado completo mediante programación | AES de 128 bits (Spire.Presentation) | Avanzada | Protección por lotes o uso empresarial | Escalable y eficiente | Requiere conocimientos de codificación |
Resumen
La protección con contraseña es una de las formas más eficaces de proteger las presentaciones de PowerPoint contra el acceso o la modificación no autorizados. Tanto si necesita cifrar diapositivas confidenciales, controlar los permisos de edición o distribuir una versión segura de solo lectura, PowerPoint ofrece opciones flexibles para cada situación.
La función de cifrado integrada ofrece una protección fuerte e inmediata; las opciones de contraseña de Guardar como le permiten decidir quién puede abrir o editar el archivo; las herramientas de cifrado de terceros añaden una capa extra de seguridad para los archivos compartidos; la conversión a PDF garantiza que su público solo pueda ver el contenido; y la automatización con C# simplifica la protección para tareas a gran escala o repetitivas.
Al elegir el método de protección con contraseña adecuado para su flujo de trabajo, puede mantener sus presentaciones privadas, profesionales y seguras en cada etapa de uso.
Preguntas frecuentes
P1. ¿Puedo eliminar una contraseña de un archivo de PowerPoint?
Sí. Abra la presentación con la contraseña correcta, vaya a Archivo → Información → Proteger presentación → Cifrar con contraseña, borre el campo de la contraseña y guarde el archivo.
P2. ¿Qué ocurre si olvido mi contraseña de PowerPoint?
Microsoft no ofrece un método de recuperación para las presentaciones cifradas. Debe volver a crear el archivo o restaurar una copia de seguridad. Guarde siempre las contraseñas de forma segura en un gestor de contraseñas.
P3. ¿Es segura la protección con contraseña de PowerPoint?
Sí. Las versiones modernas de PowerPoint (2010 y posteriores) utilizan el cifrado AES de 128 bits, que proporciona una seguridad sólida cuando se utiliza una contraseña compleja.
P4. ¿Puedo utilizar VBA o macros para establecer una contraseña de PowerPoint?
Sí, puede utilizar VBA para establecer o eliminar contraseñas automáticamente, pero las bibliotecas de C# como Spire.Presentation ofrecen opciones más flexibles y modernas.
P5. ¿Cuál es la diferencia entre las contraseñas de apertura y de modificación?
Una contraseña de apertura impide que nadie abra el archivo sin ella, mientras que una contraseña de modificación permite abrirlo pero restringe la edición.
Véase también
5 effektive Wege, PowerPoint-Dateien mit einem Passwort zu schützen
```html
Inhaltsverzeichnis
- Warum PowerPoint mit einem Passwort schützen
- Methode 1. Die Präsentation mit einem Passwort verschlüsseln
- Methode 2. Ein Passwort zum Öffnen oder Ändern über die Speicheroptionen hinzufügen
- Methode 3. PowerPoint mit einem ZIP-Passwort schützen
- Methode 4. In PDF mit Passwort konvertieren
- Methode 5. Passwortschutz per Code automatisieren
- Vergleichstabelle: Wählen Sie den richtigen Weg, um Ihre Präsentation zu schützen
- Zusammenfassung
- FAQs
PowerPoint-Präsentationen enthalten oft sensible oder vertrauliche Informationen – Geschäftsberichte, Marketingpläne oder akademische Forschungen, bei denen Sie nicht möchten, dass andere frei darauf zugreifen oder sie ändern. Glücklicherweise bietet PowerPoint mehrere Möglichkeiten, Ihre Präsentationen mit Passwörtern oder Verschlüsselung zu sichern.
In diesem Leitfaden lernen Sie fünf effektive Möglichkeiten kennen, PowerPoint-Dateien mit einem Passwort zu schützen, von der integrierten Verschlüsselung bis zum automatisierten Schutz mit C#. Wir werden auch die Methoden vergleichen, damit Sie das richtige Sicherheitsniveau für Ihre Bedürfnisse wählen können.
Methodenübersicht:
- Methode 1. Die Präsentation mit einem Passwort verschlüsseln
- Methode 2. Ein Passwort zum Öffnen oder Ändern über die Speicheroptionen hinzufügen
- Methode 3. PowerPoint mit einem ZIP-Passwort schützen
- Methode 4. In PDF mit Passwort konvertieren
- Methode 5. Passwortschutz per Code automatisieren
Warum PowerPoint mit einem Passwort schützen
Obwohl PowerPoint weit verbreitet zum Erstellen und Teilen von Präsentationen verwendet wird, erkennen nur wenige Benutzer, wie einfach es für unbefugte Personen ist, Inhalte zu öffnen, zu bearbeiten oder zu kopieren, wenn die Datei nicht geschützt ist. Der Passwortschutz hilft Ihnen zu kontrollieren, wer Ihre Arbeit ansehen, bearbeiten oder wiederverwenden darf.
Gründe, Ihre PowerPoint-Dateien mit einem Passwort zu sichern:
- Vertraulichkeit: Verhindern Sie, dass unbefugte Benutzer sensible Daten wie interne Finanzberichte oder strategische Pläne einsehen.
- Integrität: Verhindern Sie, dass andere Ihre Folien ändern oder Inhalte ohne Erlaubnis verändern.
- Professionalität: Stellen Sie sicher, dass nur endgültige Versionen von Präsentationen verteilt werden.
- Compliance: Einige Organisationen oder Kunden verlangen einen Passwortschutz, um die Datensicherheitsrichtlinien zu erfüllen.
PowerPoint-Schutzstufen:
- Schutz beim Öffnen: Erfordert ein Passwort zum Öffnen der Datei.
- Schutz beim Ändern: Erlaubt das Anzeigen, verhindert aber das Bearbeiten ohne Passwort.
Lassen Sie uns nun fünf praktische Möglichkeiten erkunden, um diesen Schutz anzuwenden.
Methode 1. Die Präsentation mit einem Passwort verschlüsseln
Die einfachste und sicherste Methode, Ihre PowerPoint-Datei zu schützen, ist die Verschlüsselung mit einem Passwort über die integrierte Funktion Mit Passwort verschlüsseln von PowerPoint. Diese Methode stellt sicher, dass niemand die Datei ohne Eingabe des richtigen Passworts öffnen kann.
So geht's:
Schritt 1: Öffnen Sie Ihre PowerPoint-Datei.
Schritt 2: Klicken Sie auf Datei → Informationen → Präsentation schützen → Mit Passwort verschlüsseln.
Schritt 3: Geben Sie ein starkes Passwort ein, das aus Groß- und Kleinbuchstaben, Zahlen und Sonderzeichen besteht.
Schritt 4: Klicken Sie auf OK und speichern Sie dann Ihre Präsentation, um den Passwortschutz anzuwenden.
Wenn jemand das nächste Mal versucht, die Präsentation zu öffnen, wird PowerPoint nach dem Passwort fragen, bevor Inhalte geladen werden.
Tipps:
- Verwenden Sie ein Passwort, das mindestens 8–12 Zeichen lang ist.
- Vermeiden Sie es, das Passwort im selben Ordner wie Ihre Präsentation zu speichern.
- Wenn Sie das Passwort verlieren, kann Microsoft es nicht wiederherstellen.
Methode 2. Ein Passwort zum Öffnen oder Ändern über die Speicheroptionen hinzufügen
Die Funktion Speicheroptionen von PowerPoint ermöglicht es Ihnen, sowohl Passwörter zum Öffnen als auch zum Ändern direkt beim Speichern Ihrer Präsentation anzuwenden. Dieser integrierte Schutz lässt Sie entscheiden, ob andere die Datei ansehen, bearbeiten oder beides dürfen.
Schritt-für-Schritt-Anleitung:
Schritt 1: Klicken Sie auf Datei → Speichern unter und wählen Sie Ihren gewünschten Speicherort.
Schritt 2: Klicken Sie im Dialogfeld Speichern unter auf Tools → Allgemeine Optionen (Windows) oder Optionen (Mac).
Schritt 3: Geben Sie ein Passwort in das Feld Passwort zum Öffnen ein, um den Zugriff vollständig zu beschränken, oder in Passwort zum Ändern, um das Anzeigen zu erlauben, aber das Bearbeiten zu verhindern.
Schritt 4: Klicken Sie auf OK und speichern Sie dann die Datei, um den Schutz anzuwenden.
Tipps:
- Verwenden Sie für jede Präsentation ein starkes, einzigartiges Passwort.
- Unterscheiden Sie klar zwischen Passwörtern zum Öffnen und Ändern, um Verwirrung zu vermeiden.
Methode 3. PowerPoint mit einem ZIP-Passwort schützen
Wenn Sie Präsentationen häufig per E-Mail oder Cloud-Speicher teilen, bietet das Komprimieren und Verschlüsseln in einer ZIP-Datei eine zusätzliche Schutzschicht. Diese Methode sichert die Datei, noch bevor sie in PowerPoint geöffnet wird.
Schritte (mit 7-Zip oder WinRAR):
Schritt 1: Wählen Sie eine oder mehrere PowerPoint-Dateien auf Ihrem Computer aus.
Schritt 2: Klicken Sie mit der rechten Maustaste auf die ausgewählten Dateien und wählen Sie 7-Zip → Zum Archiv hinzufügen (oder Komprimieren unter macOS).
Schritt 3: Wählen Sie das Format ZIP oder RAR.
Schritt 4: Geben Sie ein starkes Passwort ein und aktivieren Sie die AES-256-Verschlüsselung, falls verfügbar.
Schritt 5: Speichern Sie das Archiv und teilen Sie es anstelle der Originaldatei.
Tipps:
- Bewahren Sie das Passwort getrennt von der Datei auf, um unbefugten Zugriff zu verhindern.
- Erstellen Sie für gemeinsame Projekte einzigartige Passwörter pro Archiv, um das Risiko zu minimieren.
Methode 4. In PDF mit Passwort konvertieren
Wenn Sie Ihre PowerPoint-Folien nur in schreibgeschützter Form teilen müssen, ist die Konvertierung in ein passwortgeschütztes PDF eine praktische Wahl. Empfänger können die Folien ansehen, aber ohne Erlaubnis nicht bearbeiten oder kopieren.
Folgen Sie diesen Schritten:
Schritt 1: Öffnen Sie Ihre PowerPoint-Datei und gehen Sie zu Datei → Exportieren → PDF/XPS-Dokument erstellen → PDF/XPS erstellen.
Schritt 2: Wählen Sie die Exportoptionen aus und klicken Sie auf Veröffentlichen, um das PDF zu generieren.
Schritt 3: Öffnen Sie das PDF in Adobe Acrobat oder einem anderen PDF-Editor.
Schritt 4: Wählen Sie Werkzeuge und klicken Sie dann auf Schützen.
Schritt 5: Klicken Sie auf Mit Passwort schützen, um ein Passwort zum Anzeigen oder Bearbeiten des PDFs festzulegen, und klicken Sie dann auf Anwenden.
Tipps:
- Legen Sie sowohl Benutzer- (Öffnen) als auch Besitzer- (Bearbeiten) Passwörter für einen stärkeren Schutz fest.
- Wenn Sie die Datei weitreichend teilen, erwägen Sie, in Ihrem PDF-Tool Druck- und Kopierbeschränkungen anzuwenden.
Wenn Sie häufig Präsentationen als verschlüsselte PDFs exportieren, können Sie diesen Prozess mit Code automatisieren. Sehen Sie sich unser Tutorial an: PowerPoint in passwortgeschütztes PDF in C# konvertieren
Methode 5. Passwortschutz per Code automatisieren
Für Organisationen, die Präsentationen automatisch generieren – wie Berichte, Dashboards oder Kundenangebote – ist die manuelle Passworteingabe nicht skalierbar. Stattdessen können Sie die PowerPoint-Verschlüsselung mit C# automatisieren.
Mit der Bibliothek Spire.Presentation for .NET können Sie den Passwortschutz programmgesteuert auf eine oder mehrere Dateien anwenden.
Schritt-für-Schritt-Anleitung:
Schritt 1: Installieren Sie Spire.Presentation über NuGet.
PM> Install-Package Spire.Presentation
Schritt 2: Laden Sie Ihre PowerPoint-Datei in C#.
Schritt 3: Wenden Sie den Passwortschutz mit der Methode Encrypt() an.
Schritt 4: Speichern Sie die verschlüsselte Präsentation.
Vollständiges Codebeispiel:
using Spire.Presentation;

namespace ProtectPPTWithPassword
{
    class Program
    {
        static void Main(string[] args)
        {
            // Create a new Presentation instance
            Presentation presentation = new Presentation();

            // Load the PowerPoint document from file
            presentation.LoadFromFile("sample.pptx");

            // Encrypt the presentation using a specified password
            presentation.Encrypt("your password");

            // Save the encrypted presentation to a new file in PPTX format
            presentation.SaveToFile("Encrypted.pptx", FileFormat.Pptx2013);
            presentation.Dispose();
        }
    }
}
Vorteile:
Die Automatisierung des Passwortschutzes mit C# gewährleistet Konsistenz und Genauigkeit, reduziert das Risiko menschlicher Fehler und ermöglicht die Stapelverschlüsselung mehrerer Präsentationen. Es lässt sich auch leicht in andere automatisierte Aufgaben integrieren, was Ihren Arbeitsablauf optimiert und Zeit spart.
Lesen Sie weiter: PowerPoint-Präsentationen mit C# schützen oder den Schutz aufheben
Vergleichstabelle: Wählen Sie den richtigen Weg, um Ihre Präsentation zu schützen
| Methode | Schutzart | Verschlüsselungsstärke | Schwierigkeit | Am besten für | Vorteile | Nachteile |
|---|---|---|---|---|---|---|
| Mit Passwort verschlüsseln | Vollständige Verschlüsselung | AES 128-Bit oder höher | Einfach | Vertrauliche oder sensible Präsentationen | Integrierte starke Sicherheit | Passwortwiederherstellung unmöglich |
| Speicheroptionen | Passwort auf Dateiebene | Mäßig (Legacy RC4 oder teilweise) | Einfach | Gemeinsam bearbeitete Dateien | Flexible Optionen zum Öffnen/Ändern | Schwächere Verschlüsselung bei älteren Formaten |
| Verschlüsselungstools von Drittanbietern | Schutz auf Archivebene | AES 256-Bit (abhängig vom Tool) | Mittel | Dateifreigabe und -speicherung | Funktioniert für mehrere Dateien | Erfordert Extraktionssoftware |
| PDF mit Passwort | Schreibschutz | AES 128-Bit (Adobe-Standard) | Mittel | Teilen von finalen Inhalten | Sperrt Inhalte, verhindert Bearbeitungen | Original-PPT bleibt ungeschützt |
| Automatisierung über C# | Programmatische vollständige Verschlüsselung | AES 128-Bit (Spire.Presentation) | Fortgeschritten | Stapelschutz oder Unternehmenseinsatz | Skalierbar und effizient | Erfordert Programmierkenntnisse |
Zusammenfassung
Der Passwortschutz ist eine der effektivsten Methoden, um PowerPoint-Präsentationen vor unbefugtem Zugriff oder unbefugter Änderung zu schützen. Ob Sie vertrauliche Folien verschlüsseln, Bearbeitungsrechte kontrollieren oder eine sichere, schreibgeschützte Version verteilen müssen, PowerPoint bietet flexible Optionen für jede Situation.
Die integrierte Verschlüsselungsfunktion bietet starken, sofortigen Schutz; die Passwortoptionen unter Speichern unter lassen Sie entscheiden, wer die Datei öffnen oder bearbeiten darf; Verschlüsselungstools von Drittanbietern fügen eine zusätzliche Sicherheitsebene für freigegebene Archive hinzu; die PDF-Konvertierung stellt sicher, dass Ihr Publikum den Inhalt nur ansehen kann; und die Automatisierung mit C# vereinfacht den Schutz für groß angelegte oder sich wiederholende Aufgaben.
Indem Sie die richtige Passwortschutzmethode für Ihren Arbeitsablauf wählen, können Sie Ihre Präsentationen in jeder Phase der Nutzung privat, professionell und sicher halten.
FAQs
F1. Kann ich ein Passwort aus einer PowerPoint-Datei entfernen?
Ja. Öffnen Sie die Präsentation mit dem richtigen Passwort, gehen Sie zu Datei → Informationen → Präsentation schützen → Mit Passwort verschlüsseln, leeren Sie das Passwortfeld und speichern Sie die Datei.
F2. Was passiert, wenn ich mein PowerPoint-Passwort vergesse?
Microsoft bietet keine Wiederherstellungsmethode für verschlüsselte Präsentationen an. Sie müssen die Datei neu erstellen oder eine Sicherungskopie wiederherstellen. Bewahren Sie Passwörter immer sicher in einem Passwort-Manager auf.
F3. Ist der PowerPoint-Passwortschutz sicher?
Ja. Moderne PowerPoint-Versionen (2010 und neuer) verwenden die AES-128-Bit-Verschlüsselung, die bei Verwendung eines komplexen Passworts eine starke Sicherheit bietet.
F4. Kann ich VBA oder Makros verwenden, um ein PowerPoint-Passwort festzulegen?
Ja, Sie können VBA verwenden, um Passwörter automatisch festzulegen oder zu entfernen, aber C#-Bibliotheken wie Spire.Presentation bieten flexiblere und modernere Optionen.
F5. Was ist der Unterschied zwischen Passwörtern zum Öffnen und zum Ändern?
Ein Passwort zum Öffnen verhindert, dass jemand die Datei ohne es öffnen kann, während ein Passwort zum Ändern das Öffnen erlaubt, aber das Bearbeiten einschränkt.
Siehe auch
```
5 эффективных способов защитить паролем файлы PowerPoint
Содержание
- Зачем защищать PowerPoint паролем
- Способ 1. Зашифровать презентацию паролем
- Способ 2. Добавить пароль на открытие или изменение через параметры сохранения
- Способ 3. Защитить PowerPoint паролем ZIP-архива
- Способ 4. Преобразовать в PDF с паролем
- Способ 5. Автоматизировать защиту паролем с помощью кода
- Сравнительная таблица: выберите подходящий способ защиты вашей презентации
- Итог
- Часто задаваемые вопросы
Презентации PowerPoint часто содержат конфиденциальную информацию — бизнес-отчеты, маркетинговые планы или академические исследования, к которым вы не хотите предоставлять свободный доступ или разрешать их изменение. К счастью, PowerPoint предоставляет несколько способов защиты ваших презентаций с помощью паролей или шифрования.
В этом руководстве вы узнаете пять эффективных способов защиты файлов PowerPoint паролем, от встроенного шифрования до автоматической защиты с помощью C#. Мы также сравним эти методы, чтобы вы могли выбрать подходящий уровень безопасности для ваших нужд.
Обзор методов:
- Способ 1. Зашифровать презентацию паролем
- Способ 2. Добавить пароль на открытие или изменение через параметры сохранения
- Способ 3. Защитить PowerPoint паролем ZIP-архива
- Способ 4. Преобразовать в PDF с паролем
- Способ 5. Автоматизировать защиту паролем с помощью кода
Зачем защищать PowerPoint паролем
Хотя PowerPoint широко используется для создания и обмена презентациями, немногие пользователи понимают, насколько легко посторонние могут открывать, редактировать или копировать содержимое, если файл не защищен. Защита паролем помогает вам контролировать, кто может просматривать, редактировать или повторно использовать вашу работу.
Причины для защиты ваших файлов PowerPoint паролем:
- Конфиденциальность: предотвратите просмотр конфиденциальных данных, таких как внутренние финансовые отчеты или стратегические планы, посторонними пользователями.
- Целостность: запретите другим изменять ваши слайды или контент без разрешения.
- Профессионализм: убедитесь, что распространяются только окончательные версии презентаций.
- Соответствие требованиям: некоторые организации или клиенты требуют защиты паролем для соблюдения политик безопасности данных.
Уровни защиты PowerPoint:
- Защита на открытие: требует пароль для открытия файла.
- Защита на изменение: позволяет просматривать, но запрещает редактирование без пароля.
Теперь давайте рассмотрим пять практических способов применения этих защит.
Способ 1. Зашифровать презентацию паролем
Самый простой и безопасный способ защитить ваш файл PowerPoint — это зашифровать его паролем с помощью встроенной функции PowerPoint Зашифровать паролем. Этот метод гарантирует, что никто не сможет открыть файл, не введя правильный пароль.
Как это сделать:
Шаг 1: Откройте ваш файл PowerPoint.
Шаг 2: Нажмите Файл → Сведения → Защитить презентацию → Зашифровать паролем .
Шаг 3: Введите надежный пароль, сочетающий заглавные и строчные буквы, цифры и специальные символы.
Шаг 4: Нажмите OK , затем сохраните презентацию, чтобы применить защиту паролем.
В следующий раз, когда кто-либо попытается открыть презентацию, PowerPoint запросит пароль перед загрузкой содержимого.
Советы:
- Используйте пароль длиной не менее 8–12 символов.
- Не сохраняйте пароль в той же папке, что и ваша презентация.
- Если вы потеряете пароль, Microsoft не сможет его восстановить.
Способ 2. Добавить пароль на открытие или изменение через параметры сохранения
Функция PowerPoint Параметры сохранения позволяет применять пароли как на открытие, так и на изменение непосредственно при сохранении презентации. Эта встроенная защита позволяет вам решать, могут ли другие просматривать файл, редактировать его или и то, и другое.
Пошаговая инструкция:
Шаг 1: Нажмите Файл → Сохранить как и выберите желаемое местоположение.
Шаг 2: В диалоговом окне Сохранить как нажмите Сервис → Общие параметры (Windows) или Параметры (Mac) .
Шаг 3: Введите пароль в поле Пароль для открытия, чтобы полностью ограничить доступ, или в поле Пароль для изменения, чтобы разрешить просмотр, но запретить редактирование.
Шаг 4: Нажмите OK , затем сохраните файл, чтобы применить защиту.
Советы:
- Используйте надежный, уникальный пароль для каждой презентации.
- Четко различайте пароли на открытие и изменение, чтобы избежать путаницы.
Способ 3. Защитить PowerPoint паролем ZIP-архива
Если вы часто делитесь презентациями по электронной почте или через облачное хранилище, сжатие и шифрование их в ZIP-файл добавляет дополнительный уровень защиты. Этот метод защищает файл еще до его открытия в PowerPoint.
Шаги (с использованием 7-Zip или WinRAR):
Шаг 1: Выберите один или несколько файлов PowerPoint на вашем компьютере.
Шаг 2: Щелкните правой кнопкой мыши по выбранным файлам и выберите 7-Zip → Добавить к архиву (или Сжать в macOS).
Шаг 3: Выберите формат ZIP или RAR.
Шаг 4: Введите надежный пароль и включите шифрование AES-256, если доступно.
Шаг 5: Сохраните архив и делитесь им вместо исходного файла.
Советы:
- Храните пароль отдельно от файла, чтобы предотвратить несанкционированный доступ.
- Для совместных проектов создавайте уникальные пароли для каждого архива, чтобы минимизировать риск.
Способ 4. Преобразовать в PDF с паролем
Если вам нужно поделиться слайдами PowerPoint только в режиме для чтения, преобразование их в PDF с защитой паролем является практичным выбором. Получатели смогут просматривать слайды, но не смогут их редактировать или копировать без разрешения.
Выполните следующие шаги:
Шаг 1: Откройте ваш файл PowerPoint и перейдите в Файл → Экспорт → Создать документ PDF/XPS → Создать PDF/XPS .
Шаг 2: Выберите параметры экспорта и нажмите Опубликовать, чтобы сгенерировать PDF.
Шаг 3: Откройте PDF в Adobe Acrobat или другом редакторе PDF.
Шаг 4: Выберите Инструменты , затем нажмите Защитить .
Шаг 5: Нажмите Защитить с помощью пароля, чтобы установить пароль для просмотра или редактирования PDF, а затем нажмите Применить .
Советы:
- Установите пароли пользователя (на открытие) и владельца (на редактирование) для более надежной защиты.
- При широком распространении рассмотрите возможность применения ограничений на печать и копирование в вашем инструменте для работы с PDF.
Если вы часто экспортируете презентации в виде зашифрованных PDF, вы можете автоматизировать этот процесс с помощью кода. Ознакомьтесь с нашим руководством: Как преобразовать PowerPoint в защищенный паролем PDF на C#
Способ 5. Автоматизировать защиту паролем с помощью кода
Для организаций, которые автоматически создают презентации — например, отчеты, информационные панели или предложения для клиентов — ручная установка пароля не масштабируема. Вместо этого вы можете автоматизировать шифрование PowerPoint с помощью C# .
С помощью библиотеки Spire.Presentation for .NET вы можете программно применить защиту паролем к одному или нескольким файлам.
Пошаговая инструкция:
Шаг 1: Установите Spire.Presentation через NuGet.
PM> Install-Package Spire.Presentation
Шаг 2: Загрузите ваш файл PowerPoint в C#.
Шаг 3: Примените защиту паролем с помощью метода Encrypt().
Шаг 4: Сохраните зашифрованную презентацию.
Полный пример кода:
using Spire.Presentation;

namespace ProtectPPTWithPassword
{
    class Program
    {
        static void Main(string[] args)
        {
            // Create a new Presentation instance
            Presentation presentation = new Presentation();

            // Load the PowerPoint document from file
            presentation.LoadFromFile("sample.pptx");

            // Encrypt the presentation using a specified password
            presentation.Encrypt("your password");

            // Save the encrypted presentation to a new file in PPTX format
            presentation.SaveToFile("Encrypted.pptx", FileFormat.Pptx2013);
            presentation.Dispose();
        }
    }
}
Преимущества:
Автоматизация защиты паролем с помощью C# обеспечивает последовательность и точность, снижает риск человеческой ошибки и позволяет выполнять пакетное шифрование нескольких презентаций. Это также легко интегрируется с другими автоматизированными задачами, оптимизируя ваш рабочий процесс и экономя время.
Читать далее: Защита и снятие защиты с презентаций PowerPoint с помощью C#
Сравнительная таблица: выберите подходящий способ защиты вашей презентации
| Метод | Тип защиты | Надежность шифрования | Сложность | Лучше всего подходит для | Плюсы | Минусы |
|---|---|---|---|---|---|---|
| Шифрование паролем | Полное шифрование | AES 128-бит или выше | Легко | Конфиденциальные или важные презентации | Встроенная надежная защита | Восстановление пароля невозможно |
| Параметры сохранения | Пароль на уровне файла | Средняя (устаревший RC4 или частичная) | Легко | Общие редактируемые файлы | Гибкие параметры открытия/изменения | Более слабое шифрование для старых форматов |
| Сторонние инструменты шифрования | Защита на уровне архива | AES 256-бит (зависит от инструмента) | Средне | Обмен файлами и хранение | Работает для нескольких файлов | Требуется программа для извлечения |
| PDF с паролем | Защита только для чтения | AES 128-бит (стандарт Adobe) | Средне | Обмен финальным контентом | Блокирует контент, предотвращает редактирование | Исходный PPT остается незащищенным |
| Автоматизация через C# | Программное полное шифрование | AES 128-бит (Spire.Presentation) | Сложно | Пакетная защита или корпоративное использование | Масштабируемо и эффективно | Требуются знания в программировании |
Итог
Защита паролем — один из самых эффективных способов защиты презентаций PowerPoint от несанкционированного доступа или изменения. Независимо от того, нужно ли вам зашифровать конфиденциальные слайды, контролировать права на редактирование или распространять защищенную версию только для чтения, PowerPoint предоставляет гибкие возможности для любой ситуации.
Встроенная функция шифрования предлагает надежную и немедленную защиту; параметры пароля при сохранении позволяют вам решать, кто может открывать или редактировать файл; сторонние инструменты шифрования добавляют дополнительный уровень безопасности для общих архивов; преобразование в PDF гарантирует, что ваша аудитория сможет только просматривать контент; а автоматизация с помощью C# упрощает защиту для крупномасштабных или повторяющихся задач.
Выбрав правильный метод защиты паролем для вашего рабочего процесса, вы сможете сохранить ваши презентации конфиденциальными, профессиональными и безопасными на каждом этапе использования.
Часто задаваемые вопросы
В1. Могу ли я удалить пароль из файла PowerPoint?
Да. Откройте презентацию, используя правильный пароль, перейдите в Файл → Сведения → Защитить презентацию → Зашифровать паролем , очистите поле пароля, а затем сохраните файл.
В2. Что произойдет, если я забуду пароль от PowerPoint?
Microsoft не предлагает способа восстановления для зашифрованных презентаций. Вы должны будете заново создать файл или восстановить его из резервной копии. Всегда надежно храните пароли в менеджере паролей.
В3. Надежна ли защита паролем в PowerPoint?
Да. Современные версии PowerPoint (2010 и новее) используют 128-битное шифрование AES, которое обеспечивает надежную защиту при использовании сложного пароля.
В4. Могу ли я использовать VBA или макросы для установки пароля в PowerPoint?
Да, вы можете использовать VBA для автоматической установки или удаления паролей, но библиотеки C#, такие как Spire.Presentation, предлагают более гибкие и современные возможности.
В5. В чем разница между паролями на открытие и на изменение?
Пароль на открытие не позволяет никому открыть файл без него, в то время как пароль на изменение позволяет открыть файл, но ограничивает его редактирование.