Конвертировать Word в PowerPoint: Microsoft 365, онлайн, Python
Содержание
В деловых отчетах, академических лекциях и проектных предложениях Microsoft Word и PowerPoint являются двумя наиболее часто используемыми инструментами. В то время как документы Word отлично подходят для составления подробной информации и отчетов, презентации PowerPoint гораздо эффективнее для обобщения и визуализации этих идей.
Преобразование Word в PowerPoint — это обычная потребность пользователей, которые хотят быстро превратить свой текстовый контент в привлекательные слайды. Независимо от того, хотите ли вы преобразовать документ Word в презентацию PowerPoint вручную или автоматизировать этот процесс, это руководство охватывает ряд практических методов, от использования встроенных функций Microsoft 365 до онлайн-конвертеров, инструментов искусственного интеллекта и автоматизации с помощью Python.
К концу этой статьи вы получите знания, необходимые для выбора наиболее подходящего метода для ваших нужд, что сэкономит время и обеспечит профессиональный и отточенный вид ваших презентаций.
Обзор методов преобразования Word в PowerPoint:
- Использование Microsoft 365 (официальный метод)
- Использование онлайн-инструментов (быстро и бесплатно)
- Использование моделей ИИ (гибко, но медленнее)
- Автоматическое преобразование с помощью Python
Зачем конвертировать Word в PowerPoint
Документ Word идеально подходит для создания подробного контента, но PowerPoint отлично справляется с визуальным обобщением идей. Преобразование документа Word в презентацию PowerPoint дает несколько преимуществ:
- Улучшенная визуальная коммуникация: преобразуйте текстоемкий контент в четкие, структурированные слайды.
- Экономия времени: повторно используйте существующие материалы вместо создания слайдов с нуля.
- Согласованность: поддерживайте одинаковую структуру и тон между письменными и визуальными материалами.
- Гибкость: идеально подходит для встреч, лекций и публичных выступлений.
Если вы регулярно готовите отчеты или предложения, изучение того, как преобразовывать документы Word в презентации PowerPoint, может значительно упростить вашу работу.
Перед преобразованием убедитесь, что ваш документ хорошо отформатирован для более плавного процесса преобразования — используйте стили заголовков, измените ориентацию страницы на альбомную и удалите ненужную информацию.
Метод 1 – Преобразование Word в PowerPoint с помощью Microsoft 365 (официальный метод)
Самый простой и надежный способ превратить документ Word в презентацию PowerPoint — это встроенная функция экспорта из Word в PowerPoint в Microsoft 365.
Эта официальная функция напрямую преобразует хорошо структурированный документ Word в готовый к использованию файл .pptx, что делает его наиболее удобным вариантом для пользователей Microsoft 365. Вам не нужно устанавливать какие-либо внешние инструменты или переформатировать контент вручную — Word автоматически обрабатывает создание слайдов и дизайн макета.
Шаг 1 – Подготовьте ваш документ Word
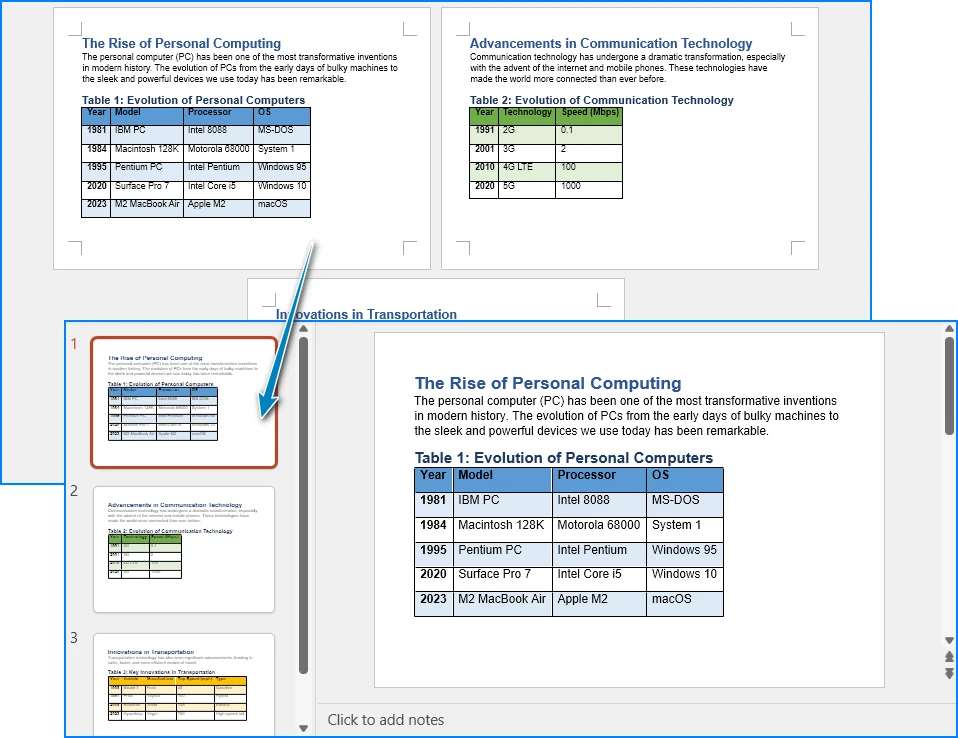
Перед экспортом убедитесь, что ваш документ правильно структурирован с использованием стилей Заголовок 1, Заголовок 2 и Заголовок 3.
Эти уровни заголовков определяют, как будут организованы ваши слайды PowerPoint. Например, Заголовок 1 станет названием слайда, а Заголовок 2 появится в виде маркеров на слайде.
Шаг 2 – Экспорт в презентацию PowerPoint
- Откройте ваш документ Word.
- Перейдите в Файл → Экспорт → Экспортировать в презентацию PowerPoint.
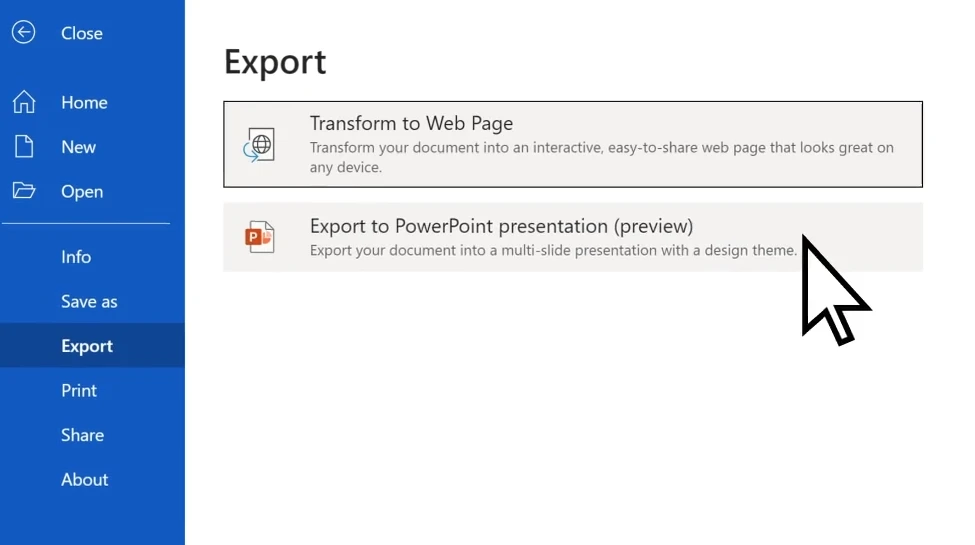
- Выберите тему (PowerPoint предложит шаблоны дизайна).
- Нажмите Экспорт, и Word автоматически создаст файл
.pptx.
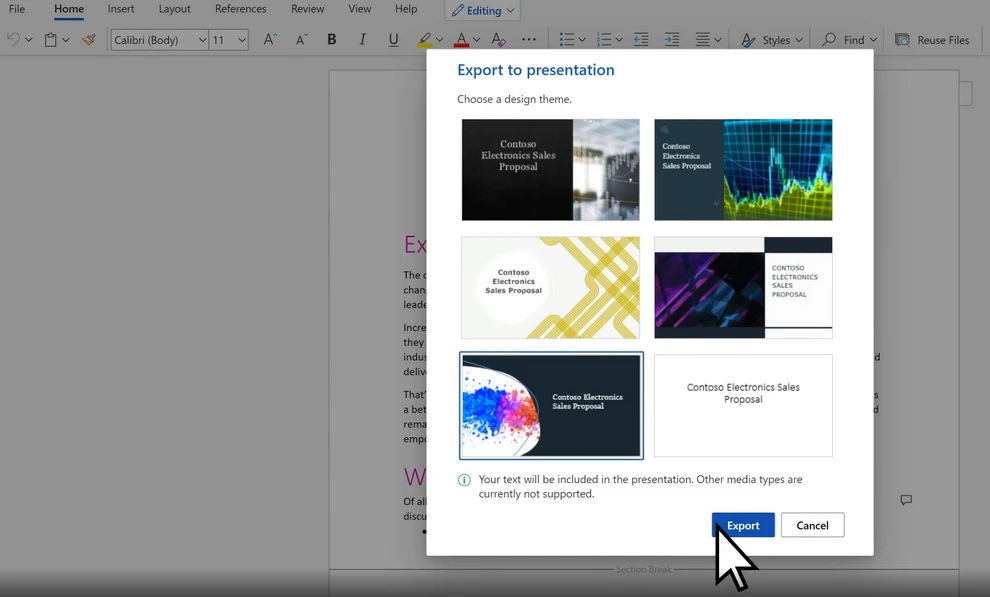
Функция дизайна на базе искусственного интеллекта от Microsoft даже предлагает макеты, соответствующие тону и стилю вашего документа.
Шаг 3 – Доработайте созданные слайды
После экспорта просмотрите свою презентацию:
- При необходимости скорректируйте изображения и макеты.
- Добавьте анимацию и переходы.
- Используйте PowerPoint Designer для улучшения внешнего вида слайдов.
Этот метод лучше всего подходит для пользователей Microsoft 365, которым нужна простота и согласованность. Если вы хотите бесплатно преобразовать документ Word в PowerPoint, вы можете ознакомиться с альтернативными методами ниже.
Метод 2 – Преобразование Word в PowerPoint онлайн (быстро и бесплатно)
Если у вас нет Microsoft 365 или вы предпочитаете решение на основе браузера, инструменты онлайн-конвертации предлагают удобную и бесплатную альтернативу.
Эти инструменты идеально подходят для пользователей, которым требуется быстрое преобразование без установки программного обеспечения. Всего за несколько кликов вы можете загрузить файл Word и скачать презентацию PowerPoint, что делает его подходящим для периодического использования или для небольших документов.
Рекомендуемые онлайн-инструменты
- Word.to - Бесплатный и простой в использовании конвертер Word.
- Convertio – Работает прямо из вашего браузера, поддерживает перетаскивание.
- Online2PDF – Бесплатный и гибкий, но с ограничениями на размер загружаемого файла.
Как использовать онлайн-конвертер
Здесь мы возьмем Word.to в качестве примера.
- Перейдите в конвертер Word.to Word в PowerPoint.
- Загрузите ваш документ Word.
- Нажмите Конвертировать файлы, чтобы начать преобразование.
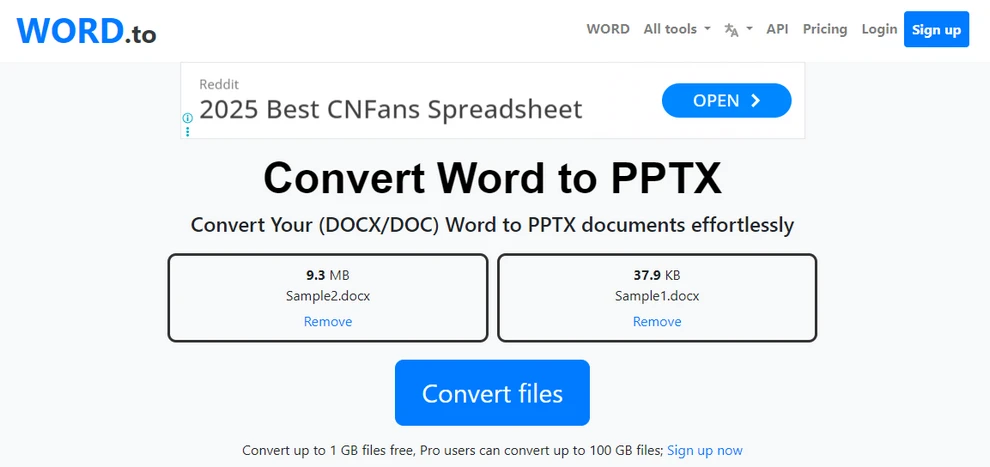
- Дождитесь окончания преобразования и загрузите файл PowerPoint.
Плюсы и минусы
| Преимущества | Недостатки |
|---|---|
| Бесплатно и быстро | Возможна потеря макета |
| Установка не требуется | Ограниченный размер файла и время конвертации |
| Работает на любой ОС | Проблемы с конфиденциальностью для конфиденциальных файлов |
Онлайн-конвертеры идеально подходят для периодических, небольших преобразований. Однако для больших файлов, сложных документов или тех, которые требуют идеального форматирования, может потребоваться более надежный метод.
Совет: ознакомьтесь с другими бесплатными онлайн-конвертерами на CLOUDXDOCS Online Converters.
Метод 3 – Преобразование Word в PowerPoint с помощью ИИ (гибко, но медленнее)
Для пользователей, которые ищут более креативную или персонализированную презентацию, инструменты на базе ИИ, такие как ChatGPT, Microsoft Copilot или специальные генераторы слайдов с ИИ, могут обеспечить гибкие и интеллектуальные результаты преобразования.
Вместо прямого преобразования эти инструменты анализируют смысл и структуру документа, а затем создают слайды, которые обобщают и визуализируют контент, что идеально подходит для повествовательных и концептуальных презентаций.
Как это работает
-
Загрузите ваш документ Word (или вставьте содержимое).
-
Используйте подсказку, например:
Преобразуйте этот документ в презентацию PowerPoint. Сохраняйте одну основную идею на слайд. -
Кроме того, если вы используете специальные инструменты ИИ, следуйте их инструкциям, чтобы настроить презентацию.
-
Загрузите и просмотрите созданную презентацию PowerPoint.
Плюсы и минусы
Преимущества:
- Высоко настраиваемые результаты.
- Может творчески обобщать или перефразировать текст.
- Отлично подходит для повествования в презентациях.
Ограничения:
- Точность макета может быть ниже, чем у метода Microsoft.
- Требуется ручное форматирование при использовании общих инструментов ИИ.
- Обработка больших файлов может быть медленной.
- Большинство специализированных инструментов ИИ предлагают только платные услуги.
Этот подход на основе ИИ подходит пользователям, которые предпочитают креативность скорости или точности. Однако службы онлайн-конвертации обычно имеют ограничения на количество и размер файлов, в то время как использование автоматизации с помощью Python может помочь с точным пакетным преобразованием больших объемов документов.
Вам также может понравиться: Как создавать и редактировать документы онлайн
Метод 4 – Автоматическое преобразование Word в PowerPoint с помощью Python
Для профессионалов или команд, которые часто обрабатывают документы, автоматизация может значительно повысить эффективность. Используя скрипты Python и библиотеку Free Spire.Office for Python, вы можете пакетно преобразовывать документы Word в презентации PowerPoint с минимальными усилиями. Этот подход особенно подходит для предприятий, преподавателей или разработчиков, которые хотят интегрировать преобразование в более крупные автоматизированные рабочие процессы или системы отчетности.
Простой рабочий процесс автоматизации с использованием Spire.Office
Самый простой способ — использовать пакет Free Spire.Office for Python. Он включает в себя два коротких шага:
- Загрузите документ Word и сохраните его как временный PDF-файл.
- Преобразуйте временный PDF-файл в презентацию PowerPoint.
Перед началом процесса убедитесь, что у вас установлена библиотека Spire.Office.
pip install spire.office.free
После установки вы можете использовать следующий код Python для преобразования Word в PowerPoint.
Пример на Python: преобразование документов Word в презентации PowerPoint
from spire.doc import Document, FileFormat
from spire.pdf import PdfDocument, FileFormat as PdfFileFormat
import os

inputFile = "Sample.docx"
tempPdfFile = "output/temp.pdf"
outputFile = "output/DocxPptx.pptx"

# Load the Word document and save it as a temporary PDF file
doc = Document()
doc.LoadFromFile(inputFile)
doc.SaveToFile(tempPdfFile, FileFormat.PDF)

# Load the temporary PDF file and save it as a PowerPoint presentation
pdfDoc = PdfDocument()
pdfDoc.LoadFromFile(tempPdfFile)
pdfDoc.SaveToFile(outputFile, PdfFileFormat.PPTX)

# Check if the temporary PDF file exists and delete it
if os.path.exists(tempPdfFile):
   os.remove(tempPdfFile)
Ниже приведен предварительный просмотр результата преобразования:
Преимущества метода Python
- Идеально подходит для пакетного преобразования и автоматизированных рабочих процессов.
- Работает в автономном режиме, точно сохраняя макет документа.
- Создает легко редактируемые презентации PowerPoint.
- Легко интегрируется в корпоративные системы создания отчетов.
Этот подход делает процесс коротким и простым, избегая ручных операций при сохранении гибкости.
После преобразования документа Word в PowerPoint вы также можете использовать Free Spire.Presentation for Python для выполнения пакетного редактирования презентаций PowerPoint.
Советы по улучшению PowerPoint после преобразования
После создания слайдов их тонкая настройка имеет большое значение. Несмотря на то, что процесс преобразования экономит много времени, несколько корректировок дизайна могут значительно улучшить визуальную привлекательность и читабельность ваших слайдов. Эти усовершенствования помогают гарантировать, что ваша презентация выглядит профессионально и хорошо структурирована.
- Обеспечьте единообразие шрифтов и цветов.
- Отрегулируйте межстрочный интервал для лучшей читаемости.
- При необходимости замените изображения с низким разрешением.
- Добавляйте переходы или анимацию экономно, чтобы сохранить профессионализм.
- Используйте темы PowerPoint для унификации дизайна презентации.
Заключение
Преобразование документа Word в презентацию PowerPoint может быть простым и эффективным, и выбранный вами метод зависит от ваших конкретных потребностей. Независимо от того, используете ли вы встроенную функцию экспорта Microsoft для простоты, онлайн-конвертеры для быстрого доступа, инструменты ИИ для творчества или автоматизацию Python для масштабируемости — каждый подход предлагает свои преимущества. Выбрав правильный рабочий процесс, вы можете легко и эффективно превратить письменный контент в профессиональную презентацию PowerPoint.
Часто задаваемые вопросы
Как импортировать файл DOCX в PowerPoint?
Если вы просто хотите импортировать контент, вы можете просто скопировать и вставить его в PowerPoint. Однако, если вы хотите создать презентацию PowerPoint из своего документа Word, вы можете использовать функцию экспорта в Microsoft 365, онлайн-конвертеры, инструменты искусственного интеллекта или сценарии Python, которые преобразуют весь документ Word в презентацию PowerPoint.
Почему я не могу экспортировать свой документ Word в PowerPoint?
Проблемы с экспортом могут быть вызваны неподдерживаемыми функциями документа, повреждением файла или использованием устаревшей версии Word. Убедитесь, что ваш документ структурирован с использованием правильных заголовков и что ваша версия Word обновлена.
Как изменить файл на PPTX?
Чтобы изменить файл на PPTX, вы можете использовать функцию Файл → Открыть в Microsoft PowerPoint, чтобы открывать различные типы документов, а затем сохранять их как файл PowerPoint. Кроме того, вы можете использовать онлайн-конвертеры или скрипты Python.
Существует ли конвертер Word в PowerPoint?
Да, доступно несколько конвертеров, включая встроенный инструмент Microsoft 365, онлайн-конвертеры, такие как Word.to, и методы автоматизации с использованием Python (например, с использованием Spire.Office for Python).
Смотрите также:
Come rimuovere le macro da Excel – 4 modi semplici
Le macro di Excel sono strumenti potenti che aiutano ad automatizzare compiti ripetitivi, rendendo il tuo flusso di lavoro molto più efficiente. Tuttavia, ci sono momenti in cui potresti aver bisogno di rimuovere le macro da Excel, che sia per sicurezza, compatibilità o semplicemente per ripulire una vecchia cartella di lavoro. In questo articolo, ti mostreremo quattro modi semplici per rimuovere le macro da Excel, così potrai mantenere i tuoi file sicuri, puliti e facili da usare.
Cosa Imparerai
- Perché Rimuovere le Macro da Excel?
- Come Rimuovere le Macro da Excel?
- Migliori Pratiche per la Rimozione delle Macro in Excel
Perché Rimuovere le Macro da Excel?
Sebbene le macro siano incredibilmente utili, possono anche comportare rischi significativi se non gestite correttamente. Di seguito sono riportati alcuni motivi chiave per cui è importante rimuovere le macro da Excel:
- Rischi per la Sicurezza: Le macro possono contenere codice dannoso, mettendo a rischio i tuoi dati.
- Compatibilità: Le macro potrebbero non funzionare su diverse versioni o piattaforme di Excel.
- Semplificare i File: Le vecchie macro possono ingombrare la tua cartella di lavoro e aumentare le dimensioni del file.
- Prestazioni: Le macro complesse possono rallentare Excel.
- Conformità: Alcuni settori richiedono file senza macro.
- Prevenire l'Esecuzione Accidentale: Disabilitare le macro evita azioni involontarie.
Come Rimuovere le Macro da Excel?
Ora che abbiamo capito perché è importante rimuovere le macro, vediamo come farlo. Esploreremo quattro metodi: rimozione manuale, disabilitazione delle macro, salvataggio del file in un formato senza macro e automazione del processo tramite Python.
Rimuovere le Macro Manualmente Usando la Scheda Sviluppo di Excel
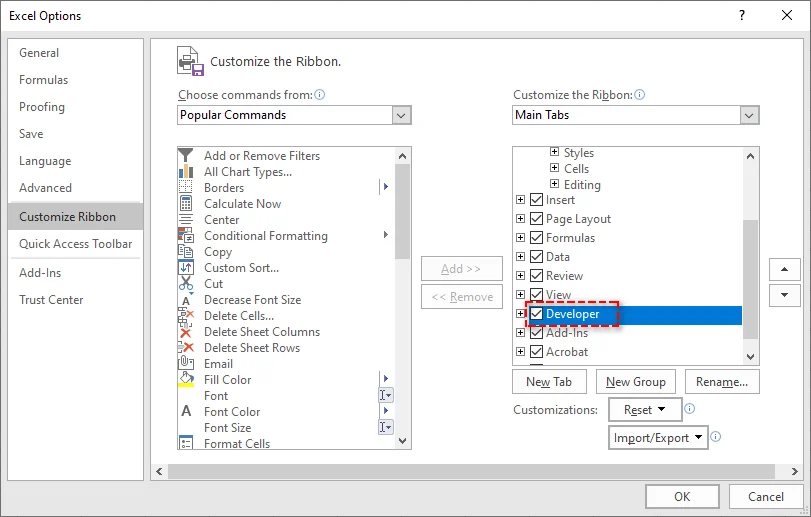
Se hai a che fare con un piccolo numero di macro, la Scheda Sviluppo in Excel è il modo più diretto per rimuoverle. Ecco come puoi farlo:
Passaggi per Rimuovere le Macro:
-
Apri Excel: Avvia Excel e apri la cartella di lavoro contenente le macro che desideri rimuovere.
-
Abilita la Scheda Sviluppo: Se la scheda Sviluppo non è visibile, vai su File > Opzioni > Personalizza barra multifunzione e seleziona Sviluppo nell'elenco delle schede principali.
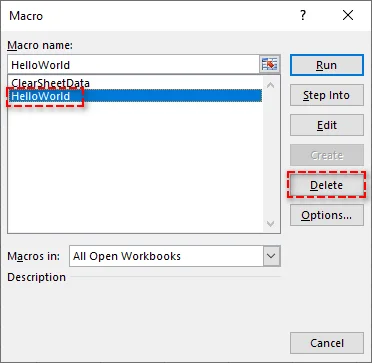
-
Apri la Finestra di Dialogo Macro: Nella scheda Sviluppo, fai clic su Macro per aprire la finestra di dialogo Macro. Verrà visualizzato un elenco di tutte le macro nella cartella di lavoro.

-
Seleziona ed Elimina Macro: Seleziona la macro che desideri rimuovere e fai clic su Elimina. Ripeti questo processo per qualsiasi altra macro che desideri rimuovere.
-
Salva la Cartella di Lavoro: Dopo aver rimosso le macro, fai clic su File > Salva con nome per salvare la cartella di lavoro con le macro rimosse.
Vantaggi:
- Veloce e diretto per rimuovere singole macro.
- Non sono necessari strumenti aggiuntivi o tecniche avanzate.
Svantaggi:
- Richiede tempo se si ha a che fare con molte macro o cartelle di lavoro di grandi dimensioni.
Per maggiori dettagli, consulta la guida di Microsoft Usare la scheda Sviluppo per creare o eliminare una macro in Excel.
Disabilitare le Macro tramite il Centro di Protezione di Excel
Se non desideri eliminare definitivamente le macro ma vuoi impedirne l'esecuzione, puoi disabilitarle tramite il Centro di Protezione di Excel. Questo metodo è perfetto per scopi di sicurezza quando si condividono cartelle di lavoro con altri.
Passaggi per Disabilitare le Macro:
-
Apri Excel: Avvia Excel e apri la cartella di lavoro.
-
Accedi al Centro di Protezione: Vai su File > Opzioni e scegli Centro di Protezione dall'elenco a sinistra. Quindi, fai clic su Impostazioni Centro di Protezione.
-
Configura Impostazioni Macro: Nella finestra Impostazioni Centro di Protezione, seleziona Impostazioni macro dalla barra laterale sinistra.
-
Seleziona Disabilita Macro: Scegli Disabilita tutte le macro senza notifica per impedire l'esecuzione di qualsiasi macro. In alternativa, puoi scegliere Disabilita tutte le macro con notifica per ricevere un avviso quando una macro tenta di essere eseguita.

-
Salva le Impostazioni: Fai clic su OK per applicare le modifiche e le macro verranno disabilitate la prossima volta che aprirai la cartella di lavoro.
Vantaggi:
- Veloce e semplice.
- Non elimina le macro, consentendoti di conservarle per un uso futuro.
Svantaggi:
- Le macro esistono ancora nella cartella di lavoro, ma non vengono eseguite.
- Non ideale per la condivisione di file se il destinatario non si fida delle macro.
Rimuovere le Macro Salvando il File in un Formato Senza Macro
Se desideri rimuovere completamente tutte le macro da una cartella di lavoro di Excel senza eliminarle manualmente una per una, salvare la cartella di lavoro in un formato senza macro (.xlsx) eliminerà tutte le macro. Questo metodo è il più semplice per garantire un file senza macro.
Passaggi per Salvare come File Senza Macro:
-
Apri la Cartella di Lavoro: Apri il file Excel che contiene le macro.
-
Salva con nome: Vai su File > Salva con nome e scegli una posizione per salvare il nuovo file.
-
Seleziona Formato Cartella di Lavoro Excel: Nel menu a discesa Salva come, seleziona Cartella di lavoro di Excel (*.xlsx). Il formato .xlsx non supporta le macro, quindi salvare il file in questo formato le rimuove automaticamente.

-
Salva il File: Fai clic su Salva e il tuo file verrà salvato senza alcuna macro.
Vantaggi:
- Semplice ed efficace per rimuovere tutte le macro.
- Garantisce la compatibilità con i sistemi che non supportano le macro.
Svantaggi:
- Irreversibile: una volta salvate in formato .xlsx, le macro vengono perse per sempre.
- Non adatto se si desidera conservare le macro per un uso futuro.
Automatizzare la Rimozione delle Macro da Excel Usando Python
Per coloro che necessitano di rimuovere macro da più file Excel o preferiscono automatizzare il processo, Python offre una soluzione efficiente. Spire.XLS for Python è una potente libreria che consente agli sviluppatori di manipolare facilmente i file Excel. Fornisce funzionalità come:
- Creare, modificare e leggere file Excel: Genera nuove cartelle di lavoro, aggiorna quelle esistenti o estrai dati.
- Convertire Excel in PDF e altri formati: Converti file Excel in PDF, CSV e HTML per una migliore compatibilità e condivisione.
- Rimuovere le macro: Cancella senza sforzo le macro dai file Excel per migliorare la sicurezza e le prestazioni dei file.
- Nessuna dipendenza da Microsoft Excel: A differenza dei metodi tradizionali, questa soluzione non richiede l'installazione di Excel, rendendola ideale per applicazioni lato server e ambienti privi di Excel.
Utilizzando Spire.XLS for Python, è possibile automatizzare il processo di rimozione delle macro, garantendo risultati coerenti su grandi insiemi di file. Questo metodo è particolarmente efficace per l'elaborazione batch, eliminando la necessità di intervento manuale e accelerando il flusso di lavoro.
Passaggi per Rimuovere le Macro dai File Excel Usando Python:
-
Installa Spire.XLS for Python:
Installa la libreria Spire.XLS da PyPI tramite pip:pip install spire-xls -
Usa lo Snippet di Codice Python per Rimuovere le Macro:
Dopo l'installazione, usa il seguente codice per rimuovere le macro da un file Excel in Python:from spire.xls import * # Load the workbook workbook = Workbook() workbook.LoadFromFile("example.xlsm") # Remove all macros workbook.HasMacros = False # Save the workbook without macros workbook.SaveToFile("remove_macros.xlsm") workbook.Dispose()
Questo codice rimuoverà tutte le macro dalla cartella di lavoro e la salverà come un nuovo file. Funziona sia per i formati .xls che .xlsm.
Vantaggi:
- Efficiente per la rimozione di macro su larga scala.
- Automatizza il processo, garantendo coerenza tra più file.
- Non è necessario Excel.
Svantaggi:
- Richiede conoscenze di Python.
- Richiede l'installazione della libreria Spire.XLS.
Migliori Pratiche per la Rimozione delle Macro da Excel
Quando si lavora con le macro in Excel, seguire queste migliori pratiche per garantire sicurezza ed efficienza:
- Esegui il Backup dei Tuoi File: Crea sempre un backup prima di rimuovere le macro da Excel per evitare di perdere dati essenziali.
- Usa Firme Digitali: Se hai bisogno di mantenere le macro, firmale digitalmente per garantire che siano affidabili.
- Abilita solo le Macro da Fonti Attendibili: Per prevenire codice dannoso, evita di eseguire macro da file non attendibili.
- Pulisci Regolarmente: Se le macro non sono più necessarie, rimuovile per mantenere i tuoi file gestibili.
- Usa Modelli Senza Macro: Inizia nuovi progetti con modelli privi di macro per evitare rischi inutili.
- Mantieni Excel Aggiornato: Aggiorna regolarmente Excel e il tuo software di sicurezza per proteggerti dalle vulnerabilità legate alle macro.
Conclusione
Rimuovere le macro da Excel è fondamentale per migliorare la sicurezza, aumentare la compatibilità e mantenere le cartelle di lavoro ottimizzate. A seconda delle tue esigenze, puoi scegliere di eliminare singole macro, disabilitarle temporaneamente, salvare il file in un formato senza macro o persino automatizzare il processo di rimozione delle macro per più file Excel utilizzando Python. Seguendo i metodi sopra descritti, puoi migliorare la sicurezza delle tue cartelle di lavoro di Excel ed evitare qualsiasi rischio associato a macro potenzialmente dannose.
Domande Frequenti
D1: Posso recuperare le macro dopo averle rimosse da Excel?
R1: No, una volta che le macro vengono rimosse o salvate in un formato senza macro (.xlsx), non possono essere recuperate. Salva sempre un backup del file originale se necessario.
D2: Come posso rimuovere macro specifiche da Excel?
R2: Puoi rimuovere singole macro utilizzando la Scheda Sviluppo in Excel, selezionandole ed eliminandole manualmente.
D3: È possibile disabilitare le macro invece di rimuoverle?
R3: Sì, puoi disabilitare le macro in Excel tramite le Impostazioni del Centro di Protezione di Excel, impedendone l'esecuzione pur mantenendole nella cartella di lavoro.
D4: Come posso automatizzare la rimozione delle macro da Excel?
R4: Puoi automatizzare il processo di rimozione delle macro da Excel utilizzando Python con la libreria Spire.XLS for Python. Questo metodo è particolarmente utile per l'elaborazione batch di più file. La libreria consente di caricare file Excel, rimuovere le macro e salvarli automaticamente in un formato senza macro.
Leggi Anche
-
Rimuovere una Tabella in Excel (Converti in Intervallo, Cancella Formattazione, VBA e Python)
-
Rimuovere i Collegamenti Ipertestuali in Excel - 4 Metodi Semplici
-
Creare un Elenco a Discesa in Excel: Guida Manuale e Automazione tramite Codice
-
Convertire Facilmente XLS/XLSX in HTML — Mantenendo Intatta la Formattazione di Excel
Como remover macros do Excel – 4 maneiras fáceis
As macros do Excel são ferramentas poderosas que ajudam a automatizar tarefas repetitivas, tornando seu fluxo de trabalho muito mais eficiente. No entanto, há momentos em que você pode precisar remover macros do Excel, seja por segurança, compatibilidade ou simplesmente para limpar uma pasta de trabalho antiga. Neste artigo, mostraremos quatro maneiras simples de remover macros do Excel, para que você possa manter seus arquivos seguros, limpos e fáceis de usar.
O Que Você Aprenderá
- Por Que Remover Macros do Excel?
- Como Remover Macros do Excel?
- Melhores Práticas para Remover Macros no Excel
Por Que Remover Macros do Excel?
Embora as macros sejam incrivelmente úteis, elas também podem apresentar riscos significativos se não forem gerenciadas adequadamente. Abaixo estão alguns dos principais motivos pelos quais é importante remover macros do Excel:
- Riscos de Segurança: As macros podem conter código malicioso, colocando seus dados em risco.
- Compatibilidade: As macros podem não funcionar em diferentes versões ou plataformas do Excel.
- Simplificar Arquivos: Macros antigas podem sobrecarregar sua pasta de trabalho e aumentar o tamanho do arquivo.
- Desempenho: Macros complexas podem deixar o Excel mais lento.
- Conformidade: Alguns setores exigem arquivos sem macros.
- Prevenir Execução Acidental: Desativar macros evita ações não intencionais.
Como Remover Macros do Excel?
Agora que entendemos por que é importante remover macros, vamos ver como fazer isso. Exploraremos quatro métodos: remoção manual, desativação de macros, salvamento do arquivo em um formato livre de macros e automação do processo usando Python.
Remover Macros Manualmente Usando a Guia Desenvolvedor do Excel
Se você está lidando com um pequeno número de macros, a Guia Desenvolvedor no Excel é a maneira mais direta de removê-las. Veja como você pode fazer isso:
Passos para Remover Macros:
-
Abra o Excel: Inicie o Excel e abra a pasta de trabalho que contém as macros que você deseja remover.
-
Habilite a Guia Desenvolvedor: Se a guia Desenvolvedor não estiver visível, vá para Arquivo > Opções > Personalizar Faixa de Opções e marque Desenvolvedor na lista de guias principais.
-
Abra a Caixa de Diálogo de Macro: Na guia Desenvolvedor, clique em Macros para abrir a caixa de diálogo de Macro. Uma lista de todas as macros na pasta de trabalho será exibida.
-
Selecione e Exclua Macros: Selecione a macro que deseja remover e clique em Excluir. Repita este processo para quaisquer outras macros que deseje remover.
-
Salve a Pasta de Trabalho: Depois de remover as macros, clique em Arquivo > Salvar Como para salvar a pasta de trabalho com as macros removidas.
Prós:
- Rápido e direto para remover macros individuais.
- Não há necessidade de ferramentas extras ou técnicas avançadas.
Contras:
- Demorado se estiver lidando com muitas macros ou pastas de trabalho grandes.
Para mais detalhes, consulte o guia Usar a guia Desenvolvedor para criar ou excluir uma macro no Excel da Microsoft.
Desativar Macros pela Central de Confiabilidade do Excel
Se você não deseja excluir permanentemente as macros, mas quer impedi-las de serem executadas, pode desativá-las através da Central de Confiabilidade do Excel. Este método é perfeito para fins de segurança ao compartilhar pastas de trabalho com outras pessoas.
Passos para Desativar Macros:
-
Abra o Excel: Inicie o Excel e abra a pasta de trabalho.
-
Acesse a Central de Confiabilidade: Vá para Arquivo > Opções e escolha Central de Confiabilidade na lista à esquerda. Em seguida, clique em Configurações da Central de Confiabilidade.
-
Configure as Configurações de Macro: Na janela Configurações da Central de Confiabilidade, selecione Configurações de Macro na barra lateral esquerda.
-
Selecione Desativar Macros: Escolha Desativar todas as macros sem notificação para impedir a execução de qualquer macro. Alternativamente, você pode escolher Desativar todas as macros com notificação para ser avisado quando uma macro tentar ser executada.
-
Salve Suas Configurações: Clique em OK para aplicar as alterações, e as macros serão desativadas na próxima vez que você abrir a pasta de trabalho.
Prós:
- Rápido e simples.
- Não exclui as macros, permitindo que você as mantenha para uso posterior.
Contras:
- As macros ainda existem na pasta de trabalho, mas não são executadas.
- Não é ideal para compartilhar arquivos se o destinatário não confiar em macros.
Remover Macros Salvando o Arquivo em um Formato Livre de Macros
Se você deseja remover completamente todas as macros de uma pasta de trabalho do Excel sem excluir manualmente cada uma, salvar a pasta de trabalho em um formato livre de macros (.xlsx) removerá todas as macros. Este método é o mais simples para garantir um arquivo sem macros.
Passos para Salvar como um Arquivo Livre de Macros:
-
Abra a Pasta de Trabalho: Abra o arquivo do Excel que contém macros.
-
Salvar Como: Vá para Arquivo > Salvar Como e escolha um local para salvar o novo arquivo.
-
Selecione o Formato de Pasta de Trabalho do Excel: Na lista suspensa Salvar como tipo, selecione Pasta de Trabalho do Excel (*.xlsx). O formato .xlsx não suporta macros, portanto, salvar o arquivo neste formato as remove automaticamente.
-
Salve o Arquivo: Clique em Salvar, e seu arquivo será salvo sem nenhuma macro.
Prós:
- Simples e eficaz para remover todas as macros.
- Garante compatibilidade com sistemas que não suportam macros.
Contras:
- Irreversível - uma vez salvas no formato .xlsx, as macros desaparecem para sempre.
- Não é adequado se você deseja manter as macros para uso futuro.
Automatizar a Remoção de Macros do Excel Usando Python
Para aqueles que precisam remover macros de vários arquivos do Excel ou preferem automatizar o processo, o Python oferece uma solução eficiente. Spire.XLS for Python é uma biblioteca poderosa que permite aos desenvolvedores manipular facilmente arquivos do Excel. Ele fornece recursos como:
- Criar, editar e ler arquivos do Excel: Gerar novas pastas de trabalho, atualizar as existentes ou extrair dados.
- Converter Excel para PDF e outros formatos: Converter arquivos do Excel em PDF, CSV e HTML para melhor compatibilidade e compartilhamento.
- Remover macros: Limpe macros de arquivos do Excel sem esforço para melhorar a segurança e o desempenho do arquivo.
- Sem dependência do Microsoft Excel: Ao contrário dos métodos tradicionais, esta solução não requer que o Excel seja instalado, tornando-a ideal para aplicativos do lado do servidor e ambientes que não possuem o Excel.
Usando o Spire.XLS for Python, você pode automatizar o processo de remoção de macros, garantindo resultados consistentes em grandes conjuntos de arquivos. Este método é particularmente eficaz para processamento em lote, eliminando a necessidade de intervenção manual e acelerando o fluxo de trabalho.
Passos para Remover Macros de Arquivos do Excel Usando Python:
-
Instale o Spire.XLS for Python:
Instale a biblioteca Spire.XLS do PyPI via pip:pip install spire-xls -
Use o Trecho de Código Python para Remover Macros:
Após a instalação, use o seguinte código para remover macros de um arquivo do Excel em Python:from spire.xls import * # Load the workbook workbook = Workbook() workbook.LoadFromFile("example.xlsm") # Remove all macros workbook.HasMacros = False # Save the workbook without macros workbook.SaveToFile("remove_macros.xlsm") workbook.Dispose()
Este código removerá todas as macros da pasta de trabalho e a salvará como um novo arquivo. Funciona para os formatos .xls e .xlsm.
Prós:
- Eficiente para remoção de macros em grande escala.
- Automatiza o processo, garantindo consistência em vários arquivos.
- Não há necessidade do Excel.
Contras:
- Requer conhecimento de Python.
- Requer a instalação da biblioteca Spire.XLS.
Melhores Práticas para Remover Macros do Excel
Ao trabalhar com macros no Excel, siga estas práticas recomendadas para garantir segurança e eficiência:
- Faça Backup de Seus Arquivos: Sempre crie um backup antes de remover macros do Excel para evitar a perda de dados essenciais.
- Use Assinaturas Digitais: Se precisar manter as macros, assine-as digitalmente para garantir que sejam confiáveis.
- Habilite Apenas Macros de Fontes Confiáveis: Para evitar código malicioso, evite executar macros de arquivos não confiáveis.
- Limpe Regularmente: Se as macros não forem mais necessárias, remova-as para manter seus arquivos gerenciáveis.
- Use Modelos Livres de Macros: Inicie novos projetos com modelos livres de macros para evitar riscos desnecessários.
- Mantenha o Excel Atualizado: Atualize regularmente o Excel e seu software de segurança para se proteger contra vulnerabilidades relacionadas a macros.
Conclusão
Remover macros do Excel é crucial para melhorar a segurança, aprimorar a compatibilidade e manter suas pastas de trabalho otimizadas. Dependendo de suas necessidades, você pode optar por excluir macros individuais, desativá-las temporariamente, salvar o arquivo em um formato livre de macros ou até mesmo automatizar o processo de remoção de macros para vários arquivos do Excel usando Python. Seguindo os métodos descritos acima, você pode aprimorar a segurança de suas pastas de trabalho do Excel e evitar quaisquer riscos associados a macros potencialmente prejudiciais.
Perguntas Frequentes
P1: Posso recuperar macros depois de removê-las do Excel?
R1: Não, uma vez que as macros são removidas ou salvas em um formato livre de macros (.xlsx), elas não podem ser recuperadas. Sempre salve um backup do arquivo original, se necessário.
P2: Como posso remover macros específicas do Excel?
R2: Você pode remover macros individuais usando a Guia Desenvolvedor no Excel, selecionando-as e excluindo-as manualmente.
P3: É possível desativar macros em vez de removê-las?
R3: Sim, você pode desativar macros no Excel através das Configurações da Central de Confiabilidade do Excel, impedindo sua execução enquanto as mantém na pasta de trabalho.
P4: Como posso automatizar a remoção de macros do Excel?
R4: Você pode automatizar o processo de remoção de macros do Excel usando Python com a biblioteca Spire.XLS for Python. Este método é especialmente útil para o processamento em lote de vários arquivos. A biblioteca permite carregar arquivos do Excel, remover macros e salvá-los em um formato livre de macros automaticamente.
Leia Também
Excel에서 매크로를 제거하는 4가지 쉬운 방법
Excel 매크로는 반복적인 작업을 자동화하여 워크플로를 훨씬 더 효율적으로 만드는 강력한 도구입니다. 그러나 보안, 호환성 또는 단순히 오래된 통합 문서를 정리하기 위해 Excel에서 매크로를 제거해야 하는 경우가 있습니다. 이 문서에서는 Excel에서 매크로를 제거하는 네 가지 간단한 방법을 보여 주므로 파일을 안전하고 깨끗하며 사용하기 쉽게 유지할 수 있습니다.
학습 내용
Excel에서 매크로를 제거해야 하는 이유
매크로는 매우 유용하지만 제대로 관리하지 않으면 상당한 위험을 초래할 수도 있습니다. 다음은 Excel에서 매크로를 제거하는 것이 중요한 몇 가지 주요 이유입니다.
- 보안 위험: 매크로에는 유해한 코드가 포함될 수 있어 데이터를 위험에 빠뜨릴 수 있습니다.
- 호환성: 매크로는 다른 Excel 버전이나 플랫폼에서 작동하지 않을 수 있습니다.
- 파일 단순화: 오래된 매크로는 통합 문서를 복잡하게 만들고 파일 크기를 늘릴 수 있습니다.
- 성능: 복잡한 매크로는 Excel 속도를 저하시킬 수 있습니다.
- 규정 준수: 일부 산업에서는 매크로 없는 파일이 필요합니다.
- 실수로 인한 실행 방지: 매크로를 비활성화하면 의도하지 않은 작업을 방지할 수 있습니다.
Excel에서 매크로를 제거하는 방법
이제 매크로를 제거하는 것이 중요한 이유를 이해했으므로 방법을 살펴보겠습니다. 수동 제거, 매크로 비활성화, 매크로 없는 형식으로 파일 저장, Python을 사용한 프로세스 자동화 등 네 가지 방법을 살펴보겠습니다.
Excel 개발자 탭을 사용하여 수동으로 매크로 제거
소수의 매크로를 처리하는 경우 Excel의 개발자 탭이 가장 간단한 제거 방법입니다. 방법은 다음과 같습니다.
매크로 제거 단계:
-
Excel 열기: Excel을 시작하고 제거하려는 매크로가 포함된 통합 문서를 엽니다.
-
개발자 탭 활성화: 개발자 탭이 보이지 않으면 파일 > 옵션 > 리본 사용자 지정으로 이동하여 기본 탭 목록에서 개발자를 선택합니다.
-
매크로 대화 상자 열기: 개발자 탭에서 매크로를 클릭하여 매크로 대화 상자를 엽니다. 통합 문서의 모든 매크로 목록이 표시됩니다.
-
매크로 선택 및 삭제: 제거할 매크로를 선택하고 삭제를 클릭합니다. 제거하려는 다른 매크로에 대해 이 프로세스를 반복합니다.
-
통합 문서 저장: 매크로를 제거한 후 파일 > 다른 이름으로 저장을 클릭하여 매크로가 제거된 통합 문서를 저장합니다.
장점:
- 개별 매크로를 빠르고 간단하게 제거할 수 있습니다.
- 추가 도구나 고급 기술이 필요하지 않습니다.
단점:
- 많은 매크로나 대용량 통합 문서를 처리하는 경우 시간이 많이 걸립니다.
자세한 내용은 Microsoft의 Excel에서 개발자 탭을 사용하여 매크로 만들기 또는 삭제 가이드를 참조하십시오.
Excel 보안 센터를 통해 매크로 비활성화
매크로를 영구적으로 삭제하고 싶지는 않지만 실행을 방지하려면 Excel의 보안 센터를 통해 비활성화할 수 있습니다. 이 방법은 다른 사람과 통합 문서를 공유할 때 보안 목적으로 적합합니다.
매크로 비활성화 단계:
-
Excel 열기: Excel을 시작하고 통합 문서를 엽니다.
-
보안 센터 액세스: 파일 > 옵션으로 이동하여 왼쪽 목록에서 보안 센터를 선택합니다. 그런 다음 보안 센터 설정을 클릭합니다.
-
매크로 설정 구성: 보안 센터 설정 창의 왼쪽 사이드바에서 매크로 설정을 선택합니다.
-
매크로 비활성화 선택: 알림 없이 모든 매크로 비활성화를 선택하여 모든 매크로 실행을 방지합니다. 또는 매크로 실행 시 메시지가 표시되도록 알림과 함께 모든 매크로 비활성화를 선택할 수 있습니다.
-
설정 저장: 확인을 클릭하여 변경 내용을 적용하면 다음에 통합 문서를 열 때 매크로가 비활성화됩니다.
장점:
- 빠르고 간단합니다.
- 매크로를 삭제하지 않으므로 나중에 사용할 수 있도록 보관할 수 있습니다.
단점:
- 매크로는 통합 문서에 여전히 존재하지만 실행되지는 않습니다.
- 수신자가 매크로를 신뢰하지 않는 경우 파일 공유에 이상적이지 않습니다.
매크로 없는 형식으로 파일 저장하여 매크로 제거
Excel 통합 문서에서 각 매크로를 수동으로 삭제하지 않고 모든 매크로를 완전히 제거하려면 통합 문서를 매크로 없는 형식(.xlsx)으로 저장하면 모든 매크로가 제거됩니다. 이 방법은 매크로 없는 파일을 보장하는 가장 간단한 방법입니다.
매크로 없는 파일로 저장하는 단계:
-
통합 문서 열기: 매크로가 포함된 Excel 파일을 엽니다.
-
다른 이름으로 저장: 파일 > 다른 이름으로 저장으로 이동하여 새 파일을 저장할 위치를 선택합니다.
-
Excel 통합 문서 형식 선택: 다른 이름으로 저장 유형 드롭다운에서 Excel 통합 문서(*.xlsx)를 선택합니다. .xlsx 형식은 매크로를 지원하지 않으므로 이 형식으로 파일을 저장하면 자동으로 제거됩니다.
-
파일 저장: 저장을 클릭하면 매크로 없이 파일이 저장됩니다.
장점:
- 모든 매크로를 간단하고 효과적으로 제거할 수 있습니다.
- 매크로를 지원하지 않는 시스템과의 호환성을 보장합니다.
단점:
- 되돌릴 수 없음-.xlsx 형식으로 저장하면 매크로는 영원히 사라집니다.
- 나중에 사용할 수 있도록 매크로를 보관하려는 경우 적합하지 않습니다.
Python을 사용하여 Excel에서 매크로 제거 자동화
여러 Excel 파일에서 매크로를 제거해야 하거나 프로세스 자동화를 선호하는 사람들을 위해 Python은 효율적인 솔루션을 제공합니다. Spire.XLS for Python은 개발자가 Excel 파일을 쉽게 조작할 수 있도록 하는 강력한 라이브러리입니다. 다음과 같은 기능을 제공합니다.
- Excel 파일 생성, 편집 및 읽기: 새 통합 문서를 생성하고, 기존 통합 문서를 업데이트하거나, 데이터를 추출합니다.
- Excel을 PDF 및 기타 형식으로 변환: Excel 파일을 PDF, CSV 및 HTML로 변환하여 호환성 및 공유를 개선합니다.
- 매크로 제거: Excel 파일에서 매크로를 손쉽게 지워 파일 보안 및 성능을 향상시킵니다.
- Microsoft Excel에 대한 종속성 없음: 기존 방법과 달리 이 솔루션은 Excel을 설치할 필요가 없으므로 Excel이 없는 서버 측 응용 프로그램 및 환경에 이상적입니다.
Spire.XLS for Python을 사용하면 매크로 제거 프로세스를 자동화하여 대규모 파일 집합에서 일관된 결과를 보장할 수 있습니다. 이 방법은 특히 일괄 처리에 효과적이며 수동 개입의 필요성을 없애고 워크플로 속도를 높입니다.
Python을 사용하여 Excel 파일에서 매크로를 제거하는 단계:
-
Spire.XLS for Python 설치:
pip를 통해 PyPI에서 Spire.XLS 라이브러리를 설치합니다.pip install spire-xls -
Python 코드 조각을 사용하여 매크로 제거:
설치 후 다음 코드를 사용하여 Python에서 Excel 파일의 매크로를 제거합니다.from spire.xls import * # 통합 문서 로드 workbook = Workbook() workbook.LoadFromFile("example.xlsm") # 모든 매크로 제거 workbook.HasMacros = False # 매크로 없이 통합 문서 저장 workbook.SaveToFile("remove_macros.xlsm") workbook.Dispose()
이 코드는 통합 문서에서 모든 매크로를 제거하고 새 파일로 저장합니다. .xls 및 .xlsm 형식 모두에서 작동합니다.
장점:
- 대규모 매크로 제거에 효율적입니다.
- 프로세스를 자동화하여 여러 파일에서 일관성을 보장합니다.
- Excel이 필요하지 않습니다.
단점:
- Python 지식이 필요합니다.
- Spire.XLS 라이브러리를 설치해야 합니다.
Excel에서 매크로 제거를 위한 모범 사례
Excel에서 매크로로 작업할 때 보안 및 효율성을 보장하려면 다음 모범 사례를 따르십시오.
- 파일 백업: 필수 데이터 손실을 방지하기 위해 Excel에서 매크로를 제거하기 전에 항상 백업을 만드십시오.
- 디지털 서명 사용: 매크로를 보관해야 하는 경우 신뢰할 수 있도록 디지털 서명하십시오.
- 신뢰할 수 있는 원본의 매크로만 활성화: 유해한 코드를 방지하려면 신뢰할 수 없는 파일의 매크로 실행을 피하십시오.
- 정기적으로 정리: 매크로가 더 이상 필요하지 않으면 제거하여 파일을 관리하기 쉽게 유지하십시오.
- 매크로 없는 템플릿 사용: 불필요한 위험을 피하기 위해 매크로 없는 템플릿으로 새 프로젝트를 시작하십시오.
- Excel을 최신 상태로 유지: 매크로 관련 취약점으로부터 보호하기 위해 Excel 및 보안 소프트웨어를 정기적으로 업데이트하십시오.
결론
Excel에서 매크로를 제거하는 것은 보안을 개선하고 호환성을 향상하며 통합 문서를 간소화하는 데 중요합니다. 필요에 따라 개별 매크로를 삭제하거나, 일시적으로 비활성화하거나, 매크로 없는 형식으로 파일을 저장하거나, Python을 사용하여 여러 Excel 파일에 대한 매크로 제거 프로세스를 자동화할 수도 있습니다. 위에 설명된 방법을 따르면 Excel 통합 문서의 보안을 강화하고 잠재적으로 유해한 매크로와 관련된 모든 위험을 피할 수 있습니다.
자주 묻는 질문
Q1: Excel에서 매크로를 제거한 후 복구할 수 있습니까?
A1: 아니요, 매크로가 제거되거나 매크로 없는 형식(.xlsx)으로 저장되면 복구할 수 없습니다. 필요한 경우 항상 원본 파일의 백업을 저장하십시오.
Q2: Excel에서 특정 매크로를 제거하려면 어떻게 해야 합니까?
A2: Excel의 개발자 탭을 사용하여 개별 매크로를 수동으로 선택하고 삭제하여 제거할 수 있습니다.
Q3: 매크로를 제거하는 대신 비활성화할 수 있습니까?
A3: 예, Excel의 보안 센터 설정을 통해 Excel에서 매크로를 비활성화하여 통합 문서에 보관하면서 실행되지 않도록 할 수 있습니다.
Q4: Excel에서 매크로 제거를 자동화하려면 어떻게 해야 합니까?
A4: Python과 Spire.XLS for Python 라이브러리를 사용하여 Excel에서 매크로를 제거하는 프로세스를 자동화할 수 있습니다. 이 방법은 특히 여러 파일을 일괄 처리하는 데 유용합니다. 이 라이브러리를 사용하면 Excel 파일을 로드하고, 매크로를 제거하고, 매크로 없는 형식으로 자동으로 저장할 수 있습니다.
함께 읽기
Comment supprimer les macros d'Excel – 4 méthodes faciles
Les macros Excel sont des outils puissants qui aident à automatiser les tâches répétitives, rendant votre flux de travail beaucoup plus efficace. Cependant, il y a des moments où vous pourriez avoir besoin de supprimer les macros d'Excel, que ce soit pour la sécurité, la compatibilité ou simplement pour nettoyer un ancien classeur. Dans cet article, nous vous montrerons quatre façons simples de supprimer les macros d'Excel, afin que vous puissiez garder vos fichiers sécurisés, propres et faciles à utiliser.
Ce que vous apprendrez
- Pourquoi supprimer les macros d'Excel ?
- Comment supprimer les macros d'Excel ?
- Meilleures pratiques pour la suppression des macros dans Excel
Pourquoi supprimer les macros d'Excel ?
Bien que les macros soient incroyablement utiles, elles peuvent également présenter des risques importants si elles ne sont pas gérées correctement. Voici quelques raisons clés pour lesquelles il est important de supprimer les macros d'Excel :
- Risques de sécurité : Les macros peuvent contenir du code malveillant, mettant vos données en danger.
- Compatibilité : Les macros peuvent ne pas fonctionner sur différentes versions ou plates-formes d'Excel.
- Simplifier les fichiers : Les anciennes macros peuvent encombrer votre classeur et augmenter la taille du fichier.
- Performance : Les macros complexes peuvent ralentir Excel.
- Conformité : Certaines industries exigent des fichiers sans macro.
- Empêcher l'exécution accidentelle : La désactivation des macros évite les actions involontaires.
Comment supprimer les macros d'Excel ?
Maintenant que nous comprenons pourquoi il est important de supprimer les macros, voyons comment le faire. Nous explorerons quatre méthodes : la suppression manuelle, la désactivation des macros, l'enregistrement du fichier dans un format sans macro et l'automatisation du processus à l'aide de Python.
Supprimer les macros manuellement à l'aide de l'onglet Développeur d'Excel
Si vous avez affaire à un petit nombre de macros, l'onglet Développeur dans Excel est le moyen le plus simple de les supprimer. Voici comment vous pouvez le faire :
Étapes pour supprimer les macros :
-
Ouvrir Excel : Lancez Excel et ouvrez le classeur contenant les macros que vous souhaitez supprimer.
-
Activer l'onglet Développeur : Si l'onglet Développeur n'est pas visible, allez dans Fichier > Options > Personnaliser le ruban et cochez Développeur dans la liste des onglets principaux.
-
Ouvrir la boîte de dialogue Macro : Dans l'onglet Développeur, cliquez sur Macros pour ouvrir la boîte de dialogue Macro. Une liste de toutes les macros du classeur s'affichera.
-
Sélectionner et supprimer des macros : sélectionnez la macro que vous souhaitez supprimer et cliquez sur Supprimer. Répétez ce processus pour toutes les autres macros que vous souhaitez supprimer.
-
Enregistrer le classeur : Après avoir supprimé les macros, cliquez sur Fichier > Enregistrer sous pour enregistrer le classeur sans les macros.
Avantages :
- Rapide et simple pour supprimer des macros individuelles.
- Pas besoin d'outils supplémentaires ou de techniques avancées.
Inconvénients :
- Prend du temps si vous avez affaire à de nombreuses macros ou à de gros classeurs.
Pour plus de détails, consultez le guide Utiliser l'onglet Développeur pour créer ou supprimer une macro dans Excel de Microsoft.
Désactiver les macros via le Centre de gestion de la confidentialité d'Excel
Si vous ne souhaitez pas supprimer définitivement les macros mais que vous voulez les empêcher de s'exécuter, vous pouvez les désactiver via le Centre de gestion de la confidentialité d'Excel. Cette méthode est parfaite à des fins de sécurité lors du partage de classeurs avec d'autres personnes.
Étapes pour désactiver les macros :
-
Ouvrir Excel : Lancez Excel et ouvrez le classeur.
-
Accéder au Centre de gestion de la confidentialité : Allez dans Fichier > Options, et choisissez Centre de gestion de la confidentialité dans la liste de gauche. Ensuite, cliquez sur Paramètres du Centre de gestion de la confidentialité.
-
Configurer les paramètres des macros : Dans la fenêtre Paramètres du Centre de gestion de la confidentialité, sélectionnez Paramètres des macros dans la barre latérale gauche.
-
Sélectionner Désactiver les macros : Choisissez Désactiver toutes les macros sans notification pour empêcher l'exécution de toute macro. Alternativement, vous pouvez choisir Désactiver toutes les macros avec notification pour être averti lorsqu'une macro tente de s'exécuter.
-
Enregistrer vos paramètres : Cliquez sur OK pour appliquer les modifications, et les macros seront désactivées la prochaine fois que vous ouvrirez le classeur.
Avantages :
- Rapide et simple.
- Ne supprime pas les macros, ce qui vous permet de les conserver pour une utilisation ultérieure.
Inconvénients :
- Les macros existent toujours dans le classeur, mais elles ne sont pas exécutées.
- Pas idéal pour partager des fichiers si le destinataire ne fait pas confiance aux macros.
Supprimer les macros en enregistrant le fichier dans un format sans macro
Si vous souhaitez supprimer complètement toutes les macros d'un classeur Excel sans supprimer manuellement chacune d'entre elles, l'enregistrement du classeur dans un format sans macro (.xlsx) supprimera toutes les macros. Cette méthode est la plus simple pour garantir un fichier sans macro.
Étapes pour enregistrer en tant que fichier sans macro :
-
Ouvrir le classeur : Ouvrez le fichier Excel qui contient des macros.
-
Enregistrer sous : Allez dans Fichier > Enregistrer sous et choisissez un emplacement pour enregistrer le nouveau fichier.
-
Sélectionner le format de classeur Excel : Dans la liste déroulante Type de fichier, sélectionnez Classeur Excel (*.xlsx). Le format .xlsx ne prend pas en charge les macros, donc l'enregistrement du fichier dans ce format les supprime automatiquement.
-
Enregistrer le fichier : Cliquez sur Enregistrer, et votre fichier sera enregistré sans aucune macro.
Avantages :
- Simple et efficace pour supprimer toutes les macros.
- Assure la compatibilité avec les systèmes qui ne prennent pas en charge les macros.
Inconvénients :
- Irréversible - une fois enregistrées au format .xlsx, les macros sont perdues à jamais.
- Ne convient pas si vous souhaitez conserver les macros pour une utilisation future.
Automatiser la suppression des macros d'Excel à l'aide de Python
Pour ceux qui ont besoin de supprimer les macros de plusieurs fichiers Excel ou qui préfèrent automatiser le processus, Python offre une solution efficace. Spire.XLS for Python est une bibliothèque puissante qui permet aux développeurs de manipuler facilement les fichiers Excel. Elle fournit des fonctionnalités telles que :
- Créer, modifier et lire des fichiers Excel : générer de nouveaux classeurs, mettre à jour ceux qui existent déjà ou extraire des données.
- Convertir Excel en PDF et autres formats : Convertir des fichiers Excel en PDF, CSV et HTML pour une meilleure compatibilité et un meilleur partage.
- Supprimer les macros : effacez sans effort les macros des fichiers Excel pour améliorer la sécurité et les performances des fichiers.
- Aucune dépendance vis-à-vis de Microsoft Excel : contrairement aux méthodes traditionnelles, cette solution ne nécessite pas l'installation d'Excel, ce qui la rend idéale pour les applications côté serveur et les environnements dépourvus d'Excel.
En utilisant Spire.XLS for Python, vous pouvez automatiser le processus de suppression des macros, garantissant des résultats cohérents sur de grands ensembles de fichiers. Cette méthode est particulièrement efficace pour le traitement par lots, éliminant le besoin d'intervention manuelle et accélérant le flux de travail.
Étapes pour supprimer les macros des fichiers Excel à l'aide de Python :
-
Installer Spire.XLS for Python:
Installez la bibliothèque Spire.XLS à partir de PyPI via pip :pip install spire-xls -
Utiliser l'extrait de code Python pour supprimer les macros:
Après l'installation, utilisez le code suivant pour supprimer les macros d'un fichier Excel en Python :from spire.xls import * # Charger le classeur workbook = Workbook() workbook.LoadFromFile("example.xlsm") # Supprimer toutes les macros workbook.HasMacros = False # Enregistrer le classeur sans macros workbook.SaveToFile("remove_macros.xlsm") workbook.Dispose()
Ce code supprimera toutes les macros du classeur et l'enregistrera en tant que nouveau fichier. Il fonctionne pour les formats .xls et .xlsm.
Avantages :
- Efficace pour la suppression de macros à grande échelle.
- Automatise le processus, garantissant la cohérence sur plusieurs fichiers.
- Pas besoin d'Excel.
Inconvénients :
- Nécessite des connaissances en Python.
- Nécessite l'installation de la bibliothèque Spire.XLS.
Meilleures pratiques pour la suppression des macros d'Excel
Lorsque vous travaillez avec des macros dans Excel, suivez ces meilleures pratiques pour garantir la sécurité et l'efficacité :
- Sauvegardez vos fichiers : créez toujours une sauvegarde avant de supprimer les macros d'Excel pour éviter de perdre des données essentielles.
- Utiliser des signatures numériques : si vous devez conserver des macros, signez-les numériquement pour vous assurer qu'elles sont dignes de confiance.
- N'activez les macros qu'à partir de sources fiables : pour empêcher le code malveillant, évitez d'exécuter des macros à partir de fichiers non fiables.
- Nettoyez régulièrement : si les macros ne sont plus nécessaires, supprimez-les pour que vos fichiers restent gérables.
- Utiliser des modèles sans macro : démarrez de nouveaux projets avec des modèles sans macro pour éviter les risques inutiles.
- Maintenez Excel à jour : mettez régulièrement à jour Excel et votre logiciel de sécurité pour vous protéger contre les vulnérabilités liées aux macros.
Conclusion
La suppression des macros d'Excel est cruciale pour améliorer la sécurité, renforcer la compatibilité et rationaliser vos classeurs. Selon vos besoins, vous pouvez choisir de supprimer des macros individuelles, de les désactiver temporairement, d'enregistrer le fichier dans un format sans macro ou même d'automatiser le processus de suppression des macros pour plusieurs fichiers Excel à l'aide de Python. En suivant les méthodes décrites ci-dessus, vous pouvez renforcer la sécurité de vos classeurs Excel et éviter tout risque associé à des macros potentiellement dangereuses.
Foire aux questions
Q1 : Puis-je récupérer les macros après les avoir supprimées d'Excel ?
R1 : Non, une fois les macros supprimées ou enregistrées dans un format sans macro (.xlsx), elles ne peuvent pas être récupérées. Enregistrez toujours une sauvegarde du fichier d'origine si nécessaire.
Q2 : Comment puis-je supprimer des macros spécifiques d'Excel ?
R2 : Vous pouvez supprimer des macros individuelles à l'aide de l'onglet Développeur dans Excel en les sélectionnant et en les supprimant manuellement.
Q3 : Est-il possible de désactiver les macros au lieu de les supprimer ?
R3 : Oui, vous pouvez désactiver les macros dans Excel via les Paramètres du Centre de gestion de la confidentialité d'Excel, ce qui les empêche de s'exécuter tout en les conservant dans le classeur.
Q4 : Comment puis-je automatiser la suppression des macros d'Excel ?
R4 : Vous pouvez automatiser le processus de suppression des macros d'Excel en utilisant Python avec la bibliothèque Spire.XLS for Python. Cette méthode est particulièrement utile pour le traitement par lots de plusieurs fichiers. La bibliothèque vous permet de charger des fichiers Excel, de supprimer les macros et de les enregistrer automatiquement dans un format sans macro.
À lire également
-
Supprimer un tableau dans Excel (convertir en plage, effacer la mise en forme, VBA & Python)
-
Supprimer les liens hypertextes dans Excel - 4 méthodes faciles
-
Créer une liste déroulante dans Excel : guide d'automatisation manuelle et par code
-
Convertir facilement XLS/XLSX en HTML — Conserver la mise en forme d'Excel intacte
Cómo eliminar macros de Excel: 4 maneras fáciles
Tabla de Contenidos
Las macros de Excel son herramientas poderosas que ayudan a automatizar tareas repetitivas, haciendo que su flujo de trabajo sea mucho más eficiente. Sin embargo, hay ocasiones en las que podría necesitar eliminar macros de Excel, ya sea por seguridad, compatibilidad o simplemente para limpiar un libro de trabajo antiguo. En este artículo, le mostraremos cuatro formas sencillas de eliminar macros de Excel, para que pueda mantener sus archivos seguros, limpios y fáciles de usar.
Lo que aprenderá
- ¿Por qué eliminar macros de Excel?
- ¿Cómo eliminar macros de Excel?
- Mejores prácticas para eliminar macros en Excel
¿Por qué eliminar macros de Excel?
Si bien las macros son increíblemente útiles, también pueden presentar riesgos significativos si no se administran correctamente. A continuación se presentan algunas razones clave por las que es importante eliminar las macros de Excel:
- Riesgos de seguridad: las macros pueden contener código dañino, poniendo sus datos en riesgo.
- Compatibilidad: es posible que las macros no funcionen en diferentes versiones o plataformas de Excel.
- Simplificar archivos: las macros antiguas pueden saturar su libro de trabajo y aumentar el tamaño del archivo.
- Rendimiento: las macros complejas pueden ralentizar Excel.
- Cumplimiento: algunas industrias requieren archivos sin macros.
- Prevenir la ejecución accidental: deshabilitar las macros evita acciones no deseadas.
¿Cómo eliminar macros de Excel?
Ahora que entendemos por qué es importante eliminar las macros, veamos cómo hacerlo. Exploraremos cuatro métodos: eliminación manual, deshabilitación de macros, guardado del archivo en un formato sin macros y automatización del proceso usando Python.
Eliminar macros manualmente usando la pestaña Desarrollador de Excel
Si está tratando con una pequeña cantidad de macros, la pestaña Desarrollador en Excel es la forma más directa de eliminarlas. Así es como puede hacerlo:
Pasos para eliminar macros:
-
Abrir Excel: inicie Excel y abra el libro de trabajo que contiene las macros que desea eliminar.
-
Habilitar la pestaña Desarrollador: si la pestaña Desarrollador no está visible, vaya a Archivo > Opciones > Personalizar cinta de opciones y marque Desarrollador en la lista de pestañas principales.
-
Abrir el cuadro de diálogo de macro: en la pestaña Desarrollador, haga clic en Macros para abrir el cuadro de diálogo de macro. Se mostrará una lista de todas las macros del libro de trabajo.
-
Seleccionar y eliminar macros: seleccione la macro que desea eliminar y haga clic en Eliminar. Repita este proceso para cualquier otra macro que desee eliminar.
-
Guardar el libro de trabajo: después de eliminar las macros, haga clic en Archivo > Guardar como para guardar el libro de trabajo con las macros eliminadas.
Ventajas:
- Rápido y sencillo para eliminar macros individuales.
- No se necesitan herramientas adicionales ni técnicas avanzadas.
Desventajas:
- Consume mucho tiempo si se trata de muchas macros o libros de trabajo grandes.
Para obtener más detalles, consulte la guía Usar la pestaña Desarrollador para crear o eliminar una macro en Excel de Microsoft.
Deshabilitar macros a través del Centro de confianza de Excel
Si no desea eliminar permanentemente las macros pero desea evitar que se ejecuten, puede deshabilitarlas a través del Centro de confianza de Excel. Este método es perfecto para fines de seguridad al compartir libros de trabajo con otros.
Pasos para deshabilitar macros:
-
Abrir Excel: inicie Excel y abra el libro de trabajo.
-
Acceder al Centro de confianza: vaya a Archivo > Opciones y elija Centro de confianza de la lista de la izquierda. Luego, haga clic en Configuración del Centro de confianza.
-
Configurar la configuración de macros: en la ventana Configuración del Centro de confianza, seleccione Configuración de macros en la barra lateral izquierda.
-
Seleccionar Deshabilitar macros: elija Deshabilitar todas las macros sin notificación para evitar que se ejecuten macros. Alternativamente, puede elegir Deshabilitar todas las macros con notificación para que se le avise cuando una macro intente ejecutarse.
-
Guardar la configuración: haga clic en Aceptar para aplicar los cambios, y las macros se deshabilitarán la próxima vez que abra el libro de trabajo.
Ventajas:
- Rápido y sencillo.
- No elimina las macros, lo que le permite conservarlas para su uso posterior.
Desventajas:
- Las macros todavía existen en el libro de trabajo, pero no se ejecutan.
- No es ideal para compartir archivos si el destinatario no confía en las macros.
Eliminar macros guardando el archivo en un formato sin macros
Si desea eliminar por completo todas las macros de un libro de trabajo de Excel sin eliminar manualmente cada una, guardar el libro de trabajo en un formato sin macros (.xlsx) eliminará todas las macros. Este método es el más sencillo para garantizar un archivo sin macros.
Pasos para guardar como un archivo sin macros:
-
Abrir el libro de trabajo: abra el archivo de Excel que contiene macros.
-
Guardar como: vaya a Archivo > Guardar como y elija una ubicación para guardar el nuevo archivo.
-
Seleccionar formato de libro de Excel: en el menú desplegable Guardar como tipo, seleccione Libro de Excel (*.xlsx). El formato .xlsx no admite macros, por lo que guardar el archivo en este formato las elimina automáticamente.
-
Guardar el archivo: haga clic en Guardar y su archivo se guardará sin macros.
Ventajas:
- Sencillo y eficaz para eliminar todas las macros.
- Garantiza la compatibilidad con sistemas que no admiten macros.
Desventajas:
- Irreversible: una vez guardadas en formato .xlsx, las macros desaparecen para siempre.
- No es adecuado si desea conservar las macros para su uso futuro.
Automatizar la eliminación de macros de Excel usando Python
Para aquellos que necesitan eliminar macros de varios archivos de Excel o prefieren automatizar el proceso, Python ofrece una solución eficiente. Spire.XLS for Python es una potente biblioteca que permite a los desarrolladores manipular fácilmente los archivos de Excel. Proporciona características como:
- Crear, editar y leer archivos de Excel: genere nuevos libros de trabajo, actualice los existentes o extraiga datos.
- Convertir Excel a PDF y otros formatos: Convierta archivos de Excel a PDF, CSV y HTML para una mejor compatibilidad y uso compartido.
- Eliminar macros: borre sin esfuerzo las macros de los archivos de Excel para mejorar la seguridad y el rendimiento de los archivos.
- Sin dependencia de Microsoft Excel: a diferencia de los métodos tradicionales, esta solución no requiere que Excel esté instalado, lo que la hace ideal para aplicaciones del lado del servidor y entornos que carecen de Excel.
Al usar Spire.XLS for Python, puede automatizar el proceso de eliminación de macros, garantizando resultados consistentes en grandes conjuntos de archivos. Este método es particularmente eficaz para el procesamiento por lotes, eliminando la necesidad de intervención manual y acelerando el flujo de trabajo.
Pasos para eliminar macros de archivos de Excel usando Python:
-
Instalar Spire.XLS for Python:
Instale la biblioteca Spire.XLS desde PyPI a través de pip:pip install spire-xls -
Use el fragmento de código de Python para eliminar macros:
Después de la instalación, use el siguiente código para eliminar macros de un archivo de Excel en Python:from spire.xls import * # Load the workbook workbook = Workbook() workbook.LoadFromFile("example.xlsm") # Remove all macros workbook.HasMacros = False # Save the workbook without macros workbook.SaveToFile("remove_macros.xlsm") workbook.Dispose()
Este código eliminará todas las macros del libro de trabajo y lo guardará como un archivo nuevo. Funciona para los formatos .xls y .xlsm.
Ventajas:
- Eficiente para la eliminación de macros a gran escala.
- Automatiza el proceso, garantizando la coherencia en varios archivos.
- No se necesita Excel.
Desventajas:
- Requiere conocimientos de Python.
- Requiere la instalación de la biblioteca Spire.XLS.
Mejores prácticas para eliminar macros de Excel
Cuando trabaje con macros en Excel, siga estas mejores prácticas para garantizar la seguridad y la eficiencia:
- Haga una copia de seguridad de sus archivos: siempre cree una copia de seguridad antes de eliminar macros de Excel para evitar la pérdida de datos esenciales.
- Use firmas digitales: si necesita conservar macros, fírmelas digitalmente para garantizar que sean confiables.
- Habilite solo macros de fuentes confiables: para evitar código dañino, evite ejecutar macros de archivos que no sean de confianza.
- Limpie regularmente: si las macros ya no son necesarias, elimínelas para mantener sus archivos manejables.
- Use plantillas sin macros: inicie nuevos proyectos con plantillas sin macros para evitar riesgos innecesarios.
- Mantenga Excel actualizado: actualice periódicamente Excel y su software de seguridad para protegerse contra las vulnerabilidades relacionadas con las macros.
Conclusión
Eliminar macros de Excel es crucial para mejorar la seguridad, mejorar la compatibilidad y mantener sus libros de trabajo optimizados. Dependiendo de sus necesidades, puede optar por eliminar macros individuales, deshabilitarlas temporalmente, guardar el archivo en un formato sin macros o incluso automatizar el proceso de eliminación de macros para varios archivos de Excel usando Python. Siguiendo los métodos descritos anteriormente, puede mejorar la seguridad de sus libros de trabajo de Excel y evitar cualquier riesgo asociado con macros potencialmente dañinas.
Preguntas frecuentes
P1: ¿Puedo recuperar macros después de eliminarlas de Excel?
R1: No, una vez que se eliminan las macros o se guardan en un formato sin macros (.xlsx), no se pueden recuperar. Siempre guarde una copia de seguridad del archivo original si es necesario.
P2: ¿Cómo puedo eliminar macros específicas de Excel?
R2: Puede eliminar macros individuales usando la pestaña Desarrollador en Excel seleccionándolas y eliminándolas manualmente.
P3: ¿Es posible deshabilitar las macros en lugar de eliminarlas?
R3: Sí, puede deshabilitar las macros en Excel a través de la Configuración del Centro de confianza de Excel, lo que evita que se ejecuten mientras se mantienen en el libro de trabajo.
P4: ¿Cómo puedo automatizar la eliminación de macros de Excel?
R4: Puede automatizar el proceso de eliminación de macros de Excel usando Python con la biblioteca Spire.XLS for Python. Este método es especialmente útil para procesar por lotes varios archivos. La biblioteca le permite cargar archivos de Excel, eliminar macros y guardarlos en un formato sin macros automáticamente.
Lea también
Wie man Makros aus Excel entfernt – 4 einfache Wege
Excel-Makros sind leistungsstarke Werkzeuge, die helfen, sich wiederholende Aufgaben zu automatisieren und Ihren Arbeitsablauf wesentlich effizienter zu gestalten. Es gibt jedoch Zeiten, in denen Sie möglicherweise Makros aus Excel entfernen müssen, sei es aus Sicherheits-, Kompatibilitäts- oder einfach nur zum Aufräumen einer alten Arbeitsmappe. In diesem Artikel zeigen wir Ihnen vier einfache Möglichkeiten, Makros aus Excel zu entfernen, damit Sie Ihre Dateien sicher, sauber und einfach zu verwenden halten können.
Was Sie lernen werden
- Warum Makros aus Excel entfernen?
- Wie entfernt man Makros aus Excel?
- Best Practices zum Entfernen von Makros in Excel
Warum Makros aus Excel entfernen?
Obwohl Makros unglaublich nützlich sind, können sie auch erhebliche Risiken bergen, wenn sie nicht ordnungsgemäß verwaltet werden. Nachfolgend sind einige Hauptgründe aufgeführt, warum es wichtig ist, Makros aus Excel zu entfernen:
- Sicherheitsrisiken: Makros können schädlichen Code enthalten, der Ihre Daten gefährdet.
- Kompatibilität: Makros funktionieren möglicherweise nicht über verschiedene Excel-Versionen oder Plattformen hinweg.
- Dateien vereinfachen: Alte Makros können Ihre Arbeitsmappe überladen und die Dateigröße erhöhen.
- Leistung: Komplexe Makros können Excel verlangsamen.
- Compliance: Einige Branchen erfordern makrofreie Dateien.
- Versehentliche Ausführung verhindern: Das Deaktivieren von Makros vermeidet unbeabsichtigte Aktionen.
Wie entfernt man Makros aus Excel?
Nachdem wir nun verstanden haben, warum es wichtig ist, Makros zu entfernen, schauen wir uns an, wie man es macht. Wir werden vier Methoden untersuchen: manuelle Entfernung, Deaktivieren von Makros, Speichern der Datei in einem makrofreien Format und Automatisierung des Prozesses mit Python.
Makros manuell über die Excel-Entwicklerregisterkarte entfernen
Wenn Sie es mit einer kleinen Anzahl von Makros zu tun haben, ist die Entwicklerregisterkarte in Excel der einfachste Weg, sie zu entfernen. So geht's:
Schritte zum Entfernen von Makros:
-
Excel öffnen: Starten Sie Excel und öffnen Sie die Arbeitsmappe, die die zu entfernenden Makros enthält.
-
Entwicklerregisterkarte aktivieren: Wenn die Registerkarte Entwickler nicht sichtbar ist, gehen Sie zu Datei > Optionen > Menüband anpassen und aktivieren Sie Entwickler in der Liste der Hauptregisterkarten.
-
Makro-Dialog öffnen: Klicken Sie auf der Entwicklerregisterkarte auf Makros, um das Makro-Dialogfeld zu öffnen. Eine Liste aller Makros in der Arbeitsmappe wird angezeigt.
-
Makros auswählen und löschen: Wählen Sie das zu entfernende Makro aus und klicken Sie auf Löschen. Wiederholen Sie diesen Vorgang für alle anderen Makros, die Sie entfernen möchten.
-
Arbeitsmappe speichern: Nachdem Sie die Makros entfernt haben, klicken Sie auf Datei > Speichern unter, um die Arbeitsmappe ohne die Makros zu speichern.
Vorteile:
- Schnell und unkompliziert zum Entfernen einzelner Makros.
- Keine Notwendigkeit für zusätzliche Werkzeuge oder fortgeschrittene Techniken.
Nachteile:
- Zeitaufwändig bei vielen Makros oder großen Arbeitsmappen.
Weitere Informationen finden Sie in der Anleitung zum Erstellen oder Löschen eines Makros in Excel über die Entwicklerregisterkarte von Microsoft.
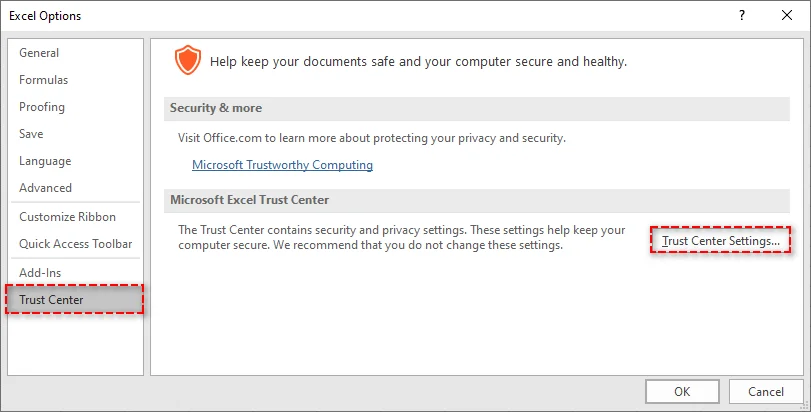
Makros über das Excel Trust Center deaktivieren
Wenn Sie Makros nicht dauerhaft löschen, aber deren Ausführung verhindern möchten, können Sie sie über das Trust Center von Excel deaktivieren. Diese Methode eignet sich perfekt für Sicherheitszwecke beim Teilen von Arbeitsmappen mit anderen.
Schritte zum Deaktivieren von Makros:
-
Excel öffnen: Starten Sie Excel und öffnen Sie die Arbeitsmappe.
-
Trust Center aufrufen: Gehen Sie zu Datei > Optionen und wählen Sie Trust Center aus der Liste auf der linken Seite. Klicken Sie dann auf Trust Center-Einstellungen.
-
Makroeinstellungen konfigurieren: Wählen Sie im Fenster „Trust Center-Einstellungen“ in der linken Seitenleiste Makroeinstellungen aus.
-
Makros deaktivieren auswählen: Wählen Sie Alle Makros ohne Benachrichtigung deaktivieren, um die Ausführung von Makros zu verhindern. Alternativ können Sie Alle Makros mit Benachrichtigung deaktivieren wählen, um bei jedem Versuch, ein Makro auszuführen, eine Benachrichtigung zu erhalten.
-
Einstellungen speichern: Klicken Sie auf OK, um die Änderungen zu übernehmen. Die Makros werden beim nächsten Öffnen der Arbeitsmappe deaktiviert.
Vorteile:
- Schnell und einfach.
- Löscht Makros nicht, sodass Sie sie für eine spätere Verwendung aufbewahren können.
Nachteile:
- Makros sind weiterhin in der Arbeitsmappe vorhanden, werden aber nicht ausgeführt.
- Nicht ideal zum Teilen von Dateien, wenn der Empfänger Makros nicht vertraut.
Makros durch Speichern der Datei in einem makrofreien Format entfernen
Wenn Sie alle Makros aus einer Excel-Arbeitsmappe vollständig entfernen möchten, ohne jedes einzeln manuell zu löschen, werden durch das Speichern der Arbeitsmappe in einem makrofreien Format (.xlsx) alle Makros entfernt. Diese Methode ist die einfachste, um eine makrofreie Datei zu gewährleisten.
Schritte zum Speichern als makrofreie Datei:
-
Arbeitsmappe öffnen: Öffnen Sie die Excel-Datei, die Makros enthält.
-
Speichern unter: Gehen Sie zu Datei > Speichern unter und wählen Sie einen Speicherort für die neue Datei.
-
Excel-Arbeitsmappenformat auswählen: Wählen Sie im Dropdown-Menü Dateityp die Option Excel-Arbeitsmappe (*.xlsx) aus. Das .xlsx-Format unterstützt keine Makros, daher werden sie beim Speichern der Datei in diesem Format automatisch entfernt.
-
Datei speichern: Klicken Sie auf Speichern, und Ihre Datei wird ohne Makros gespeichert.
Vorteile:
- Einfach und effektiv zum Entfernen aller Makros.
- Gewährleistet die Kompatibilität mit Systemen, die keine Makros unterstützen.
Nachteile:
- Irreversibel – einmal im .xlsx-Format gespeichert, sind die Makros für immer verschwunden.
- Nicht geeignet, wenn Sie Makros für die zukünftige Verwendung aufbewahren möchten.
Makroentfernung aus Excel mit Python automatisieren
Für diejenigen, die Makros aus mehreren Excel-Dateien entfernen müssen oder den Prozess automatisieren möchten, bietet Python eine effiziente Lösung. Spire.XLS for Python ist eine leistungsstarke Bibliothek, mit der Entwickler Excel-Dateien einfach bearbeiten können. Sie bietet Funktionen wie:
- Excel-Dateien erstellen, bearbeiten und lesen: Neue Arbeitsmappen erstellen, vorhandene aktualisieren oder Daten extrahieren.
- Excel in PDF und andere Formate konvertieren: Excel-Dateien in PDF, CSV und HTML konvertieren, um eine bessere Kompatibilität und gemeinsame Nutzung zu ermöglichen.
- Makros entfernen: Makros mühelos aus Excel-Dateien entfernen, um die Dateisicherheit und -leistung zu verbessern.
- Keine Abhängigkeit von Microsoft Excel: Im Gegensatz zu herkömmlichen Methoden erfordert diese Lösung keine Installation von Excel, was sie ideal für serverseitige Anwendungen und Umgebungen ohne Excel macht.
Durch die Verwendung von Spire.XLS for Python können Sie den Prozess der Makroentfernung automatisieren und so konsistente Ergebnisse über große Dateisätze hinweg sicherstellen. Diese Methode ist besonders effektiv für die Stapelverarbeitung, da sie manuelle Eingriffe überflüssig macht und den Arbeitsablauf beschleunigt.
Schritte zum Entfernen von Makros aus Excel-Dateien mit Python:
-
Spire.XLS for Python installieren:
Installieren Sie die Spire.XLS-Bibliothek von PyPI über pip:pip install spire-xls -
Verwenden Sie den Python-Codeausschnitt zum Entfernen von Makros:
Verwenden Sie nach der Installation den folgenden Code, um Makros aus einer Excel-Datei in Python zu entfernen:from spire.xls import * # Laden Sie die Arbeitsmappe workbook = Workbook() workbook.LoadFromFile("beispiel.xlsm") # Entfernen Sie alle Makros workbook.HasMacros = False # Speichern Sie die Arbeitsmappe ohne Makros workbook.SaveToFile("makros_entfernen.xlsm") workbook.Dispose()
Dieser Code entfernt alle Makros aus der Arbeitsmappe und speichert sie als neue Datei. Er funktioniert sowohl für .xls- als auch für .xlsm-Formate.
Vorteile:
- Effizient für die großflächige Entfernung von Makros.
- Automatisiert den Prozess und gewährleistet die Konsistenz über mehrere Dateien hinweg.
- Kein Excel erforderlich.
Nachteile:
- Erfordert Python-Kenntnisse.
- Erfordert die Installation der Spire.XLS-Bibliothek.
Best Practices zum Entfernen von Makros aus Excel
Befolgen Sie beim Arbeiten mit Makros in Excel diese Best Practices, um Sicherheit und Effizienz zu gewährleisten:
- Sichern Sie Ihre Dateien: Erstellen Sie immer eine Sicherungskopie, bevor Sie Makros aus Excel entfernen, um den Verlust wichtiger Daten zu vermeiden.
- Verwenden Sie digitale Signaturen: Wenn Sie Makros beibehalten müssen, signieren Sie sie digital, um ihre Vertrauenswürdigkeit zu gewährleisten.
- Aktivieren Sie Makros nur aus vertrauenswürdigen Quellen: Um schädlichen Code zu vermeiden, führen Sie keine Makros aus nicht vertrauenswürdigen Dateien aus.
- Regelmäßig aufräumen: Wenn Makros nicht mehr benötigt werden, entfernen Sie sie, um Ihre Dateien überschaubar zu halten.
- Verwenden Sie makrofreie Vorlagen: Starten Sie neue Projekte mit makrofreien Vorlagen, um unnötige Risiken zu vermeiden.
- Halten Sie Excel auf dem neuesten Stand: Aktualisieren Sie Excel und Ihre Sicherheitssoftware regelmäßig, um sich vor makrobezogenen Sicherheitslücken zu schützen.
Fazit
Das Entfernen von Makros aus Excel ist entscheidend für die Verbesserung der Sicherheit, die Erhöhung der Kompatibilität und die Optimierung Ihrer Arbeitsmappen. Je nach Bedarf können Sie einzelne Makros löschen, sie vorübergehend deaktivieren, die Datei in einem makrofreien Format speichern oder sogar den Prozess der Makroentfernung für mehrere Excel-Dateien mit Python automatisieren. Indem Sie die oben beschriebenen Methoden befolgen, können Sie die Sicherheit Ihrer Excel-Arbeitsmappen erhöhen und alle Risiken vermeiden, die mit potenziell schädlichen Makros verbunden sind.
Häufig gestellte Fragen
F1: Kann ich Makros wiederherstellen, nachdem ich sie aus Excel entfernt habe?
A1: Nein, sobald Makros entfernt oder in einem makrofreien Format (.xlsx) gespeichert wurden, können sie nicht wiederhergestellt werden. Speichern Sie bei Bedarf immer eine Sicherungskopie der Originaldatei.
F2: Wie kann ich bestimmte Makros aus Excel entfernen?
A2: Sie können einzelne Makros über die Entwicklerregisterkarte in Excel entfernen, indem Sie sie manuell auswählen und löschen.
F3: Ist es möglich, Makros zu deaktivieren, anstatt sie zu entfernen?
A3: Ja, Sie können Makros in Excel über die Trust Center-Einstellungen von Excel deaktivieren, wodurch deren Ausführung verhindert wird, während sie in der Arbeitsmappe verbleiben.
F4: Wie kann ich die Entfernung von Makros aus Excel automatisieren?
A4: Sie können den Prozess des Entfernens von Makros aus Excel automatisieren, indem Sie Python mit der Bibliothek Spire.XLS for Python verwenden. Diese Methode ist besonders nützlich für die Stapelverarbeitung mehrerer Dateien. Die Bibliothek ermöglicht es Ihnen, Excel-Dateien zu laden, Makros zu entfernen und sie automatisch in einem makrofreien Format zu speichern.
Lesen Sie auch
Как удалить макросы из Excel — 4 простых способа
Макросы Excel — это мощные инструменты, которые помогают автоматизировать повторяющиеся задачи, делая ваш рабочий процесс намного эффективнее. Однако бывают случаи, когда вам может потребоваться удалить макросы из Excel, будь то из соображений безопасности, совместимости или просто для очистки старой рабочей книги. В этой статье мы покажем вам четыре простых способа удаления макросов из Excel, чтобы вы могли сохранить свои файлы в безопасности, чистоте и простоте использования.
Что вы узнаете
- Зачем удалять макросы из Excel?
- Как удалить макросы из Excel?
- Лучшие практики по удалению макросов в Excel
Зачем удалять макросы из Excel?
Хотя макросы невероятно полезны, они также могут представлять значительные риски, если ими не управлять должным образом. Ниже приведены некоторые ключевые причины, по которым важно удалять макросы из Excel:
- Риски безопасности: Макросы могут содержать вредоносный код, подвергая ваши данные риску.
- Совместимость: Макросы могут не работать в разных версиях Excel или на разных платформах.
- Упрощение файлов: Старые макросы могут загромождать вашу рабочую книгу и увеличивать размер файла.
- Производительность: Сложные макросы могут замедлять работу Excel.
- Соответствие требованиям: В некоторых отраслях требуются файлы без макросов.
- Предотвращение случайного выполнения: Отключение макросов позволяет избежать непреднамеренных действий.
Как удалить макросы из Excel?
Теперь, когда мы понимаем, почему важно удалять макросы, давайте посмотрим, как это сделать. Мы рассмотрим четыре метода: удаление вручную, отключение макросов, сохранение файла в формате без макросов и автоматизация процесса с помощью Python.
Удаление макросов вручную с помощью вкладки «Разработчик» в Excel
Если вы имеете дело с небольшим количеством макросов, вкладка «Разработчик» в Excel — это самый простой способ их удалить. Вот как это можно сделать:
Шаги по удалению макросов:
-
Откройте Excel: Запустите Excel и откройте рабочую книгу, содержащую макросы, которые вы хотите удалить.
-
Включите вкладку «Разработчик»: Если вкладка «Разработчик» не видна, перейдите в Файл > Параметры > Настроить ленту и установите флажок Разработчик в списке основных вкладок.
-
Откройте диалоговое окно «Макрос»: На вкладке «Разработчик» нажмите Макросы, чтобы открыть диалоговое окно «Макрос». Отобразится список всех макросов в рабочей книге.
-
Выберите и удалите макросы: Выберите макрос, который хотите удалить, и нажмите Удалить. Повторите этот процесс для всех других макросов, которые вы хотите удалить.
-
Сохраните рабочую книгу: После удаления макросов нажмите Файл > Сохранить как, чтобы сохранить рабочую книгу с удаленными макросами.
Плюсы:
- Быстрое и простое удаление отдельных макросов.
- Нет необходимости в дополнительных инструментах или сложных методах.
Минусы:
- Отнимает много времени при работе с большим количеством макросов или большими рабочими книгами.
Для получения дополнительной информации обратитесь к руководству Использование вкладки «Разработчик» для создания или удаления макроса в Excel от Microsoft.
Отключение макросов через Центр управления безопасностью Excel
Если вы не хотите окончательно удалять макросы, а хотите запретить их запуск, вы можете отключить их через Центр управления безопасностью Excel. Этот метод идеально подходит для обеспечения безопасности при совместном использовании рабочих книг с другими пользователями.
Шаги по отключению макросов:
-
Откройте Excel: Запустите Excel и откройте рабочую книгу.
-
Доступ к Центру управления безопасностью: Перейдите в Файл > Параметры и выберите Центр управления безопасностью из списка слева. Затем нажмите Параметры центра управления безопасностью.
-
Настройте параметры макросов: В окне «Параметры центра управления безопасностью» выберите Параметры макросов на левой боковой панели.
-
Выберите «Отключить макросы»: Выберите Отключить все макросы без уведомления, чтобы запретить запуск любых макросов. Кроме того, вы можете выбрать Отключить все макросы с уведомлением, чтобы получать запрос при попытке запуска макроса.
-
Сохраните настройки: Нажмите ОК, чтобы применить изменения, и макросы будут отключены при следующем открытии рабочей книги.
Плюсы:
- Быстро и просто.
- Не удаляет макросы, позволяя сохранить их для дальнейшего использования.
Минусы:
- Макросы по-прежнему существуют в рабочей книге, но они не выполняются.
- Не идеально для обмена файлами, если получатель не доверяет макросам.
Удаление макросов путем сохранения файла в формате без макросов
Если вы хотите полностью удалить все макросы из рабочей книги Excel, не удаляя каждый вручную, сохранение рабочей книги в формате без макросов (.xlsx) удалит все макросы. Этот метод является самым простым для обеспечения файла без макросов.
Шаги по сохранению в виде файла без макросов:
-
Откройте рабочую книгу: Откройте файл Excel, содержащий макросы.
-
Сохранить как: Перейдите в Файл > Сохранить как и выберите место для сохранения нового файла.
-
Выберите формат рабочей книги Excel: В раскрывающемся списке Тип файла выберите Рабочая книга Excel (*.xlsx). Формат .xlsx не поддерживает макросы, поэтому сохранение файла в этом формате автоматически их удаляет.
-
Сохраните файл: Нажмите Сохранить, и ваш файл будет сохранен без макросов.
Плюсы:
- Простой и эффективный способ удаления всех макросов.
- Обеспечивает совместимость с системами, не поддерживающими макросы.
Минусы:
- Необратимо-после сохранения в формате .xlsx макросы исчезают навсегда.
- Не подходит, если вы хотите сохранить макросы для будущего использования.
Автоматизация удаления макросов из Excel с помощью Python
Для тех, кому нужно удалить макросы из нескольких файлов Excel или кто предпочитает автоматизировать этот процесс, Python предлагает эффективное решение. Spire.XLS для Python — это мощная библиотека, которая позволяет разработчикам легко управлять файлами Excel. Она предоставляет такие функции, как:
- Создание, редактирование и чтение файлов Excel: Создавайте новые рабочие книги, обновляйте существующие или извлекайте данные.
- Преобразование Excel в PDF и другие форматы: Преобразуйте файлы Excel в PDF, CSV и HTML для лучшей совместимости и обмена.
- Удаление макросов: Легко удаляйте макросы из файлов Excel для повышения безопасности и производительности файлов.
- Нет зависимости от Microsoft Excel: В отличие от традиционных методов, это решение не требует установки Excel, что делает его идеальным для серверных приложений и сред, в которых отсутствует Excel.
Используя Spire.XLS для Python, вы можете автоматизировать процесс удаления макросов, обеспечивая согласованные результаты для больших наборов файлов. Этот метод особенно эффективен для пакетной обработки, устраняя необходимость ручного вмешательства и ускоряя рабочий процесс.
Шаги по удалению макросов из файлов Excel с помощью Python:
-
Установите Spire.XLS для Python:
Установите библиотеку Spire.XLS из PyPI с помощью pip:pip install spire-xls -
Используйте фрагмент кода Python для удаления макросов:
После установки используйте следующий код для удаления макросов из файла Excel в Python:from spire.xls import * # Загрузите рабочую книгу workbook = Workbook() workbook.LoadFromFile("example.xlsm") # Удалите все макросы workbook.HasMacros = False # Сохраните рабочую книгу без макросов workbook.SaveToFile("remove_macros.xlsm") workbook.Dispose()
Этот код удалит все макросы из рабочей книги и сохранит ее как новый файл. Он работает как с форматами .xls, так и с .xlsm.
Плюсы:
- Эффективен для крупномасштабного удаления макросов.
- Автоматизирует процесс, обеспечивая согласованность между несколькими файлами.
- Нет необходимости в Excel.
Минусы:
- Требуются знания Python.
- Требуется установка библиотеки Spire.XLS.
Лучшие практики по удалению макросов из Excel
При работе с макросами в Excel следуйте этим рекомендациям для обеспечения безопасности и эффективности:
- Создавайте резервные копии ваших файлов: Всегда создавайте резервную копию перед удалением макросов из Excel, чтобы избежать потери важных данных.
- Используйте цифровые подписи: Если вам нужно сохранить макросы, подпишите их цифровой подписью, чтобы убедиться в их надежности.
- Включайте макросы только из надежных источников: Чтобы предотвратить вредоносный код, избегайте запуска макросов из ненадежных файлов.
- Регулярно очищайте: Если макросы больше не нужны, удалите их, чтобы ваши файлы оставались управляемыми.
- Используйте шаблоны без макросов: Начинайте новые проекты с шаблонов без макросов, чтобы избежать ненужных рисков.
- Обновляйте Excel: Регулярно обновляйте Excel и ваше программное обеспечение безопасности для защиты от уязвимостей, связанных с макросами.
Заключение
Удаление макросов из Excel имеет решающее значение для повышения безопасности, улучшения совместимости и оптимизации ваших рабочих книг. В зависимости от ваших потребностей вы можете удалять отдельные макросы, временно отключать их, сохранять файл в формате без макросов или даже автоматизировать процесс удаления макросов для нескольких файлов Excel с помощью Python. Следуя описанным выше методам, вы можете повысить безопасность своих рабочих книг Excel и избежать любых рисков, связанных с потенциально вредоносными макросами.
Часто задаваемые вопросы
В1: Могу ли я восстановить макросы после их удаления из Excel?
О1: Нет, после удаления макросов или сохранения в формате без макросов (.xlsx), их невозможно восстановить. Всегда сохраняйте резервную копию исходного файла, если это необходимо.
В2: Как я могу удалить определенные макросы из Excel?
О2: Вы можете удалять отдельные макросы с помощью вкладки «Разработчик» в Excel, выбирая и удаляя их вручную.
В3: Можно ли отключить макросы вместо их удаления?
О3: Да, вы можете отключить макросы в Excel через Параметры центра управления безопасностью Excel, что предотвратит их запуск, но сохранит их в рабочей книге.
В4: Как я могу автоматизировать удаление макросов из Excel?
О4: Вы можете автоматизировать процесс удаления макросов из Excel, используя Python с библиотекой Spire.XLS для Python. Этот метод особенно полезен для пакетной обработки нескольких файлов. Библиотека позволяет автоматически загружать файлы Excel, удалять макросы и сохранять их в формате без макросов.
Читайте также
Como extrair páginas de um PDF de graça — Sem precisar do Adobe
Muitas pessoas abrem o Adobe Acrobat apenas para descobrir que extrair páginas de um PDF é um recurso pago. A boa notícia é que você não precisa pagar por isso. Se você precisa manter páginas importantes de um contrato ou extrair uma seção de um relatório, este guia mostrará três maneiras fáceis e gratuitas de extrair páginas de um PDF com apenas alguns cliques.
- Extrair Páginas de PDF com o Google Chrome
- Salvar uma Página de um PDF Rapidamente com Ferramentas Online
- Extrair Páginas de um PDF Gratuitamente Usando Python
- A Conclusão
Como Extrair Páginas de PDF com o Google Chrome
Você não precisa de nenhum software extra — o Google Chrome por si só pode extrair páginas específicas de um PDF online. Usando seu recurso de impressão integrado, você pode optar por salvar todas as páginas, apenas as páginas ímpares ou pares, ou qualquer intervalo de páginas personalizado que desejar. Basta selecionar as páginas que deseja manter e salvá-las como um novo arquivo PDF. Veja como extrair páginas de um PDF usando o Google Chrome:
- Localize o arquivo PDF do qual deseja extrair as páginas e clique com o botão direito para abri-lo no Google Chrome.
- Clique no botão Imprimir no canto superior direito e altere a impressora de destino para Salvar como PDF.
- Selecione as páginas que deseja manter e clique em Salvar. O Chrome fará o download automático do novo PDF para o seu dispositivo.
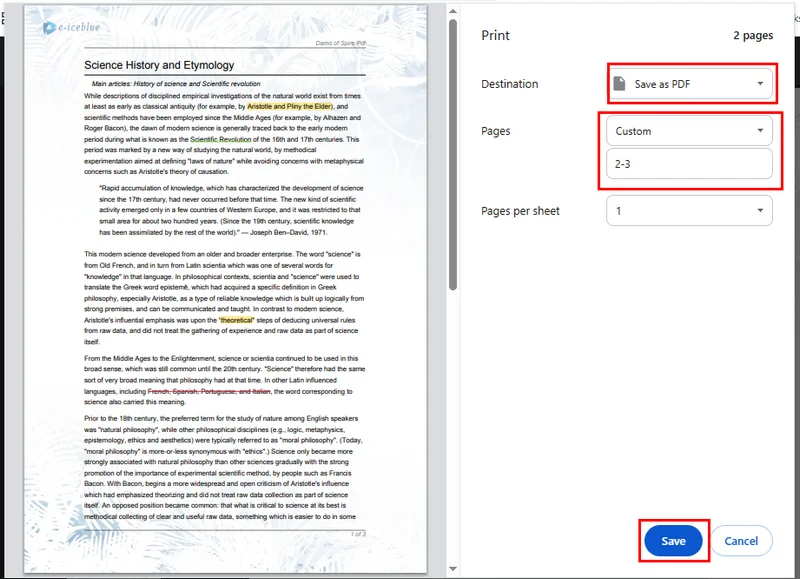
Prós
- Não é necessário instalar nenhum software de terceiros.
- Ideal para extrair rapidamente 1 a 2 páginas.
- Experiência suave e amplamente acessível (quase todos os usuários têm o Chrome).
Contras
- Não é adequado para extrair um grande número de páginas não consecutivas.
- As opções de saída são bastante básicas.
Como Salvar uma Página de um PDF Rapidamente com Ferramentas Online
Existem muitas maneiras de extrair páginas de um PDF. Além de usar o recurso integrado do Chrome, você também pode usar ferramentas online para dividir documentos PDF e salvar as páginas que você precisa. Como essas ferramentas são baseadas na web, elas funcionam tanto em computadores quanto em dispositivos móveis, e você não precisa baixar nada ou se inscrever. Basta pesquisar por “como extrair páginas de um PDF” em seu navegador e você encontrará muitas opções. Neste guia, demonstraremos o processo usando o Smallpdf, mas não se preocupe — a maioria das ferramentas online funciona de maneira muito semelhante.
- Acesse a página Extrair PDF no Smallpdf.
- Arraste seu arquivo PDF para a ferramenta, que o processará automaticamente e exibirá todas as páginas.
- Selecione as páginas que deseja extrair e clique em Concluir. Você pode optar por exportar as páginas como um único PDF ou como arquivos PDF separados.
- Quando a extração estiver concluída, clique no botão Download para salvar o PDF resultante em seu dispositivo.
Prós
- Pode ser usado diretamente no seu navegador, sem downloads ou instalações.
- Suporta a extração de páginas únicas, páginas consecutivas ou páginas não consecutivas.
- Interface intuitiva — basta arrastar e soltar, fácil até para iniciantes.
- Funciona em qualquer dispositivo com navegador e conexão à internet, altamente compatível.
Contras
- Requer uma conexão com a internet; não pode ser usado offline.
- Algumas ferramentas limitam o tamanho do arquivo para usuários gratuitos.
- Os arquivos são enviados para o servidor, portanto, seja cauteloso com conteúdo sensível.
- Recursos avançados, como processamento em lote ou downloads sem marca d'água, podem exigir pagamento.
Como Extrair Páginas de um PDF Gratuitamente Usando Python
Ao lidar com PDFs, tanto o Chrome quanto as ferramentas online compartilham uma limitação — eles só podem processar um arquivo por vez. Se você estiver lidando com vários PDFs, existe uma solução mais rápida e profissional: Free Spire.PDF for Python.

Esta poderosa biblioteca oferece uma ampla gama de recursos de PDF, incluindo extração de páginas, conversão de formatos e edição de conteúdo. Com o Free Spire.PDF, você pode extrair facilmente páginas específicas, adicionando-as do PDF de origem a um novo documento usando o método PdfDocument.InsertPage().
O código de exemplo abaixo demonstra como extrair a 2ª e a 4ª páginas de um PDF e mesclá-las em um novo arquivo.
from spire.pdf import PdfDocument

# Load a PDF file
source_pdf = PdfDocument()
source_pdf.LoadFromFile("/input/Booklet.pdf")

# Create a new PdfDocument instance
new_pdf = PdfDocument()

# Extract page 2 and page 4
new_pdf.InsertPage(source_pdf, 1)
new_pdf.InsertPage(source_pdf, 3)

# Save the extracted pages
new_pdf.SaveToFile("/output/extracted_pages.pdf")
new_pdf.Close()
Aqui está a pré-visualização do arquivo resultante: 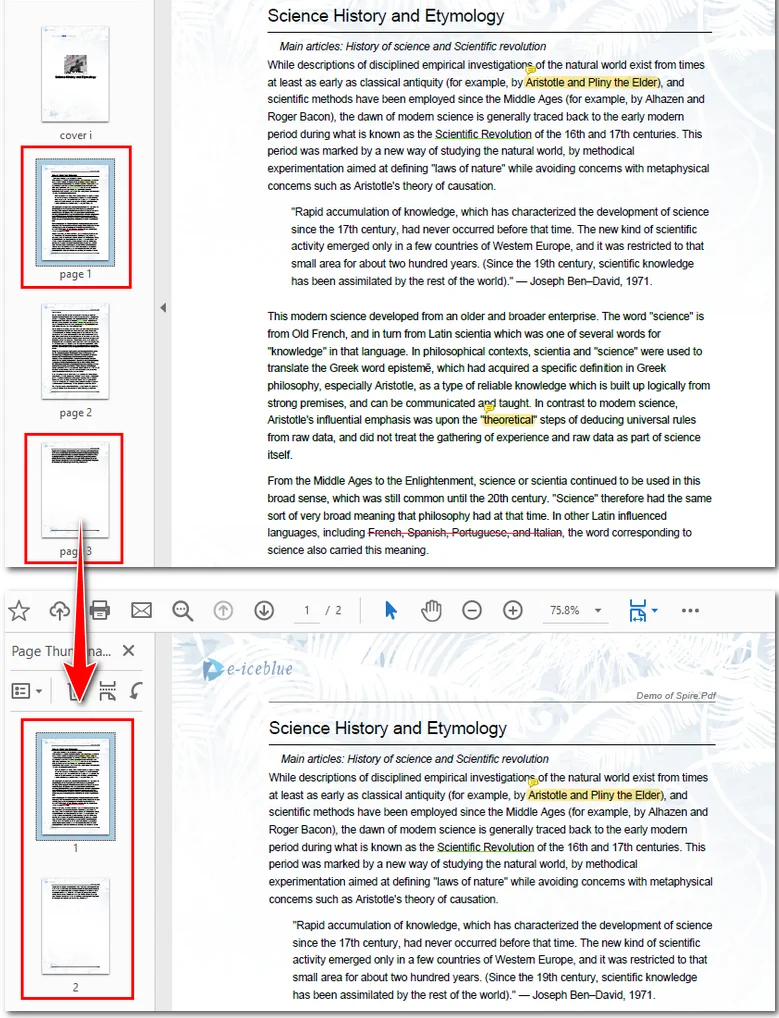
Se você precisar extrair um grande número de páginas, outra opção é excluir as páginas desnecessárias. Essa abordagem pode ser igualmente eficaz ao trabalhar com PDFs em Python.
A Conclusão
Esteja você extraindo uma única página ou gerenciando vários PDFs, escolher a ferramenta certa pode economizar muito tempo. Se você prefere uma solução mais flexível e baseada em código, o Free Spire.PDF for Python oferece uma maneira confiável de extrair, editar ou organizar arquivos PDF com eficiência. Você pode baixá-lo gratuitamente e explorar mais recursos no site oficial.
LEIA TAMBÉM
Come estrarre pagine da un PDF gratuitamente — Senza bisogno di Adobe
Molte persone aprono Adobe Acrobat solo per scoprire che l'estrazione di pagine da un PDF è una funzione a pagamento. La buona notizia è che non devi pagare per questo. Che tu abbia bisogno di conservare le pagine chiave di un contratto o di estrarre una sezione da un report, questa guida ti mostrerà tre modi facili e gratuiti per estrarre pagine da un PDF in pochi clic.
- Estrarre Pagine da PDF con Google Chrome
- Salvare Rapidamente una Pagina di un PDF con Strumenti Online
- Estrarre Pagine da un PDF Gratuitamente Usando Python
- La Conclusione
Come Estrarre Pagine da PDF con Google Chrome
Non hai bisogno di alcun software aggiuntivo: Google Chrome da solo può estrarre pagine specifiche da un PDF online. Utilizzando la sua funzione di stampa integrata, puoi scegliere di salvare tutte le pagine, solo le pagine dispari o pari, o qualsiasi intervallo di pagine personalizzato che desideri. Seleziona semplicemente le pagine che vuoi conservare e salvale come un nuovo file PDF. Ecco come estrarre pagine da un PDF utilizzando Google Chrome:
- Individua il file PDF da cui desideri estrarre le pagine e fai clic con il pulsante destro del mouse per aprirlo in Google Chrome.
- Fai clic sul pulsante Stampa nell'angolo in alto a destra e cambia la stampante di destinazione in Salva come PDF.
- Seleziona le pagine che desideri conservare, quindi fai clic su Salva. Chrome scaricherà automaticamente il nuovo PDF sul tuo dispositivo.
Vantaggi
- Non è necessario installare alcun software di terze parti.
- Ideale per estrarre rapidamente 1–2 pagine.
- Esperienza fluida e ampiamente accessibile (quasi tutti gli utenti hanno Chrome).
Svantaggi
- Non adatto per estrarre un gran numero di pagine non consecutive.
- Le opzioni di output sono piuttosto basilari.
Come Salvare Rapidamente una Pagina di un PDF con Strumenti Online
Ci sono molti modi per estrarre pagine da un PDF. Oltre a utilizzare la funzione integrata di Chrome, puoi anche utilizzare strumenti online per dividere documenti PDF e salvare le pagine di cui hai bisogno. Poiché questi strumenti sono basati sul web, funzionano sia su computer che su dispositivi mobili e non è necessario scaricare nulla o registrarsi. Cerca semplicemente "come estrarre pagine da un PDF" nel tuo browser e troverai molte opzioni. In questa guida, dimostreremo il processo utilizzando Smallpdf, ma non preoccuparti: la maggior parte degli strumenti online funziona in modo molto simile.
- Vai alla pagina Estrai Pagine PDF su Smallpdf.
- Trascina il tuo file PDF nello strumento, che lo elaborerà automaticamente e visualizzerà tutte le pagine.
- Seleziona le pagine che desideri estrarre, quindi fai clic su Fine. Puoi scegliere di esportare le pagine come un singolo PDF o come file PDF separati.
- Una volta completata l'estrazione, fai clic sul pulsante Scarica per salvare il PDF risultante sul tuo dispositivo.
Vantaggi
- Può essere utilizzato direttamente nel tuo browser, senza download o installazioni.
- Supporta l'estrazione di singole pagine, pagine consecutive o pagine non consecutive.
- Interfaccia intuitiva: basta trascinare e rilasciare, facile anche per i principianti.
- Funziona su qualsiasi dispositivo con un browser e una connessione Internet, altamente compatibile.
Svantaggi
- Richiede una connessione Internet; non può essere utilizzato offline.
- Alcuni strumenti limitano la dimensione del file per gli utenti gratuiti.
- I file vengono caricati sul server, quindi fai attenzione ai contenuti sensibili.
- Funzionalità avanzate, come l'elaborazione batch o i download senza filigrana, potrebbero richiedere un pagamento.
Come Estrarre Pagine da un PDF Gratuitamente Usando Python
Quando si ha a che fare con i PDF, sia Chrome che gli strumenti online condividono una limitazione: possono elaborare solo un file alla volta. Se gestisci più PDF, esiste una soluzione più rapida e professionale: Free Spire.PDF for Python.
Questa potente libreria offre una vasta gamma di funzionalità PDF, tra cui l'estrazione di pagine, la conversione di formati e la modifica dei contenuti. Con Free Spire.PDF, puoi estrarre facilmente pagine specifiche aggiungendole dal PDF di origine a un nuovo documento utilizzando il metodo PdfDocument.InsertPage().
Il codice di esempio seguente mostra come estrarre la 2a e la 4a pagina da un PDF e unirle in un nuovo file.
from spire.pdf import PdfDocument

# Load a PDF file
source_pdf = PdfDocument()
source_pdf.LoadFromFile("/input/Booklet.pdf")

# Create a new PdfDocument instance
new_pdf = PdfDocument()

# Extract page 2 and page 4
new_pdf.InsertPage(source_pdf, 1)
new_pdf.InsertPage(source_pdf, 3)

# Save the extracted pages
new_pdf.SaveToFile("/output/extracted_pages.pdf")
new_pdf.Close()
Ecco l'anteprima del file risultante:
Se devi estrarre un gran numero di pagine, un'altra opzione è eliminare le pagine non necessarie. Questo approccio può essere altrettanto efficace quando si lavora con i PDF in Python.
La Conclusione
Che tu stia estraendo una singola pagina o gestendo più PDF, la scelta dello strumento giusto può farti risparmiare molto tempo. Se preferisci una soluzione più flessibile e basata sul codice, Free Spire.PDF for Python offre un modo affidabile per estrarre, modificare o organizzare i file PDF in modo efficiente. Puoi scaricarlo gratuitamente ed esplorare più funzionalità sul sito ufficiale.
LEGGI ANCHE