Converter RTF para Word: 3 métodos fáceis (Online, Word, Python)
A conversão de RTF para Word é essencial para melhorar a compatibilidade com processadores de texto modernos e desbloquear as opções avançadas de formatação do Word. Embora os arquivos RTF sejam comumente usados para formatação básica de texto, os documentos do Word oferecem recursos adicionais, como modelos, melhores ferramentas de formatação e design de documentos profissional. Neste guia, mostraremos três métodos fáceis para converter RTF para Word: usando o Microsoft Word, ferramentas online gratuitas e automação com Python - adequado tanto para iniciantes quanto para usuários avançados.
O que você vai aprender
- Por que converter RTF para Word?
- Como converter RTF para Word?
- Melhores práticas e dicas para evitar problemas de formatação ao converter RTF para Word
Por que converter RTF para Word?
A conversão de RTF para Word pode melhorar seu fluxo de trabalho, tornando o documento mais fácil de gerenciar e editar. Abaixo estão alguns dos principais motivos pelos quais você pode querer converter um arquivo RTF para um documento do Word:
- Formatação e Estilização Aprimoradas: O Word oferece ferramentas de formatação mais sofisticadas, incluindo estilos de texto avançados, cabeçalhos, rodapés, números de página e sumários, que não são totalmente suportados em RTF.
- Colaboração: Os documentos do Word são mais comumente usados em ambientes colaborativos, onde várias pessoas editam o documento ao mesmo tempo.
- Segurança e Compatibilidade: Os arquivos do Word são compatíveis com uma variedade de aplicativos e plataformas e oferecem opções mais robustas para proteção e criptografia de documentos.
- Recursos Avançados: Os arquivos do Word permitem adicionar recursos como comentários, controle de alterações e muito mais, o que facilita o gerenciamento de documentos.
Como converter RTF para Word?
Agora que conhecemos os motivos para converter RTF para Word, vamos ver como fazê-lo. Exploraremos três métodos: usando o Microsoft Word, ferramentas online gratuitas e automação com Python.
Converter RTF para Word usando o Microsoft Word
O Microsoft Word é uma das ferramentas mais utilizadas para trabalhar com documentos do Word. Ele também fornece uma maneira fácil e confiável de abrir e salvar arquivos RTF como documentos do Word.
Passos para converter RTF para Word usando o Microsoft Word:
-
Abra o Microsoft Word: Inicie o Microsoft Word no seu computador.
-
Abra o arquivo RTF: Vá para Arquivo > Abrir e selecione o arquivo RTF que deseja converter. O Word abrirá automaticamente o arquivo RTF.
-
Salvar como documento do Word: Com o arquivo RTF aberto, vá para Arquivo > Salvar como. No menu suspenso Salvar como tipo, selecione Documento do Word (*.docx) ou Documento do Word 97-2003 (*.doc).

-
Escolha um local para salvar: Selecione o local onde deseja salvar o documento do Word e clique em Salvar. Seu arquivo RTF agora está convertido em um documento do Word.
Prós:
- Rápido e Simples: O processo é rápido e fácil.
- Controle total sobre a formatação: Você pode ajustar manualmente a aparência do documento conforme necessário.
- Não são necessárias ferramentas de terceiros: Utiliza o Microsoft Word, que é uma ferramenta amplamente utilizada.
Contras:
- Não é ideal para conversões em lote: A conversão manual não é eficiente para vários arquivos.
- Requer o Microsoft Word: Você deve ter o Microsoft Word instalado em seu sistema.
Converter RTF para Word usando ferramentas online gratuitas
Se você não tem o Microsoft Word ou prefere uma solução rápida e sem software, ferramentas online como Zamzar e convertio são uma ótima escolha. Basta enviar seu arquivo RTF, selecionar o formato do Word e baixar o documento convertido. Essa abordagem é rápida, gratuita e acessível de qualquer dispositivo com conexão à internet.
Passos para converter RTF para Word online gratuitamente (usando o Zamzar como exemplo):
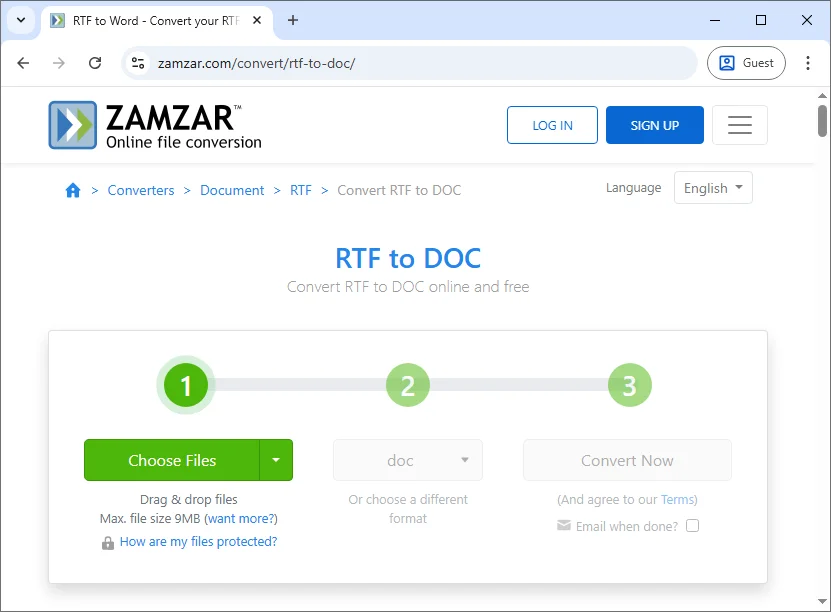
- Acesse o Zamzar: Visite o conversor online gratuito de RTF para Word do Zamzar.
- Envie seu arquivo RTF: Clique no botão Escolher arquivos para enviar seu arquivo RTF do seu computador ou arraste e solte o arquivo na área designada.
- Selecione o formato de saída: Escolha doc ou docx como formato de saída.
- Converta o arquivo: Clique no botão Converter agora. A ferramenta processará o arquivo e gerará o documento do Word convertido.
- Baixe o arquivo do Word: Quando a conversão estiver concluída, baixe o documento do Word convertido.
Prós:
- Nenhuma instalação necessária: Acessível de qualquer dispositivo com acesso à internet.
- Gratuito e fácil de usar: Ideal para conversões rápidas e únicas.
- Suporta vários formatos: Muitas ferramentas online suportam vários tipos de arquivo além de RTF para Word.
Contras:
- Preocupações com a privacidade: O envio de arquivos para sites de terceiros pode expor dados confidenciais.
- Limitações de tamanho de arquivo: Algumas ferramentas impõem limites de tamanho de arquivo para conversões gratuitas.
- Dependente da conexão com a Internet: Requer uma conexão estável com a internet para acessar e usar a ferramenta.
Converter em lote RTF para Word usando automação com Python
Para usuários que precisam converter RTF para Word em lote com frequência ou preferem automação para vários arquivos, o Python oferece uma solução eficiente e escalável. Usando bibliotecas como Spire.Doc for Python, você pode converter facilmente arquivos RTF em documentos do Word sem a necessidade de instalar o Microsoft Word.
Principais recursos
- Crie e edite documentos: Crie, edite e gerencie documentos do Word sem esforço diretamente do Python.
- Converter entre formatos: Converta perfeitamente entre vários formatos de documento, incluindo RTF para DOCX, DOC para PDF e muito mais.
- Preservar a estrutura do documento: Mantenha a integridade da formatação do documento, incluindo estilos de texto, tabelas, parágrafos e cabeçalhos.
- Opções avançadas de formatação: Aplique formatação personalizada a texto, tabelas e parágrafos, como ajuste de margens, estilos de fonte e alinhamento.
- Conversão em lote: Automatize a conversão de vários arquivos RTF para o Word em uma única operação para processamento em massa eficiente.
Ao usar o Spire.Doc for Python, você pode automatizar as conversões de RTF para Word, garantindo resultados consistentes em grandes conjuntos de arquivos e eliminando a intervenção manual.

Passos para converter RTF para Word usando Python:
-
Instale a biblioteca Python necessária:
Instale a biblioteca Spire.Doc do PyPI usando pip:
pip install spire-doc -
Adicione o script Python para converter RTF para Word:
Depois que a biblioteca estiver instalada, adicione o seguinte código para converter um arquivo RTF em um documento do Word em Python:
from spire.doc import * # Create a Document object document = Document() # Load the RTF file document.LoadFromFile("Test.rtf") # Option 1: Save as .docx (Word 2016 format) document.SaveToFile("Test_output.docx", FileFormat.Docx2016) # Option 2: Save as .doc (Word 97-2003 format) # document.SaveToFile("Test_output.doc", FileFormat.Doc) # Close the document document.Close() -
Execute o script:
O script carregará o arquivo RTF em um objeto Document do Spire.Doc e o salvará em um documento Word DOCX ou DOC.
Se você deseja converter em lote vários arquivos RTF em uma pasta para documentos do Word, pode modificar o código da seguinte maneira:
from spire.doc import *
import os

# Path to the folder containing the RTF files
input_folder = "path_to_rtf_folder"
output_folder = "path_to_output_folder"

# Loop through all files in the folder
for filename in os.listdir(input_folder):
    if filename.endswith(".rtf"):
        # Create a Document object
        document = Document()

        # Load the RTF file
        rtf_path = os.path.join(input_folder, filename)
        document.LoadFromFile(rtf_path)

        # Define the output file path (same name, but with .docx extension)
        output_path = os.path.join(output_folder, f"{os.path.splitext(filename)[0]}.docx")

        # Save as .docx (Word 2016 format)
        document.SaveToFile(output_path, FileFormat.Docx2016)

        # Optionally, save as .doc (Word 97-2003 format)
        # document.SaveToFile(output_path.replace(".docx", ".doc"), FileFormat.Doc)

        # Close the document
        document.Close()

print("Conversão concluída para todos os arquivos RTF.")
Prós:
- Ideal para processamento em lote: Converta facilmente vários arquivos RTF de uma vez.
- Não há necessidade do Microsoft Word: A conversão é tratada inteiramente pelo Python, sem a necessidade do Microsoft Word.
- Personalizável: Adicione recursos como tratamento de erros, registro ou manipulação de documentos antes de salvar.
Contras:
- Requer conhecimento de Python: Não é adequado para usuários sem experiência em programação.
- Configuração necessária: Você precisa instalar o Python, a biblioteca necessária e gerenciar o ambiente.
Para mais detalhes, consulte o guia oficial completo: Python: Converter Word para RTF e vice-versa.
Melhores práticas e dicas para evitar problemas de formatação ao converter RTF para Word
Ao converter arquivos RTF para Word, seguir algumas práticas recomendadas pode ajudá-lo a garantir a qualidade e a precisão da sua conversão:
- Verificar formatação: Sempre revise o documento do Word convertido em busca de erros de formatação. Os arquivos RTF às vezes perdem sua formatação original durante a conversão.
- Conversão em lote: Se você precisar converter muitos arquivos RTF, considere usar automação com Python ou ferramentas de processamento em lote para economizar tempo.
- Salvar backups: Mantenha backups de seus arquivos RTF originais, especialmente se estiver usando uma ferramenta online ou um script automatizado, para evitar a perda de dados.
- Validar compatibilidade: Certifique-se de que o arquivo do Word convertido seja compatível com a versão do Microsoft Word que você está usando.
Dicas para evitar problemas de formatação
-
Verifique imagens e tabelas: Esses elementos são propensos a quebrar durante a conversão.
-
Use fontes comuns: Use fontes seguras para a web, como Arial ou Times New Roman.
-
Use o Microsoft Word para arquivos complexos: O conversor nativo do Word lida com formatação complexa melhor do que as ferramentas online.
Conclusão
A conversão de RTF para Word é uma etapa simples, mas essencial, para aprimorar a formatação e a compatibilidade do documento. Se você prefere a confiabilidade do Microsoft Word, a conveniência de ferramentas online para conversões rápidas ou a eficiência da automação com Python para tarefas em massa, existe uma solução para cada necessidade.
Selecione o método que melhor se adapta às suas necessidades e comece a transformar seus arquivos RTF em documentos profissionais do Word hoje mesmo!
Perguntas frequentes: conversão de RTF para Word
P1: Posso converter RTF para Word sem o Microsoft Word?
R1: Sim, ferramentas online e bibliotecas Python permitem converter RTF para Word sem a necessidade de ter o Microsoft Word instalado.
P2: A conversão de RTF para Word afeta a formatação do documento?
R2: Às vezes, a conversão de RTF para Word pode causar pequenos problemas de formatação. Sempre verifique o documento convertido e ajuste a formatação conforme necessário.
P3: Posso automatizar a conversão de RTF para Word para vários arquivos?
R3: Sim, o Python e a biblioteca Spire.Doc for Python permitem automatizar o processo e converter muitos arquivos RTF para o Word de uma vez, tornando-o eficiente para tarefas de conversão em massa.
Veja também
RTF를 Word로 변환하는 3가지 쉬운 방법 (온라인, Word, Python)
RTF를 Word로 변환하는 것은 최신 워드 프로세서와의 호환성을 개선하고 Word의 고급 서식 옵션을 활용하는 데 필수적입니다. RTF 파일은 일반적으로 기본 텍스트 서식에 사용되지만 Word 문서는 템플릿, 더 나은 서식 도구 및 전문적인 문서 디자인과 같은 추가 기능을 제공합니다. 이 가이드에서는 초보자와 고급 사용자 모두에게 적합한 Microsoft Word, 무료 온라인 도구 및 Python 자동화를 사용하는 세 가지 쉬운 RTF를 Word로 변환하는 방법을 보여줍니다.
학습 내용
RTF를 Word로 변환해야 하는 이유
RTF를 Word로 변환하면 문서를 더 쉽게 관리하고 편집할 수 있어 작업 흐름을 개선할 수 있습니다. 다음은 RTF 파일을 Word 문서로 변환하려는 몇 가지 주요 이유입니다.
- 향상된 서식 및 스타일링: Word는 고급 텍스트 스타일, 머리글, 바닥글, 페이지 번호 및 목차를 포함하여 RTF에서 완전히 지원되지 않는 더 정교한 서식 도구를 제공합니다.
- 공동 작업: Word 문서는 여러 사람이 동시에 문서를 편집하는 공동 작업 환경에서 더 일반적으로 사용됩니다.
- 보안 및 호환성: Word 파일은 다양한 응용 프로그램 및 플랫폼과 호환되며 문서 보호 및 암호화를 위한 더 강력한 옵션을 제공합니다.
- 고급 기능: Word 파일을 사용하면 메모, 변경 내용 추적 등과 같은 기능을 추가할 수 있어 문서 관리가 더 쉬워집니다.
RTF를 Word로 변환하는 방법
이제 RTF를 Word로 변환해야 하는 이유를 알았으니 어떻게 하는지 살펴보겠습니다. Microsoft Word, 무료 온라인 도구 및 Python 자동화의 세 가지 방법을 살펴보겠습니다.
Microsoft Word를 사용하여 RTF를 Word로 변환
Microsoft Word는 Word 문서 작업을 위해 가장 널리 사용되는 도구 중 하나입니다. 또한 RTF 파일을 Word 문서로 열고 저장하는 쉽고 안정적인 방법을 제공합니다.
Microsoft Word를 사용하여 RTF를 Word로 변환하는 단계:
-
Microsoft Word 열기: 컴퓨터에서 Microsoft Word를 시작합니다.
-
RTF 파일 열기: 파일 > 열기로 이동한 다음 변환하려는 RTF 파일을 선택합니다. Word가 자동으로 RTF 파일을 엽니다.
-
Word 문서로 저장: RTF 파일이 열리면 파일 > 다른 이름으로 저장으로 이동합니다. 다른 이름으로 저장 유형 드롭다운 메뉴에서 Word 문서 (*.docx) 또는 Word 97-2003 문서 (*.doc)를 선택합니다.
-
저장 위치 선택: Word 문서를 저장할 위치를 선택하고 저장을 클릭합니다. 이제 RTF 파일이 Word 문서로 변환되었습니다.
장점:
- 빠르고 간단함: 프로세스가 빠르고 쉽습니다.
- 서식에 대한 전체 제어: 필요에 따라 문서의 모양을 수동으로 조정할 수 있습니다.
- 타사 도구 필요 없음: 널리 사용되는 도구인 Microsoft Word를 활용합니다.
단점:
- 일괄 변환에 이상적이지 않음: 수동 변환은 여러 파일에 효율적이지 않습니다.
- Microsoft Word 필요: 시스템에 Microsoft Word가 설치되어 있어야 합니다.
무료 온라인 도구를 사용하여 RTF를 Word로 변환
Microsoft Word가 없거나 빠르고 소프트웨어가 필요 없는 솔루션을 선호하는 경우 Zamzar 및 convertio와 같은 온라인 도구가 훌륭한 선택입니다. RTF 파일을 업로드하고 Word 형식을 선택한 다음 변환된 문서를 다운로드하기만 하면 됩니다. 이 접근 방식은 빠르고 무료이며 인터넷에 연결된 모든 장치에서 액세스할 수 있습니다.
온라인에서 무료로 RTF를 Word로 변환하는 단계(Zamzar 예시):
- Zamzar로 이동: Zamzar의 무료 온라인 RTF to Word 변환기를 방문하세요.
- RTF 파일 업로드: 파일 선택 버튼을 클릭하여 컴퓨터에서 RTF 파일을 업로드하거나 지정된 영역으로 파일을 끌어다 놓습니다.
- 출력 형식 선택: 출력 형식으로 doc 또는 docx를 선택합니다.
- 파일 변환: 지금 변환 버튼을 클릭합니다. 도구가 파일을 처리하고 변환된 Word 문서를 생성합니다.
- Word 파일 다운로드: 변환이 완료되면 변환된 Word 문서를 다운로드합니다.
장점:
- 설치 필요 없음: 인터넷에 액세스할 수 있는 모든 장치에서 액세스할 수 있습니다.
- 무료이며 사용하기 쉬움: 빠른 일회성 변환에 이상적입니다.
- 다중 형식 지원: 많은 온라인 도구는 RTF to Word 이외의 다양한 파일 형식을 지원합니다.
단점:
- 개인 정보 보호 문제: 타사 웹사이트에 파일을 업로드하면 민감한 데이터가 노출될 수 있습니다.
- 파일 크기 제한: 일부 도구는 무료 변환에 대한 파일 크기 제한을 부과합니다.
- 인터넷 연결에 의존: 도구에 액세스하고 사용하려면 안정적인 인터넷 연결이 필요합니다.
Python 자동화를 사용하여 RTF를 Word로 일괄 변환
RTF를 Word로 자주 일괄 변환해야 하거나 여러 파일에 대한 자동화를 선호하는 사용자를 위해 Python은 효율적이고 확장 가능한 솔루션을 제공합니다. Spire.Doc for Python과 같은 라이브러리를 사용하면 Microsoft Word를 설치할 필요 없이 RTF 파일을 Word 문서로 쉽게 변환할 수 있습니다.
주요 특징
- 문서 생성 및 편집: Python에서 직접 Word 문서를 손쉽게 생성, 편집 및 관리합니다.
- 형식 간 변환: RTF에서 DOCX, DOC에서 PDF 등으로 다양한 문서 형식 간에 원활하게 변환합니다.
- 문서 구조 보존: 텍스트 스타일, 표, 단락 및 머리글을 포함한 문서 서식의 무결성을 유지합니다.
- 고급 서식 옵션: 여백, 글꼴 스타일 및 정렬 조정과 같은 사용자 지정 서식을 텍스트, 표 및 단락에 적용합니다.
- 일괄 변환: 여러 RTF 파일을 Word로 변환하는 작업을 단일 작업으로 자동화하여 효율적인 대량 처리를 수행합니다.
Spire.Doc for Python을 사용하면 RTF to Word 변환을 자동화하여 수동 개입을 제거하면서 대규모 파일 세트에서 일관된 결과를 보장할 수 있습니다.
Python을 사용하여 RTF를 Word로 변환하는 단계:
-
필요한 Python 라이브러리 설치:
pip를 사용하여 PyPI에서 Spire.Doc 라이브러리를 설치합니다.
pip install spire-doc -
RTF를 Word로 변환하는 Python 스크립트 추가:
라이브러리가 설치되면 다음 코드를 추가하여 Python에서 RTF 파일을 Word 문서로 변환합니다.
from spire.doc import * # Document 객체 생성 document = Document() # RTF 파일 로드 document.LoadFromFile("Test.rtf") # 옵션 1: .docx로 저장 (Word 2016 형식) document.SaveToFile("Test_output.docx", FileFormat.Docx2016) # 옵션 2: .doc로 저장 (Word 97-2003 형식) # document.SaveToFile("Test_output.doc", FileFormat.Doc) # 문서 닫기 document.Close() -
스크립트 실행:
스크립트는 RTF 파일을 Spire.Doc 문서 개체에 로드하고 Word DOCX 또는 DOC 문서에 저장합니다.
폴더에 있는 여러 RTF 파일을 Word 문서로 일괄 변환하려면 다음과 같이 코드를 수정할 수 있습니다.
from spire.doc import *
import os

# RTF 파일이 포함된 폴더 경로
input_folder = "path_to_rtf_folder"
output_folder = "path_to_output_folder"

# 폴더의 모든 파일을 반복
for filename in os.listdir(input_folder):
    if filename.endswith(".rtf"):
        # Document 객체 생성
        document = Document()

        # RTF 파일 로드
        rtf_path = os.path.join(input_folder, filename)
        document.LoadFromFile(rtf_path)

        # 출력 파일 경로 정의 (같은 이름, 하지만 .docx 확장자)
        output_path = os.path.join(output_folder, f"{os.path.splitext(filename)[0]}.docx")

        # .docx로 저장 (Word 2016 형식)
        document.SaveToFile(output_path, FileFormat.Docx2016)

        # 선택적으로 .doc로 저장 (Word 97-2003 형식)
        # document.SaveToFile(output_path.replace(".docx", ".doc"), FileFormat.Doc)

        # 문서 닫기
        document.Close()

print("모든 RTF 파일에 대한 변환이 완료되었습니다.")
장점:
- 일괄 처리에 이상적: 여러 RTF 파일을 한 번에 쉽게 변환합니다.
- Microsoft Word 필요 없음: 변환은 Microsoft Word 없이 Python에서 전적으로 처리됩니다.
- 사용자 정의 가능: 저장하기 전에 오류 처리, 로깅 또는 문서 조작과 같은 기능을 추가합니다.
단점:
- Python 지식 필요: 프로그래밍 경험이 없는 사용자에게는 적합하지 않습니다.
- 설정 필요: Python, 필요한 라이브러리를 설치하고 환경을 관리해야 합니다.
자세한 내용은 공식 전체 가이드를 확인하세요: Python: Word를 RTF로 변환 및 그 반대.
RTF를 Word로 변환할 때 서식 문제를 피하기 위한 모범 사례 및 팁
RTF 파일을 Word로 변환할 때 몇 가지 모범 사례를 따르면 변환의 품질과 정확성을 보장하는 데 도움이 될 수 있습니다.
- 서식 확인: 변환된 Word 문서에 서식 오류가 있는지 항상 검토하십시오. RTF 파일은 변환 중에 원래 서식을 잃는 경우가 있습니다.
- 일괄 변환: 많은 RTF 파일을 변환해야 하는 경우 시간을 절약하기 위해 Python 자동화 또는 일괄 처리 도구를 사용하는 것을 고려하십시오.
- 백업 저장: 데이터 손실을 방지하기 위해 특히 온라인 도구나 자동화된 스크립트를 사용하는 경우 원본 RTF 파일의 백업을 보관하십시오.
- 호환성 확인: 변환된 Word 파일이 사용 중인 Microsoft Word 버전과 호환되는지 확인하십시오.
서식 문제 방지를 위한 팁
-
이미지 및 표 확인: 이러한 요소는 변환 중에 깨지기 쉽습니다.
-
일반적인 글꼴 사용: Arial 또는 Times New Roman과 같은 웹 안전 글꼴을 사용하십시오.
-
복잡한 파일에 Microsoft Word 사용: 기본 Word 변환기는 온라인 도구보다 복잡한 서식을 더 잘 처리합니다.
결론
RTF를 Word로 변환하는 것은 문서 서식과 호환성을 향상시키기 위한 간단하면서도 필수적인 단계입니다. Microsoft Word의 신뢰성, 빠른 변환을 위한 온라인 도구의 편리함, 대량 작업을 위한 Python 자동화의 효율성 중 무엇을 선호하든 모든 요구에 맞는 솔루션이 있습니다.
요구 사항에 가장 적합한 방법을 선택하고 오늘부터 RTF 파일을 전문적인 Word 문서로 변환하십시오!
FAQ: RTF to Word 변환
Q1: Microsoft Word 없이 RTF를 Word로 변환할 수 있습니까?
A1: 예, 온라인 도구 및 Python 라이브러리를 사용하면 Microsoft Word를 설치할 필요 없이 RTF를 Word로 변환할 수 있습니다.
Q2: RTF를 Word로 변환하면 문서 서식에 영향을 줍니까?
A2: 경우에 따라 RTF를 Word로 변환하면 사소한 서식 문제가 발생할 수 있습니다. 항상 변환된 문서를 확인하고 필요에 따라 서식을 조정하십시오.
Q3: 여러 파일에 대해 RTF to Word 변환을 자동화할 수 있습니까?
A3: 예, Python 및 Spire.Doc for Python 라이브러리를 사용하면 프로세스를 자동화하고 많은 RTF 파일을 한 번에 Word로 변환하여 대량 변환 작업에 효율적입니다.
참고 항목
Convertir RTF en Word : 3 méthodes faciles (en ligne, Word, Python)
La conversion de RTF en Word est essentielle pour améliorer la compatibilité avec les traitements de texte modernes et débloquer les options de formatage avancées de Word. Tandis que les fichiers RTF sont couramment utilisés pour la mise en forme de texte de base, les documents Word offrent des fonctionnalités supplémentaires telles que des modèles, de meilleurs outils de mise en forme et une conception de documents professionnelle. Dans ce guide, nous vous présenterons trois méthodes simples pour convertir RTF en Word : en utilisant Microsoft Word, des outils en ligne gratuits et l'automatisation avec Python, adaptées aussi bien aux débutants qu'aux utilisateurs avancés.
Ce que vous apprendrez
- Pourquoi convertir RTF en Word ?
- Comment convertir RTF en Word ?
- Meilleures pratiques et conseils pour éviter les problèmes de formatage lors de la conversion de RTF en Word
Pourquoi convertir RTF en Word ?
La conversion de RTF en Word peut améliorer votre flux de travail en rendant le document plus facile à gérer et à modifier. Voici quelques raisons clés pour lesquelles vous pourriez vouloir convertir un fichier RTF en document Word :
- Mise en forme et style améliorés : Word offre des outils de mise en forme plus sophistiqués, notamment des styles de texte avancés, des en-têtes, des pieds de page, des numéros de page et une table des matières, qui ne sont pas entièrement pris en charge en RTF.
- Collaboration : Les documents Word sont plus couramment utilisés dans les environnements collaboratifs où plusieurs personnes modifient le document en même temps.
- Sécurité et compatibilité : Les fichiers Word sont compatibles avec une variété d'applications et de plateformes, et ils offrent des options plus robustes pour la protection et le chiffrement des documents.
- Fonctionnalités avancées : Les fichiers Word vous permettent d'ajouter des fonctionnalités telles que des commentaires, le suivi des modifications, etc., ce qui facilite la gestion des documents.
Comment convertir RTF en Word ?
Maintenant que nous connaissons les raisons de convertir RTF en Word, voyons comment le faire. Nous explorerons trois méthodes : en utilisant Microsoft Word, des outils en ligne gratuits et l'automatisation avec Python.
Convertir RTF en Word avec Microsoft Word
Microsoft Word est l'un des outils les plus utilisés pour travailler avec des documents Word. Il offre également un moyen simple et fiable d'ouvrir et d'enregistrer des fichiers RTF en tant que documents Word.
Étapes pour convertir RTF en Word avec Microsoft Word :
-
Ouvrir Microsoft Word : Lancez Microsoft Word sur votre ordinateur.
-
Ouvrir le fichier RTF : Allez dans Fichier > Ouvrir, puis sélectionnez le fichier RTF que vous souhaitez convertir. Word ouvrira automatiquement le fichier RTF.
-
Enregistrer en tant que document Word : Une fois le fichier RTF ouvert, allez dans Fichier > Enregistrer sous. Dans le menu déroulant Type de fichier, sélectionnez Document Word (*.docx) ou Document Word 97-2003 (*.doc).
-
Choisir un emplacement de sauvegarde : Sélectionnez l'emplacement où vous souhaitez enregistrer le document Word et cliquez sur Enregistrer. Votre fichier RTF est maintenant converti en document Word.
Avantages :
- Rapide et simple : Le processus est rapide et facile.
- Contrôle total sur la mise en forme : Vous pouvez ajuster manuellement l'apparence du document selon vos besoins.
- Aucun outil tiers nécessaire : Utilise Microsoft Word, qui est un outil largement utilisé.
Inconvénients :
- Pas idéal pour les conversions par lots : La conversion manuelle n'est pas efficace pour plusieurs fichiers.
- Nécessite Microsoft Word : Vous devez avoir Microsoft Word installé sur votre système.
Convertir RTF en Word avec des outils en ligne gratuits
Si vous n'avez pas Microsoft Word ou si vous préférez une solution rapide et sans logiciel, les outils en ligne comme Zamzar et convertio sont un excellent choix. Téléchargez simplement votre fichier RTF, sélectionnez le format Word et téléchargez votre document converti. Cette approche est rapide, gratuite et accessible depuis n'importe quel appareil disposant d'une connexion Internet.
Étapes pour convertir RTF en Word en ligne gratuitement (en utilisant Zamzar comme exemple) :
- Aller sur Zamzar : Visitez le convertisseur RTF en Word en ligne gratuit de Zamzar.
- Télécharger votre fichier RTF : Cliquez sur le bouton Choisir les fichiers pour télécharger votre fichier RTF depuis votre ordinateur, ou faites glisser et déposez le fichier dans la zone désignée.
- Sélectionner le format de sortie : Choisissez doc ou docx comme format de sortie.
- Convertir le fichier : Cliquez sur le bouton Convertir maintenant. L'outil traitera le fichier et générera le document Word converti.
- Télécharger le fichier Word : Une fois la conversion terminée, téléchargez le document Word converti.
Avantages :
- Aucune installation requise : Accessible depuis n'importe quel appareil avec un accès Internet.
- Gratuit et facile à utiliser : Idéal pour les conversions rapides et ponctuelles.
- Prend en charge plusieurs formats : De nombreux outils en ligne prennent en charge divers types de fichiers au-delà du RTF vers Word.
Inconvénients :
- Problèmes de confidentialité : Le téléchargement de fichiers sur des sites Web tiers peut exposer des données sensibles.
- Limitations de taille de fichier : Certains outils imposent des limites de taille de fichier pour les conversions gratuites.
- Dépendant de la connexion Internet : Nécessite une connexion Internet stable pour accéder et utiliser l'outil.
Convertir par lots RTF en Word avec l'automatisation Python
Pour les utilisateurs qui ont besoin de convertir fréquemment des RTF en Word par lots ou qui préfèrent l'automatisation pour plusieurs fichiers, Python offre une solution efficace et évolutive. En utilisant des bibliothèques comme Spire.Doc for Python, vous pouvez facilement convertir des fichiers RTF en documents Word sans avoir besoin d'installer Microsoft Word.
Caractéristiques principales
- Créer et modifier des documents : Créez, modifiez et gérez sans effort des documents Word directement depuis Python.
- Convertir entre les formats : Convertissez en toute transparence entre différents formats de documents, y compris RTF en DOCX, DOC en PDF, et plus encore.
- Préserver la structure du document : Maintenez l'intégrité de la mise en forme du document, y compris les styles de texte, les tableaux, les paragraphes et les en-têtes.
- Options de mise en forme avancées : Appliquez une mise en forme personnalisée au texte, aux tableaux et aux paragraphes, comme l'ajustement des marges, des styles de police et de l'alignement.
- Conversion par lots : Automatisez la conversion de plusieurs fichiers RTF en Word en une seule opération pour un traitement en masse efficace.
En utilisant Spire.Doc for Python, vous pouvez automatiser les conversions de RTF en Word, garantissant des résultats cohérents sur de grands ensembles de fichiers tout en éliminant l'intervention manuelle.
Étapes pour convertir RTF en Word avec Python :
-
Installer la bibliothèque Python requise :
Installez la bibliothèque Spire.Doc depuis PyPI en utilisant pip :
pip install spire-doc -
Ajouter le script Python pour convertir RTF en Word :
Une fois la bibliothèque installée, ajoutez le code suivant pour convertir un fichier RTF en document Word en Python :
from spire.doc import * # Créer un objet Document document = Document() # Charger le fichier RTF document.LoadFromFile("Test.rtf") # Option 1 : Enregistrer en .docx (format Word 2016) document.SaveToFile("Test_output.docx", FileFormat.Docx2016) # Option 2 : Enregistrer en .doc (format Word 97-2003) # document.SaveToFile("Test_output.doc", FileFormat.Doc) # Fermer le document document.Close() -
Exécuter le script :
Le script chargera le fichier RTF dans un objet Document de Spire.Doc et l'enregistrera dans un document Word DOCX ou DOC.
Si vous souhaitez convertir par lots plusieurs fichiers RTF d'un dossier en documents Word, vous pouvez modifier le code comme suit :
from spire.doc import *
import os

# Chemin vers le dossier contenant les fichiers RTF
input_folder = "chemin_vers_le_dossier_rtf"
output_folder = "chemin_vers_le_dossier_de_sortie"

# Parcourir tous les fichiers du dossier
for filename in os.listdir(input_folder):
    if filename.endswith(".rtf"):
        # Créer un objet Document
        document = Document()

        # Charger le fichier RTF
        rtf_path = os.path.join(input_folder, filename)
        document.LoadFromFile(rtf_path)

        # Définir le chemin du fichier de sortie (même nom, mais avec l'extension .docx)
        output_path = os.path.join(output_folder, f"{os.path.splitext(filename)[0]}.docx")

        # Enregistrer en .docx (format Word 2016)
        document.SaveToFile(output_path, FileFormat.Docx2016)

        # Optionnellement, enregistrer en .doc (format Word 97-2003)
        # document.SaveToFile(output_path.replace(".docx", ".doc"), FileFormat.Doc)

        # Fermer le document
        document.Close()

print("Conversion terminée pour tous les fichiers RTF.")
Avantages :
- Idéal pour le traitement par lots : Convertissez facilement plusieurs fichiers RTF à la fois.
- Pas besoin de Microsoft Word : La conversion est entièrement gérée by Python, sans nécessiter Microsoft Word.
- Personnalisable : Ajoutez des fonctionnalités telles que la gestion des erreurs, la journalisation ou la manipulation de documents avant d'enregistrer.
Inconvénients :
- Nécessite des connaissances en Python : Ne convient pas aux utilisateurs sans expérience en programmation.
- Configuration requise : Vous devez installer Python, la bibliothèque nécessaire et gérer l'environnement.
Pour plus de détails, consultez le guide complet officiel : Python : Convertir Word en RTF et vice versa.
Meilleures pratiques et conseils pour éviter les problèmes de formatage lors de la conversion de RTF en Word
Lors de la conversion de fichiers RTF en Word, le respect de certaines bonnes pratiques peut vous aider à garantir la qualité et l'exactitude de votre conversion :
- Vérifier la mise en forme : Examinez toujours le document Word converti pour détecter les erreurs de mise en forme. Les fichiers RTF perdent parfois leur mise en forme d'origine lors de la conversion.
- Conversion par lots : Si vous devez convertir de nombreux fichiers RTF, envisagez d'utiliser l'automatisation Python ou des outils de traitement par lots pour gagner du temps.
- Enregistrer des sauvegardes : Conservez des sauvegardes de vos fichiers RTF d'origine, en particulier si vous utilisez un outil en ligne ou un script automatisé, pour éviter la perte de données.
- Valider la compatibilité : Assurez-vous que le fichier Word converti est compatible avec la version de Microsoft Word que vous utilisez.
Conseils pour éviter les problèmes de mise en forme
-
Vérifier les images et les tableaux : Ces éléments sont susceptibles de se casser lors de la conversion.
-
Utiliser des polices courantes : Tenez-vous-en à des polices sécurisées pour le Web comme Arial ou Times New Roman.
-
Utiliser Microsoft Word pour les fichiers complexes : Le convertisseur natif de Word gère mieux la mise en forme complexe que les outils en ligne.
Conclusion
La conversion de RTF en Word est une étape simple mais essentielle pour améliorer la mise en forme et la compatibilité des documents. Que vous préfériez la fiabilité de Microsoft Word, la commodité des outils en ligne pour des conversions rapides ou l'efficacité de l'automatisation Python pour les tâches en masse, il existe une solution pour chaque besoin.
Sélectionnez la méthode qui correspond le mieux à vos besoins et commencez à transformer vos fichiers RTF en documents Word professionnels dès aujourd'hui !
FAQ : Conversion de RTF en Word
Q1 : Puis-je convertir RTF en Word sans Microsoft Word ?
R1 : Oui, les outils en ligne et les bibliothèques Python vous permettent de convertir RTF en Word sans avoir besoin d'installer Microsoft Word.
Q2 : La conversion de RTF en Word affecte-t-elle la mise en forme du document ?
R2 : Parfois, la conversion de RTF en Word peut entraîner des problèmes de mise en forme mineurs. Vérifiez toujours le document converti et ajustez la mise en forme si nécessaire.
Q3 : Puis-je automatiser la conversion de RTF en Word pour plusieurs fichiers ?
R3 : Oui, Python et la bibliothèque Spire.Doc for Python vous permettent d'automatiser le processus et de convertir de nombreux fichiers RTF en Word à la fois, ce qui le rend efficace pour les tâches de conversion en masse.
Voir également
Convertir RTF a Word: 3 métodos fáciles (en línea, Word, Python)
Tabla de Contenidos
Convertir RTF a Word es esencial para mejorar la compatibilidad con los procesadores de texto modernos y desbloquear las opciones de formato avanzadas de Word. Aunque los archivos RTF se utilizan comúnmente para el formato de texto básico, los documentos de Word ofrecen características adicionales como plantillas, mejores herramientas de formato y diseño de documentos profesionales. En esta guía, le mostraremos tres métodos sencillos para convertir RTF a Word: usando Microsoft Word, herramientas gratuitas en línea y automatización con Python, adecuados tanto para principiantes como para usuarios avanzados.
Lo Que Aprenderá
- ¿Por Qué Convertir RTF a Word?
- ¿Cómo Convertir RTF a Word?
- Mejores Prácticas y Consejos para Evitar Problemas de Formato al Convertir RTF a Word
¿Por Qué Convertir RTF a Word?
Convertir RTF a Word puede mejorar su flujo de trabajo al hacer que el documento sea más fácil de administrar y editar. A continuación se presentan algunas razones clave por las que podría querer convertir un archivo RTF a un documento de Word:
- Formato y Estilo Mejorados: Word ofrece herramientas de formato más sofisticadas, incluyendo estilos de texto avanzados, encabezados, pies de página, números de página y tablas de contenido, que no son totalmente compatibles con RTF.
- Colaboración: Los documentos de Word se utilizan más comúnmente en entornos de colaboración donde varias personas editan el documento al mismo tiempo.
- Seguridad y Compatibilidad: Los archivos de Word son compatibles con una variedad de aplicaciones y plataformas, y ofrecen opciones más robustas para la protección y el cifrado de documentos.
- Características Avanzadas: Los archivos de Word le permiten agregar características como comentarios, control de cambios y más, lo que facilita la gestión de documentos.
¿Cómo Convertir RTF a Word?
Ahora que conocemos las razones para convertir RTF a Word, veamos cómo hacerlo. Exploraremos tres métodos: usando Microsoft Word, herramientas gratuitas en línea y automatización con Python.
Convertir RTF a Word Usando Microsoft Word
Microsoft Word es una de las herramientas más utilizadas para trabajar con documentos de Word. También proporciona una forma fácil y confiable de abrir y guardar archivos RTF como documentos de Word.
Pasos para Convertir RTF a Word Usando Microsoft Word:
-
Abrir Microsoft Word: Inicie Microsoft Word en su computadora.
-
Abrir el Archivo RTF: Vaya a Archivo > Abrir, luego seleccione el archivo RTF que desea convertir. Word abrirá automáticamente el archivo RTF.
-
Guardar como Documento de Word: Una vez que el archivo RTF esté abierto, vaya a Archivo > Guardar como. En el menú desplegable Guardar como tipo, seleccione Documento de Word (*.docx) o Documento de Word 97-2003 (*.doc).
-
Elija una Ubicación para Guardar: Seleccione la ubicación donde desea guardar el documento de Word y haga clic en Guardar. Su archivo RTF ahora está convertido en un documento de Word.
Ventajas:
- Rápido y Sencillo: El proceso es rápido y fácil.
- Control Total sobre el Formato: Puede ajustar manualmente la apariencia del documento según sea necesario.
- No se Necesitan Herramientas de Terceros: Utiliza Microsoft Word, que es una herramienta muy utilizada.
Desventajas:
- No es Ideal para Conversiones por Lotes: La conversión manual no es eficiente para múltiples archivos.
- Requiere Microsoft Word: Debe tener Microsoft Word instalado en su sistema.
Convertir RTF a Word Usando Herramientas Gratuitas en Línea
Si no tiene Microsoft Word o prefiere una solución rápida y sin software, las herramientas en línea como Zamzar y convertio son una excelente opción. Simplemente cargue su archivo RTF, seleccione el formato de Word y descargue su documento convertido. Este enfoque es rápido, gratuito y accesible desde cualquier dispositivo con conexión a Internet.
Pasos para Convertir RTF a Word en Línea Gratis (usando Zamzar como ejemplo):
- Ir a Zamzar: Visite el convertidor gratuito en línea de RTF a Word de Zamzar.
- Subir su Archivo RTF: Haga clic en el botón Elegir Archivos para subir su archivo RTF desde su computadora, o arrastre y suelte el archivo en el área designada.
- Seleccionar Formato de Salida: Elija doc o docx como formato de salida.
- Convertir el Archivo: Haga clic en el botón Convertir Ahora. La herramienta procesará el archivo y generará el documento de Word convertido.
- Descargar el Archivo de Word: Una vez que se complete la conversión, descargue el documento de Word convertido.
Ventajas:
- No se Requiere Instalación: Accesible desde cualquier dispositivo con acceso a Internet.
- Gratis y Fácil de Usar: Ideal para conversiones rápidas y únicas.
- Admite Múltiples Formatos: Muchas herramientas en línea admiten varios tipos de archivos además de RTF a Word.
Desventajas:
- Preocupaciones de Privacidad: Subir archivos a sitios web de terceros puede exponer datos confidenciales.
- Limitaciones de Tamaño de Archivo: Algunas herramientas imponen límites en el tamaño del archivo para las conversiones gratuitas.
- Dependiente de la Conexión a Internet: Requiere una conexión a Internet estable para acceder y usar la herramienta.
Convertir por Lotes RTF a Word Usando Automatización con Python
Para los usuarios que necesitan convertir por lotes RTF a Word con frecuencia o prefieren la automatización para múltiples archivos, Python proporciona una solución eficiente y escalable. Usando bibliotecas como Spire.Doc for Python, puede convertir fácilmente archivos RTF a documentos de Word sin necesidad de tener Microsoft Word instalado.
Características Clave
- Crear y Editar Documentos: Cree, edite y administre documentos de Word sin esfuerzo directamente desde Python.
- Convertir Entre Formatos: Convierta sin problemas entre varios formatos de documentos, incluidos RTF a DOCX, DOC a PDF y más.
- Preservar la Estructura del Documento: Mantenga la integridad del formato del documento, incluidos los estilos de texto, tablas, párrafos y encabezados.
- Opciones de Formato Avanzadas: Aplique formato personalizado a texto, tablas y párrafos, como ajustar márgenes, estilos de fuente y alineación.
- Conversión por Lotes: Automatice la conversión de múltiples archivos RTF a Word en una sola operación para un procesamiento masivo eficiente.
Al usar Spire.Doc for Python, puede automatizar las conversiones de RTF a Word, asegurando resultados consistentes en grandes conjuntos de archivos y eliminando la intervención manual.
Pasos para Convertir RTF a Word Usando Python:
-
Instale la Biblioteca de Python Requerida:
Instale la biblioteca Spire.Doc desde PyPI usando pip:
pip install spire-doc -
Agregue el Script de Python para Convertir RTF a Word:
Una vez instalada la biblioteca, agregue el siguiente código para convertir un archivo RTF a un documento de Word en Python:
from spire.doc import * # Create a Document object document = Document() # Load the RTF file document.LoadFromFile("Test.rtf") # Option 1: Save as .docx (Word 2016 format) document.SaveToFile("Test_output.docx", FileFormat.Docx2016) # Option 2: Save as .doc (Word 97-2003 format) # document.SaveToFile("Test_output.doc", FileFormat.Doc) # Close the document document.Close() -
Ejecute el Script:
El script cargará el archivo RTF en un objeto Document de Spire.Doc y lo guardará en un documento DOCX o DOC de Word.
Si desea convertir por lotes múltiples archivos RTF en una carpeta a documentos de Word, puede modificar el código de la siguiente manera:
from spire.doc import *
import os

# Path to the folder containing the RTF files
input_folder = "path_to_rtf_folder"
output_folder = "path_to_output_folder"

# Loop through all files in the folder
for filename in os.listdir(input_folder):
    if filename.endswith(".rtf"):
        # Create a Document object
        document = Document()

        # Load the RTF file
        rtf_path = os.path.join(input_folder, filename)
        document.LoadFromFile(rtf_path)

        # Define the output file path (same name, but with .docx extension)
        output_path = os.path.join(output_folder, f"{os.path.splitext(filename)[0]}.docx")

        # Save as .docx (Word 2016 format)
        document.SaveToFile(output_path, FileFormat.Docx2016)

        # Optionally, save as .doc (Word 97-2003 format)
        # document.SaveToFile(output_path.replace(".docx", ".doc"), FileFormat.Doc)

        # Close the document
        document.Close()

print("Conversion completed for all RTF files.")
Ventajas:
- Ideal para Procesamiento por Lotes: Convierta fácilmente múltiples archivos RTF a la vez.
- No se Necesita Microsoft Word: La conversión se maneja completamente con Python, sin requerir Microsoft Word.
- Personalizable: Agregue características como manejo de errores, registro o manipulación de documentos antes de guardar.
Desventajas:
- Requiere Conocimientos de Python: No es adecuado para usuarios sin experiencia en programación.
- Se Requiere Configuración: Necesita instalar Python, la biblioteca necesaria y administrar el entorno.
Para más detalles, consulte la guía oficial completa: Python: Convertir Word a RTF y Viceversa.
Mejores Prácticas y Consejos para Evitar Problemas de Formato al Convertir RTF a Word
Al convertir archivos RTF a Word, seguir algunas de las mejores prácticas puede ayudarlo a garantizar la calidad y precisión de su conversión:
- Verificar Formato: Siempre revise el documento de Word convertido en busca de errores de formato. Los archivos RTF a veces pierden su formato original durante la conversión.
- Conversión por Lotes: Si necesita convertir muchos archivos RTF, considere usar la automatización de Python o herramientas de procesamiento por lotes para ahorrar tiempo.
- Guardar Copias de Seguridad: Mantenga copias de seguridad de sus archivos RTF originales, especialmente si está utilizando una herramienta en línea o un script automatizado, para evitar la pérdida de datos.
- Validar Compatibilidad: Asegúrese de que el archivo de Word convertido sea compatible con la versión de Microsoft Word que está utilizando.
Consejos para Prevenir Problemas de Formato
-
Verificar Imágenes y Tablas: Estos elementos son propensos a romperse durante la conversión.
-
Usar Fuentes Comunes: Cíñase a fuentes seguras para la web como Arial o Times New Roman.
-
Usar Microsoft Word para Archivos Complejos: El convertidor nativo de Word maneja el formato complejo mejor que las herramientas en línea.
Conclusión
Convertir RTF a Word es un paso sencillo pero esencial para mejorar el formato y la compatibilidad de los documentos. Ya sea que prefiera la confiabilidad de Microsoft Word, la conveniencia de las herramientas en línea para conversiones rápidas o la eficiencia de la automatización de Python para tareas masivas, hay una solución para cada necesidad.
¡Seleccione el método que mejor se adapte a sus requisitos y comience a transformar sus archivos RTF en documentos de Word profesionales hoy mismo!
Preguntas Frecuentes: Conversión de RTF a Word
P1: ¿Puedo convertir RTF a Word sin Microsoft Word?
R1: Sí, las herramientas en línea y las bibliotecas de Python le permiten convertir RTF a Word sin necesidad de tener Microsoft Word instalado.
P2: ¿La conversión de RTF a Word afecta el formato del documento?
R2: A veces, la conversión de RTF a Word puede causar problemas menores de formato. Siempre verifique el documento convertido y ajuste el formato según sea necesario.
P3: ¿Puedo automatizar la conversión de RTF a Word para múltiples archivos?
R3: Sí, Python y la biblioteca Spire.Doc for Python le permiten automatizar el proceso y convertir muchos archivos RTF a Word a la vez, lo que lo hace eficiente para tareas de conversión masiva.
Ver También
RTF in Word umwandeln: 3 einfache Methoden (Online, Word, Python)
Das Konvertieren von RTF in Word ist unerlässlich, um die Kompatibilität mit modernen Textverarbeitungsprogrammen zu verbessern und die erweiterten Formatierungsoptionen von Word freizuschalten. Während RTF-Dateien häufig für grundlegende Textformatierungen verwendet werden, bieten Word-Dokumente zusätzliche Funktionen wie Vorlagen, bessere Formatierungswerkzeuge und professionelles Dokumentendesign. In dieser Anleitung zeigen wir Ihnen drei einfache Methoden zum Konvertieren von RTF in Word: mit Microsoft Word, kostenlosen Online-Tools und Python-Automatisierung – geeignet für Anfänger und fortgeschrittene Benutzer.
Was Sie lernen werden
- Warum RTF in Word konvertieren?
- Wie konvertiert man RTF in Word?
- Best Practices und Tipps zur Vermeidung von Formatierungsproblemen beim Konvertieren von RTF in Word
Warum RTF in Word konvertieren?
Das Konvertieren von RTF in Word kann Ihren Arbeitsablauf verbessern, indem das Dokument einfacher zu verwalten und zu bearbeiten ist. Im Folgenden sind einige Hauptgründe aufgeführt, warum Sie eine RTF-Datei in ein Word-Dokument konvertieren sollten:
- Erweiterte Formatierung und Gestaltung: Word bietet anspruchsvollere Formatierungswerkzeuge, einschließlich erweiterter Textstile, Kopf- und Fußzeilen, Seitenzahlen und Inhaltsverzeichnisse, die in RTF nicht vollständig unterstützt werden.
- Zusammenarbeit: Word-Dokumente werden häufiger in kollaborativen Umgebungen verwendet, in denen mehrere Personen gleichzeitig das Dokument bearbeiten.
- Sicherheit und Kompatibilität: Word-Dateien sind mit einer Vielzahl von Anwendungen und Plattformen kompatibel und bieten robustere Optionen für den Dokumentschutz und die Verschlüsselung.
- Erweiterte Funktionen: Word-Dateien ermöglichen das Hinzufügen von Funktionen wie Kommentaren, Nachverfolgen von Änderungen und mehr, was die Dokumentenverwaltung erleichtert.
Wie konvertiert man RTF in Word?
Nachdem wir die Gründe für die Konvertierung von RTF in Word kennen, schauen wir uns an, wie man es macht. Wir werden drei Methoden untersuchen: die Verwendung von Microsoft Word, kostenlosen Online-Tools und Python-Automatisierung.
RTF in Word mit Microsoft Word konvertieren
Microsoft Word ist eines der am weitesten verbreiteten Werkzeuge für die Arbeit mit Word-Dokumenten. Es bietet auch eine einfache und zuverlässige Möglichkeit, RTF-Dateien als Word-Dokumente zu öffnen und zu speichern.
Schritte zum Konvertieren von RTF in Word mit Microsoft Word:
-
Öffnen Sie Microsoft Word: Starten Sie Microsoft Word auf Ihrem Computer.
-
Öffnen Sie die RTF-Datei: Gehen Sie zu Datei > Öffnen und wählen Sie dann die RTF-Datei aus, die Sie konvertieren möchten. Word öffnet die RTF-Datei automatisch.
-
Als Word-Dokument speichern: Sobald die RTF-Datei geöffnet ist, gehen Sie zu Datei > Speichern unter. Wählen Sie im Dropdown-Menü Dateityp entweder Word-Dokument (*.docx) oder Word 97-2003-Dokument (*.doc) aus.
-
Wählen Sie einen Speicherort: Wählen Sie den Speicherort, an dem Sie das Word-Dokument speichern möchten, und klicken Sie auf Speichern. Ihre RTF-Datei wird nun in ein Word-Dokument konvertiert.
Vorteile:
- Schnell und einfach: Der Vorgang ist schnell und einfach.
- Volle Kontrolle über die Formatierung: Sie können das Erscheinungsbild des Dokuments bei Bedarf manuell anpassen.
- Keine Tools von Drittanbietern erforderlich: Verwendet Microsoft Word, ein weit verbreitetes Werkzeug.
Nachteile:
- Nicht ideal für Stapelkonvertierungen: Die manuelle Konvertierung ist für mehrere Dateien nicht effizient.
- Erfordert Microsoft Word: Sie müssen Microsoft Word auf Ihrem System installiert haben.
RTF in Word mit kostenlosen Online-Tools konvertieren
Wenn Sie kein Microsoft Word haben oder eine schnelle, softwarefreie Lösung bevorzugen, sind Online-Tools wie Zamzar und convertio eine gute Wahl. Laden Sie einfach Ihre RTF-Datei hoch, wählen Sie das Word-Format aus und laden Sie Ihr konvertiertes Dokument herunter. Dieser Ansatz ist schnell, kostenlos und von jedem Gerät mit Internetverbindung aus zugänglich.
Schritte zum kostenlosen Online-Konvertieren von RTF in Word (am Beispiel von Zamzar):
- Gehen Sie zu Zamzar: Besuchen Sie Zamzars kostenlosen Online-RTF-zu-Word-Konverter.
- Laden Sie Ihre RTF-Datei hoch: Klicken Sie auf die Schaltfläche Dateien auswählen, um Ihre RTF-Datei von Ihrem Computer hochzuladen, oder ziehen Sie die Datei per Drag & Drop in den dafür vorgesehenen Bereich.
- Ausgabeformat auswählen: Wählen Sie doc oder docx als Ausgabeformat.
- Datei konvertieren: Klicken Sie auf die Schaltfläche Jetzt konvertieren. Das Tool verarbeitet die Datei und generiert das konvertierte Word-Dokument.
- Laden Sie die Word-Datei herunter: Sobald die Konvertierung abgeschlossen ist, laden Sie das konvertierte Word-Dokument herunter.
Vorteile:
- Keine Installation erforderlich: Von jedem Gerät mit Internetzugang aus zugänglich.
- Kostenlos und einfach zu bedienen: Ideal für schnelle, einmalige Konvertierungen.
- Unterstützt mehrere Formate: Viele Online-Tools unterstützen verschiedene Dateitypen über RTF zu Word hinaus.
Nachteile:
- Datenschutzbedenken: Das Hochladen von Dateien auf Websites von Drittanbietern kann sensible Daten preisgeben.
- Dateigrößenbeschränkungen: Einige Tools begrenzen die Dateigröße für kostenlose Konvertierungen.
- Abhängig von der Internetverbindung: Erfordert eine stabile Internetverbindung, um auf das Tool zuzugreifen und es zu verwenden.
Stapelkonvertierung von RTF in Word mit Python-Automatisierung
Für Benutzer, die häufig RTF-Dateien stapelweise in Word konvertieren müssen oder die Automatisierung für mehrere Dateien bevorzugen, bietet Python eine effiziente und skalierbare Lösung. Mit Bibliotheken wie Spire.Doc for Python können Sie RTF-Dateien einfach in Word-Dokumente konvertieren, ohne dass Microsoft Word installiert sein muss.
Hauptmerkmale
- Dokumente erstellen und bearbeiten: Erstellen, bearbeiten und verwalten Sie Word-Dokumente mühelos direkt von Python aus mit create, edit, and manage Word documents.
- Zwischen Formaten konvertieren: Konvertieren Sie nahtlos zwischen verschiedenen Dokumentformaten, einschließlich RTF zu DOCX, DOC zu PDF und mehr.
- Dokumentstruktur beibehalten: Behalten Sie die Integrität der Dokumentformatierung bei, einschließlich Textstilen, Tabellen, Absätzen und Kopfzeilen.
- Erweiterte Formatierungsoptionen: Wenden Sie benutzerdefinierte Formatierungen auf Text, Tabellen und Absätze an, z. B. das Anpassen von Rändern, Schriftstilen und Ausrichtung.
- Stapelkonvertierung: Automatisieren Sie die Konvertierung mehrerer RTF-Dateien in Word in einem einzigen Vorgang für eine effiziente Massenverarbeitung.
Durch die Verwendung von Spire.Doc for Python können Sie die Konvertierung von RTF in Word automatisieren und so konsistente Ergebnisse bei großen Dateisätzen gewährleisten, während manuelle Eingriffe entfallen.
Schritte zum Konvertieren von RTF in Word mit Python:
-
Installieren Sie die erforderliche Python-Bibliothek:
Installieren Sie die Spire.Doc-Bibliothek von PyPI mit pip:
pip install spire-doc -
Fügen Sie das Python-Skript zum Konvertieren von RTF in Word hinzu:
Sobald die Bibliothek installiert ist, fügen Sie den folgenden Code hinzu, um eine RTF-Datei in ein Word-Dokument in Python zu konvertieren:
from spire.doc import * # Erstellen Sie ein Document-Objekt document = Document() # Laden Sie die RTF-Datei document.LoadFromFile("Test.rtf") # Option 1: Speichern als .docx (Word 2016-Format) document.SaveToFile("Test_output.docx", FileFormat.Docx2016) # Option 2: Speichern als .doc (Word 97-2003-Format) # document.SaveToFile("Test_output.doc", FileFormat.Doc) # Schließen Sie das Dokument document.Close() -
Führen Sie das Skript aus:
Das Skript lädt die RTF-Datei in ein Spire.Doc Document-Objekt und speichert sie als Word-DOCX- oder DOC-Dokument.
Wenn Sie mehrere RTF-Dateien in einem Ordner stapelweise in Word-Dokumente konvertieren möchten, können Sie den Code wie folgt ändern:
from spire.doc import *
import os

# Pfad zum Ordner mit den RTF-Dateien
input_folder = "path_to_rtf_folder"
output_folder = "path_to_output_folder"

# Durchlaufen Sie alle Dateien im Ordner
for filename in os.listdir(input_folder):
    if filename.endswith(".rtf"):
        # Erstellen Sie ein Document-Objekt
        document = Document()

        # Laden Sie die RTF-Datei
        rtf_path = os.path.join(input_folder, filename)
        document.LoadFromFile(rtf_path)

        # Definieren Sie den Ausgabedateipfad (gleicher Name, aber mit .docx-Erweiterung)
        output_path = os.path.join(output_folder, f"{os.path.splitext(filename)[0]}.docx")

        # Speichern als .docx (Word 2016-Format)
        document.SaveToFile(output_path, FileFormat.Docx2016)

        # Optional als .doc speichern (Word 97-2003-Format)
        # document.SaveToFile(output_path.replace(".docx", ".doc"), FileFormat.Doc)

        # Schließen Sie das Dokument
        document.Close()

print("Konvertierung für alle RTF-Dateien abgeschlossen.")
Vorteile:
- Ideal für die Stapelverarbeitung: Konvertieren Sie einfach mehrere RTF-Dateien auf einmal.
- Kein Microsoft Word erforderlich: Die Konvertierung wird vollständig von Python übernommen, ohne dass Microsoft Word erforderlich ist.
- Anpassbar: Fügen Sie Funktionen wie Fehlerbehandlung, Protokollierung oder Dokumentenbearbeitung vor dem Speichern hinzu.
Nachteile:
- Erfordert Python-Kenntnisse: Nicht für Benutzer ohne Programmiererfahrung geeignet.
- Einrichtung erforderlich: Sie müssen Python, die erforderliche Bibliothek installieren und die Umgebung verwalten.
Weitere Details finden Sie in der offiziellen vollständigen Anleitung: Python: Word in RTF konvertieren und umgekehrt.
Best Practices und Tipps zur Vermeidung von Formatierungsproblemen beim Konvertieren von RTF in Word
Beim Konvertieren von RTF-Dateien in Word können Sie durch Befolgen einiger Best Practices die Qualität und Genauigkeit Ihrer Konvertierung sicherstellen:
- Formatierung überprüfen: Überprüfen Sie das konvertierte Word-Dokument immer auf Formatierungsfehler. RTF-Dateien verlieren manchmal während der Konvertierung ihre ursprüngliche Formatierung.
- Stapelkonvertierung: Wenn Sie viele RTF-Dateien konvertieren müssen, sollten Sie die Verwendung von Python-Automatisierung oder Stapelverarbeitungstools in Betracht ziehen, um Zeit zu sparen.
- Backups speichern: Bewahren Sie Backups Ihrer ursprünglichen RTF-Dateien auf, insbesondere wenn Sie ein Online-Tool oder ein automatisiertes Skript verwenden, um Datenverlust zu vermeiden.
- Kompatibilität überprüfen: Stellen Sie sicher, dass die konvertierte Word-Datei mit der von Ihnen verwendeten Version von Microsoft Word kompatibel ist.
Tipps zur Vermeidung von Formatierungsproblemen
-
Bilder und Tabellen überprüfen: Diese Elemente können bei der Konvertierung leicht beschädigt werden.
-
Verwenden Sie gängige Schriftarten: Halten Sie sich an websichere Schriftarten wie Arial oder Times New Roman.
-
Verwenden Sie Microsoft Word für komplexe Dateien: Der native Word-Konverter verarbeitet komplexe Formatierungen besser als Online-Tools.
Fazit
Das Konvertieren von RTF in Word ist ein unkomplizierter, aber wesentlicher Schritt zur Verbesserung der Dokumentformatierung und -kompatibilität. Ob Sie die Zuverlässigkeit von Microsoft Word, die Bequemlichkeit von Online-Tools für schnelle Konvertierungen oder die Effizienz der Python-Automatisierung für Massenaufgaben bevorzugen, es gibt für jeden Bedarf eine passende Lösung.
Wählen Sie die Methode, die Ihren Anforderungen am besten entspricht, und beginnen Sie noch heute damit, Ihre RTF-Dateien in professionelle Word-Dokumente umzuwandeln!
FAQs: RTF-zu-Word-Konvertierung
F1: Kann ich RTF ohne Microsoft Word in Word konvertieren?
A1: Ja, Online-Tools und Python-Bibliotheken ermöglichen es Ihnen, RTF in Word zu konvertieren, ohne dass Microsoft Word installiert sein muss.
F2: Beeinträchtigt die Konvertierung von RTF in Word die Formatierung des Dokuments?
A2: Manchmal kann die Konvertierung von RTF in Word zu geringfügigen Formatierungsproblemen führen. Überprüfen Sie immer das konvertierte Dokument und passen Sie die Formatierung bei Bedarf an.
F3: Kann ich die Konvertierung von RTF in Word für mehrere Dateien automatisieren?
A3: Ja, Python und die Spire.Doc for Python-Bibliothek ermöglichen es Ihnen, den Prozess zu automatisieren und viele RTF-Dateien auf einmal in Word zu konvertieren, was es für Massenkonvertierungsaufgaben effizient macht.
Siehe auch
- So hängen Sie Dateien an ein Word-Dokument an (5 effektive Möglichkeiten)
- 5 einfache Möglichkeiten, eine Word-Datei schreibgeschützt zu machen
- Einfache Möglichkeiten, die Kopfzeile in Word-Dokumenten zu entfernen
- So fügen Sie Wasserzeichen in Word hinzu (Anleitung für manuelle und C#-Automatisierung)
Конвертировать RTF в Word: 3 простых способа (онлайн, Word, Python)
Конвертация RTF в Word необходима для улучшения совместимости с современными текстовыми процессорами и использования расширенных возможностей форматирования Word. Хотя файлы RTF обычно используются для базового форматирования текста, документы Word предлагают дополнительные функции, такие как шаблоны, лучшие инструменты форматирования и профессиональный дизайн документов. В этом руководстве мы покажем вам три простых способа конвертации RTF в Word: с помощью Microsoft Word, бесплатных онлайн-инструментов и автоматизации с использованием Python, подходящих как для начинающих, так и для опытных пользователей.
Что вы узнаете
- Зачем конвертировать RTF в Word?
- Как конвертировать RTF в Word?
- Лучшие практики и советы, чтобы избежать проблем с форматированием при конвертации RTF в Word
Зачем конвертировать RTF в Word?
Конвертация RTF в Word может улучшить ваш рабочий процесс, упростив управление и редактирование документа. Ниже приведены некоторые ключевые причины, по которым вы можете захотеть преобразовать файл RTF в документ Word:
- Расширенное форматирование и стили: Word предлагает более сложные инструменты форматирования, включая расширенные стили текста, колонтитулы, номера страниц и оглавление, которые не полностью поддерживаются в RTF.
- Совместная работа: Документы Word чаще используются в средах для совместной работы, где несколько человек редактируют документ одновременно.
- Безопасность и совместимость: Файлы Word совместимы с различными приложениями и платформами и предлагают более надежные варианты защиты и шифрования документов.
- Расширенные функции: Файлы Word позволяют добавлять такие функции, как комментарии, отслеживание изменений и многое другое, что упрощает управление документами.
Как конвертировать RTF в Word?
Теперь, когда мы знаем причины для конвертации RTF в Word, давайте посмотрим, как это сделать. Мы рассмотрим три метода: использование Microsoft Word, бесплатные онлайн-инструменты и автоматизацию с помощью Python.
Конвертация RTF в Word с помощью Microsoft Word
Microsoft Word — один из наиболее широко используемых инструментов для работы с документами Word. Он также предоставляет простой и надежный способ открывать и сохранять файлы RTF как документы Word.
Шаги по конвертации RTF в Word с помощью Microsoft Word:
-
Откройте Microsoft Word: Запустите Microsoft Word на своем компьютере.
-
Откройте файл RTF: Перейдите в Файл > Открыть, затем выберите файл RTF, который хотите конвертировать. Word автоматически откроет файл RTF.
-
Сохранить как документ Word: Когда файл RTF открыт, перейдите в Файл > Сохранить как. В раскрывающемся меню Тип файла выберите Документ Word (*.docx) или Документ Word 97-2003 (*.doc).
-
Выберите место сохранения: Выберите место, где вы хотите сохранить документ Word, и нажмите Сохранить. Ваш файл RTF теперь преобразован в документ Word.
Плюсы:
- Быстро и просто: Процесс быстрый и легкий.
- Полный контроль над форматированием: Вы можете вручную настраивать внешний вид документа по мере необходимости.
- Не требуются сторонние инструменты: Используется Microsoft Word, который является широко используемым инструментом.
Минусы:
- Не идеально для пакетной конвертации: Ручное преобразование неэффективно для нескольких файлов.
- Требуется Microsoft Word: У вас должен быть установлен Microsoft Word в вашей системе.
Конвертация RTF в Word с помощью бесплатных онлайн-инструментов
Если у вас нет Microsoft Word или вы предпочитаете быстрое решение без программного обеспечения, онлайн-инструменты, такие как Zamzar и convertio, являются отличным выбором. Просто загрузите свой файл RTF, выберите формат Word и скачайте преобразованный документ. Этот подход быстрый, бесплатный и доступен с любого устройства с подключением к Интернету.
Шаги по бесплатной онлайн-конвертации RTF в Word (на примере Zamzar):
- Перейдите в Zamzar: Посетите бесплатный онлайн-конвертер RTF в Word от Zamzar.
- Загрузите свой файл RTF: Нажмите кнопку Выбрать файлы, чтобы загрузить файл RTF с вашего компьютера, или перетащите файл в указанную область.
- Выберите формат вывода: Выберите doc или docx в качестве формата вывода.
- Конвертировать файл: Нажмите кнопку Конвертировать сейчас. Инструмент обработает файл и создаст преобразованный документ Word.
- Скачайте файл Word: После завершения преобразования загрузите преобразованный документ Word.
Плюсы:
- Не требуется установка: Доступно с любого устройства с доступом в Интернет.
- Бесплатно и просто в использовании: Идеально подходит для быстрых, одноразовых преобразований.
- Поддерживает несколько форматов: Многие онлайн-инструменты поддерживают различные типы файлов помимо RTF в Word.
Минусы:
- Проблемы конфиденциальности: Загрузка файлов на сторонние веб-сайты может привести к раскрытию конфиденциальных данных.
- Ограничения по размеру файла: Некоторые инструменты устанавливают ограничения на размер файла для бесплатных преобразований.
- Зависимость от подключения к Интернету: Требуется стабильное подключение к Интернету для доступа и использования инструмента.
Пакетная конвертация RTF в Word с помощью автоматизации Python
Для пользователей, которым необходимо часто выполнять пакетное преобразование RTF в Word или которые предпочитают автоматизацию для нескольких файлов, Python предоставляет эффективное и масштабируемое решение. Используя библиотеки, такие как Spire.Doc for Python, вы можете легко конвертировать файлы RTF в документы Word без необходимости установки Microsoft Word.
Ключевые особенности
- Создание и редактирование документов: Легко создавайте, редактируйте и управляйте документами Word прямо из Python.
- Конвертация между форматами: Беспрепятственно конвертируйте между различными форматами документов, включая RTF в DOCX, DOC в PDF и другие.
- Сохранение структуры документа: Сохраняйте целостность форматирования документа, включая стили текста, таблицы, абзацы и колонтитулы.
- Расширенные параметры форматирования: Применяйте пользовательское форматирование к тексту, таблицам и абзацам, например, настраивая поля, стили шрифтов и выравнивание.
- Пакетная конвертация: Автоматизируйте преобразование нескольких файлов RTF в Word за одну операцию для эффективной массовой обработки.
Используя Spire.Doc for Python, вы можете автоматизировать преобразование RTF в Word, обеспечивая согласованные результаты для больших наборов файлов и устраняя ручное вмешательство.
Шаги по конвертации RTF в Word с помощью Python:
-
Установите необходимую библиотеку Python:
Установите библиотеку Spire.Doc из PyPI с помощью pip:
pip install spire-doc -
Добавьте скрипт Python для конвертации RTF в Word:
После установки библиотеки добавьте следующий код для преобразования файла RTF в документ Word на Python:
from spire.doc import * # Create a Document object document = Document() # Load the RTF file document.LoadFromFile("Test.rtf") # Option 1: Save as .docx (Word 2016 format) document.SaveToFile("Test_output.docx", FileFormat.Docx2016) # Option 2: Save as .doc (Word 97-2003 format) # document.SaveToFile("Test_output.doc", FileFormat.Doc) # Close the document document.Close() -
Запустите скрипт:
Скрипт загрузит файл RTF в объект Document Spire.Doc и сохранит его в документ Word DOCX или DOC.
Если вы хотите выполнить пакетное преобразование нескольких файлов RTF в папке в документы Word, вы можете изменить код следующим образом:
from spire.doc import *
import os

# Path to the folder containing the RTF files
input_folder = "path_to_rtf_folder"
output_folder = "path_to_output_folder"

# Loop through all files in the folder
for filename in os.listdir(input_folder):
    if filename.endswith(".rtf"):
        # Create a Document object
        document = Document()

        # Load the RTF file
        rtf_path = os.path.join(input_folder, filename)
        document.LoadFromFile(rtf_path)

        # Define the output file path (same name, but with .docx extension)
        output_path = os.path.join(output_folder, f"{os.path.splitext(filename)[0]}.docx")

        # Save as .docx (Word 2016 format)
        document.SaveToFile(output_path, FileFormat.Docx2016)

        # Optionally, save as .doc (Word 97-2003 format)
        # document.SaveToFile(output_path.replace(".docx", ".doc"), FileFormat.Doc)

        # Close the document
        document.Close()

print("Conversion completed for all RTF files.")
Плюсы:
- Идеально для пакетной обработки: Легко конвертируйте несколько файлов RTF одновременно.
- Не требуется Microsoft Word: Преобразование полностью выполняется с помощью Python, без необходимости в Microsoft Word.
- Настраиваемый: Добавляйте такие функции, как обработка ошибок, ведение журнала или манипуляции с документом перед сохранением.
Минусы:
- Требуются знания Python: Не подходит для пользователей без опыта программирования.
- Требуется настройка: Вам необходимо установить Python, необходимую библиотеку и управлять средой.
Для получения более подробной информации ознакомьтесь с полным официальным руководством: Python: Конвертация Word в RTF и наоборот.
Лучшие практики и советы, чтобы избежать проблем с форматированием при конвертации RTF в Word
При преобразовании файлов RTF в Word соблюдение некоторых рекомендаций поможет вам обеспечить качество и точность преобразования:
- Проверяйте форматирование: Всегда просматривайте преобразованный документ Word на наличие ошибок форматирования. Файлы RTF иногда теряют исходное форматирование во время преобразования.
- Пакетная конвертация: Если вам нужно преобразовать много файлов RTF, рассмотрите возможность использования автоматизации Python или инструментов пакетной обработки для экономии времени.
- Сохраняйте резервные копии: Храните резервные копии исходных файлов RTF, особенно если вы используете онлайн-инструмент или автоматизированный скрипт, чтобы предотвратить потерю данных.
- Проверяйте совместимость: Убедитесь, что преобразованный файл Word совместим с используемой вами версией Microsoft Word.
Советы по предотвращению проблем с форматированием
-
Проверяйте изображения и таблицы: Эти элементы склонны к повреждению во время преобразования.
-
Используйте распространенные шрифты: Придерживайтесь веб-безопасных шрифтов, таких как Arial или Times New Roman.
-
Используйте Microsoft Word для сложных файлов: Встроенный конвертер Word лучше справляется со сложным форматированием, чем онлайн-инструменты.
Заключение
Конвертация RTF в Word — это простой, но важный шаг для улучшения форматирования и совместимости документов. Независимо от того, предпочитаете ли вы надежность Microsoft Word, удобство онлайн-инструментов для быстрых преобразований или эффективность автоматизации Python для массовых задач, найдется решение для любых потребностей.
Выберите метод, который наилучшим образом соответствует вашим требованиям, и начните преобразовывать ваши файлы RTF в профессиональные документы Word уже сегодня!
Часто задаваемые вопросы: Конвертация RTF в Word
В1: Могу ли я конвертировать RTF в Word без Microsoft Word?
О1: Да, онлайн-инструменты и библиотеки Python позволяют конвертировать RTF в Word без необходимости установки Microsoft Word.
В2: Влияет ли конвертация RTF в Word на форматирование документа?
О2: Иногда преобразование RTF в Word может вызывать незначительные проблемы с форматированием. Всегда проверяйте преобразованный документ и при необходимости корректируйте форматирование.
В3: Могу ли я автоматизировать преобразование RTF в Word для нескольких файлов?
О3: Да, Python и библиотека Spire.Doc for Python позволяют автоматизировать процесс и конвертировать множество файлов RTF в Word одновременно, что делает его эффективным для задач массового преобразования.
Смотрите также
Come eliminare le righe vuote in Excel: 5 metodi semplici
Indice dei contenuti
- Metodo 1: Utilizzo di Filtra ed elimina (il più intuitivo)
- Metodo 2: Utilizzo di "Vai a speciale" (il più veloce per grandi set di dati)
- Metodo 3: Utilizzo di Power Query (non distruttivo e riutilizzabile)
- Metodo 4: Utilizzo di una macro VBA (automatizzato per utenti esperti)
- Metodo 5: Utilizzo dell'automazione Python (per sviluppatori ed elaborazione batch)

Le righe vuote sono più di un piccolo fastidio in Excel; interrompono l'analisi dei dati, rompono le tabelle pivot e creano fogli di calcolo non professionali e difficili da navigare. Che tu stia pulendo dati importati, organizzando report o preparando fogli di calcolo per la collaborazione, rimuovere le righe vuote in Excel è un'abilità essenziale.
Questa guida fornisce cinque metodi affidabili per eliminare le righe vuote in Excel, adatti a tutti i livelli di abilità e scenari, dalle rapide correzioni manuali alle soluzioni completamente automatizzate.
- Metodo 1: Utilizzo di Filtra ed elimina (il più intuitivo)
- Metodo 2: Utilizzo di "Vai a speciale" (il più veloce per grandi set di dati)
- Metodo 3: Utilizzo di Power Query (non distruttivo e riutilizzabile)
- Metodo 4: Utilizzo di una macro VBA (automatizzato per utenti esperti)
- Metodo 5: Utilizzo dell'automazione Python (per sviluppatori ed elaborazione batch)
Perché dovresti eliminare le righe vuote in Excel
L'eliminazione delle righe vuote in Excel è fondamentale per:
- Analisi accurata dei dati: funzioni come SOMMA, MEDIA e CERCA.VERT possono fornire risultati errati se includono celle vuote nel loro intervallo.
- Tabelle pivot funzionali: le tabelle pivot spesso contano le righe vuote come elementi di dati, ingombrando i report e falsando le tue intuizioni.
- Visualizzazione pulita dei dati: grafici e diagrammi includeranno spazi vuoti dove esistono righe vuote, rendendoli difficili da leggere e interpretare.
- Professionalità e leggibilità: un set di dati compatto e contiguo è più facile da navigare e con cui lavorare.
Metodo 1: Utilizzo di Filtra ed elimina (il più intuitivo)
Il metodo Filtro funziona per tutte le versioni di Excel ed è ideale per set di dati con righe miste vuote/non vuote:
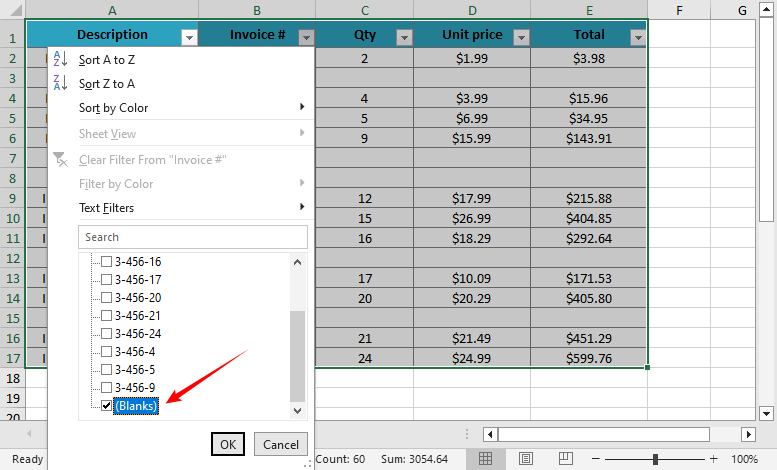
- Seleziona il tuo intervallo di dati (includi le intestazioni se applicabile).
- Vai alla scheda Dati → Fai clic sul pulsante Filtro (icona a forma di imbuto).
- Fai clic sulla freccia a discesa su qualsiasi intestazione di colonna → Deseleziona "Seleziona tutto" → Seleziona Vuote.
- Excel nasconderà le righe non vuote, quindi selezionerà tutte le righe vuote visibili.
- Fai clic con il pulsante destro del mouse → Elimina riga → Conferma.
- Fai di nuovo clic sul pulsante Filtro per ripristinare la visibilità.
- ✔ Pro: Semplice e sicuro; funziona per la maggior parte dei set di dati.
- ✘ Contro: Manuale; non gestisce le righe con dati parziali.
Ideale per: pulizia rapida e una tantum di righe completamente vuote.
Metodo 2: Utilizzo di "Vai a speciale" (il più veloce per grandi set di dati)
Questo metodo con scorciatoia da tastiera è uno dei preferiti dagli utenti esperti. Salta la selezione manuale e individua le righe vuote in pochi secondi:
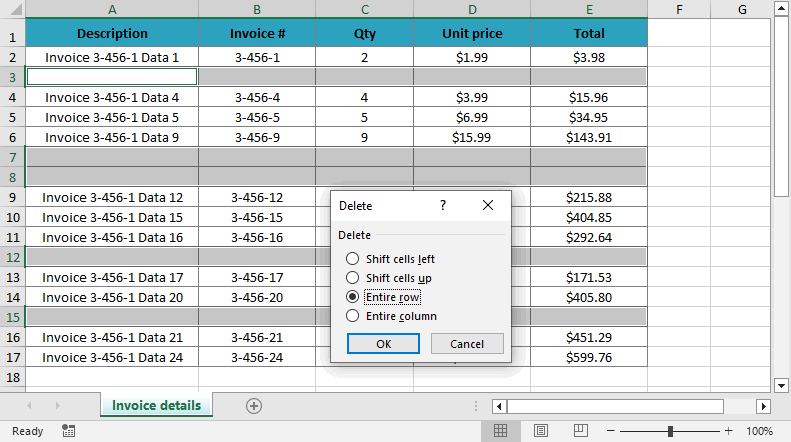
- Seleziona il tuo intervallo di dati (o premi Ctrl+A/⌘+A per selezionare l'intero foglio).
- Premi Ctrl+G (Windows) o ⌘+G (Mac) per aprire la finestra di dialogo Vai a.
- Fai clic su Speciale → Seleziona Vuote → Fai clic su OK.
- Verranno selezionate tutte le celle vuote nel tuo intervallo.
- Fai clic con il pulsante destro del mouse su una cella selezionata → Elimina → Scegli Riga intera → Fai clic su OK.

- ✔ Pro: 10 volte più veloce del filtro; funziona per 1000+ righe.
- ✘ Contro: Rischioso; può eliminare righe con dati parziali.
Ideale per: pulire rapidamente grandi set di dati in cui si è sicuri che le celle vuote indichino righe completamente inutili.
Metodo 3: Utilizzo di Power Query (non distruttivo e riutilizzabile)
Power Query (Recupera e trasforma dati) è la scelta migliore per le attività di pulizia dei dati ripetute. Conserva i dati originali e automatizza gli aggiornamenti.
- Seleziona il tuo intervallo di dati → Vai alla scheda Dati → Fai clic su Da tabella/intervallo.
- Excel convertirà i tuoi dati in una tabella (conferma con "La mia tabella ha intestazioni" se applicabile).
- Nell'editor di Power Query: seleziona tutte le colonne (tieni premuto Ctrl/⌘ e fai clic sulle intestazioni delle colonne).
- Vai alla scheda Home → Fai clic su Rimuovi righe → Seleziona Rimuovi righe vuote.
- Fai clic su Chiudi e carica (in alto a sinistra) per esportare i dati puliti in un nuovo foglio di lavoro.

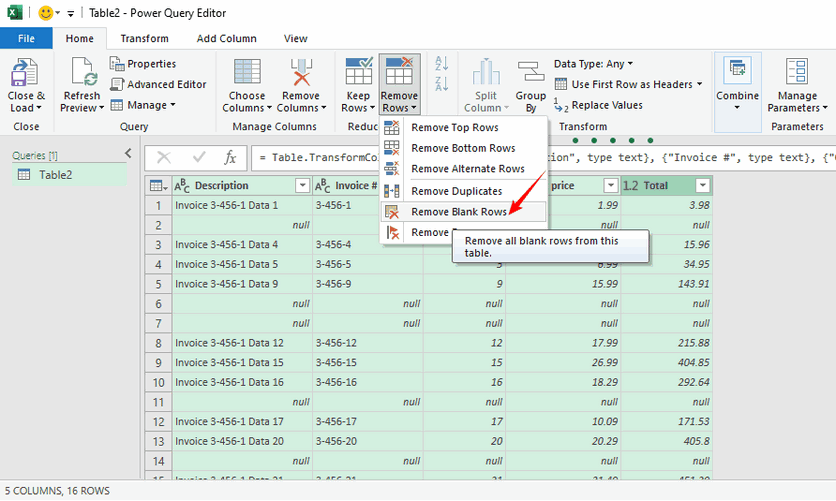
- ✔ Pro: Non distruttivo; riutilizzabile (aggiorna con nuovi dati); gestisce in modo efficiente grandi set di dati.
- ✘ Contro: Non disponibile in Excel 2013 o versioni precedenti.
Ideale per: attività di pulizia dei dati ricorrenti, grandi set di dati e creazione di un processo ripetibile.
Potrebbe piacerti anche: Come rimuovere le righe duplicate da Excel - 6 semplici modi
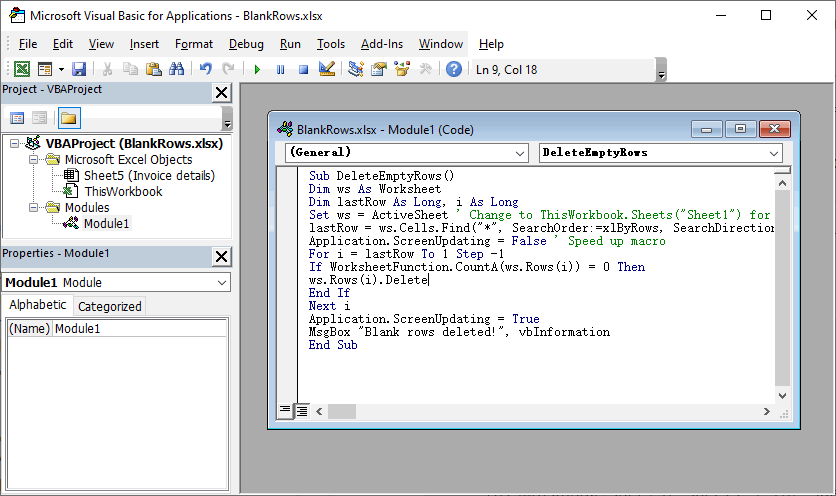
Metodo 4: Utilizzo di una macro VBA (automatizzato per utenti esperti)
Per un'automazione completa all'interno di Excel, una macro VBA può eliminare le righe vuote con un solo clic.
- Premi Alt+F11 (Windows) o ⌘+F11 (Mac) per aprire l'editor VBA.
- Fai clic con il pulsante destro del mouse sulla cartella di lavoro → Inserisci → Modulo.
- Copia e incolla il seguente codice nel modulo:
- Premi F5 per eseguire la macro. Salva sempre un backup della cartella di lavoro prima di eseguire le macro, poiché l'azione non può essere annullata.
Sub DeleteFullyBlankRows()
Dim ws As Worksheet
Dim lastRow As Long, i As Long
Set ws = ActiveSheet ' Cambia in ThisWorkbook.Sheets("Sheet1") per un foglio specifico
lastRow = ws.Cells.Find("*", SearchOrder:=xlByRows, SearchDirection:=xlPrevious).Row
Application.ScreenUpdating = False ' Accelera la macro
For i = lastRow To 1 Step -1
If WorksheetFunction.CountA(ws.Rows(i)) = 0 Then
ws.Rows(i).Delete
End If
Next i
Application.ScreenUpdating = True
MsgBox "Righe vuote eliminate!", vbInformation
End Sub
Questo codice controlla ogni cella di una riga per assicurarsi che sia vuota (evita di eliminare righe con dati parziali)
- ✔ Pro: Automatizzato; gestisce scenari complessi; personalizzabile.
- ✘ Contro: Richiede una conoscenza di base di VBA; nessuna funzione di annullamento (eseguire prima il backup).
Ideale per: utenti esperti che necessitano di automatizzare il processo per un uso regolare.
Metodo 5: Utilizzo dell'automazione Python (per sviluppatori ed elaborazione batch)
Per sviluppatori, ingegneri dei dati o chiunque abbia bisogno di integrare la pulizia di Excel in uno script o un'applicazione automatizzata, l'utilizzo di Python è un'opzione potente. La libreria Spire.XLS for Python fornisce una solida API per elaborare i file di Excel, inclusa la rimozione di righe vuote, la copia di righe/colonne, l'applicazione della formattazione condizionale e l'aggiunta di tabelle pivot, ecc.
- Innanzitutto, installa la libreria tramite pip:
- Scrivi il codice Python per eliminare le righe vuote in Excel:
pip install Spire.XLS
from spire.xls import *
from spire.xls.common import *

# Crea un oggetto Workbook
workbook = Workbook()
# Carica un file Excel
workbook.LoadFromFile("Input1.xlsx")

# Ottieni il primo foglio di lavoro
sheet = workbook.Worksheets[0]

# Trova ed elimina le righe vuote dal foglio di lavoro
for i in range(sheet.Rows.Length - 1, -1, -1):
    if sheet.Rows[i].IsBlank:
        sheet.DeleteRow(i + 1)

# Salva il file dei risultati
workbook.SaveToFile("DeleteBlankRows.xlsx", ExcelVersion.Version2016)
workbook.Dispose()
Questo script carica un file Excel, rileva le righe vuote tramite la proprietà IsBlank e quindi le elimina con il metodo DeleteRows().
(Facoltativo) Se è necessario eliminare anche le colonne vuote, fare riferimento a:
# Elimina le colonne vuote dal foglio di lavoro
for j in range(sheet.Columns.Length - 1, -1, -1):
    if sheet.Columns[j].IsBlank:
        sheet.DeleteColumn(j + 1)
- ✔ Pro: Automatizza l'elaborazione batch; si integra con i flussi di lavoro Python; altamente scalabile.
- ✘ Contro: Richiede una conoscenza di base di Python.
Ideale per: automatizzare la pulizia di più file Excel, integrare in una pipeline di elaborazione dati o applicazioni lato server in cui Microsoft Excel non è installato.
Considerazioni finali
Rimuovere le righe vuote in Excel è un'abilità fondamentale per una gestione pulita dei dati. Dal semplice metodo Filtro alla potente automazione di Python, esiste una soluzione per ogni utente e scenario. Ricorda sempre di eseguire il backup dei dati prima di provare un nuovo metodo, in particolare quelli che coinvolgono VBA o Vai a speciale. Per le attività ricorrenti, investire tempo nell'apprendimento di Power Query o nella scrittura di uno script ti farà risparmiare innumerevoli ore a lungo termine.
Per ulteriori suggerimenti su Excel, consulta le nostre guide su elenchi a discesa e formattazione condizionale.
Domande frequenti sull'eliminazione delle righe vuote di Excel
D1: Qual è la differenza tra righe "veramente vuote" e "quasi vuote"?
- Righe veramente vuote: non contengono dati, formule o caratteri nascosti in nessuna cella.
- Righe quasi vuote: contengono spazi, spazi unificatori (ASCII 160) o formule che restituiscono stringhe vuote
Metodi come Power Query e VBA (con logica specifica) sono migliori nell'identificare e gestire queste righe "quasi vuote".
D2: Come eliminare le righe vuote in Fogli Google?
Il processo è simile:
- Seleziona il tuo intervallo di dati.
- Fai clic su Dati > Crea un filtro.
- Fai clic sull'icona del filtro in una colonna e deseleziona "Seleziona tutto", quindi seleziona "Vuote".
- Seleziona le righe vuote visibili, fai clic con il pulsante destro del mouse e scegli Elimina righe.
- Disattiva il filtro.
D3: Come posso eliminare automaticamente le righe vuote quando vengono aggiunti nuovi dati?
Per attività ricorrenti (ad es. importazioni giornaliere di dati), utilizzare:
- Power Query: imposta una query su "Rimuovi righe vuote" (Metodo 3) → Fai clic su Aggiorna tutto ogni volta che vengono aggiunti nuovi dati per aggiornare il foglio pulito.
- Macro VBA: assegna la macro DeleteFullyBlankRows (Metodo 4) a un pulsante nel tuo foglio: fai clic per eseguire l'eliminazione automaticamente.
D4: Quando dovrei usare Python invece di VBA?
Scegli Python quando:
- Stai elaborando file su un computer senza Excel installato (ad es. un server).
- È necessario elaborare in batch centinaia di file Excel automaticamente.
Scegli VBA quando:
- L'intero flusso di lavoro si svolge all'interno di Excel.
- Hai bisogno di una soluzione semplice con un solo clic all'interno dell'applicazione Excel.
Vedi anche
Como excluir linhas em branco no Excel: 5 métodos fáceis
Índice
- Método 1: Usando Filtro e Exclusão (Mais Amigável)
- Método 2: Usando "Ir para Especial" (Mais Rápido para Grandes Conjuntos de Dados)
- Método 3: Usando Power Query (Não Destrutivo e Reutilizável)
- Método 4: Usando Macro VBA (Automatizado para Usuários Avançados)
- Método 5: Usando Automação com Python (Para Desenvolvedores e Processamento em Lote)
Linhas em branco são mais do que um pequeno incômodo no Excel; elas atrapalham a análise de dados, quebram Tabelas Dinâmicas e criam planilhas não profissionais e difíceis de navegar. Seja para limpar dados importados, organizar relatórios ou preparar planilhas para colaboração, remover linhas em branco no Excel é uma habilidade essencial.
Este guia fornece cinco métodos confiáveis para excluir linhas em branco no Excel, adequados para todos os níveis de habilidade e cenários, desde correções manuais rápidas até soluções totalmente automatizadas.
- Método 1: Usando Filtro e Exclusão (Mais Amigável)
- Método 2: Usando "Ir para Especial" (Mais Rápido para Grandes Conjuntos de Dados)
- Método 3: Usando Power Query (Não Destrutivo e Reutilizável)
- Método 4: Usando Macro VBA (Automatizado para Usuários Avançados)
- Método 5: Usando Automação com Python (Para Desenvolvedores e Processamento em Lote)
Por Que Você Deve Eliminar Linhas Vazias no Excel
Excluir linhas vazias no Excel é crucial para:
- Análise de Dados Precisa: Funções como SOMA, MÉDIA e PROCV podem fornecer resultados incorretos se incluírem células em branco em seu intervalo.
- Tabelas Dinâmicas Funcionais: As Tabelas Dinâmicas frequentemente contam linhas em branco como itens de dados, poluindo seus relatórios e distorcendo suas percepções.
- Visualização de Dados Limpa: Gráficos e diagramas incluirão espaços vazios onde existirem linhas em branco, tornando-os difíceis de ler e interpretar.
- Profissionalismo e Legibilidade: Um conjunto de dados compacto e contíguo é mais fácil de navegar e trabalhar.
Método 1: Usando Filtro e Exclusão (Mais Amigável)
O método de Filtro funciona para todas as versões do Excel e é ideal para conjuntos de dados com linhas mistas em branco/não em branco:
- Selecione seu intervalo de dados (inclua cabeçalhos, se aplicável).
- Vá para a guia Dados → Clique no botão Filtro (ícone de funil).
- Clique na seta suspensa em qualquer cabeçalho de coluna → Desmarque "Selecionar Tudo" → Marque Vazias.
- O Excel ocultará as linhas não em branco e, em seguida, selecionará todas as linhas em branco visíveis.
- Clique com o botão direito → Excluir Linha → Confirme.
- Clique no botão Filtro novamente para restaurar a visibilidade.
- ✔ Prós: Simples e seguro; funciona para a maioria dos conjuntos de dados.
- ✘ Contras: Manual; não lida com linhas com dados parciais.
Ideal para: Limpeza rápida e única de linhas totalmente vazias.
Método 2: Usando "Ir para Especial" (Mais Rápido para Grandes Conjuntos de Dados)
Este método de atalho de teclado é um favorito dos usuários avançados. Ele pula a seleção manual e visa as linhas em branco em segundos:
- Selecione seu intervalo de dados (ou pressione Ctrl+A/⌘+A para selecionar a planilha inteira).
- Pressione Ctrl+G (Windows) ou ⌘+G (Mac) para abrir a caixa de diálogo Ir Para.
- Clique em Especial → Selecione Em branco → Clique em OK.
- Todas as células em branco no seu intervalo serão selecionadas.
- Clique com o botão direito em qualquer célula selecionada → Excluir → Escolha Linha Inteira → Clique em OK.
- ✔ Prós: 10x mais rápido que a filtragem; funciona para mais de 1000 linhas.
- ✘ Contras: Arriscado; pode excluir linhas com dados parciais.
Ideal para: Limpar rapidamente grandes conjuntos de dados onde você tem certeza de que as células em branco indicam linhas totalmente inúteis.
Método 3: Usando Power Query (Não Destrutivo e Reutilizável)
O Power Query (Obter e Transformar Dados) é a melhor escolha para tarefas repetidas de limpeza de dados. Ele preserva seus dados originais e automatiza as atualizações.
- Selecione seu intervalo de dados → Vá para a guia Dados → Clique em Da Tabela/Intervalo.
- O Excel converterá seus dados em uma tabela (confirme com "Minha tabela tem cabeçalhos", se aplicável).
- No Editor do Power Query: Selecione todas as colunas (segure Ctrl/⌘ e clique nos cabeçalhos das colunas).
- Vá para a guia Página Inicial → Clique em Remover Linhas → Selecione Remover Linhas em Branco.
- Clique em Fechar e Carregar (canto superior esquerdo) para exportar os dados limpos para uma nova planilha.
- ✔ Prós: Não destrutivo; reutilizável (atualize com novos dados); lida com grandes conjuntos de dados de forma eficiente.
- ✘ Contras: Não disponível no Excel 2013 ou anterior.
Ideal para: Tarefas recorrentes de limpeza de dados, grandes conjuntos de dados e criação de um processo repetível.
Você também pode gostar: Como Remover Linhas Duplicadas do Excel - 6 Maneiras Fáceis
Método 4: Usando Macro VBA (Automatizado para Usuários Avançados)
Para automação máxima no Excel, uma macro VBA pode excluir linhas em branco com um único clique.
- Pressione Alt+F11 (Windows) ou ⌘+F11 (Mac) para abrir o Editor do VBA.
- Clique com o botão direito na sua pasta de trabalho → Inserir → Módulo.
- Copie e cole o seguinte código no módulo:
- Pressione F5 para executar a macro. Sempre salve um backup da sua pasta de trabalho antes de executar macros, pois a ação não pode ser desfeita.
Sub DeleteFullyBlankRows()
Dim ws As Worksheet
Dim lastRow As Long, i As Long
Set ws = ActiveSheet ' Change to ThisWorkbook.Sheets("Sheet1") for specific sheet
lastRow = ws.Cells.Find("*", SearchOrder:=xlByRows, SearchDirection:=xlPrevious).Row
Application.ScreenUpdating = False ' Speed up macro
For i = lastRow To 1 Step -1
If WorksheetFunction.CountA(ws.Rows(i)) = 0 Then
ws.Rows(i).Delete
End If
Next i
Application.ScreenUpdating = True
MsgBox "Blank rows deleted!", vbInformation
End Sub
Este código verifica cada célula em uma linha para garantir que esteja em branco (evita a exclusão de linhas com dados parciais)
- ✔ Prós: Automatizado; lida com cenários complexos; personalizável.
- ✘ Contras: Requer conhecimento básico de VBA; sem desfazer (faça backup primeiro).
Ideal para: Usuários avançados que precisam automatizar o processo para uso regular.
Método 5: Usando Automação com Python (Para Desenvolvedores e Processamento em Lote)
Para desenvolvedores, engenheiros de dados ou qualquer pessoa que precise integrar a limpeza do Excel em um script ou aplicativo automatizado, usar Python é uma opção poderosa. A biblioteca Spire.XLS for Python fornece uma API robusta para processar arquivos do Excel, incluindo a remoção de linhas em branco, copiar linhas/colunas, aplicar formatação condicional e adicionar tabelas dinâmicas, etc.
- Primeiro, instale a biblioteca via pip:
- Escreva o código Python para excluir linhas em branco no Excel:
pip install Spire.XLS
from spire.xls import *
from spire.xls.common import *

# Create a Workbook object
workbook = Workbook()
# Load an Excel file
workbook.LoadFromFile("Input1.xlsx")

# Get the first worksheet
sheet = workbook.Worksheets[0]

# Find and delete blank rows from the worksheet
for i in range(sheet.Rows.Length - 1, -1, -1):
    if sheet.Rows[i].IsBlank:
        sheet.DeleteRow(i + 1)

# Save the result file
workbook.SaveToFile("DeleteBlankRows.xlsx", ExcelVersion.Version2016)
workbook.Dispose()
Este script carrega um arquivo Excel, detecta linhas vazias através da propriedade IsBlank e, em seguida, as exclui com o método DeleteRows().
(Opcional) Se você precisar excluir colunas em branco também, consulte:
# Delete blank columns from the worksheet
for j in range(sheet.Columns.Length - 1, -1, -1):
    if sheet.Columns[j].IsBlank:
        sheet.DeleteColumn(j + 1)
- ✔ Prós: Automatiza o processamento em lote; integra-se com fluxos de trabalho Python; altamente escalável.
- ✘ Contras: Requer conhecimento básico de Python.
Ideal para: Automatizar a limpeza de vários arquivos do Excel, integrar em um pipeline de processamento de dados ou aplicativos do lado do servidor onde o Microsoft Excel não está instalado.
Considerações Finais
Remover linhas em branco no Excel é uma habilidade fundamental para o gerenciamento de dados limpos. Do método de Filtro direto à poderosa automação do Python, existe uma solução para cada usuário e cenário. Lembre-se sempre de fazer backup de seus dados antes de tentar um novo método, especialmente aqueles que envolvem VBA ou Ir para Especial. Para tarefas recorrentes, investir tempo para aprender o Power Query ou escrever um script economizará inúmeras horas a longo prazo.
Para mais dicas de Excel, confira nossos guias sobre listas suspensas e formatação condicional.
Perguntas Frequentes sobre a Exclusão de Linhas em Branco no Excel
P1: Qual é a diferença entre linhas "verdadeiramente em branco" e "quase em branco"?
- Linhas verdadeiramente em branco: Não contêm dados, fórmulas ou caracteres ocultos em nenhuma célula.
- Linhas quase em branco: Contêm espaços, espaços não separáveis (ASCII 160) ou fórmulas que retornam strings vazias
Métodos como Power Query e VBA (com lógica específica) são melhores para identificar e lidar com essas linhas "quase em branco".
P2: Como excluir linhas em branco no Google Sheets?
O processo é semelhante:
- Selecione seu intervalo de dados.
- Clique em Dados > Criar um filtro.
- Clique no ícone do filtro em uma coluna, desmarque "Selecionar tudo" e marque "Em branco."
- Selecione as linhas em branco visíveis, clique com o botão direito e escolha Excluir linhas.
- Desative o filtro.
P3: Como eu excluo automaticamente linhas em branco quando novos dados são adicionados?
Para tarefas recorrentes (por exemplo, importações diárias de dados), use:
- Power Query: Configure uma consulta para "Remover Linhas em Branco" (Método 3) → Clique em Atualizar Tudo sempre que novos dados forem adicionados para atualizar a planilha limpa.
- Macro VBA: Atribua a macro DeleteFullyBlankRows (Método 4) a um botão em sua planilha—clique nele para executar a exclusão automaticamente.
P4: Quando devo usar Python em vez de VBA?
Escolha Python quando:
- Você está processando arquivos em um computador sem o Excel instalado (por exemplo, um servidor).
- Você precisa processar em lote centenas de arquivos do Excel automaticamente.
Escolha VBA quando:
- Todo o fluxo de trabalho acontece no Excel.
- Você precisa de uma solução simples de um clique dentro do aplicativo Excel.
Veja Também
Excel에서 빈 행을 삭제하는 5가지 쉬운 방법
빈 행은 Excel에서 사소한 성가심 이상입니다. 데이터 분석을 방해하고 피벗 테이블을 깨뜨리며 전문가답지 않고 탐색하기 어려운 스프레드시트를 만듭니다. 가져온 데이터를 정리하든, 보고서를 구성하든, 공동 작업을 위해 스프레드시트를 준비하든, Excel에서 빈 줄을 제거하는 것은 필수적인 기술입니다.
이 가이드는 빠른 수동 수정에서 완전 자동화된 솔루션에 이르기까지 모든 기술 수준과 시나리오에 적합한 Excel에서 빈 행을 삭제하는 다섯 가지 신뢰할 수 있는 방법을 제공합니다.
- 방법 1: 필터 및 삭제 사용 (가장 사용자 친화적)
- 방법 2: "특수 이동" 사용 (대용량 데이터 세트에 가장 빠름)
- 방법 3: 파워 쿼리 사용 (비파괴적 및 재사용 가능)
- 방법 4: VBA 매크로 사용 (고급 사용자를 위한 자동화)
- 방법 5: Python 자동화 사용 (개발자 및 일괄 처리용)
Excel에서 빈 행을 제거해야 하는 이유
Excel에서 빈 줄을 삭제하는 것은 다음에 중요합니다.
- 정확한 데이터 분석: SUM, AVERAGE 및 VLOOKUP과 같은 함수는 범위에 빈 셀이 포함된 경우 잘못된 결과를 제공할 수 있습니다.
- 기능적 피벗 테이블: 피벗 테이블은 종종 빈 행을 데이터 항목으로 계산하여 보고서를 복잡하게 만들고 통찰력을 왜곡합니다.
- 깨끗한 데이터 시각화: 차트와 그래프에는 빈 행이 있는 빈 공간이 포함되어 읽고 해석하기 어렵습니다.
- 전문성 및 가독성: 빽빽하고 연속적인 데이터 세트는 탐색하고 작업하기가 더 쉽습니다.
방법 1: 필터 및 삭제 사용 (가장 사용자 친화적)
필터 방법은 모든 Excel 버전에서 작동하며 비어 있지 않은 행과 비어 있는 행이 혼합된 데이터 세트에 이상적입니다.
- 데이터 범위를 선택합니다(해당하는 경우 머리글 포함).
- 데이터 탭으로 이동 → 필터 버튼(깔때기 아이콘)을 클릭합니다.
- 열 머리글의 드롭다운 화살표를 클릭 → "모두 선택" 선택 취소 → 공백을 선택합니다.
- Excel은 비어 있지 않은 행을 숨긴 다음 보이는 모든 빈 행을 선택합니다.
- 마우스 오른쪽 버튼 클릭 → 행 삭제 → 확인.
- 필터 버튼을 다시 클릭하여 가시성을 복원합니다.
- ✔ 장점: 간단하고 안전하며 대부분의 데이터 세트에서 작동합니다.
- ✖ 단점: 수동이며 부분 데이터가 있는 행을 처리하지 않습니다.
적합 대상: 전체 빈 행의 빠른 일회성 정리.
방법 2: "특수 이동" 사용 (대용량 데이터 세트에 가장 빠름)
이 키보드 단축키 방법은 고급 사용자가 가장 좋아하는 방법입니다. 수동 선택을 건너뛰고 몇 초 만에 빈 행을 대상으로 합니다.
- 데이터 범위를 선택합니다(또는 Ctrl+A/⌘+A를 눌러 전체 시트를 선택).
- Ctrl+G(Windows) 또는 ⌘+G(Mac)를 눌러 이동 대화 상자를 엽니다.
- 특수 클릭 → 공백 선택 → 확인 클릭.
- 범위의 모든 빈 셀이 선택됩니다.
- 선택한 셀을 마우스 오른쪽 버튼으로 클릭 → 삭제 → 전체 행 선택 → 확인 클릭.
- ✔ 장점: 필터링보다 10배 빠르며 1000개 이상의 행에서 작동합니다.
- ✖ 단점: 위험하며 부분 데이터가 있는 행을 삭제할 수 있습니다.
적합 대상: 빈 셀이 완전히 쓸모없는 행임을 확신하는 대용량 데이터 세트를 빠르게 정리합니다.
방법 3: 파워 쿼리 사용 (비파괴적 및 재사용 가능)
파워 쿼리(데이터 가져오기 및 변환)는 반복적인 데이터 정리 작업에 가장 적합한 선택입니다. 원본 데이터를 보존하고 업데이트를 자동화합니다.
- 데이터 범위를 선택 → 데이터 탭으로 이동 → 테이블/범위에서를 클릭합니다.
- Excel은 데이터를 테이블로 변환합니다(해당하는 경우 "내 테이블에 머리글 있음"으로 확인).
- 파워 쿼리 편집기에서: 모든 열을 선택합니다(Ctrl/⌘를 누르고 열 머리글을 클릭).
- 홈 탭으로 이동 → 행 제거 클릭 → 빈 행 제거 선택.
- 닫기 및 로드(왼쪽 상단)를 클릭하여 정리된 데이터를 새 워크시트로 내보냅니다.
- ✔ 장점: 비파괴적, 재사용 가능(새 데이터로 새로 고침), 대용량 데이터 세트를 효율적으로 처리합니다.
- ✖ 단점: Excel 2013 또는 이전 버전에서는 사용할 수 없습니다.
적합 대상: 반복적인 데이터 정리 작업, 대용량 데이터 세트 및 반복 가능한 프로세스 생성.
관심 있을 만한 다른 글: Excel에서 중복 행을 제거하는 6가지 쉬운 방법
방법 4: VBA 매크로 사용 (고급 사용자를 위한 자동화)
Excel 내에서 궁극적인 자동화를 위해 VBA 매크로는 한 번의 클릭으로 빈 행을 삭제할 수 있습니다.
- Alt+F11(Windows) 또는 ⌘+F11(Mac)을 눌러 VBA 편집기를 엽니다.
- 통합 문서를 마우스 오른쪽 버튼으로 클릭 → 삽입 → 모듈.
- 다음 코드를 복사하여 모듈에 붙여넣습니다.
- F5 키를 눌러 매크로를 실행합니다. 매크로를 실행하기 전에 항상 통합 문서의 백업을 저장하십시오. 작업은 취소할 수 없습니다.
Sub DeleteFullyBlankRows()
Dim ws As Worksheet
Dim lastRow As Long, i As Long
Set ws = ActiveSheet ' Change to ThisWorkbook.Sheets("Sheet1") for specific sheet
lastRow = ws.Cells.Find("*", SearchOrder:=xlByRows, SearchDirection:=xlPrevious).Row
Application.ScreenUpdating = False ' Speed up macro
For i = lastRow To 1 Step -1
If WorksheetFunction.CountA(ws.Rows(i)) = 0 Then
ws.Rows(i).Delete
End If
Next i
Application.ScreenUpdating = True
MsgBox "Blank rows deleted!", vbInformation
End Sub
이 코드는 행의 모든 셀을 확인하여 비어 있는지 확인합니다(부분 데이터가 있는 행 삭제 방지)
- ✔ 장점: 자동화, 복잡한 시나리오 처리, 사용자 정의 가능.
- ✖ 단점: 기본 VBA 지식이 필요하며 실행 취소가 없습니다(먼저 백업).
적합 대상: 정기적인 사용을 위해 프로세스를 자동화해야 하는 고급 사용자.
방법 5: Python 자동화 사용 (개발자 및 일괄 처리용)
개발자, 데이터 엔지니어 또는 Excel 정리를 자동화된 스크립트나 애플리케이션에 통합해야 하는 모든 사람에게 Python을 사용하는 것은 강력한 옵션입니다. Spire.XLS for Python 라이브러리는 빈 행 제거, 행/열 복사, 조건부 서식 적용, 피벗 테이블 추가 등을 포함하여 Excel 파일을 처리하기 위한 강력한 API를 제공합니다.
- 먼저 pip를 통해 라이브러리를 설치합니다.
- Excel에서 빈 행을 삭제하는 Python 코드를 작성합니다.
pip install Spire.XLS
from spire.xls import *
from spire.xls.common import *

# Create a Workbook object
workbook = Workbook()
# Load an Excel file
workbook.LoadFromFile("Input1.xlsx")

# Get the first worksheet
sheet = workbook.Worksheets[0]

# Find and delete blank rows from the worksheet
for i in range(sheet.Rows.Length - 1, -1, -1):
    if sheet.Rows[i].IsBlank:
        sheet.DeleteRow(i + 1)

# Save the result file
workbook.SaveToFile("DeleteBlankRows.xlsx", ExcelVersion.Version2016)
workbook.Dispose()
이 스크립트는 Excel 파일을 로드하고 IsBlank 속성을 통해 빈 행을 감지한 다음 DeleteRows() 메서드로 삭제합니다.
(선택 사항) 빈 열도 삭제해야 하는 경우 다음을 참조하십시오.
# Delete blank columns from the worksheet
for j in range(sheet.Columns.Length - 1, -1, -1):
    if sheet.Columns[j].IsBlank:
        sheet.DeleteColumn(j + 1)
- ✔ 장점: 일괄 처리를 자동화하고 Python 워크플로와 통합되며 확장성이 뛰어납니다.
- ✖ 단점: 기본 Python 지식이 필요합니다.
적합 대상: 여러 Excel 파일 정리 자동화, 데이터 처리 파이프라인에 통합 또는 Microsoft Excel이 설치되지 않은 서버 측 애플리케이션.
마지막 생각들
Excel에서 빈 행을 제거하는 것은 깨끗한 데이터 관리를 위한 기본 기술입니다. 간단한 필터 방법부터 강력한 Python 자동화에 이르기까지 모든 사용자와 시나리오에 대한 솔루션이 있습니다. 특히 VBA 또는 특수 이동과 관련된 새 방법을 시도하기 전에 항상 데이터를 백업하는 것을 잊지 마십시오. 반복적인 작업의 경우 파워 쿼리를 배우거나 스크립트를 작성하는 데 시간을 투자하면 장기적으로 수많은 시간을 절약할 수 있습니다.
더 많은 Excel 팁을 보려면 드롭다운 목록 및 조건부 서식에 대한 가이드를 확인하십시오.
Excel 빈 행 삭제에 대한 FAQ
Q1: "진짜 빈" 행과 "거의 빈" 행의 차이점은 무엇입니까?
- 진짜 빈 행: 모든 셀에 데이터, 수식 또는 숨겨진 문자가 포함되어 있지 않습니다.
- 거의 빈 행: 공백, 줄 바꿈 없는 공백(ASCII 160) 또는 빈 문자열을 반환하는 수식이 포함되어 있습니다.
파워 쿼리 및 VBA(특정 논리 포함)와 같은 방법은 이러한 "거의 빈" 행을 식별하고 처리하는 데 더 좋습니다.
Q2: Google Sheets에서 빈 행을 삭제하는 방법은 무엇입니까?
프로세스는 비슷합니다.
- 데이터 범위를 선택합니다.
- 데이터 > 필터 만들기를 클릭합니다.
- 열의 필터 아이콘을 클릭하고 "모두 선택"을 선택 취소한 다음 "공백"을 선택합니다.
- 보이는 빈 행을 선택하고 마우스 오른쪽 버튼을 클릭한 다음 행 삭제를 선택합니다.
- 필터를 끕니다.
Q3: 새 데이터가 추가될 때 빈 행을 자동으로 삭제하려면 어떻게 해야 합니까?
반복적인 작업(예: 일일 데이터 가져오기)의 경우 다음을 사용합니다.
- 파워 쿼리: "빈 행 제거"(방법 3) 쿼리를 설정 → 새 데이터가 추가될 때마다 모두 새로 고침을 클릭하여 정리된 시트를 업데이트합니다.
- VBA 매크로: DeleteFullyBlankRows 매크로(방법 4)를 시트의 버튼에 할당하고 클릭하여 자동으로 삭제를 실행합니다.
Q4: 언제 VBA 대신 Python을 사용해야 합니까?
다음을 수행할 때 Python을 선택합니다.
- Excel이 설치되지 않은 컴퓨터(예: 서버)에서 파일을 처리하고 있습니다.
- 수백 개의 Excel 파일을 자동으로 일괄 처리해야 합니다.
다음을 수행할 때 VBA를 선택합니다.
- 전체 워크플로가 Excel 내에서 발생합니다.
- Excel 애플리케이션 내에서 간단한 원클릭 솔루션이 필요합니다.
참고 항목
Comment supprimer les lignes vides dans Excel : 5 méthodes faciles
Table des matières
- Méthode 1 : Utiliser Filtrer & Supprimer (la plus conviviale)
- Méthode 2 : Utiliser "Atteindre (Spécial)" (la plus rapide pour les grands ensembles de données)
- Méthode 3 : Utiliser Power Query (non destructif et réutilisable)
- Méthode 4 : Utiliser une macro VBA (automatisée pour les utilisateurs avancés)
- Méthode 5 : Utiliser l'automatisation Python (pour les développeurs et le traitement par lots)
Les lignes vides sont plus qu'un simple désagrément dans Excel ; elles perturbent l'analyse des données, cassent les tableaux croisés dynamiques et créent des feuilles de calcul non professionnelles et difficiles à parcourir. Que vous nettoyiez des données importées, organisiez des rapports ou prépariez des feuilles de calcul pour la collaboration, supprimer les lignes vides dans Excel est une compétence essentielle.
Ce guide propose cinq méthodes fiables pour supprimer les lignes vides dans Excel, adaptées à tous les niveaux de compétence et à tous les scénarios, des corrections manuelles rapides aux solutions entièrement automatisées.
- Méthode 1 : Utiliser Filtrer & Supprimer (la plus conviviale)
- Méthode 2 : Utiliser "Atteindre (Spécial)" (la plus rapide pour les grands ensembles de données)
- Méthode 3 : Utiliser Power Query (non destructif et réutilisable)
- Méthode 4 : Utiliser une macro VBA (automatisée pour les utilisateurs avancés)
- Méthode 5 : Utiliser l'automatisation Python (pour les développeurs et le traitement par lots)
Pourquoi vous devriez éliminer les lignes vides dans Excel
La suppression des lignes vides dans Excel est cruciale pour :
- Analyse précise des données : Des fonctions comme SOMME, MOYENNE et RECHERCHEV peuvent donner des résultats incorrects si elles incluent des cellules vides dans leur plage.
- Tableaux croisés dynamiques fonctionnels : Les tableaux croisés dynamiques comptent souvent les lignes vides comme des éléments de données, ce qui encombre vos rapports et fausse vos informations.
- Visualisation claire des données : Les diagrammes et les graphiques incluront des espaces vides là où des lignes vides existent, ce qui les rend difficiles à lire et à interpréter.
- Professionnalisme et lisibilité : Un ensemble de données compact et contigu est plus facile à parcourir et à utiliser.
Méthode 1 : Utiliser Filtrer & Supprimer (la plus conviviale)
La méthode Filtrer fonctionne pour toutes les versions d'Excel et est idéale pour les ensembles de données avec des lignes vides/non vides mélangées :
- Sélectionnez votre plage de données (incluez les en-têtes le cas échéant).
- Allez dans l'onglet Données → Cliquez sur le bouton Filtrer (icône en forme d'entonnoir).
- Cliquez sur la flèche déroulante de n'importe quel en-tête de colonne → Décochez "Sélectionner tout" → Cochez Vides.
- Excel masquera les lignes non vides, puis sélectionnera toutes les lignes vides visibles.
- Clic droit → Supprimer la ligne → Confirmer.
- Cliquez à nouveau sur le bouton Filtrer pour restaurer la visibilité.
- ✔ Avantages : Simple et sûr ; fonctionne pour la plupart des ensembles de données.
- ✘ Inconvénients : Manuel ; ne gère pas les lignes avec des données partielles.
Idéal pour : Le nettoyage rapide et ponctuel de lignes entièrement vides.
Méthode 2 : Utiliser "Atteindre (Spécial)" (la plus rapide pour les grands ensembles de données)
Cette méthode de raccourci clavier est la préférée des utilisateurs expérimentés. Elle évite la sélection manuelle et cible les lignes vides en quelques secondes :
- Sélectionnez votre plage de données (ou appuyez sur Ctrl+A/⌘+A pour sélectionner la feuille entière).
- Appuyez sur Ctrl+G (Windows) ou ⌘+G (Mac) pour ouvrir la boîte de dialogue Atteindre.
- Cliquez sur Spécial → Sélectionnez Vides → Cliquez sur OK.
- Toutes les cellules vides de votre plage seront sélectionnées.
- Faites un clic droit sur n'importe quelle cellule sélectionnée → Supprimer → Choisissez Ligne entière → Cliquez sur OK.
- ✔ Avantages : 10 fois plus rapide que le filtrage ; fonctionne pour plus de 1000 lignes.
- ✘ Inconvénients : Risqué ; peut supprimer des lignes avec des données partielles.
Idéal pour : Nettoyer rapidement de grands ensembles de données où vous êtes sûr que les cellules vides indiquent des lignes entièrement inutiles.
Méthode 3 : Utiliser Power Query (non destructif et réutilisable)
Power Query (Obtenir et transformer des données) est le meilleur choix pour les tâches de nettoyage de données répétées. Il préserve vos données d'origine et automatise les mises à jour.
- Sélectionnez votre plage de données → Allez dans l'onglet Données → Cliquez sur À partir d'un tableau/d'une plage.
- Excel convertira vos données en tableau (confirmez avec "Mon tableau a des en-têtes" le cas échéant).
- Dans l'éditeur Power Query : sélectionnez toutes les colonnes (maintenez Ctrl/⌘ et cliquez sur les en-têtes de colonne).
- Allez dans l'onglet Accueil → Cliquez sur Supprimer les lignes → Sélectionnez Supprimer les lignes vides.
- Cliquez sur Fermer et charger (en haut à gauche) pour exporter les données nettoyées vers une nouvelle feuille de calcul.
- ✔ Avantages : Non destructif ; réutilisable (actualiser avec de nouvelles données) ; gère efficacement les grands ensembles de données.
- ✘ Inconvénients : Non disponible dans Excel 2013 ou version antérieure.
Idéal pour : Les tâches de nettoyage de données récurrentes, les grands ensembles de données et la création d'un processus reproductible.
Vous aimerez peut-être aussi : Comment supprimer les lignes en double d'Excel - 6 façons simples
Méthode 4 : Utiliser une macro VBA (automatisée pour les utilisateurs avancés)
Pour une automatisation ultime dans Excel, une macro VBA peut supprimer les lignes vides en un seul clic.
- Appuyez sur Alt+F11 (Windows) ou ⌘+F11 (Mac) pour ouvrir l'éditeur VBA.
- Faites un clic droit sur votre classeur → Insertion → Module.
- Copiez et collez le code suivant dans le module :
- Appuyez sur F5 pour exécuter la macro. Enregistrez toujours une sauvegarde de votre classeur avant d'exécuter des macros, car l'action ne peut pas être annulée.
Sub DeleteFullyBlankRows()
Dim ws As Worksheet
Dim lastRow As Long, i As Long
Set ws = ActiveSheet ' Change to ThisWorkbook.Sheets("Sheet1") for specific sheet
lastRow = ws.Cells.Find("*", SearchOrder:=xlByRows, SearchDirection:=xlPrevious).Row
Application.ScreenUpdating = False ' Speed up macro
For i = lastRow To 1 Step -1
If WorksheetFunction.CountA(ws.Rows(i)) = 0 Then
ws.Rows(i).Delete
End If
Next i
Application.ScreenUpdating = True
MsgBox "Blank rows deleted!", vbInformation
End Sub
Ce code vérifie chaque cellule d'une ligne pour s'assurer qu'elle est vide (évite de supprimer des lignes avec des données partielles)
- ✔ Avantages : Automatisé ; gère des scénarios complexes ; personnalisable.
- ✘ Inconvénients : Nécessite des connaissances de base en VBA ; pas d'annulation (sauvegardez d'abord).
Idéal pour : Les utilisateurs avancés qui ont besoin d'automatiser le processus pour une utilisation régulière.
Méthode 5 : Utiliser l'automatisation Python (pour les développeurs et le traitement par lots)
Pour les développeurs, les ingénieurs de données ou toute personne ayant besoin d'intégrer le nettoyage d'Excel dans un script ou une application automatisé, l'utilisation de Python est une option puissante. La bibliothèque Spire.XLS for Python fournit une API robuste pour traiter les fichiers Excel, y compris la suppression des lignes vides, la copie de lignes/colonnes, l'application d'une mise en forme conditionnelle et l'ajout de tableaux croisés dynamiques, etc.
- Tout d'abord, installez la bibliothèque via pip :
- Écrivez le code Python pour supprimer les lignes vides dans Excel :
pip install Spire.XLS
from spire.xls import *
from spire.xls.common import *

# Create a Workbook object
workbook = Workbook()
# Load an Excel file
workbook.LoadFromFile("Input1.xlsx")

# Get the first worksheet
sheet = workbook.Worksheets[0]

# Find and delete blank rows from the worksheet
for i in range(sheet.Rows.Length - 1, -1, -1):
    if sheet.Rows[i].IsBlank:
        sheet.DeleteRow(i + 1)

# Save the result file
workbook.SaveToFile("DeleteBlankRows.xlsx", ExcelVersion.Version2016)
workbook.Dispose()
Ce script charge un fichier Excel, détecte les lignes vides via la propriété IsBlank, puis les supprime with la méthode DeleteRows().
(Facultatif) Si vous avez également besoin de supprimer les colonnes vides, reportez-vous à :
# Delete blank columns from the worksheet
for j in range(sheet.Columns.Length - 1, -1, -1):
    if sheet.Columns[j].IsBlank:
        sheet.DeleteColumn(j + 1)
- ✔ Avantages : Automatise le traitement par lots ; s'intègre aux flux de travail Python ; hautement évolutif.
- ✘ Inconvénients : Nécessite des connaissances de base en Python.
Idéal pour : Automatiser le nettoyage de plusieurs fichiers Excel, l'intégrer dans un pipeline de traitement de données ou des applications côté serveur where Microsoft Excel n'est pas installé.
Réflexions finales
La suppression des lignes vides dans Excel est une compétence fondamentale pour une gestion propre des données. De la méthode simple de filtrage à l'automatisation puissante de Python, il existe une solution pour chaque utilisateur et chaque scénario. N'oubliez jamais de sauvegarder vos données avant d'essayer une nouvelle méthode, en particulier celles impliquant VBA ou Atteindre (Spécial). Pour les tâches récurrentes, investir du temps dans l'apprentissage de Power Query ou l'écriture d'un script vous fera gagner d'innombrables heures à long terme.
Pour plus de conseils sur Excel, consultez nos guides sur les listes déroulantes et la mise en forme conditionnelle.
FAQ sur la suppression des lignes vides d'Excel
Q1 : Quelle est la différence entre les lignes "vraiment vides" et "presque vides" ?
- Lignes vraiment vides : ne contiennent aucune donnée, formule ou caractère masqué dans aucune cellule.
- Lignes presque vides : contiennent des espaces, des espaces insécables (ASCII 160) ou des formules renvoyant des chaînes vides
Des méthodes comme Power Query et VBA (avec une logique spécifique) sont meilleures pour identifier et gérer ces lignes "presque vides".
Q2 : Comment supprimer les lignes vides dans Google Sheets ?
Le processus est similaire :
- Sélectionnez votre plage de données.
- Cliquez sur Données > Créer un filtre.
- Cliquez sur l'icône de filtre dans une colonne, décochez "Sélectionner tout", puis cochez "Vides".
- Sélectionnez les lignes vides visibles, faites un clic droit et choisissez Supprimer les lignes.
- Désactivez le filtre.
Q3 : Comment supprimer automatically les lignes vides lorsque de nouvelles données sont ajoutées ?
Pour les tâches récurrentes (par exemple, les importations quotidiennes de données), utilisez :
- Power Query : configurez une requête pour "Supprimer les lignes vides" (méthode 3) → Cliquez sur Actualiser tout chaque fois que de nouvelles données sont ajoutées pour mettre à jour la feuille nettoyée.
- Macro VBA : affectez la macro DeleteFullyBlankRows (méthode 4) à un bouton de votre feuille—cliquez dessus pour exécuter la suppression automatiquement.
Q4 : Quand devrais-je utiliser Python plutôt que VBA ?
Choisissez Python lorsque :
- Vous traitez des fichiers sur un ordinateur sans Excel installé (par exemple, un serveur).
- Vous devez traiter par lots des centaines de fichiers Excel automatically.
Choisissez VBA lorsque :
- L'ensemble du flux de travail se déroule dans Excel.
- Vous avez besoin d'une solution simple en un clic dans l'application Excel.
Voir également
- Comment ajuster automatiquement la largeur des colonnes dans Excel (5 façons)
- Comment diviser des feuilles Excel en plusieurs fichiers (3 façons)
- Comment supprimer les formules dans Excel tout en conservant les données
- Insérer des lignes et des colonnes dans Excel en Python
- Masquer ou afficher des lignes et des colonnes dans Excel en Python