
Knowledgebase (2344)
Children categories
Shapes in Excel serve as visual elements that can decorate or optimize worksheets, including objects such as text boxes and images. By inserting shapes, users are able to present data in a more intuitive manner and emphasize vital information, ultimately improving the readability of the spreadsheets. When it becomes necessary to deal with the contents within the shapes independently, you can programmatically extract them from shapes for further processing. In this article, we will show you how to extract text and images from excel shapes by using Spire.XLS for .NET.
Install Spire.XLS for .NET
To begin with, you need to add the DLL files included in the Spire.XLS for.NET package as references in your .NET project. The DLLs files can be either downloaded from this link or installed via NuGet.
PM> Install-Package Spire.XLS
Extract Text from Excel Shapes
Spire.XLS for .NET allows users to extract text from shape object by using IPrstGeomShape.Text property and write it to a new .txt file. The following are detailed steps.
- Create a Workbook object.
- Load an Excel file using Workbook.LoadFromFile() method.
- Get the first worksheet by Workbook.Worksheets[] property.
- Get the second shape by Worksheet.PrstGeomShapes[] property.
- Extract text content from the second shape and save it to the string variable.
- Create a StringBuilder object and append the extracted text to it.
- Write the text to a .txt file using File.WriteAllText() method.
- C#
- VB.NET
using System.IO;
using System.Text;
using Spire.Xls;
using Spire.Xls.Core;

namespace Extracttext
{
    class Program
    {
        static void Main(string[] args)
        {
            //Create a Workbook object
            Workbook workbook = new Workbook();

            //Load the Excel file
            workbook.LoadFromFile("sample.xlsx");

            //Get the first worksheet
            Worksheet sheet = workbook.Worksheets[0];

            //Get the second shape and extract text from it
            IPrstGeomShape shape1 = sheet.PrstGeomShapes[1];
            string s = shape1.Text;

            //Append the extracted text to StringBuilder object
            StringBuilder sb = new StringBuilder();
            sb.AppendLine(s);

            //Write the text to a .txt file
            File.WriteAllText("ShapeText.txt", sb.ToString());
            workbook.Dispose();
        }
    }
}

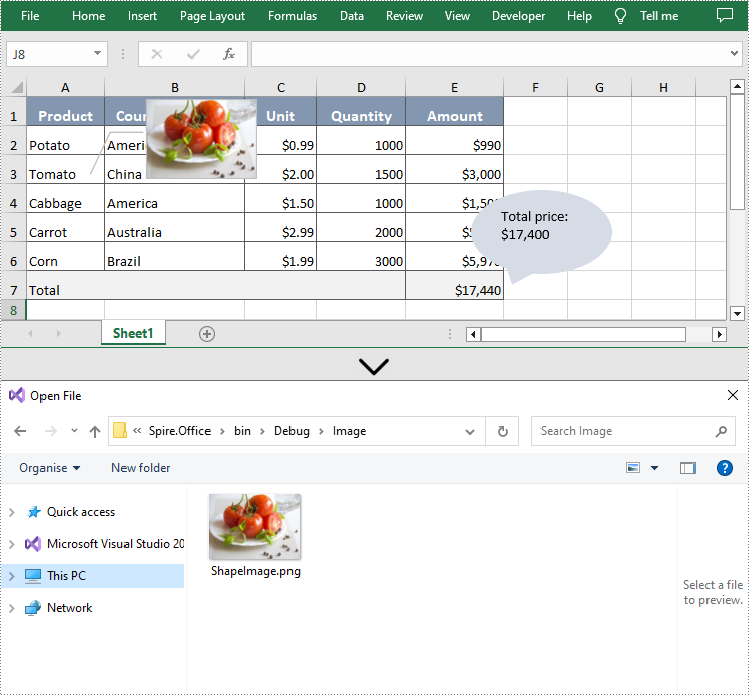
Extract Images from Excel Shapes
Additionally, Spire.XLS for .NET also supports extracting the image by using IPrstGeomShape.Fill.Picture property and save it to a local folder. The related steps are as follows.
- Create a Workbook object.
- Load an Excel file using Workbook.LoadFromFile() method.
- Get the first worksheet by Workbook.Worksheets[] property.
- Get the first shape by Worksheet.PrstGeomShapes[] property.
- Extract the image from the first shape by its Fill and Picture property.
- Save the extracted image to a folder by using Image.Save() method.
- C#
- VB.NET
using System.Drawing;
using System.Drawing.Imaging;
using Spire.Xls;
using Spire.Xls.Core;

namespace Extractimage
{
    class Program
    {
        static void Main(string[] args)
        {
            //Create a Workbook object
            Workbook workbook = new Workbook();

            //Load the Excel file
            workbook.LoadFromFile("sample.xlsx");

            //Get the first worksheet
            Worksheet sheet = workbook.Worksheets[0];

            //Get the first shape and extract the image from it
            IPrstGeomShape shape2 = sheet.PrstGeomShapes[0];
            Image image = shape2.Fill.Picture;

            //Save the extracted image to a folder
            image.Save(@"Image\ShapeImage.png", ImageFormat.Png);
            workbook.Dispose();
        }
    }
}
Apply for a Temporary License
If you'd like to remove the evaluation message from the generated documents, or to get rid of the function limitations, please request a 30-day trial license for yourself.
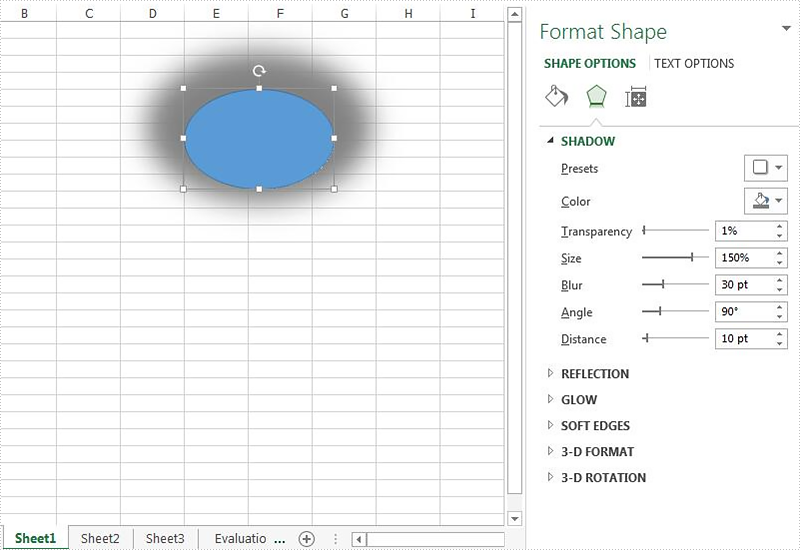
With the help of Spire.XLS, we can easily add shapes to the Excel worksheet. This article will demonstrate how to format the shadow of shape on Excel in C#. We can use Spire.XLS to set the color, size, blur, angle, transparency and distance of the shadow for the shape on Excel worksheet.
Set the shadow style when we add new shape to the Excel worksheet:
using Spire.Xls;
using Spire.Xls.Core;
using System.Drawing;
namespace SetShadowStyle
{
    class Program
    {
        static void Main(string[] args)
        {
            //instantiate a Workbook object and get the first worksheet
            Workbook workbook = new Workbook();
            Worksheet sheet = workbook.Worksheets[0];

            //add an ellipse shape
            IPrstGeomShape ellipse = sheet.PrstGeomShapes.AddPrstGeomShape(5, 5, 150, 100, PrstGeomShapeType.Ellipse);

            //set the shadow style for the ellipse
            ellipse.Shadow.Angle = 90;
            ellipse.Shadow.Distance = 10;
            ellipse.Shadow.Size = 150;
            ellipse.Shadow.Color = Color.Gray;
            ellipse.Shadow.Blur = 30;
            ellipse.Shadow.Transparency = 1;
            ellipse.Shadow.HasCustomStyle = true;

            //save the document to file
            workbook.SaveToFile("Shapeshadow.xlsx", FileFormat.Version2010);
        }
    }
}
Effective screenshot after setting the shadow style for the shape on the Excel worksheet:
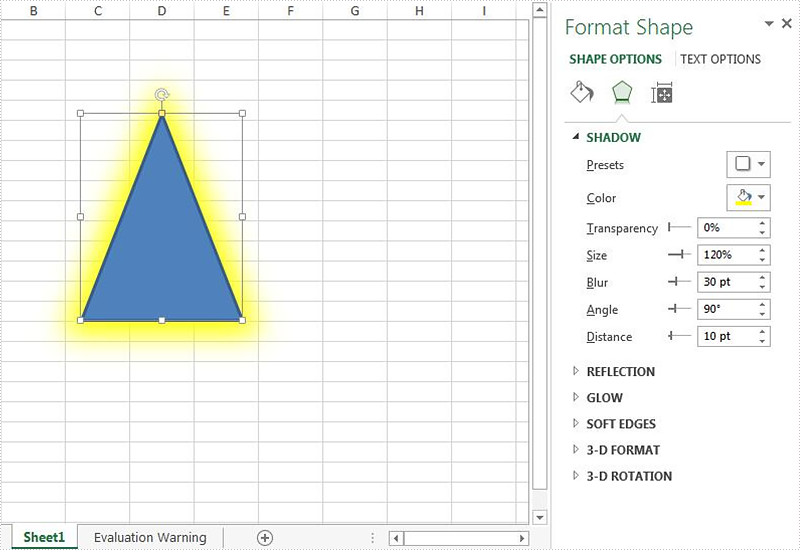
Set the shadow style when we loaded an Excel document with shape:
using Spire.Xls;
using Spire.Xls.Core;
using System.Drawing;
namespace SetShadowStyle
{
    class Program
    {
        static void Main(string[] args)
        {
            //create an instance of workbook and load the document from file
            Workbook workbook = new Workbook();
            workbook.LoadFromFile("Sample.xlsx");

            //get the first worksheet from the sample document
            Worksheet sheet = workbook.Worksheets[0];

            //get the first shape from the worksheet
            IPrstGeomShape shape = sheet.PrstGeomShapes[0];

            //set the shadow style for the shape
            shape.Shadow.Angle = 90;
            shape.Shadow.Distance = 10;
            shape.Shadow.Size = 120;
            shape.Shadow.Color = Color.Yellow;
            shape.Shadow.Blur = 30;
            shape.Shadow.HasCustomStyle = true;

            //save the document to file
            workbook.SaveToFile("ShadowStyle.xlsx", FileFormat.Version2010);

        }
    }
}
Effective screenshot after setting the shadow style for the shape on the Excel worksheet:
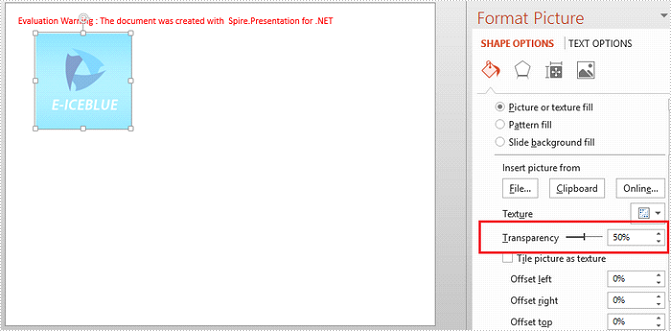
When you position some text over an image shape, you may want to make the image lighter or transparent so it doesn’t interfere with text. This article will demonstrate how to apply transparency to the image inside of a shape using Spire.Presentation with C# and VB.NET.
Step 1: Create a Presentation instance.
Presentation presentation = new Presentation();
Step 2: Create an Image from the specified file.
string imagePath = "logo.png";
Image image = Image.FromFile(imagePath);
Step 3: Add a shape to the first slide.
float width = image.Width;
float height = image.Height;
RectangleF rect = new RectangleF(50, 50, width, height);
IAutoShape shape = presentation.Slides[0].Shapes.AppendShape(ShapeType.Rectangle, rect);
shape.Line.FillType = FillFormatType.None;
Step 4: Fill the shape with image.
shape.Fill.FillType = FillFormatType.Picture;
shape.Fill.PictureFill.Picture.Url = imagePath;
shape.Fill.PictureFill.FillType = PictureFillType.Stretch;
Step 5: Set transparency on the image.
shape.Fill.PictureFill.Picture.Transparency = 50;
Step 6: Save to file.
presentation.SaveToFile("output.pptx", FileFormat.Pptx2013);
Output:
Full Code:
using Spire.Presentation;
using Spire.Presentation.Drawing;
using System.Drawing;

namespace ApplyTransparency
{

    class Program
    {

        static void Main(string[] args)
        {
            {
                //create a PowerPoint document
                Presentation presentation = new Presentation();
                string imagePath = "logo.png";
                Image image = Image.FromFile(imagePath);
                float width = image.Width;
                float height = image.Height;
                RectangleF rect = new RectangleF(50, 50, width, height);
                //add a shape
                IAutoShape shape = presentation.Slides[0].Shapes.AppendShape(ShapeType.Rectangle, rect);
                shape.Line.FillType = FillFormatType.None;
                //fill shape with image
                shape.Fill.FillType = FillFormatType.Picture;
                shape.Fill.PictureFill.Picture.Url = imagePath;
                shape.Fill.PictureFill.FillType = PictureFillType.Stretch;
                //set transparency on image
                shape.Fill.PictureFill.Picture.Transparency = 50;
                //save file
                presentation.SaveToFile("output.pptx", FileFormat.Pptx2013);
            }
        }

    }
}
Imports Spire.Presentation
Imports Spire.Presentation.Drawing
Imports System.Drawing

Namespace ApplyTransparency

	Class Program

		Private Shared Sub Main(args As String())
			If True Then
				'create a PowerPoint document
				Dim presentation As New Presentation()
				Dim imagePath As String = "logo.png"
				Dim image__1 As Image = Image.FromFile(imagePath)
				Dim width As Single = image__1.Width
				Dim height As Single = image__1.Height
				Dim rect As New RectangleF(50, 50, width, height)
				'add a shape
				Dim shape As IAutoShape = presentation.Slides(0).Shapes.AppendShape(ShapeType.Rectangle, rect)
				shape.Line.FillType = FillFormatType.None
				'fill shape with image
				shape.Fill.FillType = FillFormatType.Picture
				shape.Fill.PictureFill.Picture.Url = imagePath
				shape.Fill.PictureFill.FillType = PictureFillType.Stretch
				'set transparency on image
				shape.Fill.PictureFill.Picture.Transparency = 50
				'save file
				presentation.SaveToFile("output.pptx", FileFormat.Pptx2013)
			End If
		End Sub

	End Class
End Namespace
