
Knowledgebase (2417)
Children categories
How to reset the position of the date time and slide number for the presentation slides
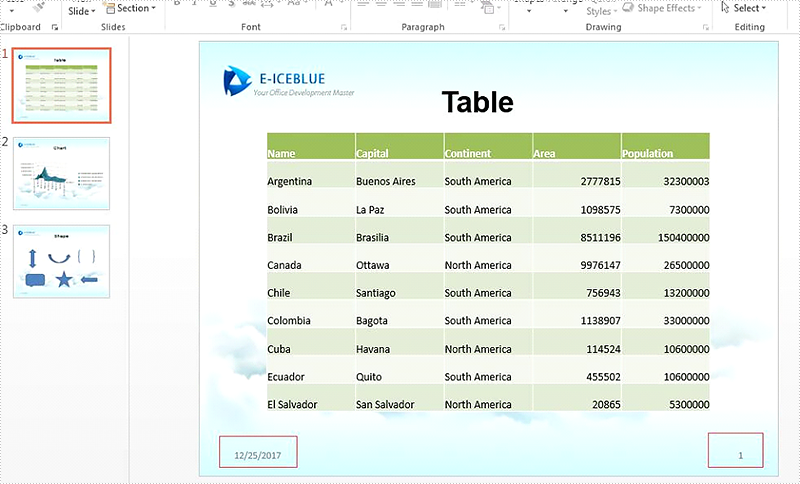
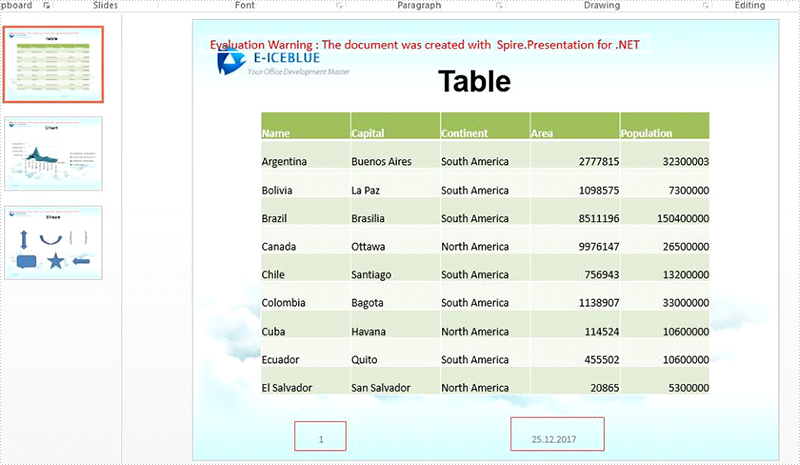
2017-12-25 09:12:30 Written by KoohjiWe have already demonstrated whether to display the additional information for presentation slides on header and footer area, such as hide or display date and time, the slide number, and the footer with the help of Spire.Presentation. This article will show you how to reset the position of the slide number and the date time in C#. We will also demonstrate how to reset the display format for the date and time from MM/dd/yyyy to yy.MM.yyyy on the presentation slides.
Firstly, view the default position of the date time at the left and the slide number at the right.
Step 1: Create a presentation document and load the file from disk.
Presentation presentation = new Presentation();
presentation.LoadFromFile("Sample.pptx", FileFormat.Pptx2013);
Step 2: Get the first slide from the sample document.
ISlide slide = presentation.Slides[0];
Step 3: Reset the position of the slide number to the left and date time to the center, and reset the date time display style.
foreach (IShape shapeToMove in slide.Shapes)
{
    if (shapeToMove.Name.Contains("Slide Number Placeholder"))
    {
        shapeToMove.Left =0;
     }

    else if (shapeToMove.Name.Contains("Date Placeholder"))
    {
        shapeToMove.Left = presentation.SlideSize.Size.Width / 2;

        (shapeToMove as IAutoShape).TextFrame.TextRange.Paragraph.Text = DateTime.Now.ToString("dd.MM.yyyy");
        (shapeToMove as IAutoShape).TextFrame.IsCentered = true;
    }
}
Step 4: Save the document to file.
presentation.SaveToFile("Result.pptx", FileFormat.Pptx2013);
Effective screenshot after reset the position and the format for the date time and slide number.
Full codes of how to reset the position of slide number and date time:
using Spire.Presentation;
using System;
namespace ResetPosition
{

    class Program
    {

        static void Main(string[] args)
        {
            Presentation presentation = new Presentation();

            presentation.LoadFromFile("Sample.pptx", Spire.Presentation.FileFormat.Pptx2013);

            ISlide slide = presentation.Slides[0];

            foreach (IShape shapeToMove in slide.Shapes)
            {
                if (shapeToMove.Name.Contains("Slide Number Placeholder"))
                {
                    shapeToMove.Left = 0;

                }

                else if (shapeToMove.Name.Contains("Date Placeholder"))
                {
                    shapeToMove.Left = presentation.SlideSize.Size.Width / 2;

                    (shapeToMove as IAutoShape).TextFrame.TextRange.Paragraph.Text = DateTime.Now.ToString("dd.MM.yyyy");
                    (shapeToMove as IAutoShape).TextFrame.IsCentered = true;
                }

            }
            presentation.SaveToFile("Result.pptx", Spire.Presentation.FileFormat.Pptx2013);

        }
    }
}
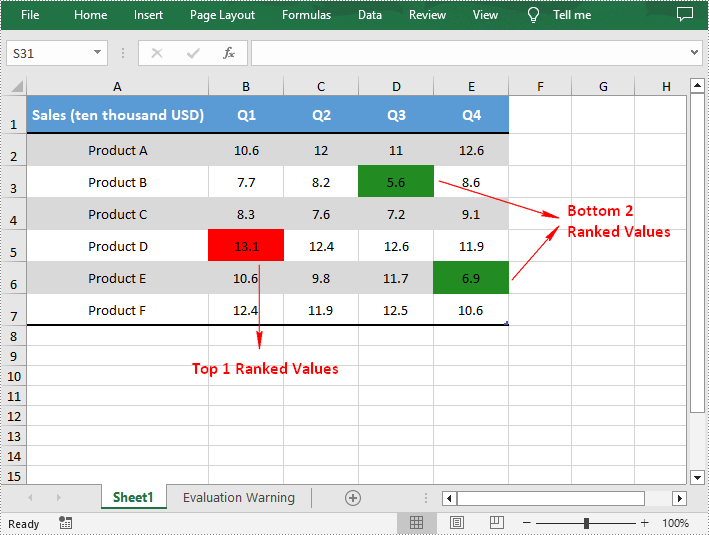
Searching for high or low values in large amounts of data can be cumbersome and error-prone. Fortunately, in Excel, you can apply conditional formatting to quickly highlight a specified number of top or bottom ranked values in a selected cell range. In this article, you will learn how to programmatically highlight top and bottom values in Excel using Spire.XLS for .NET.
Install Spire.XLS for .NET
To begin with, you need to add the DLL files included in the Spire.XLS for .NET package as references in your .NET project. The DLL files can be either downloaded from this link or installed via NuGet.
PM> Install-Package Spire.XLS
Highlight Top and Bottom Values in Excel in C# and VB.NET
Spire.XLS for .NET provides the XlsConditionalFormats.AddTopBottomCondition(TopBottomType topBottomType, int rank) method to specify the top N or bottom N ranked values, and then you can highlight these values with a background color. The following are the detailed steps.
- Create a Workbook instance.
- Load a sample Excel document using Workbook.LoadFromFile() method.
- Get a specified worksheet by its index using Workbook.Worksheets[sheetIndex] property.
- Add a conditional formatting to the worksheet using Worksheet.ConditionalFormats.Add() method and return an object of XlsConditionalFormats class.
- Set the cell range where the conditional formatting will be applied using XlsConditionalFormats.AddRange() method.
- Add a top condition to specify the highest or top N ranked values using XlsConditionalFormats.AddTopBottomCondition(TopBottomType topBottomType, int rank) method. Then highlight the cells that meet the condition with a background color using IConditionalFormat.BackColor property.
- Add a bottom condition to specify the lowest or bottom N ranked values and highlight the cells that meet the condition with a background color.
- Save the result document using Workbook.SaveToFile() method.
- C#
- VB.NET
using Spire.Xls;
using Spire.Xls.Core;
using Spire.Xls.Core.Spreadsheet.Collections;
using System.Drawing;

namespace HighlightValues
{
    class Program
    {
        static void Main(string[] args)
        {
            {

                //Create a Workbook instance
                Workbook workbook = new Workbook();

                //Load a sample Excel document
                workbook.LoadFromFile("sample.xlsx");

                //Get the first worksheet
                Worksheet sheet = workbook.Worksheets[0];

                //Add a conditional format to the worksheet
                XlsConditionalFormats format = sheet.ConditionalFormats.Add();

                //Set the range where the conditional format will be applied
                format.AddRange(sheet.Range["B2:F7"]);

                //Apply conditional formatting to highlight the highest values
                IConditionalFormat condition1 = format.AddTopBottomCondition(TopBottomType.Top, 1);
                condition1.BackColor = Color.Red;

                //Apply conditional formatting to highlight the bottom two values
                IConditionalFormat condition2 = format.AddTopBottomCondition(TopBottomType.Bottom, 2);
                condition2.BackColor = Color.ForestGreen;

                //Save the result document
                workbook.SaveToFile("TopBottomValues.xlsx", ExcelVersion.Version2013);

            }
        }
    }
}
Apply for a Temporary License
If you'd like to remove the evaluation message from the generated documents, or to get rid of the function limitations, please request a 30-day trial license for yourself.
Create a Cross-Reference to Bookmark in Word in C#, VB.NET
2017-12-21 07:54:20 Written by AdministratorA cross-reference refers to related information elsewhere in the same document. You can create cross-references to any existing items such as headings, footnotes, bookmarks, captions, and numbered paragraphs. This article will show you how to create a cross-reference to bookmark using Spire.Doc with C# and VB.NET.
Step 1: Create a Document instance.
Document doc = new Document();
Section section = doc.AddSection();
Step 2: Insert a bookmark.
Paragraph paragraph = section.AddParagraph();
paragraph.AppendBookmarkStart("MyBookmark");
paragraph.AppendText("Text inside a bookmark");
paragraph.AppendBookmarkEnd("MyBookmark");
Step 3: Create a cross-reference field, and link it to the bookmark through bookmark name.
Field field = new Field(doc);
field.Type = FieldType.FieldRef;
field.Code = @"REF MyBookmark \p \h";
Step 4: Add a paragraph, and insert the field to the paragraph.
paragraph = section.AddParagraph();
paragraph.AppendText("For more information, see ");
paragraph.ChildObjects.Add(field);
Step 5: Insert a FieldSeparator object to the paragraph, which works as separator in a field.
FieldMark fieldSeparator= new FieldMark(doc, FieldMarkType.FieldSeparator);
paragraph.ChildObjects.Add(fieldSeparator);
Step 6: Set the display text of the cross-reference field.
TextRange tr = new TextRange(doc);
tr.Text = "above";
paragraph.ChildObjects.Add(tr);
Step 7: Insert a FieldEnd object to the paragraph, which is used to mark the end of a field.
FieldMark fieldEnd = new FieldMark(doc, FieldMarkType.FieldEnd);
paragraph.ChildObjects.Add(fieldEnd);
Step 8: Save to file.
doc.SaveToFile("output.docx", FileFormat.Docx2013);
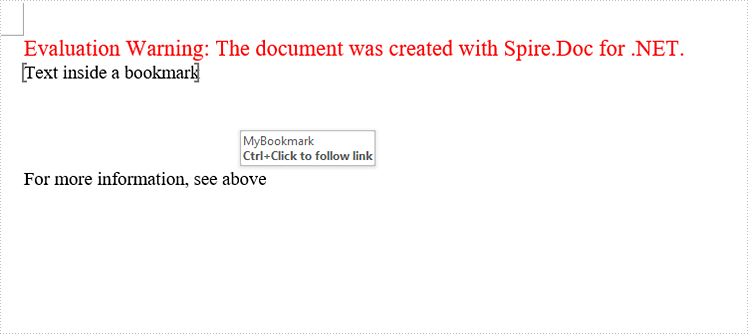
Output:
The cross-reference appears as a link that takes the reader to the referenced item.
Full Code:
using Spire.Doc;
using Spire.Doc.Documents;
using Spire.Doc.Fields;
namespace CreatCR
{
    class Program
    {
        static void Main(string[] args)
        {
            Document doc = new Document();
            Section section = doc.AddSection();
            //create a bookmark
            Paragraph paragraph = section.AddParagraph();
            paragraph.AppendBookmarkStart("MyBookmark");
            paragraph.AppendText("Text inside a bookmark");
            paragraph.AppendBookmarkEnd("MyBookmark");
            //insert line breaks
            for (int i = 0; i < 4; i++)
            {
                paragraph.AppendBreak(BreakType.LineBreak);
            }
            //create a cross-reference field, and link it to bookmark
            Field field = new Field(doc);
            field.Type = FieldType.FieldRef;
            field.Code = @"REF MyBookmark \p \h";
            //insert field to paragraph
            paragraph = section.AddParagraph();
            paragraph.AppendText("For more information, see ");
            paragraph.ChildObjects.Add(field);
            //insert FieldSeparator object
            FieldMark fieldSeparator = new FieldMark(doc, FieldMarkType.FieldSeparator);
            paragraph.ChildObjects.Add(fieldSeparator);
            //set display text of the field
            TextRange tr = new TextRange(doc);
            tr.Text = "above";
            paragraph.ChildObjects.Add(tr);
            //insert FieldEnd object to mark the end of the field
            FieldMark fieldEnd = new FieldMark(doc, FieldMarkType.FieldEnd);
            paragraph.ChildObjects.Add(fieldEnd);
            //save file
            doc.SaveToFile("output.docx", FileFormat.Docx2013);

        }
    }
}
Imports Spire.Doc
Imports Spire.Doc.Documents
Imports Spire.Doc.Fields
Namespace CreatCR
	Class Program
		Private Shared Sub Main(args As String())
			Dim doc As New Document()
			Dim section As Section = doc.AddSection()
			'create a bookmark
			Dim paragraph As Paragraph = section.AddParagraph()
			paragraph.AppendBookmarkStart("MyBookmark")
			paragraph.AppendText("Text inside a bookmark")
			paragraph.AppendBookmarkEnd("MyBookmark")
			'insert line breaks
			For i As Integer = 0 To 3
				paragraph.AppendBreak(BreakType.LineBreak)
			Next
			'create a cross-reference field, and link it to bookmark
			Dim field As New Field(doc)
			field.Type = FieldType.FieldRef
			field.Code = "REF MyBookmark \p \h"
			'insert field to paragraph
			paragraph = section.AddParagraph()
			paragraph.AppendText("For more information, see ")
			paragraph.ChildObjects.Add(field)
			'insert FieldSeparator object
			Dim fieldSeparator As New FieldMark(doc, FieldMarkType.FieldSeparator)
			paragraph.ChildObjects.Add(fieldSeparator)
			'set display text of the field
			Dim tr As New TextRange(doc)
			tr.Text = "above"
			paragraph.ChildObjects.Add(tr)
			'insert FieldEnd object to mark the end of the field
			Dim fieldEnd As New FieldMark(doc, FieldMarkType.FieldEnd)
			paragraph.ChildObjects.Add(fieldEnd)
			'save file
			doc.SaveToFile("output.docx", FileFormat.Docx2013)

		End Sub
	End Class
End Namespace
