
Knowledgebase (2417)
Children categories
How to set the position and number format for word footnote in C#
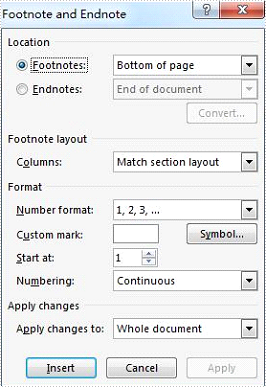
2017-12-11 08:22:32 Written by KoohjiWe have already demonstrated how to insert footnote to the word document with the help of Spire.Doc. This article we will show you how to set the position and number format for the footnote. The footnote position can be at the bottom of each page or below text. The default number format for the footnote is “1, 2, 3”. The following example shows how to set the position, number format, and the restart rule of footnote by calling the property of Section.FootnoteOptions.
Firstly, view the Footnote options under Microsoft Word and the original sample document file:


Step 1: Create a new instance of Document and load the document from file.
Document doc = new Document();
doc.LoadFromFile("Sample.docx",FileFormat.Docx2013);
Step 2: Get the first section from the document.
Section sec = doc.Sections[0];
Step 3: Set the number format, restart rule and position for the footnote.
sec.FootnoteOptions.NumberFormat = FootnoteNumberFormat.UpperCaseLetter;
sec.FootnoteOptions.RestartRule = FootnoteRestartRule.RestartPage;
sec.FootnoteOptions.Position = FootnotePosition.PrintAtBottomOfPage;
Step 4: Save the document to file.
doc.SaveToFile("Footnoteoptions.docx", FileFormat.Docx2013);
Effective screenshot after setting the formatting for the footnote.


Full codes of how to set the footnote options:
Document doc = new Document();
doc.LoadFromFile("Sample.docx", FileFormat.Docx2013);

Section sec = doc.Sections[0];

sec.FootnoteOptions.NumberFormat = FootnoteNumberFormat.UpperCaseLetter;
sec.FootnoteOptions.RestartRule = FootnoteRestartRule.RestartPage;
sec.FootnoteOptions.Position = FootnotePosition.PrintAtBottomOfPage;

////Clear all the formatting for the footnote and back to the default opitions
//sec.FootnoteOptions.ClearFormatting();

doc.SaveToFile("Footnoteoptions.docx", FileFormat.Docx2013);
Add text watermark and image watermark to word document in C#
2017-12-08 09:05:33 Written by jie zouText watermark and image watermark are two kinds of watermarks in Word document. The text watermark always shows some additional but related information to the word context. While image watermark is used to make the Word document be more attractive. This section will demonstrate how to use Spire.Doc to add text watermark and image watermark to Word document in C#.
Add Image Watermark in C#:
using Spire.Doc;
namespace SetImageWatermark
{
    class Program
    {
        static void Main(string[] args)
        {
            {
                //create a new instance of Document and load the document from file.
                Document doc = new Document();
                doc.LoadFromFile("Sample.docx", FileFormat.Docx2013);

                //create a new instance of the PictureWatermark and load the picture from file.
                PictureWatermark picture = new PictureWatermark();
                picture.Picture = System.Drawing.Image.FromFile("logo.png");

                //set the image watermark scaling and Washout property
                picture.Scaling = 20;
                picture.IsWashout = false;

                //add the picture watermark
                doc.Watermark = picture;

                //save the document to file
                doc.SaveToFile("ImageWatermark.docx", FileFormat.Docx2013);

            }
        }
    }
}

Add Text Watermark in C#::
using Spire.Doc;
using Spire.Doc.Documents;
using System.Drawing;
namespace SetTextWatermark
{
    class Program
    {
        static void Main(string[] args)
        {
            {
                //create a new instance of Document and load the document from file.
                Document doc = new Document();
                doc.LoadFromFile("Sample.docx", FileFormat.Docx2013);

                //create a new instance of the TextWatermark
                TextWatermark txtWatermark = new TextWatermark();

                //set the text watermark with text string, font, color and layout.
                txtWatermark.Text = "Confidential";
                txtWatermark.FontSize = 45;
                txtWatermark.Color = Color.Green;
                txtWatermark.Layout = WatermarkLayout.Diagonal;

                //add the text watermark
                doc.Watermark = txtWatermark;

                //save the file.
                doc.SaveToFile("TextWatermark.docx", FileFormat.Docx2013);

            }
        }
    }
}

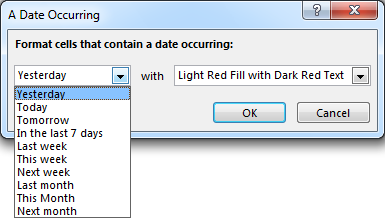
Microsoft Excel provides 10 date options, ranging from yesterday to next month (see below image) to format selected cells based on the current date. Spire.XLS supports all of these options, in this article, we’re going to show you how to conditionally format dates in Excel using Spire.XLS. If you want to highlight cells based on a date in another cell, or create rules for other dates (i.e., more than a month from the current date), you will have to create your own conditional formatting rule based on a formula.
Detail steps:
Step 1: Initialize an object of Workbook class and load the Excel file.
Workbook workbook = new Workbook();
workbook.LoadFromFile("Input.xlsx");
Step 2: Get the first worksheet.
Worksheet sheet = workbook.Worksheets[0];
Step 3: Add a condition to the used range in the worksheet.
XlsConditionalFormats xcfs1 = sheet.ConditionalFormats.Add();
xcfs1.AddRange(sheet.AllocatedRange);
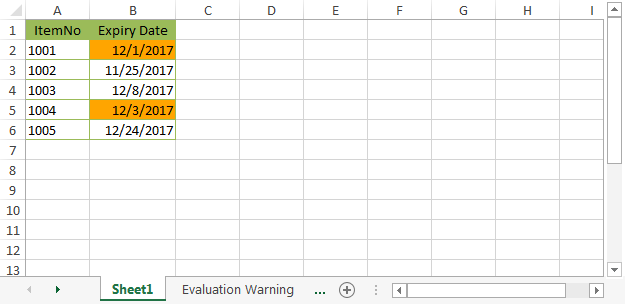
Step 4: Specify the format type of the condition as time period and set the time period as last 7 days.
IConditionalFormat format1 = xcfs1.AddTimePeriodCondition(TimePeriodType.Last7Days);
Step 5:Set the highlight color.
conditionalFormat.BackColor = Color.Orange;
Step 6:Save the file.
workbook.SaveToFile("ConditionallyFormatDates.xlsx", ExcelVersion.Version2013);
Screenshot::
Full Code:
using Spire.Xls;
using Spire.Xls.Core;
using Spire.Xls.Core.Spreadsheet.Collections;
using Spire.Xls.Core.Spreadsheet.ConditionalFormatting;
using System.Drawing;

namespace ConditionallyFormatDates
{
    class Program
    {
        static void Main(string[] args)
        {
            //Initialize an object of Workbook class
            Workbook workbook = new Workbook();

            //Load the Excel file
            workbook.LoadFromFile("Input.xlsx");

            //Get the first worksheet
            Worksheet sheet = workbook.Worksheets[0];

            //Highlight cells that contain a date occurring in the last 7 days
            XlsConditionalFormats xcfs1 = sheet.ConditionalFormats.Add();
            xcfs1.AddRange(sheet.AllocatedRange);

            IConditionalFormat conditionalFormat = xcfs1.AddTimePeriodCondition(TimePeriodType.Last7Days);
            conditionalFormat.BackColor = Color.Orange;

            //Save the file
            workbook.SaveToFile("ConditionallyFormatDates.xlsx", ExcelVersion.Version2013);
        }
    }
}
